Spring AOP:注解配置与XML配置双实战

1. AOP
1.1 概念
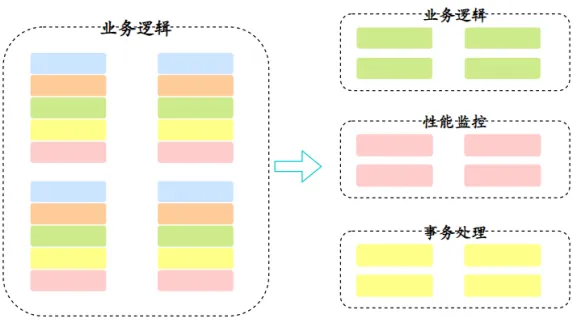
AOP为Aspect Oriented Programming的缩写,意为:面向切面编程。他是一种可以在不修改原来的核心代码的情况下给程序动态统一进行增强的一种技术。
SpringAOP: 批量对Spring容器中bean的方法做增强,并且这种增强不会与原来方法中的代码耦合。
AOP:面向切面编程。简单说,就是把一些业务逻辑中的相同的代码抽取到一个独立的模块中,让业务逻辑更加清爽。
1.2 快速入门
1.2.1 需求
要求让_08_SpringAOP模块中service包下所有类的所有方法在调用前都输出:方法被调用了。
1.2.2 准备工作
①添加依赖
需要添加SpringIOC相关依赖和AOP相关依赖。
<!--SpringIOC相关依赖--><dependency><groupId>org.springframework</groupId><artifactId>spring-context</artifactId><version>5.1.9.RELEASE</version></dependency><!--AOP相关依赖--><dependency><groupId>org.aspectj</groupId><artifactId>aspectjweaver</artifactId><version>1.8.13</version></dependency>
②相关bean要注入容器中
开启组件扫描
<context:component-scan base-package="com.sangeng"></context:component-scan>
加@Service注解
@Service
public class PhoneService {public void deleteAll(){System.out.println("PhoneService中deleteAll的核心代码");}
}
@Service
public class UserService {public void deleteAll(){System.out.println("UserService中deleteAll的核心代码");}
}1.2.3 实现AOP
①开启AOP注解支持
使用aop:aspectj-autoproxy标签
<?xml version="1.0" encoding="UTF-8"?>
<beans xmlns="http://www.springframework.org/schema/beans"xmlns:xsi="http://www.w3.org/2001/XMLSchema-instance" xmlns:aop="http://www.springframework.org/schema/aop"xmlns:context="http://www.springframework.org/schema/context"xsi:schemaLocation="http://www.springframework.org/schema/beans http://www.springframework.org/schema/beans/spring-beans.xsd http://www.springframework.org/schema/aop https://www.springframework.org/schema/aop/spring-aop.xsd http://www.springframework.org/schema/context https://www.springframework.org/schema/context/spring-context.xsd"><!--开启组件扫描--><context:component-scan base-package="com.sangeng"></context:component-scan><!--开启aop注解支持--><aop:aspectj-autoproxy></aop:aspectj-autoproxy></beans>
②创建切面类
创建一个类,在类上加上@Component和@Aspect
使用@Pointcut注解来指定要被增强的方法
使用@Before注解来给我们的增强代码所在的方法进行标识,并且指定了增强代码是在被增强方法执行之前执行的。
@Component
@Aspect
public class MyAspect {//    用Pointcut注解中的属性来指定对哪些方法进行增强@Pointcut("execution(* com.sangeng.service.*.*(..))")public void pt(){}/*用@Before注解来指定该方法中是增强的代码,并且是在被增强方法执行前执行的@Before的属性写上加了@Pointcut注解的方法: 方法名()*/@Before("pt()")public void methodbefore(){System.out.println("方法被调用了");}}
1.2.4 测试
public static void main(String[] args) {ApplicationContext applicationContext = new ClassPathXmlApplicationContext("applicationContext.xml");PhoneService phoneService = applicationContext.getBean(PhoneService.class);UserService userService = applicationContext.getBean(UserService.class);phoneService.deleteAll();}
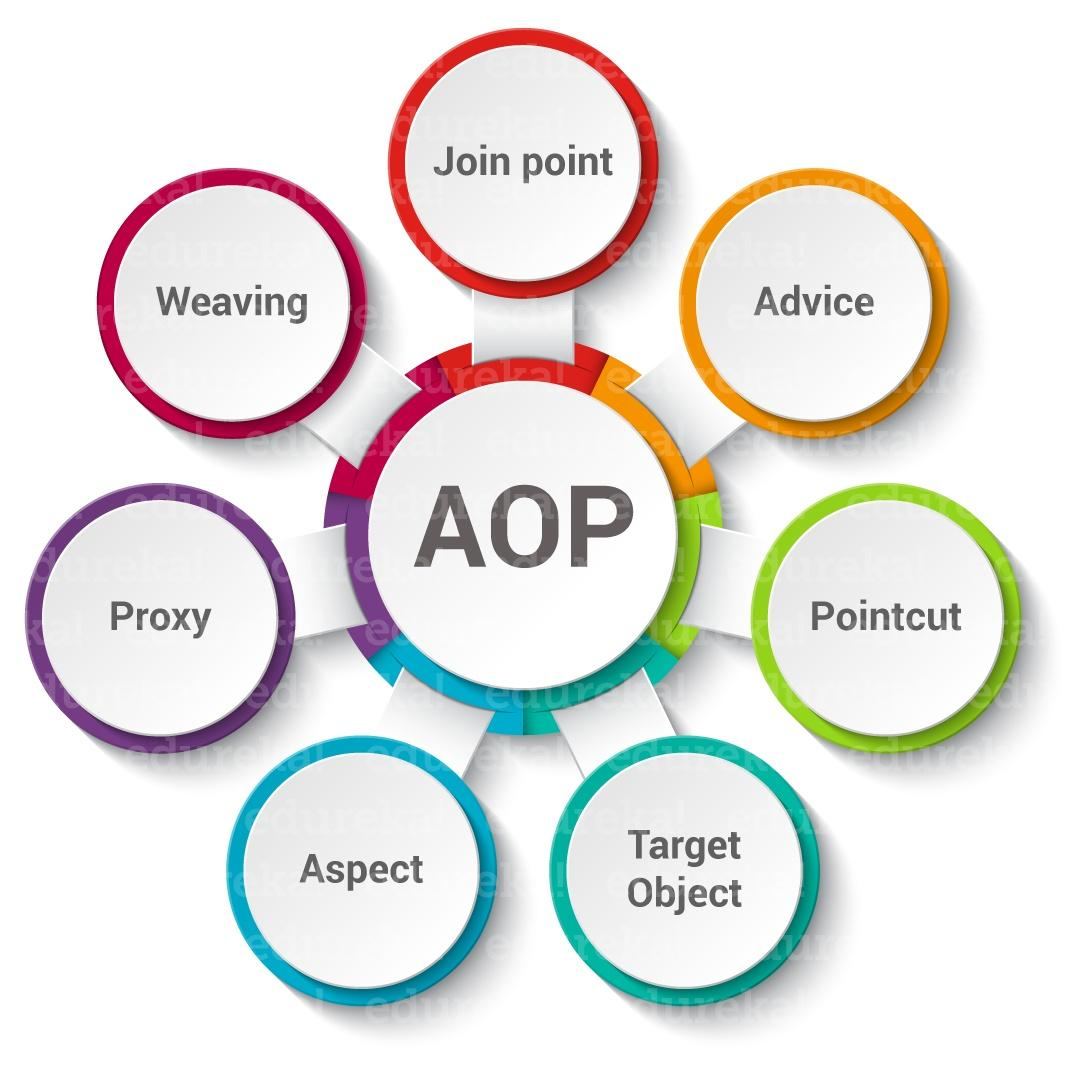
1.3 AOP核心概念
-
Joinpoint(连接点):所谓连接点是指那些可以被增强到的点。在spring中,这些点指的是方法,因为spring只支持方法类型的连接点
-
Pointcut(切入点):所谓切入点是指被增强的连接点(方法)
-
Advice(通知/ 增强):所谓通知是指具体增强的代码
-
Target(目标对象):被增强的对象就是目标对象
-
Aspect(切面):是切入点和通知(引介)的结合
-
Proxy (代理):一个类被 AOP 增强后,就产生一个结果代理类
1.4 切点确定
1.4.1 切点表达式
可以使用切点表达式来表示要对哪些方法进行增强。
写法:execution([修饰符] 返回值类型 包名.类名.方法名(参数))
- 访问修饰符可以省略,大部分情况下省略
- 返回值类型、包名、类名、方法名可以使用星号* 代表任意
- 包名与类名之间一个点 . 代表当前包下的类,两个点 … 表示当前包及其子包下的类
- 参数列表可以使用两个点 … 表示任意个数,任意类型的参数列表
例如:
execution(* com.sangeng.service.*.*(..)) 表示com.sangeng.service包下任意类,方法名任意,参数列表任意,返回值类型任意execution(* com.sangeng.service..*.*(..)) 表示com.sangeng.service包及其子包下任意类,方法名任意,参数列表任意,返回值类型任意execution(* com.sangeng.service.*.*()) 表示com.sangeng.service包下任意类,方法名任意,要求方法不能有参数,返回值类型任意execution(* com.sangeng.service.*.delete*(..)) 表示com.sangeng.service包下任意类,要求方法不能有参数,返回值类型任意,方法名要求已delete开头
1.4.2 切点函数@annotation
我们也可以在要增强的方法上加上注解。然后使用@annotation来表示对加了什么注解的方法进行增强。
写法:@annotation(注解的全类名)
例如:
定义注解如下
@Target({ElementType.METHOD})//该注解可以加在方法上
@Retention(RetentionPolicy.RUNTIME)
public @interface InvokeLog {
}
给需要增强的方法增加注解
@Service
public class PhoneService {@InvokeLog  public void deleteAll(){System.out.println("PhoneService中deleteAll的核心代码");}
}
切面类中使用@annotation来确定要增强的方法
@Component
@Aspect
public class MyAspect {//    用Pointcut注解中的属性来指定对哪些方法进行增强@Pointcut("@annotation(com.sangeng.aspect.InvokeLog)")public void pt(){}/*用@Before注解来指定该方法中是增强的代码,并且是在被增强方法执行前执行的@Before的属性写上加了@Pointcut注解的方法: 方法名()*/@Before("pt()")public void methodbefore(){System.out.println("方法被调用了");}
}
1.5 通知分类
-
@Before:前置通知,在目标方法执行前执行
-
@AfterReturning: 返回后通知,在目标方法执行后执行,如果出现异常不会执行
-
@After:后置通知,在目标方法之后执行,无论是否出现异常都会执行
-
@AfterThrowing:异常通知,在目标方法抛出异常后执行
-
@Around:环绕通知,围绕着目标方法执行
理解不同通知执行时机。(下面的伪代码是用来理解单个通知的执行时机的,不能用来理解多个通知情况下的执行顺序。如果需要配置多个通知我们会选择使用Around通知,更加的清晰并且好用)
public Object test() {before();//@Before 前置通知try {Object ret = 目标方法();//目标方法调用afterReturing();//@AfterReturning 返回后通知} catch (Throwable throwable) {throwable.printStackTrace();afterThrowing();//@AfterThrowing 异常通知通知}finally {after();//@After 后置通知}return ret;}
环绕通知非常特殊,它可以对目标方法进行全方位的增强。
例如:
@Around("pt()")public void around(ProceedingJoinPoint pjp){System.out.println("目标方法前");try {pjp.proceed();//目标方法执行System.out.println("目标方法后");} catch (Throwable throwable) {throwable.printStackTrace();System.out.println("目标方法出现异常");}finally {System.out.println("finally中进行增强");}}
1.6 获取被增强方法相关信息
我们实际对方法进行增强时往往还需要获取到被增强代码的相关信息,比如方法名,参数,返回值,异常对象等。
我们可以在除了环绕通知外的所有通知方法中增加一个JoinPoint类型的参数。这个参数封装了被增强方法的相关信息。我们可以通过这个参数获取到除了异常对象和返回值之外的所有信息。
例如:
@Before("pt()")public void methodbefore(JoinPoint jp){Object[] args = jp.getArgs();//方法调用时传入的参数Object target = jp.getTarget();//被代理对象MethodSignature signature = (MethodSignature) jp.getSignature();//获取被被增强方法签名封装的对象System.out.println("Before方法被调用了");}
案例:
需求:要求让所有service包下类的所有方法被调用前都输出全类名,方法名,以及调用时传入的参数
@Component
@Aspect
public class PrintLogAspect {//对哪些方法增强@Pointcut("execution(* com.sangeng.service..*.*(..))")public void pt(){}//怎么增强@Before("pt()")public void printLog(JoinPoint joinPoint){//输出 被增强的方法所在的类名 方法名 调用时传入的参数   joinPoint.getSignature().getName()  joinPoint.getArgs()MethodSignature signature = (MethodSignature) joinPoint.getSignature();//类名String className = signature.getDeclaringTypeName();//方法名String methodName = signature.getName();//调用时传入的参数Object[] args = joinPoint.getArgs();System.out.println(className+"=="+methodName+"======"+ Arrays.toString(args));}
} 如果需要获取被增强方法中的异常对象或者返回值则需要在方法参数上增加一个对应类型的参数,并且使用注解的属性进行配置。这样Spring会把你想获取的数据赋值给对应的方法参数。
例如:
@AfterReturning(value = "pt()",returning = "ret")//使用returning属性指定了把目标方法返回值赋值给下面方法的参数retpublic void AfterReturning(JoinPoint jp,Object ret){System.out.println("AfterReturning方法被调用了");}
@AfterThrowing(value = "pt()",throwing = "t")//使用throwing属性指定了把出现的异常对象赋值给下面方法的参数tpublic void AfterThrowing(JoinPoint jp,Throwable t){System.out.println("AfterReturning方法被调用了");}
相信你肯定觉得上面的获取方式特别的麻烦难以理解。就可以使用下面这种万能的方法。
直接在环绕通知方法中增加一个ProceedingJoinPoint类型的参数。这个参数封装了被增强方法的相关信息。
该参数的proceed()方法被调用相当于被增强方法被执行,调用后的返回值就相当于被增强方法的返回值。
例如:
@Around(value = "pt()")public Object around(ProceedingJoinPoint pjp) {Object[] args = pjp.getArgs();//方法调用时传入的参数Object target = pjp.getTarget();//被代理对象MethodSignature signature = (MethodSignature) pjp.getSignature();//获取被被增强方法签名封装的对象Object ret = null;try {ret = pjp.proceed();//ret就是目标方法执行后的返回值} catch (Throwable throwable) {throwable.printStackTrace();//throwable就是出现异常时的异常对象}return ret;}
1.7 AOP应用案例
1.7.1 需求
现有AI核心功能代码如下:
public class AIController {//AI自动回答public String getAnswer(String question){//AI核心代码 价值10个亿String str = question.replace("吗", "");str = str.replace("?","!");return str;}//AI算命public String fortuneTelling(String name){//AI算命核心代码String[] strs = {"女犯伤官把夫克,旱地莲花栽不活,不是吃上两家饭,也要刷上三家锅。","一朵鲜花头上戴,一年四季也不开,一心想要花开时,采花之人没到来。","此命生来脾气暴,上来一阵双脚跳,对你脾气啥都好,经常与人吵和闹。"};int index = name.hashCode() % 3;return strs[index];}
}
现在为了保证数据的安全性,要求调用方法时fortuneTelling传入的姓名是经过加密的。我们需要对传入的参数进行解密后才能使用。并且要对该方法的返回值进行加密后返回。
PS:后期也可能让其他方法进行相应的加密处理。
字符串加密解密直接使用下面的工具类即可:
import javax.crypto.Cipher;
import javax.crypto.KeyGenerator;
import javax.crypto.SecretKey;
import javax.crypto.spec.SecretKeySpec;
import java.security.SecureRandom;public class CryptUtil {private static final String AES = "AES";private static int keysizeAES = 128;private static String charset = "utf-8";public static String parseByte2HexStr(final byte buf[]) {final StringBuffer sb = new StringBuffer();for (int i = 0; i < buf.length; i++) {String hex = Integer.toHexString(buf[i] & 0xFF);if (hex.length() == 1) {hex = '0' + hex;}sb.append(hex.toUpperCase());}return sb.toString();}public static byte[] parseHexStr2Byte(final String hexStr) {if (hexStr.length() < 1)return null;final byte[] result = new byte[hexStr.length() / 2];for (int i = 0;i< hexStr.length()/2; i++) {int high = Integer.parseInt(hexStr.substring(i * 2, i * 2 + 1), 16);int low = Integer.parseInt(hexStr.substring(i * 2 + 1, i * 2 + 2), 16);result[i] = (byte) (high * 16 + low);}return result;}private static String keyGeneratorES(final String res, final String algorithm, final String key, final Integer keysize, final Boolean bEncode) {try {final KeyGenerator g = KeyGenerator.getInstance(algorithm);if (keysize == 0) {byte[] keyBytes = charset == null ? key.getBytes() : key.getBytes(charset);g.init(new SecureRandom(keyBytes));} else if (key == null) {g.init(keysize);} else {byte[] keyBytes = charset == null ? key.getBytes() : key.getBytes(charset);SecureRandom random = SecureRandom.getInstance("SHA1PRNG");random.setSeed(keyBytes);g.init(keysize, random);}final SecretKey sk = g.generateKey();final SecretKeySpec sks = new SecretKeySpec(sk.getEncoded(), algorithm);final Cipher cipher = Cipher.getInstance(algorithm);if (bEncode) {cipher.init(Cipher.ENCRYPT_MODE, sks);final byte[] resBytes = charset == null? res.getBytes() : res.getBytes(charset);return parseByte2HexStr(cipher.doFinal(resBytes));} else {cipher.init(Cipher.DECRYPT_MODE, sks);return new String(cipher.doFinal(parseHexStr2Byte(res)));}} catch (Exception e) {e.printStackTrace();}return null;}public static String AESencode(final String res) {return keyGeneratorES(res, AES, "aA11*-%", keysizeAES, true);}public static String AESdecode(final String res) {return keyGeneratorES(res, AES, "aA11*-%", keysizeAES, false);}public static void main(String[] args) {System.out.println("加密后:" + AESencode("将要加密的明文"));System.out.println("解密后:" + AESdecode("730CAE52D85B372FB161B39D0A908B8CC6EF6DA2F7D4E595D35402134C3E18AB"));}
}
1.7.2 实现
①导入依赖
<!--SpringIOC相关依赖--><dependency><groupId>org.springframework</groupId><artifactId>spring-context</artifactId><version>5.1.9.RELEASE</version></dependency><!--AOP相关依赖--><dependency><groupId>org.aspectj</groupId><artifactId>aspectjweaver</artifactId><version>1.8.13</version></dependency>
②开启AOP注解支持
<?xml version="1.0" encoding="UTF-8"?>
<beans xmlns="http://www.springframework.org/schema/beans"xmlns:xsi="http://www.w3.org/2001/XMLSchema-instance"xmlns:context="http://www.springframework.org/schema/context"xmlns:aop="http://www.springframework.org/schema/aop"xsi:schemaLocation="http://www.springframework.org/schema/beans http://www.springframework.org/schema/beans/spring-beans.xsd http://www.springframework.org/schema/context https://www.springframework.org/schema/context/spring-context.xsd http://www.springframework.org/schema/aop https://www.springframework.org/schema/aop/spring-aop.xsd"><!--配置组件扫描--><context:component-scan base-package="com.sangeng"></context:component-scan><!--启动AOP注解支持--><aop:aspectj-autoproxy></aop:aspectj-autoproxy>
</beans>
③自定义注解
package com.sangeng.aspect;import java.lang.annotation.ElementType;
import java.lang.annotation.Retention;
import java.lang.annotation.RetentionPolicy;
import java.lang.annotation.Target;@Target(ElementType.METHOD)
@Retention(RetentionPolicy.RUNTIME)
public @interface Crypt {}
④在目标方法上增加注解
注意:目标对象一定要记得注入Spring容器中
@Controller
public class AIController {//....//AI算命@Cryptpublic String fortuneTelling(String name){System.out.println(name);//AI算命核心代码String[] strs = {"女犯伤官把夫克,旱地莲花栽不活,不是吃上两家饭,也要刷上三家锅。","一朵鲜花头上戴,一年四季也不开,一心想要花开时,采花之人没到来。","此命生来脾气暴,上来一阵双脚跳,对你脾气啥都好,经常与人吵和闹。"};int index = name.hashCode() % 3;return strs[index];}
}
⑤定义切面类
package com.sangeng.aspect;import com.sangeng.util.CryptUtil;
import org.aspectj.lang.ProceedingJoinPoint;
import org.aspectj.lang.annotation.Around;
import org.aspectj.lang.annotation.Aspect;
import org.aspectj.lang.annotation.Pointcut;
import org.springframework.stereotype.Component;@Component
@Aspect
public class CryptAspect {//确定切点@Pointcut("@annotation(com.sangeng.aspect.Crypt)")public void pt(){}//定义通知@Around("pt()")public Object crypt(ProceedingJoinPoint pjp) {//获取去目标方法调用时的参数Object[] args = pjp.getArgs();//对参数进行解密  解密后传入目标方法执行String arg = (String) args[0];String s = CryptUtil.AESdecode(arg);//解密args[0] = s;Object proceed = null;String ret = null;try {proceed = pjp.proceed(args);//目标方法调用//目标方法执行后需要获取到返回值ret = (String) proceed;//对返回值加密后进行真正的返回ret = CryptUtil.AESencode(ret);} catch (Throwable throwable) {throwable.printStackTrace();}return ret;}}
1.8 xml配置AOP
①定义切面类
public class MyAspect {public void before(JoinPoint joinPoint){System.out.println("before");}//    @AfterReturning(value = "pt()",returning = "ret")public void afterReturning(JoinPoint joinPoint,Object ret){System.out.println("afterReturning:"+ret);}
//    @After("pt()")public void after(JoinPoint joinPoint){System.out.println("after");}//    @AfterThrowing(value = "pt()",throwing = "e")public void afterThrowing(JoinPoint joinPoint,Throwable e){String message = e.getMessage();System.out.println("afterThrowing:"+message);}public Object around(ProceedingJoinPoint pjp){//获取参数Object[] args = pjp.getArgs();MethodSignature signature = (MethodSignature) pjp.getSignature();Object target = pjp.getTarget();Object ret = null;try {ret = pjp.proceed();//目标方法的执行//ret就是被增强方法的返回值System.out.println(ret);} catch (Throwable throwable) {throwable.printStackTrace();System.out.println(throwable.getMessage());}
//        System.out.println(pjp);return ret;}
}
②目标类和切面类注入容器
在切面类和目标类上加是对应的注解。注入如果是使用注解的方式注入容器要记得开启组件扫描。
当然你也可以在xml中使用bean标签的方式注入容器。
@Component//把切面类注入容器
public class MyAspect {//..。省略无关代码
}
@Service//把目标类注入容器
public class UserService {//..。省略无关代码
}
③配置AOP
<?xml version="1.0" encoding="UTF-8"?>
<beans xmlns="http://www.springframework.org/schema/beans"xmlns:xsi="http://www.w3.org/2001/XMLSchema-instance"xmlns:context="http://www.springframework.org/schema/context"xmlns:aop="http://www.springframework.org/schema/aop"xsi:schemaLocation="http://www.springframework.org/schema/beans http://www.springframework.org/schema/beans/spring-beans.xsd http://www.springframework.org/schema/context https://www.springframework.org/schema/context/spring-context.xsd http://www.springframework.org/schema/aop https://www.springframework.org/schema/aop/spring-aop.xsd"><!--开启组件扫描--><context:component-scan base-package="com.sangeng"></context:component-scan><!--配置AOP--><aop:config><!--定义切点--><aop:pointcut id="pt1" expression="execution(* com.sangeng.service..*.*(..))"></aop:pointcut><aop:pointcut id="pt2" expression="@annotation(com.sangeng.aspect.InvokeLog)"></aop:pointcut><!--配置切面--><aop:aspect ref="myAspect"><aop:before method="before" pointcut-ref="pt1"></aop:before><aop:after method="after" pointcut-ref="pt1"></aop:after><aop:after-returning method="afterReturning" pointcut-ref="pt1" returning="ret"></aop:after-returning><aop:after-throwing method="afterThrowing" pointcut-ref="pt2" throwing="e"></aop:after-throwing></aop:aspect></aop:config>
</beans>
1.9 多切面顺序问题
在实际项目中我们可能会存在配置了多个切面的情况。这种情况下我们很可能需要控制切面的顺序。
我们在默认情况下Spring有它自己的排序规则。(按照类名排序)
默认排序规则往往不符合我们的要求,我们需要进行特殊控制。
如果是注解方式配置的AOP可以在切面类上加**@Order注解来控制顺序。@Order中的属性越小优先级越高。**
如果是XML方式配置的AOP,可以通过调整配置顺序来控制。
例如:
下面这种配置方式就会先使用CryptAspect里面的增强,在使用APrintLogAspect里的增强
@Component
@Aspect
@Order(2)
public class APrintLogAspect {//省略无关代码
}
@Component
@Aspect
@Order(1)
public class CryptAspect {//省略无关代码
}
1.10 AOP原理-动态代理
实际上Spring的AOP其实底层就是使用动态代理来完成的。并且使用了两种动态代理分别是JDK的动态代理和Cglib动态代理。
所以我们接下去来学习下这两种动态代理,理解下它们的不同点。
1.10.1 JDK动态代理
JDK的动态代理使用的java.lang.reflect.Proxy这个类来进行实现的。要求被代理(被增强)的类需要实现了接口。并且JDK动态代理也只能对接口中的方法进行增强。
public static void main(String[] args) {AIControllerImpl aiController = new AIControllerImpl();//使用动态代理增强getAnswer方法//1.JDK动态代理//获取类加载器ClassLoader cl = Demo.class.getClassLoader();//被代理类所实现接口的字节码对象数组Class<?>[] interfaces = AIControllerImpl.class.getInterfaces();AIController proxy = (AIController) Proxy.newProxyInstance(cl, interfaces, new InvocationHandler() {//使用代理对象的方法时 会调用到invokepublic Object invoke(Object proxy, Method method, Object[] args) throws Throwable {//proxy 是代理对象//method 是当前被调用的方法封装的Method对象//args 是调用方法时传入的参数//调用被代理对象的对应方法//判断 当前调用的是否是getAnswer方法if(method.getName().equals("getAnswer")){System.out.println("增强");}Object ret = method.invoke(aiController, args);return ret;}});String answer = proxy.getAnswer("三连了吗?");System.out.println(answer);}
1.10.2 Cglib动态代理
使用的是org.springframework.cglib.proxy.Enhancer类进行实现的。
public class CglibDemo {public static void main(String[] args) {Enhancer enhancer = new Enhancer();//设置父类的字节码对象enhancer.setSuperclass(AIControllerImpl.class);enhancer.setCallback(new MethodInterceptor() {//使用代理对象执行方法是都会调用到intercept方法@Overridepublic Object intercept(Object o, Method method, Object[] objects, MethodProxy methodProxy) throws Throwable {//判断当前调用的方法是不是getAnswer方法 如果是进行增强if ("getAnswer".equals(method.getName())){System.out.println("被增强了");}//调用父类中对应的方法Object ret = methodProxy.invokeSuper(o, objects);return ret;}});//生成代理对象AIControllerImpl proxy = (AIControllerImpl) enhancer.create();
//        System.out.println(proxy.getAnswer("你好吗?"));System.out.println(proxy.fortuneTelling("你好吗?"));}
}
1.10.3 总结
JDK动态代理要求被代理(被增强)的类必须要实现接口,生成的代理对象相当于是被代理对象的兄弟。
Cglib的动态代理不要求被代理(被增强)的类要实现接口,生成的代理对象相当于被代理对象的子类对象。
Spring的AOP默认情况下优先使用的是JDK的动态代理,如果使用不了JDK的动态代理才会使用Cglib的动态代理。
1.11 切换默认动态代理方式
有的时候我们需要修改AOP的代理方式。
我们可以使用以下方式修改:
如果我们是采用注解方式配置AOP的话:
设置aop:aspectj-autoproxy标签的proxy-target-class属性为true,代理方式就会修改成Cglib
<aop:aspectj-autoproxy proxy-target-class="true"/>
动态代理和静态代理详解可以看我这一篇文章: 什么是代理模式?彻底理解静态代理和动态代理
如果我们是采用xml方式配置AOP的话:
设置aop:config标签的proxy-target-class属性为true,代理方式就会修改成Cglib
<aop:config proxy-target-class="true">
</aop:config>
如果我的内容对你有帮助,请辛苦动动您的手指为我点赞,评论,收藏。感谢大家!!
