揭秘 SpringBoot 配置优先级:从源码到实战,一次讲透谁是 “最终话事人“
在 SpringBoot 开发中,你是否遇到过这样的困惑:明明在 application.properties 里配置了参数,运行时却发现值不对?或者在命令行传入参数后,结果和预期不符?这些问题的根源,往往在于对 SpringBoot 配置优先级的理解不够透彻。
SpringBoot 提供了多种配置方式,从传统的 properties 文件到环境变量,从命令行参数到配置中心,每种方式都有其特定的使用场景和优先级。掌握这些优先级规则,不仅能避免配置冲突带来的诡异问题,还能灵活运用不同配置方式满足复杂的业务需求。
本文将从底层原理出发,结合大量可运行的实例,全面解析 SpringBoot 的配置优先级体系。我们会按照优先级从高到低的顺序,逐一讲解每种配置方式的特点、使用方法和适用场景,并通过实战案例演示如何利用这些规则解决实际开发中的问题。
一、SpringBoot 配置优先级总览
在深入探讨各种配置方式之前,我们先来看一张 SpringBoot 配置优先级的总览图,对整体体系有一个直观的认识:
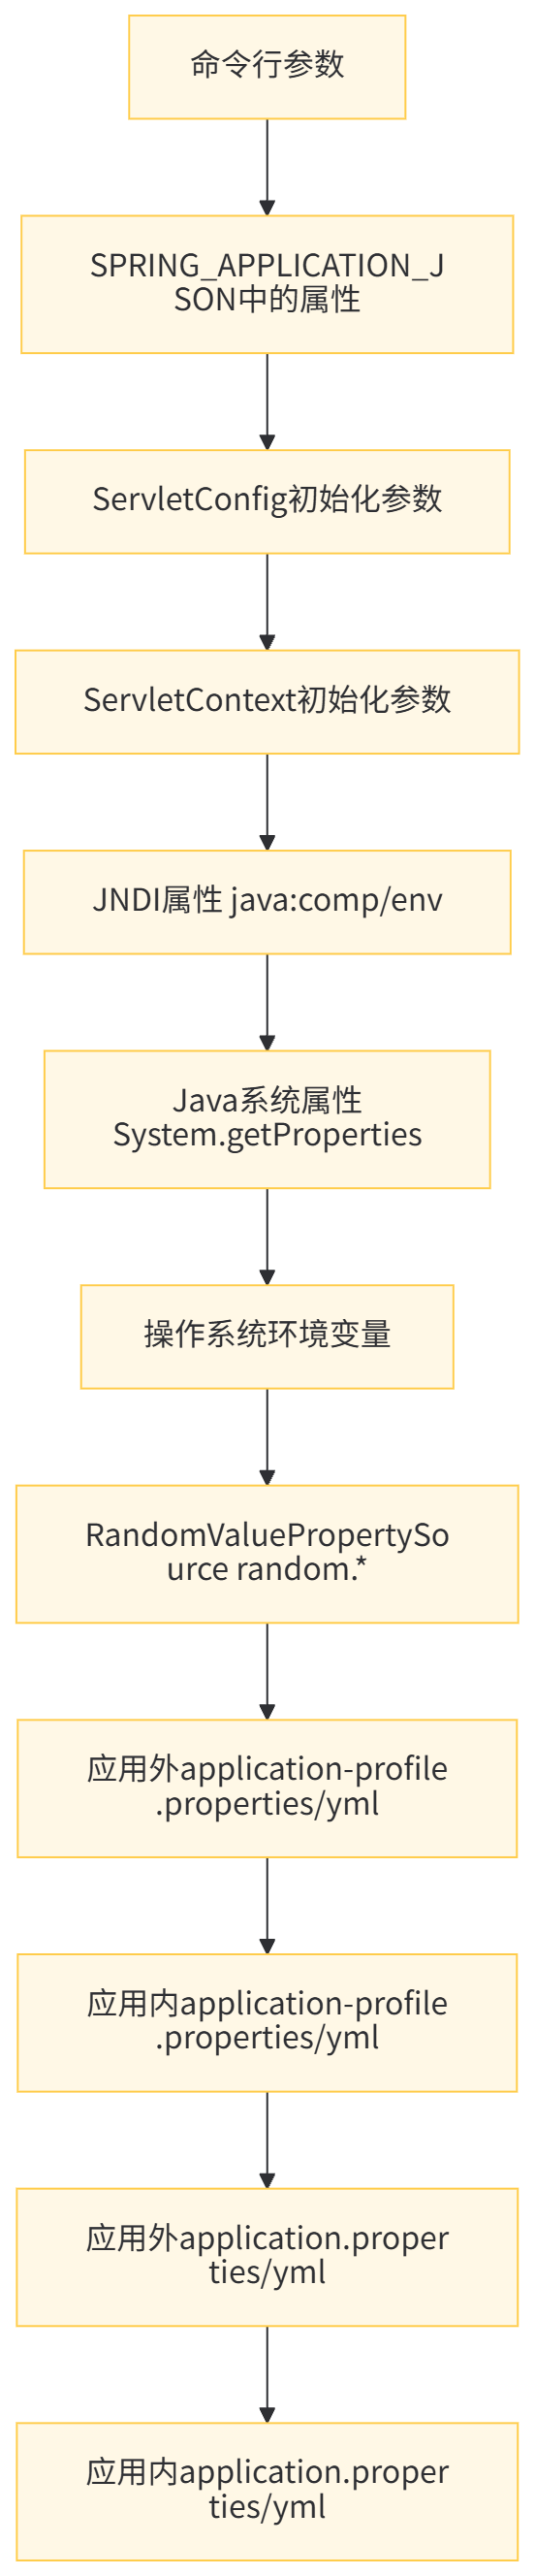
这张图展示了 SpringBoot 中配置源的优先级顺序,越靠上的配置源优先级越高。当多个配置源中存在相同的配置项时,高优先级的配置会覆盖低优先级的配置。
需要注意的是,这个顺序是 SpringBoot 官方定义的标准顺序,但在实际应用中,可能会因为自定义配置或使用某些第三方组件而有所变化。不过,对于绝大多数场景来说,这个顺序是适用的。
接下来,我们将按照从高到低的顺序,详细讲解每一种配置方式。
二、最高优先级:命令行参数
在 SpringBoot 中,命令行参数拥有最高的配置优先级。这意味着,无论其他配置源中如何设置,命令行参数总会覆盖它们。
2.1 基本使用方法
命令行参数的使用非常简单,只需在启动应用时,在命令中添加--参数名=参数值的形式即可。例如:
java -jar myapp.jar --server.port=8081 --app.name=myapp
这个命令会将应用的端口设置为 8081,应用名称设置为 myapp。
2.2 实战示例
让我们通过一个实际的例子来验证命令行参数的优先级。
首先,创建一个 SpringBoot 项目,添加必要的依赖:
<?xml version="1.0" encoding="UTF-8"?>
<project xmlns="http://maven.apache.org/POM/4.0.0" xmlns:xsi="http://www.w3.org/2001/XMLSchema-instance"xsi:schemaLocation="http://maven.apache.org/POM/4.0.0 https://maven.apache.org/xsd/maven-4.0.0.xsd"><modelVersion>4.0.0</modelVersion><parent><groupId>org.springframework.boot</groupId><artifactId>spring-boot-starter-parent</artifactId><version>3.2.0</version><relativePath/></parent><groupId>com.example</groupId><artifactId>config-priority-demo</artifactId><version>0.0.1-SNAPSHOT</version><name>config-priority-demo</name><description>Demo project for Spring Boot config priority</description><properties><java.version>17</java.version></properties><dependencies><dependency><groupId>org.springframework.boot</groupId><artifactId>spring-boot-starter-web</artifactId></dependency><dependency><groupId>org.projectlombok</groupId><artifactId>lombok</artifactId><version>1.18.30</version><scope>provided</scope></dependency><dependency><groupId>org.springframework.boot</groupId><artifactId>spring-boot-starter-test</artifactId><scope>test</scope></dependency><dependency><groupId>com.alibaba.fastjson2</groupId><artifactId>fastjson2</artifactId><version>2.0.44</version></dependency><dependency><groupId>com.google.guava</groupId><artifactId>guava</artifactId><version>33.1.0-jre</version></dependency><dependency><groupId>org.springdoc</groupId><artifactId>springdoc-openapi-starter-webmvc-ui</artifactId><version>2.3.0</version></dependency></dependencies><build><plugins><plugin><groupId>org.springframework.boot</groupId><artifactId>spring-boot-maven-plugin</artifactId></plugin></plugins></build>
</project>
创建一个配置类,用于接收配置参数:
package com.example.configprioritydemo.config;import lombok.Data;
import org.springframework.boot.context.properties.ConfigurationProperties;
import org.springframework.stereotype.Component;/*** 应用配置属性类* 用于接收和管理应用的配置参数** @author ken*/
@Data
@Component
@ConfigurationProperties(prefix = "app")
public class AppConfig {private String name;private String environment;private int maxConnections;
}
创建一个控制器,用于展示配置参数的值:
package com.example.configprioritydemo.controller;import com.example.configprioritydemo.config.AppConfig;
import io.swagger.v3.oas.annotations.Operation;
import io.swagger.v3.oas.annotations.tags.Tag;
import lombok.RequiredArgsConstructor;
import lombok.extern.slf4j.Slf4j;
import org.springframework.web.bind.annotation.GetMapping;
import org.springframework.web.bind.annotation.RequestMapping;
import org.springframework.web.bind.annotation.RestController;/*** 配置演示控制器* 用于展示不同配置源的优先级** @author ken*/
@RestController
@RequestMapping("/config")
@RequiredArgsConstructor
@Slf4j
@Tag(name = "配置演示接口", description = "用于展示不同配置源的优先级")
public class ConfigDemoController {private final AppConfig appConfig;/*** 获取当前应用的配置信息** @return 应用配置信息*/@GetMapping("/app")@Operation(summary = "获取应用配置信息", description = "返回当前应用的配置参数值")public AppConfig getAppConfig() {log.info("当前应用配置: {}", appConfig);return appConfig;}
}
在src/main/resources目录下创建application.properties文件:
app.name=default-app
app.environment=dev
app.maxConnections=100
现在,我们先不使用命令行参数启动应用:
mvn spring-boot:run
访问http://localhost:8080/config/app,可以看到返回结果:
{"name": "default-app","environment": "dev","maxConnections": 100
}
接下来,我们使用命令行参数启动应用:
mvn spring-boot:run -Dspring-boot.run.arguments="--app.name=command-line-app --app.maxConnections=200"
再次访问http://localhost:8080/config/app,可以看到返回结果:
{"name": "command-line-app","environment": "dev","maxConnections": 200
}
可以看到,命令行参数成功覆盖了application.properties中的配置。
2.3 底层原理
命令行参数之所以拥有最高优先级,是因为在 SpringBoot 的启动过程中,命令行参数会被最早加载到环境变量中。
在SpringApplication类的prepareEnvironment方法中,会先加载命令行参数,然后再加载其他配置源。这样,当后续的配置源加载时,如果存在相同的配置项,就会被已经存在的命令行参数覆盖。
相关源码片段(SpringBoot 3.2.0):
private ConfigurableEnvironment prepareEnvironment(SpringApplicationRunListeners listeners,ApplicationArguments applicationArguments) {// 创建并配置环境ConfigurableEnvironment environment = getOrCreateEnvironment();configureEnvironment(environment, applicationArguments.getSourceArgs());ConfigurationPropertySources.attach(environment);listeners.environmentPrepared(environment);bindToSpringApplication(environment);if (!this.isCustomEnvironment) {environment = new EnvironmentConverter(getClassLoader()).convertEnvironmentIfNecessary(environment,deduceEnvironmentClass());}ConfigurationPropertySources.attach(environment);return environment;
}
在configureEnvironment方法中,命令行参数会被添加到环境变量中:
protected void configureEnvironment(ConfigurableEnvironment environment, String[] args) {if (this.addConversionService) {ConversionService conversionService = ApplicationConversionService.getSharedInstance();environment.setConversionService((ConfigurableConversionService) conversionService);}configurePropertySources(environment, args);configureProfiles(environment, args);
}protected void configurePropertySources(ConfigurableEnvironment environment, String[] args) {MutablePropertySources sources = environment.getPropertySources();if (this.defaultProperties != null && !this.defaultProperties.isEmpty()) {sources.addLast(new MapPropertySource("defaultProperties", this.defaultProperties));}if (this.addCommandLineProperties && args.length > 0) {String name = CommandLinePropertySource.COMMAND_LINE_PROPERTY_SOURCE_NAME;if (sources.contains(name)) {PropertySource<?> source = sources.get(name);CompositePropertySource composite = new CompositePropertySource(name);composite.addPropertySource(new SimpleCommandLinePropertySource("springApplicationCommandLineArgs", args));composite.addPropertySource(source);sources.replace(name, composite);} else {sources.addFirst(new SimpleCommandLinePropertySource(args));}}
}
可以看到,命令行参数被添加到了PropertySources的前面(使用addFirst方法),这意味着它会被优先考虑。
2.4 适用场景
命令行参数适用于以下场景:
- 临时修改应用配置,如临时修改端口号
- 在不同环境部署时,指定特定环境的配置
- 运行时动态传递参数,如指定日志级别
需要注意的是,命令行参数不宜过多,否则会导致启动命令过长,不易维护。对于复杂的配置,应该考虑使用配置文件或配置中心。
三、SPRING_APPLICATION_JSON 属性
SPRING_APPLICATION_JSON是一种特殊的配置方式,它允许我们以 JSON 格式指定配置属性,优先级仅次于命令行参数。
3.1 基本使用方法
SPRING_APPLICATION_JSON可以通过以下几种方式设置:
- 作为系统环境变量
- 作为 Java 系统属性
- 作为命令行参数
例如,使用环境变量设置:
export SPRING_APPLICATION_JSON='{"app":{"name":"json-app","environment":"test"}}'
java -jar myapp.jar
使用 Java 系统属性设置:
java -Dspring.application.json='{"app":{"name":"json-app","environment":"test"}}' -jar myapp.jar
使用命令行参数设置:
java -jar myapp.jar --spring.application.json='{"app":{"name":"json-app","environment":"test"}}'
3.2 实战示例
我们继续使用上一节创建的项目,来验证SPRING_APPLICATION_JSON的优先级。
首先,我们同时使用SPRING_APPLICATION_JSON和命令行参数来设置配置:
export SPRING_APPLICATION_JSON='{"app":{"name":"json-app","environment":"test","maxConnections":150}}'
mvn spring-boot:run -Dspring-boot.run.arguments="--app.name=command-line-app --app.maxConnections=200"
访问http://localhost:8080/config/app,可以看到返回结果:
{"name": "command-line-app","environment": "test","maxConnections": 200
}
可以看到,命令行参数(app.name和app.maxConnections)覆盖了SPRING_APPLICATION_JSON中的配置,而SPRING_APPLICATION_JSON中的app.environment则覆盖了application.properties中的配置。这验证了SPRING_APPLICATION_JSON的优先级低于命令行参数,但高于application.properties。
3.3 底层原理
SPRING_APPLICATION_JSON的解析是在ConfigFileApplicationListener中完成的。当 SpringBoot 启动时,会检查是否存在spring.application.json或SPRING_APPLICATION_JSON属性,如果存在,则会将其解析为 JSON 对象,并添加到环境变量中。
相关源码片段(SpringBoot 3.2.0):
private void loadSpringApplicationJson(ConfigurableEnvironment environment) {String json = environment.getProperty("spring.application.json");if (StringUtils.hasText(json)) {json = json.replace("\\\"", "\"");try {JsonParser parser = JsonParserFactory.getJsonParser();Map<String, Object> map = parser.parseMap(json);if (!map.isEmpty()) {addJsonPropertySource(environment, map);}} catch (Exception ex) {logger.warn("Cannot parse spring.application.json: {}", json, ex);}}
}private void addJsonPropertySource(ConfigurableEnvironment environment, Map<String, Object> map) {MutablePropertySources sources = environment.getPropertySources();String sourceName = "springApplicationJson";if (sources.contains(sourceName)) {PropertySource<?> existing = sources.get(sourceName);if (existing instanceof CompositePropertySource composite) {composite.addPropertySource(new MapPropertySource(sourceName + "-" + composite.getPropertySources().size(),map));} else {CompositePropertySource composite = new CompositePropertySource(sourceName);composite.addPropertySource(new MapPropertySource(sourceName + "-0", map));composite.addPropertySource(existing);sources.replace(sourceName, composite);}} else {sources.addAfter(CommandLinePropertySource.COMMAND_LINE_PROPERTY_SOURCE_NAME,new MapPropertySource(sourceName, map));}
}
可以看到,SPRING_APPLICATION_JSON解析后的属性被添加到了命令行参数之后,这也是它的优先级低于命令行参数的原因。
3.4 适用场景
SPRING_APPLICATION_JSON适用于以下场景:
- 需要传递复杂结构的配置参数
- 在容器化部署时(如 Docker),通过环境变量传递配置
- 需要批量设置多个相关配置参数
四、Servlet 容器相关配置
在 Web 应用中,Servlet 容器的配置(如 ServletConfig 和 ServletContext 的初始化参数)也会影响 SpringBoot 的配置,其优先级介于SPRING_APPLICATION_JSON和 JNDI 属性之间。
4.1 ServletConfig 初始化参数
ServletConfig 初始化参数是针对单个 Servlet 的配置,在 SpringBoot 中,我们可以通过自定义ServletRegistrationBean来设置。
package com.example.configprioritydemo.config;import org.springframework.boot.web.servlet.ServletRegistrationBean;
import org.springframework.context.annotation.Bean;
import org.springframework.context.annotation.Configuration;
import org.springframework.web.servlet.DispatcherServlet;/*** Servlet配置类* 用于配置Servlet相关的初始化参数** @author ken*/
@Configuration
public class ServletConfig {/*** 配置DispatcherServlet的初始化参数** @param dispatcherServlet DispatcherServlet实例* @return ServletRegistrationBean实例*/@Beanpublic ServletRegistrationBean<DispatcherServlet> dispatcherServletRegistration(DispatcherServlet dispatcherServlet) {ServletRegistrationBean<DispatcherServlet> registration = new ServletRegistrationBean<>(dispatcherServlet);registration.addInitParameter("app.name", "servlet-config-app");registration.addInitParameter("app.environment", "servlet");return registration;}
}
4.2 ServletContext 初始化参数
ServletContext 初始化参数是全局的,适用于整个 Web 应用。在 SpringBoot 中,我们可以通过ServletContextInitializer来设置。
package com.example.configprioritydemo.config;import org.springframework.boot.web.servlet.ServletContextInitializer;
import org.springframework.context.annotation.Bean;
import org.springframework.context.annotation.Configuration;import jakarta.servlet.ServletContext;
import jakarta.servlet.ServletException;/*** ServletContext配置类* 用于配置ServletContext的初始化参数** @author ken*/
@Configuration
public class ServletContextConfig {/*** 配置ServletContext的初始化参数** @return ServletContextInitializer实例*/@Beanpublic ServletContextInitializer servletContextInitializer() {return new ServletContextInitializer() {@Overridepublic void onStartup(ServletContext servletContext) throws ServletException {servletContext.setInitParameter("app.name", "servlet-context-app");servletContext.setInitParameter("app.maxConnections", "300");}};}
}
4.3 实战示例
为了验证 Servlet 容器配置的优先级,我们需要确保没有更高优先级的配置(如命令行参数和SPRING_APPLICATION_JSON)影响结果。
启动应用:
mvn spring-boot:run
访问http://localhost:8080/config/app,可以看到返回结果:
{"name": "servlet-config-app","environment": "servlet","maxConnections": 300
}
可以看到,ServletConfig 的app.name和app.environment覆盖了 ServletContext 和application.properties中的配置,而 ServletContext 的app.maxConnections覆盖了application.properties中的配置。这说明 ServletConfig 的优先级高于 ServletContext。
接下来,我们添加SPRING_APPLICATION_JSON配置:
export SPRING_APPLICATION_JSON='{"app":{"name":"json-app","environment":"test","maxConnections":150}}'
mvn spring-boot:run
访问http://localhost:8080/config/app,可以看到返回结果:
{"name": "json-app","environment": "test","maxConnections": 150
}
这说明SPRING_APPLICATION_JSON的优先级高于 Servlet 容器的配置。
4.4 底层原理
Servlet 容器的初始化参数是在 Web 应用启动过程中被加载的。在 SpringBoot 中,ServletWebServerApplicationContext会负责创建和配置 Servlet 容器,并将 ServletConfig 和 ServletContext 的初始化参数添加到环境变量中。
相关源码片段(SpringBoot 3.2.0):
@Override
protected void onRefresh() {super.onRefresh();try {createWebServer();} catch (Throwable ex) {throw new ApplicationContextException("Unable to start web server", ex);}
}private void createWebServer() {WebServer webServer = this.webServer;ServletContext servletContext = getServletContext();if (webServer == null && servletContext == null) {ServletWebServerFactory factory = getWebServerFactory();this.webServer = factory.getWebServer(getSelfInitializer());getBeanFactory().registerSingleton("webServerGracefulShutdown",new WebServerGracefulShutdownLifecycle(this.webServer));getBeanFactory().registerSingleton("webServerStartStop",new WebServerStartStopLifecycle(this, this.webServer));} else if (servletContext != null) {try {getSelfInitializer().onStartup(servletContext);} catch (ServletException ex) {throw new ApplicationContextException("Cannot initialize servlet context", ex);}}initPropertySources();
}
在initPropertySources方法中,ServletContext 的初始化参数被添加到环境变量中:
@Override
protected void initPropertySources() {ConfigurableEnvironment env = getEnvironment();if (env instanceof ConfigurableWebEnvironment) {((ConfigurableWebEnvironment) env).initPropertySources(getServletContext(), null);}
}
而 ServletConfig 的初始化参数则是在DispatcherServlet注册时被添加到环境变量中的。
4.5 适用场景
Servlet 容器相关配置适用于以下场景:
- 需要与 Servlet 容器集成的配置
- 针对特定 Servlet 的配置
- 兼容传统 Web 应用的配置方式
五、JNDI 属性
JNDI(Java Naming and Directory Interface)是 Java EE 中的一项技术,用于在应用服务器中查找和访问资源。在 SpringBoot 中,JNDI 属性的优先级介于 Servlet 容器配置和 Java 系统属性之间。
5.1 基本使用方法
要在 SpringBoot 中使用 JNDI,需要先在应用服务器中配置 JNDI 资源,然后在 SpringBoot 中通过jndi-name来引用。
以 Tomcat 为例,首先在conf/context.xml中配置 JNDI 资源:
<Context><Resource name="jdbc/myDataSource" auth="Container" type="javax.sql.DataSource"driverClassName="com.mysql.cj.jdbc.Driver" url="jdbc:mysql://localhost:3306/mydb"username="root" password="password" maxTotal="100" maxIdle="30" maxWaitMillis="10000"/><Environment name="app/name" value="jndi-app" type="java.lang.String" override="false"/><Environment name="app/environment" value="jndi" type="java.lang.String" override="false"/>
</Context>
然后,在 SpringBoot 中配置 JNDI 属性的引用:
package com.example.configprioritydemo.config;import org.springframework.context.annotation.Bean;
import org.springframework.context.annotation.Configuration;
import org.springframework.jndi.JndiObjectFactoryBean;import javax.naming.NamingException;/*** JNDI配置类* 用于配置JNDI资源的引用** @author ken*/
@Configuration
public class JndiConfig {/*** 配置JNDI中的app.name属性** @return JndiObjectFactoryBean实例* @throws NamingException 如果JNDI查找失败*/@Beanpublic JndiObjectFactoryBean appName() throws NamingException {JndiObjectFactoryBean jndiObjectFactoryBean = new JndiObjectFactoryBean();jndiObjectFactoryBean.setJndiName("java:comp/env/app/name");return jndiObjectFactoryBean;}/*** 配置JNDI中的app.environment属性** @return JndiObjectFactoryBean实例* @throws NamingException 如果JNDI查找失败*/@Beanpublic JndiObjectFactoryBean appEnvironment() throws NamingException {JndiObjectFactoryBean jndiObjectFactoryBean = new JndiObjectFactoryBean();jndiObjectFactoryBean.setJndiName("java:comp/env/app/environment");return jndiObjectFactoryBean;}
}
在application.properties中添加 JNDI 属性的绑定:
app.name=${app.name:default-app}
app.environment=${app.environment:dev}
5.2 实战示例
为了验证 JNDI 属性的优先级,我们需要将应用部署到支持 JNDI 的应用服务器(如 Tomcat)中。
- 构建应用:
mvn clean package
将生成的 WAR 包部署到 Tomcat 的
webapps目录下。启动 Tomcat,访问
http://localhost:8080/config-priority-demo-0.0.1-SNAPSHOT/config/app,可以看到返回
{"name": "jndi-app","environment": "jndi","maxConnections": 100
}
可以看到,JNDI 中的配置覆盖了application.properties中的默认值。
接下来,我们添加 ServletContext 配置:
@Override
public void onStartup(ServletContext servletContext) throws ServletException {servletContext.setInitParameter("app.name", "servlet-context-app");servletContext.setInitParameter("app.environment", "servlet");servletContext.setInitParameter("app.maxConnections", "300");
}
重新部署应用,访问相同的 URL,返回结果:
{"name": "servlet-context-app","environment": "servlet","maxConnections": 300
}
这说明 ServletContext 配置的优先级高于 JNDI 属性。
5.3 底层原理
JNDI 属性的加载是在JndiPropertySource中完成的。JndiPropertySource会从 JNDI 上下文中查找属性,并将其添加到 Spring 的环境变量中。
相关源码片段(Spring 6.1.1):
public class JndiPropertySource extends EnumerablePropertySource<Context> {public JndiPropertySource(String name, Context context) {super(name, context);}@Overridepublic Object getProperty(String name) {try {Object value = this.source.lookup(convertPropertyName(name));if (logger.isDebugEnabled()) {logger.debug("JNDI lookup for name [" + name + "] returned: [" + value + "]");}return value;} catch (NameNotFoundException ex) {if (logger.isTraceEnabled()) {logger.trace("JNDI name [" + name + "] not found", ex);}return null;} catch (NamingException ex) {if (logger.isDebugEnabled()) {logger.debug("JNDI lookup for name [" + name + "] threw NamingException", ex);}return null;}}protected String convertPropertyName(String name) {return name.replace('.', '/');}
}
JndiPropertySource被添加到环境变量中的时机是在ConfigurableWebEnvironment的初始化过程中:
@Override
public void initPropertySources(@Nullable ServletContext servletContext, @Nullable ServletConfig servletConfig) {WebApplicationContextUtils.initServletPropertySources(getPropertySources(), servletContext, servletConfig);
}
在WebApplicationContextUtils中:
public static void initServletPropertySources(MutablePropertySources sources,@Nullable ServletContext servletContext, @Nullable ServletConfig servletConfig) {Assert.notNull(sources, "PropertySources must not be null");String name = StandardServletEnvironment.JNDI_PROPERTY_SOURCE_NAME;if (sources.contains(name)) {PropertySource<?> jndiPs = sources.get(name);if (jndiPs instanceof JndiPropertySource) {((JndiPropertySource) jndiPs).setResourceRef(true);}}if (servletContext != null && !sources.contains(StandardServletEnvironment.SERVLET_CONTEXT_PROPERTY_SOURCE_NAME)) {sources.addLast(new ServletContextPropertySource(StandardServletEnvironment.SERVLET_CONTEXT_PROPERTY_SOURCE_NAME, servletContext));}if (servletConfig != null && !sources.contains(StandardServletEnvironment.SERVLET_CONFIG_PROPERTY_SOURCE_NAME)) {sources.addLast(new ServletConfigPropertySource(StandardServletEnvironment.SERVLET_CONFIG_PROPERTY_SOURCE_NAME, servletConfig));}
}
可以看到,JNDI 属性源被添加到了 ServletContext 和 ServletConfig 属性源之前,这也是它的优先级低于这两者的原因。
5.4 适用场景
JNDI 属性适用于以下场景:
- 在 Java EE 应用服务器中部署 SpringBoot 应用
- 需要与应用服务器集成的资源配置(如数据源、JMS 队列等)
- 多应用共享配置的场景
六、Java 系统属性
Java 系统属性(通过System.getProperties()获取的属性)在 SpringBoot 的配置优先级体系中也占有重要地位,其优先级介于 JNDI 属性和操作系统环境变量之间。
6.1 基本使用方法
设置 Java 系统属性有多种方式:
- 在启动命令中使用
-D参数:
java -Dapp.name=system-prop-app -Dapp.environment=system -jar myapp.jar
- 在代码中使用
System.setProperty()方法:
System.setProperty("app.name", "system-prop-app");
System.setProperty("app.environment", "system");
6.2 实战示例
我们继续使用之前的项目,来验证 Java 系统属性的优先级。
首先,启动应用时添加 Java 系统属性:
mvn spring-boot:run -Dapp.name=system-prop-app -Dapp.environment=system
访问http://localhost:8080/config/app,可以看到返回结果:
{"name": "system-prop-app","environment": "system","maxConnections": 100
}
可以看到,Java 系统属性覆盖了application.properties中的配置。
接下来,我们添加 JNDI 配置(需要部署到 Tomcat):
<Environment name="app/name" value="jndi-app" type="java.lang.String" override="false"/>
<Environment name="app/environment" value="jndi" type="java.lang.String" override="false"/>
启动 Tomcat,访问应用,返回结果:
{"name": "system-prop-app","environment": "system","maxConnections": 100
}
这说明 Java 系统属性的优先级高于 JNDI 属性。
然后,我们添加 ServletContext 配置:
@Override
public void onStartup(ServletContext servletContext) throws ServletException {servletContext.setInitParameter("app.name", "servlet-context-app");servletContext.setInitParameter("app.environment", "servlet");
}
重新部署应用,访问相同的 URL,返回结果:
{"name": "servlet-context-app","environment": "servlet","maxConnections": 100
}
这说明 ServletContext 配置的优先级高于 Java 系统属性。
6.3 底层原理
Java 系统属性是通过SystemEnvironmentPropertySource和JdkEnvironmentPropertySource加载到 Spring 环境中的。在 SpringBoot 启动过程中,这些属性源会被添加到环境变量中。
相关源码片段(Spring 6.1.1):
public class StandardEnvironment extends AbstractEnvironment {/** System environment property source name: {@value}. */public static final String SYSTEM_ENVIRONMENT_PROPERTY_SOURCE_NAME = "systemEnvironment";/** JVM system properties property source name: {@value}. */public static final String SYSTEM_PROPERTIES_PROPERTY_SOURCE_NAME = "systemProperties";@Overrideprotected void customizePropertySources(MutablePropertySources propertySources) {propertySources.addLast(new PropertiesPropertySource(SYSTEM_PROPERTIES_PROPERTY_SOURCE_NAME, getSystemProperties()));propertySources.addLast(new SystemEnvironmentPropertySource(SYSTEM_ENVIRONMENT_PROPERTY_SOURCE_NAME, getSystemEnvironment()));}
}
在StandardServletEnvironment中,这个顺序被调整为:
public class StandardServletEnvironment extends StandardEnvironment implements ConfigurableWebEnvironment {/** Servlet context init parameters property source name: {@value}. */public static final String SERVLET_CONTEXT_PROPERTY_SOURCE_NAME = "servletContextInitParams";/** Servlet config init parameters property source name: {@value}. */public static final String SERVLET_CONFIG_PROPERTY_SOURCE_NAME = "servletConfigInitParams";/** JNDI property source name: {@value}. */public static final String JNDI_PROPERTY_SOURCE_NAME = "jndiProperties";@Overrideprotected void customizePropertySources(MutablePropertySources propertySources) {propertySources.addLast(new JndiPropertySource(JNDI_PROPERTY_SOURCE_NAME, new JndiLocatorDelegate()));super.customizePropertySources(propertySources);}
}
可以看到,JNDI 属性源被添加到了 Java 系统属性和系统环境变量之前,这也是它的优先级高于这两者的原因。
6.4 适用场景
Java 系统属性适用于以下场景:
- 需要在 JVM 级别设置的配置
- 跨应用的全局配置
- 与 JVM 相关的配置(如内存大小、日志配置等)
七、操作系统环境变量
操作系统环境变量是另一种常用的配置方式,其优先级介于 Java 系统属性和RandomValuePropertySource之间。
7.1 基本使用方法
设置操作系统环境变量的方法因操作系统而异:
- 在 Linux/Mac 系统中,可以在终端中使用
export命令:
export APP_NAME=os-env-app
export APP_ENVIRONMENT=production
- 在 Windows 系统中,可以在命令提示符中使用
set命令:
set APP_NAME=os-env-app
set APP_ENVIRONMENT=production
需要注意的是,环境变量的名称通常使用大写字母,单词之间用下划线分隔,而 SpringBoot 会自动将这种格式的环境变量映射为驼峰式的配置属性。例如,APP_NAME会被映射为app.name。
7.2 实战示例
我们继续使用之前的项目,来验证操作系统环境变量的优先级。
首先,设置环境变量并启动应用:
export APP_NAME=os-env-app
export APP_ENVIRONMENT=production
mvn spring-boot:run
访问http://localhost:8080/config/app,可以看到返回结果:
{"name": "os-env-app","environment": "production","maxConnections": 100
}
可以看到,操作系统环境变量覆盖了application.properties中的配置。
接下来,我们添加 Java 系统属性:
export APP_NAME=os-env-app
export APP_ENVIRONMENT=production
mvn spring-boot:run -Dapp.name=system-prop-app
访问http://localhost:8080/config/app,可以看到返回结果:
{"name": "system-prop-app","environment": "production","maxConnections": 100
}
这说明 Java 系统属性的优先级高于操作系统环境变量。
7.3 底层原理
操作系统环境变量是通过SystemEnvironmentPropertySource加载到 Spring 环境中的。SystemEnvironmentPropertySource会对环境变量的名称进行转换,使其符合 Spring 的命名规范。
相关源码片段(Spring 6.1.1):
public class SystemEnvironmentPropertySource extends EnumerablePropertySource<Map<String, Object>> {public SystemEnvironmentPropertySource(String name, Map<String, Object> source) {super(name, source);}@Overridepublic Object getProperty(String name) {String actualName = resolvePropertyName(name);return this.source.get(actualName);}protected String resolvePropertyName(String name) {// 对于以"spring."开头的属性,不进行转换if (name.startsWith("spring.")) {return name;}// 将驼峰式转换为下划线分隔的大写形式return name.replace('.', '_').toUpperCase();}
}
这种转换机制使得我们可以在环境变量中使用符合操作系统习惯的命名方式,同时在 SpringBoot 中使用符合 Java 习惯的驼峰式命名。
7.4 适用场景
操作系统环境变量适用于以下场景:
- 与操作系统相关的配置
- 容器化部署时(如 Docker、Kubernetes)的配置
- 需要在应用外部设置的敏感信息(如密码、密钥等)
八、RandomValuePropertySource
RandomValuePropertySource是 SpringBoot 提供的一种特殊的配置源,用于生成随机值,其优先级介于操作系统环境变量和应用外部的 profile 配置文件之间。
8.1 基本使用方法
RandomValuePropertySource可以生成多种类型的随机值,使用方式如下:
# 随机整数
app.random.int=${random.int}
# 指定范围的随机整数
app.random.int.range=${random.int(100)}
app.random.int.range2=${random.int(10, 20)}
# 随机长整数
app.random.long=${random.long}
# 随机UUID
app.random.uuid=${random.uuid}
# 随机字符串
app.random.string=${random.value}
8.2 实战示例
我们在application.properties中添加以下配置:
app.random.int=${random.int}
app.random.int.range=${random.int(100)}
app.random.int.range2=${random.int(10, 20)}
app.random.long=${random.long}
app.random.uuid=${random.uuid}
app.random.string=${random.value}
创建一个新的配置类来接收这些随机值:
package com.example.configprioritydemo.config;import lombok.Data;
import org.springframework.boot.context.properties.ConfigurationProperties;
import org.springframework.stereotype.Component;/*** 随机值配置类* 用于接收RandomValuePropertySource生成的随机值** @author ken*/
@Data
@Component
@ConfigurationProperties(prefix = "app.random")
public class RandomConfig {private int anInt;private int intRange;private int intRange2;private long aLong;private String uuid;private String string;
}
在控制器中添加一个新的接口来展示这些随机值:
@Autowired
private RandomConfig randomConfig;/*** 获取随机值配置信息** @return 随机值配置信息*/
@GetMapping("/random")
@Operation(summary = "获取随机值配置信息", description = "返回RandomValuePropertySource生成的随机值")
public RandomConfig getRandomConfig() {log.info("随机值配置: {}", randomConfig);return randomConfig;
}
启动应用,访问http://localhost:8080/config/random,可以看到类似以下的返回结果:
{"anInt": -123456789,"intRange": 42,"intRange2": 15,"aLong": 1234567890123456789,"uuid": "a1b2c3d4-e5f6-7890-abcd-1234567890ab","string": "7f8g9h0j"
}
每次重启应用,这些值都会发生变化,说明它们确实是随机生成的。
接下来,我们尝试用操作系统环境变量来覆盖这些随机值:
export APP_RANDOM_INT=100
mvn spring-boot:run
访问http://localhost:8080/config/random,可以看到anInt的值变为了 100,这说明操作系统环境变量的优先级高于RandomValuePropertySource。
8.3 底层原理
RandomValuePropertySource是在SpringApplication的初始化过程中被添加到环境变量中的。
相关源码片段(SpringBoot 3.2.0):
protected void configurePropertySources(ConfigurableEnvironment environment, String[] args) {MutablePropertySources sources = environment.getPropertySources();if (this.defaultProperties != null && !this.defaultProperties.isEmpty()) {sources.addLast(new MapPropertySource("defaultProperties", this.defaultProperties));}if (this.addCommandLineProperties && args.length > 0) {// 添加命令行参数,省略...}// 添加RandomValuePropertySourceif (!sources.contains("random")) {sources.addAfter(PROPERTY_SOURCE_NAME, new RandomValuePropertySource("random"));}
}
RandomValuePropertySource的实现原理是使用java.util.Random来生成随机值:
public class RandomValuePropertySource extends PropertySource<Random> {private static final String RANDOM_PROPERTY_SOURCE_NAME = "random";private static final String PREFIX = "random.";private final Random random;public RandomValuePropertySource() {this(RANDOM_PROPERTY_SOURCE_NAME);}public RandomValuePropertySource(String name) {super(name, new Random());this.random = new Random();}@Overridepublic Object getProperty(String name) {if (!name.startsWith(PREFIX)) {return null;}log.trace("Generating random value for '{}'", name);String type = name.substring(PREFIX.length());if (type.equals("int")) {return this.random.nextInt();}if (type.equals("long")) {return this.random.nextLong();}String range = getRange(type, "int");if (range != null) {return getNextIntInRange(range);}range = getRange(type, "long");if (range != null) {return getNextLongInRange(range);}if (type.equals("uuid")) {return UUID.randomUUID().toString();}return getRandomString();}// 其他方法省略...
}
8.4 适用场景
RandomValuePropertySource适用于以下场景:
- 生成随机的端口号,避免端口冲突
- 生成随机的密钥或令牌
- 生成测试数据
- 需要每次启动都变化的临时值
九、应用外部的 profile 配置文件
应用外部的 profile 配置文件(如application-prod.properties)是针对特定环境的配置文件,其优先级介于RandomValuePropertySource和应用内部的 profile 配置文件之间。
9.1 基本使用方法
应用外部的 profile 配置文件通常放置在应用的外部目录中,SpringBoot 会按照以下顺序查找这些文件:
- 应用当前目录的
/config子目录 - 应用当前目录
- 应用 classpath 的
/config包 - 应用 classpath 根目录
profile 配置文件的命名格式为application-{profile}.properties或application-{profile}.yml,其中{profile}是环境的名称(如 dev、test、prod 等)。
要激活特定的 profile,可以使用以下方式:
- 在配置文件中设置:
spring.profiles.active=prod - 在命令行中设置:
--spring.profiles.active=prod - 使用环境变量:
export SPRING_PROFILES_ACTIVE=prod
9.2 实战示例
我们在项目的根目录下创建config文件夹,并在其中创建application-prod.properties文件:
app.name=external-prod-app
app.environment=prod
app.maxConnections=500
启动应用时激活 prod 环境:
mvn spring-boot:run -Dspring-boot.run.arguments="--spring.profiles.active=prod"
访问http://localhost:8080/config/app,可以看到返回结果:
{"name": "external-prod-app","environment": "prod","maxConnections": 500
}
可以看到,应用外部的 profile 配置文件覆盖了应用内部的默认配置文件。
接下来,我们尝试用随机值配置来覆盖:
在application-prod.properties中添加:
app.maxConnections=${random.int(1000)}
重启应用,访问相同的 URL,可以看到maxConnections的值变成了一个随机整数,这说明RandomValuePropertySource的优先级高于应用外部的 profile 配置文件。
然后,我们尝试用操作系统环境变量来覆盖:
export APP_NAME=os-env-app
mvn spring-boot:run -Dspring-boot.run.arguments="--spring.profiles.active=prod"
访问http://localhost:8080/config/app,可以看到name的值变成了os-env-app,这说明操作系统环境变量的优先级高于应用外部的 profile 配置文件。
9.3 底层原理
应用外部的 profile 配置文件是由ConfigFileApplicationListener加载的。ConfigFileApplicationListener会根据配置的搜索路径和激活的 profile,查找并加载相应的配置文件。
相关源码片段(SpringBoot 3.2.0):
public class ConfigFileApplicationListener implements EnvironmentPostProcessor, SmartApplicationListener, Ordered {private static final String DEFAULT_SEARCH_LOCATIONS = "classpath:/,classpath:/config/,file:./,file:./config/";private static final String DEFAULT_NAMES = "application";@Overridepublic void postProcessEnvironment(ConfigurableEnvironment environment, SpringApplication application) {addPropertySources(environment, application.getResourceLoader());}protected void addPropertySources(ConfigurableEnvironment environment, ResourceLoader resourceLoader) {RandomValuePropertySource.addToEnvironment(environment);new Loader(environment, resourceLoader).load();}private class Loader {private final ConfigurableEnvironment environment;private final ResourceLoader resourceLoader;private final List<PropertySourceLoader> propertySourceLoaders;private final List<String> profiles;private final boolean addActiveProfile;private final List<String> processedProfiles;private final List<String> loadedLocations;Loader(ConfigurableEnvironment environment, ResourceLoader resourceLoader) {this.environment = environment;this.resourceLoader = (resourceLoader != null) ? resourceLoader : new DefaultResourceLoader();this.propertySourceLoaders = SpringFactoriesLoader.loadFactories(PropertySourceLoader.class,getClass().getClassLoader());this.profiles = Collections.unmodifiableList(Arrays.asList(getProfiles(environment)));this.addActiveProfile = this.profiles.contains(ACTIVE_PROFILES_PROPERTY);this.processedProfiles = new LinkedList<>();this.loadedLocations = new LinkedList<>();}void load() {FilteredPropertySource.apply(this.environment, DEFAULT_PROPERTIES, LOAD_FILTERED_PROPERTY,(defaultProperties) -> {this.profiles = new LinkedList<>(getUnprocessedActiveProfiles());this.processedProfiles = new LinkedList<>();this.loadedLocations = new LinkedList<>();load(DEFAULT_NAMES, defaultProperties);addLoadedPropertySources();applyActiveProfiles(defaultProperties);});}// 其他方法省略...}
}
Loader类会按照预定的搜索路径和文件名模式,查找并加载配置文件。对于 profile 配置文件,它会在加载默认配置文件之后加载,因此 profile 配置文件的优先级高于默认配置文件。
同时,外部配置文件的搜索路径(如file:./config/)在内部配置文件的搜索路径(如classpath:/config/)之前,因此外部配置文件的优先级高于内部配置文件。
9.4 适用场景
应用外部的 profile 配置文件适用于以下场景:
- 不同环境(开发、测试、生产)的配置隔离
- 需要在应用部署时灵活修改的配置
- 敏感配置信息(不希望打包到应用中)
十、应用内部的 profile 配置文件
应用内部的 profile 配置文件(如src/main/resources/application-prod.properties)的优先级低于应用外部的 profile 配置文件,但高于应用外部的默认配置文件。
10.1 基本使用方法
应用内部的 profile 配置文件的使用方法与外部的类似,只是文件放置在应用的 classpath 下(通常是src/main/resources目录或其config子目录)。
10.2 实战示例
我们在src/main/resources目录下创建application-prod.properties文件:
app.name=internal-prod-app
app.environment=prod
app.maxConnections=400
确保应用根目录下的config/application-prod.properties文件不存在或已被移除,然后启动应用:
mvn spring-boot:run -Dspring-boot.run.arguments="--spring.profiles.active=prod"
访问http://localhost:8080/config/app,可以看到返回结果:
{"name": "internal-prod-app","environment": "prod","maxConnections": 400
}
可以看到,应用内部的 profile 配置文件生效了。
接下来,我们恢复应用外部的 profile 配置文件,再次启动应用:
{"name": "external-prod-app","environment": "prod","maxConnections": 500
}
这说明应用外部的 profile 配置文件的优先级高于应用内部的 profile 配置文件。
10.3 底层原理
应用内部的 profile 配置文件的加载原理与外部的相同,都是由ConfigFileApplicationListener负责加载。只是因为外部配置文件的搜索路径在内部配置文件之前,所以外部文件会被先加载,从而覆盖内部文件中的配置。
10.4 适用场景
应用内部的 profile 配置文件适用于以下场景:
- 不同环境的基础配置
- 不需要在部署时修改的环境相关配置
- 作为环境配置的默认值
十一、应用外部的默认配置文件
应用外部的默认配置文件(如application.properties)是不指定 profile 的通用配置文件,其优先级低于应用内部的 profile 配置文件,但高于应用内部的默认配置文件。
11.1 基本使用方法
应用外部的默认配置文件的使用方法与外部的 profile 配置文件类似,只是文件名不包含 profile 信息,通常命名为application.properties或application.yml。
11.2 实战示例
我们在应用根目录下的config文件夹中创建application.properties文件:
app.name=external-default-app
app.environment=default
app.maxConnections=300
启动应用时不指定 profile:
mvn spring-boot:run
访问http://localhost:8080/config/app,可以看到返回结果:
{"name": "external-default-app","environment": "default","maxConnections": 300
}
可以看到,应用外部的默认配置文件覆盖了应用内部的默认配置文件。
接下来,我们激活 prod profile:
mvn spring-boot:run -Dspring-boot.run.arguments="--spring.profiles.active=prod"
访问http://localhost:8080/config/app,可以看到返回结果:
{"name": "external-prod-app","environment": "prod","maxConnections": 500
}
这说明应用内部和外部的 profile 配置文件的优先级都高于默认配置文件。
11.3 底层原理
应用外部的默认配置文件的加载原理与其他配置文件相同,只是因为它是默认配置(不关联特定 profile),所以其优先级低于所有 profile 配置文件。
11.4 适用场景
应用外部的默认配置文件适用于以下场景:
- 所有环境通用的基础配置
- 需要在应用部署时修改的通用配置
- 作为所有配置的基础默认值
十二、应用内部的默认配置文件
应用内部的默认配置文件(如src/main/resources/application.properties)是 SpringBoot 应用最常用的配置方式,其优先级低于应用外部的默认配置文件,但高于@PropertySource注解导入的配置。
12.1 基本使用方法
应用内部的默认配置文件通常放置在src/main/resources目录下,命名为application.properties或application.yml。
12.2 实战示例
我们确保应用外部的配置文件不存在,只保留src/main/resources/application.properties文件:
app.name=default-app
app.environment=dev
app.maxConnections=100
启动应用:
mvn spring-boot:run
访问http://localhost:8080/config/app,可以看到返回结果:
{"name": "default-app","environment": "dev","maxConnections": 100
}
这说明应用内部的默认配置文件生效了。
12.3 底层原理
应用内部的默认配置文件的加载原理与其他配置文件相同,只是因为它是内部文件且不关联特定 profile,所以其优先级较低。
12.4 适用场景
应用内部的默认配置文件适用于以下场景:
- 应用的基础配置
- 开发环境的默认配置
- 不需要在部署时修改的配置
十三、@PropertySource 注解导入的配置
@PropertySource注解用于导入自定义的配置文件,其优先级低于应用内部的默认配置文件,但高于通过SpringApplication.setDefaultProperties设置的默认属性。
13.1 基本使用方法
使用@PropertySource注解导入配置文件的方法如下:
@Configuration
@PropertySource("classpath:custom.properties")
public class CustomConfig {// 配置内容
}
13.2 实战示例
我们在src/main/resources目录下创建custom.properties文件:
app.name=custom-app
app.environment=custom
app.maxConnections=200
创建一个配置类来导入这个文件:
package com.example.configprioritydemo.config;import org.springframework.context.annotation.Configuration;
import org.springframework.context.annotation.PropertySource;/*** 自定义配置类* 使用@PropertySource注解导入自定义配置文件** @author ken*/
@Configuration
@PropertySource("classpath:custom.properties")
public class CustomConfig {
}
确保其他外部配置文件不存在,启动应用:
mvn spring-boot:run
访问http://localhost:8080/config/app,可以看到返回结果:
{"name": "default-app","environment": "dev","maxConnections": 100
}
这说明application.properties中的配置覆盖了@PropertySource导入的配置,验证了@PropertySource的优先级低于应用内部的默认配置文件。
接下来,我们移除application.properties中app.name的配置,只保留:
app.environment=dev
app.maxConnections=100
重启应用,访问相同的 URL,返回结果:
{"name": "custom-app","environment": "dev","maxConnections": 100
}
可以看到,当application.properties中没有app.name的配置时,@PropertySource导入的配置生效了。
13.3 底层原理
@PropertySource注解的处理是在 Spring 容器启动过程中完成的。ConfigurationClassParser会解析@PropertySource注解,并将指定的配置文件加载到环境变量中。
相关源码片段(Spring 6.1.1):
public class ConfigurationClassParser {// 其他代码省略...private void processPropertySource(AnnotationAttributes propertySource) throws IOException {String name = propertySource.getString("name");if (!StringUtils.hasLength(name)) {name = null;}String encoding = propertySource.getString("encoding");if (!StringUtils.hasLength(encoding)) {encoding = null;}String[] locations = propertySource.getStringArray("value");Assert.isTrue(locations.length > 0, "At least one @PropertySource(value) location is required");boolean ignoreResourceNotFound = propertySource.getBoolean("ignoreResourceNotFound");Class<? extends PropertySourceFactory> factoryClass = propertySource.getClass("factory");PropertySourceFactory factory = (factoryClass == PropertySourceFactory.class ?DEFAULT_PROPERTY_SOURCE_FACTORY : BeanUtils.instantiateClass(factoryClass));for (String location : locations) {try {String resolvedLocation = this.environment.resolveRequiredPlaceholders(location);Resource resource = this.resourceLoader.getResource(resolvedLocation);addPropertySource(factory.createPropertySource(name, new EncodedResource(resource, encoding)));} catch (IllegalArgumentException | FileNotFoundException | UnknownHostException ex) {// 处理异常...}}}private void addPropertySource(PropertySource<?> propertySource) {String name = propertySource.getName();MutablePropertySources propertySources = this.environment.getPropertySources();if (propertySources.contains(name)) {PropertySource<?> existing = propertySources.get(name);if (existing instanceof CompositePropertySource composite) {composite.addFirst(propertySource);} else {if (existing != null) {propertySources.remove(name);}propertySources.addFirst(propertySource);}} else {if (propertySources.size() > 0) {PropertySource<?> first = propertySources.iterator().next();propertySources.addBefore(first.getName(), propertySource);} else {propertySources.addLast(propertySource);}}}
}
@PropertySource导入的配置文件被添加到环境变量中的位置,通常是在应用默认配置文件之后,因此其优先级较低。
13.4 适用场景
@PropertySource注解适用于以下场景:
- 导入自定义的配置文件
- 模块化的配置管理
- 第三方组件的配置导入
十四、默认属性
默认属性是通过SpringApplication.setDefaultProperties方法设置的属性,其优先级最低。
14.1 基本使用方法
设置默认属性的方法如下:
@SpringBootApplication
public class ConfigPriorityDemoApplication {public static void main(String[] args) {SpringApplication app = new SpringApplication(ConfigPriorityDemoApplication.class);Map<String, Object> defaultProps = new HashMap<>();defaultProps.put("app.name", "default-prop-app");defaultProps.put("app.environment", "default");defaultProps.put("app.maxConnections", 50);app.setDefaultProperties(defaultProps);app.run(args);}
}
14.2 实战示例
我们修改应用的主类,添加默认属性:
package com.example.configprioritydemo;import org.springframework.boot.SpringApplication;
import org.springframework.boot.autoconfigure.SpringBootApplication;
import com.google.common.collect.Maps;
import java.util.Map;@SpringBootApplication
public class ConfigPriorityDemoApplication {public static void main(String[] args) {SpringApplication app = new SpringApplication(ConfigPriorityDemoApplication.class);Map<String, Object> defaultProps = Maps.newHashMap();defaultProps.put("app.name", "default-prop-app");defaultProps.put("app.environment", "default");defaultProps.put("app.maxConnections", 50);app.setDefaultProperties(defaultProps);app.run(args);}
}
移除所有其他配置文件中的相关配置,启动应用:
mvn spring-boot:run
访问http://localhost:8080/config/app,可以看到返回结果:
{"name": "default-prop-app","environment": "default","maxConnections": 50
}
可以看到,默认属性生效了。
接下来,我们添加@PropertySource导入的配置:
app.name=custom-app
重启应用,访问相同的 URL,返回结果:
{"name": "custom-app","environment": "default","maxConnections": 50
}
这说明@PropertySource导入的配置的优先级高于默认属性。
14.3 底层原理
默认属性是在SpringApplication的初始化过程中被添加到环境变量中的。
相关源码片段(SpringBoot 3.2.0):
public class SpringApplication {// 其他代码省略...public void setDefaultProperties(Map<String, Object> defaultProperties) {if (this.defaultProperties == null) {this.defaultProperties = new HashMap<>();}this.defaultProperties.putAll(defaultProperties);}protected void configurePropertySources(ConfigurableEnvironment environment, String[] args) {MutablePropertySources sources = environment.getPropertySources();if (this.defaultProperties != null && !this.defaultProperties.isEmpty()) {sources.addLast(new MapPropertySource("defaultProperties", this.defaultProperties));}// 其他代码省略...}
}
可以看到,默认属性被添加到了环境变量的最后面(使用addLast方法),因此其优先级最低。
14.4 适用场景
默认属性适用于以下场景:
- 为应用提供最基础的默认配置
- 确保配置参数有一个安全的默认值
- 开发阶段的临时配置
十五、总结与实战建议
通过对 SpringBoot 配置优先级的全面解析,我们可以总结出以下几点关键结论:
配置优先级从高到低依次为:命令行参数 > SPRING_APPLICATION_JSON > Servlet 配置 > JNDI > Java 系统属性 > 操作系统环境变量 > RandomValuePropertySource > 外部 profile 配置 > 内部 profile 配置 > 外部默认配置 > 内部默认配置 > @PropertySource 导入的配置 > 默认属性。
外部配置的优先级高于内部配置,这使得我们可以在不修改应用代码的情况下,通过外部配置来定制应用的行为。
Profile 配置的优先级高于默认配置,这使得我们可以为不同环境(开发、测试、生产)提供不同的配置。
动态配置(如命令行参数、环境变量)的优先级高于静态配置(如配置文件),这使得我们可以在应用启动时灵活地修改配置。
基于以上结论,我们可以提出以下实战建议:
开发环境:使用内部默认配置和内部 profile 配置,方便开发和调试。
测试环境:使用外部 profile 配置,保持与生产环境的配置结构一致,但使用测试环境的具体值。
生产环境:使用外部配置(如环境变量、配置中心)来管理敏感信息和需要动态调整的配置,使用外部 profile 配置来管理环境特定的配置。
临时调整:使用命令行参数来临时调整配置,如临时修改端口号或日志级别。
随机值:使用
RandomValuePropertySource来生成随机端口号或临时密钥,避免冲突。配置覆盖:当需要覆盖某个配置时,选择优先级合适的配置方式,避免过度使用高优先级的配置方式(如命令行参数)导致配置管理混乱。
掌握 SpringBoot 的配置优先级体系,不仅能帮助我们避免配置冲突带来的问题,还能让我们更灵活地管理应用的配置,提高应用的可维护性和可扩展性。在实际开发中,我们应该根据具体的场景选择合适的配置方式,充分利用 SpringBoot 提供的配置机制来简化应用的配置管理。