【项目】基于Spring全家桶的论坛系统 【上】
目录
- 一、软件需求
- 1.1 面向对象分析(OOA)
- 1.1.1 统⼀建模语⾔UML
- 1.1.2 用例模型
- 1.1.2.1 ⽤例图的元素
- 1.1.2.2 识别参与者
- 1.1.2.3 合并需求获得⽤例
- 1.1.2.4 细化用例描述
- 1.1.3 分析模型
- 1.1.3.1 定义概念类
- 1.1.3.2 确定类之间的关系
- 1.1.3.3 为类添加职责
- 1.1.3.4 建⽴交互图
- 二、系统设计
- 2.1 技术选型
- 2.2 数据库设计
- 2.2.1 ⽤⼾表 t_user
- 2.2.2 版块表 t_board
- 2.2.3 帖⼦表 t_article
- 2.2.4 帖子回复表 t_article_reply
- 2.2.5 站内私信表 t_message
- 三、软件开发
- 3.1 搭建环境
- 3.1.1 检查jdk
- 3.1.2 检查MySQL数据库
- 3.1.3 检查 Maven
- 3.1.4 检查Gitee + Git
- 3.2 创建仓库
- 3.2.1 登录Gitee创建仓库并复制仓库地址
- 3.2.2 克隆到本地
- 3.3 创建工程
- 3.4 公共组件
- 3.4.1 pom.xml 中引⽤依赖
- 3.4.2 application.yml 中添加配置
- 3.5 生成类与映射⽂件
- 3.5.1 pom.xml 中引⽤依赖
- 3.6 公共代码
- 3.6.1 定义状态码
- 3.6.2 定义返回结果
- 3.6.3 ⾃定义异常
- 3.6.4 全局异常处理
- 3.6.5 测试异常处理
- 3.6.6 实现 API ⾃动⽣成
- 3.6.6.1 pom.xml 中引⽤依赖
- 3.6.6.2 编写配置类
- 3.6.6.3 application.yml 中添加配置
- 3.6.6.4 API常⽤注解
- 3.6.6.5 访问API列表
- 3.6.6.6 API导⼊Postman
- 3.6.7 编写工具类
- 3.6.7.1 创建MD5加密⼯具类
- 3.6.7.2 创建⽣成UUID⼯具类
- 3.6.7.3 创建字符串⼯具类
- 3.6.8 登录拦截器
- 3.6.8.1 修改application.yml配置⽂件,添加跳转⻚⾯
- 3.6.8.2 在 com.yj.forum.interceptor 包下创建 LoginInterceptor
- 3.6.8.3 在 com.yj.forum.interceptor包下创建AppInterceptorConfigurer
- 3.7 业务功能
- 3.7.1 注册
- 3.7.1.1 顺序图
- 3.7.1.2 参数要求
- 3.7.1.3 接⼝规范
- 3.7.1.4 后端代码
- 3.7.1.5 创建扩展Mapper.xml
- 3.7.1.6 修改DAO
- 3.7.1.7 创建Service接⼝
- 3.7.1.8 实现Service接⼝
- 3.7.1.9 进行service单元测试
- 3.7.1.10 实现Controller
- 3.7.1.11 测试
- 3.7.1.12 实现前端⻚⾯
- 3.7.2 登录
- 3.7.2.1 流程图
- 3.7.2.2 参数要求
- 3.7.2.3 接⼝规范
- 3.7.2.4 创建Service接⼝
- 3.7.2.5 实现Service接⼝
- 3.7.2.6 单元测试
- 3.7.2.7 实现Controller
- 3.7.2.8 测试接⼝
- 3.7.2.9 实现前端⻚⾯
- 3.7.3 退出
- 3.7.3.1 实现逻辑
- 3.7.3.2 接口规范
- 3.7.3.3 实现Controller
- 3.7.3.4 测试接⼝
- 3.7.3.5 前端代码
- 3.7.4 个⼈中⼼
- 3.7.4.1 获取⽤⼾信息
- 3.7.4.2 参数要求
- 3.7.4.3 接⼝规范
- 3.7.4.4 创建Service接⼝
- 3.7.4.5 实现Service接⼝
- 3.7.4.6 单元测试
- 3.7.4.7 实现Controller
- 3.1.4.8 测试接口
- 3.1.4.9 修复返回值存在的缺陷
- 3.1.4.10 实现前端⻚⾯
- 3.7.5 查询导航栏板块列表
- 3.7.5.1 参数要求
- 3.7.5.2 接⼝规范
- 3.7.5.3 创建扩展Mapper.xml
- 3.7.5.4 修改DAO
- 3.7.5.5 创建Service接⼝
- 3.7.5.6 实现Service接⼝
- 3.7.5.7 单元测试
- 3.7.5.8 application.yml中添加配置
- 3.7.5.8 实现Controller
- 3.7.5.8 测试 API接口
- 3.7.5.9 实现前端
- 3.7.6 发布贴⼦
- 3.7.6.1 实现逻辑
- 3.7.6.2 参数要求
- 3.7.6.3 接⼝规范
- 3.7.6.4 创建Service接⼝
- 3.7.6.5 实现Service接⼝
- 3.7.6.6 单元测试
- 3.6.2.7 实现Controller
- 3.7.6.7 测试API
- 3.6.2.8 前端代码
- 3.7.7 帖子列表(无版块id,首页展示)
- 3.7.7.1 版块帖⼦列表
- 3.7.7.2 实现逻辑
- 3.7.7.3 参数要求
- 3.7.7.4 接⼝规范
- 3.7.7.5 修改Article实体类
- 3.7.7.6 修改扩展Mapper.xml
- 3.7.7.7 修改DAO
- 3.7.7.8 创建Service接⼝
- 3.7.7.9 实现Service接⼝
- 3.7.7.10 单元测试
- 3.7.7.11 实现Controller
- 3.7.7.12 测试API
- 3.7.7.13 前端
- 3.7.8 帖子列表(根据版块id 展示)
- 3.7.8.1 修改扩展Mapper.xml
- 3.7.8.2 修改DAO
- 3.7.8.3 创建Service接⼝
- 3.7.8.4 实现Service接⼝
- 3.7.7.10 单元测试
- 3.7.7.11 实现Controller
- 3.7.7.12 测试API
- 3.7.7.13 前端
- 3.7.9 获取指定版块信息
- 3.7.9.1 实现逻辑
- 3.7.9.2 参数要求
- 3.7.9.3 接⼝规范
- 3.7.9.3 实现Controller
- 3.7.9.4 测试API
- 3.7.9.5 前端
- 3.7.10 获取帖⼦详情
- 3.7.10.1 实现逻辑
- 3.7.10.2 参数要求
- 3.7.10.3 接⼝规范
- 3.7.10.4 创建扩展Mapper.xml
- 3.7.10.5 修改DAO
- 3.7.10.6 创建Service接⼝
- 3.7.10.6 实现Service接⼝
- 3.7.10.6 单元测试
- 3.7.10.7 修改Model
- 3.7.10.8 实现controller
- 3.7.10.9 测试API
- 3.7.10.10 前端
- 3.7.11 编辑帖⼦
- 3.7.11.1 实现逻辑
- 3.7.11.2 参数要求
- 3.7.11.3 接⼝规范
- 3.7.11.4 创建Service接⼝
- 3.7.11.4 实现Service接⼝
- 3.7.11.5 单元测试
- 3.7.11.6 实现controller
- 3.7.11.7 测试API
- 3.7.11.8 前端

gitee链接: https://gitee.com/yj20040627/forum.git
访问地址:http://101.43.47.137:58080/index.html
相关技术及⼯具:
- 服务器端技术:
-
- Spring
-
- Spring Boot
-
- Spring MVC
-
- MyBatis
- 浏览器端技术
-
- HTML,CSS,JavaScript
-
- jQuery
-
- Bootstrap
- 数据库
-
- MySQL
- 项⽬构建⼯具
-
- Maven
- 版本控制⼯具
-
- Git + GITEE
一、软件需求
1.1 面向对象分析(OOA)
OOA的基本任务是运用面象对象方法,对问题域进行分拆和理解,正确认识事物间的关系,找出描述问题域和系统功能的类和对象,定义它们的属性和职责,以及它们之间形成的各种联系。
1.1.1 统⼀建模语⾔UML
统⼀建模语⾔UML:是⼀种易于表达、功能强⼤且普遍适⽤的建模语⾔,它的作⽤不限于⽀持OOA和OOD(面向对象设计),还⽀持从需求分析开始的软件开发全过程。
UML的重要组成部分:
- 事物:事物也称为建模元素,包括结构事物、行为事物、分级事物和注释事物,这些事物是UML模型中最基本的OO构造块;
- 关系:UML用关系把各个事物结合在一起,主要的关系有:依赖(dependency)、关联(association)、泛化(generalization、实现(realization);
- 图:主要包括类图、对象图、构件图、组合结构图、用例图、顺序图、通信图、定时图、状态图、活动图、部署图、制品图、包图、交互概览图等。
1.1.2 用例模型
从⽤⼾的⻆度来看,他们并不想了解系统的内部结构和设计,他们关⼼的是系统所能提供的服务,把从⽤⼾那⾥获取的需求记录下来,进⾏合成与提炼,从⽽建⽴⽤例模型。在OOA⽅法中,构建⽤例模型⼀般需要经历以下阶段分别是:识别参与者、合并需求获得⽤例、细化⽤例描述和调整⽤例模型,其中前三个阶段是必需的。
1.1.2.1 ⽤例图的元素
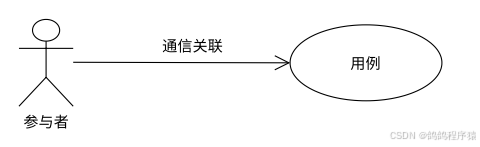
主要三个元素:参与者、⽤例和通信关联。
- 参与者:参与者是指存在于系统外部并与系统进⾏交互的任何事物,既可以是使⽤系统的⽤⼾,也可以是其他外部系统和设备等;
- ⽤例:指在系统中执⾏的动作,这些动作将⽣成参与者可⻅的结果。也就是说⽤例表⽰系统所提供的服务,它定义了系统是如何被参与者所使⽤,描述的是参与者为了使⽤系统提供的服务与使⽤发⽣的⼀段对话;
- 通信关联:表⽰的是参与者和⽤例之间的关系,或者⽤例与⽤例之间的关系。箭头所指⽅是对话的被动接受者,箭尾所指⽅是对话的主动发起者,如果不想强调对话中的主动与被动关系,可以使⽤不带箭头的关系实线。
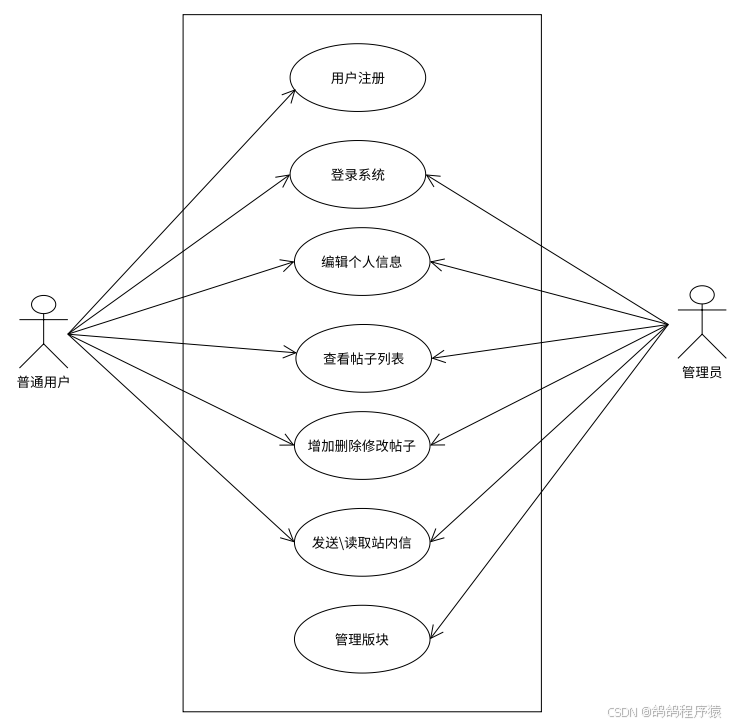
1.1.2.2 识别参与者
参与者就是与系统相关的外部角色。
我们的论坛系统的用户需求如下:
- 注册登录
- 帖子列表,发布帖子,删除帖子,回复帖子等功能.
- 支持个人主页的展示/编辑,支持头像上传.
- 支持帖子按版块分类
- 支持发布图片表情
- 支持站内私信
- 管理员可以添加/删除/修改版块
- 管理员可以管理所有帖子
明显有两个参与者:管理员 和 普通用户
1.1.2.3 合并需求获得⽤例
将需求分配给参与者。进行需求合并,产生用例。
将需求分配给参与者:
普通用户:
- 注册登录
- 帖子列表,发布帖子,删除帖子,回复帖子等功能.
- 支持个人主页的展示/编辑,支持头像上传.
- 支持站内私信
- 支持发布图片表情
- 支持帖子按版块分类
管理员:
- 普通用户能操作的
- 管理员可以添加/删除/修改版块
- 管理员可以管理所有帖子
进行需求合并,产生用例:例如发布帖⼦,修改帖⼦,删除帖⼦,在这⾥合并为操作帖⼦。
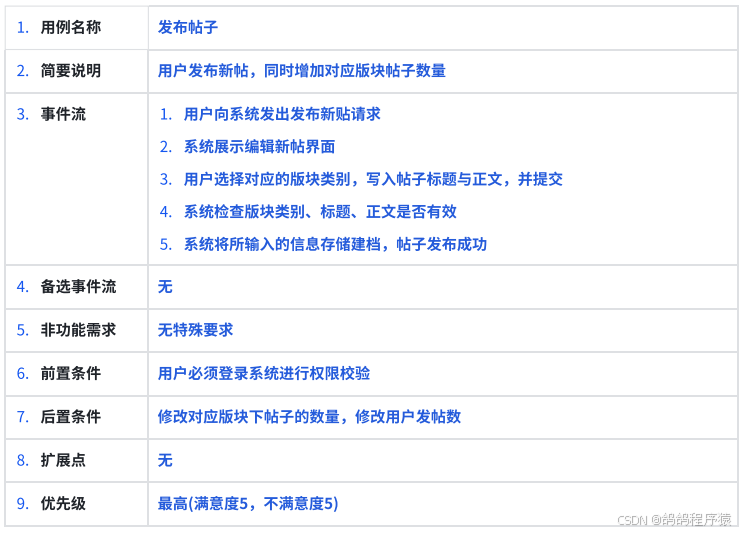
1.1.2.4 细化用例描述
⽤例描述通常包括⽤例名称、简要说明、事件流、⾮功能需求、前置和后置条件、扩展点、优先级。
以操作帖⼦⽤例中的发布帖⼦为例:
1.1.3 分析模型
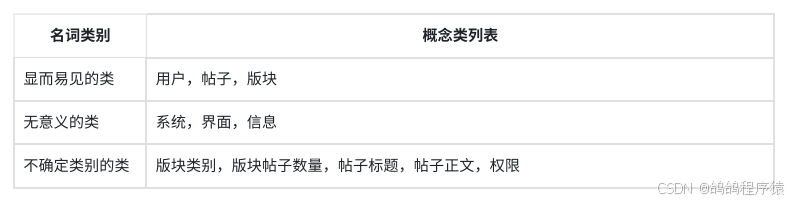
1.1.3.1 定义概念类
概念类:模型中可以代表实物与概念的对象。也就是面向对象的类。
具体步骤:
- 阅读和理解需求文档或用例描述
- 筛选出名词或名词短语,建立初始类清单(候选类)
- 将候选类分为三类:分别是显而易见的类,明显无意义的类和不确定类别的类
- 舍弃明显无意义类别的类
- 小组讨论不确定类别的类,直到把他们合并或调整到其他两个类别。
像发帖子中涉及的类:
1.1.3.2 确定类之间的关系
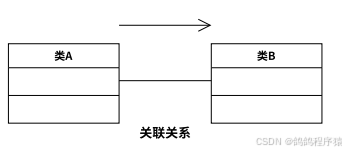
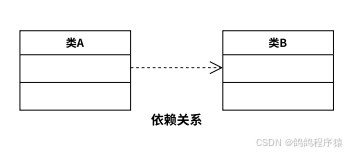
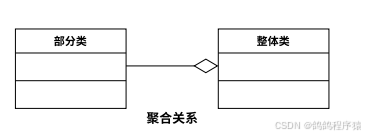
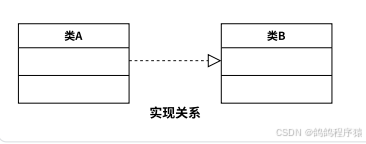
类之间的关系有:关联、依赖、泛化、聚合、组合和实现。
关系的介绍,及其在UML中的表示图标:
- 关联关系:提供不同类的对象之间的结构关系,⽽不是类与类之间的关系,两个对象之间⼀般以动词连接,⽐如,⽤⼾-发布-帖⼦;可以⽤⼀个箭头连接,表⽰关联关系对象可以从⼀个端得到另⼀端对象,如果没有箭头,认为是⼀个双向关系或是⼀个未定义的关联;
- 依赖关系:两个类A 和 B,如果B变化可能会引起A的变化,则称类A依赖与B,⽐如,⼀个类是另⼀个类的数据成员,⼀个类是另⼀个类的某个操作的参数等;
- 聚合关系:共享聚集关系通常简称为聚合关系,他表⽰了类之间整体与部分的关系,“部分”可以属于不同的“整体”,“部分”与“整体”的⽣命周期可以不同,⽐如,汽⻋和⻋轮就是聚合关系,⼀个汽有⼀多个轮⼦,汽⻋坏了,轮⼦还可以⽤,轮了坏了可以再换⼀个;
- 组合关系:组合聚集关系通常简称为组合关系,他也表⽰了类之间整体与部分的关系,与聚合关系的区别在于,组合关系中的“部分”只能属于⼀个“整体”,“部分”与“整体”的⽣命周期相同,⽐如:⼀个公司有多个部⻔,他们之间就是组合关系,公司⼀旦倒闭,部分也就不存在了;

- 实现关系:描述的是类和接⼝之间的关系,⼀个类可以实现接⼝中声明的⽅法;
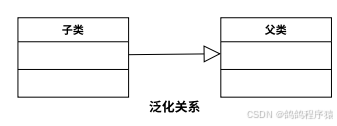
- 泛化关系:描述的是⽗类与⼦类之间的关系,继承关系是泛化关系的反关系,也就是说⼦类继承了⽗类,⽽⽗类是⼦类的泛化。
1.1.3.3 为类添加职责
主要包含两个方面:
- 类所维护的知识,即成员变量或属性:
-
- 注意要保持属性的简单性,即:只定义与系统责任和⽬标相关的属性;使⽤简单数据类型定义;不为类关联定义属性。
- 类能够执⾏的⾏为,即成员⽅法或责任
-
- 可以根据动词来判断,再进⾏筛选,与识别类的过程类似。
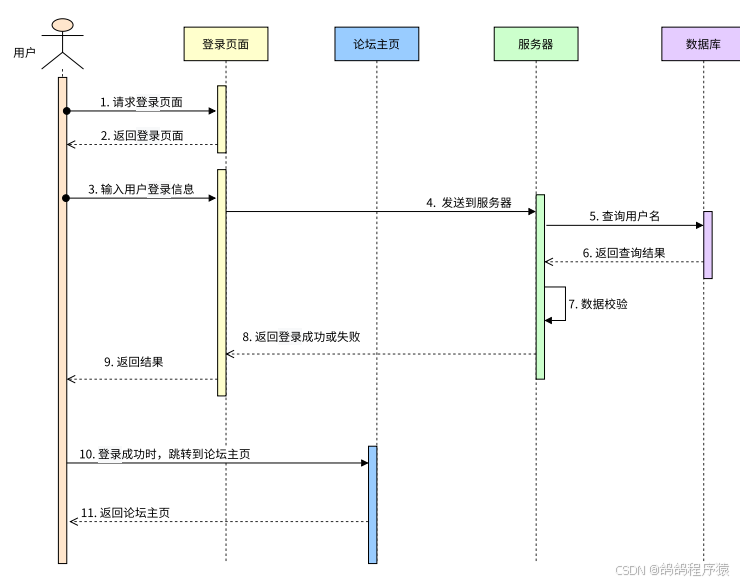
1.1.3.4 建⽴交互图
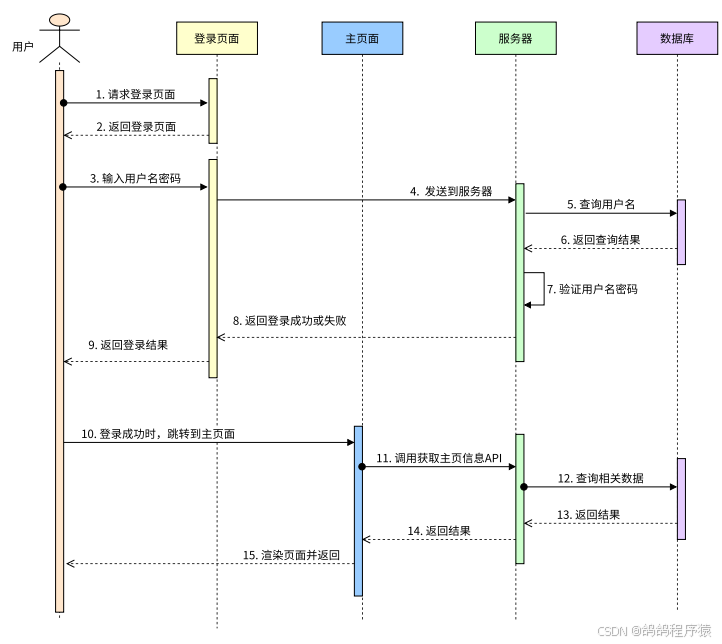
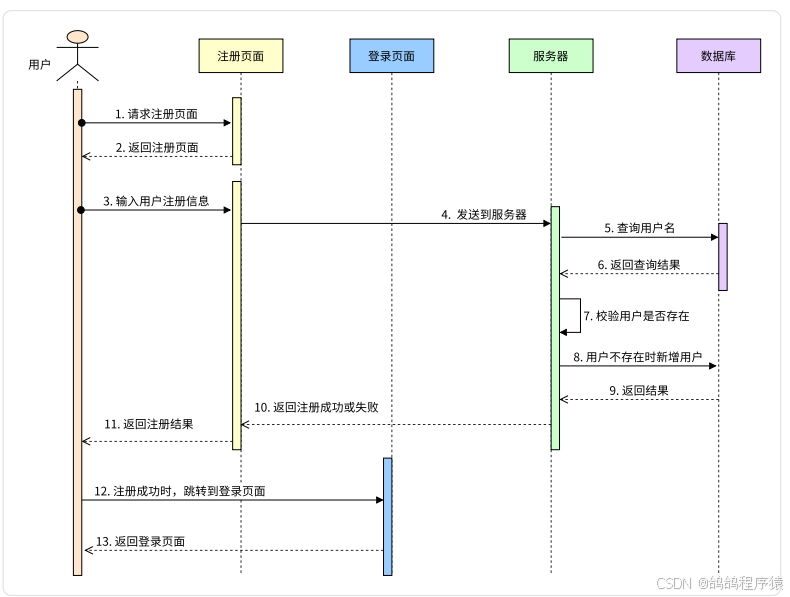
多个对象的⾏为通常采⽤交互图来表⽰,UML中最常⽤的是顺序图,⼏乎可以⽤在任何系统的场景。
顺序图的基本元素有对象、参与者、⽣命线、激活框、消息和消息线,其中消息是顺序图的灵魂。以⽤⼾登录过程为例,使⽤顺序图描述如下:
二、系统设计
2.1 技术选型
同一开发环境、测试环境、生产环境相关依赖的版本
| 类别 | 描述 |
|---|---|
| 构架 | 基于MVC构架,实现前后端分离 |
| 编码格式 | UTF-8 |
| 前后端交互数据格式 | JSON |
| JDK版本 | JDK17 |
| 服务器端技术 | SpringBoot 2.7.6, SpringMVC,MyBaits Start 2.3.0 |
| 浏览器端技术 | HTML,CSS,JavaScript,jQuery3.x,Bootstrap |
| 数据库 | MySQL 8.0 |
| 项⽬构建⼯具 | Maven 3.8.x |
| 版本控制⼯具 | Git 2.36.0 及以上 + GITEE |
| 开发⼯具 | IntelliJ IDEA 2023.2.5 |
| API⽂档⽣成⼯具 | Swagger,Springfox 3.0.0 |
2.2 数据库设计
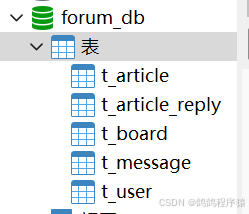
数据库名:forum_db
公共字段:⽆特殊要求的情况下,每张表必须有⻓整型的⾃增主键,删除状态、创建时间、更新时间,如下所⽰:
| 字段 | 类型 | ⾮空(Y/N) | 主键(Y/N) | 默认值 | 备注 |
|---|---|---|---|---|---|
| id | bigint | Y | Y | 编号 | 主键⾃增 |
| state | tinyint | Y | N | 0 | 状态,0正常,1禁⽤ |
| deleteState | tinyint | Y | N | 0 | 是否删除,0否,1是 |
| createTime | dateTime | Y | N | 创建时间,精确到秒 | |
| updateTime | dateTime | Y | N | 更新时间,精确到秒 |
SQL语句:
制定字符集utf8,排序规则,当前不区分大小写utf8mb4_general_ci
#创建数据库
drop database if exists forum_db;
create database forum_db character set utf8mb4 collate utf8mb4_general_ci;
2.2.1 ⽤⼾表 t_user
用户类中应该包含:用户名,密码,站内昵称,头像地址,是否管理员,发帖数,邮箱,注册日期,电话号码,个人简介,扰动字符(密码需要的随机字符串)。
我们数据库的密码通过 用户输入的密码 + 数据库随机生成字符串 一起通过MD5加密,存入数据库中。
| 字段 | 类型 | ⾮空(Y/N) | 主键(Y/N) | 默认值 | 备注 |
|---|---|---|---|---|---|
| id | bigint | Y | Y | 编号 | 主键⾃增 |
| id | bigint | Y | Y | 编号,主键⾃增 | |
| username | varchar(20) | Y | N | ⽤⼾名,唯⼀ | |
| password | varchar(32) | Y | N | 加密后的密码 | |
| nickname | varchar(50) | Y | N | 昵称 | |
| phoneNum | varchar(20) | N | N | ⼿机号 | |
| varchar(50) | N | N | 电⼦邮箱 | ||
| gender | tinyint | Y | N | 2 | 性别 0⼥,1男,2保密 |
| salt | varchar(32) | Y | N | 为密码加盐 | |
| avatarUrl | varchar(255) | N | N | ⽤⼾头像路径 | |
| articleCount | int | Y | N | 0 | 发帖数量 |
| isAdmin | tinytin | Y | N | 0 | 是否管理员 0否,1是 |
| remark | varchar(1000) | N | N | 备注,⾃我介绍 | |
| state | tinyint | Y | N | 0 | 状态 0正常,1禁⾔ |
| deleteState | tinyint | Y | N | 0 | 是否删除,0否,1是 |
| createTime | dateTime | Y | N | 创建时间,精确到秒 | |
| updateTime | dateTime | Y | N | 更新时间,精确到秒 |
SQL语句:
#创建用户表
drop table if exists t_user;
create table t_user(id bigint primary key auto_increment comment '编号,主键自增',username varchar(20) not null unique comment '用户名唯一',password varchar(32) not null comment '加密后的密码',nickname varchar(50) not null comment '昵称',phoneNum varchar(20) comment '手机号',email varchar(50) comment '电子邮箱',gender tinyint not null  default 2 comment '性别 0女,1男,2保密',salt varchar(32) not null comment '为密码加盐',avatarUrl varchar(255) comment '用户头像路径',articleCount int not null default 0 comment '发帖数量',isAdmin tinyint not null default 0 comment '是否为管理员 0否,1是',remark varchar(1000) comment '备注,自我介绍',state tinyint not null default 0 comment '状态 0正常,1禁言',deleteState tinyint not null default 0 comment '是否删除,0否,1是',createTime dateTime not null comment '创建时间,精确到秒',updateTime dateTime not null comment '更新时间,精确到秒'
);
2.2.2 版块表 t_board
板块表:板块名,排序,板块下帖子数量
| 字段 | 类型 | ⾮空(Y/N) | 主键(Y/N) | 默认值 | 备注 |
|---|---|---|---|---|---|
| id | bigint | Y | Y | 编号,主键⾃增 | |
| name | varchar(50) | Y | N | 版块名 | |
| articleCount | int | Y | N | 0 | 帖⼦数量 |
| sort | int | Y | N | 0 | 排序优先级,升序 |
| state | tinyint | Y | N | 0 | 状态 0正常,1禁⽤ |
| deleteState | tinyint | Y | N | 0 | 是否删除,0否,1是 |
| createTime | dateTime | Y | N | 创建时间,精确到秒 | |
| updateTime | dateTime | Y | N | 更新时间,精确到秒 |
SQL语句:
#创建板块表
drop table if exists t_board;
create table t_board(id bigint primary key auto_increment comment '编号,主键自增',name varchar(50) not null comment '板块名',articleCount int not null default 0 comment '帖子数量',sort int not null default 0 comment '排序优先级,升序',state tinyint not null default 0 comment '状态 0正常,1禁用',deleteState tinyint not null default 0 comment '是否删除,0否,1是',createTime dateTime not null comment '创建时间,精确到秒',updateTime dateTime not null comment '更新时间,精确到秒'
);-- 写入版块信息数据INSERT INTO `t_board` (`id`, `name`, `articleCount`, `sort`, `state`,`deleteState`, `createTime`, `updateTime`) VALUES (1, 'Java', 0, 1, 0, 0,'2025-01-14 19:02:18', '2025-01-14 19:02:18');INSERT INTO `t_board` (`id`, `name`, `articleCount`, `sort`, `state`,`deleteState`, `createTime`, `updateTime`) VALUES (2, 'C++', 0, 2, 0, 0, '2025-01-14 19:02:41', '2025-01-14 19:02:41');INSERT INTO `t_board` (`id`, `name`, `articleCount`, `sort`, `state`,`deleteState`, `createTime`, `updateTime`) VALUES (3, '前端技术', 0, 3, 0, 0,'2025-01-14 19:02:52', '2025-01-14 19:02:52');INSERT INTO `t_board` (`id`, `name`, `articleCount`, `sort`, `state`,`deleteState`, `createTime`, `updateTime`) VALUES (4, 'MySQL', 0, 4, 0, 0,'2025-01-14 19:03:02', '2025-01-14 19:03:02');INSERT INTO `t_board` (`id`, `name`, `articleCount`, `sort`, `state`,`deleteState`, `createTime`, `updateTime`) VALUES (5, '面试宝典', 0, 5, 0, 0,'2025-01-14 19:03:24', '2025-01-14 19:03:24');INSERT INTO `t_board` (`id`, `name`, `articleCount`, `sort`, `state`,`deleteState`, `createTime`, `updateTime`) VALUES (6, '经验分享', 0, 6, 0, 0,'2025-01-14 19:03:48', '2025-01-14 19:03:48');INSERT INTO `t_board` (`id`, `name`, `articleCount`, `sort`, `state`,`deleteState`, `createTime`, `updateTime`) VALUES (7, '招聘信息', 0, 7, 0, 0,'2025-01-25 21:25:33', '2025-01-25 21:25:33');INSERT INTO `t_board` (`id`, `name`, `articleCount`, `sort`, `state`,`deleteState`, `createTime`, `updateTime`) VALUES (8, '福利待遇', 0, 8, 0, 0,'2025-01-25 21:25:58', '2025-01-25 21:25:58');INSERT INTO `t_board` (`id`, `name`, `articleCount`, `sort`, `state`,`deleteState`, `createTime`, `updateTime`) VALUES (9, '灌水区', 0, 9, 0, 0,'2025-01-25 21:26:12', '2025-01-25 21:26:12');
2.2.3 帖⼦表 t_article
帖子表:作者id(需要与用户表建立关联关系),发布时间,访问次数,点赞次数,回复次数,标题,正文,板块id(与板块表建立关联关系)
| 字段 | 类型 | ⾮空(Y/N) | 主键(Y/N) | 默认值 | 备注 |
|---|---|---|---|---|---|
| id | bigint | Y | Y | 编号,主键⾃增 | |
| boardId | bigint | Y | N | 关联板块编号 | |
| userId | bigint | Y | N | 发帖⼈,关联⽤⼾编号 | |
| title | varchar(100) | Y | N | 帖⼦标题 | |
| content | text | Y | N | 帖⼦正⽂ | |
| visitCount | int | Y | N | 0 | 访问量 |
| replyCount | int | Y | N | 0 | 回复数 |
| likeCount | int | Y | N | 0 | 点赞数 |
| state | tinyint | Y | N | 0 | 状态,0正常,1禁⽤ |
| deleteState | tinyint | Y | N | 0 | 是否删除,0否,1是 |
| createTime | dateTime | Y | N | 创建时间,精确到秒 | |
| updateTime | dateTime | Y | N | 更新时间,精确到秒 |
SQL语句:
主键不在数据库中建立,会增加负担,在后端代码关联。
#创建帖子表
drop table if exists t_article;
create table t_article(id bigint primary key auto_increment comment '编号,主键自增',boardId bigint not null comment '关联板块编号',userId bigint not null comment '发帖人,关联用户编号',title varchar(100) not null comment '帖子标题',content text not null comment'帖子正文',visitCount int not null default 0 comment'访问量',replyCount int not null default 0 comment'回复数',likeCount int not null default 0 comment'点赞数',state tinyint not null default 0 comment '状态 0正常,1禁用',deleteState tinyint not null default 0 comment '是否删除,0否,1是',createTime dateTime not null comment '创建时间,精确到秒',updateTime dateTime not null comment '更新时间,精确到秒'
);
2.2.4 帖子回复表 t_article_reply
帖子回复表:回复用户id(与用户表建立关联关系),回复正文,回复时间,主帖id(与帖子表建立关联关系)
| 字段 | 类型 | ⾮空(Y/N) | 主键(Y/N) | 默认值 | 备注 |
|---|---|---|---|---|---|
| id | bigint | Y | Y | 编号,主键⾃增 | |
| articleId | bigint | Y | N | 关联帖⼦编号 | |
| postUserId | bigint | Y | N | 楼主⽤⼾,关联⽤⼾编号 | |
| replyId | bigint | N | N | 关联回复编号,⽀持楼中楼 | |
| replyUserId | bigint | N | N | 楼主下的回复⽤⼾编号,⽀持楼中楼 | |
| content | varchar(500) | Y | N | 回贴内容 | |
| likeCount | int | Y | N | 0 | 点赞数 |
| state | tinyint | Y | N | 0 | 状态,0正常,1禁⽤ |
| deleteState | tinyint | Y | N | 0 | 是否删除,0否,1是 |
| createTime | dateTime | Y | N | 创建时间,精确到秒 | |
| updateTime | dateTime | Y | N | 更新时间,精确到秒 |
SQL语句:
#创建帖子回复表
drop table if exists t_article_reply;
create table t_article_reply(id bigint primary key auto_increment comment '编号,主键自增',articleId bigint not null comment'关联帖子编号',postUserId bigint not null comment '楼主用户,关联用户编号',replyId bigint comment '关联回复编号,支持楼中楼',replyUserId bigint comment '楼主下的回复用户编号,支持楼中楼',content varchar(500) not null comment '回帖内容',likeCount int not null comment '点赞数',state tinyint not null default 0 comment '状态 0正常,1禁用',deleteState tinyint not null default 0 comment '是否删除,0否,1是',createTime dateTime not null comment '创建时间,精确到秒',updateTime dateTime not null comment '更新时间,精确到秒'
);
2.2.5 站内私信表 t_message
站内信表 :接收者用户id(与用户表建立关联关系),发送者用户id(与用户表建立关联关系),内容,发送时间。
| 字段 | 类型 | ⾮空(Y/N) | 主键(Y/N) | 默认值 | 备注 |
|---|---|---|---|---|---|
| id | bigint | Y | Y | 编号,主键⾃增 | |
| postUserId | bigint | Y | N | 发送者,关联⽤⼾编号 | |
| receiveUserId | bigint | Y | N | 接收者,关联⽤⼾编号 | |
| content | varchar(255) | Y | N | 内容 | |
| state | tinyint | Y | N | 0 | 状态,0未读,1已读,2已回复,默认0 |
| deleteState | tinyint | Y | N | 0 | 是否删除,0否,1是 |
| createTime | dateTime | Y | N | 创建时间,精确到秒 | |
| updateTime | dateTime | Y | N | 更新时间,精确到秒 |
SQL 语句:
#创建站内私信表
drop table if exists t_message;
create table t_message(id bigint primary key auto_increment comment '编号,主键自增',postUserId bigint not null comment '发送者,关联用户编号',receiveUserId bigint not null comment '接收者,关联用户编号',content varchar(255) not null comment '内容',state tinyint not null default 0 comment '状态,0未读,1已读,2已回复,默认0',deleteState tinyint not null default 0 comment '是否删除,0否,1是',createTime dateTime not null comment '创建时间,精确到秒',updateTime dateTime not null comment '更新时间,精确到秒'
);
三、软件开发
3.1 搭建环境
3.1.1 检查jdk
输⼊java -version 检查JDK配置是否成功
输⼊javac -version 检查JRE配置是否成功

3.1.2 检查MySQL数据库
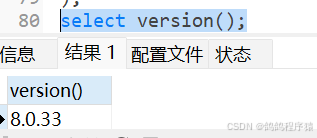
使⽤SQL语句select version();查询数据库版本
3.1.3 检查 Maven
本地要有一个Maven,mvn -version检查版本

添加国内仓库镜像,以阿⾥云仓库镜像为例:
- ⾃⼰安装Maven环境时,打开解压⽬录下conf\settings.xml⽂件,
- 使⽤Idea⾃带的Maven时,打开Idea安装路径\plugins\maven\lib\maven3\conf\settings.xml,
- 在mirrors节点中加⼊如下配置:
<mirrors><!-- mirror| Specifies a repository mirror site to use instead of a given repository. The repository that| this mirror serves has an ID that matches the mirrorOf element of this mirror. IDs are used| for inheritance and direct lookup purposes, and must be unique across the set of mirrors.--><!-- 加⼊如下mirror节点 使⽤国内阿⾥云仓库镜像 开始 --> <mirror><id>aliyun-public</id><mirrorOf>*</mirrorOf><name>aliyun public</name><url>https://maven.aliyun.com/repository/public</url></mirror><mirror><id>aliyun-central</id><mirrorOf>*</mirrorOf><name>aliyun central</name><url>https://maven.aliyun.com/repository/central</url></mirror><mirror><id>aliyun-spring</id><mirrorOf>*</mirrorOf><name>aliyun spring</name><url>https://maven.aliyun.com/repository/spring</url></mirror><!-- 加⼊如下mirror节点 使⽤国内阿⾥云仓库镜像 结束-->
</mirrors>
3.1.4 检查Gitee + Git
Gitee 有账号就行。
git -- version看当前Git版本号:

3.2 创建仓库
3.2.1 登录Gitee创建仓库并复制仓库地址
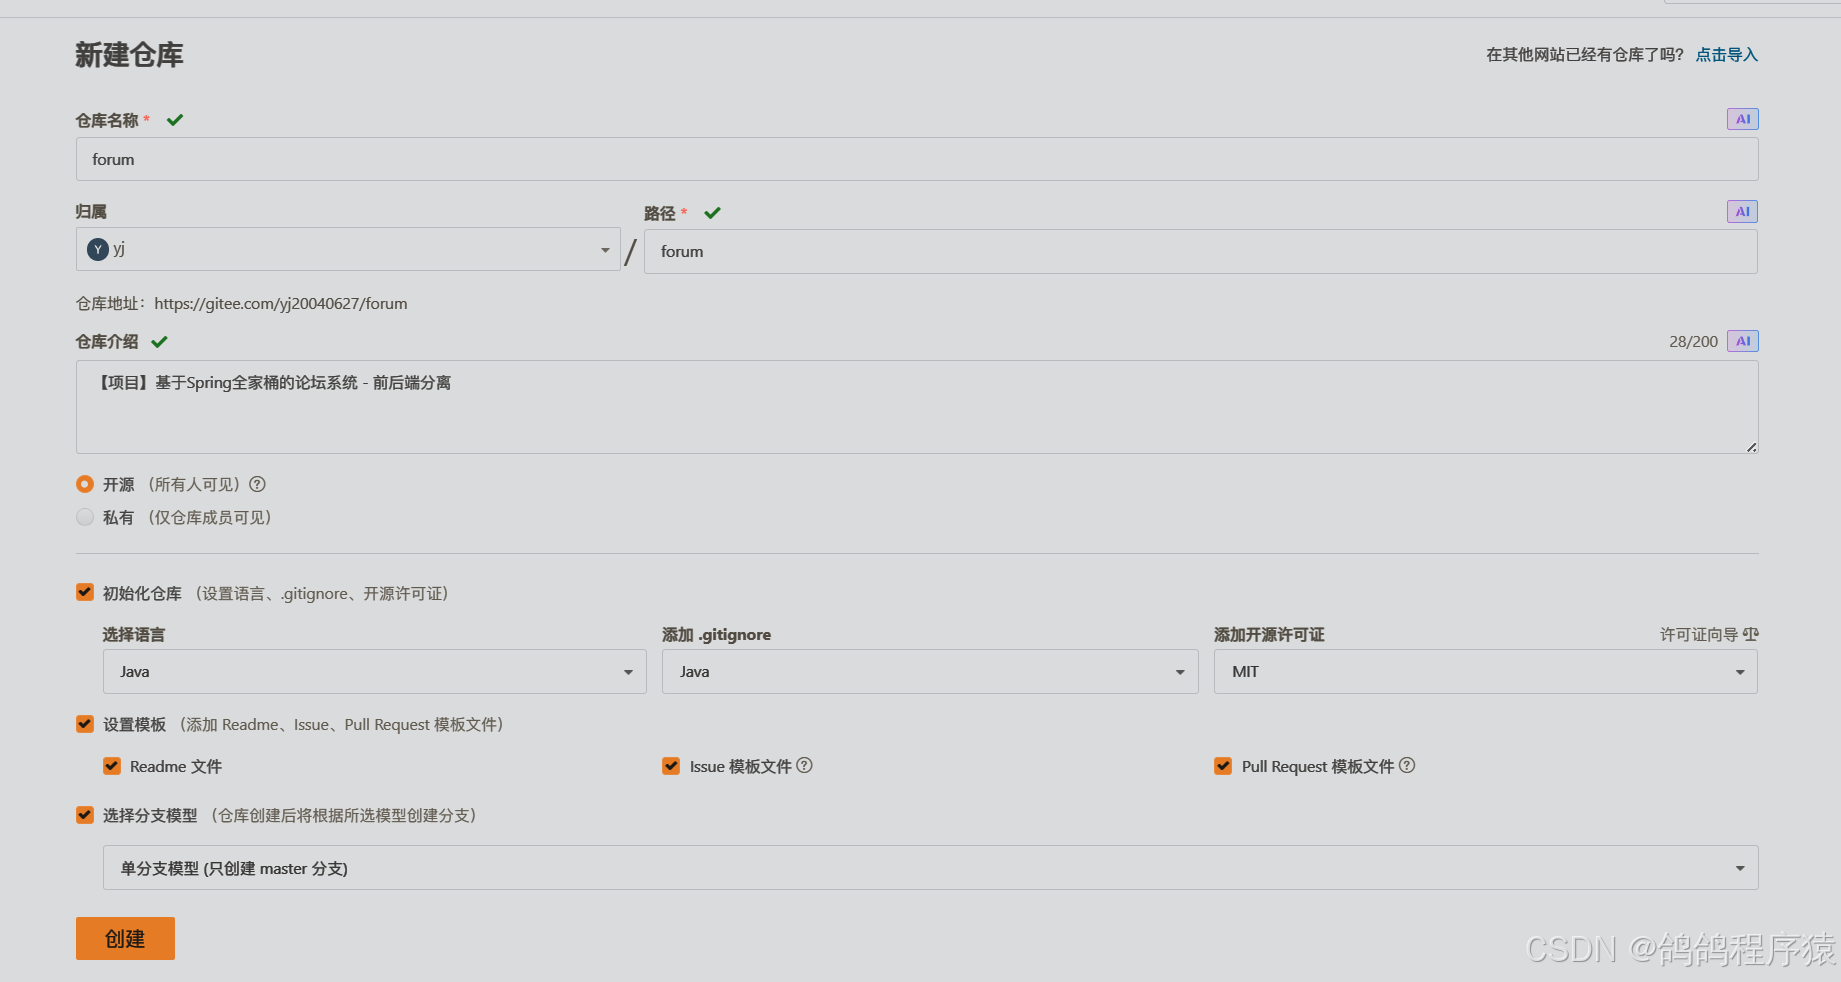
地址:https://gitee.com/yj20040627/forum.git
3.2.2 克隆到本地
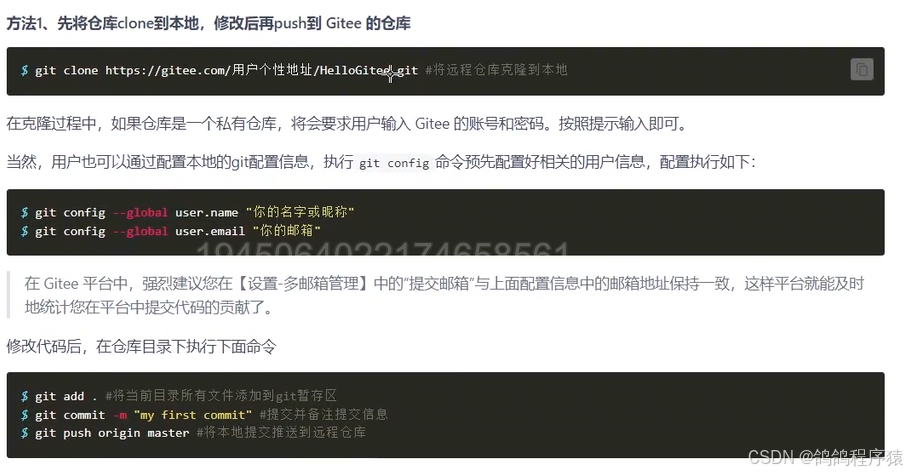
git clone https://gitee.com/yj20040627/forum.git
3.3 创建工程
工程结构:
├─java # java⽂件区
│   └─com
│       └─yj
│           └─forum
│               ├─common # 公共类
│               ├─config # 配置类
│               ├─controller # 控制器层类
│               ├─dao # 数据库访问类
│               ├─exception # ⾃定义异常类
│               ├─interceptor # ⾃定义拦截器类
│               ├─model # 数据库实体对应模型类
│               ├─services # 业务服务层接⼝
│               │ └─impl # 业务服务层接⼝实现类
│               └─utils # 输助⼯具类
|
|
└─resources # 资源⽂件区├─mapper # 数据库与模型映射⽂件│ └─extension # 扩展数据库与模型映射⽂件,⾃定义业务⽅法├─mybatis # Mybatis Generator 配置⽂件├─static # 静态⽂件└─templates # 模板⽂件
- 打开Idea --> File --> New --> Project
- 通过Spring Initializr创建⼯程
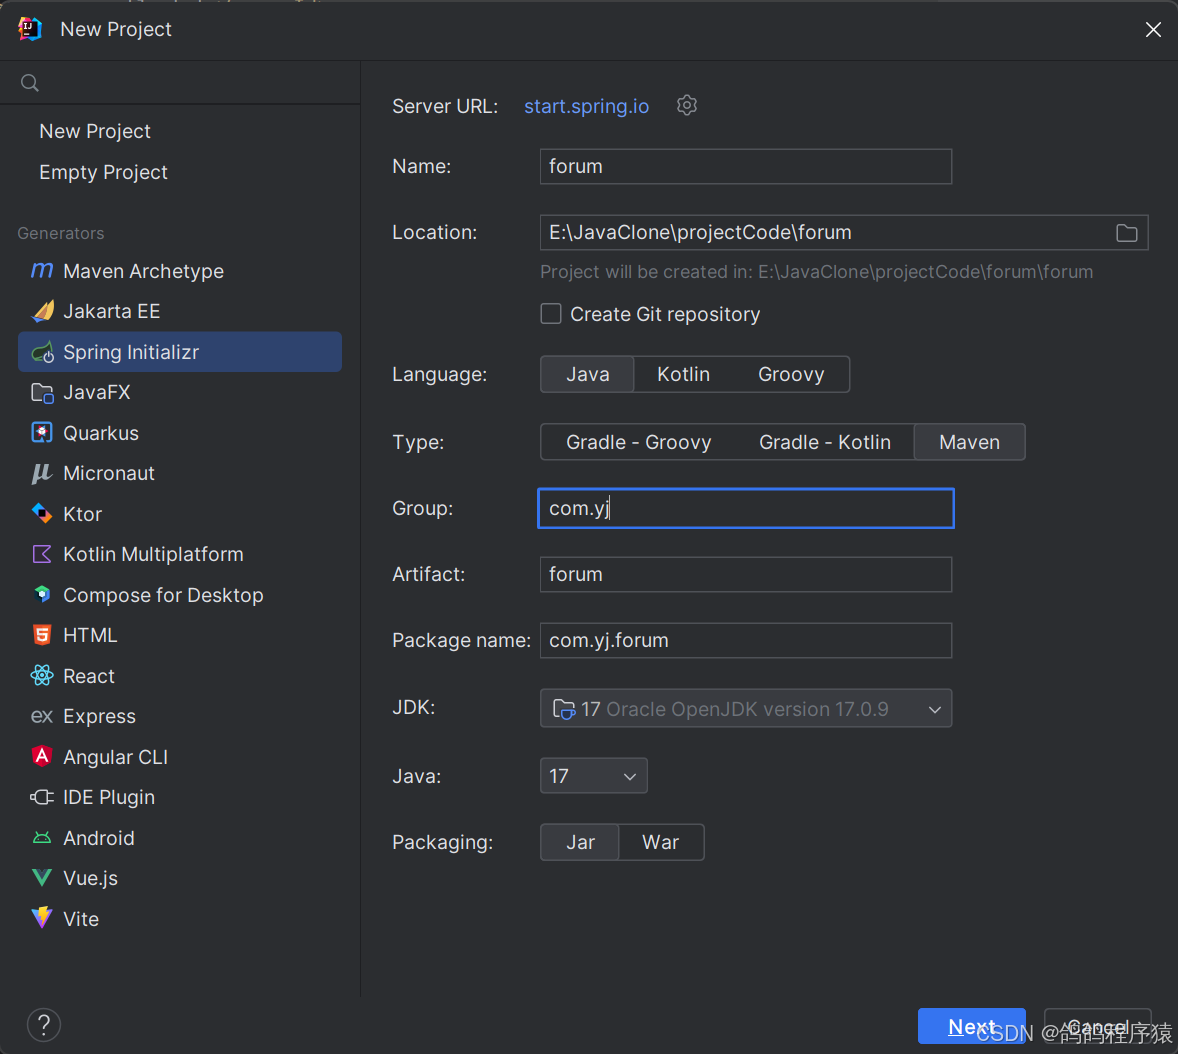
- 修改配置.
3.1. 修改编码格式为UTF-8:Settings --> Edit --> File encodings
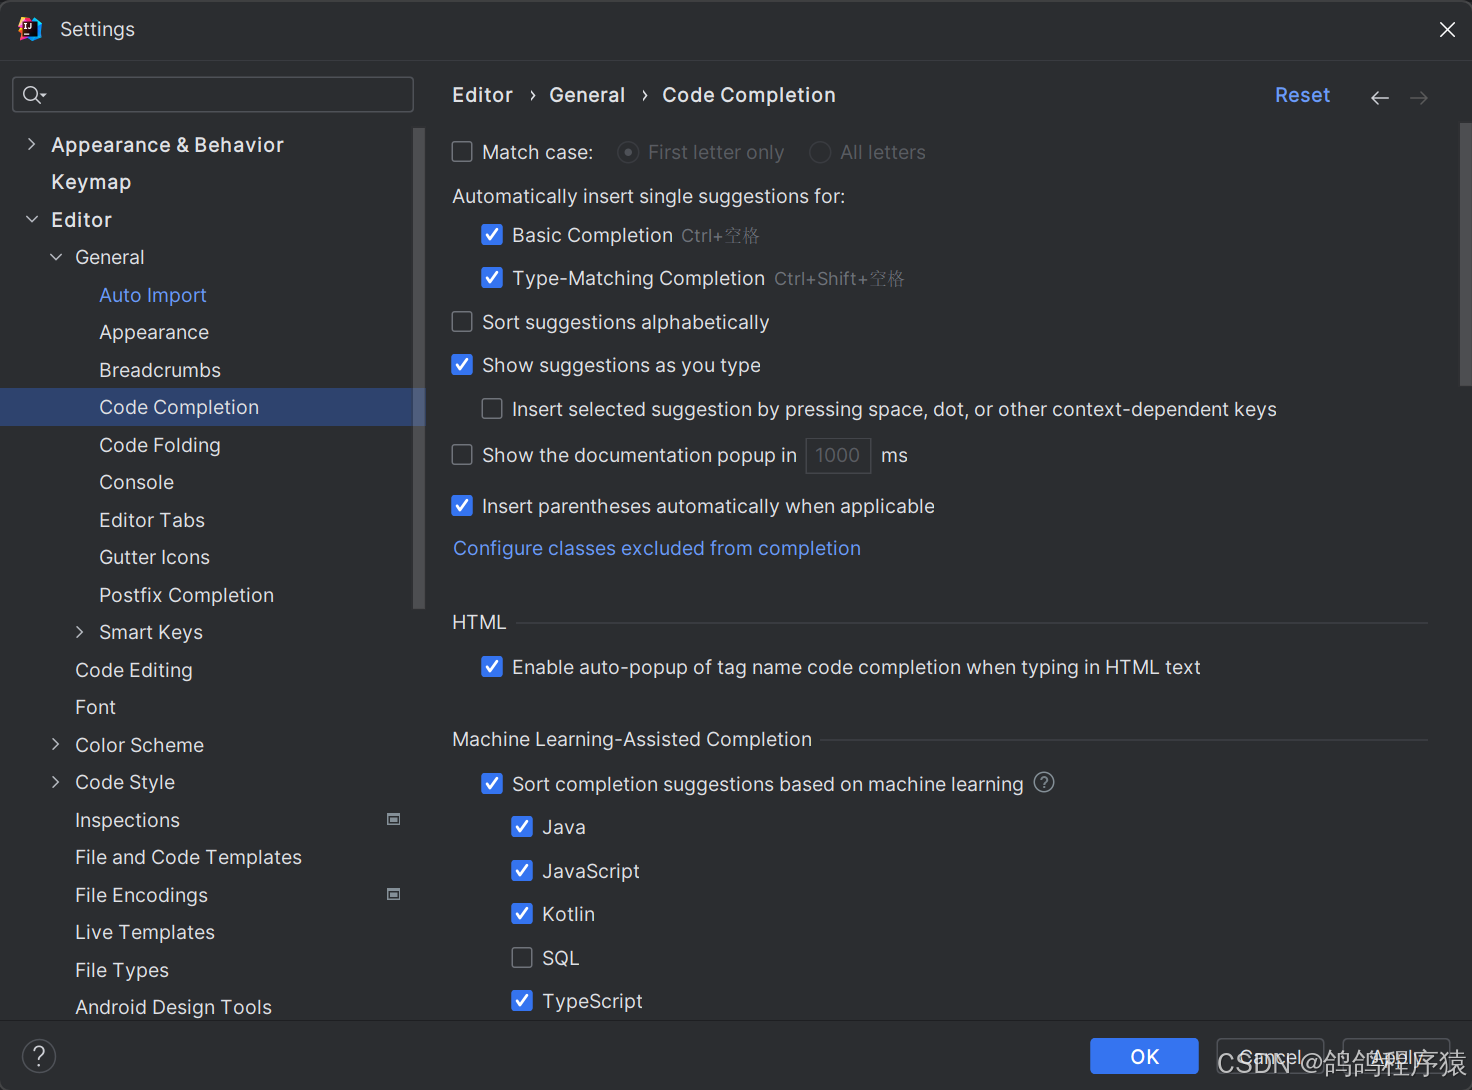
3.2. 检查或配置代码⾃动补全功能:Settings --> Edit --> General --> code completion
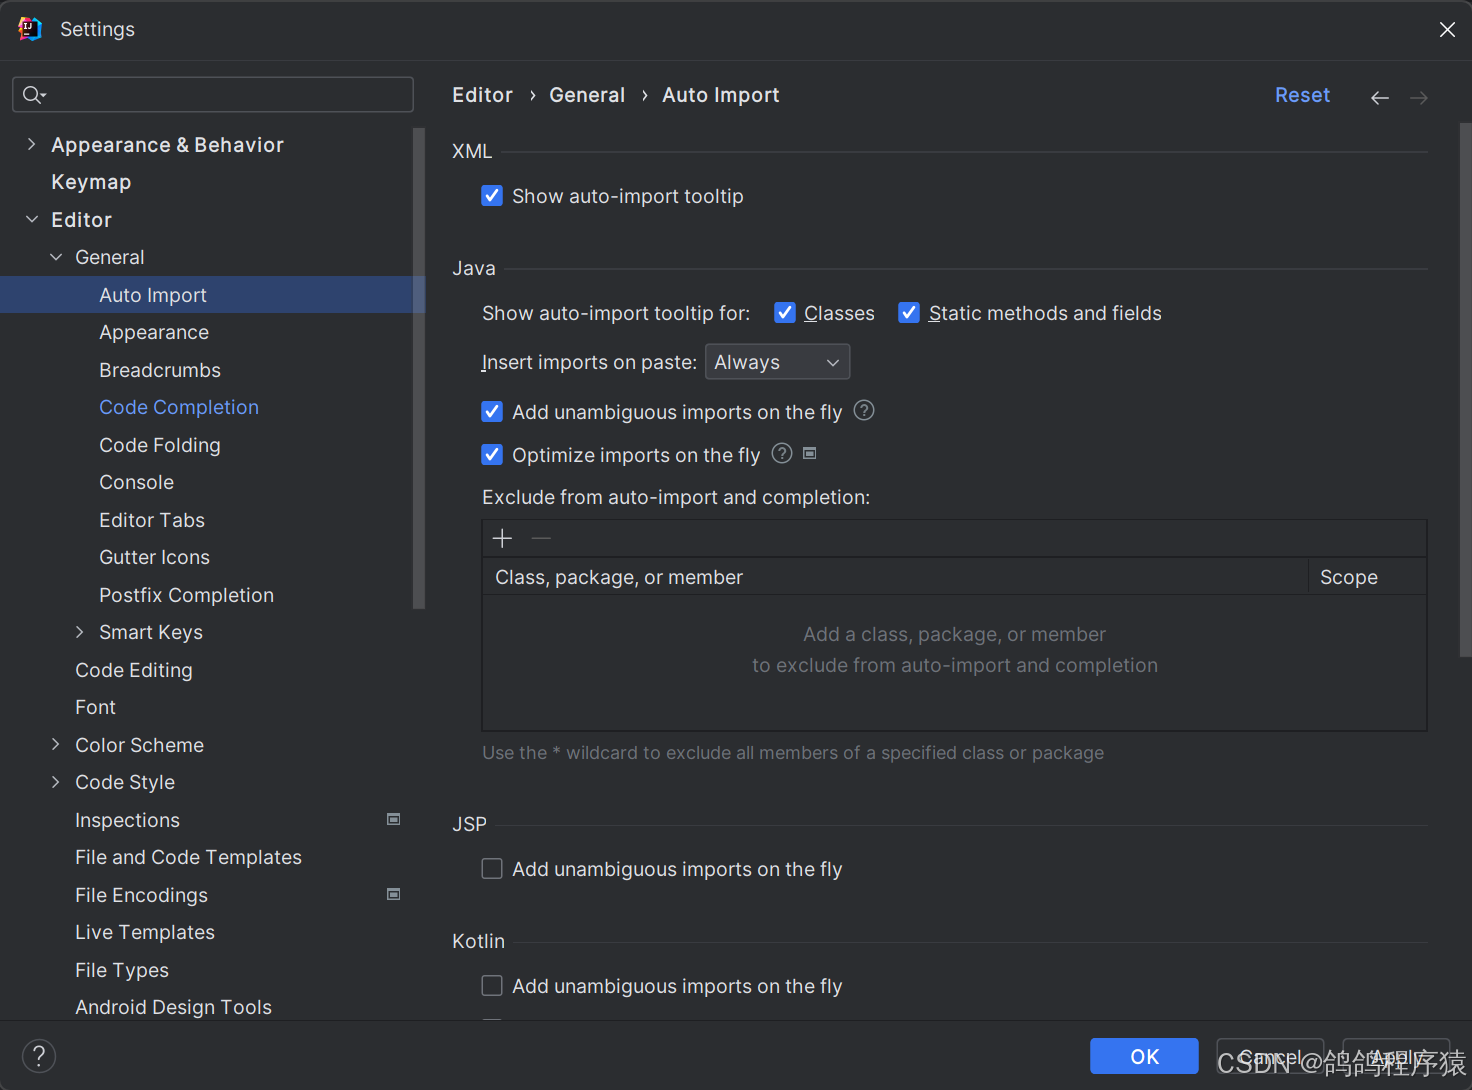
3.3. 检查或配置⾃动导包:Settings --> Edit --> General --> auto import
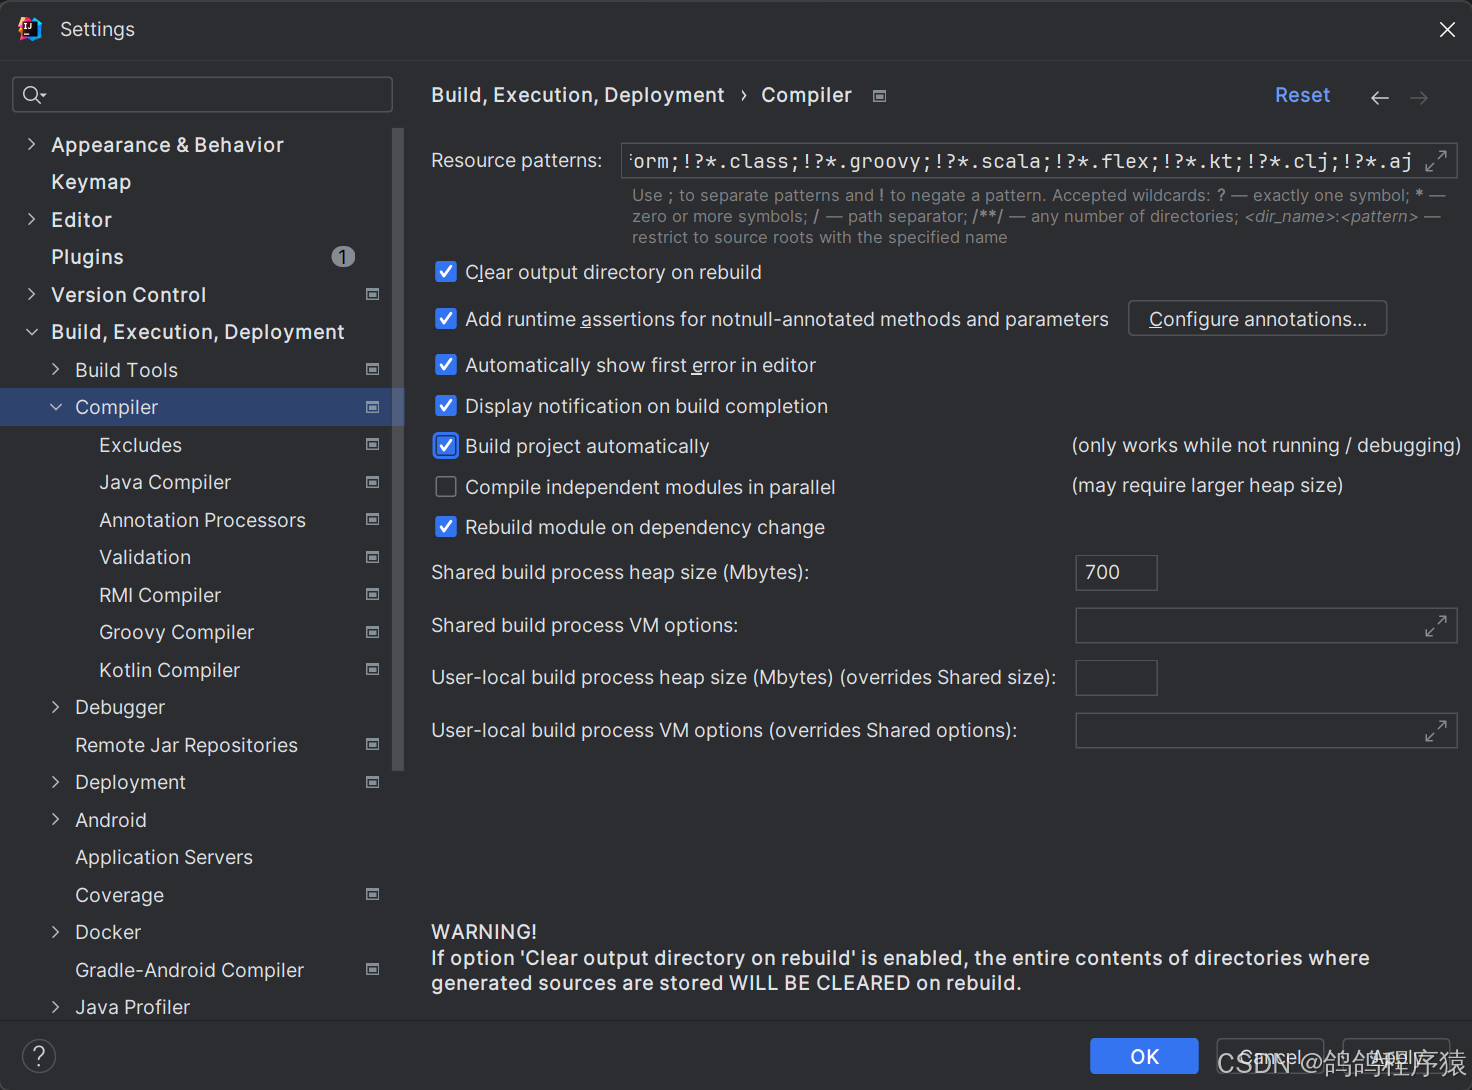
3.4. 检查或配置Maven,可以⽤国内仓库镜像:Settings --> Build, Execution & Deployment --> Build Tools–> Maven
3.5. idea识别Maven项⽬:在Notifications视图中会提⽰Load Maven Project,点击即可。
- 开启热部署
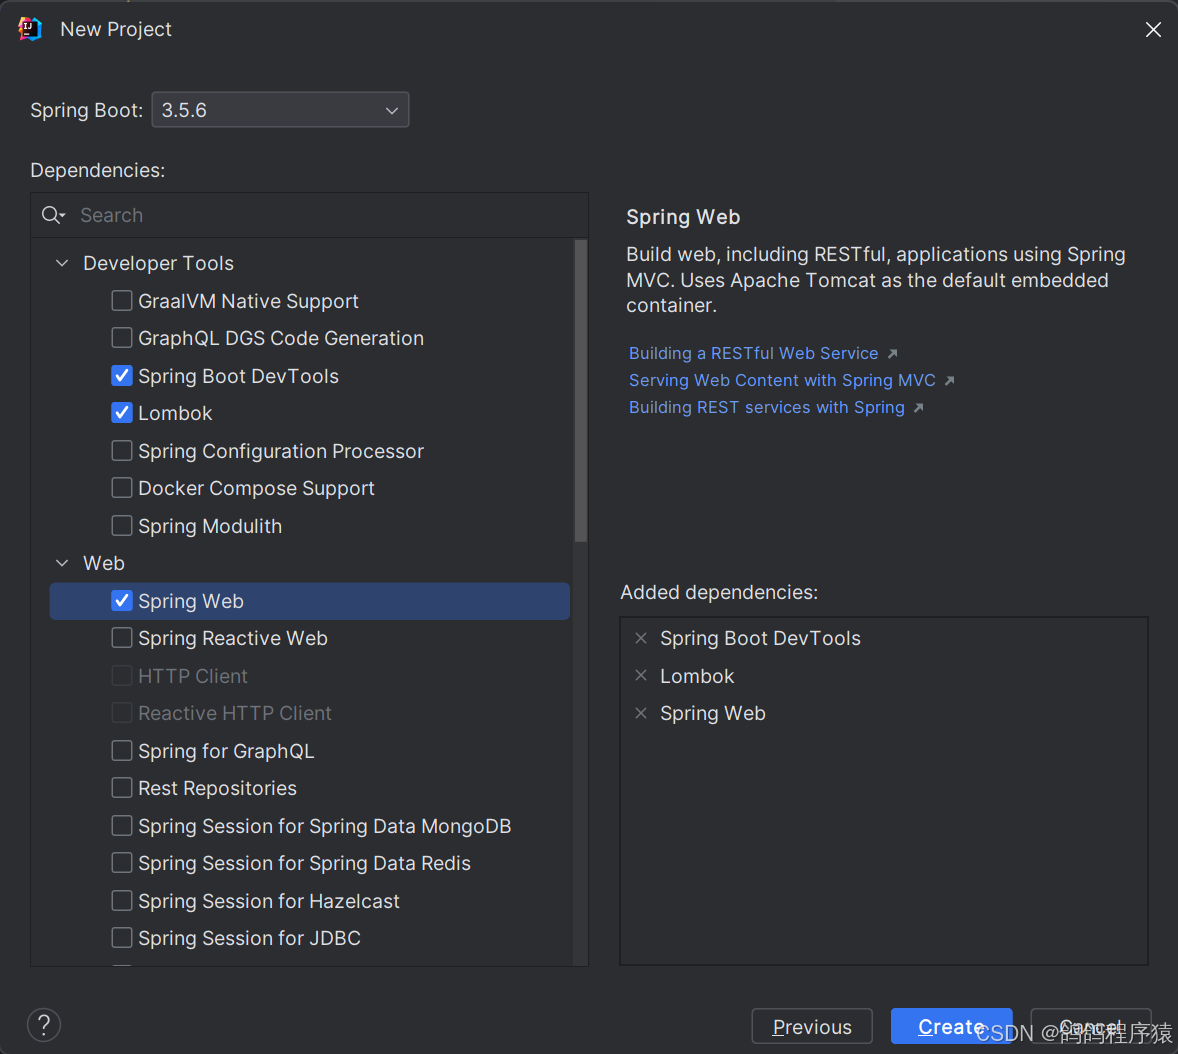
4.1. 确认 pom.xml中已经引⽤依赖A:
<!-- dependencies 标签下检查是否引⼊spring-boot-devtools依赖,如果没有加⼊如下引
⽤ -->
<dependency><groupId>org.springframework.boot</groupId><artifactId>spring-boot-devtools</artifactId><scope>runtime</scope><optional>true</optional>
</dependency>
4.2. 在Settings对应栏⽬中勾选如下选项:
- 在pom.xml⽂件的properties标签下加⼊如下配置:
<!-- 定义一些全局参数 -->
<properties><!-- JAVA 版本 --><java.version>17</java.version><!-- 编译环境JDK版本 --><maven.compiler.source>${java.version}</maven.compiler.source><!-- 运⾏环境JVM版本 --><maven.compiler.target>${java.version}</maven.compiler.target><!-- 构建项⽬指定编码集 --><project.build.sourceEncoding>UTF-8</project.build.sourceEncoding>
</properties>
- yml 文件
spring:application:name: 论坛系统output:ansi:enabled: ALWAYS # 控制台输出彩⾊⽇志#服务器配置
server:port: 58080 #端口号# ⽇志配置
logging:pattern:dateformat: MM-dd HH:mm:sslevel:root: info # 默认⽇志级别com.yj.forum: debug # 指定包的⽇志级别file:path: E:/JavaClone/log/forum # ⽇志保存⽬录- 通过Git推送⾄远程仓库
创建好了,没问题,先上传一下,作为原版本。使⽤命令⾏的⽅式:
# 查看当前状态,列出未修改后添加的⽂件
E:\JavaClone\projectCode\forum\forum> git status
# 添加修改后的⽂件到暂存区,再次运⾏git status,上⾯的⽂件会变为绿⾊显⽰
E:\JavaClone\projectCode\forum\forum> git add .
# 提交到本地仓库
E:\JavaClone\projectCode\forum\forum> git commit -m '第⼀次提交'
# 推送到远程仓库
E:\JavaClone\projectCode\forum\forum> git push
3.4 公共组件
3.4.1 pom.xml 中引⽤依赖
统⼀管理版本,在properties标签中加⼊版本号:
<!-- 数据库驱动 --><mysql-connector.version>8.0.33</mysql-connector.version><!-- Mybatis依赖 --><mybatis-starter.version>2.3.0</mybatis-starter.version><!-- 数据源 --><druid-starter.version>1.2.16</druid-starter.version>
添加依赖,在dependencies标签中加⼊相关依赖:
SpringBoot默认数据源是HikariCP由⽇本程序员开发,我们的项⽬使⽤阿⾥巴巴开发的Druid做为数据源。官方文档。
<!-- mysql 连接依赖--><dependency><groupId>mysql</groupId><artifactId>mysql-connector-java</artifactId><version>${mysql-connector.version}</version></dependency><!-- mybatis 依赖其中已经包含了spring-jdbc不再重复引⽤,此项⽬中使⽤spring-jdbc提供的HikariCP做为数据源, 相关配置在yml⽂件中--><dependency><groupId>org.mybatis.spring.boot</groupId><artifactId>mybatis-spring-boot-starter</artifactId><version>${mybatis-starter.version}</version></dependency><!-- 阿⾥巴巴druid数据源,如果使⽤SpringBoot默认的数据源,删除或注释这个依赖即可 --><dependency><groupId>com.alibaba</groupId><artifactId>druid-spring-boot-starter</artifactId><version>${druid-starter.version}</version></dependency>
3.4.2 application.yml 中添加配置
在 spring 节点下添加数据源配置项:
# 配置数据源datasource:url: jdbc:mysql://127.0.0.1:3306/forum_db?characterEncoding=utf8&useSSL=false&serverTimezone=Asia/Shanghai# 数据库连接串username: root # 数据库⽤⼾名password: 1234 # 自己的数据库密码driver-class-name: com.mysql.cj.jdbc.Driver # MySQL 8.0 驱动类
测试:
测试类中添加:
@Resourceprivate DataSource dataSource;@Testvoid testConnection() throws SQLException {System.out.println("dataSource = "+ dataSource.getClass());//获取数据库连接Connection connection = dataSource.getConnection();System.out.println("connection = "+ connection);}

3.5 生成类与映射⽂件
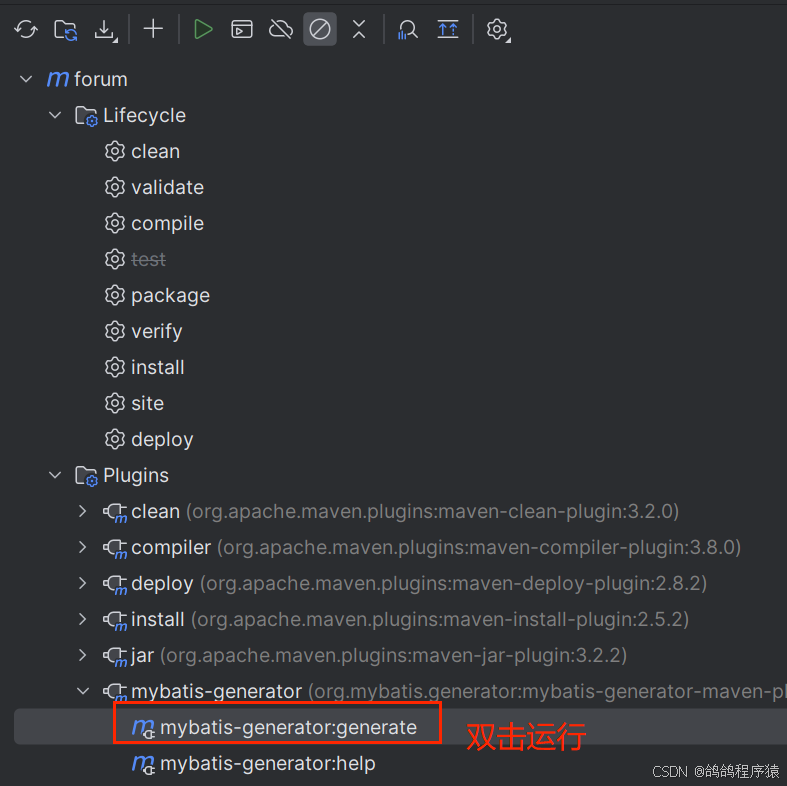
使用mybatis-generator,为我们自动生成。
3.5.1 pom.xml 中引⽤依赖
- 统⼀管理版本,在properties标签中加⼊版本号:
<mybatis-generator-plugin-version>1.4.1</mybatis-generator-plugin-version>
- 在 build --> plugins 标签中加⼊如下配置
<!-- mybatis ⽣成器插件 --><plugin><groupId>org.mybatis.generator</groupId><artifactId>mybatis-generator-maven-plugin</artifactId><version>${mybatis-generator-plugin-version}</version><executions><execution><id>Generate MyBatis Artifacts</id><phase>deploy</phase><goals><goal>generate</goal></goals></execution></executions><!-- 相关配置 --><configuration><!-- 打开⽇志 --><verbose>true</verbose><!-- 允许覆盖 --><overwrite>true</overwrite><!-- 配置⽂件路径 --><configurationFile>src/main/resources/mybatis/generatorConfig.xml</configurationFile></configuration></plugin>
- 创建generatorConfig.xml
在 src/main/resources下创建mybatis⽬录,在mybatis⽬录下创建generatorConfig.xml⽂件,内容如下:
<?xml version="1.0" encoding="UTF-8"?>
<!DOCTYPE generatorConfigurationPUBLIC "-//mybatis.org//DTD MyBatis Generator Configuration 1.0//EN""http://mybatis.org/dtd/mybatis-generator-config_1_0.dtd">
<generatorConfiguration><!-- 驱动包路径,location中路径替换成⾃⼰本地路径 --><classPathEntry location="E:\JavaClone\Maven\.m2\repository\com\mysql\mysql-connector-j\8.0.33\mysql-connector-j-8.0.33.jar"/><context id="DB2Tables" targetRuntime="MyBatis3"><!-- 禁⽤⾃动⽣成的注释 --><commentGenerator><property name="suppressAllComments" value="true"/><property name="suppressDate" value="true"/></commentGenerator><!-- 连接配置 --><jdbcConnection driverClass="com.mysql.cj.jdbc.Driver"connectionURL="jdbc:mysql://127.0.0.1:3306/forum_db?characterEncoding=utf8&useSSL=false&serverTimezone=Asia/Shanghai"userId="root"password="1234"></jdbcConnection><javaTypeResolver><!-- ⼩数统⼀转为BigDecimal --><property name="forceBigDecimals" value="false"/></javaTypeResolver><!-- 实体类⽣成位置 --><javaModelGenerator targetPackage="com.yj.forum.model" targetProject="src/main/java"><property name="enableSubPackages" value="true"/><property name="trimStrings" value="true"/></javaModelGenerator><!-- mapper.xml⽣成位置 --><sqlMapGenerator targetPackage="mapper" targetProject="src/main/resources"><property name="enableSubPackages" value="true"/></sqlMapGenerator><!-- DAO类⽣成位置 --><javaClientGenerator type="XMLMAPPER" targetPackage="com.yj.forum.dao" targetProject="src/main/java"><property name="enableSubPackages" value="true"/></javaClientGenerator><!-- 配置⽣成表与实例, 只需要修改表名tableName, 与对应类名domainObjectName 即可--><table tableName="t_article" domainObjectName="Article"enableSelectByExample="false"enableDeleteByExample="false" enableDeleteByPrimaryKey="false"enableCountByExample="false"enableUpdateByExample="false"><!-- 类的属性⽤数据库中的真实字段名做为属性名, 不指定这个属性会⾃动转换 _ 为驼峰命名规则--><property name="useActualColumnNames" value="true"/></table><table tableName="t_article_reply" domainObjectName="ArticleReply"enableSelectByExample="false"enableDeleteByExample="false" enableDeleteByPrimaryKey="false"enableCountByExample="false"enableUpdateByExample="false"><property name="useActualColumnNames" value="true"/></table><table tableName="t_board" domainObjectName="Board"enableSelectByExample="false" enableDeleteByExample="false"enableDeleteByPrimaryKey="false" enableCountByExample="false"enableUpdateByExample="false"><property name="useActualColumnNames" value="true"/></table><table tableName="t_message" domainObjectName="Message"enableSelectByExample="false"enableDeleteByExample="false" enableDeleteByPrimaryKey="false"enableCountByExample="false"enableUpdateByExample="false"><property name="useActualColumnNames" value="true"/></table><table tableName="t_user" domainObjectName="User"enableSelectByExample="false" enableDeleteByExample="false"enableDeleteByPrimaryKey="false" enableCountByExample="false"enableUpdateByExample="false"><property name="useActualColumnNames" value="true"/></table></context></generatorConfiguration>
- 在 Insert 标签中添加获取主键值的选项,每一个Insert都加上
useGeneratedKeys="true" keyProperty="id"
<!-- useGeneratedKeys = true -->
<!-- keyProperty = 主键字段-->
<!-- 当插⼊⼀条数据后,可以通过user.getId()获取到⾃动⽣成的Id值,如果⽅法中需要⽴即获取
Id值,加⼊这个配置 -->
<insert id="insert" parameterType="com.yj.forum.model.User" useGeneratedKeys="true" keyProperty="id" >
-
添加@Mapper注解,添加@Data注解
dao包下的每个xxxMapper.java加⼊@Mapper注解。
model包下每个xxx.java假如@Data注解。并且讲方法全删了,只保留属性即可。 -
扫描配置
config包下新建MybatisConfig类,指定Mybatis的扫路径。
package com.yj.forum.config;import org.mybatis.spring.annotation.MapperScan;
import org.springframework.context.annotation.Configuration;// 配置类
@Configuration
// 指定Mybatis的扫描路径
@MapperScan("com.yj.forum.dao")
public class MybatisConfig {}
application.yml中加⼊mybatis配置:
# mybatis 相关配置,单独配置,顶格写
mybatis:mapper-locations: classpath:mapper/**/*.xml # 指定 xxxMapper.xml的扫描路径
- 测试:
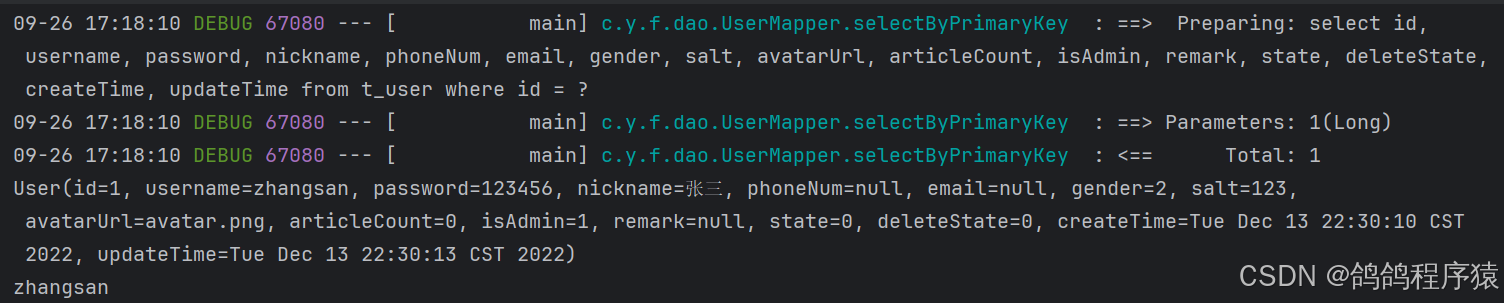
现在数据库中user表加入一条数据:
INSERT INTO `forum_db`.`t_user` (`id`, `username`, `password`, `nickname`, `gender`, `salt`, `avatarUrl`, `articleCount`, `isAdmin`, `state`,`deleteState`, `createTime`, `updateTime`) VALUES (1, 'zhangsan', '123456', '张三', 2, '123', 'avatar.png', 0, 1, 0, 0, '2022-12-13 22:30:10', '2022-12-13 22:30:13');
代码:
@Autowiredprivate UserMapper userMapper;@Testpublic void testMybatis () {User user = userMapper.selectByPrimaryKey(1L);System.out.println(user.toString());System.out.println(user.getUsername());}
3.6 公共代码
3.6.1 定义状态码
- 定义状态码:对执⾏业务处理逻辑过程中可能出现的成功与失败状态做针对性描述,⽤枚举定义状态码,先定义⼀
部分,业务中遇到新的问题再添加。
| 状态码 | 类型 | 描述 |
|---|---|---|
| 0 | SUCCESS | 操作成功 |
| 1000 | FAILED | 操作失败 |
| 1001 | FAILED_UNAUTHORIZED | 未授权 |
| 1002 | FAILED_PARAMS_VALIDATE | 参数校验失败 |
| 1003 | FAILED_FORBIDDEN | 禁⽌访问 |
| 1004 | FAILED_CREATE | 新增失败 |
| 1005 | FAILED_NOT_EXISTS | 资源不存在 |
| 1101 | FAILED_USER_EXISTS | ⽤⼾已存在 |
| 1102 | FAILED_USER_NOT_EXISTS | ⽤⼾不存在 |
| 1103 | FAILED_LOGIN | ⽤⼾名或密码错误 |
| 1104 | FAILED_USER_BANNED | 您已被禁⾔,请联系管理员, 并重新登录. |
| 1105 | FAILED_TWO_PWD_NOT_SAME | 两次输⼊的密码不⼀致 |
| 2000 | ERROR_SERVICES | 服务器内部错误 |
| 2001 | ERROR_IS_NULL | IS NULL. |
- 在 com.yj.forum.common 包下创建枚举类型命名为 ResultCode
package com.yj.forum.common;public enum ResultCode {SUCCESS                         (0,"操作成功"),FAILED                          (1000,"操作失败"),FAILED_UNAUTHORIZED             (1001,"未授权"),FAILED_PARAMS_VALIDATE          (1002,"参数校验失败"),FAILED_FORBIDDEN                (1003,"禁止访问"),FAILED_CREATE                   (1004,"新增失败"),FAILED_NOT_EXISTS               (1005,"资源不存在"),FAILED_USER_EXISTS              (1101,"用户已存在"),FAILED_USER_NOT_EXISTS          (1102,"用户不存在"),FAILED_LOGIN                    (1103,"用户名或者密码错误"),FAILED_USER_BANNED              (1104,"你已被禁言,请联系管理员,并重新登陆"),FAILED_TWO_PWD_NOT_SAME         (1105,"两次输入的密码不一致"),ERROR_SERVICES                  (200,"服务器内部错误"),ERROR_IS_NULL                   (201,"IS NULL");//状态码final long code;//状态描述final String message;ResultCode(long code, String message) {this.code = code;this.message = message;}@Overridepublic String toString() {return "code= " + code + ", message='" + message + ".";}
}public long getCode() {return code;}public String getMessage() {return message;}
3.6.2 定义返回结果
实现前后端分离,统⼀返回JSON格式的字符串,需要定义⼀个类,其中包含状态码,描述信息,返回的结果数据。
在com.yj.forum.common包下创建AppResult类;
属性加⼊ @JsonInclude(JsonInclude.Include.ALWAYS) 表⽰⽆论是否为空必须序列化。
package com.yj.forum.common;import com.fasterxml.jackson.annotation.JsonInclude;public class AppResult<T>{//状态码@JsonInclude(JsonInclude.Include.ALWAYS)private long code;//描述信息@JsonInclude(JsonInclude.Include.ALWAYS)private String message;//结果数据@JsonInclude(JsonInclude.Include.ALWAYS)private T data;/*** 成功*/public static AppResult success() {return new AppResult(ResultCode.SUCCESS.getCode(),ResultCode.SUCCESS.getMessage());}/*** 成功* @param message ⾃定义描述*/public static   AppResult success(String message) {return new AppResult(ResultCode.SUCCESS.getCode(),message);}/*** 成功* * @param data 返回的结果**/public static <T>AppResult<T> success(T data) {return new AppResult<>(ResultCode.SUCCESS.getCode(), ResultCode.SUCCESS.getMessage(),data);}/*** 成功** @param message ⾃定义描述* @param data 返回的结果*/public static <T>AppResult<T> success(String message, T data) {return new AppResult<>(ResultCode.SUCCESS.getCode(), message,data);}/*** 失败*/public static AppResult failed() {return new AppResult(ResultCode.FAILED.getCode(),ResultCode.FAILED.getMessage());}/*** 失败*/public static AppResult failed(String message) {return new AppResult(ResultCode.FAILED.getCode(), message);}/*** 失败* @param resultCode 错误状态*/public static AppResult failed(ResultCode resultCode) {return new AppResult(resultCode.getCode(), resultCode.getMessage());}/*** 失败* @param data 异常信息*/public static<T> AppResult<T> failed(T data) {return new AppResult(ResultCode.FAILED.getCode(), ResultCode.FAILED.getMessage(), data);}/*** 失败* @param message ⾃定义描述* @param data 异常信息*/public static<T> AppResult<T> failed(String message, T data) {return new AppResult(ResultCode.FAILED.getCode(), message, data);}public AppResult(long code, String message, T data) {this.code = code;this.message = message;this.data = data;}public void setCode(long code) {this.code = code;}public void setMessage(String message) {this.message = message;}public void setData(T data) {this.data = data;}public long getCode() {return code;}public String getMessage() {return message;}public T getData() {return data;}public AppResult(long code, String message) {this.code = code;this.message = message;}
}
3.6.3 ⾃定义异常
创建⼀个异常类,加⼊状态码与状态描述属性
在com.yj.forum.exception包下创建ApplicationException
package com.yj.forum.exception;import com.yj.forum.common.AppResult;/*** 自定义异常*/
public class ApplicationException extends RuntimeException{//自定义异常protected AppResult errorResult;//get方法public AppResult getErrorResult() {return errorResult;}//构造方法指定状态码,异常描述public ApplicationException(AppResult errorResult) {super(errorResult.getMessage());this.errorResult = errorResult;}//⾃定义异常描述public ApplicationException(String message) {super(message);}// ⾃定义异常描述,异常信息public ApplicationException(String message, Throwable cause) {super(message, cause);}// 指定异常public ApplicationException(Throwable cause) {super(cause);}
}
3.6.4 全局异常处理
使⽤@ControllerAdvice + @ExceptionHandler 注解实现统⼀异常处理。
在com.yj.forum.exception包下创建GlobalExceptionHandler类。
package com.yj.forum.exception;import com.yj.forum.common.AppResult;
import com.yj.forum.common.ResultCode;
import lombok.extern.slf4j.Slf4j;
import org.springframework.web.bind.annotation.ControllerAdvice;
import org.springframework.web.bind.annotation.ExceptionHandler;
import org.springframework.web.bind.annotation.ResponseBody;/*** 统一异常处理*/
@Slf4j
@ControllerAdvice
public class GlobalExceptionHandler {@ResponseBody@ExceptionHandler(ApplicationException.class)public AppResult applicationExceptionHandler(ApplicationException e) {//打印异常e.printStackTrace();//打印日志log.error(e.getMessage());//获取异常信息if(e.getErrorResult() != null) {// 返回异常类中记录的状态return e.getErrorResult();}return AppResult.failed(e.getMessage());}/*** 处理全未捕获的其他异常* @param e Exception* @return AppResult*/@ResponseBody@ExceptionHandler(Exception.class)public AppResult handleExceptionHandler (Exception e) {// 打印异常e.printStackTrace();// 记录⽇志log.error(e.getMessage());if (e.getMessage() == null) {return AppResult.failed(ResultCode.ERROR_SERVICES);}// 默认返回异常信息return AppResult.failed(e.getMessage());}
}
3.6.5 测试异常处理
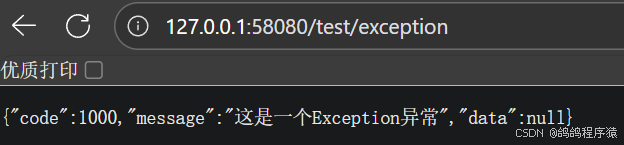
在TestController中添加如下⽅法:
@RequestMapping("/exception")public AppResult testException() throws Exception {throw new Exception("这是一个Exception异常");}@RequestMapping("/appException")public AppResult testApplicationException() throws Exception {throw new ApplicationException("这是一个ApplicatioException异常");}

3.6.6 实现 API ⾃动⽣成
使⽤Springfox Swagger⽣成API,并导⼊Postman,完成API单元测试 。
Swagger:Swagger是⼀套API定义的规范,按照这套规范的要求去定义接⼝及接⼝相关信息,
再通过可以解析这套规范⼯具,就可以⽣成各种格式的接⼝⽂档,以及在线接⼝调试⻚⾯,通过⾃动
⽂档的⽅式,解决了接⼝⽂档更新不及时的问题。
Springfox :是对Swagger规范解析并⽣成⽂档的⼀个实现。
3.6.6.1 pom.xml 中引⽤依赖
统⼀管理版本,在properties标签中加⼊版本号:
<!-- springfox --><springfox-boot-starter.version>3.0.0</springfox-boot-starter.version>
引⼊相关依赖:
<!-- API⽂档⽣成,基于swagger2 --><dependency><groupId>io.springfox</groupId><artifactId>springfox-boot-starter</artifactId><version>${springfox-boot-starter.version}</version></dependency><!-- SpringBoot健康监控 --><dependency><groupId>org.springframework.boot</groupId><artifactId>spring-boot-starter-actuator</artifactId></dependency>
3.6.6.2 编写配置类
在com.yj.forum.config包下新建SwaggerConfig.java。
- 解决SpringBoot 2.6.0以上与Springfox3.0.0 不兼容的问题,涉及SpringBoot 版本升级过程中的⼀些内部实现变化,具体说明在修改配置⽂件部分。
package com.yj.forum.config;import org.springframework.boot.actuate.autoconfigure.endpoint.web.CorsEndpointProperties;
import org.springframework.boot.actuate.autoconfigure.endpoint.web.WebEndpointProperties;
import org.springframework.boot.actuate.autoconfigure.web.server.ManagementPortType;
import org.springframework.boot.actuate.endpoint.ExposableEndpoint;
import org.springframework.boot.actuate.endpoint.web.*;
import org.springframework.boot.actuate.endpoint.web.annotation.ControllerEndpointsSupplier;
import org.springframework.boot.actuate.endpoint.web.annotation.ServletEndpointsSupplier;
import org.springframework.boot.actuate.endpoint.web.servlet.WebMvcEndpointHandlerMapping;
import org.springframework.context.annotation.Bean;
import org.springframework.context.annotation.Configuration;
import org.springframework.core.env.Environment;
import org.springframework.util.StringUtils;
import springfox.documentation.builders.ApiInfoBuilder;
import springfox.documentation.builders.PathSelectors;
import springfox.documentation.builders.RequestHandlerSelectors;
import springfox.documentation.oas.annotations.EnableOpenApi;
import springfox.documentation.service.ApiInfo;
import springfox.documentation.service.Contact;
import springfox.documentation.spi.DocumentationType;
import springfox.documentation.spring.web.plugins.Docket;import java.util.ArrayList;
import java.util.Collection;
import java.util.List;
/*** Swagger配置类*/
// 配置类
@Configuration
// 开启Springfox-Swagger
@EnableOpenApi
public class SwaggerConfig {/*** Springfox-Swagger基本配置* @return*/@Beanpublic Docket createApi() {Docket docket = new Docket(DocumentationType.OAS_30).apiInfo(apiInfo()).select().apis(RequestHandlerSelectors.basePackage("com.yj.forum.controller")).paths(PathSelectors.any()).build();return docket;}// 配置API基本信息private ApiInfo apiInfo() {ApiInfo apiInfo = new ApiInfoBuilder().title("论坛系统API").description("论坛系统前后端分离API测试").contact(new Contact("yj Tech","", "3082589463@qq.com")).version("1.0").build();return apiInfo;}/*** 解决SpringBoot 6.0以上与Swagger 3.0.0 不兼容的问题**/@Beanpublic WebMvcEndpointHandlerMappingwebEndpointServletHandlerMapping(WebEndpointsSupplier webEndpointsSupplier,ServletEndpointsSupplier servletEndpointsSupplier,ControllerEndpointsSupplier controllerEndpointsSupplier,EndpointMediaTypes endpointMediaTypes, CorsEndpointProperties corsProperties,WebEndpointProperties webEndpointProperties, Environment environment) {List<ExposableEndpoint<?>> allEndpoints = new ArrayList();Collection<ExposableWebEndpoint> webEndpoints =webEndpointsSupplier.getEndpoints();allEndpoints.addAll(webEndpoints);allEndpoints.addAll(servletEndpointsSupplier.getEndpoints());allEndpoints.addAll(controllerEndpointsSupplier.getEndpoints());String basePath = webEndpointProperties.getBasePath();EndpointMapping endpointMapping = new EndpointMapping(basePath);boolean shouldRegisterLinksMapping =this.shouldRegisterLinksMapping(webEndpointProperties, environment,basePath);return new WebMvcEndpointHandlerMapping(endpointMapping, webEndpoints,endpointMediaTypes,corsProperties.toCorsConfiguration(), newEndpointLinksResolver(allEndpoints, basePath),shouldRegisterLinksMapping, null);}private boolean shouldRegisterLinksMapping(WebEndpointPropertieswebEndpointProperties, Environment environment,String basePath) {return webEndpointProperties.getDiscovery().isEnabled() &&(StringUtils.hasText(basePath)||ManagementPortType.get(environment).equals(ManagementPortType.DIFFERENT));}
}
3.6.6.3 application.yml 中添加配置
在 spring 节点下添加mvc配置项
由于SpringBoot2.6之后版本把SpringMVC路径匹配策略修改为 MatchingStrategy.PATH_PATTERN_PARSER; ⽽Springfox-Swagger还没有更新版本,我们暂时先把路径匹配策略回退到之前 MatchingStrategy.ANT_PATH_MATCHER
mvc:pathmatch:matching-strategy: ANT_PATH_MATCHER #Springfox-Swagger兼容性配置
3.6.6.4 API常⽤注解
- @Api:作⽤在Controller上,对控制器类的说明 tags=“说明该类的作⽤,可以在前台界⾯上看到的注解”
- @ApiModel: 作⽤在响应的类上,对返回响应数据的说明
- @ApiModelProerty:作⽤在类的属性上,对属性的说明
- @ApiOperation:作⽤在具体⽅法上,对API接⼝的说明
- @ApiParam:作⽤在⽅法中的每⼀个参数上,对参数的属性进⾏说明
修改测试类:
package com.yj.forum.controller;import com.yj.forum.common.AppResult;
import com.yj.forum.exception.ApplicationException;
import io.swagger.annotations.Api;
import io.swagger.annotations.ApiOperation;
import io.swagger.annotations.ApiParam;
import org.springframework.web.bind.annotation.*;//返回结果是数据
@RestController
//一级路径
@RequestMapping("/test")
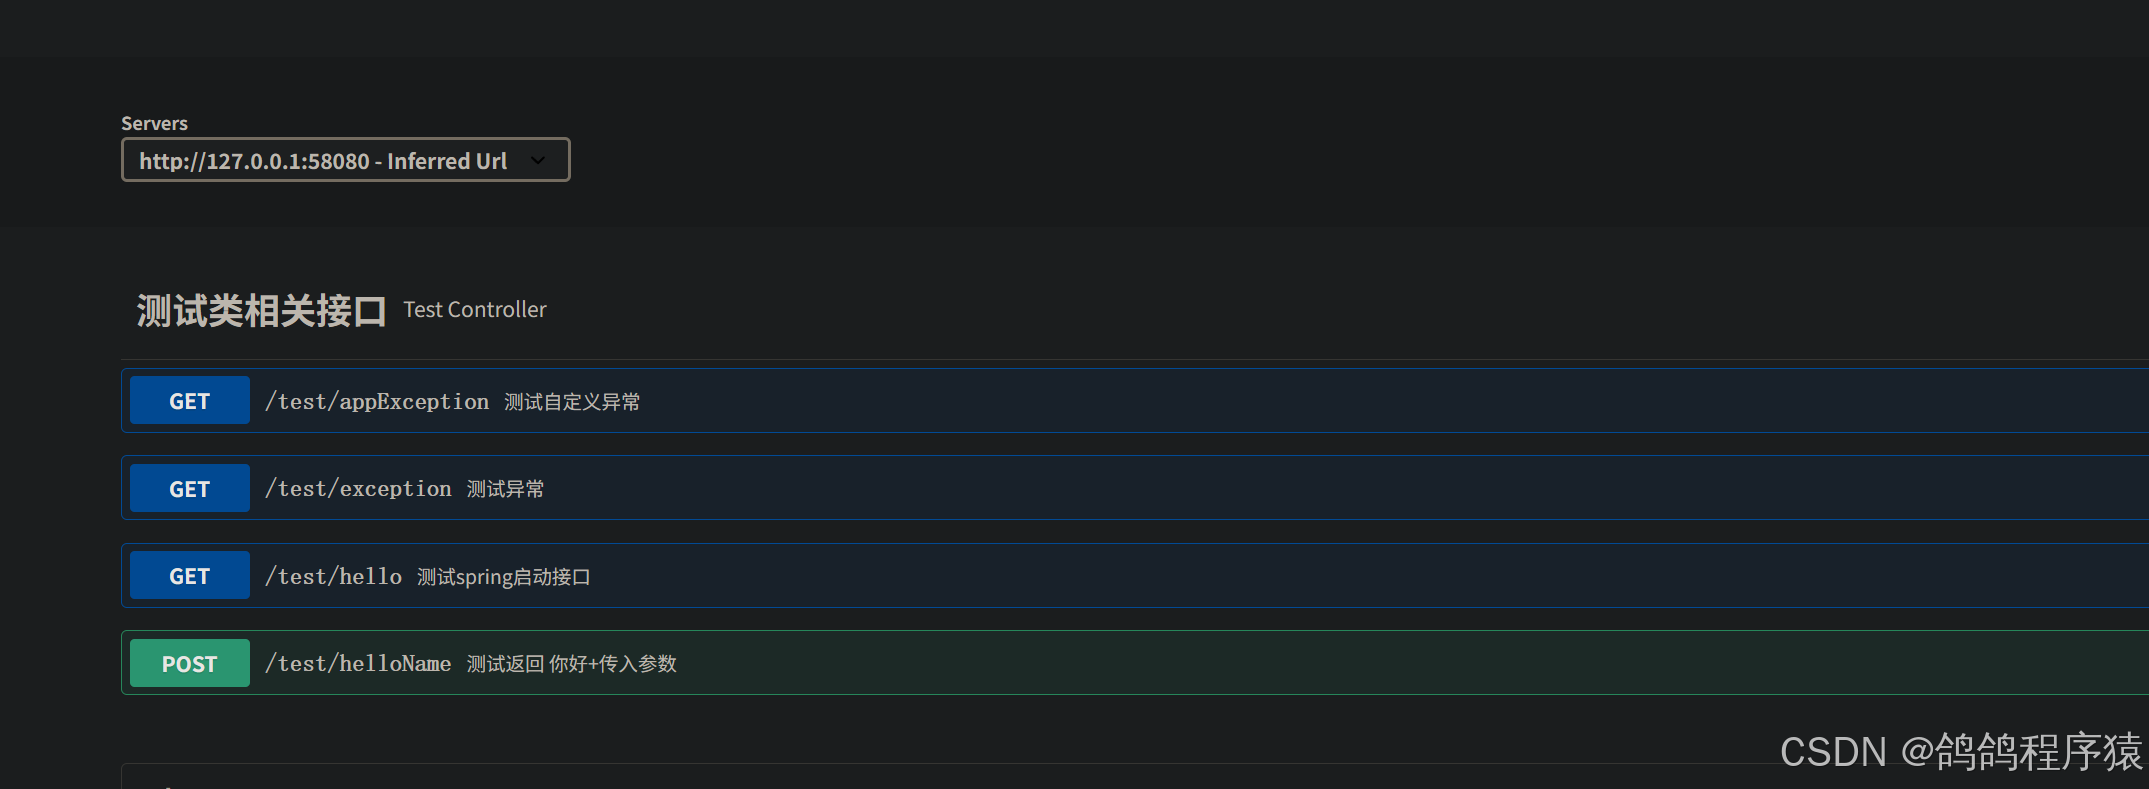
@Api(tags = "测试类相关接口")
public class TestController {@ApiOperation("测试spring启动接口")@GetMapping("/hello")public String hello() {return "hello Spring boot";}@ApiOperation("测试异常")@GetMapping("/exception")public AppResult testException() throws Exception {throw new Exception("这是一个Exception异常");}@ApiOperation("测试自定义异常")@GetMapping ("/appException")public AppResult testApplicationException() throws Exception {throw new ApplicationException("这是一个ApplicatioException异常");}@ApiOperation("测试返回 你好+传⼊参数")@PostMapping("/helloName")public AppResult<String> helloName(@ApiParam(value = "名字", required = true) @RequestParam(value = "name") String name) {return AppResult.success("hello: " + name);}
}3.6.6.5 访问API列表
启动程序,浏览器中输⼊地址:http://127.0.0.1:58080/swagger-ui/index.html。
3.6.6.6 API导⼊Postman
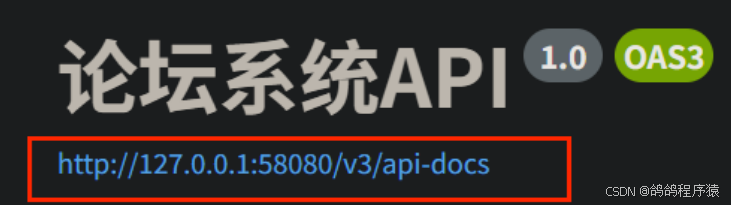
- 获取API地址,打开Swagger⻚⾯的API资源地址并复制http://127.0.0.1:58080/v3/api-docs
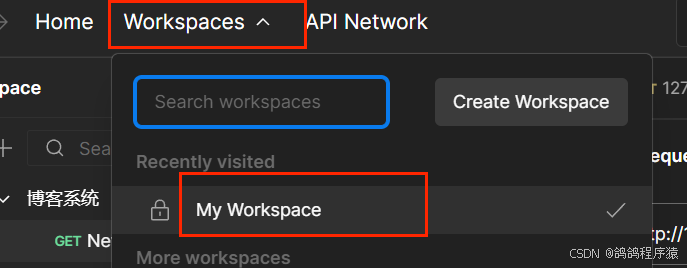
- 打开Postman进⼊⼯作空间
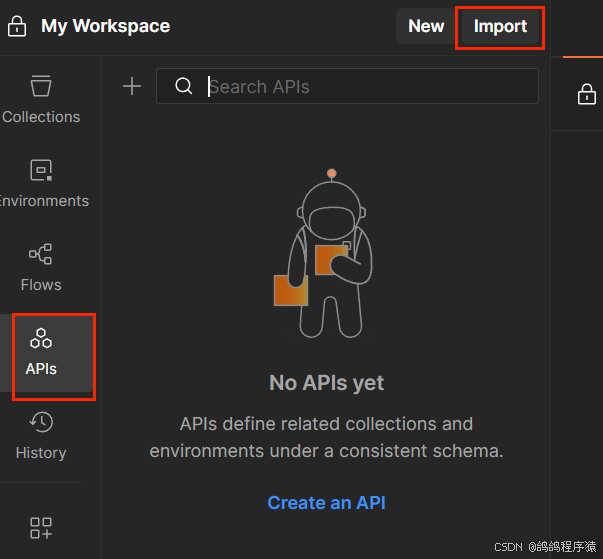
- 在APIs中导⼊API,并完成测试
3.6.7 编写工具类
3.6.7.1 创建MD5加密⼯具类
项⽬中使⽤commons-codec,它是Apache提供的⽤于摘要运算、编码解码的⼯具包。常⻅的编码解码⼯具Base64、MD5、Hex、SHA1、DES等。
- pom.xml中导⼊依赖,SpringBoot已经对这个包做了版本管理,所以这⾥不⽤指定版本号.
<!-- 编码解码加密⼯具包--><dependency><groupId>commons-codec</groupId><artifactId>commons-codec</artifactId></dependency>
- 在com.yj.forum.utils包下创建MD5Util类
package com.yj.forum.utils;import org.apache.commons.codec.digest.DigestUtils;
/*** MD5加密⼯具类*/public class MD5Util {/*** 普通MD5加密* @param str 原始字符串* @return ⼀次MD5加密后的密⽂*/public static String md5 (String str) {return DigestUtils.md5Hex(str);}/*** 原始字符串与Key组合进⾏⼀次MD5加密* @param str 原始字符串* @param key* @return 组合字符串⼀次MD5加密后的密⽂*/public static String md5 (String str, String key) {return DigestUtils.md5Hex(str + key);}/*** 原始字符串加密后与扰动字符串组合再进⾏⼀次MD5加密* @param str 原始字符串* @param salt 扰动字符串* @return 加密后的密⽂*/public static String md5Salt (String str, String salt) {return DigestUtils.md5Hex(DigestUtils.md5Hex(str) + salt);}/*** 校验原⽂与盐加密后是否与传⼊的密⽂相同* @param original 原字符串* @param salt 扰动字符串* @param ciphertext 密⽂* @return true 相同, false 不同*/public static boolean verifyOriginalAndCiphertext (String original, Stringsalt, String ciphertext) {String md5text = md5Salt(original, salt);if (md5text.equalsIgnoreCase(ciphertext)) {return true;}return false;}
}
3.6.7.2 创建⽣成UUID⼯具类
- com.bitejiuyeke.forum.utils包下创建UUIDUtil类,最终生成一个随机字符串
package com.yj.forum.utils;import java.util.UUID;/*** ⽣成UUID⼯具类 */
public class UUIDUtil {/*** 生成一个uuid(32位)* @return 32位没有 - 字符的UUID*/public static String UUID_32() {return UUID.randomUUID().toString().replace("-","");}/*** 生成一个uuid(36位)* @return 36位字符的UUID*/public static String UUID_36() {return UUID.randomUUID().toString();}
}
3.6.7.3 创建字符串⼯具类
- 在com.bitejiuyeke.forum.utils包下创建StringUtil类
package com.yj.forum.utils;/*** 字符串相关的⼯具类 */
public class StringUtil {/*** 字符串是否为空** @param value 待验证的字符串* @return true 为空 false 不为空*/public static boolean isEmpty(String value) {return value == null || value.isEmpty();}}
3.6.8 登录拦截器
3.6.8.1 修改application.yml配置⽂件,添加跳转⻚⾯
在bit-forum节点下添加login.url配置
# 项⽬⾃定义相关配置
yj-forum:login:url: sign-in.html # 未登录状况下强制跳转⻚⾯
3.6.8.2 在 com.yj.forum.interceptor 包下创建 LoginInterceptor
package com.yj.forum.interceptor;import com.yj.forum.common.AppConfig;
import org.springframework.beans.factory.annotation.Value;
import org.springframework.stereotype.Component;
import org.springframework.web.servlet.HandlerInterceptor;import javax.servlet.http.HttpServletRequest;
import javax.servlet.http.HttpServletResponse;
import javax.servlet.http.HttpSession;/*** 登录拦截器*/
@Component
public class LoginInterceptor implements HandlerInterceptor {@Value("${yj-forum.login.url}")private String defaultURL;/*** 预处理(请求的前置处理)回调⽅法<br/>* 返回值: <br/>true 流程继续;<br/>* false流程中断, 不会再调⽤其他的拦截器*/@Overridepublic boolean preHandle(HttpServletRequest request, HttpServletResponse response, Object handler) throws Exception {//获取sessionHttpSession session = request.getSession(false);//判断session是否有效if(session != null && session.getAttribute(AppConfig.USER_SESSION) != null) {//已登录状态return true;}//校验URLif(!defaultURL.startsWith("/")) {defaultURL = "/" +defaultURL;}//校验不通过,跳转登录界面response.sendRedirect(defaultURL);return false;}
}
3.6.8.3 在 com.yj.forum.interceptor包下创建AppInterceptorConfigurer
package com.yj.forum.interceptor;import org.springframework.web.servlet.config.annotation.InterceptorRegistry;
import org.springframework.web.servlet.config.annotation.WebMvcConfigurer;import javax.annotation.Resource;@Configuration
public class AppInterceptorConfigurer implements WebMvcConfigurer {@Resourceprivate LoginInterceptor loginInterceptor;@Overridepublic void addInterceptors(InterceptorRegistry registry) {// 添加登录拦截器registry.addInterceptor(loginInterceptor) // 添加⽤⼾登录拦截器.addPathPatterns("/**") // 拦截所有请求.excludePathPatterns("/sign-in.html") // 排除登录HTML.excludePathPatterns("/sign-up.html") // 排除注册HTML.excludePathPatterns("/user/login") // 排除登录api接⼝.excludePathPatterns("/user/register") // 排除注册api接⼝.excludePathPatterns("/user/logout") // 排除退出api接⼝.excludePathPatterns("/swagger*/**") // 排除登录swagger下所有.excludePathPatterns("/v3*/**") // 排除登录v3下所有,与 swagger相关.excludePathPatterns("/dist/**") // 排除所有静态⽂件.excludePathPatterns("/image/**").excludePathPatterns("/**.ico").excludePathPatterns("/js/**");}
}
3.7 业务功能
业务实现过程中主要的包和⽬录及主要功能:
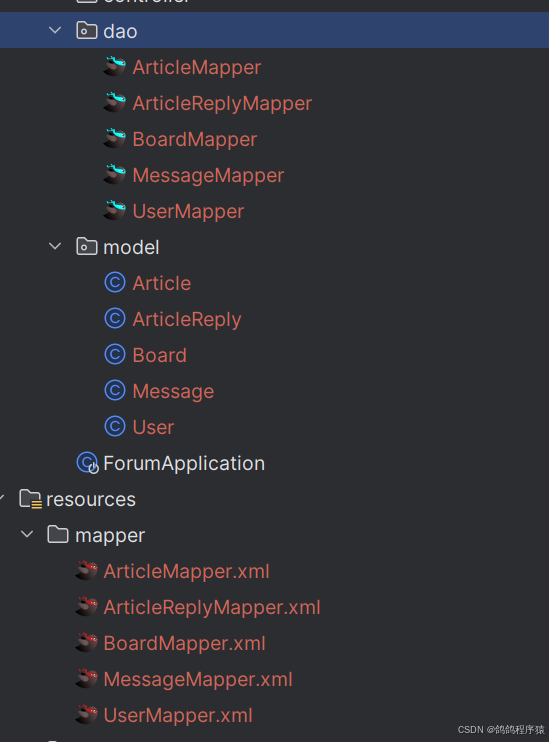
- model 包:实体对象,初始是根据数据库使用Mybatis generator生成的。
- dao 包:数据库访问,和数据库交互拿数据的。
- services 包:业务处理相关的接⼝与实现,所有业务都在Services中实现。
- controller 包:提供URL映射,⽤来接收参数并做校验,调⽤Service中的业务代码,返回执⾏结果。
- src/main/resources/mapper ⽬录:Mybaits映射⽂件,配置数据库实体与类之间的映射关系。
- src/main/resources/static ⽬录:前端资源。
3.7.1 注册
3.7.1.1 顺序图
UML顺序图:
3.7.1.2 参数要求
注册时需要⽤⼾提交的参数列表:
| 参数名 | 描述 | 类型 | 默认值 | 条件 |
|---|---|---|---|---|
| username | ⽤⼾名 | String | 必须 | |
| nickname | 昵称 | String | 与⽤⼾名相同 | 必须 |
| password | 密码 | String | 必须 | |
| passwordRepeat | 确认密码 | String | 必须,与密码相同 |
3.7.1.3 接⼝规范
// 请求
POST /user/register HTTP/1.1
Content-Type: application/x-www-form-urlencoded
username=user222&nickname=user222&password=123456&passwordRepeat=123456
// 响应
HTTP/1.1 200
Content-Type: application/json
{"code":0,"message":"成功","data":null}
3.7.1.4 后端代码
3.7.1.5 创建扩展Mapper.xml
定义SQL,按照用户名查询。
- src/main/resources/mapper⽬录下创建extension
-
- 由于src/main/resources/mapper ⽬录下是⾃动⽣成的映射⽂件,为防⽌后⾯修改数据再次⾃动⽣成时把我们写的SQL给覆盖掉,新建⼀个扩展⽬录extension⽤来存放我们业务的SQL
- 在extension⽬录下新建 UserExtMapper.xml,并将自动生成的xml的前三行拷贝过来:
-
- 注意namespace表⽰命名空间,指定要与 UserMapper,xml中的namespace相同
-
- 统⼀⽤com.yj.forum.dao.UserMapper,也就是UserMapper的完全限定名(包名+类名)
-
- 不同的映射⽂件指定了相同的namespace后,定义的所有⽤id或name标识的结果集映射都可以不同⽂件中共享
<?xml version="1.0" encoding="UTF-8"?>
<!DOCTYPE mapper PUBLIC "-//mybatis.org//DTD Mapper 3.0//EN" "http://mybatis.org/dtd/mybatis-3-mapper.dtd">
<mapper namespace="com.yj.forum.dao.UserMapper"><!-- 根据用户名查询用户信息 --><select id="selectByUserName" resultMap="BaseResultMap" parameterType="java.lang.String">select<include refid="Base_Column_List"/>from t_userwheredeleteState = 0andusername = #{username, jdbcType=VARCHAR}</select>
</mapper>
Base_Column_List:插件生成文件将数据封装。

BaseResultMap:也是自动生成的。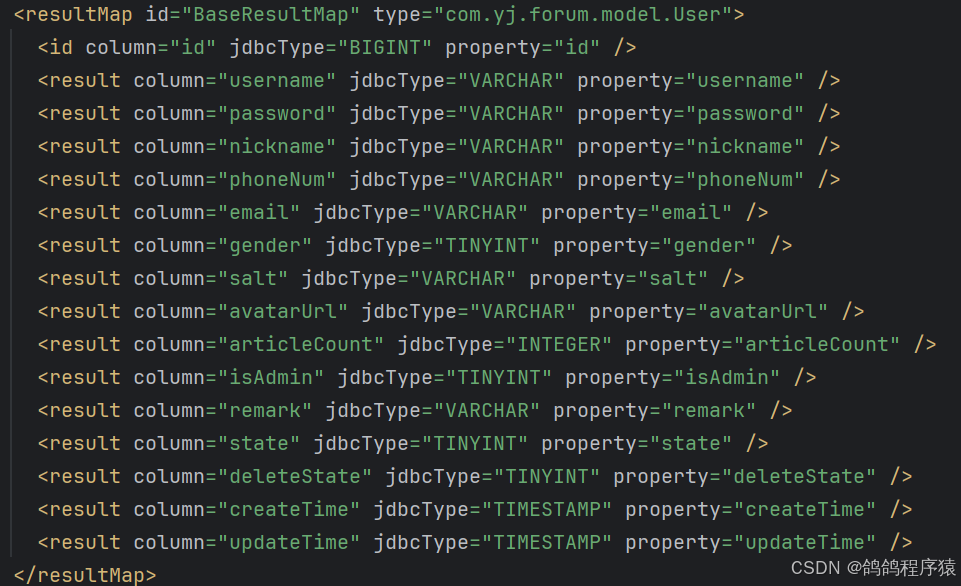
3.7.1.6 修改DAO
com.yj.forum.dao包下的UserMapper中添加⽅法声明, 注意⽅法名要与UserExtMapper.xml中SQL标签的id相同
/*** 接⽤⼾名查询⽤⼾信息** @param username ⽤⼾名* @return 对应的⽤⼾信息*/User selectByUserName(@Param("username") String username);
3.7.1.7 创建Service接⼝
com.yj.forum.services包下创建IUserService接⼝
package com.yj.forum.services;import com.yj.forum.model.User;
/*** 用户接口*/
public interface IUserService {/*** 创建普通⽤⼾* @param user ⽤⼾信息*/void createNormalUser(User user);}
3.7.1.8 实现Service接⼝
com.yj.forum.services.impl包下创建UserServiceImpl类并实现IUserService接⼝,
- 实现逻辑:我们对传入的参数进行非空校验,对必传参数校验,有默认值的设置默认值,插入数据库,进行插入成功与否校验。
package com.yj.forum.services.impl;import com.yj.forum.common.AppResult;
import com.yj.forum.common.ResultCode;
import com.yj.forum.dao.UserMapper;
import com.yj.forum.exception.ApplicationException;
import com.yj.forum.model.User;
import com.yj.forum.services.IUserService;
import com.yj.forum.utils.StringUtil;
import lombok.extern.slf4j.Slf4j;
import org.springframework.stereotype.Service;import javax.annotation.Resource;
import java.util.Date;@Service
@Slf4j
public class UserServiceImpl implements IUserService {@Resourceprivate UserMapper userMapper;@Overridepublic void createNormalUser(User user) {//非空校验if(user == null) {//打印日志log.error(ResultCode.ERROR_IS_NULL.toString());//抛出是空的异常throw new ApplicationException(AppResult.failed(ResultCode.ERROR_IS_NULL));}//必传参数if(StringUtil.isEmpty(user.getUsername())|| StringUtil.isEmpty(user.getNickname())|| StringUtil.isEmpty(user.getPassword())|| StringUtil.isEmpty(user.getSalt())) {//打印日志log.warn(ResultCode.FAILED_PARAMS_VALIDATE.toString());//抛出参数校验失败的异常throw new ApplicationException(AppResult.failed(ResultCode.FAILED_PARAMS_VALIDATE));}//判断用户是否存在User existsUser = userMapper.selectByUserName(user.getUsername());if(existsUser != null) {//打印日志log.warn(ResultCode.FAILED_USER_EXISTS.toString());//抛出用户已存在的异常throw new ApplicationException(AppResult.failed(ResultCode.FAILED_USER_EXISTS));}// 除了注册时传⼊的有效值,其他全部使⽤默认if(user.getGender() == null) {user.setGender((byte) 2);}user.setIsAdmin((byte) 0);user.setAvatarUrl(null);user.setArticleCount(0);user.setState((byte) 0);user.setDeleteState((byte) 0);Date date = new Date();user.setCreateTime(date);user.setUpdateTime(date);//插入数据库int row = userMapper.insertSelective(user);//插入成功校验if(row != 1) {//记录日志log.info(ResultCode.FAILED_CREATE.toString());//抛出新增失败异常throw new ApplicationException(AppResult.failed(ResultCode.FAILED_CREATE));}//成功新增用户log.info("新增⽤⼾成功:username = " + user.getUsername());}
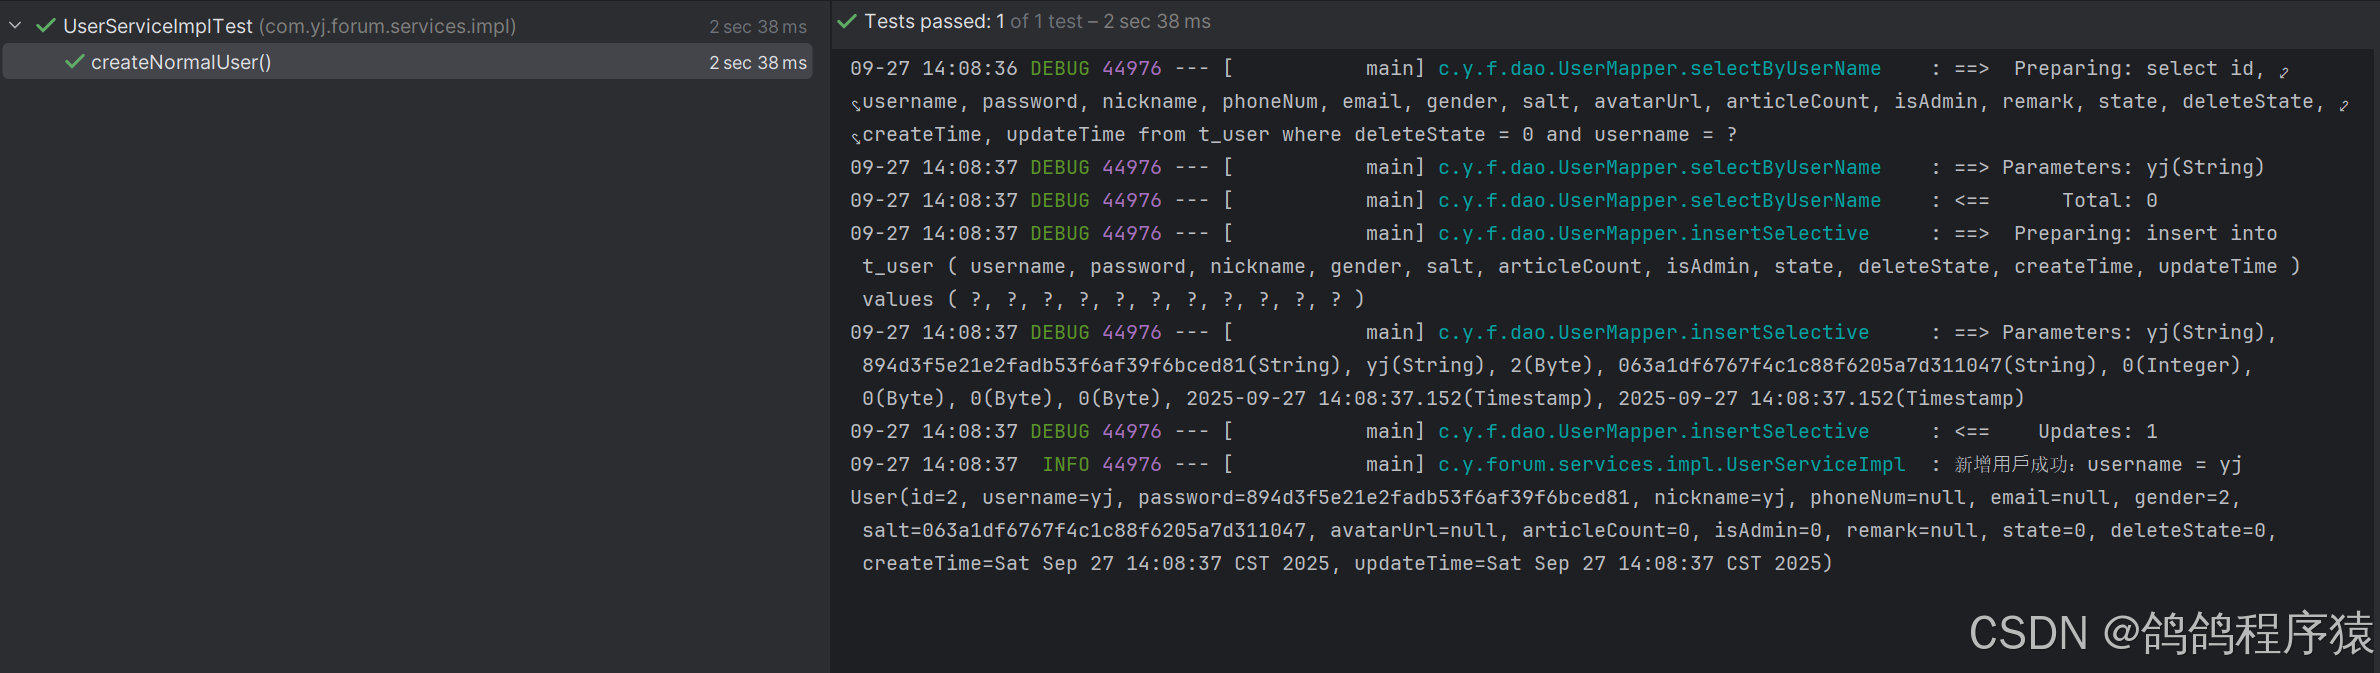
}3.7.1.9 进行service单元测试
下面是测试一个插入正常数据的代码,其它异常数据也是通过(符合预期)的。
package com.yj.forum.services.impl;import com.yj.forum.model.User;
import com.yj.forum.services.IUserService;
import com.yj.forum.utils.MD5Util;
import com.yj.forum.utils.UUIDUtil;
import org.junit.jupiter.api.Test;
import org.springframework.boot.test.context.SpringBootTest;import javax.annotation.Resource;
@SpringBootTest
class UserServiceImplTest {@Resourceprivate IUserService userService;@Testvoid createNormalUser() {User user = new User();user.setUsername("yj");user.setNickname("yj");//原始密码String password = "111";//扰动字符串String salt = UUIDUtil.UUID_32();//密文String ciphertext = MD5Util.md5Salt(password, salt);user.setPassword(ciphertext);user.setSalt(salt);userService.createNormalUser(user);System.out.println(user.toString());}
}
3.7.1.10 实现Controller
com.yj.forum.controller包下创建UserController类,
实现逻辑:
- 对参数进行非空校验
- 两次密码一致性校验
- 初始化用户
- 密码通过MD5加密
- 调用service
- 返回成功状态
package com.yj.forum.controller;import com.yj.forum.common.AppResult;
import com.yj.forum.common.ResultCode;
import com.yj.forum.model.User;
import com.yj.forum.services.IUserService;
import com.yj.forum.utils.MD5Util;
import com.yj.forum.utils.StringUtil;
import com.yj.forum.utils.UUIDUtil;
import io.swagger.annotations.Api;
import io.swagger.annotations.ApiOperation;
import io.swagger.annotations.ApiParam;
import lombok.extern.slf4j.Slf4j;
import org.springframework.web.bind.annotation.PostMapping;
import org.springframework.web.bind.annotation.RequestMapping;
import org.springframework.web.bind.annotation.RequestParam;
import org.springframework.web.bind.annotation.RestController;import javax.annotation.Resource;@Api(tags = "用户接口")
@Slf4j
// 标识为了个Controller并且响应时返回Body中的数据
@RestController
//路径映射
@RequestMapping("/user")
public class UserController {//service注入@Resourceprivate IUserService userService;/*** 用户注册* @param username 用户名* @param nickname 用户昵称* @param password 用户密码* @param passwordRepeat 确认密码* @return 成功*/@PostMapping("/register")@ApiOperation("用户注册")public AppResult register(@ApiParam("用户名") @RequestParam(value = "username" ) String username,@ApiParam("用户昵称") @RequestParam(value = "nickname" ) String nickname,@ApiParam("用户密码") @RequestParam(value = "password" ) String password,@ApiParam("确认密码") @RequestParam(value = "passwordRepeat") String passwordRepeat)  {//参数校验if(StringUtil.isEmpty(username)|| StringUtil.isEmpty(nickname)|| StringUtil.isEmpty(password)|| StringUtil.isEmpty(passwordRepeat)) {//打印日志log.warn(ResultCode.FAILED_PARAMS_VALIDATE.toString());//抛出参数校验失败异常return AppResult.failed(ResultCode.FAILED_PARAMS_VALIDATE);}//密码确认if(!password.equals(passwordRepeat)) {log.warn(ResultCode.FAILED_TWO_PWD_NOT_SAME.toString());return AppResult.failed(ResultCode.FAILED_TWO_PWD_NOT_SAME);}// 基本信息赋值User user = new User();user.setUsername(username);user.setNickname(nickname);//  加密密码String salt = UUIDUtil.UUID_32();user.setSalt(salt);String ciphertext = MD5Util.md5Salt(password, salt);user.setPassword(ciphertext);userService.createNormalUser(user);return AppResult.success();}}
3.7.1.11 测试
在http://127.0.0.1:58080/swagger-ui/index.html或者Postman中传入参数测试即可。

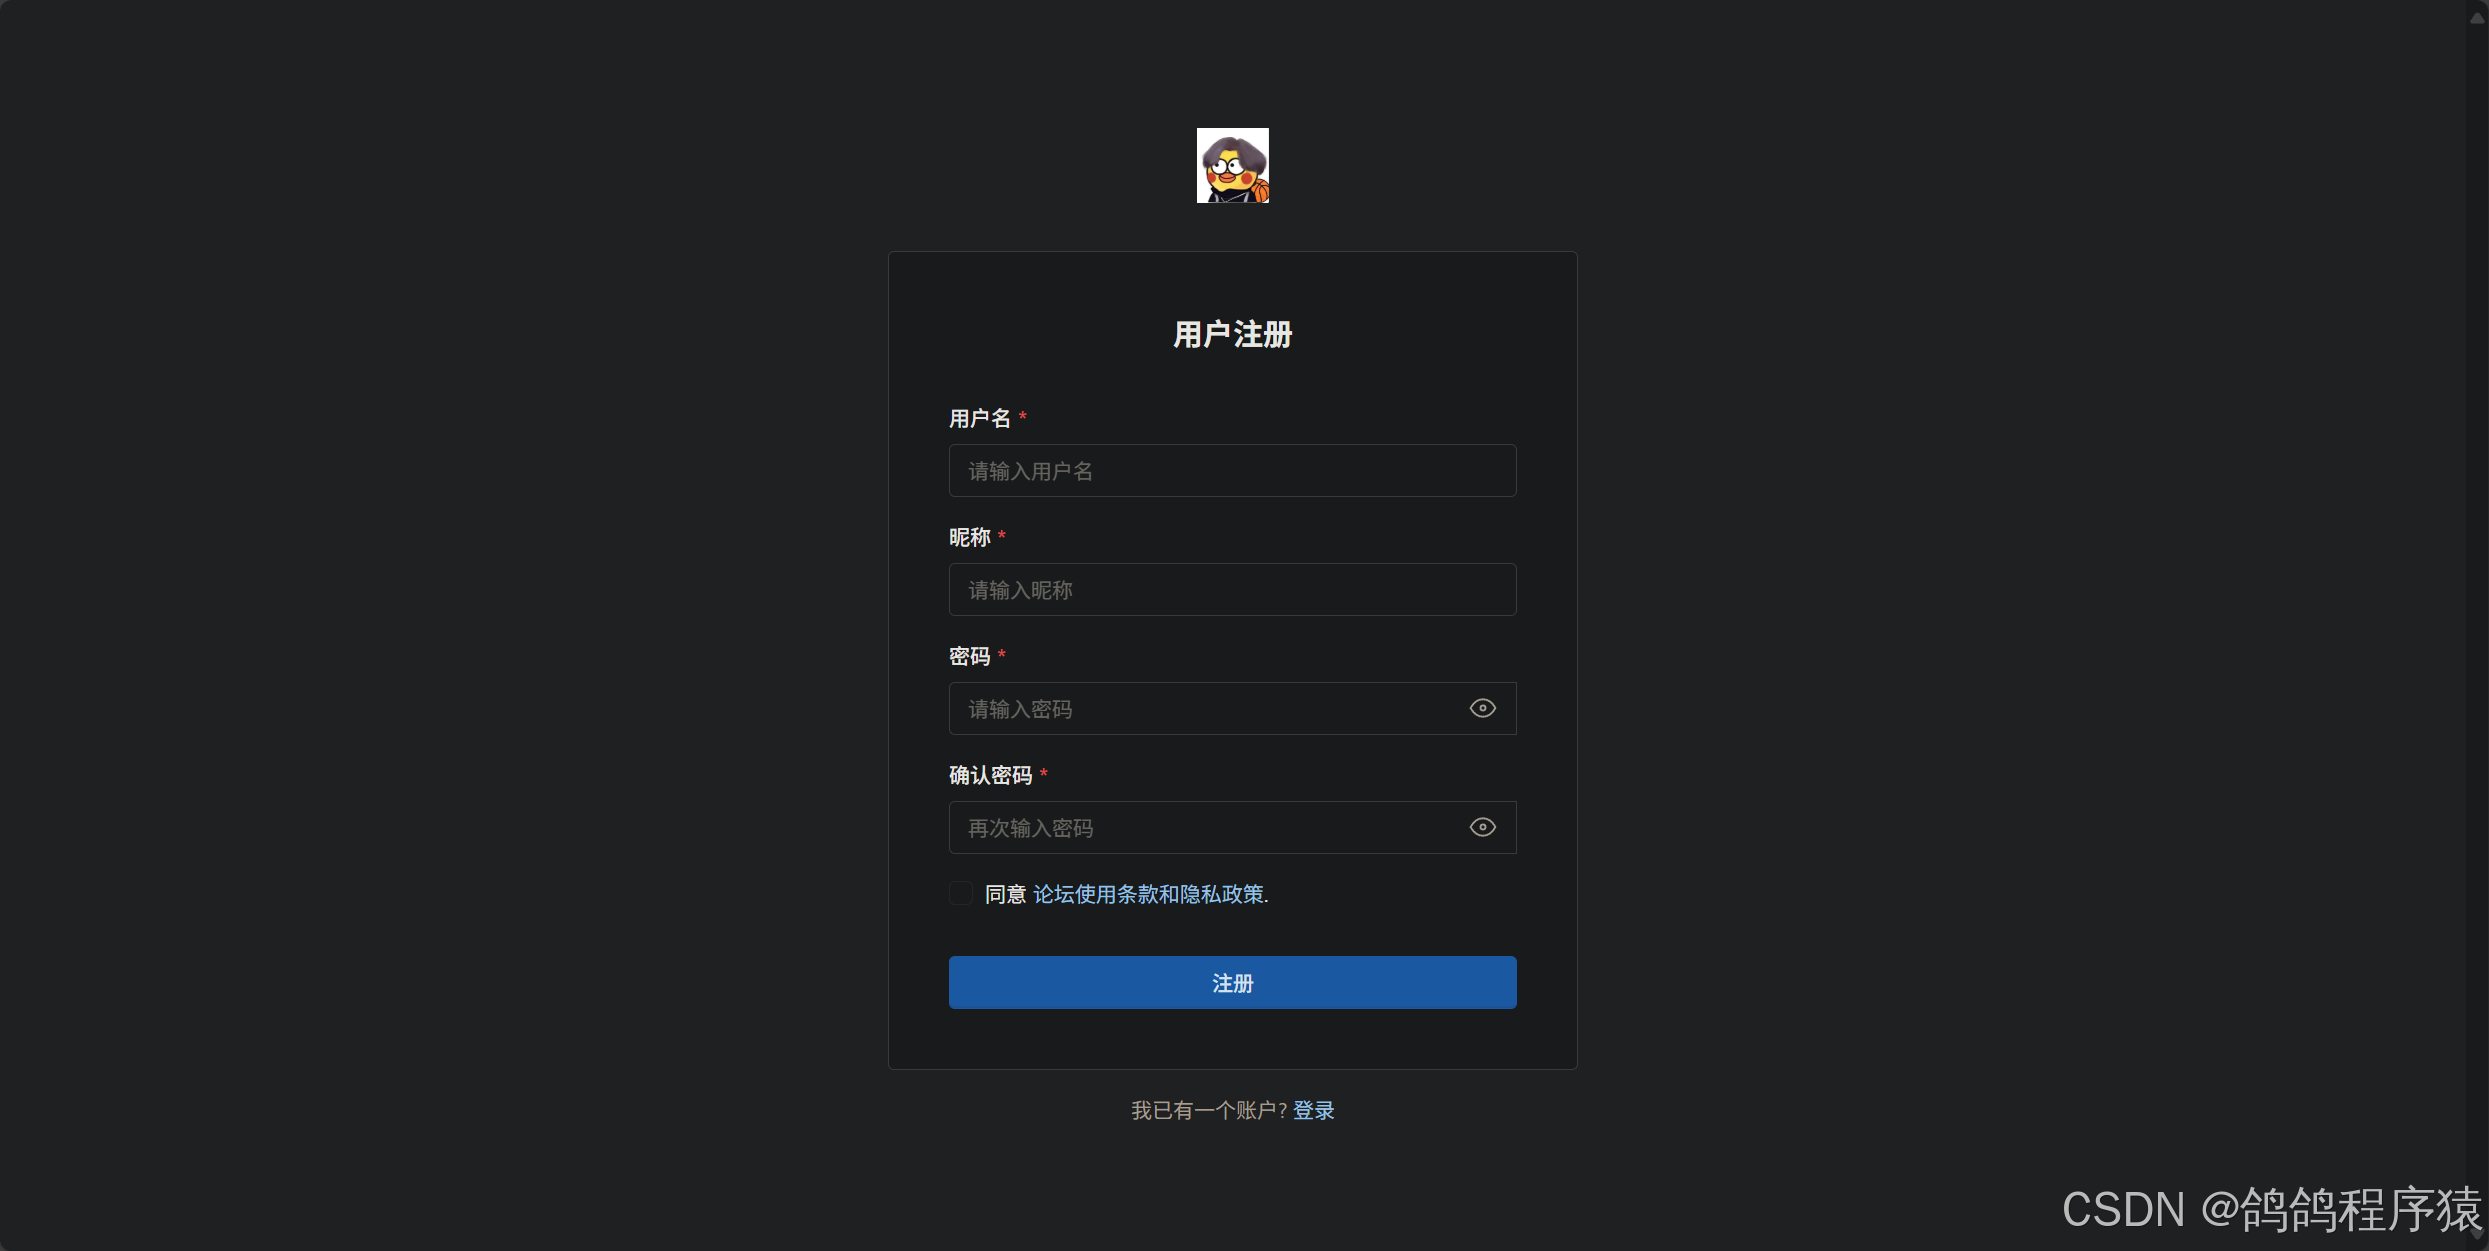
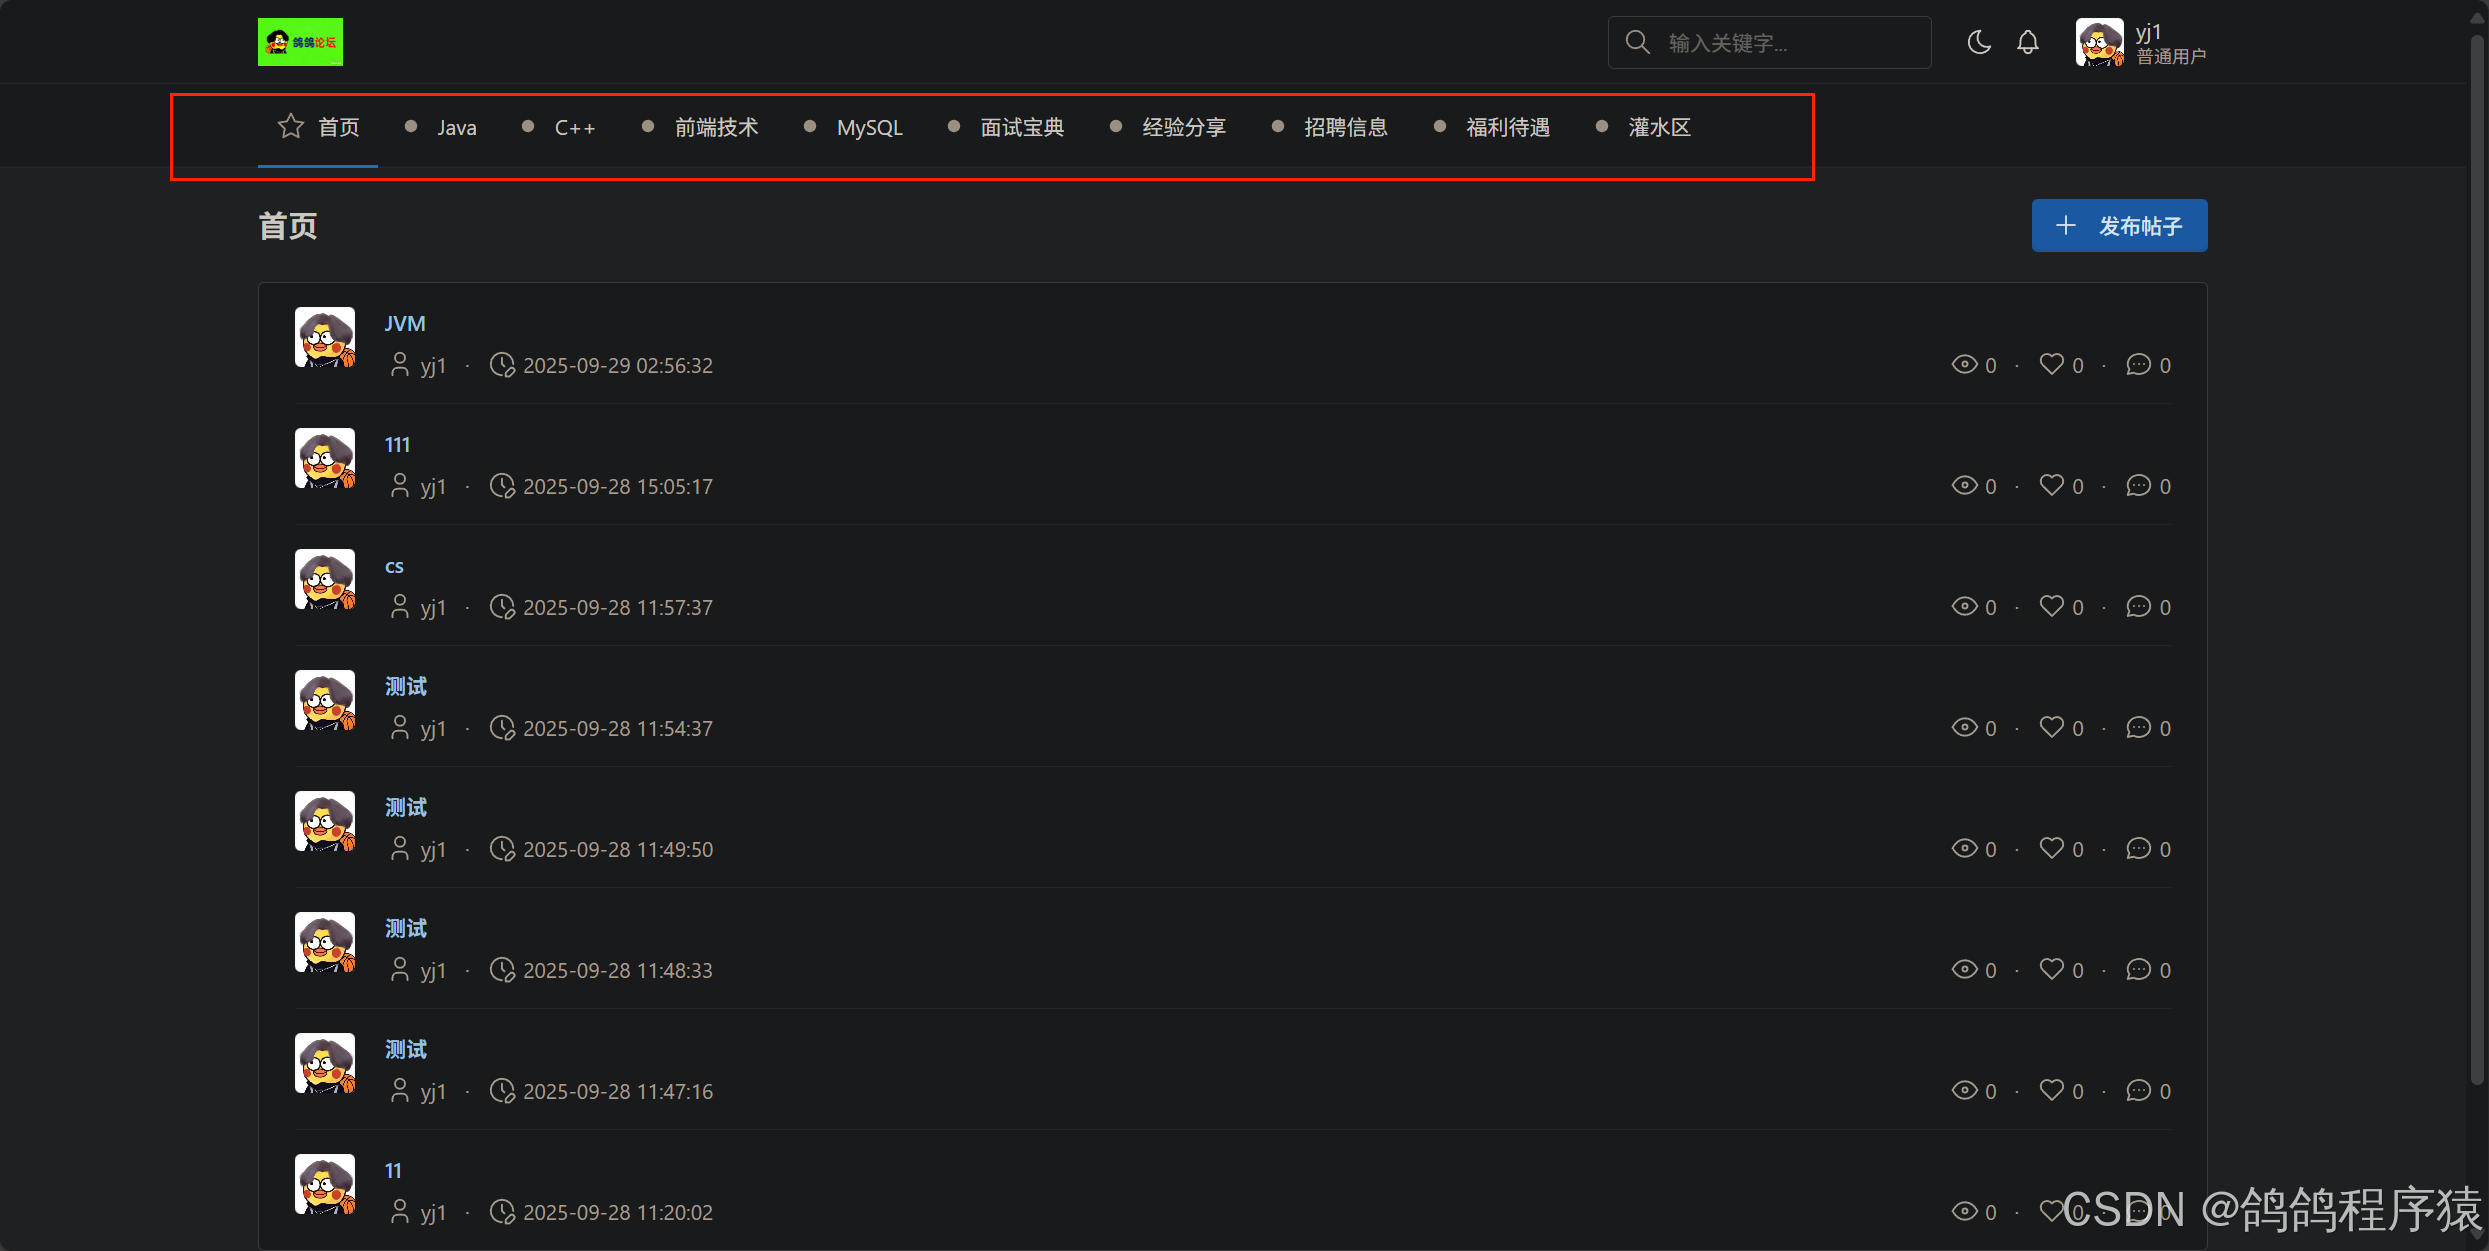
3.7.1.12 实现前端⻚⾯
sign-up.html文件:
<!doctype html><html lang="zh-CN"><head><meta charset="utf-8" /><meta name="viewport" content="width=device-width, initial-scale=1, viewport-fit=cover" /><meta http-equiv="X-UA-Compatible" content="ie=edge" /><link rel="shortcut icon" href="/favicon.ico"><title>论坛 - 用户注册</title><!-- 导入CSS --><link href="./dist/css/tabler.min.css?1674944402" rel="stylesheet" /><link rel="stylesheet" href="./dist/css/jquery.toast.css"><!-- 设置字体 --><!-- <style>@import url('https://rsms.me/inter/inter.css');:root {--tblr-font-sans-serif: 'Inter Var', -apple-system, BlinkMacSystemFont, San Francisco, Segoe UI, Roboto, Helvetica Neue, sans-serif;}body {font-feature-settings: "cv03", "cv04", "cv11";}</style> -->
</head><body class="d-flex flex-column"><!-- 正文 --><div class="page page-center"><div class="container container-tight py-4"><div class="text-center mb-4"><img src="./image/bit-forum-logo01.png" height="50" alt=""></div><form id="signUpForm" class="card card-md" autocomplete="off" novalidate><div class="card-body"><h2 class="text-center mb-4">用户注册</h2><!-- 用户名 --><div class="mb-3"><label class="form-label required">用户名</label><input type="text" class="form-control " placeholder="请输入用户名" name="username" id="username"><div class="invalid-feedback">用户名不能为空</div></div><!-- 昵称 --><div class="mb-3"><label class="form-label required">昵称</label><input type="text" class="form-control" placeholder="请输入昵称" name="nickname" id="nickname"><div class="invalid-feedback">昵称不能为空</div></div><!-- 密码 --><div class="mb-3"><label class="form-label required">密码</label><div class="input-group input-group-flat"><input type="password" class="form-control" placeholder="请输入密码" autocomplete="off" name="password"id="password"><span class="input-group-text"><a href="javascript:void(0);" class="link-secondary" id="password_a" title="显示密码"data-bs-toggle="tooltip"><!-- Download SVG icon from http://tabler-icons.io/i/eye --><svg xmlns="http://www.w3.org/2000/svg" class="icon" width="24" height="24" viewBox="0 0 24 24"stroke-width="2" stroke="currentColor" fill="none" stroke-linecap="round" stroke-linejoin="round"><path stroke="none" d="M0 0h24v24H0z" fill="none" /><path d="M12 12m-2 0a2 2 0 1 0 4 0a2 2 0 1 0 -4 0" /><pathd="M22 12c-2.667 4.667 -6 7 -10 7s-7.333 -2.333 -10 -7c2.667 -4.667 6 -7 10 -7s7.333 2.333 10 7" /></svg></a></span><div class="invalid-feedback">密码不能为空</div></div></div><!-- 确认密码 --><div class="mb-3"><label class="form-label required">确认密码</label><div class="input-group input-group-flat"><input type="password" class="form-control" placeholder="再次输入密码" autocomplete="off" name="passwordRepeat"id="passwordRepeat"><span class="input-group-text"><a href="javascript:void(0);" class="link-secondary" id="passwordRepeat_a" title="显示密码"data-bs-toggle="tooltip"><!-- Download SVG icon from http://tabler-icons.io/i/eye --><svg xmlns="http://www.w3.org/2000/svg" class="icon" width="24" height="24" viewBox="0 0 24 24"stroke-width="2" stroke="currentColor" fill="none" stroke-linecap="round" stroke-linejoin="round"><path stroke="none" d="M0 0h24v24H0z" fill="none" /><path d="M12 12m-2 0a2 2 0 1 0 4 0a2 2 0 1 0 -4 0" /><pathd="M22 12c-2.667 4.667 -6 7 -10 7s-7.333 -2.333 -10 -7c2.667 -4.667 6 -7 10 -7s7.333 2.333 10 7" /></svg></a></span><div class="invalid-feedback">请检查确认密码</div></div></div><div class="mb-3"><label class="form-check"><input type="checkbox" class="form-check-input" id="policy" /><span class="form-check-label">同意 <a href="#" tabindex="-1">论坛使用条款和隐私政策</a>.</span></label></div><div class="form-footer"><button type="button" class="btn btn-primary w-100" id="submit">注册</button></div></div></form><div class="text-center text-muted mt-3">我已有一个账户? <a href="./sign-in.html" tabindex="-1">登录</a></div></div></div>
</body>
<!-- 导入JS -->
<script src="./dist/js/tabler.min.js"></script>
<script src="./dist/js/jquery-3.6.3.min.js"></script>
<script src="./dist/js/jquery.toast.js"></script>
<script>//当前页面加载成功后执行
$(function () {// 获取表单并校验$('#submit').click(function () {let checkForm = true;// 校验用户名if (!$('#username').val()) {$('#username').addClass('is-invalid');checkForm = false;}// 校验昵称if (!$('#nickname').val()) {$('#nickname').addClass('is-invalid');checkForm = false;}// 校验密码非空if (!$('#password').val()) {$('#password').addClass('is-invalid');checkForm = false;}// 校验确认密码非空, 校验密码与重复密码是否相同if (!$('#passwordRepeat').val() || $('#password').val() != $('#passwordRepeat').val()) {$('#passwordRepeat').addClass('is-invalid');checkForm = false;}// 检验政策是否勾选if (!$('#policy').prop('checked')) {$('#policy').addClass('is-invalid');checkForm = false;}// 根据判断结果提交表单if (!checkForm) {return false;}// 构造数据let postData = {username : $('#username').val(),nickname : $('#nickname').val(),password : $('#password').val(),passwordRepeat : $('#passwordRepeat').val()};// 发送AJAX请求 // contentType = application/x-www-form-urlencoded// 成功后跳转到 sign-in.html$.ajax ({type : 'post',url : '/user/register',contentType : 'application/x-www-form-urlencoded',data : postData,//回调方法success: function (respData) {//判断返回状态吗if(respData.code == 0) {//跳转到登录页面location.assign('/sign-in.html');}else {//提示信息$.toast({heading : '警告',text: respData.message,icon: 'warning'});}},error: function () {//提示信息$.toast({heading : '错误',text: '访问出现错误,请于管理员联系',icon: 'error'});}});});// 表单元单独检验,失去焦点时校验(鼠标移走)$('#username, #nickname, #password').on('blur', function () {if ($(this).val()) {$(this).removeClass('is-invalid');$(this).addClass('is-valid');} else {$(this).removeClass('is-valid');$(this).addClass('is-invalid');}})// 检验确认密码$('#passwordRepeat').on('blur', function () {if ($(this).val() && $(this).val() == $('#password').val()) {$(this).removeClass('is-invalid');$(this).addClass('is-valid');} else {$(this).removeClass('is-valid');$(this).addClass('is-invalid');}})// 校验政策是否勾选$('#policy').on('change', function () {if ($(this).prop('checked')) {$(this).removeClass('is-invalid');$(this).addClass('is-valid');} else {$(this).removeClass('is-valid');$(this).addClass('is-invalid');}})// 密码框右侧明文密文切换按钮$('#passwordRepeat_a').click(function () {if($('#passwordRepeat').attr('type') == 'password') {$('#passwordRepeat').attr('type', 'text');} else {$('#passwordRepeat').attr('type', 'password');}});$('#password_a').click(function () {if($('#password').attr('type') == 'password') {$('#password').attr('type', 'text');} else {$('#password').attr('type', 'password');}});
});</script></html>
3.7.2 登录
3.7.2.1 流程图
3.7.2.2 参数要求
| 参数名 | 描述 | 类型 | 默认值 | 条件 |
|---|---|---|---|---|
| username | ⽤⼾名 | String | 必须 | |
| password | 密码 | String | 必须 |
3.7.2.3 接⼝规范
// 请求
POST /user/login HTTP/1.1
Content-Type: application/x-www-form-urlencoded
username=yj&password=123456// 响应
HTTP/1.1 200
Content-Type: application/json
{"code":0,"message":"成功","data":null}
3.7.2.4 创建Service接⼝
我们根据username查询,在上面注册的时候已经实现了,所以Mapper.xml 和 Mapper.java 不用再定义。
在com.yj.forum.services包下的 IUserService 新加上两个⽅法,如下:
/*** 根据用户名查用户信息* @param username 用户名* @return 用户信息*/User selectByUserName(String username);/*** 用户登录* @param username 用户名* @param password 密码* @return 返回用户信息*/User login(String username, String password);
3.7.2.5 实现Service接⼝
com.yj.forum.services.impl 包下UserServiceImpl中重写 IUserService 中新增的两个⽅法:
逻辑如下:
- selectByUserName方法直接调用Mapper方法即可。
- login方法:先校验传入的参数是否正确,在查询用户信息,对用户进行非空校验,再进行密码校验。
@Overridepublic User selectByUserName(String username) {return userMapper.selectByUserName(username);}@Overridepublic User login(String username, String password) {//非空校验if(StringUtil.isEmpty(username) || StringUtil.isEmpty(password)) {log.info(ResultCode.FAILED_PARAMS_VALIDATE.toString());throw new ApplicationException(AppResult.failed(ResultCode.FAILED_PARAMS_VALIDATE));}//根据用户名查询用户User user = selectByUserName(username);//用户不存在if(user == null) {log.info(ResultCode.FAILED_USER_NOT_EXISTS.toString());throw new ApplicationException(AppResult.failed(ResultCode.FAILED_USER_NOT_EXISTS));}//校验密码//String cipherText = MD5Util.md5Salt(password, user.getSalt());//密码不正确//if(!cipherText.equals( user.getPassword())) {if(!MD5Util.verifyOriginalAndCiphertext(password, user.getSalt(),user.getPassword())) {log.info(ResultCode.FAILED_LOGIN.toString() + " 密码错误:username = " + username );throw new ApplicationException(AppResult.failed(ResultCode.FAILED_LOGIN));}return user;}
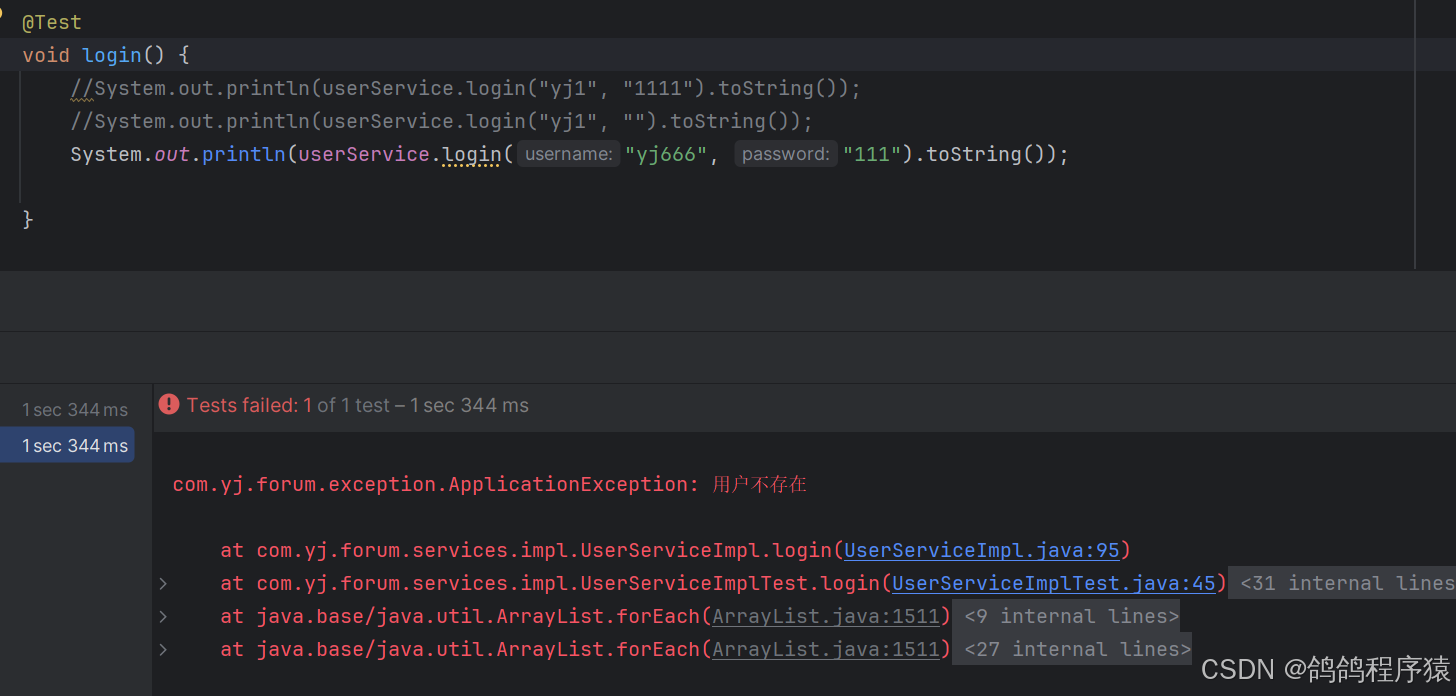
3.7.2.6 单元测试
@Testvoid selectByUserName() {userService.selectByUserName("yj1");}
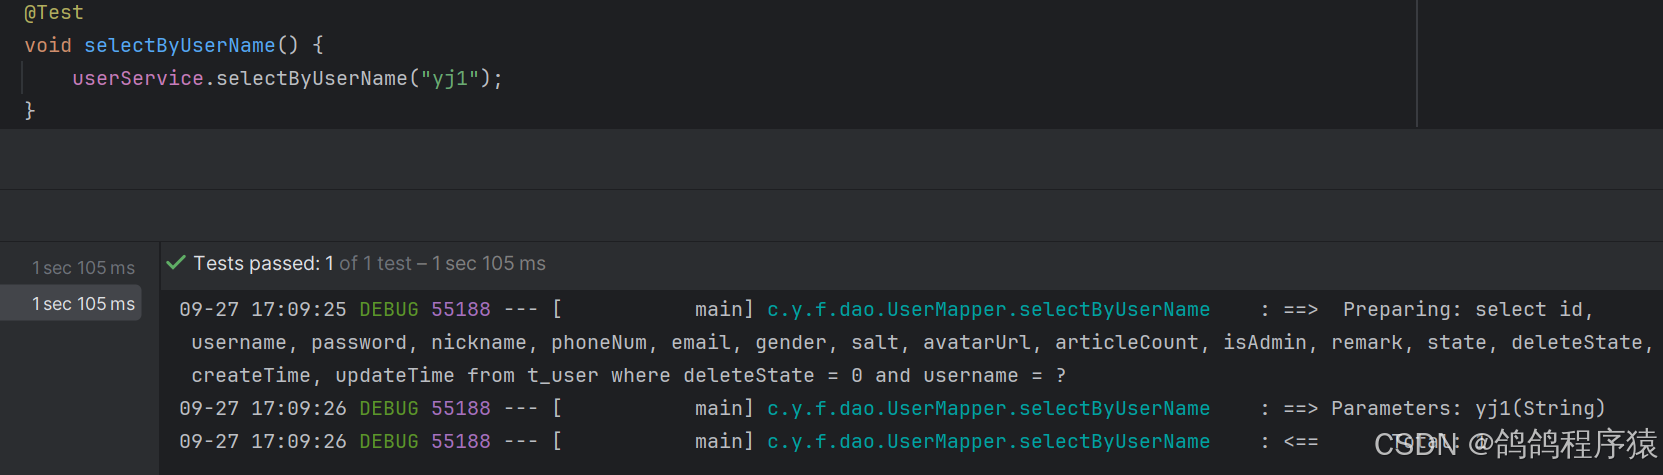
@Testvoid login() {//System.out.println(userService.login("yj1", "1111").toString());//System.out.println(userService.login("yj1", "").toString());System.out.println(userService.login("yj666", "111").toString());}
3.7.2.7 实现Controller
com.yj.forum.common包下,创造类AppConfig ,来定义全局变量。
package com.yj.forum.common;/*** 全局变量定义*/
public class AppConfig {/*** 用户session的key值*/public static final String USER_SESSION = "USER_SESSION";
}
在 com.yj.forum.controller 包下的UserController中实现登录⽅法。
逻辑:
- 非空校验,调用service拿到用户,将信息传入session中。
/*** 用户登录* @param username 用户名* @param password 用户密码* @return*/@ApiOperation("用户登录")@PostMapping("/login")public AppResult login(@ApiParam("用户名") @RequestParam(value = "username" ) String username,@ApiParam("用户密码") @RequestParam(value = "password" ) String password ,HttpServletRequest request) {//非空校验if(StringUtil.isEmpty(username) || StringUtil.isEmpty(password)) {log.info(ResultCode.FAILED_PARAMS_VALIDATE.toString());return AppResult.failed(ResultCode.FAILED_PARAMS_VALIDATE);}//调用serviceUser user = userService.login(username, password);// 获取SessionHttpSession session = request.getSession(true);// 把User设置到Session中 session.setAttribute(AppConfig.USER_SESSION , user);return AppResult.success();}
3.7.2.8 测试接⼝
在http://127.0.0.1:58080/swagger-ui/index.html或者Postman中传入参数测试即可。

3.7.2.9 实现前端⻚⾯
sign-in.html文件:
<!doctype html><html lang="zh-CN"><head><meta charset="utf-8"/><meta name="viewport" content="width=device-width, initial-scale=1, viewport-fit=cover"/><meta http-equiv="X-UA-Compatible" content="ie=edge"/><link rel="shortcut icon" href="/favicon.ico"><!-- 标题 --><title>论坛 - 用户登录</title><!-- 导入CSS --><link href="./dist/css/tabler.min.css?1674944402" rel="stylesheet"/><link rel="stylesheet" href="./dist/css/jquery.toast.css"><!-- 设置字体 --><!-- <style>@import url('https://rsms.me/inter/inter.css');:root {--tblr-font-sans-serif: 'Inter Var', -apple-system, BlinkMacSystemFont, San Francisco, Segoe UI, Roboto, Helvetica Neue, sans-serif;}body {font-feature-settings: "cv03", "cv04", "cv11";}</style> --></head><body class="d-flex flex-column"><!-- 正文 --><div class="page page-center"><div class="container container-normal py-4"><div class="row align-items-center g-4"><div class="col-lg"><div class="container-tight"><div class="text-center mb-4"><img src="./image/bit-forum-logo01.png" height="50" alt=""></div><div class="card card-md"><div class="card-body"><h2 class="text-center mb-4">用户登录</h2><form id="signInForm" method="get" autocomplete="off" novalidate><div class="mb-3"><label class="form-label required">用户名</label><input type="text" class="form-control" placeholder="请输入用户名" autocomplete="off" name="username" id="username"><div class="invalid-feedback">用户名不能为空</div></div><div class="mb-2"><label class="form-label required">密码<!-- <span class="form-label-description"><a href="#">忘记密码</a></span> --></label><div class="input-group input-group-flat"><input type="password" class="form-control"  placeholder="请输入密码"  autocomplete="off" name="password"id="password"><span class="input-group-text"><a href="javascript:void(0);" id="password_a" class="link-secondary" title="显示密码" data-bs-toggle="tooltip"><!-- Download SVG icon from http://tabler-icons.io/i/eye --><svg xmlns="http://www.w3.org/2000/svg" class="icon" width="24" height="24" viewBox="0 0 24 24" stroke-width="2" stroke="currentColor" fill="none" stroke-linecap="round" stroke-linejoin="round"><path stroke="none" d="M0 0h24v24H0z" fill="none"/><path d="M12 12m-2 0a2 2 0 1 0 4 0a2 2 0 1 0 -4 0" /><path d="M22 12c-2.667 4.667 -6 7 -10 7s-7.333 -2.333 -10 -7c2.667 -4.667 6 -7 10 -7s7.333 2.333 10 7" /></svg></a></span><div class="invalid-feedback">密码不能为空</div></div></div><!-- <div class="mb-2"><label class="form-check"><input type="checkbox" class="form-check-input"/><span class="form-check-label">记住我</span></label></div> --><div class="form-footer"><button id="submit" type="button" class="btn btn-primary w-100">登录</button></div></form></div></div><div class="text-center text-muted mt-3">还没有注册吗? <a href="./sign-up.html" tabindex="-1">点击注册</a></div></div></div><div class="col-lg d-none d-lg-block"><img src="./dist/illustrations/undraw_joyride_hnno.svg" height="300" class="d-block mx-auto" alt=""></div></div></div></div></body><!-- 导入JS --><script src="./dist/js/jquery-3.6.3.min.js"></script><script src="./dist/js/tabler.min.js"></script><script src="./dist/js/jquery.toast.js"></script><script>$(function () {// 获取控件// 用户名let usernameEl = $('#username');let passwordEl = $('#password');// 登录校验$('#submit').click(function () {let checkForm = true;// 校验用户名if (!usernameEl.val()) {usernameEl.addClass('is-invalid');checkForm = false;}// 校验密码if (!passwordEl.val()) {passwordEl.addClass('is-invalid');checkForm = false;}// 根据判断结果提交表单if (!checkForm) {return false;}// 构造数据let postData = {username : usernameEl.val(),password : passwordEl.val()};// 发送AJAX请求,成功后跳转到index.html$.ajax({type: 'post',url: 'user/login',contentType: 'application/x-www-form-urlencoded',data : postData,success : function (respData){//判断返回状态吗if(respData.code == 0) {//跳转到登录页面location.assign('/index.html');}else {//提示信息$.toast({heading : '警告',text: respData.message,icon: 'warning'});}},error : function () {//提示信息$.toast({heading : '错误',text: '访问出现错误,请于管理员联系',icon: 'error'});}});});//// 表单元单独检验$('#username, #password').on('blur', function () {if ($(this).val()) {$(this).removeClass('is-invalid');$(this).addClass('is-valid');} else {$(this).removeClass('is-valid');$(this).addClass('is-invalid');}});// 显示密码$('#password_a').click(function () {if(passwordEl.attr('type') == 'password') {passwordEl.attr('type', 'text');} else {passwordEl.attr('type', 'password');}});});</script>
</html>
3.7.3 退出
3.7.3.1 实现逻辑
流程⾮常简单,具体的实现逻辑如下:
- ⽤⼾访问退出接⼝
- 服务器注销Session
- 返回成功或失败4. 如果返回成功浏览器跳转到相应⻚⾯
- 结束
退出后跳转到哪个⻚⾯交给前端处理,建议跳转到登录⻚⾯。
3.7.3.2 接口规范
// 请求
GET http://127.0.0.1:58080/user/logout HTTP/1.1
// 响应
HTTP/1.1 200
Content-Type: application/json
{"code":0,"message":"成功","data":null}
3.7.3.3 实现Controller
在Contrller中实现销毁Session就完成了⽤⼾退出功能,不需要编写Service层代码。
/*** 用户退出* @return 成功状态*/@ApiOperation("用户退出")@GetMapping("/logout")public AppResult logout(HttpServletRequest request) {//获取sessionHttpSession session = request.getSession();if( session != null) {// 注销sessionsession.invalidate();}return AppResult.success("退出成功");}
3.7.3.4 测试接⼝
在http://127.0.0.1:58080/swagger-ui/index.html或者Postman中传入参数测试即可。

3.7.3.5 前端代码
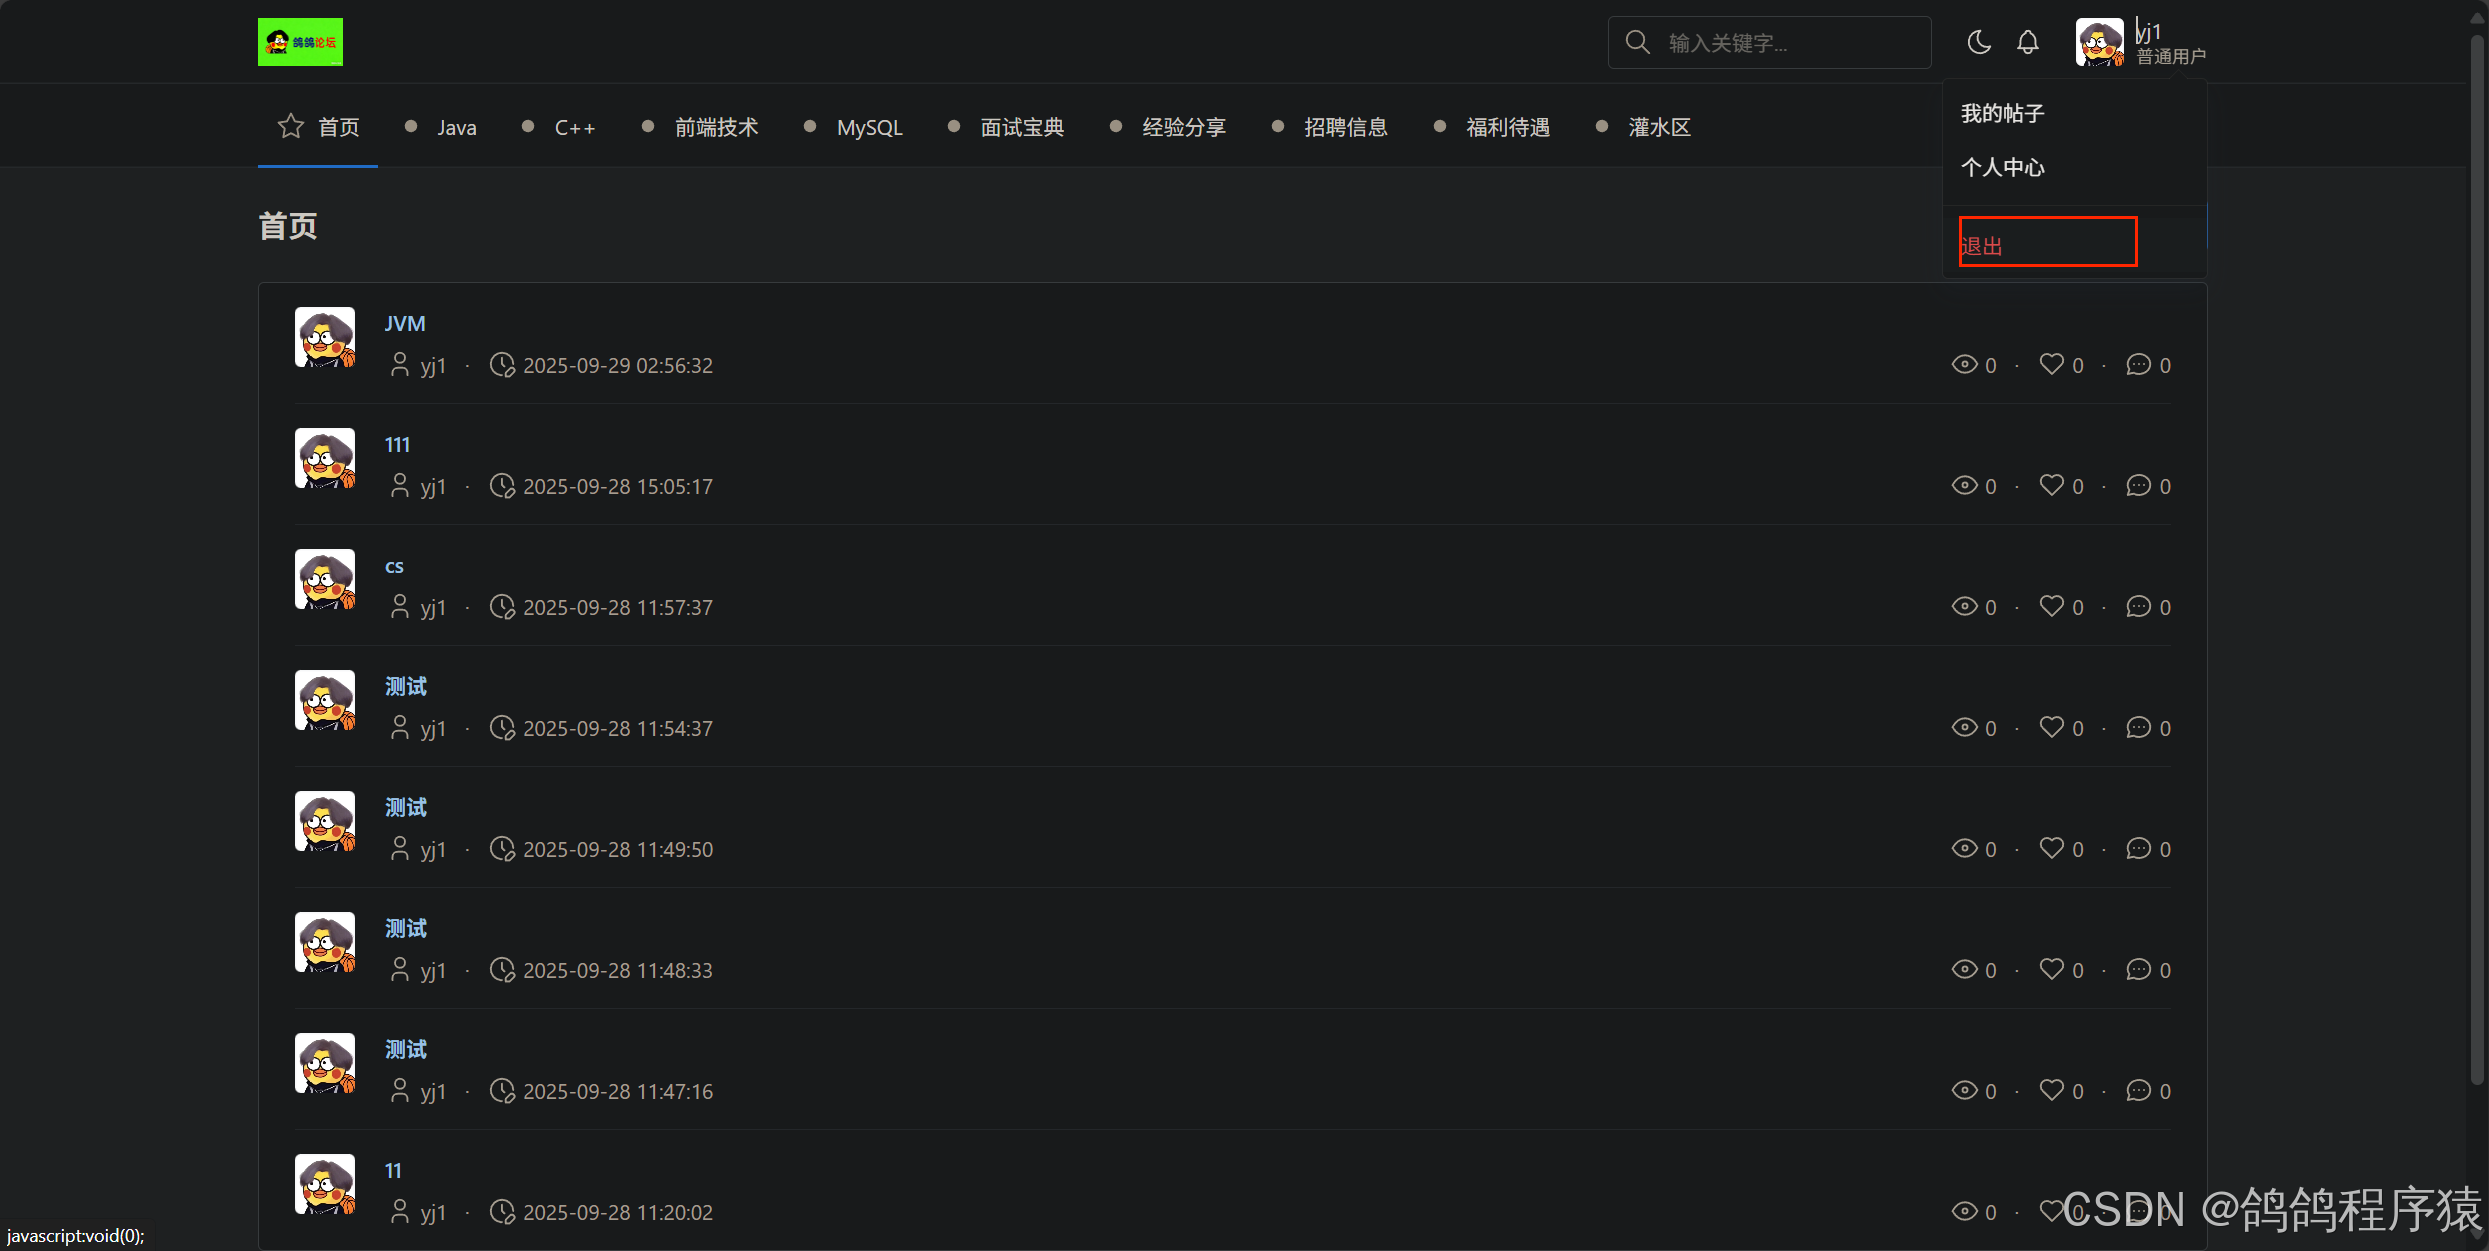
具体在下面的index.html中修改这一小部分。
// ============================ 处理退出登录点击事件 ===========================// 成功后,跳转到sign-in.html$('#index_user_logout').click(function () {$.ajax({type: 'get',url: 'user/logout',complete: function () {//请求完成,跳转登录页面location.assign('sign-in.html');}});});
3.7.4 个⼈中⼼

3.7.4.1 获取⽤⼾信息
3.3.1.1 实现逻辑
⽤⼾提交请求,服务器根据是否传⼊Id参数决定返回哪个⽤⼾的详情
- 不传⽤⼾Id,返回当前登录⽤⼾的详情
- 传⼊⽤⼾Id,返回指定Id的⽤⼾详情
3.7.4.2 参数要求
| 参数名 | 描述 | 类型 | 默认值 | 条件 |
|---|---|---|---|---|
| id | ⽤⼾Id | long | 可以为空 |
3.7.4.3 接⼝规范
// 请求
GET /user/info HTTP/1.1
GET /user/info?id=1 HTTP/1.1
// 响应
HTTP/1.1 200
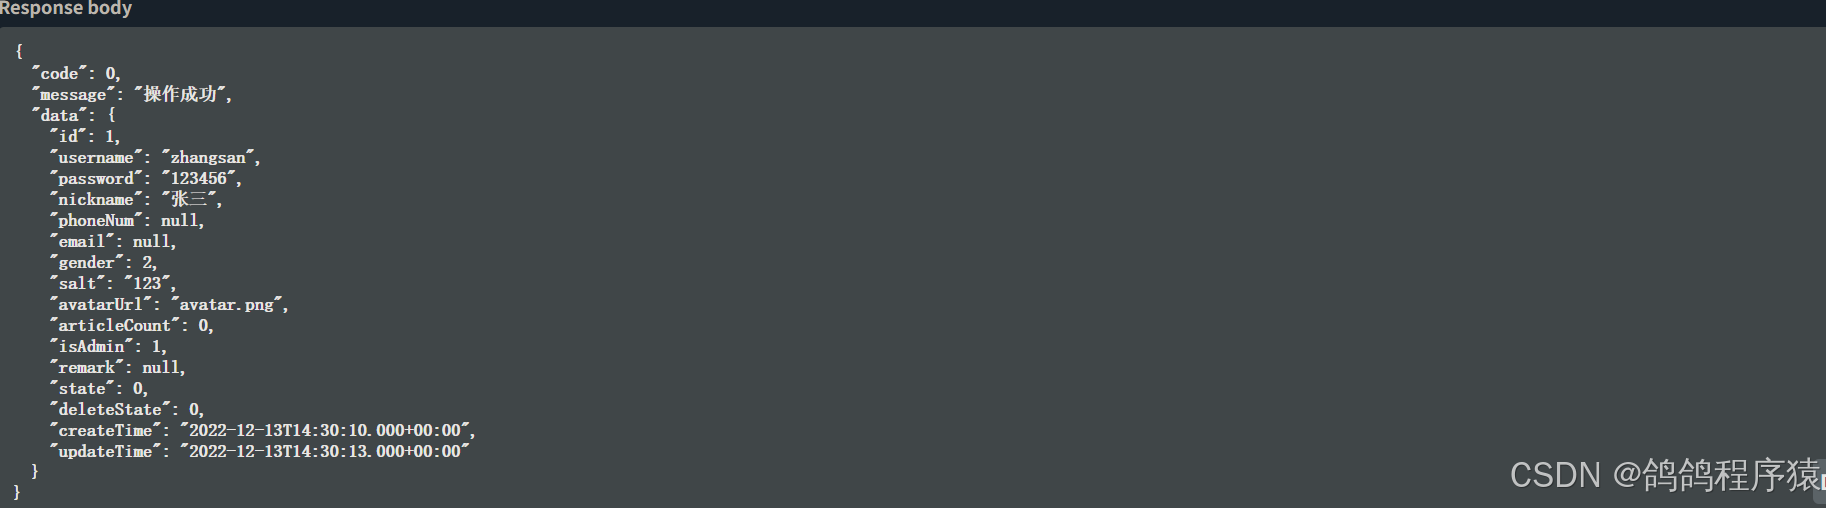
Content-type: applicatin/json{"code": 0,"message": "成功","data": {"id": 25,"username": "user223","nickname": "user223","phoneNum": null,"email": null,"gender": 1,"avatarUrl": null,"articleCount": 0,"isAdmin": 0,"state": 0,"createTime": "2023-04-08 15:06:10","updateTime": "2023-04-08 15:06:10"}
}
3.7.4.4 创建Service接⼝
通过id查找数据,已经由插件自己生成了,不用写mapper和dao层的代码
在com.yj.forum.services 包 的 IUserService 接口定义selectById⽅法,如下:
/*** 通过id查用户信息* @param id 用户id* @return 用户信息*/User selectById(long id);
3.7.4.5 实现Service接⼝
在com.yj.forum.services.impl 包 UserServiceImpl 中实现selectById⽅法,
@Overridepublic User selectById(long id) {return userMapper.selectByPrimaryKey(id);}
3.7.4.6 单元测试
 @Test
void selectById() {System.out.println(userService.selectById(1).toString());
}

3.7.4.7 实现Controller
在UserController中实现修改个⼈信息⽅法,
实现逻辑
- id 为空,返回当前登录⽤⼾
- id 不为空,返回指定id的⽤⼾
    /*** 获取用户详情* @param id 用户id* @return 用户详情*/@ApiOperation("获取用户信息")@GetMapping("/info")public AppResult<User> getUserInfo(HttpServletRequest request, @ApiParam("用户id") @RequestParam(value = "id", required = false) Long id) {User user = null;//id 为空,返回当前登录⽤⼾if( id == null) {// 获取Session中的⽤⼾信息HttpSession session = request.getSession();//拦截器已经做了
//            if(session == null || session.getAttribute(AppConfig.USER_SESSION) == null) {
//                return AppResult.failed(ResultCode.FAILED_FORBIDDEN);
//            }user = (User) session.getAttribute(AppConfig.USER_SESSION);} else {// id 不为空,根据⽤⼾Id从数据库中查询⽤⼾信息user = userService.selectById(id);}return AppResult.success(user);}
3.1.4.8 测试接口
在http://127.0.0.1:58080/swagger-ui/index.html或者Postman中传入参数测试即可。
3.1.4.9 修复返回值存在的缺陷
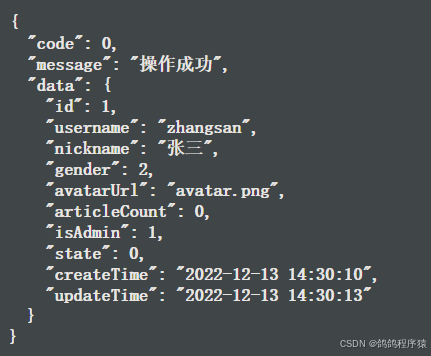
登录成功的返回结果发现,⽤⼾信息中的password, salt, deletState不应该返回给前台,在com.yj.forum.model 包 User类中的对应属性上加@JsonIgnore注解,可以使对应的字段不参与JSON的序列化(java对象转为JSON字符串)。
@JsonIgnoreprivate String password;@JsonIgnoreprivate String salt;@JsonIgnoreprivate Byte deleteState;

修改⽇期格式为 yyyy-MM-dd HH:mm:ss, 在application.yml中添加配置
# 在spring下加⼊⼦节点
spring: # JSON序列化配置 jackson:date-format: yyyy-MM-dd HH:mm:ss # ⽇期格式 default-property-inclusion: NON_NULL # 不为null时序列化
3.1.4.10 实现前端⻚⾯
具体在下面的index.html中修改这一小部分。
$(function () {//========================= 获取用户信息 =======================// 成功后,手动设置用户信息// $('#index_nav_avatar').css('background-image', 'url(' + user.avatarUrl + ')');$.ajax({type: 'get',url: 'user/info',success: function (respData) {if(respData.code == 0) {let user = respData.data;//用户头像是否有效if(!user.avatarUrl) {//默认头像user.avatarUrl = avatarUrl;}//设置页面头像$('#index_nav_avatar').css('background-image', 'url(' + user.avatarUrl + ')');//用户昵称$('#index_nav_nickname').html(user.nickname);//设置用户组let subNum = user.isAdmin == 1 ?'管理员':'普通用户';$('#index_nav_name_sub').html(subNum);} else {//提示信息$.toast({heading : '警告',text: respData.message,icon: 'warning'});}},error: function (){//提示信息$.toast({heading : '错误',text: '访问出现错误,请于管理员联系',icon: 'error'});}});3.7.5 查询导航栏板块列表
单独提供查询前N条记录的接⼝,⽤来控制⾸⻚中版块的个数。
3.7.5.1 参数要求
⽆
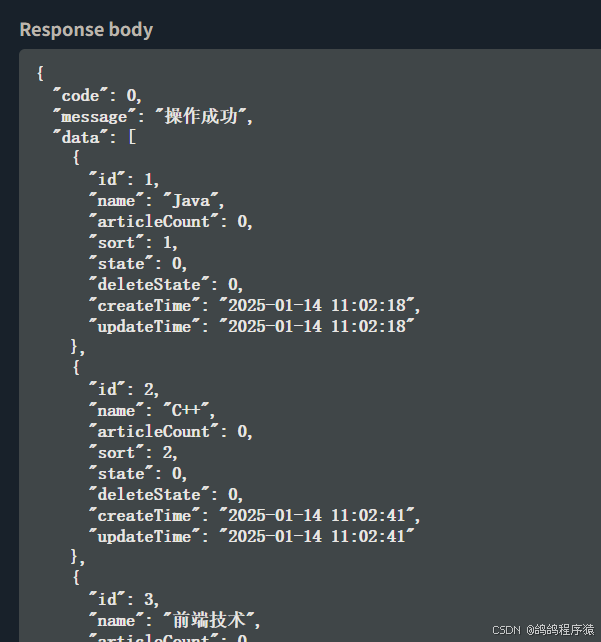
3.7.5.2 接⼝规范
// 请求 GET http://127.0.0.1:58080/board/topList HTTP/1.1
// 响应 HTTP/1.1 200Content-Type: application/json{"code": 0,"message": "成功","data": [{"id": 1,"name": "Java","articleCount": 5,"sort": 1,"state": 0,"createTime": "2023-01-14 11:02:18","updateTime": "2023-01-14 11:02:18"},{"id": 2,"name": "C++","articleCount": 1,"sort": 2,"state": 0,"createTime": "2023-01-14 11:02:41","updateTime": "2023-01-14 11:02:41"},{"id": 3,"name": "前端技术","articleCount": 0,"sort": 3,"state": 0,"createTime": "2023-01-14 11:02:52","updateTime": "2023-01-14 11:02:52"},{"id": 4,"name": "MySQL","articleCount": 0,"sort": 4,"state": 0,"createTime": "2023-01-14 11:03:02","updateTime": "2023-01-14 11:03:02"},{"id": 5,"name": "⾯试宝典","articleCount": 0,"sort": 5,"state": 0,"createTime": "2023-01-14 11:03:24","updateTime": "2023-01-14 11:03:24"},{"id": 6,"name": "经验分享","articleCount": 0,"sort": 6,"state": 0,"createTime": "2023-01-14 11:03:48","updateTime": "2023-01-14 11:03:48"},{"id": 7,"name": "招聘信息","articleCount": 0,"sort": 7,"state": 0,"createTime": "2023-01-25 13:25:33","updateTime": "2023-01-25 13:25:33"},{"id": 8,"name": "福利待遇","articleCount": 0,"sort": 8,"state": 0,"createTime": "2023-01-25 13:25:58","updateTime": "2023-01-25 13:25:58"},{"id": 9,"name": "灌⽔区","articleCount": 0,"sort": 9,"state": 0,"createTime": "2023-01-25 13:26:12","updateTime": "2023-01-25 13:26:12"}]}
3.7.5.3 创建扩展Mapper.xml
在src/main/resources/mapper/extension⽬录下新建 BoardExtMapper.xml
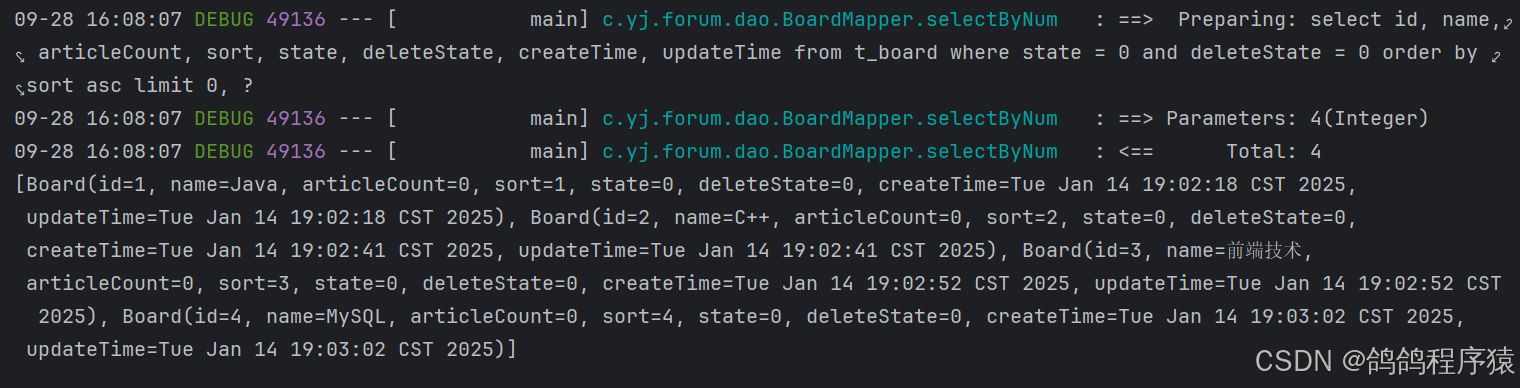
我们的sql语句是: select * from t_board where state = 0 and deleteState = 0 order by sort asc limit 0, 9;
<?xml version="1.0" encoding="UTF-8"?>
<!DOCTYPE mapper PUBLIC "-//mybatis.org//DTD Mapper 3.0//EN" "http://mybatis.org/dtd/mybatis-3-mapper.dtd">
<mapper namespace="com.yj.forum.dao.BoardMapper"><!-- 查询前N个正常状态的版块 --><select id="selectByNum" resultMap="BaseResultMap" parameterType="java.lang.Integer">select<include refid="Base_Column_List"/>from t_boardwhere state = 0 and deleteState = 0order by sort asclimit 0, #{num,jdbcType=INTEGER}</select></mapper>
3.7.5.4 修改DAO
com.yj.forum.dao包下的BoardMapper中添加⽅法声明:
/*** 查询前 num个正常状态的版块* @param num 查询的个数* @return 前 num个版块的集合*/List<Board> selectByNum (@Param("num") Integer num);
3.7.5.5 创建Service接⼝
在com.yj.forum.services 包下 IBoradService 接口类 定义⽅法,如下:
package com.yj.forum.services;import com.yj.forum.model.Board;import java.util.List;public interface IBoradService {/*** 查询前 num个正常状态的版块* @param num 查询的个数* @return 前 num个版块的集合*/List<Board> selectByNum (Integer num);}3.7.5.6 实现Service接⼝
在com.yj.forum.services.impl包下 BoardServiceImpl 中新增⽅法,
实现逻辑,只需要校验一下参数是否大于0,返回数据是否为空,在使用方去校验。
package com.yj.forum.services.impl;import com.yj.forum.common.AppResult;
import com.yj.forum.common.ResultCode;
import com.yj.forum.dao.BoardMapper;
import com.yj.forum.exception.ApplicationException;
import com.yj.forum.model.Board;
import com.yj.forum.services.IBoradService;
import lombok.extern.slf4j.Slf4j;
import org.springframework.stereotype.Service;import javax.annotation.Resource;
import java.util.List;@Service
@Slf4j
public class BoardServiceImpl implements IBoradService {@Resourceprivate BoardMapper boardMapper;/*** 查询前 num个正常状态的版块* @param num 查询的个数* @return 前 num个版块的集合*/@Overridepublic List<Board> selectByNum(Integer num) {//参数校验if(num <= 0) {log.warn(ResultCode.FAILED_PARAMS_VALIDATE.toString());throw new ApplicationException(AppResult.failed(ResultCode.FAILED_PARAMS_VALIDATE));}//调用dao层List<Board> boards = boardMapper.selectByNum(num);return boards;}
}
3.7.5.7 单元测试
package com.yj.forum.services.impl;import com.yj.forum.model.Board;
import com.yj.forum.services.IBoardService;
import org.junit.jupiter.api.Test;
import org.springframework.boot.test.context.SpringBootTest;import javax.annotation.Resource;
import java.util.List;@SpringBootTest
class BoardServiceImplTest {@Resourceprivate IBoardService boardService;@Testvoid selectByNum() {List<Board> boards = boardService.selectByNum(4);System.out.println(boards.toString());}
}
3.7.5.8 application.yml中添加配置
# 项⽬⾃定义相关配置(顶格写)
bit-forum:index: # ⾸⻚配置节点 board-num: 9 # ⾸⻚中显⽰的版块个数
3.7.5.8 实现Controller
在com.yj.forum.controller包BoardController中提供对外的API接⼝
package com.yj.forum.controller;import com.yj.forum.common.AppResult;
import com.yj.forum.model.Board;
import com.yj.forum.services.IBoardService;
import io.swagger.annotations.Api;
import io.swagger.annotations.ApiOperation;
import lombok.extern.slf4j.Slf4j;
import org.springframework.beans.factory.annotation.Value;
import org.springframework.web.bind.annotation.GetMapping;
import org.springframework.web.bind.annotation.RestController;import javax.annotation.Resource;
import java.util.List;@Api(tags = "版块接口")
@RestController
@Slf4j
@RequestMapping("/board")
public class BoardController {// 从配置⽂件中获取主⻚中显⽰的版块个数,默认为9@Value("${yj-forum.index.board-num:9}")private Integer indexBoardNum;@Resourceprivate IBoardService boardService;@ApiOperation("获取首页版块列表")@GetMapping("/topList")public AppResult<List<Board>> topList() {log.info("主⻚中显⽰的版块个数: indexBoardNum = " + indexBoardNum);List<Board> boards = boardService.selectByNum(indexBoardNum);return AppResult.success(boards);}
}
3.7.5.8 测试 API接口
在http://127.0.0.1:58080/swagger-ui/index.html或者Postman中测试接口,记得登录。
3.7.5.9 实现前端
index.html 加入:
// ========================= 获取版块信息 =======================// 成功后,调用buildTopBoard()方法,构建版块列表$.ajax({type: 'get',url: 'board/topList',success : function (respData) {if(respData.code == 0) {buildTopBoard(respData.data);} else {//提示信息$.toast({heading : '警告',text: respData.message,icon: 'warning'});}},error: function () {//提示信息$.toast({heading : '错误',text: '访问出现错误,请于管理员联系',icon: 'error'});}});//========================= 构造首页版块=======================// 构造首页版块function buildTopBoard(data) {// 版块导航let navBoardListEl = $('#topBoardList');// 遍历版块data.forEach(board => {// 构建版块let itemHtml = '<li class="nav-item">'+ '<a class="nav-link" href="javascript:void(0);">'+ '<span class="nav-link-icon d-md-none d-lg-inline-block">'+ '<svg xmlns="http://www.w3.org/2000/svg" class="icon icon-tabler icon-tabler-point-filled" width="24"'+ 'height="24" viewBox="0 0 24 24" stroke-width="2" stroke="currentColor" fill="none"'+ 'stroke-linecap="round" stroke-linejoin="round">'+ '<path stroke="none" d="M0 0h24v24H0z" fill="none"></path>'+ '<path d="M12 7a5 5 0 1 1 -4.995 5.217l-.005 -.217l.005 -.217a5 5 0 0 1 4.995 -4.783z"'+ 'stroke-width="0" fill="currentColor"></path>'+ '</svg>'+ '</span>'+ '<span class="nav-link-title">'+ board.name+ '</span>'+ '</a>'+ '</li>'// 为版块绑定当前版块数据对象以便后续获取let boardItem = $(itemHtml);// 把版块信息绑定到当前导航单元boardItem.data('board', board);console.log('data = ' + boardItem.data('board').name + ', id = ' + boardItem.data('board').id);// 处理点击事件boardItem.click(function () {// alert('data = ' + boardItem.data('board').name + ', id = ' + boardItem.data('board').id);// 激活效果changeNavActive(boardItem);});// 加入版块导航navBoardListEl.append(boardItem);});}3.7.6 发布贴⼦
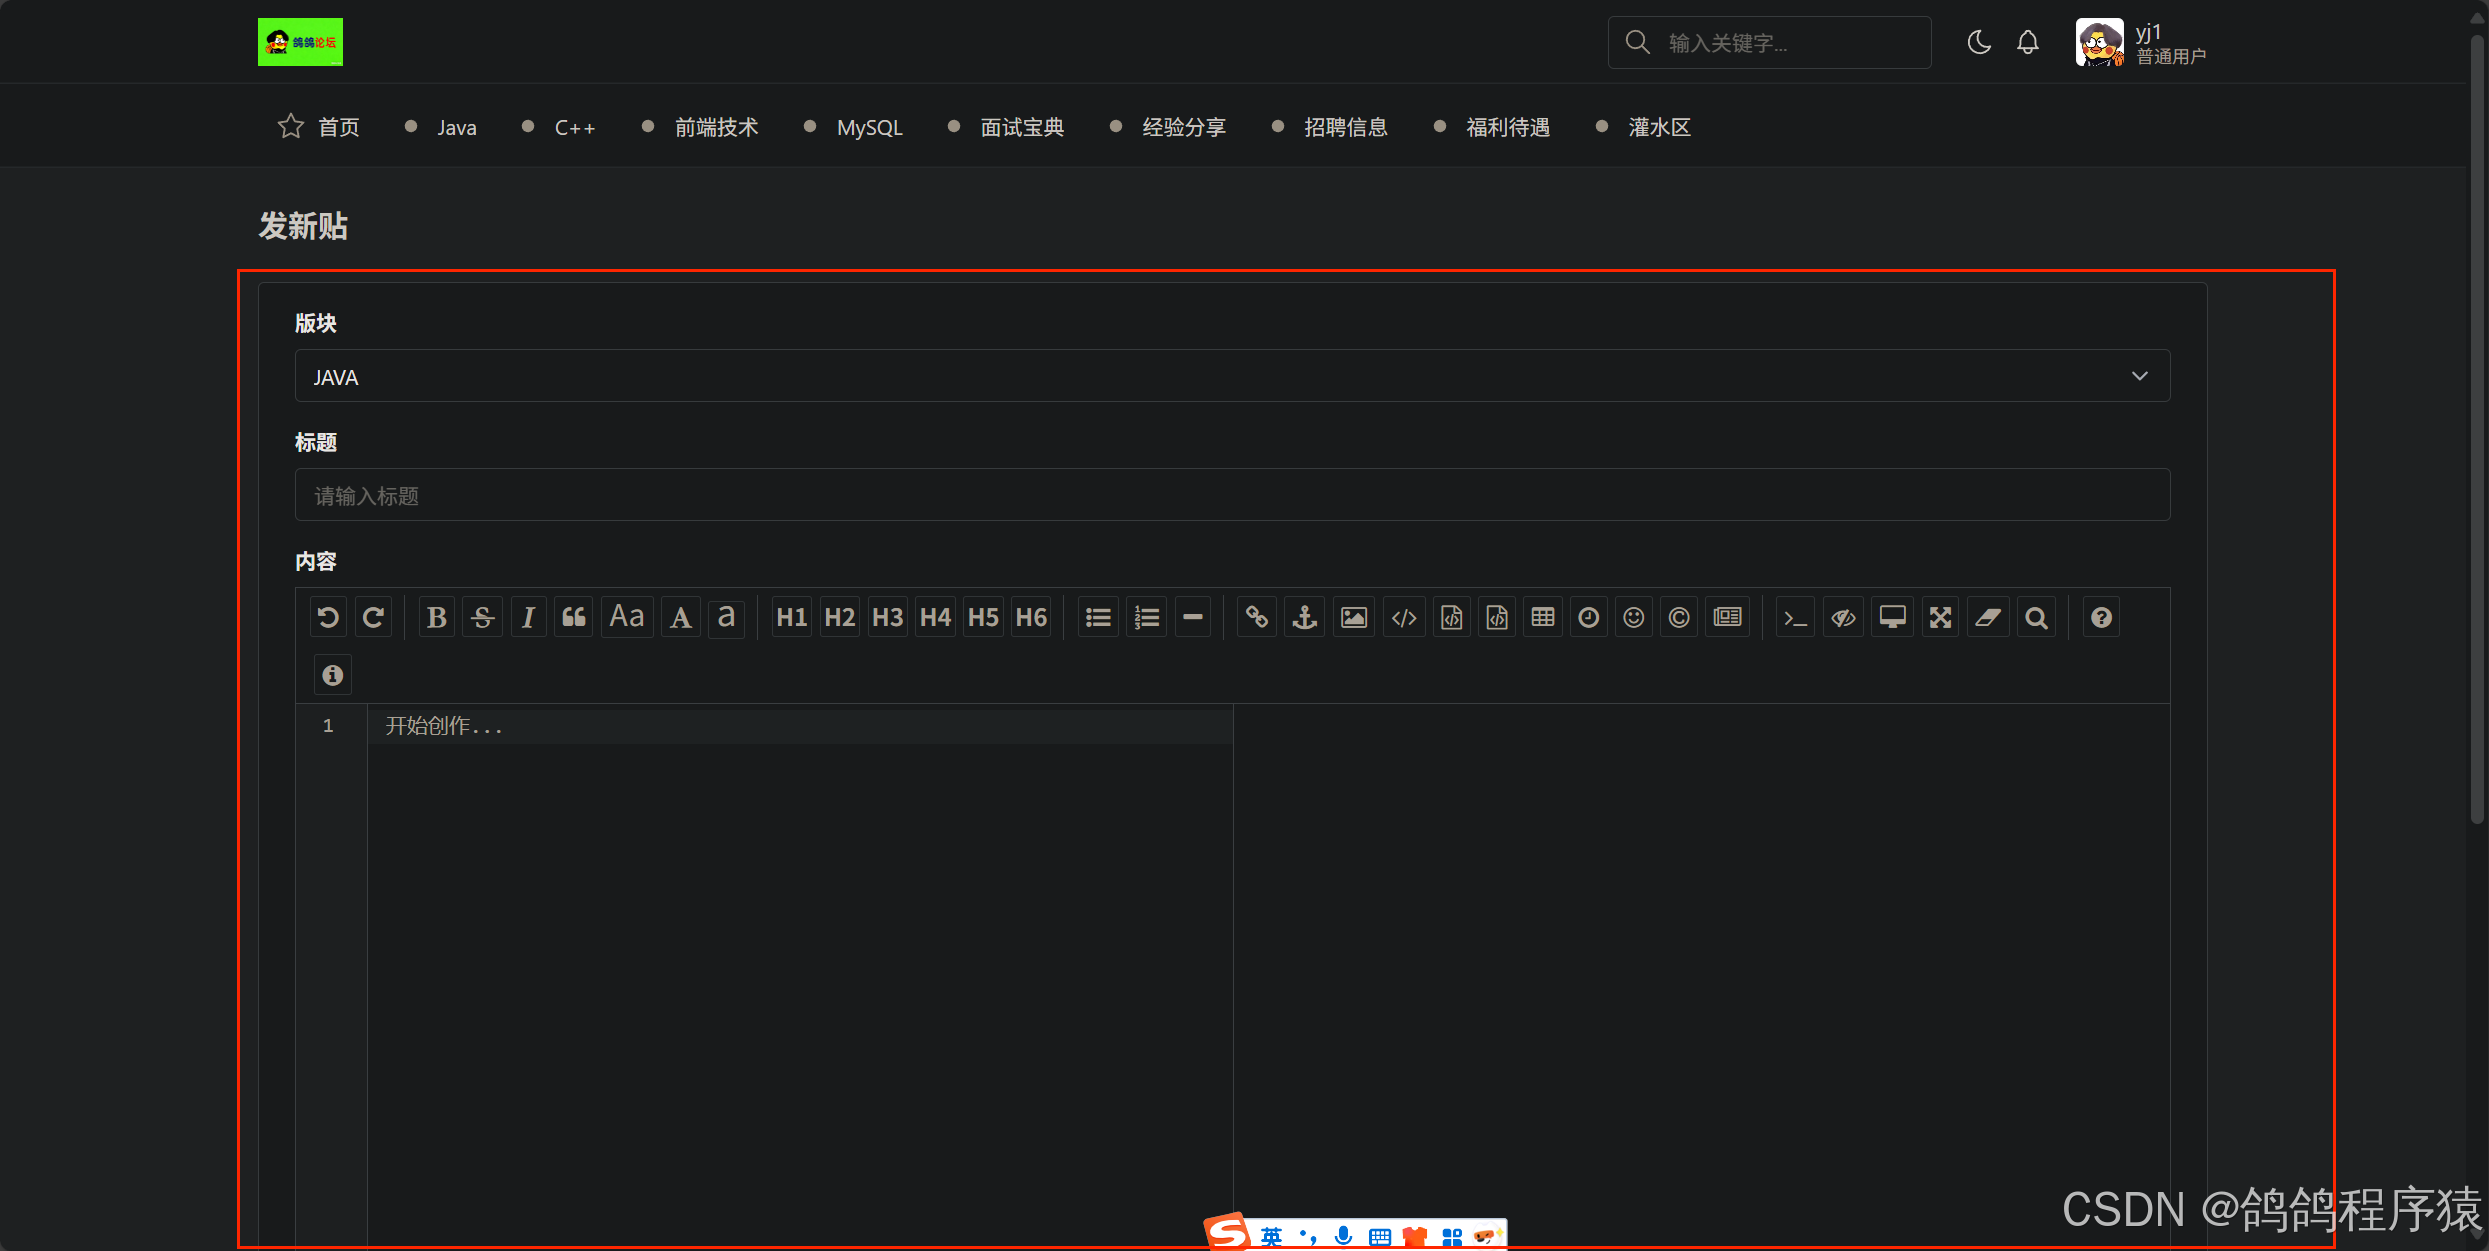
3.7.6.1 实现逻辑
- ⽤⼾点击发新帖按钮,进⼊发帖⻚⾯
- 选择版块,填⼊标题、正⽂后提交服务器
- 服务器校验信息并写⼊数据库,文章表 t_article
- 更新⽤⼾发帖数与版块帖⼦数,用户表t_user和帖子表t_board
- 返回结果
3.7.6.2 参数要求
| 参数名 | 描述 | 类型 | 默认值 | 条件 |
|---|---|---|---|---|
| boardId | 版块Id | long | 必须 | |
| title | ⽂章标题 | String | 必须 | |
| content | 帖⼦内容 | String | 必须 |
3.7.6.3 接⼝规范
/ 请求
POST http://127.0.0.1:58080/article/create HTTP/1.1
Content-Type: application/x-www-form-urlencodedboardId=1&title=%E6%B5%8B%E8%AF%95%E6%96%B0%E5%B8%96%E5%AD%90%E6%A0%87%E9%A2%98
&content=%E6%B5%8B%E8%AF%95%E6%96%B0%E5%B8%96%E5%AD%90%E5%86%85%E5%AE%B9%E6%B5%
8B%E8%AF%95%E6%96%B0%E5%B8%96%E5%AD%90%E5%86%85%E5%AE%B9// 响应
HTTP/1.1 200
Content-Type: application/json
{"code":0,"message":"成功","data":null}
3.7.6.4 创建Service接⼝
在Mapper和dao,已经通过插件Mybatis Generator 自动生成了动态更新的SQL,不用写。
在 com.yj.forum.services 包 IUserService 定义⽅法。
/*** 更新当前用户的发帖数* @param id 用户id*/void addOneArticleCountById(Long id);
在 com.yj.forum.services 包下 IBoardService 定义⽅法。
/*** 板块中 帖⼦数加1* @param id 用户id* @return*/void addOneArticleCountById(Long id);
在 com.yj.forum.services 包下 IArticleService 定义⽅法。
package com.yj.forum.services;import com.yj.forum.model.Article;
import org.springframework.transaction.annotation.Transactional;public interface IArticleService {/*** 新增帖⼦* @param article 帖⼦信息*/// 事务管理@Transactionalvoid create(Article article);
}
3.7.6.5 实现Service接⼝
在 com.yj.forum.services.impl 包下 BoardServiceImpl 中实现⽅法
逻辑:
- 非空校验
- 新创板块,将原板块id赋值,板块的文章数量加一赋值,在更新。因为我们的mapper的实现逻辑就是只更改不同得值,id是更改的依据。
- 判断一下更新影响行数是否正常。
@Overridepublic void addOneArticleCountById(Long id) {//非空校验if(id == null || id <= 0) {log.warn(ResultCode.FAILED_BOARD_ARTICLE_COUNT.toString());throw new ApplicationException(AppResult.failed(ResultCode.FAILED_BOARD_ARTICLE_COUNT));}//查询对应板块Board board = boardMapper.selectByPrimaryKey(id);if(board == null) {log.info(ResultCode.ERROR_IS_NULL.toString() + ", board id = " + id);throw new ApplicationException(AppResult.failed(ResultCode.ERROR_IS_NULL));}// 更新帖⼦数量Board updateBoard = new Board();updateBoard.setId(board.getId());updateBoard.setArticleCount(board.getArticleCount() + 1);// 调⽤DAO,执⾏更新int row = boardMapper.updateByPrimaryKeySelective(updateBoard);//判断行数if(row != 1) {log.warn(ResultCode.FAILED.toString() + ", 受影响的⾏数不等于 1 ,为 " + row);throw new ApplicationException(AppResult.failed(ResultCode.FAILED));}}
在 com.yj.forum.services.impl 包下 UserServiceImpl 中实现⽅法
逻辑:
- 非空校验
- 新创用户,将原板块id赋值,用户的文章数量加一赋值,在更新。因为我们的mapper的实现逻辑就是只更改不同得值,id是更改的依据。
- 判断一下更新影响行数是否正常。
@Overridepublic void addOneArticleCountById(Long id) {//非空校验if( id == null || id <= 0) {log.warn(ResultCode.FAILED_USER_ARTICLE_COUNT.toString());throw new ApplicationException(AppResult.failed(ResultCode.FAILED_USER_ARTICLE_COUNT));}//获取用户User user = userMapper.selectByPrimaryKey(id);if(user == null) {log.warn(ResultCode.ERROR_IS_NULL.toString() + " 查询到的用户不存在:id:"+ id );throw new ApplicationException(AppResult.failed(ResultCode.ERROR_IS_NULL));}//更新用户发帖数User updateUser = new User();updateUser.setId(user.getId());updateUser.setArticleCount(updateUser.getArticleCount() + 1);int row = userMapper.updateByPrimaryKeySelective(updateUser);//校验更新行数if(row != 1) {log.warn(ResultCode.FAILED.toString() + ", 受影响的⾏数不等于 1 .");throw new ApplicationException(AppResult.failed(ResultCode.FAILED));}}
在 com.yj.forum.services.impl 包下 ArticleServiceImpl 中实现⽅法
逻辑:
- 非空校验
- 新创文章,设置默认值。写入数据。
- 根据文章属性,拿到用户和板块的id,,根据id拿到对应数据,非空校验。去更新对应的文章数。
- 判断一下更新影响行数是否正常。
package com.yj.forum.services.impl;import com.yj.forum.common.AppResult;
import com.yj.forum.common.ResultCode;
import com.yj.forum.dao.ArticleMapper;
import com.yj.forum.exception.ApplicationException;
import com.yj.forum.model.Article;
import com.yj.forum.model.Board;
import com.yj.forum.model.User;
import com.yj.forum.services.IArticleService;
import com.yj.forum.services.IBoardService;
import com.yj.forum.services.IUserService;
import com.yj.forum.utils.StringUtil;
import lombok.extern.slf4j.Slf4j;
import org.springframework.stereotype.Service;import javax.annotation.Resource;
import java.util.Date;@Slf4j
@Service
public class ArticleServiceImpl implements IArticleService {// ⽤⼾和版块的操作@Resourceprivate ArticleMapper articleMapper;@Resourceprivate IUserService userService;@Resourceprivate IBoardService boardService;@Overridepublic void create(Article article) {//非空校验if(article == null || article.getBoardId() == null || article.getUserId() == null|| StringUtil.isEmpty(article.getContent()) || StringUtil.isEmpty(article.getTitle())) {log.warn(ResultCode.FAILED_PARAMS_VALIDATE.toString());throw new ApplicationException(AppResult.failed(ResultCode.FAILED_PARAMS_VALIDATE));}// 设置默认值article.setVisitCount(0); // 访问数article.setReplyCount(0); // 回复数article.setLikeCount(0); // 点赞数article.setDeleteState((byte) 0);article.setState((byte) 0);Date date = new Date();article.setCreateTime(date);article.setUpdateTime(date);// 写⼊数据库int row = articleMapper.insert(article);if (row <= 0) {log.warn(ResultCode.FAILED_CREATE.toString());throw new ApplicationException(AppResult.failed(ResultCode.FAILED_CREATE));}// 获取⽤⼾信息User user = userService.selectById(article.getUserId());// 没有找到指定的⽤⼾信息if(user == null) {log.warn(ResultCode.FAILED_CREATE.toString() + ", 发贴失败, user id = " + article.getUserId());throw new ApplicationException(AppResult.failed(ResultCode.FAILED_CREATE));}// 更新⽤⼾的发贴数userService.addOneArticleCountById(user.getId());// 获取板块信息Board board = boardService.selectById(article.getBoardId());// 没有找到版块的⽤⼾信息if(board == null) {log.warn(ResultCode.FAILED_CREATE.toString() + ", 发贴失败, board id = " + article.getBoardId());throw new ApplicationException(AppResult.failed(ResultCode.FAILED_CREATE));}// 更新版块的发贴数boardService.addOneArticleCountById(board.getId());// 打印⽇志log.info(ResultCode.SUCCESS.toString() + ", user id = " +article.getUserId() + ", board id = " + article.getBoardId() + ", article id = "+article.getId() + "发帖成功");}
}
3.7.6.6 单元测试
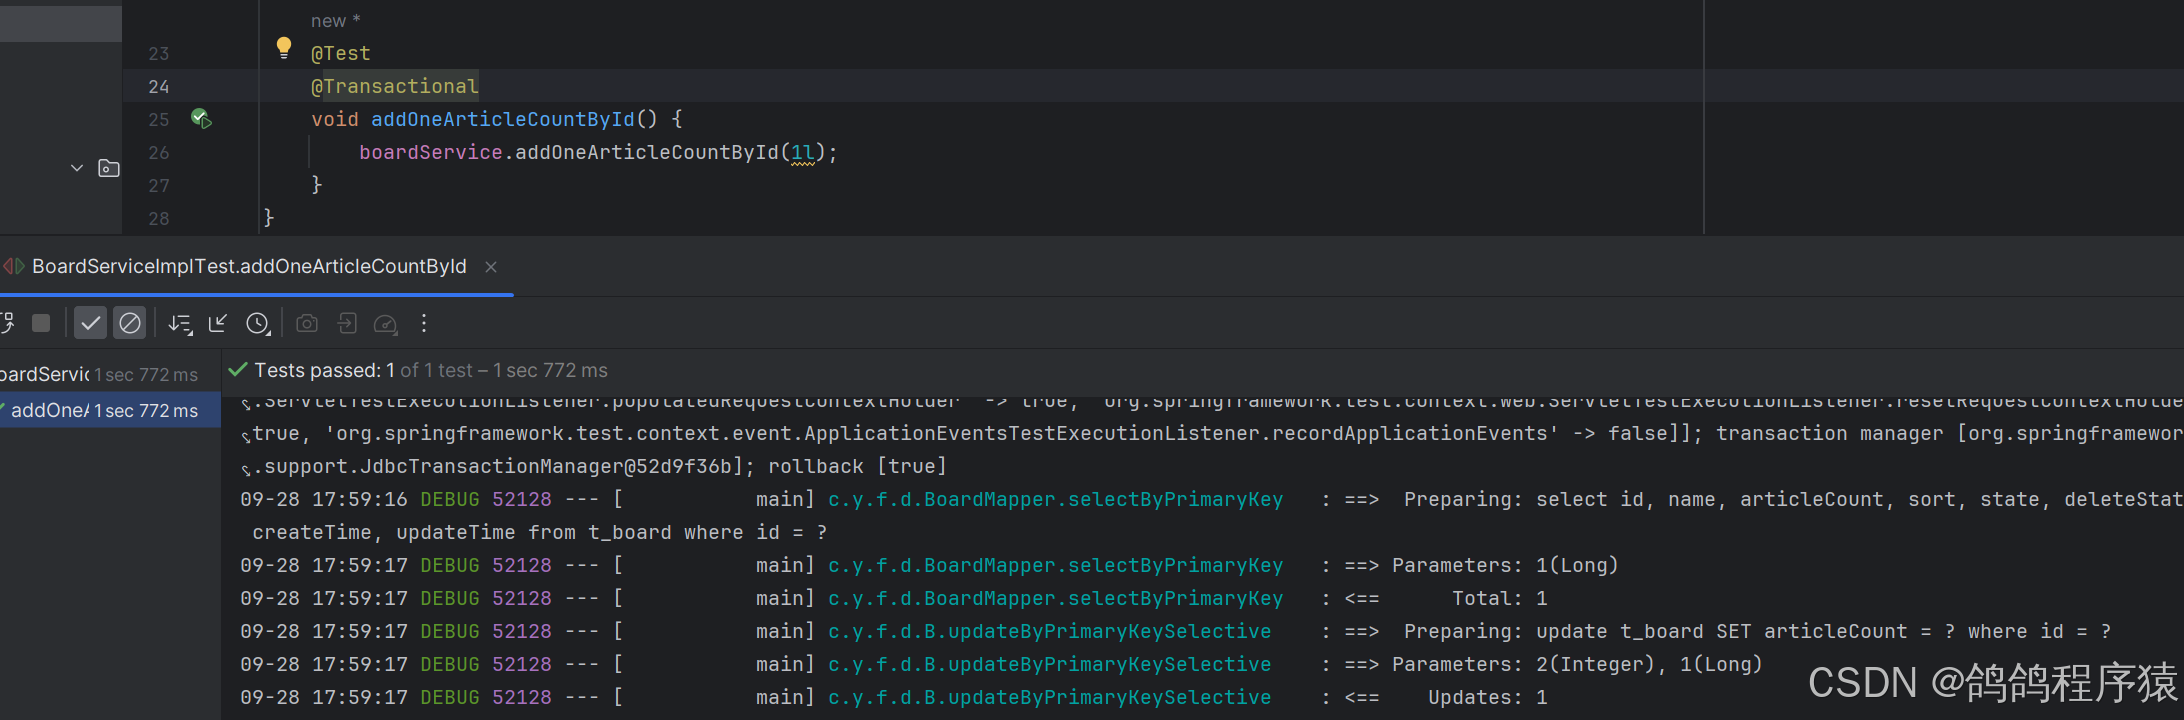
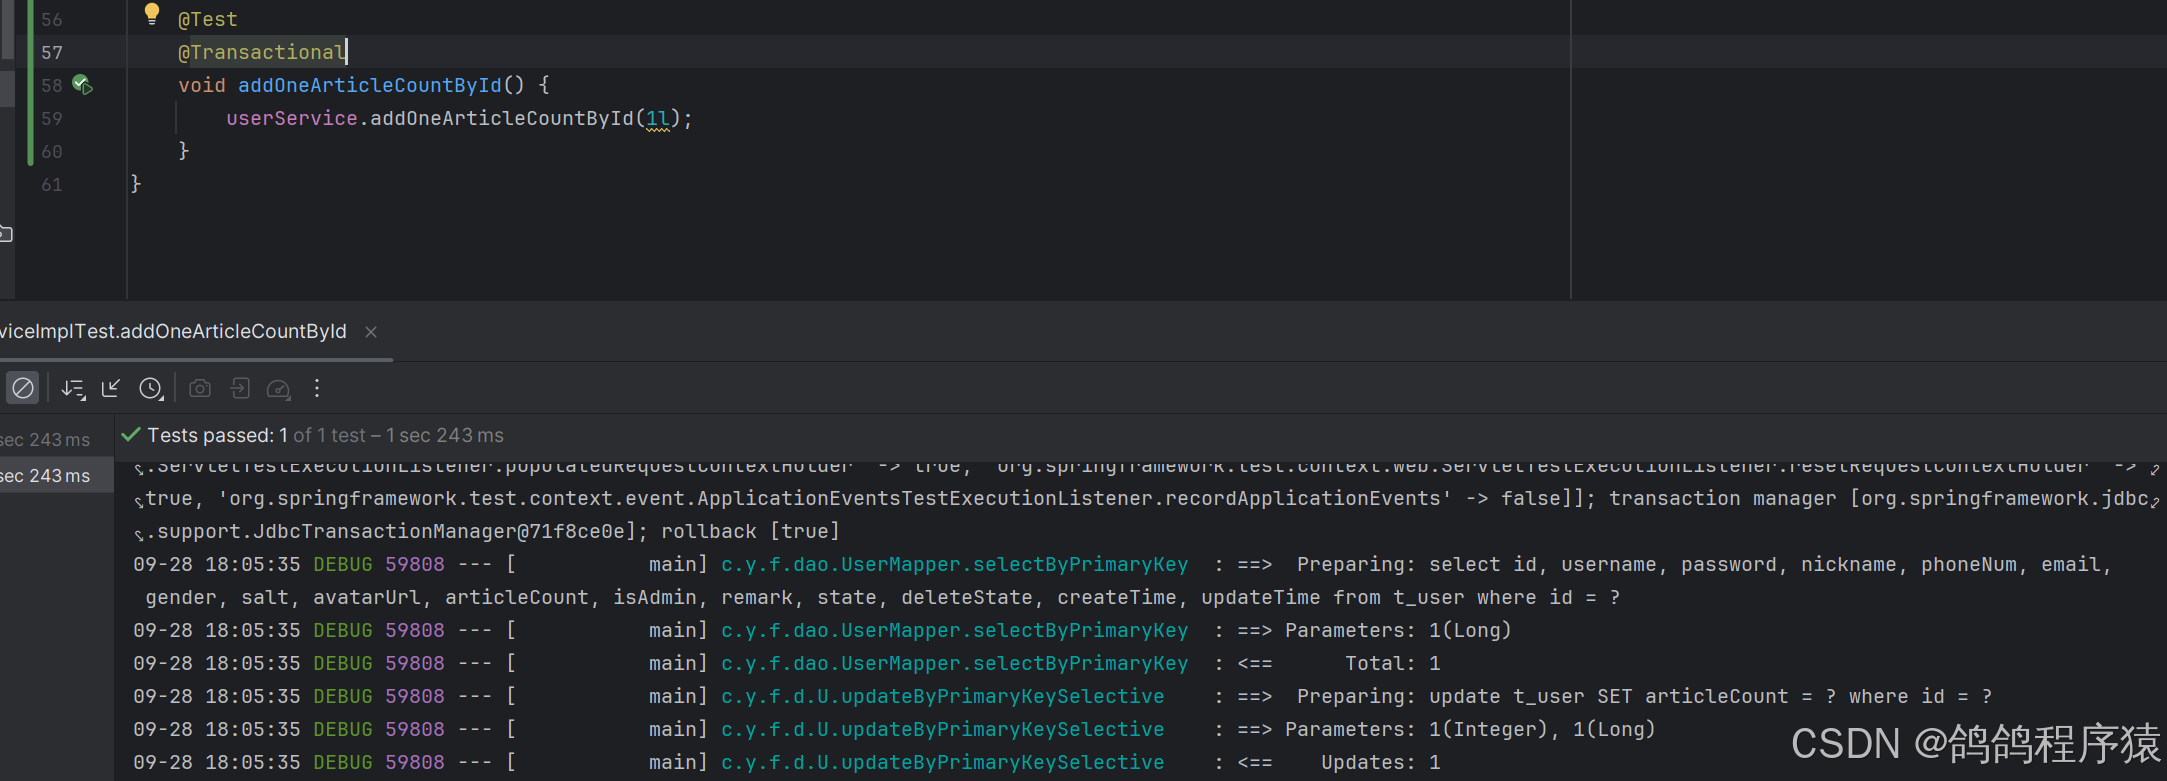
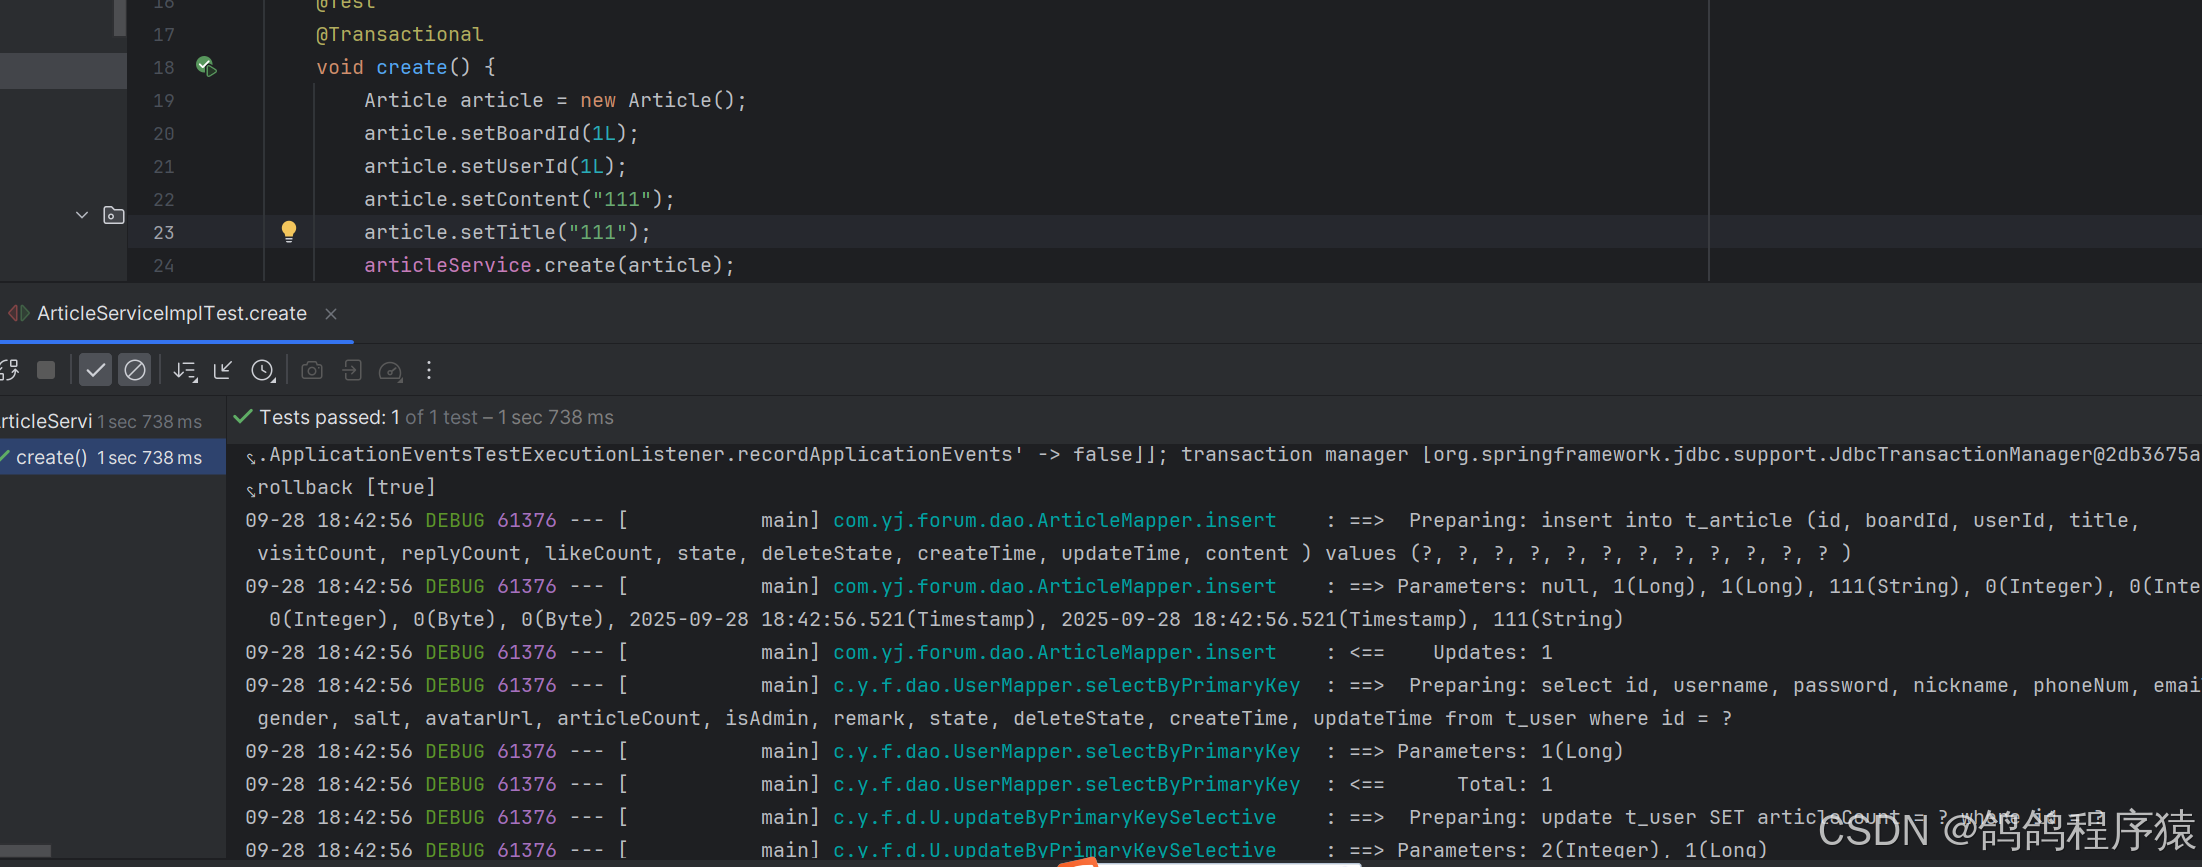
3.6.2.7 实现Controller
在 com.yj.forum.controller 包 ArticleController中提供对外的API接⼝
逻辑:
- 非空校验
- 板块是否删除,没有
- 获取用户,校验用户是否禁言
- 构造文章对象
- 调用service发帖
package com.yj.forum.controller;import com.yj.forum.common.AppConfig;
import com.yj.forum.common.AppResult;
import com.yj.forum.common.ResultCode;
import com.yj.forum.exception.ApplicationException;
import com.yj.forum.model.Article;
import com.yj.forum.model.Board;
import com.yj.forum.model.User;
import com.yj.forum.services.IArticleService;
import com.yj.forum.services.IBoardService;
import com.yj.forum.utils.StringUtil;
import io.swagger.annotations.Api;
import io.swagger.annotations.ApiOperation;
import io.swagger.annotations.ApiParam;
import lombok.extern.slf4j.Slf4j;
import org.springframework.web.bind.annotation.PostMapping;
import org.springframework.web.bind.annotation.RequestMapping;
import org.springframework.web.bind.annotation.RequestParam;
import org.springframework.web.bind.annotation.RestController;import javax.annotation.Resource;
import javax.servlet.http.HttpServletRequest;
import javax.servlet.http.HttpSession;@Slf4j
@Api(tags = "文章接口")
@RestController
@RequestMapping("/article")
public class ArticleController {@Resourceprivate IArticleService articleService;@Resourceprivate IBoardService boardService;@ApiOperation("发新帖")@PostMapping("/create")public AppResult create(HttpServletRequest request,@ApiParam(value = "版块Id") @RequestParam("boardId") Long boardId,@ApiParam(value = "⽂章标题") @RequestParam("title") String title,@ApiParam(value = "⽂章内容") @RequestParam("content") String content) {//非空校验if(StringUtil.isEmpty(title) || StringUtil.isEmpty(content) || boardId <= 0) {log.warn(ResultCode.FAILED_PARAMS_VALIDATE.toString());return AppResult.failed(ResultCode.FAILED_PARAMS_VALIDATE);}Board board = boardService.selectById(boardId.longValue());if(board == null || board.getDeleteState() == 1 || board.getState() == 1) {log.warn(ResultCode.FAILED_BOARD_BANNED.toString());throw new ApplicationException(AppResult.failed(ResultCode.FAILED_BOARD_BANNED));}//获取用户信息HttpSession session = request.getSession();User user = (User) session.getAttribute(AppConfig.USER_SESSION);//判断用户是否禁言if(user.getState() == 1) {return AppResult.failed(ResultCode.FAILED_USER_BANNED);}// 构造帖⼦对象Article article = new Article();article.setBoardId(boardId);article.setUserId(user.getId());article.setTitle(title);article.setContent(content);// 调⽤业务层articleService.create(article);// 返回结果return AppResult.success();}}
3.7.6.7 测试API
在http://127.0.0.1:58080/swagger-ui/index.html或者Postman中测试接口,记得登录。
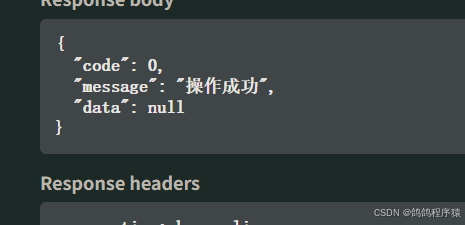
3.6.2.8 前端代码
article.html :
<!-- Page header -->
<div class="page-header d-print-none"><div class="container-xl"><div class="row g-2 align-items-center"><div class="col"><h2 class="page-title">发新贴</h2></div></div></div>
</div>
<!-- Page body -->
<div class="page-body"><div class="container-xl"><div class="card"><div class="card-body"><div class="mb-3"><label class="form-label"><strong>版块</strong></label><select id="article_post_borad" type="text" class="form-select" placeholder="Select a date" id="select-tags"value=""><option value="1">JAVA</option><option value="2">C++</option><option value="3">前端技术</option><option value="4">MySQL</option><option value="5">面试宝典</option><option value="6">经验分享</option><option value="7">招聘信息</option><option value="8">福利待遇</option><option value="9">灌水区</option></select></div><div class="mb-3"><label class="form-label"><strong>标题</strong></label><input id="article_post_title" type="text" class="form-control" placeholder="请输入标题"></div><div class="mb-3" style="height: 680px;"><label class="form-label"><strong>内容</strong></label><div id="edit-article"><!-- textarea也是一个表单控件,当在editor.md中编辑好的内容会关联这个文本域上 --><textarea id="article_post_content" style="display: none;"></textarea></div></div></div><div class="card-footer bg-transparent mt-auto"><div class="btn-list justify-content-end"><a id="article_post_submit" href="javascript:void(0);" class="btn btn-primary"><svg xmlns="http://www.w3.org/2000/svg" class="icon" width="24" height="24" viewBox="0 0 24 24" stroke-width="2" stroke="currentColor" fill="none" stroke-linecap="round" stroke-linejoin="round"><path stroke="none" d="M0 0h24v24H0z" fill="none"></path><path d="M5 12l5 5l10 -10"></path></svg>发 布</a></div></div></div></div>
</div><!-- 初始化编辑器 -->
<script type="text/javascript">$(function () {var editor = editormd("edit-article", {width: "100%",height: "100%",// theme : "dark",// previewTheme : "dark",// editorTheme : "pastel-on-dark",codeFold: true,markdown : '', // 处理编辑区内容//syncScrolling : false,saveHTMLToTextarea: true,    // 保存 HTML 到 TextareasearchReplace: true,watch : true,                    // 关闭实时预览htmlDecode: "style,script,iframe|on*",            // 开启 HTML 标签解析,为了安全性,默认不开启    // toolbar  : false,             //关闭工具栏// previewCodeHighlight : false, // 关闭预览 HTML 的代码块高亮,默认开启emoji: true,taskList: true,tocm: true,         // Using [TOCM]tex: true,                     // 开启科学公式TeX语言支持,默认关闭// flowChart: true,               // 开启流程图支持,默认关闭// sequenceDiagram: true,         // 开启时序/序列图支持,默认关闭,placeholder: '开始创作...',     // 占位符path: "./dist/editor.md/lib/"});// ================== 处理发贴按钮事件 =======================$('#article_post_submit').click(function () {let boardIdEl = $('#article_post_borad');let titleEl = $('#article_post_title');let contentEl = $('#article_post_content');// 非空校验if (!titleEl.val()) {titleEl.focus();// 提示$.toast({heading: '提示',text: '请输入帖子标题',icon: 'warning'});return;}if (!contentEl.val()) {// 提示$.toast({heading: '提示',text: '请输入帖子内容',icon: 'warning'});return;}// 构造帖子对象let postData = {boardId : boardIdEl.val(),title : titleEl.val(),content : contentEl.val()};// 提交, 成功后调用changeNavActive($('#nav_board_index'));回到首页并加载帖子列表// contentType: 'application/x-www-form-urlencoded'$.ajax({type : 'post',url : 'article/create',contentType: 'application/x-www-form-urlencoded',data : postData,//回调success : function (respData) {if (respData.code == 0) {//发布成功changeNavActive($('#nav_board_index'))//提示信息$.toast({heading: '成功',text: '发帖成功',icon: 'success'});} else {//提示信息$.toast({heading: '警告',text: respData.message,icon: 'warning'});}},error : function () {//提示信息$.toast({heading : '错误',text: '访问出现错误,请于管理员联系',icon: 'error'});}});});});
</script></body></html>
3.7.7 帖子列表(无版块id,首页展示)
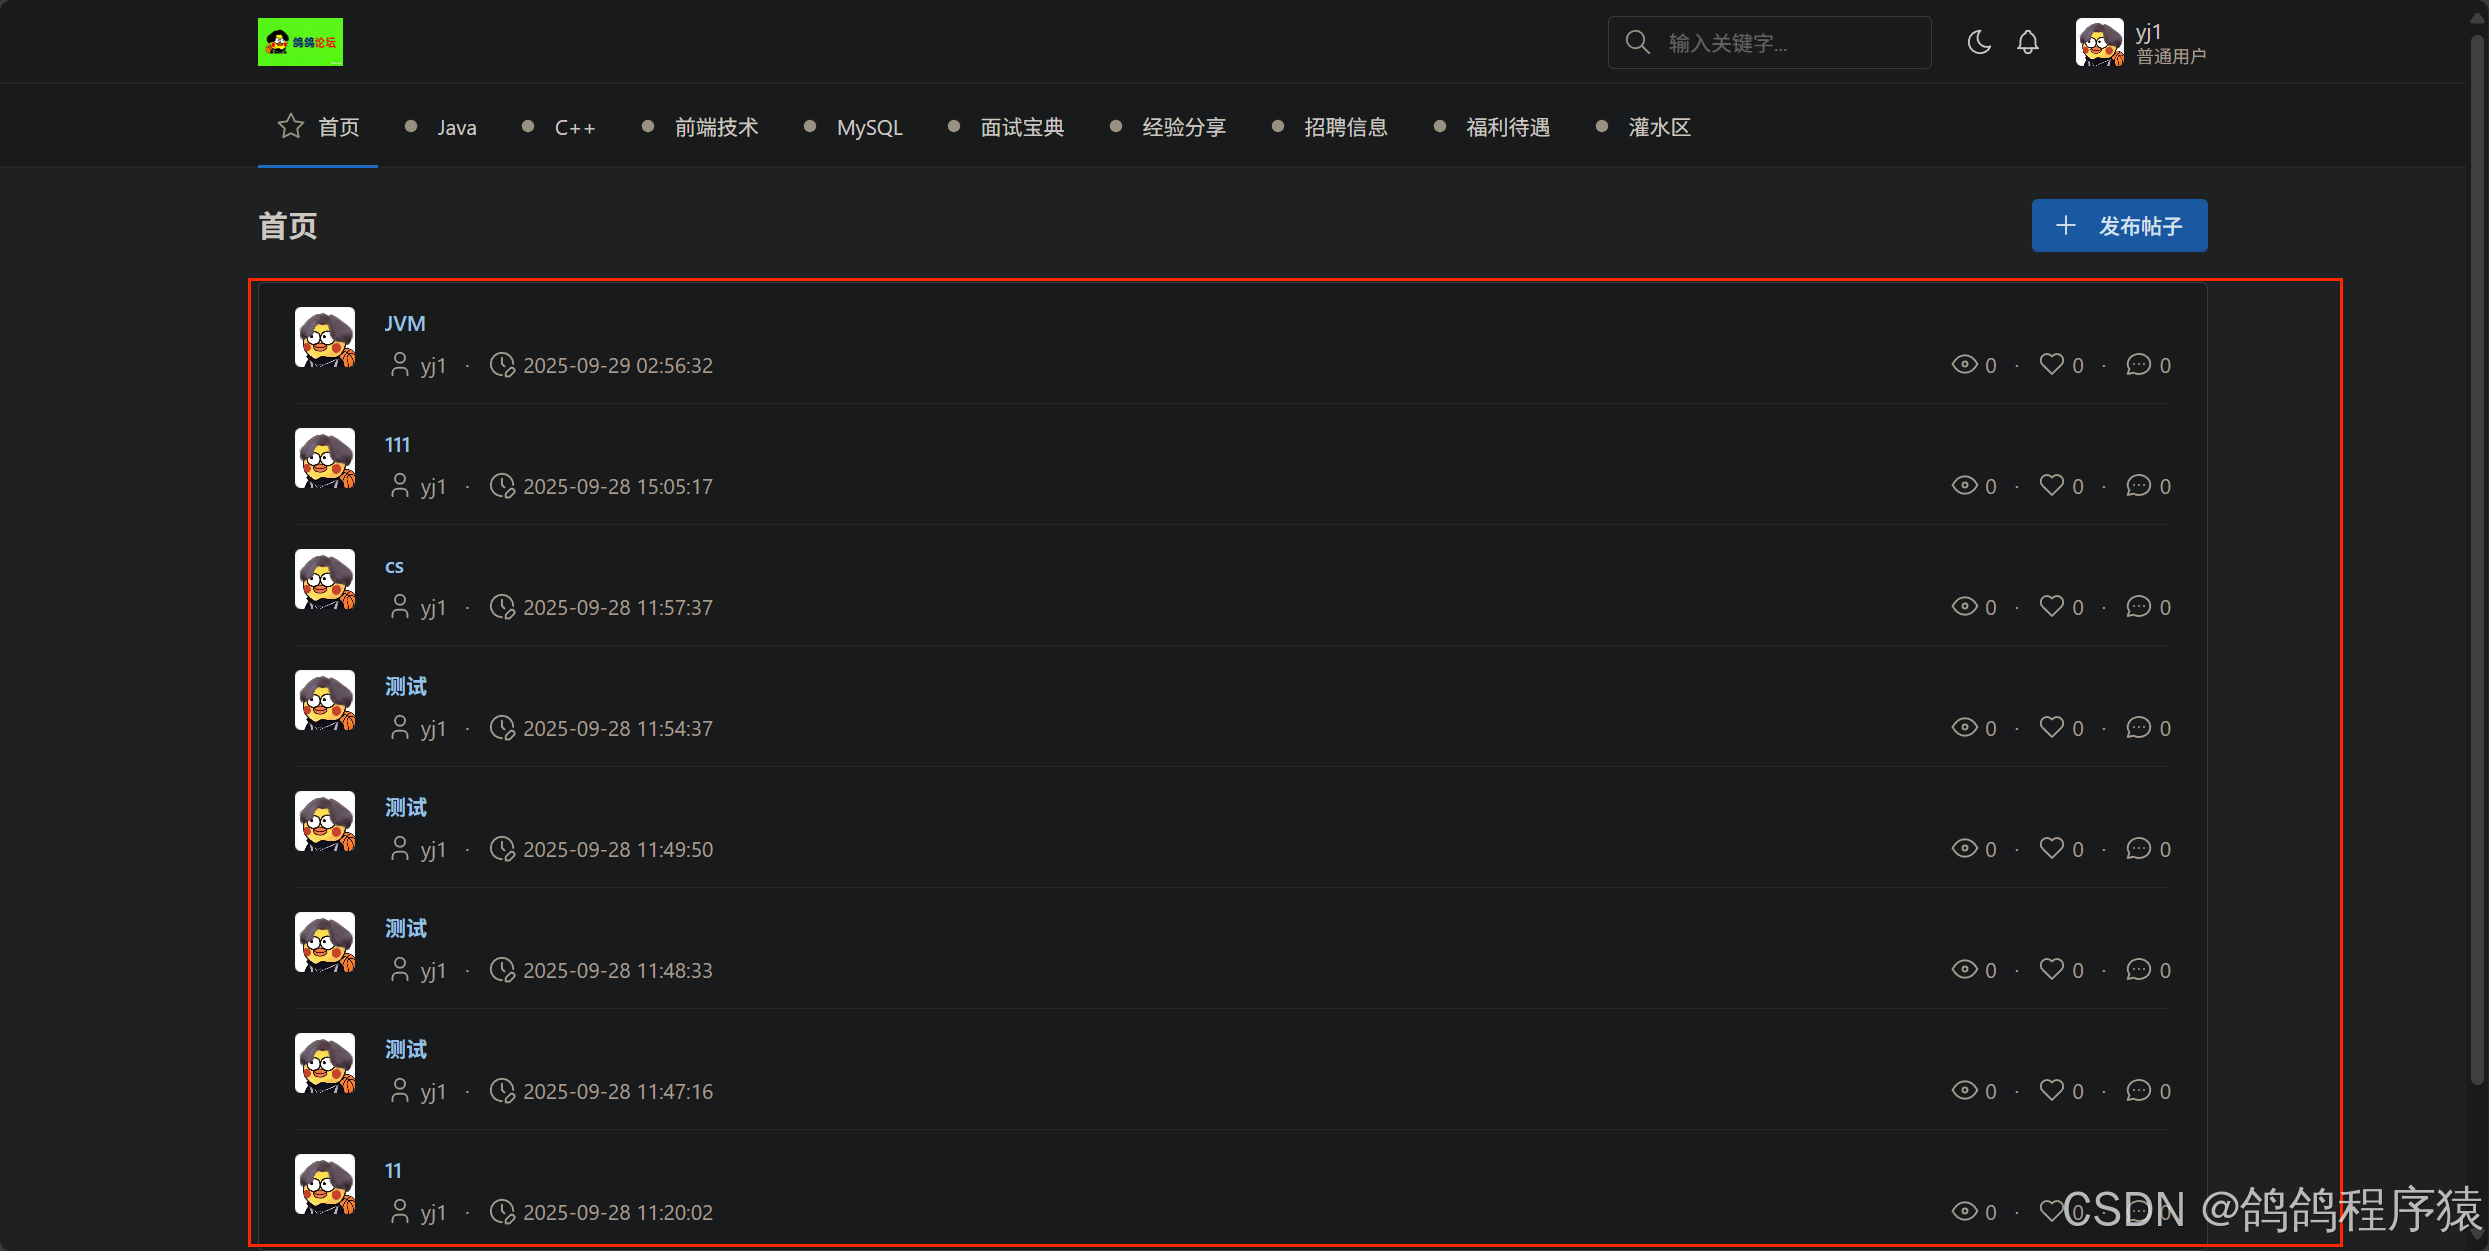
3.7.7.1 版块帖⼦列表
对应版块中显⽰的帖⼦列表以发布时间降序排列
传⼊版块Id返回所有帖⼦
3.7.7.2 实现逻辑
- ⽤⼾点击某个版块或⾸⻚时,将版块Id做为参数向服务器发送请求
- 服务器接收请求,并获取版块Id,查询对应版块下的所有帖⼦
- 返回查询结果
3.7.7.3 参数要求
| 参数名 | 描述 | 类型 | 默认值 | 条件 |
|---|---|---|---|---|
| boardId | 版块Id | Long | 可为空 |
3.7.7.4 接⼝规范
    // 请求
// 返回指定版块下的帖⼦列表GET http://127.0.0.1:58080/article/getAllByBoardId?boardId=1 HTTP/1.1// 返回所有的帖⼦列表GET http://127.0.0.1:58080/article/getAllByBoardId HTTP/1.1
// 响应HTTP/1.1 200Content-Type: application/json{"code": 0,"message": "成功","data": [{"id": 17,"boardId": 1,"userId": 1,"title": "测试删除","visitCount": 8,"replyCount": 1,"likeCount": 1,"state": 0,"createTime": "2023-07-05 04:10:46","updateTime": "2023-07-05 11:22:43","board": {"id": 1,"name": "Java"},"user": {"id": 1,"nickname": "bitboy","phoneNum": null,"email": null,"gender": 1,"avatarUrl": null},"own": false},{"id": 15,"boardId": 1,"userId": 2,"title": "单元测试","visitCount": 11,"replyCount": 0,"likeCount": 6,"state": 0,"createTime": "2023-07-03 11:30:36","updateTime": "2023-07-04 10:31:00","board": {"id": 1,"name": "Java"},"user": {"id": 2,"nickname": "bitgirl","phoneNum": null,"email": null,"gender": 2,"avatarUrl": null},"own": false},{"id": 11,"boardId": 1,"userId": 1,"title": "testtest222","visitCount": 4,"replyCount": 0,"likeCount": 0,"state": 0,"createTime": "2023-07-02 09:19:00","updateTime": "2023-07-02 09:19:00","board": {"id": 1,"name": "Java"},"user": {"id": 1,"nickname": "bitboy","phoneNum": null,"email": null,"gender": 1,"avatarUrl": null},"own": false},{"id": 10,"boardId": 1,"userId": 1,"title": "测试⻚⾯发帖","visitCount": 1,"replyCount": 1,"likeCount": 0,"state": 0,"createTime": "2023-07-02 09:17:47","updateTime": "2023-07-05 10:51:43","board": {"id": 1,"name": "Java"},"user": {"id": 1,"nickname": "bitboy","phoneNum": null,"email": null,"gender": 1,"avatarUrl": null},"own": false},{"id": 1,"boardId": 1,"userId": 1,"title": "单元测试","visitCount": 13,"replyCount": 2,"likeCount": 3,"state": 0,"createTime": "2023-07-02 06:46:32","updateTime": "2023-07-05 10:16:43","board": {"id": 1,"name": "Java"},"user": {"id": 1,"nickname": "bitboy","phoneNum": null,"email": null,"gender": 1,"avatarUrl": null},"own": false}]}
3.7.7.5 修改Article实体类
帖⼦列表中需要关联⽤⼾信息与版块信息,在 com.yj.forum.model包下 Article类中加⼊User与Board的关联
// 版块信息@ApiModelProperty("版块信息")private Board board;// ⽤⼾信息@ApiModelProperty("⽤⼾信息")private User user;
3.7.7.6 修改扩展Mapper.xml
SQL语句是:
select u.id as U_id,u.avatarUrl as u_avatarUrl,u.nickname as u_nickname,a.id,a.boardId,a.userId,a.title,a.visitCount, a.replyCount, a.likeCount, a.state,a.createTime,a.updateTime
from t_article a, t_user u where a.userId = u.id and a.deleteState = 0order by a.createTime desc;
在src/main/resources/mapper/extension⽬录下新建 ArticleExtMapper.xml
- 定义表连接查询返回的结果集映射,继承⾃源配置⽂件的映射结果集 extends=“BaseResultMap”
<?xml version="1.0" encoding="UTF-8"?>
<!DOCTYPE mapper PUBLIC "-//mybatis.org//DTD Mapper 3.0//EN" "http://mybatis.org/dtd/mybatis-3-mapper.dtd">
<mapper namespace="com.yj.forum.dao.ArticleMapper"><!-- 自定义结果集映射 --><resultMap id="AllInfoResultMap" type="com.yj.forum.model.Article" extends="ResultMapWithBLOBs"><!-- 关联用户映射 --><association property="user" resultMap="com.yj.forum.dao.UserMapper.BaseResultMap" columnPrefix="u_"/></resultMap><!-- 查询所有未被删除的帖子列表 --><select id="selectAll" resultMap="AllInfoResultMap"><!-- 主⻚中显⽰的帖⼦列表以发布时间降序排列 -->selectu.id as U_id,u.avatarUrl as u_avatarUrl,u.nickname as u_nickname,a.id,a.boardId,a.userId,a.title,a.visitCount,a.replyCount,a.likeCount,a.state,a.createTime,a.updateTimefromt_article a,t_user uwhere a.userId = u.id and a.deleteState = 0order by a.createTime desc;</select></mapper>
3.7.7.7 修改DAO
com.yj.forum.dao包下的 ArticleMapper 中添加⽅法声明
/*** 查询所有未被删除的帖子列表* @return*/List<Article> selectAll();
3.7.7.8 创建Service接⼝
在 com.yj.forum.services 包 IArticleService定义⽅法:
List<Article> selectAll();
3.7.7.9 实现Service接⼝
在 com.yj.forum.services.impl 包 ArticleServiceImpl中实现⽅法
@Overridepublic List<Article> selectAll() {//调用daoList<Article> articles = articleMapper.selectAll();return articles;}
3.7.7.10 单元测试
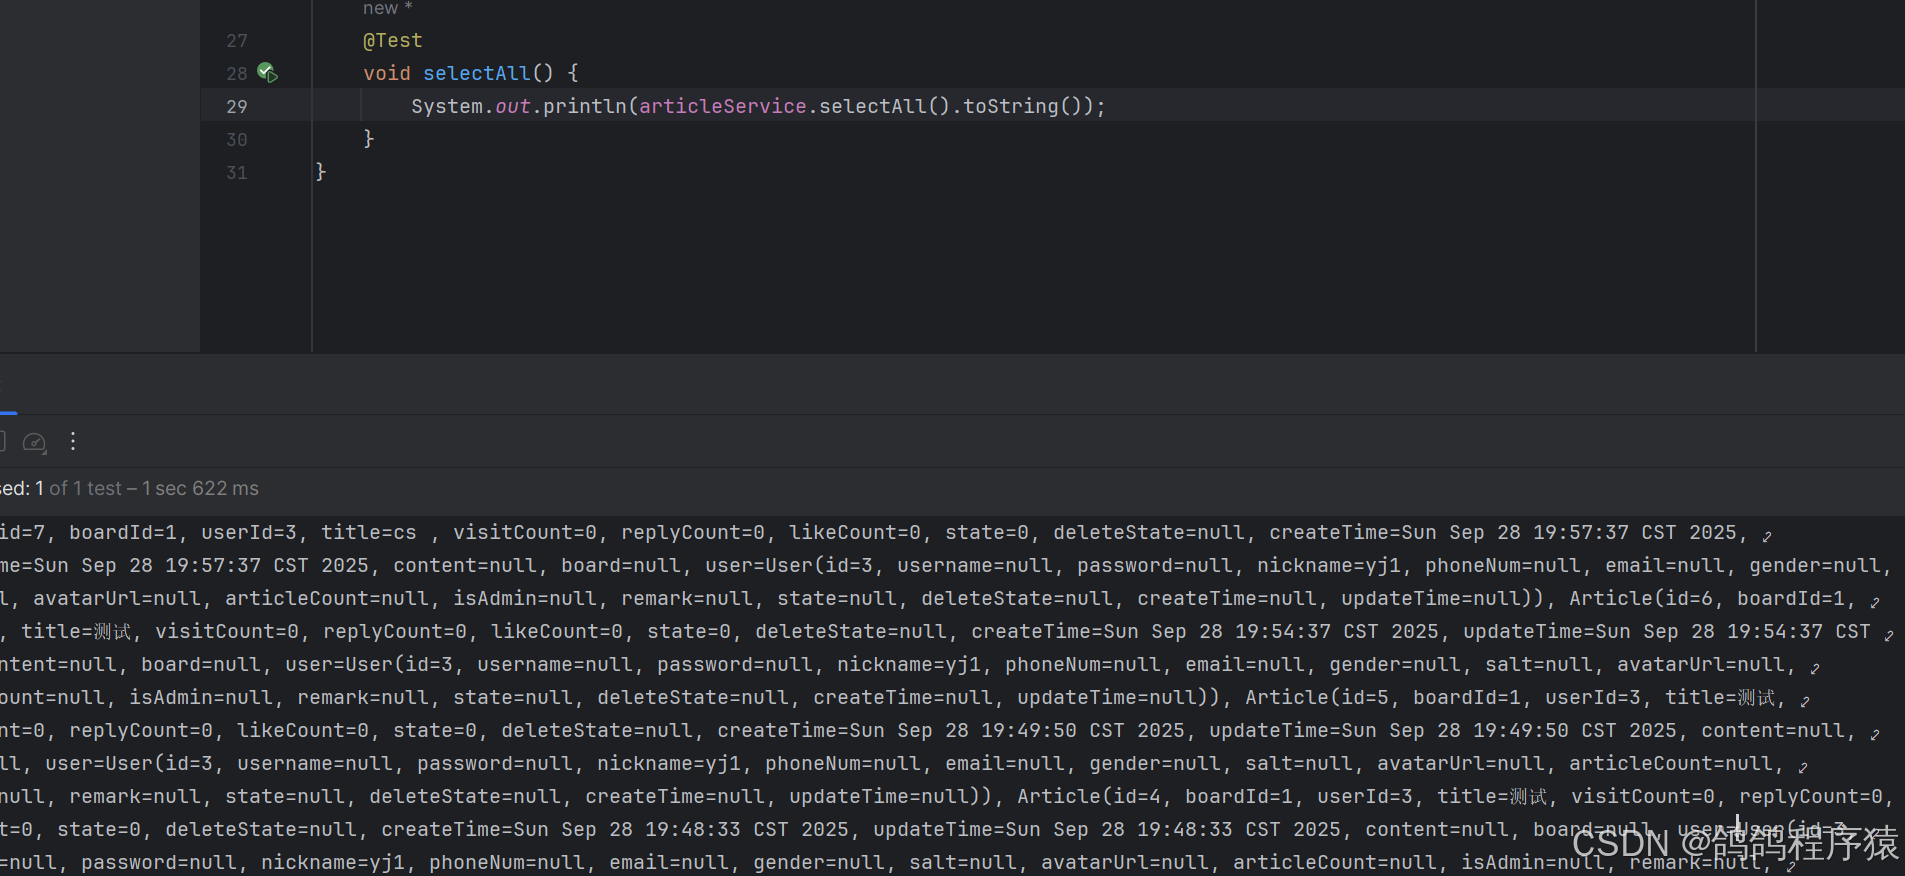
3.7.7.11 实现Controller
在com.yj.forum.controller 包 ArticleController中提供对应方法
先查询⾸⻚帖⼦列表,逻辑:直接调用即可
@ApiOperation("根据版块Id查询帖⼦列表")@GetMapping("/getAllByBoardId")public AppResult<List<Article>> getAllByBoardId(@ApiParam("版块Id") @RequestParam(value = "boardId", required = false) Long boardId) {// 定义返回的集对象List<Article> result = null;// 参数为空时表⽰⾸⻚帖⼦列表result = articleService.selectAll();log.info("查询所有帖⼦列表");// 如果为null返回⼀个空JSONif (result == null) {result = new ArrayList<>();}// 返回结果return AppResult.success(result);}
3.7.7.12 测试API
在http://127.0.0.1:58080/swagger-ui/index.html或者Postman中测试接口,记得登录。
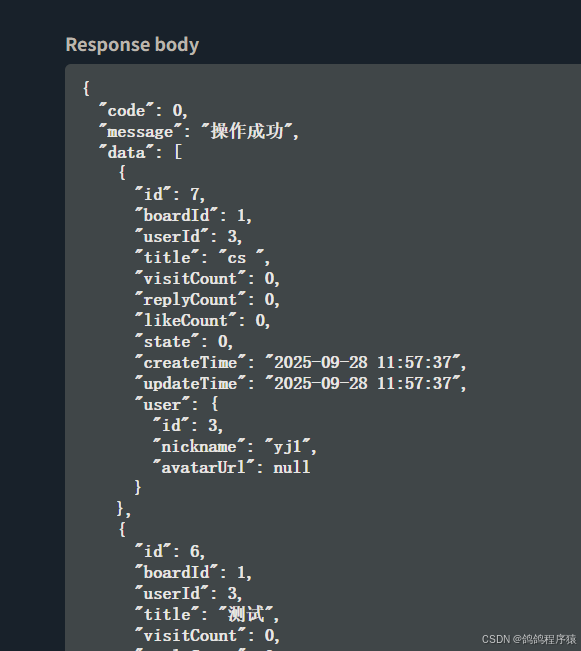
3.7.7.13 前端
在article_list.html 下添加:
// ========================= 获取帖子列表 =======================// 成功后,调用listBuildArticleList()方法,构建帖子列表$.ajax({type : 'get',url : 'article/getAllByBoardId',//回调success : function (respData) {if(respData.code == 0) {//成功调用listBuildArticleList(respData.data);} else {//失败//提示信息$.toast({heading : '警告',text: respData.message,icon: 'warning'});}},error : function () {//提示信息$.toast({heading : '错误',text: '访问出现错误,请于管理员联系',icon: 'error'});}});
3.7.8 帖子列表(根据版块id 展示)
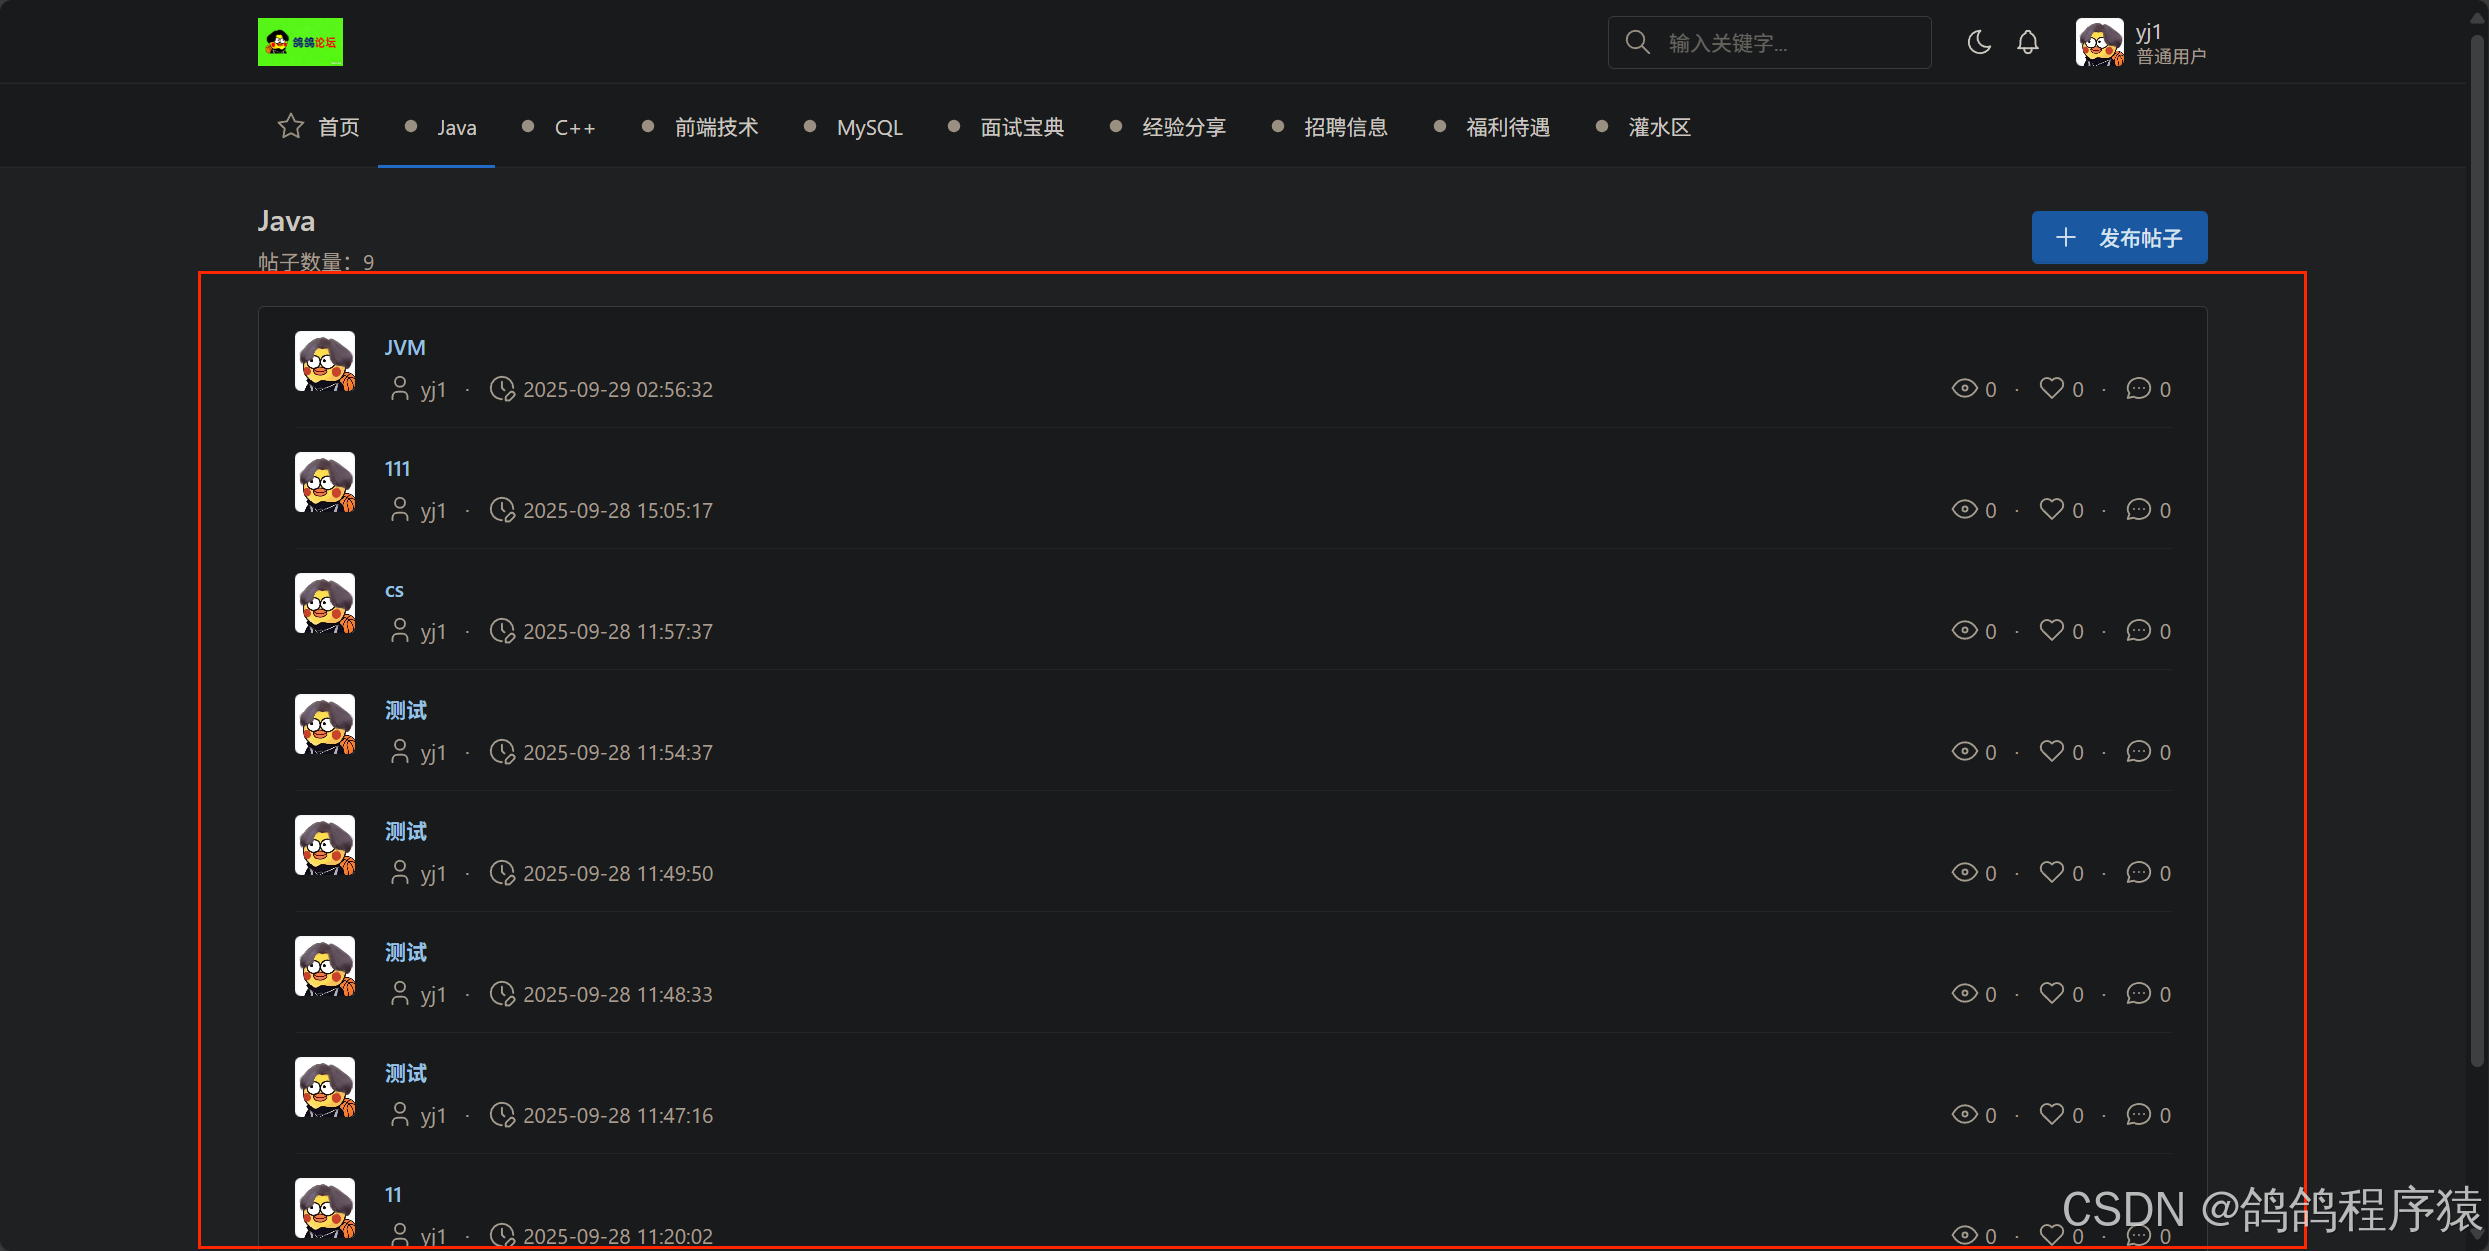
3.7.8.1 修改扩展Mapper.xml
跟上面的 无板块id的参数要求和接口是共用的。
在 forum/src/main/resources/mapper/ArticleMapper.xml 下添加:
我们的SQL语句只需要在上一个语句 加上版块id查询条件即可: and a.boardId = 1
<!-- 根据版块id查询所有未被删除的帖子列表 --><select id="selectAllByBoardId" resultMap="AllInfoResultMap" parameterType="java.lang.Long"><!-- 主⻚中显⽰的帖⼦列表以发布时间降序排列 -->selectu.id as U_id,u.avatarUrl as u_avatarUrl,u.nickname as u_nickname,a.id,a.boardId,a.userId,a.title,a.visitCount,a.replyCount,a.likeCount,a.state,a.createTime,a.updateTimefromt_article a,t_user uwhere a.userId = u.idand a.deleteState = 0and a.boardId = #{boardId,jdbcType=BIGINT}order by a.createTime desc;</select>
3.7.8.2 修改DAO
com.yj.forum.dao包下的 ArticleMapper 中添加⽅法声明:
/*** 根据版块Id 查询所有未被删除的帖子列表* @param boardId 版块Id* @return 所有未被删除的帖子列表*/List<Article> selectAllByBoardId(@Param("boardId") Long boardId);
3.7.8.3 创建Service接⼝
在 com.yj.forum.services 包 IArticleService定义⽅法:
/*** 根据版块Id 查询所有未被删除的帖子列表* @param boardId 版块Id* @return 所有未被删除的帖子列表*/List<Article> selectAllByBoardId( Long boardId);
3.7.8.4 实现Service接⼝
在 com.yj.forum.services.impl 包 ArticleServiceImpl中实现⽅法:
逻辑:
- 非空校验,校验boardId是否合法
- 校验版块Id对应的版块是否存在
- 调用dao拿到帖子列表
/*** 根据版块Id 查询所有未被删除的帖子列表* @param boardId 版块Id* @return 所有未被删除的帖子列表*/@Overridepublic List<Article> selectAllByBoardId(Long boardId) {//非空校验if(boardId == null || boardId <= 0) {log.warn(ResultCode.FAILED_PARAMS_VALIDATE.toString());throw new ApplicationException(AppResult.failed(ResultCode.FAILED_PARAMS_VALIDATE));}//检验版块是否存在Board board = boardService.selectById(boardId);if(board == null) {log.warn(ResultCode.FAILED_BOARD_IS_NOT_EXISTS.toString() + " boardId = " + boardId);throw new ApplicationException(AppResult.failed(ResultCode.FAILED_BOARD_IS_NOT_EXISTS));}//调用daoList<Article> articles = articleMapper.selectAllByBoardId(boardId);return articles;}
3.7.7.10 单元测试
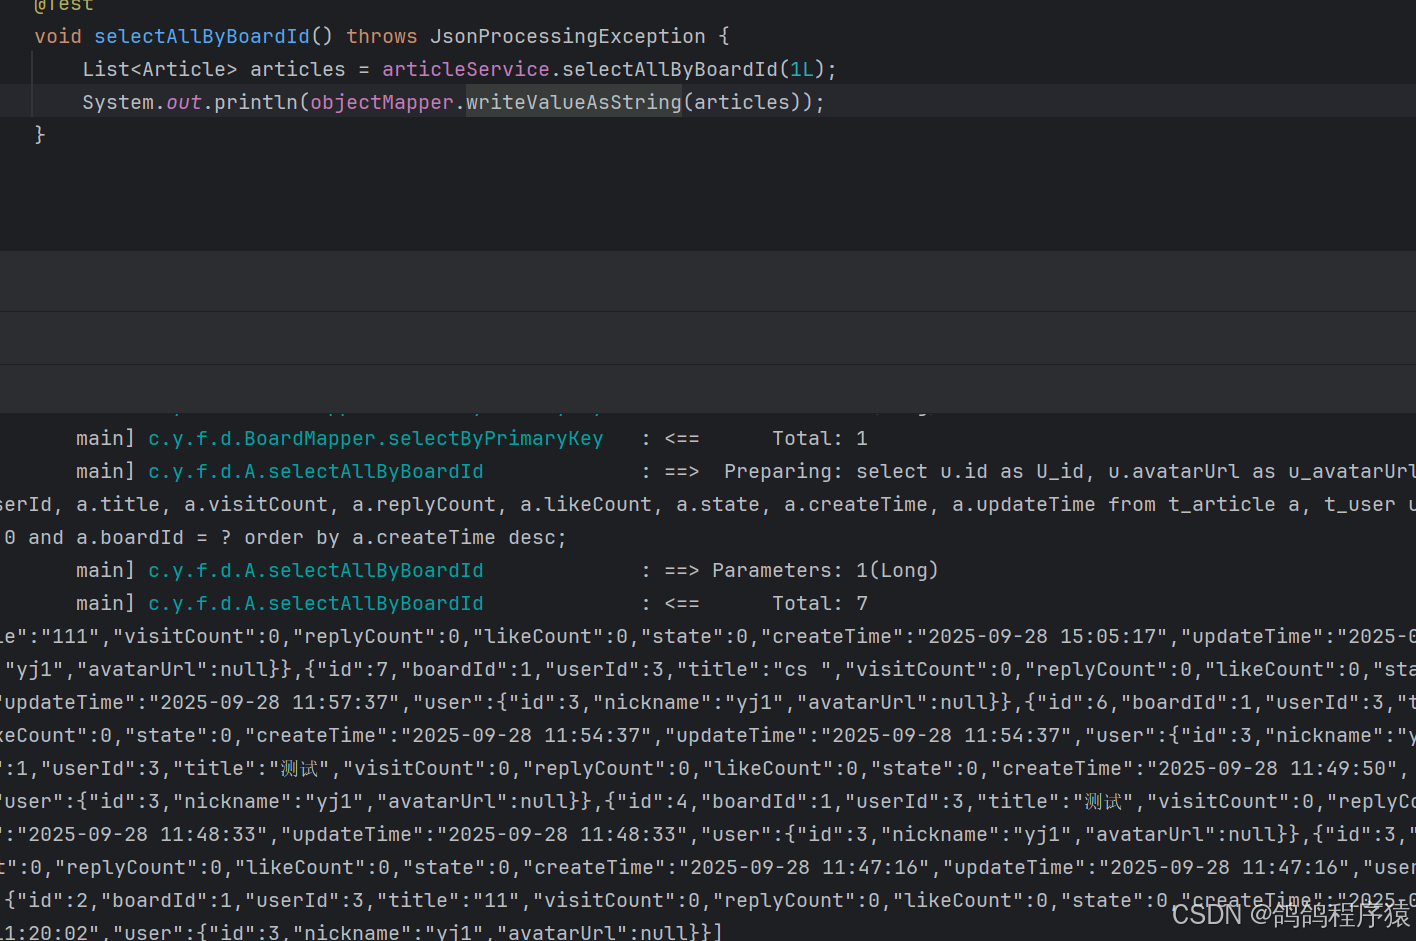
3.7.7.11 实现Controller
在com.yj.forum.controller 包 ArticleController中对 getAllByBoardId 方法修改
先查询⾸⻚帖⼦列表,
逻辑:
- 判断版块Id是否为空,为空执行上面所写的逻辑
- 不为空,调用service的selectAllByBoardId 方法
@ApiOperation("根据版块Id查询帖⼦列表")@GetMapping("/getAllByBoardId")public AppResult<List<Article>> getAllByBoardId(@ApiParam("版块Id") @RequestParam(value = "boardId", required = false) Long boardId) {// 定义返回的集对象List<Article> articles = null;if(boardId == null) {articles= articleService.selectAll();log.info("查询所有帖⼦列表");} else {articles = articleService.selectAllByBoardId(boardId);}// 如果为null返回⼀个空JSONif (articles == null) {articles = new ArrayList<>();}// 返回结果return AppResult.success(articles);}
3.7.7.12 测试API
在http://127.0.0.1:58080/swagger-ui/index.html或者Postman中测试接口,记得登录。
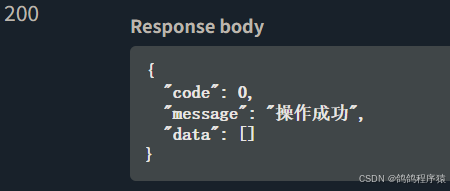
3.7.7.13 前端
article_list.html,下一个功能实现完一起给出
3.7.9 获取指定版块信息
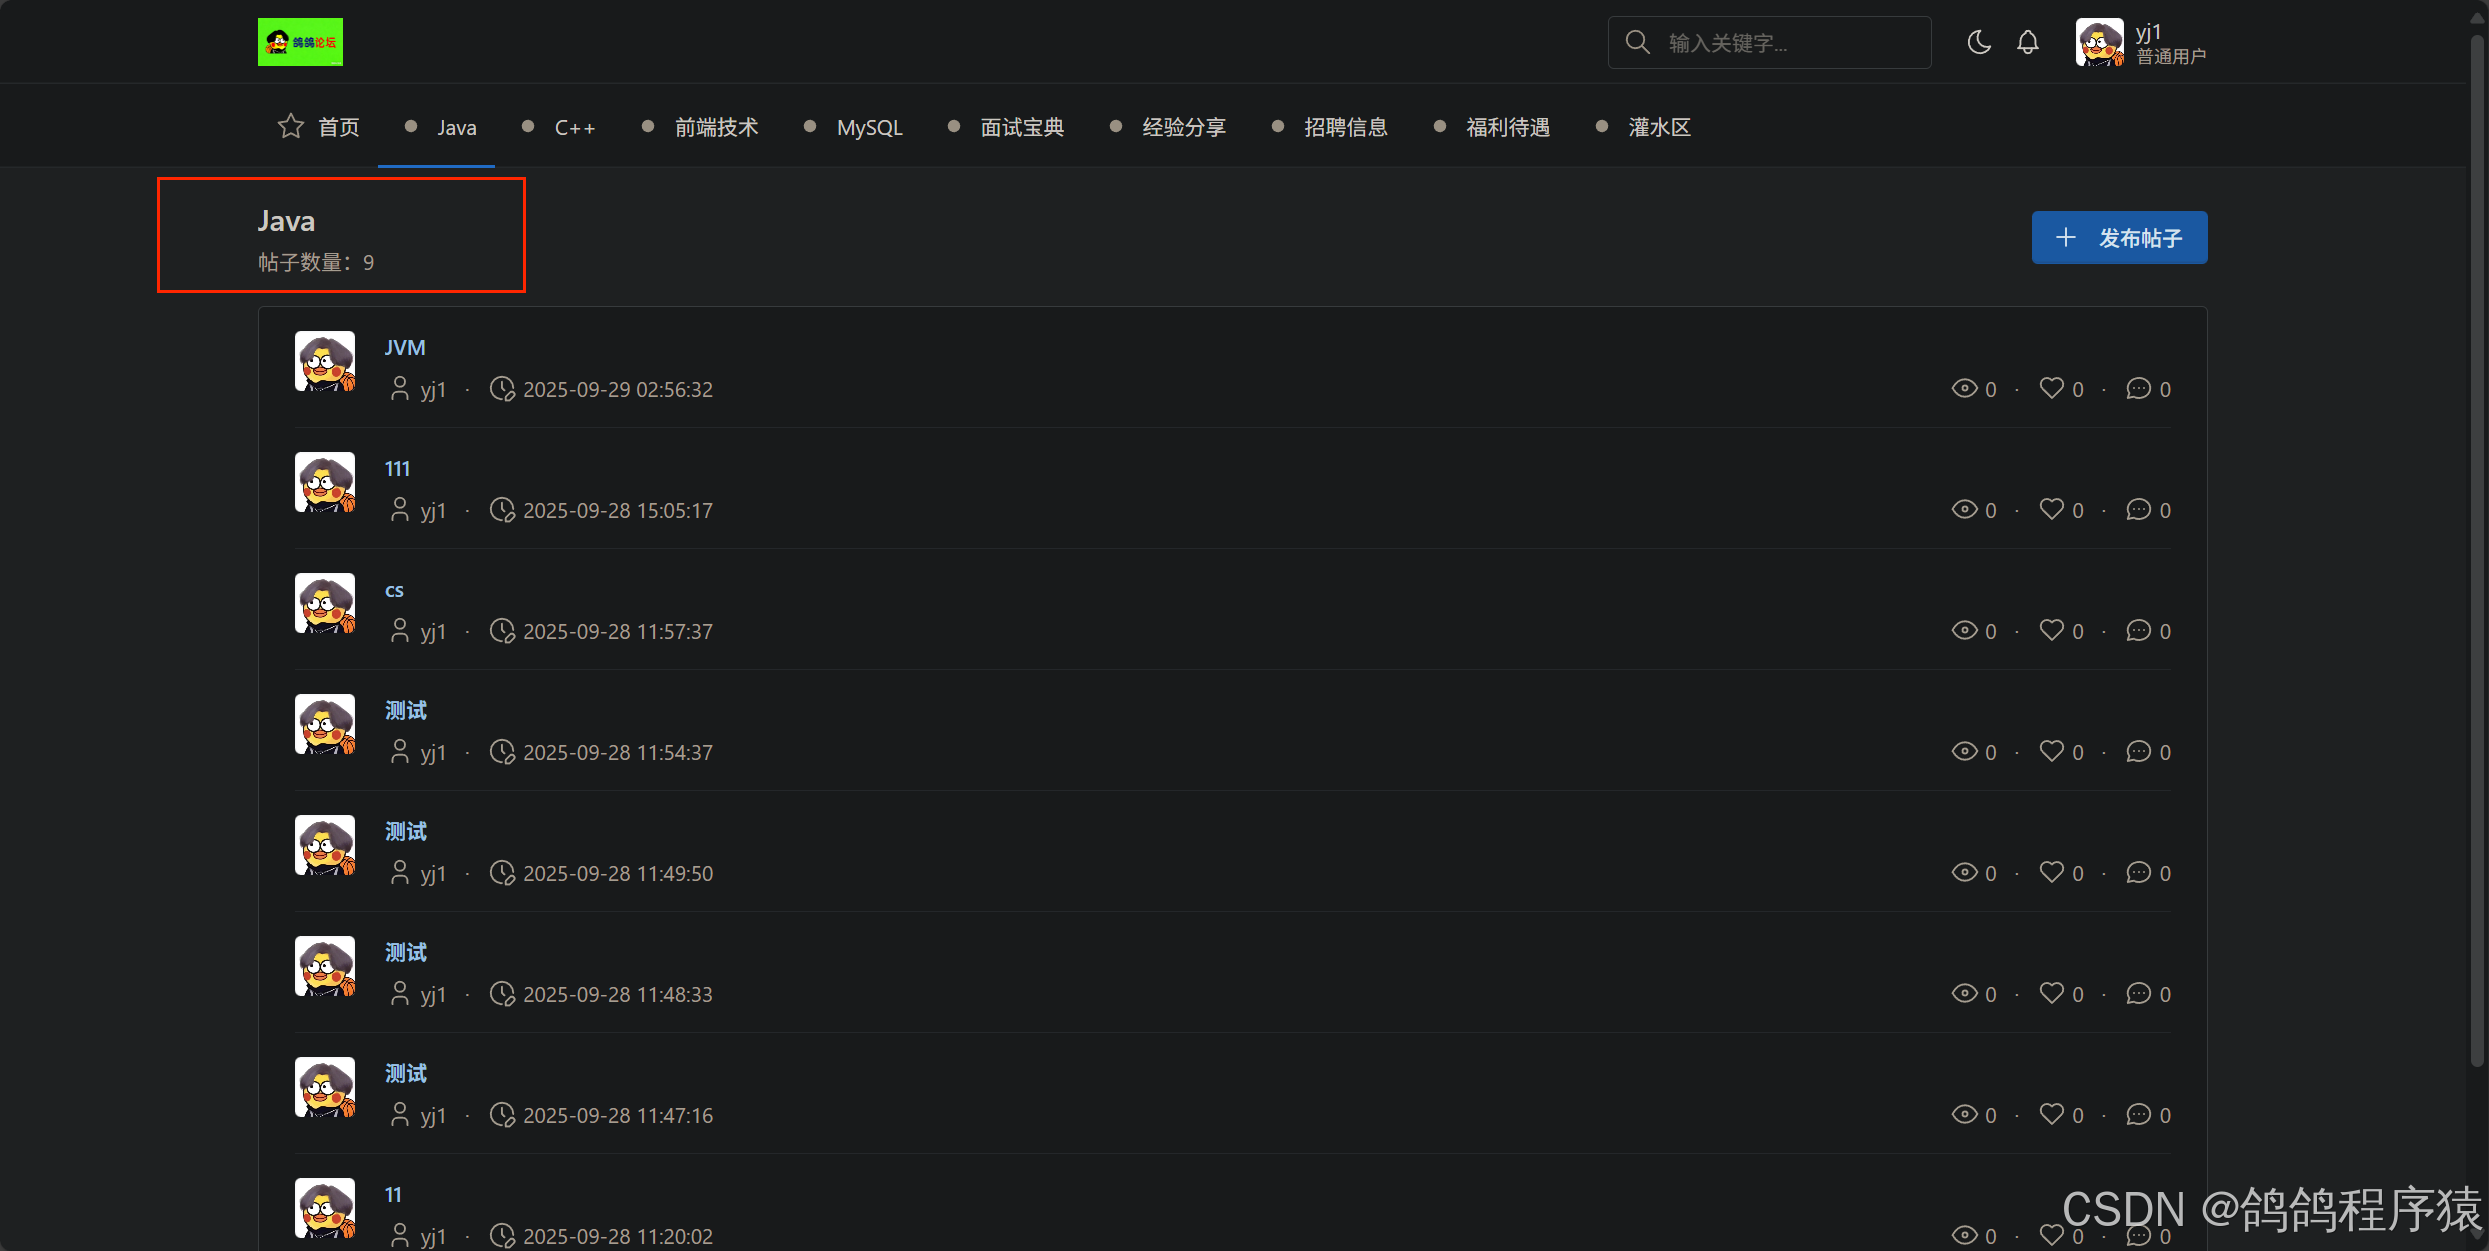
3.7.9.1 实现逻辑
客⼾端发送请求传⼊版块Id,服务器响应对应版本的详情。
3.7.9.2 参数要求
| 参数名 | 描述 | 类型 | 默认值 | 条件 |
|---|---|---|---|---|
| id | 版块Id | long | 必须 |
3.7.9.3 接⼝规范
// 请求
GET http://127.0.0.1:58080/board/getById?id=1 HTTP/1.1
// 响应
HTTP/1.1 200
Content-Type: application/json
{"code": 0,"message": "成功","data": {"id": 1,"name": "Java","articleCount": 5,"sort": 1,"state": 0,"createTime": "2023-01-14 11:02:18","updateTime": "2023-01-14 11:02:18"}
}
3.7.9.3 实现Controller
不用修改mapper和dao直接使用自动生成的。service在前面获取首页版块列表时也已经实现过了。
/*** 获取版块详情* @param id 版块id* @return 板块详情*/@ApiOperation("获取版块详情")@GetMapping("/getById")public AppResult<Board> getBoardInfo(@ApiParam("版块id") @RequestParam("id") Long id) {Board board = boardService.selectById(id);if(board == null || board.getDeleteState() == 1) {log.warn(ResultCode.FAILED_BOARD_IS_NOT_EXISTS.toString());throw new ApplicationException(AppResult.failed(ResultCode.FAILED_BOARD_IS_NOT_EXISTS));}return AppResult.success(board);}
3.7.9.4 测试API
在http://127.0.0.1:58080/swagger-ui/index.html或者Postman中测试接口,记得登录。
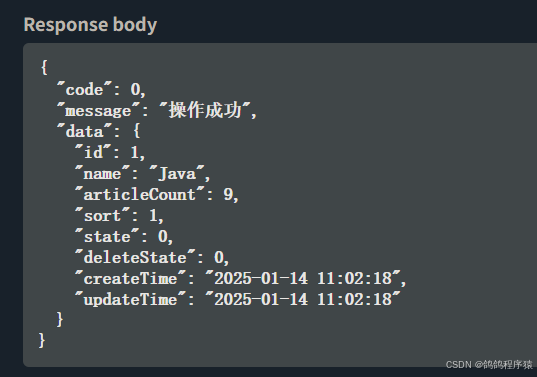
3.7.9.5 前端
article_list.html :
<!-- Page header -->
<div class="page-header d-print-none"><div class="container-xl"><div class="row g-2 align-items-center"><div class="col"><!-- Page pre-title --><!-- <div class="page-pretitle">子标题</div> --><h2 class="page-title" id="article_list_board_title">首页</h2><!-- 帖子数量 --><div class="text-muted mt-1" id="article_list_count_board"></div></div><!-- Page title actions --><div class="col-auto ms-auto d-print-none"><div class="btn-list"><!-- 发新帖按钮 宽屏 --><a  href="javascript:void(0);" class="btn btn-primary d-none d-sm-inline-block article_post"><svg xmlns="http://www.w3.org/2000/svg" class="icon" width="24" height="24" viewBox="0 0 24 24"stroke-width="2" stroke="currentColor" fill="none" stroke-linecap="round" stroke-linejoin="round"><path stroke="none" d="M0 0h24v24H0z" fill="none" /><path d="M12 5l0 14" /><path d="M5 12l14 0" /></svg>发布帖子</a><!-- 发新帖按钮 窄屏 --><a href="javascript:void(0);" class="btn btn-primary d-sm-none btn-icon article_post" aria-label="发布帖子"><svg xmlns="http://www.w3.org/2000/svg" class="icon" width="24" height="24" viewBox="0 0 24 24"stroke-width="2" stroke="currentColor" fill="none" stroke-linecap="round" stroke-linejoin="round"><path stroke="none" d="M0 0h24v24H0z" fill="none" /><path d="M12 5l0 14" /><path d="M5 12l14 0" /></svg></a></div></div></div></div>
</div>
<!-- Page body -->
<div class="page-body"><div class="container-xl"><div class="row justify-content-center"><!-- 显示列表的宽度 --><div class="col-12"><div class="card"><div class="card-body"><div class="divide-y" id="artical-items-body"><!-- 动态生成帖子列表 --></div></div></div></div></div></div><!-- 正文 结束 -->
</div>
<script>$(function () {// ========================= 获取版块下帖子信息 =======================// 获取当前选中的版块let activeLiEl = $('#topBoardList>.active');// 构造query stringlet queryString = '';let boardData = activeLiEl.data('board');// 导航栏版块Item是否绑定版块数据if (boardData) {// 构造query string queryString = '?boardId=' + boardData.id;// 获取版块信息getBoardInfo(boardData.id);} else {// 设置版块名称$('#article_list_board_title').html('首页');$('#article_list_count_board').hide();}// ========================= 获取版块信息 =======================// function getBoardInfo (boardId) {if (!boardId) {return;}// 发送请求, 成功后,显示版块相关信息$.ajax({type : 'get',url : 'board/getById?id='+ boardId,
//回调success : function (respData) {if(respData.code == 0) {let board = respData.data;//成功调用,更新页面内容$('#article_list_board_title').html(board.name);$('#article_list_count_board').html('帖子数量:' + board.articleCount);} else {//失败//提示信息$.toast({heading : '警告',text: respData.message,icon: 'warning'});}},error : function () {//提示信息$.toast({heading : '错误',text: '访问出现错误,请于管理员联系',icon: 'error'});}});}// ========================= 获取帖子列表 =======================// 成功后,调用listBuildArticleList()方法,构建帖子列表$.ajax({type : 'get',url : 'article/getAllByBoardId'+ queryString,//回调success : function (respData) {if(respData.code == 0) {//成功调用listBuildArticleList(respData.data);} else {//失败//提示信息$.toast({heading : '警告',text: respData.message,icon: 'warning'});}},error : function () {//提示信息$.toast({heading : '错误',text: '访问出现错误,请于管理员联系',icon: 'error'});}});// ========================= 构造帖子列表 =======================function listBuildArticleList(data) {if(data.length == 0) {$('#artical-items-body').html('还没有帖子');return;}// 默认头像路径let avatarUrl = 'image/avatar01.jpeg';// 遍历结果data.forEach(article => {// 设置默认头像if (!article.user.avatarUrl) {article.user.avatarUrl = avatarUrl;}// 构造HTMLlet articleHtmlStr = '<div>'+ ' <div class="row">'+ ' <div class="col-auto">'+ ' <span class="avatar" style="background-image: url(' + article.user.avatarUrl + ')"></span>'+ ' </div>'+ ' <div class="col">'+ ' <div class="text-truncate">'+ ' <a href="javascript:void(0);" class="article_list_a_title">'+ ' <strong>' + article.title + '</strong>'+ ' </a>'+ ' </div>'+ ' <div class="text-muted mt-2">'+ ' <div class="row">'+ ' <div class="col">'+ ' <ul class="list-inline list-inline-dots mb-0">'+ ' <li class="list-inline-item">'+ ' <svg xmlns="http://www.w3.org/2000/svg" class="icon icon-tabler icon-tabler-user"'+ ' width="24" height="24" viewBox="0 0 24 24" stroke-width="2" stroke="currentColor"'+ ' fill="none" stroke-linecap="round" stroke-linejoin="round">'+ ' <path stroke="none" d="M0 0h24v24H0z" fill="none"></path>'+ ' <path d="M12 7m-4 0a4 4 0 1 0 8 0a4 4 0 1 0 -8 0"></path>'+ ' <path d="M6 21v-2a4 4 0 0 1 4 -4h4a4 4 0 0 1 4 4v2"></path>'+ ' </svg> '+ article.user.nickname+ ' </li>'+ ' <li class="list-inline-item">'+ ' <svg xmlns="http://www.w3.org/2000/svg"'+ ' class="icon icon-tabler icon-tabler-clock-edit" width="24" height="24"'+ ' viewBox="0 0 24 24" stroke-width="2" stroke="currentColor" fill="none"'+ ' stroke-linecap="round" stroke-linejoin="round">'+ ' <path stroke="none" d="M0 0h24v24H0z" fill="none"></path>'+ ' <path d="M21 12a9 9 0 1 0 -9.972 8.948c.32 .034 .644 .052 .972 .052"></path>'+ ' <path d="M12 7v5l2 2"></path>'+ ' <path d="M18.42 15.61a2.1 2.1 0 0 1 2.97 2.97l-3.39 3.42h-3v-3l3.42 -3.39z">'+ ' </path>'+ ' </svg> '+ article.createTime+ ' </li>'+ ' </ul>'+ ' </div>'+ ' <div class="col-auto d-none d-md-inline">'+ ' <ul class="list-inline list-inline-dots mb-0">'+ ' <li class="list-inline-item">'+ ' <svg xmlns="http://www.w3.org/2000/svg" class="icon icon-tabler icon-tabler-eye"'+ ' width="24" height="24" viewBox="0 0 24 24" stroke-width="2" stroke="currentColor"'+ ' fill="none" stroke-linecap="round" stroke-linejoin="round">'+ ' <path stroke="none" d="M0 0h24v24H0z" fill="none"></path>'+ ' <path d="M12 12m-2 0a2 2 0 1 0 4 0a2 2 0 1 0 -4 0"></path>'+ ' <path'+ ' d="M22 12c-2.667 4.667 -6 7 -10 7s-7.333 -2.333 -10 -7c2.667 -4.667 6 -7 10 -7s7.333 2.333 10 7">'+ ' </path>'+ ' </svg> '+ article.visitCount+ ' </li>'+ ' <li class="list-inline-item">'+ ' <svg xmlns="http://www.w3.org/2000/svg" class="icon icon-tabler icon-tabler-heart"'+ ' width="24" height="24" viewBox="0 0 24 24" stroke-width="2" stroke="currentColor"'+ ' fill="none" stroke-linecap="round" stroke-linejoin="round">'+ ' <path stroke="none" d="M0 0h24v24H0z" fill="none"></path>'+ ' <path'+ ' d="M19.5 12.572l-7.5 7.428l-7.5 -7.428a5 5 0 1 1 7.5 -6.566a5 5 0 1 1 7.5 6.572">'+ ' </path>'+ ' </svg> '+ article.likeCount+ ' </li>'+ ' <li class="list-inline-item">'+ ' <svg xmlns="http://www.w3.org/2000/svg"'+ ' class="icon icon-tabler icon-tabler-message-circle" width="24" height="24"'+ ' viewBox="0 0 24 24" stroke-width="2" stroke="currentColor" fill="none"'+ ' stroke-linecap="round" stroke-linejoin="round">'+ ' <path stroke="none" d="M0 0h24v24H0z" fill="none"></path>'+ ' <path d="M3 20l1.3 -3.9a9 8 0 1 1 3.4 2.9l-4.7 1"></path>'+ ' <path d="M12 12l0 .01"></path>'+ ' <path d="M8 12l0 .01"></path>'+ ' <path d="M16 12l0 .01"></path>'+ ' </svg> '+ article.replyCount+ ' </li>'+ ' </ul>'+ ' </div>'+ ' </div>'+ ' </div>'+ ' </div>'+ ' </div>'+ ' </div>';// 转为元素对象let articleItem = $(articleHtmlStr);// 获取标题的 a 标签let articleTitle = articleItem.find('.article_list_a_title');// 处理标题点击事件articleTitle.click(function() {// 通过全局变量保存当前访问的帖子信息currentArticle = article;removeNavActive();$('#bit-forum-content').load('details.html');});// 添加到列表$('#artical-items-body').append(articleItem);});}// ================== 处理发贴事件 =====================$('.article_post').click(function () {console.log('加载发贴页面');removeNavActive();$('#bit-forum-content').load('article.html');});});
</script>
3.7.10 获取帖⼦详情
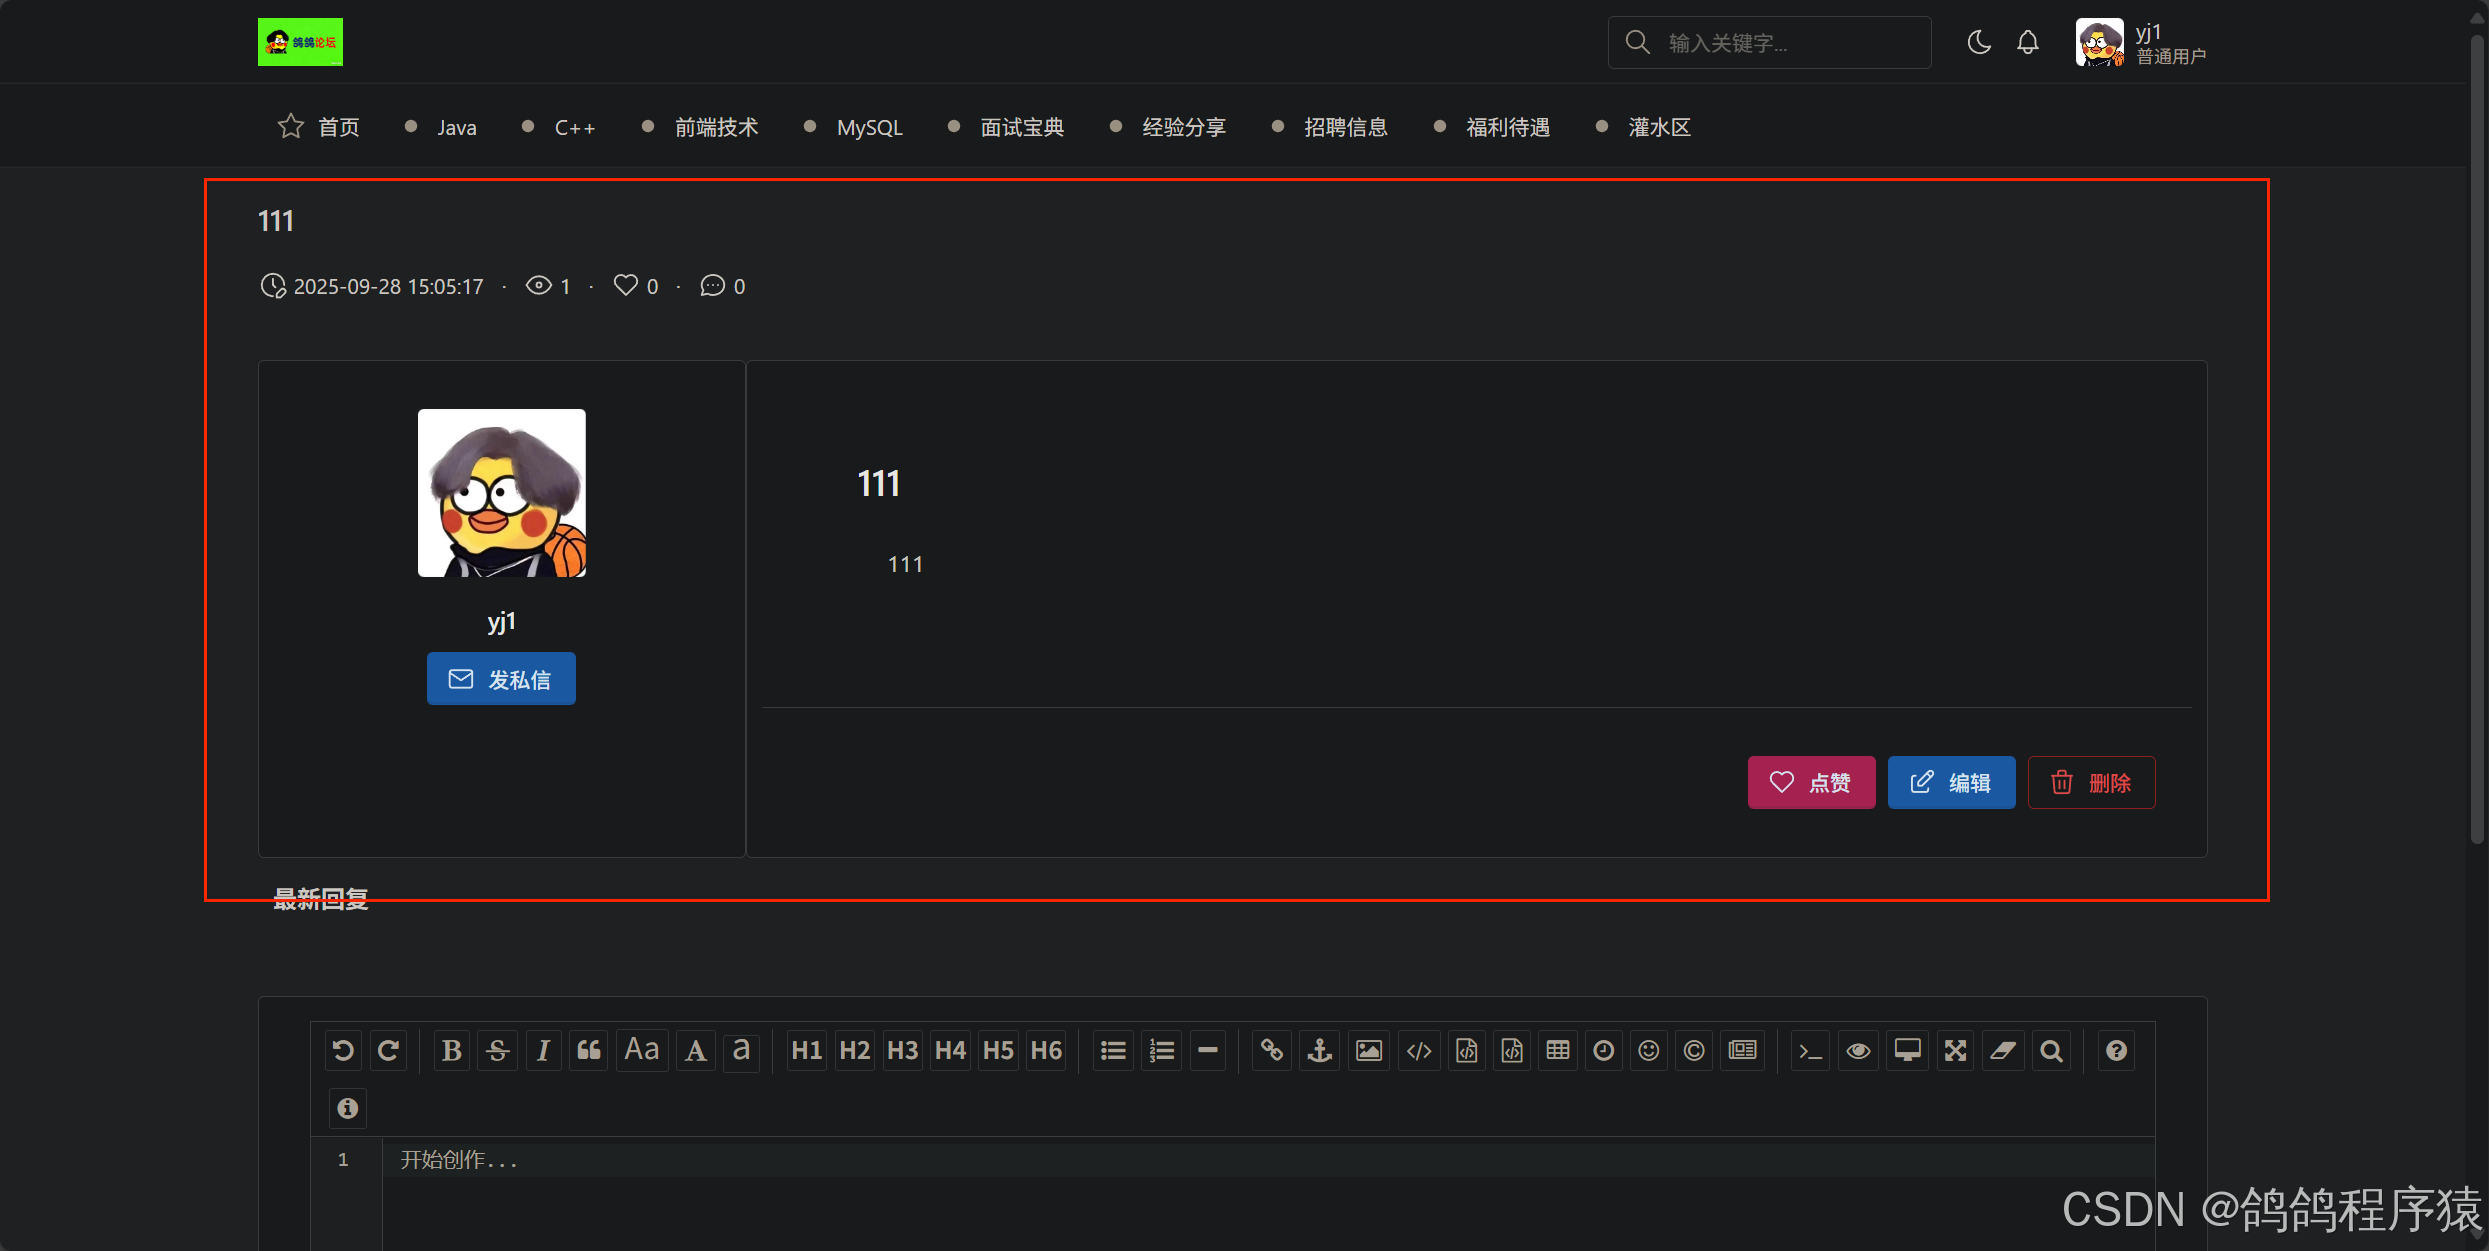
3.7.10.1 实现逻辑
- ⽤⼾点击帖⼦,将帖⼦Id做为参数向服务器发送请求
- 服务器查询帖⼦信息
- 帖⼦访问次数加1
- 返回查询结果
3.7.10.2 参数要求
| 参数名 | 描述 | 类型 | 默认值 | 条件 |
|---|---|---|---|---|
| id | 帖⼦Id | long | 必须 |
3.7.10.3 接⼝规范
// 请求
GET http://127.0.0.1:58080/article/getById?id=1 HTTP/1.1
// 响应
HTTP/1.1 200
Content-Type: application/json
{"code": 0,"message": "成功","data": {"id": 1,"boardId": 1,"userId": 1,"title": "单元测试","visitCount": 14,"replyCount": 2,"likeCount": 3,"state": 0,"createTime": "2023-07-02 06:46:32","updateTime": "2023-07-05 10:16:43","content": "测试内容","board": {"id": 1,D"name": "Java"},"user": {"id": 1,"nickname": "bitboy","phoneNum": null,"email": null,"gender": 1,"avatarUrl": null},"own": true}
}
3.7.10.4 创建扩展Mapper.xml
SQL 语句
select
u.id as U_id,
u.avatarUrl as u_avatarUrl,
u.nickname as u_nickname,
u.gender as u_gender,
u.deleteState as u_deleteState,
u.state as u_state,
u.isAdmin as u_isAdmin,
b.id as b_id,
b.name as b_name,
b.state as b_state,
b.deleteState as b_deleteState,
a.id,
a.boardId,
a.userId,
a.title,
a.content,
a.visitCount,
a.replyCount,
a.likeCount,
a.state,
a.createTime,
a.updateTime
from
t_article as a,
t_user as u,
t_board as b
where a.userId = u.id
and a.deleteState = 0
and a.boardId = b.id
and a.id = 2;
在 src/main/resources/mapper/extension/ArticleExtMapper.xml 加上查询语句
<select id="selectDetailById" resultMap="AllInfoResultMap" parameterType="java.lang.Long">selectu.id as U_id,u.avatarUrl as u_avatarUrl,u.nickname as u_nickname,u.gender as u_gender,u.deleteState as u_deleteState,u.state as u_state,u.isAdmin as u_isAdmin,b.id as b_id,b.name as b_name,b.state as b_state,b.deleteState as b_deleteState,a.id,a.boardId,a.userId,a.title,a.content,a.visitCount,a.replyCount,a.likeCount,a.state,a.createTime,a.updateTimefromt_article as a,t_user as u,t_board as bwhere a.userId = u.idand a.deleteState = 0and a.boardId = b.idand a.id = #{id,jdbcType=BIGINT}</select>
3.7.10.5 修改DAO
/*** 根据版块Id 查询当前文章详情* @param id 版块Id* @return 当前文章详情*/Article selectDetailById(@Param("id") Long id);3.7.10.6 创建Service接⼝
在com/yj/forum/services/IArticleService.java 定义接口:
/*** 根据版块Id 查询当前文章详情* @param id 版块Id* @return 当前文章详情*/Article selectDetailById( Long id);
3.7.10.6 实现Service接⼝
在com/yj/forum/dao/ArticleMapper.java 实现方法:
逻辑:
- 非空校验
- 拿帖子
- 帖子进行非空校验
- 更新数据库该帖子的访问数量
- 影响行数校验
- 更新对象的访问数量
/*** 根据版块Id 查询当前文章详情* @param id 版块Id* @return 当前文章详情*/@Overridepublic Article selectDetailById(Long id) {//非空校验if(id == null || id <= 0) {log.warn(ResultCode.FAILED_PARAMS_VALIDATE.toString());throw new ApplicationException(AppResult.failed(ResultCode.FAILED_PARAMS_VALIDATE));}Article article = articleMapper.selectDetailById(id);//校验if(article == null) {log.warn(ResultCode.FAILED_ARTICLE_IS_NOT_EXISTS.toString());throw new ApplicationException(AppResult.failed(ResultCode.FAILED_ARTICLE_IS_NOT_EXISTS));}//构造对象,数据库更新访问次数Article updateArticle = new Article();updateArticle.setId(article.getId());updateArticle.setVisitCount(article.getVisitCount() == null ? 1 : article.getVisitCount() + 1);int row = articleMapper.updateByPrimaryKeySelective(updateArticle);if(row != 1) {// 记录⽇志log.warn(ResultCode.ERROR_SERVICES.toString() + "articleId = " + article.getId());// 抛出异常throw new ApplicationException(AppResult.failed(ResultCode.ERROR_SERVICES));}// 对象返回的帖⼦访问数加1article.setVisitCount(article.getVisitCount() == null ? 1 : article.getVisitCount() + 1);return article;}
3.7.10.6 单元测试
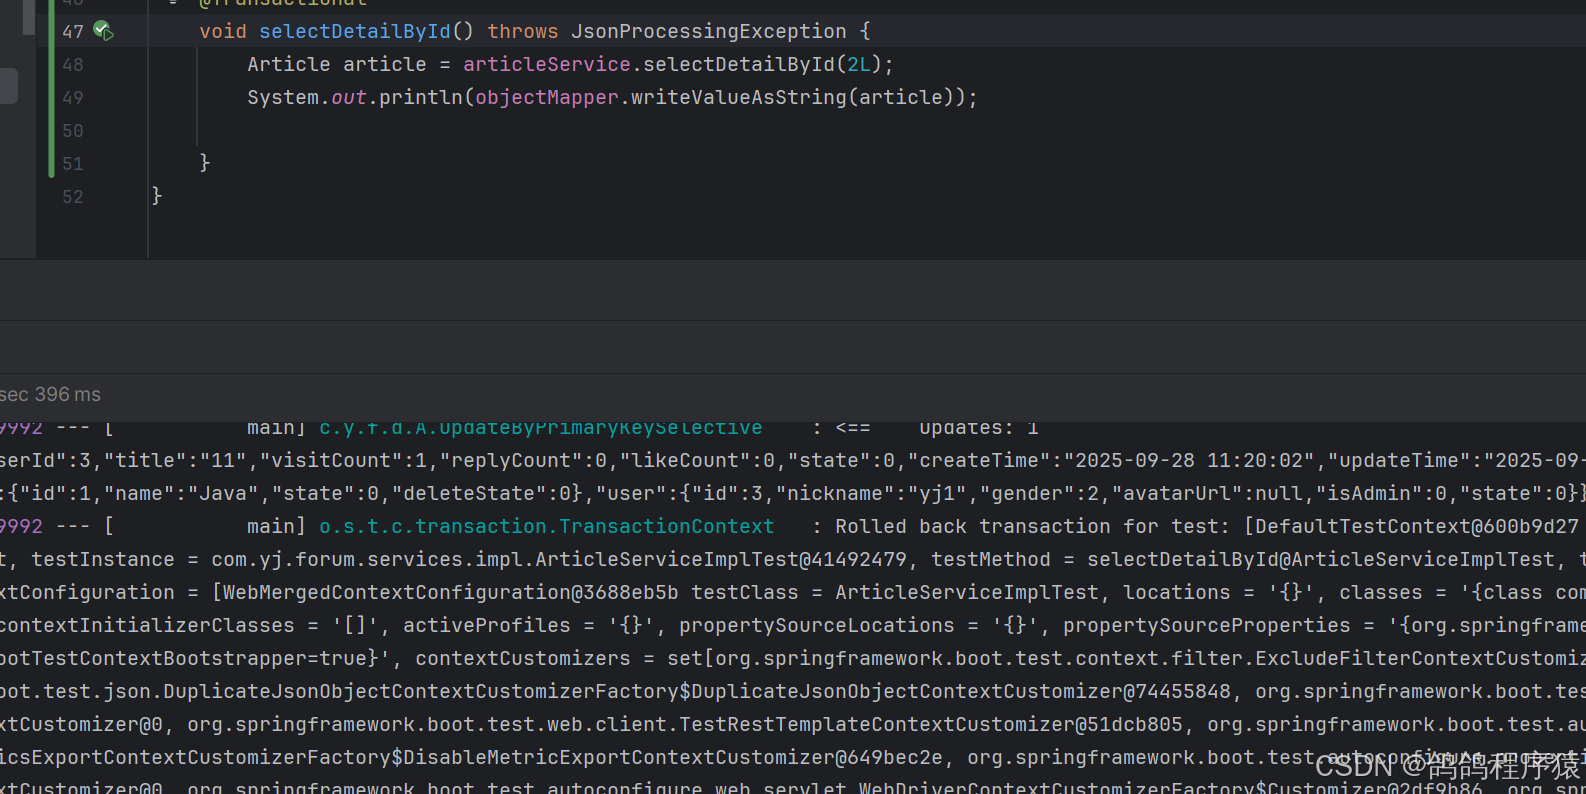
3.7.10.7 修改Model
判断⾃⼰是不是当前访问帖⼦的作者有多种⽅法:
- 当⽤⼾登录成功时,使⽤JS中的全局变量记录⼀下⽤⼾信息,并在帖⼦详情⻚⾯判断帖⼦作者与当前登录⽤⼾是否同⼀个⼈
- Controller返回响应数据时使⽤⼀个标识来明确的表时当前登录⽤⼾是不是作者
在com/yj/forum/model/Article.java类中加⼊属性
// ⽤⼾是不是作者
@ApiModelProperty("⽤⼾是不是作者") // ⽤于swagger的注解
private boolean isOwn;
3.7.10.8 实现controller
com/yj/forum/controller/ArticleController.java 添加方法:
逻辑:
- 获取当前登录用户
- 获取帖子
- 判断是否为作者
@ApiOperation("根据Id查询帖⼦详情")@GetMapping("/details")public AppResult<Article> getDetails( HttpServletRequest request, @ApiParam("帖⼦Id") @RequestParam("id") Long id) {// 获取⽤⼾信息HttpSession session = request.getSession();User user = (User) session.getAttribute(AppConfig.USER_SESSION);// 调⽤Service层获取帖⼦详情Article article = articleService.selectDetailById(id);// 当前⽤⼾是否作者if(article.getUserId().equals(user.getId())) {article.setOwn(true);}return AppResult.success(article);}
3.7.10.9 测试API
在http://127.0.0.1:58080/swagger-ui/index.html或者Postman中测试接口,记得登录。
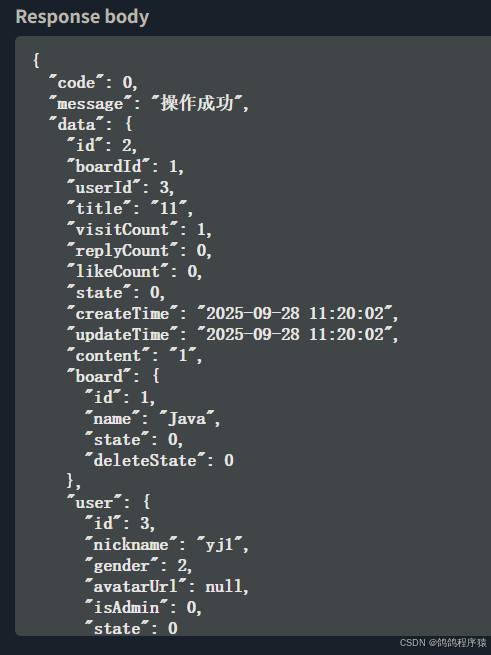
3.7.10.10 前端
static/details.html:
<!-- Page header -->
<div class="page-header d-print-none"><div class="container-xl"><!-- 帖子Id --><input type="text" style="display: none;" id="details_article_id"><div class="row g-2 align-items-center"><div class="col"><!-- 帖子标题 --><h2 class="page-title" id="details_article_title"></h2></div></div><div class="col-auto d-none d-md-inline" style="padding: 0px 3px;"><ul class="list-inline list-inline-dots mb-0"><li class="list-inline-item"><svg xmlns="http://www.w3.org/2000/svg" class="icon icon-tabler icon-tabler-clock-edit" width="24" height="24"viewBox="0 0 24 24" stroke-width="2" stroke="currentColor" fill="none" stroke-linecap="round"stroke-linejoin="round"><path stroke="none" d="M0 0h24v24H0z" fill="none"></path><path d="M21 12a9 9 0 1 0 -9.972 8.948c.32 .034 .644 .052 .972 .052"></path><path d="M12 7v5l2 2"></path><path d="M18.42 15.61a2.1 2.1 0 0 1 2.97 2.97l-3.39 3.42h-3v-3l3.42 -3.39z"></path></svg><!-- 发布时间 --><span id="details_article_createTime"></span></li><li class="list-inline-item"><svg xmlns="http://www.w3.org/2000/svg" class="icon icon-tabler icon-tabler-eye" width="24" height="24"viewBox="0 0 24 24" stroke-width="2" stroke="currentColor" fill="none" stroke-linecap="round"stroke-linejoin="round"><path stroke="none" d="M0 0h24v24H0z" fill="none"></path><path d="M12 12m-2 0a2 2 0 1 0 4 0a2 2 0 1 0 -4 0"></path><path d="M22 12c-2.667 4.667 -6 7 -10 7s-7.333 -2.333 -10 -7c2.667 -4.667 6 -7 10 -7s7.333 2.333 10 7"></path></svg><!-- 访问数量 --><span id="details_article_visitCount"></span></li><li class="list-inline-item"><svg xmlns="http://www.w3.org/2000/svg" class="icon icon-tabler icon-tabler-heart" width="24" height="24"viewBox="0 0 24 24" stroke-width="2" stroke="currentColor" fill="none" stroke-linecap="round"stroke-linejoin="round"><path stroke="none" d="M0 0h24v24H0z" fill="none"></path><path d="M19.5 12.572l-7.5 7.428l-7.5 -7.428a5 5 0 1 1 7.5 -6.566a5 5 0 1 1 7.5 6.572"></path></svg><!-- 点赞数量 --><span id="details_article_likeCount"></span></li><li class="list-inline-item"><svg xmlns="http://www.w3.org/2000/svg" class="icon icon-tabler icon-tabler-message-circle" width="24"height="24" viewBox="0 0 24 24" stroke-width="2" stroke="currentColor" fill="none" stroke-linecap="round"stroke-linejoin="round"><path stroke="none" d="M0 0h24v24H0z" fill="none"></path><path d="M3 20l1.3 -3.9a9 8 0 1 1 3.4 2.9l-4.7 1"></path><path d="M12 12l0 .01"></path><path d="M8 12l0 .01"></path><path d="M16 12l0 .01"></path></svg><!-- 回复数量 --><span id="details_article_replyCount"></span></li></ul></div></div>
</div>
<!-- Page body -->
<div class="page-body"><div class="container-xl"><div class="row justify-content-center"><div class="row"><!-- 作者区 --><div class="col-3 card"><div class="card-body p-4 text-center"><span class="avatar avatar-xl mb-3 rounded" style="background-image: url(./image/avatar01.jpeg)"id="article_details_author_avatar"></span><h3 class="m-0 mb-1"><a href="javascript:void(0);" id="article_details_author_name"></a></h3><div style="margin-top: 10px;" id="div_details_send_message"><a href="javascript:void(0);" class="btn btn-primary" id="btn_details_send_message" data-bs-toggle="modal" data-bs-target="#index_message_modal"><svg xmlns="http://www.w3.org/2000/svg" class="icon icon-tabler icon-tabler-mail" width="24" height="24"viewBox="0 0 24 24" stroke-width="2" stroke="currentColor" fill="none" stroke-linecap="round"stroke-linejoin="round"><path stroke="none" d="M0 0h24v24H0z" fill="none"></path><path d="M3 7a2 2 0 0 1 2 -2h14a2 2 0 0 1 2 2v10a2 2 0 0 1 -2 2h-14a2 2 0 0 1 -2 -2v-10z"></path><path d="M3 7l9 6l9 -6"></path></svg>发私信</a></div></div></div><div class="col-9 card card-lg"><!-- 帖子正文 --><div class="card-body"><h1 id="details_article_content_title"></h1><div id="details_article_content"></div></div><!-- 卡片页脚 --><div class="card-footer bg-transparent mt-auto justify-content-end"style="display: flex; justify-content: space-between; align-items: center;"><!-- 操作区开始 --><div class="col-auto row g-2 align-items-center"><div class="col-auto"><div class="col-6 col-sm-4 col-md-2 col-xl-auto py-3"><a href="javascript:void(0);" class="btn btn-pink w-100" id="details_btn_like_count"><svg xmlns="http://www.w3.org/2000/svg" class="icon" width="24" height="24" viewBox="0 0 24 24"stroke-width="2" stroke="currentColor" fill="none" stroke-linecap="round" stroke-linejoin="round"><path stroke="none" d="M0 0h24v24H0z" fill="none"></path><path d="M19.5 12.572l-7.5 7.428l-7.5 -7.428a5 5 0 1 1 7.5 -6.566a5 5 0 1 1 7.5 6.572"></path></svg>点赞</a></div></div><div class="col-auto details-is-own" style="display: none;"><div class="col-6 col-sm-4 col-md-2 col-xl-auto py-3"><a href="javascript:void(0);" class="btn btn-tabler w-100" id="details_artile_edit"><svg xmlns="http://www.w3.org/2000/svg" class="icon icon-tabler icon-tabler-edit" width="24"height="24" viewBox="0 0 24 24" stroke-width="2" stroke="currentColor" fill="none"stroke-linecap="round" stroke-linejoin="round"><path stroke="none" d="M0 0h24v24H0z" fill="none"></path><path d="M7 7h-1a2 2 0 0 0 -2 2v9a2 2 0 0 0 2 2h9a2 2 0 0 0 2 -2v-1"></path><path d="M20.385 6.585a2.1 2.1 0 0 0 -2.97 -2.97l-8.415 8.385v3h3l8.385 -8.415z"></path><path d="M16 5l3 3"></path></svg><span>编辑</span></a></div></div><div class="col-auto details-is-own" style="display: none;"><div class="col-6 col-sm-4 col-md-2 col-xl-auto py-3"><a href="javascript:void(0);" class="btn btn-outline-danger w-100" data-bs-toggle="modal" data-bs-target="#details_delete_modal"><svg xmlns="http://www.w3.org/2000/svg" class="icon icon-tabler icon-tabler-trash" width="24"height="24" viewBox="0 0 24 24" stroke-width="2" stroke="currentColor" fill="none"stroke-linecap="round" stroke-linejoin="round"><path stroke="none" d="M0 0h24v24H0z" fill="none"></path><path d="M4 7l16 0"></path><path d="M10 11l0 6"></path><path d="M14 11l0 6"></path><path d="M5 7l1 12a2 2 0 0 0 2 2h8a2 2 0 0 0 2 -2l1 -12"></path><path d="M9 7v-3a1 1 0 0 1 1 -1h4a1 1 0 0 1 1 1v3"></path></svg><span>删除</span></a></div></div></div></div><!-- 操作区 结束 --></div></div><div style="margin: 15px 0px; padding-left: 20px;"><h3>最新回复</h3></div><div style="margin: 15px 0px; padding-left: 20px;" id="details_reply_area"><!-- 回复列表区域 --></div><div class="row"><!-- 回复编辑区 --><div class="card"><div class="card-body"><div class="mb-3" style="height: 300px;"><div id="article_details_reply"><!-- textarea也是一个表单控件,当在editor.md中编辑好的内容会关联这个文本域上 --><textarea id="details_article_reply_content" style="display: none;"></textarea></div></div></div><div class="card-footer bg-transparent mt-auto"><!-- 操作区 结束 --><div class="col-auto row g-2 justify-content-end"><div class="col-auto"><div class="col-6 col-sm-4 col-md-2 col-xl-auto py-3"><a href="javascript:void(0);" class="btn btn-tabler w-100" id="details_btn_article_reply"><svg xmlns="http://www.w3.org/2000/svg" class="icon icon-tabler icon-tabler-edit" width="24"height="24" viewBox="0 0 24 24" stroke-width="2" stroke="currentColor" fill="none"stroke-linecap="round" stroke-linejoin="round"><path stroke="none" d="M0 0h24v24H0z" fill="none"></path><path d="M7 7h-1a2 2 0 0 0 -2 2v9a2 2 0 0 0 2 2h9a2 2 0 0 0 2 -2v-1"></path><path d="M20.385 6.585a2.1 2.1 0 0 0 -2.97 -2.97l-8.415 8.385v3h3l8.385 -8.415z"></path><path d="M16 5l3 3"></path></svg><span>回复</span></a></div></div></div></div></div></div></div></div>
</div>
<div class="modal modal-blur fade" id="details_delete_modal" tabindex="-1" role="dialog" aria-hidden="true"><div class="modal-dialog modal-sm modal-dialog-centered" role="document"><div class="modal-content"><button type="button" class="btn-close" data-bs-dismiss="modal" aria-label="Close"></button><div class="modal-status bg-danger"></div><div class="modal-body text-center py-4"><!-- Download SVG icon from http://tabler-icons.io/i/alert-triangle --><svg xmlns="http://www.w3.org/2000/svg" class="icon mb-2 text-danger icon-lg" width="24" height="24" viewBox="0 0 24 24" stroke-width="2" stroke="currentColor" fill="none" stroke-linecap="round" stroke-linejoin="round"><path stroke="none" d="M0 0h24v24H0z" fill="none"/><path d="M12 9v2m0 4v.01" /><path d="M5 19h14a2 2 0 0 0 1.84 -2.75l-7.1 -12.25a2 2 0 0 0 -3.5 0l-7.1 12.25a2 2 0 0 0 1.75 2.75" /></svg><h3>确定要删除当前帖子吗?</h3><div class="text-muted">点击确认该帖子将被删除.</div></div><div class="modal-footer"><div class="w-100"><div class="row"><div class="col"><a href="javascript:void(0);" class="btn w-100" data-bs-dismiss="modal">取消</a></div><div class="col"><a href="javascript:void(0);" class="btn btn-danger w-100" data-bs-dismiss="modal" id="details_artile_delete">删除</a></div></div></div></div></div></div>
</div>
<script>$(function () {// ===================== 初始化回复编辑区 ===================== var editor = editormd("article_details_reply", {width: "100%",height: "100%",// theme : "dark",// previewTheme : "dark",// editorTheme : "pastel-on-dark",autoFocus: false, // 关闭自动获得焦点codeFold: true,markdown : '', // 处理编辑区内容//syncScrolling : false,saveHTMLToTextarea: true,    // 保存 HTML 到 TextareasearchReplace: true,watch: false,                    // 关闭实时预览htmlDecode: "style,script,iframe|on*",            // 开启 HTML 标签解析,为了安全性,默认不开启    // toolbar  : false,             //关闭工具栏// previewCodeHighlight : false, // 关闭预览 HTML 的代码块高亮,默认开启emoji: true,taskList: true,tocm: true,         // Using [TOCM]tex: true,                     // 开启科学公式TeX语言支持,默认关闭// flowChart : true,               // 开启流程图支持,默认关闭// sequenceDiagram : true,         // 开启时序/序列图支持,默认关闭,placeholder: '开始创作...',     // 占位符path: "./dist/editor.md/lib/"});// ===================== 请求帖子详情 ===================== // url: '/article/getById?id=' + currentArticle.id,// 成功后, 调用initArticleDetails()方法,初始化页面内容$.ajax({type: 'get',url: 'article/details?id='+ currentArticle.id,success : function (respData){if(respData.code == 0) {initArticleDetails(respData.data);}else {//提示信息$.toast({heading : '警告',text: respData.message,icon: 'warning'});}},error : function () {//提示信息$.toast({heading : '错误',text: '访问出现错误,请于管理员联系',icon: 'error'});}});// ===================== 初始化页面内空 ======================function initArticleDetails(article) {// 设置当前操作的帖子为最新查询出来的值currentArticle = article;// 默认头像路径if (!article.user.avatarUrl) {article.user.avatarUrl = avatarUrl;}// 设置头像$('#article_details_author_avatar').css('background-image', 'url(' + article.user.avatarUrl + ')');// 设置用户名$('#article_details_author_name').html(article.user.nickname);// 设置帖子Id$('#details_article_id').val(article.id);// 设置帖子标题$('#details_article_title').html(article.title);// 设置发布时间$('#details_article_createTime').html(article.createTime);// 设置访问数量$('#details_article_visitCount').html(article.visitCount);// 设置点赞数$('#details_article_likeCount').html(article.likeCount);// 设置回复数$('#details_article_replyCount').html(article.replyCount);// 帖子正文$('#details_article_content_title').html(article.title)// 让内容以markdown 的形式显示editormd.markdownToHTML('details_article_content', { markdown: article.content });// 编辑权限通过后台返回的属性值处理if (article.own) {$('.details-is-own').show();}// 是否显示站内信按钮if (article.user.id == currentUserId) {$('#div_details_send_message').hide();} else {// 设置站内信目标用户信息$('#btn_details_send_message').click(function() {setMessageReceiveUserInfo(article.user.id, article.user.nickname);});}// 个人帖子列表$('#article_details_author_name').click(function () {// 设置要查看用户的IdprofileUserId = article.userId;// 是否为当前登录用户if (article.userId == currentUserId) {profileUserId = undefined;}$('#bit-forum-content').load('profile.html');});}// ====================== 加载回复列表 ======================// url: 'article/getReplies?articleId=' + currentArticle.id// 成功后,调用buildArticleReply()方法构建回复列表function loadArticleDetailsReply() {$.ajax({});}// function buildArticleReply(data) {let replyArea = $('#details_reply_area');// 没有回复内容if (!data || data.length == 0) {replyArea.html('<p>还没有回复,第一个写下回复吧</p>');return;}// 清空原有内空$('#details_reply_area').html('');data.forEach(articleReply => {// 默认头像路径if (!articleReply.user.avatarUrl) {articleReply.user.avatarUrl = avatarUrl;}// 构造回复记录let replyHtml = '<div class="row" >'+ ' <div class="col-3 card">'+ ' <div class="card-body p-4 text-center">'+ ' <span class="avatar avatar-xl mb-3 rounded" style="background-image: url(' + articleReply.user.avatarUrl + ')"></span>'+ ' <h3 class="m-0 mb-1"><a href="javascript:void(0);" class="a_reply_user_profile">' + articleReply.user.nickname + '</a></h3>'+ ' <div class="div_reply_send_message" style="margin-top: 10px;">'+ ' <a href="javascript:void(0);" class="btn btn-primary btn_reply_send_message" data-bs-toggle="modal" data-bs-target="#index_message_modal">'+ ' <svg xmlns="http://www.w3.org/2000/svg" class="icon icon-tabler icon-tabler-mail" width="24" height="24"'+ ' viewBox="0 0 24 24" stroke-width="2" stroke="currentColor" fill="none" stroke-linecap="round"' + ' stroke-linejoin="round">'+ ' <path stroke="none" d="M0 0h24v24H0z" fill="none"></path>'+ ' <path d="M3 7a2 2 0 0 1 2 -2h14a2 2 0 0 1 2 2v10a2 2 0 0 1 -2 2h-14a2 2 0 0 1 -2 -2v-10z">'+ ' </path>'+ ' <path d="M3 7l9 6l9 -6"></path>'+ ' </svg>'+ ' 发私信'+ ' </a>'+ ' </div>'+ ' </div>'+ ' </div>'+ ' <div class="col-9 card card-lg">'+ ' <div class="card-body">'+ ' <div id="details_article_reply_content_' + articleReply.id + '"></div>'+ ' </div>'+ ' <div class="card-footer bg-transparent mt-auto"'+ ' style="display: flex; justify-content: space-between; align-items: center;">'+ ' <div class="row">'+ ' <div class="col-auto d-none d-md-inline">'+ ' <ul class="list-inline list-inline-dots mb-0">'+ ' <li class="list-inline-item">'+ ' <svg xmlns="http://www.w3.org/2000/svg" class="icon icon-tabler icon-tabler-clock-edit" width="24"'+ ' height="24" viewBox="0 0 24 24" stroke-width="2" stroke="currentColor" fill="none"'+ ' stroke-linecap="round" stroke-linejoin="round">'+ ' <path stroke="none" d="M0 0h24v24H0z" fill="none"></path>'+ ' <path d="M21 12a9 9 0 1 0 -9.972 8.948c.32 .034 .644 .052 .972 .052"></path>'+ ' <path d="M12 7v5l2 2"></path>'+ ' <path d="M18.42 15.61a2.1 2.1 0 0 1 2.97 2.97l-3.39 3.42h-3v-3l3.42 -3.39z"></path>'+ ' </svg> '+ articleReply.createTime+ ' </li>'+ ' </ul>'+ ' </div>'+ ' </div>'+ ' </div>'+ ' </div>'+ ' </div>';let replyItem = $(replyHtml);// 获取标题的 a 标签let replySendMessageDiv = replyItem.find('.div_reply_send_message');// 是否显示站内信按钮if (articleReply.user.id == currentUserId) {replySendMessageDiv.css('display', 'none');} else {console.log('显示回复中的站内信');// 设置站内信目标用户信息let replySendMessageBtn = replyItem.find('.btn_reply_send_message');console.log(replySendMessageBtn);replySendMessageBtn.click(function() {console.log(articleReply);setMessageReceiveUserInfo(articleReply.user.id, articleReply.user.nickname);});}// 个人帖子列表let replyUserProfileBtn = replyItem.find('.a_reply_user_profile');replyUserProfileBtn.click(function () {// 设置要查看用户的IdprofileUserId = articleReply.user.id;$('#bit-forum-content').load('profile.html');});// 添加到回复区replyArea.append(replyItem);// 处理内容editormd.markdownToHTML('details_article_reply_content_' + articleReply.id, { markdown: articleReply.content });});}// ====================== 加载回复 ======================loadArticleDetailsReply();// ====================== 处理点赞 ======================// url: '/article/thumbsUp?id=' + currentArticle.id// 成功后,修改点赞个数 currentArticle.likeCount = currentArticle.likeCount + 1;$('#details_btn_like_count').click(function () {$.ajax({});});// ====================== 回复帖子 ======================$('#details_btn_article_reply').click(function () {let articleIdEl = $('#details_article_id');let replyContentEl = $('#details_article_reply_content');// 非空校验if (!replyContentEl.val()) {// 提示$.toast({heading: '提示',text: '请输入回复内容',icon: 'warning'});return;}// 构造帖子对象// 发送请求,成功后 // 1. 清空回复区域// 2. 更新回贴数 currentArticle.replyCount = currentArticle.replyCount + 1;// 3. 调用loadArticleDetailsReply()方法,重新构建回贴列表$.ajax({});});// ====================== 处理删除事件 ======================// 成功后,调用changeNavActive($('#nav-link-title'));  回到首页// url: 'article/delete?id=' + $('#details_article_id').val()$('#details_artile_delete').click(function () {$.ajax({});});// ====================== 处理编辑事件 ======================$('#details_artile_edit').click(function () {console.log('开始编辑');removeNavActive();$('#bit-forum-content').load('article_edit.html');});});
</script>
3.7.11 编辑帖⼦
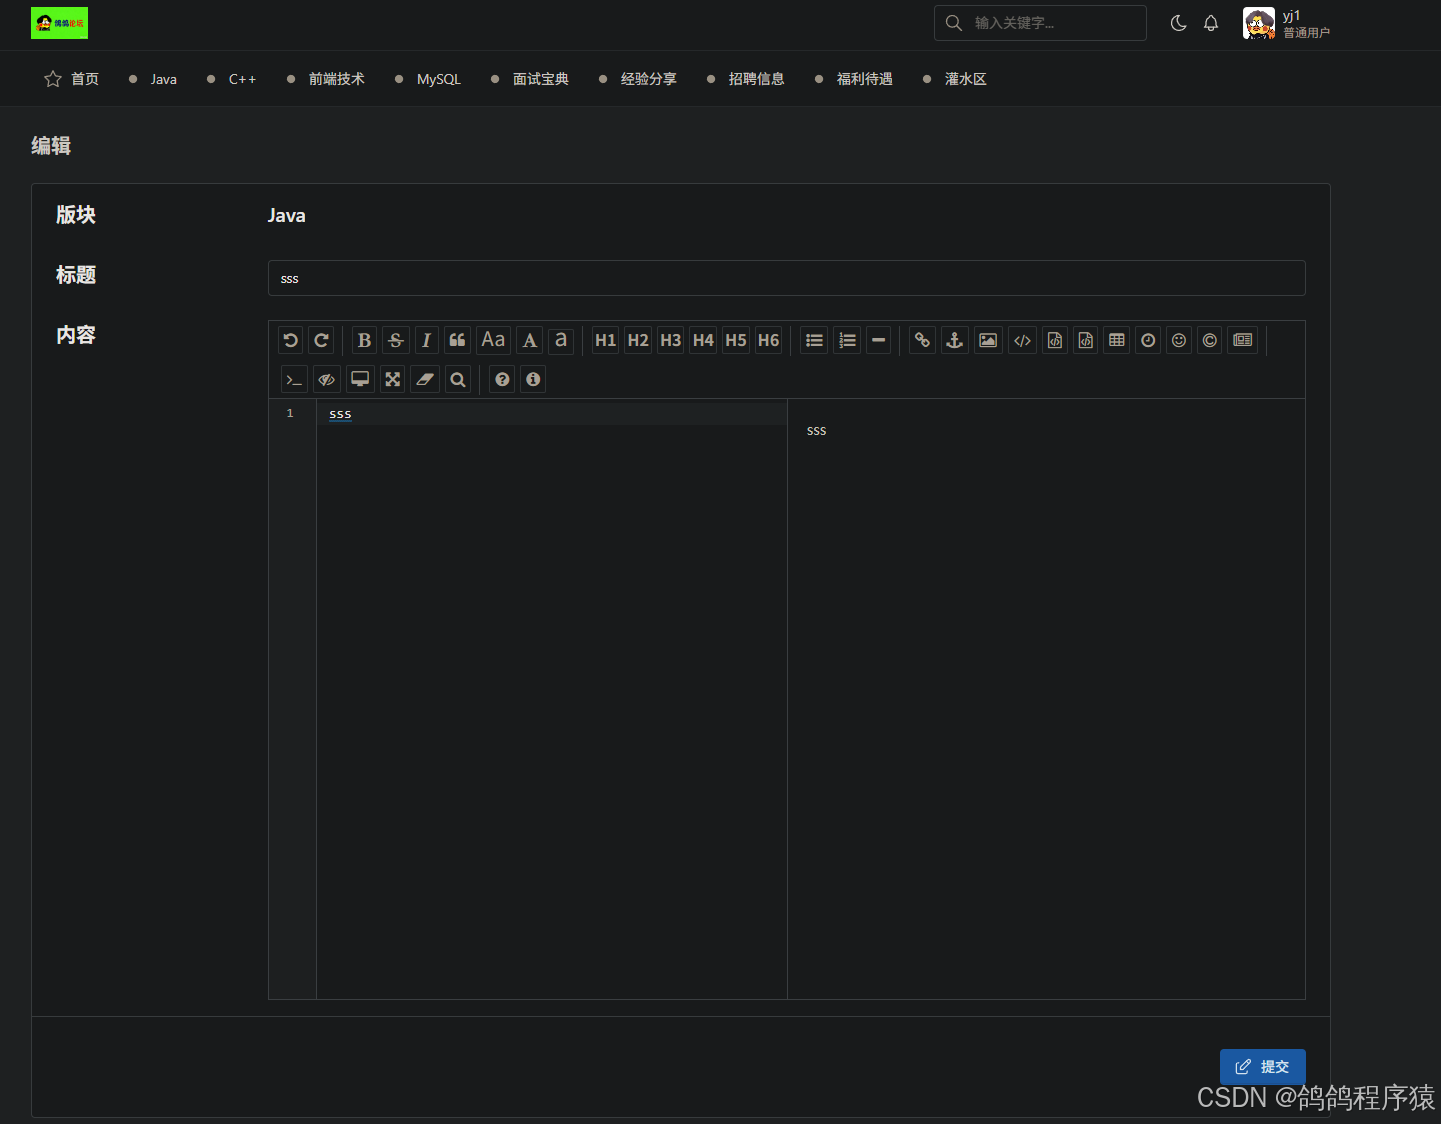
3.7.11.1 实现逻辑
- 当发帖⼈为当前⽤⼾时,显⽰编辑接钮,⽤⼾点击编辑接钮,进⼊编辑⻚⾯
- 获取帖⼦信息,并在对应的位置显⽰
- ⽤⼾修改帖⼦标题和内容
- 提交到服务器,服务器检验当前⽤⼾是否为发帖⼈,并更新数据库
- 返回更新结果
3.7.11.2 参数要求
| 参数名 | 描述 | 类型 | 默认值 | 条件 |
|---|---|---|---|---|
| id | 帖⼦Id | Long | 必须 | |
| title | ⽂章标题 | String | 必须 | |
| content | 帖⼦内容 | String | 必须 |
3.7.11.3 接⼝规范
1 // 请求
POST http://127.0.0.1:58080/article/modify HTTP/1.1
Content-Type: application/x-www-form-urlencodedid=1&content=%E5%B8%96%E5%AD%90%E5%86%85%E5%AE%B9%EF%BC%8C%E6%B5%8B%E8%AF%95%E7
%BC%96%E8%BE%91// 响应
HTTP/1.1 200
Content-Type: application/json
{"code": 0,"message": "成功","data": null
}
3.7.11.4 创建Service接⼝
mapper和dao都可以使用生成的动态更新的方法。
在 com/yj/forum/services/IArticleService.java 定义⽅法:
/*** 根据帖⼦Id更新帖⼦标题与内容 * @param id 帖⼦Id * @param title 标题 * @param content 内容 */void modify(Long id, String title, String content);
3.7.11.4 实现Service接⼝
com/yj/forum/services/impl/ArticleServiceImpl.java 实现接口:
逻辑:
- 非空校验
- 构造对象
- 调用dao
- 校验影响行数
/*** 根据帖⼦Id更新帖⼦标题与内容* @param id 帖⼦Id* @param title 标题* @param content 内容*/@Overridepublic void modify(Long id, String title, String content) {//非空校验if(id == null || id <= 0 || StringUtil.isEmpty(title) || StringUtil.isEmpty(content)) {log.warn(ResultCode.FAILED_PARAMS_VALIDATE.toString());throw new ApplicationException(AppResult.failed(ResultCode.FAILED_PARAMS_VALIDATE));}//构造帖子对象Article updateArticle = new Article();updateArticle.setId(id);updateArticle.setTitle(title);updateArticle.setContent(content);//调用daoint row = articleMapper.updateByPrimaryKeySelective(updateArticle);//校验if(row != 1) {log.warn(ResultCode.ERROR_SERVICES.toString());throw new ApplicationException(AppResult.failed(ResultCode.ERROR_SERVICES));}}
3.7.11.5 单元测试
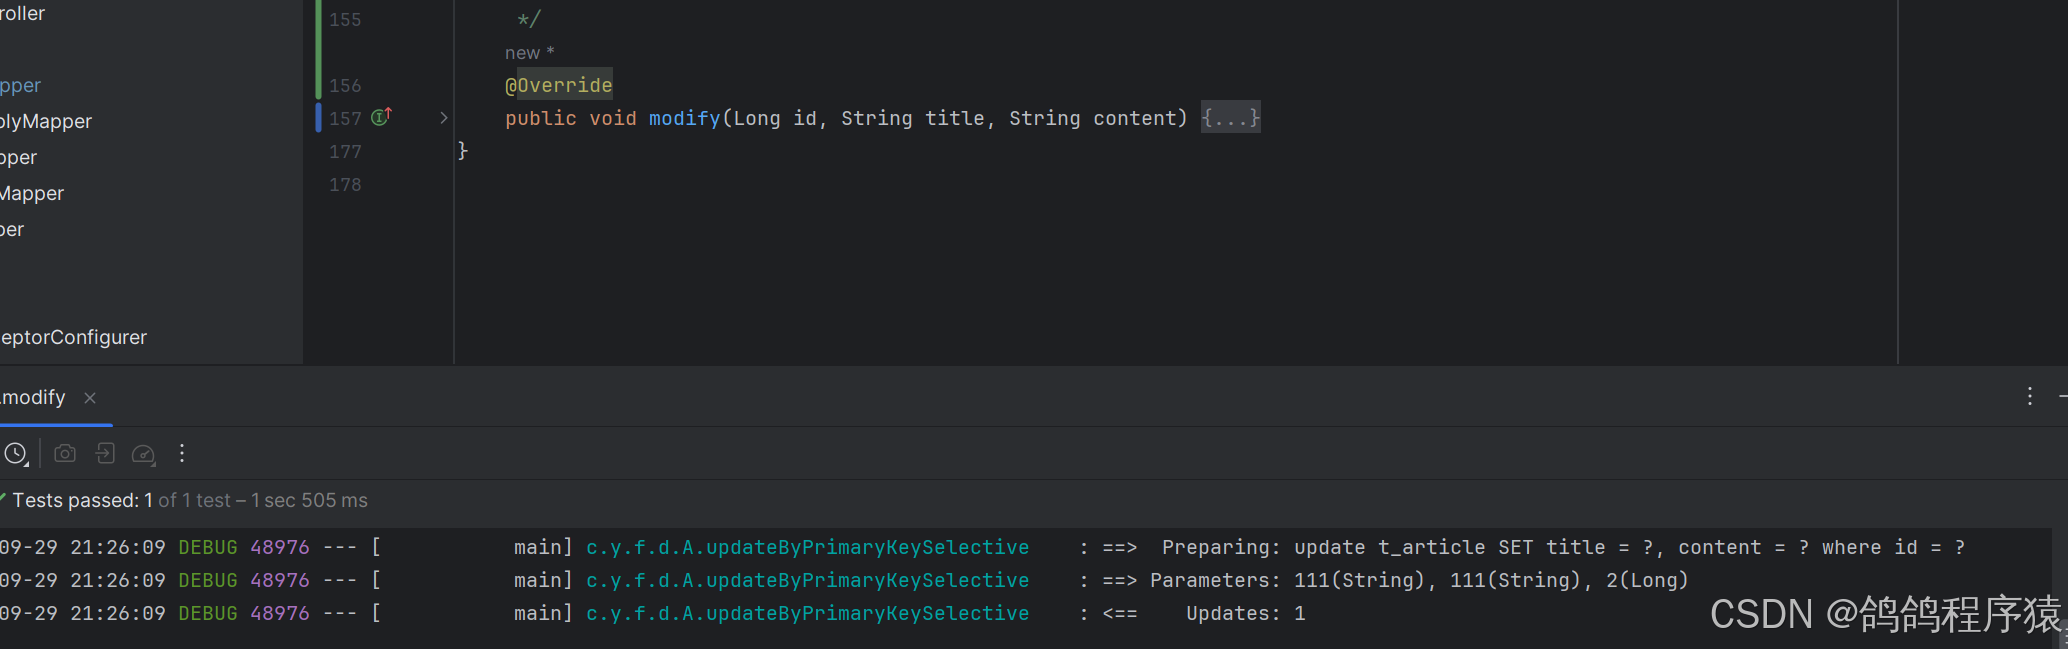
3.7.11.6 实现controller
com/yj/forum/controller/ArticleController.java下实现:
逻辑:
- 获取当前用户
- 判断是否禁言
- 拿文章
- 判断结果
- 判断帖子是否删除
- 判断当前用户和是不是作者
- 调用service更新
/*** 根据帖⼦Id更新帖⼦标题与内容* @param id 帖⼦Id* @param title 标题* @param content 内容*/@ApiOperation("编辑帖⼦")@PostMapping("/modify")public AppResult modify( HttpServletRequest request,@ApiParam("帖⼦Id") @RequestParam("id") Long id,@ApiParam("⽂章标题") @RequestParam("title")String title,@ApiParam("⽂章内容") @RequestParam("content")String content) {//获取已用户HttpSession session = request.getSession();User user = (User)session.getAttribute(AppConfig.USER_SESSION);//判断是否禁言if(user.getState() == 1) {log.warn(ResultCode.FAILED_USER_BANNED.toString()+", userId = " + user.getId());return AppResult.failed(ResultCode.FAILED_USER_BANNED);}//获取文章Article article = articleService.selectById(id);// 数据校验if(article == null) {log.warn(ResultCode.FAILED_ARTICLE_IS_NOT_EXISTS.toString());return AppResult.failed(ResultCode.FAILED_ARTICLE_IS_NOT_EXISTS);}//当前不是作者if(!article.getUserId().equals(user.getId())) {log.warn(ResultCode.FAILED_FORBIDDEN.toString());return AppResult.failed(ResultCode.FAILED_FORBIDDEN);}// 帖⼦状态异常if(article.getState() == 1 || article.getDeleteState() == 1) {log.warn("帖⼦状态异常.+ articleId = " + id + ", state = " +article.getState() + ", delete state = " + article.getDeleteState());return AppResult.failed(ResultCode.FAILED_ARTICLE_IS_NOT_EXISTS);}//调用servicearticleService.modify(id,title,content);// ⽇志log.info(MessageFormat.format("帖⼦修改成功. id = {0}, user id = {1}, 原标题 = {2}, 新标题 = {3}",id, user.getId(), article.getTitle(), title));// 返回结果return AppResult.success();}
3.7.11.7 测试API
在http://127.0.0.1:58080/swagger-ui/index.html或者Postman中测试接口,记得登录。
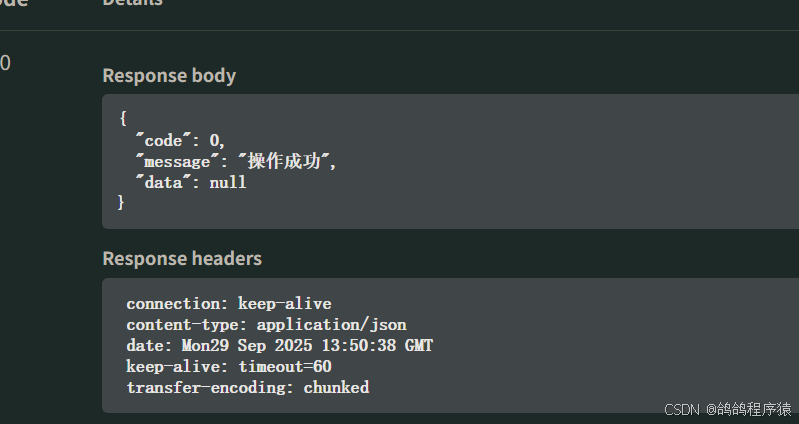
3.7.11.8 前端
static/article_edit.html :
<!-- Page header -->
<div class="page-header d-print-none"><div class="container-xl"><div class="row g-2 align-items-center"><div class="col"><h2 class="page-title">编辑</h2></div></div></div>
</div>
<!-- Page body -->
<div class="page-body"><div class="container-xl"><div class="card"><div class="row g-0"><div class="col d-flex flex-column"><div class="card-body"><!-- 帖子Id --><input type="text" id="edit_article_id" style="display: none;"><!-- 版块 --><div class="row align-items-center"><div class="col-2"><h2 class="mb-4">版块</h2></div><div class="col-10"><h2 class="mb-4" id="edit_article_board_name"></h2></div></div><!-- 标题 --><div class="row"><div class="col-2"><h2 class="mb-4">标题</h2></div><div class="col-10"><!-- <h2 class="mb-4" id="edit_article_title"></h2> --><input id="edit_article_title" type="text" class="form-control" placeholder="请输入标题"></div></div><!-- 内容 --><div class="row"><div class="col-2"><h2 class="mb-4">内容</h2></div><div class="col-10" style="height: 680px;"><div id="edit_article_content_area"><!-- textarea也是一个表单控件,当在editor.md中编辑好的内容会关联这个文本域上 --><textarea id="edit_article_content" style="display: none;"></textarea></div></div></div></div><div class="card-footer bg-transparent mt-auto"><!-- 操作区 结束 --><div class="col-auto row g-2 justify-content-end"><div class="col-auto"><div class="col-6 col-sm-4 col-md-2 col-xl-auto py-3"><a href="javascript:void(0);" class="btn btn-tabler w-100" id="edit_article_submit"><svg xmlns="http://www.w3.org/2000/svg" class="icon icon-tabler icon-tabler-edit" width="24"height="24" viewBox="0 0 24 24" stroke-width="2" stroke="currentColor" fill="none"stroke-linecap="round" stroke-linejoin="round"><path stroke="none" d="M0 0h24v24H0z" fill="none"></path><path d="M7 7h-1a2 2 0 0 0 -2 2v9a2 2 0 0 0 2 2h9a2 2 0 0 0 2 -2v-1"></path><path d="M20.385 6.585a2.1 2.1 0 0 0 -2.97 -2.97l-8.415 8.385v3h3l8.385 -8.415z"></path><path d="M16 5l3 3"></path></svg><span>提交</span></a></div></div></div></div></div></div></div></div>
</div><script>$(function () {// ========================== 获取帖子详情 ========================== // 成功后,设置ID,版块名,标题,并初始编辑区同时设置正文initEditor(edit_article.content);$.ajax({type: 'get',url: 'article/details?id='+ currentArticle.id,//回调success : function (respData){if(respData.code == 0) {let article = respData.data;//设置帖子id$('#edit_article_id').val(article.id);//设置版块名$('#edit_article_board_name').html(article.board.name);//设置标题$('#edit_article_title').val(article.title);//设置正文initEditor(article.content);}else {//提示信息$.toast({heading : '警告',text: respData.message,icon: 'warning'});}},error : function () {//提示信息$.toast({heading : '错误',text: '访问出现错误,请于管理员联系',icon: 'error'});}});// ========================== 初始化编辑器 ========================== var editor;function initEditor (md) {console.log('编辑区内容:' + md);editor = editormd("edit_article_content_area", {width: "100%",height: "100%",// theme : "dark",// previewTheme : "dark",// editorTheme : "pastel-on-dark",codeFold: true,markdown : md, // 处理编辑区内容//syncScrolling : false,saveHTMLToTextarea: true,    // 保存 HTML 到 TextareasearchReplace: true,watch : true,                    // 实时预览htmlDecode: "style,script,iframe|on*",            // 开启 HTML 标签解析,为了安全性,默认不开启    // toolbar  : false,             //关闭工具栏// previewCodeHighlight : false, // 关闭预览 HTML 的代码块高亮,默认开启emoji: true,taskList: true,tocm: true,         // Using [TOCM]tex: true,                     // 开启科学公式TeX语言支持,默认关闭// flowChart: true,               // 开启流程图支持,默认关闭// sequenceDiagram: true,         // 开启时序/序列图支持,默认关闭,placeholder: '开始创作...',     // 占位符path: "./dist/editor.md/lib/"});}// ========================== 处理提交修改事件 ========================== $('#edit_article_submit').click(function () {// IDlet articleIdEl = $('#edit_article_id');if(!articleIdEl.val()) {// 提示$.toast({heading: '提示',text: '帖子状态异常',icon: 'warning'});return;}let articleTitleEl = $('#edit_article_title');if (!articleTitleEl.val()) {articleTitleEl.focus();// 提示$.toast({heading: '提示',text: '请输入帖子标题',icon: 'warning'});return;}// contentlet articleContentEl = $('#edit_article_content');// 非空校验if (!articleContentEl.val()) {// 提示$.toast({heading: '提示',text: '请输入帖子内容',icon: 'warning'});return;}// 构造修改对象let postData = {id : articleIdEl.val(),title : articleTitleEl.val(),content : articleContentEl.val()};// 发送修改请求, 成功后跳转至首页changeNavActive($('#nav_board_index'));$.ajax({type : 'post',url : 'article/modify',contentType : 'application/x-www-form-urlencoded',data : postData,success: function (respData) {if(respData.code == 0) {// 提示$.toast({heading: '成功',text: '编辑帖子内容成功',icon: 'success'});//跳转主页changeNavActive($('#nav_board_index'));}else  {// 提示$.toast({heading: '提示',text: '请输入帖子内容',icon: 'warning'});}},error : function () {//提示信息$.toast({heading : '错误',text: '访问出现错误,请于管理员联系',icon: 'error'});}});});});</script>