基于Spring Security 6的OAuth2 系列之二十三 - 高级特性--TLS客户端认证方法之二
之所以想写这一系列,是因为之前工作过程中使用Spring Security OAuth2搭建了网关和授权服务器,但当时基于spring-boot 2.3.x,其默认的Spring Security是5.3.x。之后新项目升级到了spring-boot 3.3.0,结果一看Spring Security也升级为6.3.0。无论是Spring Security的风格和以及OAuth2都做了较大改动,里面甚至将授权服务器模块都移除了,导致在配置同样功能时,花费了些时间研究新版本的底层原理,这里将一些学习经验分享给大家。
注意:由于框架不同版本改造会有些使用的不同,因此本次系列中使用基本框架是 spring-boo-3.3.0(默认引入的Spring Security是6.3.0),JDK版本使用的是19,本系列OAuth2的代码采用Spring Security6.3.0框架,所有代码都在oauth2-study项目上:https://github.com/forever1986/oauth2-study.git
目录
- 1 底层原理
- 2 证书生成
- 3 搭建发布oidc-client.jks
- 4 授权服务器的TLS客户端认证方法
上一章我们讲了Spring Security如何通过证书实现免密码登录的。那么这一章就来开始正题,授权服务器的tls_client_auth和self_signed_tls_client_auth客户端认证方式
注意:看本章之前,一定要先看看《系列之二十二 - 高级特性–TLS客户端认证方法之一》
我们之前已经了解到证书就是做身份认证的作用,那么授权服务器的tls_client_auth和self_signed_tls_client_auth客户端认证方式其实就是通过证书认证。我们先看看底层代码原理
1 底层原理
我们在《系列十五 - 高级特性–客户端认证方式》已经讲过授权服务器客户端认证的底层原理,主要是通过OAuth2ClientAuthenticationFilter过滤器,流程是通过authenticationConverter转换参数,然后通过AuthenticationProvider进行认证。那么tls_client_auth和self_signed_tls_client_auth认证方式就是通过X509ClientCertificateAuthenticationConverter和X509ClientCertificateAuthenticationProvider
参数转换:X509ClientCertificateAuthenticationConverter
认证处理:X509ClientCertificateAuthenticationProvider
1)我们先来看看X509ClientCertificateAuthenticationConverter需要哪些参数,如下图
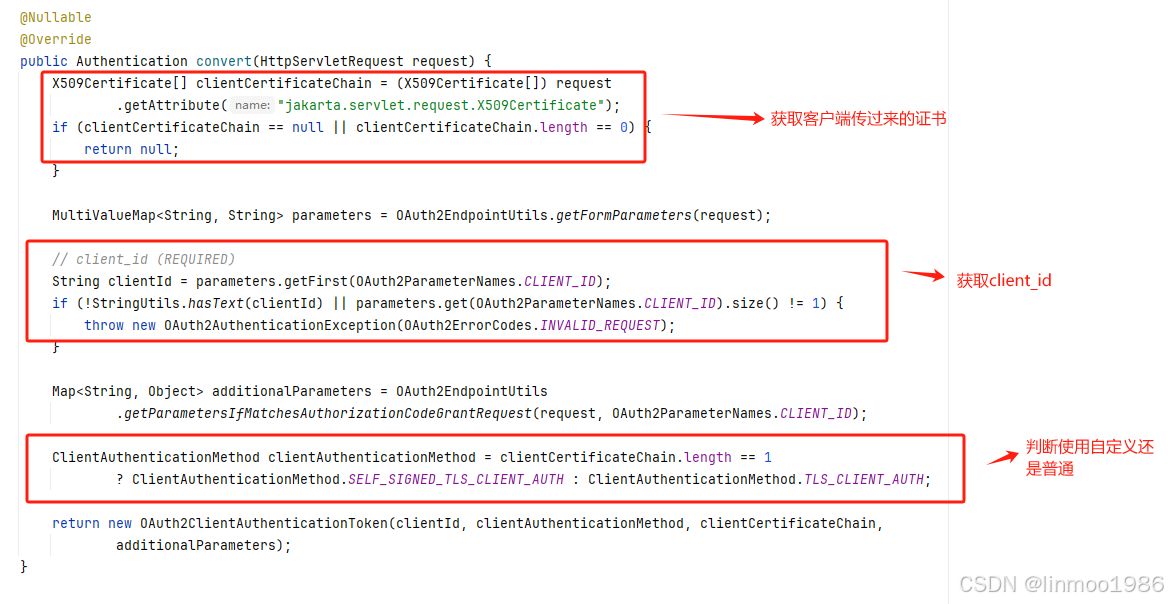
这里通过判断请求传过来的证书多少进行判断,不是很了解。应该
2)接下来,我们再看看如何认证X509ClientCertificateAuthenticationProvider,如下图
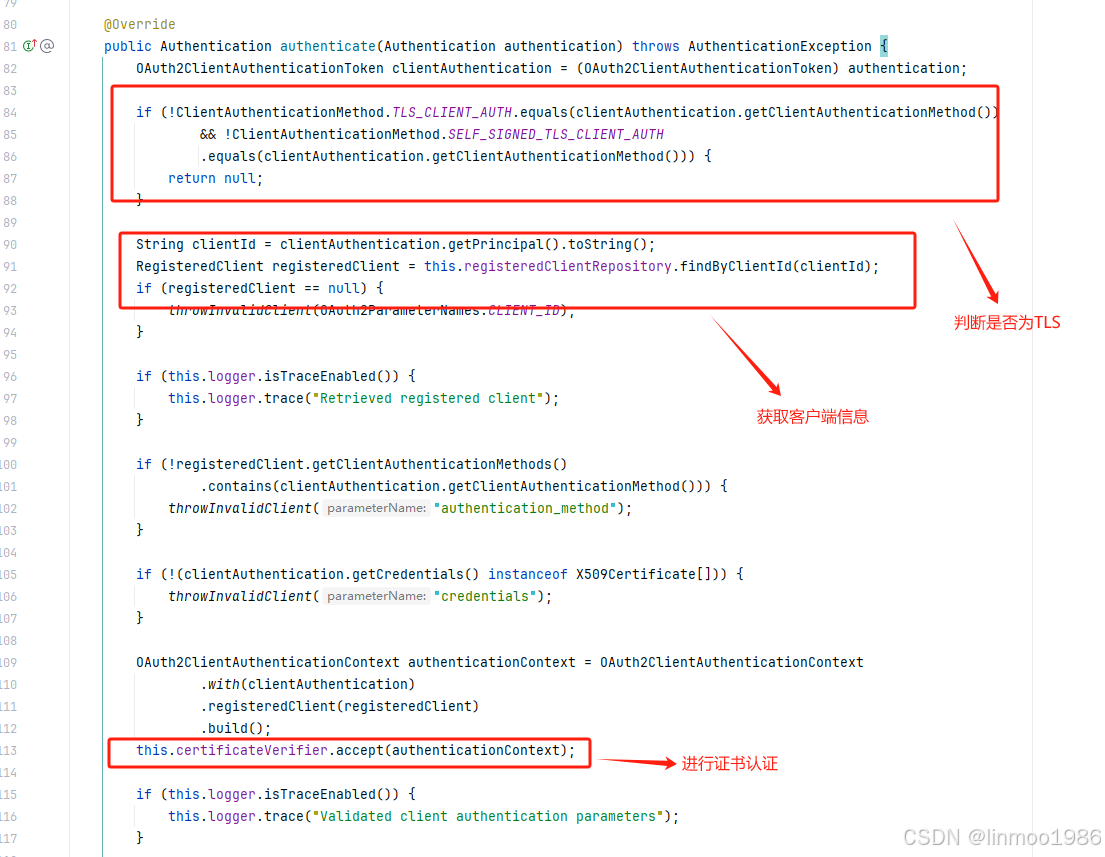
3)在上图中,我们知道最终certificateVerifier是做认证,如下图:
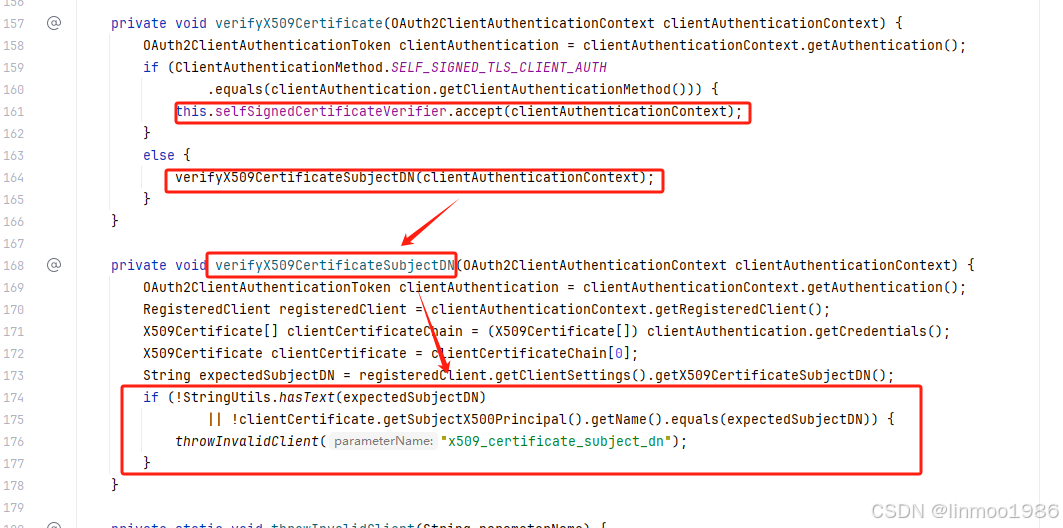
上图中,我们看到tls_client_auth和self_signed_tls_client_auth不同的认证方式, tls_client_auth:是通过注册客户端配置的X509CertificateSubjectDN标识与请求传过来证书的X509CertificateSubjectDN进行匹配
4)而self_signed_tls_client_auth方式,是通过X509SelfSignedCertificateVerifier来匹对,如下图
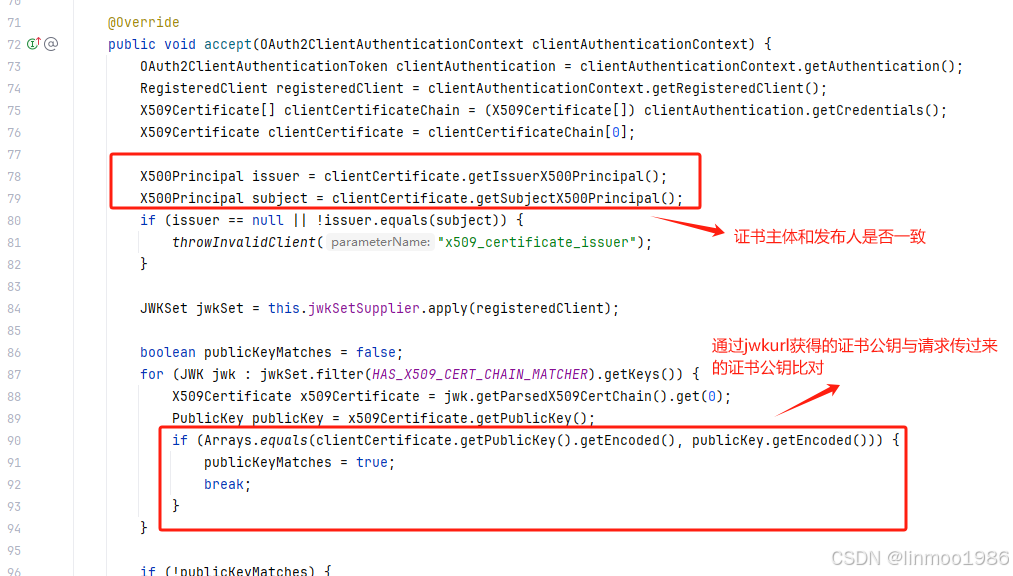
从上图可知,self_signed_tls_client_auth:是通过注册客户端的jwkSetUrl获取公钥进行认证
2 证书生成
从上一章我们知道如何生成一个证书,因此我们利用上一章的根证书rootCA.crt,对我们下面要生成的证书进行签名。
1)创建客户端证书oidc-client.csr以及私钥oidc-client.key
openssl req -new -newkey rsa:4096 -nodes -keyout oidc-client.key -out oidc-client.csr
要设置密码,我们这里设置密码:linmoo ;还可以设置一下CN标识:demo.com
2)使用rootCA.crt根证书对客户端的证书进行签名,生成oidc-client.crt
openssl x509 -req -CA rootCA.crt -CAkey rootCA.key -in oidc-client.csr -out oidc-client.crt -days 365 -CAcreateserial
这里要输入rootCA.crt的密码:linmoo
3)将客户端的签名证书oidc-client.crt和私有密钥oidc-client.key打包到oidc-client.p12,给浏览器发送使用
openssl pkcs12 -export -out oidc-client.p12 -name "oidc-client" -inkey oidc-client.key -in oidc-client.crt
要设置密码,我们这里设置密码:linmoo
4)使用keytool将localhost.p12导入密钥库oidc-client.jks,给授权服务器比对使用
keytool -importkeystore -srckeystore oidc-client.p12 -srcstoretype PKCS12 -destkeystore oidc-client.jks -deststoretype JKS
要设置密码,我们这里设置密码:linmoo
这样我们就得到oidc-client.p12可以作为我们浏览器传递给授权服务器,oidc-client.jks作为发布到公开地址的证书。
3 搭建发布oidc-client.jks
代码参考lesson17子模块和caserver子模块
我们从前面的原理可以你知道,需要提供一个让授权服务器获取证书的方式,因此,在这里大家一个caserver用于发布证书
1)新建lesson17子模块,作为一个父模块
2)在lesson17子模块下新建caserver子模块,其pom引入如下:
<dependencies>
    <dependency>
        <groupId>org.springframework.boot</groupId>
        <artifactId>spring-boot-starter-web</artifactId>
    </dependency>
    <dependency>
        <groupId>org.springframework.security</groupId>
        <artifactId>spring-security-oauth2-jose</artifactId>
    </dependency>
</dependencies>
3)在resources目录下,配置yaml文件
server:
  port: 9001
4)将前面证书打包的oidc-client.jks放到resources目录下
5)在controller包下,新建JwtController,用于发布证书
@RestController
public class JwtController {


    private JWKSource<SecurityContext> jwkSource = jwkSource();


    @GetMapping("/jwt")
    public String jwt(){
        JWKSet jwkSet;
        try {
            JWKSelector jwkSelector = new JWKSelector(new JWKMatcher.Builder().build());
            jwkSet = new JWKSet(this.jwkSource.get(jwkSelector, null));
        }
        catch (Exception ex) {
            throw new IllegalStateException("Failed to select the JWK(s) -> " + ex.getMessage(), ex);
        }

        return jwkSet.toString();
    }


    /**
     * 生成JWKSource
     */
    private static JWKSource<SecurityContext> jwkSource(){
        X509Certificate certificate = null;
        List<Base64> base64List = new ArrayList<>();
        try {
            certificate = getCertificate();
            base64List.add(Base64.encode(certificate.getEncoded()));
        }catch (Exception e){
            e.printStackTrace();
            return null;
        }
        RSAKey rsaKey = new RSAKey.Builder( (RSAPublicKey)certificate.getPublicKey())
                .keyID(UUID.randomUUID().toString())
                .x509CertChain(base64List)
                .build();
        JWKSet jwkSet = new JWKSet(rsaKey);
        return new ImmutableJWKSet<>(jwkSet);
    }

    /**
     * 读取证书
     */
    private static X509Certificate getCertificate() throws Exception {
        KeyStore ks = KeyStore.getInstance("JKS");
        ks.load(new ClassPathResource("oidc-client.jks").getInputStream(),"linmoo".toCharArray());
        Certificate[] list = ks.getCertificateChain("oidc-client");
        return (X509Certificate)list[0];
    }
}
6)新建启动类Oauth2Lesson17CAServerApplication,并启动项目
7)访问:http://localhost:9001/jwt 可以看到证书信息

4 授权服务器的TLS客户端认证方法
代码参考lesson17子模块和oauthserver子模块
本章我们利用上一章lesson16的代码。
1)在lesson17子模块下,新建oauthserver子模块
2)拷贝lesson16子模块src和resources下的类和文件到oauthserver子模块
3)在config包下,修改SecurityConfig,配置授权服务器和Spring Security。这里为了演示方便,我们的授权方式采用客户端模式
@Configuration
public class SecurityConfig {

    // 自定义授权服务器的Filter链
    @Bean
    @Order(Ordered.HIGHEST_PRECEDENCE)
    SecurityFilterChain authorizationServerSecurityFilterChain(HttpSecurity http) throws Exception {
        OAuth2AuthorizationServerConfiguration.applyDefaultSecurity(http);
        http.getConfigurer(OAuth2AuthorizationServerConfigurer.class)
                // oidc配置
                .oidc(withDefaults())
        ;
        // 异常处理
        http.exceptionHandling((exceptions) -> exceptions.authenticationEntryPoint(
                new LoginUrlAuthenticationEntryPoint("/login")));
        return http.build();
    }

    // 自定义Spring Security的链路。如果自定义授权服务器的Filter链,则原先自动化配置将会失效,因此也要配置Spring Security
    @Bean
    @Order(SecurityProperties.BASIC_AUTH_ORDER)
    SecurityFilterChain defaultSecurityFilterChain(HttpSecurity http) throws Exception {
        http.authorizeHttpRequests((authorize) -> authorize
                        .anyRequest().authenticated())
                .formLogin(withDefaults())
                // 开启证书
                .x509(configure -> configure.subjectPrincipalRegex("CN=(.*?)(?:,|$)"))
        ;
        return http.build();
    }

    @Bean
    public RegisteredClientRepository registeredClientRepository() {
        RegisteredClient registeredClient = RegisteredClient.withId(UUID.randomUUID().toString())
                // 客户端id
                .clientId("oidc-client")
                // 客户端密码
                .clientSecret("{noop}secret")
                // 客户端认证方式
                .clientAuthenticationMethods(methods ->{
                    methods.add(ClientAuthenticationMethod.TLS_CLIENT_AUTH);
                    methods.add(ClientAuthenticationMethod.SELF_SIGNED_TLS_CLIENT_AUTH);
                })
                // 配置客户端模式
                .authorizationGrantTypes(grantTypes -> {
                    grantTypes.add(AuthorizationGrantType.CLIENT_CREDENTIALS);
                })
                .clientSettings(ClientSettings.builder()
                        // 需要授权确认
                        .requireAuthorizationConsent(true)
                        // 如果是TLS_CLIENT_AUTH方式,需要增加x509CertificateSubjectDN
                        .x509CertificateSubjectDN("CN=demo.com, O=Internet Widgits Pty Ltd, ST=Some-State, C=AU")
                        // 如果是SELF_SIGNED_TLS_CLIENT_AUTH,需要获取公钥地址
                        .jwkSetUrl("http://localhost:9001/jwt")
                        .build())
                // 回调地址
                .redirectUri("http://localhost:8080/login/oauth2/code/oidc-client")
                .postLogoutRedirectUri("http://localhost:8080/")
                // 授权范围
                .scopes(scopes->{
                    scopes.add(OidcScopes.OPENID);
                    scopes.add(OidcScopes.PROFILE);
                })
                .build();

        return new InMemoryRegisteredClientRepository(registeredClient);
    }

}
注意:
- 如果是TLS_CLIENT_AUTH,这里要配置x509CertificateSubjectDN,就是怎么生成客户端证书时,输入的信息,在授权服务器中就是通过它来验证。
- 如果是SELF_SIGNED_TLS_CLIENT_AUTH,这里要配置jwkSetUrl,地址就是我们前面发布的http://localhost:9001/jwt
4)启动Oauth2Lesson16ServerApplication类
5)打开postman的证书管理,将签名后的证书oidc-client.p12设置到Client certificates中
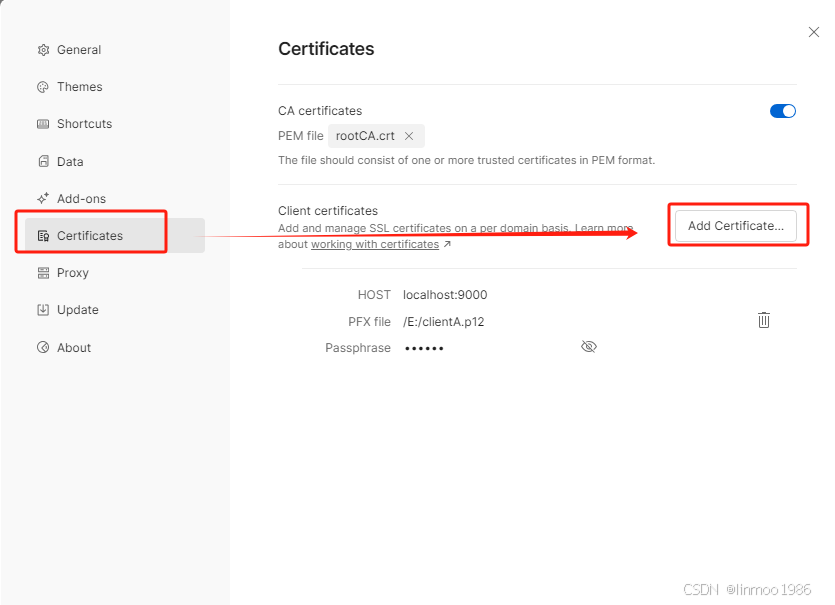
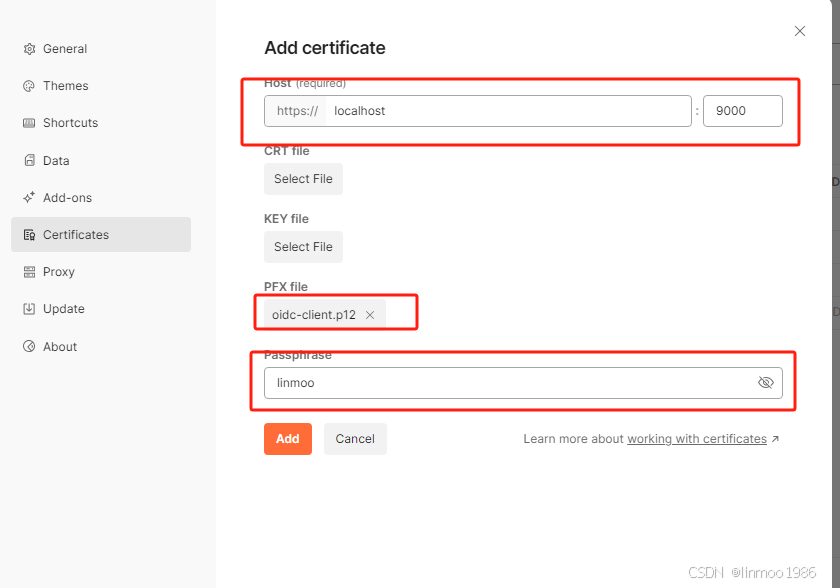
6)直接请求就可以
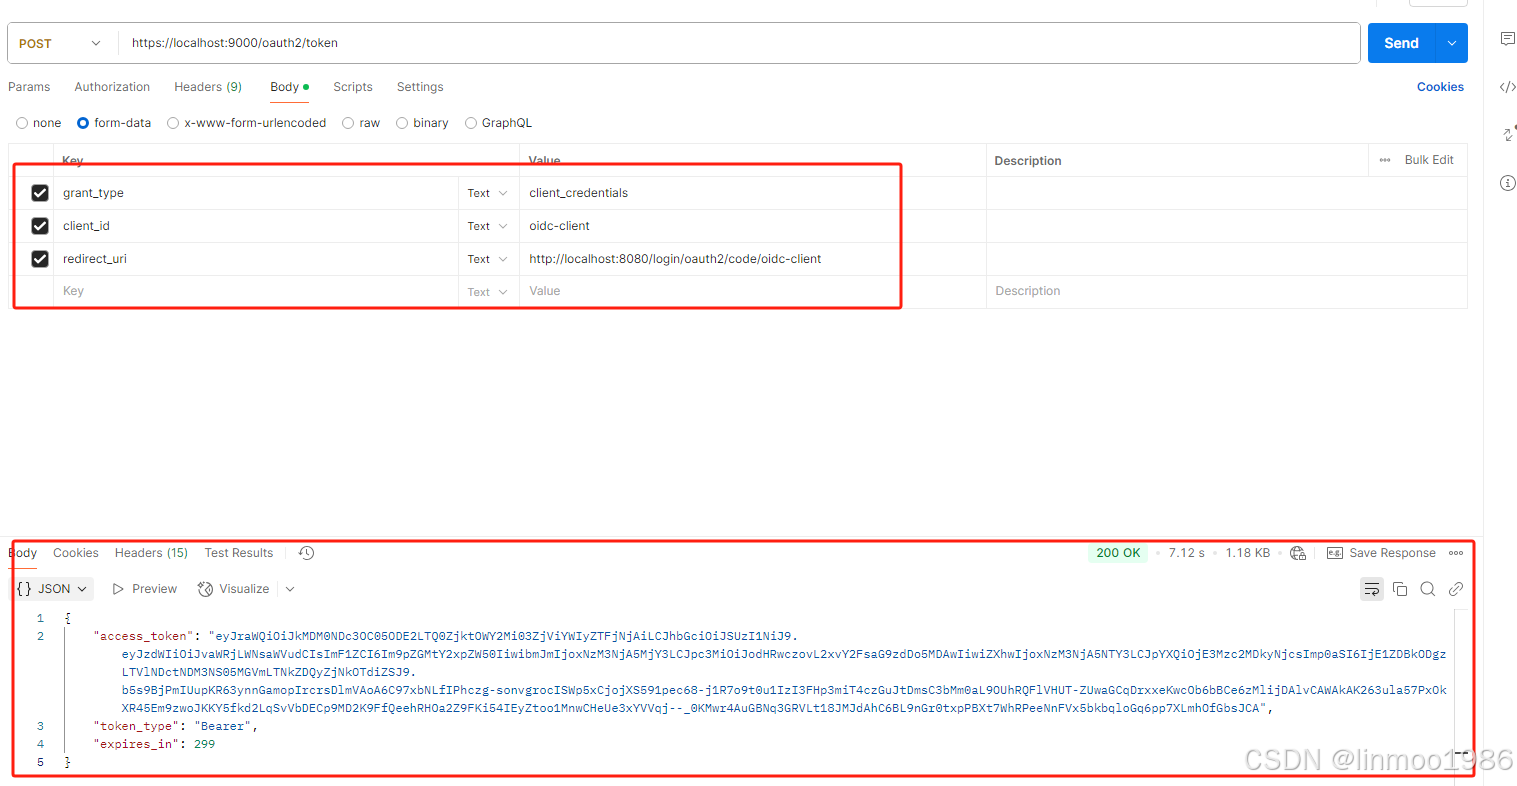
结语:本章我们介绍了如何使用证书对授权服务器的客户端进行认证。下一章,我们讲一种新的编程范式:响应式编程。在Spring Security中也采用了这种编程范式重新实现了一遍其框架,因此了解这一部分也很重要。