【iOS】设计模式复习
目录
观察者模式
通知机制
基本使用
注册观察者
创建一个通知
发送通知
通知与多线程
使用异步发送通知
NSNotificationQueue通知队列
在子线程中运行观察者函数
实现原理
named表
nameless表
wildcard表
添加观察者
发送通知
移除通知
KVO机制
基本使用
一对多
实现原理
KVO Crash
同一个类的不同对象在使用KVO时,是否会创造出不同的中间子类
单例模式
基本使用
实现原理
懒汉式
饿汉式
代理模式
关于block和代理的选择
其他设计模式
设计模式原则
设计模式一览
观察者模式
iOS中常见的观察者模式有通知机制、KVO机制,这种模式定义了一种一对多的依赖关系,让多个观察者对象同时监听某一个主体对象,这个主体对象在状态上发生变化时,会通知所有观察者对象,使他们能自动更新自己。简单地说就是,A需要响应B的变化,就注册A为观察者,当B发生变化时通知A,告知B发生了变化,这个也叫经典观察者模式
通知机制
基本使用
通知机制的基本使用包括三个步骤:注册观察者、创建通知、发送通知
注册观察者
//方式一:观察者接收到通知后执行任务的代码在发送通知的线程中执行
[[NSNotification defaultCenter] addObserver:self selector:@selector(changeString:) name:@"ChangeStringWithInfo" object:nil]; //object用来指定发送通知的对象
//方式二:观察者接收到通知后执行任务的代码在指定的操作队列中执行
self.observer = [notificationCenter addObserverForName:@"ChangeStringWithoutInfo" object:nil queue:[NSOperationQueue mainQueue] usingBlock:^(NSNotification * _Nonnull notification) {NSLog(@"%@", notification.userInfo[@"string"]);}];
//使用block创建时需要用一个id类型的属性来保存方法的返回值 因为这个方法没有把self注册为observer,而是注册了一个匿名对象,返回的就是这个匿名对象 如果不把这个对象保存起来的话,就无法在dealloc中remove这个观察者,block就会一直保存在通知中心,导致内存泄漏
- (void)dealloc {[[NSNotification defaultCenter] removeObserver:self.observer];
}在iOS9以后,注册的观察者已经不用在dealloc中移除了,系统会自动将其移除,但是一定不要忘记使用block注册观察者返回的对象还是需要在dealloc中移除,不然block和匿名的观察者就会一直保存在通知中心,导致内存泄漏(注意block不要强引用self,否则会导致循环引用)
创建一个通知
//1.不带信息NSNotification* notification = [NSNotification notificationWithName:@"ChangeStringWithoutInfo" object:self];
//2.带信息NSDictionary* userInfo = [NSDictionary dictionaryWithObjectsAndKeys:self.string,@"string", nil];NSNotification* notification1 = [NSNotification notificationWithName:@"ChangeStringWithInfo" object:self userInfo:userInfo];
发送通知
//1.先创建好通知再直接发送通知[[NSNotificationCenter defaultCenter] postNotification:notification1];//2.不用先创建通知,这个方法自己创建并发送[[NSNotificationCenter defaultCenter] postNotificationName:@"ChangeStringWithoutInfo" object:self];[[NSNotificationCenter defaultCenter] postNotificationName:@"ChangeStringWithoutInfo" object:self userInfo:userInfo];});通知与多线程
通知的多线程要从两个方面来看,一个是发送通知的操作,另一个是观察者的执行操作,如果并发队列中异步派发通知的发送操作,那么如果是同步观察者,也只会阻塞每条通知各自的线程,但会开辟多个线程,观察者函数的执行实现异步的效果,如果是异步观察者那观察者函数执行则肯定是异步的。别的情况下观察者函数的执行都是同步的(这里除黑体别管了,要理解底层的原理,NSNotification的接口只会决定观察者是异步还是同步,只决定通知的发送会不会被阻塞,别的要根据通知发送的异步同步派发和串行并发队列去具体情况具体分析)
通知的发送是同步的,意味着如果是同步观察者,那么观察者函数的执行会阻塞通知的发送,如果是异步观察者,那么观察者的函数会被放到一个队列中等待执行,函数的执行不会阻塞通知的发送。同步观察者其实就是观察者要执行的代码是在发送通知的线程上执行的(queue参数为nil),而异步观察者则表明函数是在非当前线程的指定队列中执行的,函数执行是否并发取决于队列的类型和提交方式(queue设置为非当前线程的队列)
有一条规则:同步或异步观察者只能决定通知发送是否被阻塞,而观察者函数的执行要综合考虑通知发送和函数执行的队列类型和派发方式
一个通知发送时会做这些事:
-
查找所有匹配的观察者
-
执行所有同步观察者
-
提交所有异步观察者到目标队列
使用异步发送通知
NSNotificationQueue通知队列
通过NSNotificationQueue通知队列,可以实现异步的发送通知,通过它不会直接把通知发给通知中心,而是先发给这个队列,再由这个队列决定在当前runLoop结束的时候或者空闲的时候转发给通知中心,再由通知中心转发给注册的观察者。通过这个队列可以合并重复的通知,以便只发送一个通知
NSNotificationQueue遵循FIFO的顺序,当一个通知移动到NSNotificationQueue的最前面,它就被发送给notification Center,然后notification Center再将通知转发给注册了该通知的监听者
每一个线程都有一个默认的NSNotificationQueue,这个NSNotificationQueue和通知中心联系在一起。当然我们也可以自己创建NSNotificationQueue,可以为一个线程创建多个NSNotificationQueue。
通过类方法创建NSNotificationQueue实例:
NSNotificationQueue* notificationQueue = [NSNotificationQueue defaultQueue];接着通过方法将通知送到通知队列
- (void)enqueueNotification:(NSNotification *)notification postingStyle:(NSPostingStyle)postingStyle coalesceMask:(NSNotificationCoalescing)coalesceMask forModes:(nullable NSArray<NSRunLoopMode> *)modes;
- (void)enqueueNotification:(NSNotification *)notification postingStyle:(NSPostingStyle)postingStyle;在这个方法中,postingStyle是一个枚举量,表明队列发送通知的策略
typedef NS_ENUM(NSUInteger, NSPostingStyle) {NSPostWhenIdle = 1,NSPostASAP = 2,NSPostNow = 3
};-
NSPostWhenIdle 在空闲时发送,即当本线程的runloop空闲时就发送通知到通知中心
-
NSPostASAP 尽可能快地发送通知,即当前通知或者timer的回调执行完毕后发送通知到通知中心
-
NSPostNow 多个相同的通知合并之后马上发送
coalesceMask这个参数表明多个通知的合并方式,也是一个枚举类型,当向队列中发送多个重复的通知时,有时我们不希望这些通知全部发送给通知中心,这时就可以使用这个枚举类型的参数表明通知的合并策略
typedef NS_OPTIONS(NSUInteger, NSNotificationCoalescing) {NSNotificationNoCoalescing = 0,NSNotificationCoalescingOnName = 1,NSNotificationCoalescingOnSender = 2
};-
NSNotifacationNoCoalescing 不管是否重复,不合并
-
NSNotifacationCoalescingOnName 按照通知的名字,如果名字重复就移除重复的
-
NSNotifacationCoalescingOnSender 按照发送方,如果多个通知的发送方是一样的,就只保留一个
modes这个参数用来指定runloop的mode,指定mode后,只有当前线程的runloop在这个特定的mode下才能将通知发送到通知中心
这里当NSPostingStyle的类型是NSPostWhenIdle和NSPostASAP时是异步的,但是类型是NSPostNow时时同步的
在子线程中运行观察者函数
把观察者函数放到新开的子线程(GCD异步派发+串行队列)中运行也可以实现类似异步的效果,因为每一个同步的通知函数中都只需要开辟新的线程,很快就可以结束,函数执行在新的线程中,只会阻塞新的线程
- (void)test {dispatch_queue_t queue = dispatch_queue_create("test.queue", DISPATCH_QUEUE_SERIAL);dispatch_async(queue, ^{    // 异步执行 + 串行队列NSLog(@"--current thread: %@", [NSThread currentThread]);NSLog(@"Handle notification and sleep 3s");sleep(3);});
}
实现原理
通知机制的核心是一个与线程关联的单例对象叫通知中心,这个单例类中主要定义了两个结构体,一个用来存储所有注册通知信息的表,另一个用来保存单个注册信息的节点
typedef struct NCTbl {Observation *wildcard; // 添加观察者时既没有传入 NotificationName ,又没有传入object,就会加在这个链表上,它里边的观察者可以接收所有的系统通知GSIMapTable nameless; // 添加观察者时没有传入 NotificationName 的表GSIMapTable named; // 添加观察者时传入了 NotificationName 的表
} NCTable
typedef struct Obs {id observer; // 观察者对象SEL selector; // 方法信息struct Obs *next; // 指向下一个节点int retained; /* Retain count for structure. */struct NCTbl *link; /* Pointer back to chunk table */
} Observation;三个表的结构各有不同:
named表
named表中,通知的名字作为表的key,而value中由于还要保存object的信息,因此得用一张表来保存object和Observer的对应关系,当有多个观察者时Observer用一个链表来保存

当参数object为nil时,系统会根据nil生成一个key,这个key对应的value(链表)保存的就是传入了通知名字没有传入object的所有观察者
nameless表
nameless表没有通知名,因此不用外层的键值对应关系:

wildcard表
这个表就是既没有通知名字也没有object,所以他会在nameless基础上再脱去一层键值关系,直接存所有可以相应所有通知的观察者的信息

添加观察者
- (void) addObserver: (id)observerselector: (SEL)selectorname: (NSString*)nameobject: (id)object
{Observation        *list;Observation        *o;GSIMapTable        m;GSIMapNode        n;
// observer为空时的报错if (observer == nil)[NSException raise: NSInvalidArgumentExceptionformat: @"Nil observer passed to addObserver ..."];
// selector为空时的报错if (selector == 0)[NSException raise: NSInvalidArgumentExceptionformat: @"Null selector passed to addObserver ..."];
// observer不能响应selector时的报错if ([observer respondsToSelector: selector] == NO){[NSException raise: NSInvalidArgumentExceptionformat: @"[%@-%@] Observer '%@' does not respond to selector '%@'",NSStringFromClass([self class]), NSStringFromSelector(_cmd),observer, NSStringFromSelector(selector)];}
// 给表上锁lockNCTable(TABLE);
// 建立一个新Observation,存储这次注册的信息o = obsNew(TABLE, selector, observer);// 如果有nameif (name) {// 在named表中 以name为key寻找valuen = GSIMapNodeForKey(NAMED, (GSIMapKey)(id)name);// named表中没有找到对应的valueif (n == 0) {// 新建一个表m = mapNew(TABLE);// 由于这是对给定名称的首次观察,因此我们对该名称进行了复制,以便在map中无法对其进行更改(来自GNUStep的注释)name = [name copyWithZone: NSDefaultMallocZone()];// 新建表作为name的value添加在named表中GSIMapAddPair(NAMED, (GSIMapKey)(id)name, (GSIMapVal)(void*)m);GS_CONSUMED(name)} else { //named表中有对应的value// 取出对应的valuem = (GSIMapTable)n->value.ptr;}// 将observation添加到正确object的列表中// 获取添加完后name对应的value的object对应的链表n = GSIMapNodeForSimpleKey(m, (GSIMapKey)object);// n是object的valueif (n == 0) { // 如果object对应value没有数据o->next = ENDOBS;// 将o作为object的value链表的头结点插入GSIMapAddPair(m, (GSIMapKey)object, (GSIMapVal)o);} else { // 如果有object对应的value那么就直接添加到原练表的尾部// 在链表尾部加入olist = (Observation*)n->value.ptr;o->next = list->next;list->next = o;}// 这个else if 就是没有name有object的Observation,对object进行的操作相同,} else if (object) {// 直接获取object对应的value链表n = GSIMapNodeForSimpleKey(NAMELESS, (GSIMapKey)object);if (n == 0) { // 这个对应链表如果没有数据o->next = ENDOBS;// 将该observation作为头节点插入GSIMapAddPair(NAMELESS, (GSIMapKey)object, (GSIMapVal)o);} else { // 有数据,将obsevation直接插在原链表的后面list = (Observation*)n->value.ptr;o->next = list->next;list->next = o;}} else {// 既没有name又没有object,就加在WILDCARD链表中o->next = WILDCARD;WILDCARD = o;}// 解锁unlockNCTable(TABLE);
}
自然语言描述:
-
先检查参数是否为空,observer为空或者selector为空或者observer不能响应selector时报错
-
首先给表上锁,根据要插入的类信息建立一个新Observation,存储这次注册的信息,然后开始对表操作:
-
如果有name,在named表中以name为key查找,找到了就先取出来一会儿用,如果没有找到,就创一个新的表加到name表里并用指针记录,这时就获取到了这个表,然后在这个表中找到object对应的链表,接着就把观察者信息加到这个表里,object对应为空就把新节点作为头节点,不为空就加到链表末尾
-
如果没有name但是有object,就在nameless表里找,直接根据object找对应的链表,然后与之前相同,没数据就作为头节点,有数据就存到链表末尾
-
如果没有name也没有object,就加到wildcard表里,直接存到链表末头部
-
-
然后给表解锁
发送通知
- (void) postNotification: (NSNotification*)notification {if (notification == nil) {[NSException raise: NSInvalidArgumentExceptionformat: @"Tried to post a nil notification."];}[self _postAndRelease: RETAIN(notification)];
}
- (void) postNotificationName: (NSString*)nameobject: (id)object {[self postNotificationName: name object: object userInfo: nil];
}
- (void) postNotificationName: (NSString*)nameobject: (id)objectuserInfo: (NSDictionary*)info {GSNotification *notification;
notification = (id)NSAllocateObject(concrete, 0, NSDefaultMallocZone());notification->_name = [name copyWithZone: [self zone]];notification->_object = [object retain];notification->_info = [info retain];[self _postAndRelease: notification];
}发送通知最后都是调用_postAndRelease,有一个是直接用传进来的NSNotification,另外两个是根据传进来的信息创建一个新的NSNotification,所以重点就在于_postAndRelease
- (void) _postAndRelease: (NSNotification*)notification {Observation *o;unsigned count;NSString *name = [notification name];id object;GSIMapNode n;GSIMapTable m;GSIArrayItem i[64];GSIArray_t b;GSIArray a = &b;// name为空的报错,注册时可以注册无名,注册无名就等于说是所有的通知都能接收,但是发送通知时不可以if (name == nil) {RELEASE(notification);[NSException raise: NSInvalidArgumentExceptionformat: @"Tried to post a notification with no name."];}object = [notification object];
GSIArrayInitWithZoneAndStaticCapacity(a, _zone, 64, i);lockNCTable(TABLE);// 查找所有未指定name或object的观察者,加在a数组中,即将wildcard表中的数据都加在新建链表中for (o = WILDCARD = purgeCollected(WILDCARD); o != ENDOBS; o = o->next){GSIArrayAddItem(a, (GSIArrayItem)o);}// 查找与通知的object相同但是没有name的观察者,加在a数组中if (object) {// 在nameless中找object对应的数据节点n = GSIMapNodeForSimpleKey(NAMELESS, (GSIMapKey)object);if (n != 0) { // 将其加入到新建链表中o = purgeCollectedFromMapNode(NAMELESS, n);while (o != ENDOBS) {GSIArrayAddItem(a, (GSIArrayItem)o);o = o->next;}}}
// 查找name的观察者,但观察者的非零对象与通知的object不匹配时除外,加在a数组中if (name) {// 先匹配namen = GSIMapNodeForKey(NAMED, (GSIMapKey)((id)name));if (n) { // m指向name匹配到的数据m = (GSIMapTable)n->value.ptr;} else {m = 0;}if (m != 0) { // 如果上述name查找到了数据// 首先,查找与通知的object相同的观察者n = GSIMapNodeForSimpleKey(m, (GSIMapKey)object);if (n != 0) { // 找到了与通知的object相同的观察者,就加入到新建链表中o = purgeCollectedFromMapNode(m, n);while (o != ENDOBS) {GSIArrayAddItem(a, (GSIArrayItem)o);o = o->next;}}
if (object != nil) {// 接着是没有object的观察者,都加在新建链表中n = GSIMapNodeForSimpleKey(m, (GSIMapKey)nil);if (n != 0) { // 如果没有object并且有数据,就把其中的数据加到新建链表中o = purgeCollectedFromMapNode(m, n);while (o != ENDOBS) {GSIArrayAddItem(a, (GSIArrayItem)o);o = o->next;}}}}}unlockNCTable(TABLE);
// 发送通知,给之前新建链表中的所有数据count = GSIArrayCount(a);while (count-- > 0) {o = GSIArrayItemAtIndex(a, count).ext;if (o->next != 0) {NS_DURING {// 给observer发送selector,让其处理[o->observer performSelector: o->selectorwithObject: notification];}NS_HANDLER {BOOL logged;// 尝试将通知与异常一起报告,但是如果通知本身有问题,我们只记录异常。NS_DURINGNSLog(@"Problem posting %@: %@", notification, localException);logged = YES;NS_HANDLERlogged = NO;NS_ENDHANDLERif (NO == logged){ NSLog(@"Problem posting notification: %@", localException);} }NS_ENDHANDLER}}lockNCTable(TABLE);GSIArrayEmpty(a);unlockNCTable(TABLE);
RELEASE(notification);
}自然语言描述:
-
首先检测name是否为空,为空就释放notification并报错,然后创建数组用来存储观察者,接着给表上锁,开始查找所有没指定name或者object的观察者(wildcard表中的所有数据)加到数组中
-
然后查找object相同但是没有name的观察者,加到数组中(也就是在nameless表里查找object对应的那个链表,然后遍历链表加到新建的链表数组中)
-
接着name对应的观察者(在name表里找),找到name的数据后查找key与通知的object相同的观察者并放到新数组里,再找没有object为nil的那个链表,把里面的所有数据都存到新数组里,然后给表解锁
-
最后遍历得到的新数组,让观察者performSelector去执行对应的函数,然后清空新数组并release通知
移除通知
- (void) removeObserver: (id)observer {if (observer == nil)return;
[self removeObserver: observer name: nil object: nil];
}
- (void) removeObserver: (id)observername: (NSString*)nameobject: (id)object {// 当其要移除的信息都为空时,直接返回if (name == nil && object == nil && observer == nil)return;
lockNCTable(TABLE);// name和object都为nil,就在wildcard链表里删除对应observer的注册信息if (name == nil && object == nil) {WILDCARD = listPurge(WILDCARD, observer);}// name为空时if (name == nil) {GSIMapEnumerator_t e0;GSIMapNode n0;// 首先尝试删除为此object对应的所有命名项目// 在named表中e0 = GSIMapEnumeratorForMap(NAMED);n0 = GSIMapEnumeratorNextNode(&e0);while (n0 != 0) {GSIMapTable m = (GSIMapTable)n0->value.ptr;NSString *thisName = (NSString*)n0->key.obj;
n0 = GSIMapEnumeratorNextNode(&e0);if (object == nil) { // 如果object为空,直接清除named表// 清空named表GSIMapEnumerator_t e1 = GSIMapEnumeratorForMap(m);GSIMapNode n1 = GSIMapEnumeratorNextNode(&e1);
while (n1 != 0) {GSIMapNode next = GSIMapEnumeratorNextNode(&e1);
purgeMapNode(m, n1, observer);n1 = next;}} else {// 以object为key找到对应链表,清空该链表GSIMapNode n1;n1 = GSIMapNodeForSimpleKey(m, (GSIMapKey)object);if (n1 != 0) {purgeMapNode(m, n1, observer);}}if (m->nodeCount == 0) {mapFree(TABLE, m);GSIMapRemoveKey(NAMED, (GSIMapKey)(id)thisName);}}// 开始操作nameless表if (object == nil) { // object为空时// 清空nameless表e0 = GSIMapEnumeratorForMap(NAMELESS);n0 = GSIMapEnumeratorNextNode(&e0);while (n0 != 0) {GSIMapNode next = GSIMapEnumeratorNextNode(&e0);
purgeMapNode(NAMELESS, n0, observer);n0 = next;}} else { // object不为空// 找到对应的observer链表,清空该链表n0 = GSIMapNodeForSimpleKey(NAMELESS, (GSIMapKey)object);if (n0 != 0) {purgeMapNode(NAMELESS, n0, observer);}}} else { // name不为空GSIMapTable m;GSIMapEnumerator_t e0;GSIMapNode n0;
n0 = GSIMapNodeForKey(NAMED, (GSIMapKey)((id)name));// 如果没有和这个name相同的key,直接返回if (n0 == 0) {unlockNCTable(TABLE);return; /* Nothing to do. */}m = (GSIMapTable)n0->value.ptr; // 找到name作为key对应的数据信息
if (object == nil) {// 如果object为nil,就清空刚才找到的name对应的数据信息e0 = GSIMapEnumeratorForMap(m);n0 = GSIMapEnumeratorNextNode(&e0);
while (n0 != 0) {GSIMapNode next = GSIMapEnumeratorNextNode(&e0);
purgeMapNode(m, n0, observer);n0 = next;}} else {// 如果object不为空,清空object对应的链表n0 = GSIMapNodeForSimpleKey(m, (GSIMapKey)object);if (n0 != 0) {purgeMapNode(m, n0, observer);}}// 因为其中的数据清除完了,所以记得清除named表中的作为key的nameif (m->nodeCount == 0) {mapFree(TABLE, m);GSIMapRemoveKey(NAMED, (GSIMapKey)((id)name));}}unlockNCTable(TABLE);
}自然语言描述:
-
如果要移除的信息都为空直接返回
-
然后给表上锁,如果name和object都为nil,就在wildcard链表里删除对应observer的注册信息
-
当name为空时,首先在name表中操作,如果object为空的话,就直接遍历named表,找到其中value的value与参数相等的为观察者并移除,如果object不为空,就找到object为key对应的链表,在链表中移除该观察者;然后在nameless表里操作,如果object为空,就在nameless表里移除观察者,如果object不为空,就先找到对应的链表,再移除链表中对应的观察者
-
name不为空时,如果没找到和name相同的key,直接返回,如果找到了而且object为空,就清空name对应的数据中相应的Obserber,如果object不为空,就清空object对应的链表中相应的Observer,如果某个name对应的数据清除完了,就清除name表中作为key的name,操作完解锁
KVO机制
KVO来监听对象属性的变化,并及时做出响应的一种机制,即当指定的被观察的对象的属性被修改后,KVO会自动通知相应的观察者,它与NSNotificationCenter的区别如下:
相同点
-
1、两者的实现原理都是
观察者模式,都是用于监听 -
2、都能
实现一对多的操作
不同点
-
1、
KVO只能用于监听对象属性的变化,并且属性名都是通过NSString来查找,编译器不会帮你检测对错和补全,纯手敲比较容易出错 -
2、
NSNotification的发送监听(post)的操作我们可以控制,KVO由系统控制 -
3、
KVO可以记录新旧值变化
基本使用
KVO的使用分三步:注册观察者、实现回调、移除观察者
 [self.subViewController addObserver:self forKeyPath:@"string" options:NSKeyValueObservingOptionNew context:nil];
- (void)observeValueForKeyPath:(NSString *)keyPath ofObject:(id)object change:(NSDictionary<NSKeyValueChangeKey,id> *)change context:(void *)context {if ([keyPath isEqualToString:@"string"]) {NSLog(@"KVO:%@", change);}
}
- (void)dealloc {[self.subViewController removeObserver:self forKeyPath:@"name"];
}
这里参数context是用来区分不同对象的同名属性的,它是一个void*类型
void *subViewControllerContext = &subViewControllerContext;如果需要指定某些时候触发KVO,别的时候不触发,可以使用手动触发KVO
+ (BOOL)automaticallyNotifiesObserversForKey:(NSString *)key {if ([key isEqualToString:@"string"]) {return NO;}return [super automaticallyNotifiesObserversForKey:key];
}//返回NO,不自动触发KVO
[self.subViewController willChangeValueForKey:@"string"];
self.subViewController.string = @"希珀";
[self.subViewController didChangeValueForKey:@"string"];
//手动触发
一对多
有时候一个属性的值取决于当前或者其他对象的一个或多个属性的值,比如人的FullName取决于fisrtName和lastName
- (NSString *)fullName {return [NSString stringWithFormat:@"%@ %@",_firstName, _lastName];
}
//方法一
+ (NSSet<NSString *> *)keyPathsForValuesAffectingValueForKey:(NSString *)key {NSSet *keyPaths = [super keyPathsForValuesAffectingValueForKey:key];if([key isEqualToString:@"fullName"]) {NSArray* affectingKeys = @[@"lastName", @"firstName"];keyPaths = [keyPaths setByAddingObjectsFromArray:affectingKeys];}return keyPaths;
}
//方法二
+ (NSSet<NSString *> *)keyPathsForValuesAffectingFullName
{return [NSSet setWithObjects:@"lastName", @"firstName", nil];
}实现原理
KVO的底层是通过isa-swizzling实现的,在注册KVO观察者时,将修改观察对象的isa指针,指向中间类而不是真实类
注册KVO观察者后,会将isa指针指向原类的子类NSKVONotifing_NameOfCalss,在这个动态子类中观察的是setter方法,子类会重写父类中的dealloc方法(使dealloc后isa指回原类,不会销毁这个动态子类),重写基类中的class方法和_isKVOA方法,以确保重写的class方法可以指回原类,还会重写父类对应属性的setter方法,在这个方法中会在修改属性值前后调用willChangeValue和didChangeValueForKey这两个方法,会触发监听者的响应方法
动态子类会根据观察属性的automaticallyNotifiesObserversForKey的布尔值来决定是否生成
KVO Crash
KVO Crash,通常是KVO的被观察者dealloc时仍然注册着KVO导致的crash,添加KVO时重复添加观察者或重复移除观察者引起的。 一个被观察的对象上有若干个观察者,每个观察者又有若干条keypath。如果观察者和keypath的数量一多,很容易不清楚被观察的对象整个KVO关系,导致被观察者在dealloc的时候,仍然残存着一些关系没有被注销,同时还会导致KVO注册者和移除观察者不匹配的情况发生。尤其是多线程的情况下,导致KVO重复添加观察者或者移除观察者的情况,这种类似的情况通常发生的比较隐蔽,很难从代码的层面上排查。
可以让观察对象持有一个KVO的delegate,所有和KVO相关的操作均通过delegate来进行管理,delegate通过建立一张MAP表来维护KVO的整个关系,这样做的好处有2个: 1:如果出现KVO重复添加观察或者移除观察者(KVO注册者不匹配的)情况,delegate可以直接阻止这些非正常的操作。 2:被观察对象dealloc之前,可以通过delegate自动将与自己有关的KVO关系都注销掉,避免了KVO的被观察者dealloc时仍然注册着KVO导致的crash
同一个类的不同对象在使用KVO时,是否会创造出不同的中间子类
willChangeValue和didChangeValueForKey这两个方法是怎么触发监听者的响应方法的?
这两个问题可以同时回答。
单例模式
单例模式表明某个类只能生成一个实例,并且提供一个全局的访问入口访问这个实例。iOS常见的单例类有这些:UIApplication(应用程序实例类)、NSNotificationCenter(消息中心类)、NSFileManager(文件管理类)、NSUserDefaults(应用程序设置)、NSURLCache(请求缓存类)、NSHTTPCookieStorage(应用程序cookies池)
基本使用
@implementation GCDSingleton
static GCDSingleton *singleton;
+(instancetype)sharedInstacne {static dispatch_once_t onceToken;dispatch_once(&onceToken, ^{singleton = [[super allocWithZone:nil] init];});return singleton;
}
+(instancetype) allocWithZone:(struct _NSZone *)zone {return [self sharedInstacne];
}
-(instancetype)copyWithZone:(NSZone *)zone {return singleton;
}
@end实现原理
dispatch_once是通过dispatch_once_f来实现单例类的,&oncetoken作为一个全局静态变量,可以视为一个开关,在函数中会进行原子操作,以避免多线程的问题,确认线程安全后会进行block里代码的执行并在执行完毕后广播,执行完会把开关的状态改变,把开关关上,第二次进入这个函数时就会判断到这个开关的值,如果是关上的就直接返回,如果开关的值没关但是多线程的锁上锁了,就会进行无限期等待,等待开锁。
懒汉式
像一个懒汉,需要的时候再加载
static LazyModeSingleton *instance = nil;
+(instancetype)shareInstance {if (!instance) {@synchronized (self) {if (!instance) {instance = [[self alloc] init];}}}return instance;
}
+(instancetype)allocWithZone:(struct _NSZone *)zone {if (!instance) {@synchronized (self) {if (!instance) {instance = [super allocWithZone:nil];}}}return instance;
}饿汉式
像一个饿汉,程序一开始就加载
static LazyModeSingleton *instance = nil;
+(void)load {instance = [[self alloc] init];
}
+(instancetype)allocWithZone:(struct _NSZone *)zone {return instance;
}
+(instancetype)sharedInstance {return instance;
}代理模式
代理模式是一种常见的设计模式,用于在对象之间进行通信和交互。在iOS开发中,代理模式经常被使用。
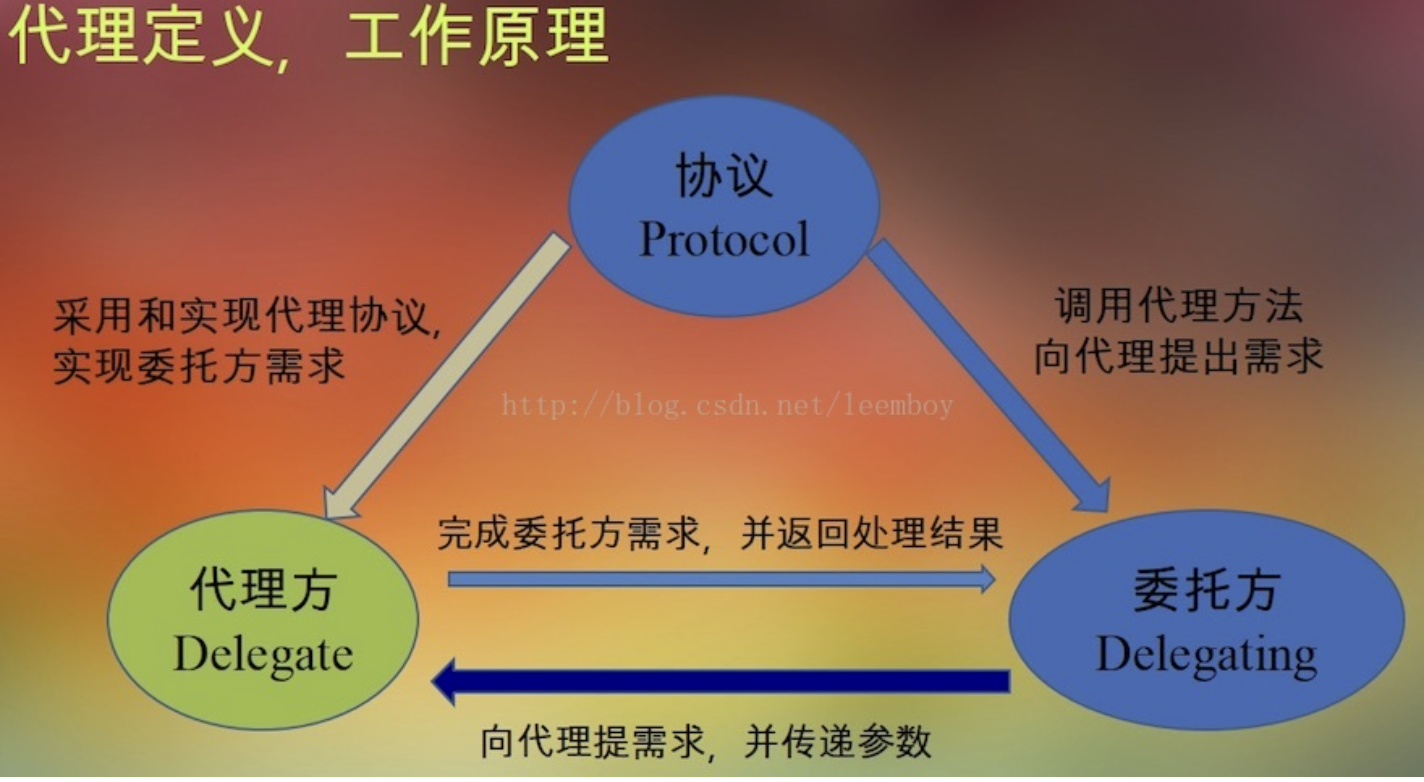
代理模式的核心是委托,其中一个对象(委托方)将一些任务委托给另一个对象(代理方)来完成。代理方负责执行委托方指定的任务,并将结果返回给委托方。
在iOS开发中,通常通过定义协议(Protocol)来使用代理模式。委托方定义一个协议,声明一组可选或必需的方法。代理方实现该协议,并将自身设置为委托方的代理。然后,委托方可以调用代理去执行协议中的函数并给函数传参
iOS常见的代理模式有:UITableViewDelegate 和 UITableViewDataSource、UIWebViewDelegate 和 WKNavigationDelegate、UITextFieldDelegate等等
-
协议:用来指定代理双方可以做什么,必须做什么。
-
代理:根据指定的协议,完成委托方需要实现的功能。
-
委托:根据指定的协议,指定代理去完成什么功能。
代理需要使用weak属性关键字,以免造成循环引用,自定义的协议在使用的时候需要先判断方法是否实现再调用函数
非正式协议通过category来实现
比如我们可以用代理模式给UITableView瘦身
typedef void (^selectCell) (NSIndexPath *indexPath);
//代理对象的协议需要声明在.h文件中
@interface TableViewDelegateObj : NSObject <UITableViewDelegate, UITableViewDataSource>
//创建代理对象实例,并将数据列表传进去
//代理对象通过block将消息向外界传递
//return返回实例对象
+ (instancetype)createTableViewDelegateWithDataList:(NSArray *)dataList selectBlock:(selectCell)selectBlock;
代理对象.m文件
#import "TableViewDelegateObj.h"
@interface TableViewDelegateObj () @property (nonatomic, strong) NSArray *dataList;
@property (nonatomic, copy) selectCell selectBlock;
@end@implementation TableViewDelegateObj
+ (instancetype)createTableViewDelegateWithDataList:(NSArray *)dataList selectBlock:(selectCell)selectBlock {return [[[self class] alloc] initTableViewDelegateWithDataList:dataListselectBlock:selectBlock];
}
- (instancetype)initTableViewDelegateWithDataList:(NSArray *)dataList selectBlock:(selectCell)selectBlock {self = [super init];if (self) {self.dataList = dataList;self.selectBlock = selectBlock;}return self;
}
- (UITableViewCell *)tableView:(UITableView *)tableView cellForRowAtIndexPath:(NSIndexPath *)indexPath {static NSString *identifier = @"cell";UITableViewCell *cell = [tableView dequeueReusableCellWithIdentifier:identifier];if (!cell) {cell = [[UITableViewCell alloc] initWithStyle:UITableViewCellStyleDefault reuseIdentifier:identifier];}cell.textLabel.text = self.dataList[indexPath.row];return cell;
}
- (NSInteger)tableView:(UITableView *)tableView numberOfRowsInSection:(NSInteger)section {return self.dataList.count;
}
- (void)tableView:(UITableView *)tableView didSelectRowAtIndexPath:(NSIndexPath *)indexPath {[tableView deselectRowAtIndexPath:indexPath animated:NO];// 将点击事件通过block的方式传递出去self.selectBlock(indexPath);
}
@end关于block和代理的选择
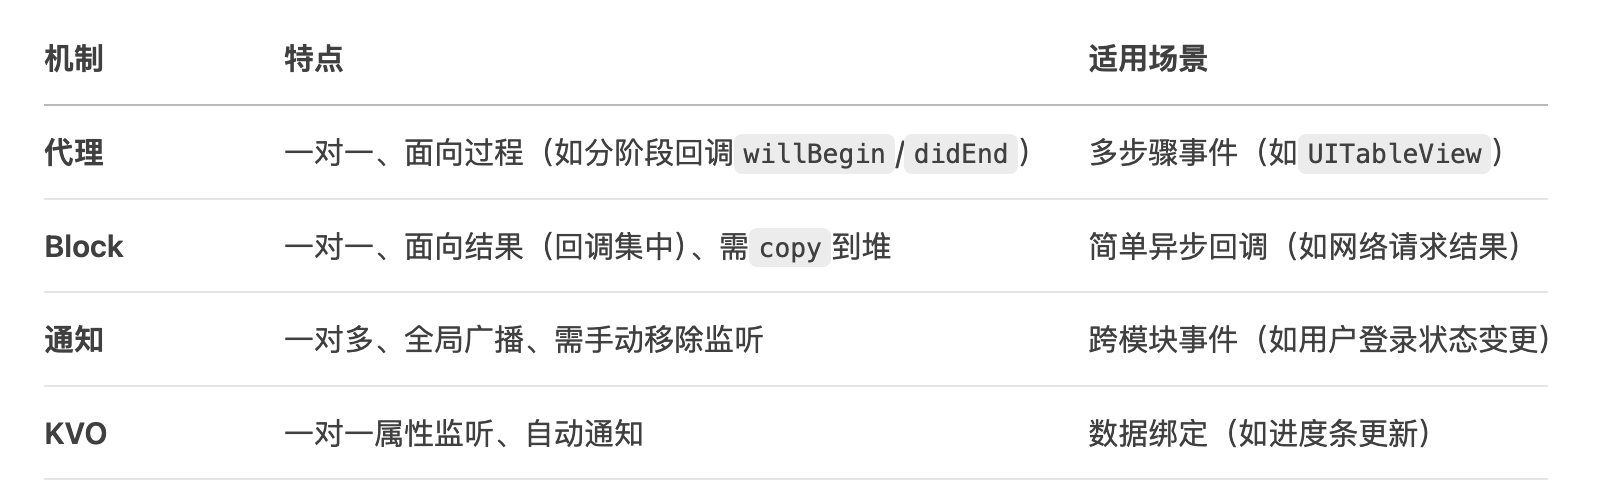
多个消息传递时,应该使用delegate而不是block;一个委托对象的代理属性只有一个代理对象,如果想要委托对象调用多个代理对象的回调应该用block而不是代理;如果是单例对象最好不要用delegate
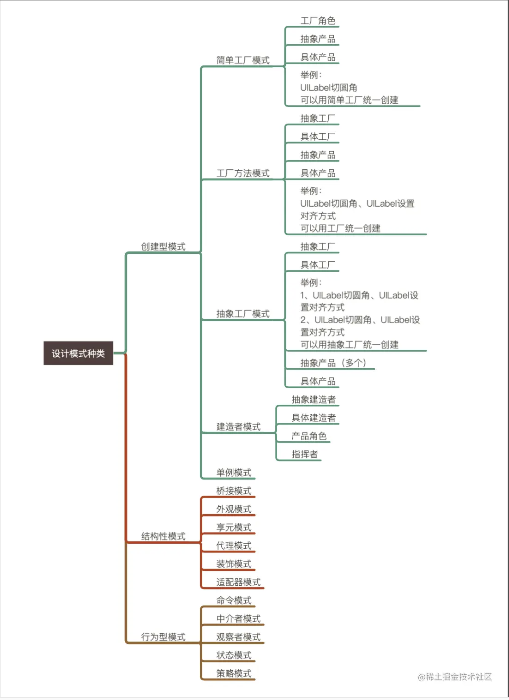
其他设计模式
设计模式原则
S 单一职责原则告诉我们实现类要职责单一;
O 开闭原则是总纲,它告诉我们要对扩展开放,对修改关闭;
L 里氏替换原则告诉我们不要破坏继承体系;
L 迪米特法则告诉我们要降低耦合度;
I 接口隔离原则告诉我们在设计接口的时候要精简单一;
D 依赖倒置原则告诉我们要面向接口编程;
设计模式一览