mmaction安装的详细说明帖
⚡ MMAction2 安装与环境准备 / MMAction2 Installation & Environment Setup
https://github.com/open-mmlab/mmaction2/blob/master/demo/README.md
对于单个目标的图像我们直接使用行为识别模型进行行为预测
https://github.com/open-mmlab/mmaction2/blob/master/docs/en/getting_started.md
查看一些基础模型的api调用可以直接输出结果。
————————————————
🛠️ 前置条件 / Prerequisites
中文:
MMAction2 可在 Linux、Windows、macOS 上运行。最低要求为 Python ≥3.7、CUDA ≥10.2、PyTorch ≥1.8。
如果你已经熟悉 PyTorch 并且正确安装过,可直接跳到下一节。否则建议按以下步骤逐步准备环境。
English:
MMAction2 works on Linux, Windows, and macOS. Minimum requirements: Python ≥3.7, CUDA ≥10.2, PyTorch ≥1.8.
If you already have a working PyTorch installation, skip ahead. Otherwise, follow the preparation steps below.
🔹 Step 1 — 安装 Miniconda / Install Miniconda
- 中文:推荐用 Miniconda 管理环境,避免不同项目间的依赖冲突。
- English: It is recommended to use Miniconda for environment management to avoid dependency conflicts.
👉 Miniconda 下载链接 / Official download
🔹 Step 2 — 创建并激活虚拟环境 / Create & Activate Conda Environment
conda create --name openmmlab python=3.8 -y
conda activate openmmlab
- 中文:此命令创建一个名为
openmmlab的环境,并指定 Python 3.8。激活环境后,所有安装的依赖只影响该环境,不会污染系统。 - English: This creates a new Conda env named
openmmlabwith Python 3.8. Activating ensures packages are isolated from system-wide Python.
🔹 Step 3 — 安装 PyTorch / Install PyTorch
GPU 平台(自动匹配 cudatoolkit 版本):
On GPU platforms (auto-matches cudatoolkit):
conda install pytorch torchvision -c pytorch
CPU 平台:
CPU platforms:
conda install pytorch torchvision cpuonly -c pytorch
⚠️ 注意 / Warning:PyTorch 会自动选择合适的 CUDA 运行时。如果 CUDA 与显卡驱动版本不匹配,可能导致安装成功但运行报错。因此务必对照 PyTorch 官方安装页面 与 NVIDIA 驱动-Toolkit 对照表。
🌟 最佳实践安装流程 / Best Practices for Installation
推荐顺序(逻辑:先 Conda → 再 PyTorch → 再 MIM → 再源码/包):
Recommended order (logic: Conda → PyTorch → MIM → source/package):
# 1) 安装 OpenMIM 工具(统一依赖安装器)
pip install -U openmim# 2) 安装核心依赖(必须:MMEngine、MMCV;可选:MMDetection、MMPose)
mim install mmengine
mim install mmcv
mim install mmdet   # optional
mim install mmpose  # optional# 3) 安装 MMAction2
# 推荐源码安装(可编辑模式)
git clone https://github.com/open-mmlab/mmaction2.git
cd mmaction2
pip install -v -e .
📦 安装方式对比 / Installation Modes Comparison
| 模式 / Mode | 命令 / Command | 特点 / Features |
|---|---|---|
| 源码安装(推荐) Source (recommended) | pip install -v -e . | 可编辑:代码改动即时生效,适合开发、调试、新模型添加。 |
| Python 包安装 Package | pip install mmaction2 | 快速调用:适合只做推理或调用 API。 |
💡 提示 / Tip:开发者请使用 -e (editable),仅消费 API 时用普通安装即可。
✅ 验证安装 / Verify Installation
步骤 1:下载配置和权重 / Step 1: Download Config & Checkpoint
mim download mmaction2 \--config tsn_imagenet-pretrained-r50_8xb32-1x1x8-100e_kinetics400-rgb --dest .
步骤 2:运行 Demo / Step 2: Run Demo
(a) 源码安装的情况 / Source install
python demo/demo.py tsn_imagenet-pretrained-r50_8xb32-1x1x8-100e_kinetics400-rgb.py \tsn_imagenet-pretrained-r50_8xb32-1x1x8-100e_kinetics400-rgb_20220906-2692d16c.pth \demo/demo.mp4 tools/data/kinetics/label_map_k400.txt
输出示例:终端会显示前 5 个类别及其预测分数。
Output: The terminal prints Top-5 predicted labels with scores.
(b) Python 包方式 / Package install
在 Python 解释器中测试:
Test inside Python interpreter:
from mmaction.apis import init_recognizer, inference_recognizer
from operator import itemgetterconfig_file = 'tsn_imagenet-pretrained-r50_8xb32-1x1x8-100e_kinetics400-rgb.py'
checkpoint_file = 'tsn_imagenet-pretrained-r50_8xb32-1x1x8-100e_kinetics400-rgb_20220906-2692d16c.pth'
video_file = 'demo/demo.mp4'
label_file = 'tools/data/kinetics/label_map_k400.txt'# 初始化模型
model = init_recognizer(config_file, checkpoint_file, device='cpu')  # or 'cuda:0'# 推理
pred_result = inference_recognizer(model, video_file)# 提取 Top-5
scores = pred_result.pred_score.tolist()
top5 = sorted(enumerate(scores), key=itemgetter(1), reverse=True)[:5]
labels = [x.strip() for x in open(label_file).readlines()]print("Top-5 labels:")
for idx, score in top5:print(f"{labels[idx]}: {score:.4f}")
⚙️ CUDA 与 PyTorch 版本关系 / CUDA-PyTorch Compatibility
| 硬件 / Hardware | 推荐 CUDA / Recommended CUDA | 说明 / Note |
|---|---|---|
| NVIDIA Ampere (RTX 30 系列 / A100) | CUDA 11.x | 必须 11+ 才能用,旧版不支持。 |
| 较老 GPU (Pascal / Turing) | CUDA 10.2 或 11.x | CUDA 11 向下兼容,但 10.2 更轻量。 |
💡 经验法则 / Rule of thumb:
- 如果只是安装预编译包 → 运行时库就够。
- 如果需要自己编译 MMCV/CUDA 算子 → 必须保证 PyTorch CUDA 版本与系统 CUDA toolkit 完全一致。
🐳 Docker 使用 / Using Docker
Dockerfile 已内置 PyTorch 与依赖,避免复杂环境问题。
# 构建镜像(默认 PyTorch 1.8.1 + CUDA 10.2 + CUDNN 7)
docker build -f ./docker/Dockerfile --rm -t mmaction2 .
运行容器(挂载本地数据集路径到容器内 /mmaction2/data):
Run container (mount dataset path):
docker run --gpus all --shm-size=8g -it -v {DATA_DIR}:/mmaction2/data mmaction2
🔑 重点 / Key point:--shm-size=8g 可防止大批量数据加载时报共享内存不足错误。
🛠️ CPU-only 平台 / CPU-only Platforms
即使没有 GPU,MMAction2 也能正常运行训练/推理,大部分模型不依赖 GPU 编译算子。只是训练速度会大幅降低。
Even without GPU, MMAction2 can train/infer (though slower). Most models do not rely on GPU-only ops.
🔧 常见问题排查 / Troubleshooting
-
版本迁移问题
- 从 0.x → 1.x 可能遇到依赖不匹配。请确保依赖版本满足以下最低要求:
mmaction2 >= 1.0.0
mmcv      >= 2.0.0
mmdet     >= 3.0.0
mmengine  >= 0.7.2
mmpose    >= 1.0.0
-
安装报错
- 多数情况为 CUDA 与 PyTorch 版本不匹配 → 建议用官方命令重新安装 PyTorch。
- 如果用
pip install -e .,请确认你已在正确的虚拟环境内执行。
📌 总结 / Summary
中文:本节完整展示了 MMAction2 的安装流程,包括 Conda 环境准备、PyTorch 与 CUDA 版本匹配、依赖安装顺序、源码/包两种安装方式,以及验证方法和 Docker 运行方案。
English: This section provided a full installation walkthrough: Conda setup, CUDA-PyTorch compatibility, dependency order, source vs package installs, verification, and Docker usage.
好的 ✅
你点到的这两行确实是 MMAction2 推理流程的核心,几乎所有 Demo 的关键就在这。我们可以像上课一样,把它们从 函数入口 → 内部机制 → 实际输出 逐层展开。
🔹 代码核心 / Core Code
# 初始化模型 / Initialize the model
model = init_recognizer(config_file, checkpoint_file, device='cpu')  # or 'cuda:0'# 推理 / Inference
pred_result = inference_recognizer(model, video_file)
细节拓展:
关于这两行代码:
# 初始化模型
model = init_recognizer(config_file, checkpoint_file, device='cpu')  # or 'cuda:0'
# 推理
pred_result = inference_recognizer(model, video_file)
🧩 第一步:init_recognizer
中文:
-
作用:根据配置文件和权重文件,构建一个视频理解模型(通常是 TSN、I3D、SlowFast、PoseC3D 等)。
-
参数:
config_file: 模型结构定义(包含 backbone、head、数据处理 pipeline 等)。checkpoint_file: 已训练好的权重文件(.pth)。device: 指定运行硬件,cpu或cuda:0。
English:
-
Purpose: Build a video understanding model (e.g., TSN, I3D, SlowFast, PoseC3D) from a config and checkpoint.
-
Args:
config_file: Defines architecture (backbone, head, data pipeline).checkpoint_file: Trained weights (.pth).device: Where to load the model (cpuorcuda:0).
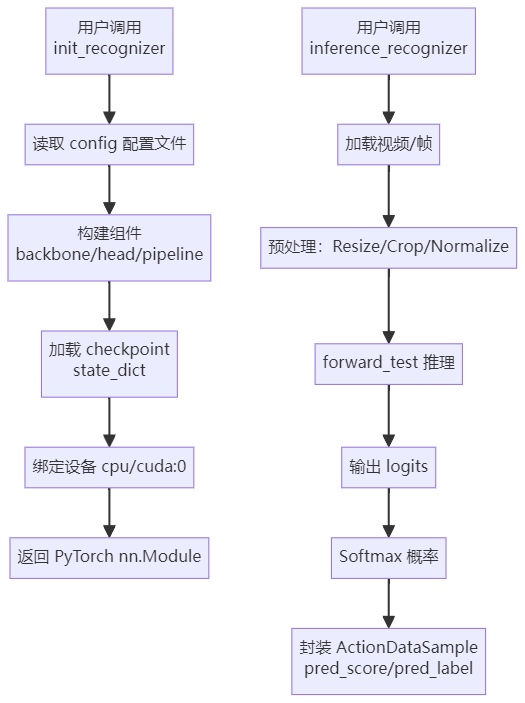
内部机制 / Internal mechanism:
- 读取配置 → 使用 MMEngine 构建模型对象。
- 加载 checkpoint → 恢复网络参数(
state_dict)。 - 模型放到指定设备 → CPU/GPU。
- 返回一个可直接调用的 PyTorch
nn.Module。
📌 类比:就像你在 PyTorch 里手动写 model = ResNet50(); model.load_state_dict(torch.load(...)),只是这里封装成了一个统一 API。
🧩 第二步:inference_recognizer
中文:
-
作用:用指定模型对输入视频进行推理,输出分类结果。
-
参数:
model: 刚才初始化的模型。video_file: 待识别的视频路径。
English:
-
Purpose: Run inference on a given video with the model and return predictions.
-
Args:
model: The initialized recognizer.video_file: Path to input video.
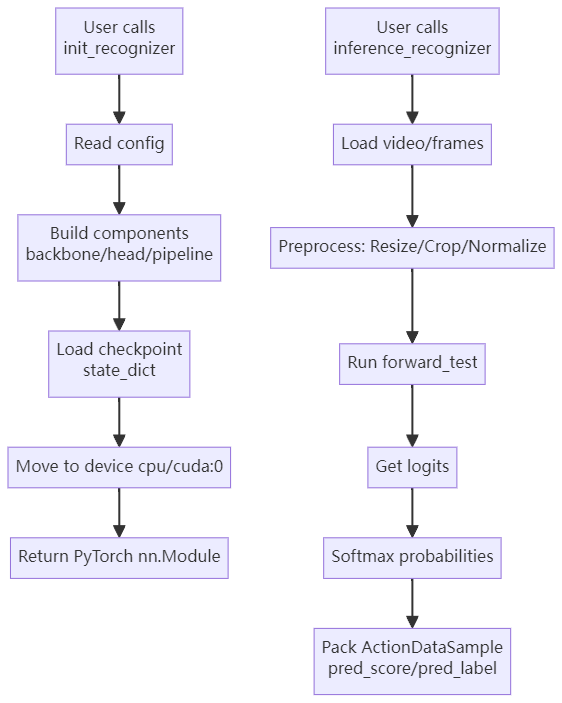
内部机制 / Internal mechanism:
-
加载视频帧 → 根据配置 pipeline(如
SampleFrames,Resize,CenterCrop)对视频抽帧、预处理。 -
输入模型 → 调用
model.forward_test,输出 logits。 -
后处理 → 将 logits 归一化为概率分布(
softmax),得到类别分数。 -
封装结果 → 返回一个
ActionDataSample对象,内含:pred_score(张量,概率分布)pred_label(预测类别索引)- 可选的可视化信息(如 GradCAM)。
📌 类比:PyTorch 中你会写 output = model(x); probs = softmax(output),这里全帮你封装好了。
🧪 综合理解 / Putting It Together
运行这两行时,发生的逻辑链条是:
中文:
- 配置+权重 → 构建视频理解模型。
- 视频输入 → pipeline 预处理 → 模型前向传播。
- 模型输出 → 概率分布 → 封装结果返回。
English:
- Config + checkpoint → build the model.
- Video input → preprocessing pipeline → forward pass.
- Model output → probabilities → packaged result.
📊 返回结果结构 / Output Structure
print(type(pred_result))
# <class 'mmaction.structures.ActionDataSample'>print(pred_result.pred_score.shape)
# torch.Size([num_classes])  # 每个类别的概率print(pred_result.pred_label)
# tensor([class_index])
- 中文:
pred_score是所有类别的预测分布,pred_label是最高分的类别索引。 - English:
pred_scoreis the full probability distribution,pred_labelis the index of the top class.
🌟 小扩展 / Extended Insight
- 🔹 可替换输入:不仅支持视频,还支持 rawframes(预先解帧的图像序列)或 音频特征。
- 🔹 可视化支持:与
GradCAM融合后,能输出网络关注的时空区域。 - 🔹 批量处理:可在 config 中调整
test_dataloader,支持多视频并行推理。
🖼️ 调用流程图 / Call Flow Diagram
📌 中文流程图
📌 English Flowchart
⚙️ MMEngine 的核心原理 / Core Principles of MMEngine
OpenMMLab 从 2.x 开始,把 MMEngine 定义为“基础设施层”(infra layer)。
它相当于 PyTorch 上的一个 高阶抽象与管理框架,类似于 “操作系统 + 任务调度器”,解决了以下几个核心问题:
🧩 1. 模块化设计 / Modular Design
中文:
- 在
config文件里定义的每个组件(如 backbone、head、optimizer、scheduler),MMEngine 提供统一的Registry注册机制。 - 只要在代码里
@MODELS.register_module(),就能让新模型被框架自动识别,而不需要手动改入口。
English:
- Every component in
config(backbone, head, optimizer, scheduler) is registered via a unified Registry system. - With decorators like
@MODELS.register_module(), new models become discoverable without changing entrypoints.
🧩 2. 训练/推理循环抽象 / Loops Abstraction
中文:
-
PyTorch 原生训练通常要写:
for epoch in ...→model.train()→loss.backward()→optimizer.step()。 -
MMEngine 提供 Runner 抽象:
- TrainLoop:封装训练步骤。
- ValLoop:封装验证步骤。
- TestLoop:封装测试步骤。
这样所有算法库(MMAction2, MMDetection, MMSegmentation …)都能共享相同的训练逻辑,只换模型和数据。
English:
- Raw PyTorch requires writing explicit loops:
for epoch ...,loss.backward(),optimizer.step(). - MMEngine provides a Runner abstraction with
TrainLoop,ValLoop,TestLoop. - This standardizes workflows across repos (MMAction2, MMDetection, MMSeg, etc.) → only model/data differ.
🧩 3. 钩子系统 / Hook System
中文:
-
在训练循环中,很多任务需要“插队”:日志记录、学习率调度、权重保存、评估指标计算。
-
MMEngine 提供 Hook 机制:
LoggerHook,CheckpointHook,LrSchedulerHook,EvaluationHook等。- 用户可写自定义 Hook,挂载到 Runner,不改核心代码即可拓展功能。
English:
-
Many tasks (logging, LR scheduling, checkpointing, evaluation) must run inside training loops.
-
MMEngine offers a Hook system:
- Built-ins like
LoggerHook,CheckpointHook,LrSchedulerHook. - Users can register custom hooks onto Runner without touching core code.
- Built-ins like
🧩 4. 配置系统 / Config System
中文:
- 统一的
.py配置文件系统,支持继承(_base_)、覆盖(cfg-options),实现高度复用。 - 配置 → 实例化对象,靠的是 MMEngine 内部的 Config + Registry 机制。
English:
- Unified
.pyconfig files, supporting inheritance (_base_) and overrides (cfg-options), highly reusable. - Config → Object instantiation is powered by Config + Registry.
🧩 5. 分布式与加速支持 / Distributed & Acceleration
中文:
- 内置支持 DDP (DistributedDataParallel)、混合精度训练(FP16/AMP)、多机多卡训练。
- 用户只需要在命令行加
--launcher pytorch或配置runner.type=EpochBasedTrainLoop,即可跑分布式。
English:
- Built-in support for DDP, mixed precision (AMP/FP16), multi-node multi-GPU training.
- Users just set
--launcher pytorchor configrunner.type=EpochBasedTrainLoop.
🔑 总结 / Summary
中文:
init_recognizer 和 inference_recognizer 是用户级 API,内部调用了 MMEngine 的配置管理、模型构建、推理流程。MMEngine 通过 Registry + Runner + Hook 三大机制,把深度学习训练/推理抽象成统一框架,使得不同任务(检测、分割、视频理解)都能共用一套底层逻辑。
English:
init_recognizer and inference_recognizer are user-facing APIs, but under the hood they rely on MMEngine’s config, registry, and loop systems. MMEngine abstracts training & inference via Registry + Runner + Hook, providing a common infrastructure for all OpenMMLab libraries (detection, segmentation, video, etc.).
下面给你一张总览流程图(大一统视角),分别提供 中文 与 英文 两个版本,便于直接放到 CSDN / GitHub README.md 中。
🗺️ 总览流程图(中文)/ Unified Overview (CN)
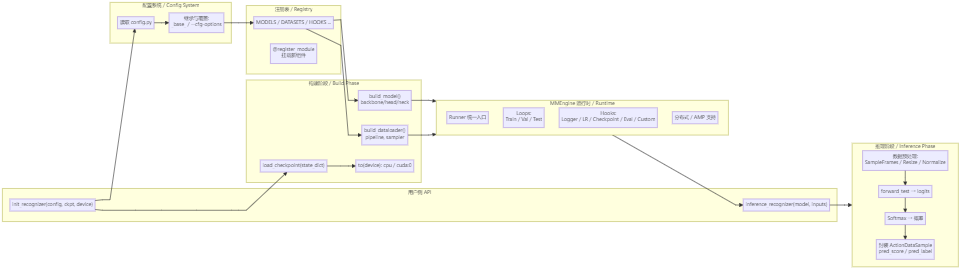
说明(简要)
init_recognizer:走 配置→注册→构建→加载权重→放置设备 的完整链路,并把模型交给 Runner。inference_recognizer:调用数据 pipeline 预处理,执行forward_test,返回 ActionDataSample(含pred_score/pred_label)。- MMEngine 以 Runner/Loops/Hooks/Registry/Config 为核心,把训练与推理的公共机制抽象出来,供 MMAction2、MMDetection 等复用。
Notes (concise)
init_recognizer: walks through Config → Registry → Build → Load ckpt → Device, then hands the model to the Runner runtime.inference_recognizer: invokes data pipeline, executesforward_test, returns ActionDataSample (pred_score/pred_label).- MMEngine centers on Runner/Loops/Hooks/Registry/Config, abstracting shared training/inference mechanisms across OpenMMLab repos.
要不要我再补一页:把 Runner、Loops、Hook 回调时序(如 before_train_epoch → before_train_iter → ... → after_train_iter → after_train_epoch)也画成双语时序图?这样整套“从 API 到引擎,再到回调时序”的链路就完全闭环了。