设计模式:原型模式(Prototype Pattern)
文章目录
- 一、原型模式的概念
- 二、原型模式的结构
- 三、原型注册机制
- 四、完整示例代码
一、原型模式的概念
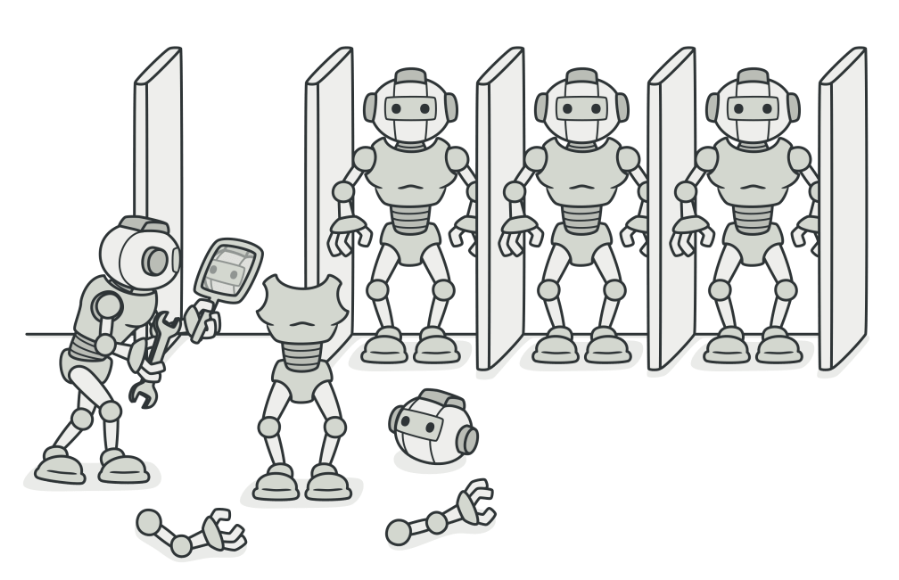
原型模式是一种创建型设计模式, 使你能够复制已有对象, 而又无需使代码依赖它们所属的类。通过复制(克隆)已有的实例来创建新的对象,而不是通过 new 来实例化。
- 意图:在对象创建代价较大、或需要保留对象当前状态时,通过克隆来生成新对象。
- 核心思想:每个类实现一个 clone() 接口,用于复制自身。
优点:
- 隐藏对象创建细节,对客户端透明。
- 提高性能(适合复杂对象复制)。
- 动态扩展对象种类,不需要修改工厂类。
缺点:
- 对象内部含有复杂引用时,深拷贝实现复杂。
- 如果对象的构造过程并不复杂,使用原型模式反而增加代码复杂度。
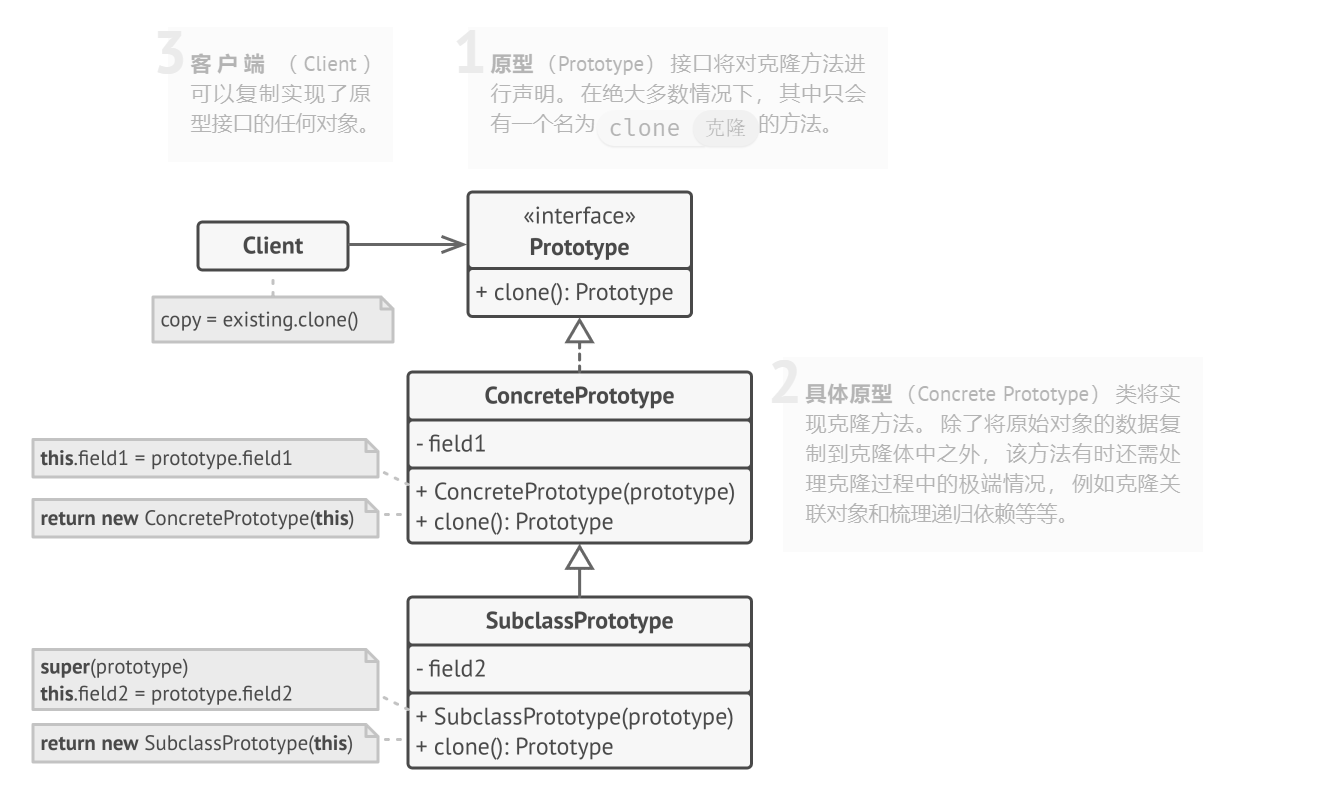
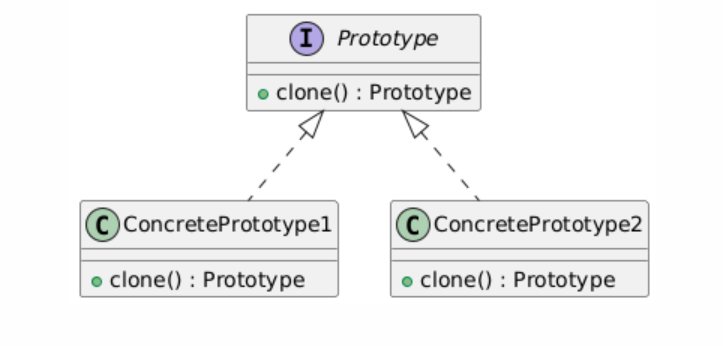
二、原型模式的结构
角色组成:
- Prototype(抽象原型类):定义了 clone() 方法的接口。
- ConcretePrototype(具体原型类):实现 clone(),复制自身。
- Client(客户类):通过调用 clone() 来创建新对象,而不是直接 new。
基本实现:
UML类图:
示例代码:
#include <iostream>
#include <string>
using namespace std;// 抽象原型类
class Prototype {
public:virtual ~Prototype() {}virtual Prototype* clone() const = 0;virtual void show() const = 0;
};// 具体原型类 A
class ConcretePrototypeA : public Prototype {
public:ConcretePrototypeA(const string& name) : name(name) {}Prototype* clone() const override {return new ConcretePrototypeA(*this); // 调用拷贝构造}void show() const override {cout << "ConcretePrototypeA: " << name << endl;}
private:string name;
};// 具体原型类 B
class ConcretePrototypeB : public Prototype {
public:ConcretePrototypeB(int value) : value(value) {}Prototype* clone() const override {return new ConcretePrototypeB(*this); // 调用拷贝构造}void show() const override {cout << "ConcretePrototypeB: value=" << value << endl;}
private:int value;
};// 使用示例
int main() {Prototype* p1 = new ConcretePrototypeA("原型A");Prototype* p2 = new ConcretePrototypeB(42);Prototype* c1 = p1->clone(); // 克隆APrototype* c2 = p2->clone(); // 克隆Bc1->show();c2->show();delete p1;delete p2;delete c1;delete c2;return 0;
}
原型模式(Prototype Pattern)示例,用来克隆 QWidget 界面
场景:
- 有一个复杂的界面 CustomWidget(包含标签和按钮)。
- 界面创建比较复杂,不想每次都 new。
- 通过原型模式,我们直接 clone() 来复制已有的界面。
代码示例:
#include <QApplication>
#include <QWidget>
#include <QVBoxLayout>
#include <QLabel>
#include <QPushButton>
#include <QString>// ============ 抽象原型类 ============
class PrototypeWidget : public QWidget {
public:PrototypeWidget(QWidget *parent = nullptr) : QWidget(parent) {}virtual ~PrototypeWidget() {}virtual PrototypeWidget* clone() const = 0;  // 原型接口
};// ============ 具体原型类 ============
class CustomWidget : public PrototypeWidget {
public:CustomWidget(const QString &title, const QString &buttonText, QWidget *parent = nullptr): PrototypeWidget(parent), m_title(title), m_buttonText(buttonText) {QVBoxLayout *layout = new QVBoxLayout(this);m_label = new QLabel(m_title, this);m_button = new QPushButton(m_buttonText, this);layout->addWidget(m_label);layout->addWidget(m_button);setLayout(layout);resize(220, 120);}// 克隆自身PrototypeWidget* clone() const override {return new CustomWidget(m_title, m_buttonText);}// ====== 扩展功能:支持修改部分内容 ======void setTitle(const QString &title) {m_title = title;if (m_label) m_label->setText(m_title);}void setButtonText(const QString &text) {m_buttonText = text;if (m_button) m_button->setText(m_buttonText);}private:QString m_title;QString m_buttonText;QLabel *m_label{nullptr};QPushButton *m_button{nullptr};
};// ============ 使用示例 ============
int main(int argc, char *argv[]) {QApplication app(argc, argv);// 原型窗口CustomWidget *prototype = new CustomWidget("原型窗口", "点击我");prototype->setWindowTitle("原型窗口");prototype->move(100, 100);prototype->show();// 克隆窗口 1(修改标题和按钮文字)CustomWidget *w1 = static_cast<CustomWidget*>(prototype->clone());w1->setWindowTitle("克隆窗口 1");w1->setTitle("我是克隆1");w1->setButtonText("确认");w1->move(350, 100);w1->show();// 克隆窗口 2(只修改按钮文字)CustomWidget *w2 = static_cast<CustomWidget*>(prototype->clone());w2->setWindowTitle("克隆窗口 2");w2->setButtonText("取消");w2->move(600, 100);w2->show();return app.exec();
}
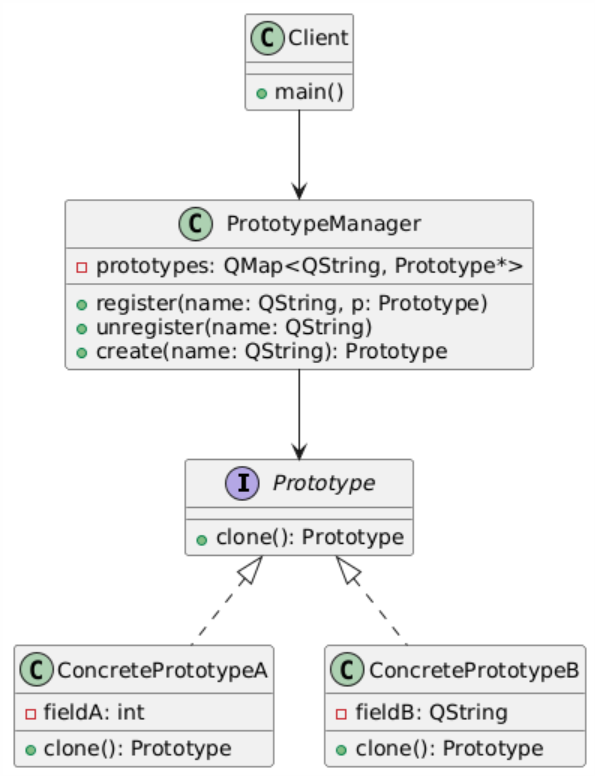
三、原型注册机制
基本实现:
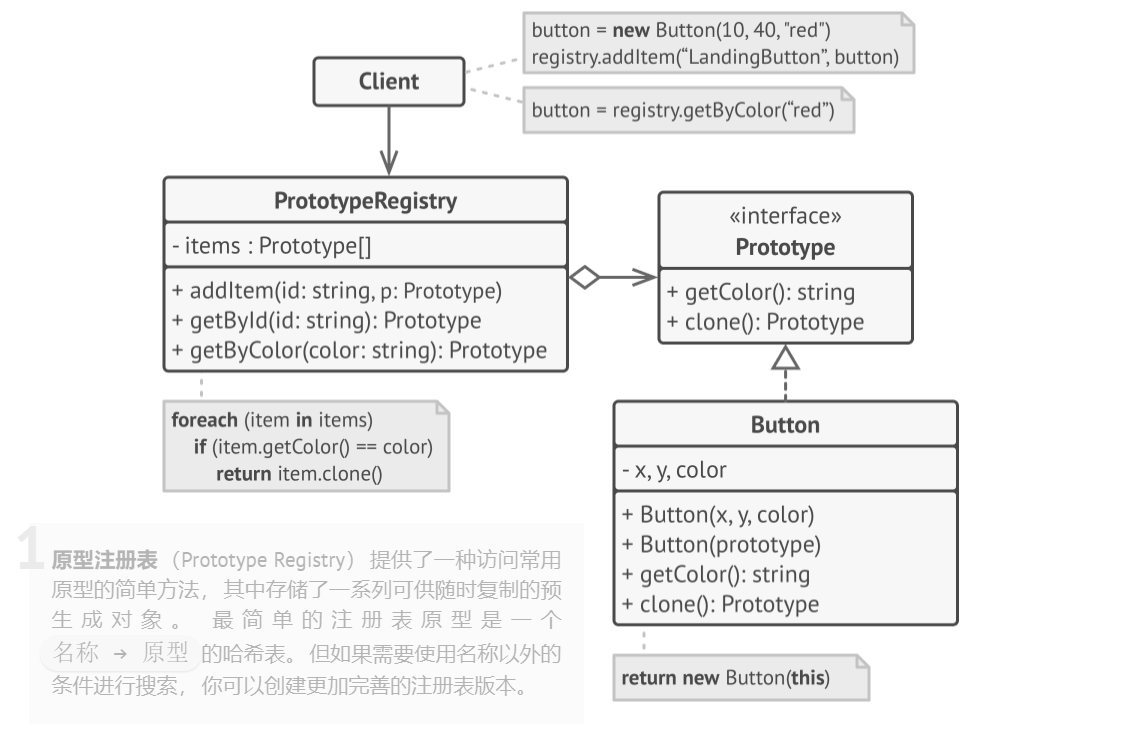
UML类图:
示例:支持原型注册
#include <QApplication>
#include <QWidget>
#include <QVBoxLayout>
#include <QLabel>
#include <QPushButton>
#include <QString>
#include <QMap>// ============ 抽象原型类 ============
class PrototypeWidget : public QWidget {
public:PrototypeWidget(QWidget *parent = nullptr) : QWidget(parent) {}virtual ~PrototypeWidget() {}virtual PrototypeWidget* clone() const = 0;  // 原型接口
};// ============ 具体原型类 ============
class CustomWidget : public PrototypeWidget {
public:CustomWidget(const QString &title, const QString &buttonText, QWidget *parent = nullptr): PrototypeWidget(parent), m_title(title), m_buttonText(buttonText){QVBoxLayout *layout = new QVBoxLayout(this);m_label = new QLabel(m_title, this);m_button = new QPushButton(m_buttonText, this);layout->addWidget(m_label);layout->addWidget(m_button);setLayout(layout);resize(220, 120);}// 克隆自身PrototypeWidget* clone() const override {return new CustomWidget(m_title, m_buttonText);}// ====== 扩展功能:支持修改部分内容 ======void setTitle(const QString &title) {m_title = title;if (m_label) m_label->setText(m_title);}void setButtonText(const QString &text) {m_buttonText = text;if (m_button) m_button->setText(m_buttonText);}private:QString m_title;QString m_buttonText;QLabel *m_label{nullptr};QPushButton *m_button{nullptr};
};// ============ 原型管理器 ============
class PrototypeManager {
public:~PrototypeManager() {qDeleteAll(m_prototypes);}void registerPrototype(const QString &name, PrototypeWidget *prototype) {if (m_prototypes.contains(name)) {delete m_prototypes[name];}m_prototypes[name] = prototype;}PrototypeWidget* create(const QString &name) {if (m_prototypes.contains(name)) {return m_prototypes[name]->clone();}return nullptr;}private:QMap<QString, PrototypeWidget*> m_prototypes;
};// ============ 使用示例 ============
int main(int argc, char *argv[]) {QApplication app(argc, argv);PrototypeManager manager;// 注册不同类型的窗口原型manager.registerPrototype("login", new CustomWidget("登录窗口", "登录"));manager.registerPrototype("register", new CustomWidget("注册窗口", "注册"));manager.registerPrototype("alert", new CustomWidget("警告", "确定"));// 克隆出 登录窗口CustomWidget *w1 = static_cast<CustomWidget*>(manager.create("login"));if (w1) {w1->setWindowTitle("克隆 - 登录");w1->move(100, 100);w1->show();}// 克隆出 注册窗口,并修改按钮文字CustomWidget *w2 = static_cast<CustomWidget*>(manager.create("register"));if (w2) {w2->setWindowTitle("克隆 - 注册");w2->setButtonText("立即注册");w2->move(350, 100);w2->show();}// 克隆出 警告窗口CustomWidget *w3 = static_cast<CustomWidget*>(manager.create("alert"));if (w3) {w3->setWindowTitle("克隆 - 警告");w3->move(600, 100);w3->show();}return app.exec();
}
四、完整示例代码
假设有一套 图形(Shape)类,包含圆形(Circle)、矩形(Rectangle),需要通过原型拷贝的方式创建新对象。
#include <QCoreApplication>
#include <QDebug>
#include <QString>
#include <QMap>// Prototype 接口
class Shape {
public:virtual ~Shape() {}virtual Shape* clone() const = 0;virtual void draw() const = 0;
};// 具体原型类:圆形
class Circle : public Shape {
public:Circle(int r = 0) : radius(r) {}Circle(const Circle& other) { radius = other.radius; }Shape* clone() const override {return new Circle(*this); // 深拷贝}void draw() const override {qDebug() << "绘制一个圆, 半径 =" << radius;}private:int radius;
};// 具体原型类:矩形
class Rectangle : public Shape {
public:Rectangle(int w = 0, int h = 0) : width(w), height(h) {}Rectangle(const Rectangle& other) {width = other.width;height = other.height;}Shape* clone() const override {return new Rectangle(*this);}void draw() const override {qDebug() << "绘制一个矩形, 宽 =" << width << " 高 =" << height;}private:int width;int height;
};// PrototypeManager 原型管理器
class PrototypeManager {
public:void registerPrototype(const QString& name, Shape* prototype) {prototypes[name] = prototype;}void unregisterPrototype(const QString& name) {prototypes.remove(name);}Shape* create(const QString& name) {if (prototypes.contains(name)) {return prototypes[name]->clone();}return nullptr;}private:QMap<QString, Shape*> prototypes;
};// 客户端使用
int main(int argc, char *argv[])
{QCoreApplication a(argc, argv);PrototypeManager manager;// 注册原型manager.registerPrototype("circle", new Circle(10));manager.registerPrototype("rectangle", new Rectangle(20, 30));// 克隆对象Shape* c1 = manager.create("circle");Shape* r1 = manager.create("rectangle");if (c1) c1->draw();if (r1) r1->draw();// 再次克隆,得到新的对象Shape* c2 = manager.create("circle");if (c2) c2->draw();// 清理内存delete c1;delete r1;delete c2;return a.exec();
}