C++版本
#include <QApplication>
#include <QGraphicsView>
#include <QGraphicsScene>
#include <QGraphicsWidget>
#include <QGraphicsAnchorLayout>
#include <QPushButton>#include <QtWidgets>class MyWidget : public QGraphicsWidget
{
public:MyWidget(const QColor &color, const QColor &textColor, const QString &caption,QGraphicsItem *parent = nullptr): QGraphicsWidget(parent), caption(caption), color(color), textColor(textColor){ }void paint(QPainter *painter, const QStyleOptionGraphicsItem *, QWidget * = nullptr) override{QFont font;font.setPixelSize(0.75 * qMin(boundingRect().width(), boundingRect().height()));painter->fillRect(boundingRect(), color);painter->save();painter->setFont(font);painter->setPen(textColor);painter->drawText(boundingRect(), Qt::AlignCenter, caption);painter->restore();}
private:QString caption;QColor color;QColor textColor;
};int main(int argc, char *argv[])
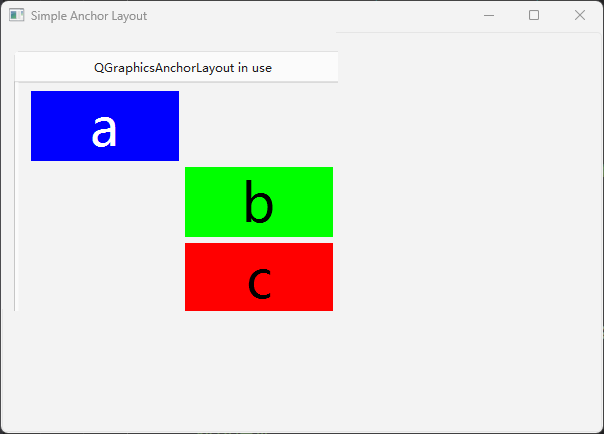
{QApplication app(argc, argv);QGraphicsScene scene(0,0,600,400);MyWidget *a = new MyWidget(Qt::blue, Qt::white, "a");a->setPreferredSize(100, 100);MyWidget *b = new MyWidget(Qt::green, Qt::black, "b");b->setPreferredSize(100, 100);MyWidget *c = new MyWidget(Qt::red, Qt::black, "c");c->setPreferredSize(100, 100);QGraphicsAnchorLayout *layout = new QGraphicsAnchorLayout;layout->addCornerAnchors(a, Qt::TopLeftCorner, layout, Qt::TopLeftCorner);layout->addAnchor(b, Qt::AnchorLeft, a, Qt::AnchorRight);layout->addAnchor(b, Qt::AnchorTop, a, Qt::AnchorBottom);layout->addAnchor(b, Qt::AnchorBottom, c, Qt::AnchorTop);layout->addAnchors(b, c, Qt::Horizontal);layout->addCornerAnchors(c, Qt::BottomRightCorner, layout, Qt::BottomRightCorner);auto w = new QGraphicsWidget(nullptr, Qt::Window | Qt::CustomizeWindowHint | Qt::WindowTitleHint);w->setPos(20, 50);w->setMinimumSize(100, 100);w->setPreferredSize(320, 240);w->setLayout(layout);w->setWindowTitle(QApplication::translate("simpleanchorlayout", "QGraphicsAnchorLayout in use"));scene.addItem(w);QGraphicsView view;view.setScene(&scene);view.setWindowTitle(QApplication::translate("simpleanchorlayout", "Simple Anchor Layout"));view.show();return app.exec();
}
测试结果
python版本代码
import sys
from PySide6.QtWidgets import (QApplication, QGraphicsView, QGraphicsScene, QGraphicsWidget,QGraphicsLinearLayout, QGraphicsGridLayout, QGraphicsLayoutItem,QGraphicsAnchorLayout, QGraphicsProxyWidget, QLabel, QLineEdit, QPushButton
)
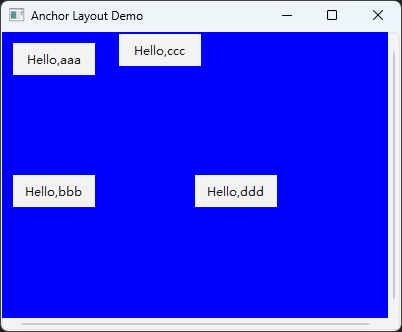
from PySide6.QtCore import Qt, QSizeFclass MyWidget(QGraphicsWidget):def __init__(self,text = "default"):super().__init__()self.label = QLabel("Hello,{}".format(text))self.label.setAlignment(Qt.AlignCenter)self.label_proxy = QGraphicsProxyWidget()self.label_proxy.setWidget(self.label)layout = QGraphicsLinearLayout()layout.addItem(self.label_proxy)self.setLayout(layout)class AnchorLayoutDemo(QGraphicsView):def __init__(self):super().__init__()self.resize(400, 300)scene = QGraphicsScene()scene.setSceneRect(0, 0, 400, 300)self.setScene(scene)self.layout = QGraphicsAnchorLayout()self.a = MyWidget("aaa")self.a.setPreferredSize(QSizeF(100, 50))self.b = MyWidget("bbb")self.b.setPreferredSize(QSizeF(100, 50))self.c = MyWidget("ccc")self.c.setPreferredSize(QSizeF(100, 50))self.d = MyWidget("ddd")self.d.setPreferredSize(QSizeF(100, 50))self.layout.addCornerAnchors(self.a,Qt.TopLeftCorner, self.layout, Qt.TopLeftCorner)self.layout.addCornerAnchors(self.b,Qt.BottomLeftCorner, self.layout, Qt.BottomLeftCorner)self.layout.addAnchor(self.c, Qt.AnchorLeft, self.a, Qt.AnchorRight)self.layout.addAnchor(self.d, Qt.AnchorRight, self.layout, Qt.AnchorRight)self.layout.addAnchor(self.d, Qt.AnchorBottom, self.layout, Qt.AnchorBottom)self.scene().setBackgroundBrush(Qt.blue)w = QGraphicsWidget()# w.setAutoFillBackground(True)w.setPos(0, 0)w.setMinimumSize(QSizeF(300, 200))w.setPreferredSize(QSizeF(300, 200))w.setLayout(self.layout)self.scene().addItem(w)self.show()self.setWindowTitle("Anchor Layout Demo") if __name__ == "__main__":app = QApplication.instance() or QApplication(sys.argv)window = AnchorLayoutDemo()window.show()app.exec()
测试结果
import sys
from PySide6.QtWidgets import (QApplication, QGraphicsView, QGraphicsScene, QGraphicsWidget,QGraphicsAnchorLayout, QGraphicsProxyWidget, QLabel, QLineEdit, QPushButton
)
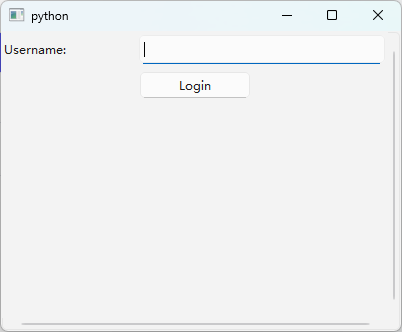
from PySide6.QtCore import Qt, QSizeFclass AnchorLayoutDemo(QGraphicsView):def __init__(self):super().__init__()self.resize(400, 300)scene = QGraphicsScene()scene.setSceneRect(0, 0, 400, 300)self.setScene(scene)# 创建容器(QGraphicsWidget)self.container = QGraphicsWidget()self.container.setGeometry(0, 0, 400, 300) # 必须设置大小scene.addItem(self.container)# 创建 AnchorLayoutself.layout = QGraphicsAnchorLayout()self.container.setLayout(self.layout)# 创建控件self.label = QLabel("Username:")self.label_proxy = QGraphicsProxyWidget()self.label_proxy.setWidget(self.label)self.label_proxy.setPreferredSize(QSizeF(80, 30)) # 设置固定大小self.input = QLineEdit()self.input_proxy = QGraphicsProxyWidget()self.input_proxy.setWidget(self.input)self.input_proxy.setPreferredSize(QSizeF(200, 30)) # 设置固定大小self.button = QPushButton("Login")self.button_proxy = QGraphicsProxyWidget()self.button_proxy.setWidget(self.button)self.button_proxy.setPreferredSize(QSizeF(100, 30)) # 设置固定大小# 添加控件到布局(通过 addAnchor 定义约束)# 水平方向约束self.layout.addAnchor(self.label_proxy, Qt.AnchorLeft, self.layout, Qt.AnchorLeft) self.layout.addAnchor(self.input_proxy, Qt.AnchorLeft, self.label_proxy, Qt.AnchorRight) self.layout.addAnchor(self.input_proxy, Qt.AnchorRight, self.layout, Qt.AnchorRight) self.layout.addAnchor(self.button_proxy, Qt.AnchorHorizontalCenter, self.layout, Qt.AnchorHorizontalCenter) # 垂直方向约束self.layout.addAnchor(self.label_proxy, Qt.AnchorTop, self.layout, Qt.AnchorTop) self.layout.addAnchor(self.input_proxy, Qt.AnchorTop, self.label_proxy, Qt.AnchorTop) self.layout.addAnchor(self.button_proxy, Qt.AnchorTop, self.input_proxy, Qt.AnchorBottom) self.layout.addAnchor(self.button_proxy, Qt.AnchorLeft, self.input_proxy, Qt.AnchorLeft) if __name__ == "__main__":app = QApplication.instance() or QApplication(sys.argv)window = AnchorLayoutDemo()window.show()app.exec()
python版本代码2
import sys
from PySide6.QtWidgets import (QApplication, QGraphicsView, QGraphicsScene, QGraphicsWidget,QGraphicsAnchorLayout, QGraphicsProxyWidget, QLabel, QLineEdit, QPushButton
)
from PySide6.QtCore import Qt, QSizeFclass AnchorLayoutDemo(QGraphicsView):def __init__(self):super().__init__()self.resize(400, 300)scene = QGraphicsScene()scene.setSceneRect(0, 0, 400, 300)self.setScene(scene)# 创建容器(QGraphicsWidget)self.container = QGraphicsWidget()self.container.setGeometry(0, 0, 400, 300)  # 必须设置大小scene.addItem(self.container)# 创建 AnchorLayoutself.layout = QGraphicsAnchorLayout()self.container.setLayout(self.layout)# 创建控件self.label = QLabel("Username:")self.label_proxy = QGraphicsProxyWidget()self.label_proxy.setWidget(self.label)self.label_proxy.setPreferredSize(QSizeF(80, 30))  # 设置固定大小self.input = QLineEdit()self.input_proxy = QGraphicsProxyWidget()self.input_proxy.setWidget(self.input)self.input_proxy.setPreferredSize(QSizeF(200, 30))  # 设置固定大小self.button = QPushButton("Login")self.button_proxy = QGraphicsProxyWidget()self.button_proxy.setWidget(self.button)self.button_proxy.setPreferredSize(QSizeF(100, 30))  # 设置固定大小# 添加控件到布局(通过 addAnchor 定义约束)# 水平方向约束self.layout.addAnchor(self.label_proxy, Qt.AnchorLeft, self.layout, Qt.AnchorLeft)  self.layout.addAnchor(self.input_proxy, Qt.AnchorLeft, self.label_proxy, Qt.AnchorRight) self.layout.addAnchor(self.input_proxy, Qt.AnchorRight, self.layout, Qt.AnchorRight)  self.layout.addAnchor(self.button_proxy, Qt.AnchorHorizontalCenter, self.layout, Qt.AnchorHorizontalCenter) # 垂直方向约束self.layout.addAnchor(self.label_proxy, Qt.AnchorTop, self.layout, Qt.AnchorTop)  self.layout.addAnchor(self.input_proxy, Qt.AnchorTop, self.label_proxy, Qt.AnchorTop)  self.layout.addAnchor(self.button_proxy, Qt.AnchorTop, self.input_proxy, Qt.AnchorBottom)  self.layout.addAnchor(self.button_proxy, Qt.AnchorLeft, self.input_proxy, Qt.AnchorLeft)  if __name__ == "__main__":app = QApplication.instance() or QApplication(sys.argv)window = AnchorLayoutDemo()window.show()app.exec()
测试结果