Spring原理—加载Bean
上篇文章:
SpringBoot系列—统一功能处理(统一异常处理)![]() https://blog.csdn.net/sniper_fandc/article/details/148998405?fromshare=blogdetail&sharetype=blogdetail&sharerId=148998405&sharerefer=PC&sharesource=sniper_fandc&sharefrom=from_link
https://blog.csdn.net/sniper_fandc/article/details/148998405?fromshare=blogdetail&sharetype=blogdetail&sharerId=148998405&sharerefer=PC&sharesource=sniper_fandc&sharefrom=from_link
目录
1 Spring加载Bean
1.1 @ComponentScan注解
1.2 @Import注解
2 SpringBoot自动装配
2.1 @SpringBootApplication注解
2.2 @SpringBootConfiguration注解
2.3 @ComponentScan注解
2.4 @EnableAutoConfiguration注解
1 Spring加载Bean
在使用Spring以及SpringBoot时,会发现很多时候并没有声明某个类需要Spring来管理,就可以直接注入到程序中使用,这是因为Spring和SpringBoot为我们已经做好了一些Bean的加载:
通常Spring会识别到@SpringBootApplication注解所在的目录下的包和类以及对应的注解,但是如果不是这个路径下有一些代码(第三方jar包会在类加载时期合并到src/main/java路径下),如果不做一些配置,Spring就无法识别到这些路径下的代码。在Spring中有两种方式可以实现加载Bean时的路径扫描:
1.1 @ComponentScan注解
使用方法在@SpringBootApplication所在的启动类添加@ComponentScan("全路径的包名"),可以让Spring扫描该路径下的所有内容。
缺点:扫描范围太大,会扫描大量不需要管理的依赖项。
1.2 @Import注解
使用方法在@SpringBootApplication所在的启动类添加@Import("类.class"),可以让Spring扫描该类。
缺点:扫描范围太小,多个类需要管理就需要写多个类名。
上述两种方式都有缺点,并且程序员也不知道第三方依赖哪些类需要被管理。但是如果第三方依赖可以提供一个需要管理的清单,把两个注解结合一下,在通过一个文件管理需要扫描的路径,由@Import来导入这个文件,就可以更灵活方便的完成Bean的扫描和加载了。SpringBoot就是采用这种方式:
2 SpringBoot自动装配
2.1 @SpringBootApplication注解
SpringBoot对Spring进行了封装,在@SpringBootApplication注解的源码中:
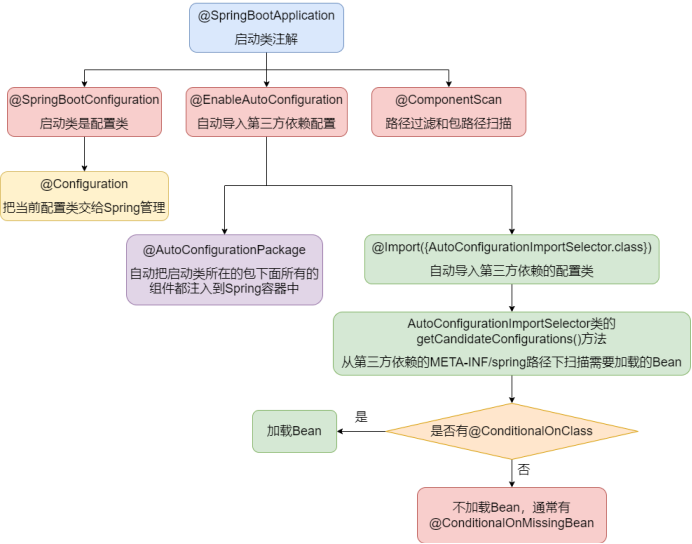
@Target({ElementType.TYPE})@Retention(RetentionPolicy.RUNTIME)@Documented@Inherited@SpringBootConfiguration@EnableAutoConfiguration@ComponentScan(excludeFilters = {@Filter(type = FilterType.CUSTOM,classes = {TypeExcludeFilter.class}), @Filter(type = FilterType.CUSTOM,classes = {AutoConfigurationExcludeFilter.class})})public @interface SpringBootApplication {@AliasFor(annotation = EnableAutoConfiguration.class)Class<?>[] exclude() default {};@AliasFor(annotation = EnableAutoConfiguration.class)String[] excludeName() default {};@AliasFor(annotation = ComponentScan.class,attribute = "basePackages")String[] scanBasePackages() default {};@AliasFor(annotation = ComponentScan.class,attribute = "basePackageClasses")Class<?>[] scanBasePackageClasses() default {};@AliasFor(annotation = ComponentScan.class,attribute = "nameGenerator")Class<? extends BeanNameGenerator> nameGenerator() default BeanNameGenerator.class;@AliasFor(annotation = Configuration.class)boolean proxyBeanMethods() default true;}其中,@SpringBootConfiguration、@EnableAutoConfiguration、@ComponentScan注解最关键。
2.2 @SpringBootConfiguration注解
@Target({ElementType.TYPE})
@Retention(RetentionPolicy.RUNTIME)
@Documented
@Configuration
@Indexed
public @interface SpringBootConfiguration {@AliasFor(annotation = Configuration.class)boolean proxyBeanMethods() default true;
}
@SpringBootConfiguration的元注解是@Configuration和@Indexed注解(索引,加速启动),即让启动类被Spring扫描到。
2.3 @ComponentScan注解
@ComponentScan注解用来进行路径过滤和自定义的路径扫描,可以通过basePackageClasses或basePackages来定义要扫描的特定包,如果没有定义特定的包,将从声明该注解的类的包开始扫描,这也是为什么SpringBoot项目声明的注解类必须要在启动类的目录下。
2.4 @EnableAutoConfiguration注解
@Target({ElementType.TYPE})@Retention(RetentionPolicy.RUNTIME)@Documented@Inherited@AutoConfigurationPackage@Import({AutoConfigurationImportSelector.class})public @interface EnableAutoConfiguration {String ENABLED_OVERRIDE_PROPERTY = "spring.boot.enableautoconfiguration";Class<?>[] exclude() default {};String[] excludeName() default {};}最关键的注解是@EnableAutoConfiguration,负责第三方依赖的配置类(@Bean注解的方法获得第三方依赖的对象)和组件(比如MyBatis的@Mapper注解不属于Spring)的扫描,其中包含两个关键注解:@AutoConfigurationPackage和@Import({AutoConfigurationImportSelector.class})。
@Target({ElementType.TYPE})@Retention(RetentionPolicy.RUNTIME)@Documented@Inherited@Import({AutoConfigurationPackages.Registrar.class})public @interface AutoConfigurationPackage {String[] basePackages() default {};Class<?>[] basePackageClasses() default {};}@AutoConfigurationPackage注解把启动类所在的包下面所有的组件都注入到Spring容器中。
而@Import注解负责把AutoConfigurationImportSelector类导入进来,在该类中的方法:
protected List<String> getCandidateConfigurations(AnnotationMetadata metadata, AnnotationAttributes attributes) {List<String> configurations = SpringFactoriesLoader.loadFactoryNames(this.getSpringFactoriesLoaderFactoryClass(), this.getBeanClassLoader());Assert.notEmpty(configurations, "No auto configuration classes found in META-INF/spring.factories. If you are using a custom packaging, make sure that file is correct.");return configurations;}该方法通过Spring工厂的SpringFactoriesLoader.loadFactoryNames方法来自动加载配置类,扫描路径META-INF/spring.factories,该文件会给出第三方依赖需要加载的Bean的路径,但是需要按@ConditionalOnClass注解(需要注入)和@ConditionalOnMissingBean注解(忽略该Bean)来选择注入或者忽略。