OC-UI学习-Auto Layout使用
Auto Layout布局学习
前言
笔者在学习自定义cell的时候,对如何精美布局以及适应屏幕变化比较苦恼,为此学习了Auto Layout的内容以便利布局自定义cell
- 常见外部改变
- 用户调整窗口大小
- 设备旋转
- 活动通话和音频录制条出现或消失
- 您希望支持不同大小的类
- 支持不同的屏幕尺寸
- 内部变化
- 内部应用程序显示的内容变化
- 程序支持动态类型
- 该应用程序支持国际化
创建自定义布局的步骤
使用自定义布局本质上就是为布局创建一定的约束(constraint),让系统自行计算布局的相对位置
- 创建constraint步骤
- 创建约束对象NSLayoutConstraint
- 将约束对象添加到父视图中
自动布局属性
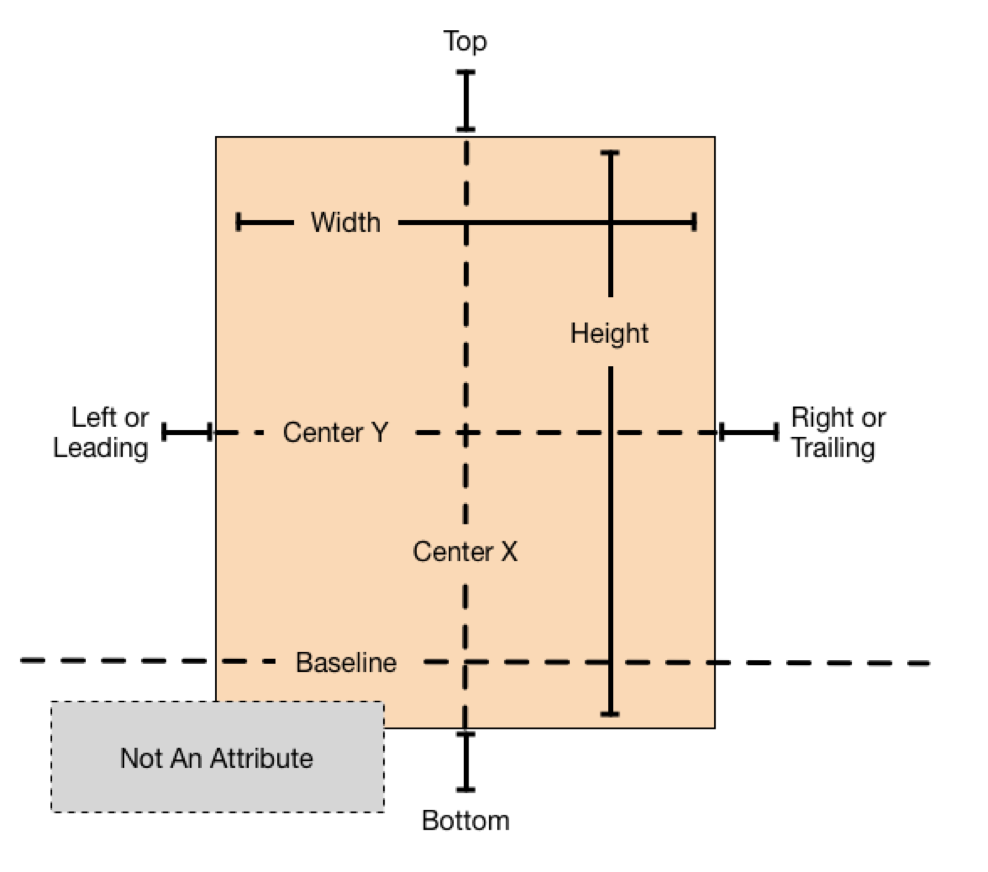
在Xcode中查看NSLayoutAttributes的枚举属性
typedef NS_ENUM(NSInteger, NSLayoutAttribute) {NSLayoutAttributeLeft = 1,//视图的左边缘NSLayoutAttributeRight,//视图的右边缘NSLayoutAttributeTop,//顶部边缘NSLayoutAttributeBottom,//底部边缘NSLayoutAttributeLeading,//视图的前导边缘(根据用户的界面布局方向的不同,可能是左边或者右边)NSLayoutAttributeTrailing,//尾随边缘NSLayoutAttributeWidth,//视图宽度NSLayoutAttributeHeight,//视图高度NSLayoutAttributeCenterX;//视图的水平中心NSLayoutAttributeCenterY,//视图的垂直中心NSLayoutAttributeLastBaseline,//视图的最后一行基线
NSLayoutAttributeNotAnAttribute 本质上是NSLayoutAttribute的枚举的初始值(0),表示无效属性,如果在报错的日志中出现可能是下面的原因
1.是否有效是使用了枚举值
2.是否禁用了autoresizingMask,需要设置translatesAutoresizingMaskIntoConstraints = NO;
3.约束链是否完整
实现自动布局约束方程
视图层次结构的布局被定义为一系列线形方程,每个约束代表一个单一的方程,我们的目标是声明一系列方程,其中只有一个可能的解决方案
示例:
item1.attribute1 = multiplier * attribute2 + constant;
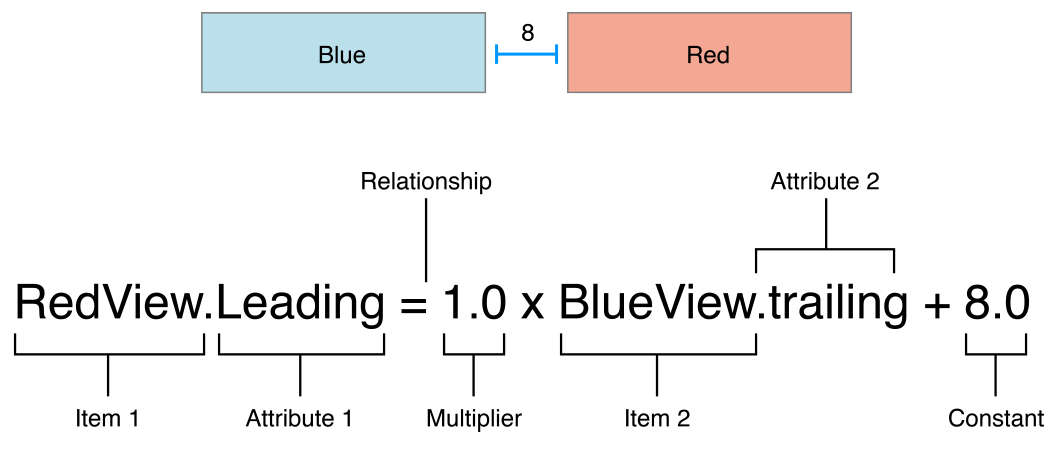
解释:
Item1:方程中的第一个对象,这里指红色视图
Attribute1:第一个项目所需要的约束属性,这里指的是左侧开始边缘
Relationship: 左右双方之间的关系,可以为大于、等于、小于
multiplier:定义两个视图对象之间的比例关系
item:第二个视图对象,这里指蓝色视图
Attribute2: 第二个项目要上的约束,这里指蓝色视图的结束边缘
constant: 偏移量
定义锚的两种方式
- 在使用这个方式之前需要先关闭Autoresizing模式
view.translateAutoresizingMaskIntoConstants = NO;
前面介绍到约束等价于一个线性的方程,那么在程序之中我们又该如何去实现自动布局?
- 约束表达式用Visual Format Language(VFL)或NSLayoutConstraint类来定义
这里介绍NSLayoutConstraint类的构造方法
NSLayoutConstraint类的构造方法
当使用NSLayoutConstraint类来约束表达式时,可以将表达式中的每一个部分对应到NSLayoutConstraint构造方法的对应参数上
假设有一个视图view,需要实现如下约束parentView:父视图
view.left = parentView.left + 20;
代码如下:
NSLayoutConstraint* constraintOfLeft = [NSLayaoutConstraint constraintWithItem:viewattribute:NSLayoutAttributeleftrelatedBy:NSlayoutRelationEqualtoItem:parentViewattribute:NSLayoutAttributeLeftmultiplier:1.0constant:20.0];
[LayoutConstraint activateConstraints:@[leftConstraint]];//激活并应用约束
view.width = parentView.width / 2 - 10;
代码如下:
NSLayoutConstraint* constraintOfWidth = [NSLayoutConstraint constraintWithItem:viewattribute:NSLayoutAttributeWidthrelatedBy:NSLayoutRelationEqualtoItem:parentViewattributeNSLayoutAttributeWidthmultplier:0.5constant:-10.0];
[NSLayoutConstraint activateConstraints:@[widthConstraint]];
通过这种方式,我们可以将约束表达式转换为使用NSLayoutConstraint类的构造方法来创建相应的约束对象,并将其激活使用
- NSLayoutrelation枚举值介绍
NSLayoutRelationGreaterThanOrEqual
NSLayoutRelationLessThanorEqual
NSLayoutRelationEqual
- 使用NSConstraint类的构造方法来表达大于等于和小于等于关系
NSLayoutConstraint* widthConstraint = [NSLayoutConstraint constraintWithItem:view attribute:NSLayoutAttributeWidth relatedBy:NSLayoutRelationGreaterThanOrEqual toItem:nil attribute:NSLayoutAttributeNotAttribute multiplier:1.0 constant:100];NSLayoutConstraint* height[NSLayoutConstraint constraintWithItem:view attribute:NSLayoutAttributeHeight relatedBy:NSLayoutRelationLessThanOrEqual toItem:nil attribute:NSLayoutAttributeNotAttribute multiplier:1.0 constant:200];
上面的示例表示视图的宽度至少为100,高度至多为200
VFL使用介绍
-
概念、
- 是一种基于字符串的约束描述语言,用简洁的符号表示符号的位置、大小、间距
例如:
H:[button(100)]; 水平方向上,创建一个宽度为100的按钮
V:[label]-20-[button];垂直方向上,标签下方20点间距后是按钮
参数解释:
H:/V: :指定水平/垂直方向
[] :包裹视图标识符
-:表示间距(如-20-表示 20 点间距)。
|:表示父视图边缘(如 |-10-[view] 表示视图距父视图左侧 10 点)。
- 多个视图
@"H:[button(100)]"  // 水平方向,按钮宽度 100
@"V:[label(>=44)]"  // 垂直方向,标签高度至少 44
与父视图关系:
- 边缘对齐
@"H:|-15-[view]-15-|"  // 视图左右边缘距父视图各 15 点
@"V:|[view]|"  // 视图上下边缘与父视图对齐
- 居中对齐
// 水平居中:父视图左边缘到视图左边缘的距离 = 视图右边缘到父视图右边缘的距离
@"H:|-[view(==S)]-|"  // S 为父视图剩余空间的一半
尺寸约束:
- 固定尺寸
@"[view(100, 50)]" //宽100,高50
@"[button(width)]" //使用metrics中的width值
- 相对尺寸
@"[view1(==view2)]"  // 两视图宽度相等
@"[view(>=200)]"  // 视图宽度至少 200
@"[view(<=300)]"  // 视图宽度至多 300
- 优先级设置
@"[button(100@750)]" // 按钮宽度 100,优先级 750(High)
VFL使用步骤
- 创建视图并添加到父视图上
- 禁止自动转换
- 创建视图字典
- 创建尺寸参数:使用字典,避免直接使用参数值
- 创建约束数组
- 激活约束
关键参数讲解:
option:NSLayoutFormatOptions(枚举值)
常用值
// 水平方向上的对齐方式(与垂直方向相关)
NSLayoutFormatAlignAllTop          // 所有视图顶部对齐
NSLayoutFormatAlignAllBottom       // 所有视图底部对齐
NSLayoutFormatAlignAllCenterY      // 所有视图垂直居中对齐// 布局方向(影响 leading/trailing 的方向)
NSLayoutFormatDirectionLeadingToTrailing  // 默认(左到右语言环境)
NSLayoutFormatDirectionRightToLeft        // 右到左语言环境(如阿拉伯语)
自定义cell中的具体实现
#import "CustomTableViewCell.h"@implementation CustomTableViewCell- (instancetype)initWithStyle:(UITableViewCellStyle)style reuseIdentifier:(NSString *)reuseIdentifier {NSLayoutAttributeself = [super initWithStyle:style reuseIdentifier:reuseIdentifier];if (self) {self.titleLabel = [[UILabel alloc] init];self.titleLabel.font = [UIFont systemFontOfSize:18];/*防止系统自动生成约束这句话的作用是阻止视图自动把autoresizing mask 转换为 Auto Layout约束Autoresizing Mask:这是一种相对简单的布局机制,通过sutoresizingMask属性,可以让视图依据父视图的尺寸变化自动调整自身的位置和大小AutoLayout:这是一种更为灵活且强大的布局系统,它借助定义视图间的约束关系(像对齐、间距、比例等)来确定视图的位置和大小当创建一个视图时,如果没有为其制定任何约束,系统会默认生成一组基于autoresizingMask的约束,这样一来,如果要手动添加Auto Layout约束时,就会和系统自动产生的约束产生冲突*/self.titleLabel.translatesAutoresizingMaskIntoConstraints = NO;[self.contentView addSubview:self.titleLabel];self.detailLabel = [[UILabel alloc] init];self.detailLabel.font = [UIFont systemFontOfSize:18];self.detailLabel.textAlignment = NSTextAlignmentCenter;self.detailLabel.translatesAutoresizingMaskIntoConstraints = NO;[self.contentView addSubview:self.detailLabel];//添加约束[NSLayoutConstraint activateConstraints:@[[self.titleLabel.leadingAnchor constraintEqualToAnchor:self.contentView.leadingAnchor constant:15],[self.titleLabel.centerYAnchor constraintEqualToAnchor:self.contentView.centerYAnchor],[self.detailLabel.trailingAnchor constraintEqualToAnchor:self.contentView.trailingAnchor constant:-15],[self.detailLabel.centerYAnchor constraintEqualToAnchor:self.contentView.centerYAnchor]]];}return  self;
}
约束1:子视图的左边缘相较于父视图的左边缘偏移15点
约束2:子视图的垂直中心点与父视图的垂直中心点对齐
其余同理
- 锚点类型拓展
-
水平位置
- leadingAnchor:视图起始边缘(不固定,看语言是左到右还是右到左)
- trailingAnchor:视图结束边缘
- leftAnchor:视图的左边缘(固定)
- rightAnchor:视图的右边缘
- centerXAnchor:视图的水平中心点
-
垂直位置
- topAnchor:
- bottomAnchor:
- centerYanchor:
- firstBaselineAnchor:视图的第一行基线
- lastBaselineAnchor:视图的最后一行基线
-
尺寸锚点
- widthAnchor:
- heightAnchor: