展开说说Android之Glide详解_源码解析
基于上一篇介绍了Glide的使用篇本文分析一下Glide的源码实现,看看我们简单几步就实现的图片展示功能在源码中是怎样完成的。
一、Glide中的核心文件
先逐个介绍一下个人以为的几个核心类:
1、Glide
Glide是必经的入口,通过Glide.get(context)主要是做初始化,包括、Registry、RequestManagerRetriever等核心组件。
2、RequestManagerRetriever
获取RequestManager,创建无UI的RequestManagerFragment绑定生命周期监听,通过Lifecycle监听宿主生命周期。
3、GlideBuilder
GlideBuilder 它的build方法会配置线程池、缓存策略等、初始化Engine以及初始化Glide对象。
4、RequestBuilder
构建请求参数,asDrawable、asGif、asBitmap加载不同类型,默认asDrawable。最终由Engine调度三级缓存(活动资源/LRU内存/磁盘)。
5、RequestManager
管理请求队列,协调生命周期。
6、RequestManagerFragment
绑定生命周期非Application上下文:创建无UI的RequestManagerFragment,通过Lifecycle监听宿主生命周期。主线程调用时通过FragmentManager管理Fragment,子线程使用Application级生命周期。
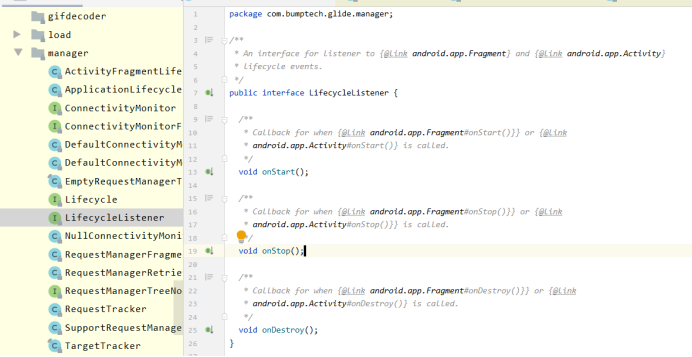
7、LifecycleListener
定义生命周期的接口,里面onStart、onStop、onDestroy三个方法与宿主Fragment或Activity的同名生命周期绑定。
8、Engine
合理调度三级缓存(调取活动资源/内存/磁盘)
9、Target
Target是一个接口,继承自LifecycleListener并且额外增加了一些加载过程中的方法,比如onLoadStarted、onLoadFailed、onLoadCleared等等。他还有一个抽象的实现类BaseTarget。
后面子子孙孙还有很多抽象类继承BaseTarget,比如下一代ViewTarget、下下代ImageViewTarget
、下下下代是BitmapImageViewTarget和DrawableImageViewTarget以及ThumbnailImageViewTarget,他们才是into方法传入的实际展示图片的控件。
是借助ImageViewTargetFactory来创建对应Target(如BitmapImageViewTarget)。
10、DecodeJob
看得出来他是做解码工作的,缓存未命中时创建DecodeJob,提交到EngineJob线程池。实现了Runnable接口因此再run方法中借助DataFetcher进行解码。
11、DataFetcher
上面提到了借助DataFetcher进行解码,但他是个接口,所以真正工作是它的实现类们,比如FileFetcher、AssetPathFetcher和HttpUrlFetcher等都不同地址来源的图片进行解码。
12、Registry
组件注册中心,支持扩展ModelLoader等模块。根据模型类型(如String/File)匹配对应的ModelLoader。
二、分阶段梳理工作流程
1、注
Glide.with(mActivity).load(R.drawable.czzs_step_station).into(image);
以在Activity中加载为例,这也是使用最多的场景。其他场景请按此思路自行梳理。
2、初始化阶段:
Glide.with()通过RequestManagerRetriever获取RequestManager,绑定生命周期监听。
2.1 获取RequestManager
public static RequestManager with(Activity activity) {return getRetriever(activity).get(activity);
}
2.2 获取RequestManagerRetriever
private static RequestManagerRetriever getRetriever(@Nullable Context context) {// Context could be null for other reasons (ie the user passes in null), but in practice it will// only occur due to errors with the Fragment lifecycle.Preconditions.checkNotNull(context,"You cannot start a load on a not yet attached View or a  Fragment where getActivity() "+ "returns null (which usually occurs when getActivity() is called before the Fragment "+ "is attached or after the Fragment is destroyed).");return Glide.get(context).getRequestManagerRetriever();
}顺着捋会找到Glide中的initializeGlide方法,此处代码角度,只贴出实例化GlideBuilder以及通过它的build方法创建Glide对象,并将Glide对象声明为成员变量。
GlideBuilder builder = new GlideBuilder().setRequestManagerFactory(factory);
for (GlideModule module : manifestModules) {module.applyOptions(applicationContext, builder);
}
if (annotationGeneratedModule != null) {annotationGeneratedModule.applyOptions(applicationContext, builder);
}
Glide glide = builder.build(applicationContext);
for (GlideModule module : manifestModules) {module.registerComponents(applicationContext, glide, glide.registry);
}
if (annotationGeneratedModule != null) {annotationGeneratedModule.registerComponents(applicationContext, glide, glide.registry);
}
Glide.glide = glide;然后上面的builder.build(applicationContext);中初始化了Engine、RequestManagerRetriever
以及Glid,当然也创建了线程池,只关键部分代码:
 if (engine == null) {engine = new Engine(memoryCache, diskCacheFactory, diskCacheExecutor, sourceExecutor,GlideExecutor.newUnlimitedSourceExecutor());}RequestManagerRetriever requestManagerRetriever = new RequestManagerRetriever(requestManagerFactory);return new Glide(context,engine,memoryCache,bitmapPool,arrayPool,requestManagerRetriever,connectivityMonitorFactory,logLevel,defaultRequestOptions.lock());
}
2.3 绑定生命周期
现在看2.1中后半部分get(activity),这里是调用RequestManagerRetriever的get方法:
public RequestManager get(Activity activity) {if (Util.isOnBackgroundThread()) {return get(activity.getApplicationContext());} else {assertNotDestroyed(activity);android.app.FragmentManager fm = activity.getFragmentManager();return fragmentGet(activity, fm, null /*parentHint*/);}
}这里出现了FragmentManager,它就是要创建无UI的RequestManagerFragment,通过Lifecycle监听宿主生命周期。 创建fragment的代码:
@TargetApi(Build.VERSION_CODES.JELLY_BEAN_MR1)
RequestManagerFragment getRequestManagerFragment(final android.app.FragmentManager fm, android.app.Fragment parentHint) {RequestManagerFragment current = (RequestManagerFragment) fm.findFragmentByTag(FRAGMENT_TAG);if (current == null) {current = pendingRequestManagerFragments.get(fm);if (current == null) {current = new RequestManagerFragment();current.setParentFragmentHint(parentHint);pendingRequestManagerFragments.put(fm, current);fm.beginTransaction().add(current, FRAGMENT_TAG).commitAllowingStateLoss();handler.obtainMessage(ID_REMOVE_FRAGMENT_MANAGER, fm).sendToTarget();}}return current;
}
现在准备工作基本完成了。
2、加载阶段:
load(R.drawable.czzs_step_station).into(image);
传入图片路径和ImageView组件。
public RequestBuilder<Drawable> load(@Nullable Object model) {return asDrawable().load(model);
}
RequestBuilder构建请求参数,最终由Engine调度三级缓存(活动资源/LRU内存/磁盘)。
public Target<TranscodeType> into(ImageView view) {省略很多行。。。return into(context.buildImageViewTarget(view, transcodeClass));
}buildImageViewTarget方法创建一个Target实例,其实就是上面提到的BitmapImageViewTarget或DrawableImageViewTarget。
@SuppressWarnings("unchecked")
public <Z> Target<Z> buildTarget(ImageView view, Class<Z> clazz) {if (Bitmap.class.equals(clazz)) {return (Target<Z>) new BitmapImageViewTarget(view);} else if (Drawable.class.isAssignableFrom(clazz)) {return (Target<Z>) new DrawableImageViewTarget(view);} else {throw new IllegalArgumentException("Unhandled class: " + clazz + ", try .as*(Class).transcode(ResourceTranscoder)");}
}然后进入RequestManager的track方法:
void track(Target<?> target, Request request) {targetTracker.track(target);requestTracker.runRequest(request);
}
下一步
public void runRequest(Request request) {requests.add(request);if (!isPaused) {request.begin();} else {pendingRequests.add(request);}
}进入Request的实现类SingleRequest中的begin方法开始处理加载。
3、解码阶段:
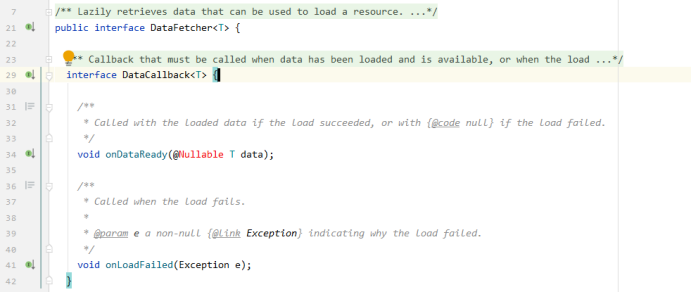
解码是用DataFetcher和它的子实现类们:
这是加载结果的两个回调:
这里说一下Glide是怎样加载网络图片的,没错,和其他网络请求一样她也是用的HttpURLConnection。
在它的实现类HttpUrlFetcher中loadData方法:
@Override
public void loadData(Priority priority, DataCallback<? super InputStream> callback) {long startTime = LogTime.getLogTime();final InputStream result;try {result = loadDataWithRedirects(glideUrl.toURL(), 0 /*redirects*/, null /*lastUrl*/,glideUrl.getHeaders());} catch (IOException e) {if (Log.isLoggable(TAG, Log.DEBUG)) {Log.d(TAG, "Failed to load data for url", e);}callback.onLoadFailed(e);return;}if (Log.isLoggable(TAG, Log.VERBOSE)) {Log.v(TAG, "Finished http url fetcher fetch in " + LogTime.getElapsedMillis(startTime)+ " ms and loaded " + result);}callback.onDataReady(result);
}这里会将结果callback.onDataReady(result);毁掉了上面截图中提到的onDataReady方法。
调用loadDataWithRedirects方法里:
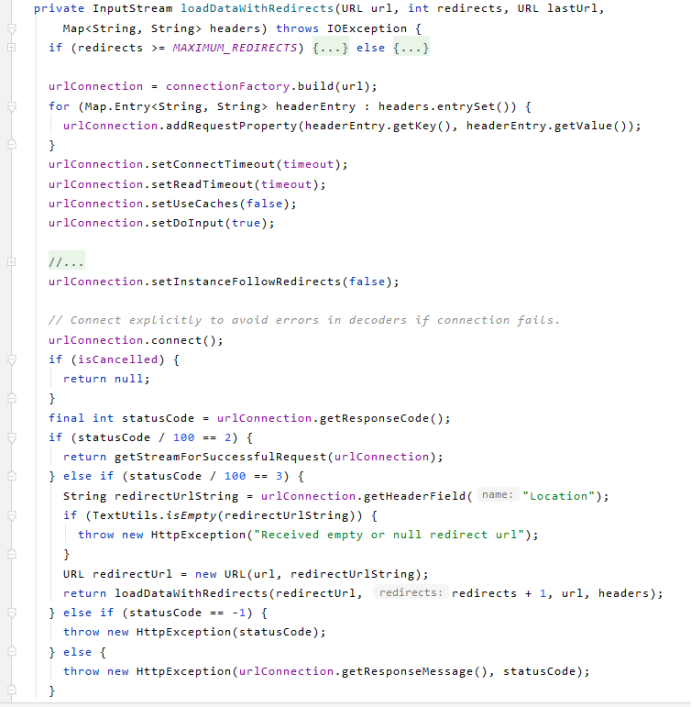
这里如果失败还会重新请求连接,最多重连五次:
private static final int MAXIMUM_REDIRECTS = 5;
最后各种通过FetcherReadyCallback以及其他各种回调,最终在BitmapImageViewTarget展示图片内容:
/*** Sets the {@link android.graphics.Bitmap} on the view using {@link* android.widget.ImageView#setImageBitmap(android.graphics.Bitmap)}.** @param resource The bitmap to display.*/
@Override
protected void setResource(Bitmap resource) {view.setImageBitmap(resource);
}
三、其实还有一些其他很重要的公共类:
有一个线程池:

还一个上下文:
一个异常类:

Glide是一个非常优秀的框架,源码架构设计的太好了。另外想了解Glide使用的朋友可以参考上一篇《展开说说Android之Glide详解_使用篇》。
个人总结记录,才疏学浅,如有错误,欢迎指正,多谢。