【实用生信代码】分子对接后的分子动力学模拟实战——OpennMM
在完成docking之后,看着interaction的结果总感觉咱们的配体不可能有这么好的对接结果,所以分子动力学的验证就应允而生了。不仅能让自己拿这个物质准备做实验的心安下来,也能让自己在验证完这个药物有效之后,进一步思考它的机理。今天就给大家分享一种open source的分子动力学方法,示例代码加自己的蛋白+分子的实战。
今天的教程来自teachopencadd,是一群大佬手把手教你怎么做docking,如果大家感兴趣可以去https://projects.volkamerlab.org/teachopencadd/talktorials/T019_md_simulation.html阅读原文;这篇内容在教程的基础上添加了如何准备自己的配体和蛋白。
分子动力学模拟由三个分子组成的超分子在受限纳米孔中的旋转
分子动力学原理
如果要总结分子动力学在docking中的应用,说人话就是:通过模拟微观水平的分子之间的作用力,推断出我们的配体在其中所有可能的存在情况。进一步判断结合的稳定性。 经典分子动力学 (MD) 模拟可用于研究涉及蛋白质、脂质、核酸、碳水化合物和小有机分子的过程。

汽车碰撞实验是不是有点像分子动力学的物理版
那需要如何精确地描述分子的作用力呢?就涉及到其中几个重要概念了:
力场
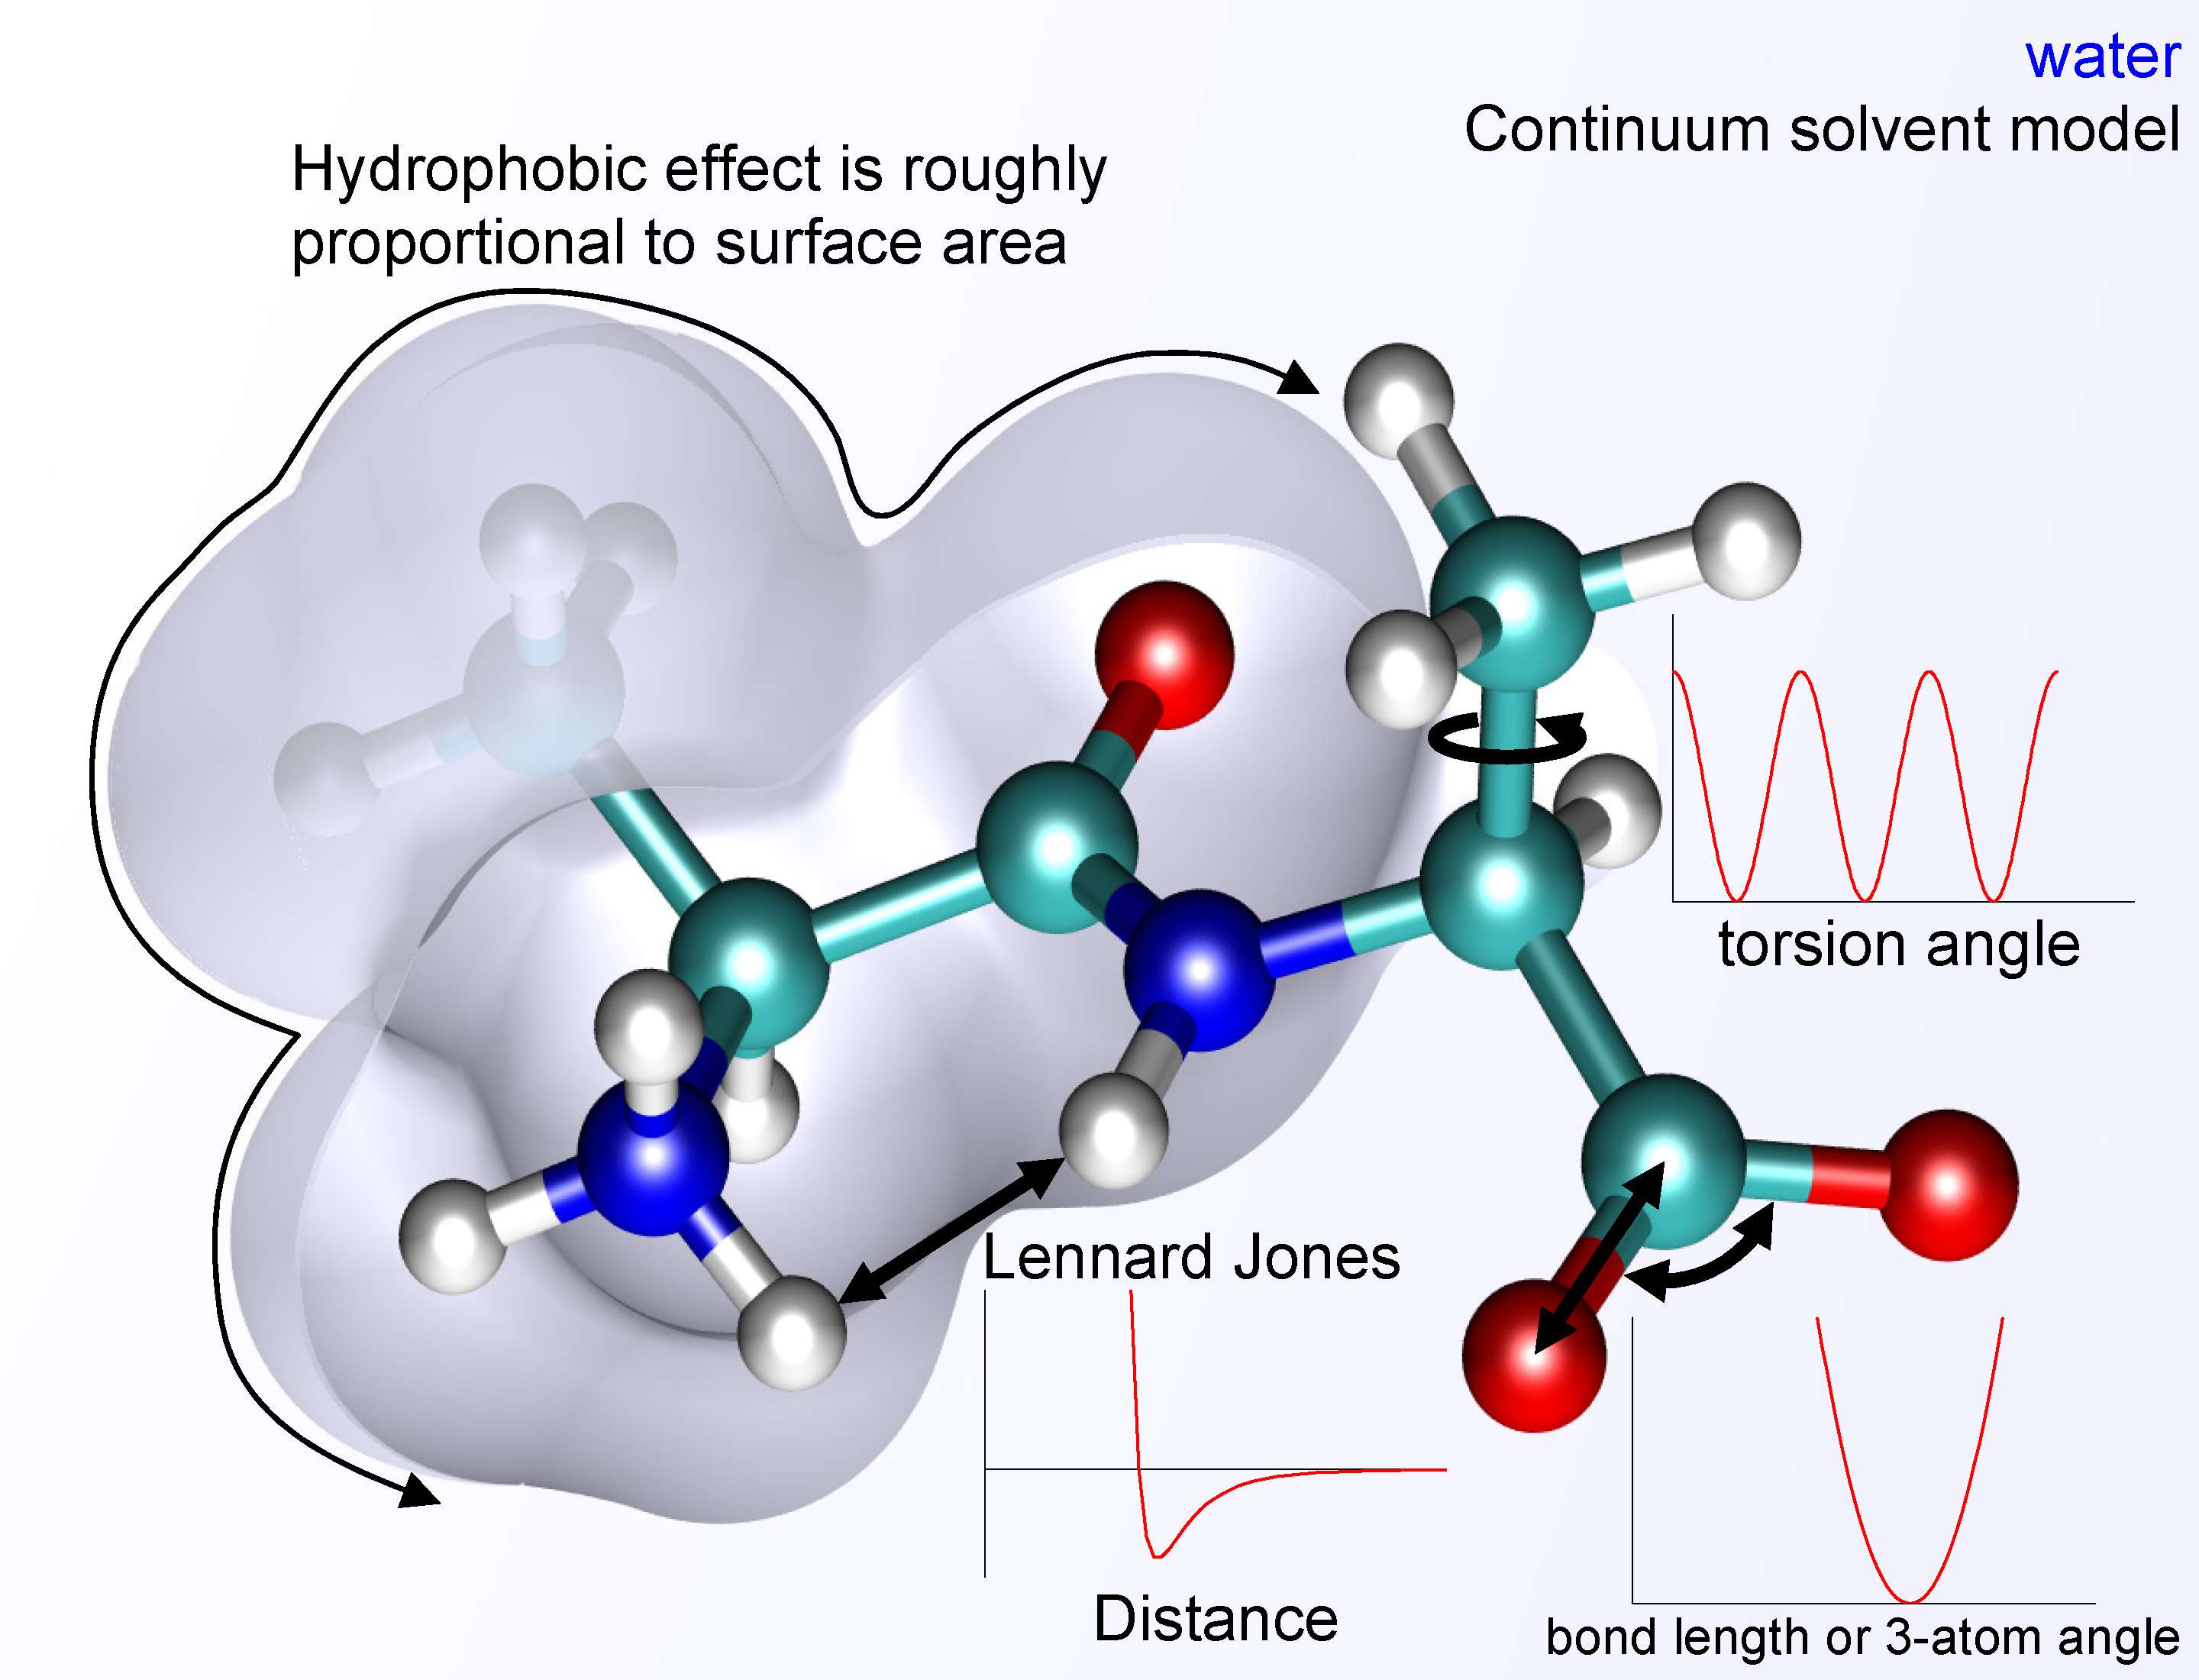
描述分子内部和分子之间的原子间作用力。它们是参数方程,包含不同力(键伸缩力、范德华力等)的分量。参数值通常通过实验推导,并根据所涉及的分子和模拟设置,在每个MD场景下发生变化。其结果是系统能量图的数学描述,其中作用于每个粒子的力源于势能相对于原子坐标的梯度。
四大类 (生物) 分子力场 AMBER、CHARMM、GROMOS 和 OPLS ,可以参考这篇文献:https://pubs.acs.org/doi/10.1021/acs.jcim.8b00042,详细地描述了用于蛋白质、核酸、脂质、碳水化合物和小有机分子的 MD 模拟的固定电荷原子力场列表:

在这里我们将使用 AMBER 力场家族中的一个成员,该家族广泛用于蛋白质的 MD 模拟。它们的函数形式为:

是的,和大家一样,这里我的大脑已经停止运转了。但幸好我们有可视化的图片,从这里我们可以理解,通过在适应的范围内改变分子的化学键的长度、角度和分子键的力度,同时考虑到分子间的力,就有机会模拟整个分子在环境中出现的状态。
边界条件
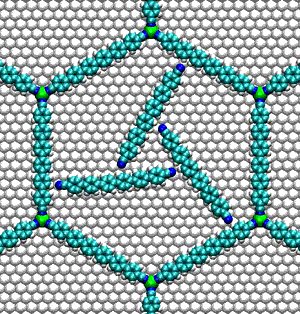
通常,分子系统是在充满溶剂(例如水)的盒子中模拟的。这些盒子的尺寸有限,这会导致盒子边界处或附近的分子出现问题。这些分子应该与哪些分子相互作用?周期性边界条件可以通过模拟理论上无限的系统来避免这种边界伪影。因此,盒子一侧边界处的分子会与盒子另一侧边界处的分子相互作用。这模拟了模拟盒子被其自身复制品包围的情况。在可视化此类MD模拟时,通常可以观察到粒子从一侧离开盒子(图3)。然而,它们会同时以相同的速度重新出现在盒子的另一侧。对于周期性边界条件下的模拟,建议使用足够大的模拟盒子,以便模拟的大分子不会与自身相邻的图像发生接触。
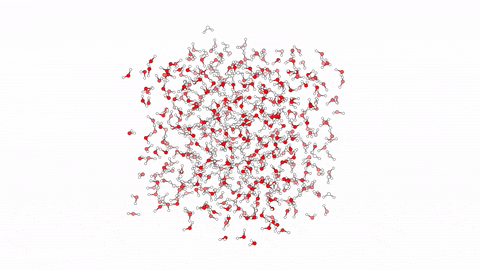
具有周期性边界条件的水分子的分子动力学模拟
MD模拟和药物设计
MD 模拟为了解配体与其靶标结合的高度动态过程提供了宝贵的见解。当配体(或药物)接近溶液中的大分子(蛋白质)时,它会遇到一个不断运动的结构。此外,配体可能会诱导大分子发生构象变化,以便最好地适应小分子。静态方法可能无法发现此类构象。因此,在静态无配体结构中观察到的结合位点,但可以通过MD模拟发现,有时被称为隐蔽结合位点。使用 MD 模拟识别此类结合位点可以启动新药发现活动。在药物发现过程的后期,MD模拟还可用于在进行更昂贵且更耗时的体外测试之前评估通过计算识别的小分子的质量。总之,MD 模拟在计算药物设计中是一项宝贵工作。
在EFGR激酶上做分子动力学
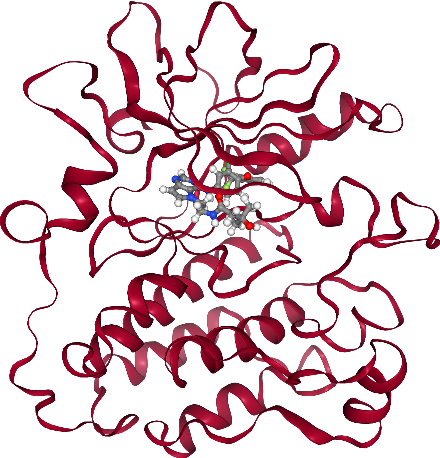
表皮生长因子受体( EGFR ) 是与癌症和炎症相关的重要药物靶点,制这种激酶是几种已获批准的抗癌药物的潜在作用机制,在本期中,我们使用这种激酶的 PDB 结构3POZ(它与小分子抑制剂03P形成复合物)进行MD模拟。使用分子动力学引擎OpenMM进行分子动力学模拟。

首先准备安装包后导入依赖
conda install -q -y -c conda-forge mdtraj openmm openmmforcefields openff-toolkit pdbfixer pypdb rdkit
mamba install -q -y -c conda-forge openmmforcefieldsimport copy
from pathlib import Pathimport requests
from IPython.display import display
import numpy as np
from rdkit import Chem
from rdkit.Chem import Draw
from rdkit.Chem import AllChem
import mdtraj as md
import pdbfixer
import openmm as mm
import openmm.app as app
from openmm import unit
from openff.toolkit.topology import Molecule, Topology
from openmmforcefields.generators import GAFFTemplateGenerator
准备文件地址,下载PDB文件
# create data directory if not exists
HERE = Path(_dh[-1])
DATA = HERE / "data"
DATA.mkdir(exist_ok=True)pdbid = "3POZ"
ligand_name = "03P"
pdb_path = DATA / f"{pdbid}.pdb"
pdb_url = f"https://files.rcsb.org/download/{pdbid}.pdb"r = requests.get(pdb_url)
r.raise_for_status()
with open(pdb_path, "wb") as f:f.write(r.content)
制备蛋白质配体复合物
-
蛋白质的制备:成功模拟的关键在于正确且完整的体系。从蛋白质数据库检索到的晶体结构通常会遗漏原子(主要是氢原子),并且可能包含非标准残基。我们将使用 Python 中的PDBFixer来准备蛋白质结构。然而, PDBFixer无法很好地处理共结晶配体,因此需要单独准备。
def prepare_protein(pdb_file, ignore_missing_residues=True, ignore_terminal_missing_residues=True, ph=7.0
):"""Use pdbfixer to prepare the protein from a PDB file. Hetero atoms such as ligands areremoved and non-standard residues replaced. Missing atoms to existing residues are added.Missing residues are ignored by default, but can be included.Parameters----------pdb_file: pathlib.Path or strPDB file containing the system to simulate.ignore_missing_residues: bool, optionalIf missing residues should be ignored or built.ignore_terminal_missing_residues: bool, optionalIf missing residues at the beginning and the end of a chain should be ignored or built.ph: float, optionalpH value used to determine protonation state of residuesReturns-------fixer: pdbfixer.pdbfixer.PDBFixerPrepared protein system."""fixer = pdbfixer.PDBFixer(str(pdb_file))fixer.removeHeterogens()  # co-crystallized ligands are unknown to PDBFixerfixer.findMissingResidues()  # identify missing residues, needed for identification of missing atoms# if missing terminal residues shall be ignored, remove them from the dictionaryif ignore_terminal_missing_residues:chains = list(fixer.topology.chains())keys = fixer.missingResidues.keys()for key in list(keys):chain = chains[key[0]]if key[1] == 0 or key[1] == len(list(chain.residues())):del fixer.missingResidues[key]# if all missing residues shall be ignored ignored, clear the dictionaryif ignore_missing_residues:fixer.missingResidues = {}fixer.findNonstandardResidues()  # find non-standard residuefixer.replaceNonstandardResidues()  # replace non-standard residues with standard onefixer.findMissingAtoms()  # find missing heavy atomsfixer.addMissingAtoms()  # add missing atoms and residuesfixer.addMissingHydrogens(ph)  # add missing hydrogensreturn fixer# prepare protein and build only missing non-terminal residues
prepared_protein = prepare_protein(pdb_path, ignore_missing_residues=False)
在这一步中,我们修复蛋白质结构中存在的问题(如缺失残基、原子、非标准氨基酸、共结晶配体等),生成一个完整、标准化的拓扑模型,用于分子动力学模拟。
-
准备配体:蛋白质制备完成后,我们将注意力转向配体。同样,我们需要添加氢原子,但也需要确保键序正确分配,因为某些 PDB 条目可能包含错误。我们使用 Python 包RDKit,这是一个开源化学信息学库。我们将通过 SMILES 字符串向RDKit提供正确的质子化状态和键序。每个共结晶配体的不带电异构体 SMILES 字符串可以在其各自的PDB条目中找到。PDB 条目3POZ的配体名称为03P。如果配体可能以其带电形式或特定的互变异构体形式结合,则需要将这些特性纳入 SMILES 字符串中。
def prepare_ligand(pdb_file, resname, smiles, depict=True):"""Prepare a ligand from a PDB file via adding hydrogens and assigning bond orders. A depictionof the ligand before and after preparation is rendered in 2D to allow an inspection of theresults. Huge thanks to @j-wags for the suggestion.Parameters----------pdb_file: pathlib.PosixPathPDB file containing the ligand of interest.resname: strThree character residue name of the ligand.smiles : strSMILES string of the ligand informing about correct protonation and bond orders.depict: bool, optionalshow a 2D representation of the ligandReturns-------prepared_ligand: rdkit.Chem.rdchem.MolPrepared ligand."""# split moleculerdkit_mol = Chem.MolFromPDBFile(str(pdb_file))rdkit_mol_split = Chem.rdmolops.SplitMolByPDBResidues(rdkit_mol)# extract the ligand and remove any already present hydrogensligand = rdkit_mol_split[resname]ligand = Chem.RemoveHs(ligand)# assign bond orders from templatereference_mol = Chem.MolFromSmiles(smiles)prepared_ligand = AllChem.AssignBondOrdersFromTemplate(reference_mol, ligand)prepared_ligand.AddConformer(ligand.GetConformer(0))# protonate ligandprepared_ligand = Chem.rdmolops.AddHs(prepared_ligand, addCoords=True)prepared_ligand = Chem.MolFromMolBlock(Chem.MolToMolBlock(prepared_ligand))# 2D depictionif depict:ligand_2d = copy.deepcopy(ligand)prepared_ligand_2d = copy.deepcopy(prepared_ligand)AllChem.Compute2DCoords(ligand_2d)AllChem.Compute2DCoords(prepared_ligand_2d)display(Draw.MolsToGridImage([ligand_2d, prepared_ligand_2d], molsPerRow=2, legends=["original", "prepared"]))# return ligandreturn prepared_ligand
smiles = "CC(C)(O)CC(=O)NCCn1ccc2ncnc(Nc3ccc(Oc4cccc(c4)C(F)(F)F)c(Cl)c3)c12"
rdkit_ligand = prepare_ligand(pdb_path, ligand_name, smiles)
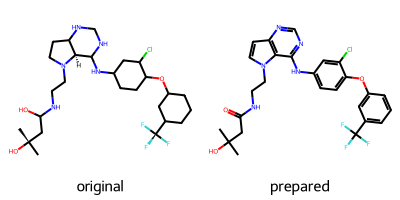
这一步是对我们即将加入其中的配体小分子,对照着原本蛋白中的配体的状态进行清洗、结构标准化和添加氢原子等处理,最终输出一个可用于模拟的准备好的 RDKit 分子对象。
-
合并蛋白质和配体:下一步,我们要使用 Python 包MDTraj合并准备好的蛋白质和配体结构。MDTraj可以处理准备好的蛋白质,它目前是一个PDBFixer分子,这种格式的拓扑结构和原子位置与OpenMM Modeller 的拓扑结构和位置相似,通常可以互换。然而,对于配体,我们需要进行一些转换,因为它目前是一个RDKit分子。
def rdkit_to_openmm(rdkit_mol, name="LIG"):"""Convert an RDKit molecule to an OpenMM molecule.Inspired by @hannahbrucemcdonald and @glass-w.Parameters----------rdkit_mol: rdkit.Chem.rdchem.MolRDKit molecule to convert.name: strMolecule name.Returns-------omm_molecule: openmm.app.ModellerOpenMM modeller object holding the molecule of interest."""# convert RDKit to OpenFFoff_mol = Molecule.from_rdkit(rdkit_mol)# add name for moleculeoff_mol.name = name# add names for atomselement_counter_dict = {}for off_atom, rdkit_atom in zip(off_mol.atoms, rdkit_mol.GetAtoms()):element = rdkit_atom.GetSymbol()if element in element_counter_dict.keys():element_counter_dict[element] += 1else:element_counter_dict[element] = 1off_atom.name = element + str(element_counter_dict[element])# convert from OpenFF to OpenMMoff_mol_topology = off_mol.to_topology()mol_topology = off_mol_topology.to_openmm()mol_positions = off_mol.conformers[0]# convert units from Ångström to nanometers# since OpenMM works in nmmol_positions = mol_positions.to("nanometers")# combine topology and positions in modeller objectomm_mol = app.Modeller(mol_topology, mol_positions)return omm_molomm_ligand = rdkit_to_openmm(rdkit_ligand, ligand_name)
现在蛋白质和配体都采用类似OpenMM 的格式,并且可以与MDTraj合并
def merge_protein_and_ligand(protein, ligand):"""Merge two OpenMM objects.Parameters----------protein: pdbfixer.pdbfixer.PDBFixerProtein to merge.ligand: openmm.app.ModellerLigand to merge.Returns-------complex_topology: openmm.app.topology.TopologyThe merged topology.complex_positions: openmm.unit.quantity.QuantityThe merged positions."""# combine topologiesmd_protein_topology = md.Topology.from_openmm(protein.topology) # using mdtraj for protein topmd_ligand_topology = md.Topology.from_openmm(ligand.topology) # using mdtraj for ligand topmd_complex_topology = md_protein_topology.join(md_ligand_topology) # add them togethercomplex_topology = md_complex_topology.to_openmm()# combine positionstotal_atoms = len(protein.positions) + len(ligand.positions)# create an array for storing all atom positions as tupels containing a value and a unit# called OpenMM Quantitiescomplex_positions = unit.Quantity(np.zeros([total_atoms, 3]), unit=unit.nanometers)complex_positions[: len(protein.positions)] = protein.positions # add protein positionscomplex_positions[len(protein.positions) :] = ligand.positions # add ligand positionsreturn complex_topology, complex_positionscomplex_topology, complex_positions = merge_protein_and_ligand(prepared_protein, omm_ligand)
print("Complex topology has", complex_topology.getNumAtoms(), "atoms.")
# NBVAL_CHECK_OUTPUT
Complex topology has 5561 atoms.
-
MD模拟设置:
-
力场:常见的力场(例如 AMBER)包含氨基酸、核酸、水和离子的参数,通常提供多种选项,以满足您的目标。我们使用amber14-all.xmlOpenMM 自带的力场文件,其中包含蛋白质、DNA、RNA 和脂质的参数。对于溶剂化,我们使用标准的三位点水模型 TIP3P。然而,配体的参数并未包含在内。为了生成这些参数,我们可以使用通用AMBER力场( GAFF ),它由 Python 包OpenMM Forcefields实现。以下函数生成一个包含标准AMBER参数的力场对象,并根据需要额外包含小分子的参数。
def generate_forcefield(rdkit_mol=None, protein_ff="amber14-all.xml", solvent_ff="amber14/tip3pfb.xml"
):"""Generate an OpenMM Forcefield object and register a small molecule.Parameters----------rdkit_mol: rdkit.Chem.rdchem.MolSmall molecule to register in the force field.protein_ff: stringName of the force field.solvent_ff: stringName of the solvent force field.Returns-------forcefield: openmm.app.ForcefieldForcefield with registered small molecule."""forcefield = app.ForceField(protein_ff, solvent_ff)if rdkit_mol is not None:gaff = GAFFTemplateGenerator(molecules=Molecule.from_rdkit(rdkit_mol, allow_undefined_stereo=True))forcefield.registerTemplateGenerator(gaff.generator)return forcefieldforcefield = generate_forcefield(rdkit_ligand)
-
系统:有了配置好的力场,我们现在可以使用OpenMM Modeller类来创建 MD 环境,这是一个包含复合物并充满溶剂的模拟盒。标准溶剂是含有指定量离子的水。盒子的大小可以通过多种方式确定。我们用填充来定义它,这样就会得到一个立方体盒子,其尺寸取决于复合物的最大尺寸。此步骤可能需要很长时间,大约几分钟,具体取决于您的硬件。
modeller = app.Modeller(complex_topology, complex_positions)
modeller.addSolvent(forcefield, padding=1.0 * unit.nanometers, ionicStrength=0.15 * unit.molar)
有了溶剂化系统和力场,我们最终可以创建一个OpenMM 系统并设置模拟。除了系统之外,模拟还需要一个积分器。OpenMM积分器定义了一种通过积分运动方程来模拟系统的方法。所选的朗之万积分器使用朗之万方程。您可以在OpenMM 文档中找到各种积分器的列表。
system = forcefield.createSystem(modeller.topology, nonbondedMethod=app.PME)
integrator = mm.LangevinIntegrator(300 * unit.kelvin, 1.0 / unit.picoseconds, 2.0 * unit.femtoseconds
)
simulation = app.Simulation(modeller.topology, system, integrator)
simulation.context.setPositions(modeller.positions)
-
执行 MD 模拟:现在一切设置完毕,我们可以进行模拟了。我们需要设置起始位置并最小化系统能量,以获得低能量的起始配置,这对于降低由于严重的原子碰撞导致模拟失败的可能性至关重要。能量最小化的系统已保存。
simulation.minimizeEnergy()
with open(DATA / "topology.pdb", "w") as pdb_file:app.PDBFile.writeFile(simulation.topology,simulation.context.getState(getPositions=True, enforcePeriodicBox=True).getPositions(),file=pdb_file,keepIds=True,)
最小化完成后,我们就可以进行分子动力学模拟了。在本讲座中,我们将进行一个简短的模拟来进行说明。用于研究的模拟通常跨越几纳秒,甚至几微秒。我们将仅模拟100皮秒的分子动力学,对应5万步,每步2飞秒。我们每10皮秒(5000步)保存一次分子“快照”,总共10帧。结果保存在一个.xtc文件中,该文件包含给定时间点所有原子的坐标。结合之前编写的能量最小化体系的PDB文件,它为我们提供了后续分析所需的所有信息。如果您有性能良好的 GPU,也可以增加模拟时间。
# output settings
if on_colab:steps = 50000  # corresponds to 100 pswrite_interval = 5000  # write every 10 pslog_interval = 2500  # log progress to stdout every 5 ps
else:steps = 10  # corresponds to 20 fswrite_interval = 1  # write every 2 fslog_interval = 1  # log progress to stdout every 2 fs
simulation.reporters.append(md.reporters.XTCReporter(file=str(DATA / "trajectory.xtc"), reportInterval=write_interval)
)
simulation.reporters.append(app.StateDataReporter(sys.stdout,log_interval,step=True,potentialEnergy=True,temperature=True,progress=True,remainingTime=True,speed=True,totalSteps=steps,separator="\t",)
)
系统中所有粒子的速度都是根据给定温度下的分布随机选择的。我们选择了 300 开尔文,比室温高出几度。随机种子会生成,但也可以明确指定以重现结果。
然后按照之前定义的步骤进行模拟。
simulation.context.setVelocitiesToTemperature(300 * unit.kelvin)
simulation.step(steps)  # perform the simulation
#"Progress (%)" "Step"  "Potential Energy (kJ/mole)"    "Temperature (K)"       "Speed (ns/day)"        "Time Remaining"
10.0%   1       -992629.2532507611      280.59188983053207      0       --
20.0%   2       -978514.3140385933      250.1140053691449       1.88    0:00
30.0%   3       -961427.9816461714      214.09328454071326      1.92    0:00
40.0%   4       -944609.5657245225      180.29949178380076      1.9     0:00
50.0%   5       -938426.3768274506      165.17778679274846      1.89    0:00
60.0%   6       -930096.1319021038      149.4126629808844       1.89    0:00
70.0%   7       -926924.8985479049      143.336941762251        1.9     0:00
80.0%   8       -930284.4123182578      149.77757492192208      1.91    0:00
90.0%   9       -932318.9156875424      155.78884925604478      1.9     0:00
100.0%  10      -937770.7580560565      167.02287919129623      1.9     0:00
让我们来看看可视化结果 第一步,我们加载拓扑 ( .pdb) 和轨迹 ( .xtc) 文件,以创建表示模拟系统的 MDAnalysis universe。NGL Viewer提供预构建功能来可视化加载在常用库(如 MD Analysis)中的模拟。
from pathlib import Pathimport pandas as pd
import numpy as np
import matplotlib.pyplot as plt
import nglview as nv
import MDAnalysis as mda
from MDAnalysis.analysis import rms, diffusionmap, align
from MDAnalysis.analysis.distances import dist
from MDAnalysis.analysis.hydrogenbonds.hbond_analysis import HydrogenBondAnalysis as HBAmd_universe = mda.Universe(str(DATA / "topology.pdb"), str(DATA / "trajectory.xtc"))
view = nv.show_mdanalysis(md_universe)
view
view.render_image(trim=True, factor=2, transparent=True);
view._display_image()
这一步可以看见动态的结果哦
-
随时间变化的 RMSD 蛋白质和配体的 RMSD¶ 动画中蛋白质和配体清晰可辨。然而,很难评估配体或蛋白质是否真的显著改变了它们的位置/构象。因此,我们将使用更完善的方法——计算均方根差 (RMSD)——来评估相对运动。因此,我们将重点关注系统的不同部分(骨架、蛋白质和配体)。配体最好通过其独特的残基名称来选择。在本例中,我们知道它是抑制剂03P,但我们也可以通过检查拓扑文件或将光标悬停在上面动画中的配体原子上来找到它的名称。为了绘制 RMSD,我们编写了一个函数,对从宇宙中选定的原子组进行 RMSD 计算并返回一个pandas Dataframe。
ligand_name = "03P"def rmsd_for_atomgroups(universe, selection1, selection2=None):"""Calulate the RMSD for selected atom groups.Parameters----------universe: MDAnalysis.core.universe.UniverseMDAnalysis universe.selection1: strSelection string for main atom group, also used during alignment.selection2: list of str, optionalSelection strings for additional atom groups.Returns-------rmsd_df: pandas.core.frame.DataFrameDataFrame containing RMSD of the selected atom groups over time."""universe.trajectory[0]ref = universermsd_analysis = rms.RMSD(universe, ref, select=selection1, groupselections=selection2)rmsd_analysis.run()columns = [selection1, *selection2] if selection2 else [selection1]rmsd_df = pd.DataFrame(np.round(rmsd_analysis.results.rmsd[:, 2:], 2), columns=columns)rmsd_df.index.name = "frame"return rmsd_df
运行该函数来计算模拟过程中选定分子的 RMSD:全蛋白质、蛋白质骨架原子、配体:
在计算过程中,分子将沿着蛋白质的主链叠加到第一帧
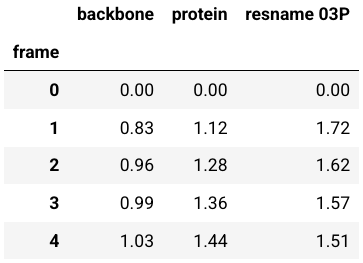
rmsd = rmsd_for_atomgroups(md_universe, "backbone", ["protein", f"resname {ligand_name}"])
rmsd.head()
然后,我们绘制结果。
rmsd.plot(title="RMSD of protein and ligand")
plt.ylabel("RMSD (Å)");
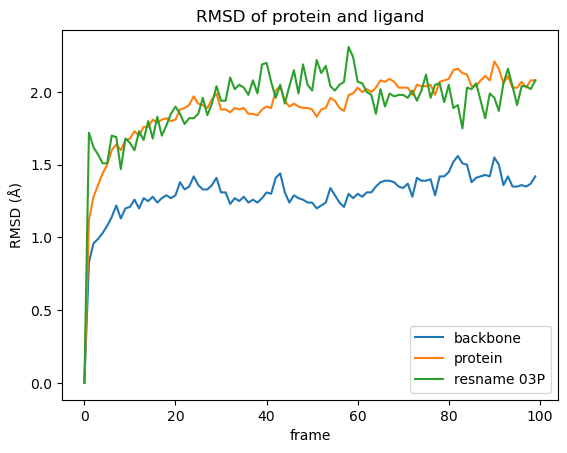
从中我们能得到什么结果:
-
在模拟过程中,主链仅发生了轻微的构象变化,这并不奇怪,因为蛋白质是相对于主链叠加的。
-
与仅计算蛋白质主链相比,将蛋白质侧链纳入 RMSD 计算中会导致更多的运动。
-
在我们的模拟中,配体的运动范围与蛋白质侧链相同。然而,情况并非总是如此,因为配体可以更自由地移动,而且除了构象变化之外,还可能涉及定向运动。如果配体的 RMSD 值非常高,则很可能出现这种情况。
计算所有帧(成对)之间的差异,并在热图中将其可视化。
def RMSD_dist_frames(universe, selection):"""Calculate the RMSD between all frames in a matrix.Parameters----------universe: MDAnalysis.core.universe.UniverseMDAnalysis universe.selection: strSelection string for the atomgroup to be investigated, also used during alignment.Returns-------array: np.ndarrayNumpy array of RMSD values."""pairwise_rmsd = diffusionmap.DistanceMatrix(universe, select=selection)pairwise_rmsd.run()return pairwise_rmsd.results.dist_matrixdist_matrix_protein = RMSD_dist_frames(md_universe, "protein")
dist_matrix_ligand = RMSD_dist_frames(md_universe, f"resname {ligand_name}")# get maximal distance between all frames
max_dist = max(np.amax(dist_matrix_ligand), np.amax(dist_matrix_protein))fig, ax = plt.subplots(1, 2)
fig.suptitle("RMSD between the frames")# protein image
img1 = ax[0].imshow(dist_matrix_protein, cmap="viridis", vmin=0, vmax=max_dist)
ax[0].title.set_text("protein")
ax[0].set_xlabel("frames")
ax[0].set_ylabel("frames")# ligand image
img2 = ax[1].imshow(dist_matrix_ligand, cmap="viridis", vmin=0, vmax=max_dist)
ax[1].title.set_text("Ligand")
ax[1].set_xlabel("frames")fig.colorbar(img1, ax=ax, orientation="horizontal", fraction=0.1, label="RMSD (Å)");
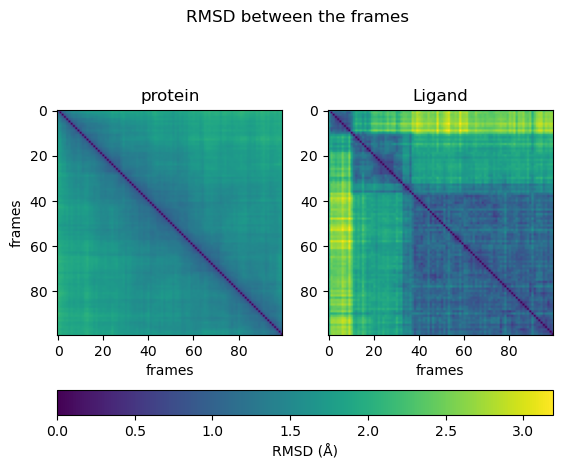
从热图可以看出,蛋白质在不同状态之间持续均匀地移动。配体在不同状态之间跳跃。有时它可以反复达到相似的构象。