Netty集群搭建
一、Netty集群服务注册方案
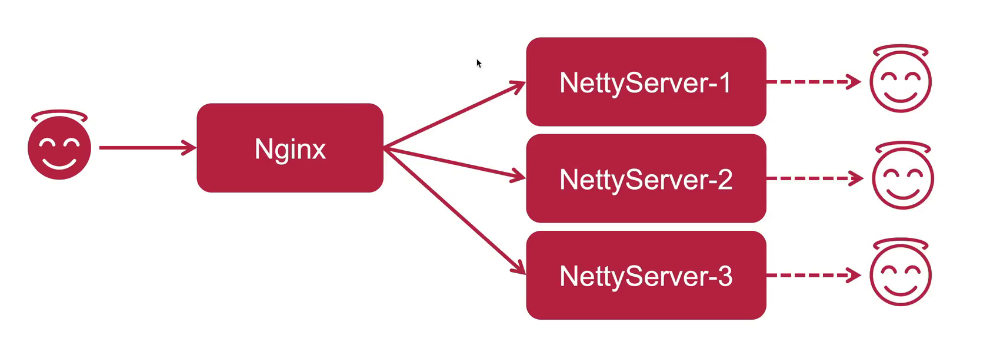
1、集群方案一
2、集群方案二
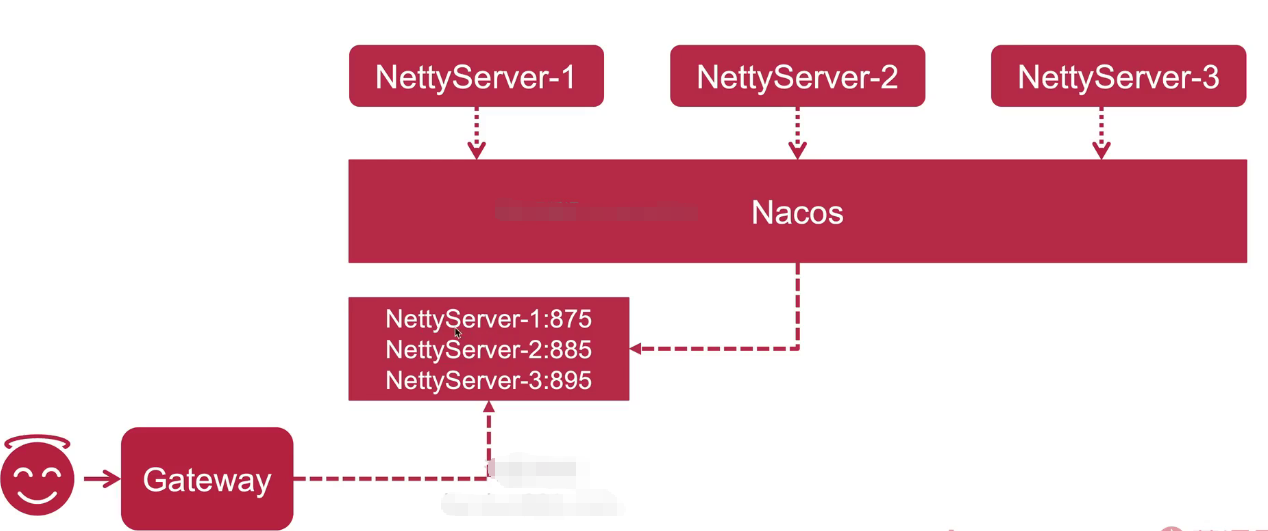
3、集群方案三
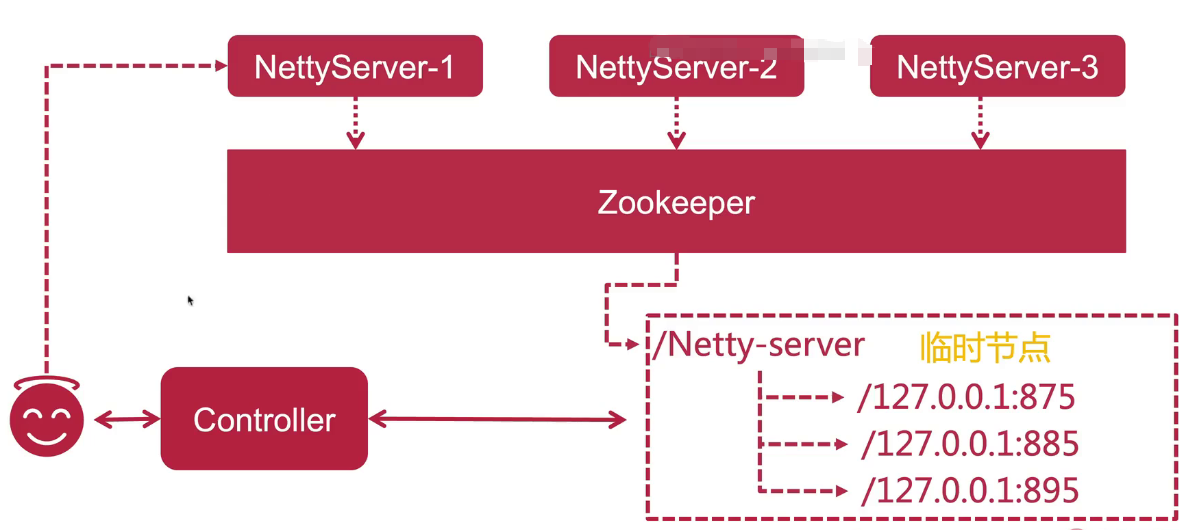
注:
这里会采用集群方案三进行下面的演练。
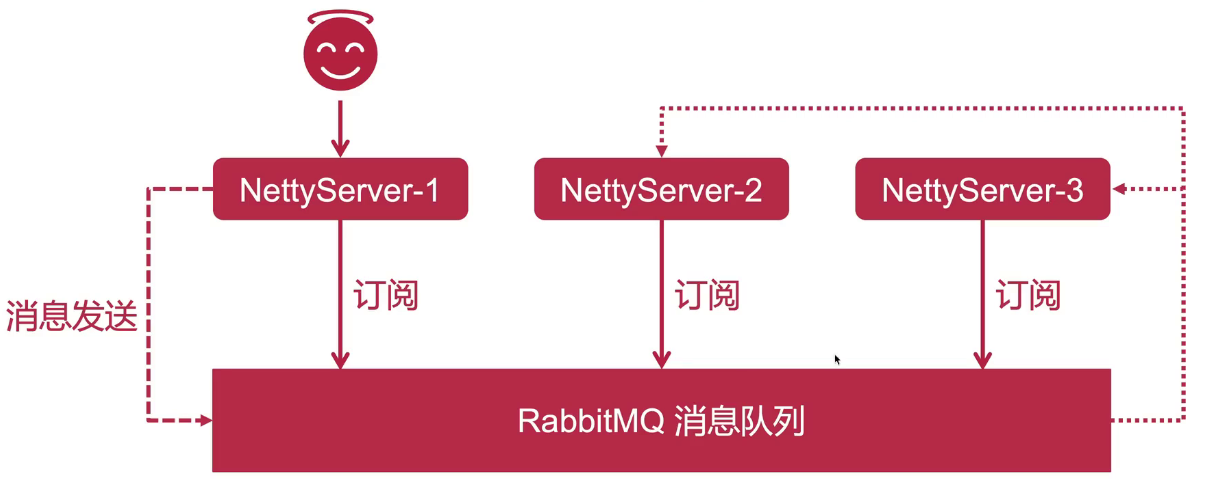
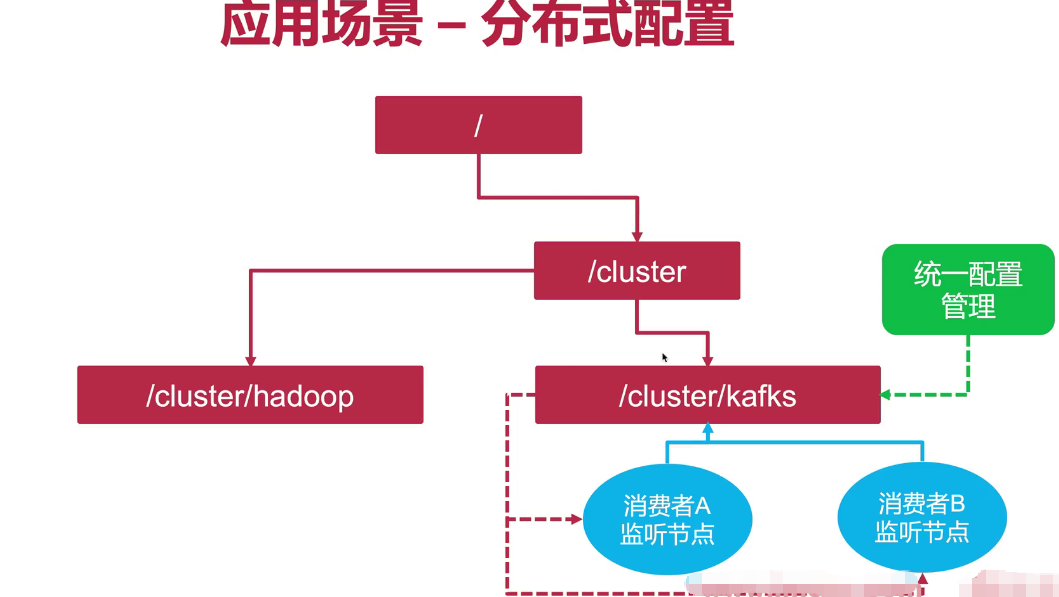
4、消息广播
二、构建Jedis连接池服务
1、引入依赖
<dependency><groupId>redis.clients</groupId><artifactId>jedis</artifactId><version>4.4.3</version></dependency>2、编写连接池工具类
package com.chat.util;import redis.clients.jedis.Jedis;
import redis.clients.jedis.JedisPool;
import redis.clients.jedis.JedisPoolConfig;import java.time.Duration;public class JedisPoolUtils {private static final JedisPool jedisPool;static {//配置连接池JedisPoolConfig poolConfig = new JedisPoolConfig();//最大连接数poolConfig.setMaxTotal(10);//最大空闲连接数poolConfig.setMaxIdle(10);//最小空闲连接数poolConfig.setMinIdle(5);//最长等待时间
//        poolConfig.setMaxWaitMillis(1500); 等效下面poolConfig.setMaxWait(Duration.ofMillis(1500));//创建连接池对象jedisPool = new JedisPool(poolConfig,"127.0.0.1",6379,1000,"123456");}public static Jedis getJedis(){return jedisPool.getResource();}
}
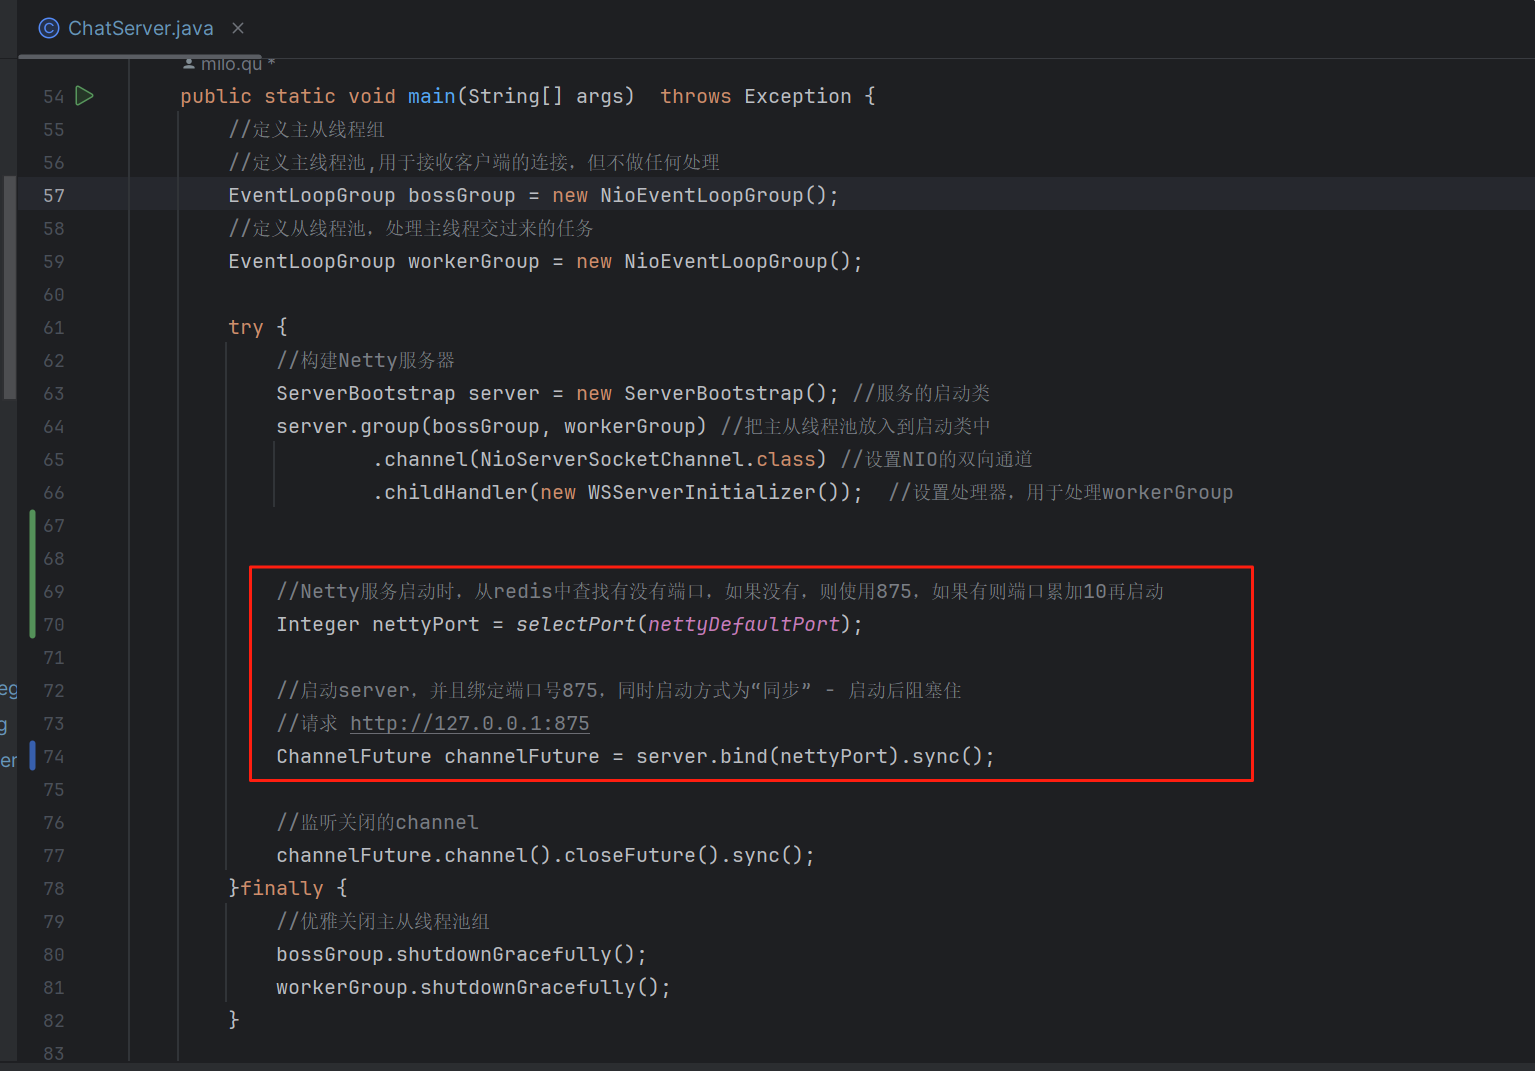
3、使用Redis动态分配Netty集群端口
public static final Integer nettyDefaultPort = 875;public static final String initOnlineCounts = "0";public static Integer selectPort(Integer port) {String portKey = "netty_port";Jedis jedis = JedisPoolUtils.getJedis();Map<String, String> portMap = jedis.hgetAll(portKey);System.out.println(portMap);// 由于map中的key都应该是整数类型的port,所以先转换成整数后,再比对,否则string类型的比对会有问题List<Integer> portList = portMap.entrySet().stream().map(entry -> Integer.valueOf(entry.getKey())).collect(Collectors.toList());// step1: 编码到此处先运行测试看一下结果System.out.println(portList);Integer nettyPort = null;if (portList == null || portList.isEmpty()) {// step2: 编码到此处先运行测试看一下结果jedis.hset(portKey, port+"", initOnlineCounts);nettyPort = port;} else {// 循环portList,获得最大值,并且累加10Optional<Integer> maxInteger = portList.stream().max(Integer::compareTo);Integer maxPort = maxInteger.get().intValue();Integer currentPort = maxPort + 10;jedis.hset(portKey, currentPort+"", initOnlineCounts);nettyPort = currentPort;}// step3: 编码到此处先运行测试看一下最终结果return nettyPort;}修改ChatServer,实现Netty端口的动态分配
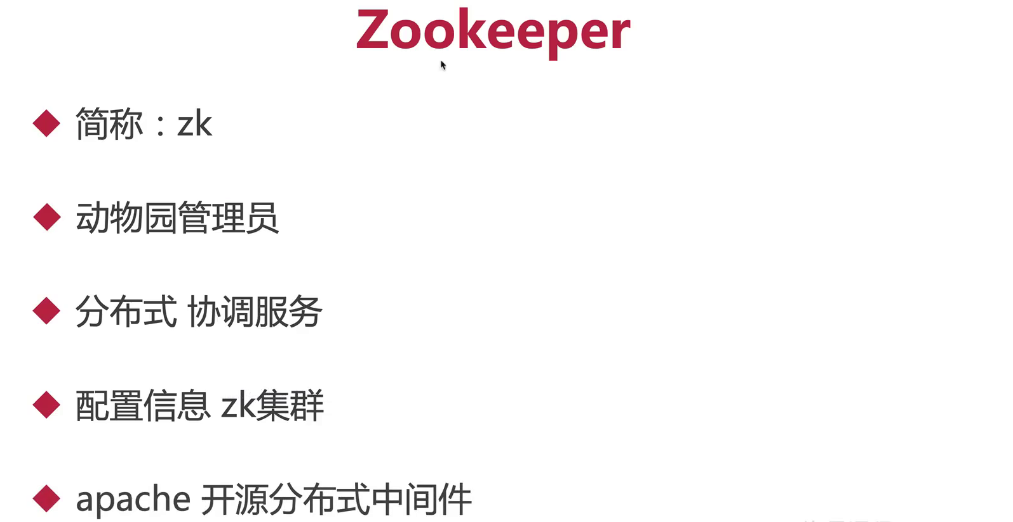
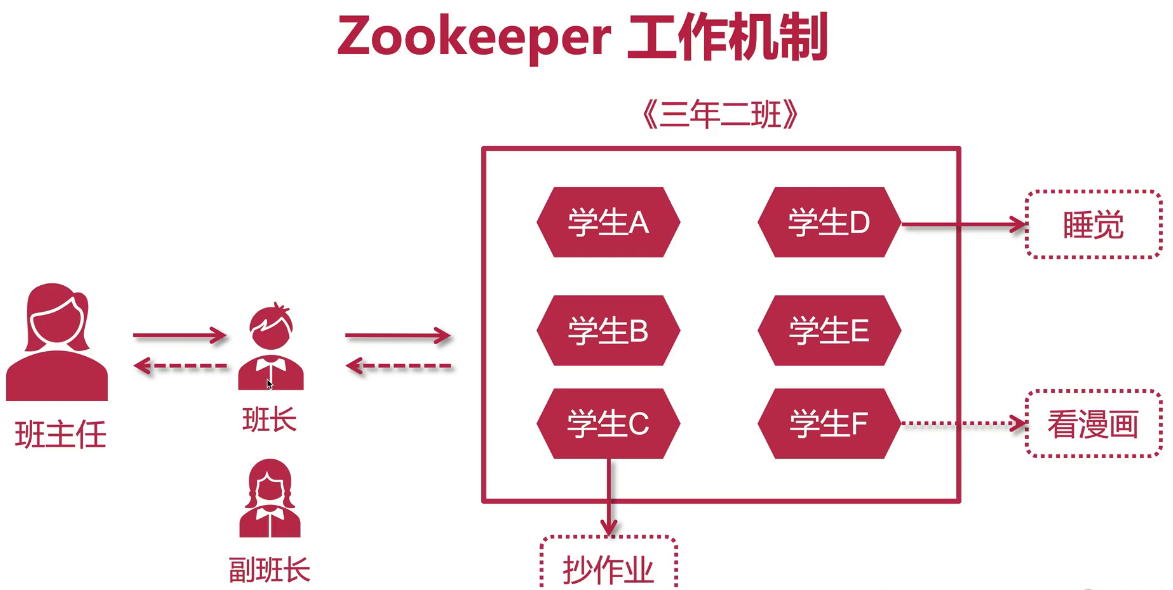
三、Zookeeper入门概述与工作机制
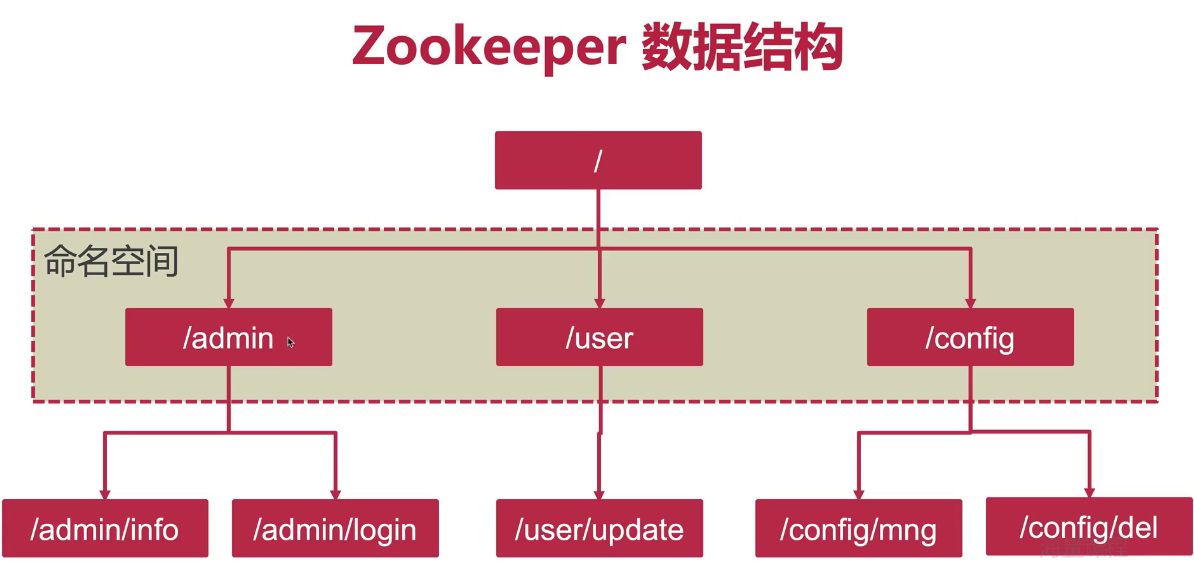
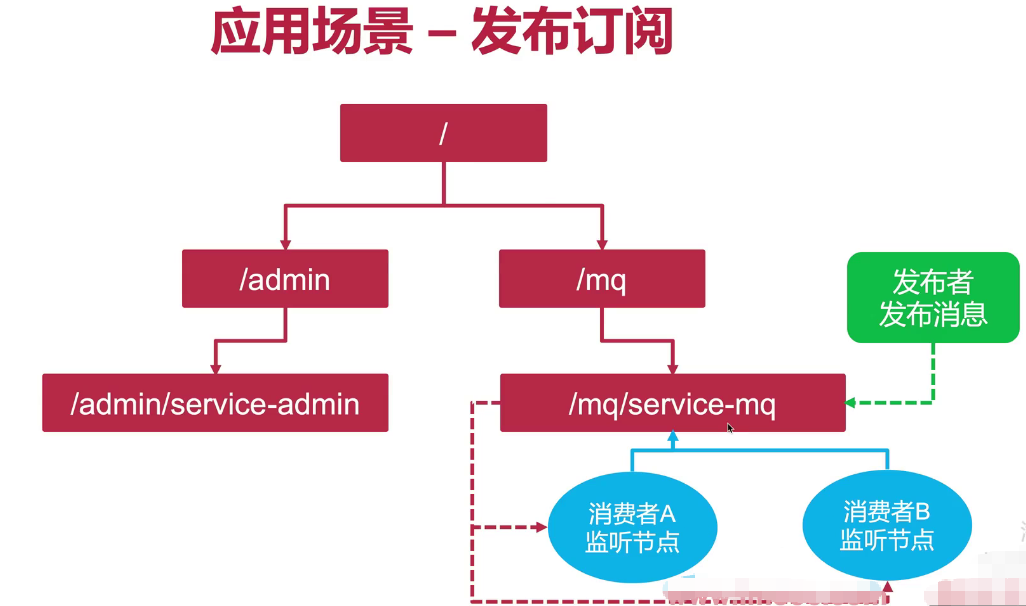
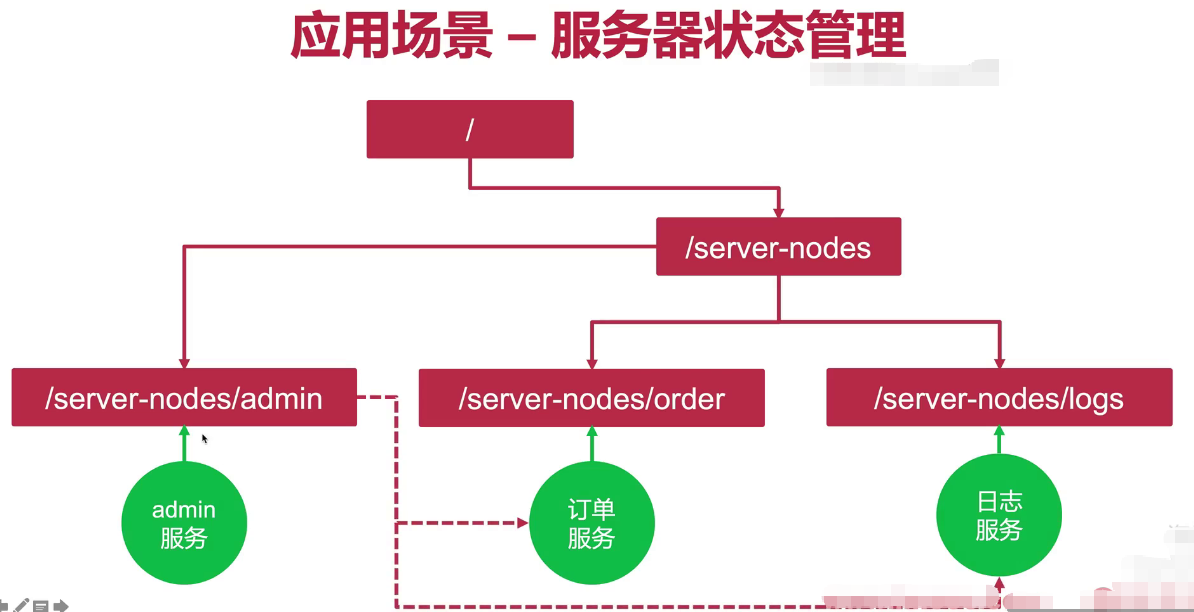
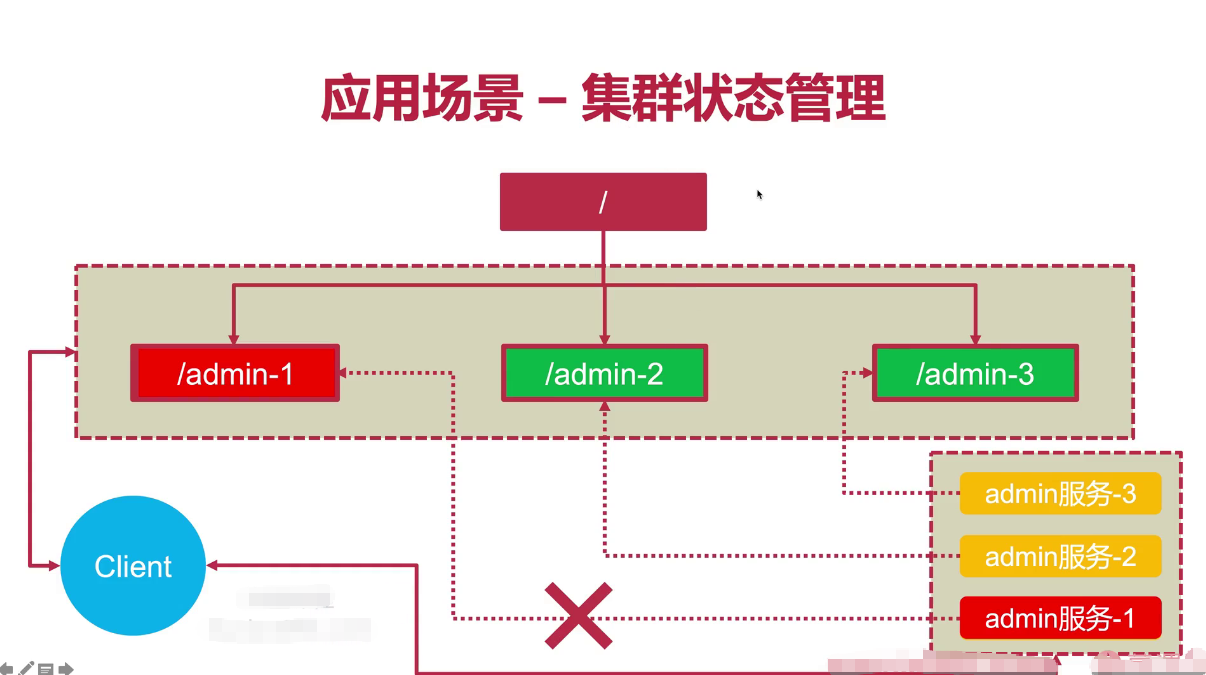
四、Zookeeper数据结构与应用场景

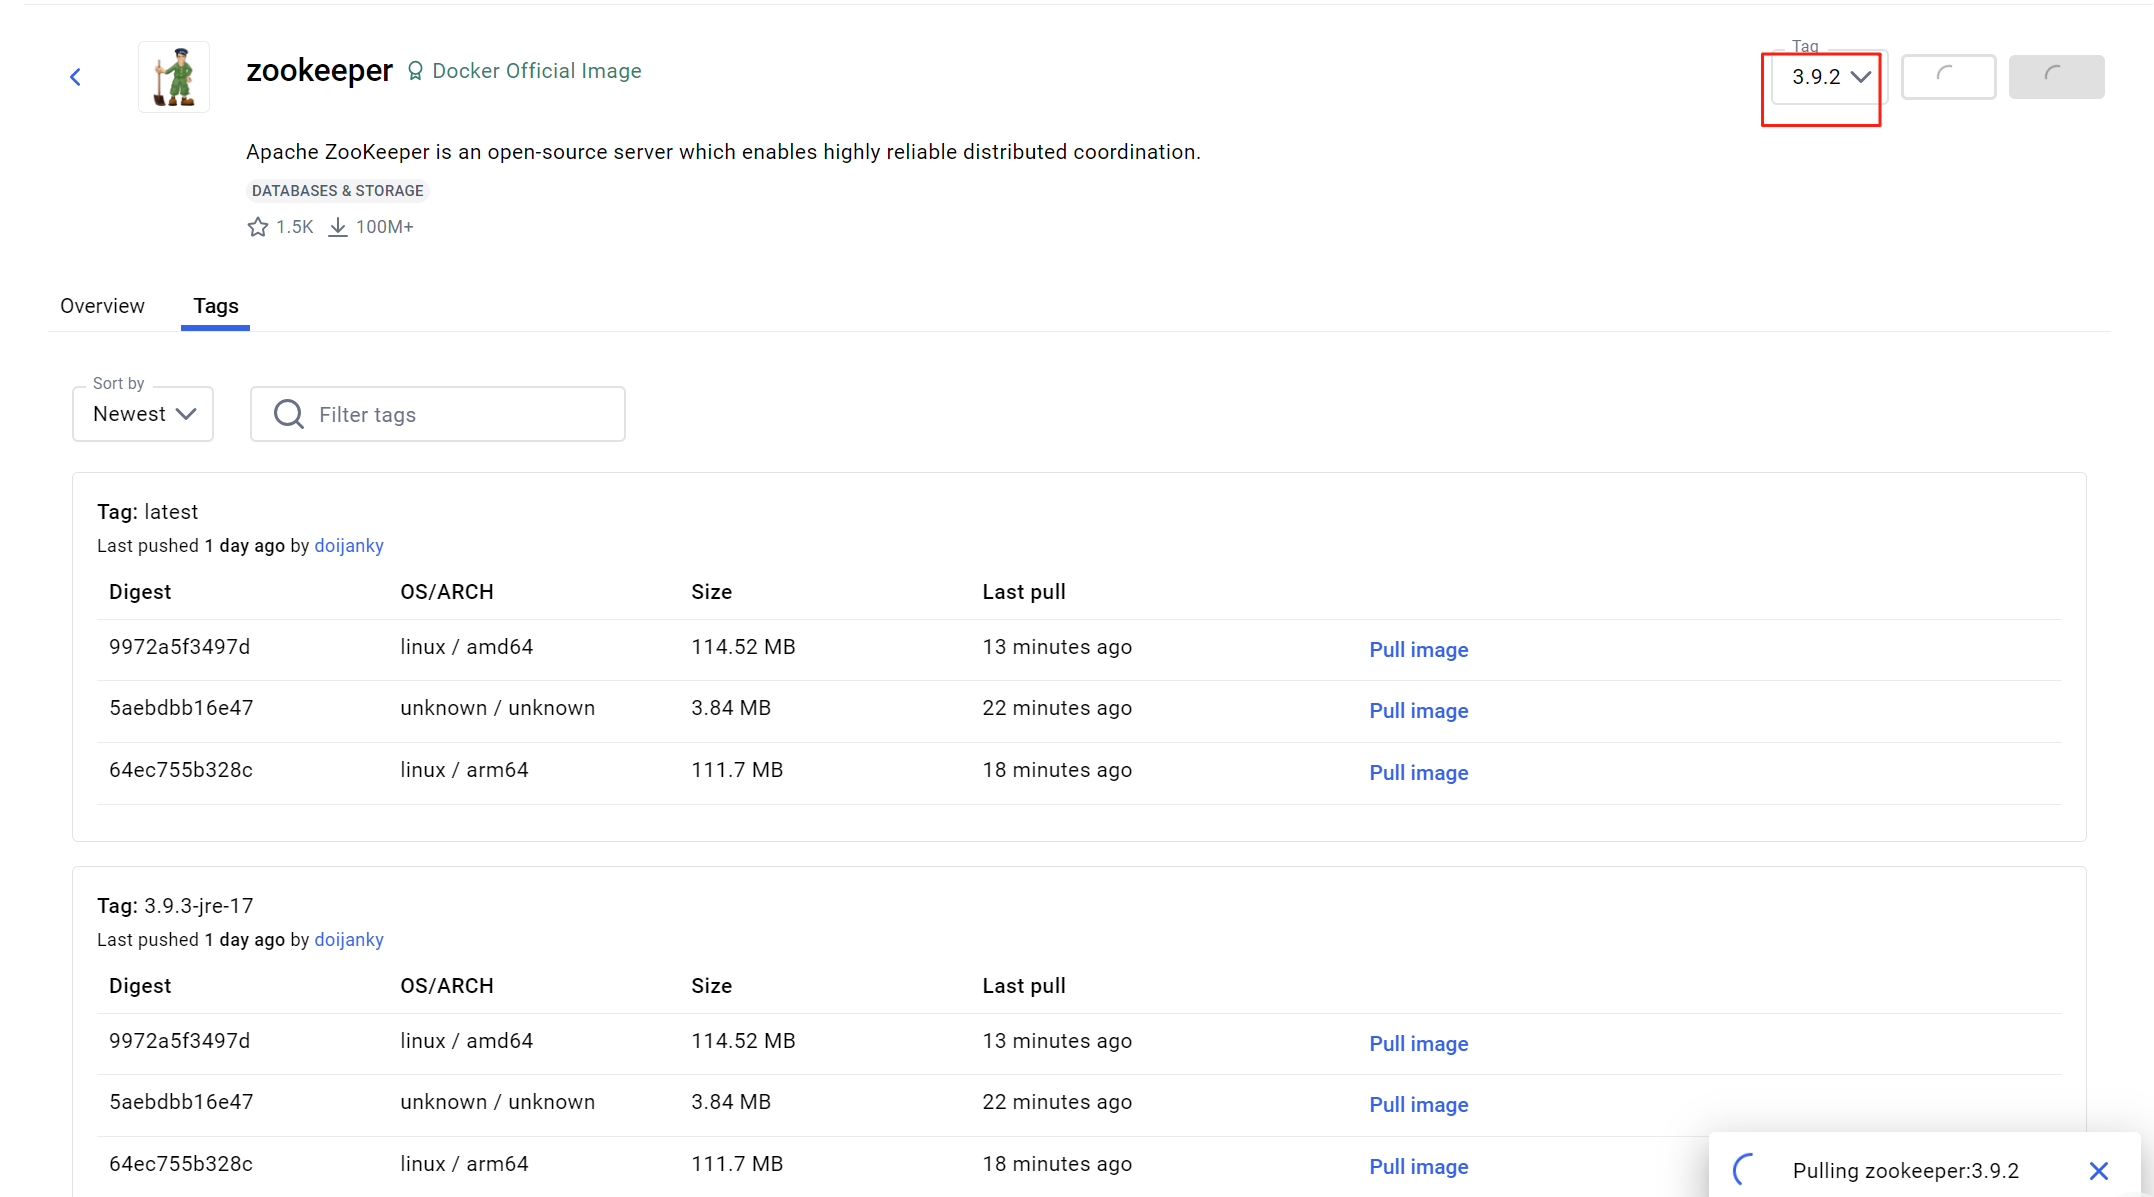
五、Docker环境配置Zookeeper
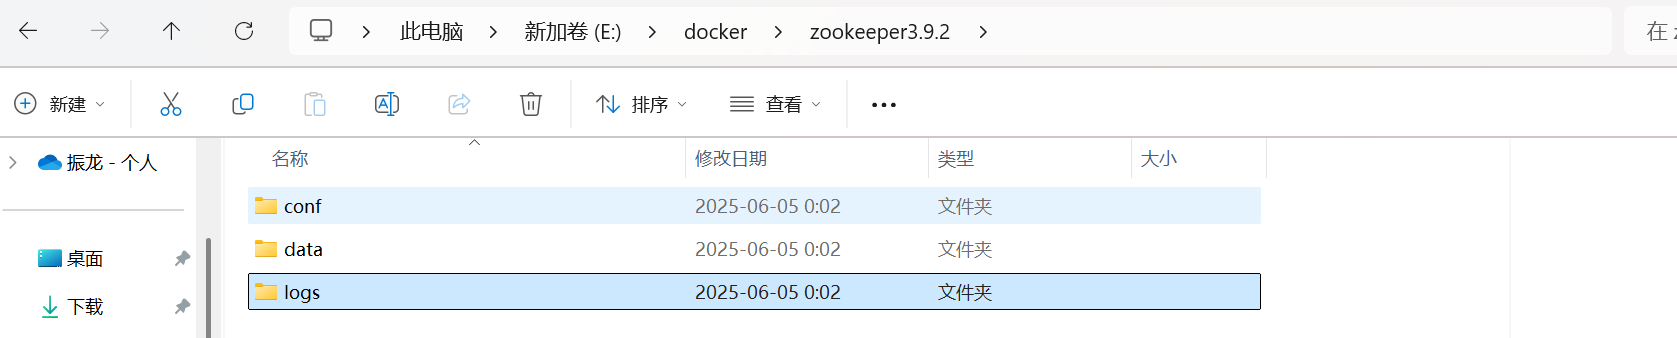
创建挂载目录
mkdir -p /Volumes/lee/docker/zookeeper3.9.2/data
mkdir -p /Volumes/lee/docker/zookeeper3.9.2/conf
mkdir -p /Volumes/lee/docker/zookeeper3.9.2/logs
拉取镜像
docker pull zookeeper:3.9.2
运行容器
docker run --name zookeeper-imooc \
-p 3191:2181 \
--restart always \
-v /Volumes/lee/docker/zookeeper3.9.2/data:/data \
-v /Volumes/lee/docker/zookeeper3.9.2/conf:/conf \
-v /Volumes/lee/docker/zookeeper3.9.2/logs:/datalog \
-d zookeeper:3.9.2
查看zk是否处于运行中发现此时在重启。
咱们来看下日志,会发现没有权限。
这是因为我们使用了容器外部本地文件的挂载,然而在外部文件中没有zk的核心配置文件,我们只需要创建即可。
# The number of milliseconds of each tick
tickTime=2000
# The number of ticks that the initial
# synchronization phase can take
initLimit=10
# The number of ticks that can pass between
# sending a request and getting an acknowledgement
syncLimit=5
# the directory where the snapshot is stored.
# do not use /tmp for storage, /tmp here is just
# example sakes.
dataDir=/data
dataLogDir=/datalog
# the port at which the clients will connect
clientPort=2181
# the maximum number of client connections.
# increase this if you need to handle more clients
#maxClientCnxns=60
#
# Be sure to read the maintenance section of the
# administrator guide before turning on autopurge.
#
# http://zookeeper.apache.org/doc/current/zookeeperAdmin.html#sc_maintenance
#
# The number of snapshots to retain in dataDir
#autopurge.snapRetainCount=3
# Purge task interval in hours
# Set to "0" to disable auto purge feature
#autopurge.purgeInterval=1
## Metrics Providers
#
# https://prometheus.io Metrics Exporter
#metricsProvider.className=org.apache.zookeeper.metrics.prometheus.PrometheusMetricsProvider
#metricsProvider.httpPort=7000
#metricsProvider.exportJvmInfo=true
复制以上配置到配置路径中
再次查看,(无需重启)你会发现状态已经是up启动了
进入zk容器
docker exec -it zookeeper bash
在内部使用zk来查看状态, ./zkServer status
如此,表示zk安装成功。
1
下载Zookeeper镜像
命令: docker pull zookeeper:3.9.2
目录准备
网页下载地址:
https://archive.apache.org/dist/zookeeper/zookeeper-3.9.2/
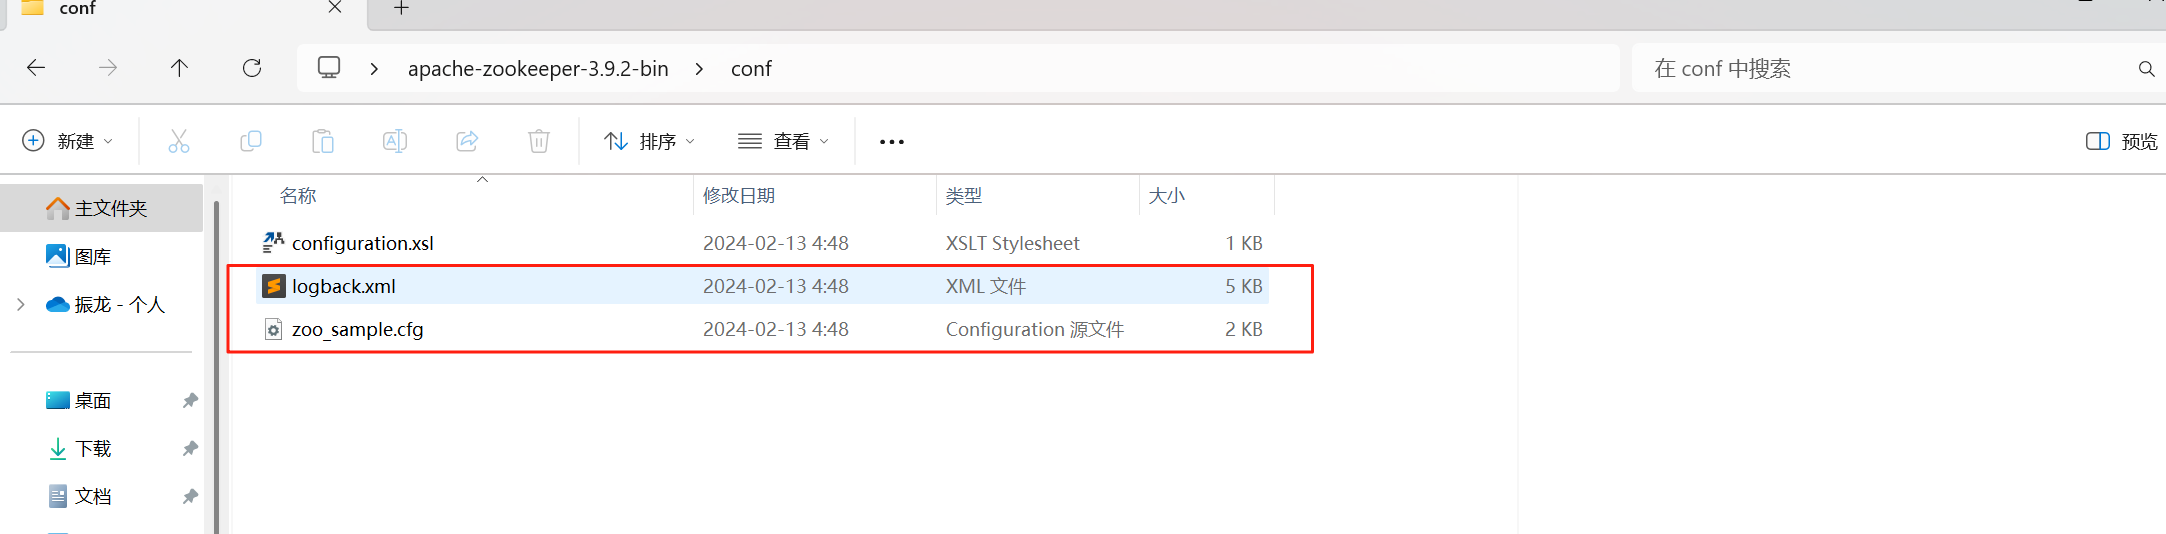
将这两个文件复制到对应的conf目录下
启动docker
docker run --name zookeeper3.9.2 -p 2181:2181 --restart always -v E:\docker\zookeeper3.9.2/data:/data -v E:\docker\zookeeper3.9.2/conf:/conf -v E:\docker\zookeeper3.9.2/logs:/datalog -d zookeeper:3.9.2
六、PrettyZoo控制管理端(开源工具)
官网:https://github.com/vran-dev/PrettyZoo
下载地址:https://github.com/vran-dev/PrettyZoo/tree/v2.1.1

七、Zookeeper核心配置详述
#dataDir - 数据目录
dataDir=/data
#dataLogDir - 日志存储目录
dataLogDir=/datalog
#tickTime - 心跳间隔默认2秒
tickTime=2000
#initLimit - 从节点加入主节点初始化次数限制
initLimit=5
#syncLimit - 主从节点之间数据同步限制,超过2次认为同步异常
syncLimit=2
#autopurge.snapRetainCount - 用于磁盘清理的,保留最近3次的数据快照
autopurge.snapRetainCount=3
#autopurge.purgeInterval - 磁盘定时清理时间,默认0不清理,按小时设置
autopurge.purgeInterval=0
#maxClientCnxns - zookeeper最大客户端连接数
maxClientCnxns=60
#standaloneEnabled - 是否启用单例模式
standaloneEnabled=true
#admin.enableServer - 是否开启Admin Server
admin.enableServer=true
#server.1 - zookeeper服务地址,目前只有一个节点,所以是server.1
#2888 - 用于集群内部通信端口
#3888 - 用于集群内部选举端口
#2181 - 定义的zookeeper服务端口
server.1=localhost:2888:3888;2181
八、Zookeeper基本操作与节点类型
创建
设置或覆盖
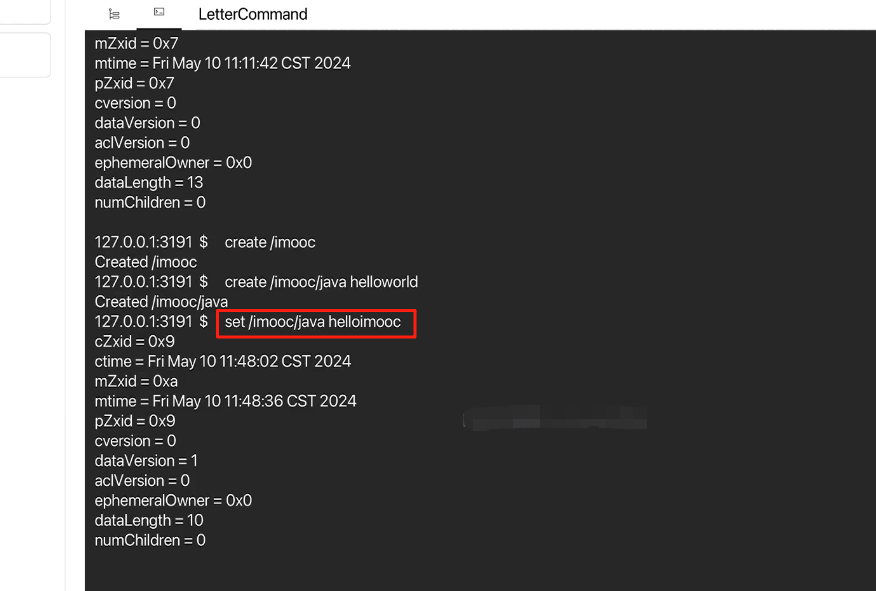
删除
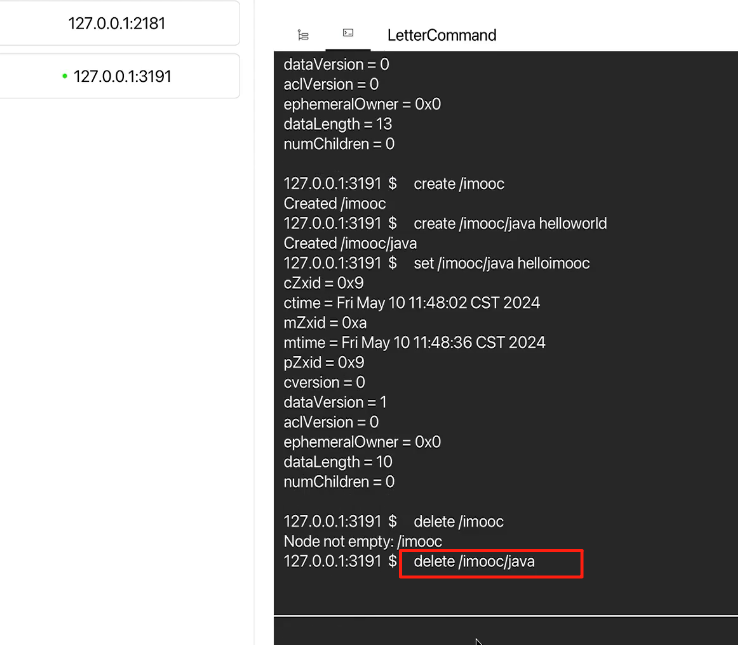
节点类型 - 默认持久化节点

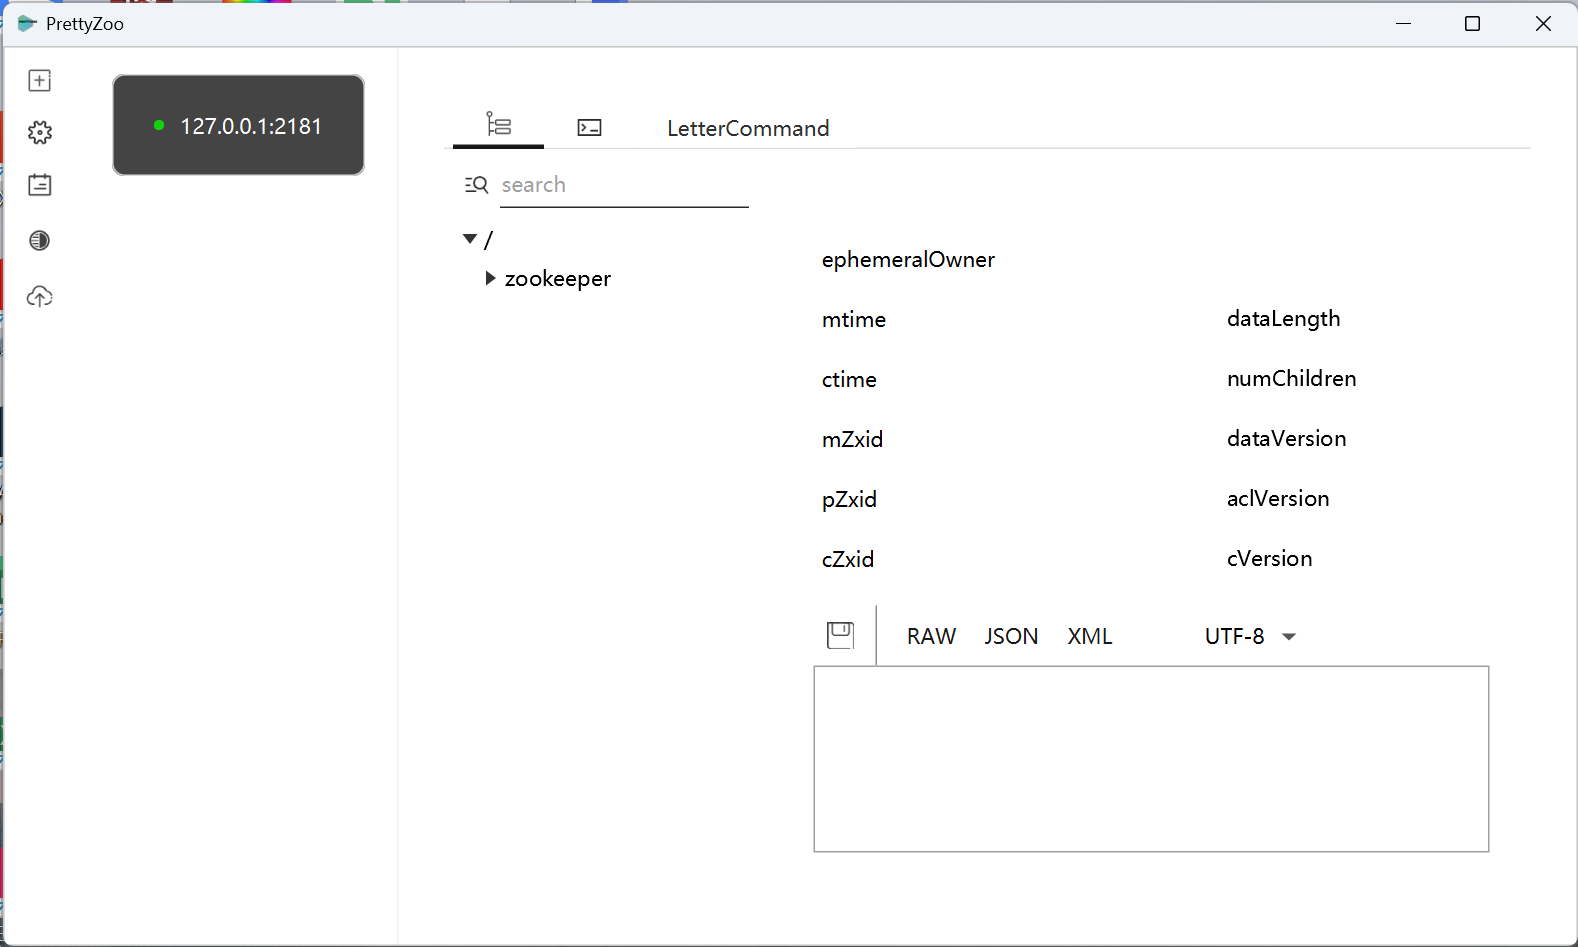
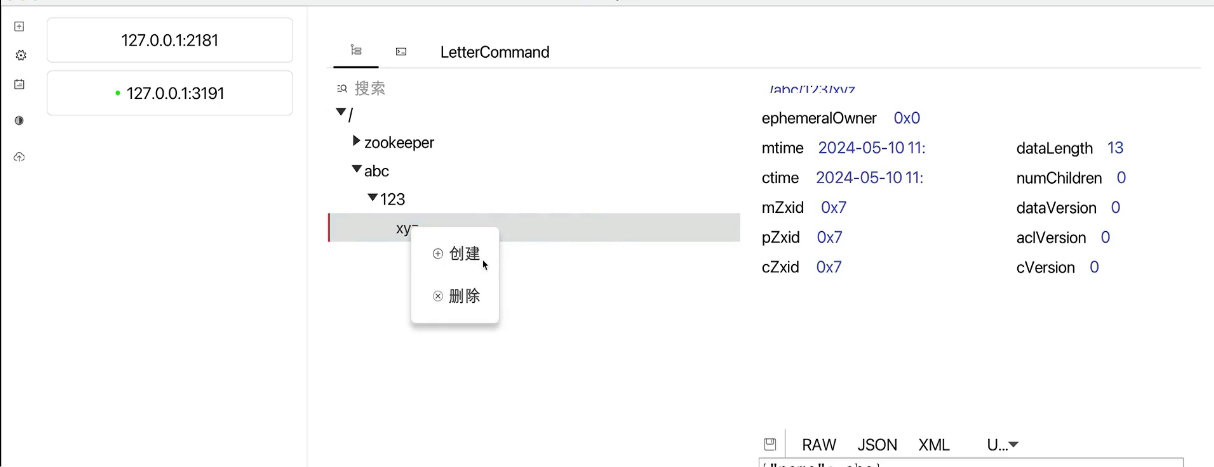
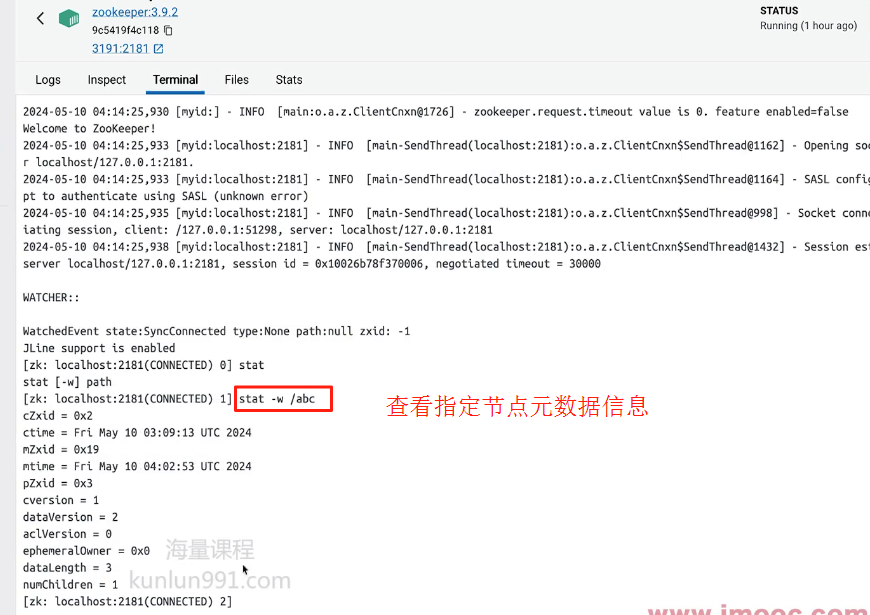
九、Zookeeper节点元数据信息
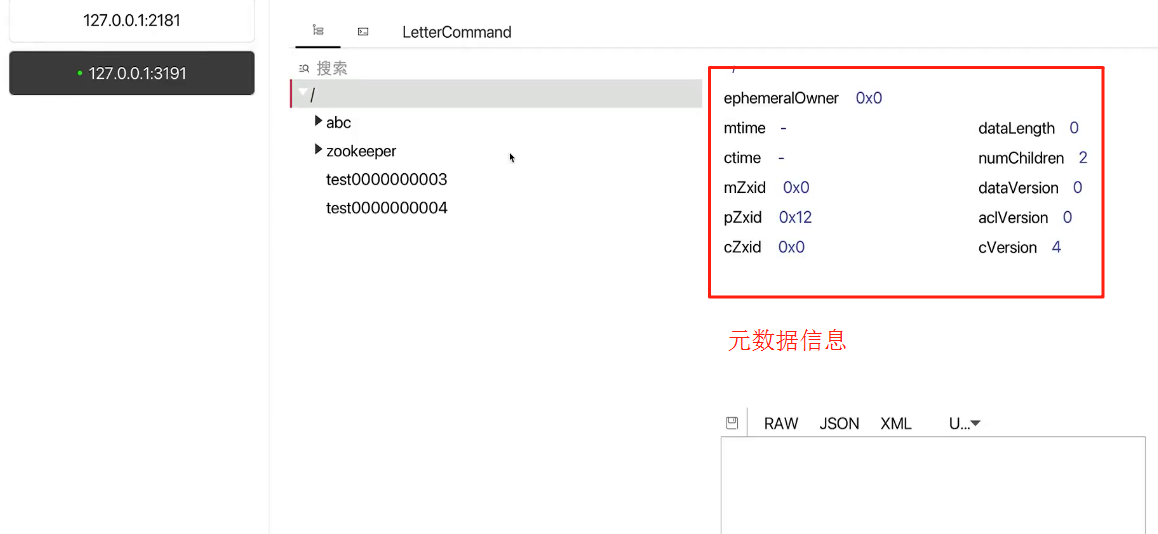
cZxid = 0x0  #创建事务ID
ctime= Thu Jan 01 08:00:00 CST1970   #创建时间
mZxid = 0x0  #修改事务ID
mtime = Thu Jan 01 08:00:00 CST 1970  #修改时间
pZxid = 0x0 #最新更新的子节点的事务ID
cversion =-2 #子节点版本号
dataVersion = 0 #数据版本
aclVersion = 0 #权限版本
ephemeralOwner = 0x0 #临时节点,归属于哪一个sessionId的
dataLength = 0 #数据长度
numChildren = 2 #子节点数量
十、Zookeeper节点事件监听
watcher主要有:
创建节点;
修改节点;
删除节点;
子节点事件;
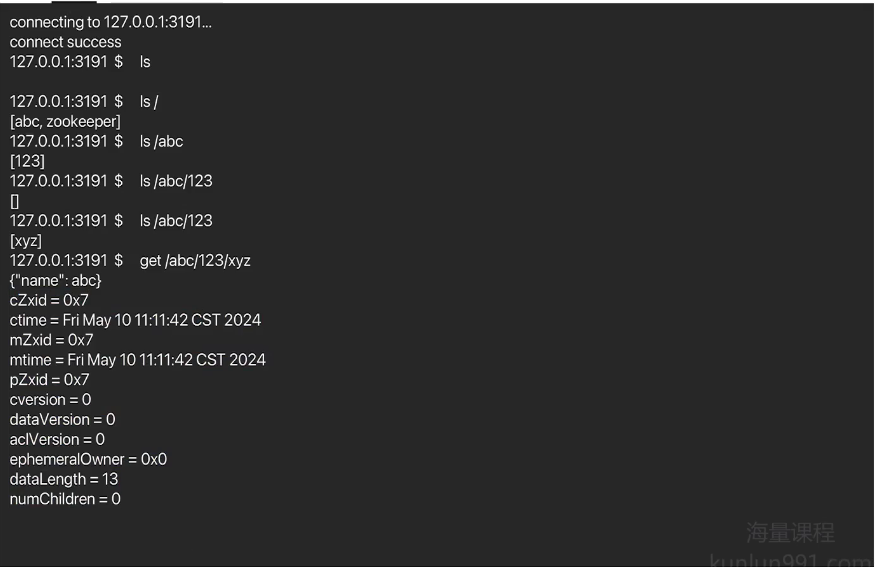
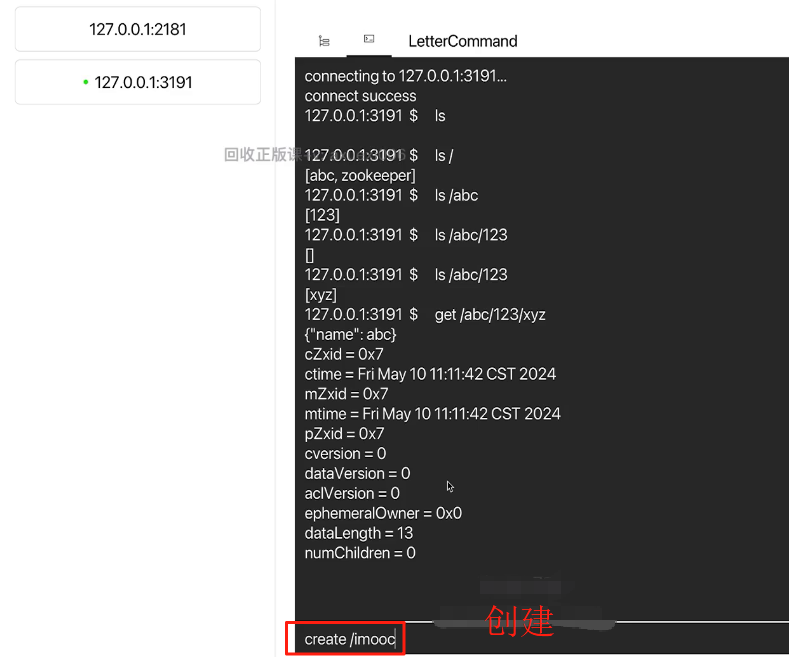
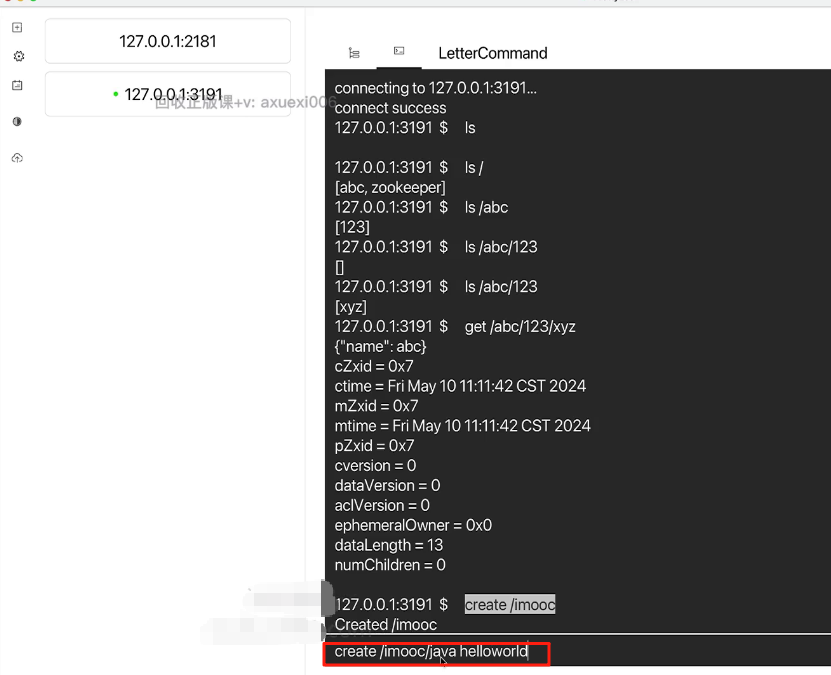
创建节点事件:
路径/abc/imooc不存在
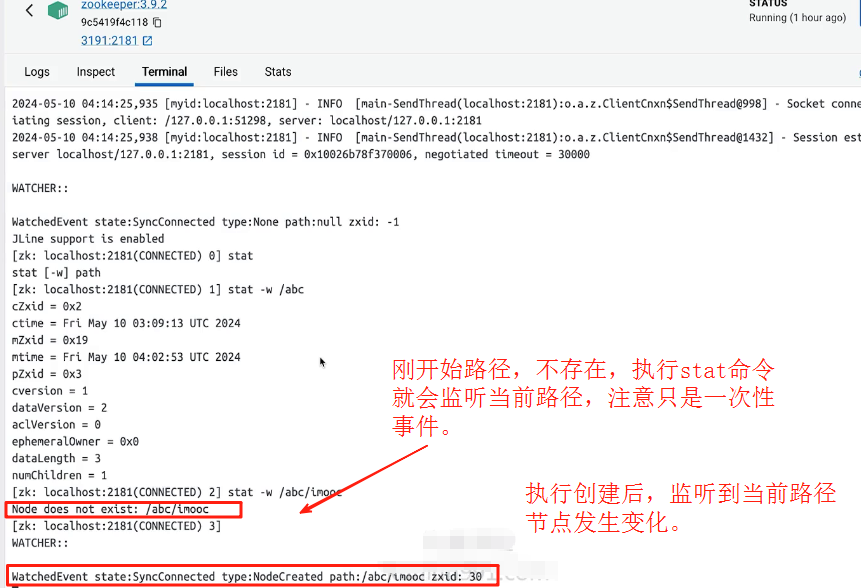
执行创建
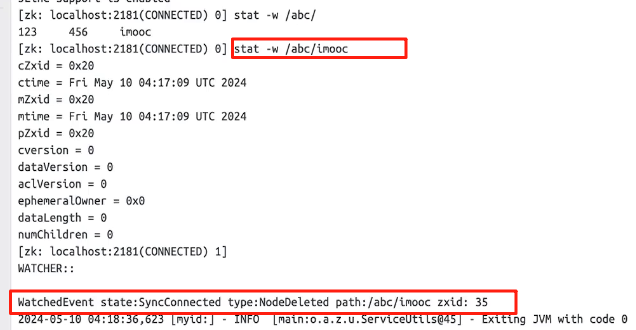
删除事件
覆盖事件
覆盖前

执行修改覆盖
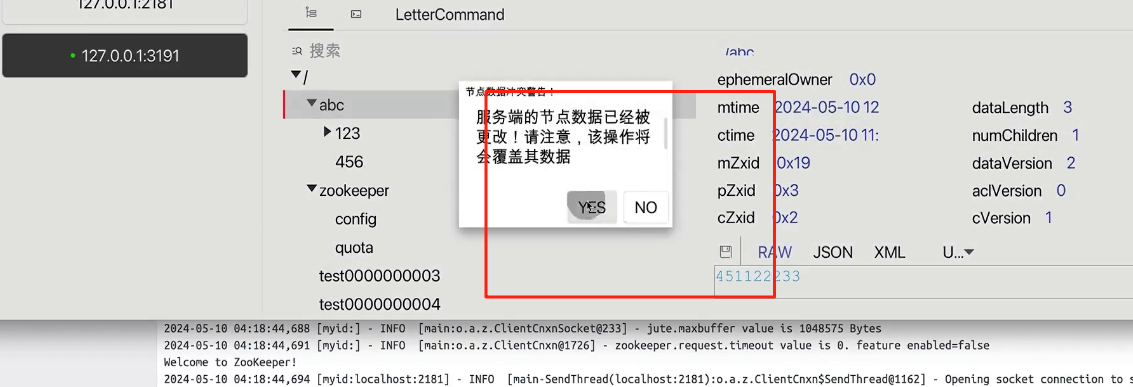
修改后
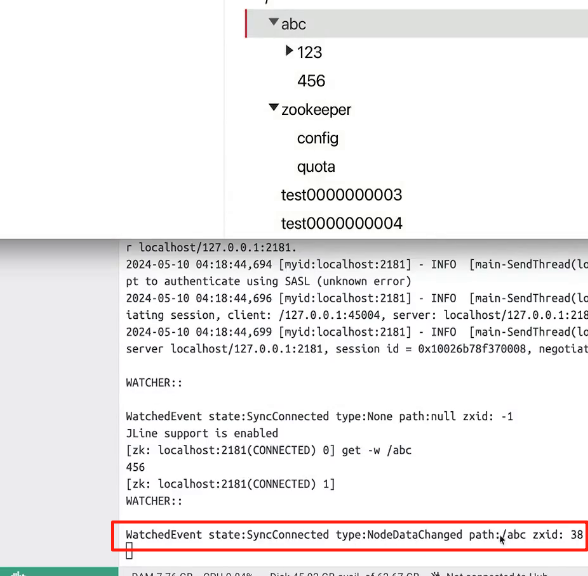
监听子节点事件
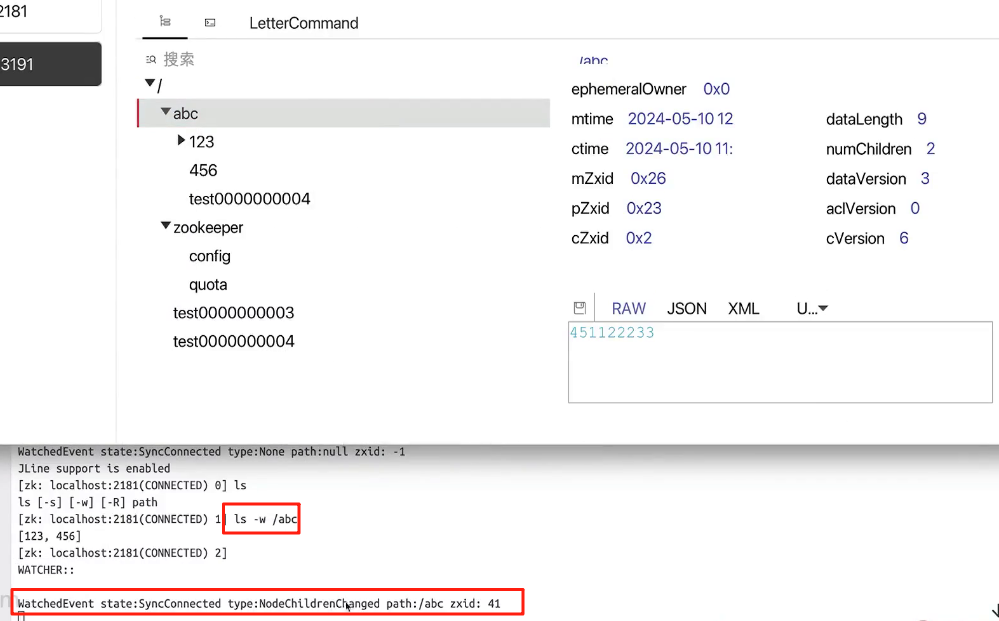
注意:节点事件是一次性节点事件!
十一、实现Curator整合Netty服务
添加Zookeeper客户端Curator依赖
<!-- zookeeper client--><dependency><groupId>org.apache.curator</groupId><artifactId>curator-framework</artifactId><version>5.5.0</version></dependency><dependency><groupId>org.apache.curator</groupId><artifactId>curator-recipes</artifactId><version>$5.5.0</version></dependency>创建CutatorConfig
package com.chat.util;import org.apache.curator.RetryPolicy;
import org.apache.curator.framework.CuratorFramework;
import org.apache.curator.framework.CuratorFrameworkFactory;
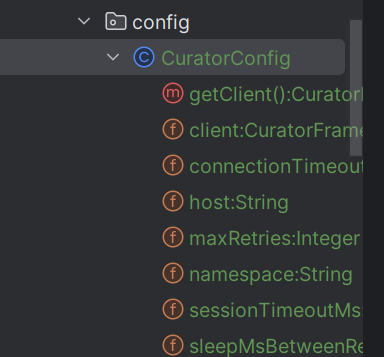
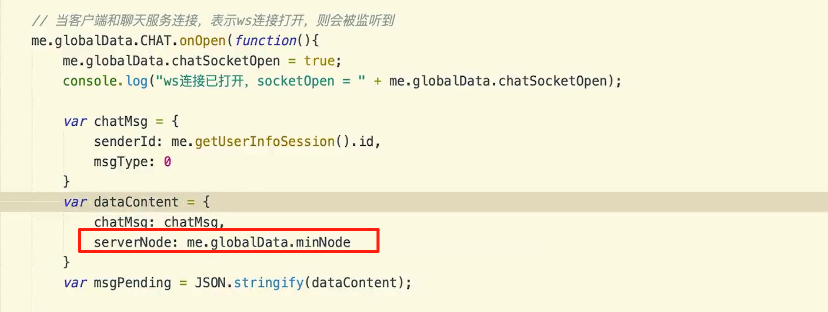
import org.apache.curator.retry.ExponentialBackoffRetry;public class CuratorConfig {private static String host = "127.0.0.1:3191"; // 单机/集群的ip:port地址private static Integer connectionTimeoutMs = 30 * 1000; // 连接超时时间private static Integer sessionTimeoutMs = 3 * 1000; // 会话超时时间private static Integer sleepMsBetweenRetry = 2 * 1000; // 每次重试的间隔时间private static Integer maxRetries = 3; // 最大重试次数private static String namespace = "itzixi-im"; // 命名空间(root根节点名称)private static CuratorFramework client;static {RetryPolicy backoffRetry = new ExponentialBackoffRetry(sleepMsBetweenRetry, maxRetries);// 声明初始化客户端client = CuratorFrameworkFactory.builder().connectString(host).connectionTimeoutMs(connectionTimeoutMs).sessionTimeoutMs(sessionTimeoutMs).retryPolicy(backoffRetry).namespace(namespace).build();client.start(); // 启动curator客户端}public static CuratorFramework getClient() {return client;}}
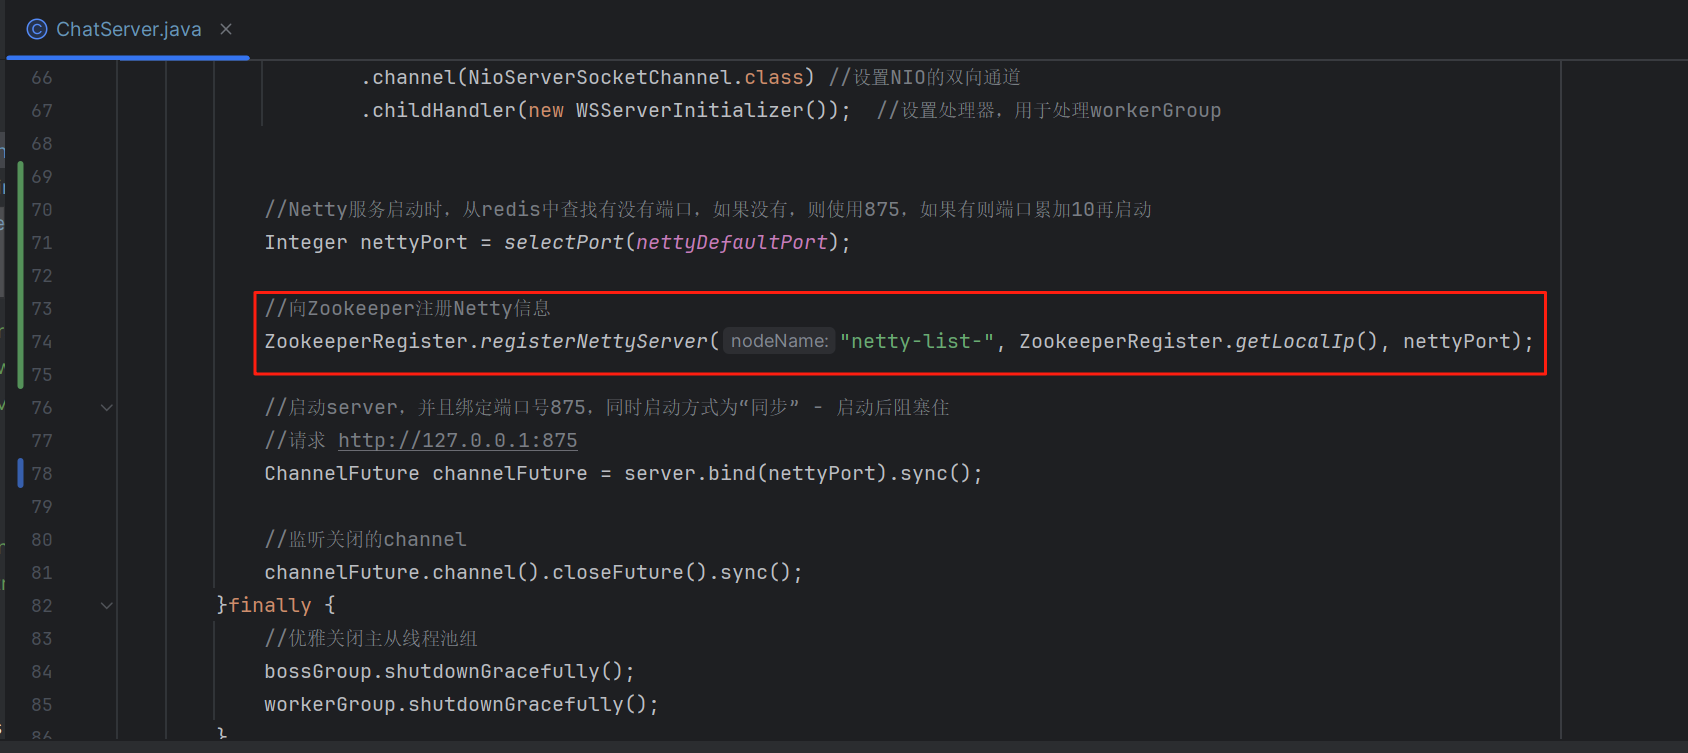
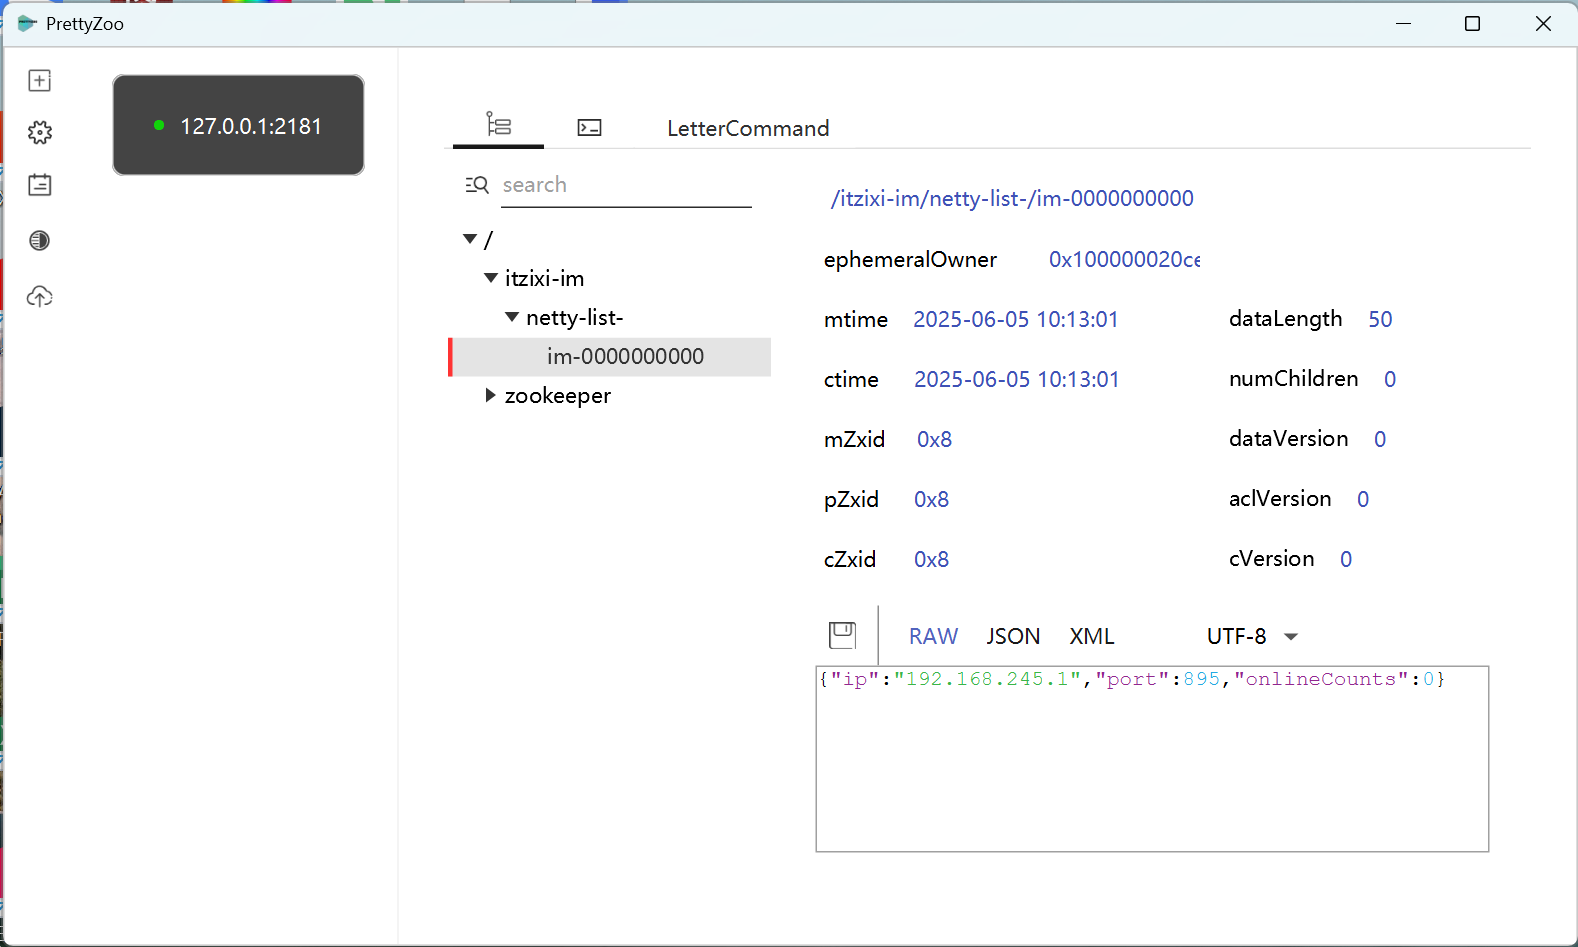
十二、向Zookeeper注册Netty信息
创建Zookeeper注册工具类
package com..chat.util;import com..chat.domain.netty.NettyServerNode;
import com..common.core.utils.JsonUtils;
import org.apache.curator.framework.CuratorFramework;
import org.apache.curator.framework.recipes.locks.InterProcessReadWriteLock;
import org.apache.zookeeper.CreateMode;
import org.apache.zookeeper.data.Stat;import java.net.InetAddress;
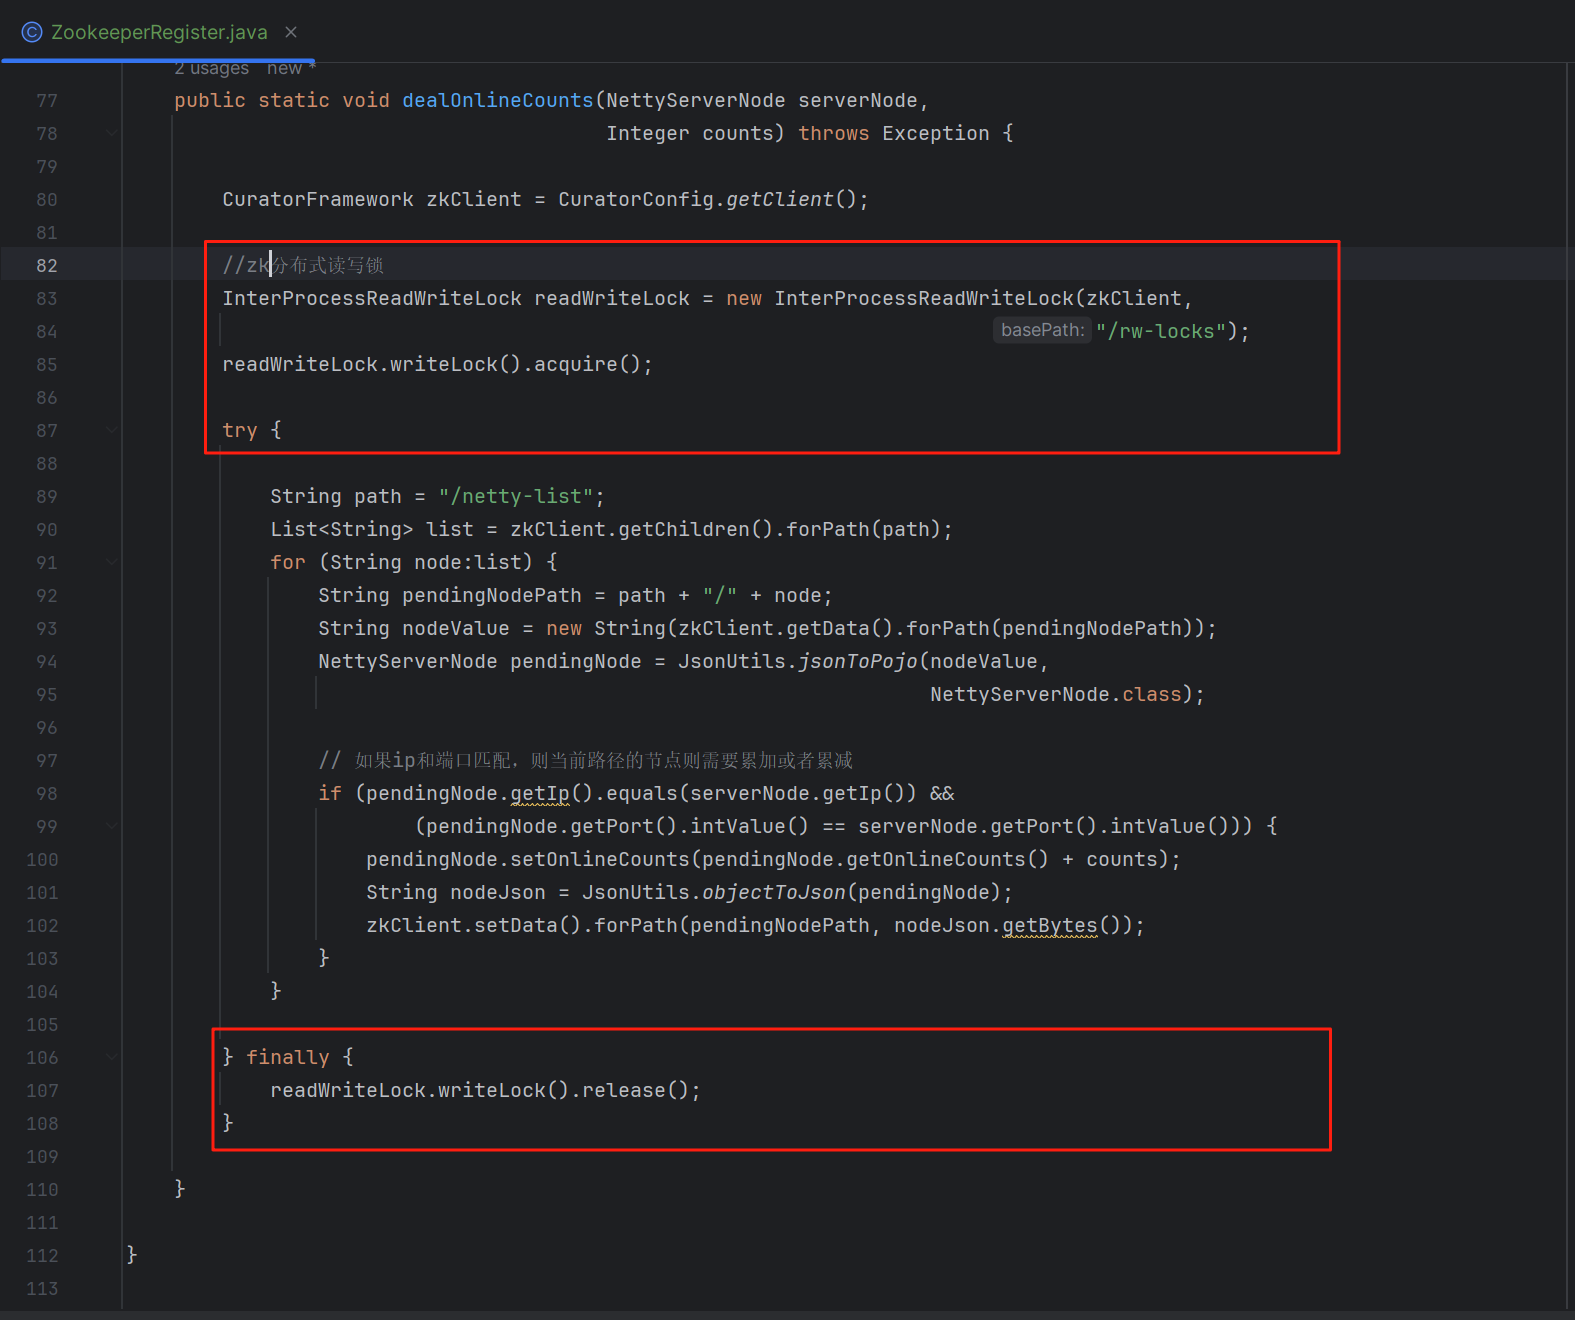
import java.util.List;public class ZookeeperRegister {public static void registerNettyServer(String nodeName,String ip,Integer port) throws Exception {CuratorFramework zkClient = CuratorConfig.getClient();String path = "/" + nodeName;Stat stat = zkClient.checkExists().forPath(path);if (stat == null) {zkClient.create().creatingParentsIfNeeded().withMode(CreateMode.PERSISTENT).forPath(path);} else {System.out.println(stat.toString());}// 创建对应的临时节点,值可以放在线人数,默认为初始化的0NettyServerNode serverNode = new NettyServerNode();serverNode.setIp(ip);serverNode.setPort(port);String nodeJson = JsonUtils.objectToJson(serverNode);zkClient.create().withMode(CreateMode.EPHEMERAL_SEQUENTIAL).forPath(path + "/im-", nodeJson.getBytes());}public static String getLocalIp() throws Exception {InetAddress addr = InetAddress.getLocalHost();String ip=addr.getHostAddress();System.out.println("本机IP地址:" + ip);return ip;}/*** 增加在线人数* @param serverNode*/public static void incrementOnlineCounts(NettyServerNode serverNode) throws Exception {dealOnlineCounts(serverNode, 1);}/*** 减少在线人数* @param serverNode*/public static void decrementOnlineCounts(NettyServerNode serverNode) throws Exception {dealOnlineCounts(serverNode, -1);}/*** 处理在线人数的增减* @param serverNode* @param counts*/public static void dealOnlineCounts(NettyServerNode serverNode,Integer counts) throws Exception {CuratorFramework zkClient = CuratorConfig.getClient();InterProcessReadWriteLock readWriteLock = new InterProcessReadWriteLock(zkClient,"/rw-locks");readWriteLock.writeLock().acquire();try {String path = "/server-list";List<String> list = zkClient.getChildren().forPath(path);for (String node:list) {String pendingNodePath = path + "/" + node;String nodeValue = new String(zkClient.getData().forPath(pendingNodePath));NettyServerNode pendingNode = JsonUtils.jsonToPojo(nodeValue,NettyServerNode.class);// 如果ip和端口匹配,则当前路径的节点则需要累加或者累减if (pendingNode.getIp().equals(serverNode.getIp()) &&(pendingNode.getPort().intValue() == serverNode.getPort().intValue())) {pendingNode.setOnlineCounts(pendingNode.getOnlineCounts() + counts);String nodeJson = JsonUtils.objectToJson(pendingNode);zkClient.setData().forPath(pendingNodePath, nodeJson.getBytes());}}} finally {readWriteLock.writeLock().release();}}}修改ChatServer
启动Netty服务查看效果
十三、Curator整合SpringBoot
SpringBoot项目添加Zookeeper依赖
<!-- zookeeper--><dependency><groupId>org.apache.curator</groupId><artifactId>curator-framework</artifactId><version>5.5.0</version></dependency><dependency><groupId>org.apache.curator</groupId><artifactId>curator-recipes</artifactId><version>5.5.0</version></dependency><dependency><groupId>org.apache.zookeeper</groupId><artifactId>zookeeper</artifactId><version>3.9.2</version></dependency><!-- zookeeper-->yml添加zookeeper配置
#zookeeper配置
zookeeper:curator:#单机/集群的ip:port地址#集群host用法 - 127.0.0.1:2181,127.0.0.1:2182host: 127.0.0.1:2181#连接超时时间connectionTimeoutMs: 30000#会话超时时间sessionTimeoutMs: 3000#每次重试的间隔时间sleepMsBetweenRetry: 2000#最大重试次数maxRetries: 3#命名空间(root根节点名称)namespace: kefu-im
将前面的CuratorConfig类复制到当前项目中
修改CuratorConfig
package com.core.config;import lombok.Data;
import lombok.extern.slf4j.Slf4j;
import org.apache.curator.RetryPolicy;
import org.apache.curator.framework.CuratorFramework;
import org.apache.curator.framework.CuratorFrameworkFactory;
import org.apache.curator.retry.ExponentialBackoffRetry;
import org.springframework.beans.factory.annotation.Value;
import org.springframework.boot.context.properties.ConfigurationProperties;
import org.springframework.context.annotation.Bean;
import org.springframework.stereotype.Component;@Component
@Data
@Slf4j
@ConfigurationProperties(prefix = "zookeeper.curator")
public class CuratorConfig {// 单机/集群的ip:port地址private String host;// 连接超时时间private Integer connectionTimeoutMs;// 会话超时时间private Integer sessionTimeoutMs;// 每次重试的间隔时间private Integer sleepMsBetweenRetry;// 最大重试次数private Integer maxRetries;// 命名空间(root根节点名称)private String namespace;@Bean("curatorClient")public CuratorFramework curatorClient() {//重试策略RetryPolicy retryPolicy = new ExponentialBackoffRetry(sleepMsBetweenRetry, maxRetries);// 声明初始化客户端CuratorFramework client = CuratorFrameworkFactory.builder().connectString(host).connectionTimeoutMs(connectionTimeoutMs).sessionTimeoutMs(sessionTimeoutMs).retryPolicy(retryPolicy).namespace(namespace).build();client.start();     // 启动curator客户端//测试代码
//       try{
//           client.create().creatingParentsIfNeeded().forPath("/springboot/test", //"springcloud".getBytes());
//        } catch (Exception e) {
//
//        }return client;}}
十四、手写客户端负载均衡值之最少连接数
前端代码
后端代码
package com.core.controller;import cn.hutool.core.collection.CollUtil;
import cn.hutool.core.date.DateUtil;
import com.alibaba.fastjson.JSON;
import com.base.domain.ChatConfig;
import com.base.domain.ChatSeatorStatistics;
import com.base.domain.vo.ChatSeatorStatisticsVo;
import com.base.domain.vo.HomeLineChartStatisticsVo;
import com.base.domain.vo.HomeStatisticsVo;
import com.base.service.IChatSeatorStatisticsService;
import com.chat.domain.netty.NettyServerNode;
import com.common.core.utils.JsonUtils;
import com.common.core.web.controller.BaseController;
import com.common.core.web.domain.AjaxResult;
import com.common.core.web.page.TableDataInfo;
import com.common.log.annotation.Log;
import com.common.log.enums.BusinessType;
import com.common.security.annotation.RequiresPermissions;
import org.apache.curator.framework.CuratorFramework;
import org.springframework.beans.factory.annotation.Autowired;
import org.springframework.web.bind.annotation.*;import javax.annotation.Resource;
import java.util.ArrayList;
import java.util.Comparator;
import java.util.List;
import java.util.Optional;/*** 客服数据统计Controller** @author milo.qu* @date 2025-05-27*/
@RestController
@RequestMapping("/home")
public class HomeController extends BaseController
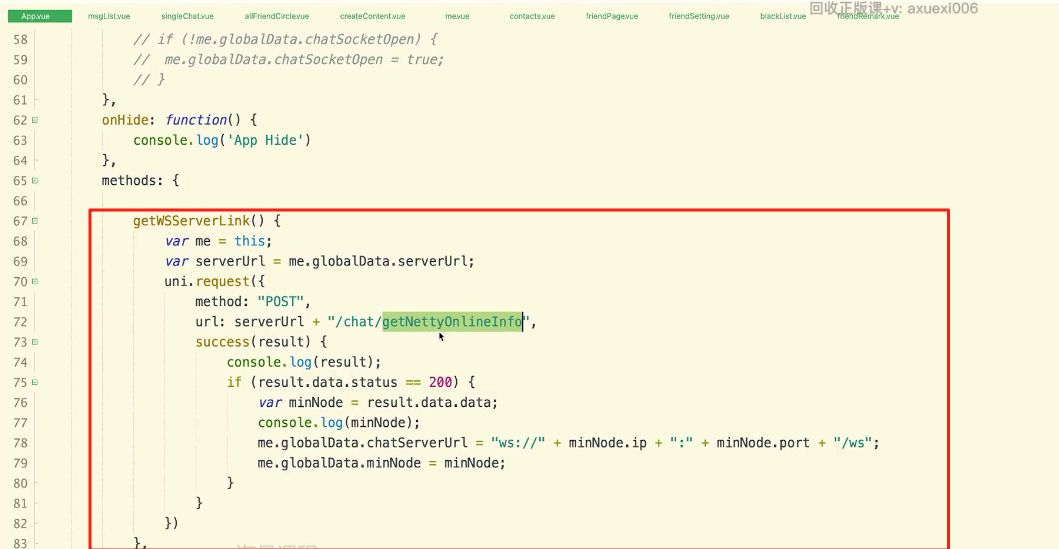
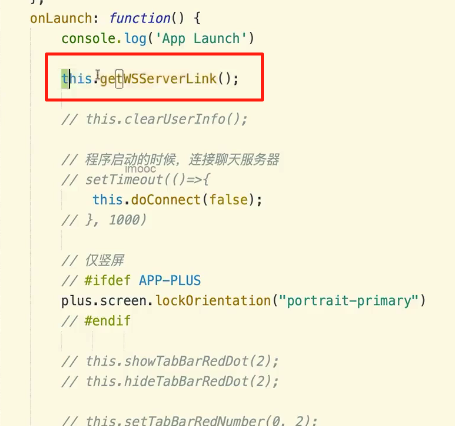
{@Resource(name = "curatorClient")private CuratorFramework zkClinent;/*** 获取Netty端口信息*/@PostMapping("getNettyOnlineInfo")public AjaxResult getNettyOnlineInfo(@RequestBody ChatConfig chatConfig) throws Exception {//从Zookeeper中获得当前已经注册的netty服务列表String path = "/service-list";List<String> list = zkClinent.getChildren().forPath(path);if(CollUtil.isNotEmpty(list)){logger.info("/service-list -> " + JSON.toJSONString(list));}List<NettyServerNode> serverNodeList = new ArrayList<>();NettyServerNode minNode = null;for (String node: list) {String nodeValue = new String(zkClinent.getData().forPath(path + "/" + node));logger.info(nodeValue);NettyServerNode serverNode = JsonUtils.jsonToPojo(nodeValue, NettyServerNode.class);serverNodeList.add(serverNode);//计算当前哪个zk的node是最少连接数,获取[ip:port]返回给前端Optional<NettyServerNode> minNodeOptional = serverNodeList.stream().min(Comparator.comparing(nettyServerNode -> nettyServerNode.getOnlineCounts()));minNode = minNodeOptional.get();}return success(minNode);}
}
十五、Zookeeper在线人数累加累减与清除
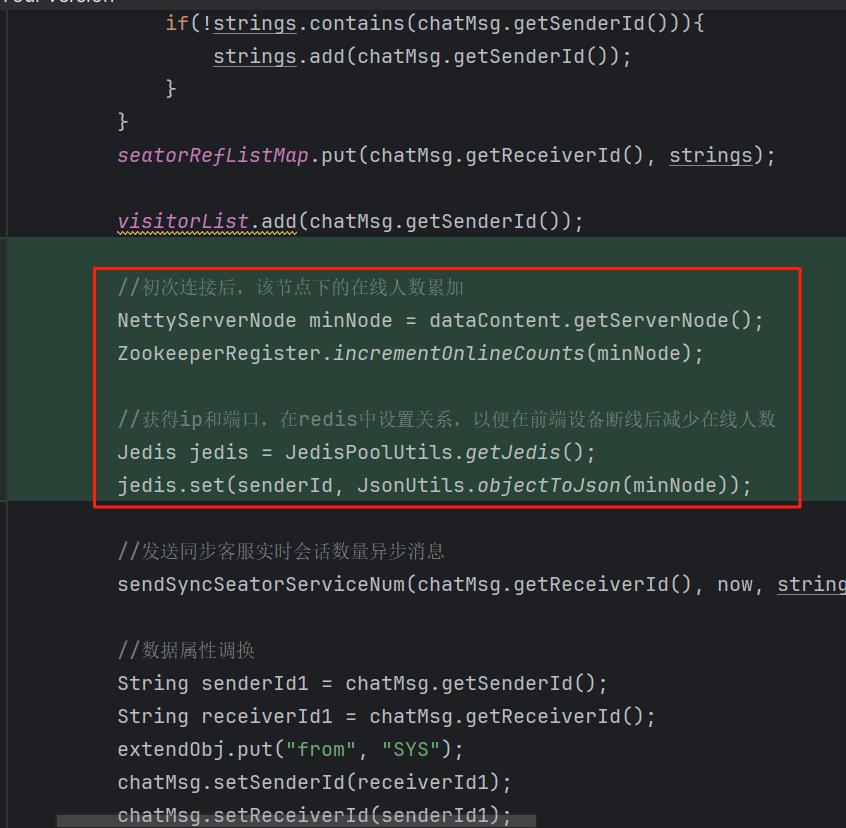
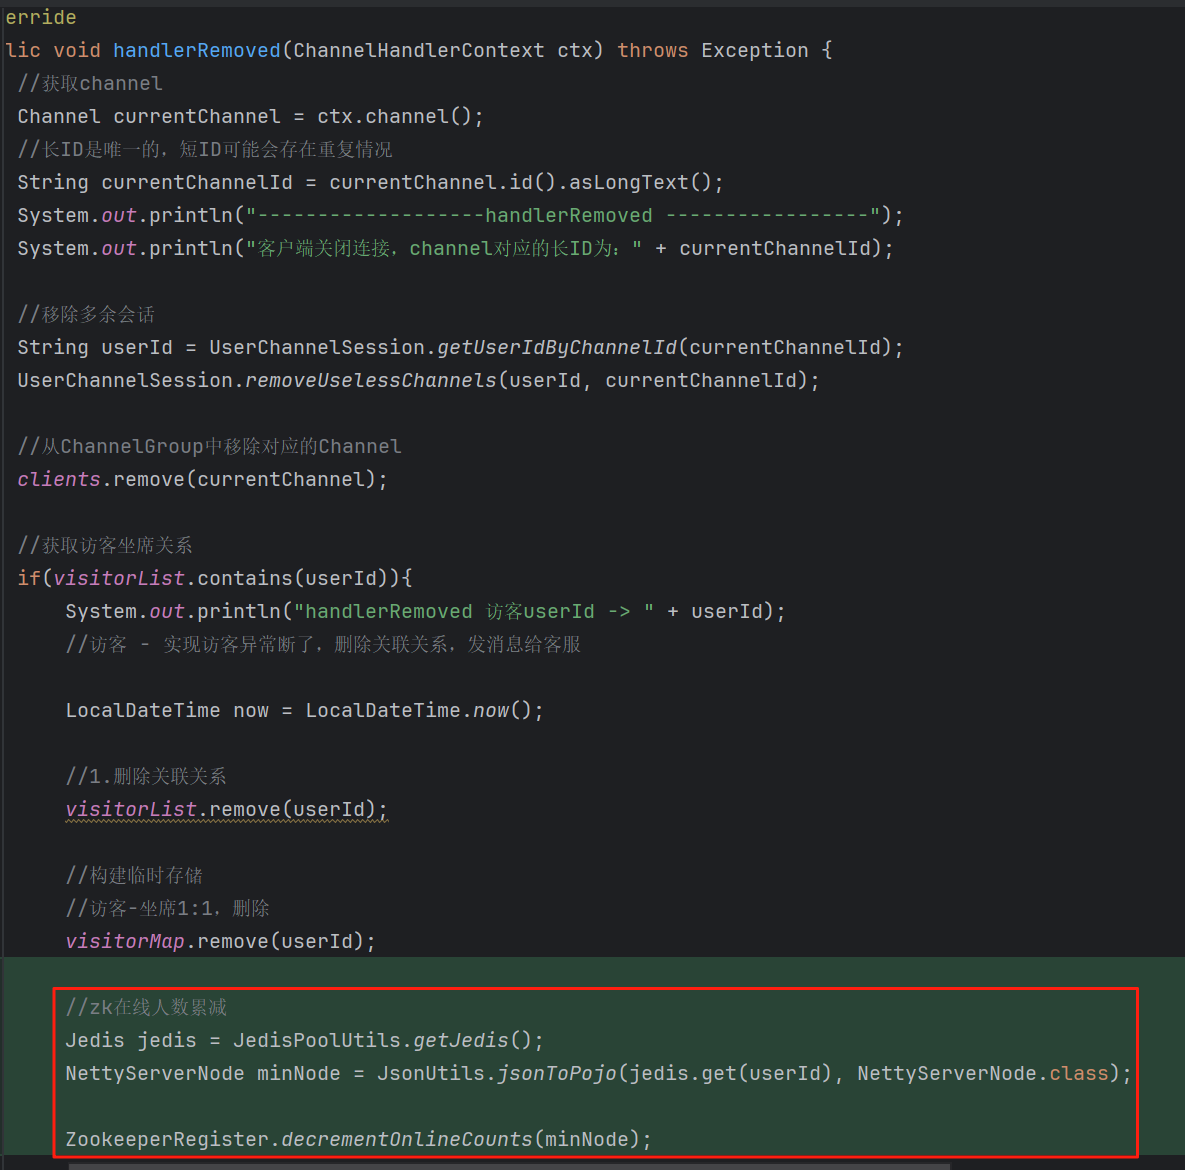
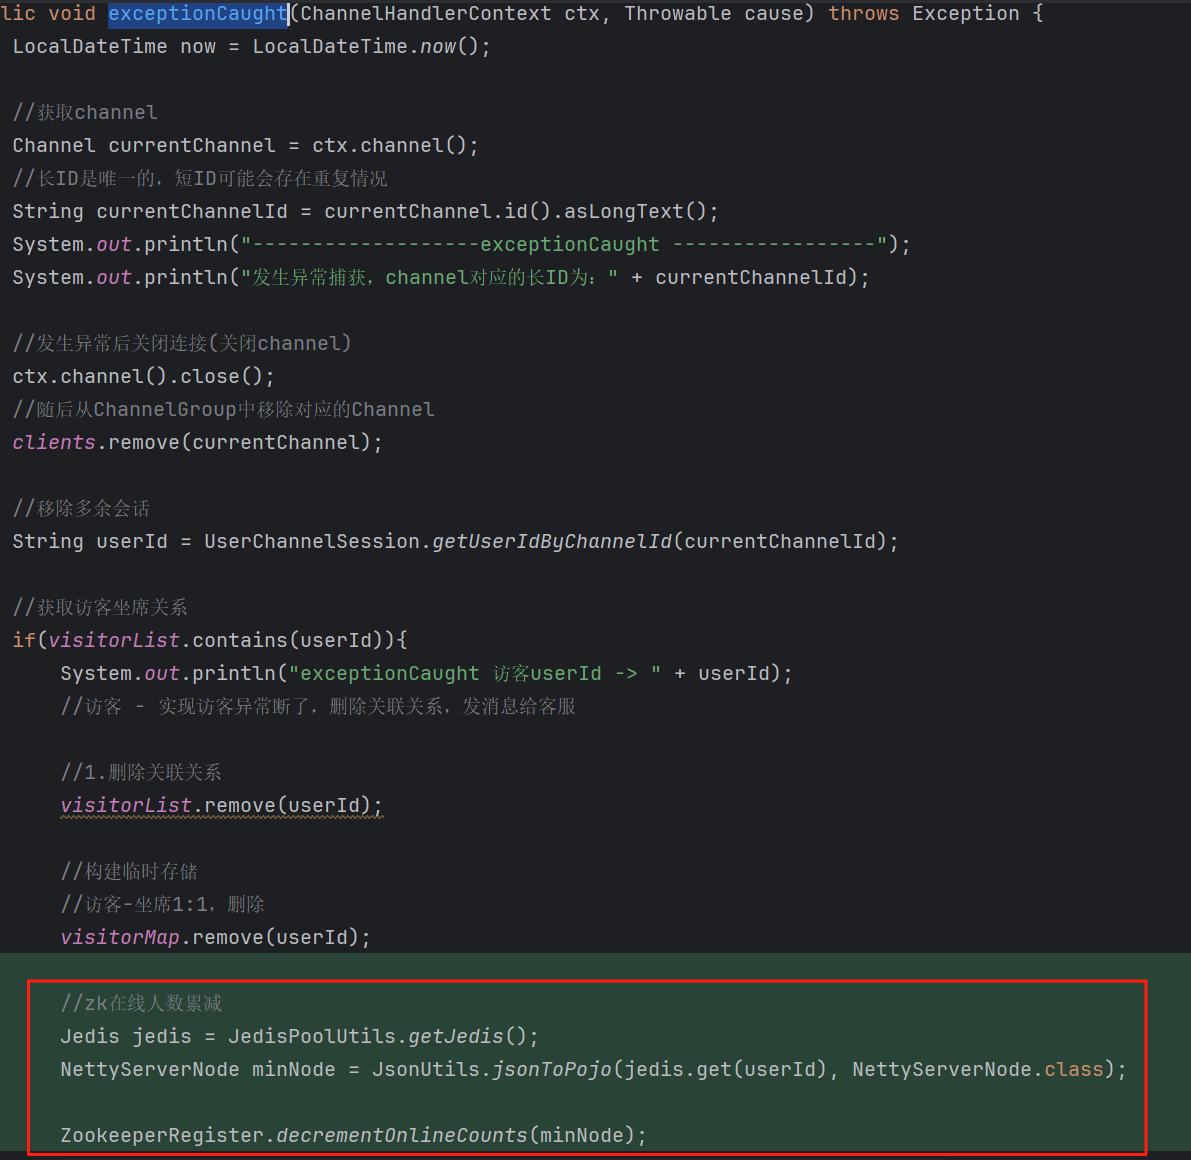
修改ChatHandler
在初始化管道的时候,做在线人数累加操作
在handlerRemoved事件和exceptionCaught事件,做在线人数累减操作
十六、Curator控制分布式读写锁

十七、Redis中端口残留缓存清理
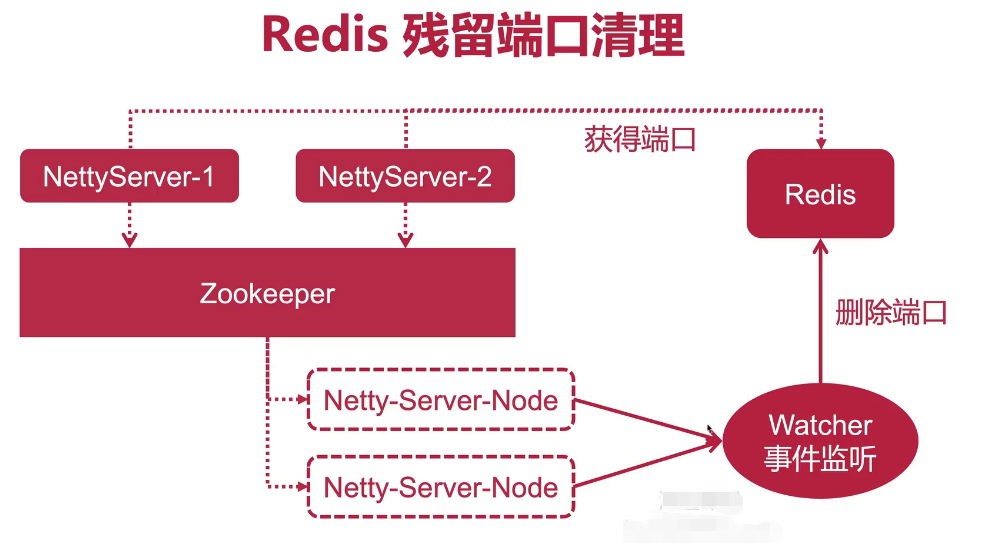
十八、SpringnBoot监听ZK节点删除残留缓存端口
package com.core.config;import cn.hutool.core.util.ObjUtil;
import com.chat.domain.netty.NettyServerNode;
import com.common.core.utils.JsonUtils;
import com.common.redis.service.RedisService;
import lombok.Data;
import lombok.extern.slf4j.Slf4j;
import org.apache.curator.RetryPolicy;
import org.apache.curator.framework.CuratorFramework;
import org.apache.curator.framework.CuratorFrameworkFactory;
import org.apache.curator.framework.recipes.cache.CuratorCache;
import org.apache.curator.retry.ExponentialBackoffRetry;
import org.springframework.amqp.rabbit.core.RabbitAdmin;
import org.springframework.beans.factory.annotation.Autowired;
import org.springframework.beans.factory.annotation.Value;
import org.springframework.boot.context.properties.ConfigurationProperties;
import org.springframework.context.annotation.Bean;
import org.springframework.data.redis.core.RedisOperations;
import org.springframework.data.redis.core.RedisTemplate;
import org.springframework.stereotype.Component;import javax.annotation.Resource;@Component
@Data
@Slf4j
@ConfigurationProperties(prefix = "zookeeper.curator")
public class CuratorConfig {// 单机/集群的ip:port地址private String host;// 连接超时时间private Integer connectionTimeoutMs;// 会话超时时间private Integer sessionTimeoutMs;// 每次重试的间隔时间private Integer sleepMsBetweenRetry;// 最大重试次数private Integer maxRetries;// 命名空间(root根节点名称)private String namespace;public static final String PATH = "/netty-list";@Autowiredprivate RedisService redisService;@Resourceprivate RabbitAdmin rabbitAdmin;@Bean("curatorClient")public CuratorFramework curatorClient() {//重试策略RetryPolicy retryPolicy = new ExponentialBackoffRetry(sleepMsBetweenRetry, maxRetries);// 声明初始化客户端CuratorFramework client = CuratorFrameworkFactory.builder().connectString(host).connectionTimeoutMs(connectionTimeoutMs).sessionTimeoutMs(sessionTimeoutMs).retryPolicy(retryPolicy).namespace(namespace).build();client.start(); // 启动curator客户端//初始化注册节点的watcher事件监听addWatcher(PATH, client);//测试代码
// try{
// client.create().creatingParentsIfNeeded().forPath("/springboot/test", "springcloud".getBytes());
// } catch (Exception e) {
//
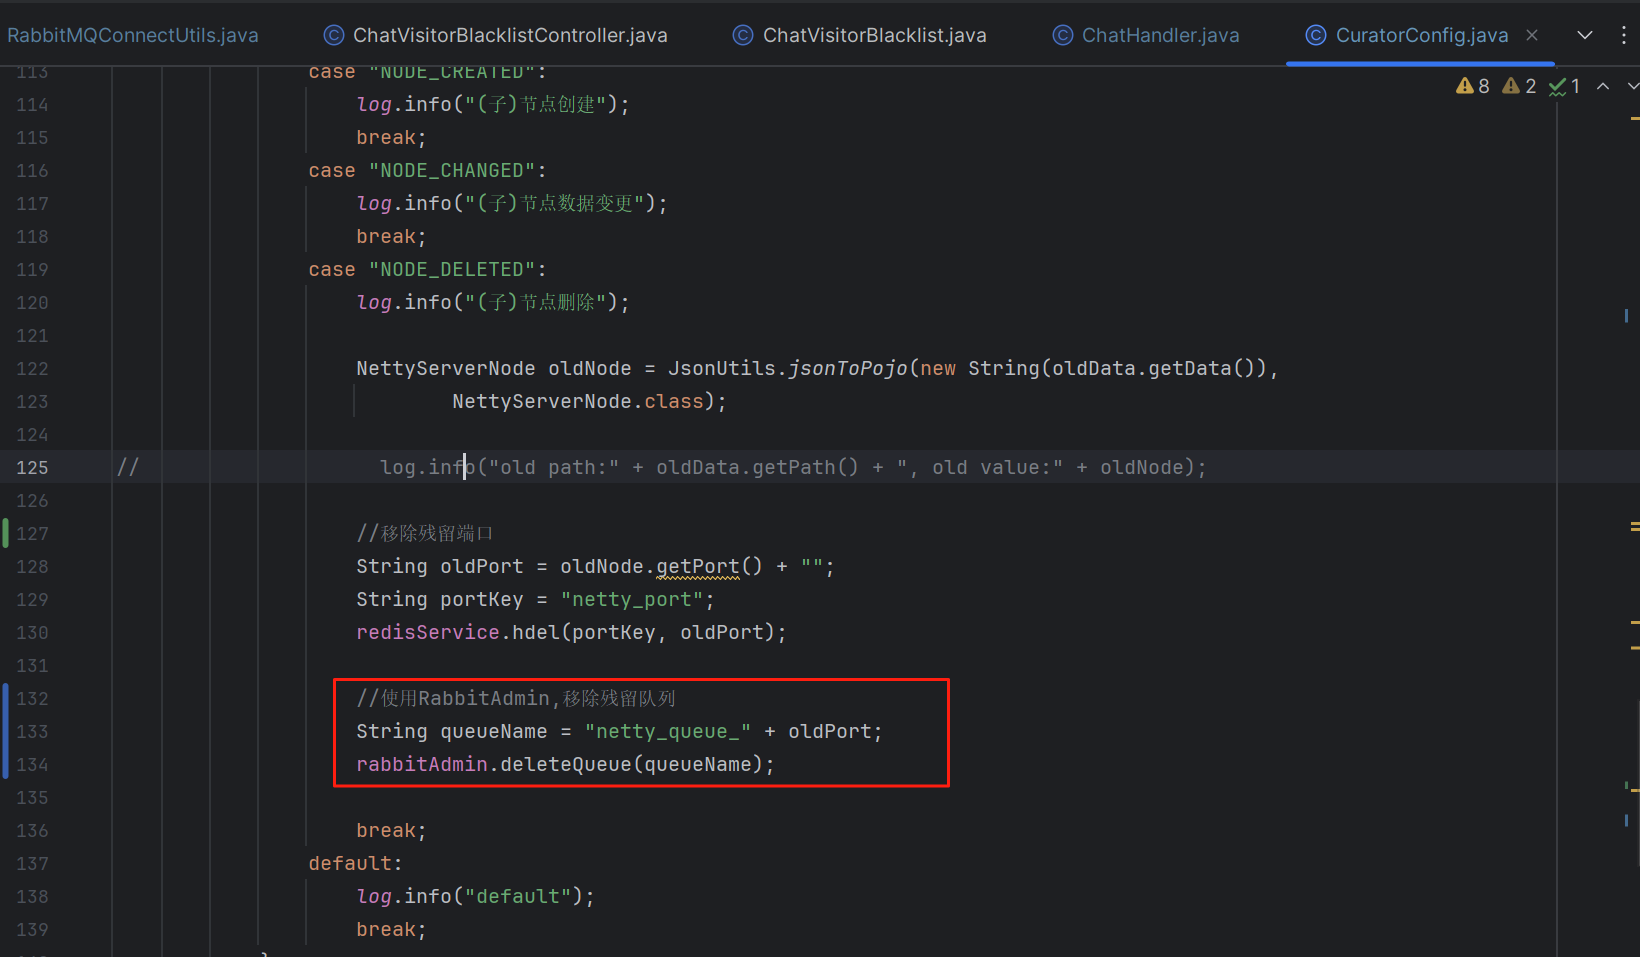
// }return client;}/*** 注册节点的事件监听* @param path* @param client*/public void addWatcher(String path, CuratorFramework client) {CuratorCache curatorCache = CuratorCache.build(client, path);//listenable - 能力列表curatorCache.listenable().addListener((type, oldData, data) -> {//type - 当前监听到的事件类型//oldData - 节点更新前的数据, 注意,oldData不一定有值,比如创建节点,oldData就是空的//data - 节点更新后的数据, 注意,data不一定有值,比如删除节点,data就是空的log.info(type.name());if(ObjUtil.isNotNull(oldData)){log.info("old path:" + oldData.getPath() + ", old value:" + oldData.getData());}if(ObjUtil.isNotNull(data)){log.info("new path:" + data.getPath() + ", new value:" + data.getData());}//NODE_CREATED//NODE_CHANGED//NODE_DELETEDswitch (type.name()) {case "NODE_CREATED":log.info("(子)节点创建");break;case "NODE_CHANGED":log.info("(子)节点数据变更");break;case "NODE_DELETED":log.info("(子)节点删除");NettyServerNode oldNode = JsonUtils.jsonToPojo(new String(oldData.getData()),NettyServerNode.class);// log.info("old path:" + oldData.getPath() + ", old value:" + oldNode);String oldPort = oldNode.getPort() + "";String portKey = "netty_port";redisService.hdel(portKey, oldPort);String queueName = "netty_queue_" + oldPort;rabbitAdmin.deleteQueue(queueName);break;default:log.info("default");break;}});curatorCache.start();}}
十九、Netty服务监听消息队列
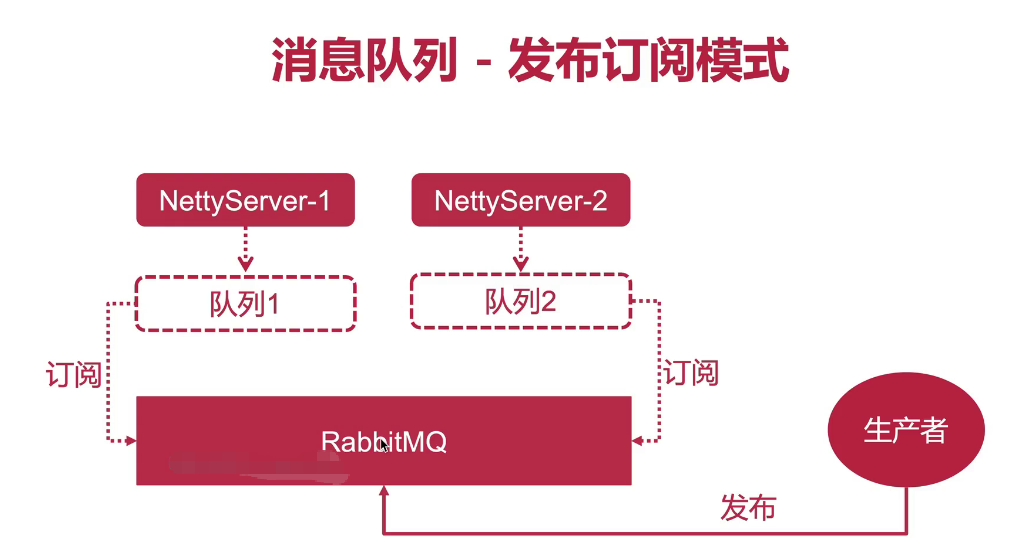
注:
这里使用消息队列 - 发布订阅模式,是因为我们的NettyServer的队列是动态生成的。
修改RabbitMQConnectUtils类,编写
package com.chat.mq;import com.rabbitmq.client.*;
import com.chat.domain.netty.DataContent;
import com.chat.domain.netty.UserChannelSession;
import com.common.core.utils.JsonUtils;import java.io.IOException;
import java.util.ArrayList;
import java.util.List;public class RabbitMQConnectUtils {private final List<Connection> connections = new ArrayList<>();private final int maxConnection = 20;// 开发环境 devprivate final String host = "127.0.0.1";private final int port = 5682;private final String username = "guest";private final String password = "guest";private final String virtualHost = "/";// 生产环境 prod//private final String host = "";//private final int port = 5672;//private final String username = "123";//private final String password = "123";//private final String virtualHost = "123";public ConnectionFactory factory;public ConnectionFactory getRabbitMqConnection() {return getFactory();}public ConnectionFactory getFactory() {initFactory();return factory;}private void initFactory() {try {if (factory == null) {factory = new ConnectionFactory();factory.setHost(host);factory.setPort(port);factory.setUsername(username);factory.setPassword(password);factory.setVirtualHost(virtualHost);}} catch (Exception e) {e.printStackTrace();}}public void sendMsg(String message, String queue) throws Exception {Connection connection = getConnection();Channel channel = connection.createChannel();channel.basicPublish("",queue,MessageProperties.PERSISTENT_TEXT_PLAIN,message.getBytes("utf-8"));channel.close();setConnection(connection);}public void sendMsg(String message, String exchange, String routingKey) throws Exception {Connection connection = getConnection();Channel channel = connection.createChannel();channel.basicPublish(exchange,routingKey,MessageProperties.PERSISTENT_TEXT_PLAIN,message.getBytes("utf-8"));channel.close();setConnection(connection);}public GetResponse basicGet(String queue, boolean autoAck) throws Exception {GetResponse getResponse = null;Connection connection = getConnection();Channel channel = connection.createChannel();getResponse = channel.basicGet(queue, autoAck);channel.close();setConnection(connection);return getResponse;}public Connection getConnection() throws Exception {return getAndSetConnection(true, null);}public void setConnection(Connection connection) throws Exception {getAndSetConnection(false, connection);}public void listen(String exchangeName, String queueName) throws Exception {Connection connection = getConnection();Channel channel = connection.createChannel();// FANOUT 发布订阅模式(广播模式)/*** 参数1 - 交换机名称* 参数2 - 交换机类型, 这里采用FANOUT,即发布订阅模式(广播模式)* 参数3 - 当前交换机是否持久化* 参数4 - 是否自动删除* 参数5 - 其他参数Map结构*/channel.exchangeDeclare(exchangeName,BuiltinExchangeType.FANOUT,true, false, false, null);/*** 参数1 - 队列名称* 参数2 - 当前队列是否持久化* 参数3 - 是否为独占队列* 参数4 - 是否自动删除* 参数5 - 其他参数Map结构*/channel.queueDeclare(queueName, true, false, false, null);//交换和队列的绑定关系,通过队列名称绑定到交换机channel.queueBind(queueName, exchangeName, "");Consumer consumer = new DefaultConsumer(channel){/*** 重写消息配送方法* @param consumerTag 消息的标签(标识)* @param envelope  信封(一些信息,比如交换机路由等等信息)* @param properties 配置信息* @param body 收到的消息数据* @throws IOException*/@Overridepublic void handleDelivery(String consumerTag,Envelope envelope,AMQP.BasicProperties properties,byte[] body) throws IOException {String msg = new String(body);System.out.println("body = " + msg);String exchange = envelope.getExchange();System.out.println("exchange = " + exchange);if (exchange.equalsIgnoreCase(exchangeName)) {DataContent dataContent = JsonUtils.jsonToPojo(msg, DataContent.class);String senderId = dataContent.getChatMsg().getSenderId();String receiverId = dataContent.getChatMsg().getReceiverId();// 广播至集群的其他节点并且发送给用户聊天信息List<io.netty.channel.Channel> receiverChannels =UserChannelSession.getMultiChannels(receiverId);UserChannelSession.sendToTarget(receiverChannels, dataContent);// 广播至集群的其他节点并且同步给自己其他设备聊天信息String currentChannelId = dataContent.getExtend();List<io.netty.channel.Channel> senderChannels =UserChannelSession.getMyOtherChannels(senderId, currentChannelId);UserChannelSession.sendToTarget(senderChannels, dataContent);}}};/*** 开启监听* queue: 监听的队列名* autoAck: 是否自动确认,true:告知mq消费者已经消费的确认通知* callback: 回调函数,处理监听到的消息*/channel.basicConsume(queueName, true, consumer);}private synchronized Connection getAndSetConnection(boolean isGet, Connection connection) throws Exception {getRabbitMqConnection();if (isGet) {if (connections.isEmpty()) {return factory.newConnection();}Connection newConnection = connections.get(0);connections.remove(0);if (newConnection.isOpen()) {return newConnection;} else {return factory.newConnection();}} else {if (connections.size() < maxConnection) {connections.add(connection);}return null;}}}
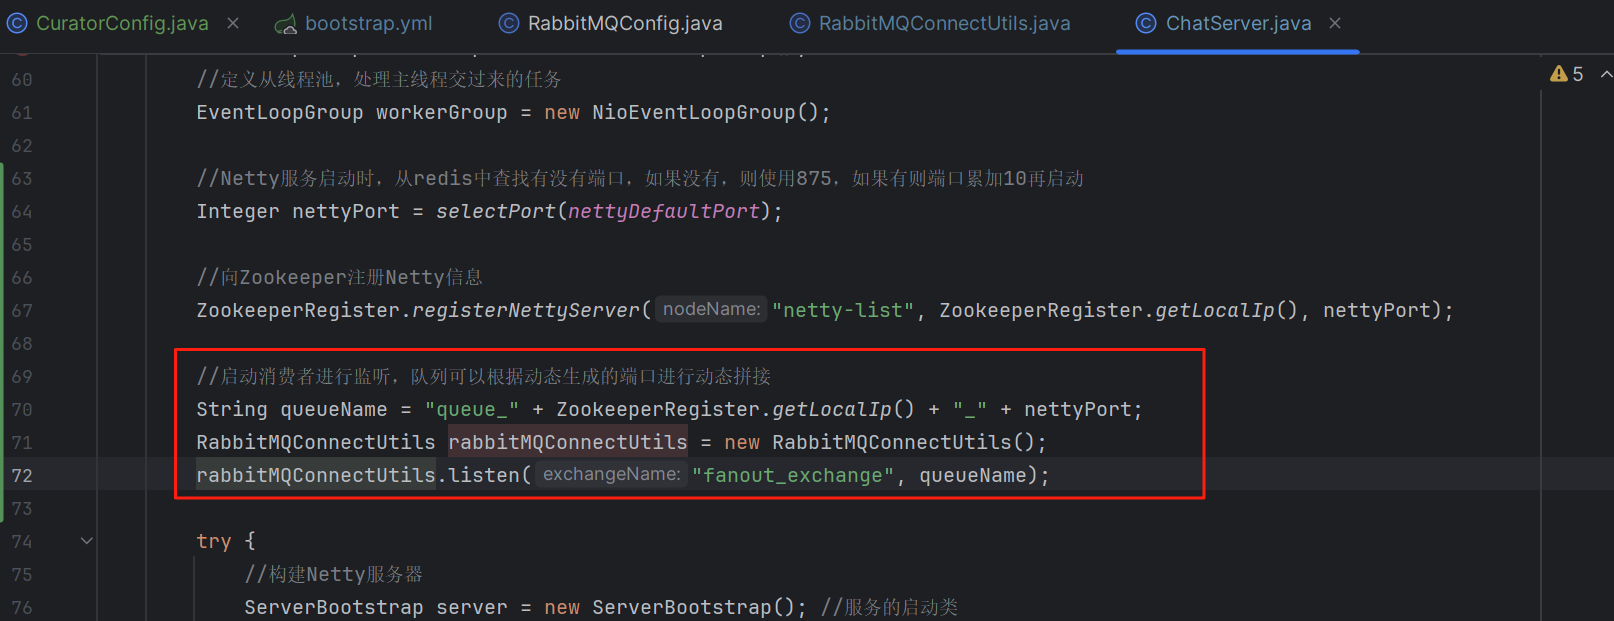
修改ChatServer,实现启动消费者进行监听
二十、Netty集群结合MQ广播聊天消息
修改UserChannelSession,增加提取sendToTarget方法
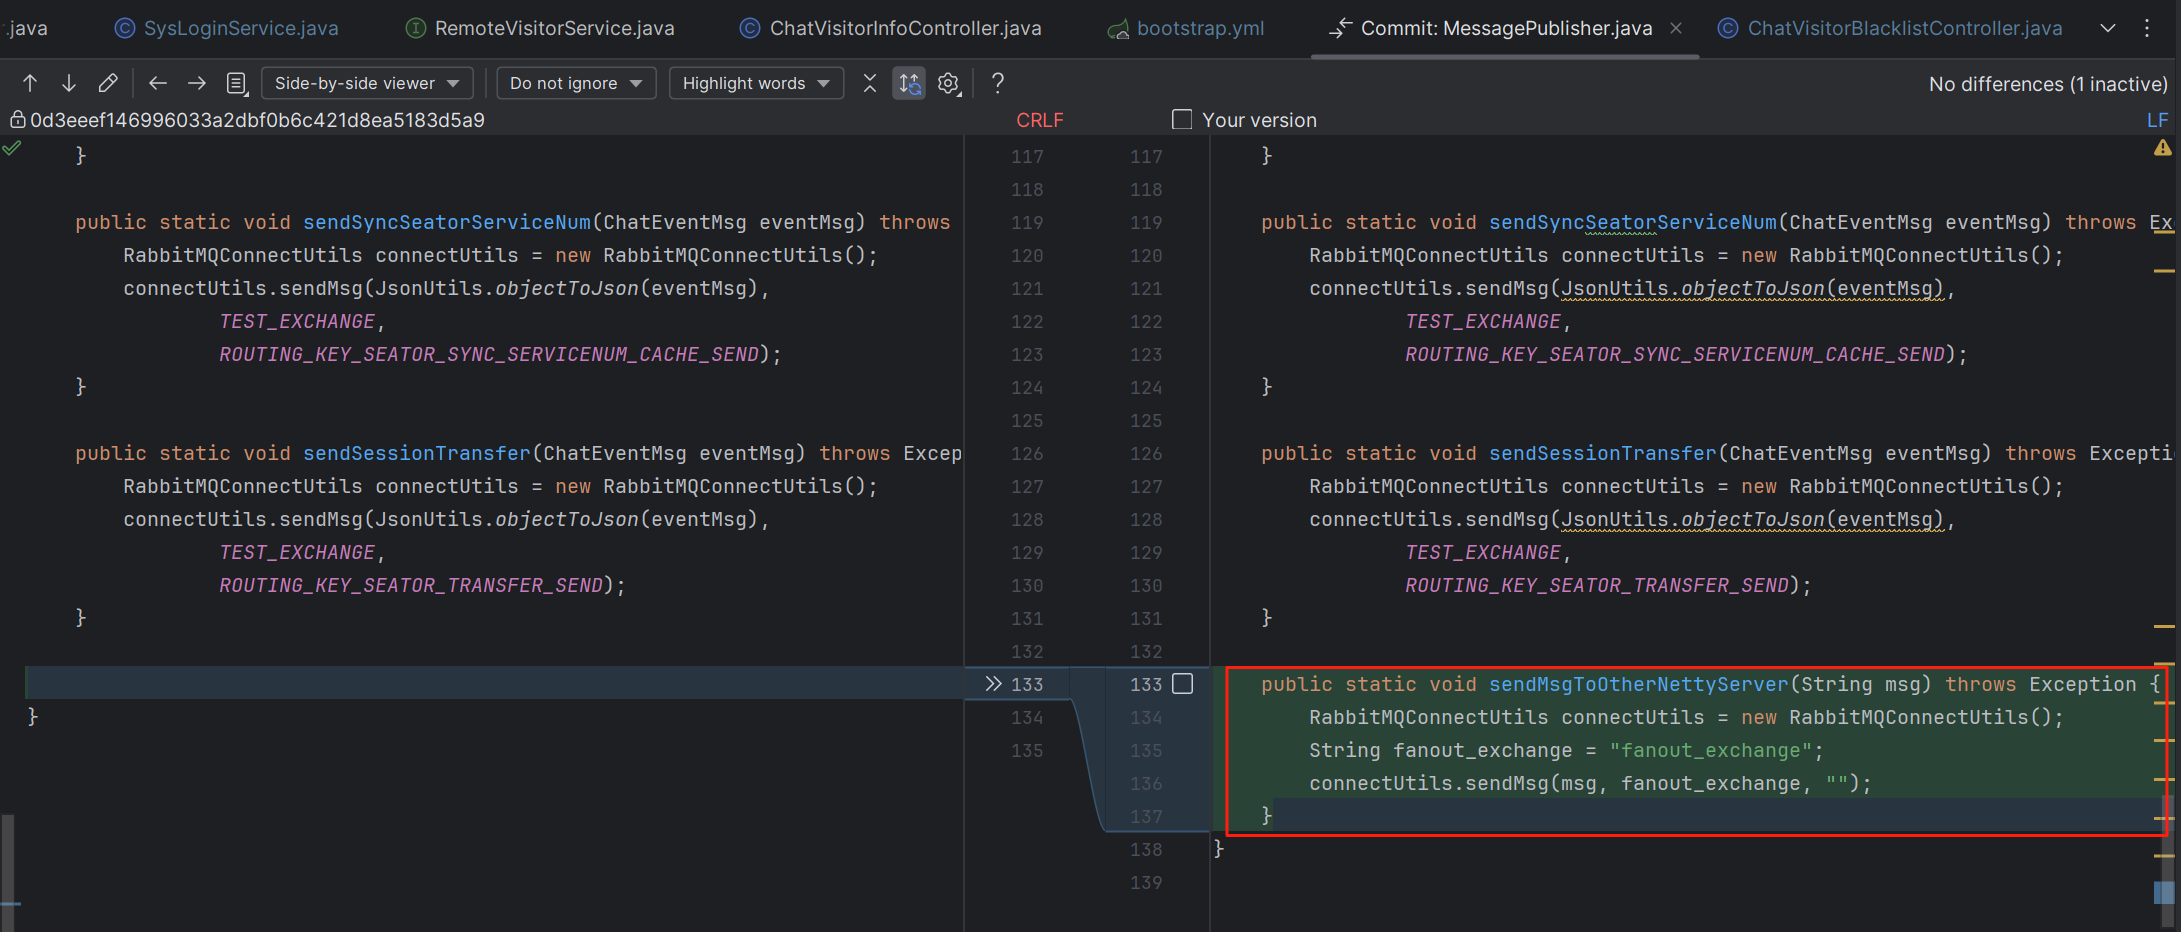
public static void sendToTarget(List<Channel> receiverChannels, DataContent dataContent) {ChannelGroup clients = ChatHandler.clients;if(CollUtil.isEmpty(receiverChannels)){return;}for (Channel c : receiverChannels) {Channel findChannel = clients.find(c.id());if (findChannel != null) {findChannel.writeAndFlush(new TextWebSocketFrame(JsonUtils.objectToJson(dataContent)));}}}修改MessagePublisher,增加消息发送到rabbitmq广播消息队列逻辑
修改RabbitMQConnectionUtils, 完善RabbitMQ广播队列处理消息逻辑
package com.yihexinda.chat.mq;import com.alibaba.fastjson2.JSON;
import com.alibaba.fastjson2.JSONObject;
import com.rabbitmq.client.*;
import com.chat.domain.netty.DataContent;
import com.chat.domain.netty.UserChannelSession;
import com.chat.enums.MsgSourceEnum;
import com.chat.enums.MsgTypeEnum;
import com.common.core.utils.JsonUtils;import java.io.IOException;
import java.util.ArrayList;
import java.util.List;public class RabbitMQConnectUtils {private final List<Connection> connections = new ArrayList<>();private final int maxConnection = 20;// 开发环境 devprivate final String host = "127.0.0.1";private final int port = 5682;private final String username = "guest";private final String password = "guest";private final String virtualHost = "/";// 生产环境 prod//private final String host = "";//private final int port = 5672;//private final String username = "123";//private final String password = "123";//private final String virtualHost = "123";public ConnectionFactory factory;public ConnectionFactory getRabbitMqConnection() {return getFactory();}public ConnectionFactory getFactory() {initFactory();return factory;}private void initFactory() {try {if (factory == null) {factory = new ConnectionFactory();factory.setHost(host);factory.setPort(port);factory.setUsername(username);factory.setPassword(password);factory.setVirtualHost(virtualHost);}} catch (Exception e) {e.printStackTrace();}}public void sendMsg(String message, String queue) throws Exception {Connection connection = getConnection();Channel channel = connection.createChannel();channel.basicPublish("",queue,MessageProperties.PERSISTENT_TEXT_PLAIN,message.getBytes("utf-8"));channel.close();setConnection(connection);}public void sendMsg(String message, String exchange, String routingKey) throws Exception {Connection connection = getConnection();Channel channel = connection.createChannel();channel.basicPublish(exchange,routingKey,MessageProperties.PERSISTENT_TEXT_PLAIN,message.getBytes("utf-8"));channel.close();setConnection(connection);}public GetResponse basicGet(String queue, boolean autoAck) throws Exception {GetResponse getResponse = null;Connection connection = getConnection();Channel channel = connection.createChannel();getResponse = channel.basicGet(queue, autoAck);channel.close();setConnection(connection);return getResponse;}public Connection getConnection() throws Exception {return getAndSetConnection(true, null);}public void setConnection(Connection connection) throws Exception {getAndSetConnection(false, connection);}public void listen(String exchangeName, String queueName) throws Exception {Connection connection = getConnection();Channel channel = connection.createChannel();// FANOUT 发布订阅模式(广播模式)/*** 参数1 - 交换机名称* 参数2 - 交换机类型, 这里采用FANOUT,即发布订阅模式(广播模式)* 参数3 - 当前交换机是否持久化* 参数4 - 是否自动删除* 参数5 - 其他参数Map结构*/channel.exchangeDeclare(exchangeName,BuiltinExchangeType.FANOUT,true, false, false, null);/*** 参数1 - 队列名称* 参数2 - 当前队列是否持久化* 参数3 - 是否为独占队列* 参数4 - 是否自动删除* 参数5 - 其他参数Map结构*/channel.queueDeclare(queueName, true, false, false, null);//交换和队列的绑定关系,通过队列名称绑定到交换机channel.queueBind(queueName, exchangeName, "");Consumer consumer = new DefaultConsumer(channel){/*** 重写消息配送方法* @param consumerTag 消息的标签(标识)* @param envelope  信封(一些信息,比如交换机路由等等信息)* @param properties 配置信息* @param body 收到的消息数据* @throws IOException*/@Overridepublic void handleDelivery(String consumerTag,Envelope envelope,AMQP.BasicProperties properties,byte[] body) throws IOException {String msg = new String(body);System.out.println("body = " + msg);System.out.println("=================================");;System.out.println("MQ 消费者监听消息 start");System.out.println("mq msg-> " + msg);System.out.println("MQ 消费者监听消息 start");String exchange = envelope.getExchange();System.out.println("exchange = " + exchange);if (exchange.equalsIgnoreCase(exchangeName)) {DataContent dataContent = JsonUtils.jsonToPojo(msg, DataContent.class);String senderId = dataContent.getChatMsg().getSenderId();String receiverId = dataContent.getChatMsg().getReceiverId();Integer msgType = dataContent.getChatMsg().getMsgType();String extend = dataContent.getExtend();JSONObject extendObj = JSON.parseObject(extend);String from = extendObj.getString("from");String currentChannelId = extendObj.getString("currentChannelId");System.out.println("currentChannelId -> " + currentChannelId);if(msgType == MsgTypeEnum.CONNECT_INIT.type){//初始化if(MsgSourceEnum.APP.name().equals(from)){//来自访客,返回一条全发// 广播至集群的其他节点并且发送给发送者聊天信息List<io.netty.channel.Channel> receiverChannels =UserChannelSession.getMultiChannels(receiverId);UserChannelSession.sendToTarget(receiverChannels, dataContent);} else if(MsgSourceEnum.SYS.name().equals(from)){//来自坐席,不发任何消息}} else if(msgType == MsgTypeEnum.END.type){//结束 - 异常产生的结束通知if(MsgSourceEnum.APP.name().equals(from)){//来自访客端// 广播至集群的其他节点并且发送给发送者聊天信息List<io.netty.channel.Channel> receiverChannels =UserChannelSession.getMultiChannels(receiverId);UserChannelSession.sendToTarget(receiverChannels, dataContent);} else if(MsgSourceEnum.SYS.name().equals(from)){//来自坐席,由sessionTransfer处理}} else if(msgType == MsgTypeEnum.SESSION_TRANSFER.type){//会话转接if(MsgSourceEnum.APP.name().equals(from)){//来自访客端 - 转接是返回一条渠道全发// 广播至集群的其他节点并且发送给发送者聊天信息List<io.netty.channel.Channel> receiverChannels =UserChannelSession.getMultiChannels(receiverId);UserChannelSession.sendToTarget(receiverChannels, dataContent);} else if(MsgSourceEnum.SYS.name().equals(from)){//来自坐席,不做处理,转接只能是单项的??// 广播至集群的其他节点并且发送给发送者聊天信息List<io.netty.channel.Channel> receiverChannels =UserChannelSession.getMultiChannels(receiverId);UserChannelSession.sendToTarget(receiverChannels, dataContent);}} else if (msgType == MsgTypeEnum.WORDS.type|| msgType == MsgTypeEnum.IMAGE.type|| msgType == MsgTypeEnum.VIDEO.type|| msgType == MsgTypeEnum.VOICE.type|| msgType == MsgTypeEnum.SEATOR_REPLY_TIMEOUT.type|| msgType == MsgTypeEnum.VISITOR_REPLY_TIMEOUT.type){//正常消息// 广播至集群的其他节点并且发送给发送者聊天信息List<io.netty.channel.Channel> receiverChannels =UserChannelSession.getMultiChannels(receiverId);
//                        if(receiverChannels.contains(currentChannelId)){
//                            receiverChannels.remove(currentChannelId);
//                        }UserChannelSession.sendToTarget(receiverChannels, dataContent);// 广播至集群的其他节点并且同步给自己其他设备聊天信息 - 暂时屏蔽List<io.netty.channel.Channel> senderChannels =UserChannelSession.getMyOtherChannels(senderId, currentChannelId);if(senderChannels.contains(currentChannelId)){senderChannels.remove(currentChannelId);}UserChannelSession.sendToTarget(senderChannels, dataContent);}}}};/*** 开启监听* queue: 监听的队列名* autoAck: 是否自动确认,true:告知mq消费者已经消费的确认通知* callback: 回调函数,处理监听到的消息*/channel.basicConsume(queueName, true, consumer);}private synchronized Connection getAndSetConnection(boolean isGet, Connection connection) throws Exception {getRabbitMqConnection();if (isGet) {if (connections.isEmpty()) {return factory.newConnection();}Connection newConnection = connections.get(0);connections.remove(0);if (newConnection.isOpen()) {return newConnection;} else {return factory.newConnection();}} else {if (connections.size() < maxConnection) {connections.add(connection);}return null;}}}
最后,修改ChatHandler,将原来直接发消息的地方,统一修改改发送给RabbitMQ广播队列,再有在线的RabbitMQ队列处理消息转发

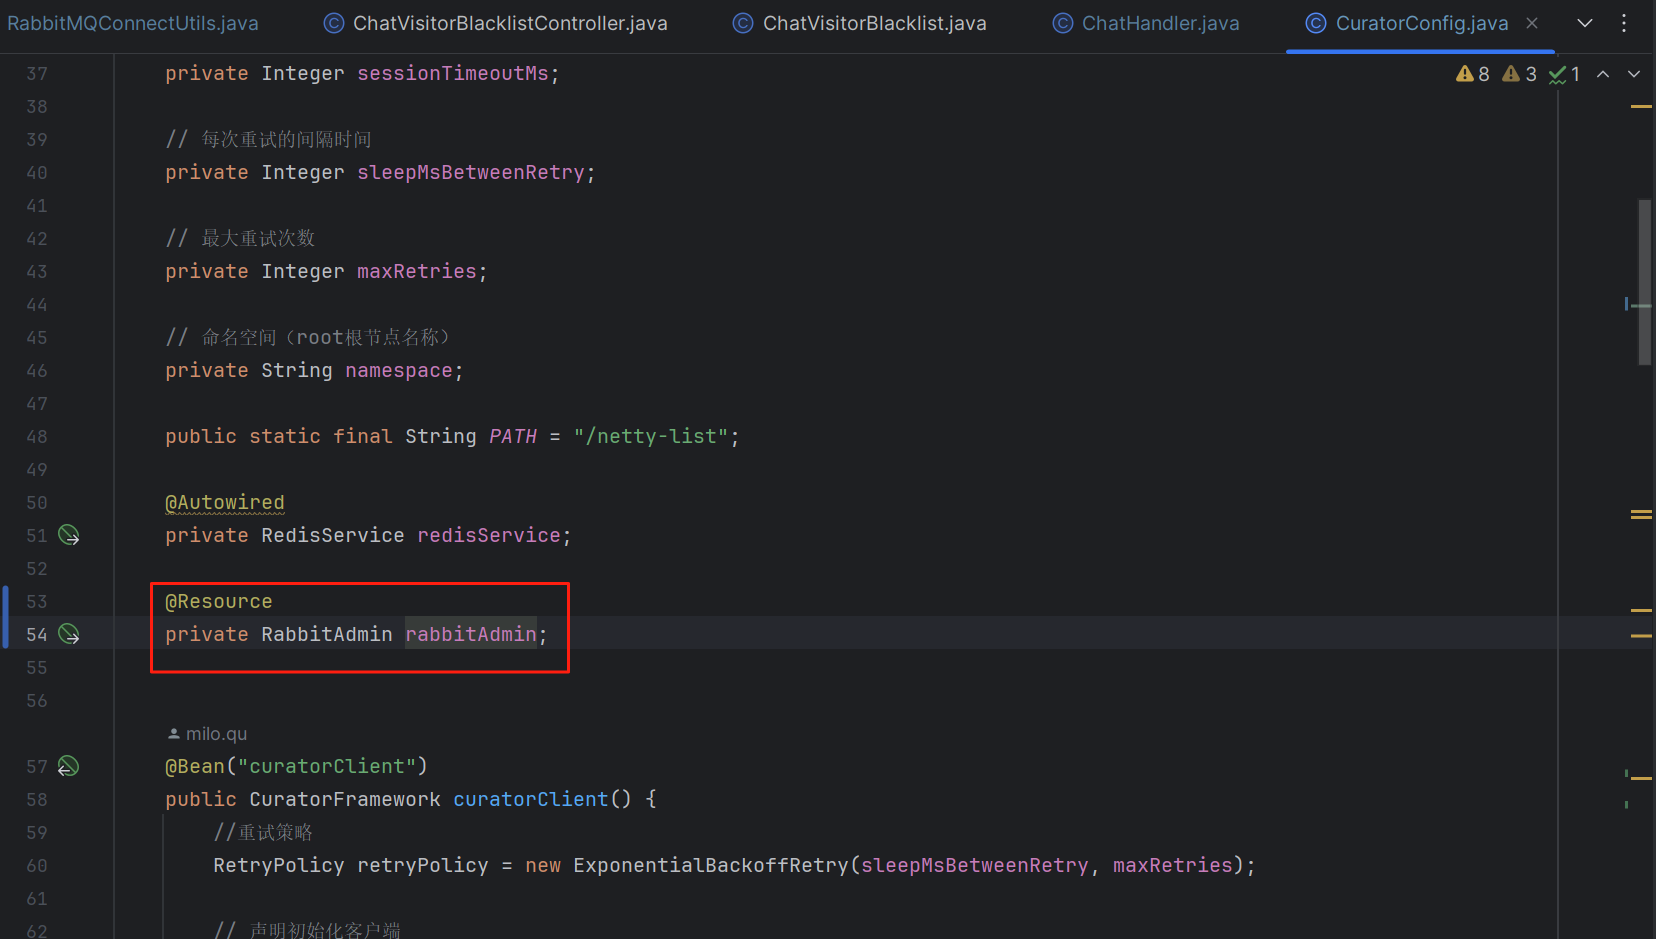
二十一、RabbitAdmin删除残留的队列
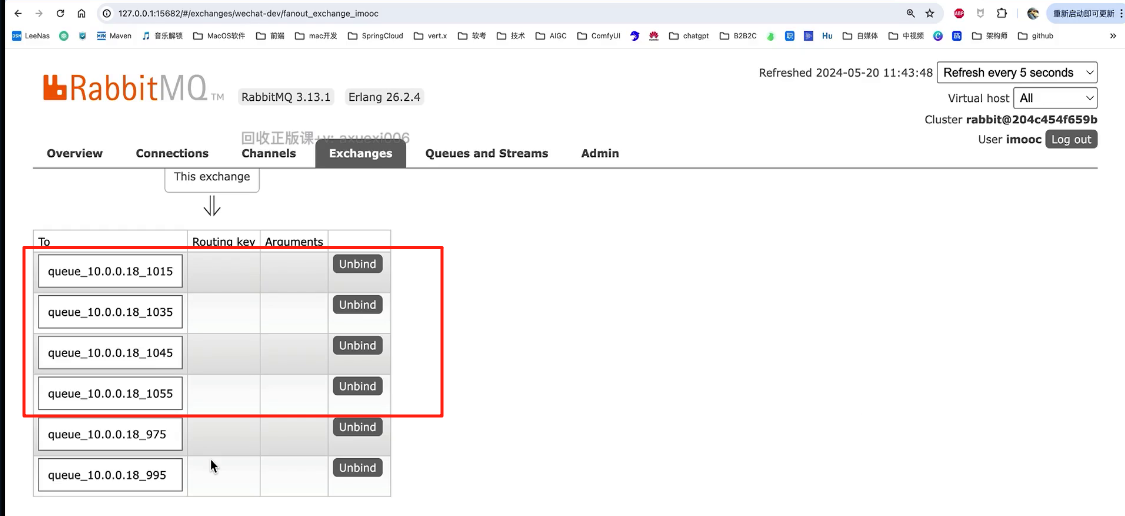
注:
存在之前启动产生且现在已无效的队列。
添加RabbitAdmin配置类
package com.core.config;import org.springframework.amqp.rabbit.connection.CachingConnectionFactory;
import org.springframework.amqp.rabbit.connection.ConnectionFactory;
import org.springframework.amqp.rabbit.core.RabbitAdmin;
import org.springframework.beans.factory.annotation.Value;
import org.springframework.context.annotation.Bean;
import org.springframework.context.annotation.Configuration;/*** RabbitAdmin的配置类*/
@Configuration
public class RabbitAdminConfig {@Value("${spring.rabbitmq.host}")private String host;@Value("${spring.rabbitmq.port}")private Integer port;@Value("${spring.rabbitmq.username}")private String username;@Value("${spring.rabbitmq.password}")private String password;@Value("${spring.rabbitmq.virtual-host}")private String virtualHost;/*** 构建RabbitMQ的连接工厂* @return*/@Beanpublic ConnectionFactory connectionFactory() {CachingConnectionFactory connectionFactory = new CachingConnectionFactory();connectionFactory.setHost(host);connectionFactory.setPort(port);connectionFactory.setPassword(username);connectionFactory.setUsername(password);connectionFactory.setVirtualHost(virtualHost);return connectionFactory;}/*** 构建RabbitAdmin* @param connectionFactory* @return*/@Beanpublic RabbitAdmin rabbitAdmin(ConnectionFactory connectionFactory){return new RabbitAdmin(connectionFactory);}}
修改CuratorConfig