Haproxy的基础配置
1、参考文档
官方文档:HAProxy version 2.2.22 - Configuration Manual
运维派配置手册:Haproxy-基础配置详解 - 运维派
Haproxy 的配置文件haproxy.cfg由两大部分组成,分别是global和proxies部分。
2、haproxy global 配置
global:全局配置段
- 进程及安全配置相关的参数
- 性能调整相关参数
- Debug参数
chroot #锁定运行目录
deamon #以守护进程运行
stats socket /var/lib/haproxy/haproxy.sock mode 600 level admin process 1 #socket文件
user, group, uid, gid  #运行haproxy的用户身份
nbproc    n     #开启的haproxy work 进程数,默认进程数是一个
#nbthread  1    #指定每个haproxy进程开启的线程数,默认为每个进程一个线程,和nbproc互斥(版本有关)
#如果同时启用nbproc和nbthread 会出现以下日志的错误,无法启动服务
Apr  7 14:46:23 haproxy haproxy: [ALERT] 097/144623 (1454) : config : cannot enable multiple processes if multiple threads are configured. Please use either nbproc or nbthread but not both.cpu-map 1 0     #绑定haproxy 进程至指定CPU,将第一个work进程绑定至0号CPU
maxconn  n      #每个haproxy进程的最大并发连接数
maxsslconn  n   #每个haproxy进程ssl最大连接数,用于haproxy配置了证书的场景下
maxconnrate n   #每个进程每秒创建的最大连接数量
spread-checks n #后端server状态check随机提前或延迟百分比时间,建议2-5(20%-50%)之间,默认值0
pidfile         #指定pid文件路径
log 127.0.0.1  local2 info #定义全局的syslog服务器;日志服务器需要开启UDP协议,最多可以定义两个
范例:多进程和socket文件
[root@centos7 ~]#vim /etc/haproxy/haproxy.cfg
global
maxconn 100000
chroot /apps/haproxy
stats socket /var/lib/haproxy/haproxy.sock1 mode 600 level admin process 1
stats socket /var/lib/haproxy/haproxy.sock2 mode 600 level admin process 2
uid 99
gid 99
daemon
nbproc 2
[root@centos7 ~]#systemctl restart haproxy
[root@centos7 ~]#pstree -p |grep haproxy|-haproxy(2634)-+-haproxy(2637)|               `-haproxy(2638)
[root@centos7 ~]#ll /var/lib/haproxy/
total 4
-rw-r--r-- 1 root root 5 Mar 31 18:49 haproxy.pid
srw------- 1 root root 0 Mar 31 18:49 haproxy.sock1
srw------- 1 root root 0 Mar 31 18:49 haproxy.sock2
3、haproxy proxies配置
官方文档:http://cbonte.github.io/haproxy-dconv/2.1/configuration.html#4
defaults [<name>] #默认配置项,针对以下的frontend、backend和listen生效,可以多个name也可以没有name
frontend <name>   #前端servername,类似于Nginx的一个虚拟主机 server和LVS服务集群。
backend  <name>   #后端服务器组,等于nginx的upstream和LVS中的RS服务器
listen   <name>   #将frontend和backend合并在一起配置,相对于frontend和backend配置更简洁,生产常用
注意:name字段只能使用大小写字母,数字,‘-’(dash),’_‘(underscore),’.’ (dot)和 ‘:'(colon),并且严格区分大小写
3.1、Proxies配置-defaults
defaults 配置参数:
option redispatch       #当server Id对应的服务器挂掉后,强制定向到其他健康的服务器,重新派发
option abortonclose     #当服务器负载很高时,自动结束掉当前队列处理比较久的链接,针对业务情况选择开启
option http-keep-alive  #开启与客户端的会话保持
option  forwardfor      #透传客户端真实IP至后端web服务器
mode http|tcp           #设置默认工作类型,使用TCP服务器性能更好,减少压力
timeout http-keep-alive 120s #session 会话保持超时时间,此时间段内会转发到相同的后端服务器
timeout connect 120s    #客户端请求从haproxy到后端server最长连接等待时间(TCP连接之前),默认单位ms
timeout server  600s    #客户端请求从haproxy到后端服务端的请求处理超时时长(TCP连接之后),默认单位ms,如果超时,会出现502错误,此值建议设置较大些,访止502错误
timeout client  600s    #设置haproxy与客户端的最长非活动时间,默认单位ms,建议和timeout server相同
timeout  check   5s     #对后端服务器的默认检测超时时间
default-server inter 1000 weight 3   #指定后端服务器的默认设置
3.2、Proxies配置-frontend
frontend 配置参数:
bind:   #指定HAProxy的监听地址,可以是IPV4或IPV6,可以同时监听多个IP或端口,可同时用于listen字段中#格式:
bind [<address>]:<port_range> [, ...] [param*]#注意:如果需要绑定在非本机的IP,需要开启内核参数:net.ipv4.ip_nonlocal_bind=1
范例:
listen http_proxy #监听http的多个IP的多个端口和sock文件bind :80,:443,:8801-8810bind 10.0.0.1:10080,10.0.0.1:10443bind /var/run/ssl-frontend.sock user root mode 600 accept-proxylisten http_https_proxy #https监听bind :80bind :443 ssl crt /etc/haproxy/site.pem #公钥和私钥公共文件listen http_https_proxy_explicit #监听ipv6、ipv4和unix sock文件bind ipv6@:80bind ipv4@public_ssl:443 ssl crt /etc/haproxy/site.pembind unix@ssl-frontend.sock user root mode 600 accept-proxylisten external_bind_app1 #监听file descriptorbind "fd@${FD_APP1}"生产示例:
frontend magedu_web_port #可以采用后面形式命名:业务-服务-端口号bind :80,:8080bind 10.0.0.7:10080,:8801-8810,10.0.0.17:9001-9010mode http|tcp #指定负载协议类型use_backend <backend_name> #调用的后端服务器组名称3.3、Proxies配置-backend
定义一组后端服务器,backend服务器将被frontend进行调用。
mode  http|tcp      #指定负载协议类型,和对应的frontend必须一致
option              #配置选项
server              #定义后端real server
注意:option后面加 httpchk,smtpchk,mysql-check,pgsql-check,ssl-hello-chk方法,可用于实现更多应用层检测功能。
option 配置
check               #对指定real进行健康状态检查,如果不加此设置,默认不开启检查addr  <IP>        #可指定的健康状态监测IP,可以是专门的数据网段,减少业务网络的流量port  <num>   #指定的健康状态监测端口inter <num>   #健康状态检查间隔时间,默认2000 msfall  <num>       #后端服务器从线上转为线下的检查的连续失效次数,默认为3rise  <num>       #后端服务器从下线恢复上线的检查的连续有效次数,默认为2
weight  <weight>  #默认为1,最大值为256,0表示不参与负载均衡,但仍接受持久连接
backup              #将后端服务器标记为备份状态,只在所有非备份主机down机时提供服务,类似Sorry Server
disabled            #将后端服务器标记为不可用状态,即维护状态,除了持久模式,将不再接受连接
redirect prefix  http://www.baidu.com/      #将请求临时(302)重定向至其它URL,只适用于http模式
redir http://www.baidu.com                  #将请求临时(302)重定向至其它URL,只适用于http模式
maxconn <maxconn>     #当前后端server的最大并发连接数
backlog <backlog> #当前端服务器的连接数达到上限后的后援队列长度,注意:不支持backend
3.4、frontend+backend配置实例
范例1:
frontend magedu-test-httpbind :80,:8080mode tcpuse_backend magedu-test-http-nodesbackend magedu-test-http-nodesmode tcpdefault-server inter 1000 weight 6 server web1 10.0.0.17:80 check weight 2 addr 10.0.0.117 port 8080server web1 10.0.0.27:80 check范例2:
#官网业务访问入口
frontend  WEB_PORT_80bind 10.0.0.7:80mode httpuse_backend  web_prot_http_nodesbackend web_prot_http_nodesmode  httpoption forwardforserver 10.0.0.17 10.0.0.17:8080   check inter 3000 fall 3 rise 5  server 10.0.0.27 10.0.0.27:8080   check inter 3000 fall 3 rise 5
3.5、Proxies配置-listen替代frontend+backend
使用listen替换上面的frontend和backend的配置方式,可以简化设置,通常只用于TCP协议的应用
#官网业务访问入口
listen  WEB_PORT_80 bind 10.0.0.7:80  mode httpoption  forwardforserver web1   10.0.0.17:8080   check inter 3000 fall 3 rise 5server web2   10.0.0.27:8080   check inter 3000 fall 3 rise 5
4、使用子配置文件保存配置
当业务众多时,将所有配置都放在一个配置文件中,会造成维护困难。可以考虑按业务分类,将配置信息拆分,放在不同的子配置文件中,从而达到方便维护的目的。
#创建子配置目录
[root@centos7 ~]#mkdir /etc/haproxy/conf.d/#创建子配置文件,注意:必须为cfg后缀
[root@centos7 ~]#vim   /etc/haproxy/conf.d/test.cfg
listen WEB_PORT_80bind 10.0.0.7:80mode httpbalance roundrobinserver web1  10.0.0.17:80  check inter 3000 fall 2 rise 5server web2  10.0.0.27:80  check inter 3000 fall 2 rise 5#添加子配置目录到unit文件中
[root@centos7 ~]#vim  /lib/systemd/system/haproxy.service
[Unit]
Description=HAProxy Load Balancer
After=syslog.target network.target[Service]
ExecStartPre=/usr/sbin/haproxy -f /etc/haproxy/haproxy.cfg -f /etc/haproxy/conf.d/ -c -q
ExecStart=/usr/sbin/haproxy -Ws -f /etc/haproxy/haproxy.cfg -f /etc/haproxy/conf.d/  -p /var/lib/haproxy/haproxy.pid
ExecReload=/bin/kill -USR2 $MAINPID[Install]
WantedBy=multi-user.target[root@centos7 ~]#systemctl daemon-reload
[root@centos7 ~]#systemctl restart haproxy
5、haproxy日志配置
配置HAProxy记录日志到指定日志文件中
haproxy配置:
#在global配置项定义:
log 127.0.0.1  local{1-7} info #基于syslog记录日志到指定设备,级别有(err、warning、info、debug)listen  web_portbind 127.0.0.1:80mode httplog global                                #开启当前web_port的日志功能,默认不记录日志server web1  127.0.0.1:8080  check inter 3000 fall 2 rise 5# systemctl  restart haproxy
rsyslog配置:
vim /etc/rsyslog.conf
$ModLoad imudp
$UDPServerRun 514
......
# Save haproxy messages also to haproxy.log
local2.*                                                /var/log/haproxy.log
......# systemctl  restart rsyslog
验证haproxy日志:
[root@Rocky-1 ~]# cat /var/log/haproxy.log
May 28 05:25:44 localhost haproxy[1847]: Connect from 192.168.93.1:61033 to 192.168.93.20:9999 (stats/HTTP)
May 28 05:25:45 localhost haproxy[1847]: Connect from 192.168.93.1:61033 to 192.168.93.20:9999 (stats/HTTP)
May 28 05:25:45 localhost haproxy[1847]: Connect from 192.168.93.1:61033 to 192.168.93.20:9999 (stats/HTTP)
6、haproxy调度算法
HAProxy通过固定参数balance指明对后端服务器的调度算法,该参数可以配置在listen或backend选项中。
HAProxy的调度算法分为静态和动态调度算法,但是有些算法可以根据参数在静态和动态算法中相互转换。
官方文档:http://cbonte.github.io/haproxy-dconv/2.1/configuration.html#4-balance
静态算法
静态算法:按照事先定义好的规则轮询公平调度,不关心后端服务器的当前负载、链接数和响应速度等,且无法实时修改权重,只能靠重启HAProxy生效。
可以利用 socat工具对服务器动态权重和其它状态的调整,Socat 是 Linux 下的一个多功能的网络工具,名字来由是Socket CAT,Socat 的主要特点就是在两个数据流之间建立通道,且支持众多协议和链接方式。如 IP、TCP、 UDP、IPv6、Socket文件等
范例:利用工具socat 对服务器动态权重调整
[root@centos7 ~]#yum -y install socat#查看帮助
[root@centos7 ~]#socat -h
[root@centos7 ~]#echo "help" | socat stdio /var/lib/haproxy/haproxy.sock
Unknown command. Please enter one of the following commands only :help           : this messageprompt         : toggle interactive mode with promptquit           : disconnectshow tls-keys [id|*]: show tls keys references or dump tls ticket keys when id specifiedset ssl tls-key [id|keyfile] <tlskey>: set the next TLS key for the <id> or <keyfile> listener to <tlskey>set ssl cert <certfile> <payload> : replace a certificate filecommit ssl cert <certfile> : commit a certificate fileabort ssl cert <certfile> : abort a transaction for a certificate fileshow sess [id] : report the list of current sessions or dump this sessionshutdown session : kill a specific sessionshutdown sessions server : kill sessions on a serverclear counters : clear max statistics counters (add 'all' for all counters)show info      : report information about the running process [desc|json|typed]*show stat      : report counters for each proxy and server [desc|json|typed]*show schema json : report schema used for statsdisable agent  : disable agent checks (use 'set server' instead)disable health : disable health checks (use 'set server' instead)disable server : disable a server for maintenance (use 'set server' instead)enable agent   : enable agent checks (use 'set server' instead)enable health  : enable health checks (use 'set server' instead)enable server  : enable a disabled server (use 'set server' instead)set maxconn server : change a server's maxconn settingset server     : change a server's state, weight or addressget weight     : report a server's current weightset weight     : change a server's weight (deprecated)show startup-logs : report logs emitted during HAProxy startupshow peers [peers section]: dump some information about all the peers or this peers sectionset maxconn global : change the per-process maxconn settingset rate-limit : change a rate limiting valueset severity-output [none|number|string] : set presence of severity level in feedback informationset timeout    : change a timeout settingshow env [var] : dump environment variables known to the processshow cli sockets : dump list of cli socketsshow cli level   : display the level of the current CLI sessionshow fd [num] : dump list of file descriptors in useshow activity : show per-thread activity stats (for support/developers)operator       : lower the level of the current CLI session to operatoruser           : lower the level of the current CLI session to userclear table    : remove an entry from a tableset table [id] : update or create a table entry's datashow table [id]: report table usage stats or dump this table's contentsdisable frontend : temporarily disable specific frontendenable frontend : re-enable specific frontendset maxconn frontend : change a frontend's maxconn settingshow servers state [id]: dump volatile server information (for backend <id>)show backend   : list backends in the current running configshutdown frontend : stop a specific frontendset dynamic-cookie-key backend : change a backend secret key for dynamic cookiesenable dynamic-cookie backend : enable dynamic cookies on a specific backenddisable dynamic-cookie backend : disable dynamic cookies on a specific backendshow errors    : report last request and response errors for each proxyshow resolvers [id]: dumps counters from all resolvers section andassociated name serversshow cache     : show cache statusadd acl        : add acl entryclear acl <id> : clear the content of this acldel acl        : delete acl entryget acl        : report the patterns matching a sample for an ACLshow acl [id]  : report available acls or dump an acl's contentsadd map        : add map entryclear map <id> : clear the content of this mapdel map        : delete map entryget map        : report the keys and values matching a sample for a mapset map        : modify map entryshow map [id]  : report available maps or dump a map's contentstrace <module> [cmd [args...]] : manage live tracingshow trace [<module>] : show live tracing stateshow threads   : show some threads debugging informationshow pools     : report information about the memory pools usageshow events [<sink>] : show event sink stateshow profiling : show CPU profiling optionsset  profiling : enable/disable CPU profiling[root@centos7 ~]#echo "show info" | socat stdio /var/lib/haproxy/haproxy.sock
Name: HAProxy
Version: 2.1.3
Release_date: 2020/02/12
Nbthread: 4
Nbproc: 1
Process_num: 1
Pid: 2279
Uptime: 0d 0h46m07s
Uptime_sec: 2767
Memmax_MB: 0
PoolAlloc_MB: 0
PoolUsed_MB: 0
PoolFailed: 0
Ulimit-n: 200041
Maxsock: 200041
Maxconn: 100000
Hard_maxconn: 100000
CurrConns: 0
CumConns: 1
CumReq: 1
MaxSslConns: 0
CurrSslConns: 0
CumSslConns: 0
Maxpipes: 0
PipesUsed: 0
PipesFree: 0
ConnRate: 0
ConnRateLimit: 0
MaxConnRate: 0
SessRate: 0
SessRateLimit: 0
MaxSessRate: 0
SslRate: 0
SslRateLimit: 0
MaxSslRate: 0
SslFrontendKeyRate: 0
SslFrontendMaxKeyRate: 0
SslFrontendSessionReuse_pct: 0
SslBackendKeyRate: 0
SslBackendMaxKeyRate: 0
SslCacheLookups: 0
SslCacheMisses: 0
CompressBpsIn: 0
CompressBpsOut: 0
CompressBpsRateLim: 0
ZlibMemUsage: 0
MaxZlibMemUsage: 0
Tasks: 19
Run_queue: 1
Idle_pct: 100
node: centos7.wangxiaochun.com
Stopping: 0
Jobs: 7
Unstoppable Jobs: 0
Listeners: 6
ActivePeers: 0
ConnectedPeers: 0
DroppedLogs: 0
BusyPolling: 0
FailedResolutions: 0
TotalBytesOut: 0
BytesOutRate: 0
DebugCommandsIssued: 0[root@centos7 ~]#cat /etc/haproxy/haproxy.cfg
......
listen magedu-test-80
bind :81,:82
mode http
server web1 10.0.0.17:80  check inter 3000 fall 3 rise 5
server web2 10.0.0.27:80 check weight 3
......[root@centos7 ~]#echo "show servers state" | socat stdio /var/lib/haproxy/haproxy.sock
1
# be_id be_name srv_id srv_name srv_addr srv_op_state srv_admin_state srv_uweight srv_iweight srv_time_since_last_change srv_check_status srv_check_result srv_check_health srv_check_state srv_agent_state bk_f_forced_id srv_f_forced_id srv_fqdn srv_port srvrecord
2 magedu-test-80 1 web1 10.0.0.17 2 0 2 1 812 6 3 7 6 0 0 0 - 80 -
2 magedu-test-80 2 web2 10.0.0.27 2 0 2 3 812 6 3 4 6 0 0 0 - 80 -
4 web_port 1 web1 127.0.0.1 0 0 1 1 810 8 2 0 6 0 0 0 - 8080 -[root@centos7 ~]#echo "get weight magedu-test-80/web2" | socat stdio /var/lib/haproxy/haproxy.sock
3 (initial 3)#修改weight,注意只针对单进程有效
[root@centos7 ~]#echo "set weight magedu-test-80/web2 2" | socat stdio /var/lib/haproxy/haproxy.sock[root@centos7 ~]#echo "get weight magedu-test-80/web2" | socat stdio /var/lib/haproxy/haproxy.sock
2 (initial 3)#将后端服务器禁用,注意只针对单进程有效
[root@centos7 ~]#echo "disable server magedu-test-80/web2" | socat stdio /var/lib/haproxy/haproxy.sock#将后端服务器软下线,即weight设为0
[root@centos7 ~]#echo "set weight magedu-test-80/web1 0" | socat stdio /var/lib/haproxy/haproxy.sock#将后端服务器禁用,针对多进程
[root@centos7 ~]#vim /etc/haproxy/haproxy.cfg
......
stats socket /var/lib/haproxy/haproxy1.sock mode 600 level admin process 1
stats socket /var/lib/haproxy/haproxy2.sock mode 600 level admin process 2               nbproc 2
.....[root@centos7 ~]#echo "disable server  magedu-test-80/web2" | socat stdio /var/lib/haproxy/haproxy1.sock
[root@centos7 ~]#echo "disable server  magedu-test-80/web2" | socat stdio /var/lib/haproxy/haproxy2.sock[root@haproxy ~]#for i in {1..2};do echo "set weight magedu-test-80/web$i 10" | socat stdio /var/lib/haproxy/haproxy$i.sock;done#如果静态算法,如:static-rr,可以更改weight为0或1,但不支持动态更改weight为其它值,否则会提示下面信息
[root@centos7 ~]#echo "set weight magedu-test-80/web1 0" | socat stdio /var/lib/haproxy/haproxy.sock
[root@centos7 ~]#echo "set weight magedu-test-80/web1 1" | socat stdio /var/lib/haproxy/haproxy.sock[root@centos7 ~]#echo "set weight magedu-test-80/web1 2" | socat stdio /var/lib/haproxy/haproxy.sock
Backend is using a static LB algorithm and only accepts weights '0%' and '100%'.
static-rr
static-rr:基于权重的轮询调度,不支持权重的运行时利用socat进行动态调整及后端服务器慢启动,其后端主机数量没有限制,相当于LVS中的 wrr
listen web_hostbind 10.0.0.7:80,:8801-8810,10.0.0.7:9001-9010mode httplog globalbalance static-rrserver web1 10.0.0.17:80 weight 1 check inter 3000 fall 2 rise 5server web2 10.0.0.27:80 weight 2 check inter 3000 fall 2 rise 5first
first:根据服务器在列表中的位置,自上而下进行调度,但是其只会当第一台服务器的连接数达到上限,新请求才会分配给下一台服务,因此会忽略服务器的权重设置,此方式使用较少
listen web_hostbind 10.0.0.7:80,:8801-8810,10.0.0.7:9001-9010mode httplog globalbalance firstserver web1 10.0.0.17:80 maxconn 2 weight 1 check inter 3000 fall 2 rise 5server web2 10.0.0.27:80 weight 1 check inter 3000 fall 2 rise 5测试访问效果
#同时运行下面命令,观察结果
# while  true;do  curl http://10.0.0.7/index.html ; sleep 0.1;done
动态算法
动态算法:基于后端服务器状态进行调度适当调整,优先调度至当前负载较低的服务器,且权重可以在haproxy运行时动态调整无需重启。
roundrobin
roundrobin:基于权重的轮询动态调度算法,支持权重的运行时调整,不同于lvs中的rr轮训模式,HAProxy中的roundrobin支持慢启动(新加的服务器会逐渐增加转发数),其每个后端backend中最多支持4095个real server,支持对real server权重动态调整,roundrobin为默认调度算法
listen web_hostbind 10.0.0.7:80,:8801-8810,10.0.0.7:9001-9010mode httplog globalbalance roundrobinserver web1 10.0.0.17:80 weight 1 check inter 3000 fall 2 rise 5server web2 10.0.0.27:80 weight 2 check inter 3000 fall 2 rise 5支持动态调整权重:
# echo "get weight web_host/web1" | socat stdio /var/lib/haproxy/haproxy.sock
1 (initial 1)# echo "set weight web_host/web1 3" | socat stdio /var/lib/haproxy/haproxy.sock # echo "get weight web_host/web1" | socat stdio /var/lib/haproxy/haproxy.sock
3 (initial 1)
leastconn
leastconn加权的最少连接的动态,支持权重的运行时调整和慢启动,即当前后端服务器连接最少的优先调度(新客户端连接),比较适合长连接的场景使用,比如:MySQL等场景。
listen web_hostbind 10.0.0.7:80,:8801-8810,10.0.0.7:9001-9010mode httplog globalbalance leastconnserver web1 10.0.0.17:80 weight 1 check inter 3000 fall 2 rise 5server web2 10.0.0.27:80 weight 1 check inter 3000 fall 2 rise 5random
在1.9版本开始增加一个叫做random的负载平衡算法,其基于随机数作为一致性hash的key,随机负载平衡对于大型服务器场或经常添加或删除服务器非常有用,支持weight的动态调整,weight较大的主机有更大概率获取新请求
random配置实例
listen web_hostbind 10.0.0.7:80,:8801-8810,10.0.0.7:9001-9010mode httplog globalbalance randomserver web1 10.0.0.17:80 weight 1 check inter 3000 fall 2 rise 5server web2 10.0.0.27:80 weight 1 check inter 3000 fall 2 rise 5其他算法
其它算法即可作为静态算法,又可以通过选项成为动态算法
source
源地址hash,基于用户源地址hash并将请求转发到后端服务器,后续同一个源地址请求将被转发至同一个后端web服务器。此方式当后端服务器数据量发生变化时,会导致很多用户的请求转发至新的后端服务器,默认为静态方式,但是可以通过hash-type支持的选项更改
这个算法一般是在不插入Cookie的TCP模式下使用,也可给拒绝会话cookie的客户提供最好的会话粘性,适用于session会话保持但不支持cookie和缓存的场景
源地址有两种转发客户端请求到后端服务器的服务器选取计算方式,分别是取模法和一致性hash
map-base取模法
map-based:取模法,对source地址进行hash计算,再基于服务器总权重的取模,最终结果决定将此请求转发至对应的后端服务器。此方法是静态的,即不支持在线调整权重,不支持慢启动,可实现对后端服务器均衡调度。缺点是当服务器的总权重发生变化时,即有服务器上线或下线,都会因总权重发生变化而导致调度结果整体改变,hash-type 指定的默认值为此算法
所谓取模运算,就是计算两个数相除之后的余数,10%7=3, 7%4=3
map-based算法:基于权重取模,hash(source_ip)%所有后端服务器相加的总权重
取模法配置示例:
listen  web_hostbind 10.0.0.7:80,:8801-8810,10.0.0.7:9001-9010mode tcplog globalbalance sourcehash-type map-based server web1  10.0.0.17:80 weight 1  check inter 3000 fall 2 rise 3server web2  10.0.0.27:80 weight 1  check inter 3000 fall 2 rise 3[root@haproxy ~]#echo "set weight web_host/10.0.0.27 10" | socat stdio /var/lib/haproxy/haproxy.sock
Backend is using a static LB algorithm and only accepts weights '0%' and '100%'.[root@haproxy ~]#echo "set weight web_host/10.0.0.27 0" | socat stdio /var/lib/haproxy/haproxy.sock [root@haproxy conf.d]#echo "get weight web_host/10.0.0.27" | socat stdio /var/lib/haproxy/haproxy.sock
0 (initial 1)
一致性hash
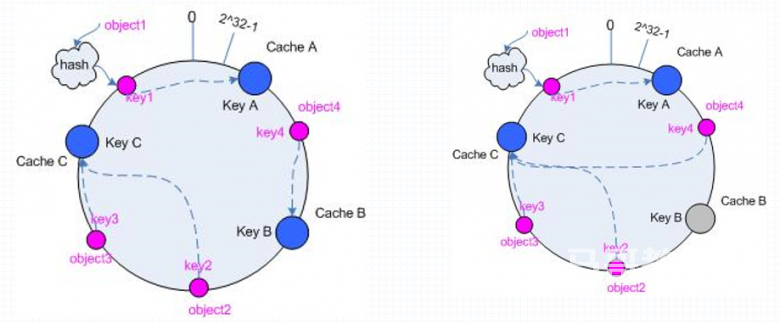
一致性哈希,当服务器的总权重发生变化时,对调度结果影响是局部的,不会引起大的变动,hash(o)mod n ,该hash算法是动态的,支持使用 socat等工具进行在线权重调整,支持慢启动
算法:
1、key1=hash(source_ip)%(2^32)  [0---4294967295]
2、keyA=hash(后端服务器虚拟ip)%(2^32)
3、将key1和keyA都放在hash环上,将用户请求调度到离key1最近的keyA对应的后端服务器
hash环偏斜问题
增加虚拟服务器IP数量,比如:一个后端服务器根据权重为1生成1000个虚拟IP,再hash。而后端服务器权重为2则生成2000的虚拟IP,再bash,最终在hash环上生成3000个节点,从而解决hash环偏斜问题hash对象
Hash对象到后端服务器的映射关系:
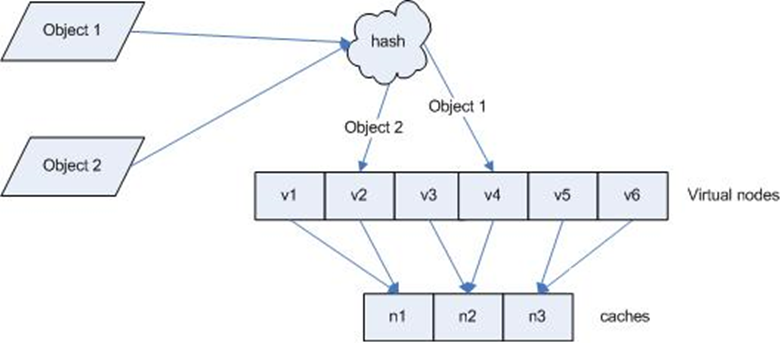
一致性hash示意图
后端服务器在线与离线的调度方式

一致性hash配置示例
listen web_hostbind 10.0.0.7:80,:8801-8810,10.0.0.7:9001-9010mode tcplog globalbalance sourcehash-type consistentserver web1 10.0.0.17:80 weight 1 check inter 3000 fall 2 rise 5server web2 10.0.0.27:80 weight 1 check inter 3000 fall 2 rise 5uri
基于对用户请求的URI的左半部分或整个uri做hash,再将hash结果对总权重进行取模后,根据最终结果将请求转发到后端指定服务器,适用于后端是缓存服务器场景,默认是静态,也可以通过hash-type指定map-based和consistent,来定义使用取模法还是一致性hash。
注意:此算法是应用层,所有只支持 mode http ,不支持 mode tcp
<scheme>://<user>:<password>@<host>:<port>/<path>;<params>?<query>#<frag>
左半部分:/<path>;<params>
整个uri:/<path>;<params>?<query>#<frag>
uri 取模法配置示例
listen web_hostbind 10.0.0.7:80,:8801-8810,10.0.0.7:9001-9010mode httplog globalbalance uriserver web1 10.0.0.17:80 weight 1 check inter 3000 fall 2 rise 5server web2 10.0.0.27:80 weight 1 check inter 3000 fall 2 rise 5uri 一致性hash配置示例
listen web_hostbind 10.0.0.7:80,:8801-8810,10.0.0.7:9001-9010mode httplog globalbalance urihash-type consistentserver web1 10.0.0.17:80 weight 1 check inter 3000 fall 2 rise 5server web2 10.0.0.27:80 weight 1 check inter 3000 fall 2 rise 5访问测试
访问不同的uri,确认可以将用户同样的请求转发至相同的服务器
# curl  http://10.0.0.7/test1.html
# curl  http://10.0.0.7/test2..html
url_param
url_param对用户请求的url中的 params 部分中的一个参数key对应的value值作hash计算,并由服务器总权重相除以后派发至某挑出的服务器;通常用于追踪用户,以确保来自同一个用户的请求始终发往同一个real server,如果无没key,将按roundrobin算法
假设:
url = http://www.magedu.com/foo/bar/index.php?key=value则:
host = "www.magedu.com"
url_param = "key=value"
url_param取模法配置示例
listen web_hostbind 10.0.0.7:80,:8801-8810,10.0.0.7:9001-9010mode httplog globalbalance url_param userid #url_param hashserver web1 10.0.0.17:80 weight 1 check inter 3000 fall 2 rise 5server web2 10.0.0.27:80 weight 1 check inter 3000 fall 2 rise 5url_param一致性hash配置示例
listen web_hostbind 10.0.0.7:80,:8801-8810,10.0.0.7:9001-9010mode httplog globalbalance url_param userid #对url_param的值取hashhash-type consistentserver web1 10.0.0.17:80 weight 1 check inter 3000 fall 2 rise 5server web2 10.0.0.27:80 weight 1 check inter 3000 fall 2 rise 5测试访问
# curl  http://10.0.0.7/index.html?userid=<NAME_ID>
# curl  "http://10.0.0.7/index.html?userid=<NAME_ID>&typeid=<TYPE_ID>"
hdr
针对用户每个http头部(header)请求中的指定信息做hash,此处由 name 指定的http首部将会被取出并做hash计算,然后由服务器总权重取模以后派发至某挑出的服务器,如无有效的值,则会使用默认的轮询调度。
hdr取模法配置示例
listen web_hostbind 10.0.0.7:80,:8801-8810,10.0.0.7:9001-9010mode httplog globalbalance hdr(User-Agent)#balance hdr(host)server web1 10.0.0.17:80 weight 1 check inter 3000 fall 2 rise 5server web2 10.0.0.27:80 weight 1 check inter 3000 fall 2 rise 5一致性hash配置示例
listen web_hostbind 10.0.0.7:80,:8801-8810,10.0.0.7:9001-9010mode httplog globalbalance hdr(User-Agent)hash-type consistentserver web1 10.0.0.17:80 weight 1 check inter 3000 fall 2 rise 5server web2 10.0.0.27:80 weight 1 check inter 3000 fall 2 rise 5测试访问
[root@centos6 ~]#curl -v http://10.0.0.7/index.html
[root@centos6 ~]#curl -vA 'firefox' http://10.0.0.7/index.html
[root@centos6 ~]#curl -vA 'chrome' http://10.0.0.7/index.html
rdp-cookie
rdp-cookie对远windows远程桌面的负载,使用cookie保持会话,默认是静态,也可以通过hash-type指定map-based和consistent,来定义使用取模法还是一致性hash。
rdp-cookie取模法配置示例
listen RDPbind 10.0.0.7:3389balance rdp-cookiemode tcpserver rdp0 10.0.0.17:3389 check fall 3 rise 5 inter 2000 weight 1rdp-cookie一致性hash配置示例
[root@haproxy ~]#cat /etc/haproxy/conf.d/windows_rdp.cfg
listen magedu_RDP_3389bind  172.16.0.100:3389balance rdp-cookiehash-type consistentmode tcpserver rdp0 10.0.0.200:3389 check fall 3 rise 5 inter 2000 weight 1[root@haproxy ~]#hostname -I
10.0.0.100 172.16.0.100 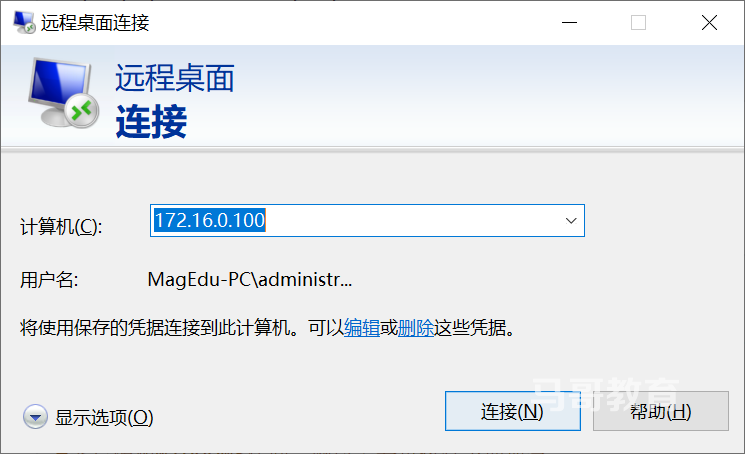

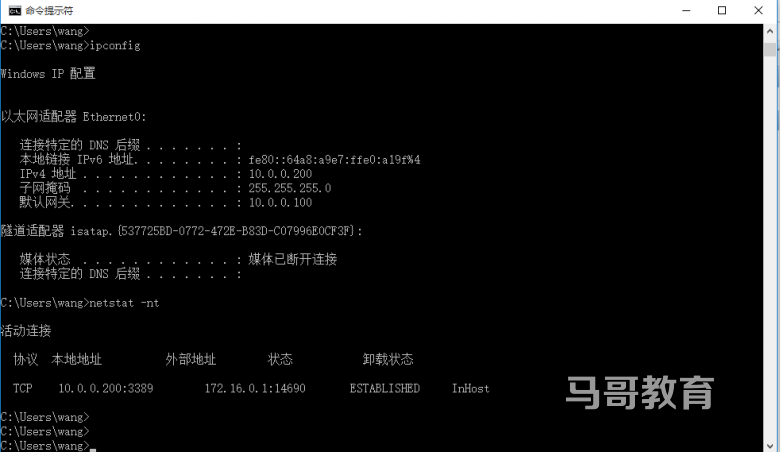
基于iptables实现RDP协议转发
必须开启ip转发功能:net.ipv4.ip_forward = 1
[root@centos8 ~]#sysctl -w net.ipv4.ip_forward=1
#客户端和Windows在不同网段需要下面命令
[root@centos8 ~]#iptables  -t nat -A PREROUTING -d 172.16.0.100 -p tcp --dport 3389 -j DNAT --to-destination 10.0.0.200:3389#客户端和Windows在同一网段需要再执行下面命令
[root@centos8 ~]#iptables  -t nat -A PREROUTING -d 10.0.0.8 -p tcp --dport 3389 -j DNAT --to-destination 10.0.0.1:3389
[root@centos8 ~]#iptables -t nat -A POSTROUTING -s 10.0.0.0/24 -j SNAT --to-source  10.0.0.8
在windows 可以看到以下信息
算法总结
static-rr--------->tcp/http  静态
first------------->tcp/http  静态roundrobin-------->tcp/http 动态
leastconn--------->tcp/http 动态
random------------>tcp/http 动态以下静态和动态取决于hash_type是否consistent
source------------>tcp/http
Uri--------------->http
url_param--------->http
hdr--------------->http
rdp-cookie-------->tcp
各算法使用场景
first       #使用较少static-rr   #做了session共享的web集群
roundrobin
randomleastconn   #数据库
source      #基于客户端公网IP的会话保持Uri--------------->http  #缓存服务器,CDN服务商,蓝汛、百度、阿里云、腾讯
url_param--------->http hdr         #基于客户端请求报文头部做下一步处理rdp-cookie  #很少使用