LFWG2024.08
-当窗口被锁定时,拒绝SendKeys访问
2024.08.06w(先试试管理员运行2024.8.26)
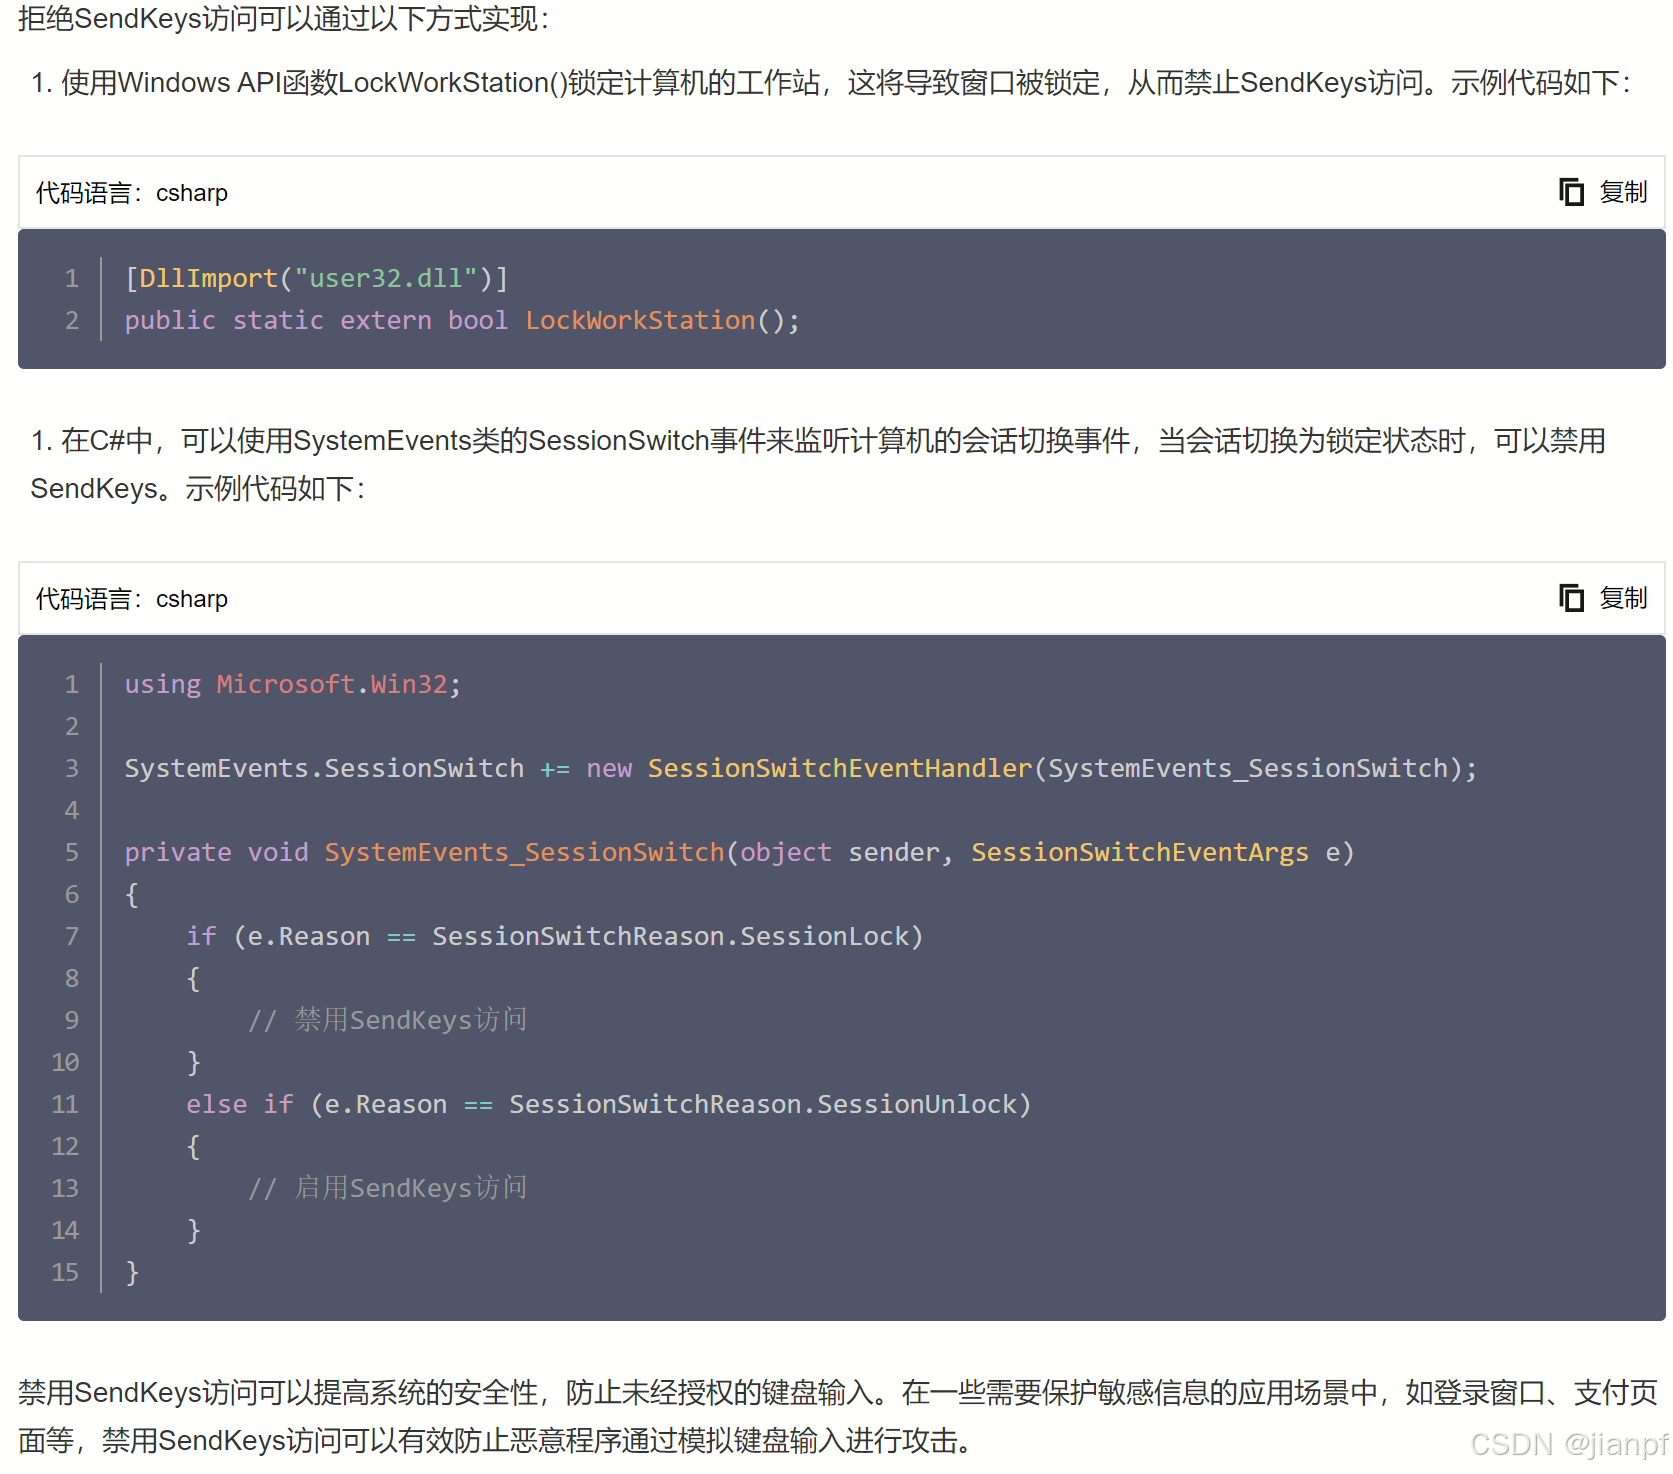
https://cloud.tencent.com/developer/information/C%23%20-%E5%BD%93%E7%AA%97%E5%8F%A3%E8%A2%AB%E9%94%81%E5%AE%9A%E6%97%B6%EF%BC%8C%E6%8B%92%E7%BB%9DSendKeys%E8%AE%BF%E9%97%AE-album
 https://www.bilibili.com/video/BV1rv4y1F7jE/
.NET(C#) SendKeys模拟键盘按键不生效使用WinAPI的替代方案
https://www.cjavapy.com/article/1921/

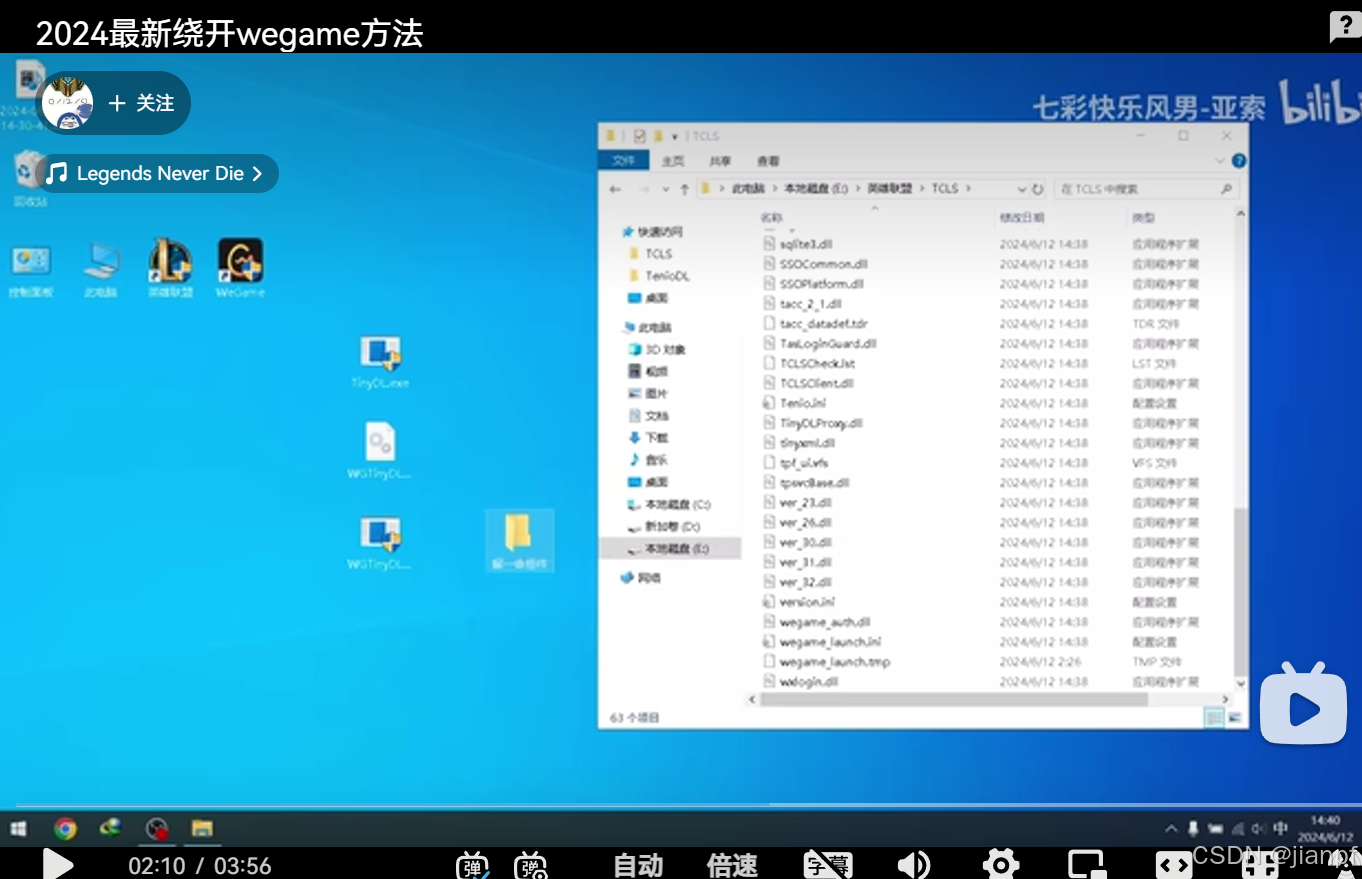
2024最新绕开wegame方法https://www.bilibili.com/video/BV1LT421e7NX/
https://blog.csdn.net/changleqy/article/details/1713451
https://www.cnblogs.com/lilun/archive/2013/05/21/3090566.html
驱动+钩子<电机硬控
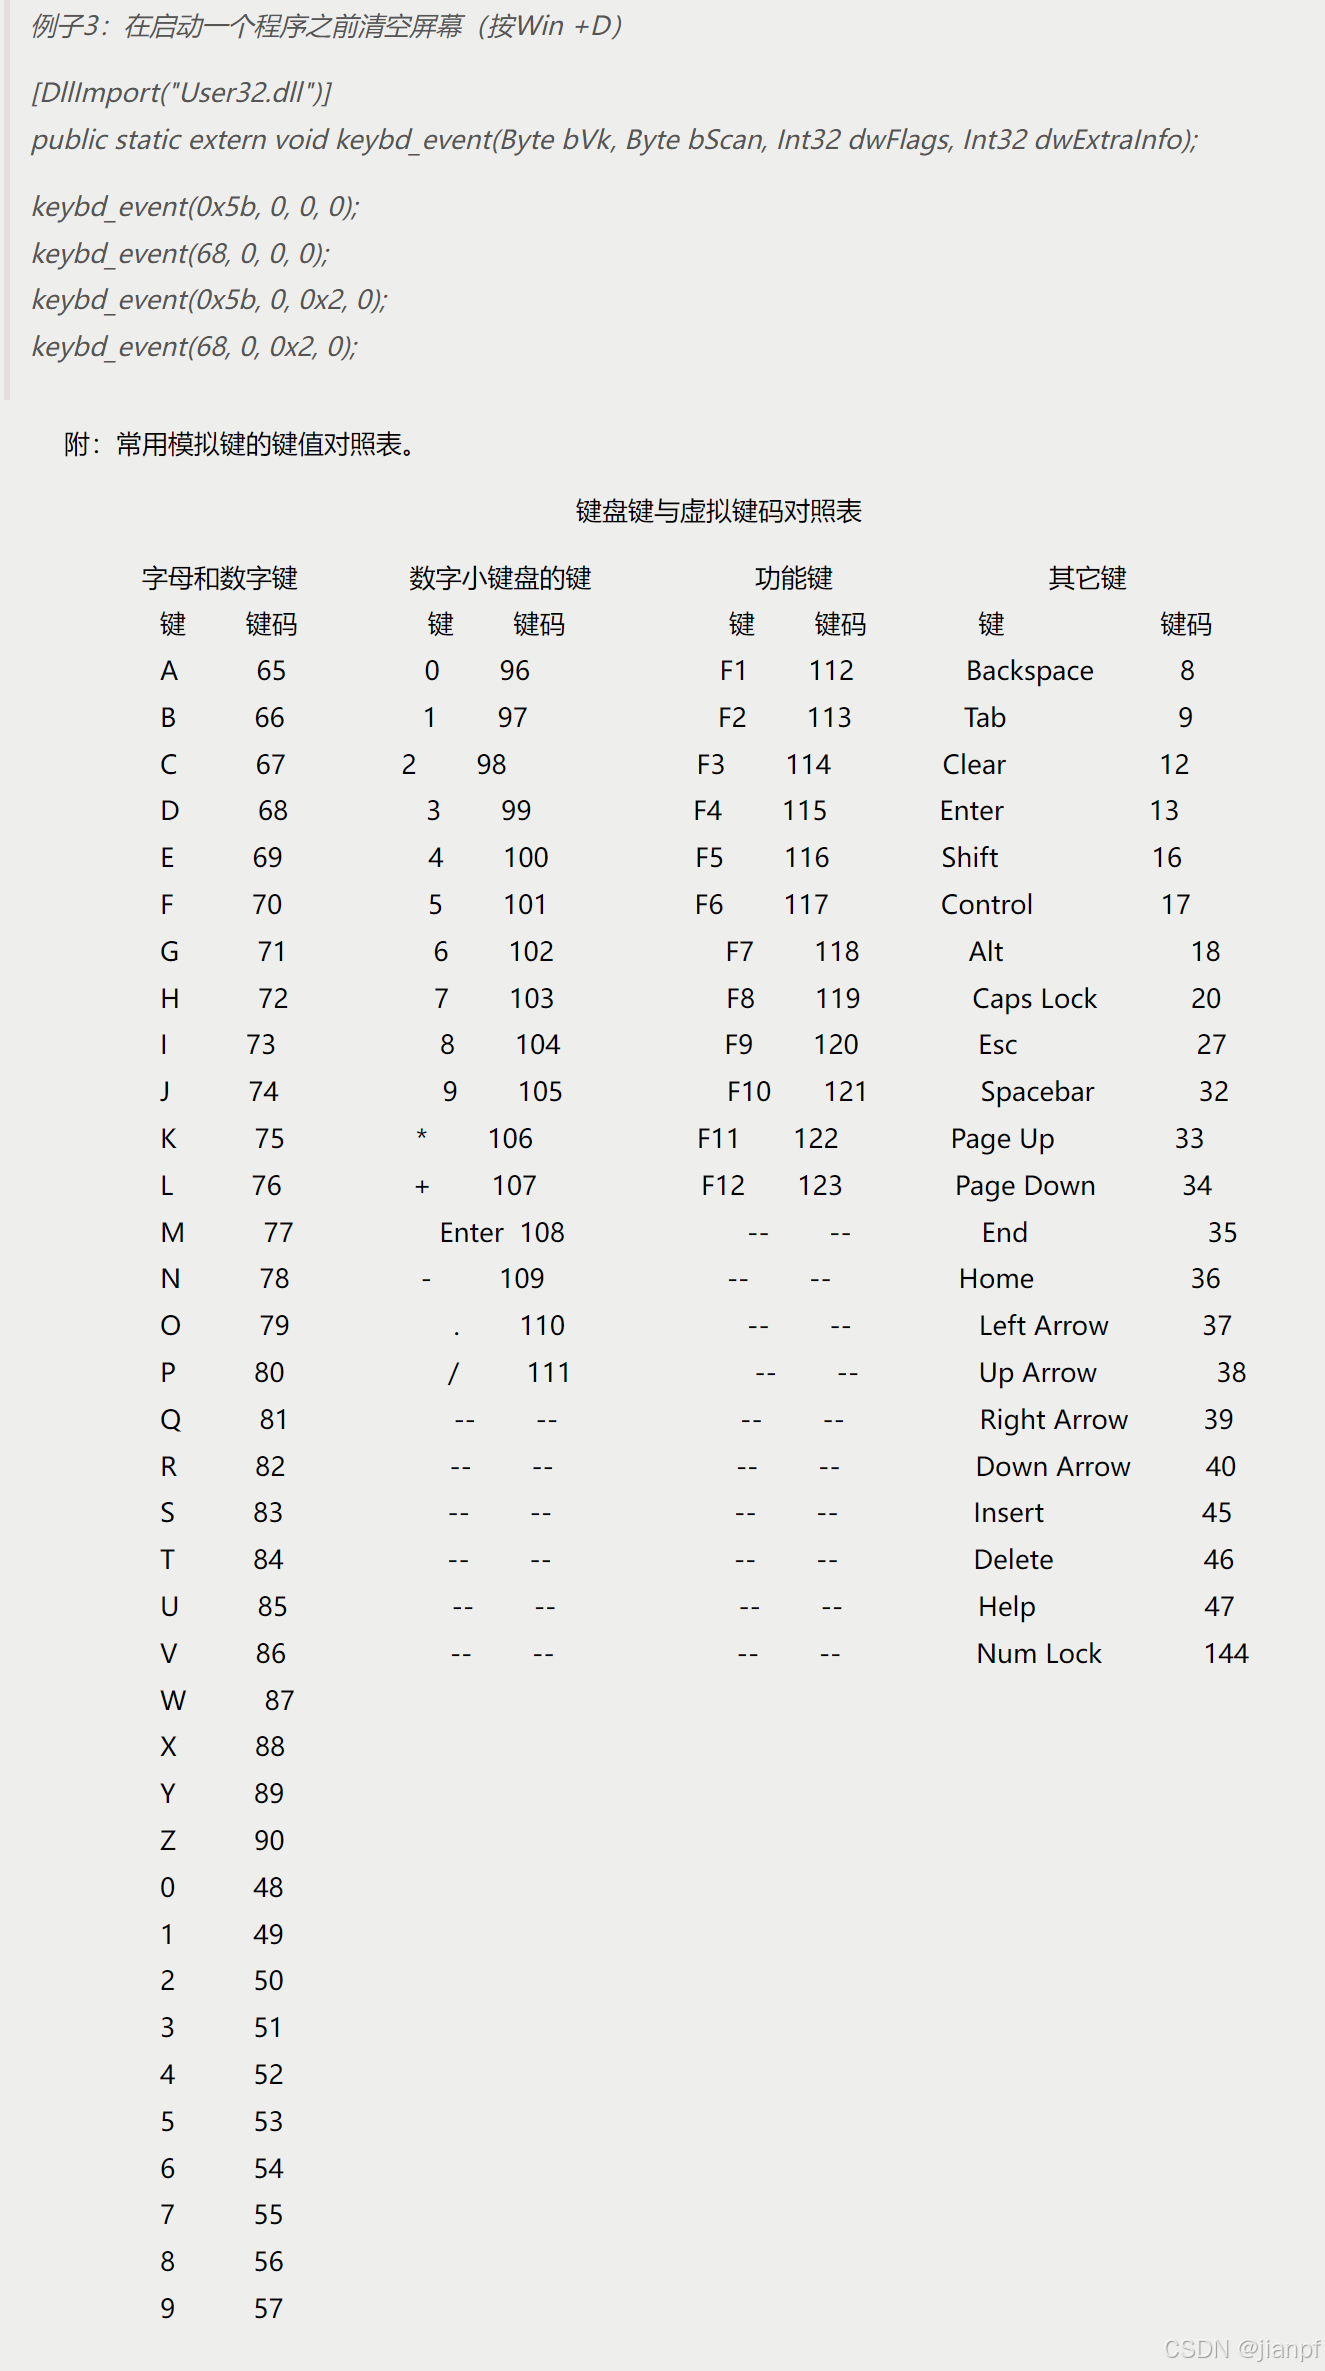
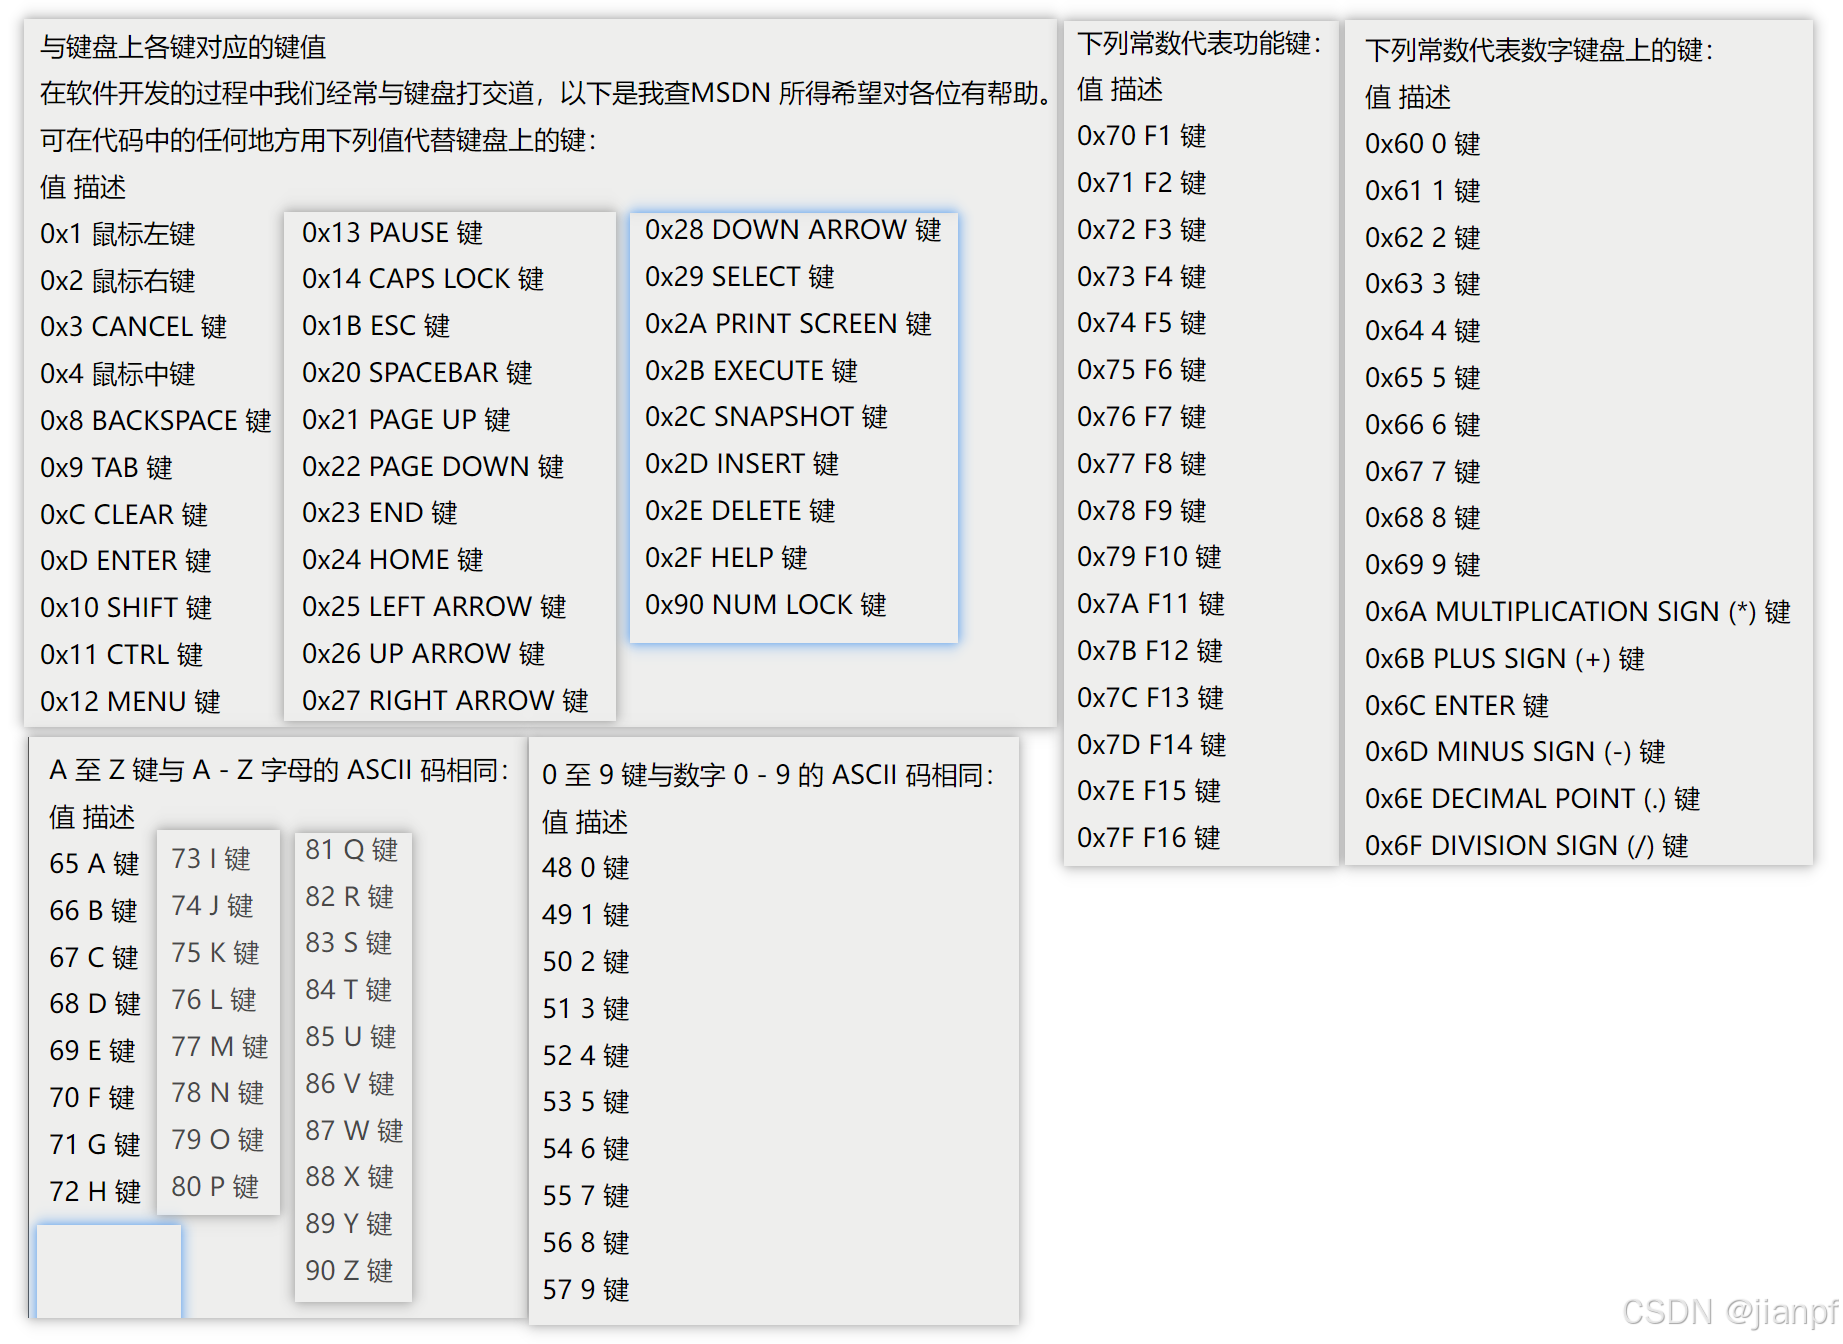
Constant Value Description
VK_LBUTTON 0x01 Left mouse button
VK_RBUTTON 0x02 Right mouse button
VK_CANCEL 0x03 Control-break processing
VK_MBUTTON 0x04 Middle mouse button
VK_XBUTTON1 0x05 X1 mouse button
VK_XBUTTON2 0x06 X2 mouse button
- 0x07 Reserved
VK_BACK 0x08 BACKSPACE key
VK_TAB 0x09 TAB key
- 0x0A-0B Reserved
VK_CLEAR 0x0C CLEAR key
VK_RETURN 0x0D ENTER key
- 0x0E-0F Unassigned
VK_SHIFT 0x10 SHIFT key
VK_CONTROL 0x11 CTRL key
VK_MENU 0x12 ALT key
VK_PAUSE 0x13 PAUSE key
VK_CAPITAL 0x14 CAPS LOCK key
VK_KANA 0x15 IME Kana mode
VK_HANGUL 0x15 IME Hangul mode
VK_IME_ON 0x16 IME On
VK_JUNJA 0x17 IME Junja mode
VK_FINAL 0x18 IME final mode
VK_HANJA 0x19 IME Hanja mode
VK_KANJI 0x19 IME Kanji mode
VK_IME_OFF 0x1A IME Off
VK_ESCAPE 0x1B ESC key
VK_CONVERT 0x1C IME convert
VK_NONCONVERT 0x1D IME nonconvert
VK_ACCEPT 0x1E IME accept
VK_MODECHANGE 0x1F IME mode change request
VK_SPACE 0x20 SPACEBAR
VK_PRIOR 0x21 PAGE UP key
VK_NEXT 0x22 PAGE DOWN key
VK_END 0x23 END key
VK_HOME 0x24 HOME key
VK_LEFT 0x25 LEFT ARROW key
VK_UP 0x26 UP ARROW key
VK_RIGHT 0x27 RIGHT ARROW key
VK_DOWN 0x28 DOWN ARROW key
VK_SELECT 0x29 SELECT key
VK_PRINT 0x2A PRINT key
VK_EXECUTE 0x2B EXECUTE key
VK_SNAPSHOT 0x2C PRINT SCREEN key
VK_INSERT 0x2D INS key
VK_DELETE 0x2E DEL key
VK_HELP 0x2F HELP key
0x30 0 key
0x31 1 key
0x32 2 key
0x33 3 key
0x34 4 key
0x35 5 key
0x36 6 key
0x37 7 key
0x38 8 key
0x39 9 key
- 0x3A-40 Undefined
0x41 A key
0x42 B key
0x43 C key
0x44 D key
0x45 E key
0x46 F key
0x47 G key
0x48 H key
0x49 I key
0x4A J key
0x4B K key
0x4C L key
0x4D M key
0x4E N key
0x4F O key
0x50 P key
0x51 Q key
0x52 R key
0x53 S key
0x54 T key
0x55 U key
0x56 V key
0x57 W key
0x58 X key
0x59 Y key
0x5A Z key
VK_LWIN 0x5B Left Windows key
VK_RWIN 0x5C Right Windows key
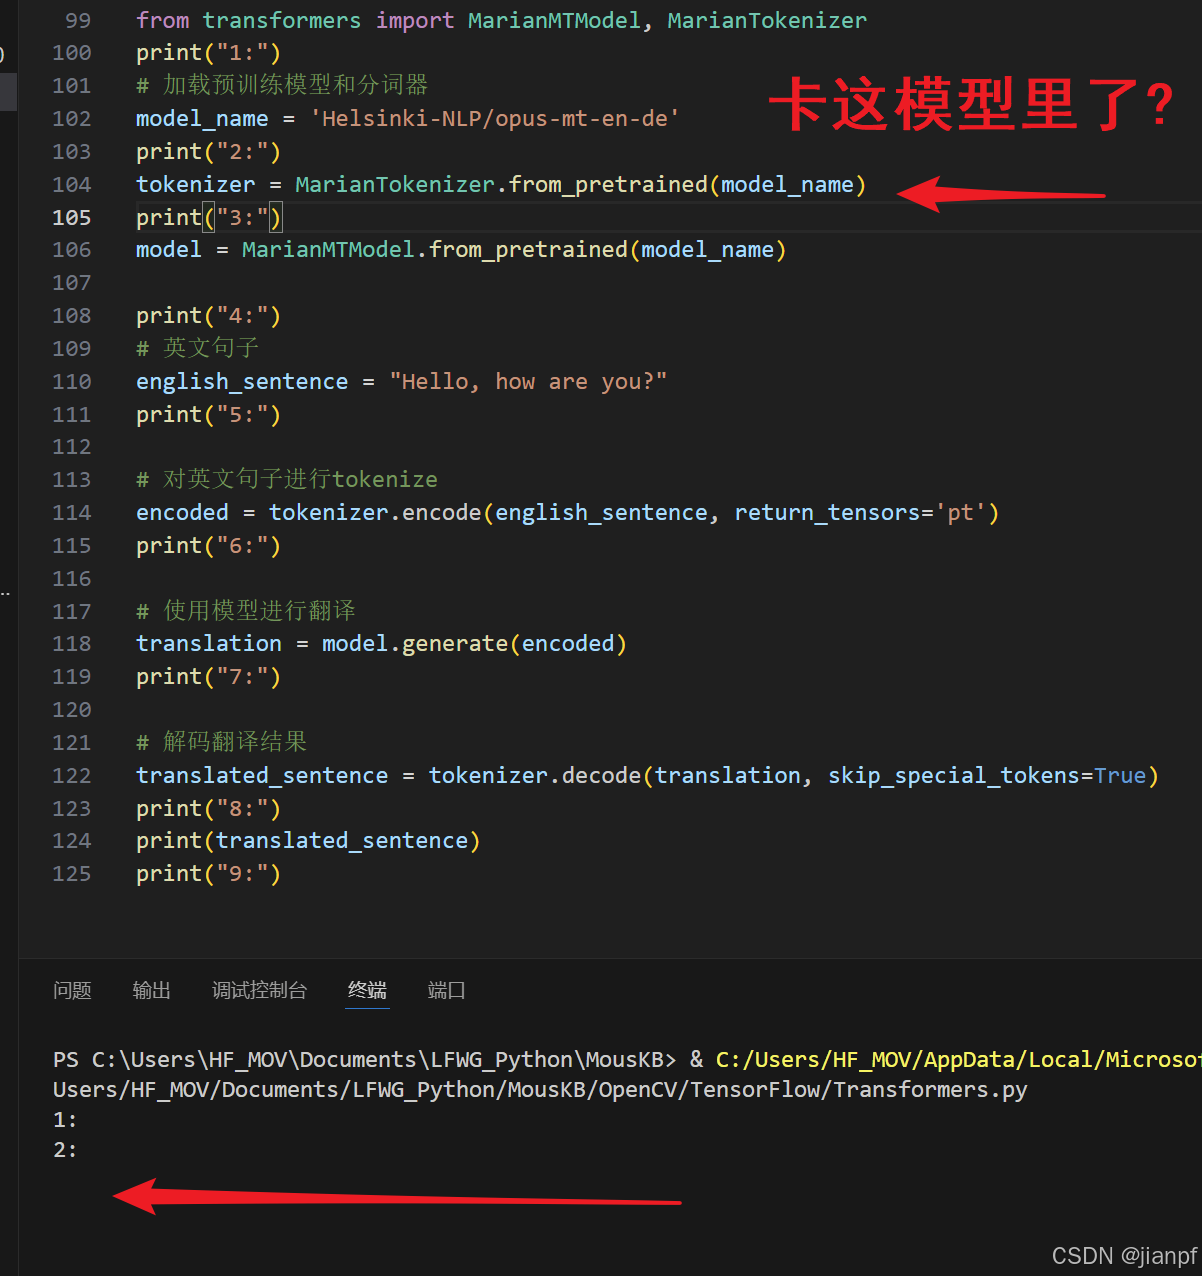
VK_APPS 0x5D Applications key
- 0x5E Reserved
VK_SLEEP 0x5F Computer Sleep key
VK_NUMPAD0 0x60 Numeric keypad 0 key
VK_NUMPAD1 0x61 Numeric keypad 1 key
VK_NUMPAD2 0x62 Numeric keypad 2 key
VK_NUMPAD3 0x63 Numeric keypad 3 key
VK_NUMPAD4 0x64 Numeric keypad 4 key
VK_NUMPAD5 0x65 Numeric keypad 5 key
VK_NUMPAD6 0x66 Numeric keypad 6 key
VK_NUMPAD7 0x67 Numeric keypad 7 key
VK_NUMPAD8 0x68 Numeric keypad 8 key
VK_NUMPAD9 0x69 Numeric keypad 9 key
VK_MULTIPLY 0x6A Multiply key
VK_ADD 0x6B Add key
VK_SEPARATOR 0x6C Separator key
VK_SUBTRACT 0x6D Subtract key
VK_DECIMAL 0x6E Decimal key
VK_DIVIDE 0x6F Divide key
VK_F1 0x70 F1 key
VK_F2 0x71 F2 key
VK_F3 0x72 F3 key
VK_F4 0x73 F4 key
VK_F5 0x74 F5 key
VK_F6 0x75 F6 key
VK_F7 0x76 F7 key
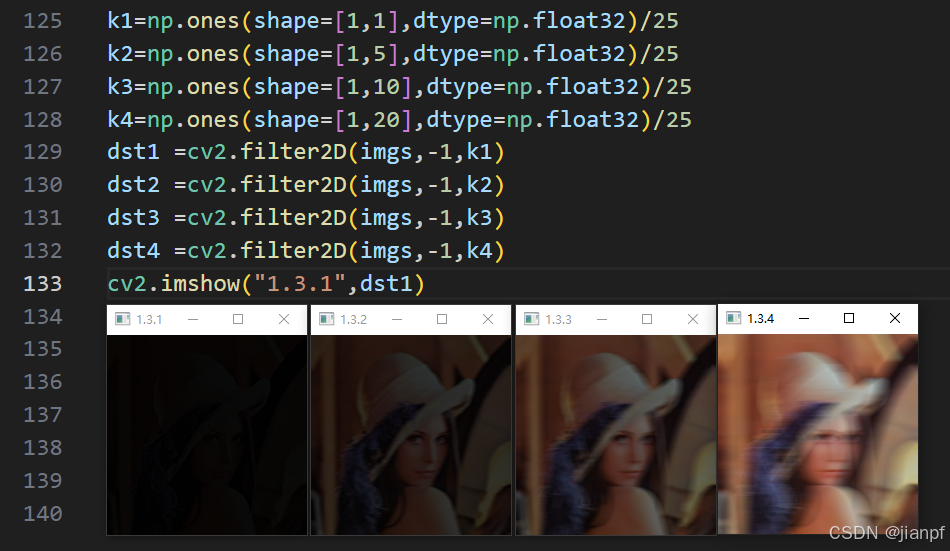
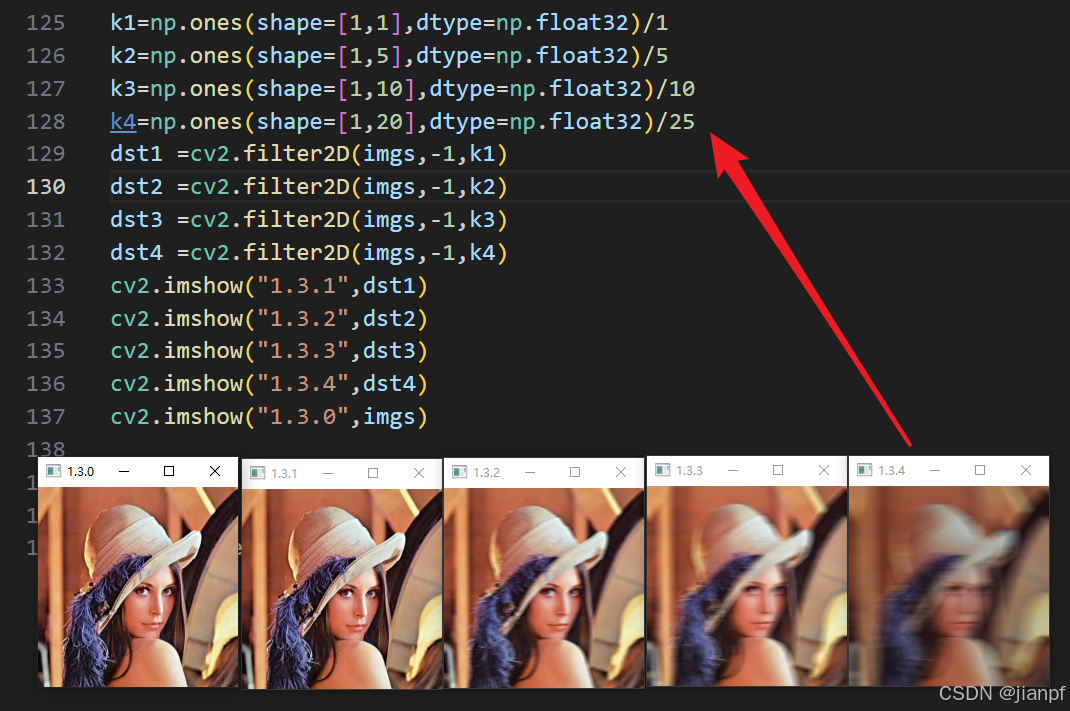
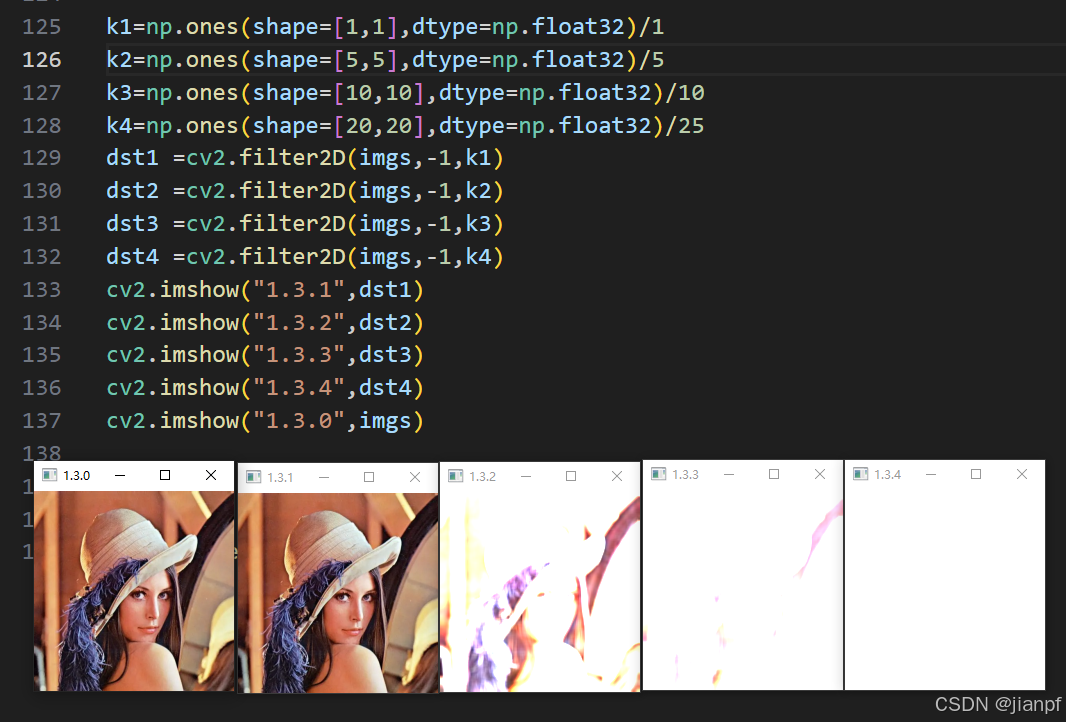
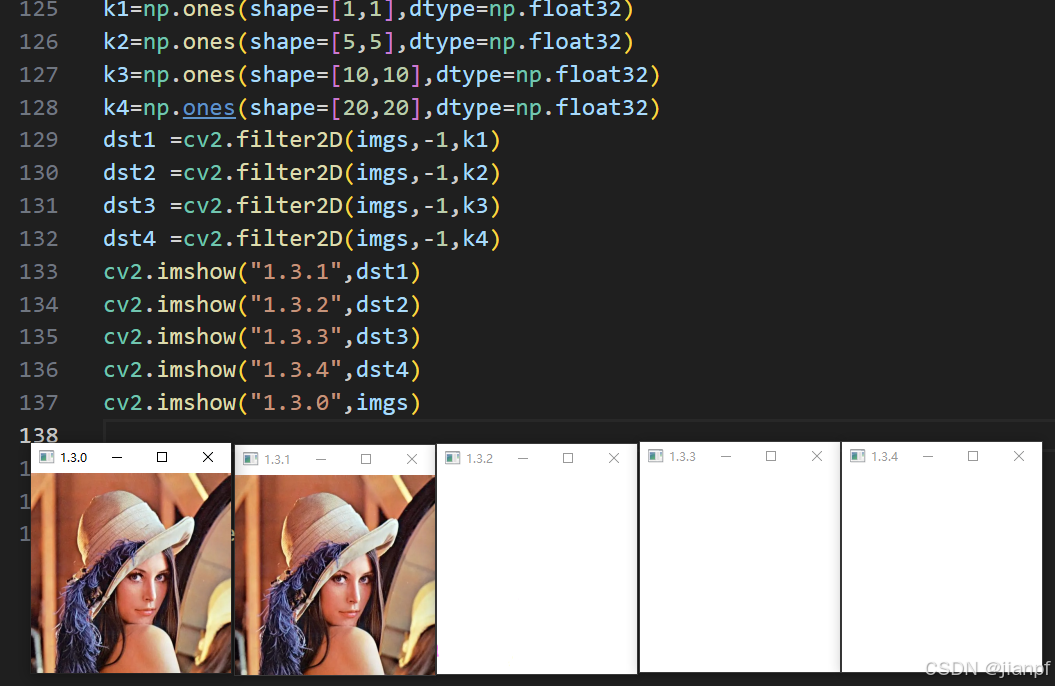
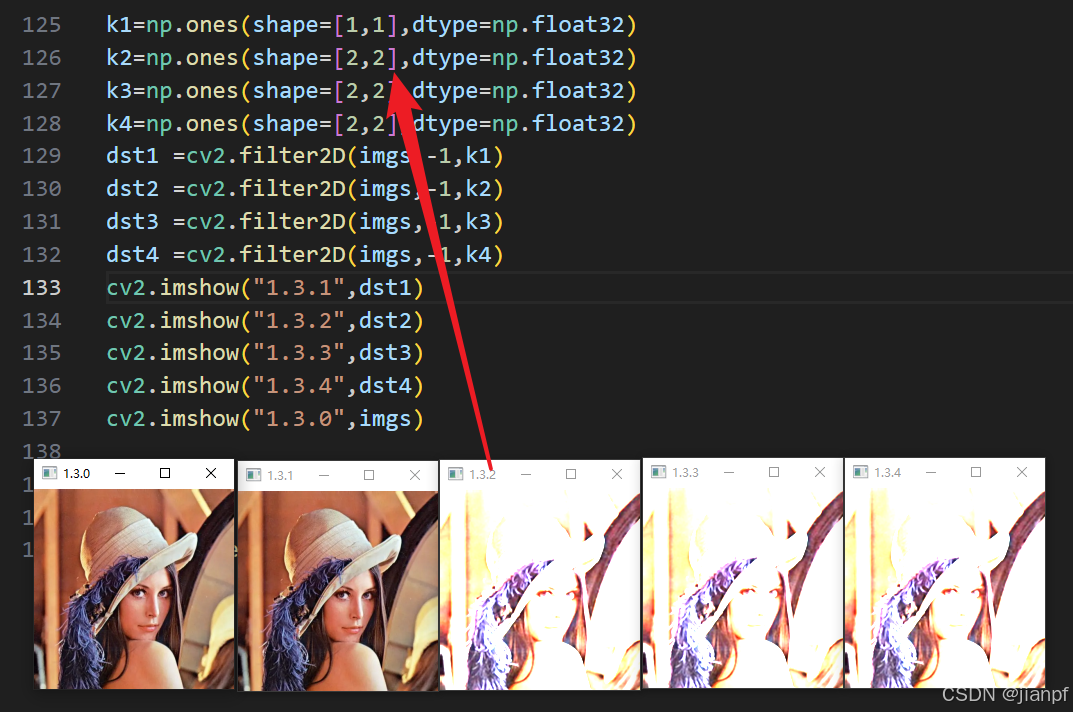
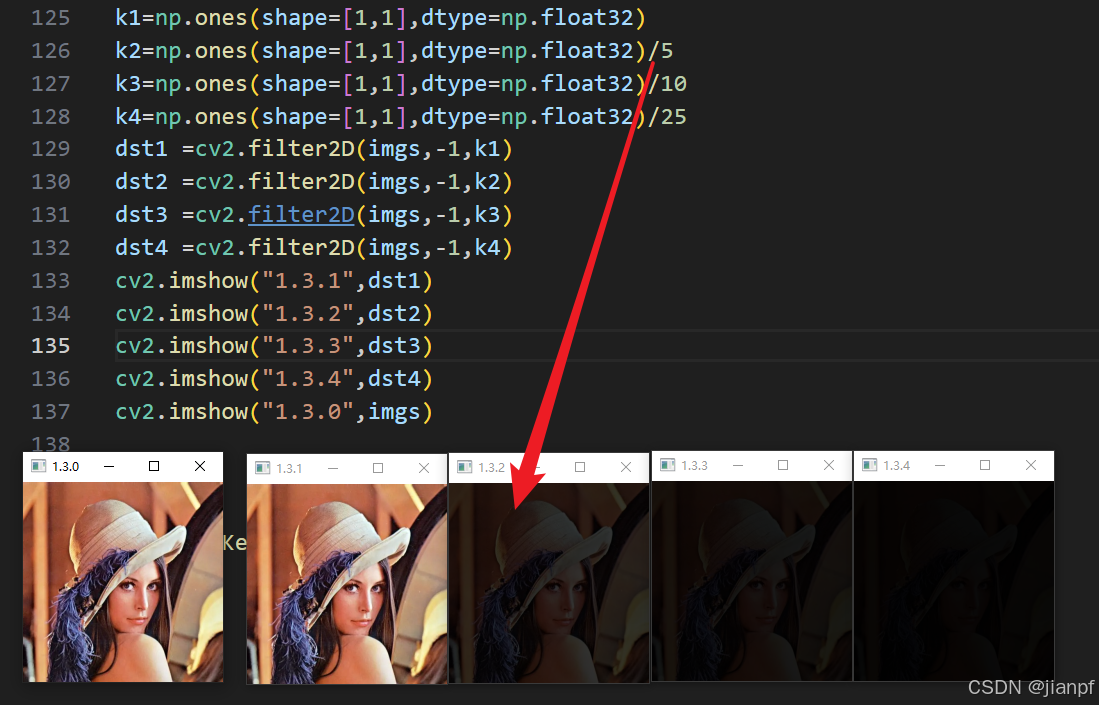
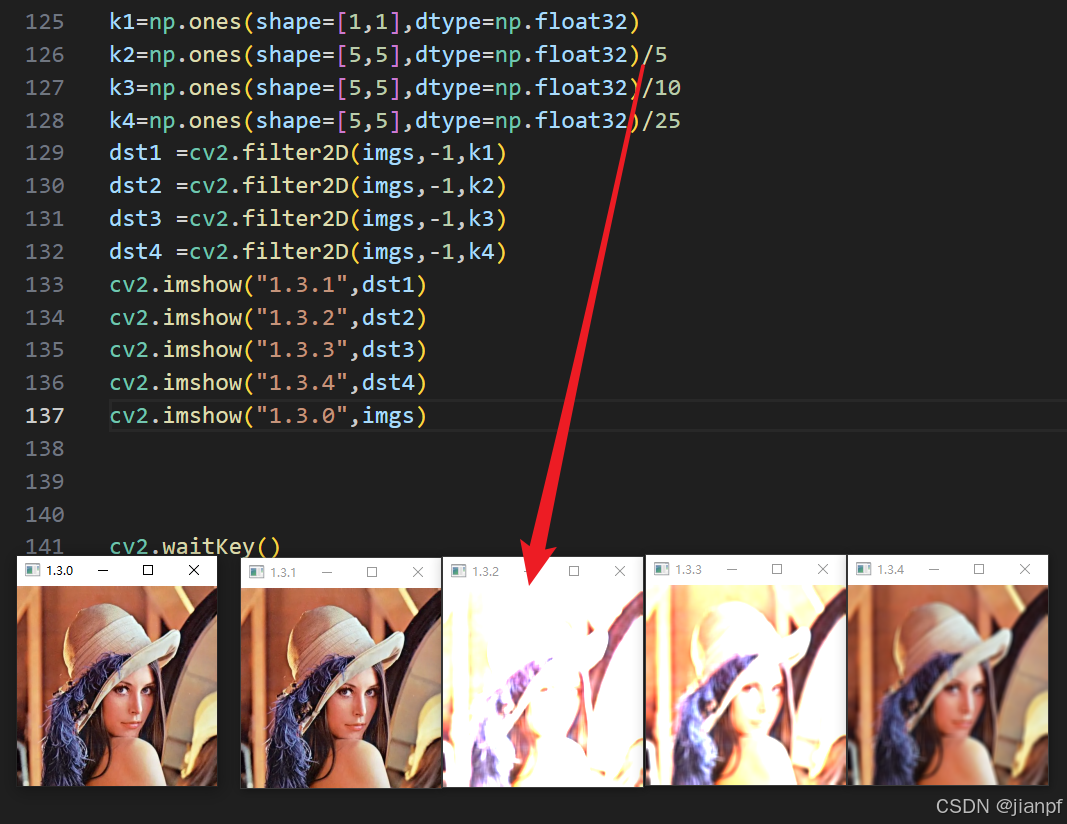
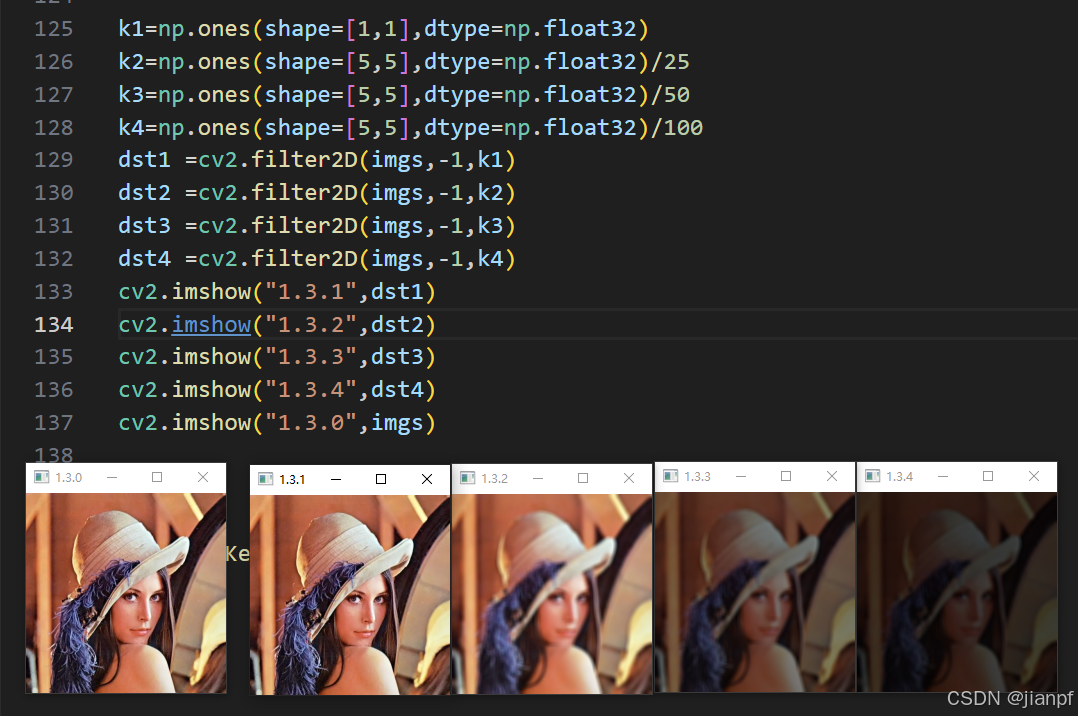
VK_F8 0x77 F8 key
VK_F9 0x78 F9 key
VK_F10 0x79 F10 key
VK_F11 0x7A F11 key
VK_F12 0x7B F12 key
VK_F13 0x7C F13 key
VK_F14 0x7D F14 key
VK_F15 0x7E F15 key
VK_F16 0x7F F16 key
VK_F17 0x80 F17 key
VK_F18 0x81 F18 key
VK_F19 0x82 F19 key
VK_F20 0x83 F20 key
VK_F21 0x84 F21 key
VK_F22 0x85 F22 key
VK_F23 0x86 F23 key
VK_F24 0x87 F24 key
- 0x88-8F Reserved
VK_NUMLOCK 0x90 NUM LOCK key
VK_SCROLL 0x91 SCROLL LOCK key
- 0x92-96 OEM specific
- 0x97-9F Unassigned
VK_LSHIFT 0xA0 Left SHIFT key
VK_RSHIFT 0xA1 Right SHIFT key
VK_LCONTROL 0xA2 Left CONTROL key
VK_RCONTROL 0xA3 Right CONTROL key
VK_LMENU 0xA4 Left ALT key
VK_RMENU 0xA5 Right ALT key
VK_BROWSER_BACK 0xA6 Browser Back key
VK_BROWSER_FORWARD 0xA7 Browser Forward key
VK_BROWSER_REFRESH 0xA8 Browser Refresh key
VK_BROWSER_STOP 0xA9 Browser Stop key
VK_BROWSER_SEARCH 0xAA Browser Search key
VK_BROWSER_FAVORITES 0xAB Browser Favorites key
VK_BROWSER_HOME 0xAC Browser Start and Home key
VK_VOLUME_MUTE 0xAD Volume Mute key
VK_VOLUME_DOWN 0xAE Volume Down key
VK_VOLUME_UP 0xAF Volume Up key
VK_MEDIA_NEXT_TRACK 0xB0 Next Track key
VK_MEDIA_PREV_TRACK 0xB1 Previous Track key
VK_MEDIA_STOP 0xB2 Stop Media key
VK_MEDIA_PLAY_PAUSE 0xB3 Play/Pause Media key
VK_LAUNCH_MAIL 0xB4 Start Mail key
VK_LAUNCH_MEDIA_SELECT 0xB5 Select Media key
VK_LAUNCH_APP1 0xB6 Start Application 1 key
VK_LAUNCH_APP2 0xB7 Start Application 2 key
- 0xB8-B9 Reserved
VK_OEM_1 0xBA Used for miscellaneous characters; it can vary by keyboard. For the US standard keyboard, the ;: key
VK_OEM_PLUS 0xBB For any country/region, the + key
VK_OEM_COMMA 0xBC For any country/region, the , key
VK_OEM_MINUS 0xBD For any country/region, the - key
VK_OEM_PERIOD 0xBE For any country/region, the . key
VK_OEM_2 0xBF Used for miscellaneous characters; it can vary by keyboard. For the US standard keyboard, the /? key
VK_OEM_3 0xC0 Used for miscellaneous characters; it can vary by keyboard. For the US standard keyboard, the `~ key
- 0xC1-DA Reserved
VK_OEM_4 0xDB Used for miscellaneous characters; it can vary by keyboard. For the US standard keyboard, the [{ key
VK_OEM_5 0xDC Used for miscellaneous characters; it can vary by keyboard. For the US standard keyboard, the \\| key
VK_OEM_6 0xDD Used for miscellaneous characters; it can vary by keyboard. For the US standard keyboard, the ]} key
VK_OEM_7 0xDE Used for miscellaneous characters; it can vary by keyboard. For the US standard keyboard, the '" key
VK_OEM_8 0xDF Used for miscellaneous characters; it can vary by keyboard.
- 0xE0 Reserved
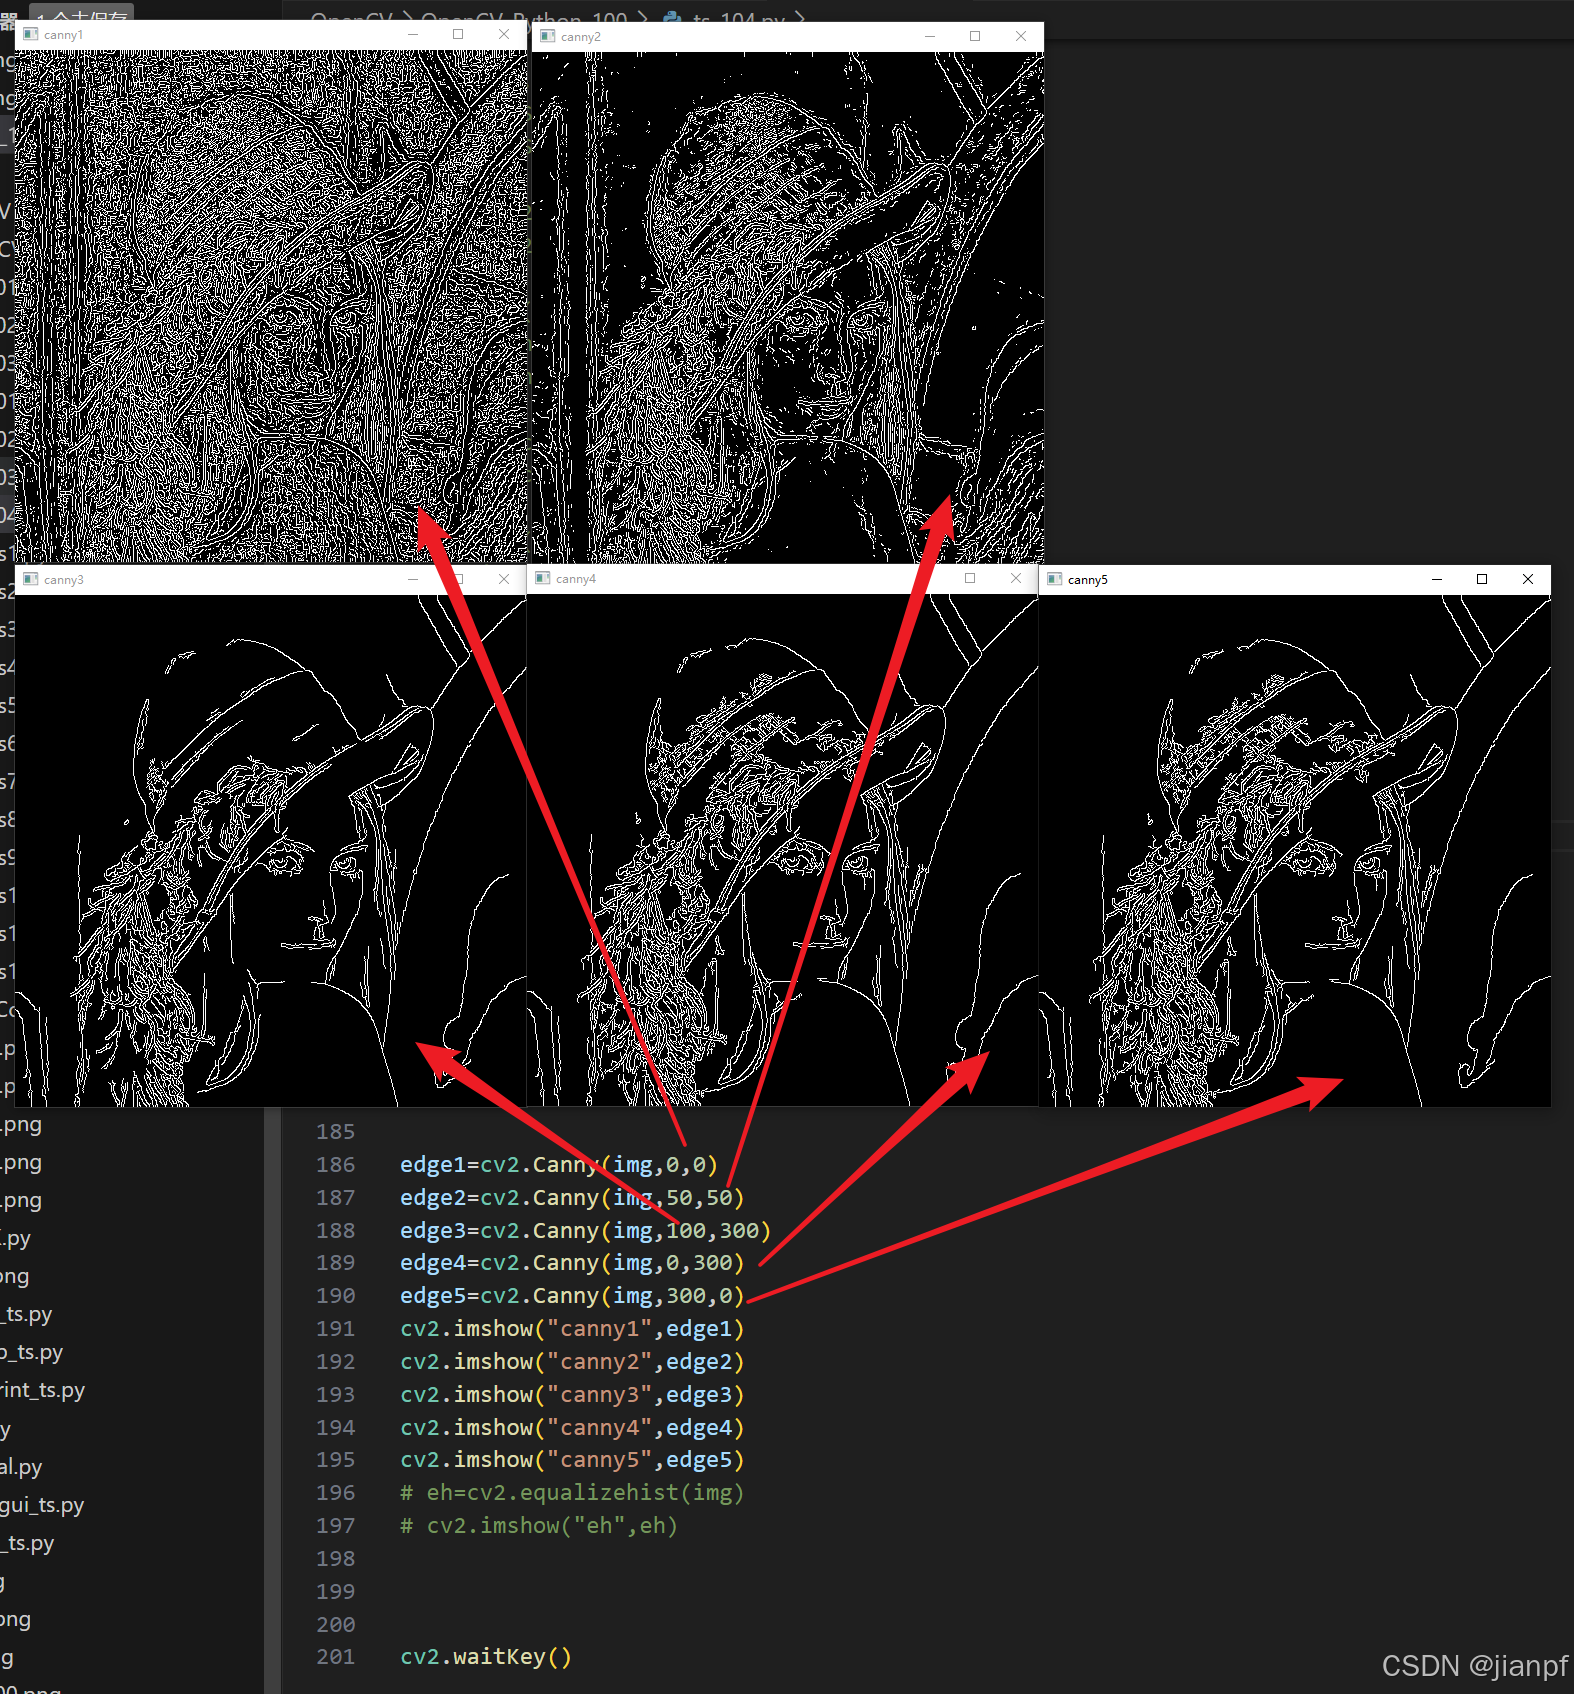
- 0xE1 OEM specific
VK_OEM_102 0xE2 The <> keys on the US standard keyboard, or the \\| key on the non-US 102-key keyboard
- 0xE3-E4 OEM specific
VK_PROCESSKEY 0xE5 IME PROCESS key
- 0xE6 OEM specific
VK_PACKET 0xE7 Used to pass Unicode characters as if they were keystrokes. The VK_PACKET key is the low word of a 32-bit Virtual Key value used for non-keyboard input methods. For more information, see Remark in KEYBDINPUT, SendInput, WM_KEYDOWN, and WM_KEYUP
- 0xE8 Unassigned
- 0xE9-F5 OEM specific
VK_ATTN 0xF6 Attn key
VK_CRSEL 0xF7 CrSel key
VK_EXSEL 0xF8 ExSel key
VK_EREOF 0xF9 Erase EOF key
VK_PLAY 0xFA Play key
VK_ZOOM 0xFB Zoom key
VK_NONAME 0xFC Reserved
VK_PA1 0xFD PA1 key
VK_OEM_CLEAR 0xFE Clear key
重点看下C#的代码和其他相关网页https://blog.csdn.net/qq_42504097/article/details/126519820
系统自带的键盘可以控制,通过触屏可控win+Ctrl+O启动软键盘
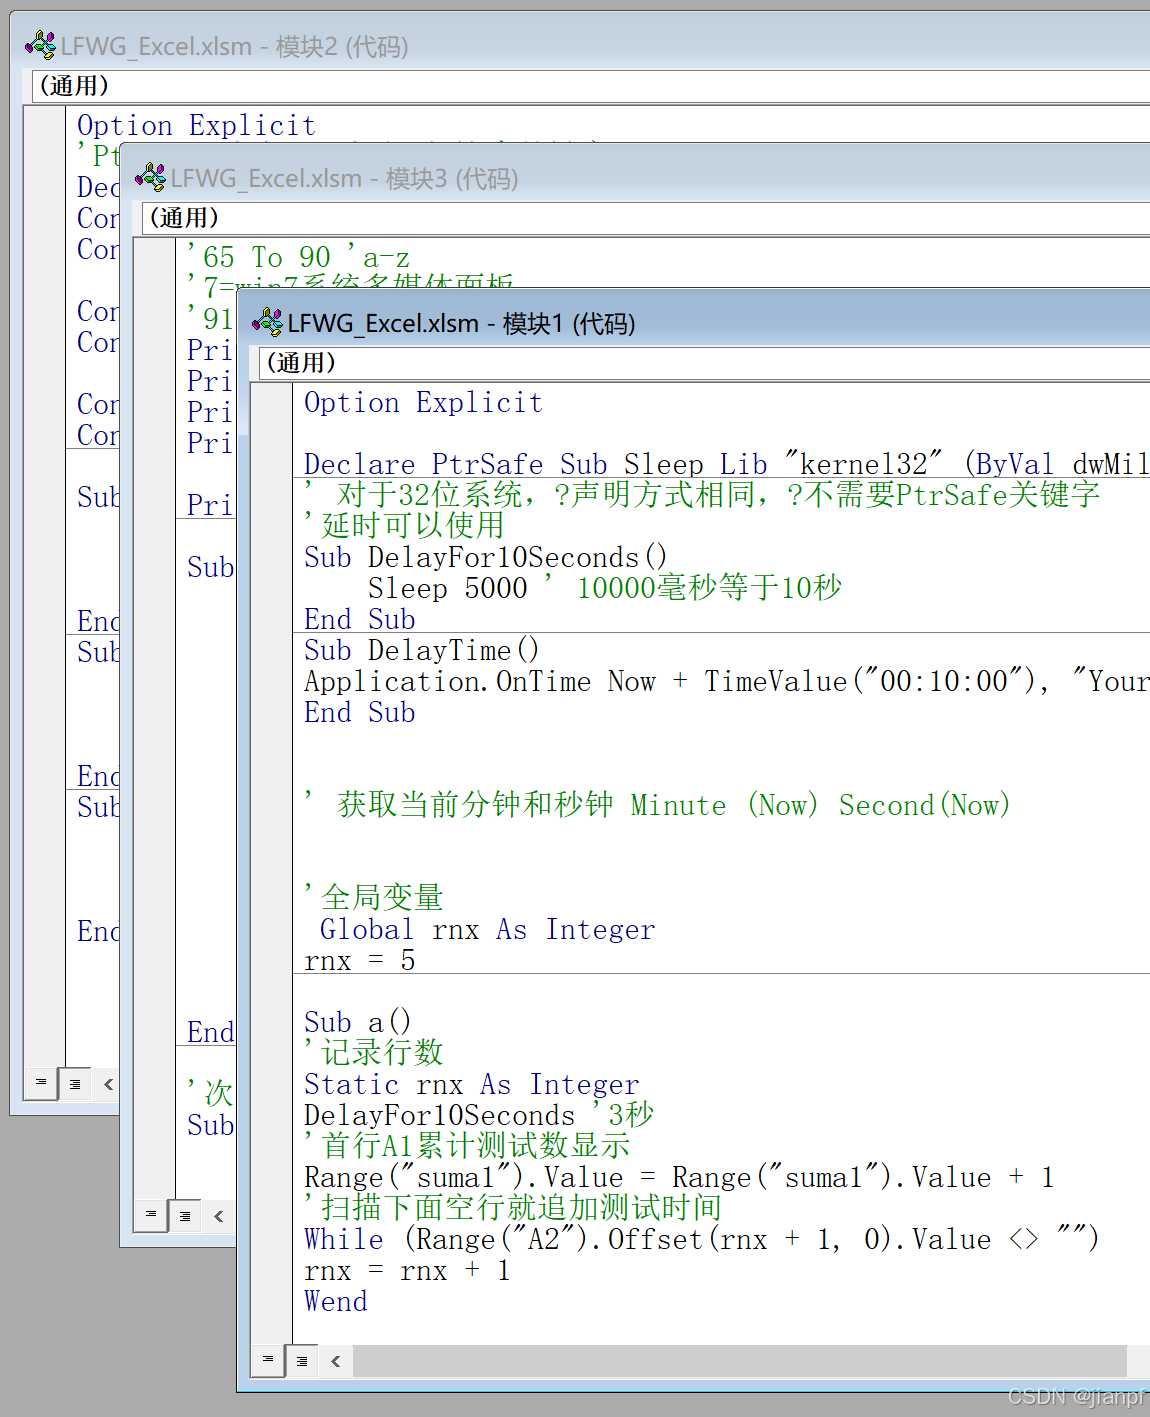
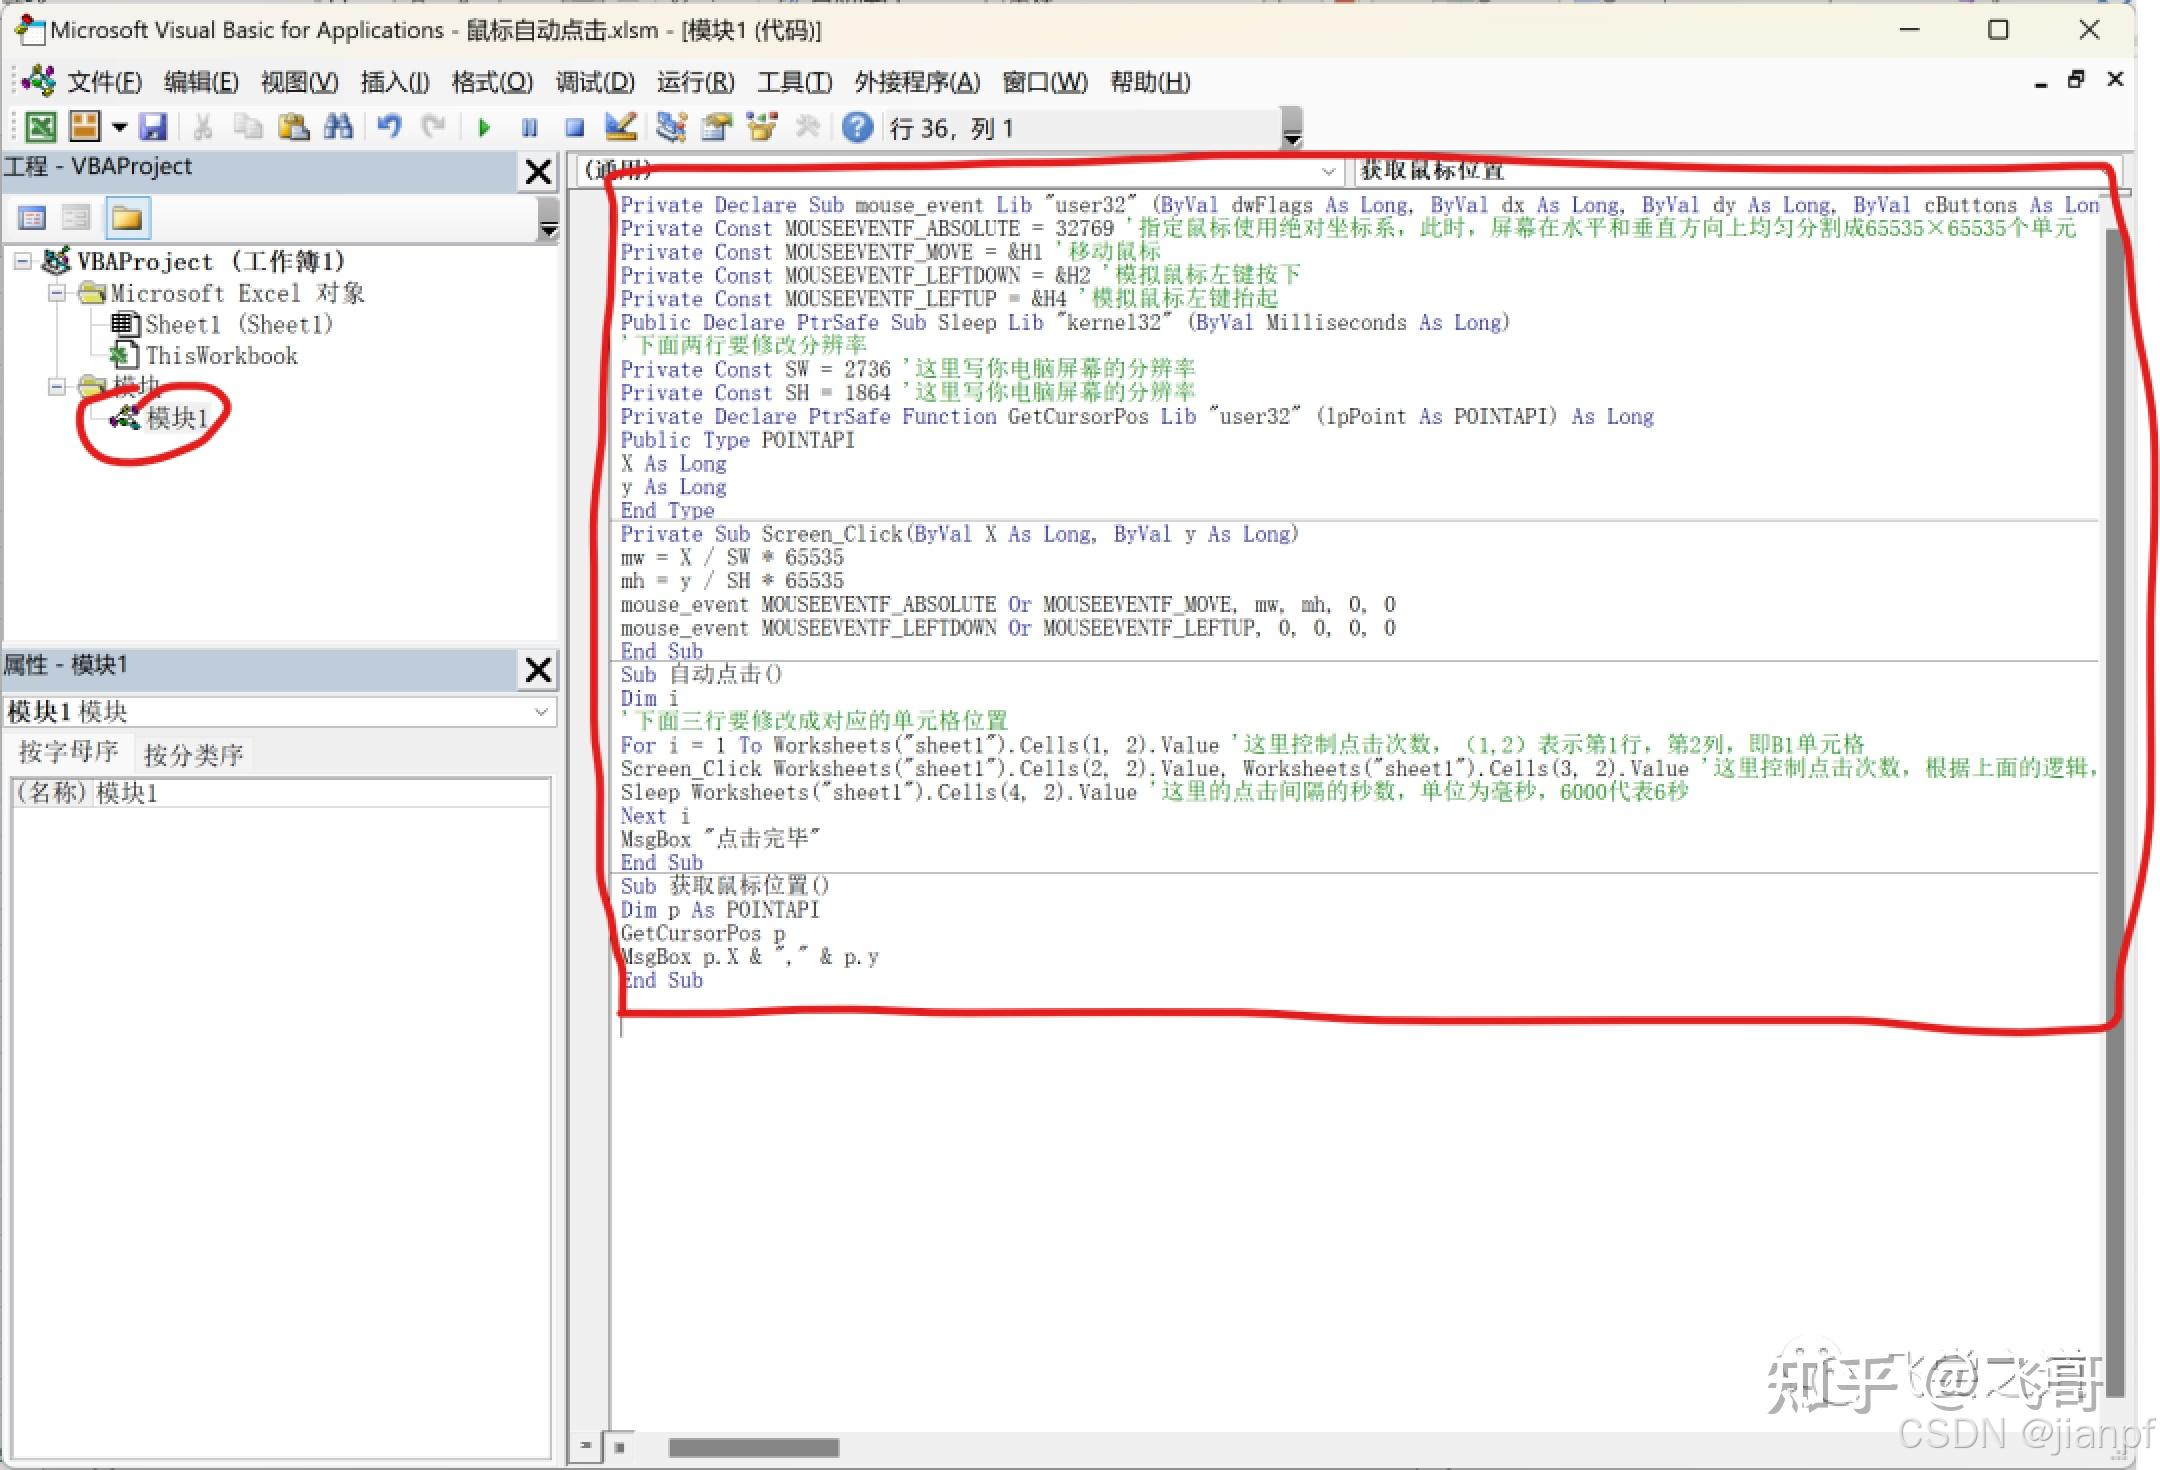
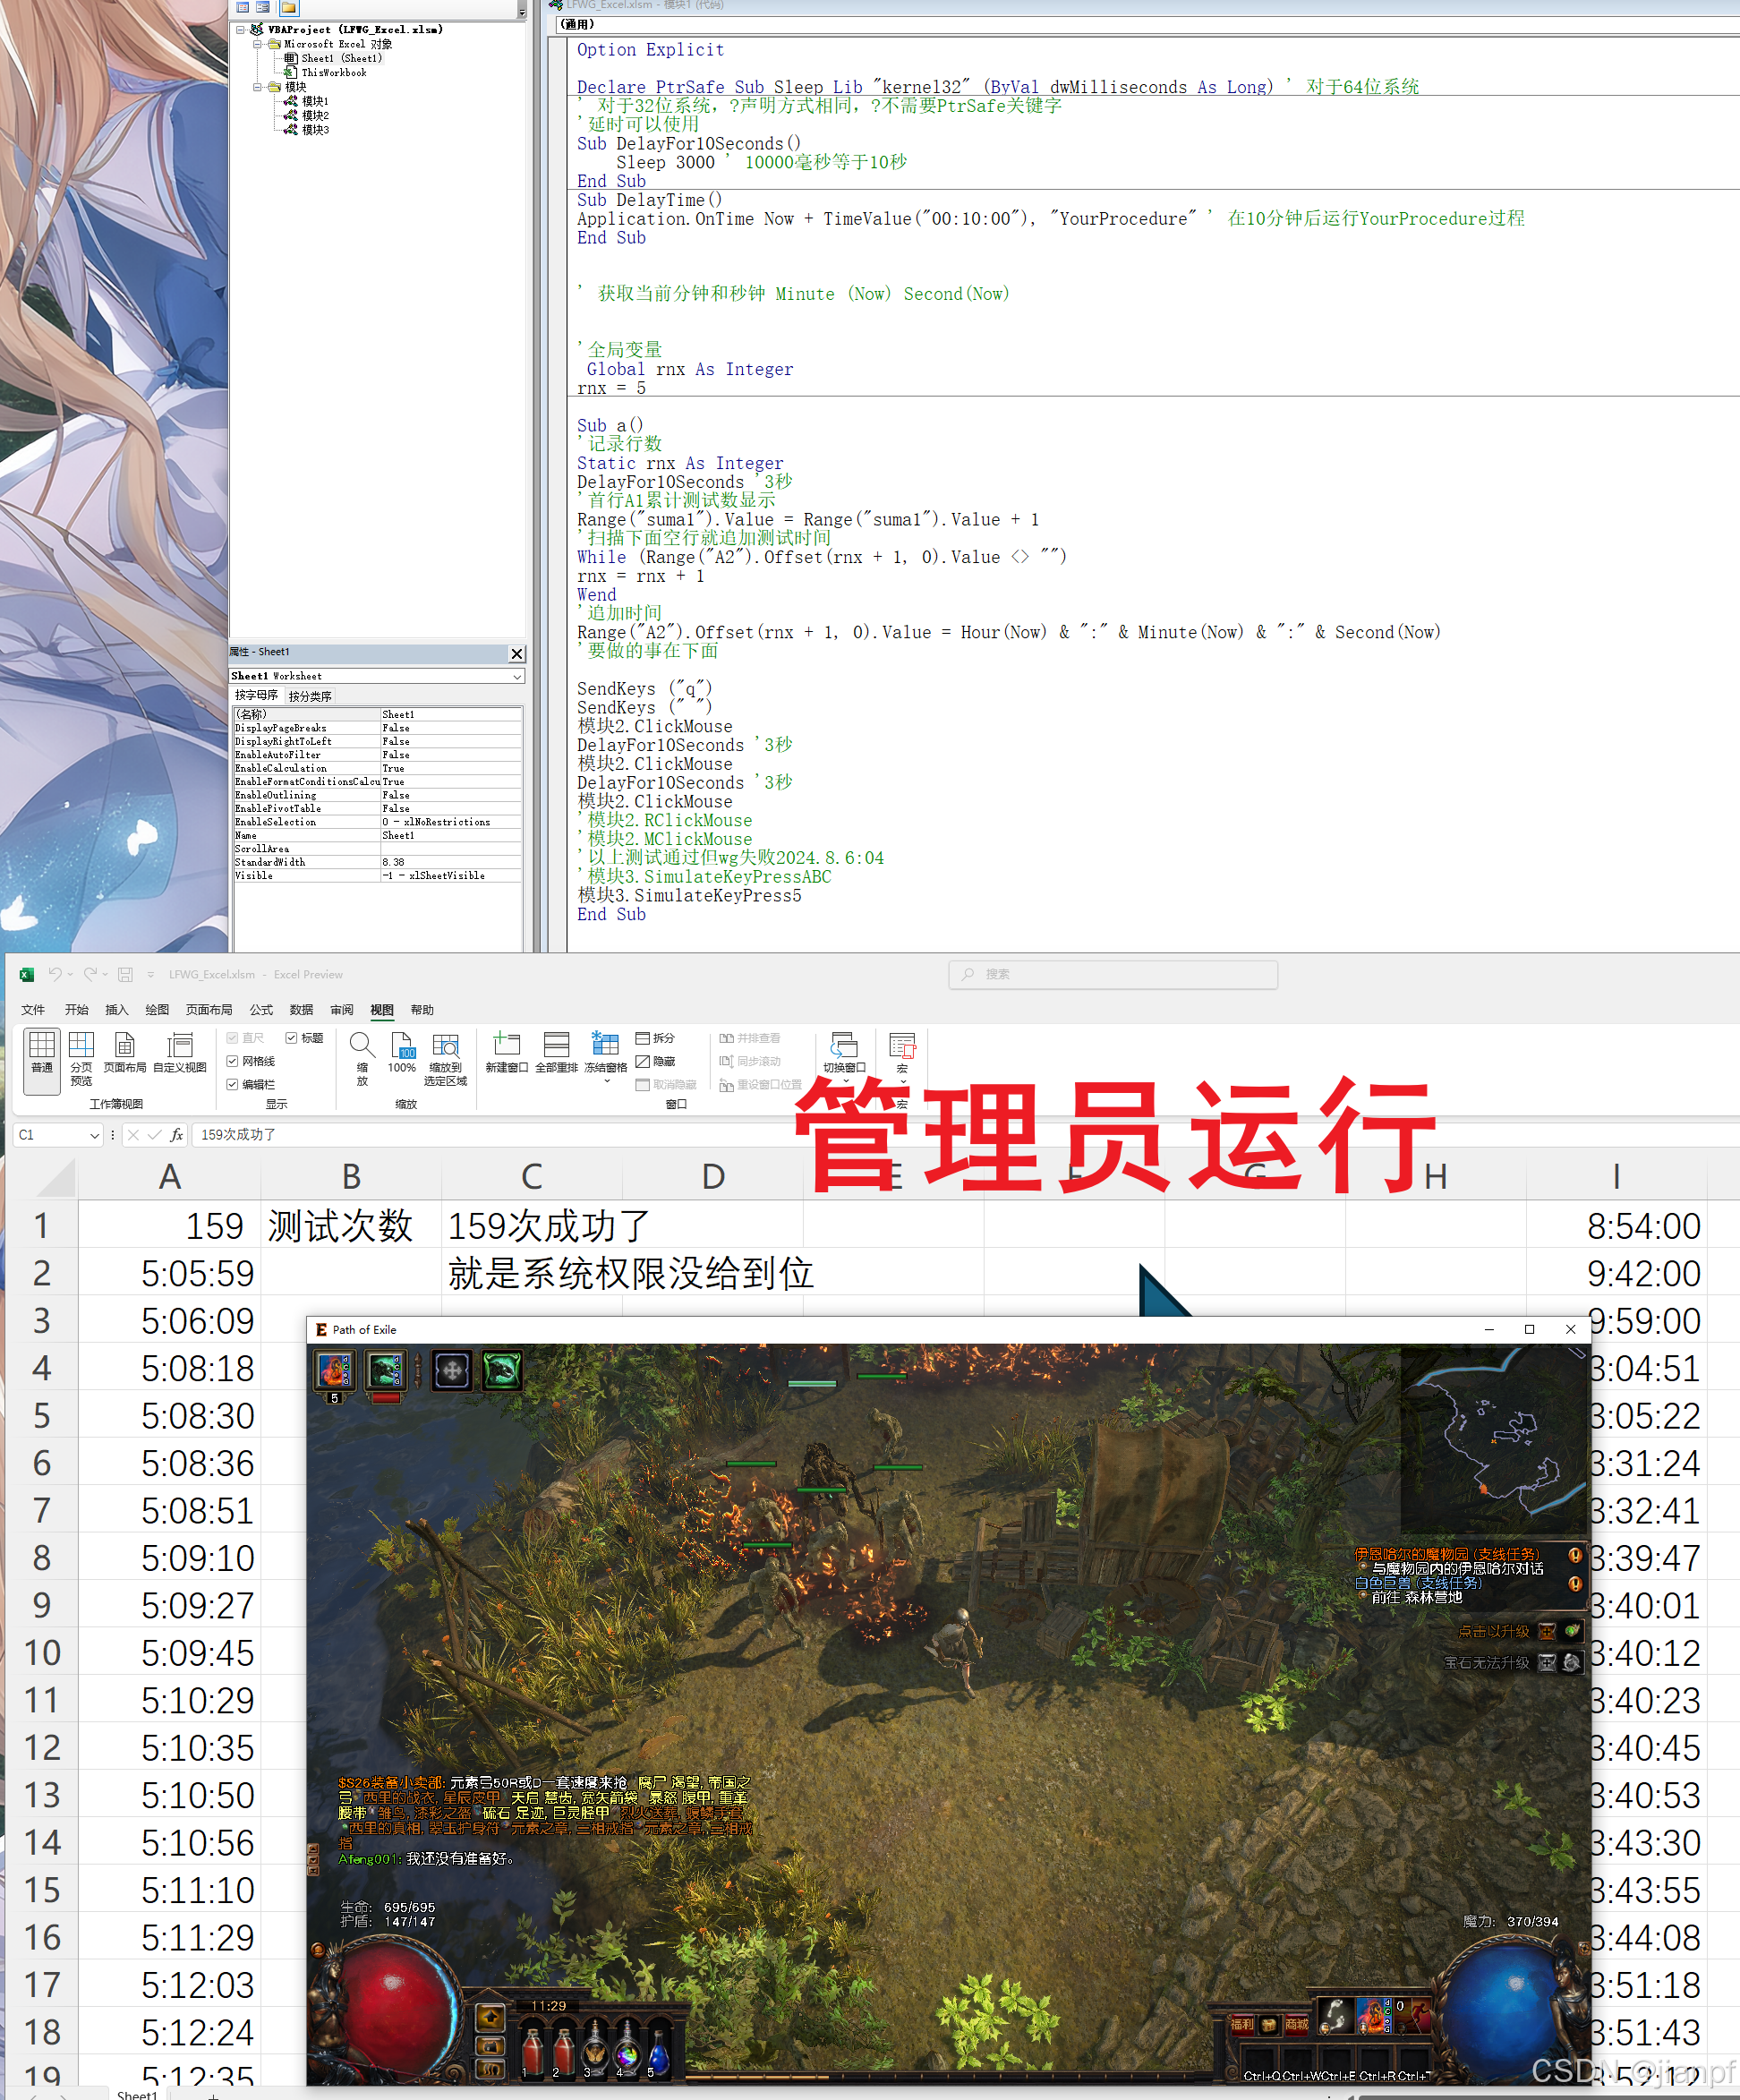
Option ExplicitDeclare PtrSafe Sub Sleep Lib "kernel32" (ByVal dwMilliseconds As Long) ' 对于64位系统
' 对于32位系统,?声明方式相同,?不需要PtrSafe关键字
'延时可以使用
Sub DelayFor10Seconds()Sleep 5000 ' 10000毫秒等于10秒
End Sub
Sub DelayTime()
Application.OnTime Now + TimeValue("00:10:00"), "YourProcedure" ' 在10分钟后运行YourProcedure过程
End Sub' 获取当前分钟和秒钟 Minute (Now) Second(Now)'全局变量Global rnx As Integer
rnx = 5Sub a()
'记录行数
Static rnx As Integer
DelayFor10Seconds '3秒
'首行A1累计测试数显示
Range("suma1").Value = Range("suma1").Value + 1
'扫描下面空行就追加测试时间
While (Range("A2").Offset(rnx + 1, 0).Value <> "")
rnx = rnx + 1
Wend
'追加时间
Range("A2").Offset(rnx + 1, 0).Value = Hour(Now) & ":" & Minute(Now) & ":" & Second(Now)
'要做的事在下面'SendKeys ("q")
'SendKeys (" ")
'模块2.ClickMouse
'模块2.RClickMouse
'模块2.MClickMouse
'以上测试通过但wg失败2024.8.6:04
'模块3.SimulateKeyPressABC
模块3.SimulateKeyPress5
End Sub
Option Explicit
'PtrSafe 注意x64需要添加这个关键字
Declare PtrSafe Sub mouse_event Lib "user32" (ByVal dwFlags As Long, ByVal dx As Long, ByVal dy As Long, ByVal cButtons As Long, ByVal dwExtraInfo As Long)
Const MOUSEEVENTF_LEFTDOWN = &H2
Const MOUSEEVENTF_LEFTUP = &H4Const MOUSEEVENTF_MIDDLEDOWN = &H20
Const MOUSEEVENTF_MIDDLEUP = &H80Const MOUSEEVENTF_RIGHTDOWN = &H8
Const MOUSEEVENTF_RIGHTUP = &H10Sub ClickMouse()' 模拟鼠标左键点击mouse_event MOUSEEVENTF_LEFTDOWN, 0, 0, 0, 0mouse_event MOUSEEVENTF_LEFTUP, 0, 0, 0, 0
End Sub
Sub RClickMouse()' 模拟鼠标右键点击mouse_event MOUSEEVENTF_RIGHTDOWN, 0, 0, 0, 0mouse_event MOUSEEVENTF_RIGHTUP, 0, 0, 0, 0
End Sub
Sub MClickMouse()' 模拟鼠标中键点击mouse_event MOUSEEVENTF_MIDDLEDOWN, 0, 0, 0, 0mouse_event MOUSEEVENTF_MIDDLEUP, 0, 0, 0, 0
End SubOption ExplicitDeclare PtrSafe Sub keybd_event Lib "user32" (ByVal bVk As Byte, ByVal bScan As Byte, ByVal dwFlags As Long, ByVal dwExtraInfo As Long)
'48 To 57 '0-9
'65 To 90 'a-z
'7=win7系统多媒体面板
'91=win键
Private Const VK_A As Byte = &H41 '65=A 65 To 90 'a-z,不知道为什么是小写的a.
Private Const VK_B As Byte = &H42
Private Const VK_C As Byte = &H43
Private Const VK_Q As Byte = &H51 '81=QPrivate Const KEYEVENTF_KEYUP As Long = &H2Sub SimulateKeyPressABC()' 模拟按下 A 键keybd_event VK_A, 0, 0, 0' 模拟释放 A 键keybd_event VK_A, 0, KEYEVENTF_KEYUP, 0' 模拟按下 B 键keybd_event VK_B, 0, 0, 0' 模拟释放 B 键keybd_event VK_B, 0, KEYEVENTF_KEYUP, 0' 模拟按下 C 键keybd_event VK_C, 0, 0, 0' 模拟释放 C 键keybd_event VK_C, 0, KEYEVENTF_KEYUP, 0
End Sub'次药5测试
Sub SimulateKeyPress5()' 模拟按下 a 键
' keybd_event 65, 0, 0, 0' 模拟释放 a 键
' keybd_event 65, 0, KEYEVENTF_KEYUP, 0Dim i As IntegerFor i = 81 To 81 '0-9' 模拟按下 a 键keybd_event i, 0, 0, 0' 模拟释放 a 键keybd_event i, 0, KEYEVENTF_KEYUP, 0Debug.Print iNext iEnd Sub
2024.08.06
软件不行就硬件上
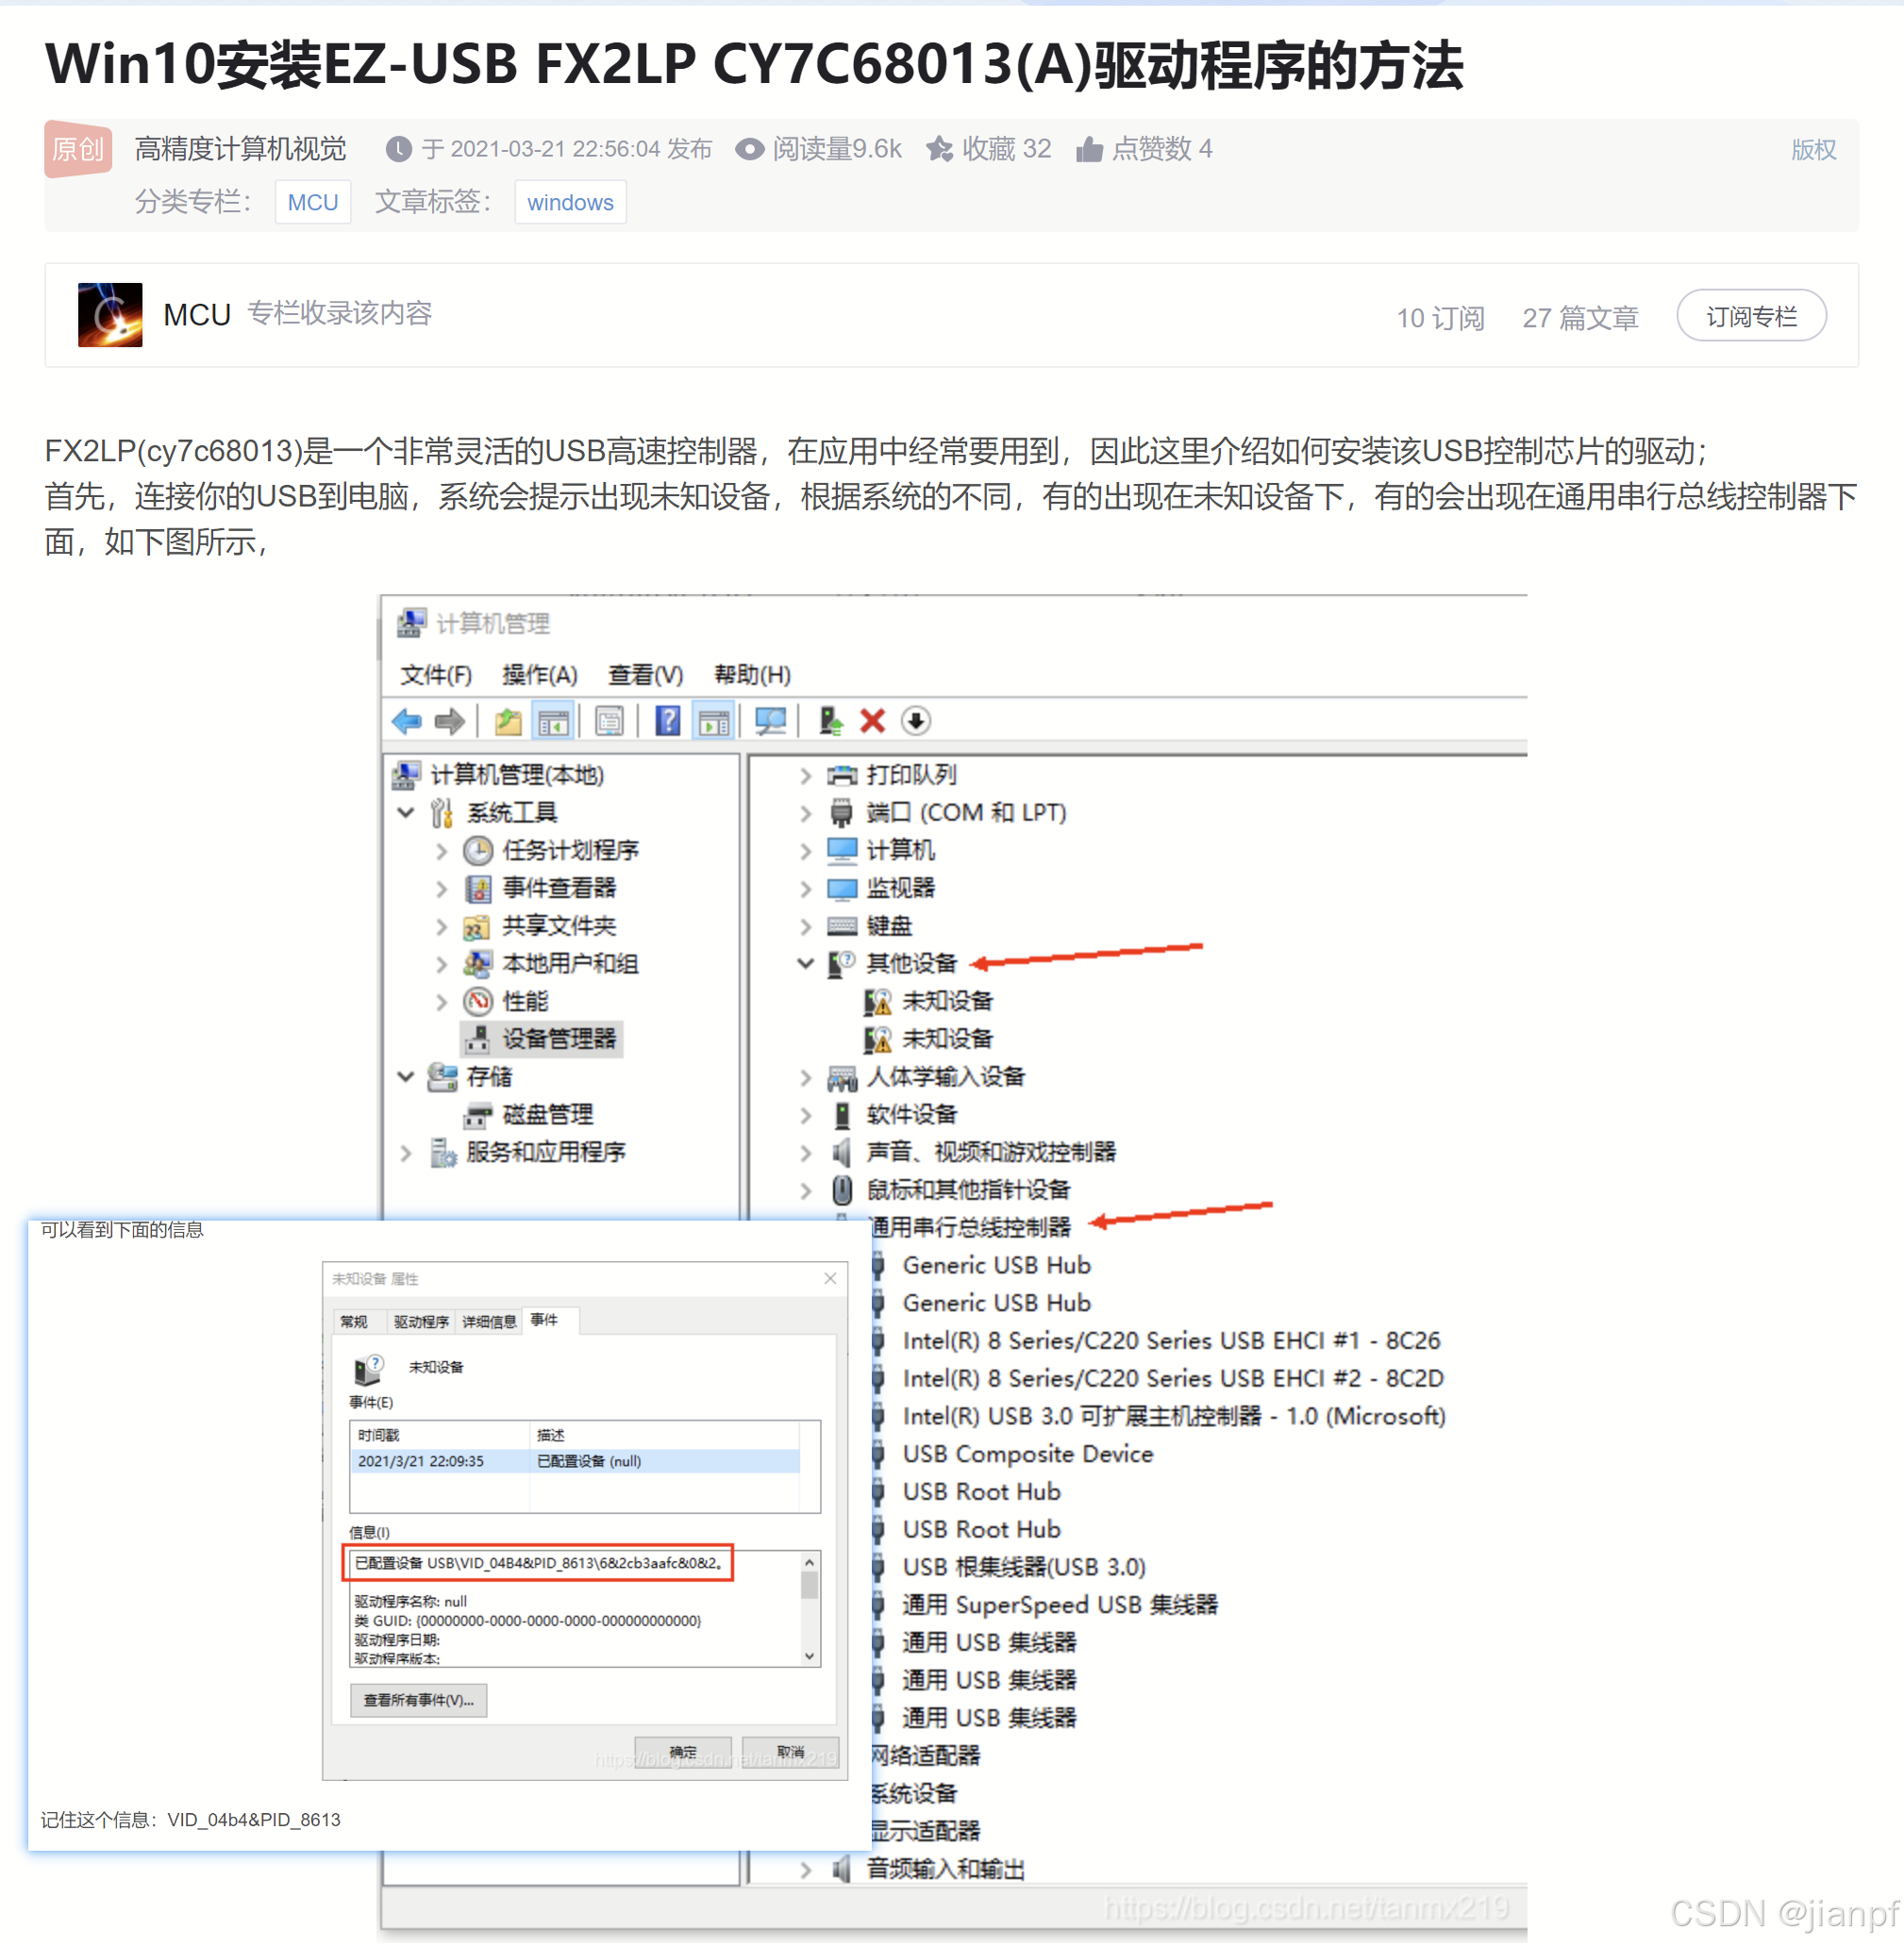
https://blog.csdn.net/tanmx219/article/details/115057698
眼睛模糊,休息5小时先.
如何用python拉取物价
https://www.bilibili.com/video/BV19u4m1K72M/

https://www.openinnolab.org.cn/pjlab/projects/channel
https://blog.csdn.net/DBA_ChenJR/article/details/136207215(这里没介绍要先后安装python编译器的,只介绍安装pyton的拓展工具,没入门的我就是花了2小时搜查测试,这里后面我也学着不会告诉你有多费时,你们没看到的人也要折腾,这就是人类的小聪明)
正的要休息一下了,虽然眼睛现在没刚刚那么模糊了,(2024.8.6.14:40)下雨打雷要关机了.
18点回来了,准备吃饭了,再来一下,数位屏可以操作.


重启发现未激活,默认42.0.0成功激活
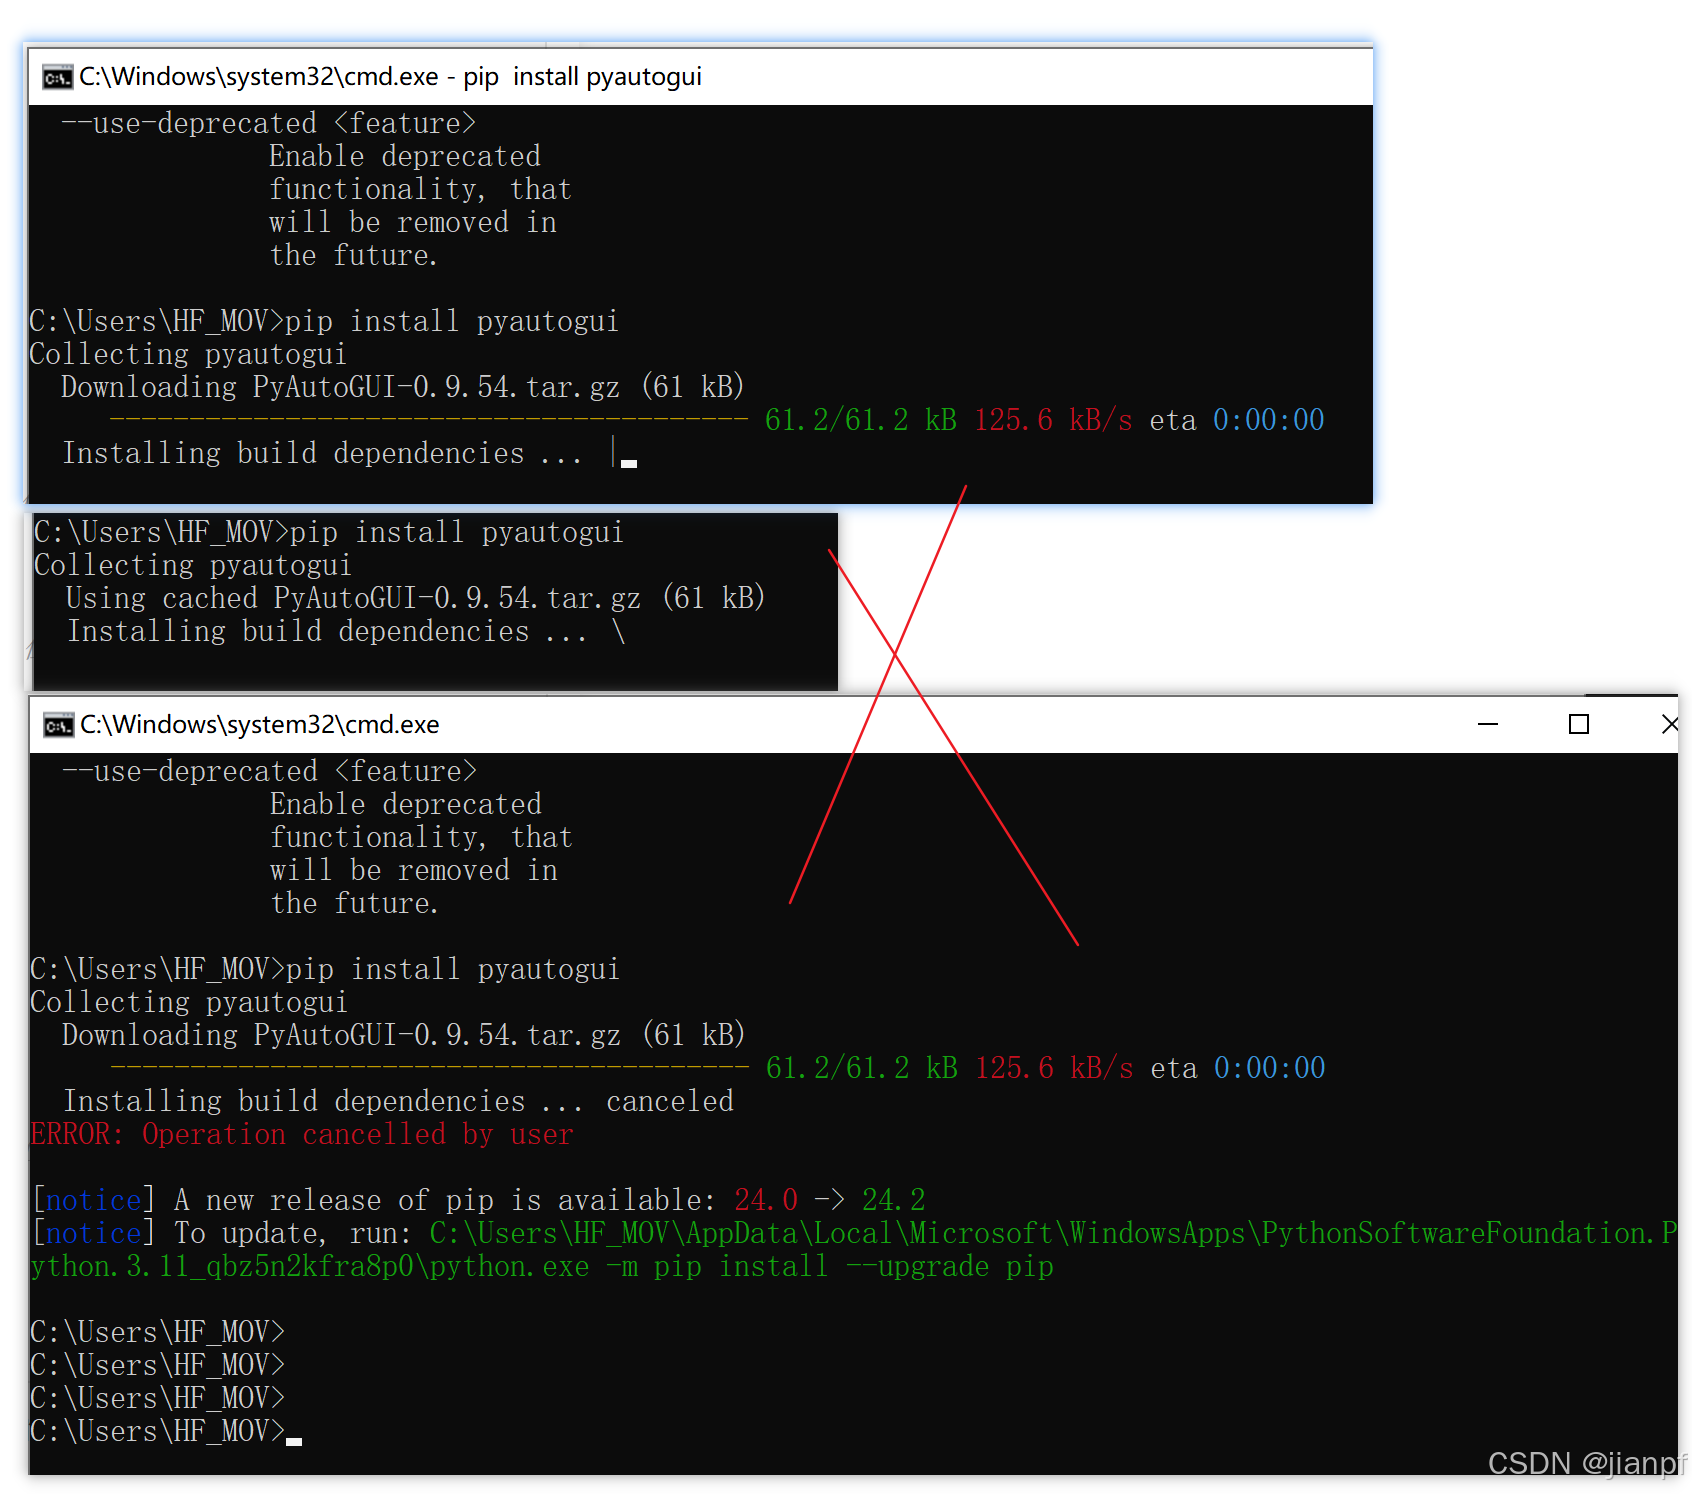
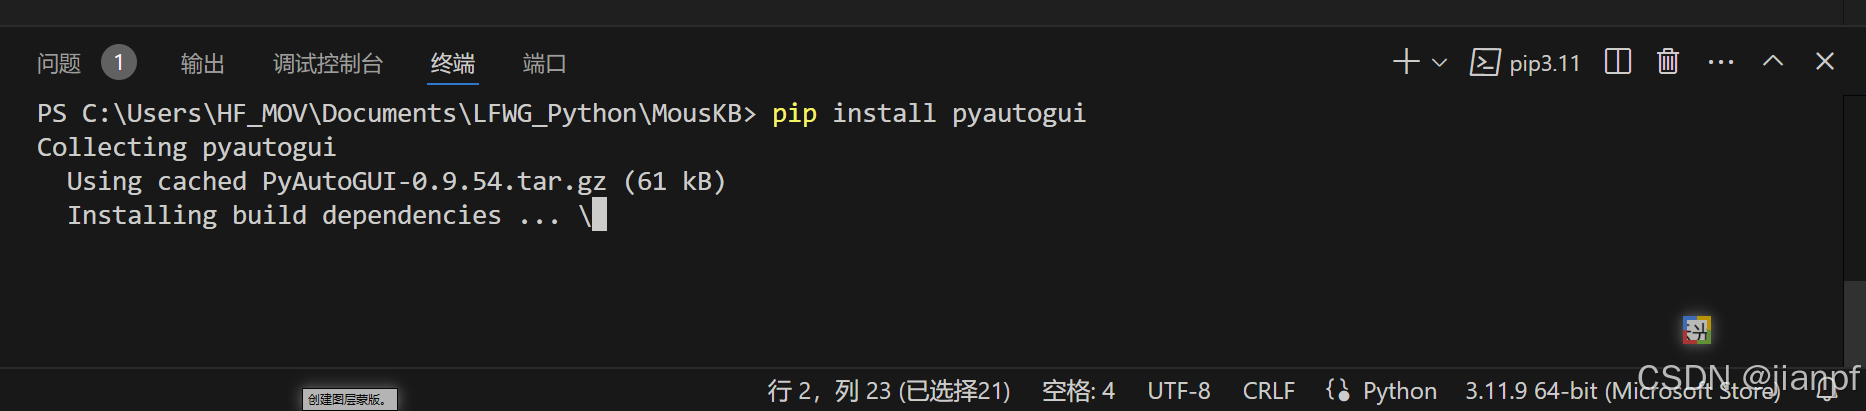
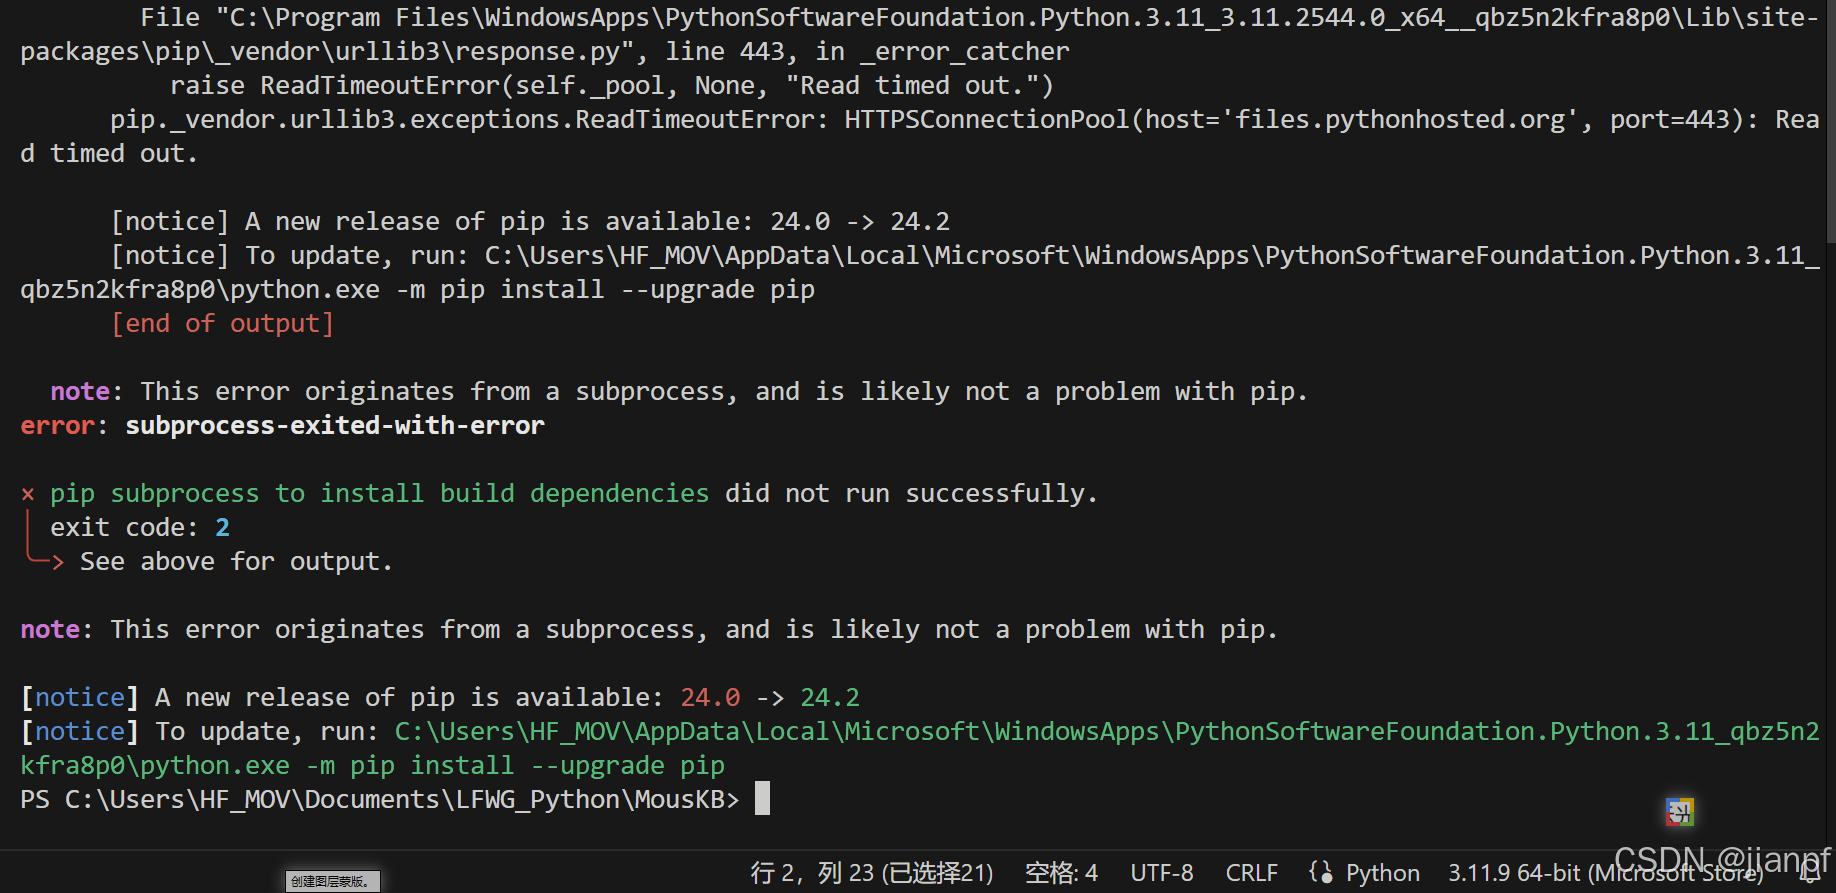
pip失败
卡卡的
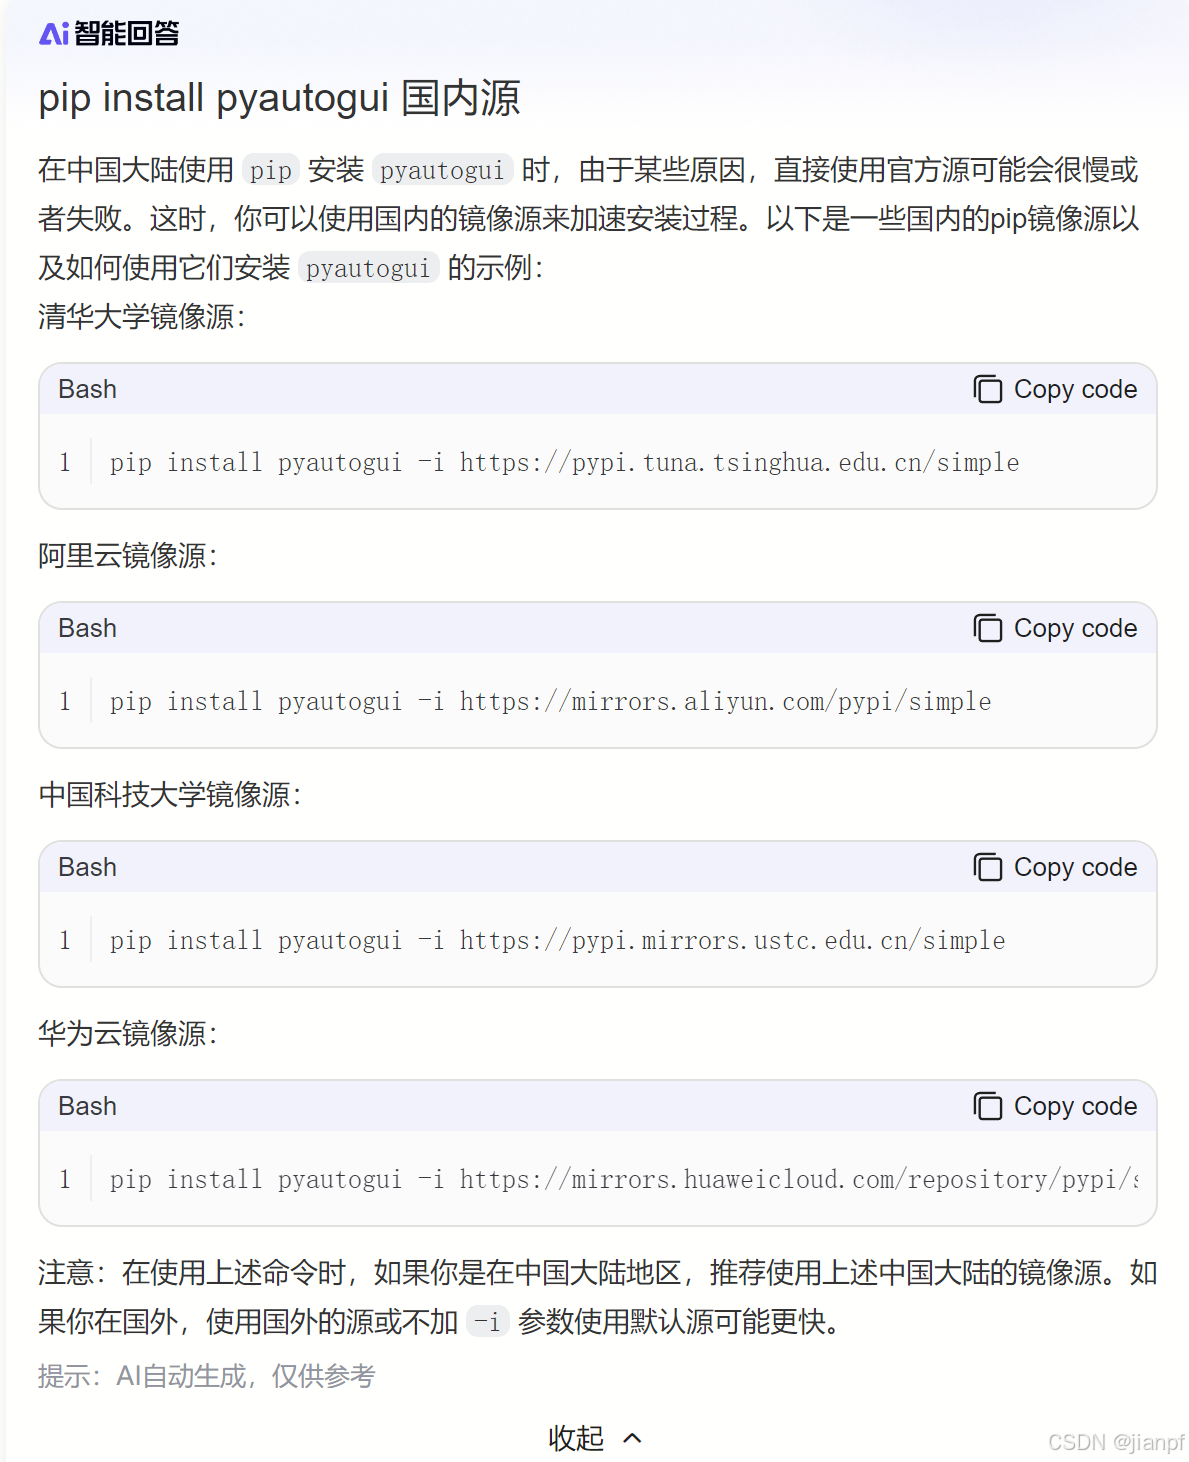
pip install pyautogui -i https://pypi.tuna.tsinghua.edu.cn/simple
pip install pyautogui -i https://mirrors.aliyun.com/pypi/simple
pip install pyautogui -i https://pypi.mirrors.ustc.edu.cn/simple
pip install pyautogui -i https://mirrors.huaweicloud.com/repository/pypi/simple

pip install pyautogui -i https://mirrors.aliyun.com/pypi/simple
国内镜像pip完成安装
py测试模拟按键给到文本没问题,但失败了某程序
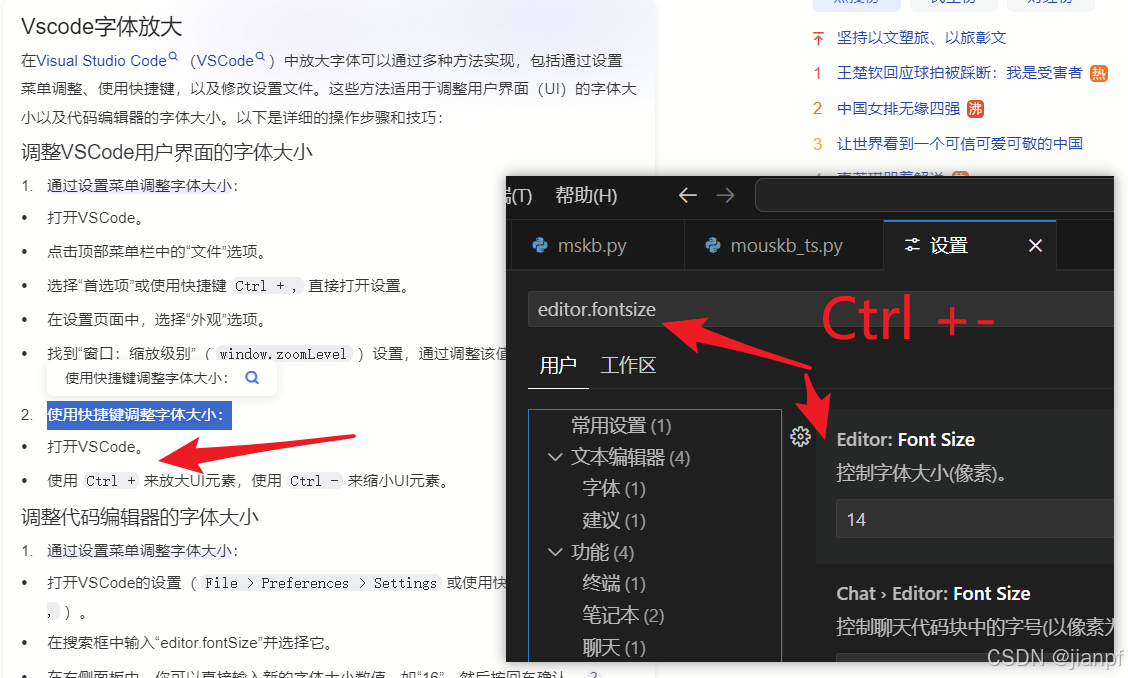
VScode的界面分辨率放大缩小设置Ctrl±
https://blog.csdn.net/Game_jqd/article/details/86478419
2024.8.7z

https://www.sohu.com/a/788722883_121980236
或许有用

系统键盘鼠标Alt+Shift+NumLock(关闭情况下按).
https://blog.csdn.net/qq_39273807/article/details/131197981
https://www.iotword.com/24250.html
https://www.iotword.com/2713.html
https://blog.csdn.net/hitzsf/article/details/136723699
----2024.8.7w—
#休眠time.sleep(2)
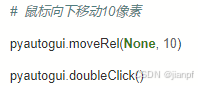
pyautogui.sleep(2)
#提示运行倒计时
pyautogui.countdown(1)
 #滚动鼠标(如果不给到窗口是可以立体转换滚动的)
pyautogui.scroll(10000)
time.sleep(1)
pyautogui.scroll(1000)
time.sleep(1)
pyautogui.scroll(-1000)
time.sleep(1)
失败

失败
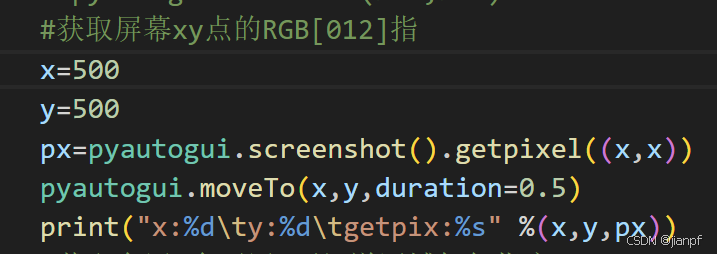
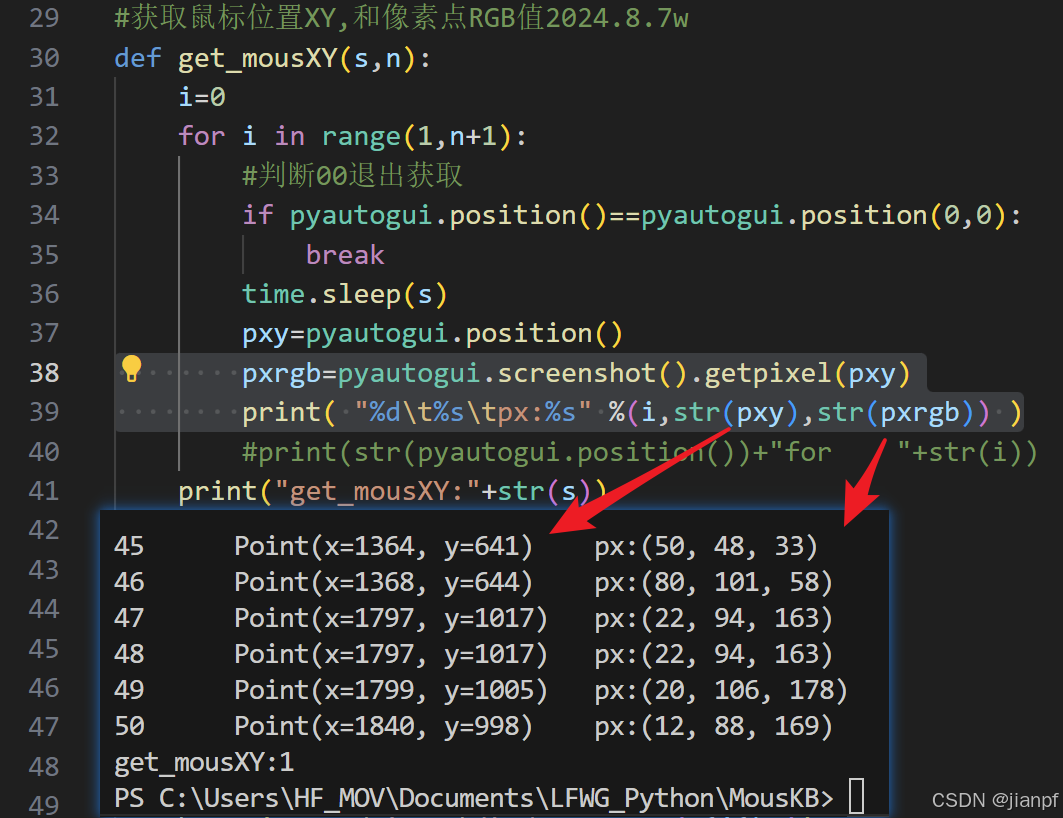
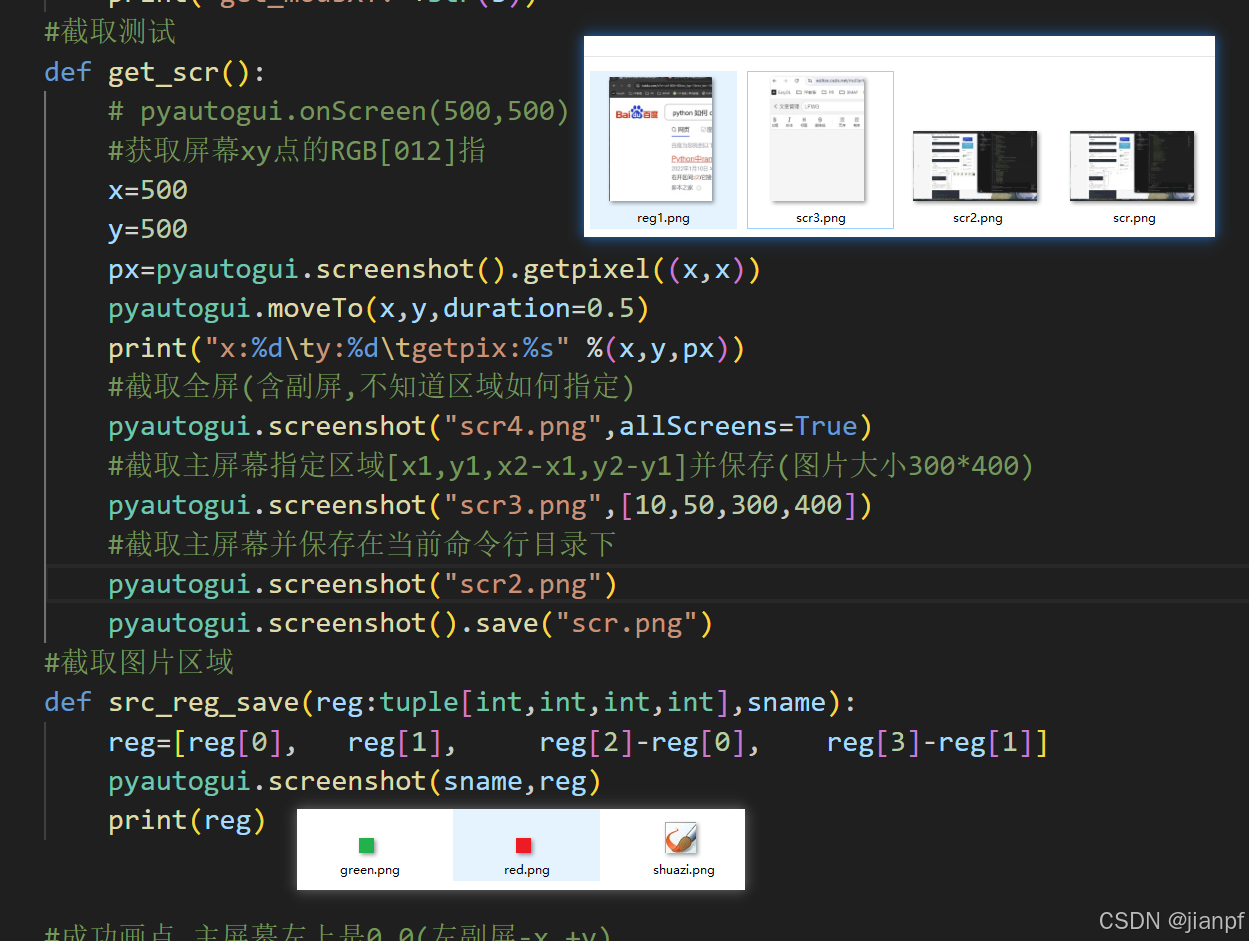
注意pyautogui.screenshot截屏尺寸是起点和图片尺寸大小 reg=[reg[0], reg[1], reg[2]-reg[0], reg[3]-reg[1]]
#截取图片区域
def src_reg_save(reg:tuple[int,int,int,int],sname):reg=[reg[0],   reg[1],     reg[2]-reg[0],    reg[3]-reg[1]]pyautogui.screenshot(sname,reg)print(reg)
#截取图片区域
def src_reg_size_save(reg,sname):pyautogui.screenshot(sname,reg)print(reg)

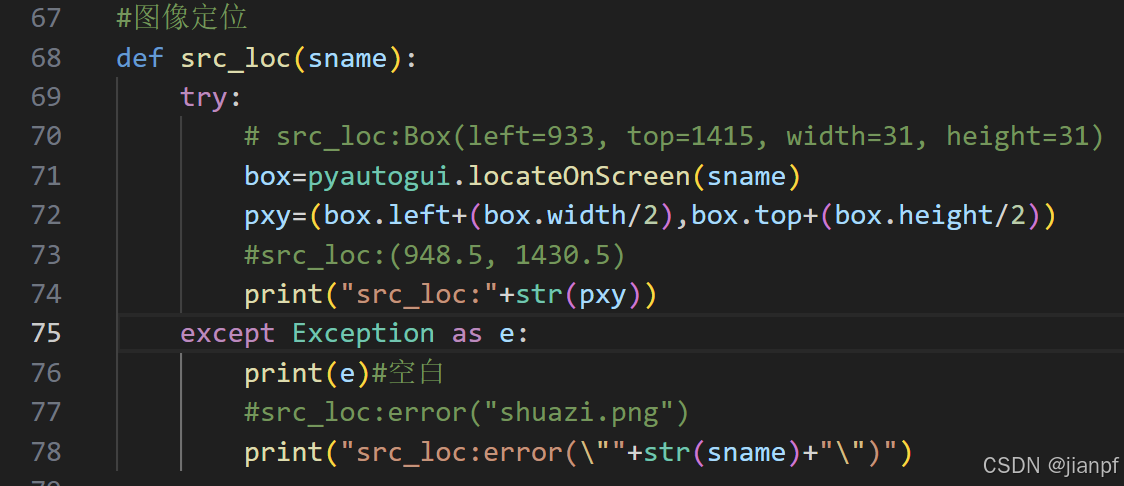
#图像定位
def src_loc(sname):try:# src_loc:Box(left=933, top=1415, width=31, height=31)box=pyautogui.locateOnScreen(sname)pxy=(box.left+(box.width/2),box.top+(box.height/2))#src_loc:(948.5, 1430.5)print("src_loc:"+str(pxy))return pxyexcept Exception as e:print(e)#空白#src_loc:error("shuazi.png")print("src_loc:error(\""+str(sname)+"\")")
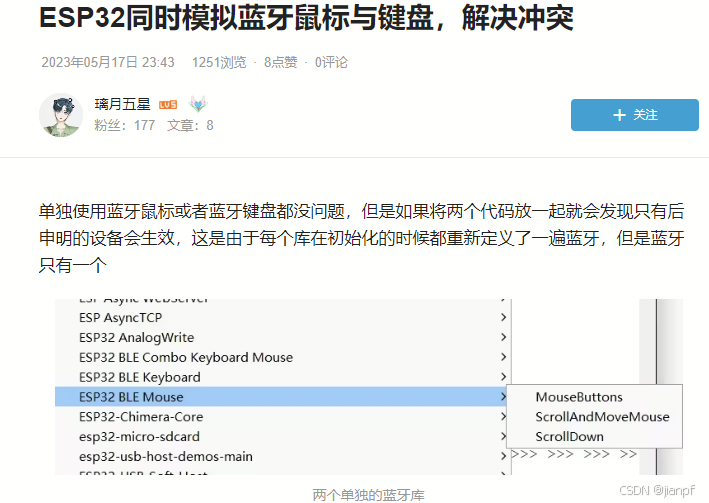
ESP32-CAM的执行按键成功了一半
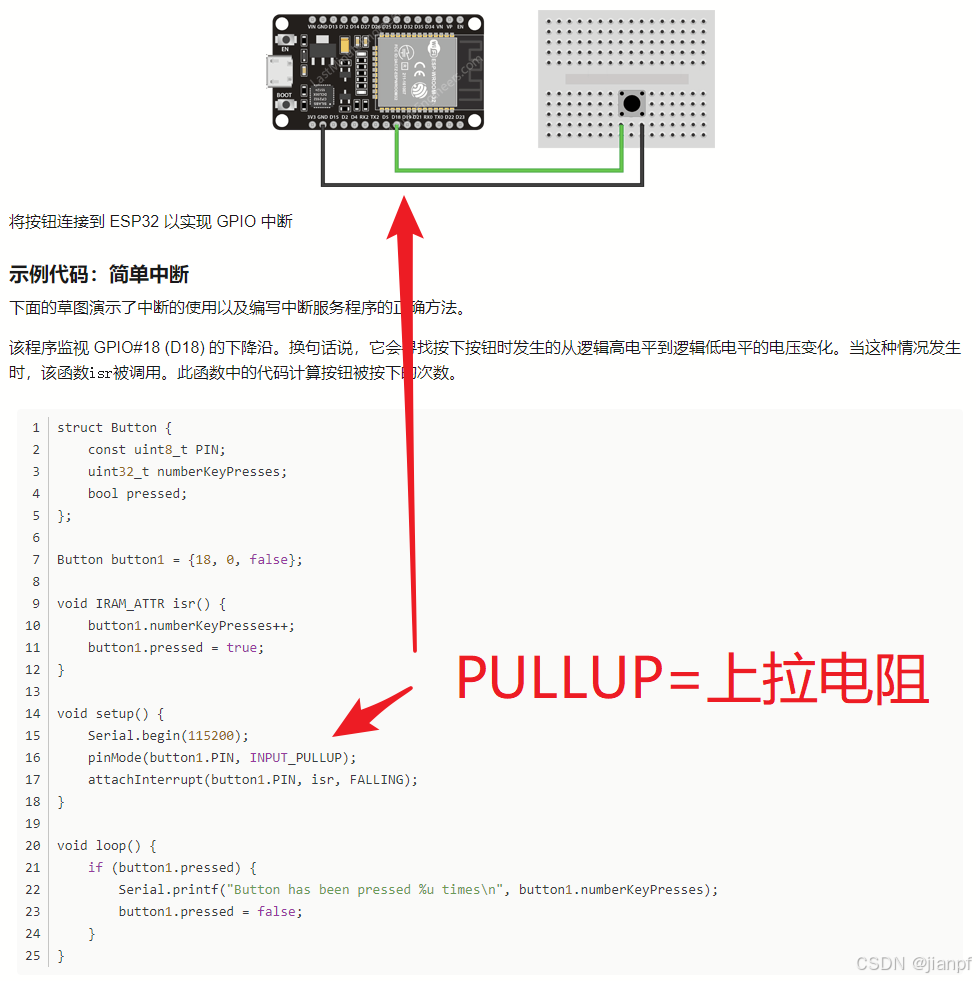
中断程序
https://blog.csdn.net/sxstj/article/details/132336811
/*** This example turns the ESP32 into a Bluetooth LE keyboard that writes the words, presses Enter, presses a media key and then Ctrl+Alt+Delete*/
#include <BleKeyboard.h>
#include <String.h>BleKeyboard bleKeyboard;
//定义引脚号按钮在CAM左边挨近GND低电平
int ggpin=12;
int gpin=13;
int g_flag=0;//默认配置程序
void setup() {Serial.begin(115200);Serial.println("Starting BLE work!");bleKeyboard.begin();//设置端口模式为输入且上拉电阻pinMode(gpin,INPUT_PULLUP);pinMode(ggpin,INPUT_PULLUP);//设置指定端口模式为下拉触发执行key12程序(注意IRAM_ATTR是内部存储器,不是外部EPROM)// attachInterrupt(gpin, key12,FALLING);}//本来是触发的发现蓝牙键盘不支持触发,还是代码有问题,后面看看
void  key12(){delay(300);// if(bleKeyboard.isConnected()) {//       Serial.println("Sending 'q'...");//       bleKeyboard.print("q");//       Serial.println("OK...");// }g_flag=1;
}
//程序开始后自动循环体
void loop() {//判断是否蓝牙连接好了if(bleKeyboard.isConnected() ) {//判断是否引脚按下,并发送对应按键if(digitalRead(ggpin)==0){bleKeyboard.print("q");Serial.println("OK...q"+ String(digitalRead(ggpin)));}//判断是否引脚按下,并发送对应按键if(digitalRead(gpin)==0){bleKeyboard.print(" ");Serial.println("OK...Space"+String(digitalRead(gpin)));}}else{//提示没有连接好蓝牙Serial.println("No connection...");}
//循环体一直提示当前状态Serial.println("Waiting 0.2 seconds..." + String(digitalRead(ggpin))  + String(digitalRead(gpin)) );delay(200);
}
https://www.eetree.cn/project/detail/1444
https://x.jlc.com/platform/detail/61ca475a3921426492fb2f4daf47a77e
https://blog.csdn.net/songisgood/article/details/125016735
项目>加载库>USB
https://blog.csdn.net/mcu_fang/article/details/128610190
https://www.kancloud.cn/davidyang1983/esp32/1937609
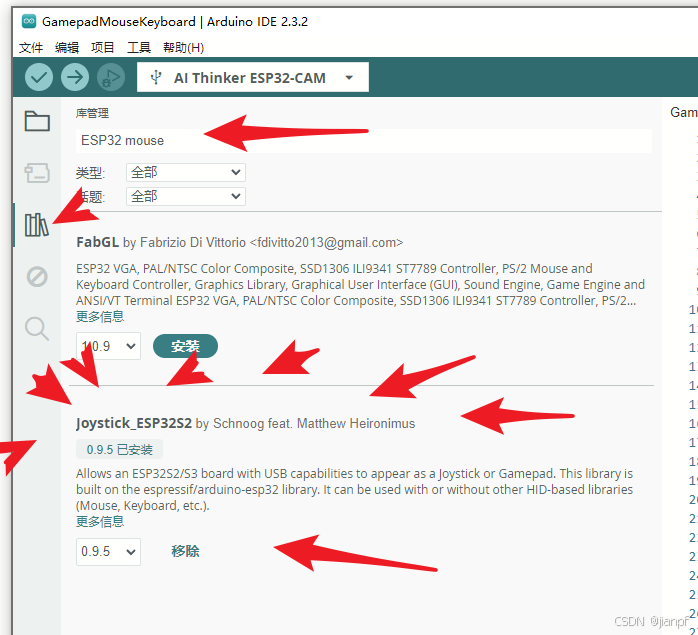
https://github.com/T-vK/ESP32-BLE-Mouse
https://github.com/Mystfit/ESP32-BLE-CompositeHID
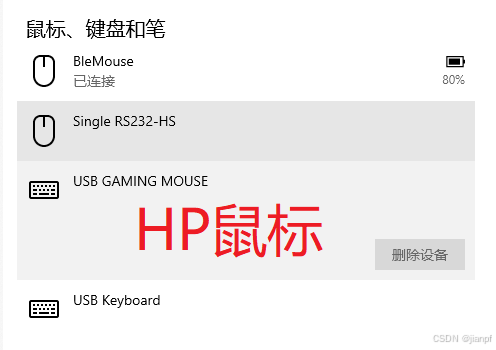
总算成功一下下了
2024.8.8凌晨4点了,要睡觉了
辉来工作室监督o

pip install -i https://pypi.tuna.tsinghua.edu.cn/simple opencv-python
安装OpenCV
#include <BleKeyboard.h>
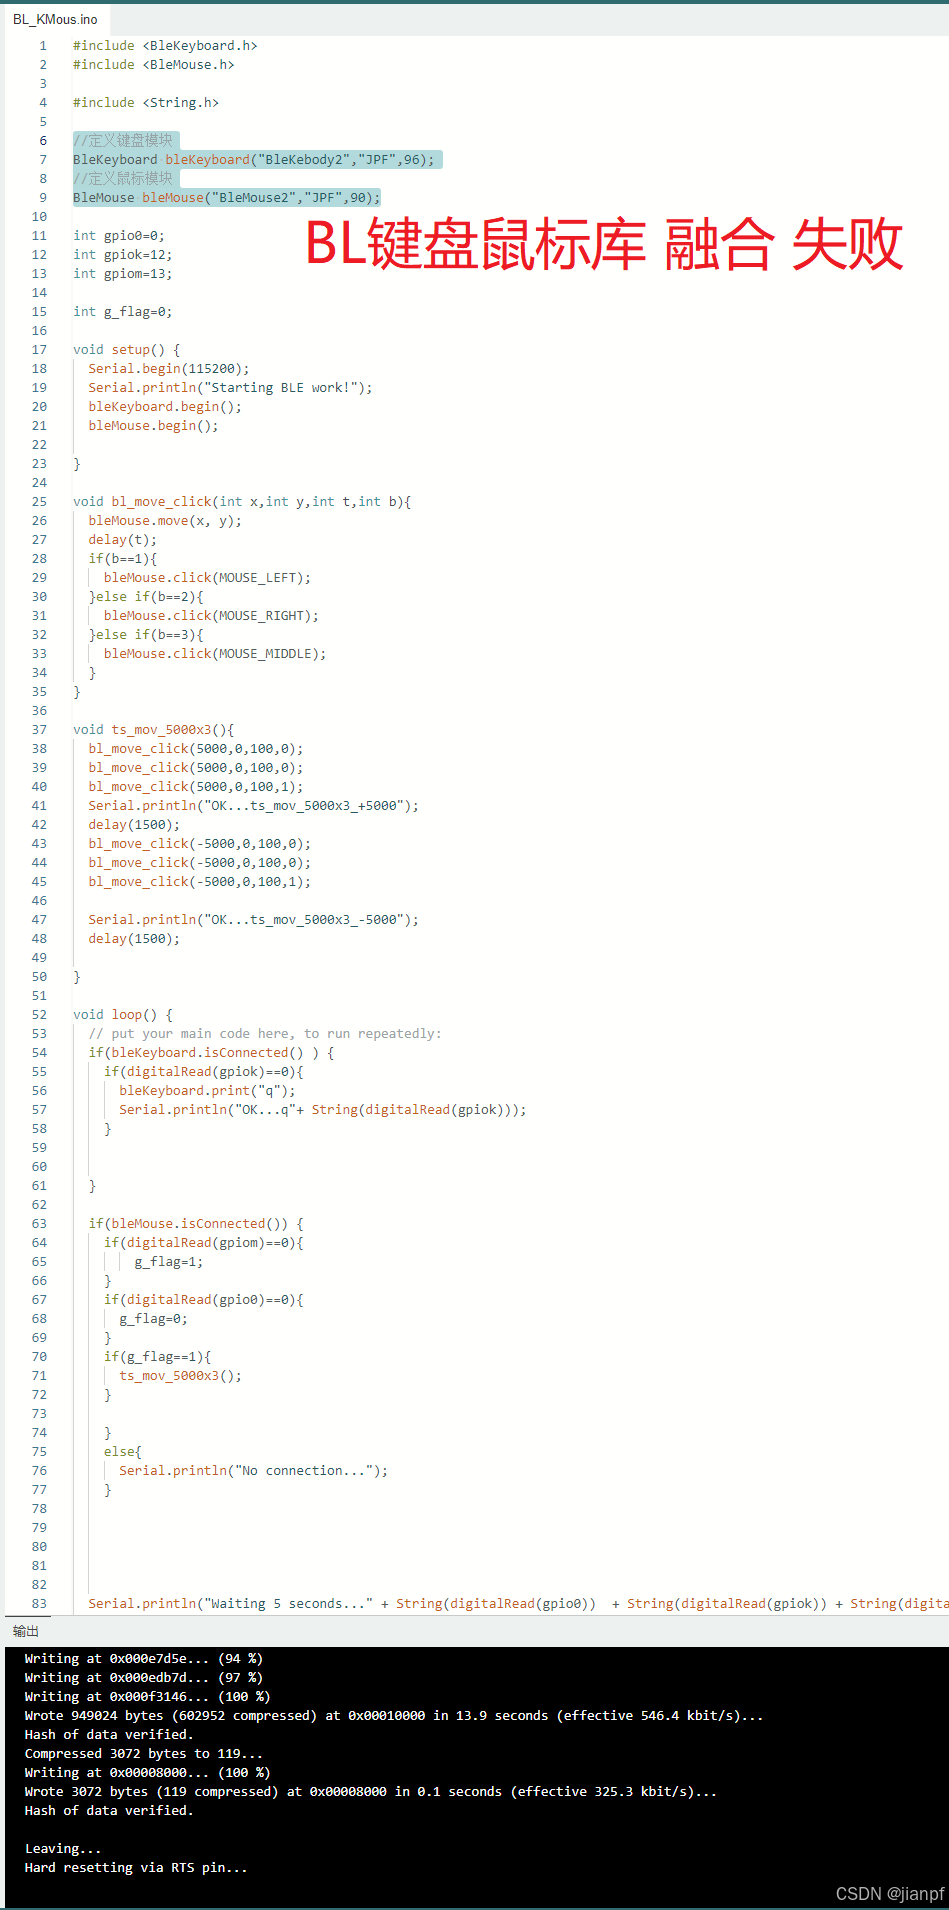
#include <BleMouse.h>#include <String.h>//双库融合失败//定义键盘模块
BleKeyboard bleKeyboard("BleKebody2","JPF",56);
//定义鼠标模块
BleMouse bleMouse("BleMouse2","JPF",57);int gpio0=0;
int gpiok=12;
int gpiom=13;
int gpiog=15;int g_flag=0;void setup() {Serial.begin(115200);Serial.println("Starting BLE work!");//设置端口模式为输入且上拉电阻pinMode(gpiok,INPUT_PULLUP);pinMode(gpiom,INPUT_PULLUP);//设置端口模式为输出(输入模式下拉是驱动不了输入的)pinMode(gpiog,OUTPUT);//输出低电平digitalWrite(gpiog,LOW);bleKeyboard.begin(); // 鼠标代码bleMouse.begin();
}//鼠标代码
void bl_move_click(int x,int y,int t,int b){bleMouse.move(x, y);delay(t);if(b==1){bleMouse.click(MOUSE_LEFT);}else if(b==2){bleMouse.click(MOUSE_RIGHT);}else if(b==3){bleMouse.click(MOUSE_MIDDLE);}
}
//鼠标代码
void ts_mov_5000x3(){bl_move_click(5000,0,100,0);bl_move_click(5000,0,100,0);bl_move_click(5000,0,100,1);Serial.println("OK...ts_mov_5000x3_+5000");delay(1500);bl_move_click(-5000,0,100,0);bl_move_click(-5000,0,100,0);bl_move_click(-5000,0,100,1);Serial.println("OK...ts_mov_5000x3_-5000");delay(1500);
}void loop() {// put your main code here, to run repeatedly://键盘代码if(bleKeyboard.isConnected() ) {if(digitalRead(gpiok)==0){bleKeyboard.print("q");Serial.println("OK...q"+ String(digitalRead(gpiok)));}}//鼠标代码if(bleMouse.isConnected()) {if(digitalRead(gpiom)==0){g_flag=1;}if(digitalRead(gpio0)==0){g_flag=0;}if(g_flag==1){ts_mov_5000x3();}}else{Serial.println("No connection...");}Serial.println("Waiting 5 seconds..." + String(digitalRead(gpio0)) + String(digitalRead(gpiok)) + String(digitalRead(gpiom)) );delay(200);
}
#define BleK1M2 2
#if BleK1M2 == 1//定义键盘模块BleKeyboard bleKeyboard("BleKebody2","JPF",51);int define_BleK1M2=1;
#elif BleK1M2 == 2//定义鼠标模块BleMouse bleMouse("BleMouse2","JPF",52);int define_BleK1M2=2;
#endif
宏定义#define
https://blog.csdn.net/chaofanzz/article/details/122604044
OpenCV 来了
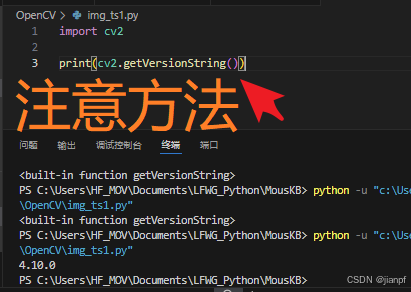
注意OpenCV的cv2.getVersionString()是一个方法返回值4.10.0
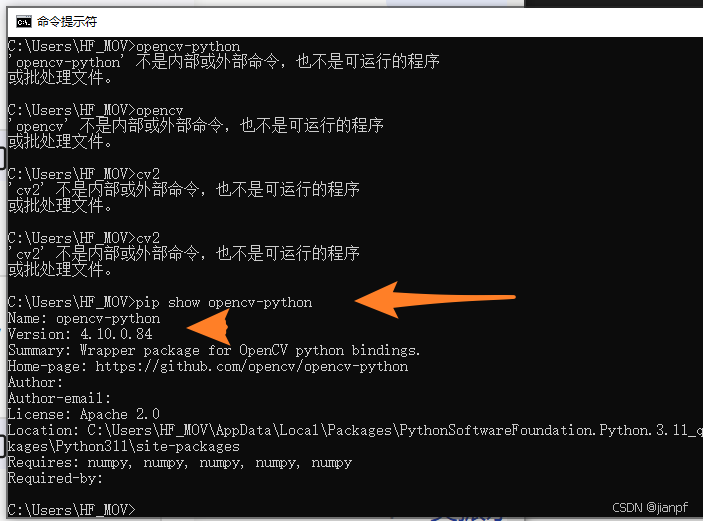
CMD命令下需要pip show opencv-python查看
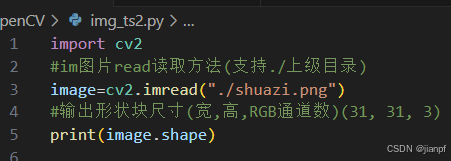
OpenCV读取图片尺寸
import cv2
#im图片read读取方法(支持./上级目录)
image=cv2.imread("./shuazi.png")
image2=cv2.imread("./red.png")
image3=cv2.imread("./reg1.png")
#输出形状块尺寸(宽,高,RGB通道数)(31, 31, 3)
print(image.shape)
#只有窗口标题不一样,就可以显示多个图窗口
cv2.imshow("窗口标题1",image3)
cv2.imshow("窗口标题2",image2)
cv2.imshow("窗口标题3",image)
#等待3000毫秒
cv2.waitKey(3000)
#一直等待窗口
# cv2.waitKey()
只有窗口标题不一样,就可以显示多个图窗口(否则在同一个窗口显示图片)
2024.8.9A0:42
找到ESP32融合库
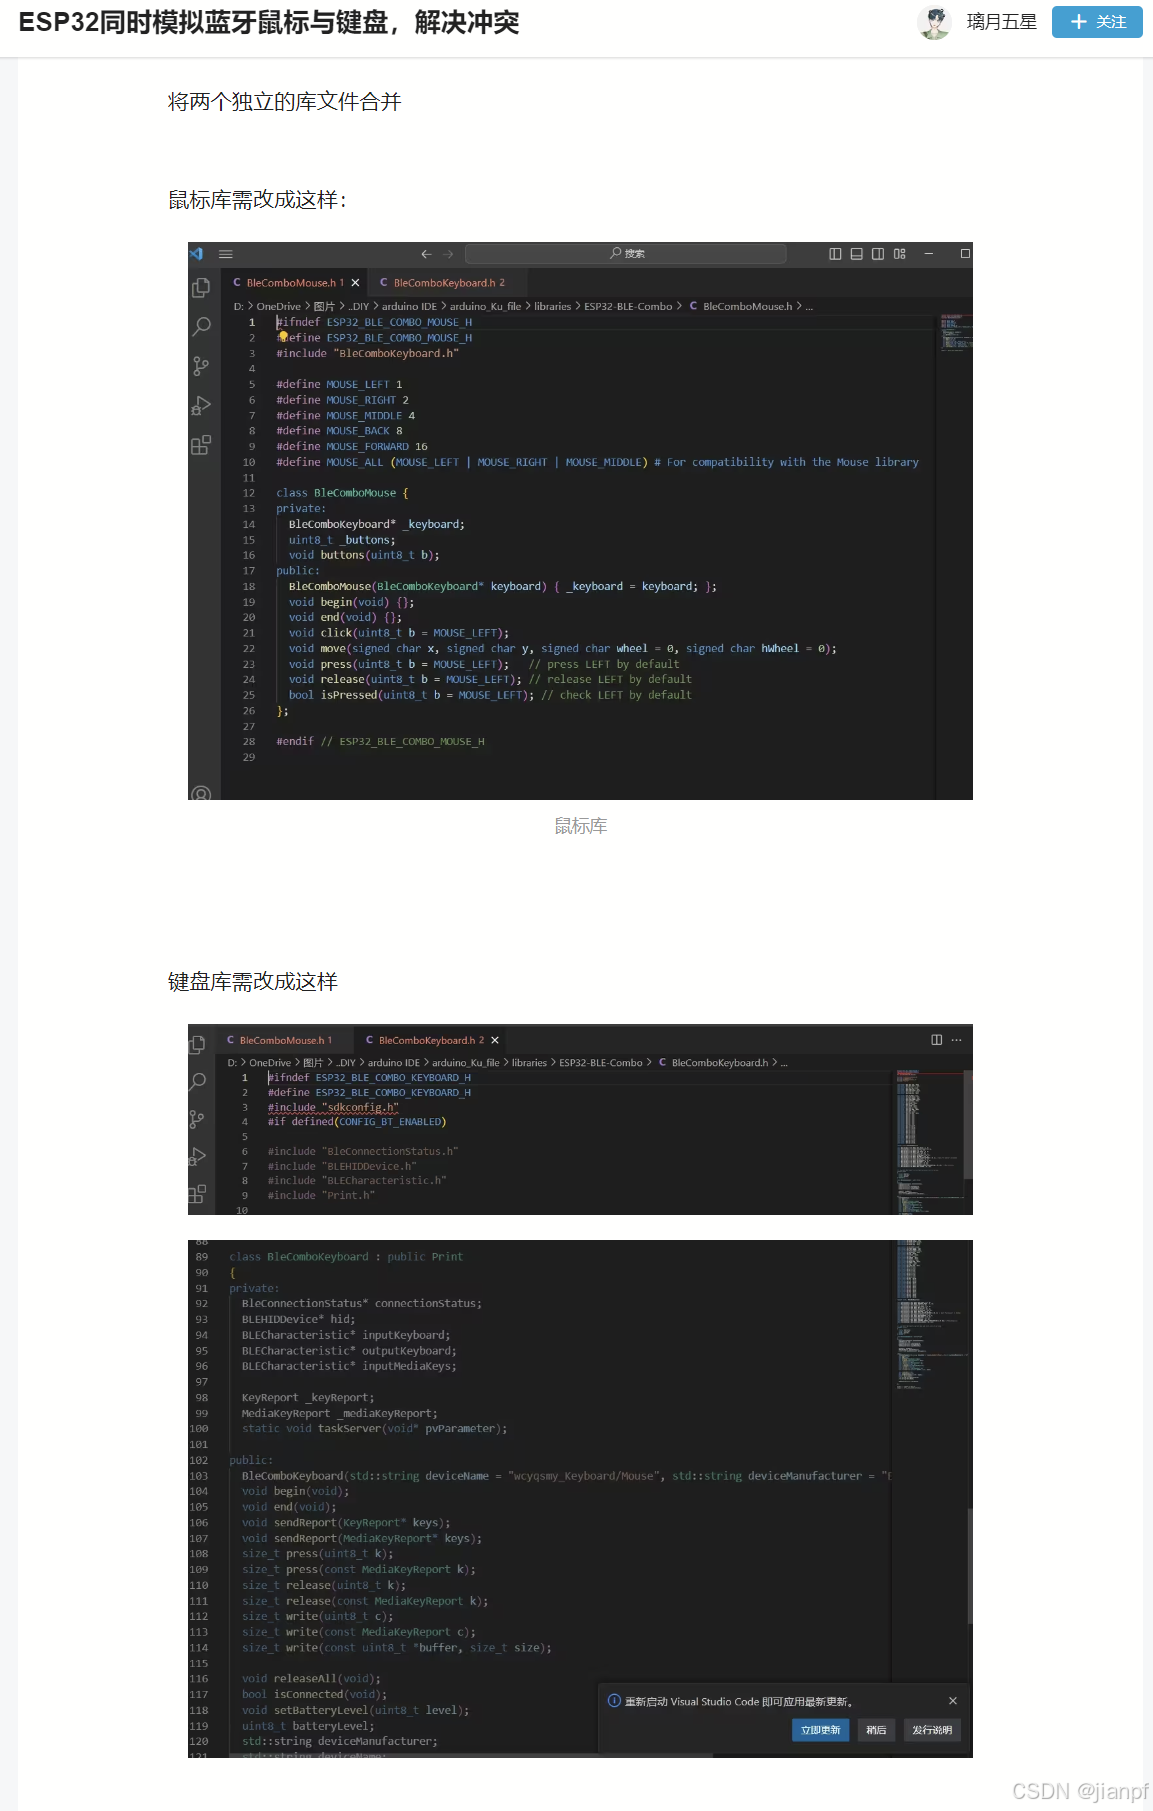
#ifndef ESP32_BLE_MOUSE_H
#define ESP32_BLE_MOUSE_H
#include "sdkconfig.h"
#if defined(CONFIG_BT_ENABLED)#include "BleConnectionStatus.h"
#include "BLEHIDDevice.h"
#include "BLECharacteristic.h"#define MOUSE_LEFT 1
#define MOUSE_RIGHT 2
#define MOUSE_MIDDLE 4
#define MOUSE_BACK 8
#define MOUSE_FORWARD 16
#define MOUSE_ALL (MOUSE_LEFT | MOUSE_RIGHT | MOUSE_MIDDLE) # For compatibility with the Mouse libraryclass BleMouse {
private:uint8_t _buttons;BleConnectionStatus* connectionStatus;BLEHIDDevice* hid;BLECharacteristic* inputMouse;void buttons(uint8_t b);void rawAction(uint8_t msg[], char msgSize);static void taskServer(void* pvParameter);
public:BleMouse(std::string deviceName = "ESP32 Bluetooth Mouse", std::string deviceManufacturer = "Espressif", uint8_t batteryLevel = 100);void begin(void);void end(void);void click(uint8_t b = MOUSE_LEFT);void move(signed char x, signed char y, signed char wheel = 0, signed char hWheel = 0);void press(uint8_t b = MOUSE_LEFT);   // press LEFT by defaultvoid release(uint8_t b = MOUSE_LEFT); // release LEFT by defaultbool isPressed(uint8_t b = MOUSE_LEFT); // check LEFT by defaultbool isConnected(void);void setBatteryLevel(uint8_t level);uint8_t batteryLevel;std::string deviceManufacturer;std::string deviceName;
protected:virtual void onStarted(BLEServer *pServer) { };
};#endif // CONFIG_BT_ENABLED
#endif // ESP32_BLE_MOUSE_H
// uncomment the following line to use NimBLE library
//#define USE_NIMBLE#ifndef ESP32_BLE_KEYBOARD_H
#define ESP32_BLE_KEYBOARD_H
#include "sdkconfig.h"
#if defined(CONFIG_BT_ENABLED)#if defined(USE_NIMBLE)#include "NimBLECharacteristic.h"
#include "NimBLEHIDDevice.h"#define BLEDevice NimBLEDevice
#define BLEServerCallbacks NimBLEServerCallbacks
#define BLECharacteristicCallbacks NimBLECharacteristicCallbacks
#define BLEHIDDevice NimBLEHIDDevice
#define BLECharacteristic NimBLECharacteristic
#define BLEAdvertising NimBLEAdvertising
#define BLEServer NimBLEServer#else#include "BLEHIDDevice.h"
#include "BLECharacteristic.h"#endif // USE_NIMBLE#include "Print.h"#define BLE_KEYBOARD_VERSION "0.0.4"
#define BLE_KEYBOARD_VERSION_MAJOR 0
#define BLE_KEYBOARD_VERSION_MINOR 0
#define BLE_KEYBOARD_VERSION_REVISION 4const uint8_t KEY_LEFT_CTRL = 0x80;
const uint8_t KEY_LEFT_SHIFT = 0x81;
const uint8_t KEY_LEFT_ALT = 0x82;
const uint8_t KEY_LEFT_GUI = 0x83;
const uint8_t KEY_RIGHT_CTRL = 0x84;
const uint8_t KEY_RIGHT_SHIFT = 0x85;
const uint8_t KEY_RIGHT_ALT = 0x86;
const uint8_t KEY_RIGHT_GUI = 0x87;const uint8_t KEY_UP_ARROW = 0xDA;
const uint8_t KEY_DOWN_ARROW = 0xD9;
const uint8_t KEY_LEFT_ARROW = 0xD8;
const uint8_t KEY_RIGHT_ARROW = 0xD7;
const uint8_t KEY_BACKSPACE = 0xB2;
const uint8_t KEY_TAB = 0xB3;
const uint8_t KEY_RETURN = 0xB0;
const uint8_t KEY_ESC = 0xB1;
const uint8_t KEY_INSERT = 0xD1;
const uint8_t KEY_PRTSC = 0xCE;
const uint8_t KEY_DELETE = 0xD4;
const uint8_t KEY_PAGE_UP = 0xD3;
const uint8_t KEY_PAGE_DOWN = 0xD6;
const uint8_t KEY_HOME = 0xD2;
const uint8_t KEY_END = 0xD5;
const uint8_t KEY_CAPS_LOCK = 0xC1;
const uint8_t KEY_F1 = 0xC2;
const uint8_t KEY_F2 = 0xC3;
const uint8_t KEY_F3 = 0xC4;
const uint8_t KEY_F4 = 0xC5;
const uint8_t KEY_F5 = 0xC6;
const uint8_t KEY_F6 = 0xC7;
const uint8_t KEY_F7 = 0xC8;
const uint8_t KEY_F8 = 0xC9;
const uint8_t KEY_F9 = 0xCA;
const uint8_t KEY_F10 = 0xCB;
const uint8_t KEY_F11 = 0xCC;
const uint8_t KEY_F12 = 0xCD;
const uint8_t KEY_F13 = 0xF0;
const uint8_t KEY_F14 = 0xF1;
const uint8_t KEY_F15 = 0xF2;
const uint8_t KEY_F16 = 0xF3;
const uint8_t KEY_F17 = 0xF4;
const uint8_t KEY_F18 = 0xF5;
const uint8_t KEY_F19 = 0xF6;
const uint8_t KEY_F20 = 0xF7;
const uint8_t KEY_F21 = 0xF8;
const uint8_t KEY_F22 = 0xF9;
const uint8_t KEY_F23 = 0xFA;
const uint8_t KEY_F24 = 0xFB;const uint8_t KEY_NUM_0 = 0xEA;
const uint8_t KEY_NUM_1 = 0xE1;
const uint8_t KEY_NUM_2 = 0xE2;
const uint8_t KEY_NUM_3 = 0xE3;
const uint8_t KEY_NUM_4 = 0xE4;
const uint8_t KEY_NUM_5 = 0xE5;
const uint8_t KEY_NUM_6 = 0xE6;
const uint8_t KEY_NUM_7 = 0xE7;
const uint8_t KEY_NUM_8 = 0xE8;
const uint8_t KEY_NUM_9 = 0xE9;
const uint8_t KEY_NUM_SLASH = 0xDC;
const uint8_t KEY_NUM_ASTERISK = 0xDD;
const uint8_t KEY_NUM_MINUS = 0xDE;
const uint8_t KEY_NUM_PLUS = 0xDF;
const uint8_t KEY_NUM_ENTER = 0xE0;
const uint8_t KEY_NUM_PERIOD = 0xEB;typedef uint8_t MediaKeyReport[2];const MediaKeyReport KEY_MEDIA_NEXT_TRACK = {1, 0};
const MediaKeyReport KEY_MEDIA_PREVIOUS_TRACK = {2, 0};
const MediaKeyReport KEY_MEDIA_STOP = {4, 0};
const MediaKeyReport KEY_MEDIA_PLAY_PAUSE = {8, 0};
const MediaKeyReport KEY_MEDIA_MUTE = {16, 0};
const MediaKeyReport KEY_MEDIA_VOLUME_UP = {32, 0};
const MediaKeyReport KEY_MEDIA_VOLUME_DOWN = {64, 0};
const MediaKeyReport KEY_MEDIA_WWW_HOME = {128, 0};
const MediaKeyReport KEY_MEDIA_LOCAL_MACHINE_BROWSER = {0, 1}; // Opens "My Computer" on Windows
const MediaKeyReport KEY_MEDIA_CALCULATOR = {0, 2};
const MediaKeyReport KEY_MEDIA_WWW_BOOKMARKS = {0, 4};
const MediaKeyReport KEY_MEDIA_WWW_SEARCH = {0, 8};
const MediaKeyReport KEY_MEDIA_WWW_STOP = {0, 16};
const MediaKeyReport KEY_MEDIA_WWW_BACK = {0, 32};
const MediaKeyReport KEY_MEDIA_CONSUMER_CONTROL_CONFIGURATION = {0, 64}; // Media Selection
const MediaKeyReport KEY_MEDIA_EMAIL_READER = {0, 128};// Low level key report: up to 6 keys and shift, ctrl etc at once
typedef struct
{uint8_t modifiers;uint8_t reserved;uint8_t keys[6];
} KeyReport;class BleKeyboard : public Print, public BLEServerCallbacks, public BLECharacteristicCallbacks
{
private:BLEHIDDevice* hid;BLECharacteristic* inputKeyboard;BLECharacteristic* outputKeyboard;BLECharacteristic* inputMediaKeys;BLEAdvertising* advertising;KeyReport _keyReport;MediaKeyReport _mediaKeyReport;std::string deviceName;std::string deviceManufacturer;uint8_t batteryLevel;bool connected = false;uint32_t _delay_ms = 7;void delay_ms(uint64_t ms);uint16_t vid = 0x05ac;uint16_t pid = 0x820a;uint16_t version = 0x0210;public:BleKeyboard(std::string deviceName = "ESP32 Keyboard", std::string deviceManufacturer = "Espressif", uint8_t batteryLevel = 100);void begin(void);void end(void);void sendReport(KeyReport* keys);void sendReport(MediaKeyReport* keys);size_t press(uint8_t k);size_t press(const MediaKeyReport k);size_t release(uint8_t k);size_t release(const MediaKeyReport k);size_t write(uint8_t c);size_t write(const MediaKeyReport c);size_t write(const uint8_t *buffer, size_t size);void releaseAll(void);bool isConnected(void);void setBatteryLevel(uint8_t level);void setName(std::string deviceName); void setDelay(uint32_t ms);void set_vendor_id(uint16_t vid);void set_product_id(uint16_t pid);void set_version(uint16_t version);
protected:virtual void onStarted(BLEServer *pServer) { };virtual void onConnect(BLEServer* pServer) override;virtual void onDisconnect(BLEServer* pServer) override;virtual void onWrite(BLECharacteristic* me) override;};#endif // CONFIG_BT_ENABLED
#endif // ESP32_BLE_KEYBOARD_Hhttps://www.bilibili.com/read/cv23745754/
https://blog.51cto.com/u_12968/10917130
明天再看.
2024.8.9A01:07
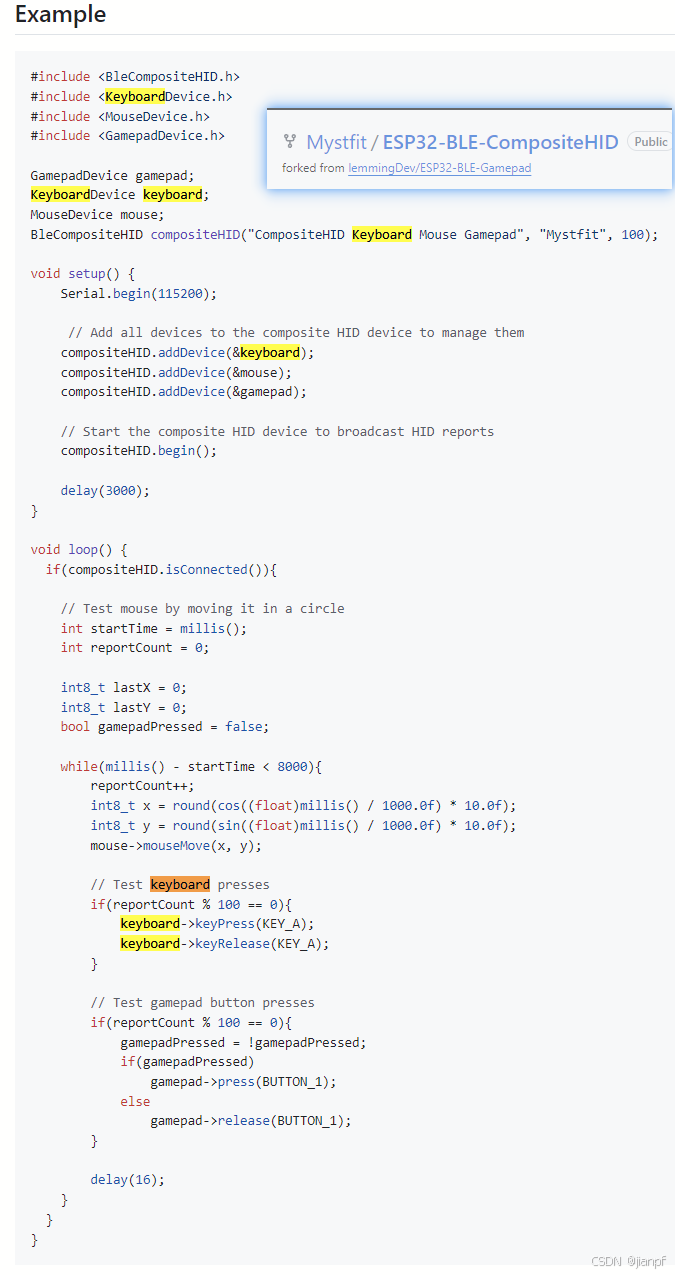
https://github.com/Mystfit/ESP32-BLE-CompositeHID
https://blog.csdn.net/lum250/article/details/123012549
找到融合复合鼠标键盘游戏柄的GitHub代码

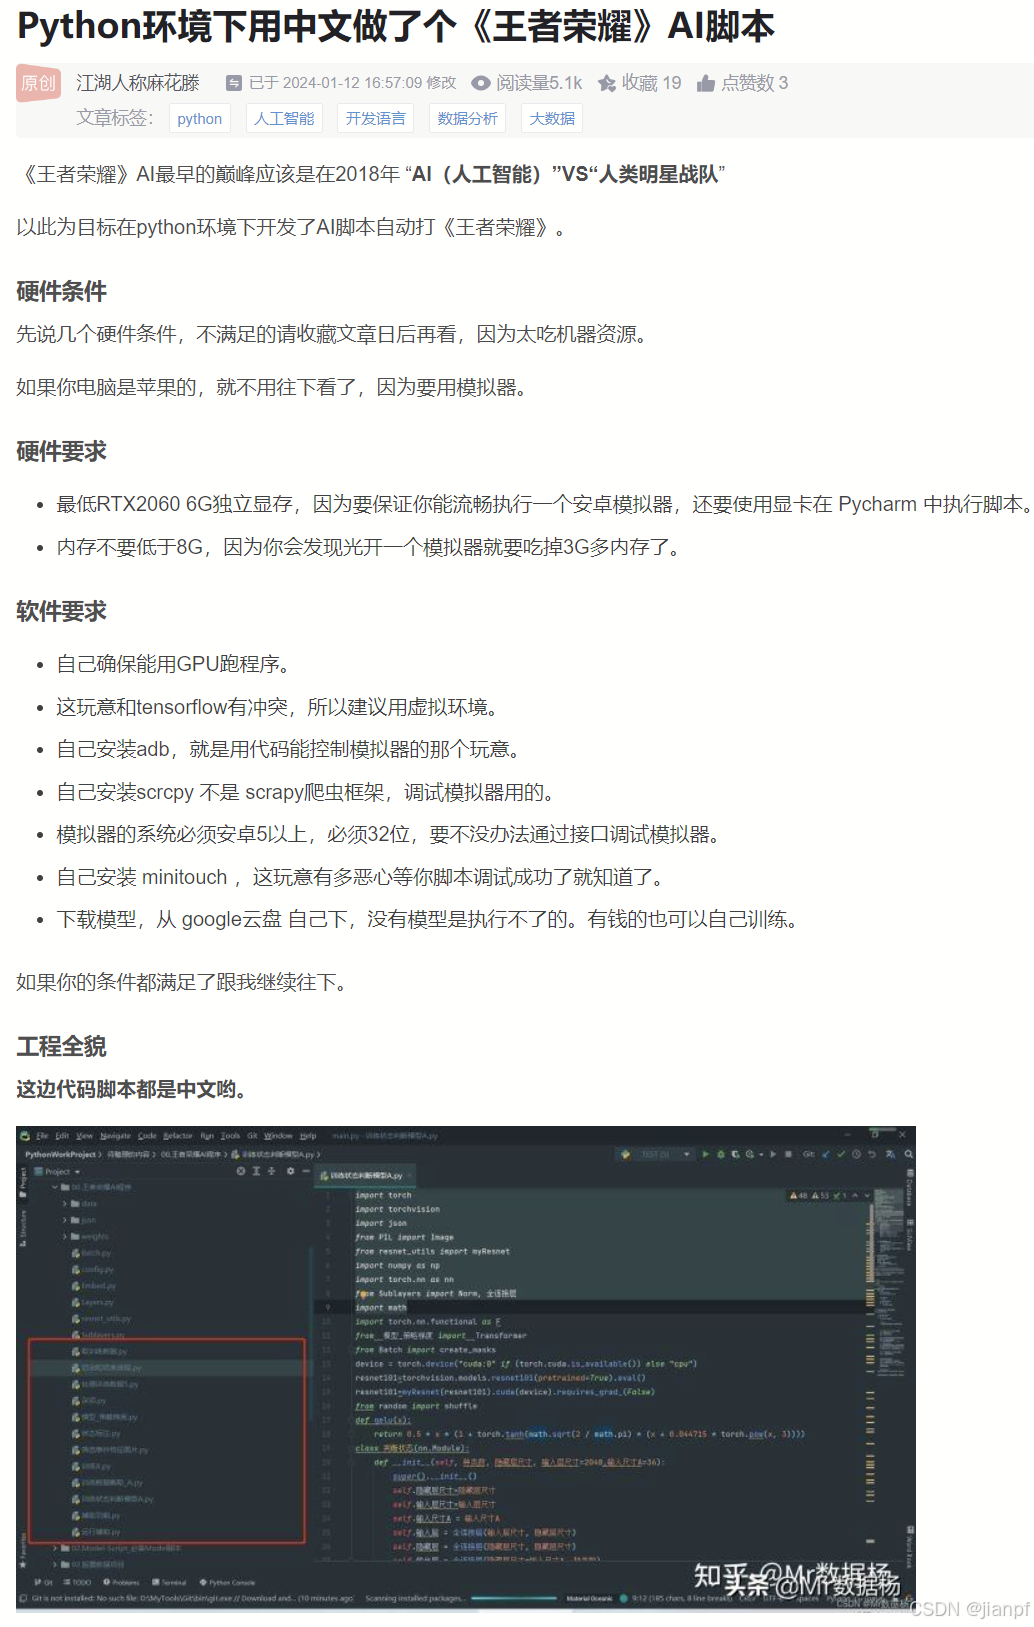
AI王者荣耀
https://www.bilibili.com/video/BV1wpaoeTEUw/
https://blog.csdn.net/m0_59235699/article/details/127695590
python 串口通信
#include <stdio.h>
#include <stdlib.h>
//定义串口字符串
String strsc;
//定义cmdstr的命令字符串测试"写 EEPROM寄存器 地址4095 写入值255 ;"
String cmdstr="write eeprom 4095 255 ;";//定义atCmd程序接受字符串命令函数,返回分隔多少段
int atCmd_ds(String s){
//定义str获取输入的字符串的长度数组
char str[s.length()+1];
//把输入的s字符串转成数组给到str保存
s.toCharArray(str,s.length()+1);
//定义分隔符指针,支持多个,例如" +-;"
const char *delim=" ;";
//定义字符指针
char *token;
//获取第一个字符串
token=strtok(str, delim);
//统计分隔数
int ds=0;
while(token != NULL){//printf("%s\n", token);token=strtok(NULL,delim);ds++;
}
return ds;
}//定义atCmd程序接受字符串命令函数,返回分隔多少段-------------------------
void atCmd(String s,String *arr){
//定义str获取输入的字符串的长度数组
char str[s.length()+1];
//把输入的s字符串转成数组给到str保存
s.toCharArray(str,s.length()+1);
//定义分隔符指针,支持多个,例如" +-;"
const char *delim=" ;";
//定义字符指针
char *token;
//获取第一个字符串
token=strtok(str, delim);
//统计分隔数
int ds=0;
while(token != NULL){//printf("%s\n", token);token=strtok(NULL,delim);ds++;
}char scmd[ds+1][80];
//把输入的s字符串转成数组给到str保存
s.toCharArray(str,s.length()+1);
//获取第一个字符串
token=strtok(str, delim);
ds=0;
while(token != NULL){strcpy(scmd[ds],token);token=strtok(NULL,delim);ds++;
}
//遍历命令和参数
for(int i=0;i<ds;i++){// printf("%s\n", scmd[i]);//这里如何返回scam数组出去?//外部定义数组接收,使用参数指针传递出去.arr[i]=scmd[i];
}//返回
return ;
}//返回函数值(未写好)(怎么传出去?)
//测试输入成功key pass q;mouse left_click 1000 123456;mouse right_click 123456789 123; //---------------------void setup() {// put your setup code here, to run once:Serial.begin(115200);Serial.println("Starting BLE work!!!!!");
}void loop() {if (Serial.available() > 0) {char inchar = Serial.read();if(inchar==';'){strsc+=inchar;Serial.println("("+strsc+")");//获取命令参数个数int sds=atCmd_ds(strsc);//定义字符串数组存储参数[的个数]String scmdstr[sds];//通过函数的指针传递出strsc字符串的参数存储到数组中atCmd(strsc,scmdstr);//显示分段数-1个就是参数个数Serial.println("--"+String(sds));//判断参数个数执行对应的代码if(sds ==2){if(scmdstr[0]=="key"){if(scmdstr[1]=="q"){Serial.println("按键q处理:"+scmdstr[1]); }else if(scmdstr[1]=="w"){Serial.println("按键w处理:"+scmdstr[1]); }else if(scmdstr[1]=="f"){Serial.println("按键f处理:"+scmdstr[1]); }}}else if(sds==4){if(scmdstr[0]=="mous"){if(scmdstr[1]=="Lclick"){Serial.println("鼠标移动到Lclick:X:"+scmdstr[2]+"Y:"+scmdstr[3]); }else if(scmdstr[1]=="Rclick"){Serial.println("鼠标移动到Rclick:X:"+scmdstr[2]+"Y:"+scmdstr[3]); }}  }// Serial.println(atCmd(strsc));// Serial.println(scmd[0]+scmd[1]+scmd[2]+scmd[3]);Serial.println("--");// for(int i=0;i<sds;i++){//    Serial.println(scmdstr[i]);// }//记得接受后清空串口,否则一直首条直到接收溢出错误strsc="";}else{strsc+=inchar;}}}
//调了4小时调通了,开始时删除串口接受完数据要清空后来是指针,直接把函数拆开2部分,再传递指针,再回车换行(一波亖折)
//2024.8.9z
-----------2024.8.9A焊接铁笼回来继续干
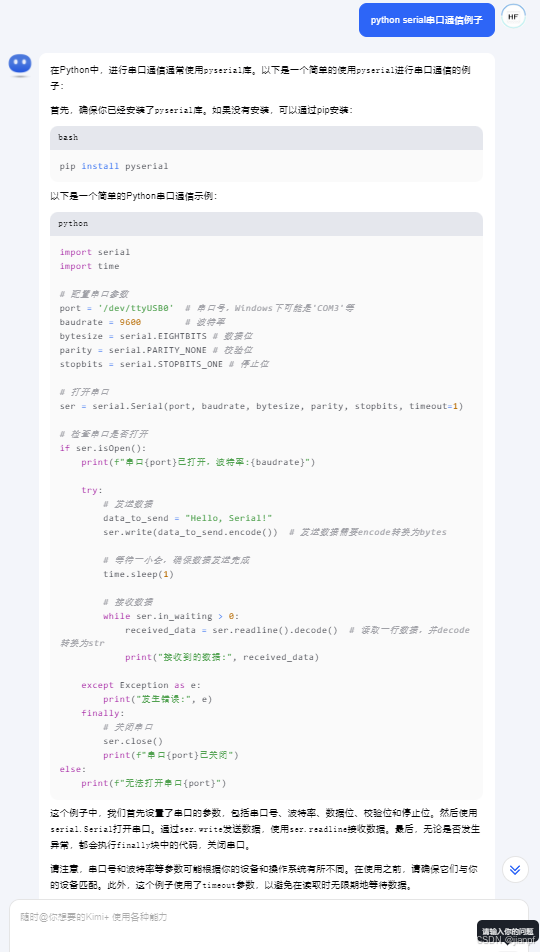
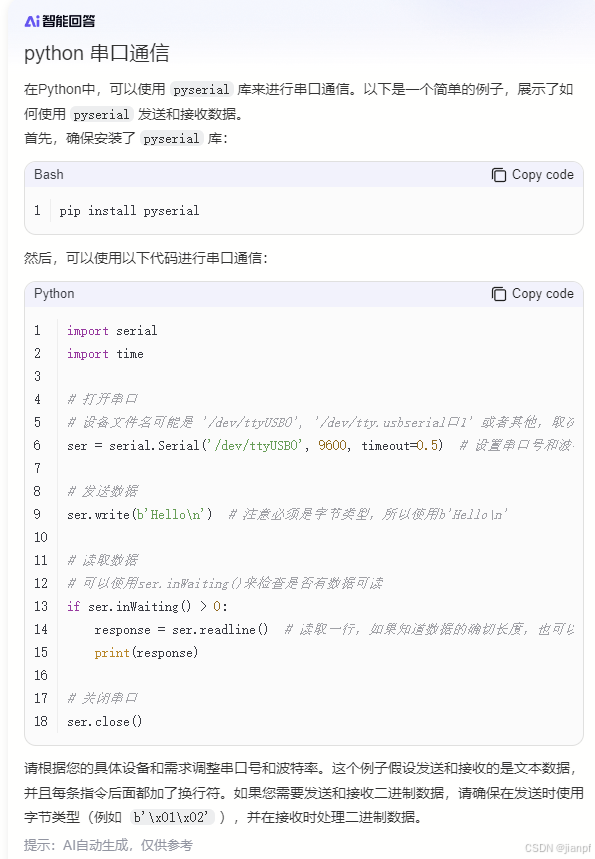
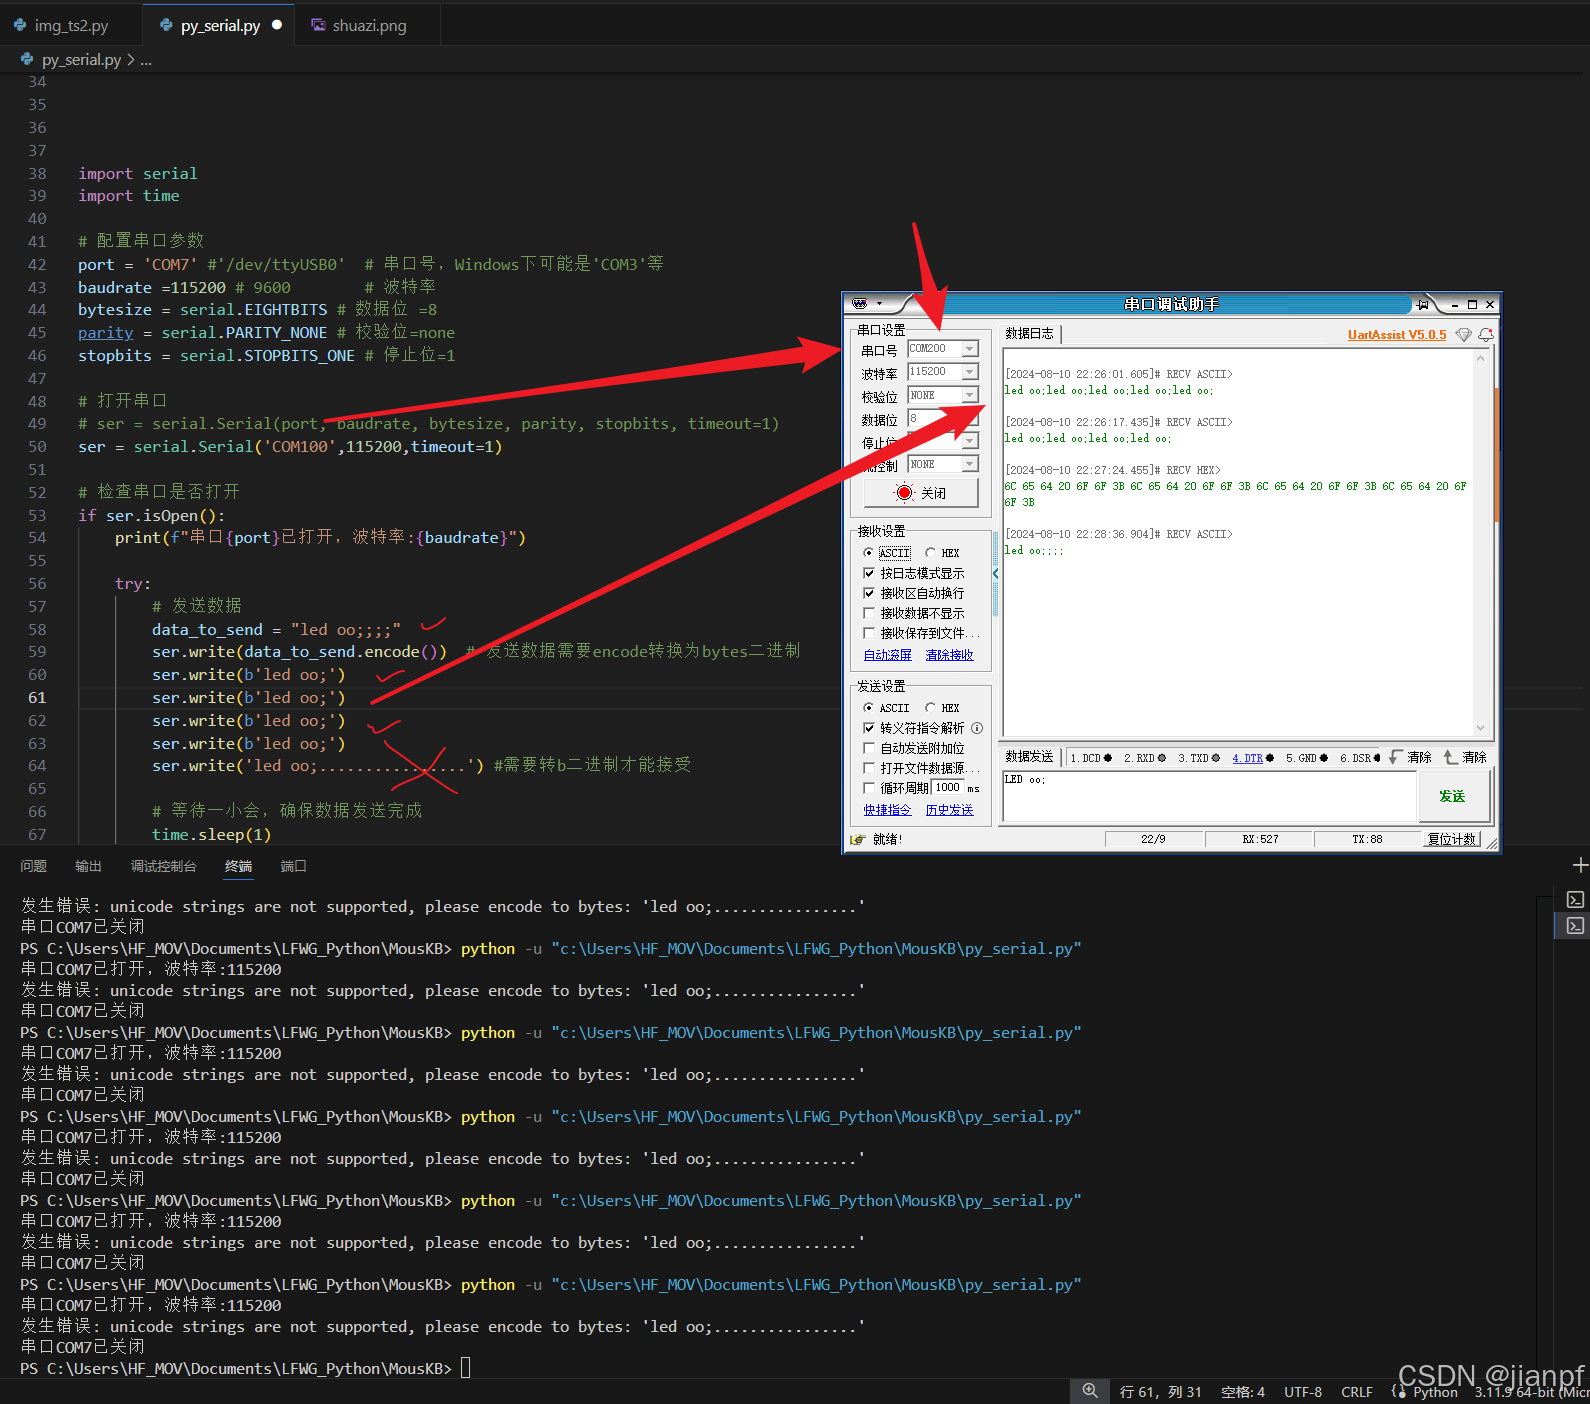
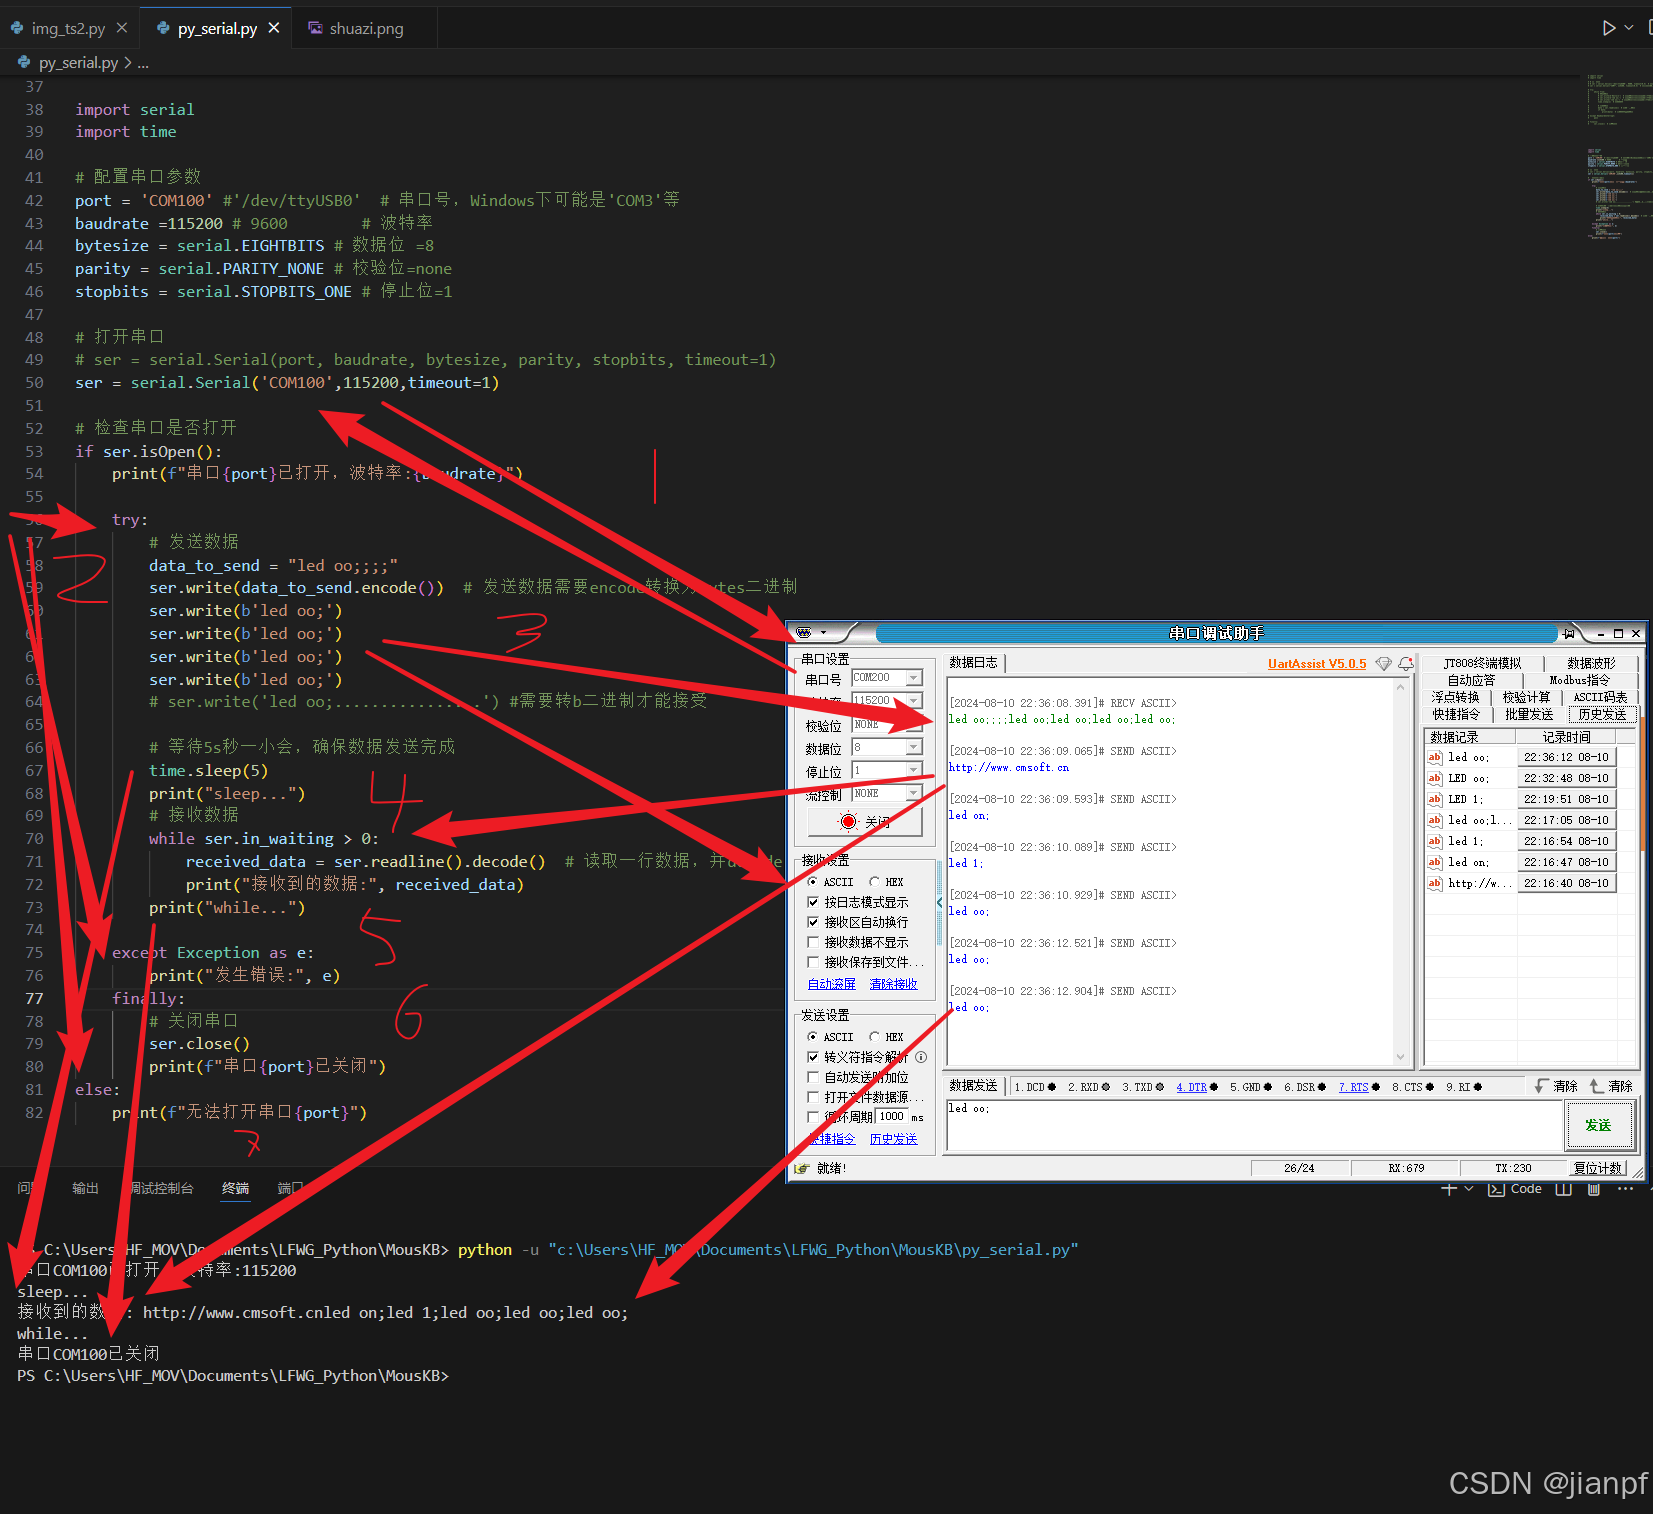
import serial
import time# 配置串口参数
port = '/dev/ttyUSB0'  # 串口号,Windows下可能是'COM3'等
baudrate = 9600        # 波特率
bytesize = serial.EIGHTBITS # 数据位
parity = serial.PARITY_NONE # 校验位
stopbits = serial.STOPBITS_ONE # 停止位# 打开串口
ser = serial.Serial(port, baudrate, bytesize, parity, stopbits, timeout=1)# 检查串口是否打开
if ser.isOpen():print(f"串口{port}已打开,波特率:{baudrate}")try:# 发送数据data_to_send = "Hello, Serial!"ser.write(data_to_send.encode())  # 发送数据需要encode转换为bytes# 等待一小会,确保数据发送完成time.sleep(1)# 接收数据while ser.in_waiting > 0:received_data = ser.readline().decode()  # 读取一行数据,并decode转换为strprint("接收到的数据:", received_data)except Exception as e:print("发生错误:", e)finally:# 关闭串口ser.close()print(f"串口{port}已关闭")
else:print(f"无法打开串口{port}")
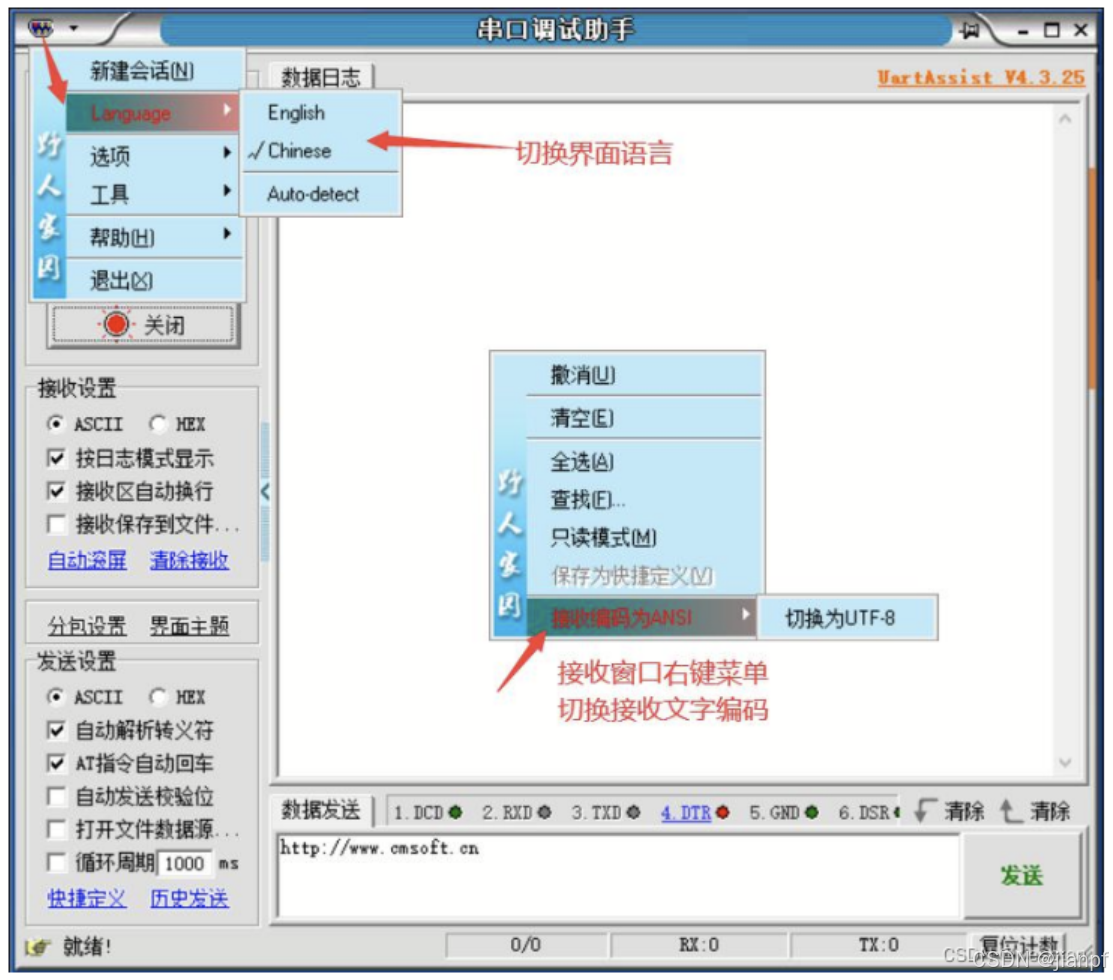
python 串口通信代码
python结构化模式匹配switch-case>>>>>>match case 123’a’‘b’‘c’:

https://blog.csdn.net/wukongaixuexi/article/details/139093097
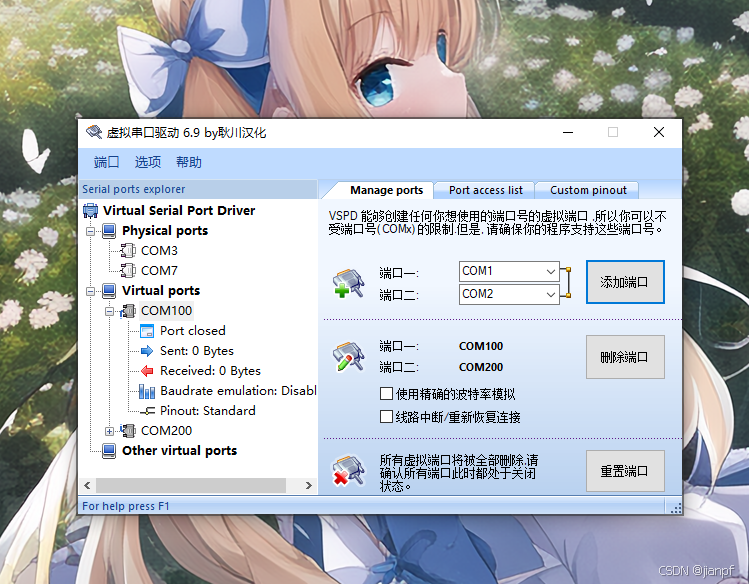
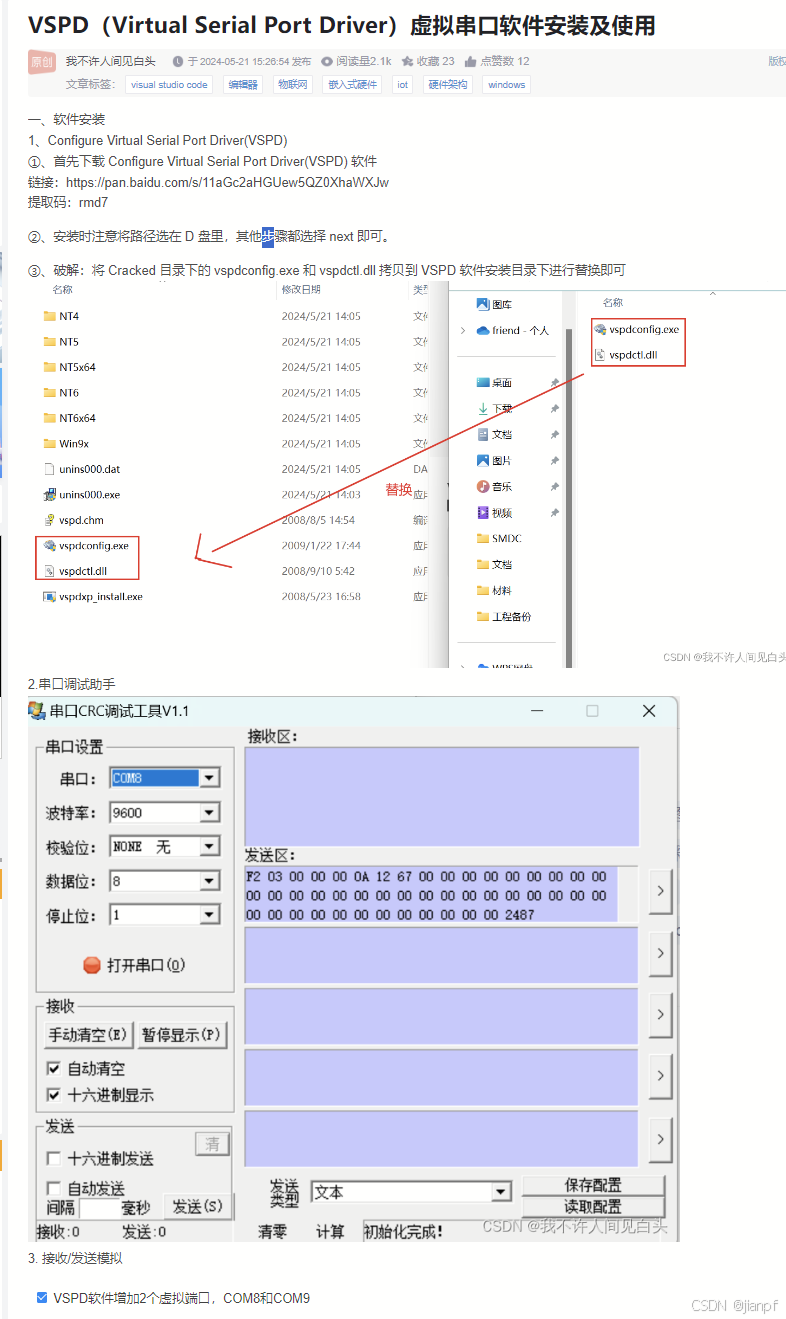
虚拟端口就是,一次同时虚拟2个端口,一个负责接受不返回但转发到另一个中(另一个同样转发不回复,如图连接一样)
https://blog.csdn.net/qq_35029061/article/details/130755444
https://blog.csdn.net/qq_35029061/article/details/130755444
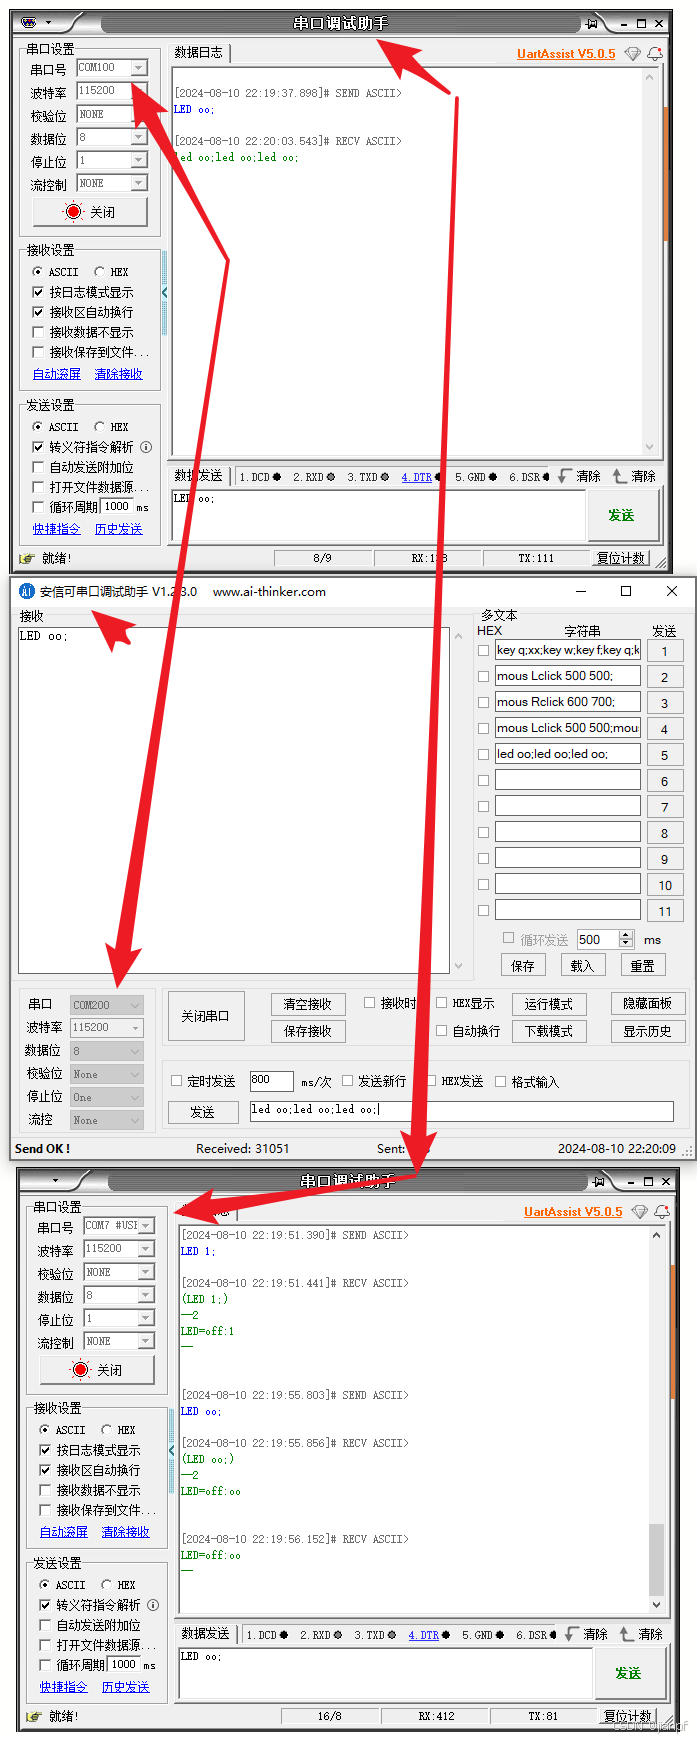
连接成功COM100-COM200
Python成功发送数据到虚拟COM200端口,
下面准备测试接受
测试成功

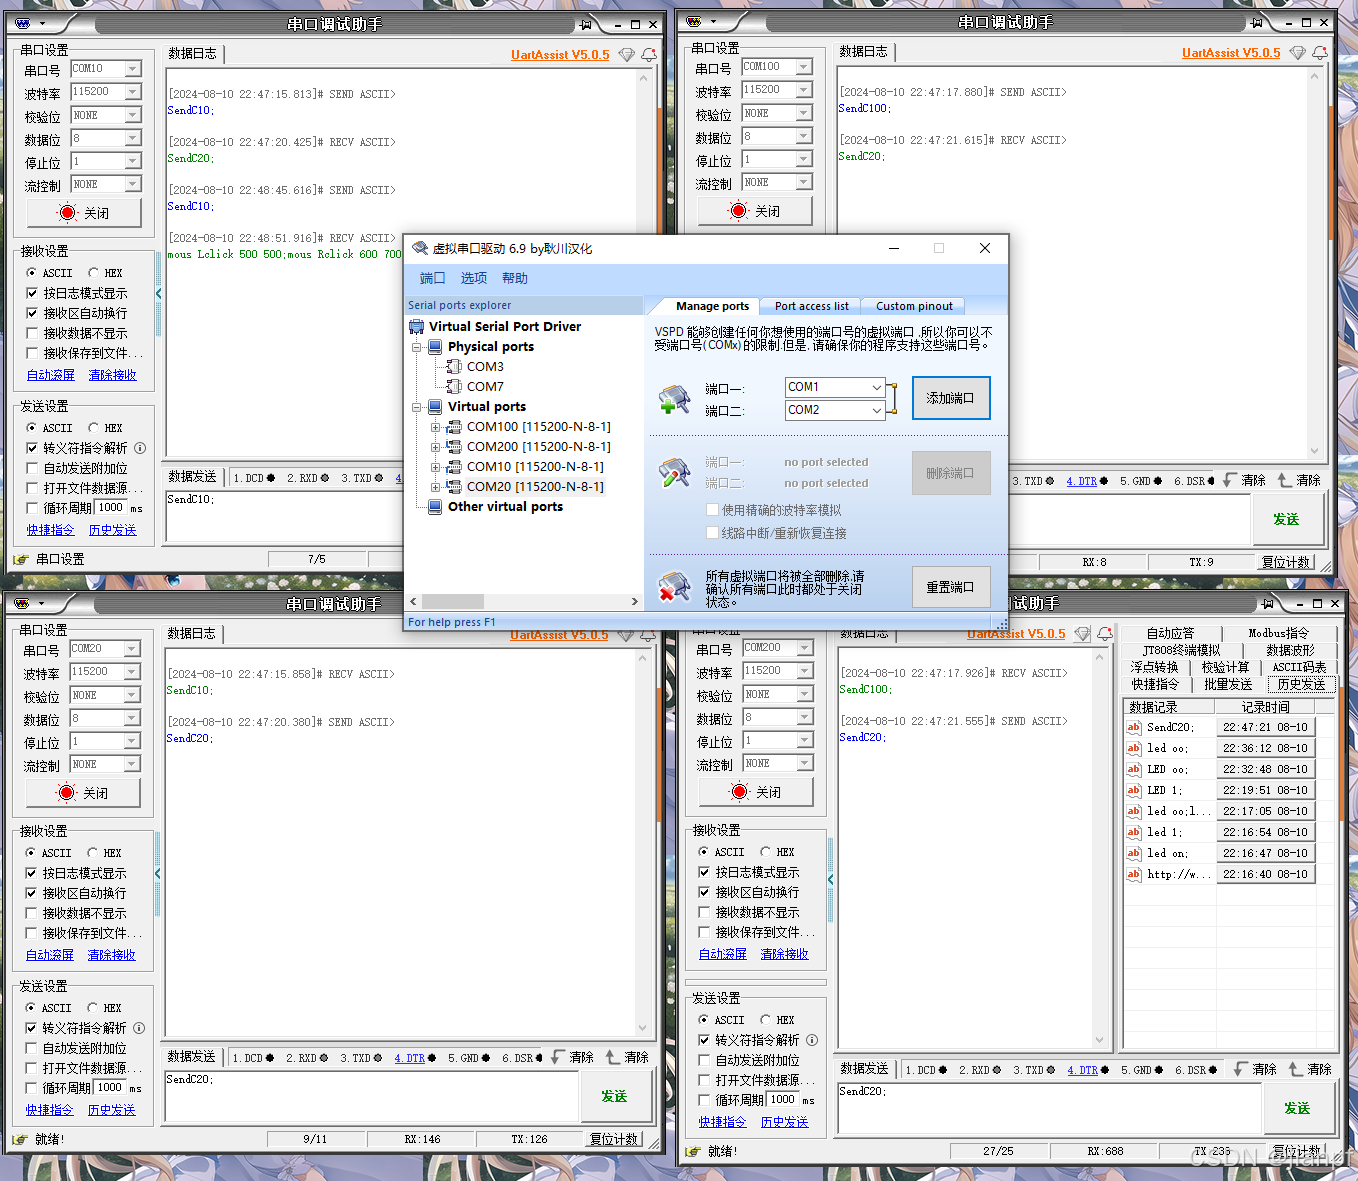
虚拟了2对测试串口成功;
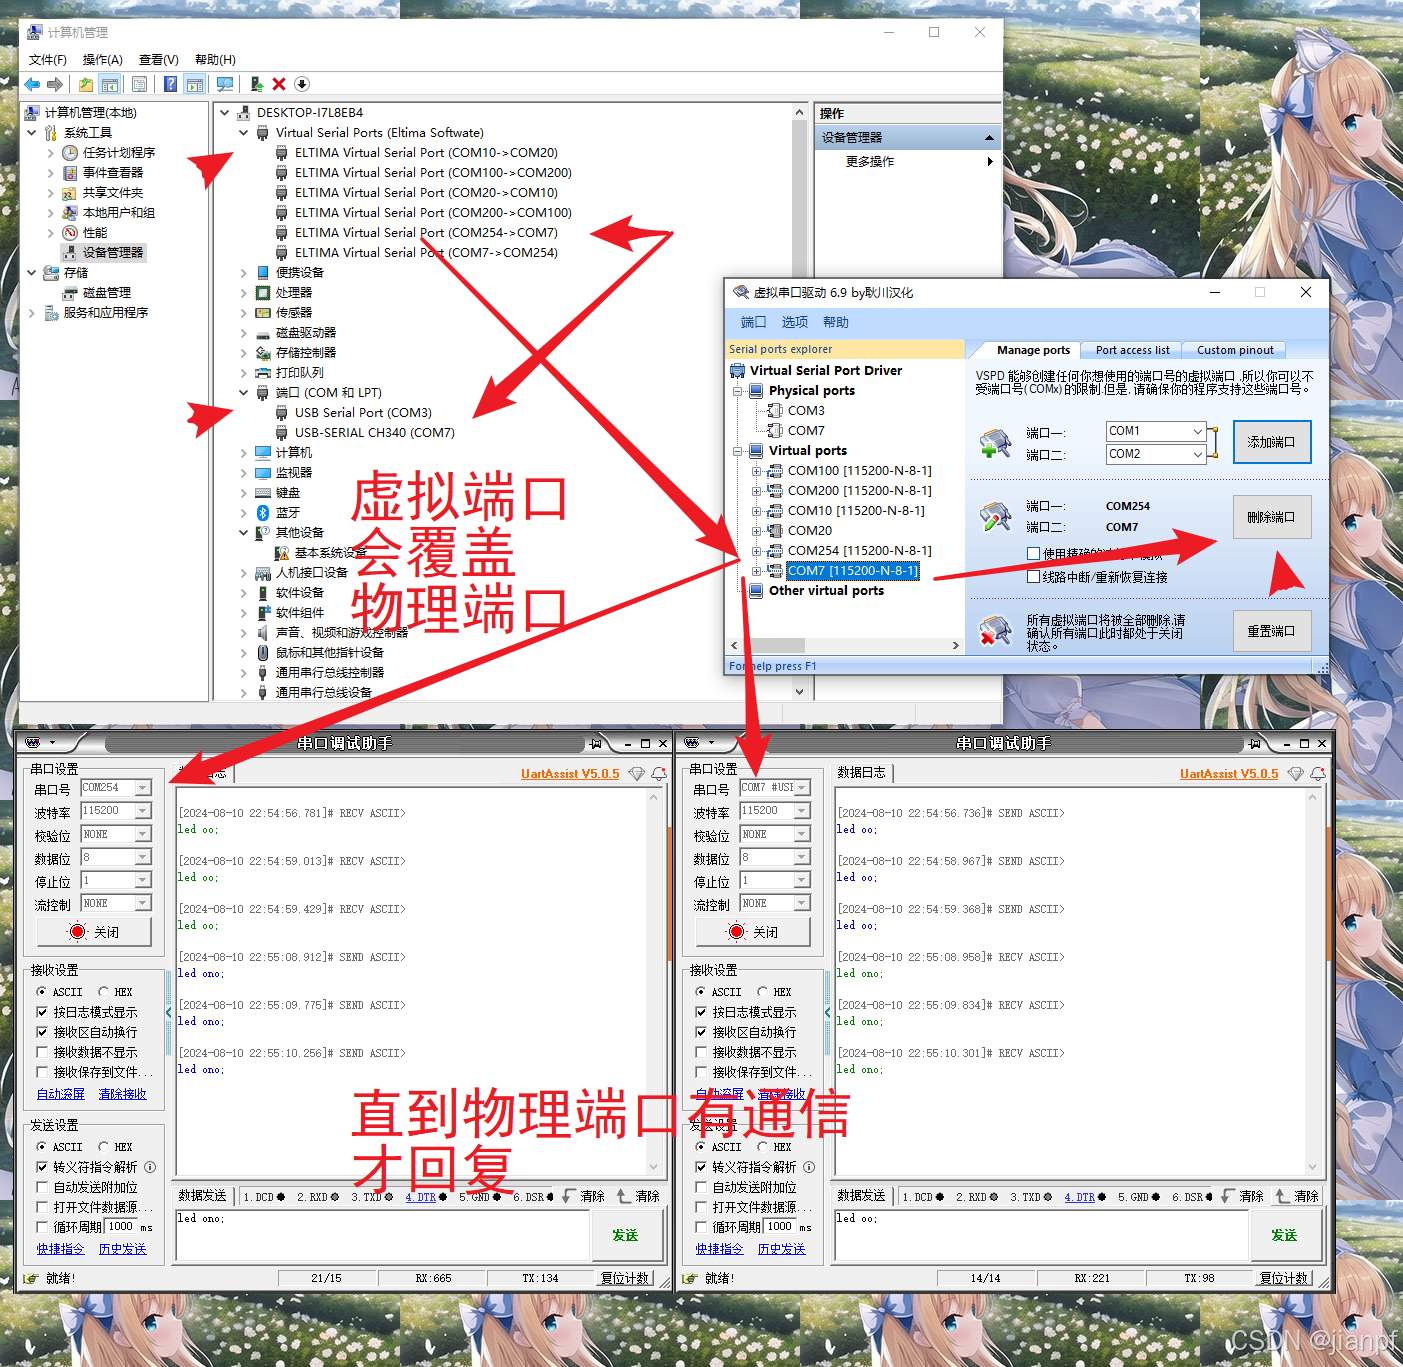
不行就删除虚拟端口,重新连接串口USB物理线缆;
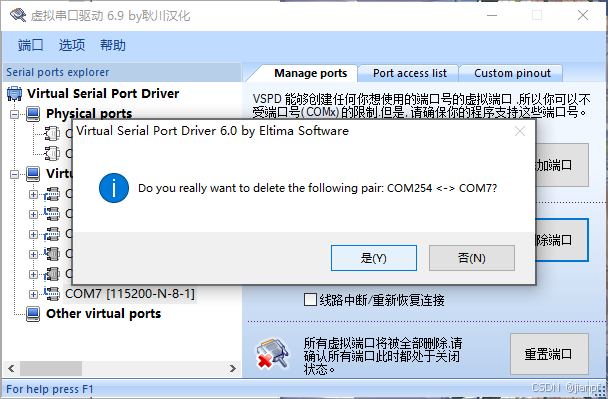
删除端口确认
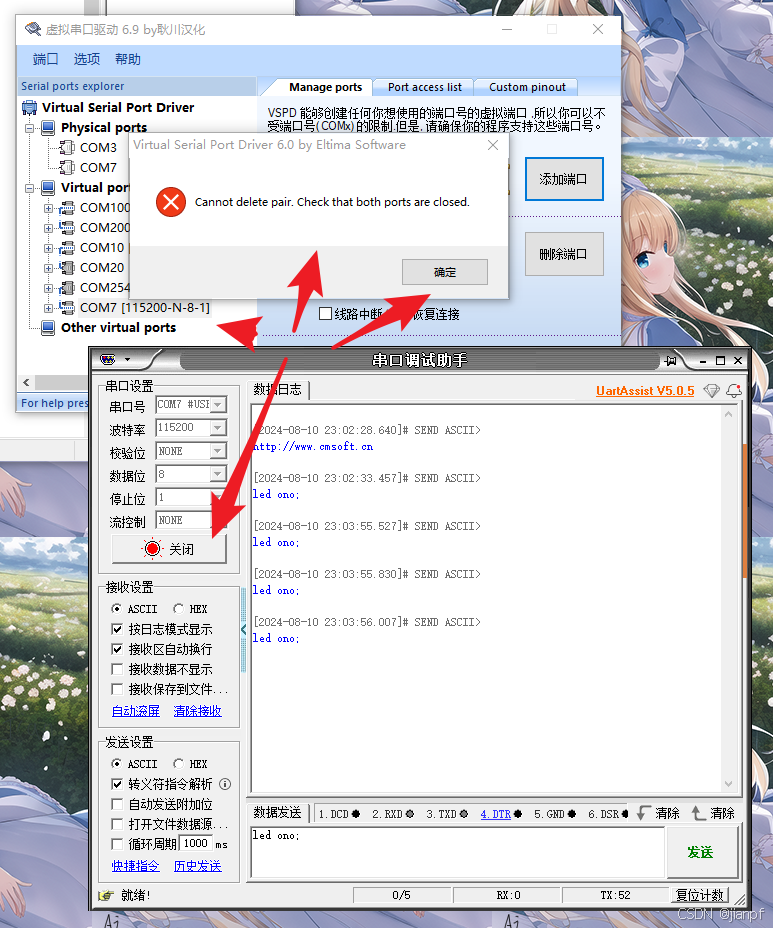
需断开断开连接才能删除虚拟端口
2024.8.11.04:01:00;
EMail测试
https://blog.51cto.com/u_16213682/10477508
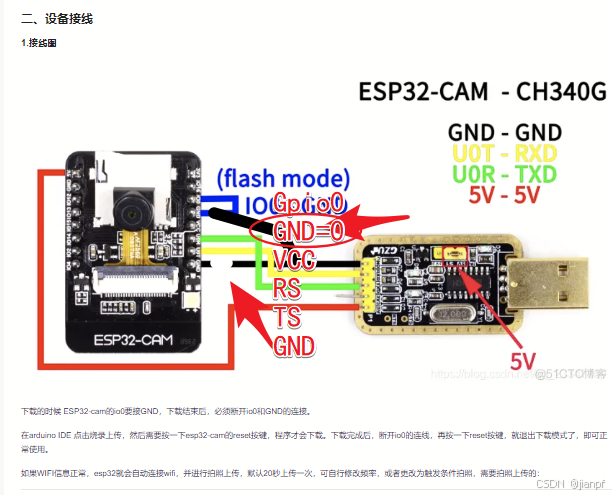
ESP32-CAM的单独供电连线左边5V和右边的中间GND即可.
Python为什么串口通信不了,因为ESP32-CAM-MB底座GND=0不通电(控制了RS+TS+右下GND和左边的5V,所以需要通不知道的指令还是什么,暂时不清楚,知道请补充一下)
https://www.elecfans.com/v/342496/
背面–注意这里是ESP32-CAM这里背面3.3V;
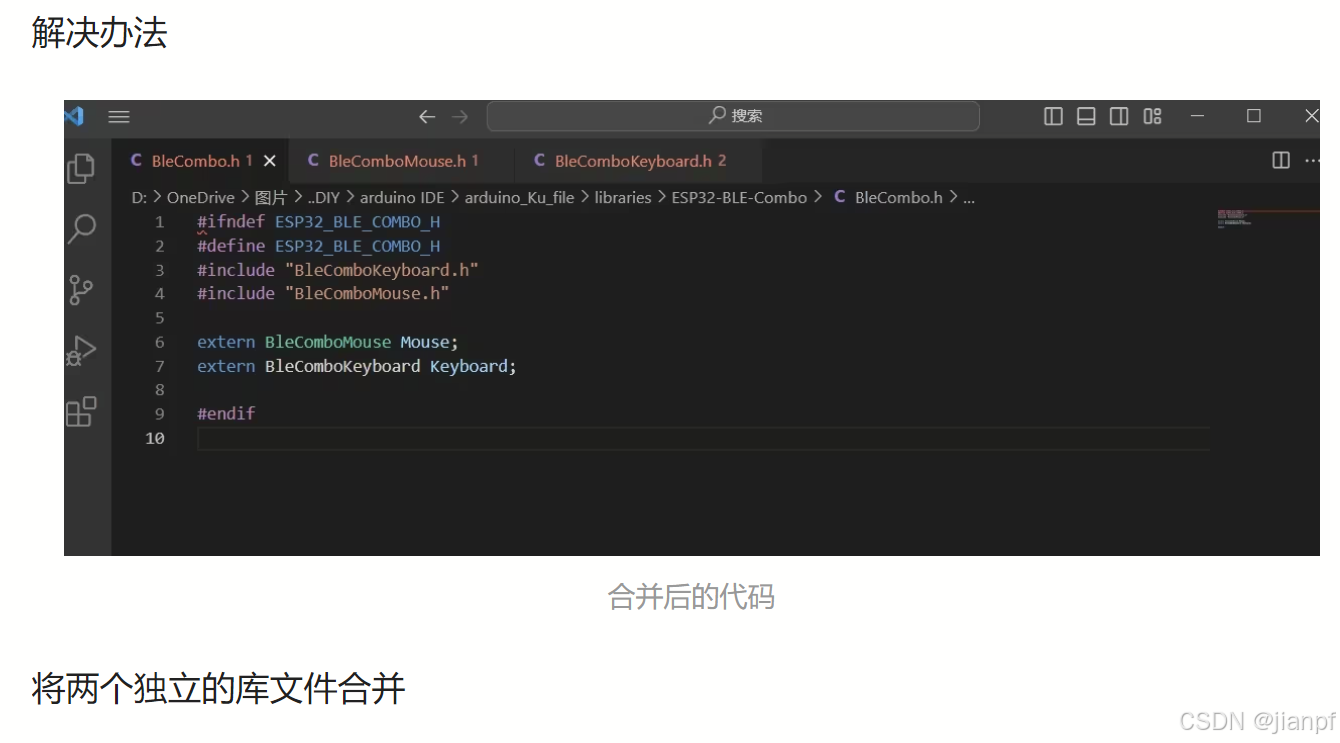
Arduino封装cmdSerial类2024.8.11.04:58(又一小时过去了)
C:\Users\HF_MOV\AppData\Local\Arduino15\libraries

https://blog.csdn.net/panjinliang066333/article/details/135476151
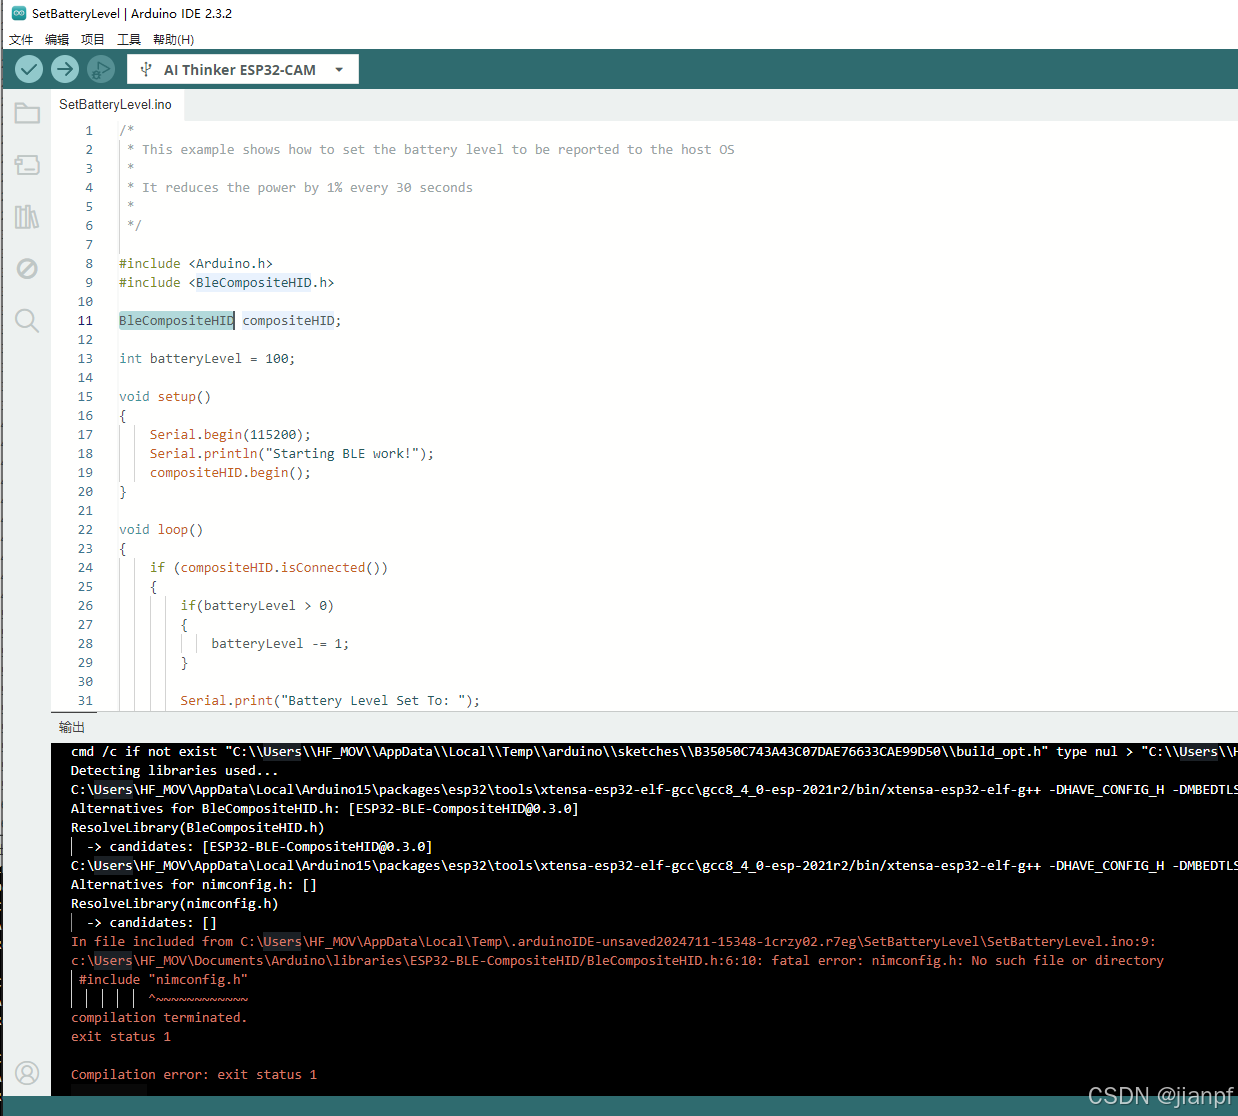

#include "nimconfig.h"依赖NimBLE-Arduino库.


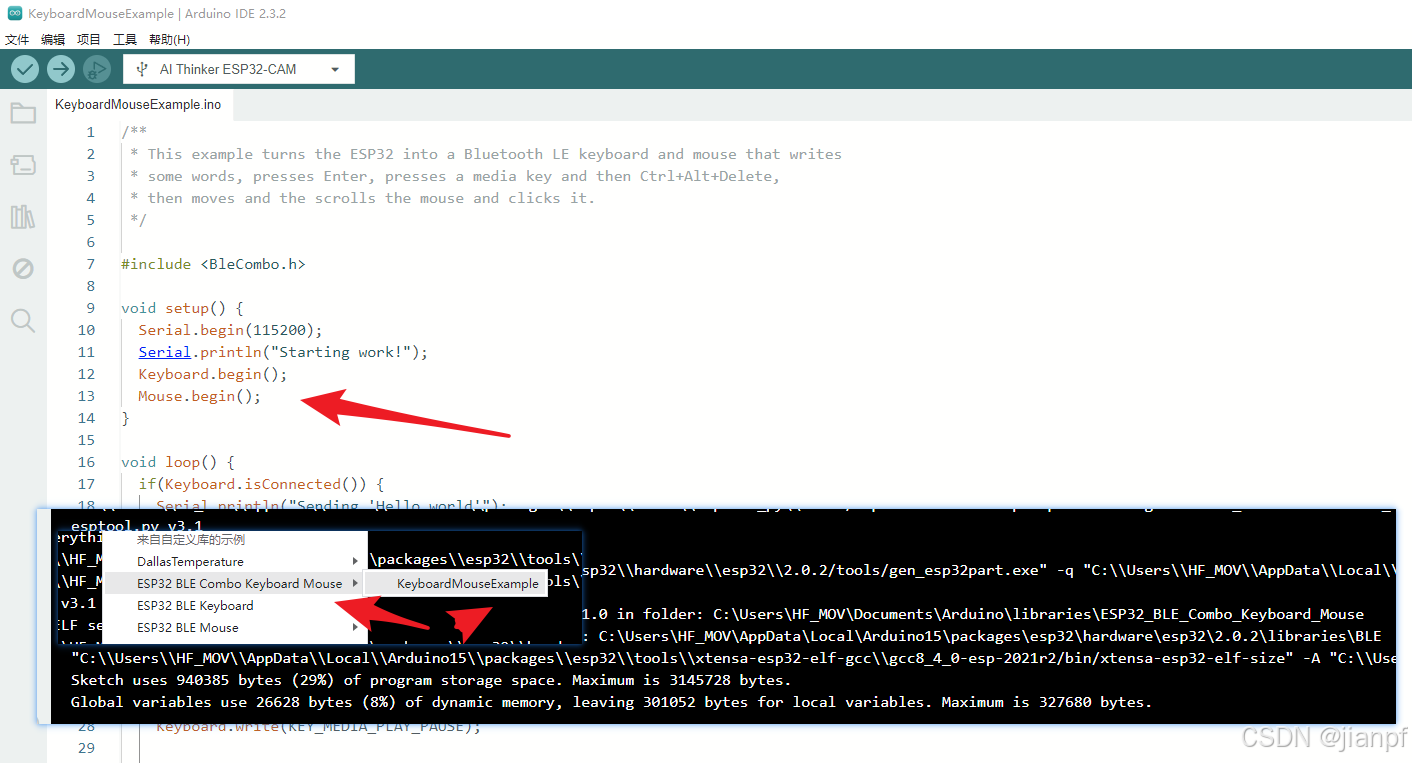
#include <BleCombo.h>void setup() {Serial.begin(115200);Serial.println("Starting work!");Keyboard.begin();Mouse.begin();
}void loop() {if(Keyboard.isConnected()) {Serial.println("Sending 'Hello world'");Keyboard.println("Hello World");Serial.println("Sending Enter key...");Keyboard.write(KEY_RETURN);Serial.println("Sending Play/Pause media key...");Keyboard.write(KEY_MEDIA_PLAY_PAUSE);Serial.println("Sending Ctrl+Alt+Delete...");Keyboard.press(KEY_LEFT_CTRL);Keyboard.press(KEY_LEFT_ALT);Keyboard.press(KEY_DELETE);delay(100);Keyboard.releaseAll();Serial.println("Move mouse pointer up");Mouse.move(0,-10);Serial.println("Scroll Down");Mouse.move(0,0,-1);Serial.println("Left click");Mouse.click(MOUSE_LEFT);}Serial.println("Waiting 2 seconds...");delay(2000);
}
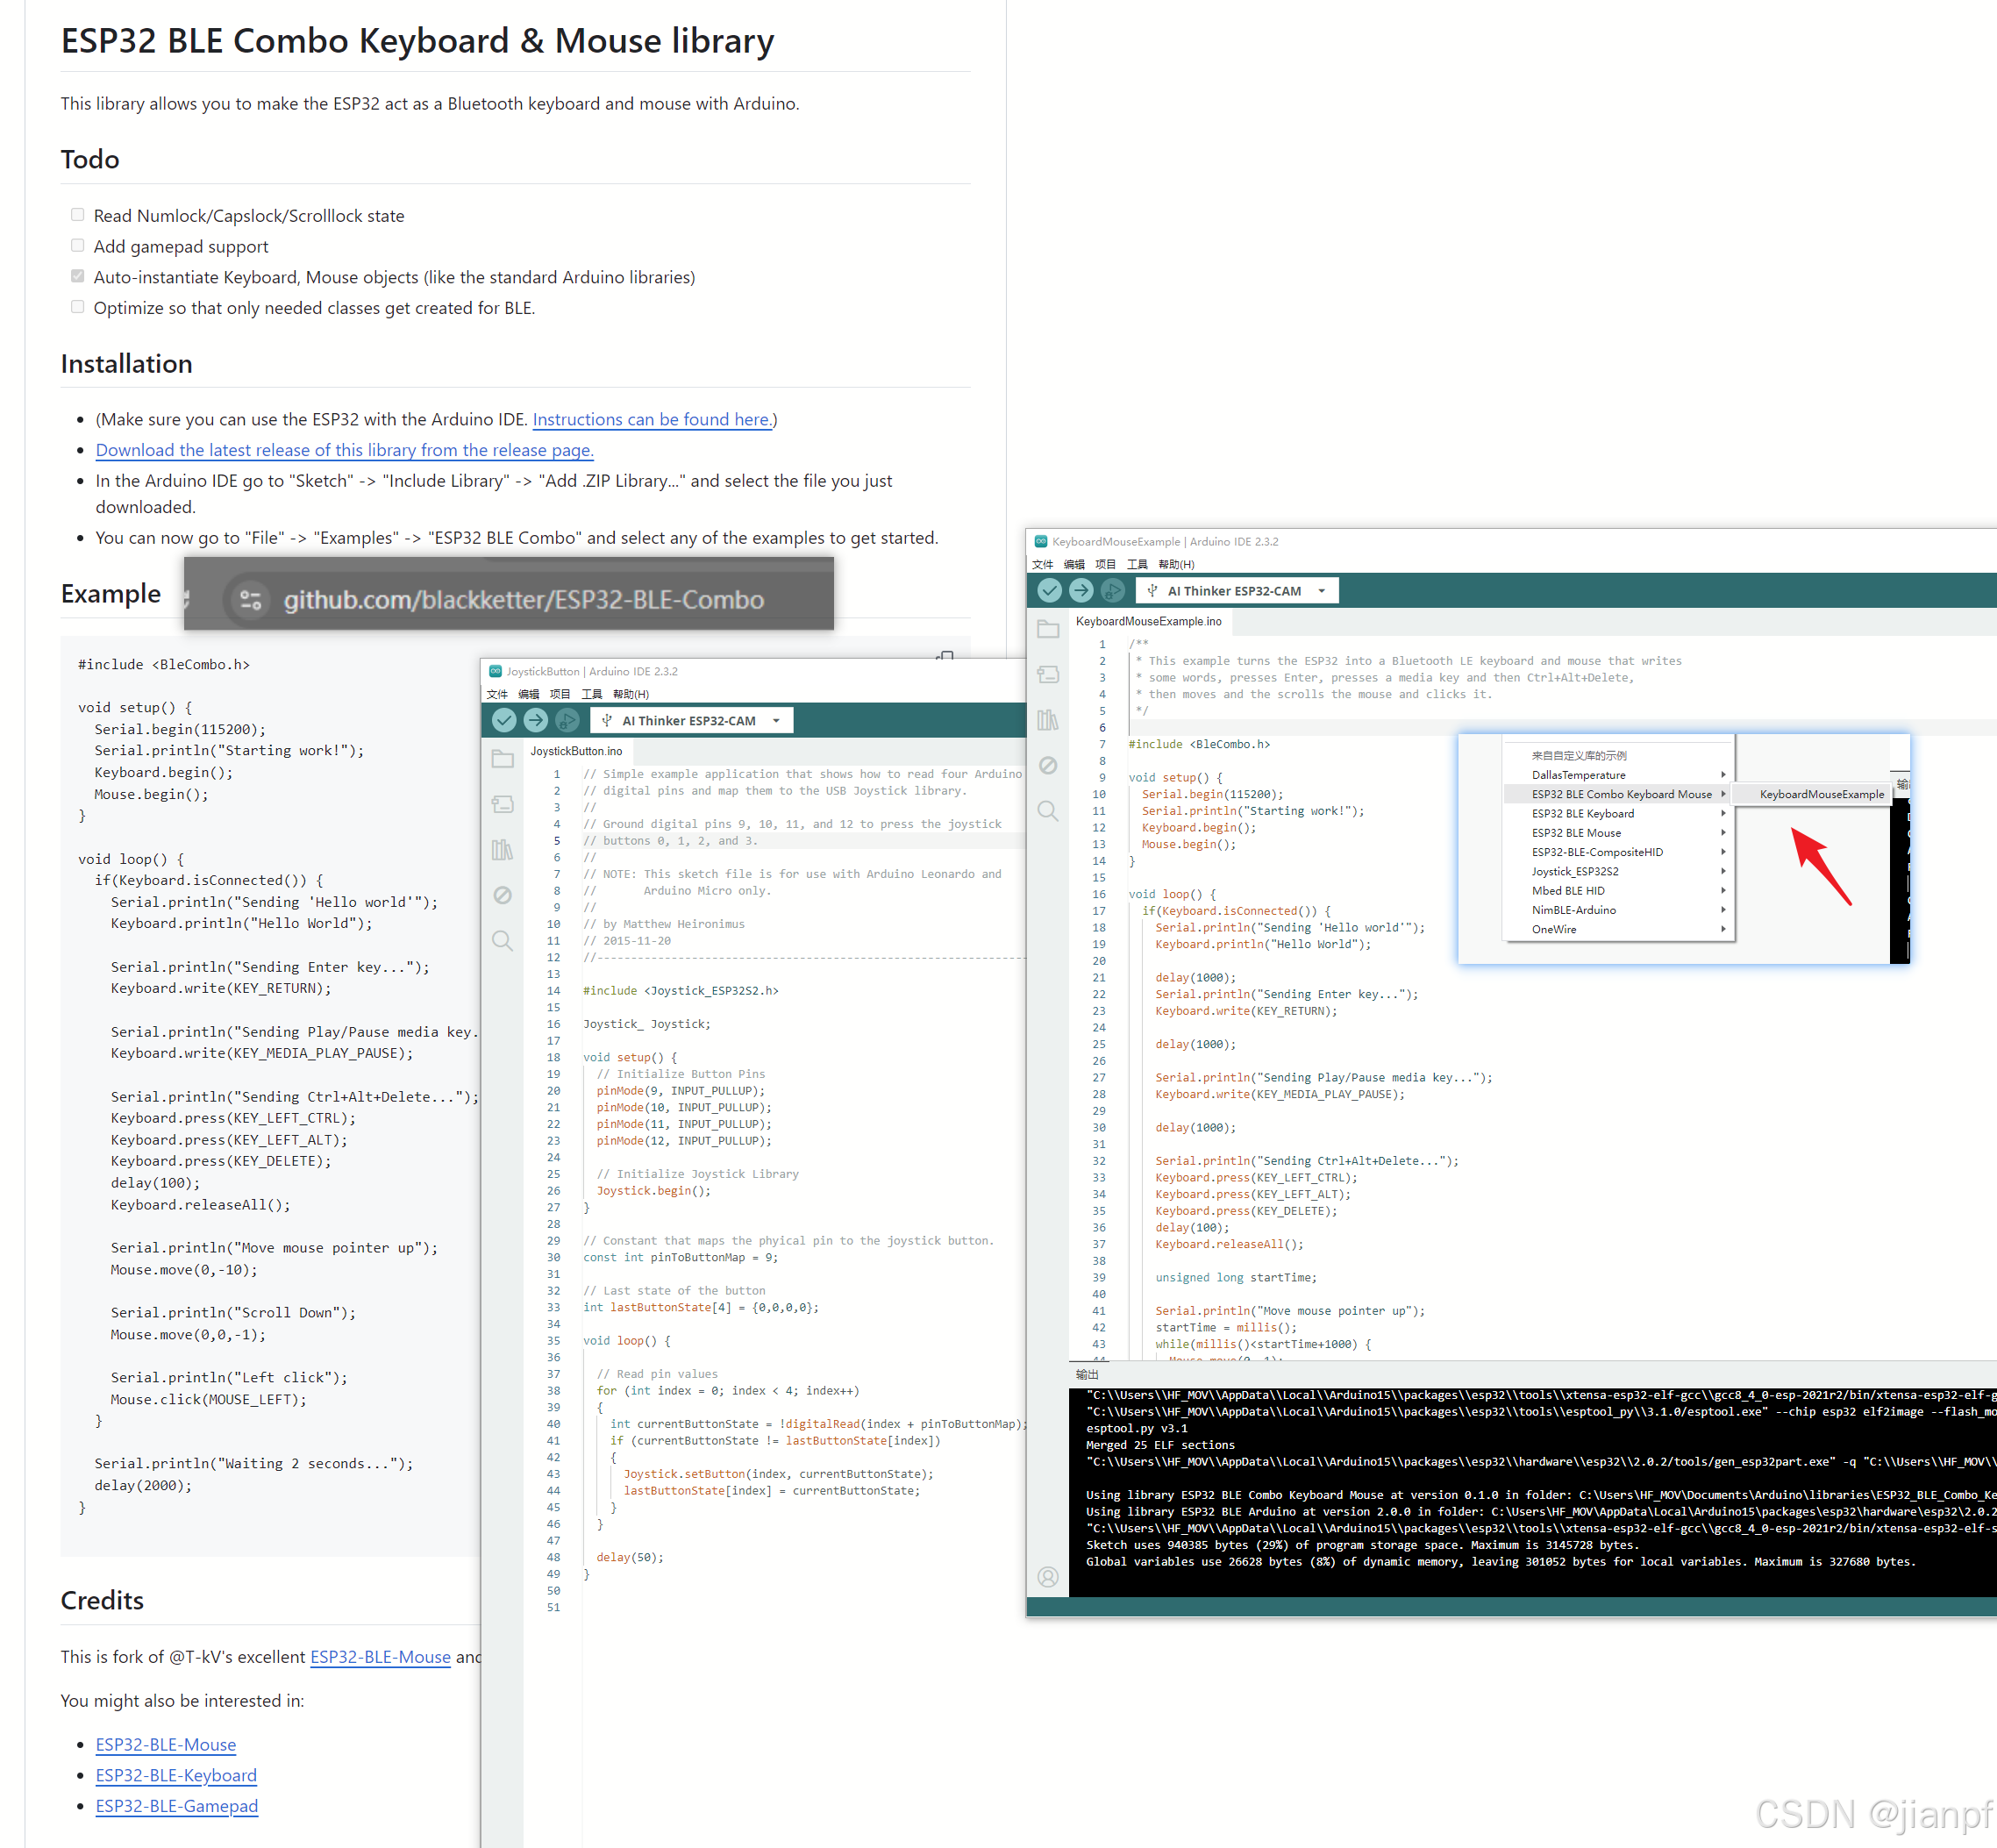
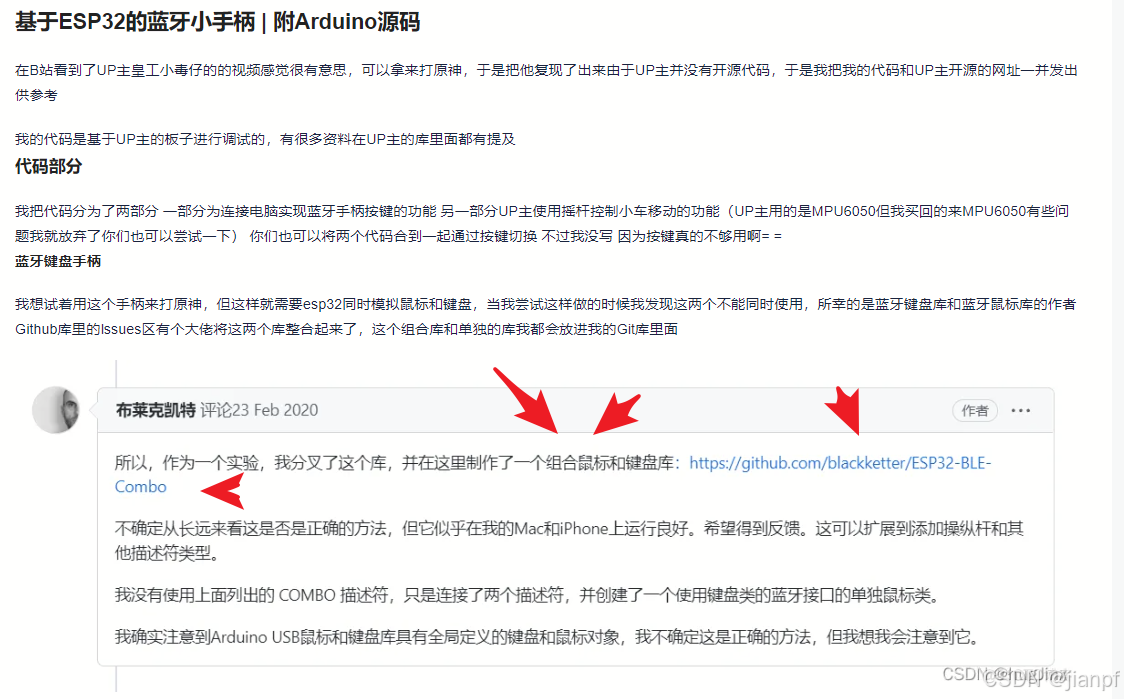
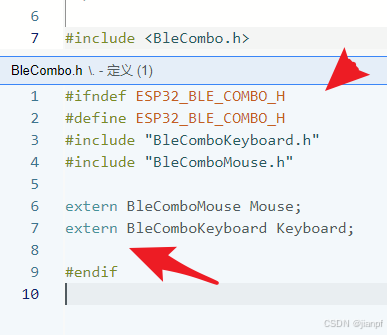
https://github.com/blackketter/ESP32-BLE-Combo
右边BleCombo.h不是蓝牙的是USB的
https://github.com/T-vK/ESP32-BLE-Keyboard/releases
2024.8.11.20:16更新开发版
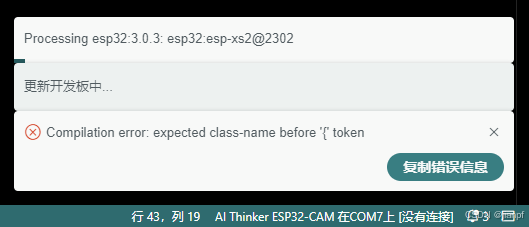
更新开发版
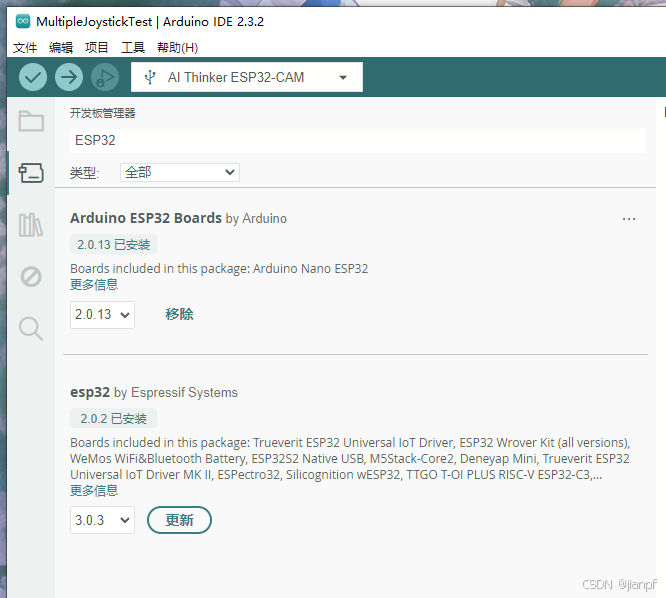
arduino的开发板包和库包地址
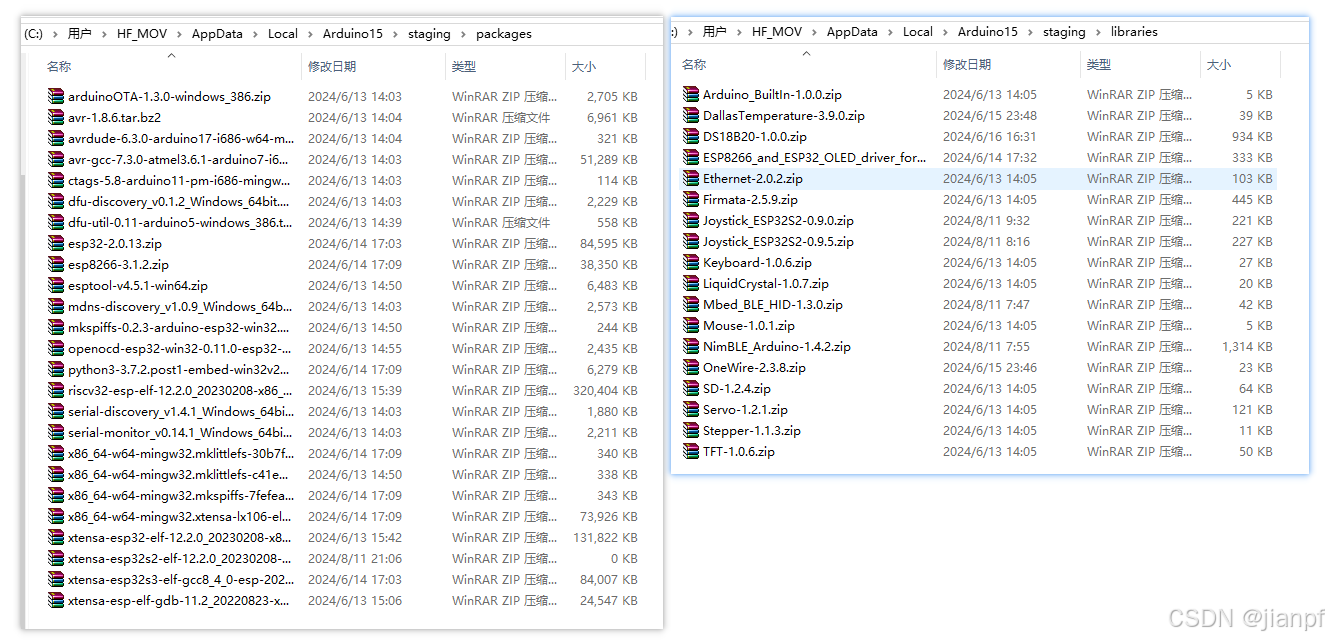
C:\Users\HF_MOV\AppData\Local\Arduino15\staging\packages
C:\Users\HF_MOV\AppData\Local\Arduino15\staging\libraries
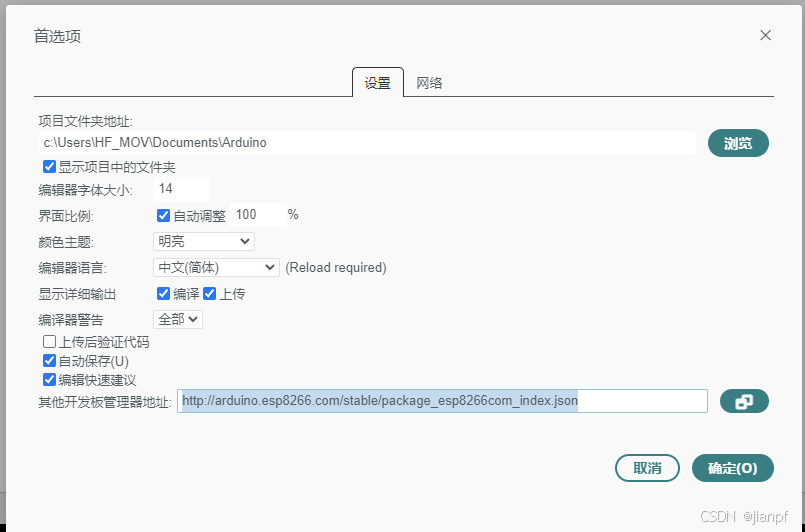
http://arduino.esp8266.com/stable/package_esp8266com_index.json
例如对于ESP8266,可以从https://static.llilii.cn/json/arduino/package_esp8266com_index.json获取,
而对于ESP32,可以从https://dl.espressif.com/dl/package_esp32_index.json下载
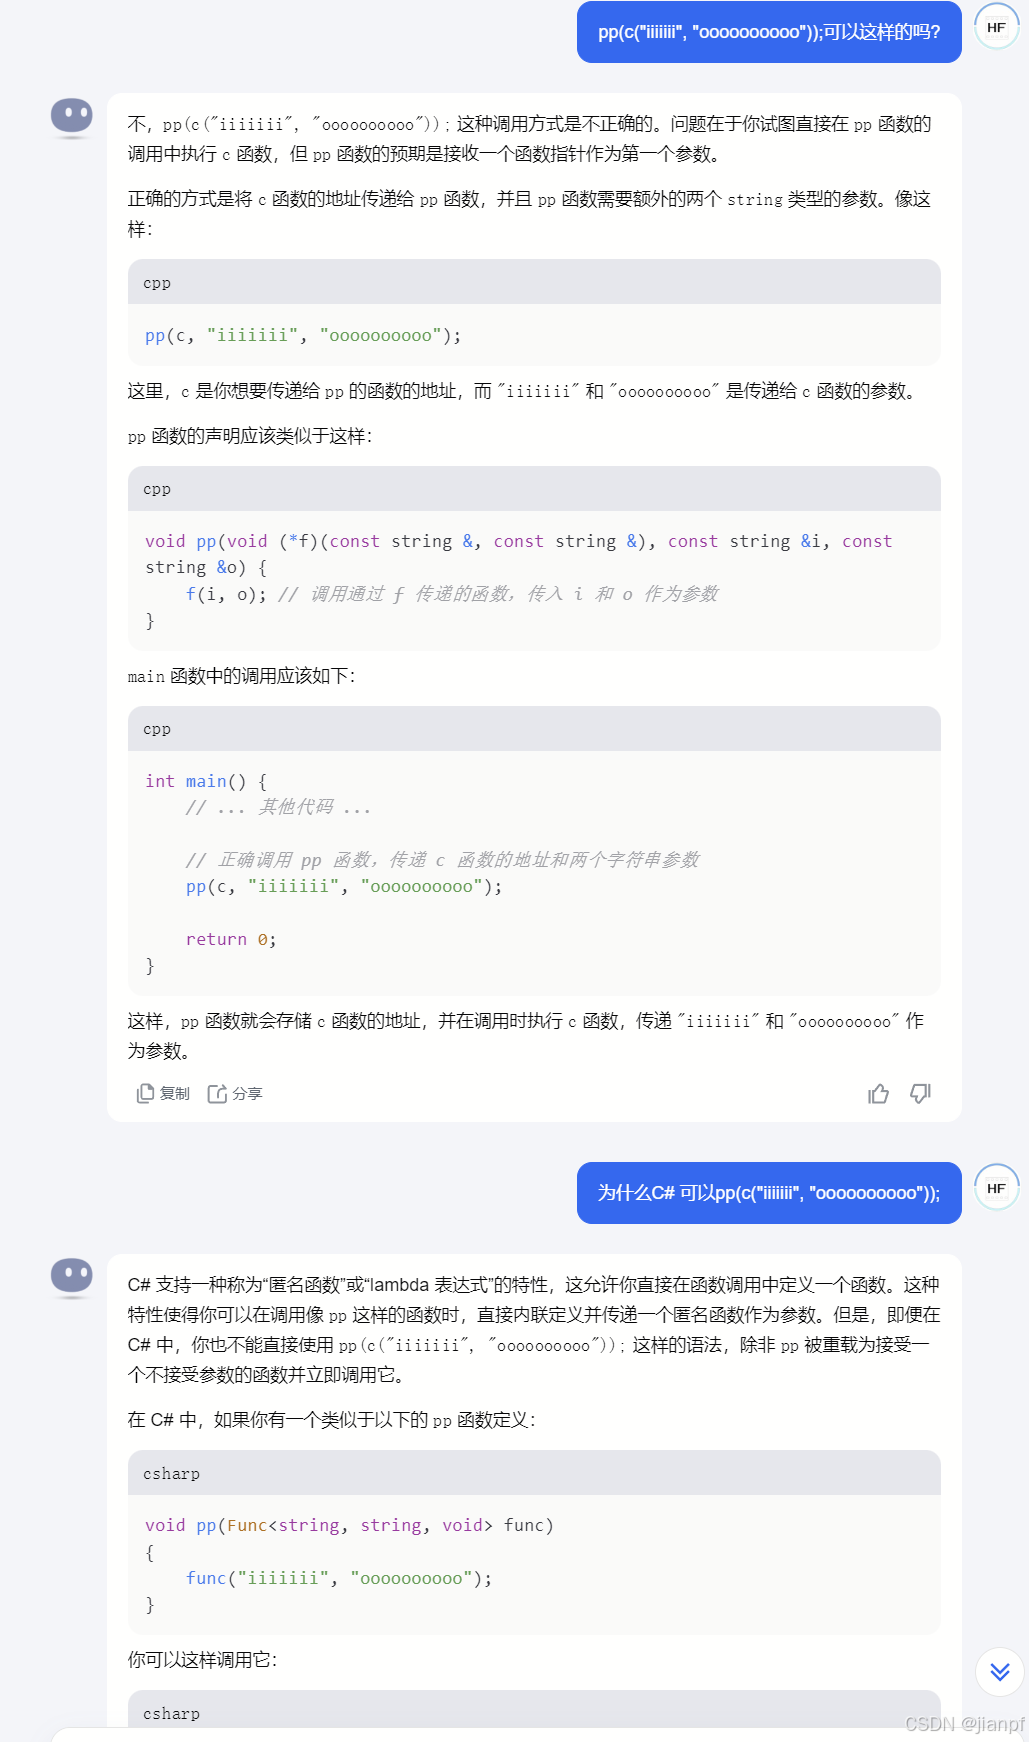
#include <iostream>
using namespace std;void a(){printf("aaaaaaaaaaaaaaaaaaaa...........");
}
void c(string s){printf("CCCCCCCCCCCCCCCCC.............");
}void p(void (*f)()){f();
}int main() {cout << "Hello, World!" << endl;printf("MMMMMMMMMMMMMMMMMM...........");//成功调用p(a);p(c);p(c);return 0;
}```cpp
#include <iostream> // 对于C++,使用iostream就足够了using namespace std;// 'a'函数定义正确
void a() {printf("aaaaaaaaaaaaaaaaaaaa...........\n"); // 添加换行符
}// 'c'函数接受两个字符串引用
void c(const string &s, const string &ss) {printf("CCCCCCCCCCCCCCCCC.............\n");cout << "Hello, World!" << s << ss << endl;
}// 'p'函数接受一个无参数的函数指针
void p(void (*f)()) {f();
}// 'pp'函数接受一个接受两个字符串引用的函数指针和两个字符串字面量
void pp(void (*f)(const string &, const string &), const string &i, const string &o) {f(i, o);
}int main() {cout << "Hello, World!" << endl;printf("MMMMMMMMMMMMMMMMMM...........\n");// 成功调用p(a);pp(c, "iiiiiii", "oooooooooo"); // 正确传递字符串字面量给pp函数return 0;
}
//运行成功!
2024.08.13.04:05又一晚没能融合,没能封装,没能cv.
https://www.bilibili.com/read/cv23745754/?from=search&spm_id_from=333.337.0.0
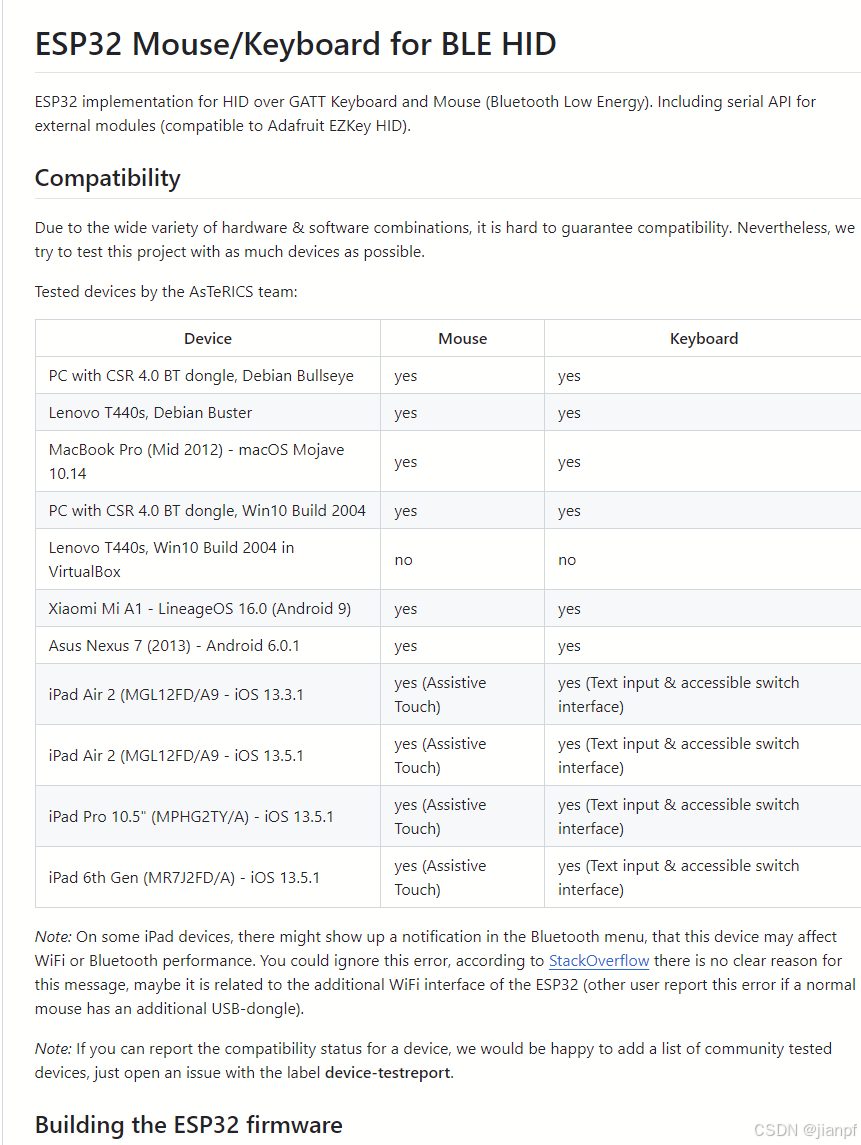https://github.com/asterics/esp32_mouse_keyboard```cpp
#include <stdio.h>
#include <stdlib.h>//开始蓝牙定义
//双库融合失败,这里只能其一
//定义定义区分现在编译部分
#define BleK1M2 2#if BleK1M2 == 1#include <BleKeyboard.h>
#elif BleK1M2 == 2#include <BleMouse.h>
#endif// #include <String.h>#if BleK1M2 == 1//定义键盘模块BleKeyboard bleKeyboard("BleKebody2","JPF",51);int define_BleK1M2=1;
#elif BleK1M2 == 2//定义鼠标模块BleMouse bleMouse("BleMouse2","JPF",52);int define_BleK1M2=2;
#endif
int g_flag=0;#if BleK1M2 == 2
//鼠标代码
void bl_move_click(int x,int y,int t,int b){bleMouse.move(x, y);delay(t);if(b==1){bleMouse.click(MOUSE_LEFT);}else if(b==2){bleMouse.click(MOUSE_RIGHT);}else if(b==3){bleMouse.click(MOUSE_MIDDLE);}
}
#endif#if BleK1M2 == 2
//鼠标代码
void ts_mov_5000x3(){bl_move_click(5000,0,100,0);bl_move_click(5000,0,100,0);bl_move_click(5000,0,100,1);Serial.println("OK...ts_mov_5000x3_+5000");delay(1500);bl_move_click(-5000,0,100,0);bl_move_click(-5000,0,100,0);bl_move_click(-5000,0,100,1);Serial.println("OK...ts_mov_5000x3_-5000");delay(1500);}
#endif// #if BleK1M2 == 1// bleKeyboard.print("w");// #elif BleK1M2 == 2// ts_mov_5000x3();// #endif//结束蓝牙定义//atCmd优化版完成2024.8.13wint gpio_led=4;int gpio0=0;
int gpiok=12;
int gpiom=13;
int gpiog=15;//AtCMD代码段
//定义串口字符串
String strsc;
//定义转换后的数组方式(默认20个参数,溢出应该也可以)
const int strArrNum=20;
String strArr[strArrNum];
//定义过滤分组字符,支持多个(默认 空格和分号;)
char delims[]=" ;";//定义atCmd程序接受字符串命令函数,返回分隔多少段-------------------------
int atCmd(String s){
//定义str获取输入的字符串的长度数组
char str[s.length()+1];
//把输入的s字符串转成数组给到str保存
s.toCharArray(str,s.length()+1);
//定义分隔符指针,支持多个,例如" +-;"
char *delim=delims;//" ;";//定义到全局变量了
//定义字符指针
char *token;
//获取第一个字符串
token=strtok(str, delim);
//统计分隔数
int ds=0;
while(token != NULL){//printf("%s\n", token);token=strtok(NULL,delim);ds++;
}
//判断是否溢出数组个数
if(ds>strArrNum){return 0;
}
// char scmd[ds+1][80];
//把输入的s字符串转成数组给到str保存
s.toCharArray(str,s.length()+1);
//获取第一个字符串
token=strtok(str, delim);
ds=0;
while(token != NULL){// // strcpy(scmd[ds],token);strArr[ds]=token;token=strtok(NULL,delim);ds++;
}
// //遍历命令和参数
// for(int i=0;i<ds;i++){
// // printf("%s\n", scmd[i]);
// //这里如何返回scam数组出去?
// //外部定义数组接收,使用参数指针传递出去.
// strArr[i]=scmd[i];
// }//返回
return ds;
}//end AtCMD代码段//---------------------void setup() {// put your setup code here, to run once:Serial.begin(115200);Serial.println("Starting BLE work!!!!!");//设置端口模式为输入且上拉电阻pinMode(gpiok,INPUT_PULLUP);pinMode(gpiom,INPUT_PULLUP);//设置端口模式为输出(输入模式下拉是驱动不了输入的)pinMode(gpiog,OUTPUT);//输出低电平digitalWrite(gpiog,LOW);//LED_GPIO4输出模式默认高电平(电路设计共阳,按RST会微亮)pinMode(gpio_led,OUTPUT);//开始蓝牙定义
#if BleK1M2 == 1//定义键盘模块bleKeyboard.begin(); Serial.println("bleKeyboard.begin();");
#elif BleK1M2 == 2//定义鼠标模块bleMouse.begin(); Serial.println(" bleMouse.begin();");
#endif
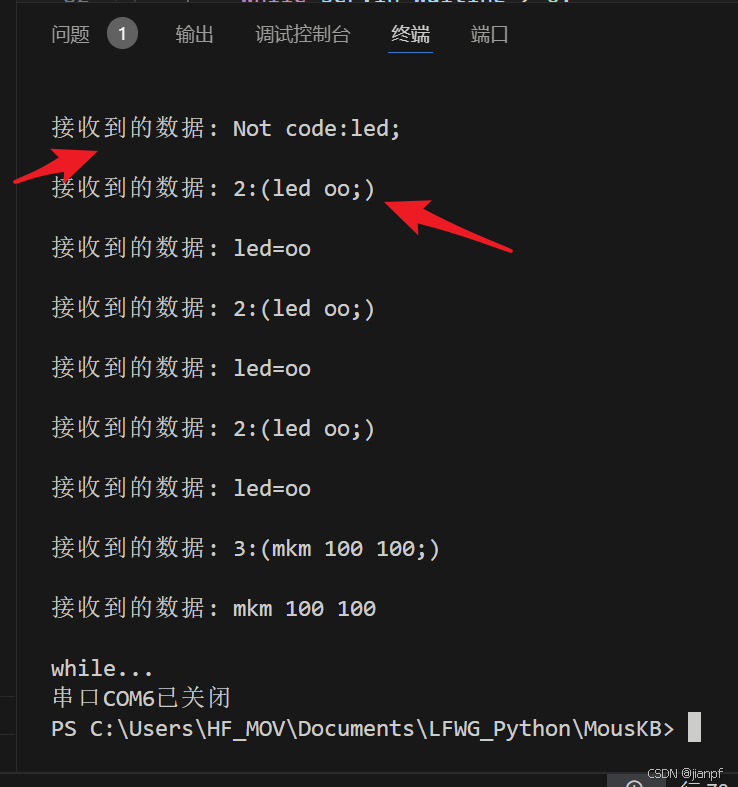
//结束蓝牙定义}void loop() {if (Serial.available() > 0) {char inchar = Serial.read();if(inchar==';'){strsc+=inchar;Serial.println("("+strsc+")");int sds= atCmd(strsc);//显示分段数-1个就是参数个数Serial.println("--"+String(sds));//判断参数个数执行对应的代码if(sds ==2){if(strArr[0]=="key"){if(strArr[1]=="q"){Serial.println("按键q处理:"+strArr[1]); }else if(strArr[1]=="w"){Serial.println("按键w处理:"+strArr[1]); }else if(strArr[1]=="f"){Serial.println("按键f处理:"+strArr[1]); }}else if(strArr[0]=="KB"||strArr[0]=="kb"){//开始蓝牙定义#if BleK1M2 == 1//蓝牙键盘输出bleKeyboard.print(strArr[1]);Serial.println("KB "+strArr[1]); #elseSerial.println("no have KB "+strArr[1]); #endif}else if(strArr[0]=="LED"||strArr[0]=="led"){int gpio_led=4;pinMode(gpio_led,OUTPUT);if(strArr[1]=="off" || strArr[1]=="0"){//输出低电平digitalWrite(gpio_led,LOW);Serial.println("LED=on:"+strArr[1]); }else if(strArr[1]=="on"||strArr[1]=="1"){//输出高电平digitalWrite(gpio_led,HIGH);Serial.println("LED=off:"+strArr[1]); }else if(strArr[1]=="ono"||strArr[1]=="2"){//输出高电平digitalWrite(gpio_led,HIGH);Serial.println("LED=off:"+strArr[1]); delay(2000);//输出低电平digitalWrite(gpio_led,LOW);Serial.println("LED=off:"+strArr[1]); }else if(strArr[1]=="oo"||strArr[1]=="3"){//输出高电平digitalWrite(gpio_led,HIGH);Serial.println("LED=off:"+strArr[1]); delay(300);//输出低电平digitalWrite(gpio_led,LOW);Serial.println("LED=off:"+strArr[1]); }}}else if(sds==3){//定义固定延时int delayt=100;if(strArr[0]=="MKM" || strArr[0]=="mkm"){//开始蓝牙定义#if BleK1M2 == 2//蓝牙鼠标输出bl_move_click(strArr[1].toInt(),strArr[2].toInt(),delayt,0);Serial.println("MKM "+strArr[1]+" "+strArr[2]); #elseSerial.println("no have "+strArr[0]); #endif }else if(strArr[0]=="MKL"|| strArr[0]=="mkl"){//开始蓝牙定义#if BleK1M2 == 2//蓝牙鼠标输出bl_move_click(strArr[1].toInt(),strArr[2].toInt(),delayt,1);Serial.println("MKM "+strArr[1]+" "+strArr[2]); #elseSerial.println("no have "+strArr[0]); #endif }else if(strArr[0]=="MKR"|| strArr[0]=="mkr"){//开始蓝牙定义#if BleK1M2 == 2//蓝牙鼠标输出bl_move_click(strArr[1].toInt(),strArr[2].toInt(),delayt,2);Serial.println("MKM "+strArr[1]+" "+strArr[2]); #elseSerial.println("no have "+strArr[0]); #endif }else if(strArr[0]=="MKI"|| strArr[0]=="mki"){//开始蓝牙定义#if BleK1M2 == 2//蓝牙鼠标输出bl_move_click(strArr[1].toInt(),strArr[2].toInt(),delayt,3);Serial.println("MKM "+strArr[1]+" "+strArr[2]); #elseSerial.println("no have "+strArr[0]); #endif }}else if(sds==4){if(strArr[0]=="mous"){if(strArr[1]=="Lclick"){Serial.println("鼠标移动到Lclick:X:"+strArr[2]+"Y:"+strArr[3]); }else if(strArr[1]=="Rclick"){Serial.println("鼠标移动到Rclick:X:"+strArr[2]+"Y:"+strArr[3]); }} }// Serial.println(atCmd(strsc));// Serial.println(scmd[0]+scmd[1]+scmd[2]+scmd[3]);Serial.println("--");// for(int i=0;i<sds;i++){// Serial.println(strArr[i]);// }//记得接受后清空串口,否则一直首条直到接收溢出错误strsc="";}else{strsc+=inchar;}}if(!digitalRead(gpiom)){Serial.println("LED=off:"); //输出高电平digitalWrite(gpio_led,HIGH);delay(300);//输出低电平digitalWrite(gpio_led,LOW);}}上面是单独的通过串口控制鼠标或键盘,算可以用了吧!
2024.8.13x-----
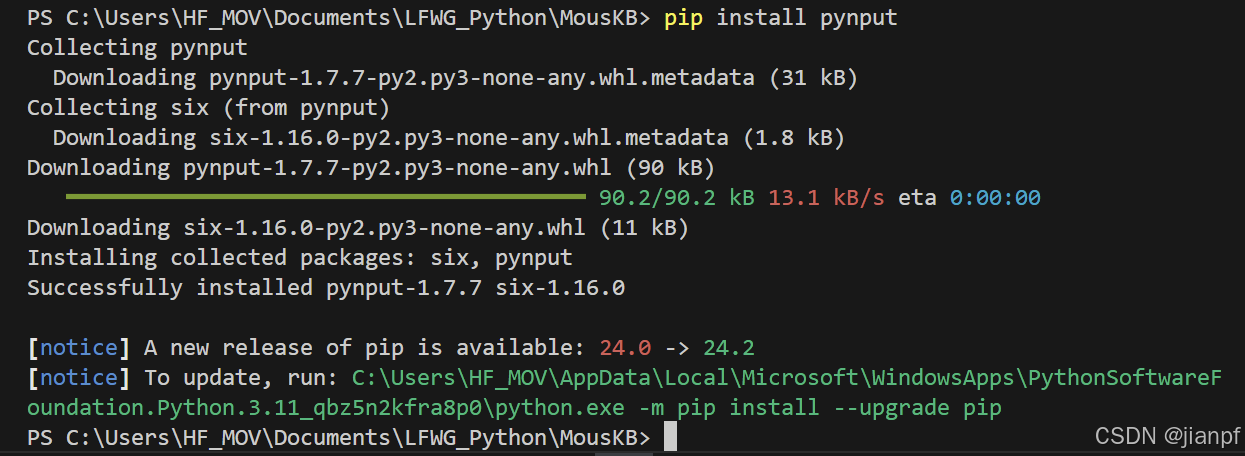
pip install pynput -i https://pypi.tuna.tsinghua.edu.cn/simple
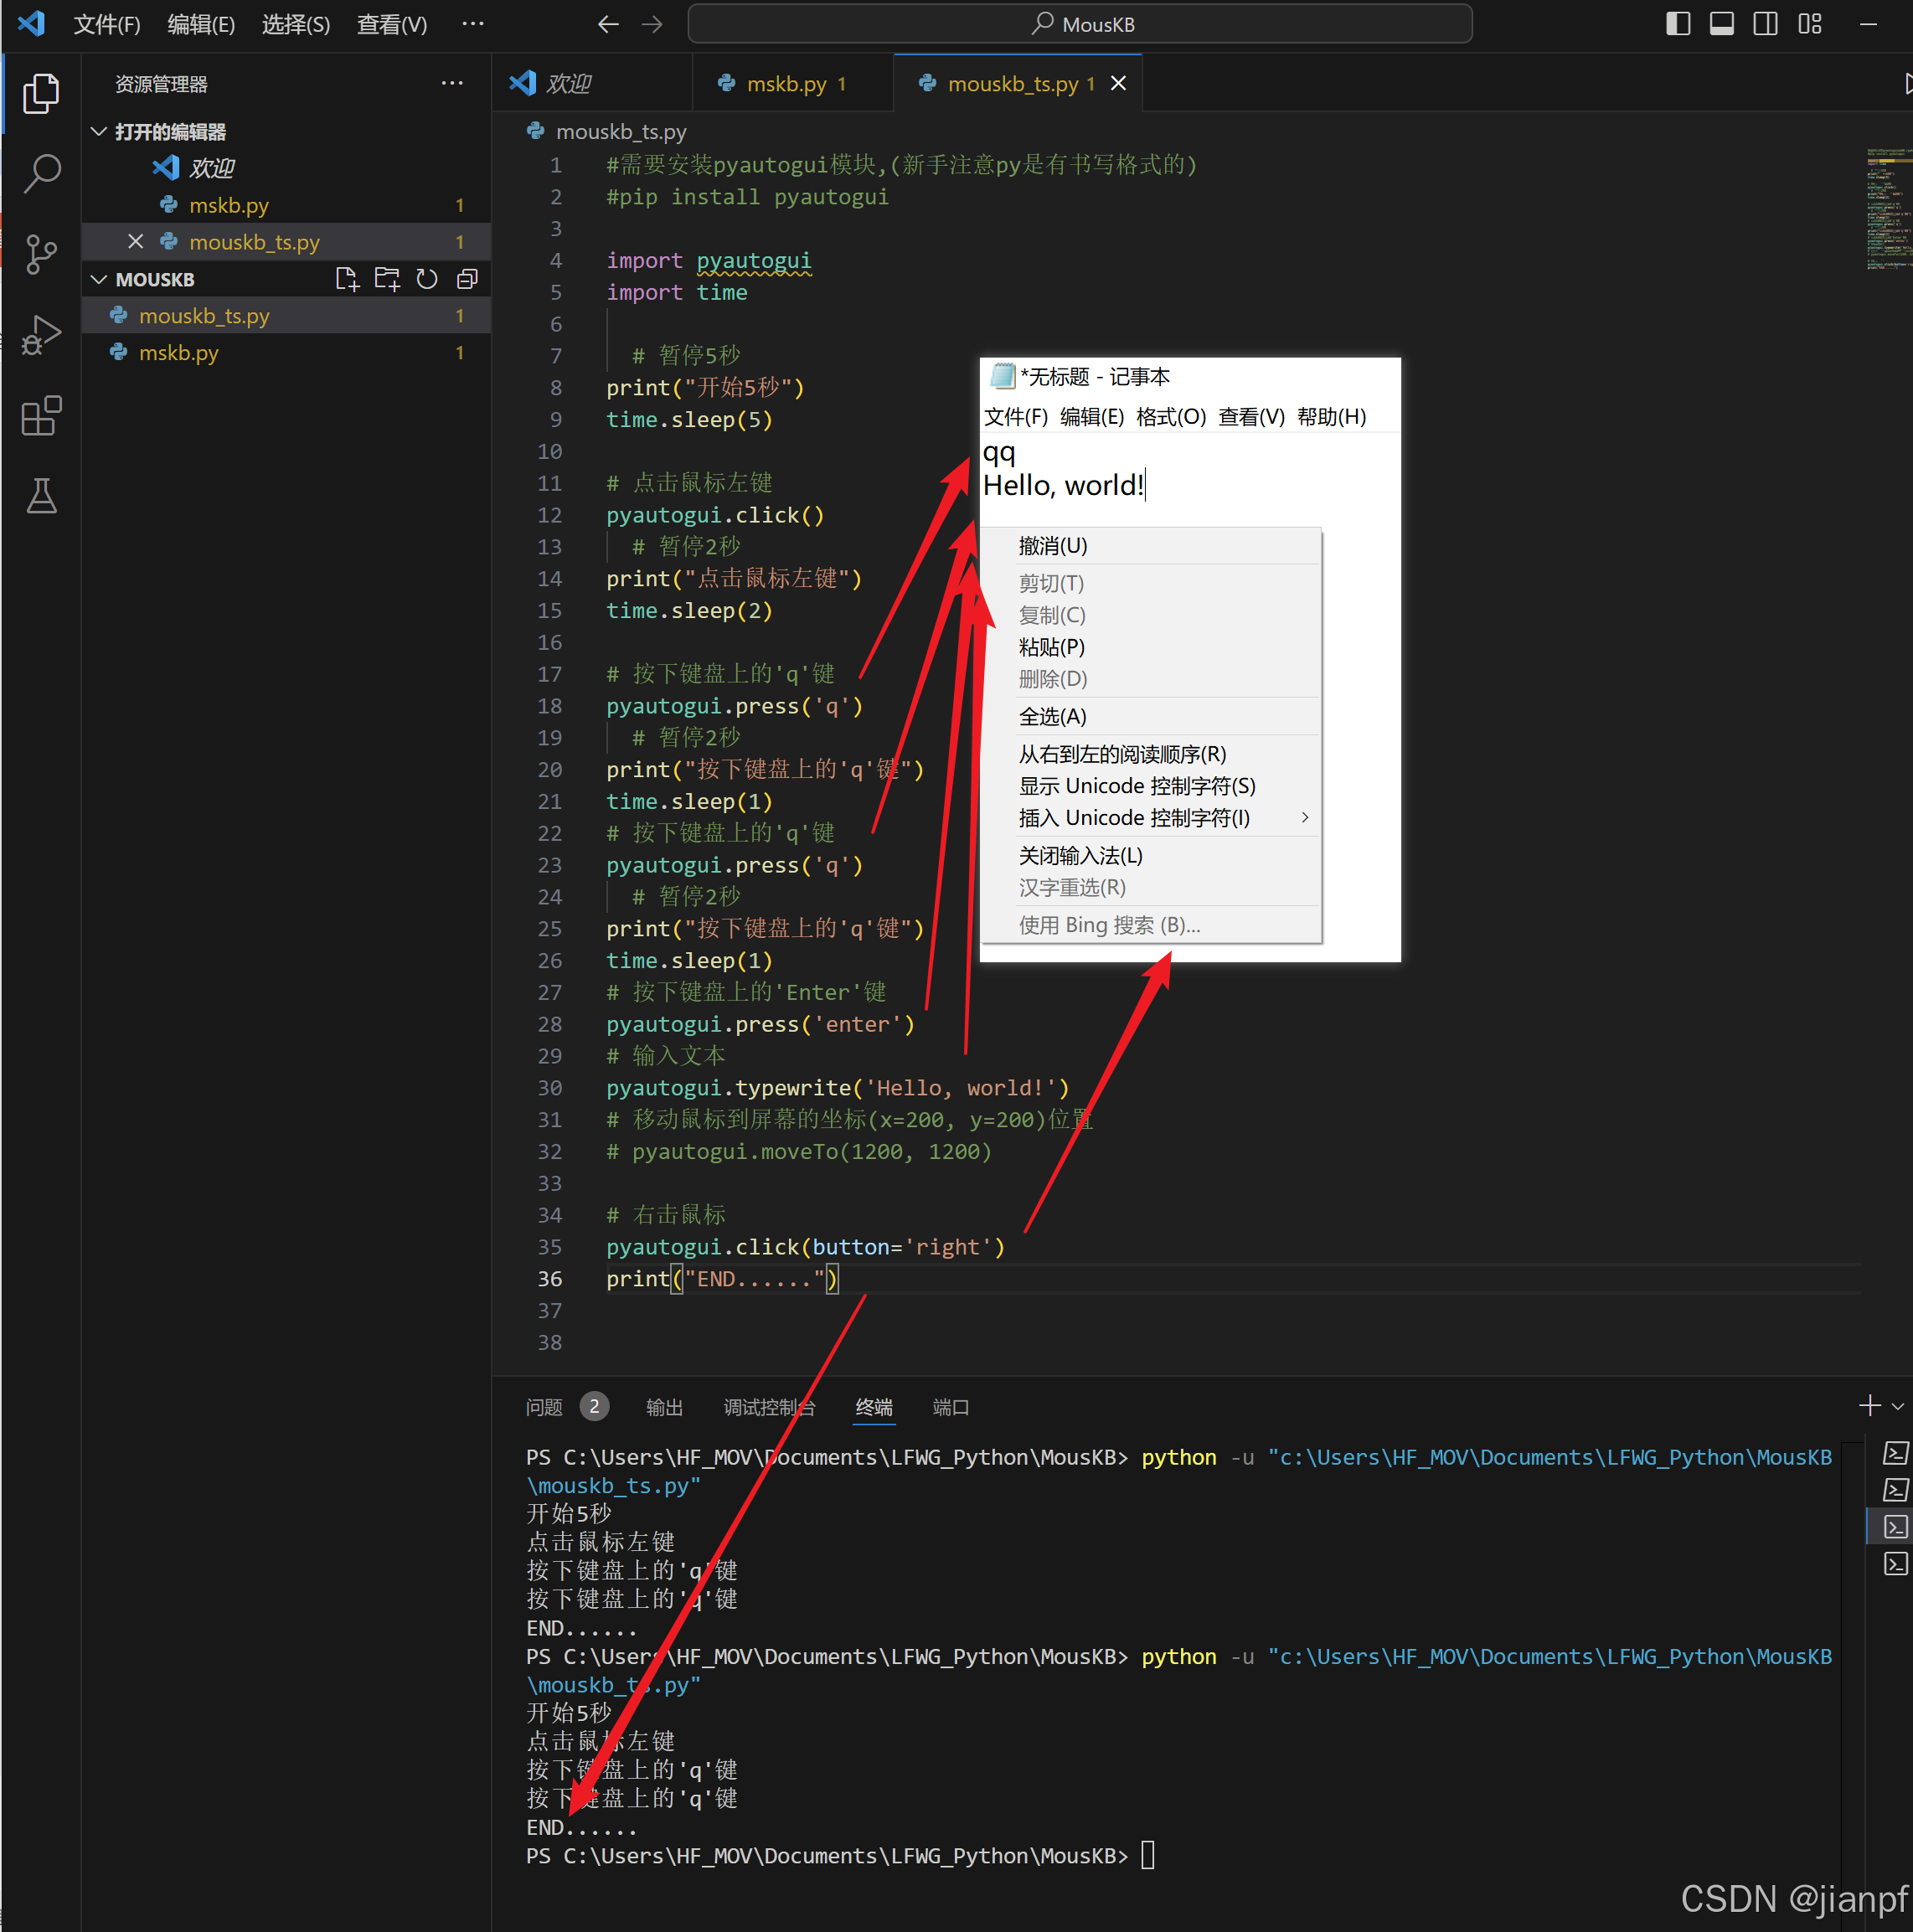
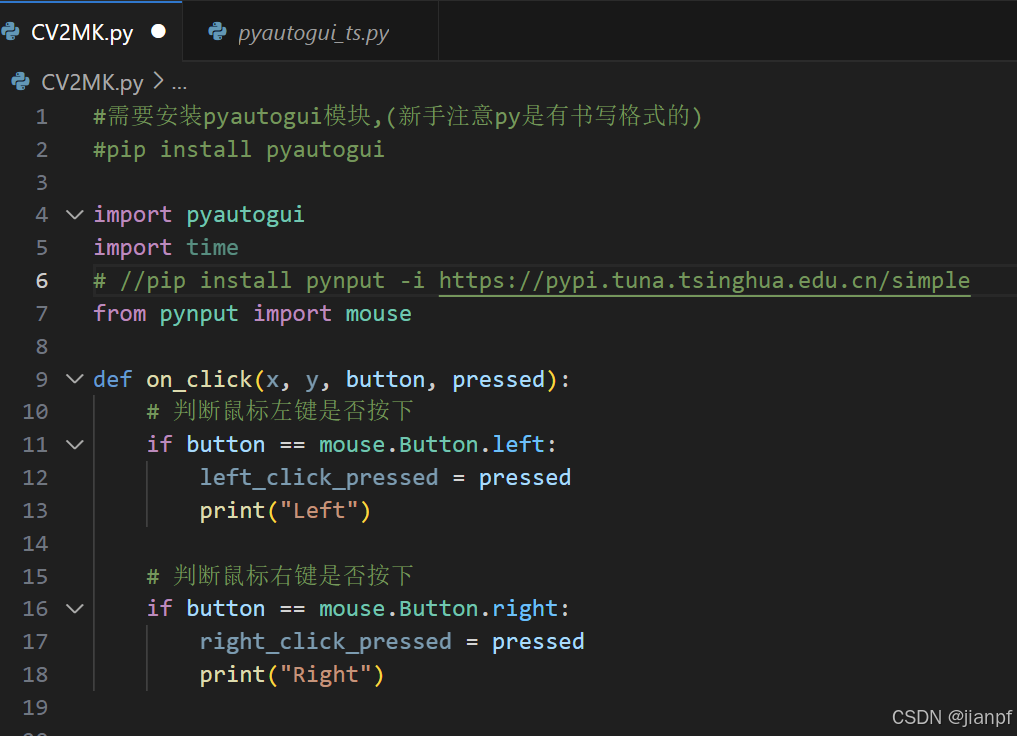
#需要安装pyautogui模块,(新手注意py是有书写格式的)
#pip install pyautoguiimport pyautogui
import time
# //pip install pynput -i https://pypi.tuna.tsinghua.edu.cn/simple
from pynput import mouse#存储
cutp1=()
cutp2=()
cutbox=()
cut_flg=False
#监听鼠标点击事件处理
def on_click(x, y, button, pressed):#获取鼠标值x,y = pyautogui.position()#获取鼠标像素颜色rgb = pyautogui.screenshot().getpixel((x,y))#输出posi = 'x:' + str(x).rjust(4) + ' y:' + str(y).rjust(4) + '  RGB:' + str(rgb)print(posi)#判断按下左键时处理if pressed==True and button == mouse.Button.left:#全局变量,否则是局部变量,不管外部是否同名global cutp1cutp1==(x,y)# print(cutp1)elif pressed==False and button == mouse.Button.left:#全局变量global cutp2 global cut_flgcutp2=(x,y)  # print(cutp2)cut_flg=True# print(cut_flg)def cutImg():try:      # 创建监听鼠标事件的线程listener = mouse.Listener(on_click=on_click)# 启动监听线程listener.start() print("开始拖动获取鼠标2点:"+ str(cut_flg))   #等待鼠标点击while cut_flg==False:time.sleep(0.5)    # print(cutp1) # print(cutp2)# print (cut_flg)listener.stop()      print("获取鼠标2点完成:"+ str(cut_flg) )   except KeyboardInterrupt:print('已退出!')cutImg()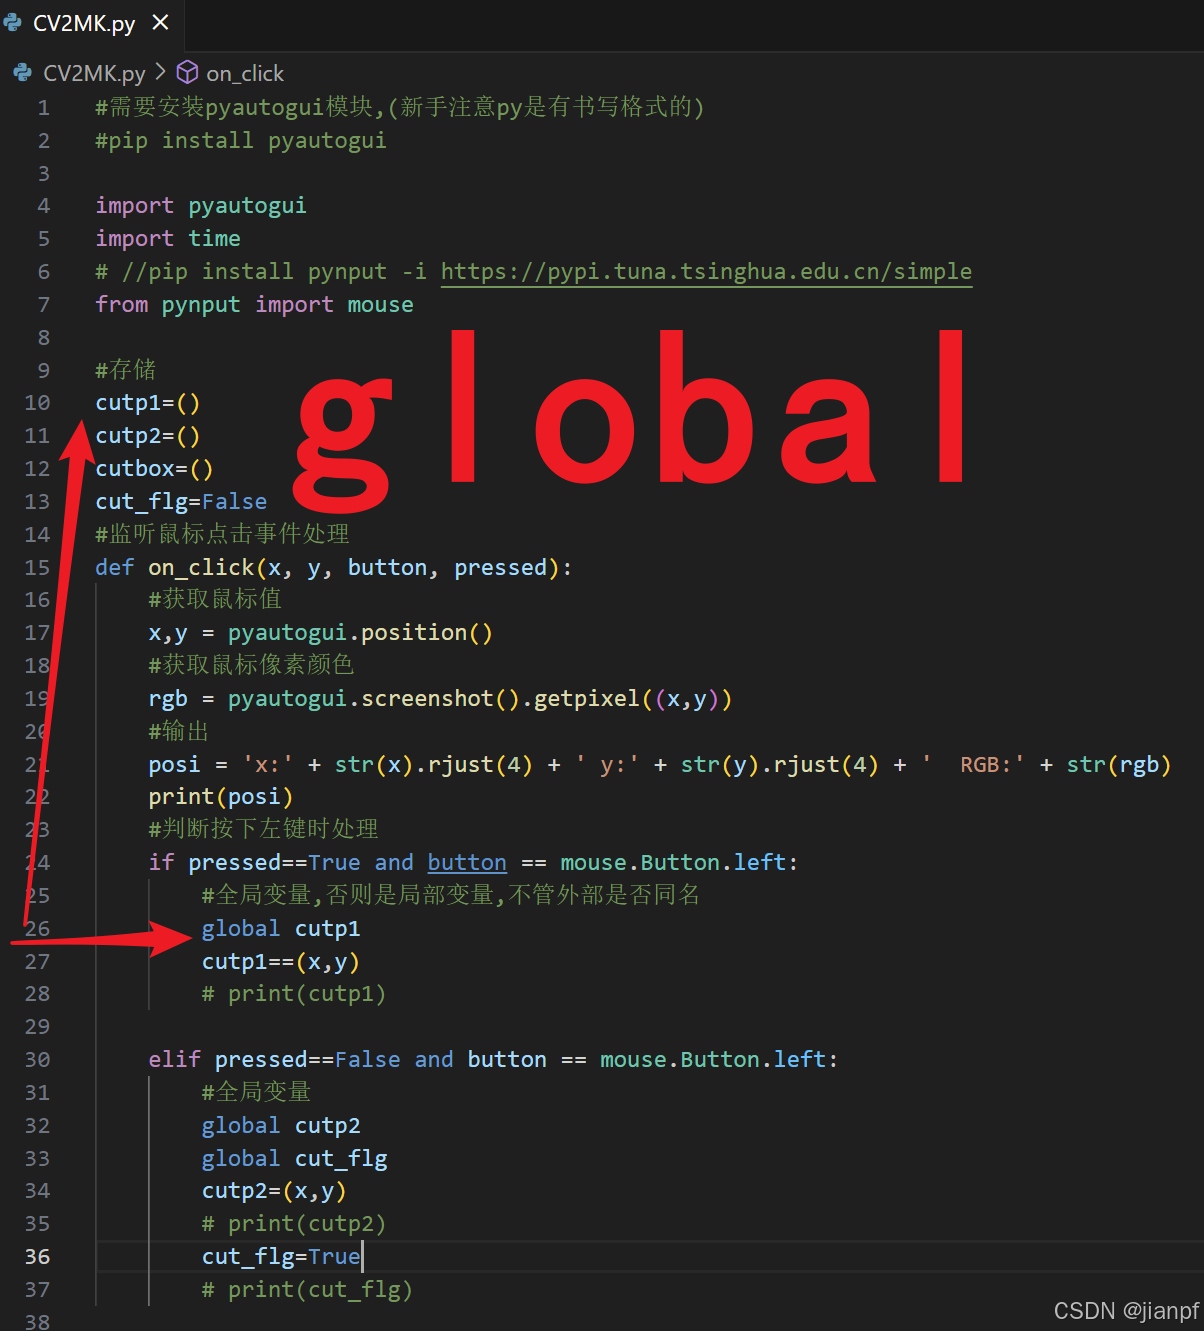
Python的方法内要设置外部变量,需要先声明global后使用(又花了2小时16:45分)
#需要安装pyautogui模块,(新手注意py是有书写格式的)
#pip install pyautoguiimport pyautogui
import time
# //pip install pynput -i https://pypi.tuna.tsinghua.edu.cn/simple
from pynput import mouse#存储
cutp1=()
cutp2=()
cutbox=()
cut_flg=False
#监听鼠标点击事件处理
def on_click(x, y, button, pressed):#获取鼠标值x,y = pyautogui.position()#获取鼠标像素颜色rgb = pyautogui.screenshot().getpixel((x,y))#输出posi = 'x:' + str(x).rjust(4) + ' y:' + str(y).rjust(4) + '  RGB:' + str(rgb)print(posi)#判断按下左键时处理if pressed==True and button == mouse.Button.middle:#全局变量,否则是局部变量,不管外部是否同名global cutp1cutp1=(x,y)# print(cutp1)elif pressed==False and button == mouse.Button.middle:#全局变量global cutp2 global cut_flgcutp2=(x,y)  # print(cutp2)cut_flg=True# print(cut_flg)#截取图片区域
def src_reg_save(reg:tuple[int,int,int,int],sname):reg=[reg[0],   reg[1],     reg[2]-reg[0],    reg[3]-reg[1]]pyautogui.screenshot(sname,reg)print(reg)def cutImg():global cut_flgglobal cutp1global cutp2global cutboxtry:      # 创建监听鼠标事件的线程listener = mouse.Listener(on_click=on_click)# 启动监听线程listener.start() print("开始拖动获取鼠标2点:"+ str(cut_flg))   #等待鼠标点击while cut_flg==False:time.sleep(0.5)    # print(cutp1) # print(cutp2)# print (cut_flg)listener.stop()      print("获取鼠标2点完成:"+ str(cut_flg) )   # im=pyautogui.screenshot(pyautogui.prompt("保存图名(默认为.png)")+".png",tuple)cutbox =cutp1 +cutp2print(cutbox)src_reg_save(cutbox,pyautogui.prompt()+".png")except KeyboardInterrupt:print('已退出!')
#中键完成截图
cutImg()
py中键截图代码完成

DX11就截图黑屏换DX12好了
2024.8.13.23:05又结束一天了
2024.8.14.01:43,又又又又熬夜了吗
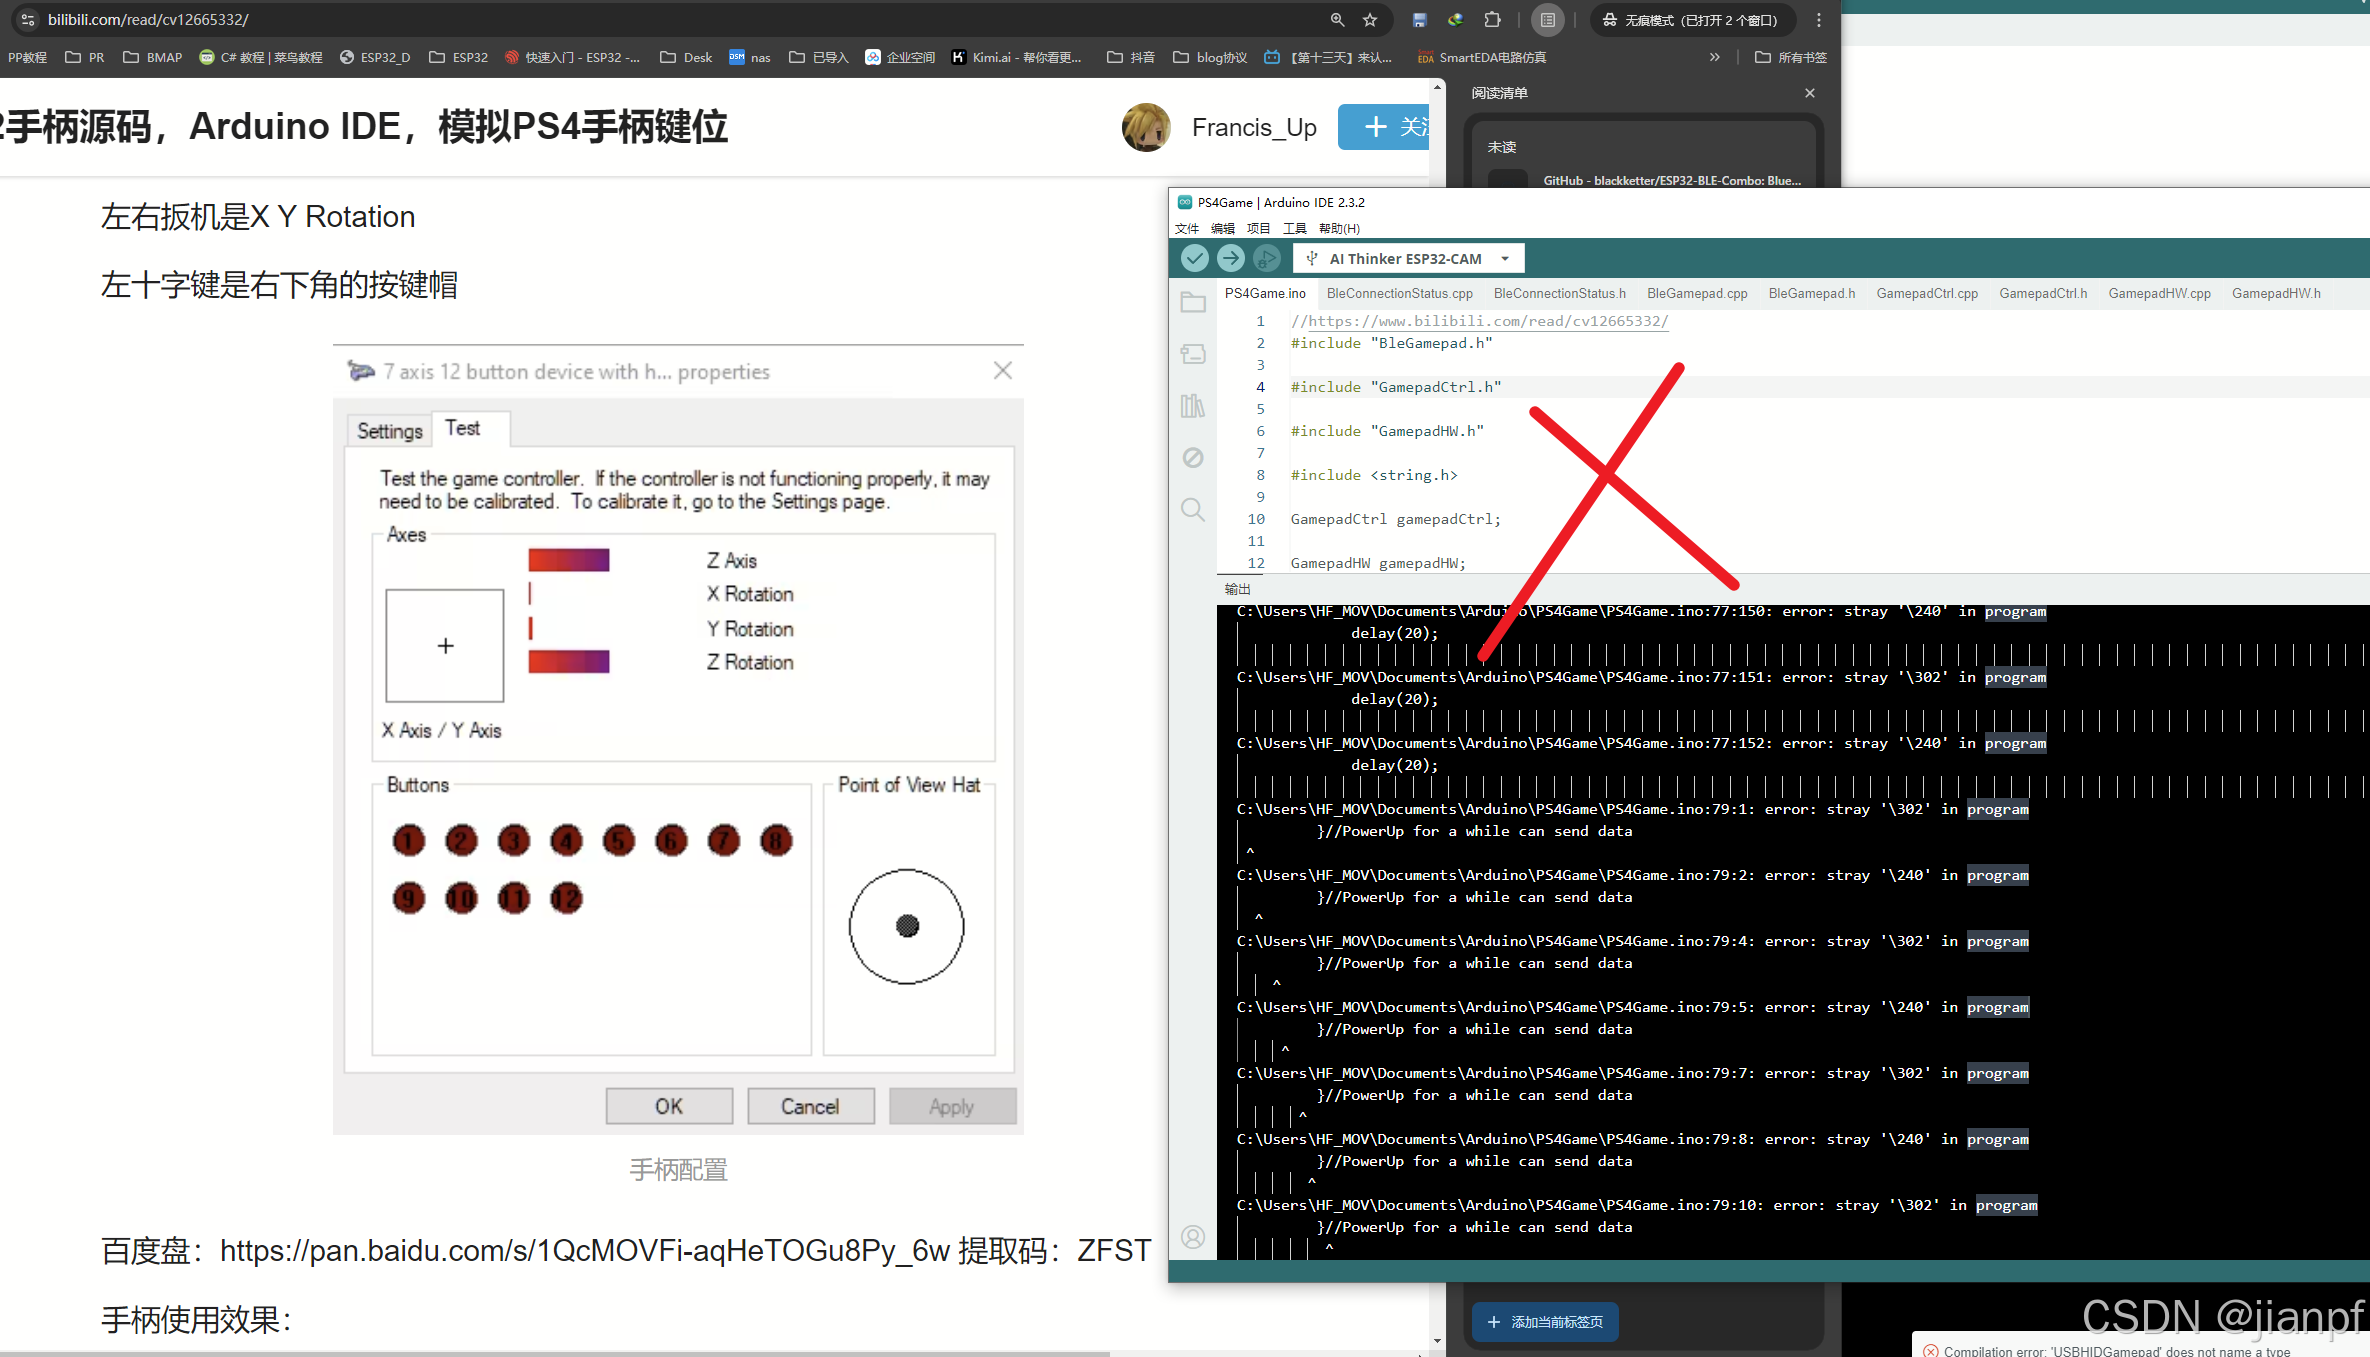
PS4蓝牙手柄,失败
https://www.bilibili.com/read/cv12665332/
2024.8.14.21:42来了下
这个能编译
又遇到了bug事件,串口信息放 if (Keyboard.isConnected()) {内处理串口接收字节会收到乱码,要放
外面(调了2小时才发现问题)
2024.8.15.02:30
C++的字符串转换问题
String a=“123”;
int b=123;
String c=String(b);
int d=a.toInt();

多了个s又搞了半小时,叫你看清提示信息和看错误编译信息,以后还会没多少个半小时?(一直没一直爽!)
/*** This example turns the ESP32 into a Bluetooth LE keyboard and mouse that writes * some words, presses Enter, presses a media key and then Ctrl+Alt+Delete,* then moves and the scrolls the mouse and clicks it.*/#include <BleCombo.h>
#include <esp_system.h>// // const uint8_t KEY_LEFT_CTRL = 0x80;
// // const uint8_t KEY_LEFT_SHIFT = 0x81;
// // const uint8_t KEY_LEFT_ALT = 0x82;
// // const uint8_t KEY_LEFT_GUI = 0x83;
// // const uint8_t KEY_RIGHT_CTRL = 0x84;
// // const uint8_t KEY_RIGHT_SHIFT = 0x85;
// // const uint8_t KEY_RIGHT_ALT = 0x86;
// // const uint8_t KEY_RIGHT_GUI = 0x87;// // const uint8_t KEY_UP_ARROW = 0xDA;
// // const uint8_t KEY_DOWN_ARROW = 0xD9;
// // const uint8_t KEY_LEFT_ARROW = 0xD8;
// // const uint8_t KEY_RIGHT_ARROW = 0xD7;
// // const uint8_t KEY_BACKSPACE = 0xB2;
// // const uint8_t KEY_TAB = 0xB3;
// // const uint8_t KEY_RETURN = 0xB0;
// // const uint8_t KEY_ESC = 0xB1;
// // const uint8_t KEY_INSERT = 0xD1;
// // const uint8_t KEY_DELETE = 0xD4;
// // const uint8_t KEY_PAGE_UP = 0xD3;
// // const uint8_t KEY_PAGE_DOWN = 0xD6;
// // const uint8_t KEY_HOME = 0xD2;
// // const uint8_t KEY_END = 0xD5;
// // const uint8_t KEY_CAPS_LOCK = 0xC1;
// // const uint8_t KEY_F1 = 0xC2;
// // const uint8_t KEY_F2 = 0xC3;
// // const uint8_t KEY_F3 = 0xC4;
// // const uint8_t KEY_F4 = 0xC5;
// // const uint8_t KEY_F5 = 0xC6;
// // const uint8_t KEY_F6 = 0xC7;
// // const uint8_t KEY_F7 = 0xC8;
// // const uint8_t KEY_F8 = 0xC9;
// // const uint8_t KEY_F9 = 0xCA;
// // const uint8_t KEY_F10 = 0xCB;
// // const uint8_t KEY_F11 = 0xCC;
// // const uint8_t KEY_F12 = 0xCD;
// // const uint8_t KEY_F13 = 0xF0;
// // const uint8_t KEY_F14 = 0xF1;
// // const uint8_t KEY_F15 = 0xF2;
// // const uint8_t KEY_F16 = 0xF3;
// // const uint8_t KEY_F17 = 0xF4;
// // const uint8_t KEY_F18 = 0xF5;
// // const uint8_t KEY_F19 = 0xF6;
// // const uint8_t KEY_F20 = 0xF7;
// // const uint8_t KEY_F21 = 0xF8;
// // const uint8_t KEY_F22 = 0xF9;
// // const uint8_t KEY_F23 = 0xFA;
// // const uint8_t KEY_F24 = 0xFB;int gpio0 = 0;     //
int gpiok = 12;    //左键
int gpiom = 13;    //右键
int gpiog = 15;    //旁边低电平
int gpio_led = 4;  //ESP32-CMA的LED灯//定义代码执行状态
bool code_flg = false;//AtCMD代码段
//定义串口字符串
String strsc;
//定义转换后的数组方式(默认20个参数,溢出应该也可以)
const int strArrNum = 20;
String strArr[strArrNum];  //[strArrNum];
//定义过滤分组字符,支持多个(默认 空格和分号;)
char delims[] = " ;";//定义atCmd程序接受字符串命令函数,返回分隔多少段-------------------------
int atCmd(String s) {//定义str获取输入的字符串的长度数组char str[s.length() + 1];//把输入的s字符串转成数组给到str保存s.toCharArray(str, s.length() + 1);//定义分隔符指针,支持多个,例如" +-;"char *delim = delims;  //" ;";//定义到全局变量了//定义字符指针char *token;//获取第一个字符串token = strtok(str, delim);//统计分隔数int ds = 0;while (token != NULL) {//printf("%s\n", token);token = strtok(NULL, delim);ds++;}//判断是否溢出数组个数if (ds > strArrNum) {return 0;}// char scmd[ds+1][80];//把输入的s字符串转成数组给到str保存s.toCharArray(str, s.length() + 1);//获取第一个字符串token = strtok(str, delim);ds = 0;while (token != NULL) {// // strcpy(scmd[ds],token);strArr[ds] = token;// Serial.println("token:" + String(token));token = strtok(NULL, delim);ds++;}// //遍历命令和参数// for(int i=0;i<ds;i++){//   // printf("%s\n", scmd[i]);//   //这里如何返回scam数组出去?//   //外部定义数组接收,使用参数指针传递出去.//   strArr[i]=scmd[i];// }//返回return ds;
}//end AtCMD代码段void setup() {//串口速率Serial.begin(115200);//串口发送信息Serial.println("Starting work!");//设置端口模式为输入且上拉电阻pinMode(gpiok, INPUT_PULLUP);pinMode(gpiom, INPUT_PULLUP);//设置端口模式为输出(输入模式下拉是驱动不了输入的)pinMode(gpiog, OUTPUT);//输出低电平digitalWrite(gpiog, LOW);//LED_GPIO4输出模式默认高电平(电路设计共阳,按RST会微亮)pinMode(gpio_led, OUTPUT);//开始键盘Keyboard.begin();Mouse.begin();
}void loop() {if (Serial.available() > 0) {//定义串口发来的每一个字符(不是字符串)char inchar = Serial.read();//判断串口接受到定义的结束字符分号;if (inchar == ';') {//把串口的每个字符组成一句串口代码strscstrsc += inchar;//串口字符串分段数的处理参数段到数组int sds = atCmd(strsc);//输出到串口反馈Serial.println(String(sds) + ":(" + strsc + ")");//定义代码执行状态code_flg = false;//判断键盘是否连接好if (Keyboard.isConnected()) {// 判断分段数处理参数段switch (sds) {//一个参数段的处理如:restart重启case 1:if (strArr[0] == "LED=1") {Serial.println("LED=1,开");//LED=1digitalWrite(gpio_led, HIGH);code_flg = true;} else if (strArr[0] == "LED=0") {Serial.println("LED=0,关");//LED=0digitalWrite(gpio_led, LOW);code_flg = true;}break;case 2:if (strArr[0] == "LED" || strArr[0] == "led") {if (strArr[1] == "ON" || strArr[1] == "on") {Serial.println("led=on,开");digitalWrite(gpio_led, HIGH);code_flg = true;} else if (strArr[1] == "OFF" || strArr[1] == "off") {Serial.println("led=on,关");digitalWrite(gpio_led, LOW);code_flg = true;} else if (strArr[1] == "OO" || strArr[1] == "oo") {digitalWrite(gpio_led, HIGH);delay(300);digitalWrite(gpio_led, LOW);Serial.println("led=" + strArr[1]);code_flg = true;}}  //结束if(LED)else if (strArr[0] == "KB" || strArr[0] == "kb") {//键盘按下一串字符(不能含有空格)Keyboard.println(strArr[1]);code_flg=true;}else if (strArr[0] == "KBPP" || strArr[0] == "kbpp") {//键盘连续按下一个按键0x81代码129=shift  kbpp 129; (a不行)Keyboard.press(strArr[1].toInt());code_flg=true;}else if (strArr[0] == "KBP" || strArr[0] == "kbp") {//键盘释放一个按键0x代码 kbp 129;  (a不行)Keyboard.release(strArr[1].toInt());code_flg=true;}else if (strArr[0] == "KBPA" || strArr[0] == "kbpa") {//释放 kbpa a;(a可以参数任意)Keyboard.releaseAll();code_flg=true;} //结束if(KB)break;case 3://mk x y; JianPF2024.8.15Aif (strArr[0] == "MKM" || strArr[0] == "mkm") {  //鼠标移动_int x = strArr[1].toInt();int y = strArr[2].toInt();Mouse.move(x, y);Serial.println("mkm " + String(x) + " " + String(y));code_flg = true;} else if (strArr[0] == "MKL" || strArr[0] == "mkl") {  //鼠标移动_点击int x = strArr[1].toInt();int y = strArr[2].toInt();Mouse.move(x, y);Mouse.click(MOUSE_LEFT);Serial.println("mkl " + String(x) + " " + String(y));code_flg = true;} else if (strArr[0] == "MKR" || strArr[0] == "mkr") {  //鼠标移动_右击int x = strArr[1].toInt();int y = strArr[2].toInt();Mouse.move(x, y);Mouse.click(MOUSE_RIGHT);Serial.println("mkr " + String(x) + " " + String(y));code_flg = true;} else if (strArr[0] == "MKI" || strArr[0] == "mki") {  //鼠标移动_中击int x = strArr[1].toInt();int y = strArr[2].toInt();Mouse.move(x, y);Mouse.click(MOUSE_MIDDLE);Serial.println("mki " + String(x) + " " + String(y));code_flg = true;}break;case 4://mk x y d;mkm 0 -20 10;mkm 0 20 10;由于鼠标算法有缓冲,所以不能准确点到按钮JianPF2024.8.15Aif (strArr[0] == "MKMW" || strArr[0] == "mkmw") {  //鼠标移动循环int x = strArr[1].toInt();int y = strArr[2].toInt();int d = strArr[3].toInt();unsigned long startTime;startTime = millis();while (millis() <= startTime + d) {Mouse.move(x, y);delay(5);}Serial.println("mkmw " + String(x) + " " + String(y) + " " + String(d));code_flg = true;} else if (strArr[0] == "MKMD" || strArr[0] == "mkmd") {  //鼠标移动后延时int x = strArr[1].toInt();int y = strArr[2].toInt();int d = strArr[3].toInt();Mouse.move(x, y);Serial.println("mkmd " + String(x) + " " + String(y) + " " + String(d));delay(d);code_flg = true;} else if (strArr[0] == "MKMLD" || strArr[0] == "mkmld") {  //鼠标移动_点击后延时int x = strArr[1].toInt();int y = strArr[2].toInt();int d = strArr[3].toInt();Mouse.move(x, y);Mouse.click(MOUSE_LEFT);Serial.println("mkmld " + String(x) + " " + String(y) + " " + String(d));delay(d);code_flg = true;} else if (strArr[0] == "MKMRD" || strArr[0] == "mkmrd") {  //鼠标移动_右击后延时int x = strArr[1].toInt();int y = strArr[2].toInt();int d = strArr[3].toInt();Mouse.move(x, y);Mouse.click(MOUSE_RIGHT);Serial.println("mkmrd " + String(x) + " " + String(y) + " " + String(d));delay(d);code_flg = true;} else if (strArr[0] == "MKMiD" || strArr[0] == "mkmid") {  //鼠标移动_中击后延时int x = strArr[1].toInt();int y = strArr[2].toInt();int d = strArr[3].toInt();Mouse.move(x, y);Mouse.click(MOUSE_MIDDLE);Serial.println("mkmid " + String(x) + " " + String(y) + " " + String(d));delay(d);code_flg = true;}break;default:break;}  //结束switch (sds)}    //结束 if (Keyboard.isConnected())//系统控制参数if (sds == 1) {if (strArr[0] == "ESP32.restart") {//串口输出开始重启Serial.println("ESP32 Restart()...!");//等待串口发送完delay(100);//ESP32重启esp_restart();code_flg = true;} else if (strArr[0] == "BLE.begin()") {//串口输出开始重启Serial.println("ESP32 BLE.begin()()...!");Keyboard.begin();Mouse.begin();code_flg = true;} else if (strArr[0] == "BLE.end()") {//串口输出开始Serial.println("ESP32 BLE.end()...!");Keyboard.end();Mouse.end();code_flg = true;} else if (strArr[0] == "hello") {//串口输出开始重启Serial.println("ESP32:HELLO I'm BLE Mouse and KeyBody working now!");code_flg = true;}}  //结束if (sds == 1)//判断代码是否未执行if (!code_flg) {//这段不是代码范围内Serial.println("Not code:" + strArr[0] + ";");}//记得接受后清空串口,否则一直首条直到接收溢出错误strsc = "";}  //结束 if(inchar==';')else {strsc += inchar;// Serial.println(inchar);}  //结束 if(inchar==';')else}  //结束if (Serial.available() > 0)delay(10);if (!digitalRead(gpiom)) {Serial.println("LED=off:");//输出高电平digitalWrite(gpio_led, HIGH);delay(300);//输出低电平digitalWrite(gpio_led, LOW);}
}  //结束 loop()//V003参数命令集合
//hello;esp32.restart;BLE.begin();BLE.end();
//LED=1;LED=0;led on;led off;led oo;
//kb www.baidu.com;kb q;kbpp 129;kbp 129;kbpa 0;
//mkm x y;mkl x y;mkr x y;mki x y;
//mkmw x y n;mkmld x y n;mkmrd x y n;mkmri x y n;
又搞了一个鼠标键盘融合版的

Python的串口通信不通是因为ESP32-CAM下载板断开了,需要手动连接RS,RT接线(注意左5V+右中GND,3v3LED带不动吗?)(还好回忆起来了5分钟,否则又要搞2小时了,笔记的作用来了)
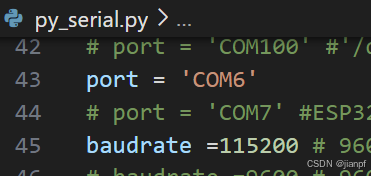
COM6+COM7两块ESP32可以同时连接电脑控制;
收到串口数据量(开心,睡觉2024.8.15.5:25)
2024.8.16.0:27USB的来到
1:33 2024/8/16 JianPF
https://www.bilibili.com/video/BV1YAvFevEr9/?vd_source=606d359e368cfd6b2c0e0b03ff16fa67
Arduino-ESP32安装修复文件下载:
https://www.hitecloud.cn/pan/share/download/code/583caed07aa259394973017a9e4d7d2f
开发板管理器地址:https://espressif.github.io/arduino-esp32/package_esp32_index.json
1.下载包,放到Arduino15版本目录下
C:\Users\HF_MOV\AppData\Local\Arduino15\staging\packages
2.打开Arduino的文件>首选设置>其他开发板管理器地址填入一下地址(github的有时不行)
https://espressif.github.io/arduino-esp32/package_esp32_index.json,
https://dl.espressif.com/dl/package_esp32_index.json
3.Arduino提示开发板更新,选择手动打开左边第二个开发板(移除by Arduino的,安装esp32 by Espressif Systems乐鑫的3.0.3版本其他版本3.0.4暂时最新不要选)
等待3.0.3安装到C:\Users\HF_MOV\AppData\Local\Arduino15\packages\esp32\hardware\esp32\3.0.3这里就可以了
4.开始写USB鼠标键盘即可(之前蓝牙鼠标键盘的是2.0.2版本可用用)
2024.8.16.3:00;
ESP32-CAM没有USB接口只是用串口通信,所以要选型选ESP32-S3有USB和仿真,模块约16元,开发板约30元.
嘉立创签到1分500分约2年可换老铁了(这应该可薅羊毛)
https://oshwhub.com/sign_in


2024.8.16.16:00开始OPCV
https://blog.csdn.net/Thomson617/article/details/103956799
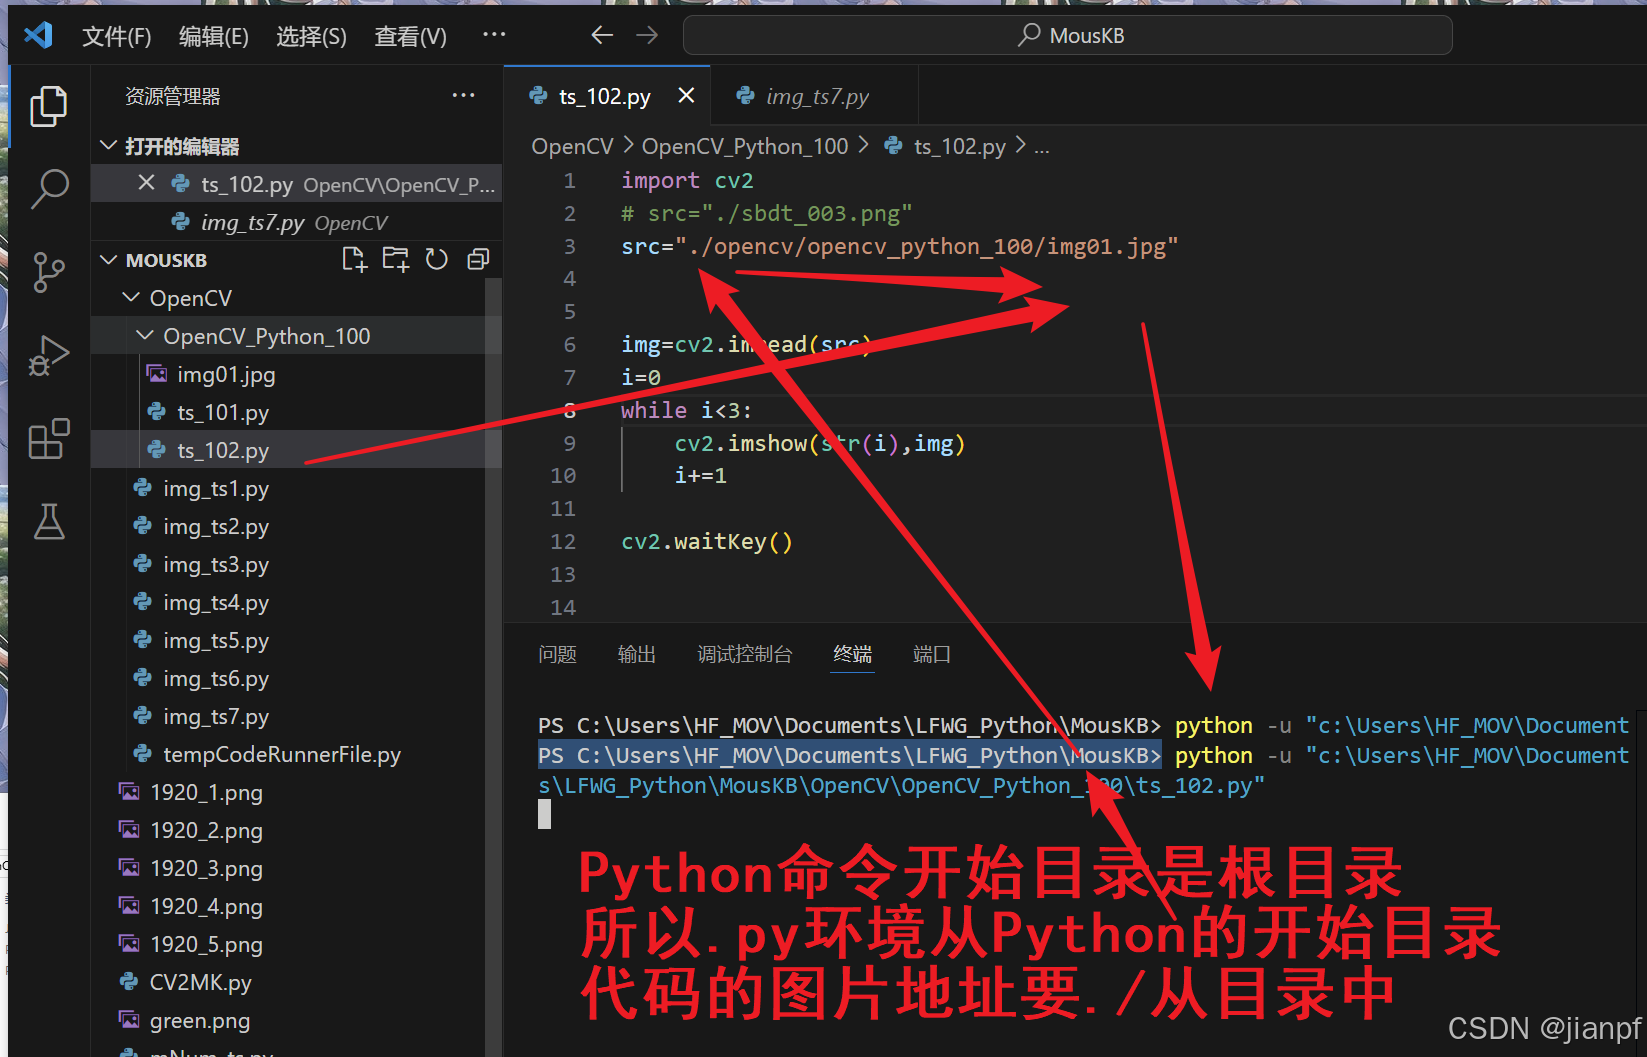
Python的命令根目录
2024.8.17.04:04A
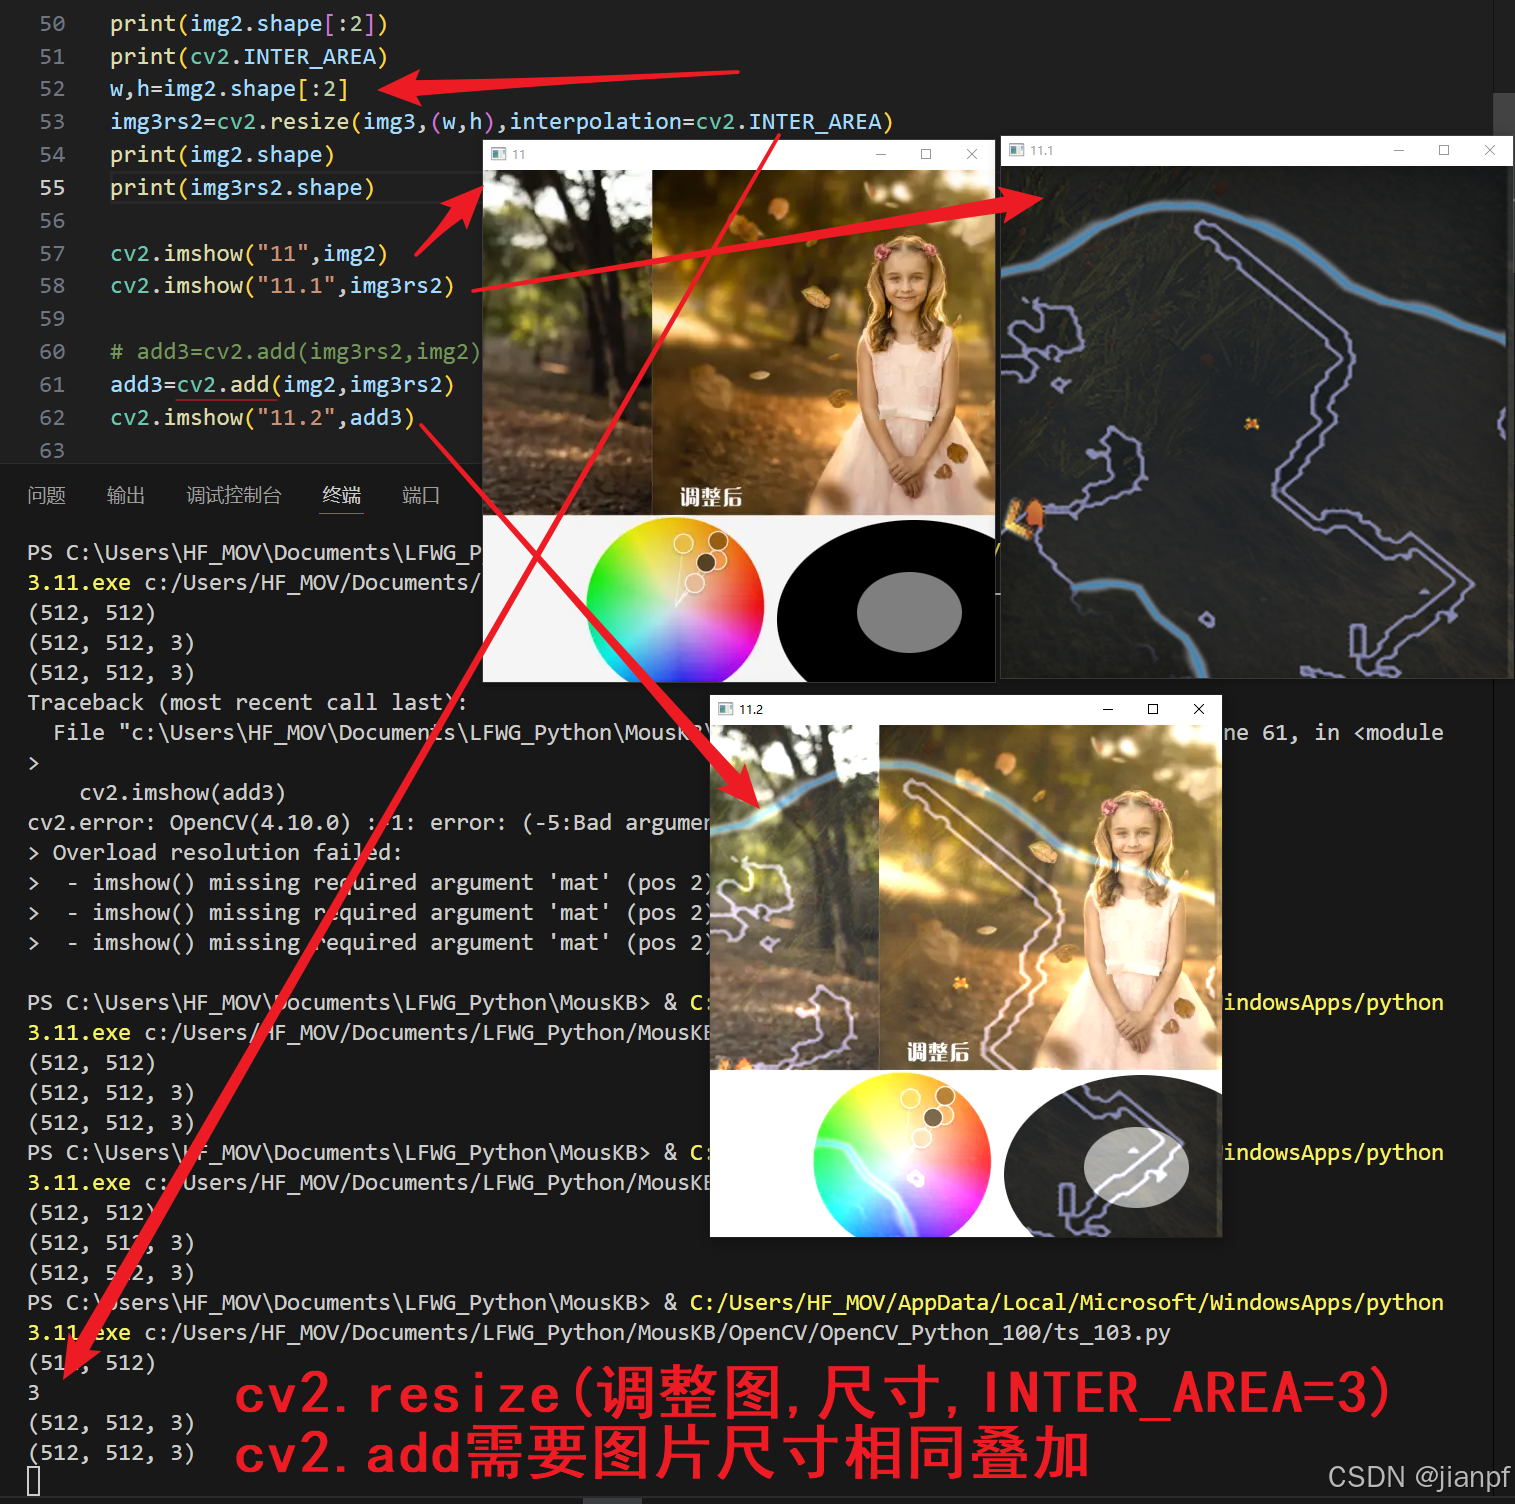
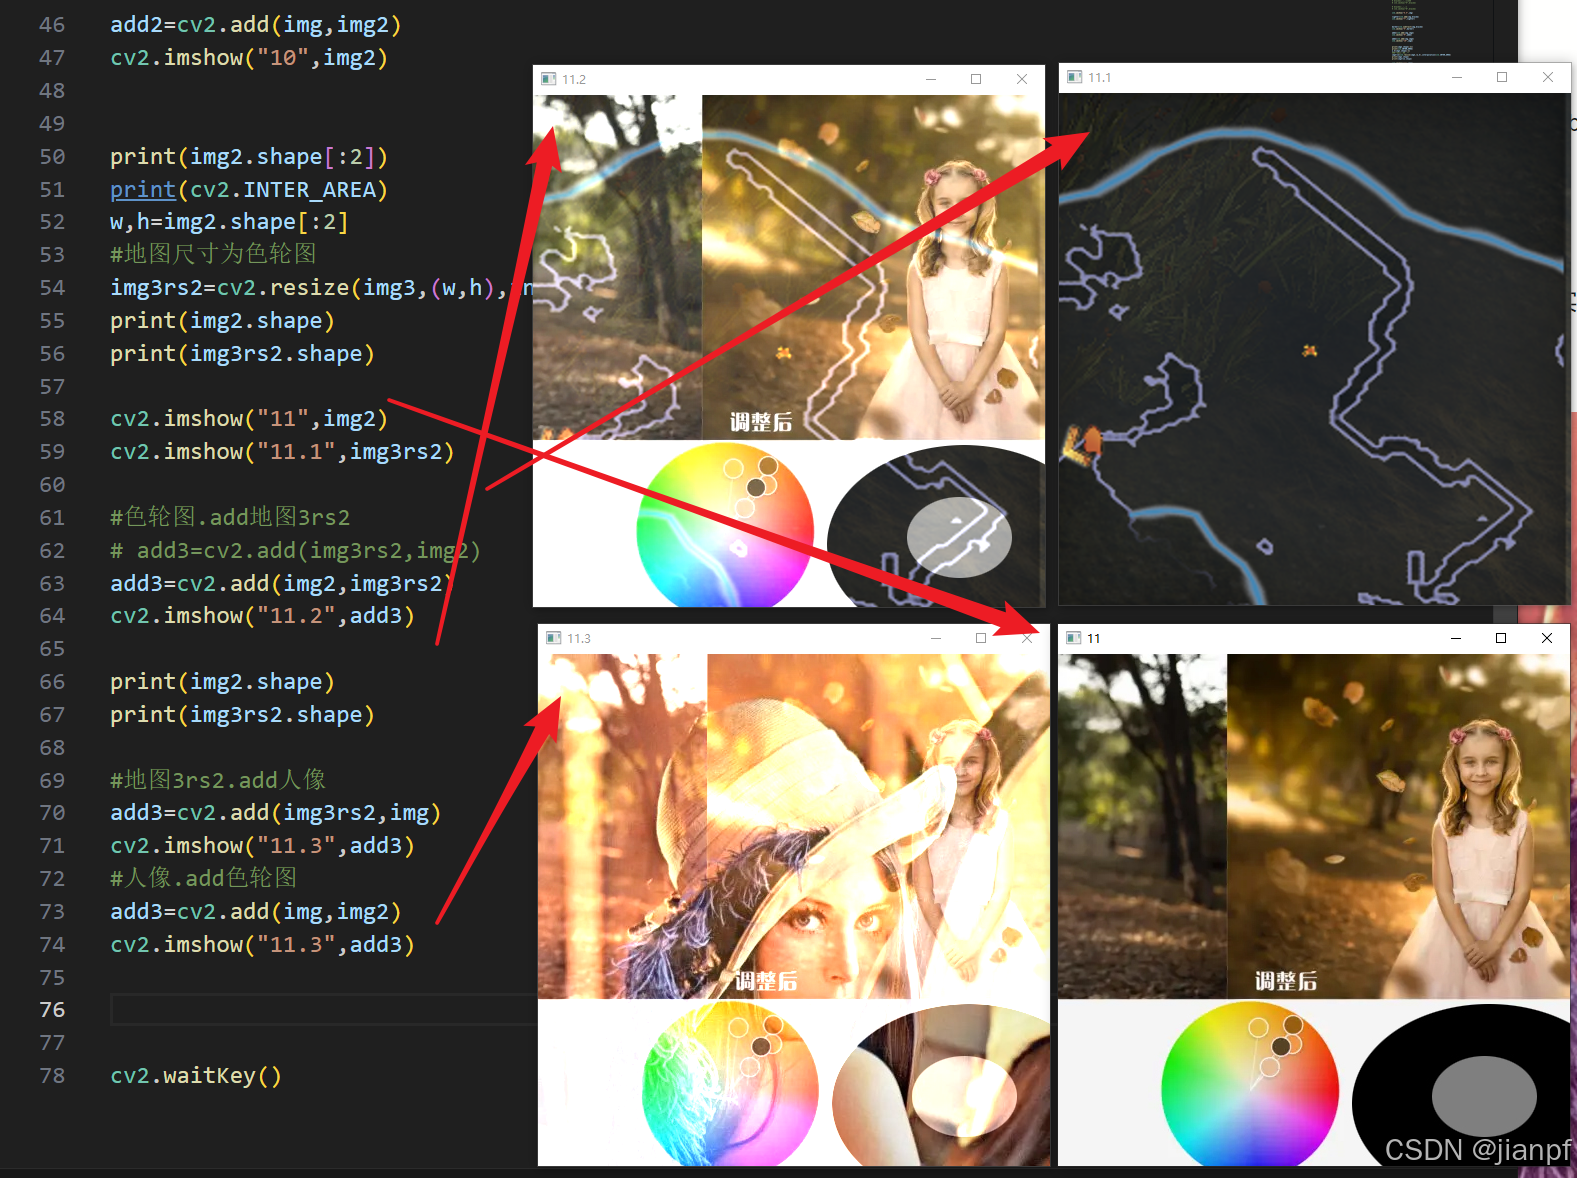

.add叠加
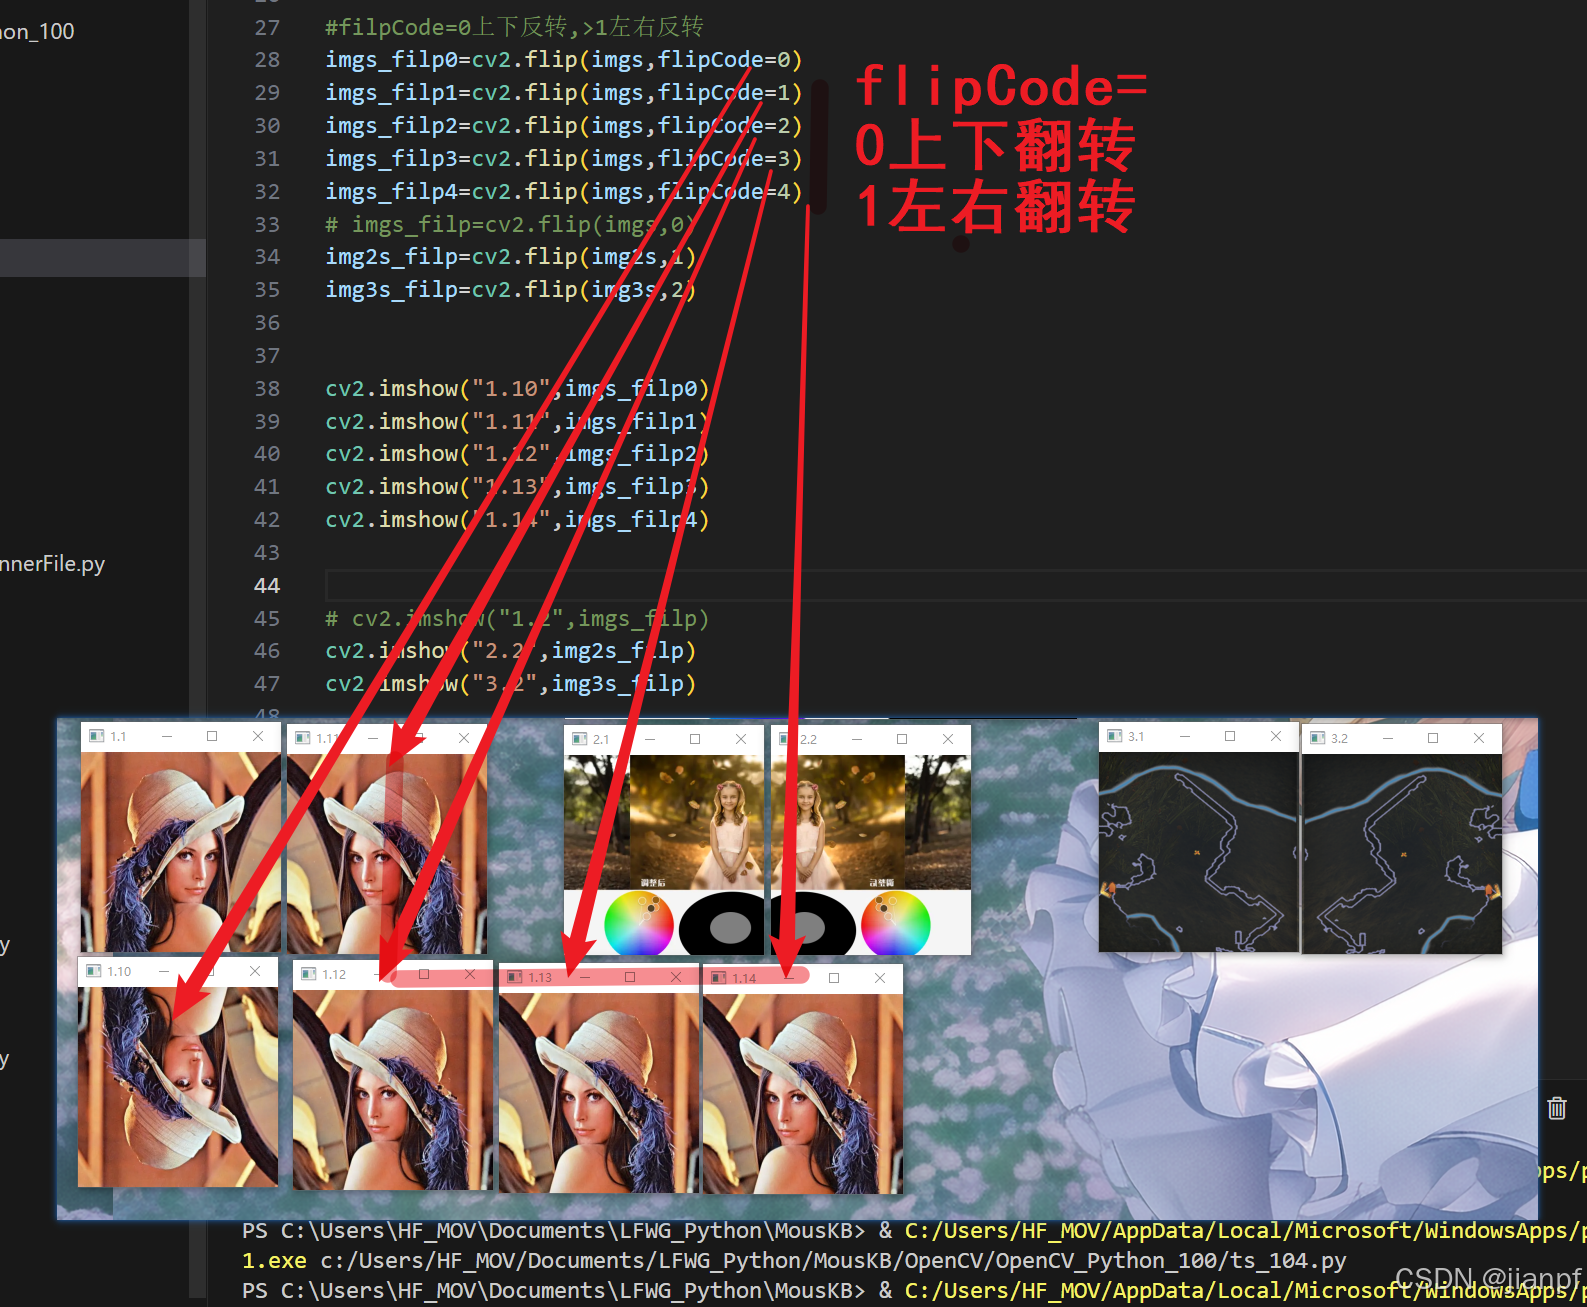
#filpCode=0上下反转,>1左右反转
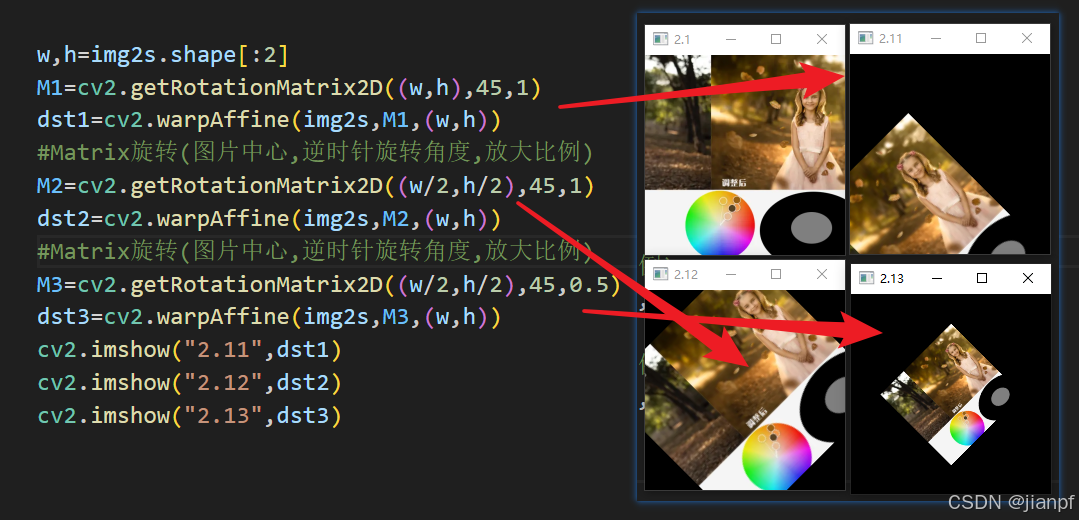
Matrix2D_warpAffine逆时针旋转角度,缩放率
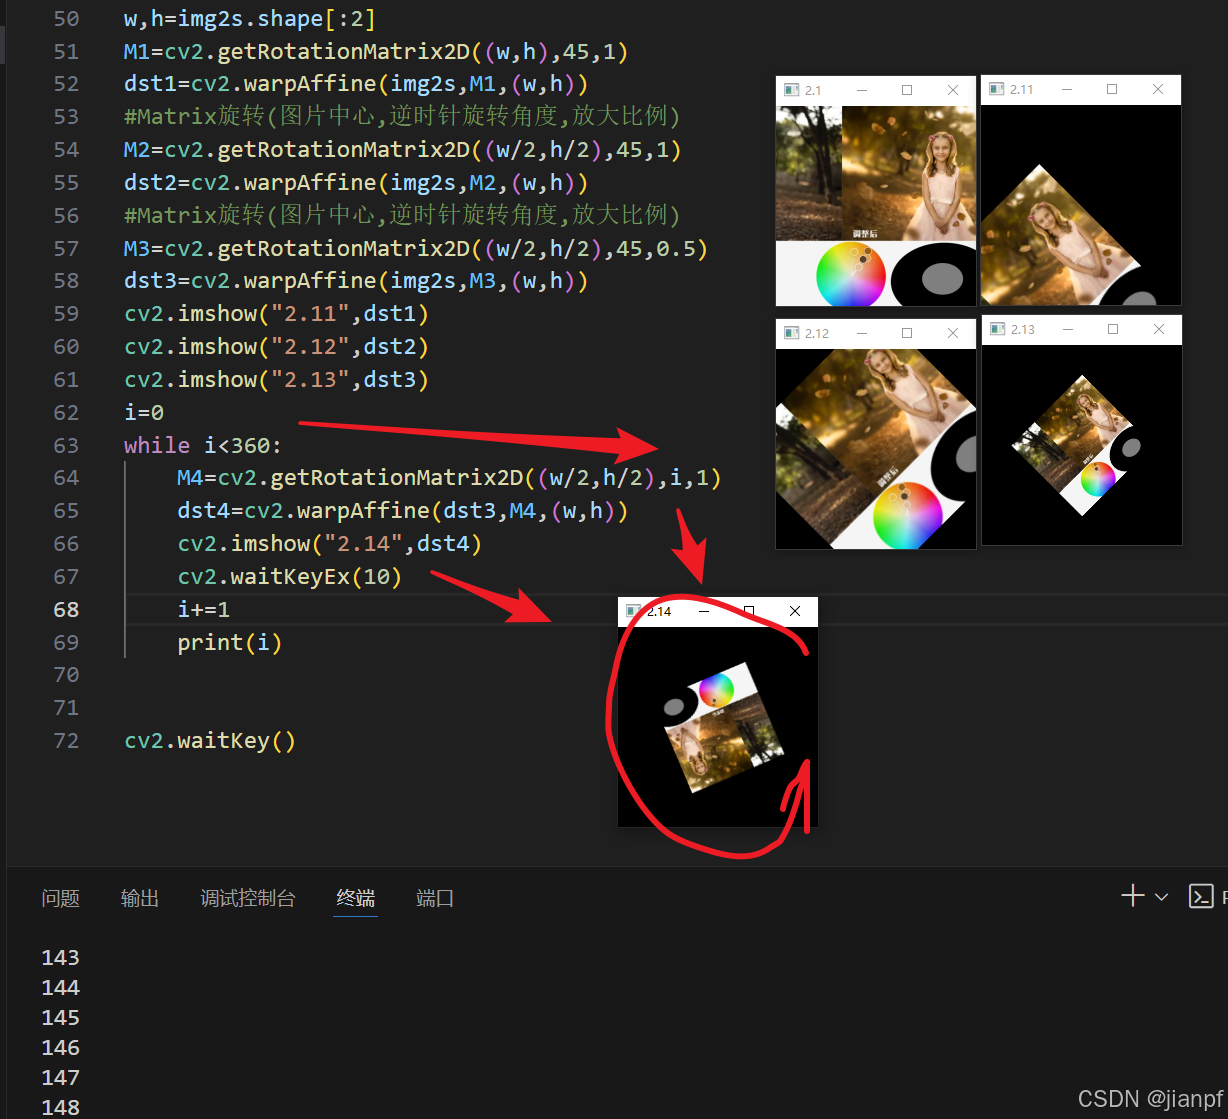
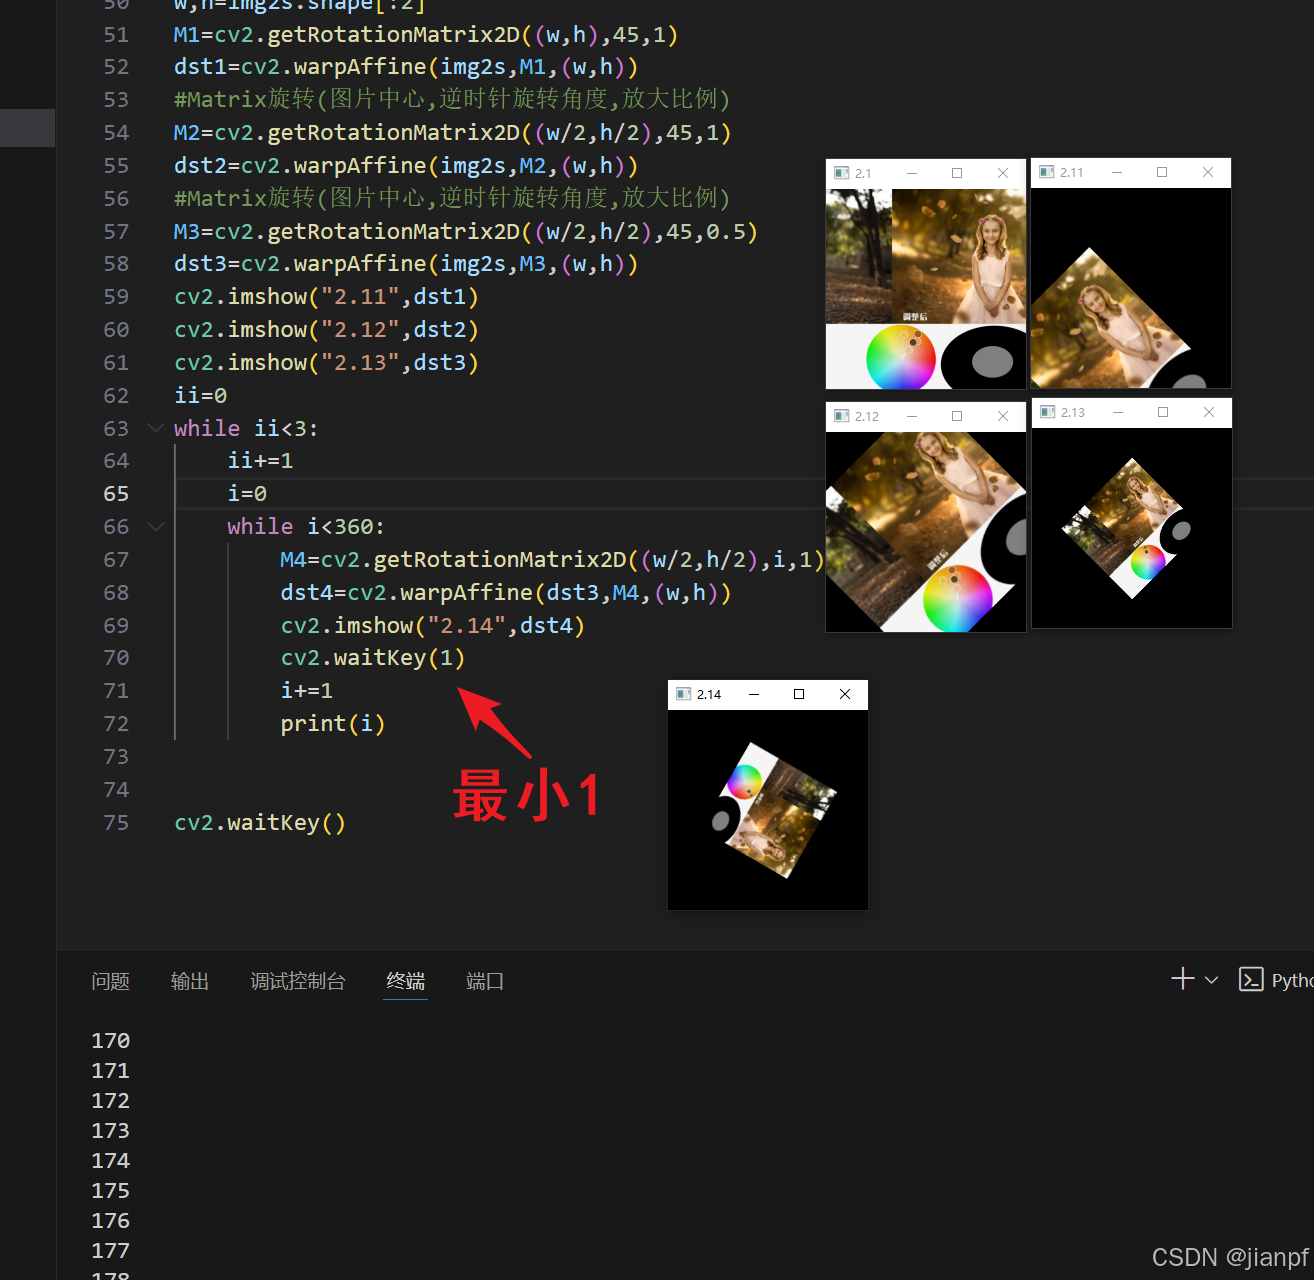
cv2.waitKey(1)最小1动画,0和空都是等待键盘
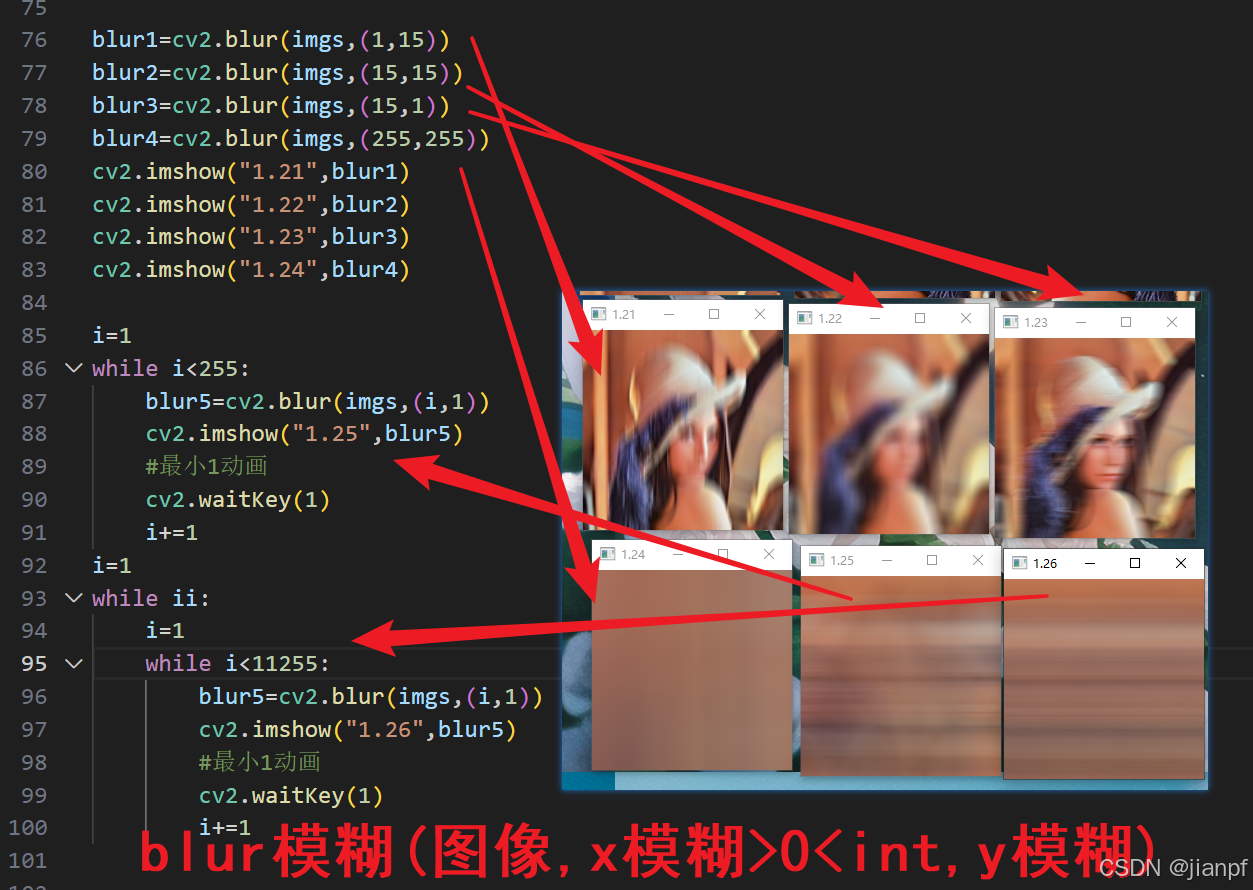
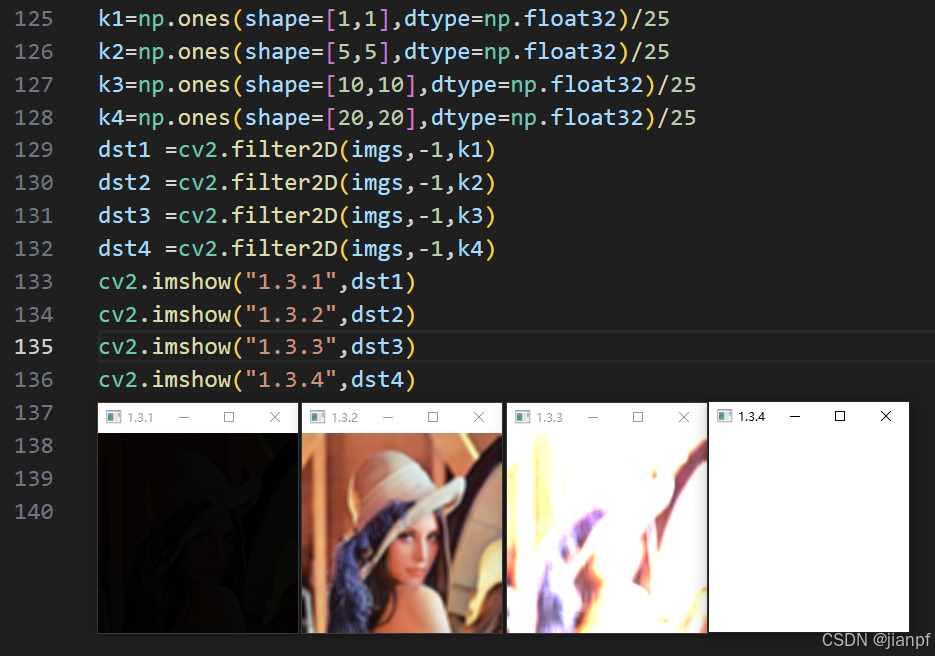
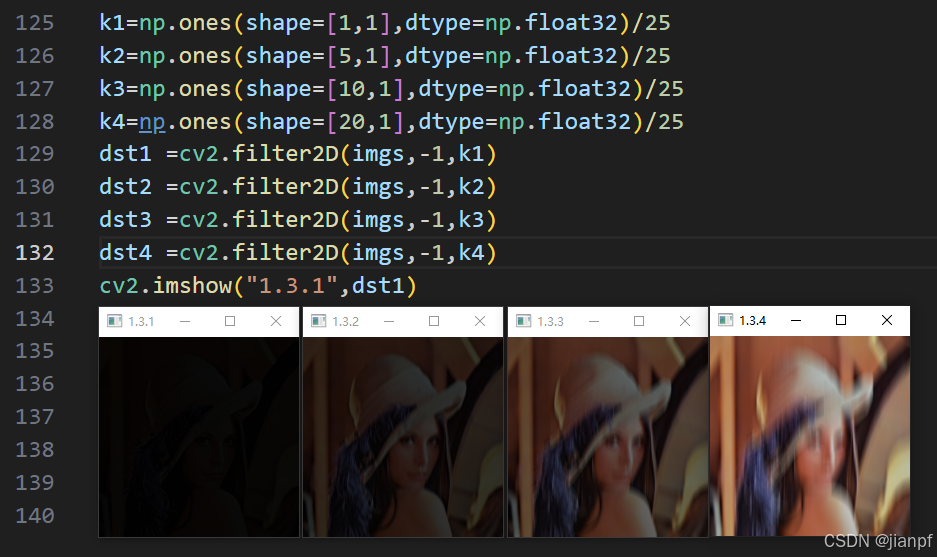
模糊blur
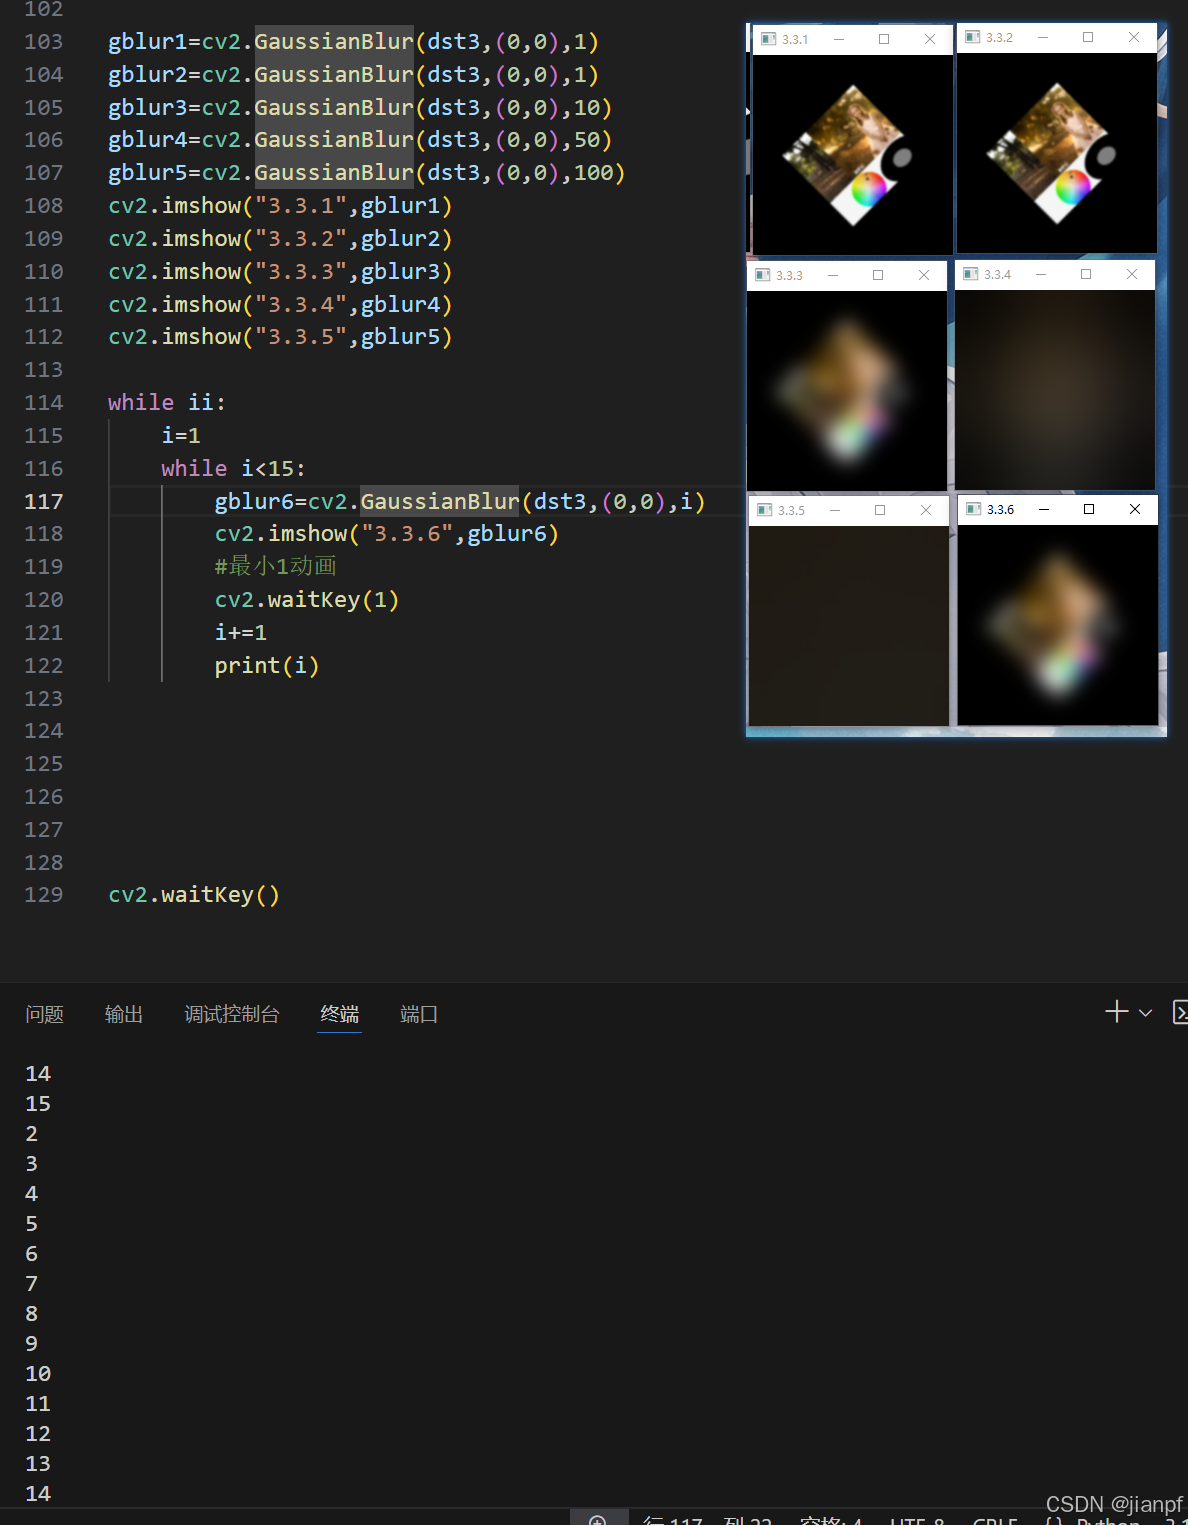
高斯模糊
gaussianBlur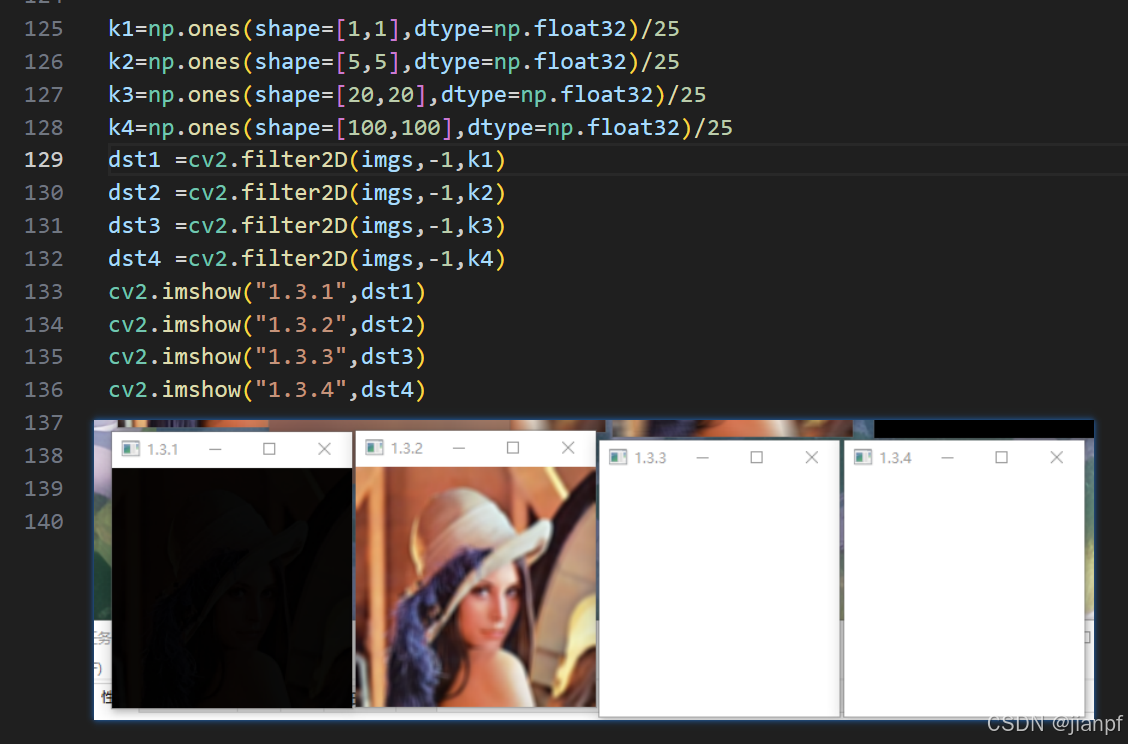
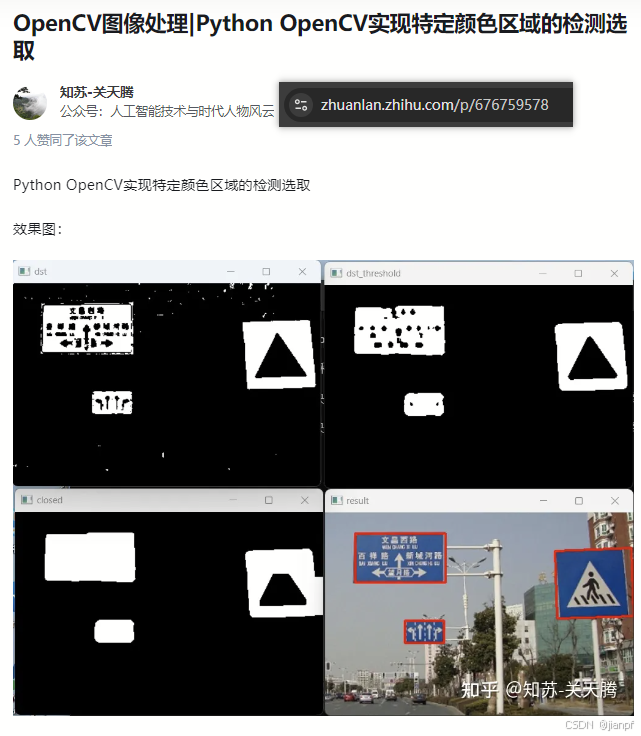
https://zhuanlan.zhihu.com/p/625489449
用python opencv实时监控一个游戏窗口句柄,并显示,并且框选特定图片
https://www.bilibili.com/video/BV1xZ421W7ya/?spm_id_from=333.788.recommend_more_video.7
python+opencv教程016-识别元素-获取传送门坐标
https://zhuanlan.zhihu.com/p/676759578
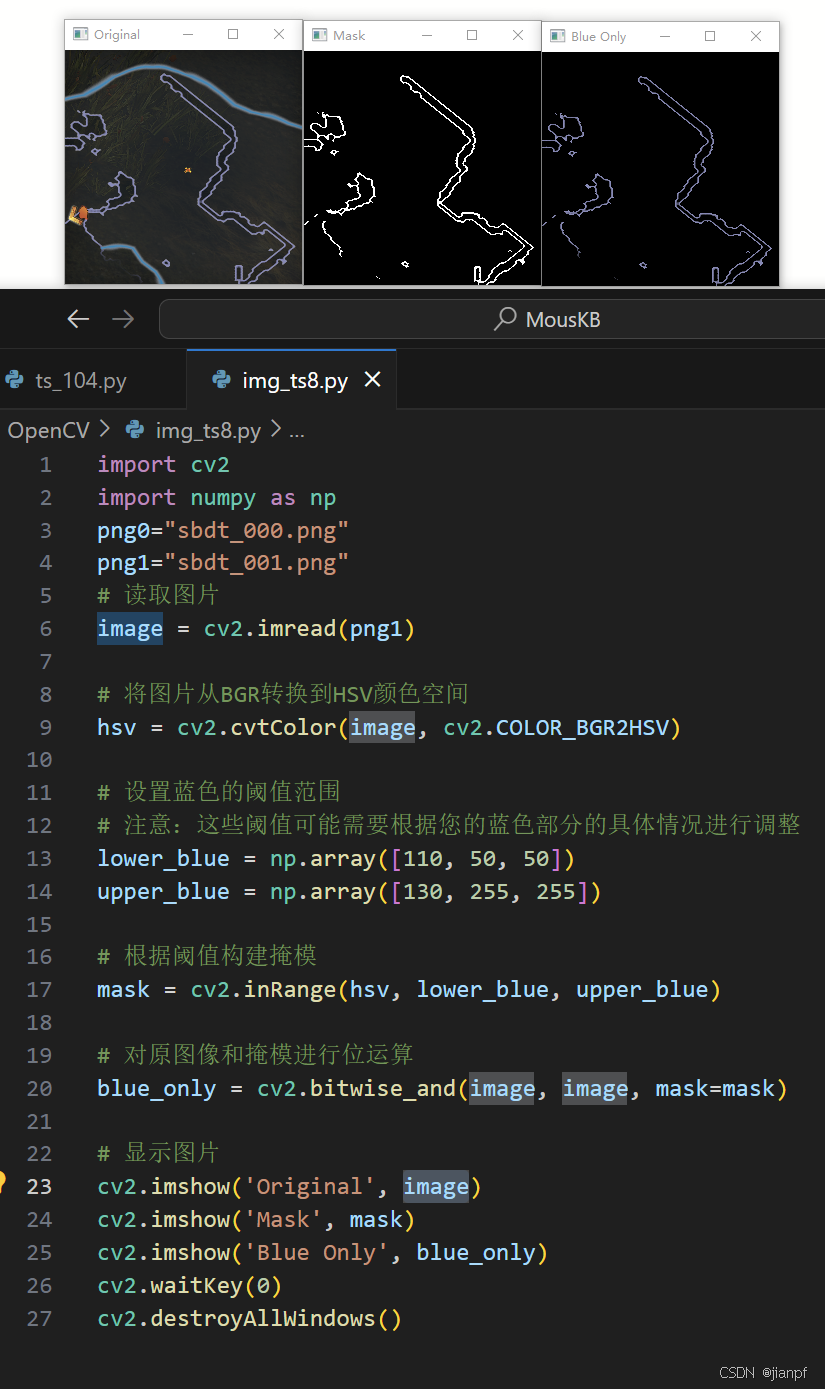
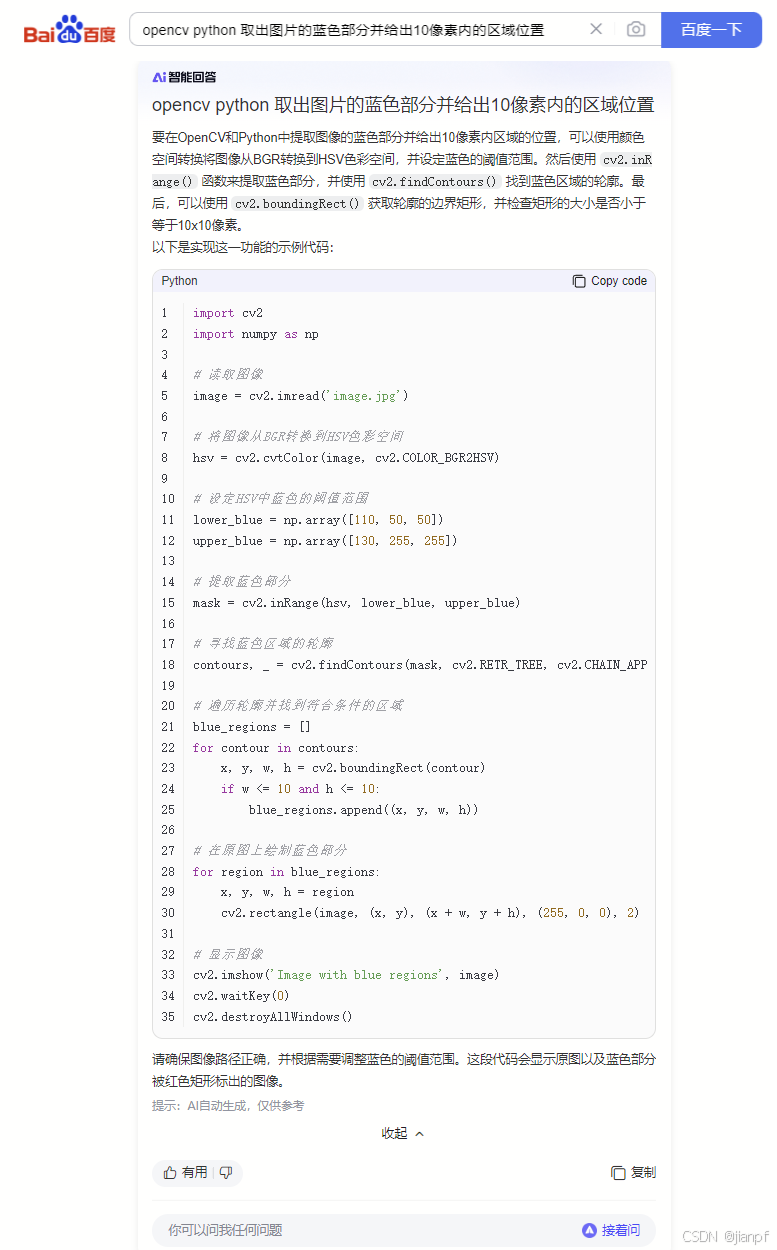
import cv2
import numpy as np
png0="sbdt_000.png"
png1="sbdt_001.png"
# 读取图片
image = cv2.imread(png1)# 将图片从BGR转换到HSV颜色空间
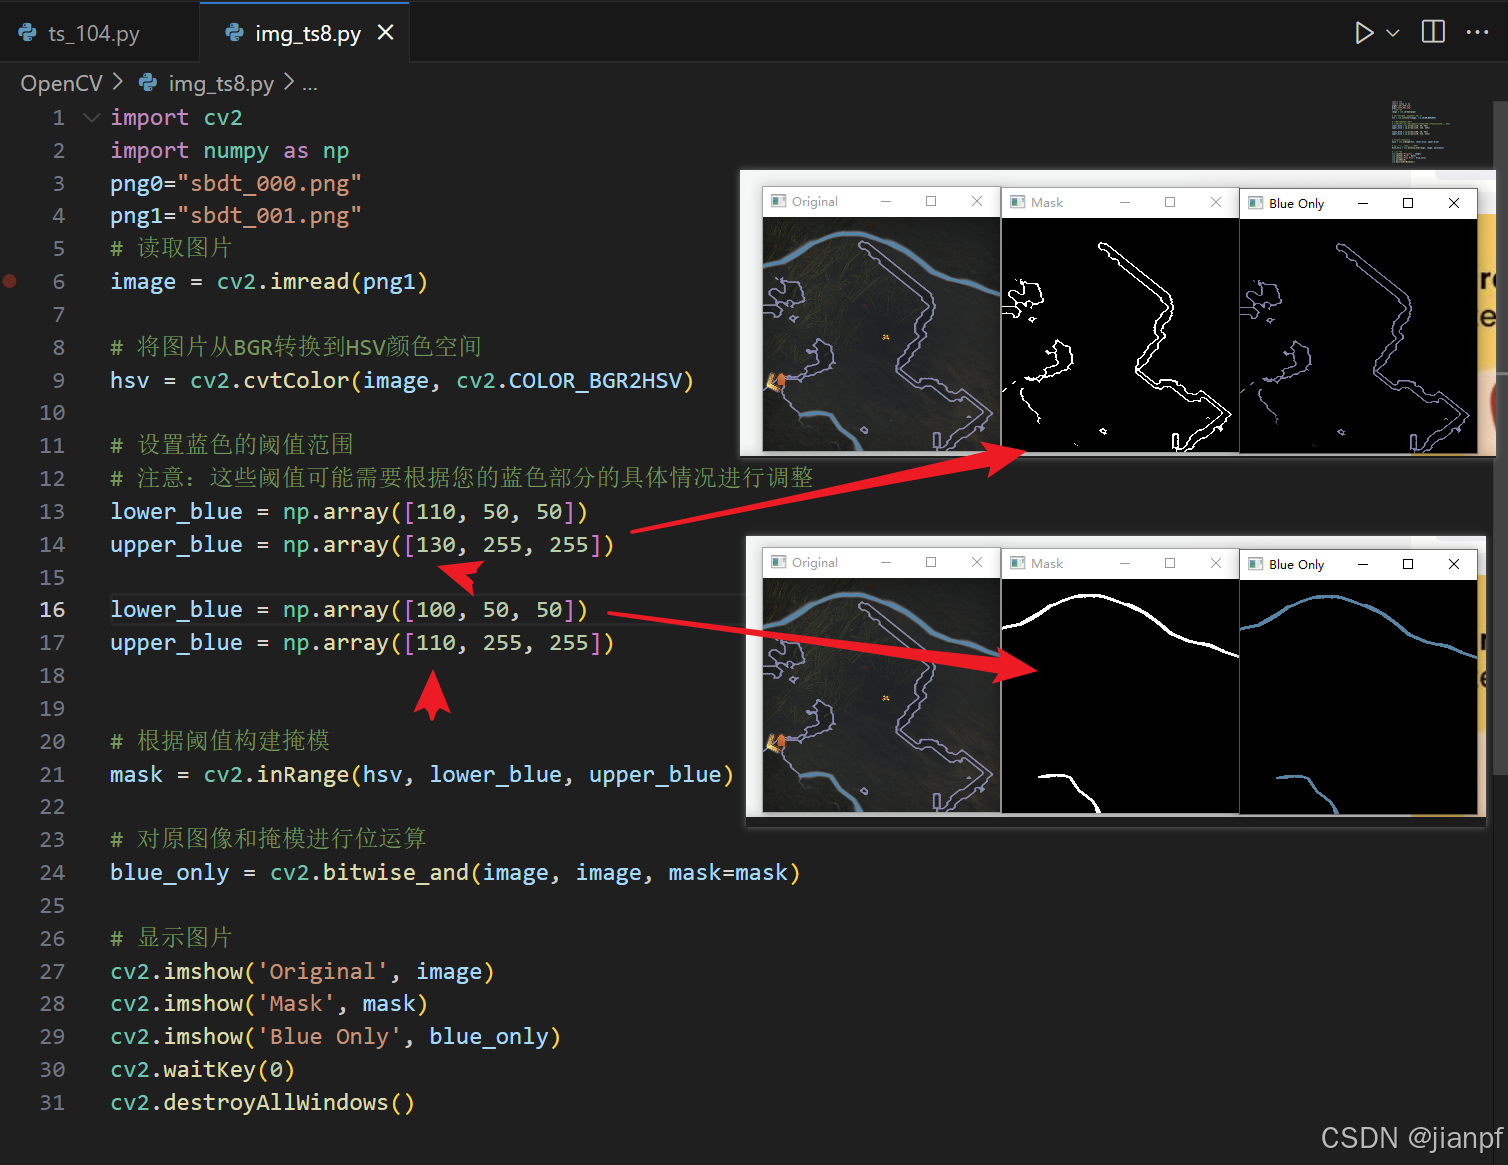
hsv = cv2.cvtColor(image, cv2.COLOR_BGR2HSV)# 设置蓝色的阈值范围
# 注意:这些阈值可能需要根据您的蓝色部分的具体情况进行调整
lower_blue = np.array([110, 50, 50])
upper_blue = np.array([130, 255, 255])lower_blue = np.array([100, 50, 50])
upper_blue = np.array([110, 255, 255])# 根据阈值构建掩模
mask = cv2.inRange(hsv, lower_blue, upper_blue)# 对原图像和掩模进行位运算
blue_only = cv2.bitwise_and(image, image, mask=mask)# 显示图片
cv2.imshow('Original', image)
cv2.imshow('Mask', mask)
cv2.imshow('Blue Only', blue_only)
cv2.waitKey(0)
cv2.destroyAllWindows()
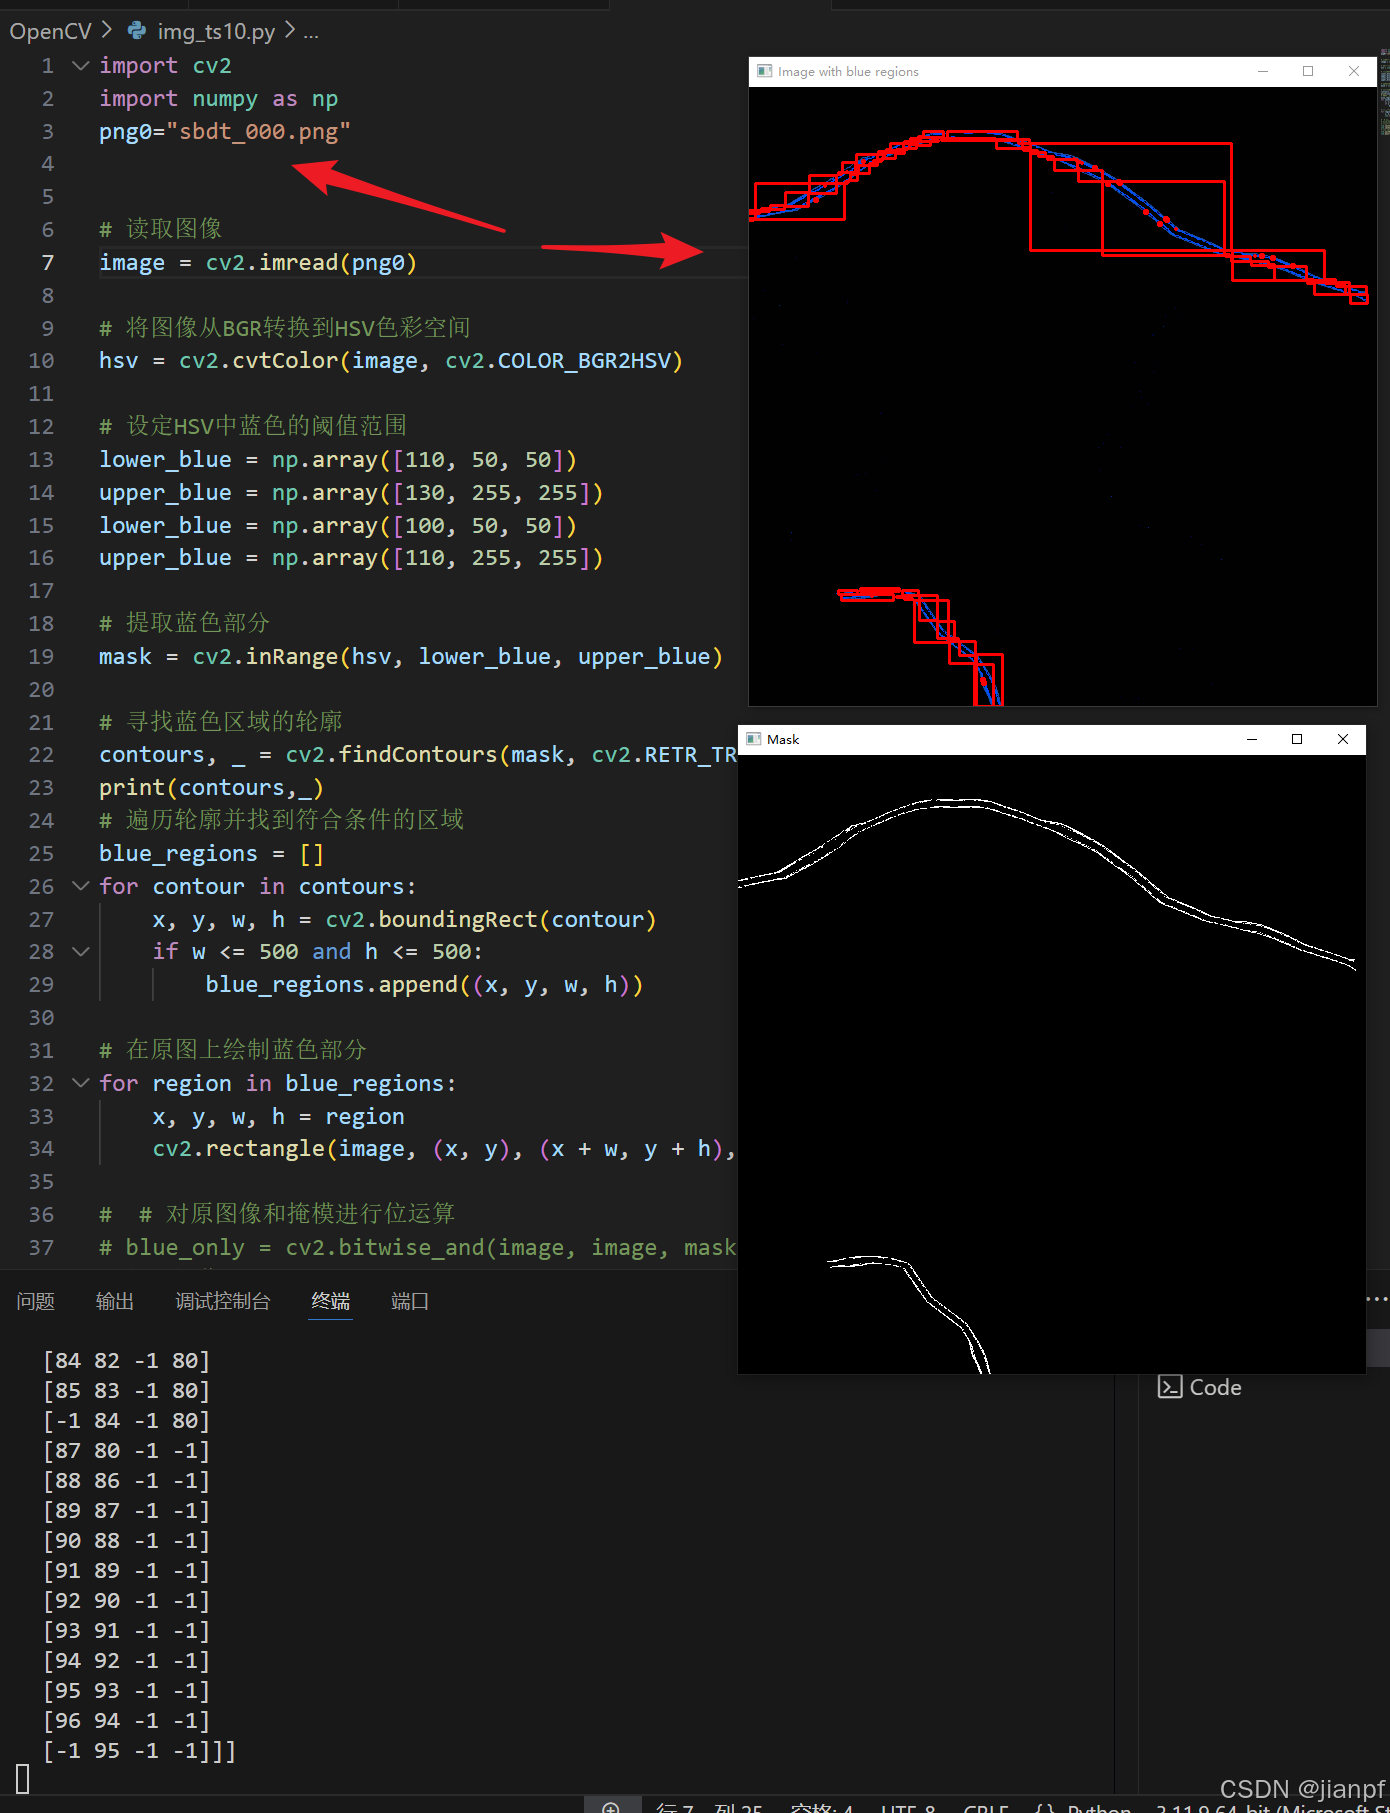
import cv2
import numpy as np
png0="sbdt_000.png"
png1="sbdt_001.png"
# 读取图像
image = cv2.imread(png1)# 将图像从BGR转换到HSV色彩空间
hsv = cv2.cvtColor(image, cv2.COLOR_BGR2HSV)# 设定HSV中蓝色的阈值范围
lower_blue = np.array([110, 50, 50])
upper_blue = np.array([130, 255, 255])
lower_blue = np.array([100, 50, 50])
upper_blue = np.array([110, 255, 255])# 提取蓝色部分
mask = cv2.inRange(hsv, lower_blue, upper_blue)# 寻找蓝色区域的轮廓
contours, _ = cv2.findContours(mask, cv2.RETR_TREE, cv2.CHAIN_APPROX_SIMPLE)
print(contours,_)
# 遍历轮廓并找到符合条件的区域
blue_regions = []
for contour in contours:x, y, w, h = cv2.boundingRect(contour)if w <= 500 and h <= 500:blue_regions.append((x, y, w, h))# 在原图上绘制蓝色部分
for region in blue_regions:x, y, w, h = regioncv2.rectangle(image, (x, y), (x + w, y + h), (0, 0, 255), 2)#  # 对原图像和掩模进行位运算
# blue_only = cv2.bitwise_and(image, image, mask=mask)
# 显示图像
cv2.imshow('Image with blue regions', image)
cv2.imshow('Mask', mask)
# cv2.imshow('Blue Only', blue_only)
cv2.waitKey(0)
cv2.destroyAllWindows()
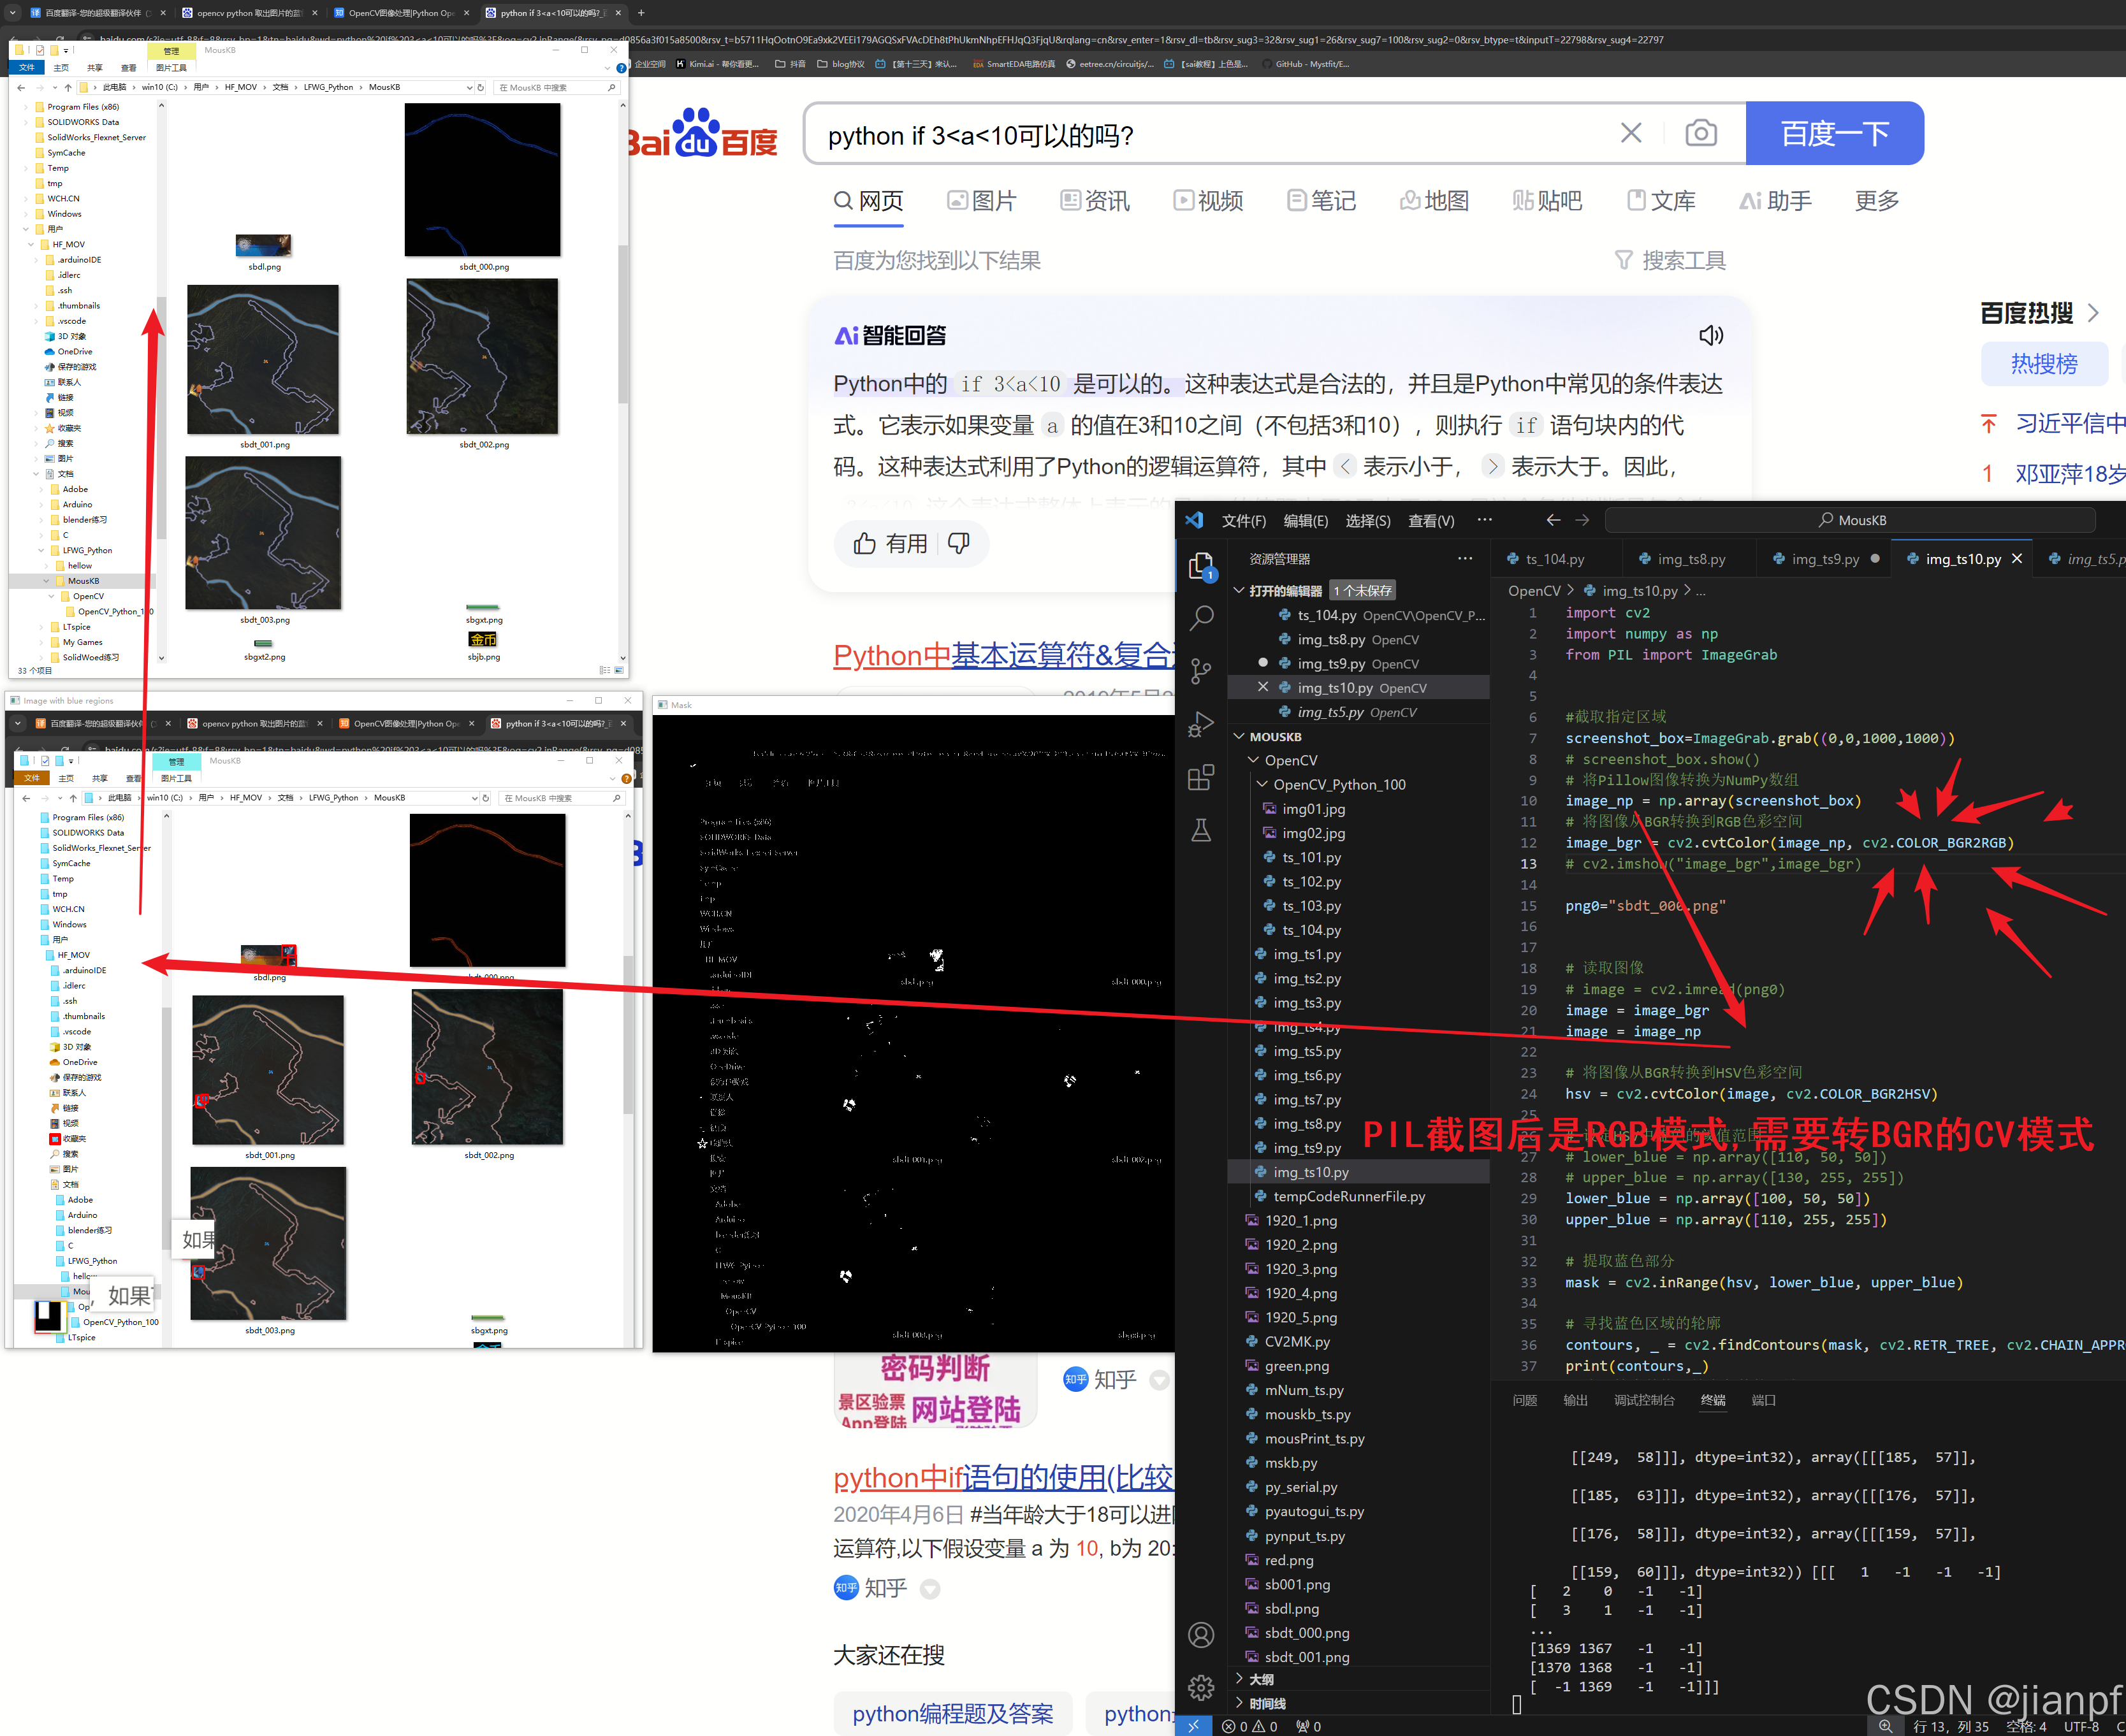

import cv2
import numpy as np
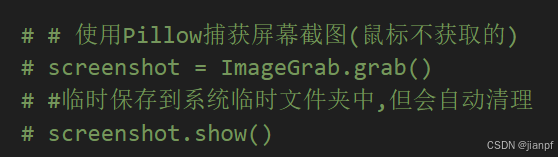
from PIL import ImageGrab#截取指定区域
screenshot_box=ImageGrab.grab((0,0,1000,1000))
# screenshot_box.show()
# 将Pillow图像转换为NumPy数组
image_np = np.array(screenshot_box)
# 将图像从BGR转换到RGB色彩空间
image_bgr = cv2.cvtColor(image_np, cv2.COLOR_BGR2RGB)
# cv2.imshow("image_bgr",image_bgr)png0="sbdt_000.png"# 读取图像
# image = cv2.imread(png0)
image = image_bgr
# image = image_np# 将图像从BGR转换到HSV色彩空间
hsv = cv2.cvtColor(image, cv2.COLOR_BGR2HSV)# 设定HSV中蓝色的阈值范围
# lower_blue = np.array([110, 50, 50])
# upper_blue = np.array([130, 255, 255])
lower_blue = np.array([100, 50, 50])
upper_blue = np.array([110, 255, 255])# 提取蓝色部分
mask = cv2.inRange(hsv, lower_blue, upper_blue)# 寻找蓝色区域的轮廓
contours, _ = cv2.findContours(mask, cv2.RETR_TREE, cv2.CHAIN_APPROX_SIMPLE)
print(contours,_)
# 遍历轮廓并找到符合条件的区域
blue_regions = []
for contour in contours:x, y, w, h = cv2.boundingRect(contour)if 10 < w <= 500 and 10< h <= 500:blue_regions.append((x, y, w, h))# 在原图上绘制蓝色部分
for region in blue_regions:x, y, w, h = regioncv2.rectangle(image, (x, y), (x + w, y + h), (0, 0, 255), 2)# # 对原图像和掩模进行位运算
# blue_only = cv2.bitwise_and(image, image, mask=mask)
# 显示图像
cv2.imshow('Image with blue regions', image)
cv2.imshow('Mask', mask)
# cv2.imshow('Blue Only', blue_only)
cv2.waitKey(0)
cv2.destroyAllWindows()
import cv2
import numpy as np
from PIL import ImageGrabi=1
while i<200:i+=1#截取指定区域screenshot_box=ImageGrab.grab((0,0,1000,1000))# 将Pillow图像转换为NumPy数组image_np = np.array(screenshot_box)# 将图像从BGR转换到RGB色彩空间image = cv2.cvtColor(image_np, cv2.COLOR_BGR2RGB)# 将图像从BGR转换到HSV色彩空间hsv = cv2.cvtColor(image, cv2.COLOR_BGR2HSV)# 设定HSV中蓝色的阈值范围# lower_blue = np.array([110, 50, 50])# upper_blue = np.array([130, 255, 255])# 无意中调到轮廓的颜色阈值lower_blue = np.array([100, 50, 50])upper_blue = np.array([110, 255, 255])# 提取蓝色部分mask = cv2.inRange(hsv, lower_blue, upper_blue)# 寻找蓝色区域的轮廓contours, _ = cv2.findContours(mask, cv2.RETR_TREE, cv2.CHAIN_APPROX_SIMPLE)# print(contours,_)# 遍历轮廓并找到符合条件的区域blue_regions = []for contour in contours:x, y, w, h = cv2.boundingRect(contour)if 10 < w <= 500 and 10< h <= 500:blue_regions.append((x, y, w, h))# 在原图上绘制蓝色部分for region in blue_regions:x, y, w, h = regioncv2.rectangle(image, (x, y), (x + w, y + h), (0, 0, 255), 2)cv2.imshow('Image with blue regions', image)cv2.imshow('Mask', mask)cv2.waitKey(200)print(i)cv2.waitKey(0)
cv2.destroyAllWindows()
2024.8.19.21:32W
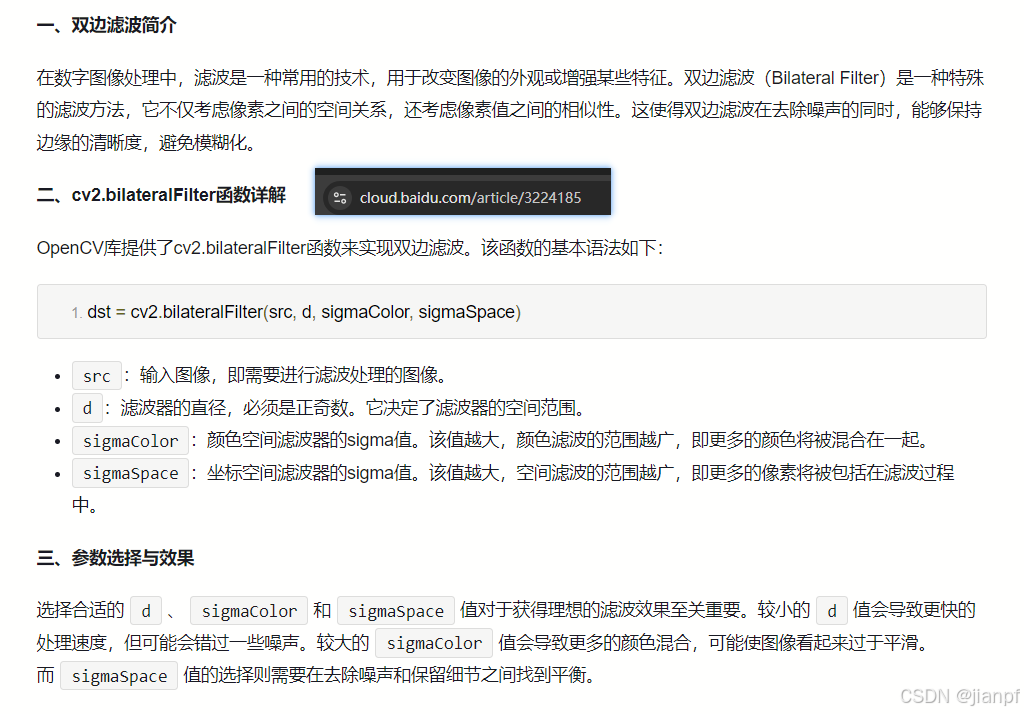
https://cloud.baidu.com/article/3224185
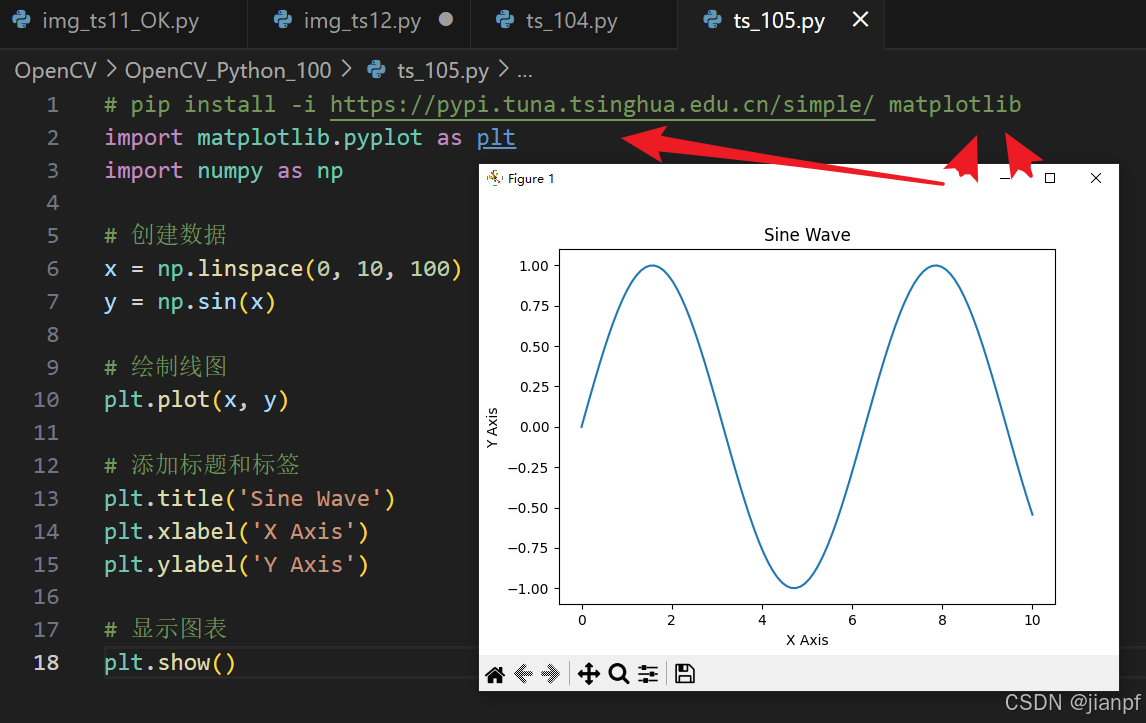
pip install -i https://pypi.tuna.tsinghua.edu.cn/simple/ matplotlib
matplotlib 库的一些主要特性:
多格式支持:支持多种输出格式,包括PNG、SVG、PDF、PS、EPS等。
交互式绘图:与IPython和Jupyter Notebook集成良好,支持交互式绘图。
#python 自带的画图库
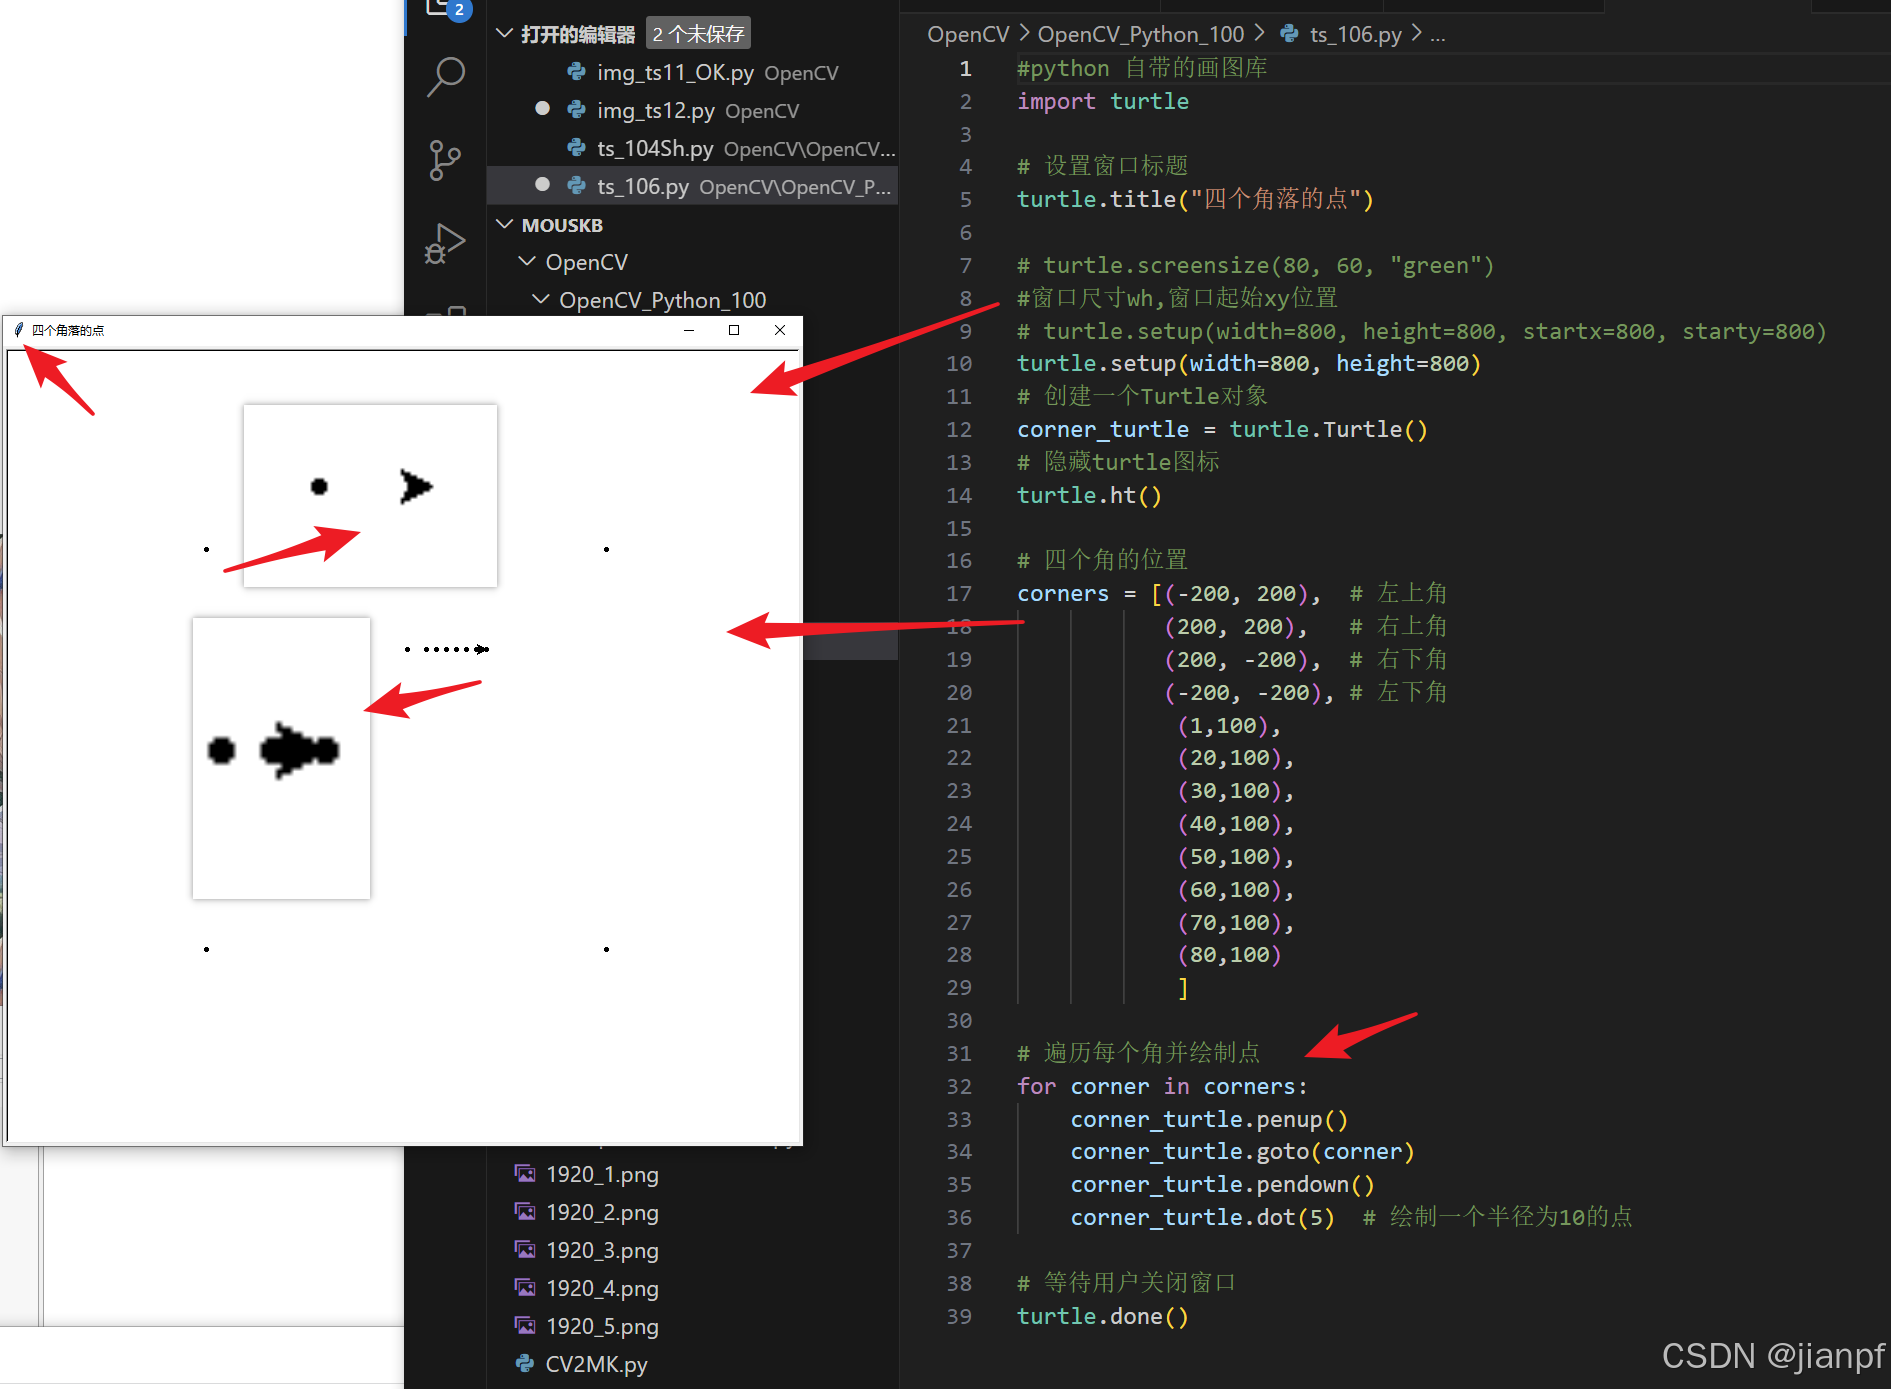
import turtle
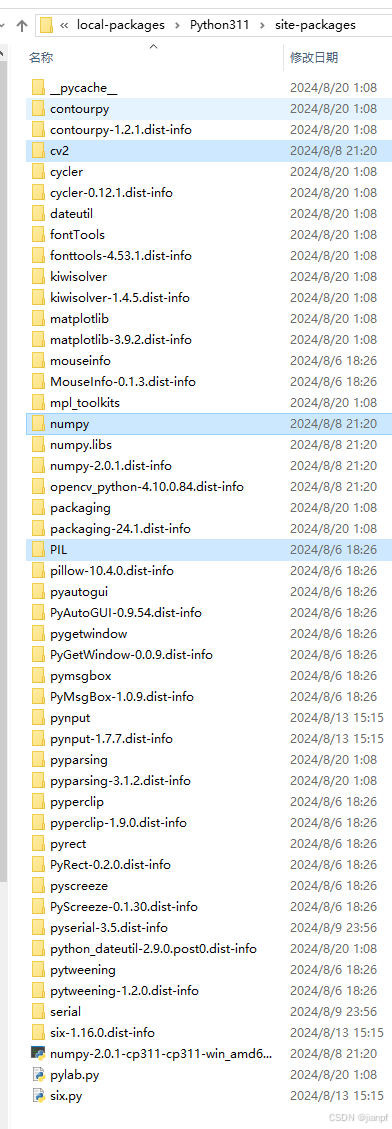
C:\Users\HF_MOV\AppData\Local\Packages\PythonSoftwareFoundation.Python.3.11_qbz5n2kfra8p0\LocalCache\local-packages\Python311\site-packages\cv2
CV2库安装位置
#复制对象,不是引用
timg=img.copy()
 https://blog.csdn.net/juzicode00/article/details/118742839
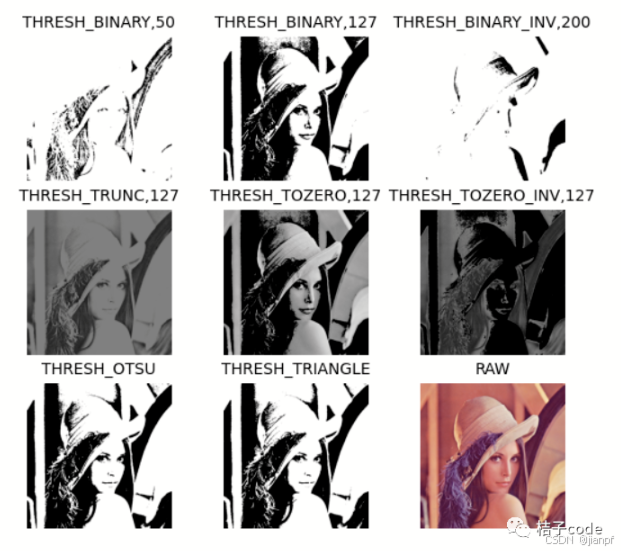
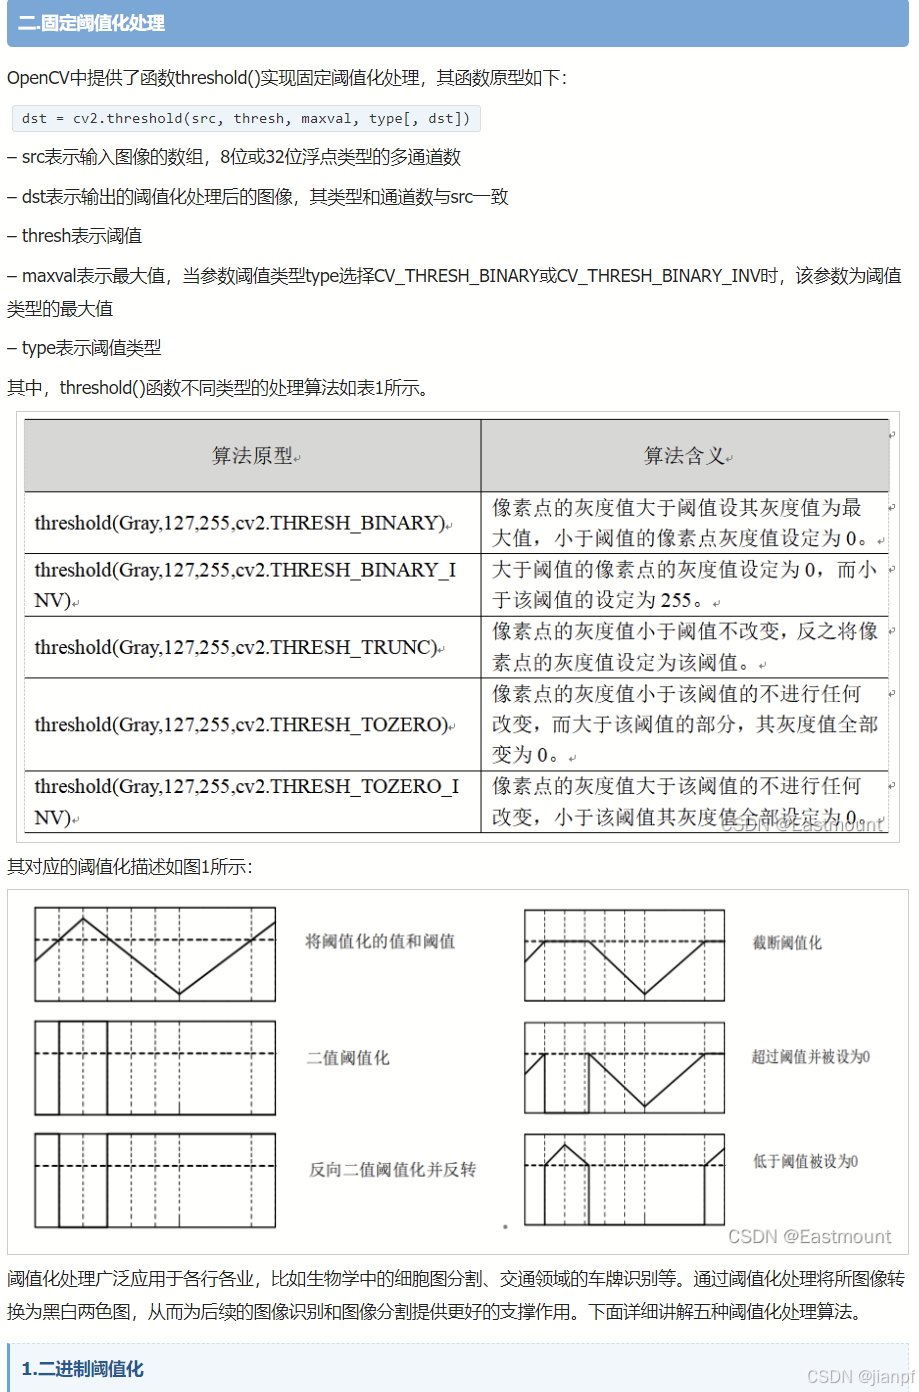
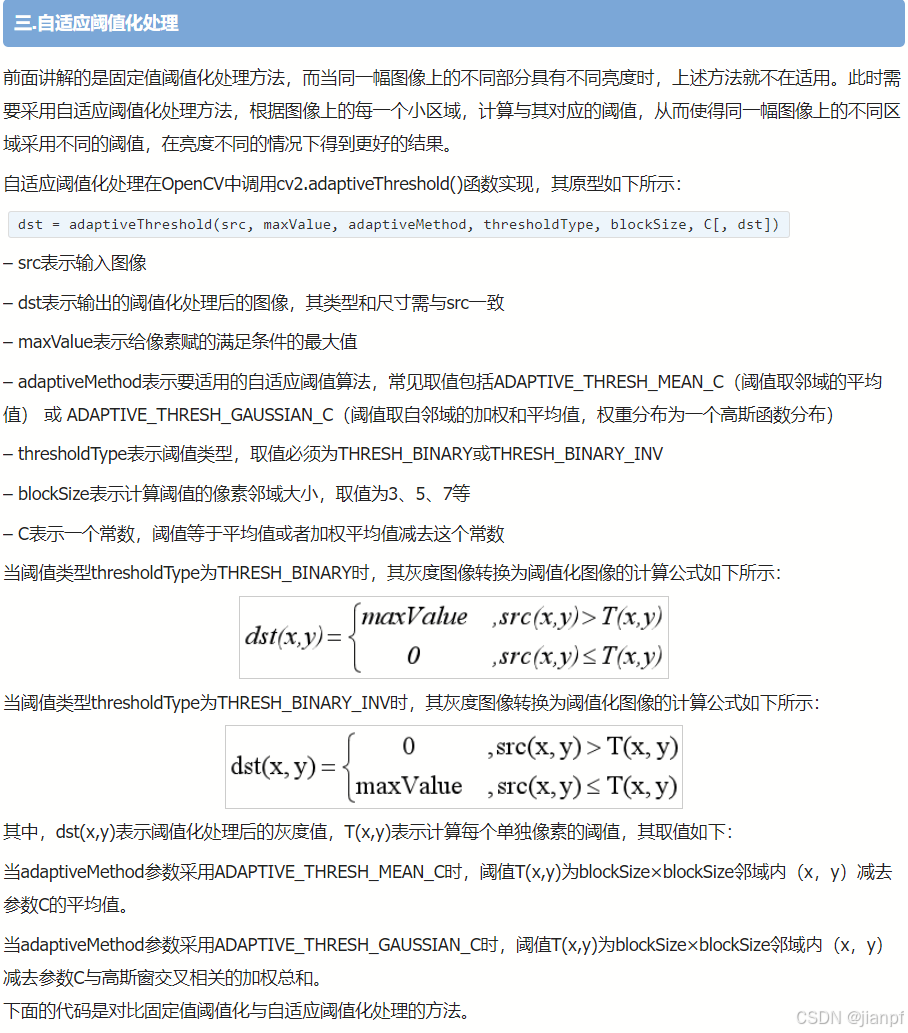
二值化

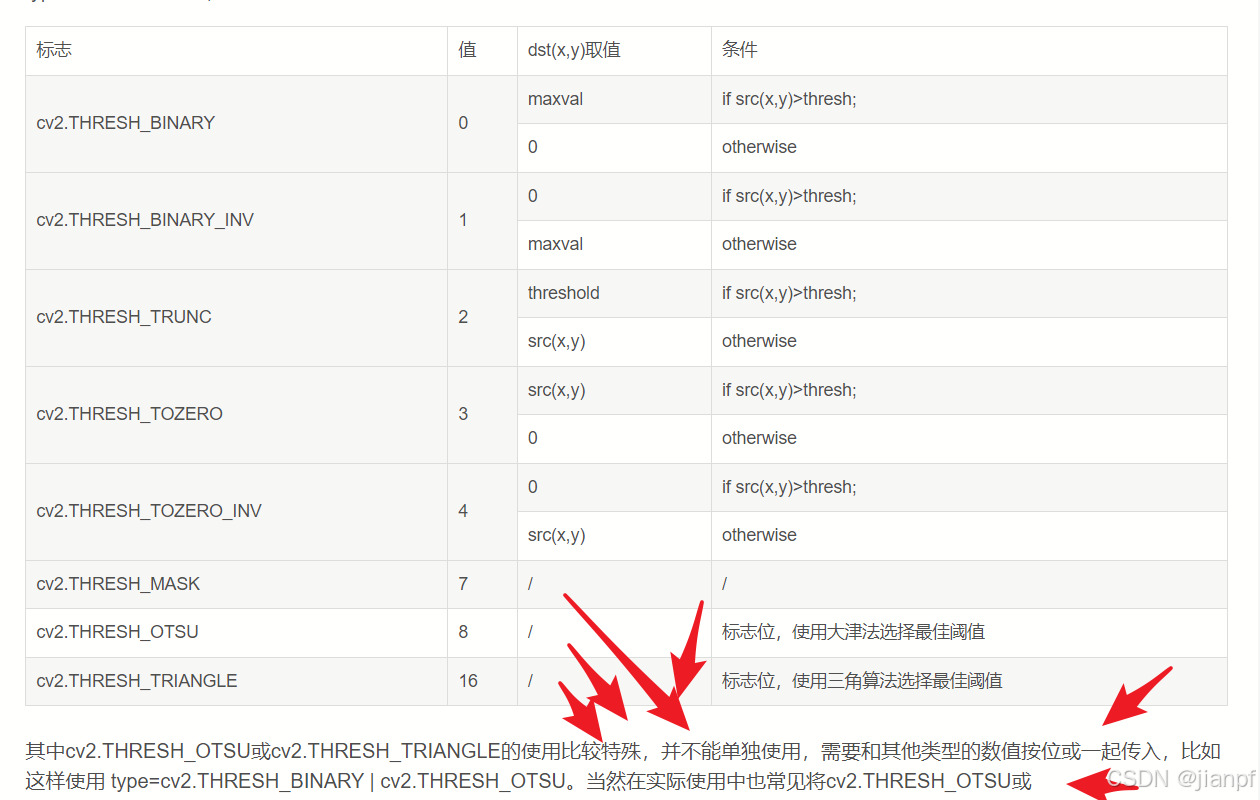
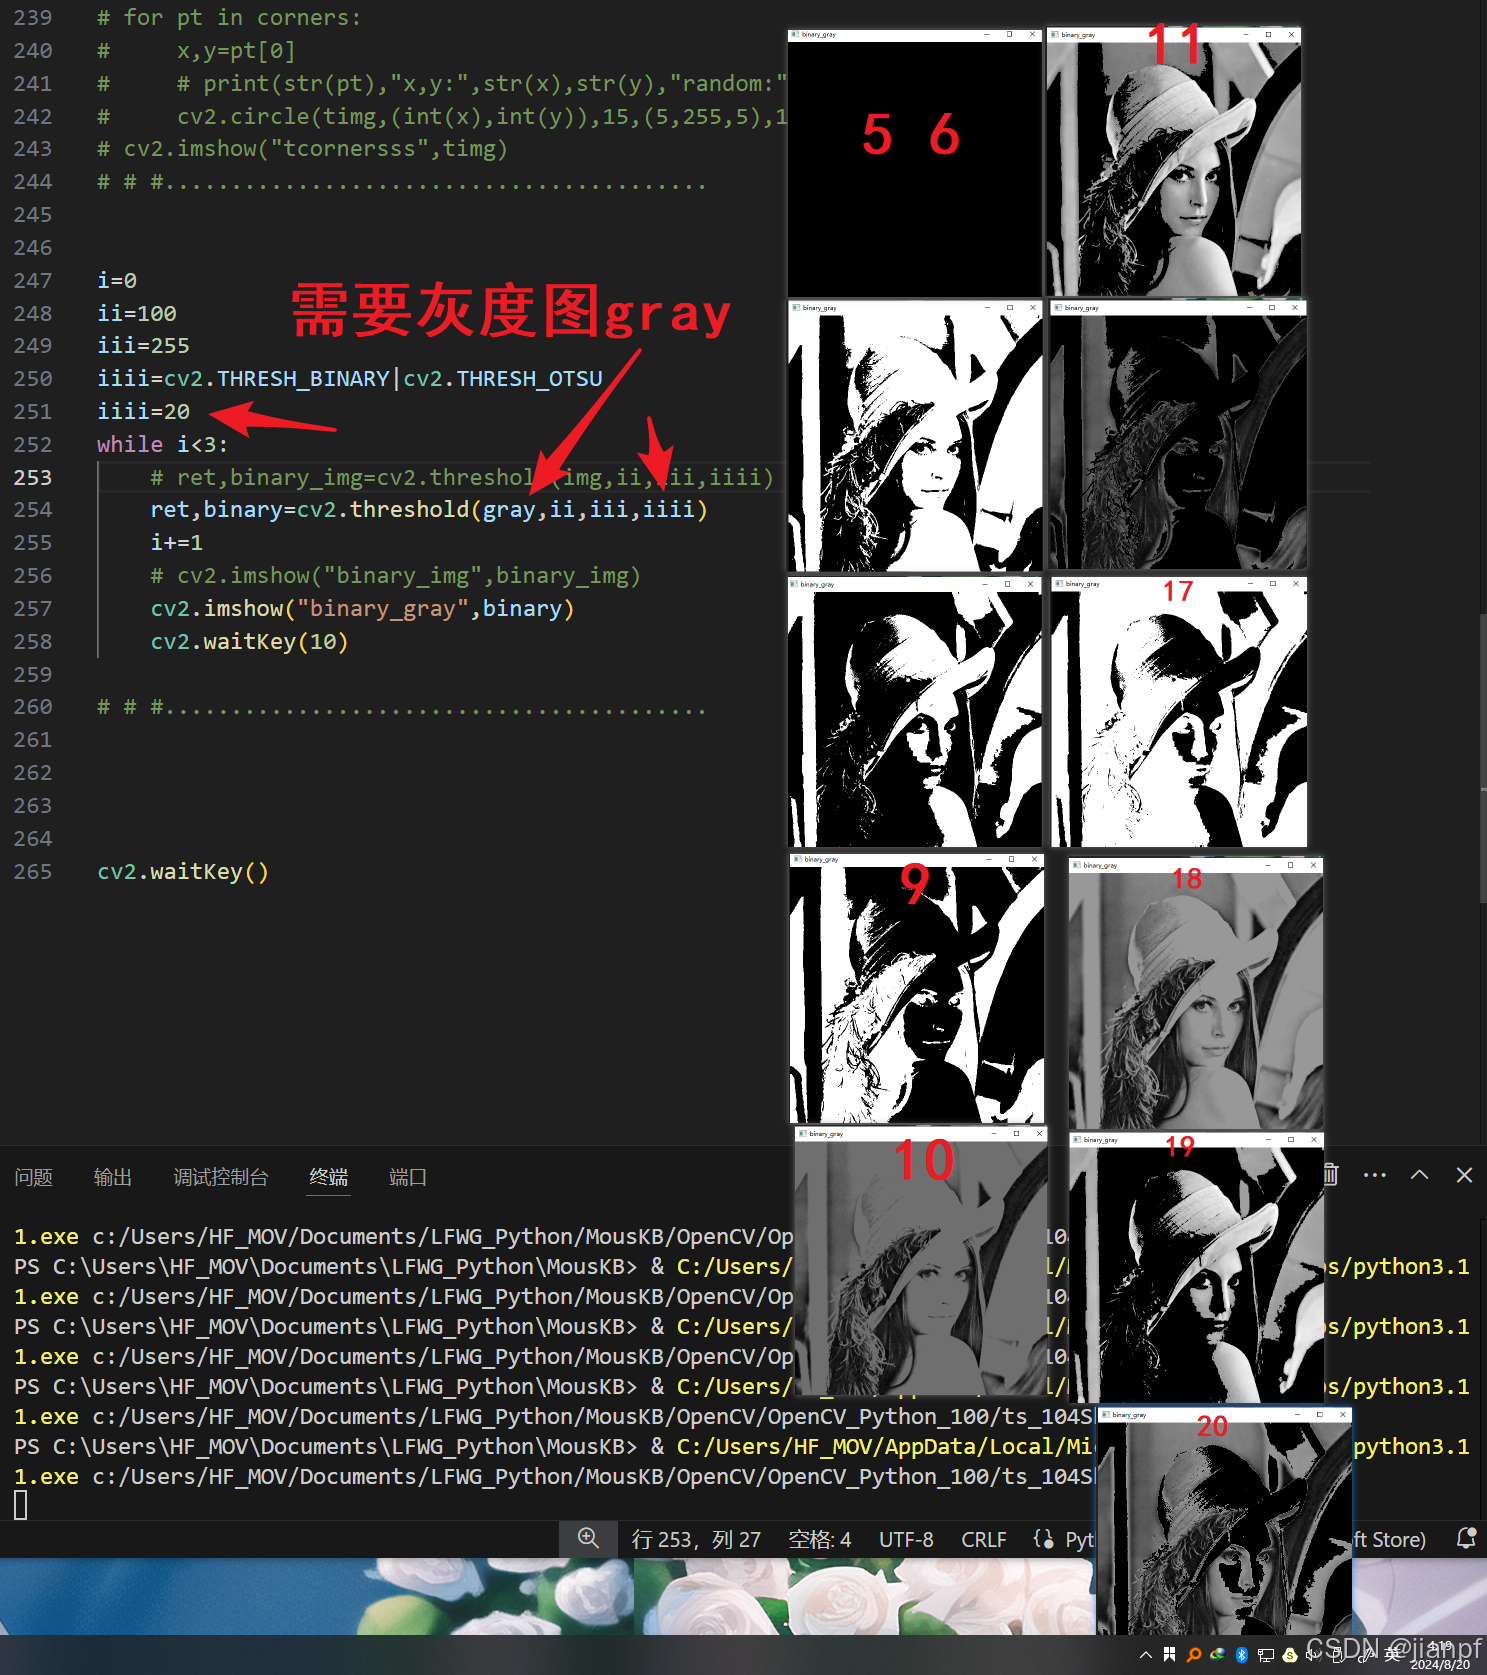
二值图需要灰度图
手动指定阈值为127,THRESH_BINARY表示大于127为白色,反之为黑色。
https://www.jb51.net/article/245025.htm
百度需要开通先用后付费协议
https://www.cnblogs.com/ivan-lyu/p/15811474.html
加载模型
https://blog.51cto.com/u_16175504/10893627
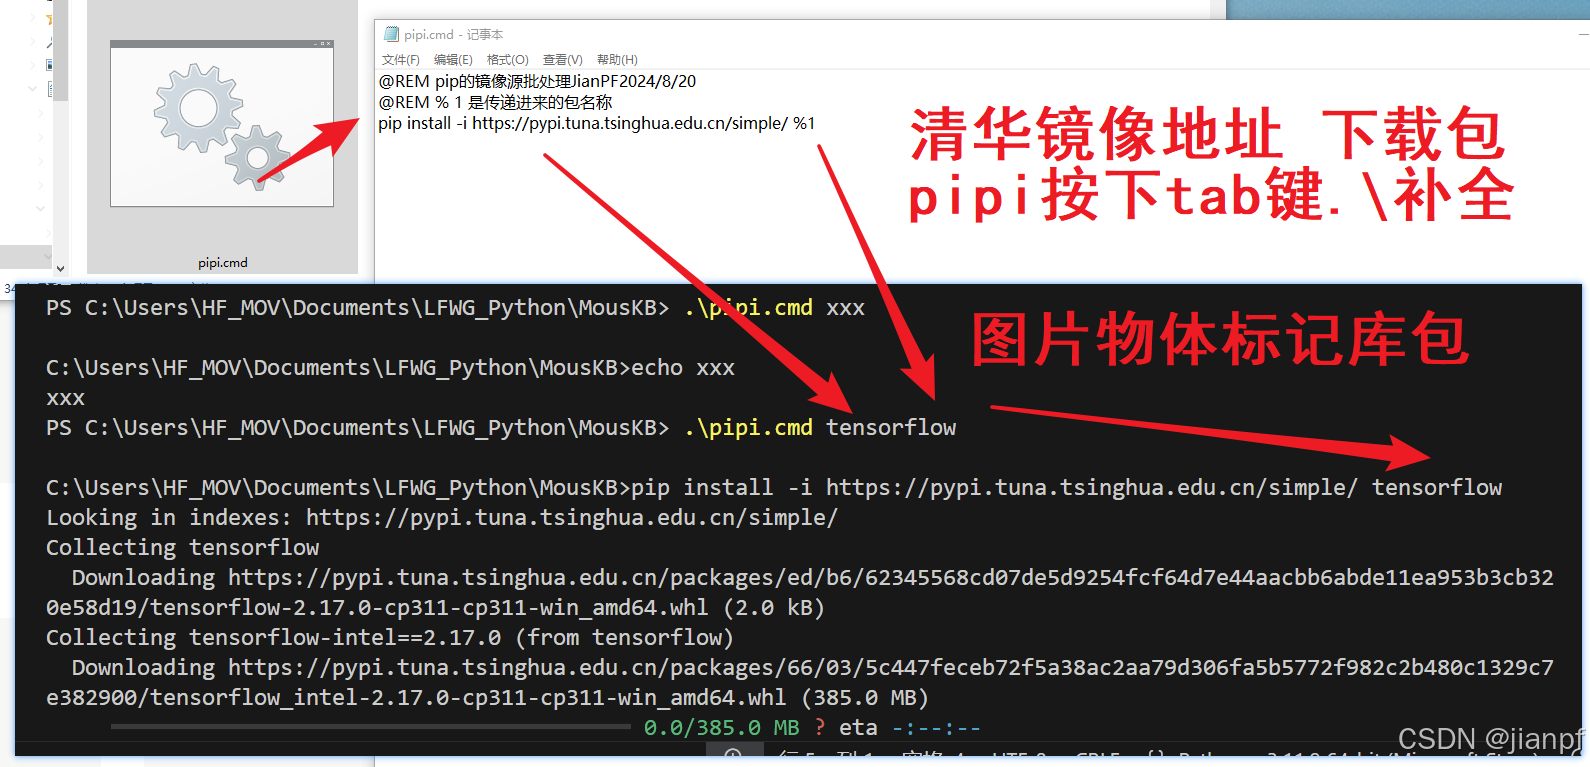
@REM pipi.cmd的镜像源批处理JianPF2024/8/20
@REM % 1 是传递进来的包名称
pip install -i https://pypi.tuna.tsinghua.edu.cn/simple/ %1
@REM pip的镜像源批处理JianPF2024/8/21(追加保存安装时间记录)
@REM % 1 是传递进来的包名称
date /t >>pipinf.txt
time /t >>pipinf.txt
echo ./pipi.cmd %1 >>pipinf.txt
echo "正在安装"  >>pipinf.txt
pip install -i https://pypi.tuna.tsinghua.edu.cn/simple/ %1
@REM pip的镜像源批处理JianPF2024/8/21(追加保存安装时间记录)
@REM % 1 是传递进来的包名称
date /t >>pipinf.txt
time /t >>pipinf.txt
echo ./pipui.cmd %1 >>pipinf.txt
echo "正在删除" >>pipinf.txt
@REM pip install -i https://pypi.tuna.tsinghua.edu.cn/simple/ %1
pip uninstall %1
@REM pip的镜像源只下载包到目录批处理JianPF2024/9/1(pipid 包名==版本 目录)
@REM % 1 是传递进来的包名称 %2 是传递存放地址
date /t >>pipidnf.txt
time /t >>pipidnf.txt
echo ./pipid.cmd %1 %2 >>pipidnf.txt
echo "正在安装"  >>pipidnf.txt
pip download %1 -d %2 -i https://pypi.tuna.tsinghua.edu.cn/simple/ 
GPU版本
https://tensorflow.google.cn/tutorials/keras/classification?hl=zh-cn
#pip install -i https://pypi.tuna.tsinghua.edu.cn/simple/ tensorflow 先安装这个库包
import cv2
import numpy as np
import tensorflow as tf
from tensorflow.keras.applications.inception_v3 import InceptionV3
from tensorflow.keras.preprocessing import image
from tensorflow.keras.applications.inception_v3 import preprocess_input, decode_predictions
import numpy as npsrc= "./opencv/opencv_python_100/img01.jpg"
src2="./opencv/opencv_python_100/img02.jpg"
src3="sbdt_003.png"
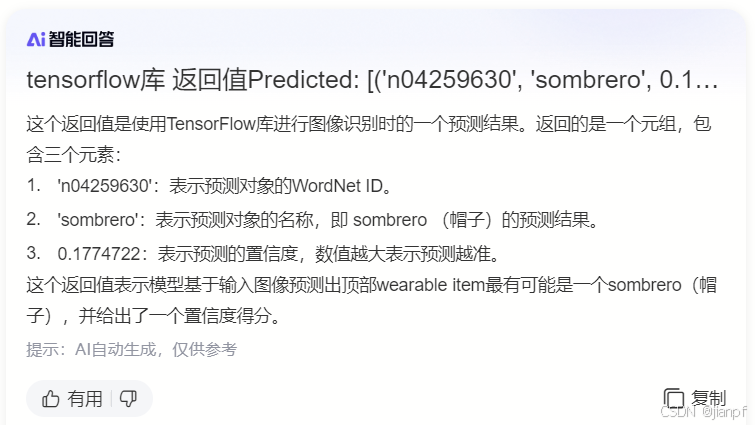
src4="./opencv/opencv_python_100/img03.png"#Predicted:
# [('n04259630', 'sombrero', 0.1774722),
# ('n02869837', 'bonnet', 0.114571236),
# ('n03124170', 'cowboy_hat', 0.06516562)]# Predicted: [('n03450230', 'gown', 0.17983808),
# ('n10148035', 'groom', 0.058164302),
# ('n06359193', 'web_site', 0.039683823)]# Predicted: [('n01930112', 'nematode', 0.2876512),
# ('n01910747', 'jellyfish', 0.11603559),
# ('n03857828', 'oscilloscope', 0.09301928)]# Predicted:猜测top:14个 [
# ('n04259630', 'sombrero', 0.1774722),
# ('n02869837', 'bonnet', 0.114571236),
# ('n03124170', 'cowboy_hat', 0.06516562),
# ('n02837789', 'bikini', 0.038271967),
# ('n02892767', 'brassiere', 0.03584331),
# ('n03710637', 'maillot', 0.018792203),
# ('n04136333', 'sarong', 0.012082286),
# ('n03770439', 'miniskirt', 0.011635187),
# ('n03447721', 'gong', 0.010147819),
# ('n03450230', 'gown', 0.009473588),
# ('n03710721', 'maillot', 0.009046382),
# ('n04599235', 'wool', 0.008736195),
# ('n04584207', 'wig', 0.008491085),
# ('n03325584', 'feather_boa', 0.00805576)]src0=srcimgx=cv2.imread(src)
img2=cv2.imread(src2)
img3=cv2.imread(src3)
img4=cv2.imread(src4)# 加载预训练的Inception V3模型
model = InceptionV3(weights='imagenet', include_top=True)# 图片路径
img_path =src0 # 'path_to_your_image.jpg'# 预处理图片
img = image.load_img(img_path, target_size=(299, 299))
x = image.img_to_array(img)
x = np.expand_dims(x, axis=0)
x = preprocess_input(x)# 用模型进行预测
preds = model.predict(x)# 解码预测结果
print("..............")
print('Predicted:', decode_predictions(preds, top=14)[0])
print("..............")
print(str(len(decode_predictions(preds, top=3))),decode_predictions(preds, top=3)[0][0])# 注意:
# 1. 需要将 'path_to_your_image.jpg' 替换为你的图片路径。
# 2. 图片会被resize到299x299,这是Inception V3模型的输入尺寸。
# 3. 输出将是模型对图片内容的最有可能的三个预测及其置信度。cv2.imshow("img",imgx)
cv2.waitKey()
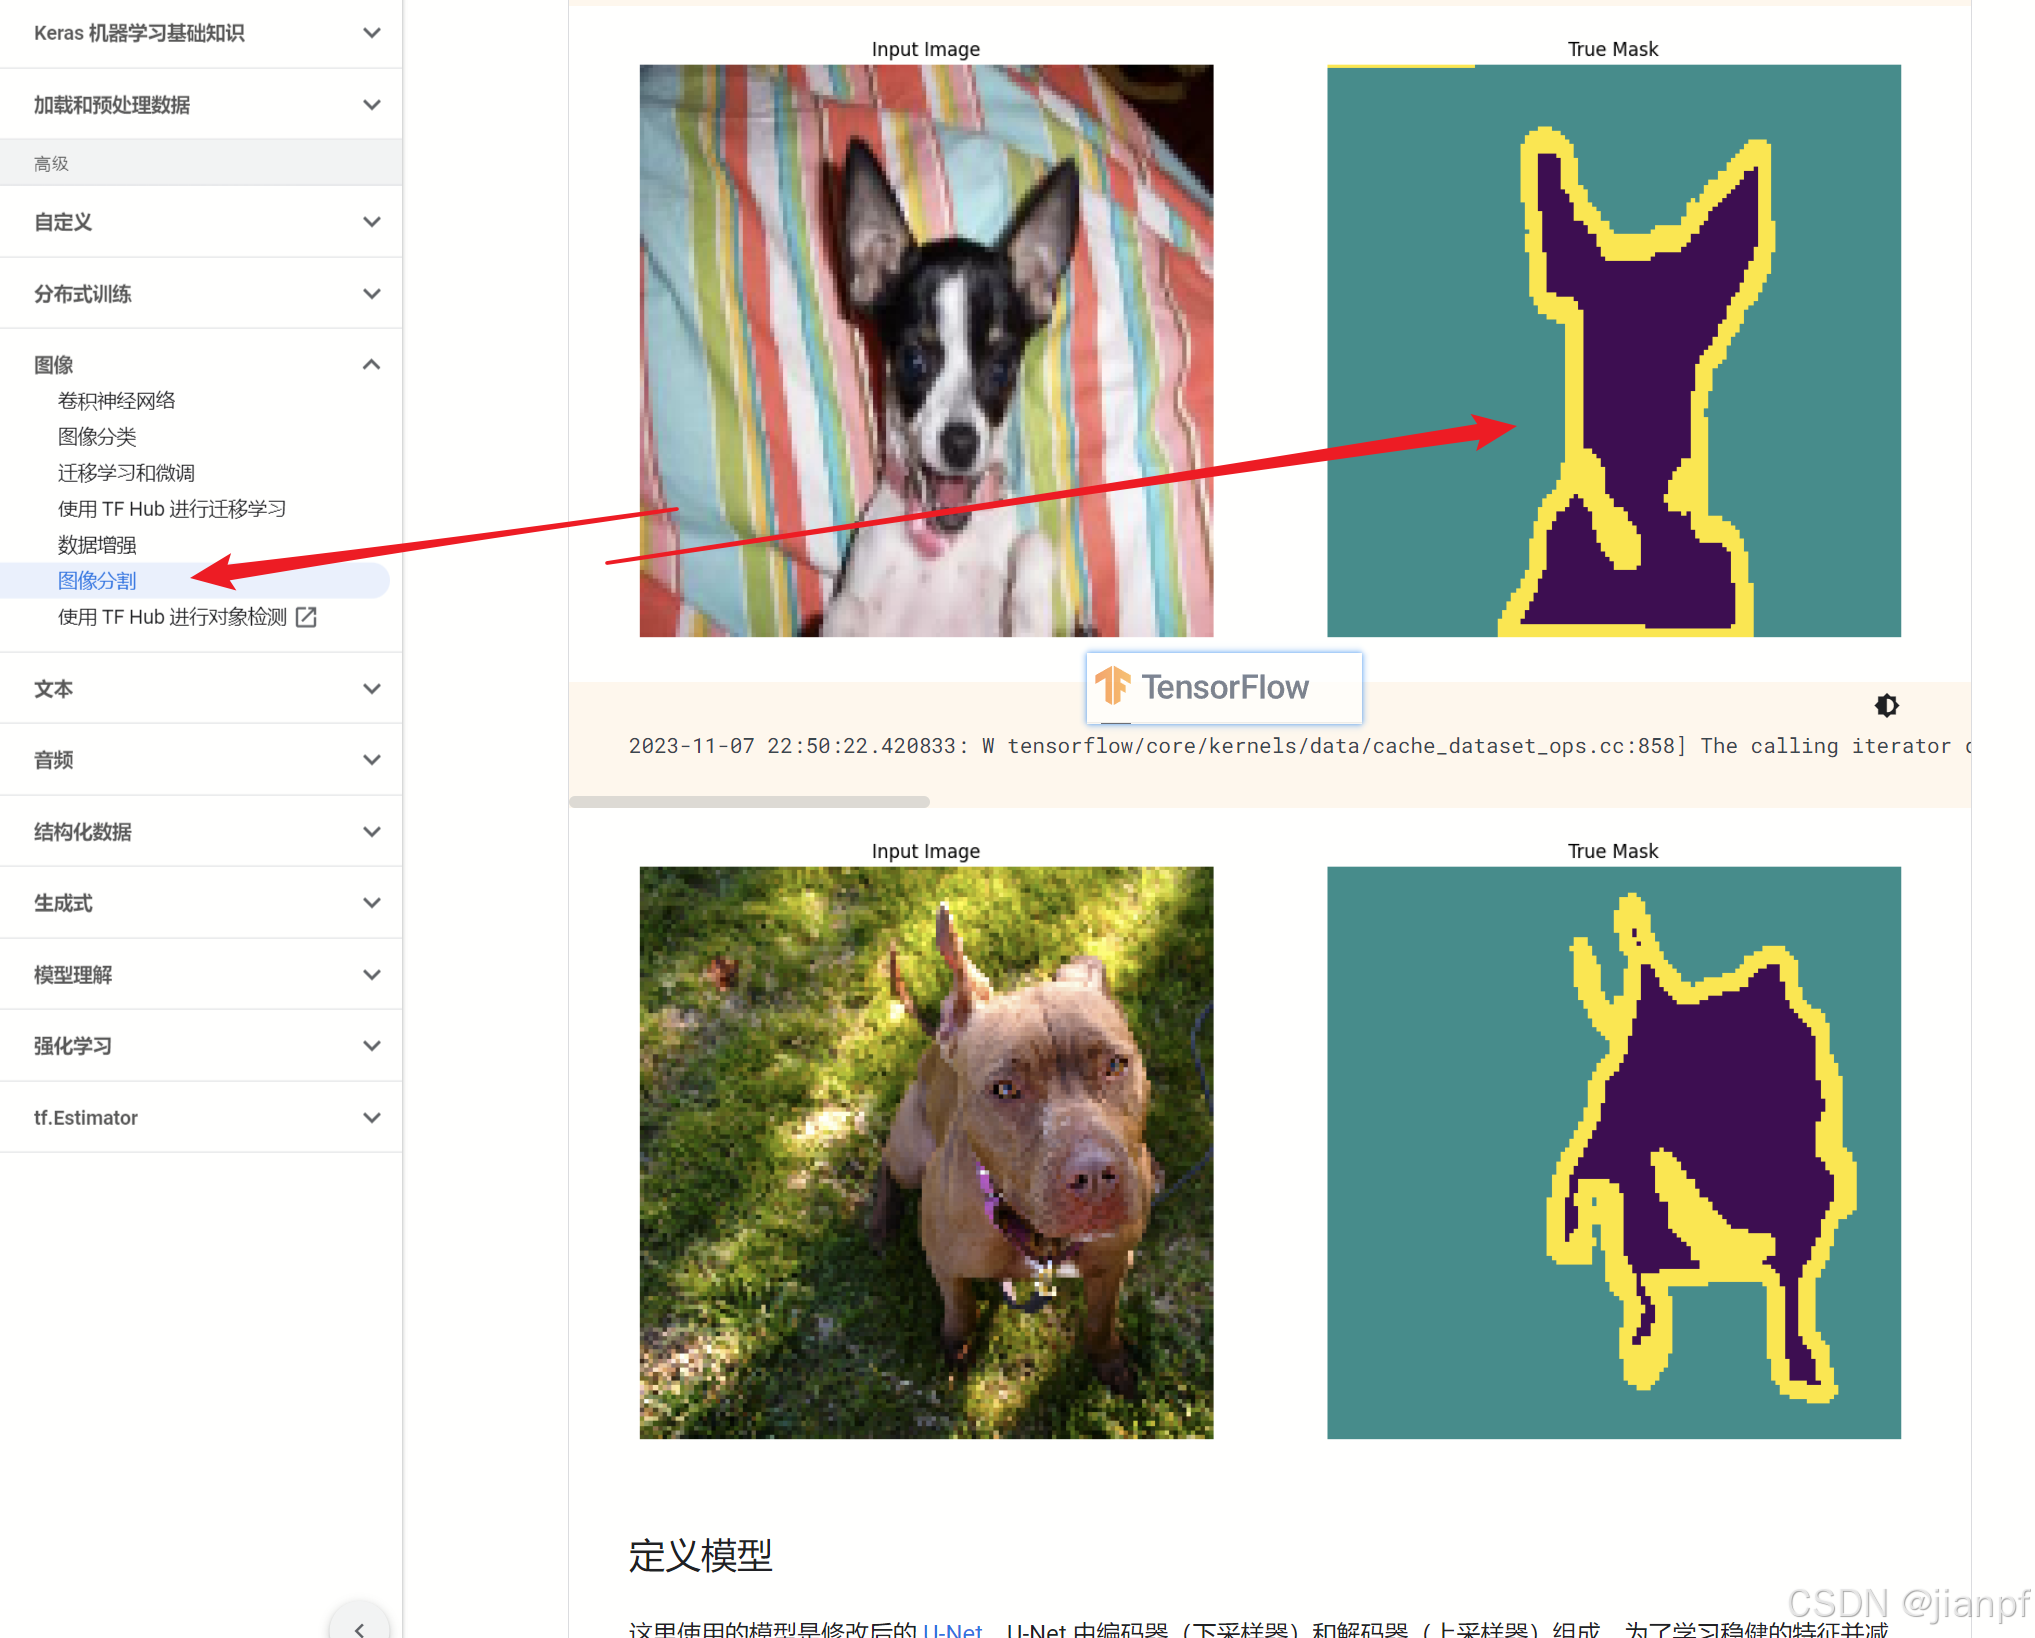
图像分割
https://tensorflow.google.cn/tutorials/images/segmentation?hl=zh-cn

https://blog.csdn.net/buptgshengod/article/details/80959504
神经网络识别图片文字
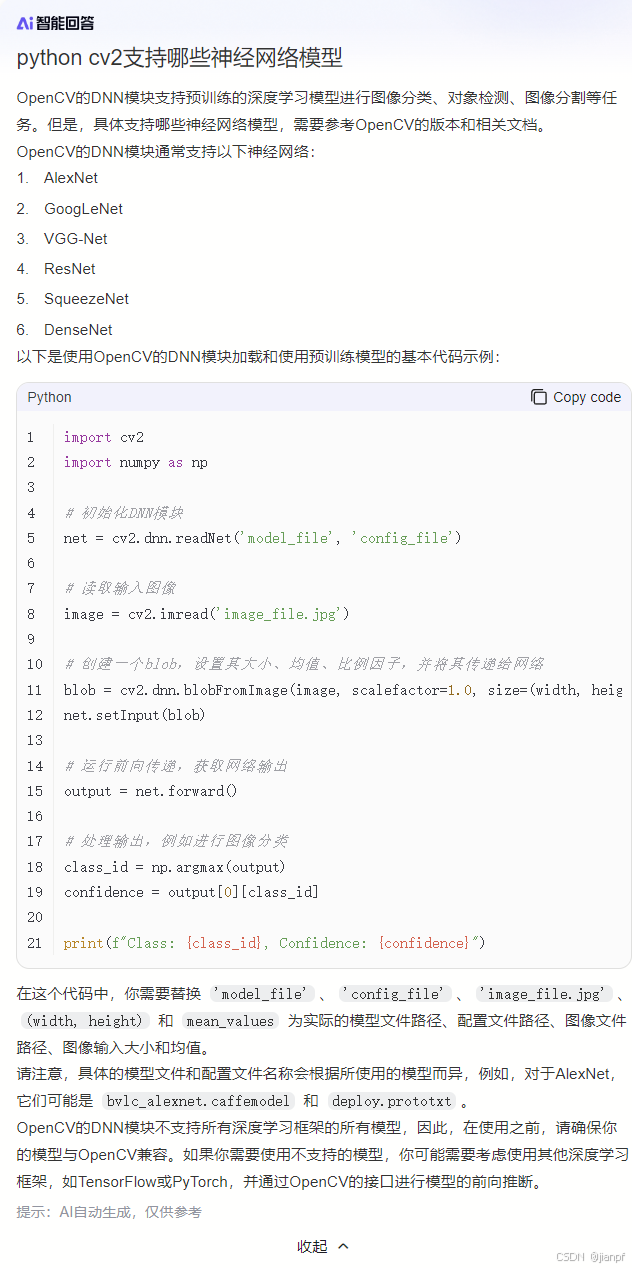
AlexNet
GoogLeNet
VGG-Net
ResNet
SqueezeNet
DenseNet
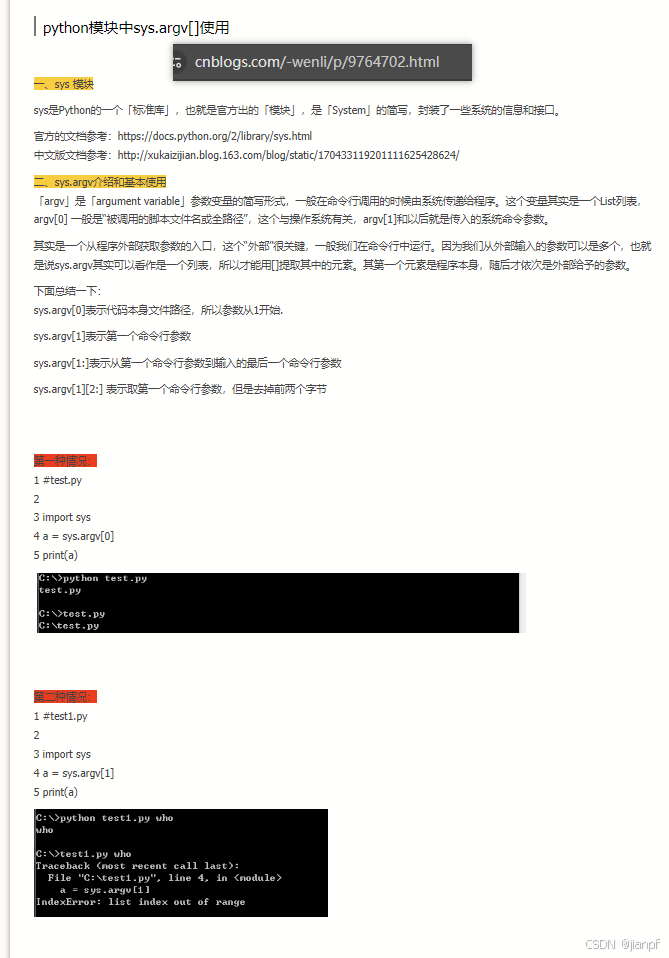
python模块中sys.argv[]使用
CMD传参数到python中
下面总结一下:
sys.argv[0]表示代码本身文件路径,所以参数从1开始.
sys.argv[1]表示第一个命令行参数
sys.argv[1:]表示从第一个命令行参数到输入的最后一个命令行参数
sys.argv[1][2:] 表示取第一个命令行参数,但是去掉前两个字节
https://www.cnblogs.com/-wenli/p/9764702.html
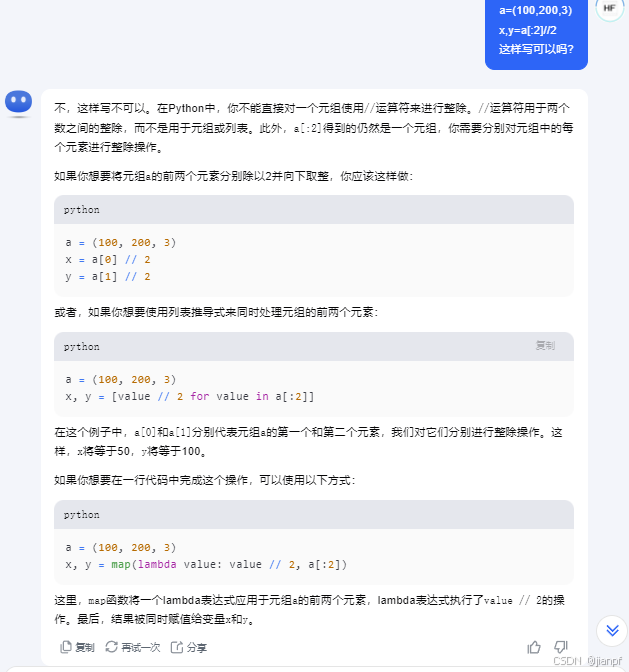
数组元素同时处理
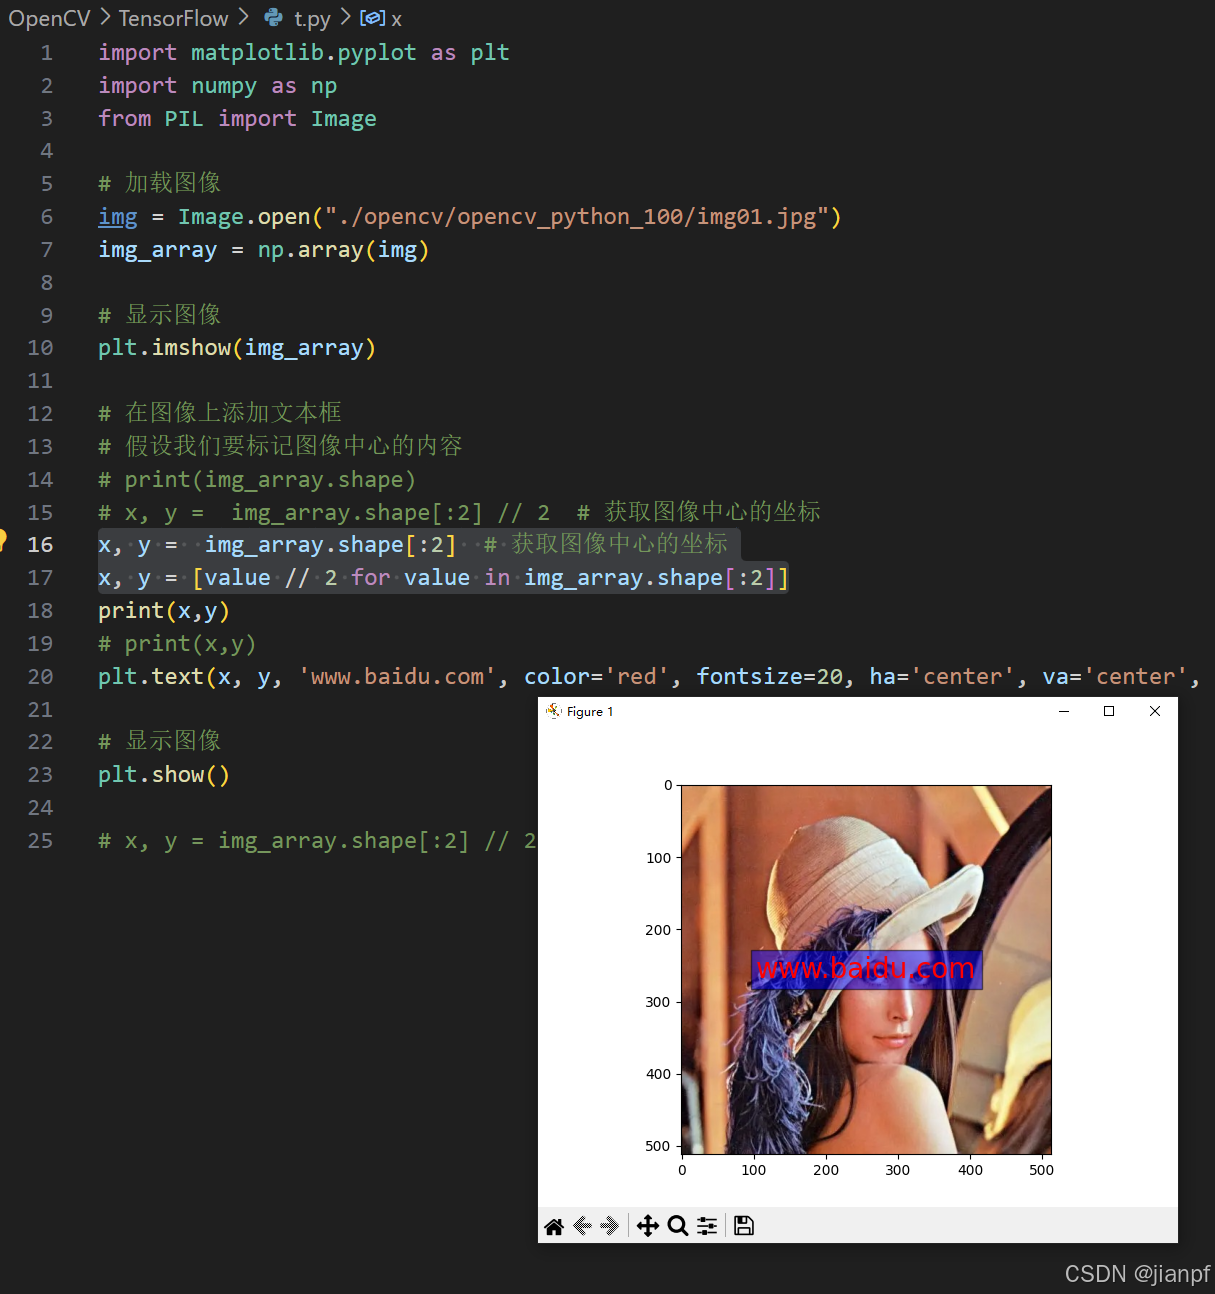
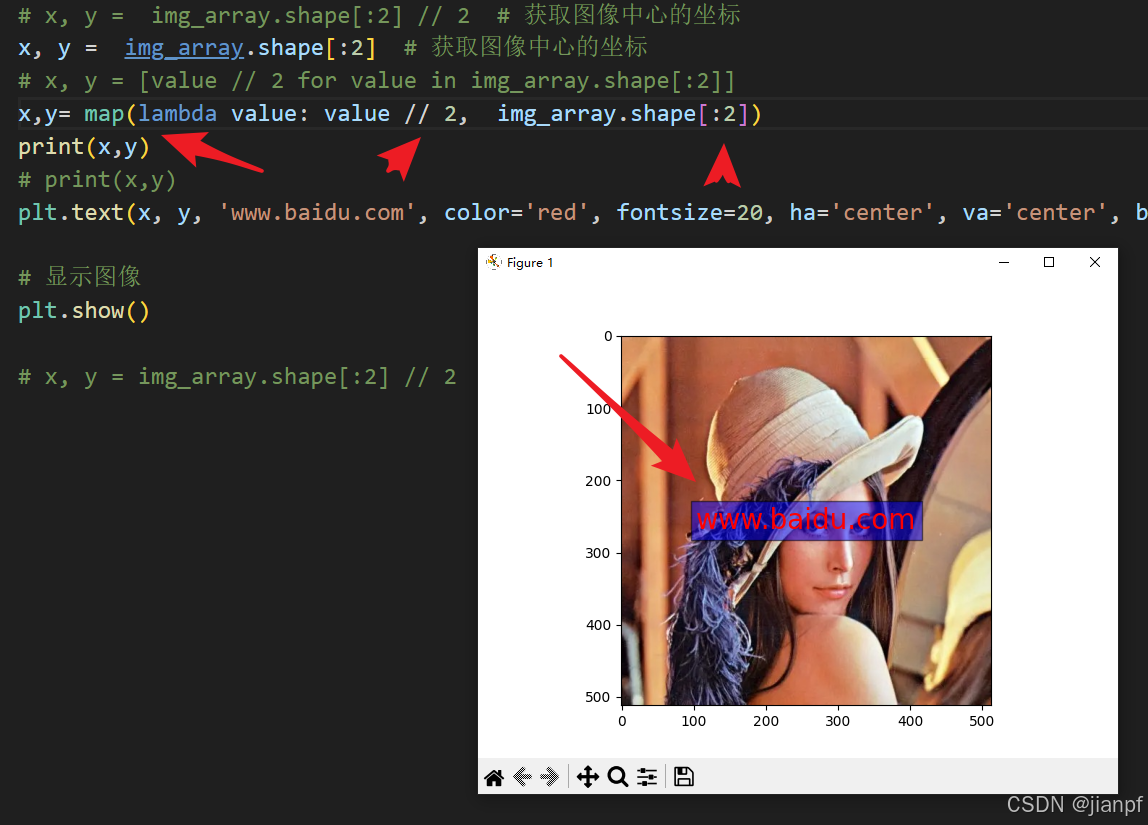
x, y = [value // 2 for value in img_array.shape[:2]]
x,y= map(lambda value: value // 2, img_array.shape[:2])
这两段代码都可以(选for简单点)
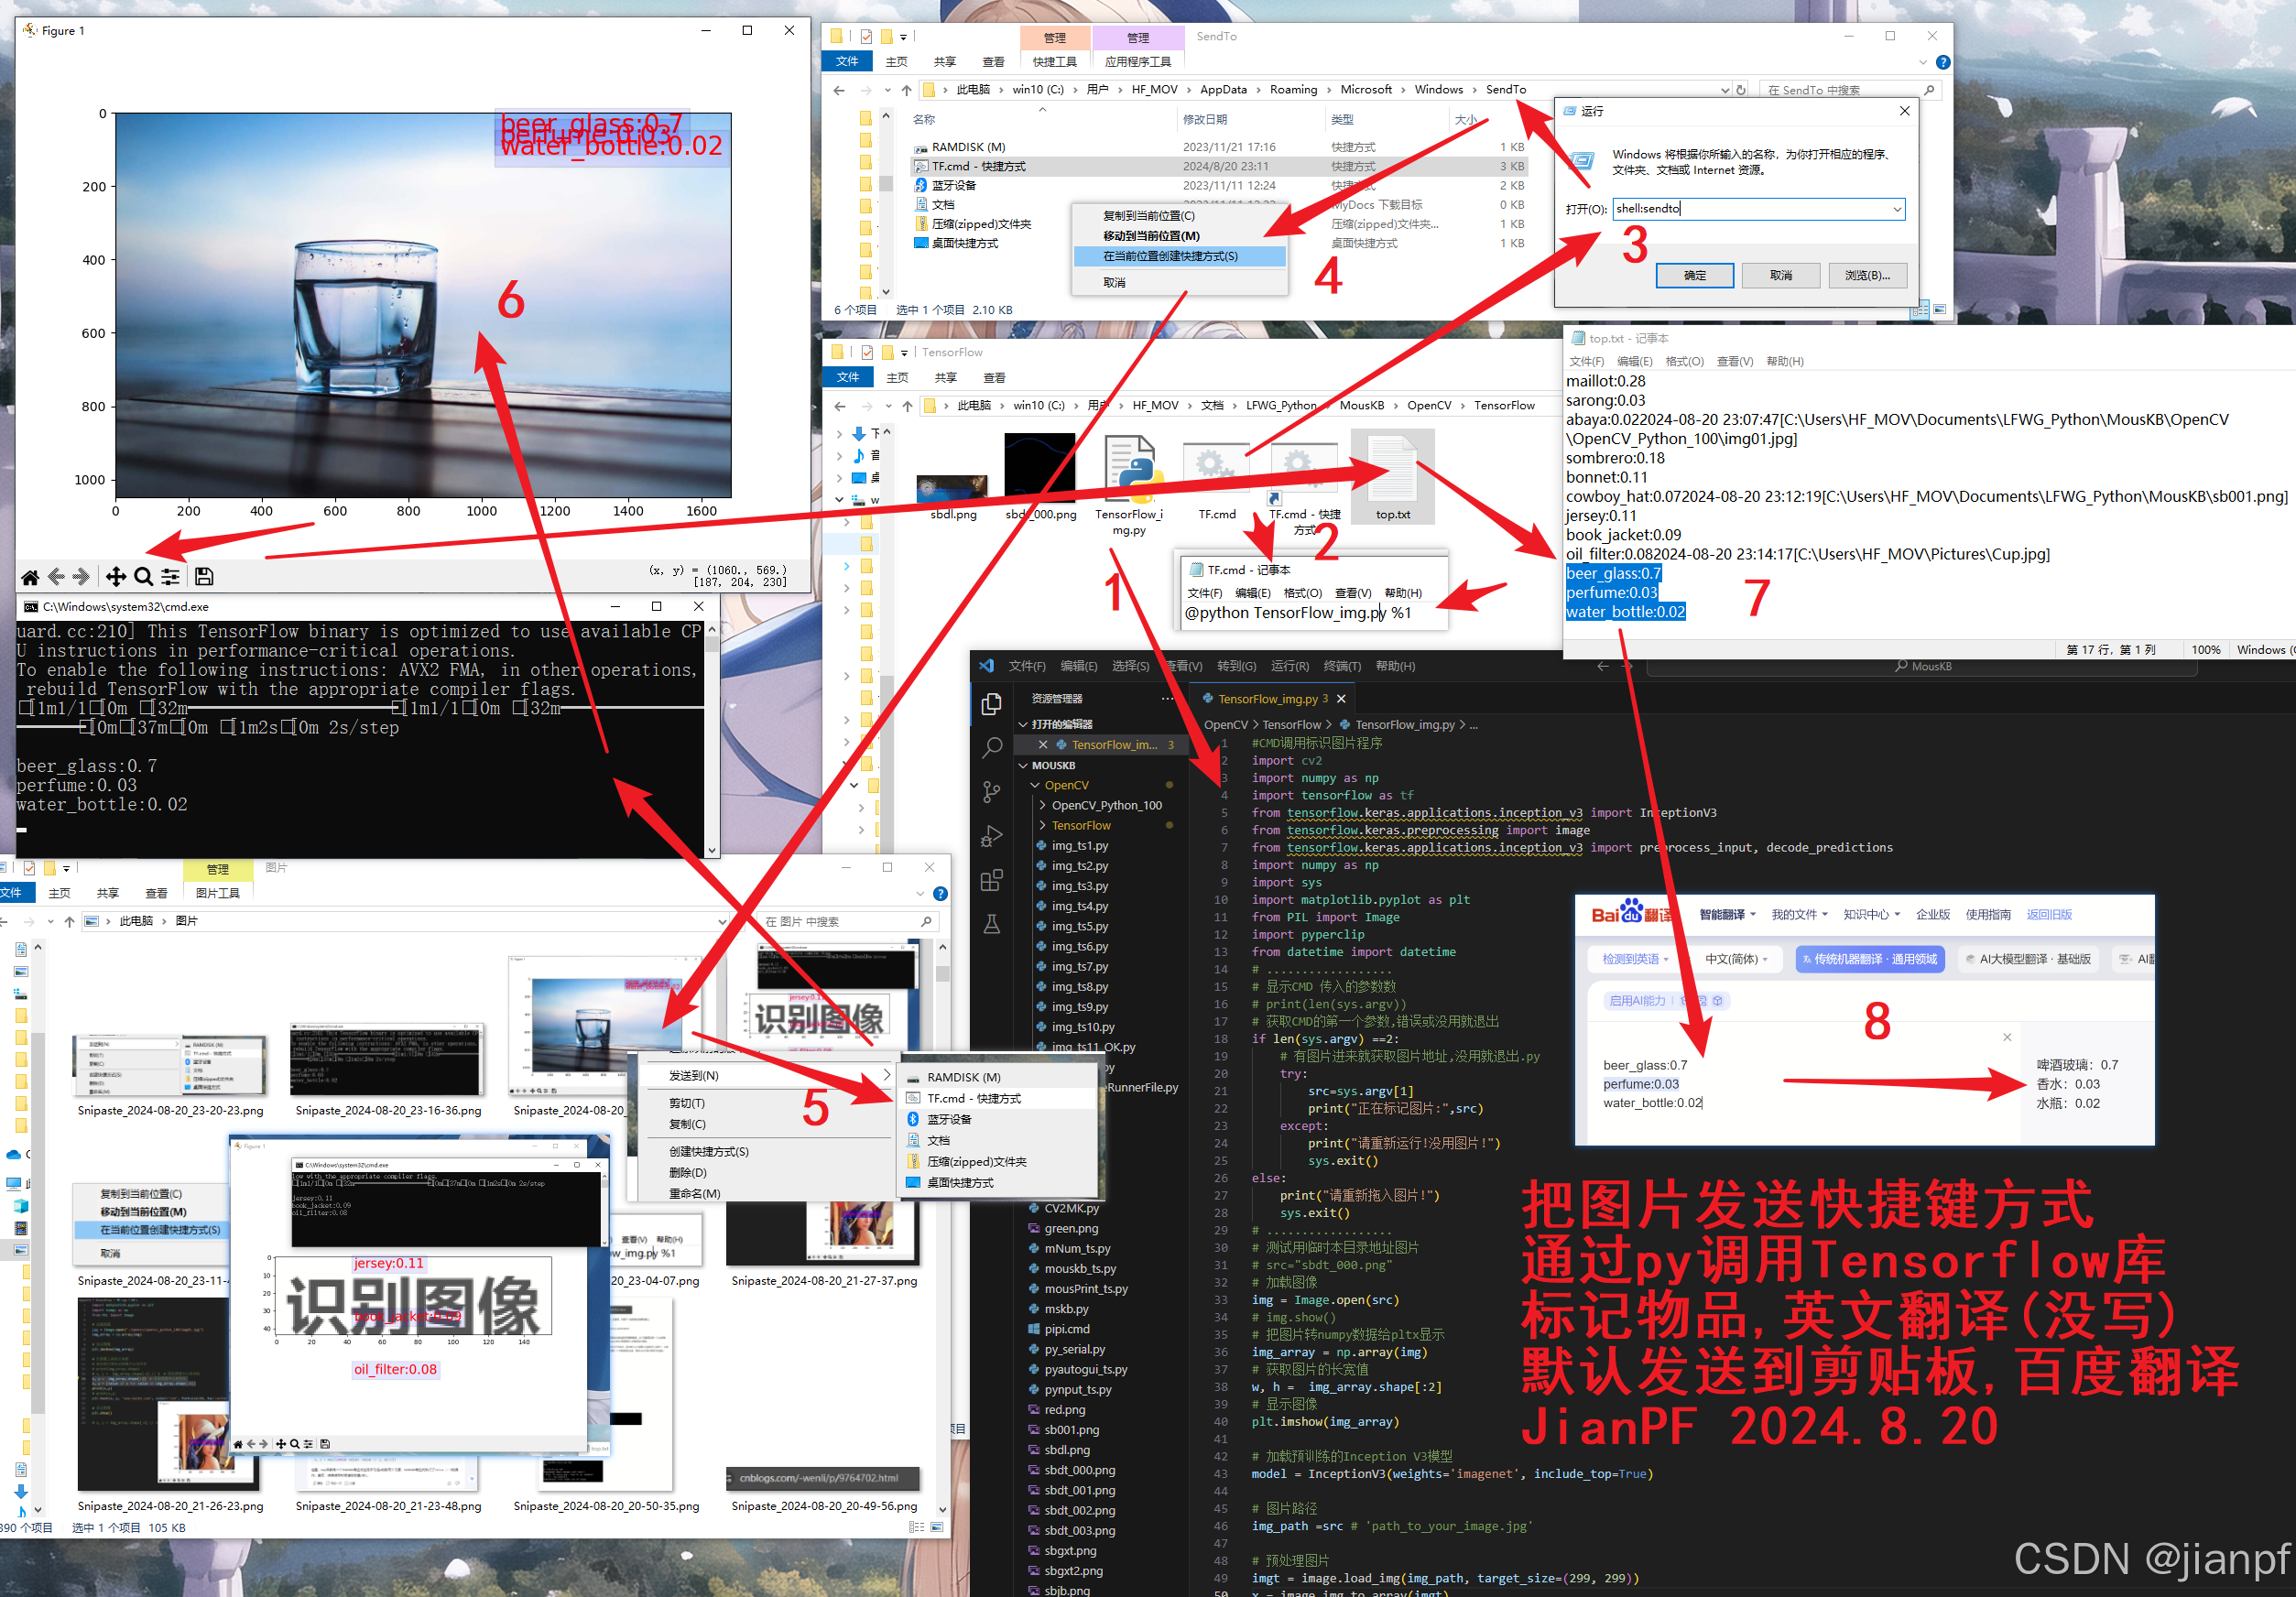
#图片拖入CMD快捷方式调用标识图片程序JianPF20240820W
import cv2
import numpy as np
import tensorflow as tf
from tensorflow.keras.applications.inception_v3 import InceptionV3
from tensorflow.keras.preprocessing import image
from tensorflow.keras.applications.inception_v3 import preprocess_input, decode_predictions
import numpy as np
import sys
import matplotlib.pyplot as plt
from PIL import Image
import pyperclip
from datetime import datetime
# ..................
# 显示CMD 传入的参数数
# print(len(sys.argv))
# 获取CMD的第一个参数,错误或没用就退出
if len(sys.argv) ==2:# 有图片进来就获取图片地址,没用就退出.pytry:src=sys.argv[1]print("正在标记图片:",src)except:print("请重新运行!没用图片!")sys.exit()
else:print("请重新拖入图片!")sys.exit()
# ..................
# 测试用临时本目录地址图片
# src="sbdt_000.png"
# 加载图像
img = Image.open(src)
# img.show()
# 把图片转numpy数据给pltx显示
img_array = np.array(img)
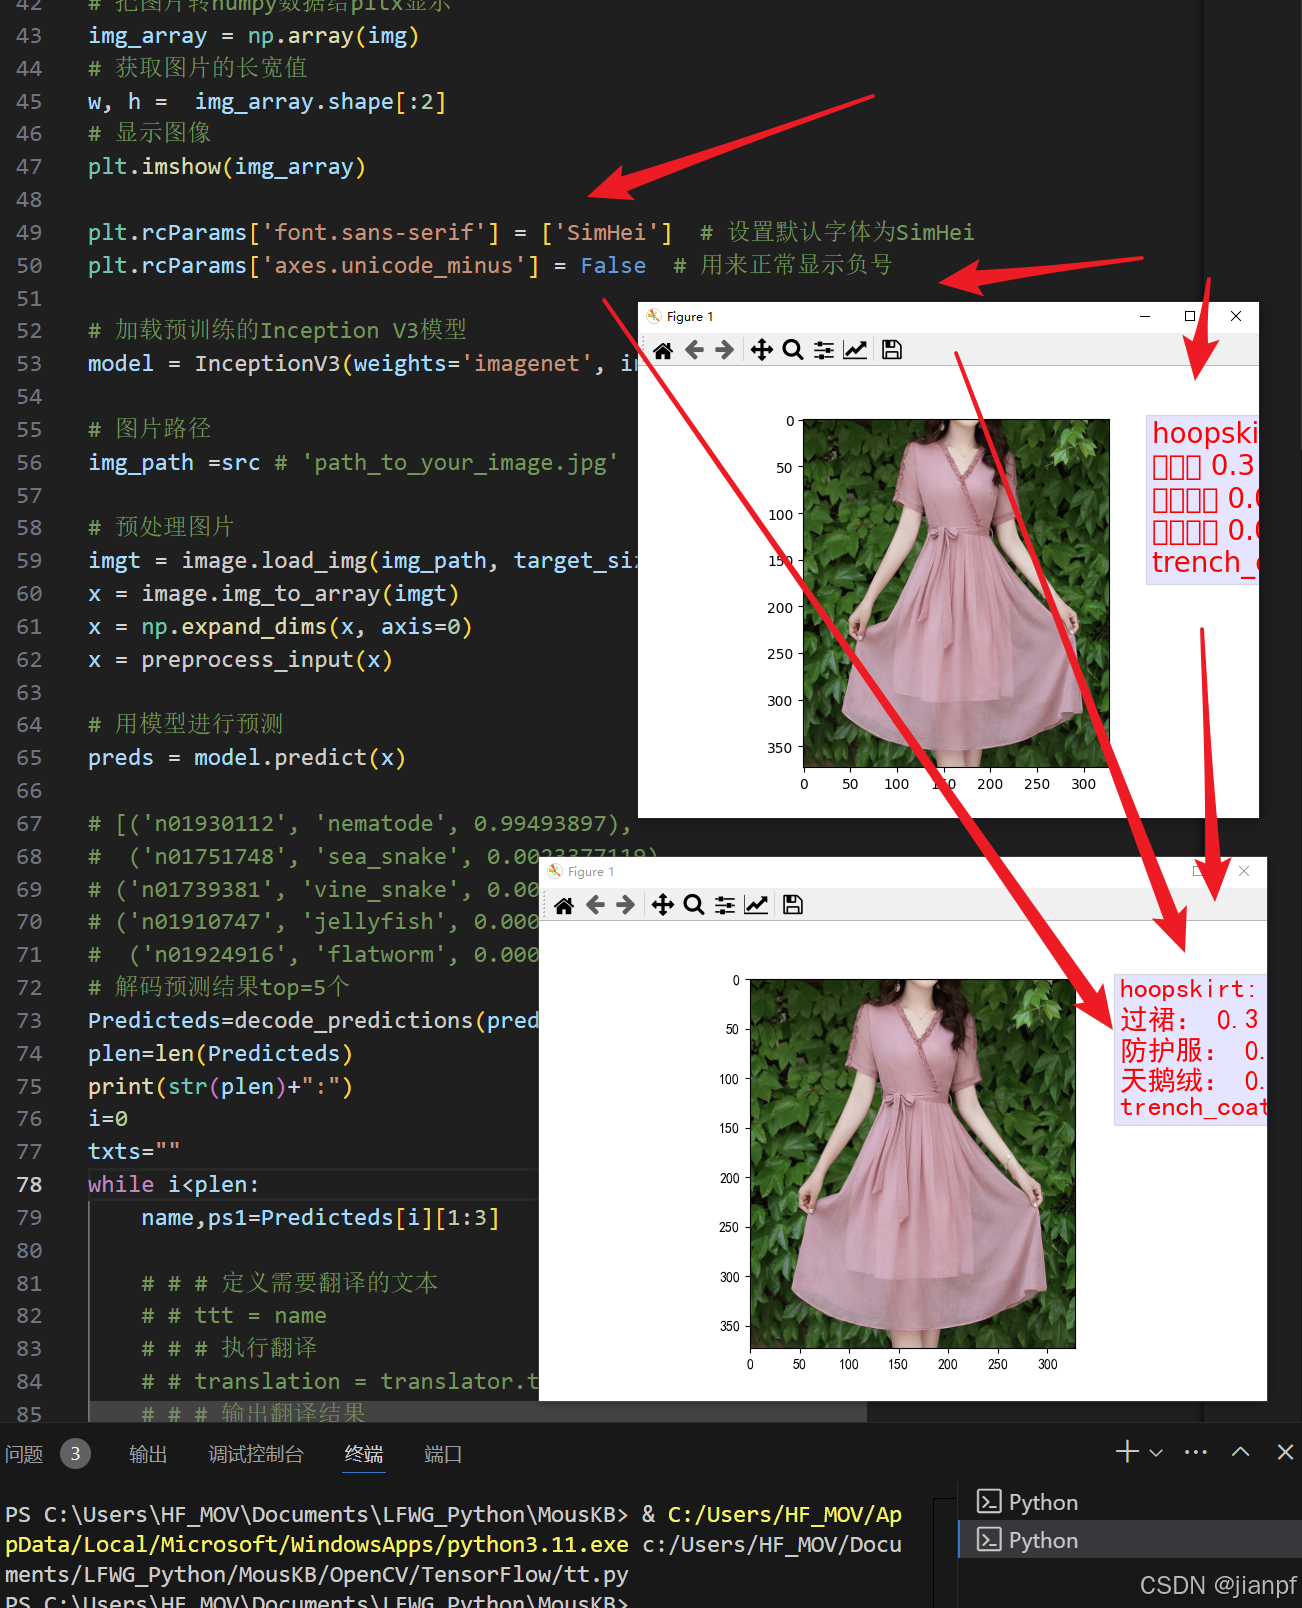
# 获取图片的长宽值
w, h = img_array.shape[:2]
# 显示图像
plt.imshow(img_array)# 加载预训练的Inception V3模型
model = InceptionV3(weights='imagenet', include_top=True)# 图片路径
img_path =src # 'path_to_your_image.jpg'# 预处理图片
imgt = image.load_img(img_path, target_size=(299, 299))
x = image.img_to_array(imgt)
x = np.expand_dims(x, axis=0)
x = preprocess_input(x)# 用模型进行预测
preds = model.predict(x)# [('n01930112', 'nematode', 0.99493897),
# ('n01751748', 'sea_snake', 0.0023377119),
# ('n01739381', 'vine_snake', 0.0005940564),
# ('n01910747', 'jellyfish', 0.0005019362),
# ('n01924916', 'flatworm', 0.00020100156)]
# 解码预测结果top=5个
Predicteds=decode_predictions(preds, top=5)[0]
plen=len(Predicteds)
i=0
txts=""
while i<plen:name,ps1=Predicteds[i][1:3]# 连接字符串,质量保留2位小数txt=name+ ":" + str(round(ps1,2))# plt显示窗口中添加文本框plt.text(w, i*30, txt, color='red', fontsize=20, ha='left', va='top', bbox=dict(facecolor='blue', alpha=0.1))txts=txts+"\n"+txt# print(name,ps1)# print(Predicteds[i][1:3])i+=1# 输出文本给到翻译
print(txts)
# 输出到剪贴板,网页翻译
pyperclip.copy(txts)
# 获取系统时间
now=datetime.now().strftime("%Y-%m-%d %H:%M:%S")
# 保存识别记录,直接创建或追加文本
with open('top.txt',"a") as file:file.write(now)file.write("["+src+"]")file.write(txts)file.write("\n")file.close()
# 显示图像
plt.show()win10发送到快捷键运行shell:sendto打开目录创建快捷键到这里
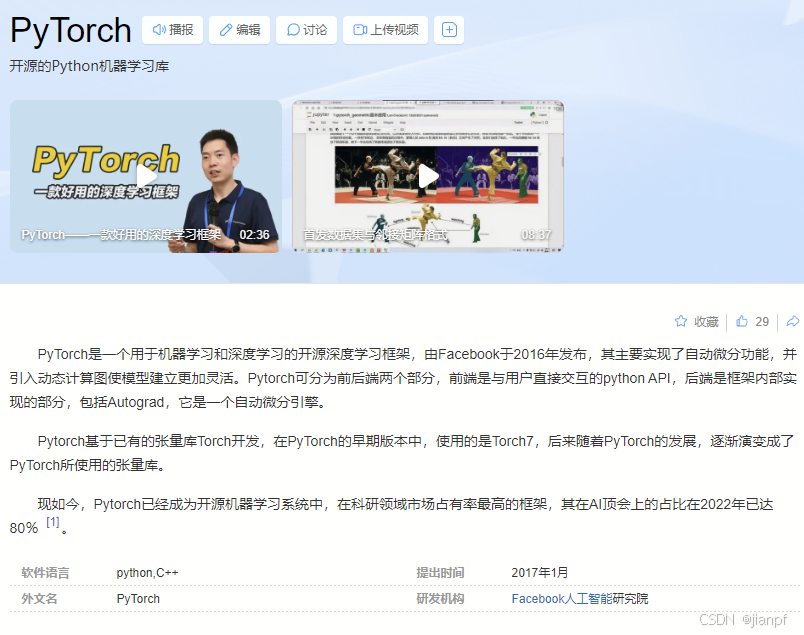
https://baike.baidu.com/item/PyTorch/24269838?fr=ge_ala
版本问题吗?

https://blog.51cto.com/u_12205/8318859
2024.8.21.01:33又又又了
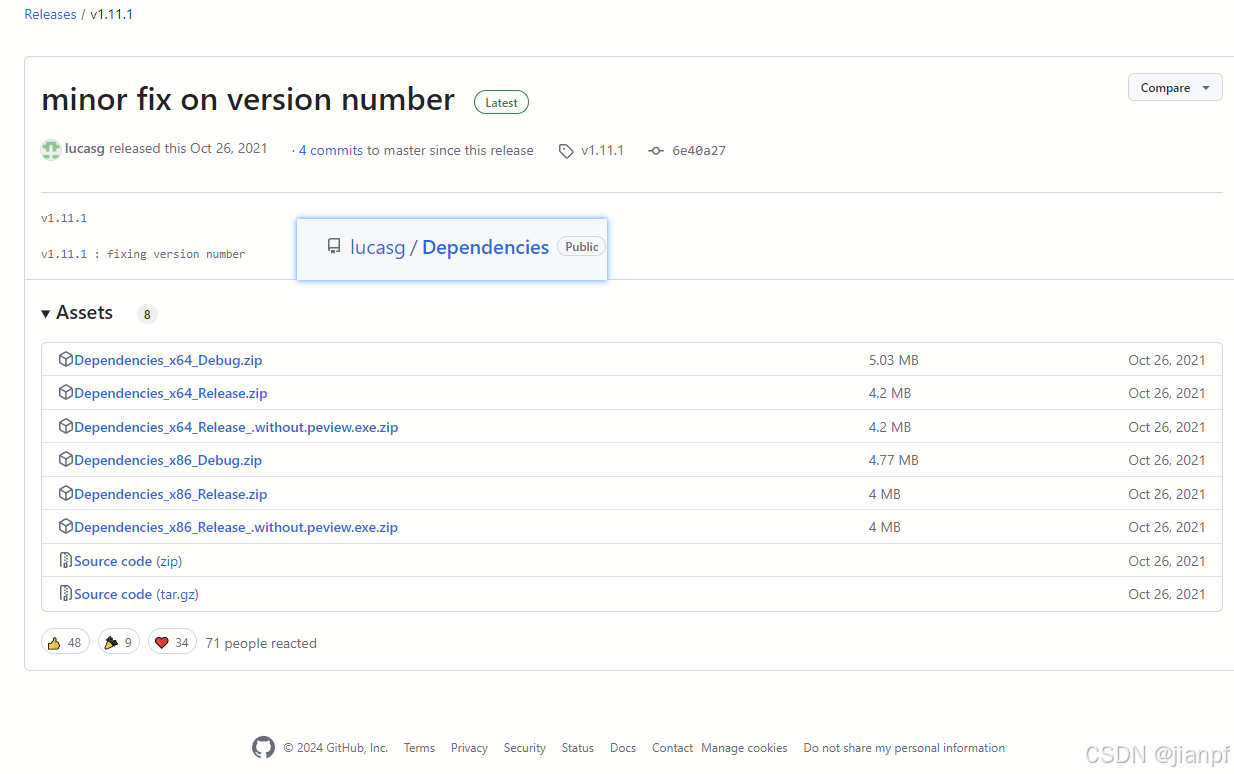
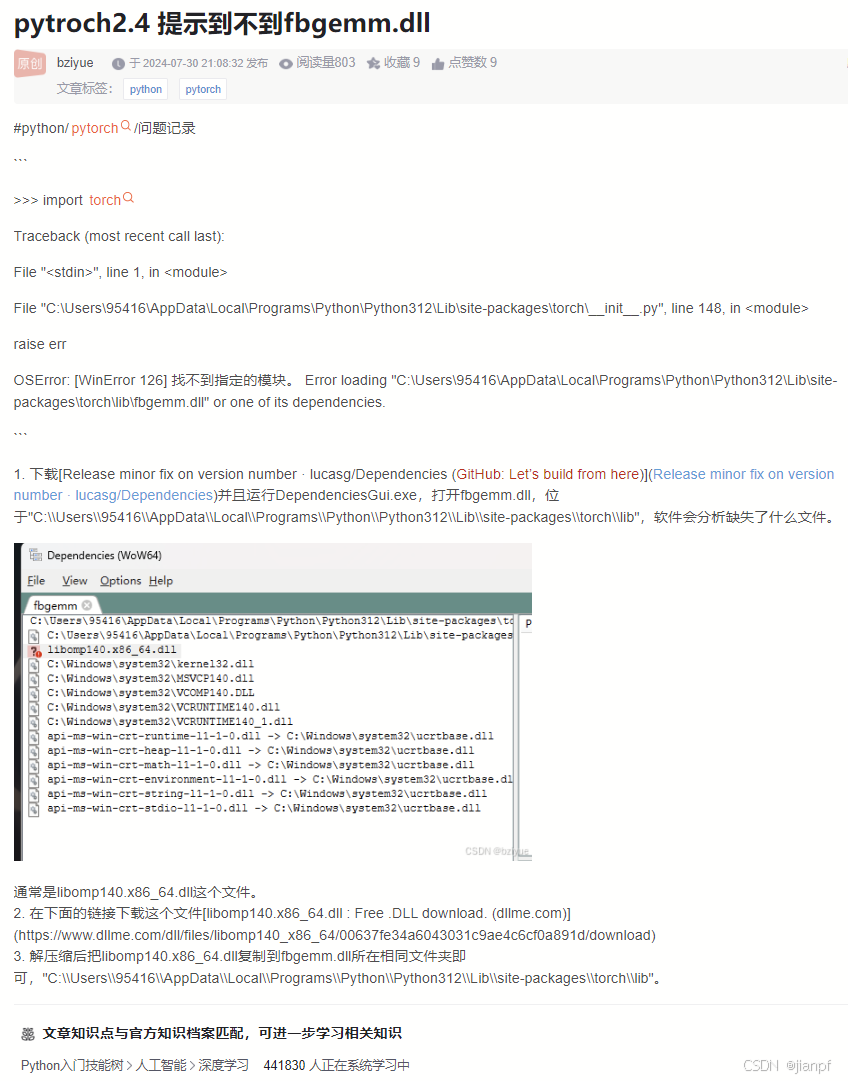
下载这个并运行Dependencies_x64_Release.zip
https://github.com/lucasg/Dependencies/releases/tag/v1.11.1
C:\Users\HF_MOV\AppData\Local\Packages\PythonSoftwareFoundation.Python.3.11_qbz5n2kfra8p0\LocalCache\local-packages\Python311\site-packages
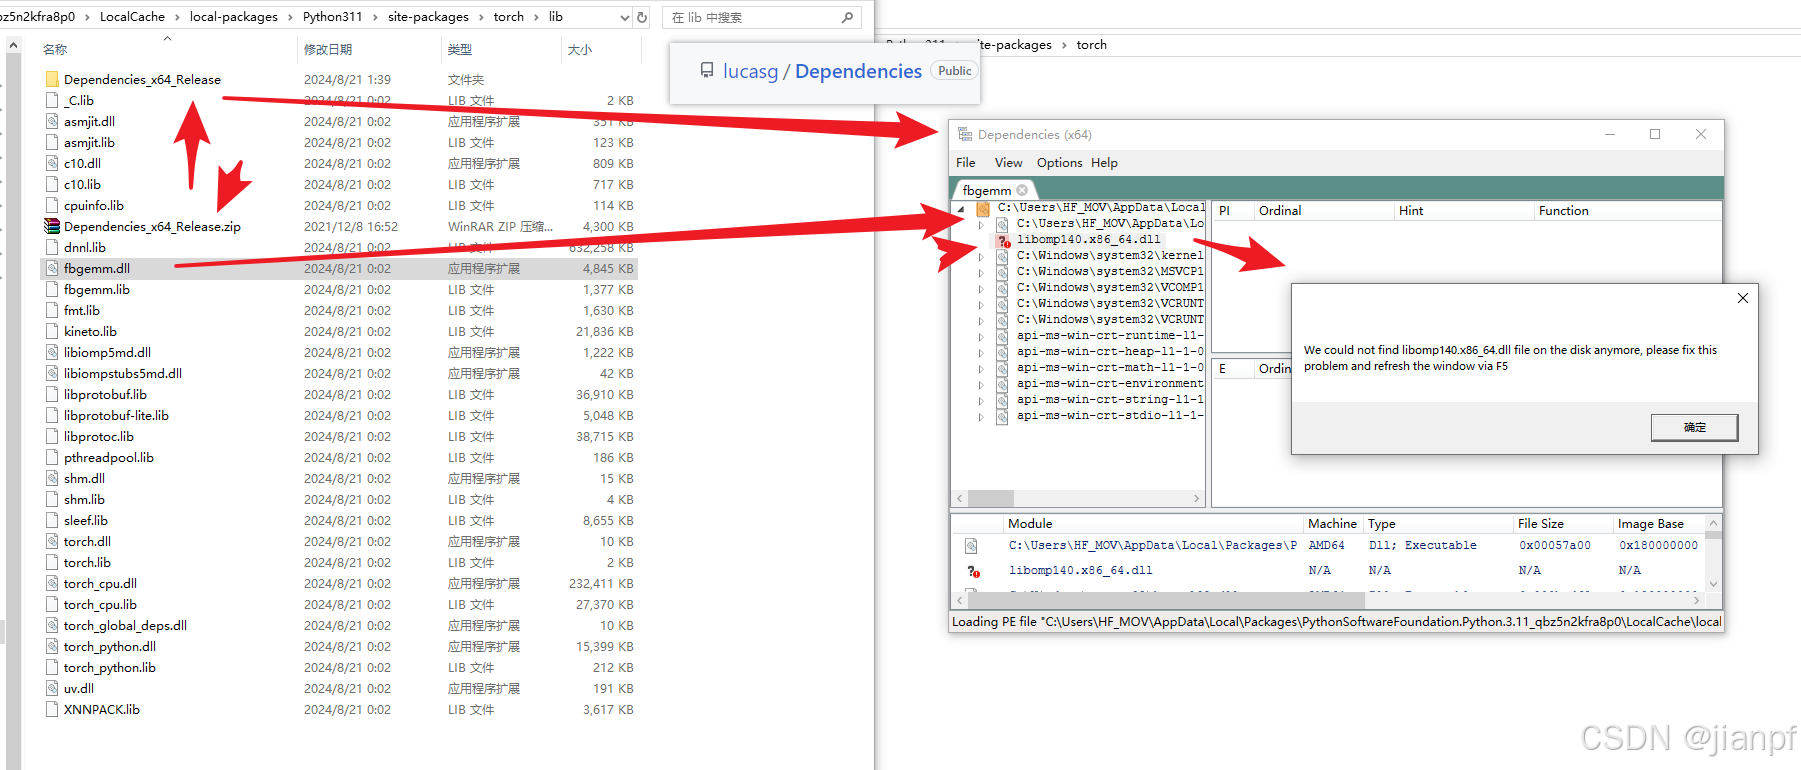
查看DLL文件依赖软件
https://www.dllme.com/dll/files/libomp140_x86_64/00637fe34a6043031c9ae4c6cf0a891d/download
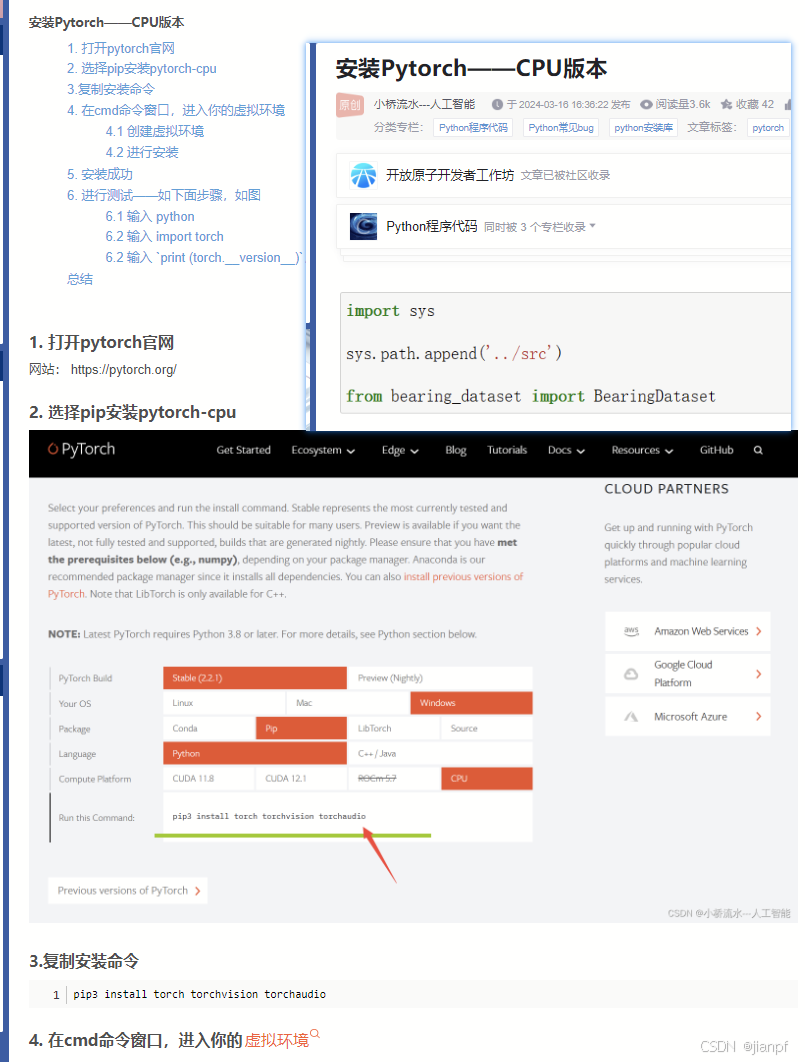
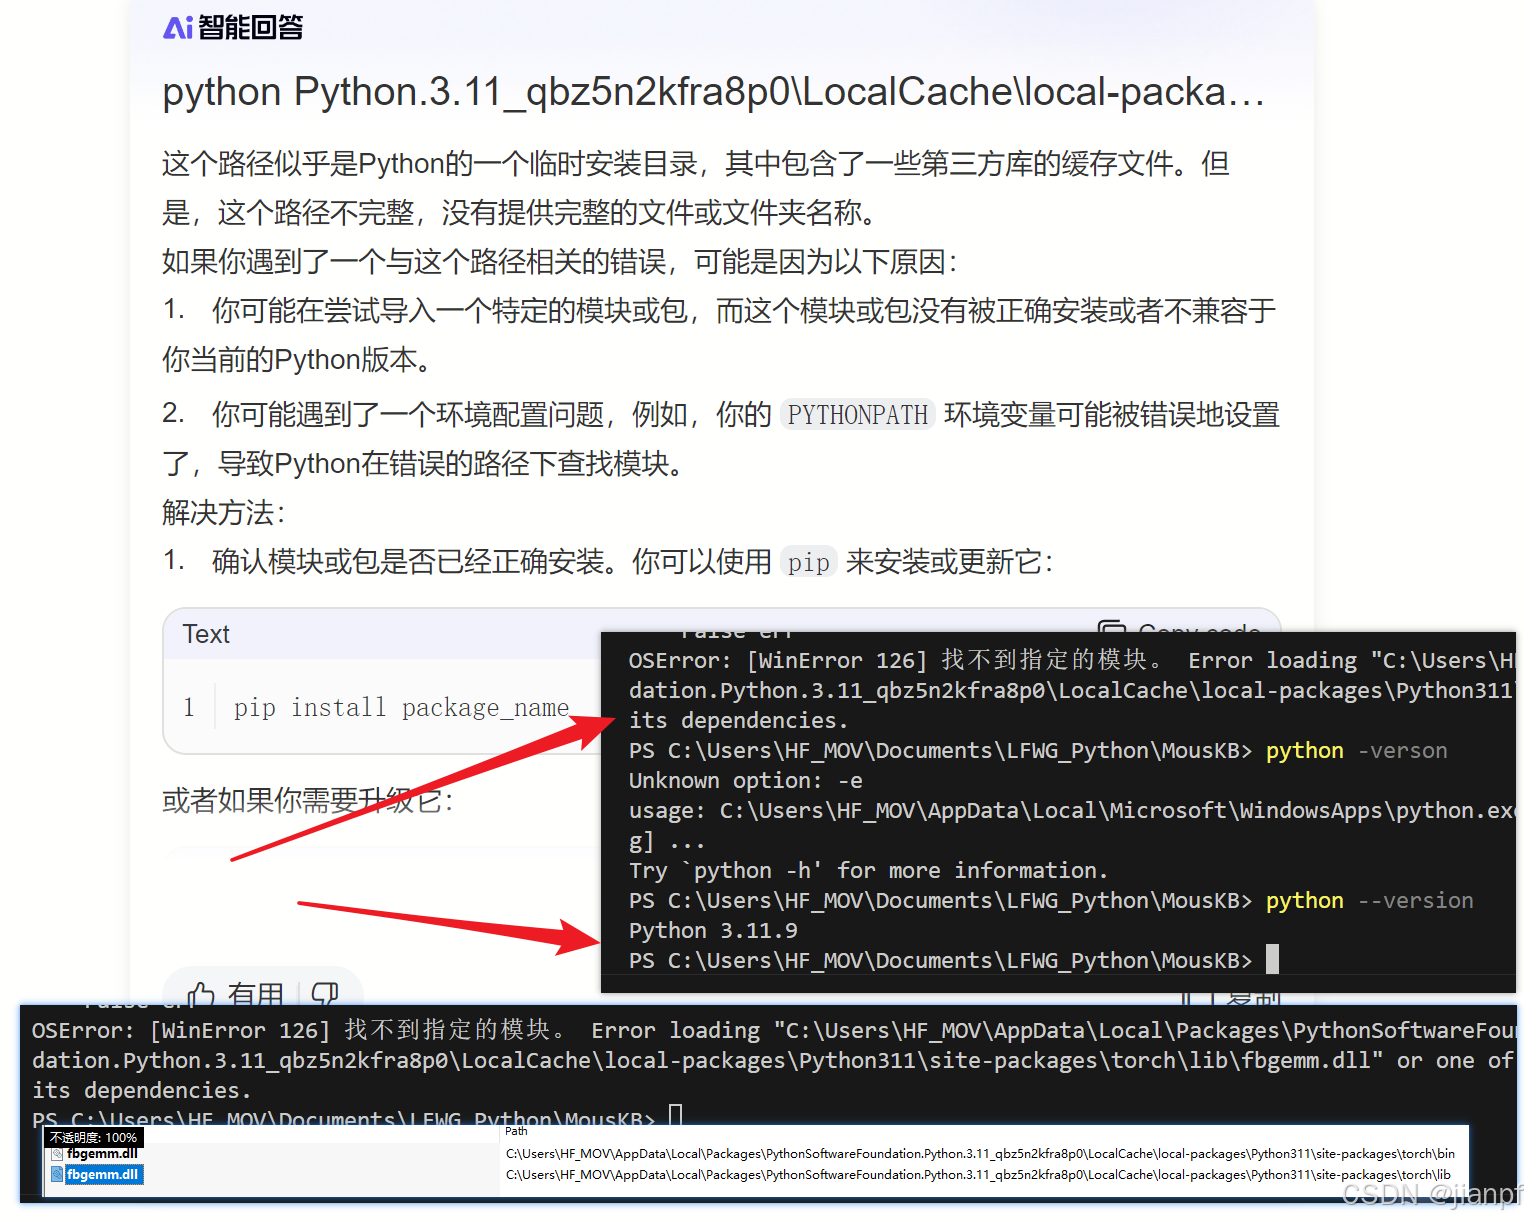
安装Pytorch——CPU版本
pip3 install torch torchvision torchaudio
raise err
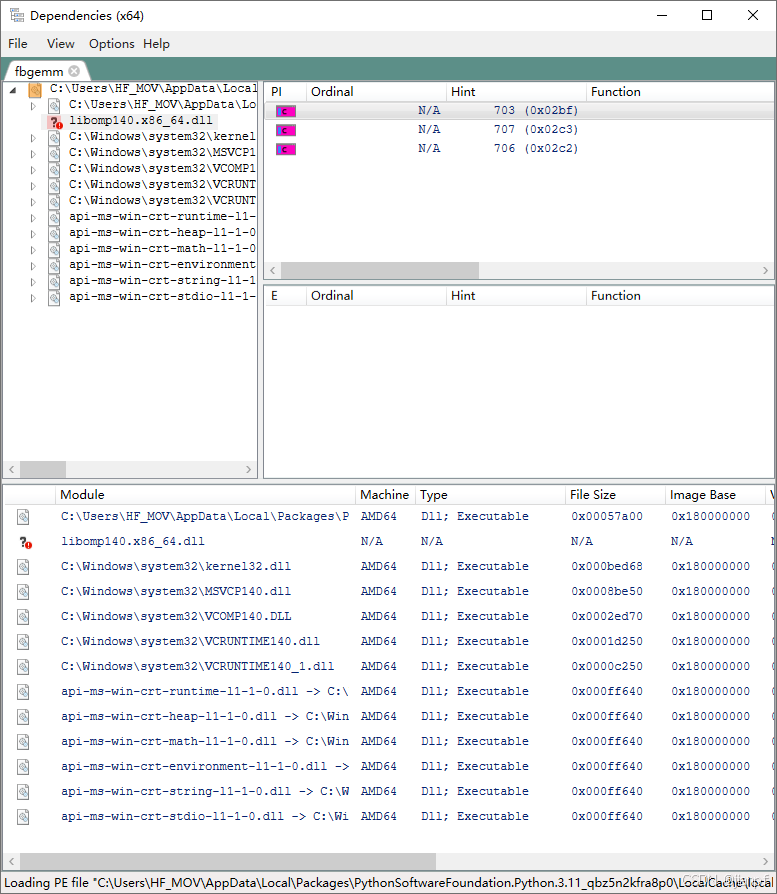
OSError: [WinError 126] 找不到指定的模块。 Error loading “C:\Users\HF_MOV\AppData\Local\Packages\PythonSoftwareFoundation.Python.3.11_qbz5n2kfra8p0\LocalCache\local-packages\Python311\site-packages\torch\lib\fbgemm.dll” or one of its dependencies.
安装了也不行,需要下载dll
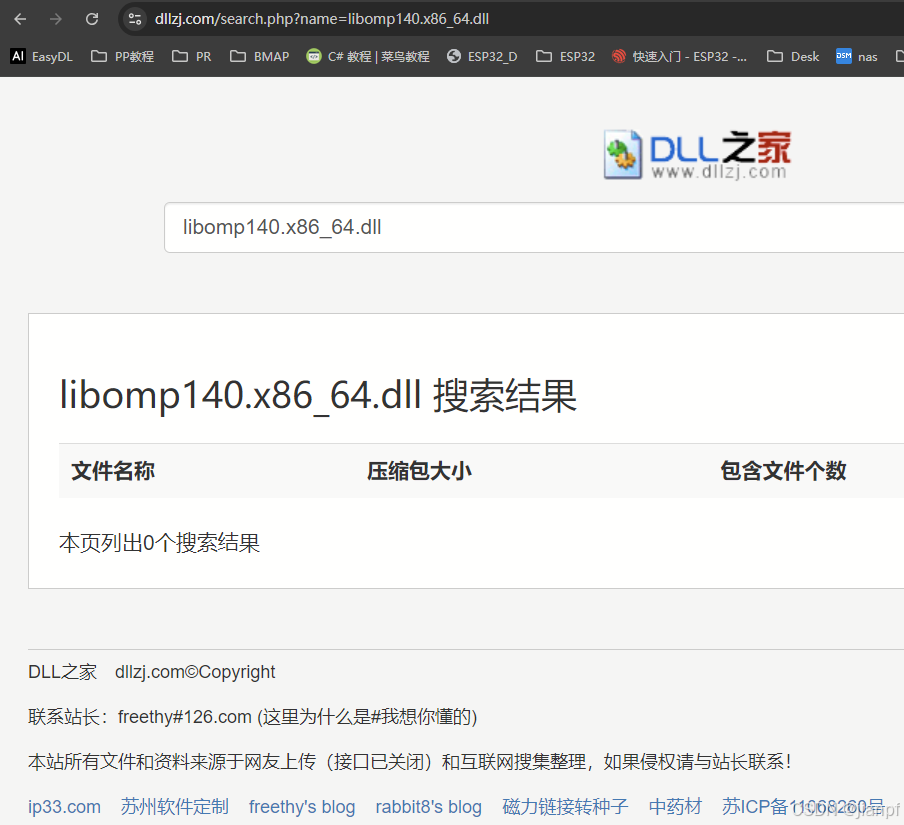
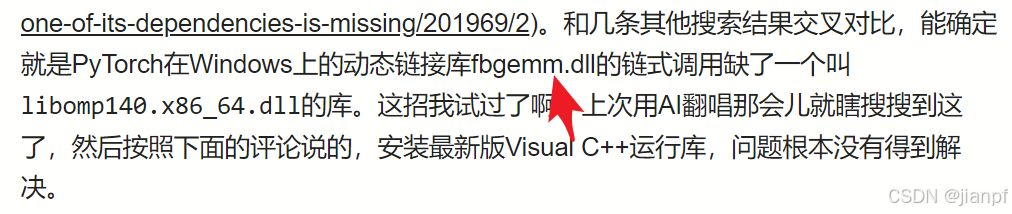
libomp140.x86_64.dll注意这是X86和64
https://www.bilibili.com/read/cv36895969/
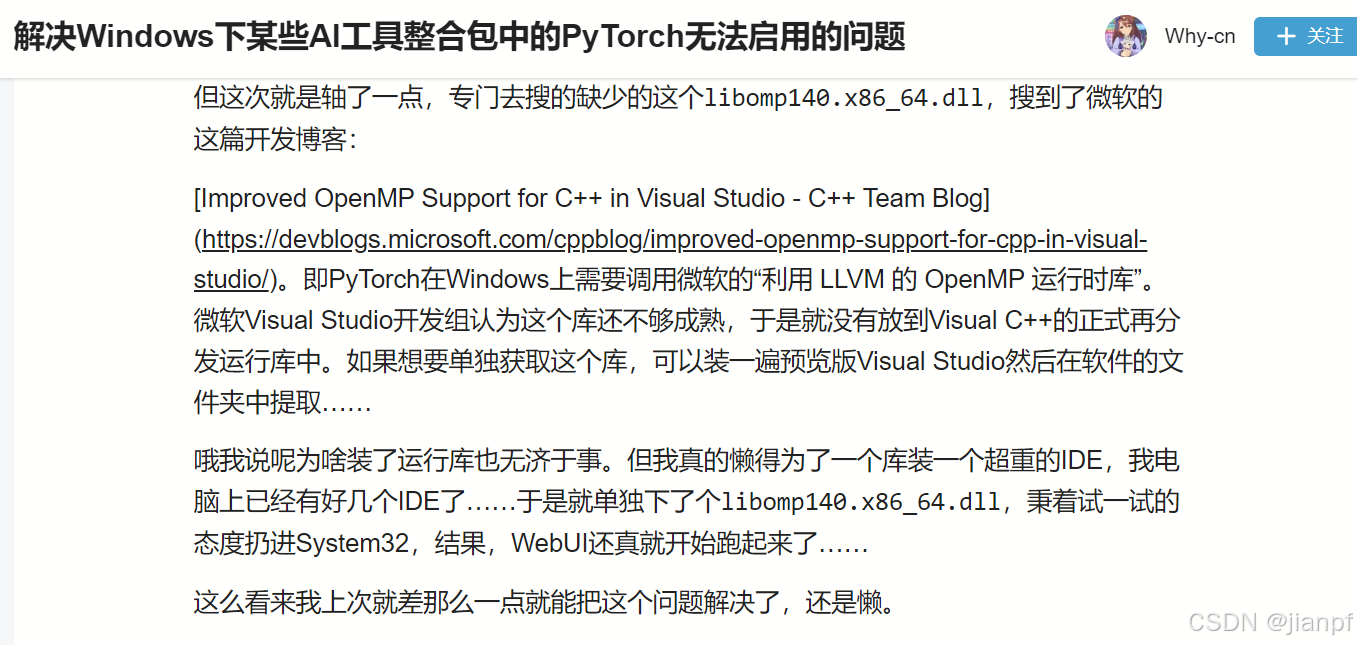
https://devblogs.microsoft.com/cppblog/improved-openmp-support-for-cpp-in-visual-studio/
https://github.com/llvm/llvm-project/tree/main
libomp140.x86_64.dll没找到
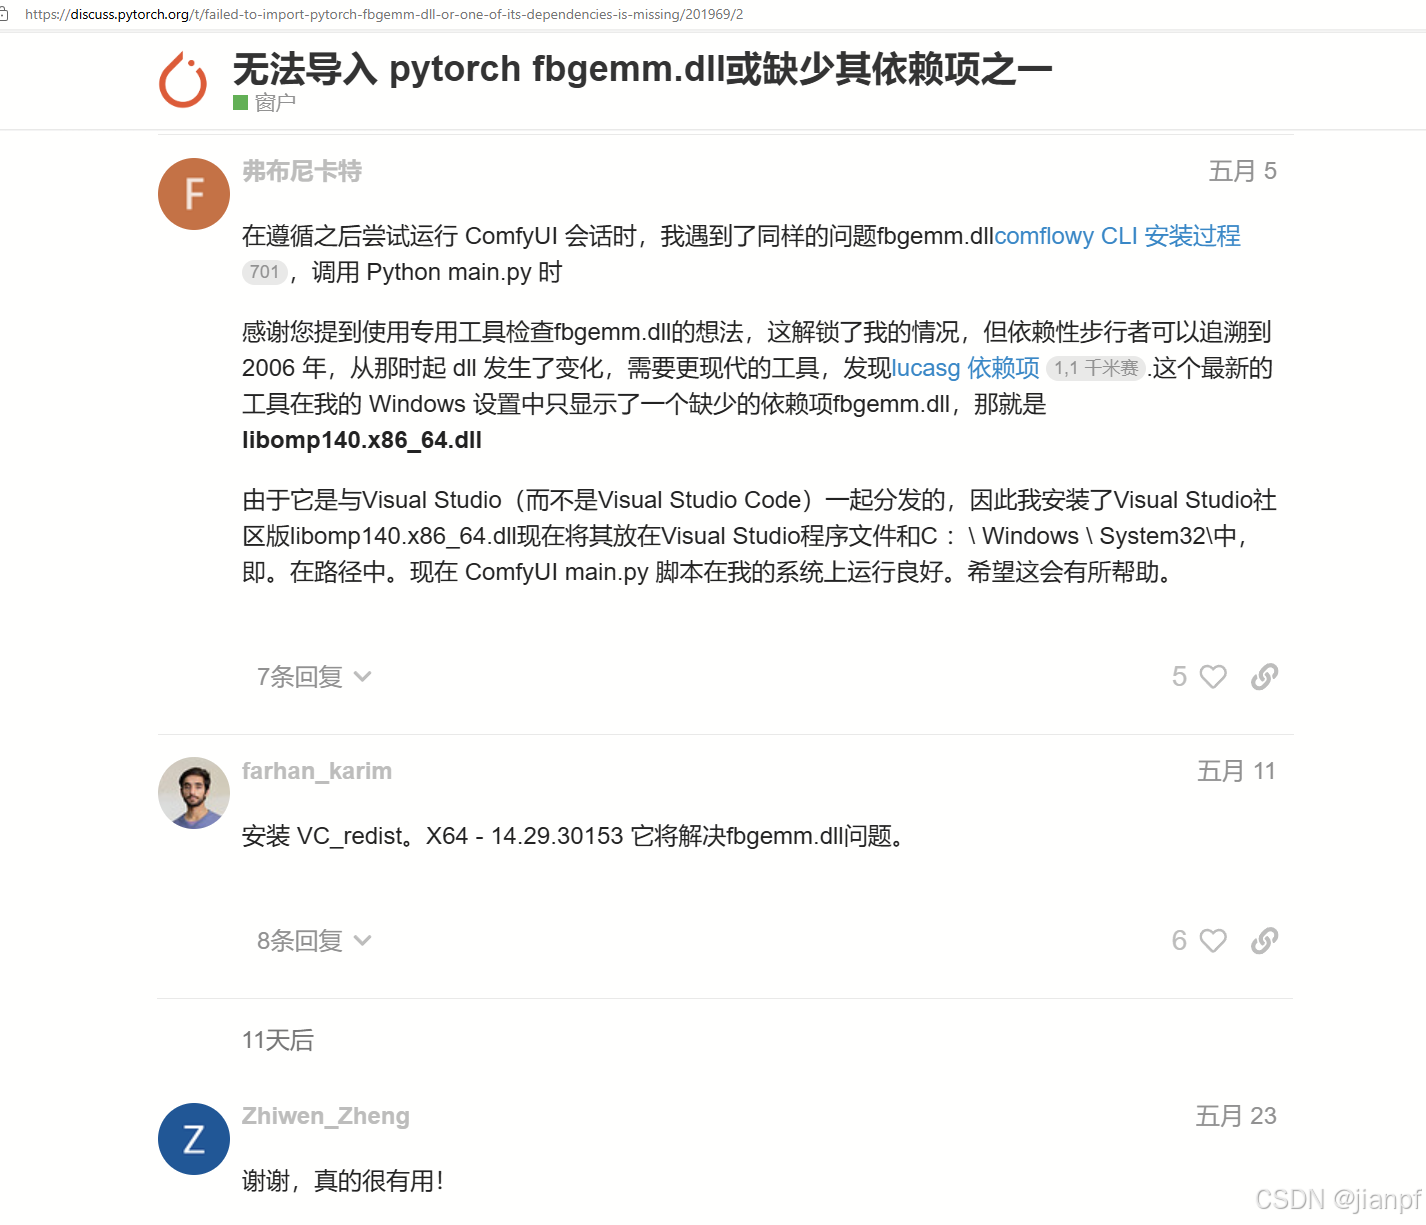
https://discuss.pytorch.org/t/failed-to-import-pytorch-fbgemm-dll-or-one-of-its-dependencies-is-missing/201969/2
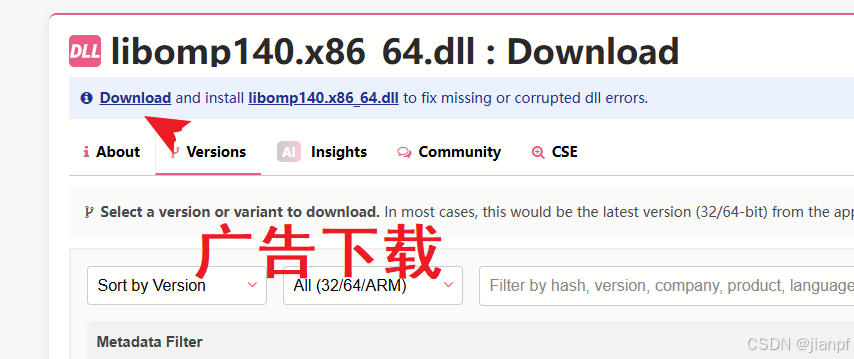
https://www.dllme.com/dll/files/libomp140_x86_64/versions
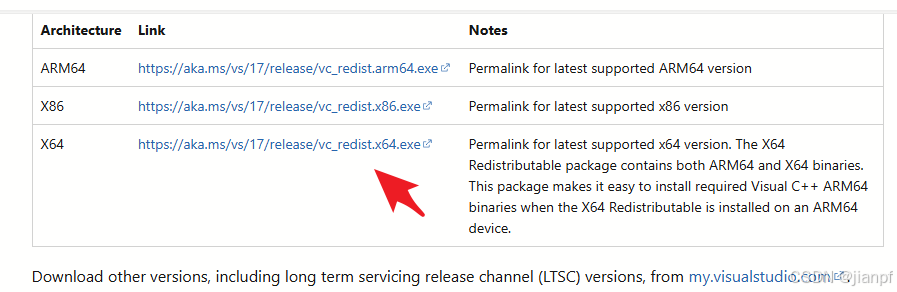
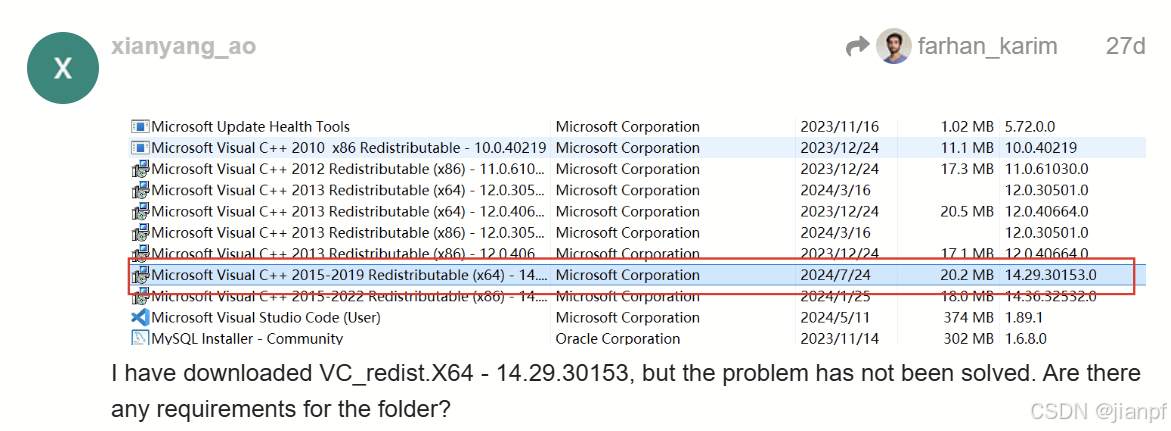
https://learn.microsoft.com/en-us/cpp/windows/latest-supported-vc-redist?view=msvc-170

C:\Users\HF_MOV\AppData\Local\Packages\PythonSoftwareFoundation.Python.3.11_qbz5n2kfra8p0\LocalCache\local-packages\Python311\site-packages\torch\lib
还是不行.
什么鬼验证码?
https://www.dllme.com/download.php?file=54979&id=00637fe34a6043031c9ae4c6cf0a891d&key=7d65a03e9ac09f855e52a25e9df096c9348048d68e323186762ef8d74ff6c7f5&iss=1724179929
只有10秒超时限制的连接
通过网盘分享的文件:libomp140.x86_64_x86-64.zip
链接: https://pan.baidu.com/s/1aHxHdsejunjYU7N7XBTwBQ?pwd=1234 提取码: 1234
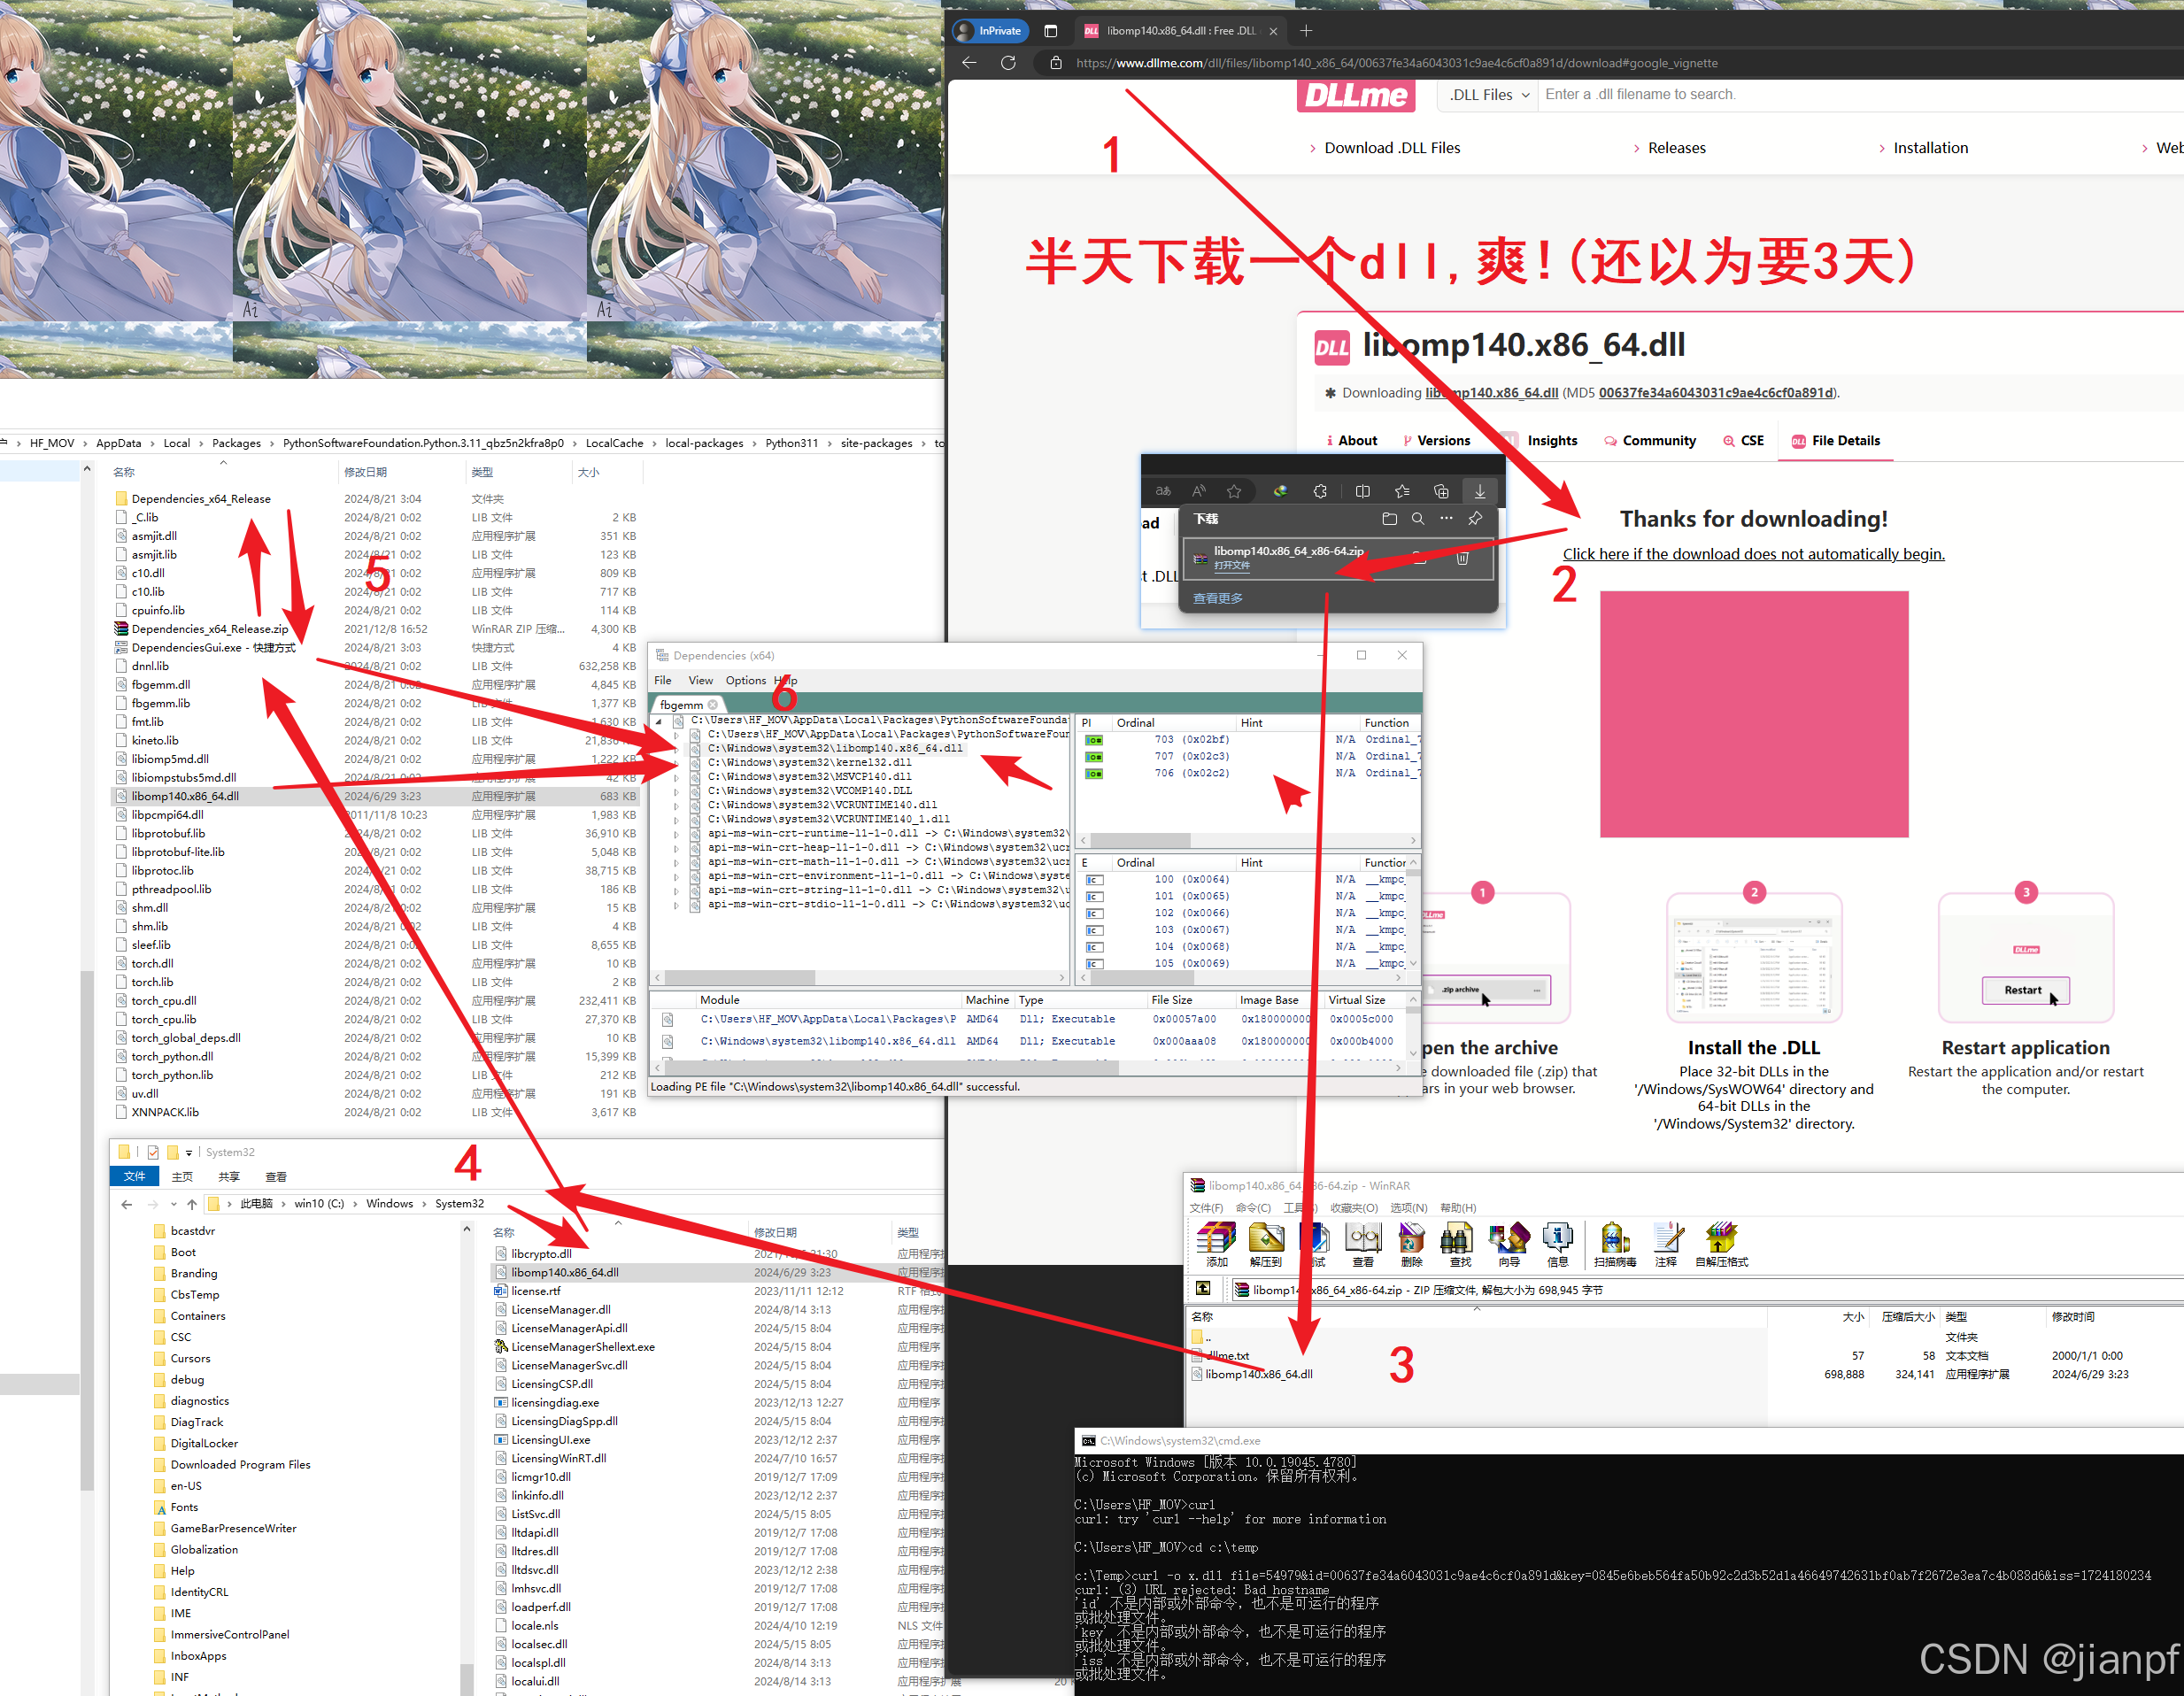

还是不行的啊?
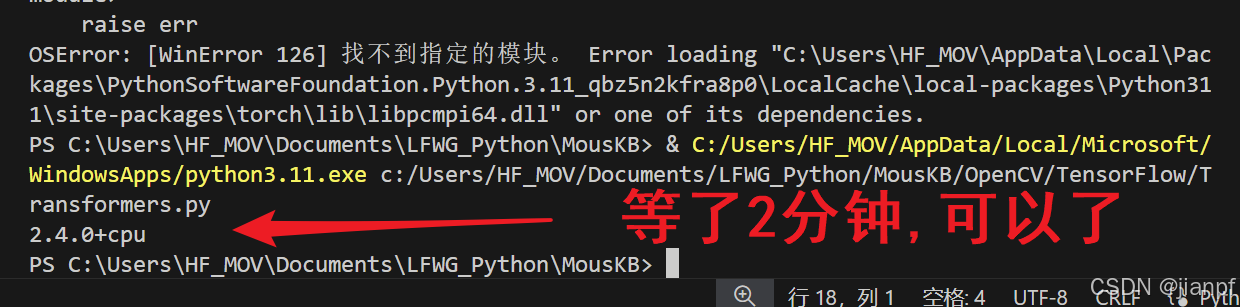
显示2.4.0+cpu版本的OpenML torch
应该是这个库名文件没用找到
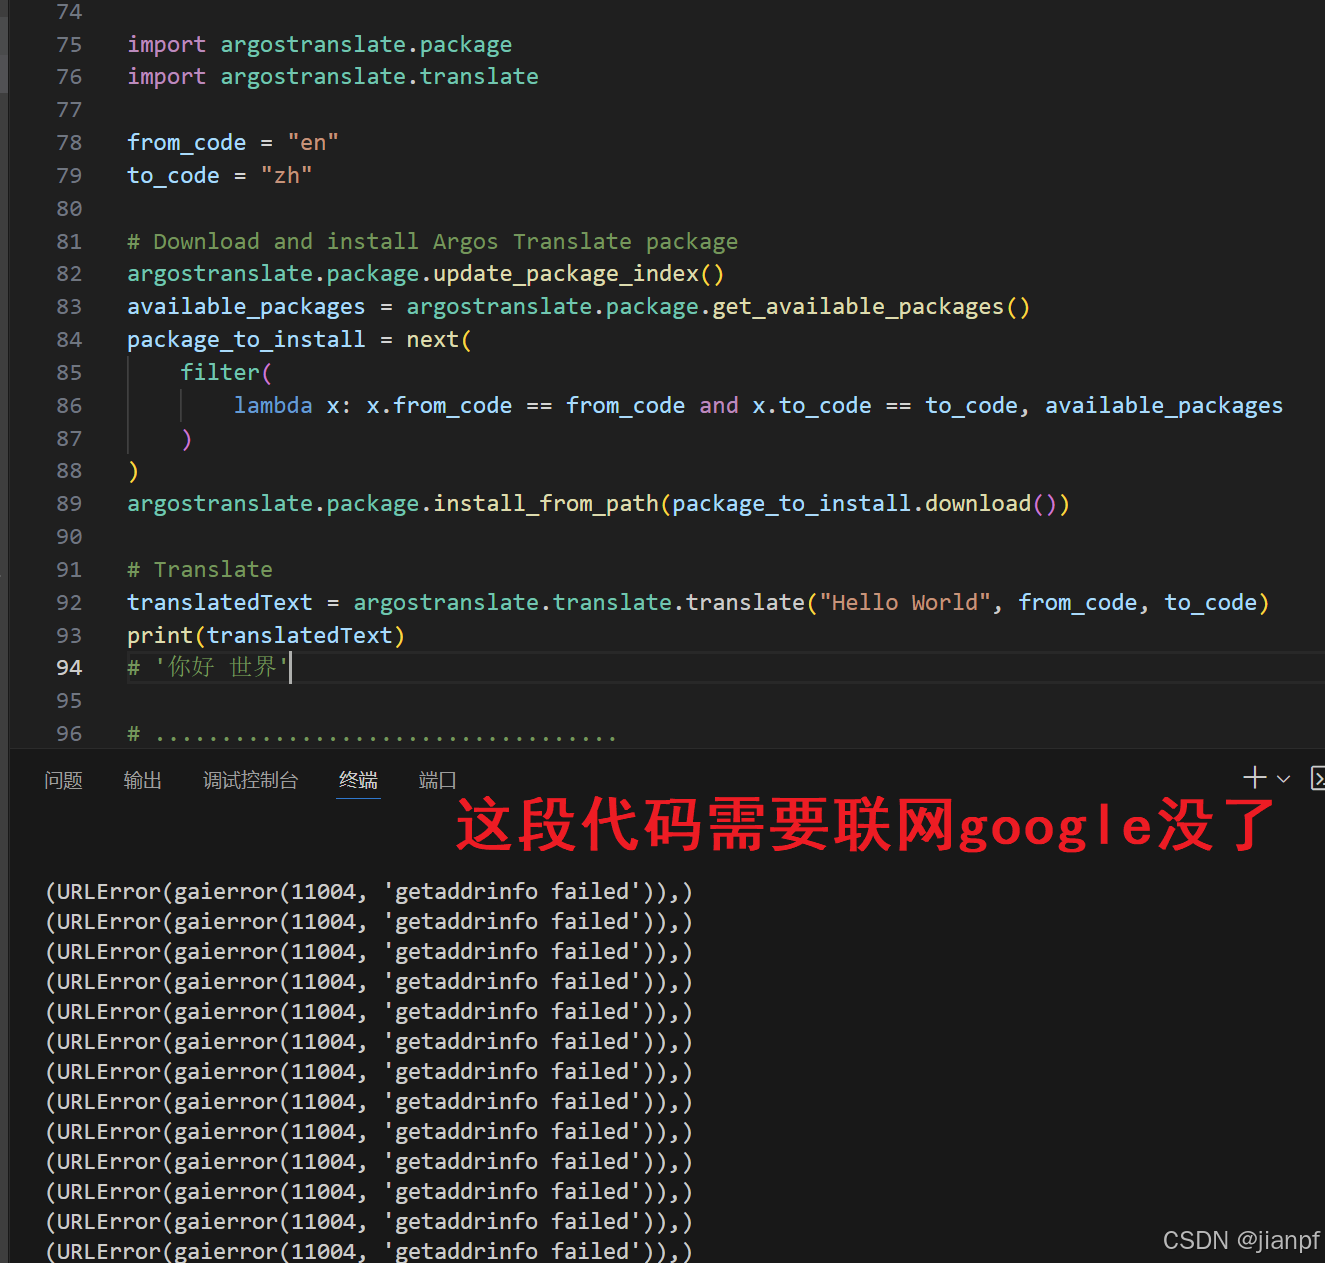
翻译成功
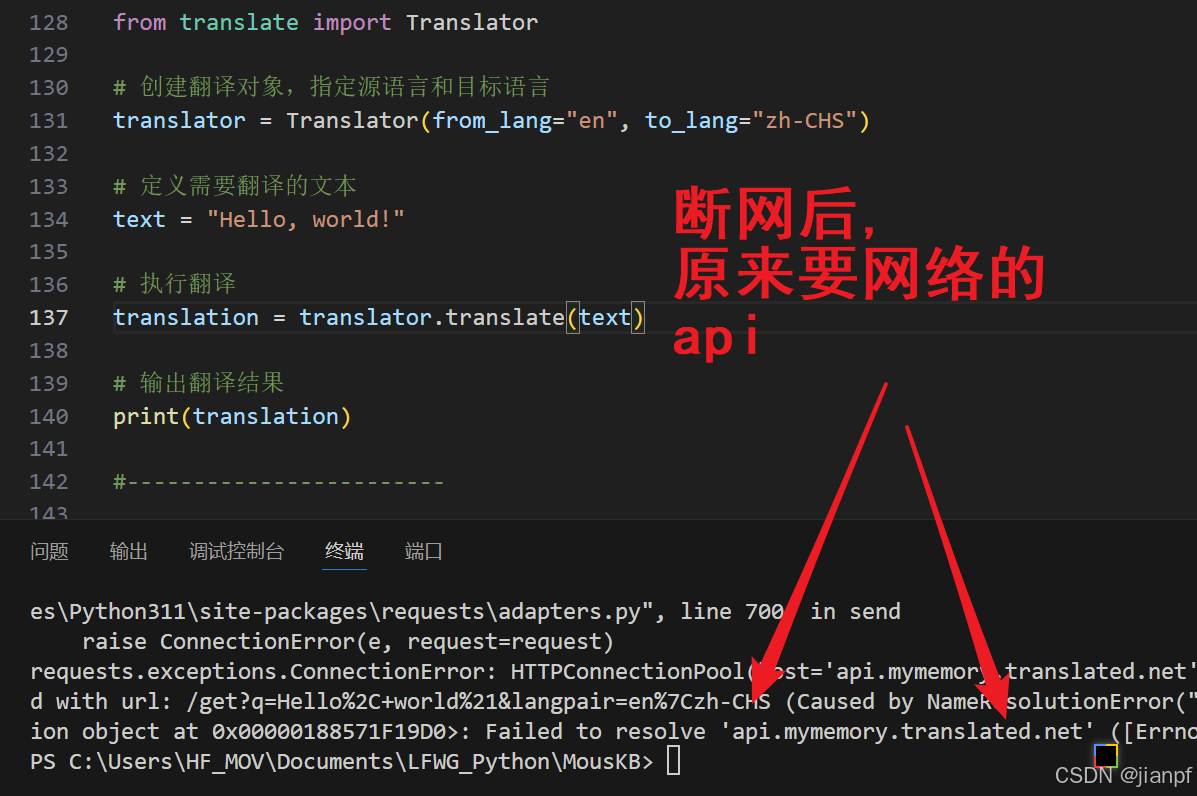
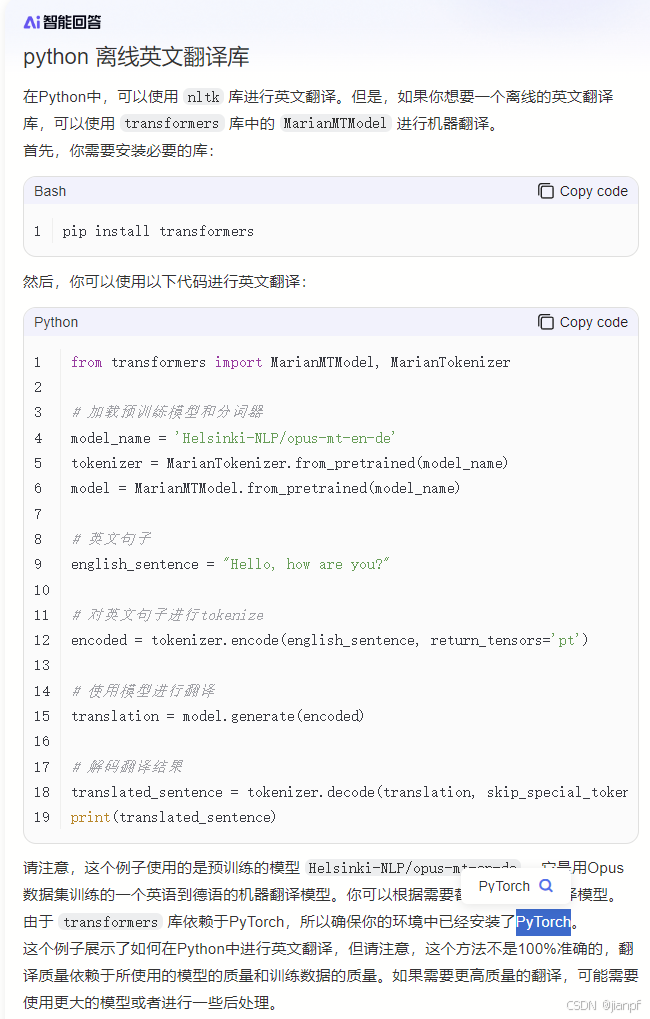
需要离线的翻译啊,在哪里啊?
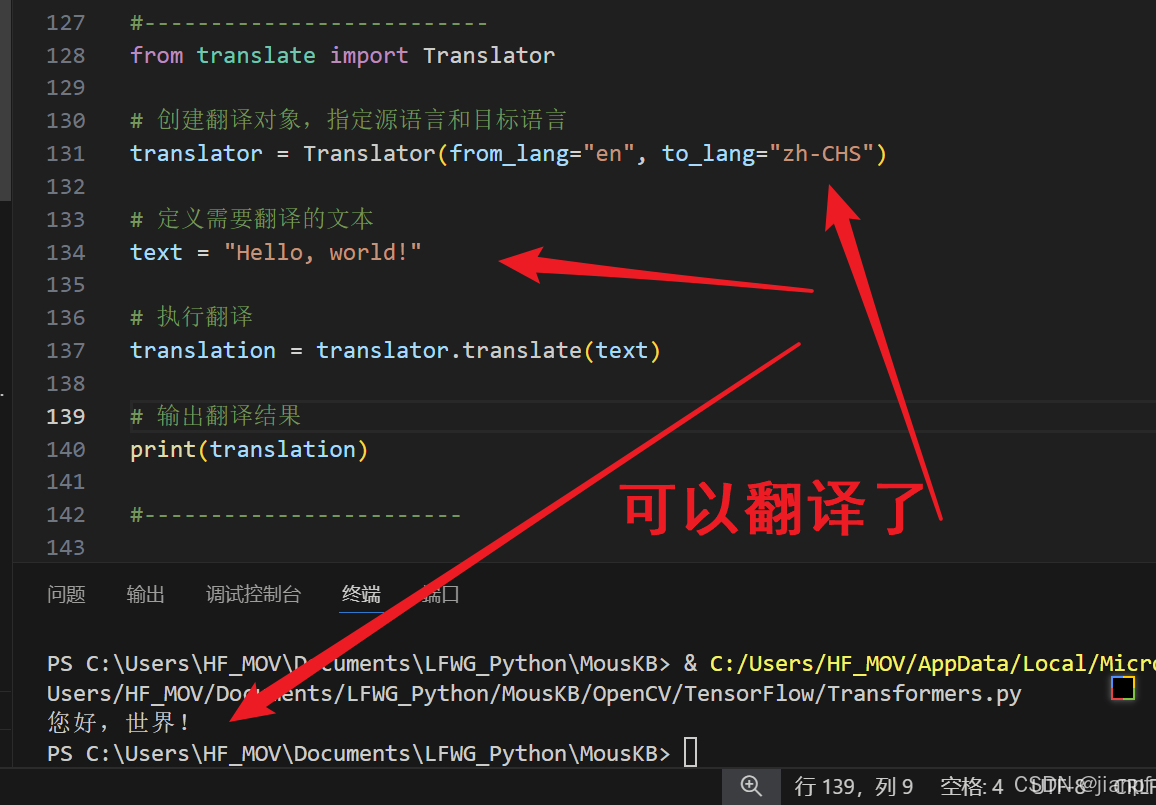
from translate import Translator# 创建翻译对象,指定源语言和目标语言
translator = Translator(from_lang="en", to_lang="zh-CHS")# 定义需要翻译的文本
text = "Hello, world!"# 执行翻译
translation = translator.translate(text)# 输出翻译结果
print(translation)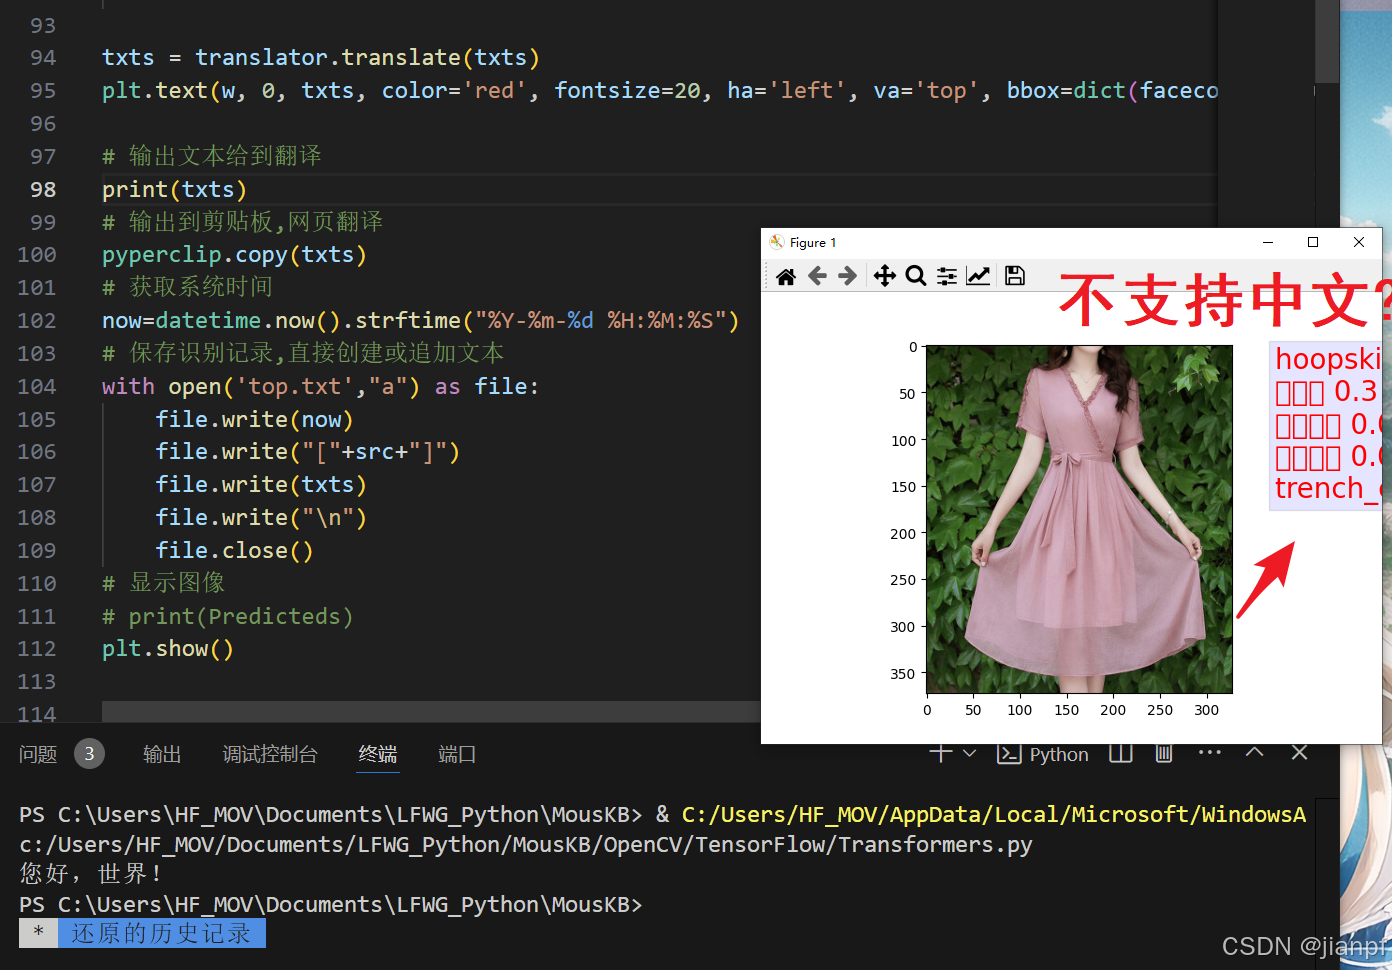
库不支持中文?

支持中文的
2024.8.21.14:26X
准备开始训练模型
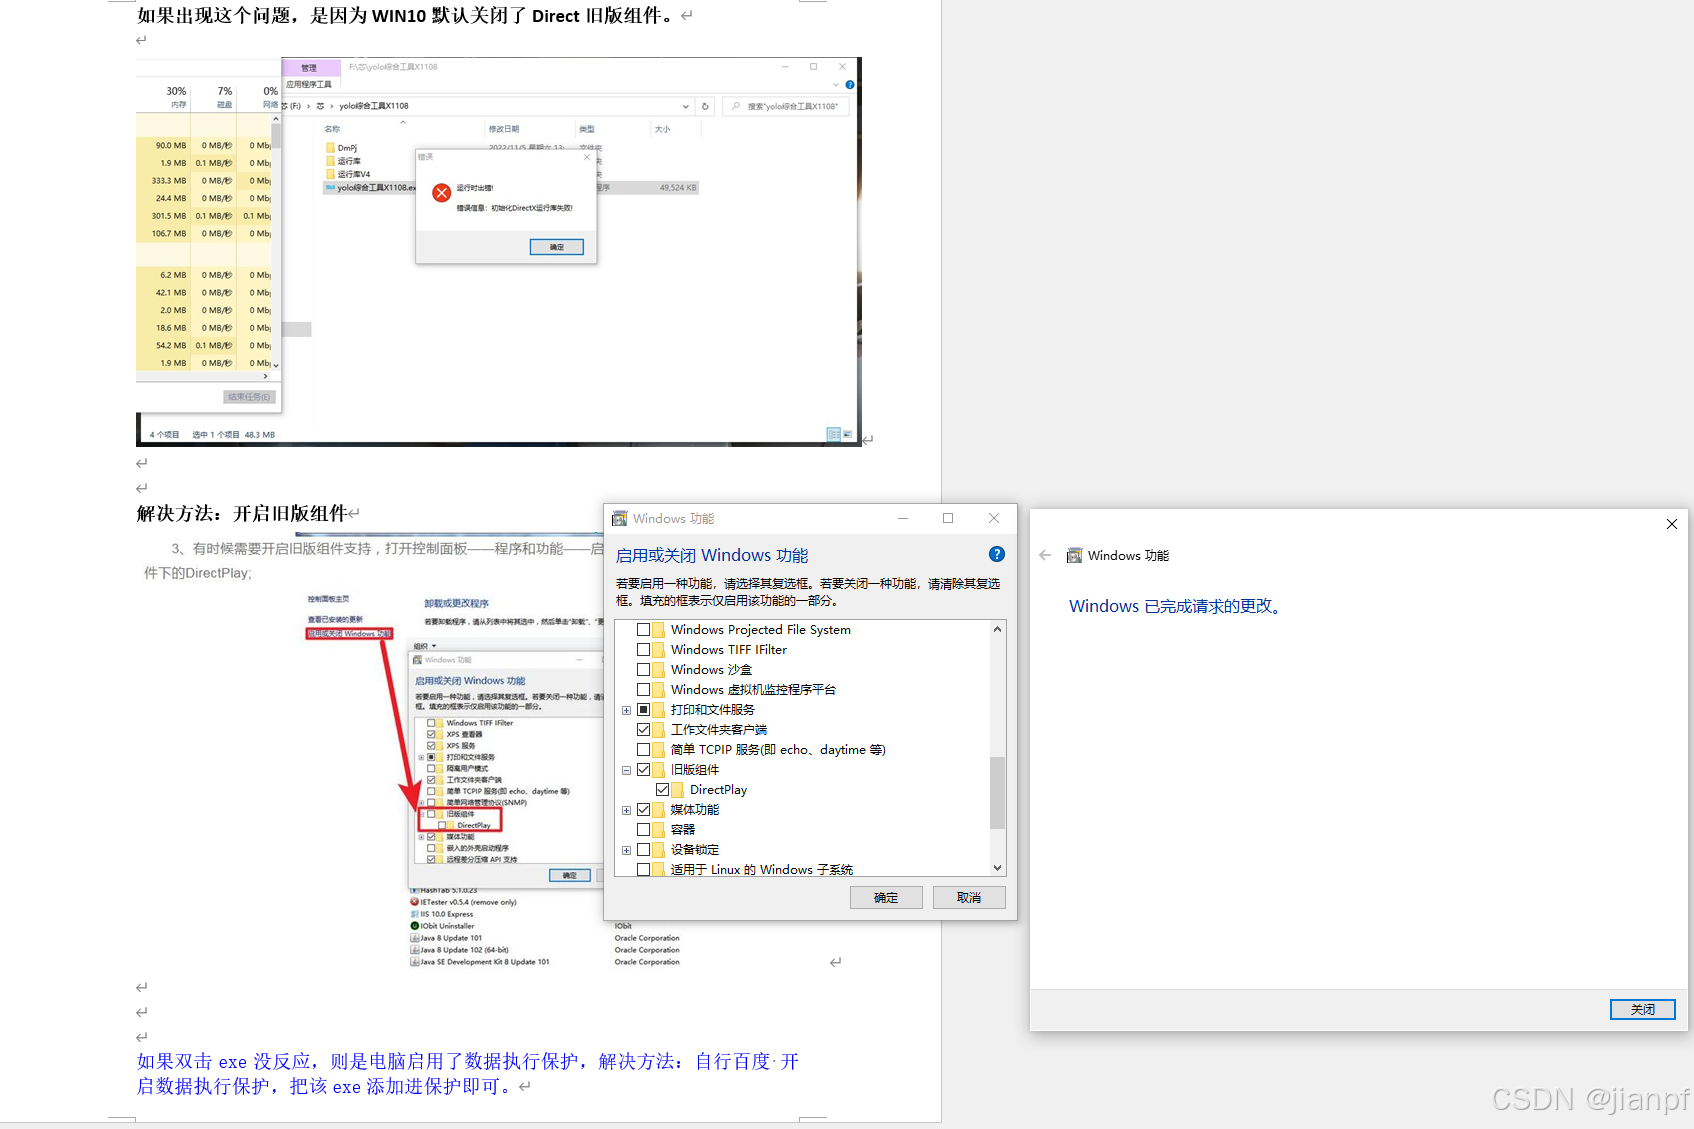
开始>控制面板>启动或关闭windows功能>旧版组件>DirectPlay>勾选>确认
链接:https://pan.baidu.com/s/1y9zFL61IAhyuTppwnjlvjQ&pwd=4s1f
提取码:4s1f
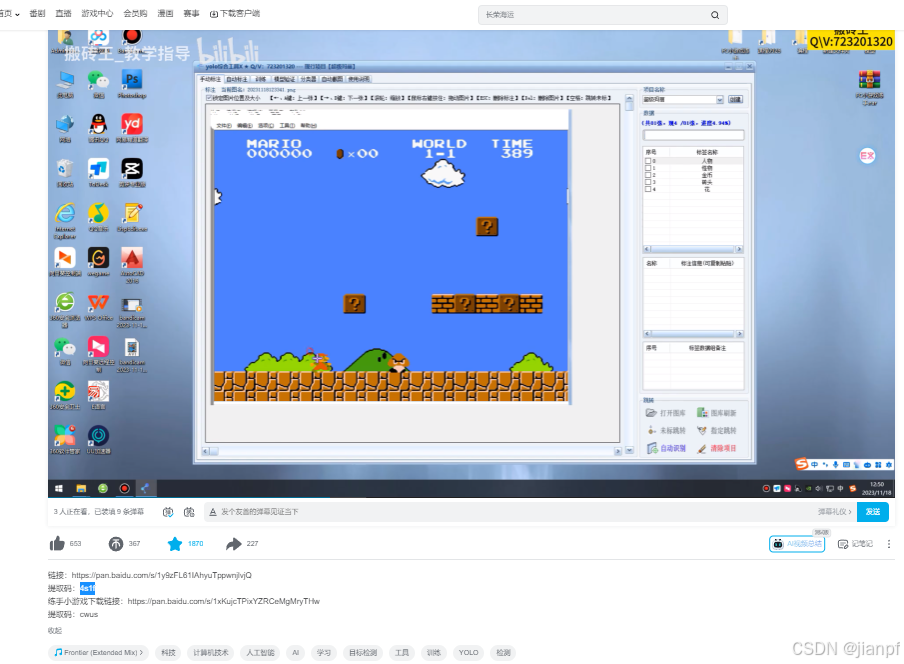
练手小游戏下载链接:https://pan.baidu.com/s/1xKujcTPixYZRCeMgMryTHw
提取码:cwus
https://www.bilibili.com/video/BV1Kj411J71h/?spm_id_from=333.337.search-card.all.click&vd_source=606d359e368cfd6b2c0e0b03ff16fa67
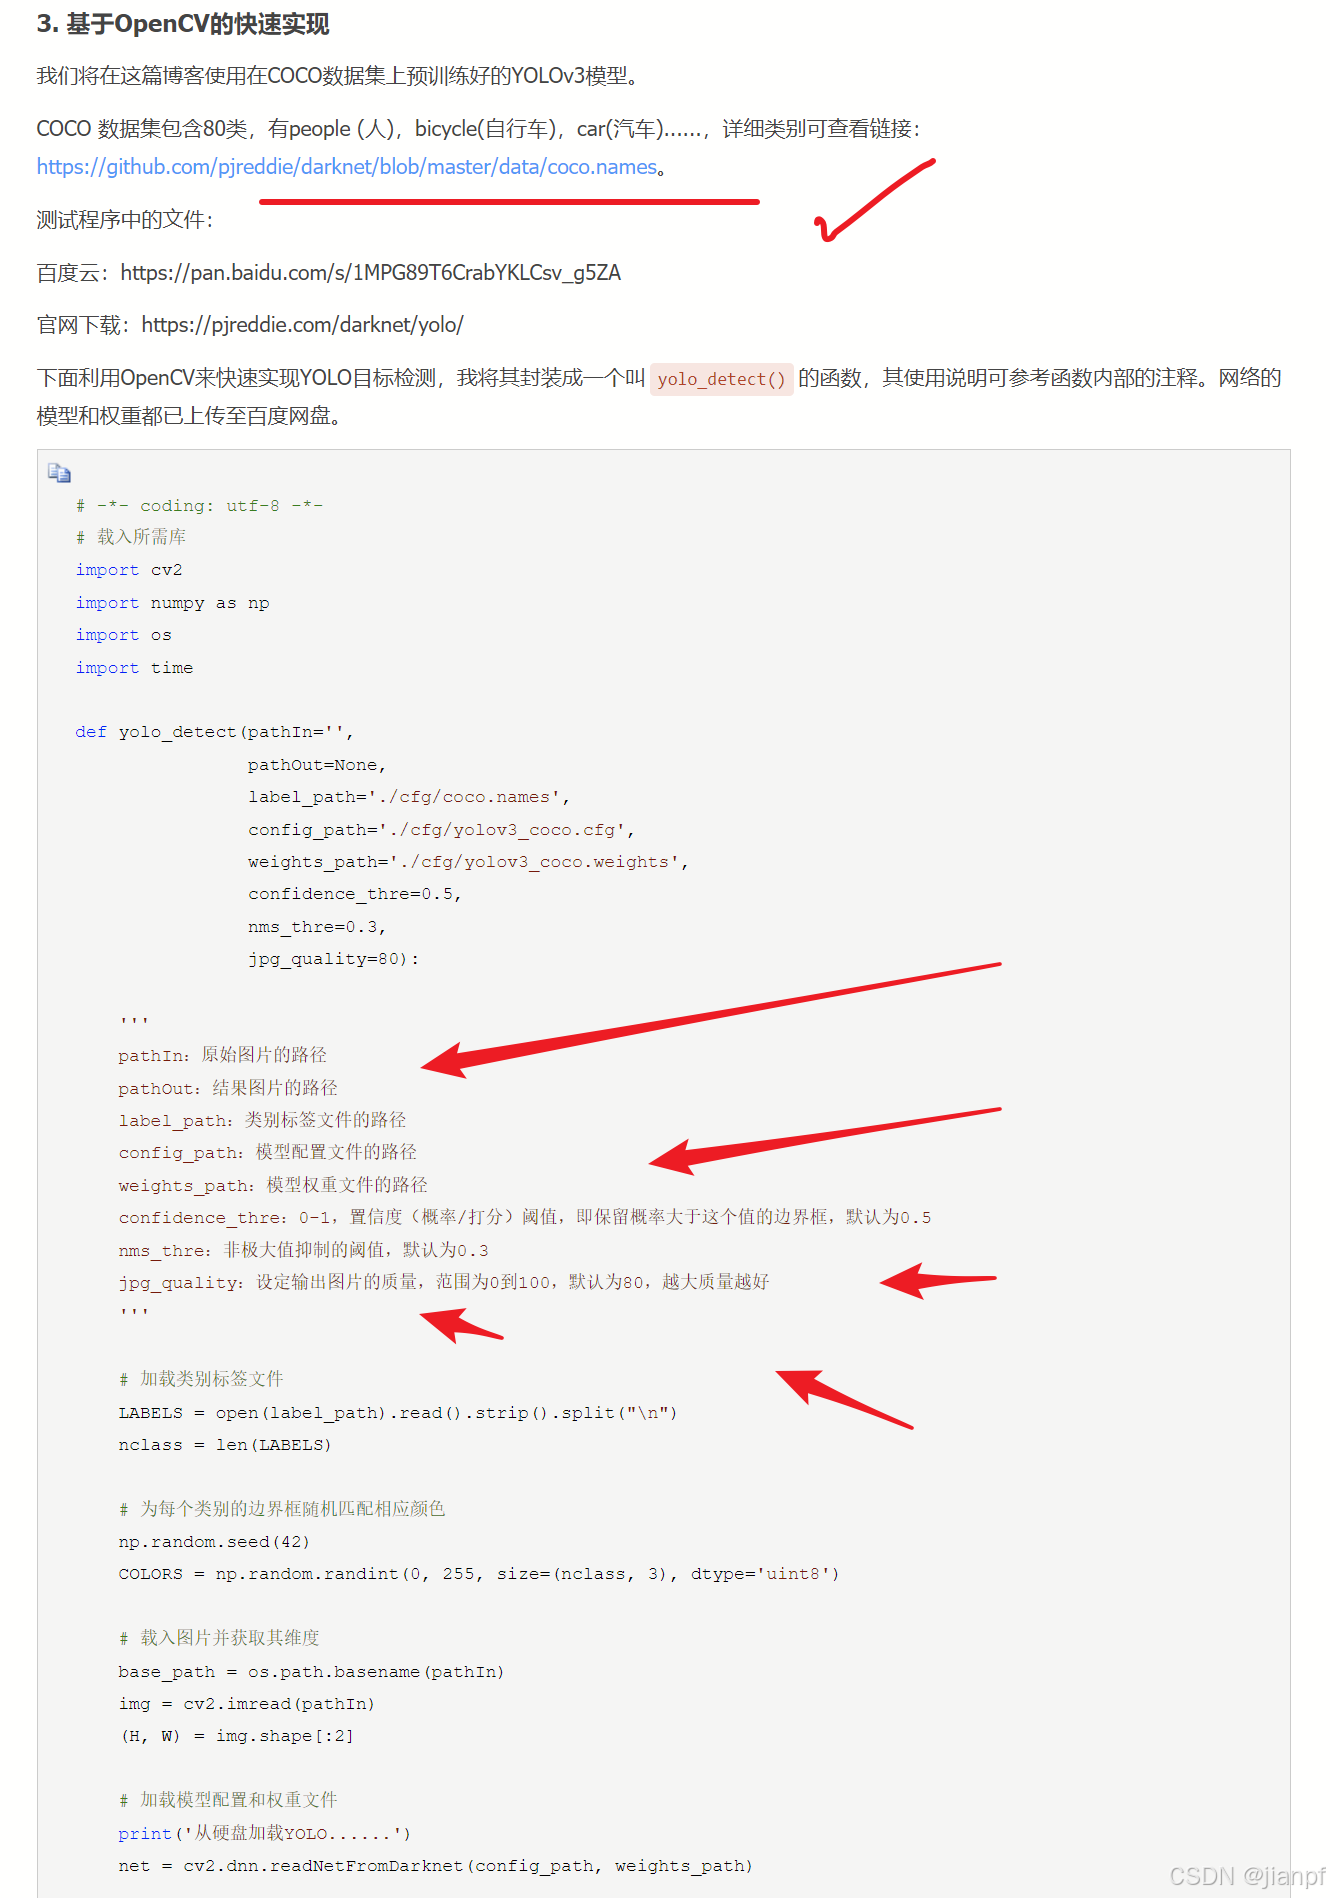
# JianPF2024.8.21
#需要下载或自己训练的YOLO的V3模型文件3个coco.names,yolov3_coco.cfg,yolov3_coco.weights
# -*- coding: utf-8 -*-
# 载入所需库
import cv2
import numpy as np
import os
import time
from PIL import Image
import matplotlib.pyplot as plt
import sys
# ..................
# 显示CMD 传入的参数数
# print(len(sys.argv))
# 获取CMD的第一个参数,错误或没用就退出
if len(sys.argv) ==2:# 有图片进来就获取图片地址,没用就退出.pytry:src=sys.argv[1]print("正在标记图片:",src)except:print("请重新运行!没用图片!")sys.exit()
else:print("请重新拖入图片!")sys.exit()
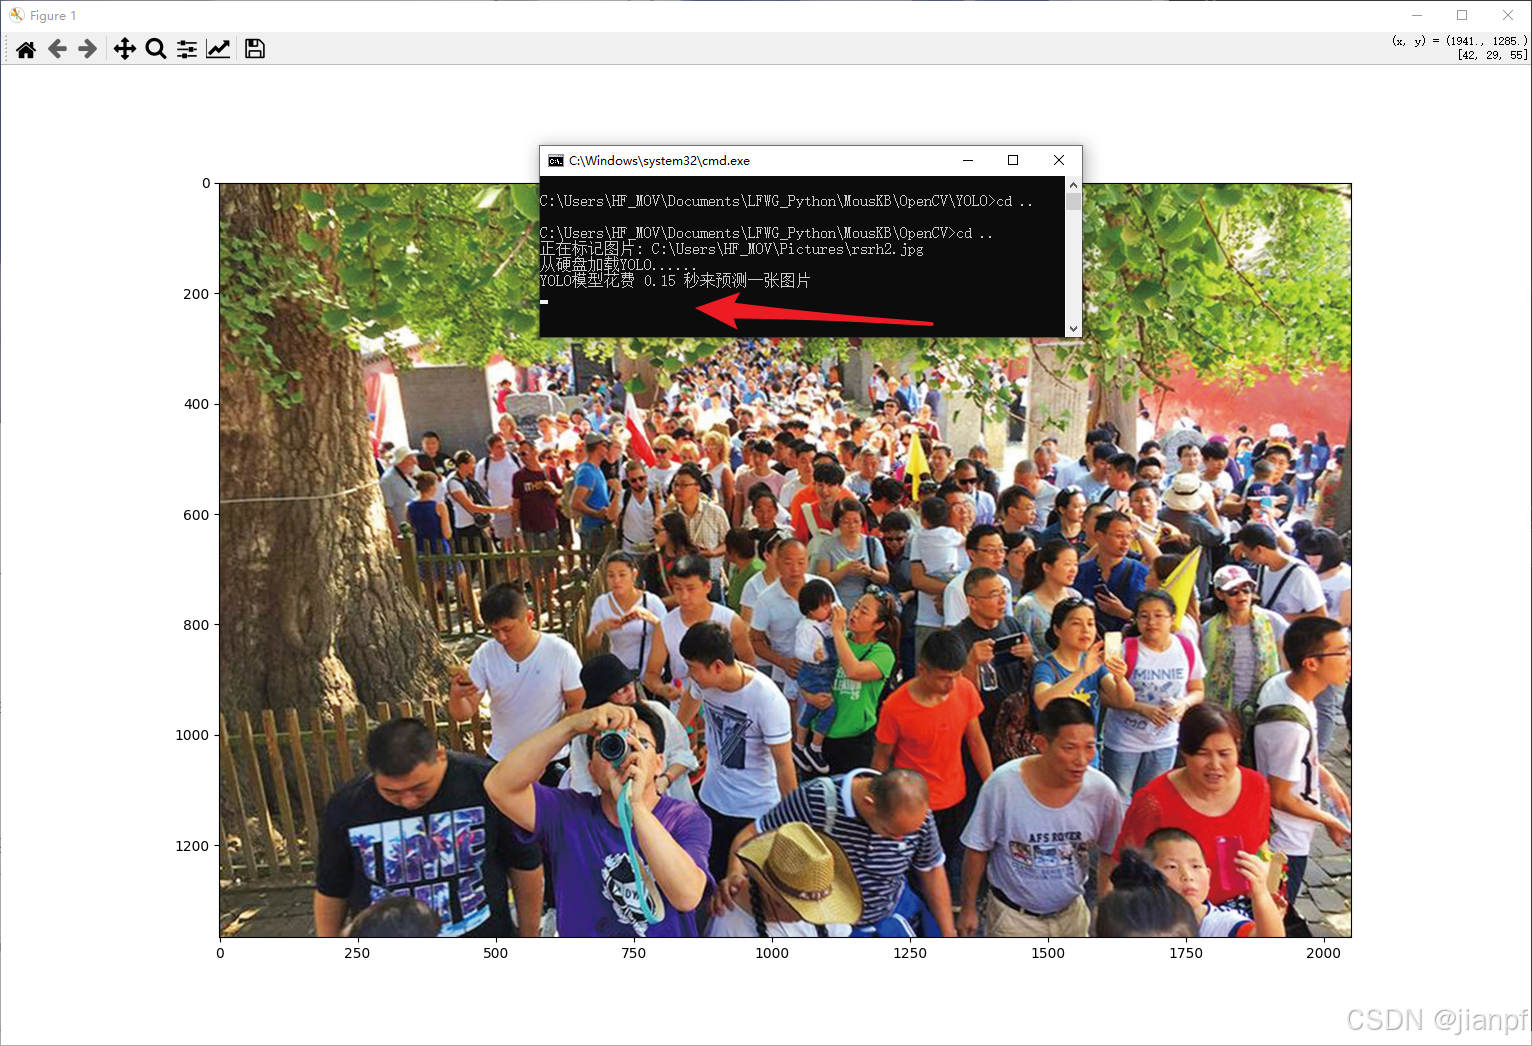
# ..................def yolo_detect(pathIn='',pathOut=None,# label_path='./cfg/coco.names',# config_path='./cfg/yolov3_coco.cfg',# weights_path='./cfg/yolov3_coco.weights',label_path='./cfg/coco.names',config_path='./cfg/yolov3.cfg',weights_path='./cfg/yolov3.weights',confidence_thre=0.5,nms_thre=0.3,jpg_quality=80):'''pathIn:原始图片的路径pathOut:结果图片的路径label_path:类别标签文件的路径config_path:模型配置文件的路径weights_path:模型权重文件的路径confidence_thre:0-1,置信度(概率/打分)阈值,即保留概率大于这个值的边界框,默认为0.5nms_thre:非极大值抑制的阈值,默认为0.3jpg_quality:设定输出图片的质量,范围为0到100,默认为80,越大质量越好'''# 加载类别标签文件LABELS = open(label_path).read().strip().split("\n")nclass = len(LABELS)# 为每个类别的边界框随机匹配相应颜色np.random.seed(42)COLORS = np.random.randint(0, 255, size=(nclass, 3), dtype='uint8')# 载入图片并获取其维度base_path = os.path.basename(pathIn)img = cv2.imread(pathIn)(H, W) = img.shape[:2]# 加载模型配置和权重文件print('从硬盘加载YOLO......')net = cv2.dnn.readNetFromDarknet(config_path, weights_path)# 获取YOLO输出层的名字ln = net.getLayerNames()# ln = [ln[i[0] - 1] for i in net.getUnconnectedOutLayers()]ln = [ln[i-1] for i in net.getUnconnectedOutLayers()]# 将图片构建成一个blob,设置图片尺寸,然后执行一次# YOLO前馈网络计算,最终获取边界框和相应概率blob = cv2.dnn.blobFromImage(img, 1 / 255.0, (416, 416), swapRB=True, crop=False)net.setInput(blob)start = time.time()layerOutputs = net.forward(ln)end = time.time()# 显示预测所花费时间print('YOLO模型花费 {:.2f} 秒来预测一张图片'.format(end - start))# 初始化边界框,置信度(概率)以及类别boxes = []confidences = []classIDs = []# 迭代每个输出层,总共三个for output in layerOutputs:# 迭代每个检测for detection in output:# 提取类别ID和置信度scores = detection[5:]classID = np.argmax(scores)confidence = scores[classID]# 只保留置信度大于某值的边界框if confidence > confidence_thre:# 将边界框的坐标还原至与原图片相匹配,记住YOLO返回的是# 边界框的中心坐标以及边界框的宽度和高度box = detection[0:4] * np.array([W, H, W, H])(centerX, centerY, width, height) = box.astype("int")# 计算边界框的左上角位置x = int(centerX - (width / 2))y = int(centerY - (height / 2))# 更新边界框,置信度(概率)以及类别boxes.append([x, y, int(width), int(height)])confidences.append(float(confidence))classIDs.append(classID)# 使用非极大值抑制方法抑制弱、重叠边界框idxs = cv2.dnn.NMSBoxes(boxes, confidences, confidence_thre, nms_thre)# 确保至少一个边界框if len(idxs) > 0:# 迭代每个边界框for i in idxs.flatten():# 提取边界框的坐标(x, y) = (boxes[i][0], boxes[i][1])(w, h) = (boxes[i][2], boxes[i][3])print("box"+str(i)+":",(x,y),(w,h))# 绘制边界框以及在左上角添加类别标签和置信度color = [int(c) for c in COLORS[classIDs[i]]]cv2.rectangle(img, (x, y), (x + w, y + h), color, 2)text = '{}: {:.3f}'.format(LABELS[classIDs[i]], confidences[i])(text_w, text_h), baseline = cv2.getTextSize(text, cv2.FONT_HERSHEY_SIMPLEX,0.5,1)cv2.rectangle(img, (x, y-text_h-baseline), (x + text_w, y), color, -1)cv2.putText(img, text, (x, y-5), cv2.FONT_HERSHEY_SIMPLEX,0.5, (0, 0, 0),1)# 输出结果图片if pathOut is None:cv2.imwrite('with_box_'+base_path, img, [int(cv2.IMWRITE_JPEG_QUALITY), jpg_quality])else:cv2.imwrite(pathOut, img, [int(cv2.IMWRITE_JPEG_QUALITY), jpg_quality])# pathIn = './sc/in_img/in006.png'
pathIn =src
pathOut = './sc/out_img/in001.png'# img1=Image.open(pathIn)
# img1.show()yolo_detect(pathIn,pathOut)
# >>> 从硬盘加载YOLO......
# >>> YOLO模型花费 3.63 秒来预测一张图片
img1=Image.open(pathOut)
img_array = np.array(img1)
# 显示图像
plt.imshow(img_array)
plt.show()# pathIn = './test_imgs/test2.jpg'
# pathOut = './result_imgs/test2.jpg'
# yolo_detect(pathIn,pathOut)
# # >>> 从硬盘加载YOLO......
# # >>> YOLO模型花费 3.55 秒来预测一张图片# pathIn = './test_imgs/test3.jpg'
# pathOut = './result_imgs/test3.jpg'
# yolo_detect(pathIn,pathOut)
# # >>> 从硬盘加载YOLO......
# # >>> YOLO模型花费 3.75 秒来预测一张图片
yolo_01.cmd,里面的cd改变当前目录和.py文件位置 %1是拖拽图片或发送桌面方式传入图片地址
cd ..
cd ..
@python .\OpenCV\YOLO\yolo_ts1_OK.py %1

淘宝下单后,根据单号,留言训练图片,上传不了
好像不是这样的格式,要下面这样的吗?
https://cloud.tencent.com/developer/article/1931752
2024.8.22.21:15需要网络训练,本机调用模型
 VOC输出XML文件
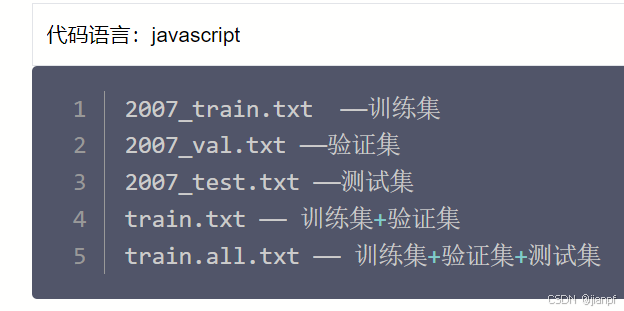
翻译:train训练集,val验证集(可无),test测试集
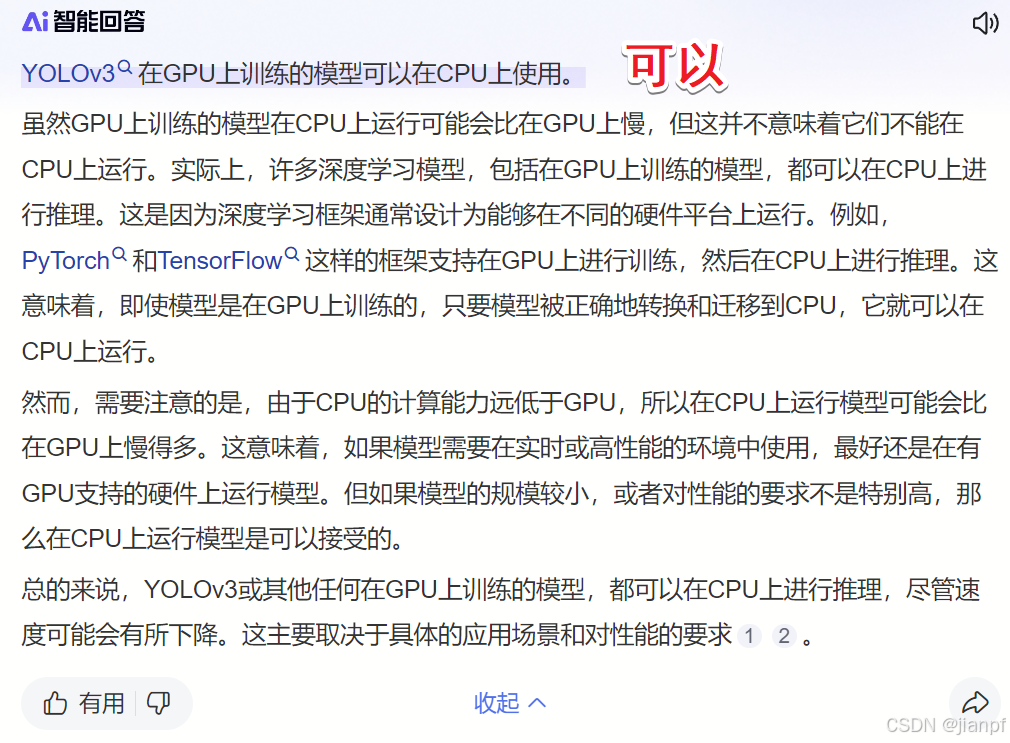
GPU训练可以给CPU用
百度pp3
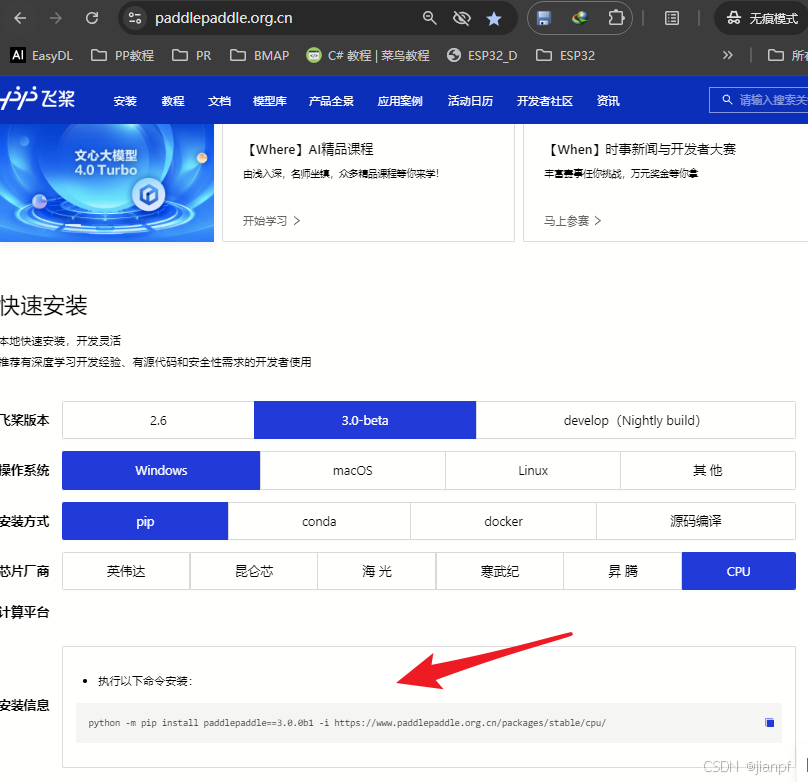
https://www.paddlepaddle.org.cn/
python -m pip install paddlepaddle==3.0.0b1 -i https://www.paddlepaddle.org.cn/packages/stable/cpu/
白嫖百度GPU算力
https://blog.csdn.net/qq_43632917/article/details/105456180
3060算力0.99元/小时
https://www.autodl.com/login

https://www.bilibili.com/video/BV1Vx4y1e75w/
AMD调用yolo推理(在N卡中模拟A卡)
https://blog.csdn.net/Tecinno4/article/details/132842863
darknet被翻译为暗网了(笑而不语)

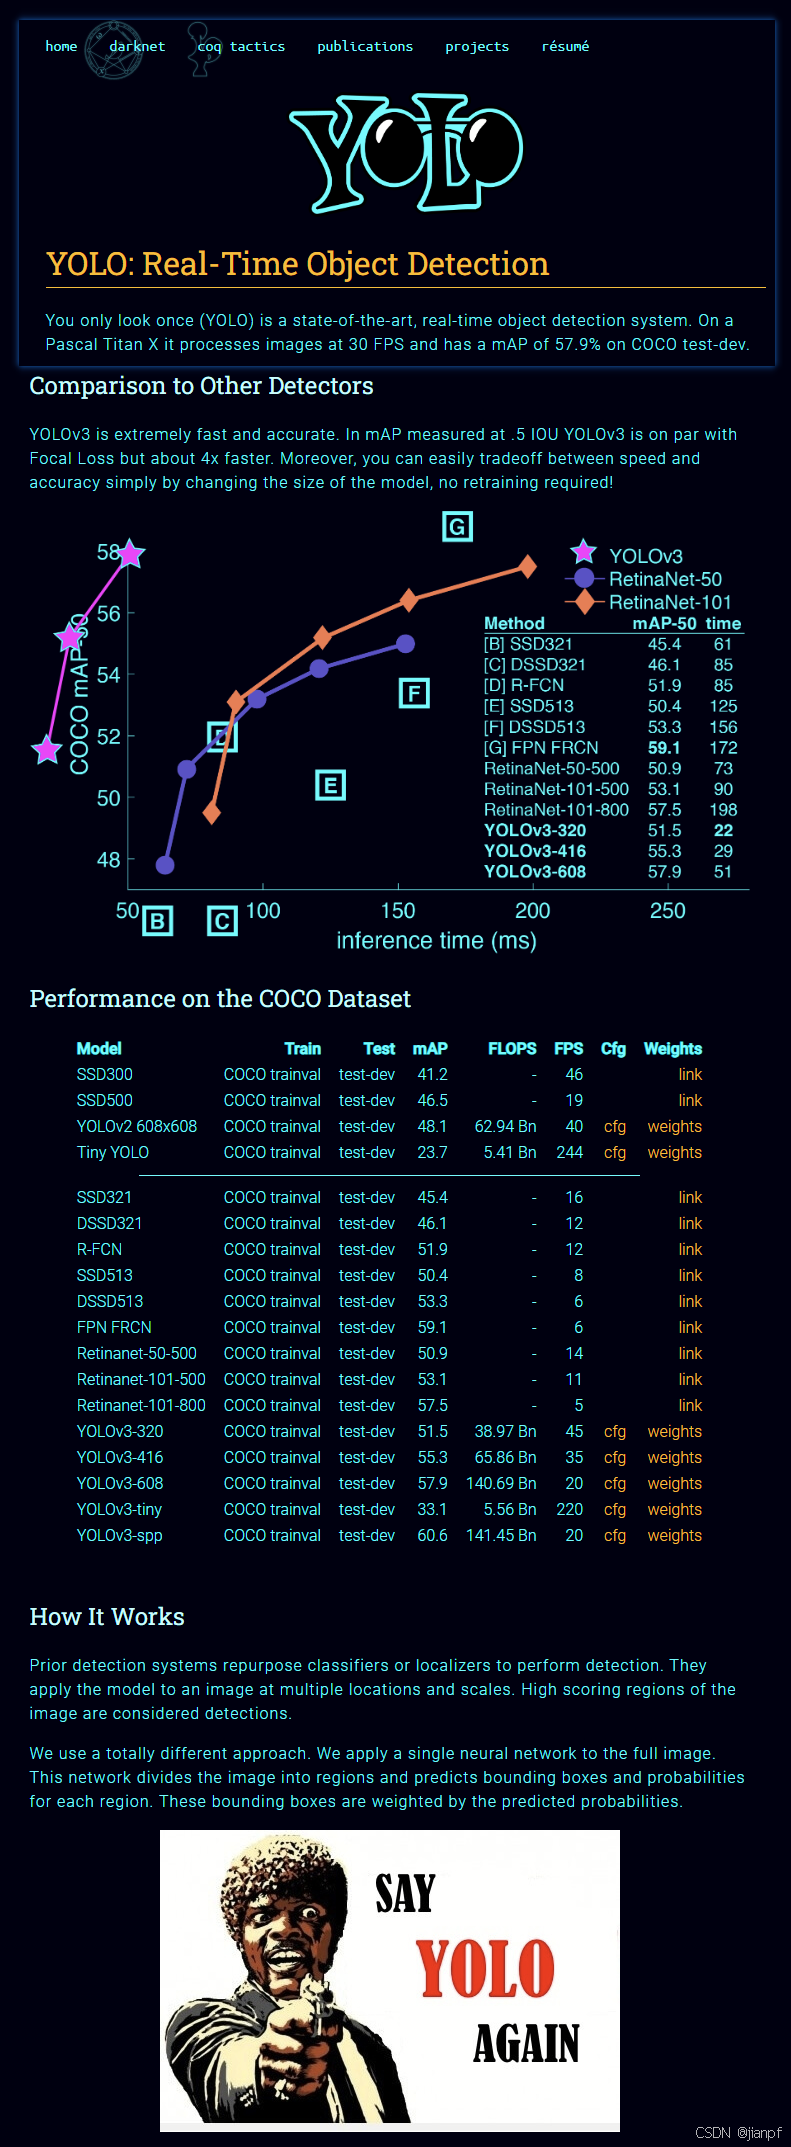

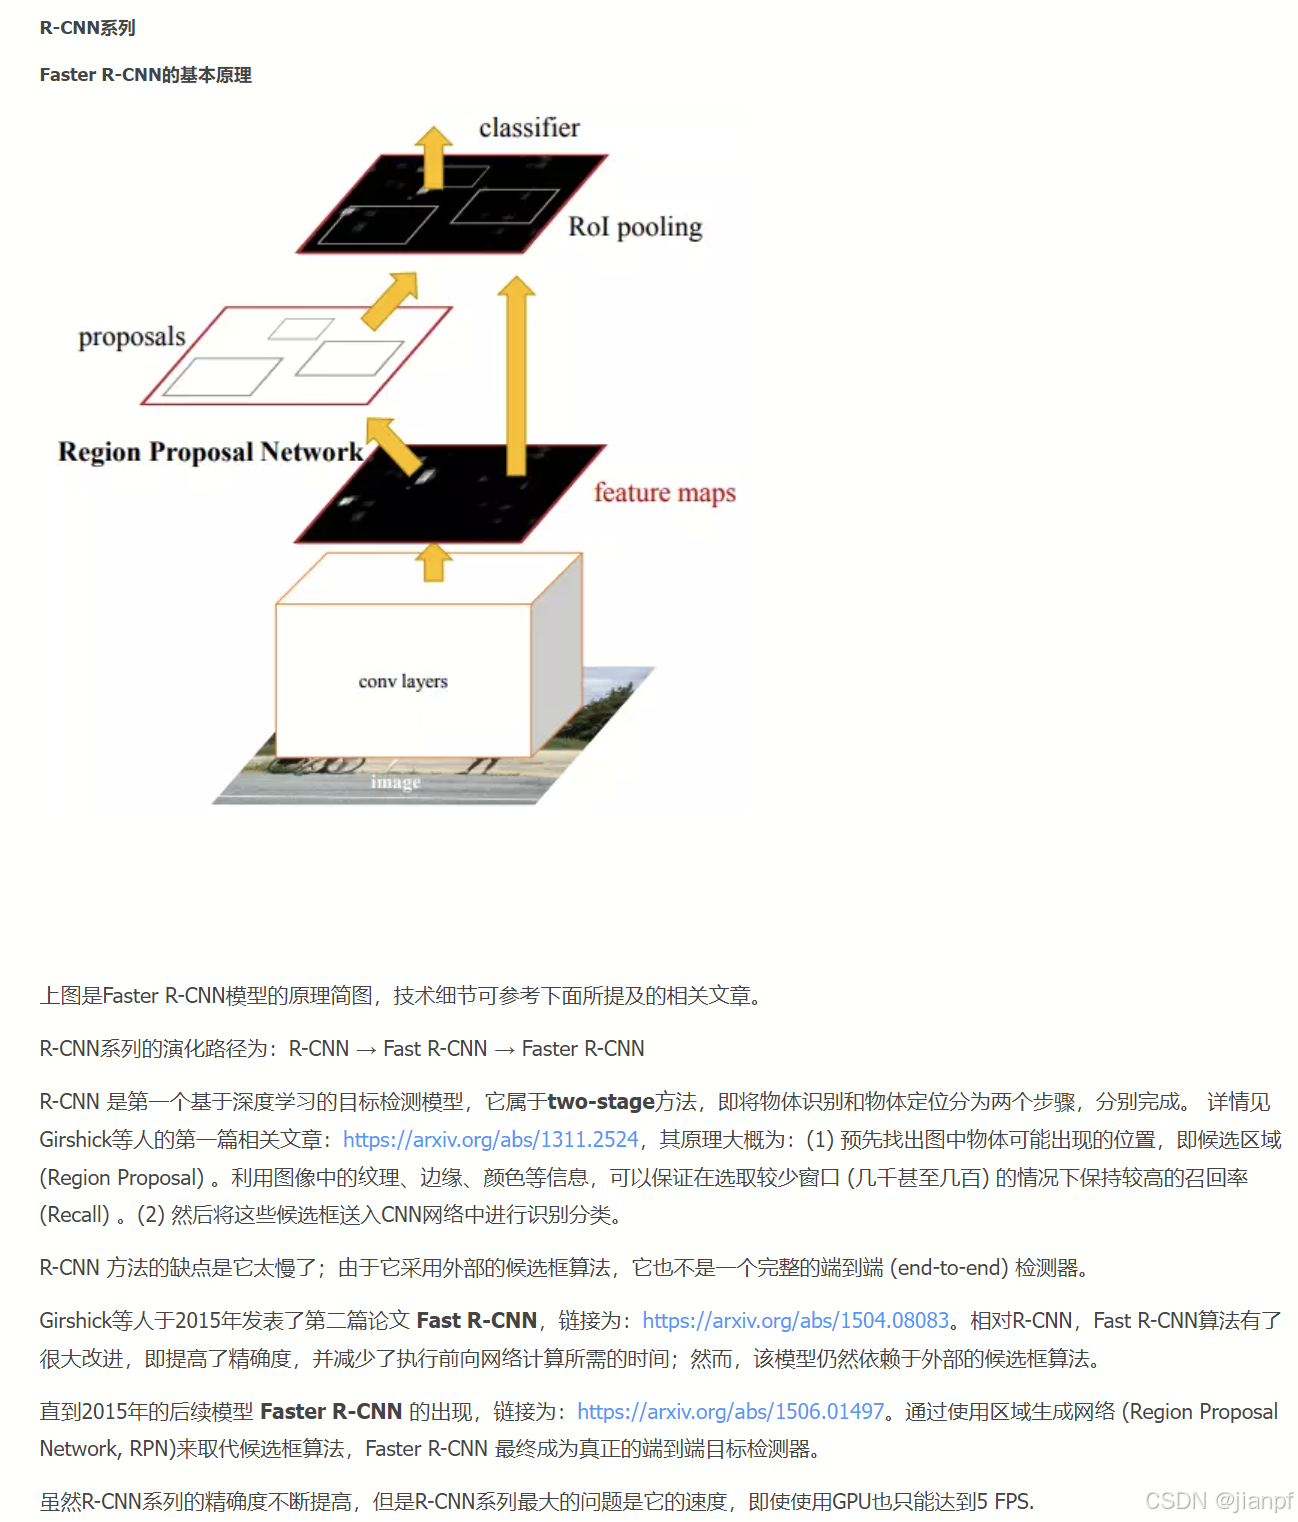
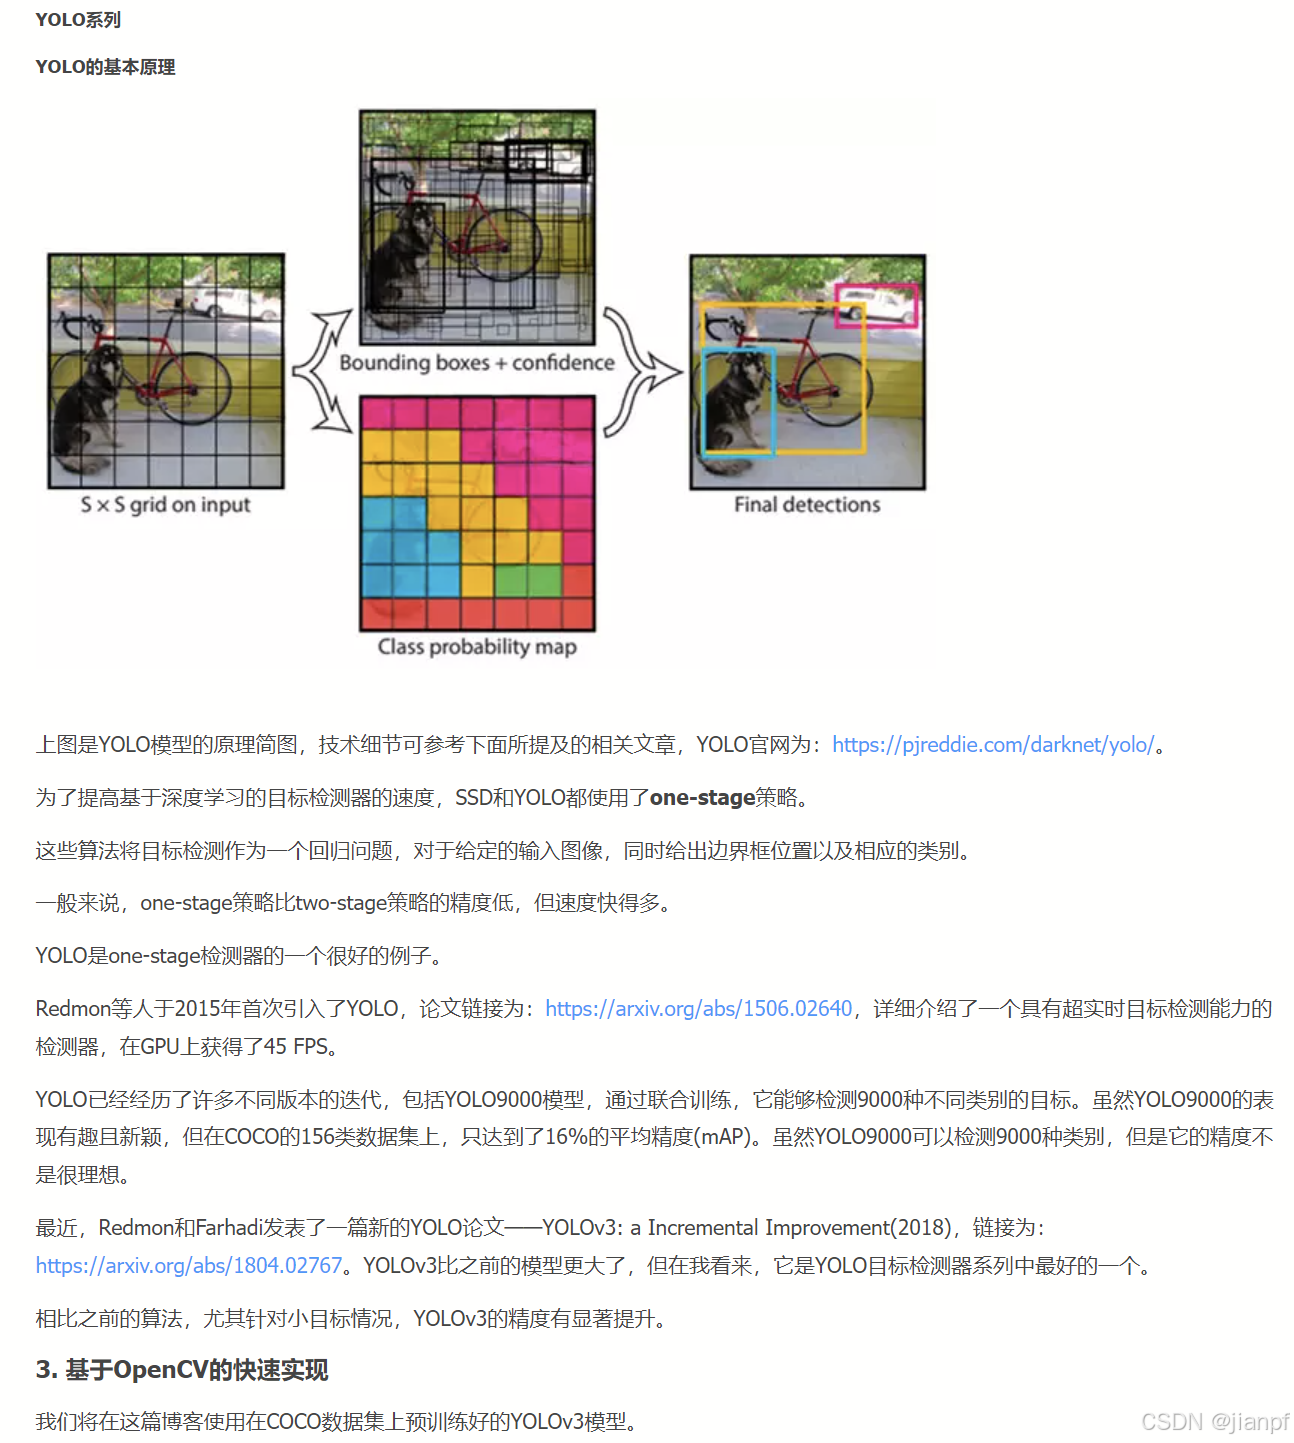
YOLO目标检测算法诞生于2015年6月,从出生的那一天起就是“高精度、高效率、高实用性”目标检测算法的代名词。
在原作者Joseph Redmon博士手中YOLO经历了三代到YOLOv3
时间:2018年4月8日
YOLOv3在320×320 YOLOv3运行22.2ms,28.2 mAP,
官网地址:https://pjreddie.com/darknet/
GitHub: https://github.com/pjreddie/darknet
Darknet本身是Joseph Redmon为了Yolo系列开发的框架。
https://pjreddie.com/darknet/yolo/
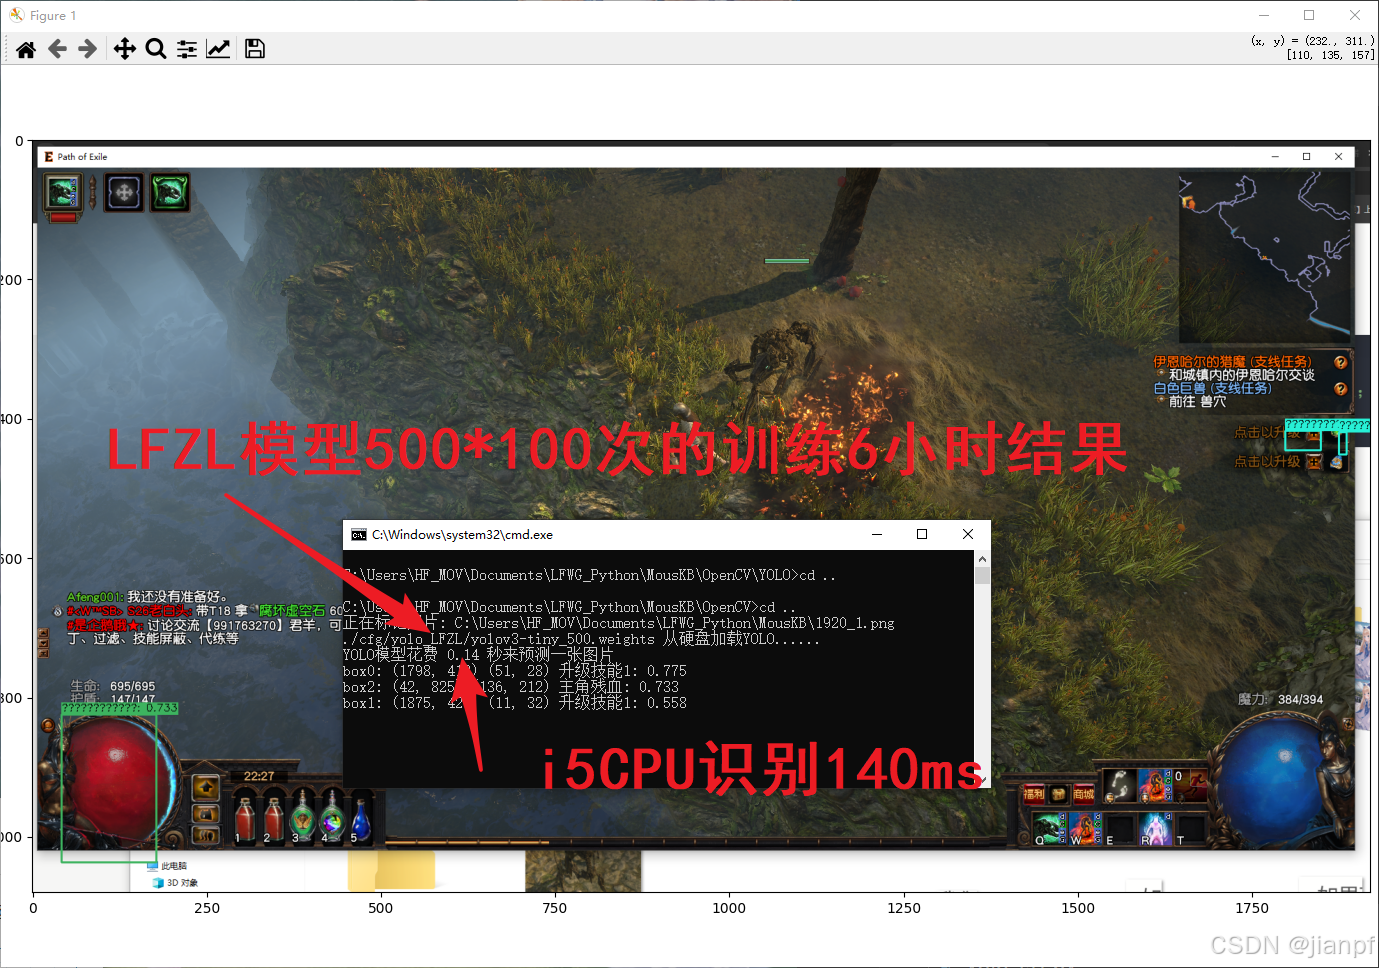
yolov3的网格wh设置越大也精确(1920p的小图标需要1664值)
1332=416
2632=832
52*32=1664
https://www.jianshu.com/p/c952e2455ea2
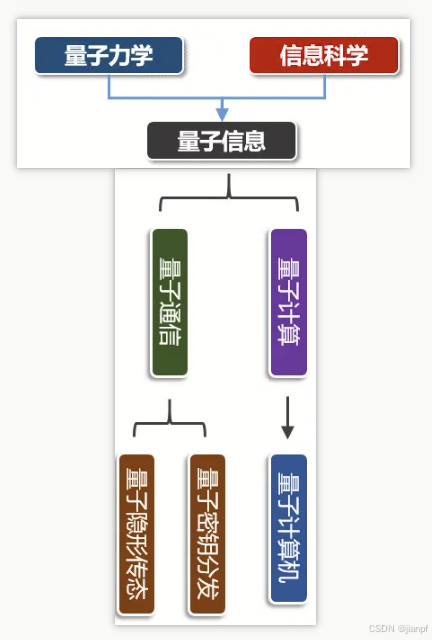

量子量子是能量动量等物理量的最小单位,是不可分割的。光子就是一种量子
不是具体的实体粒子。量子化<>量子力学<>量子通信<>量子比特<>量子信息
https://www.jianshu.com/p/676cb3a5ab72
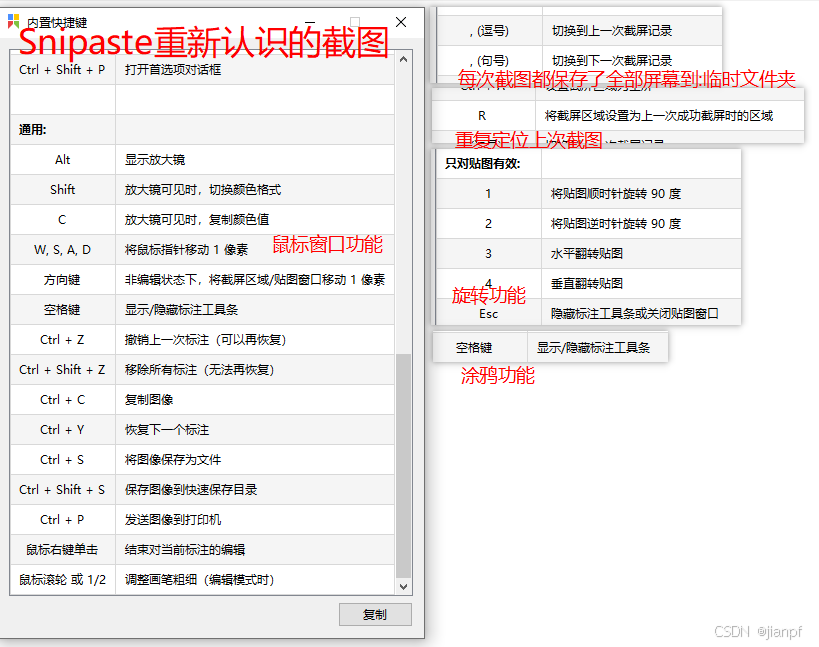
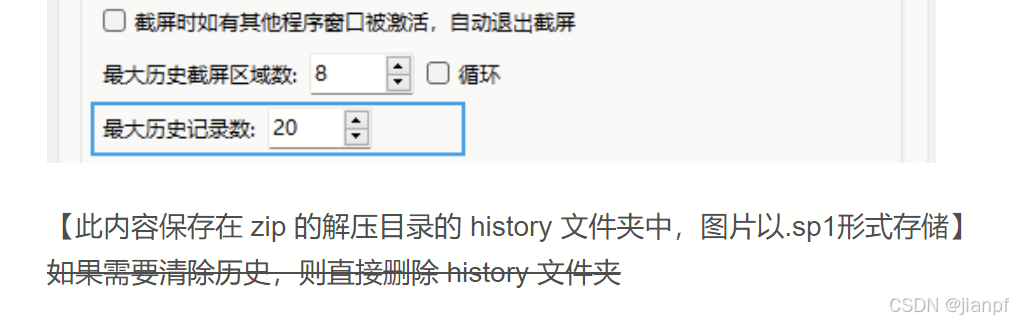
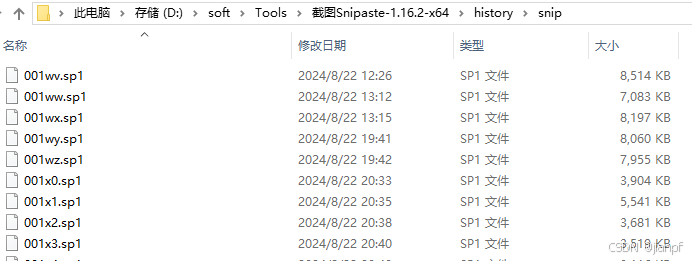
Snipaste_截全屏记录设置50次,如果需要清除历史.sp1文件,则直接删除 history 文件夹最大8.5MB/张(150MB,不大可用)
重新定位到上次截图位置,截图快捷键R,.逗号句号
https://blog.csdn.net/weixin_45964668/article/details/137956748
腾讯GPU一周价格
阿里云月价格


1亿12个月=8.3万算力/月
百度云
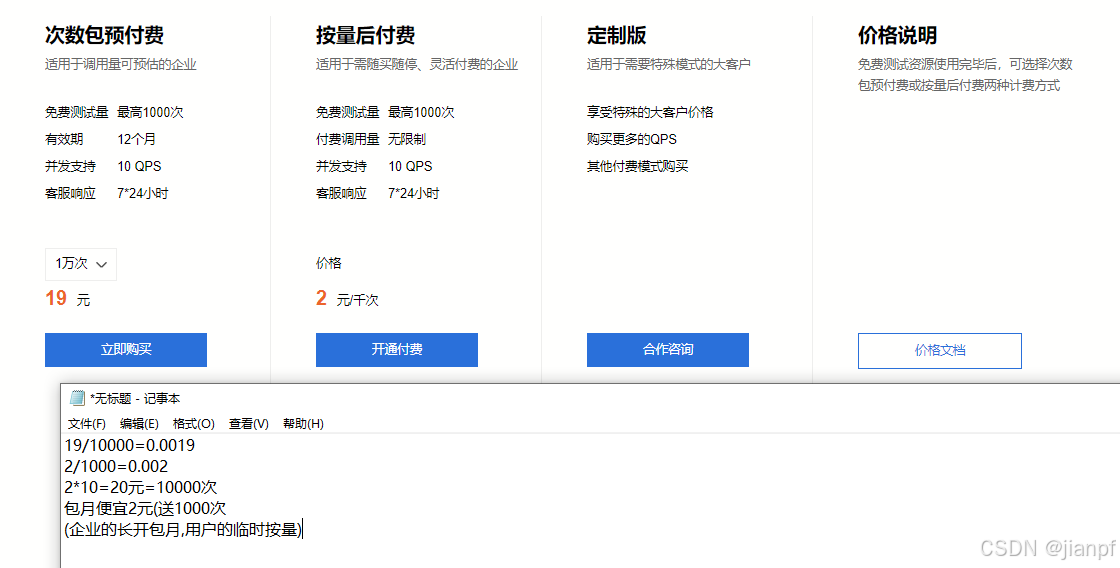
19/10000=0.0019
2/1000=0.002
2*10=20元=10000次
包月便宜2元(送1000次
(企业的长开包月,单用户的临时按量)
8小时有多少秒?(28800秒=2.88万秒)每秒10次就是28万个算力
按天也可以单用户,免费SDK,但需要授权次数时间.(必须买买买,一直变现一直买)

https://blog.csdn.net/qq_44878920/article/details/117951928

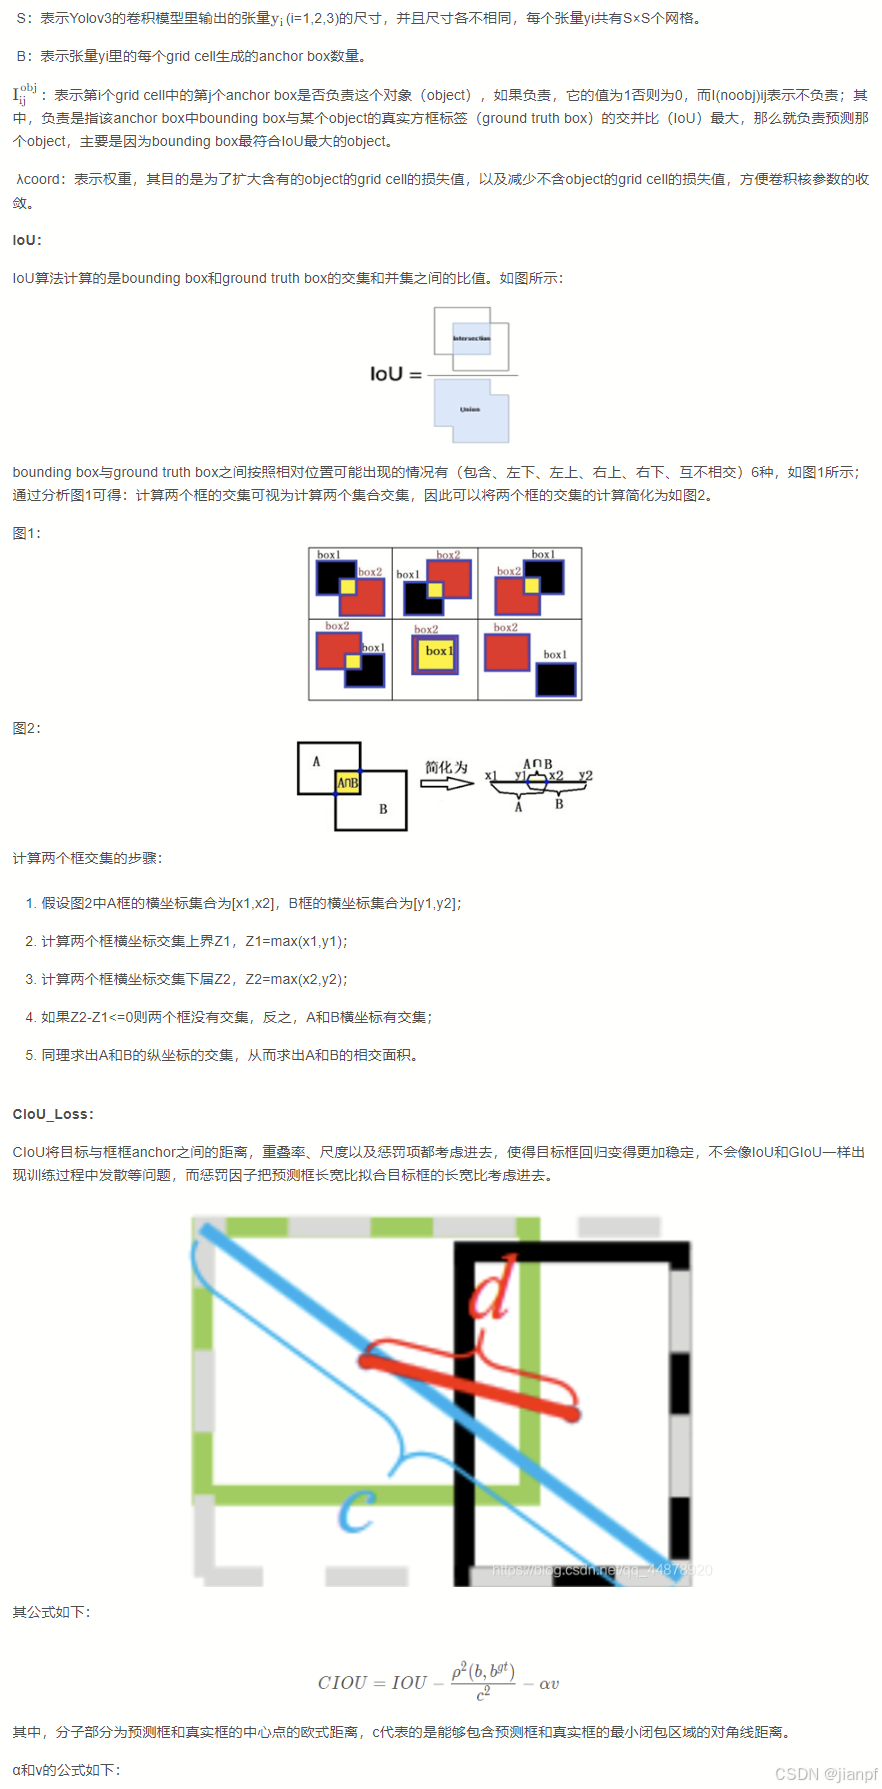
训练集(Training Set)
目的:用于模型的实际训练,即通过前向传播和反向传播来更新网络的权重。
使用方式:模型在训练集上学习特征和模式,以识别和定位对象。
验证集/校验集(Validation Set)
目的:用于模型的评估和超参数调整,不参与模型的训练过程。
使用方式:在训练过程中,定期使用验证集来评估模型的性能,以便调整学习率、批量大小等超参数,防止过拟合。
测试集(Test Set)
目的:用于最终评估模型的泛化能力。
使用方式:在模型训练完成后,使用测试集来评估模型在未见过的数据上的表现。
训练过程的名称和阶段
数据准备:收集和准备训练数据,包括图像和对应的标注信息(如边界框和类别标签)。
数据增强:对训练数据进行增强,如旋转、缩放、裁剪等,以增加数据多样性。
模型初始化:加载预训练的权重或初始化新权重。
前向传播:模型在训练集上进行预测,生成预测结果。
损失计算:计算预测结果与真实标注之间的差异(损失)。
反向传播:根据损失对模型的权重进行更新。
超参数调整:使用验证集评估模型性能,并调整超参数。
模型保存:在训练过程中定期保存模型的权重,以便恢复训练或进行后续评估。
模型评估:使用验证集和测试集评估模型的最终性能。
模型部署:将训练好的模型部署到实际应用中。
https://arxiv.org/pdf/1804.02767
https://arxiv.org/abs/1804.02767
https://www.cnblogs.com/-wenli/p/11939377.html
https://www.cnblogs.com/-wenli/p/11943523.html
https://www.cnblogs.com/-wenli/p/11951946.html
https://blog.51cto.com/u_15127504/4342277
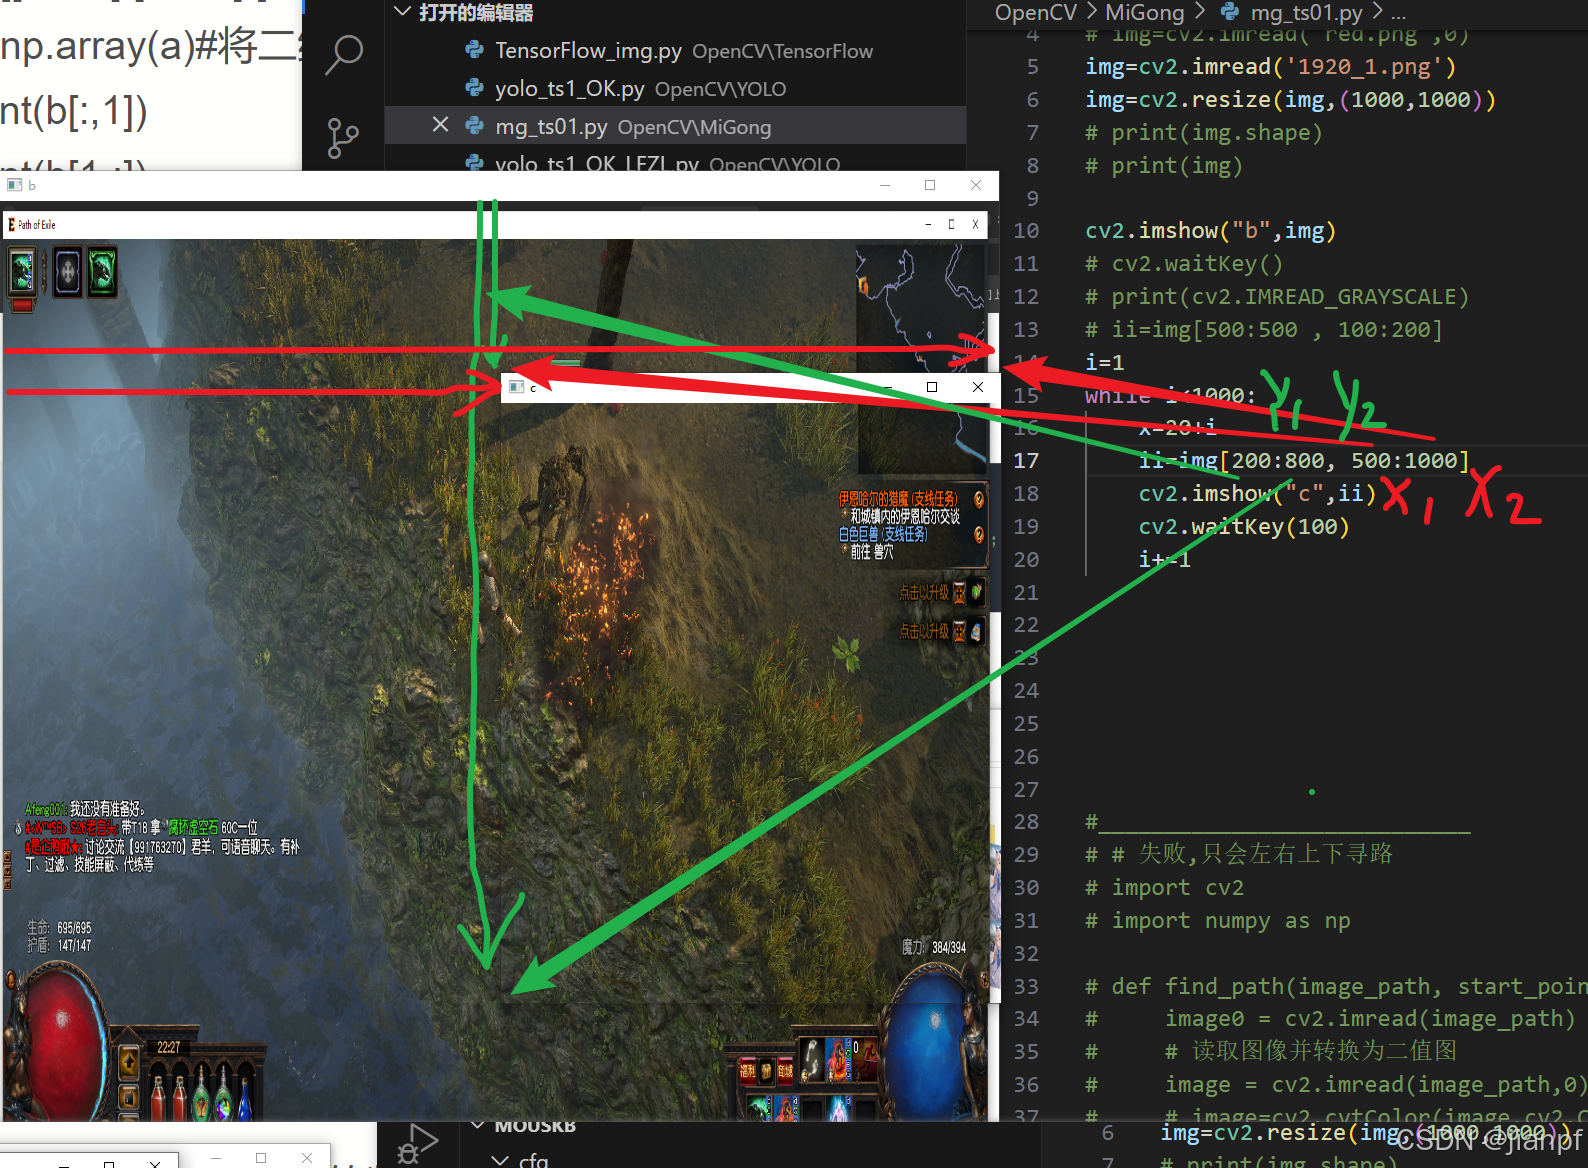
二维图=[y1:y2,x1:x2]=[y1:-1,x1:-1]
-1<0<1<max=-1<0<1<max=-1所以-1也是最大值
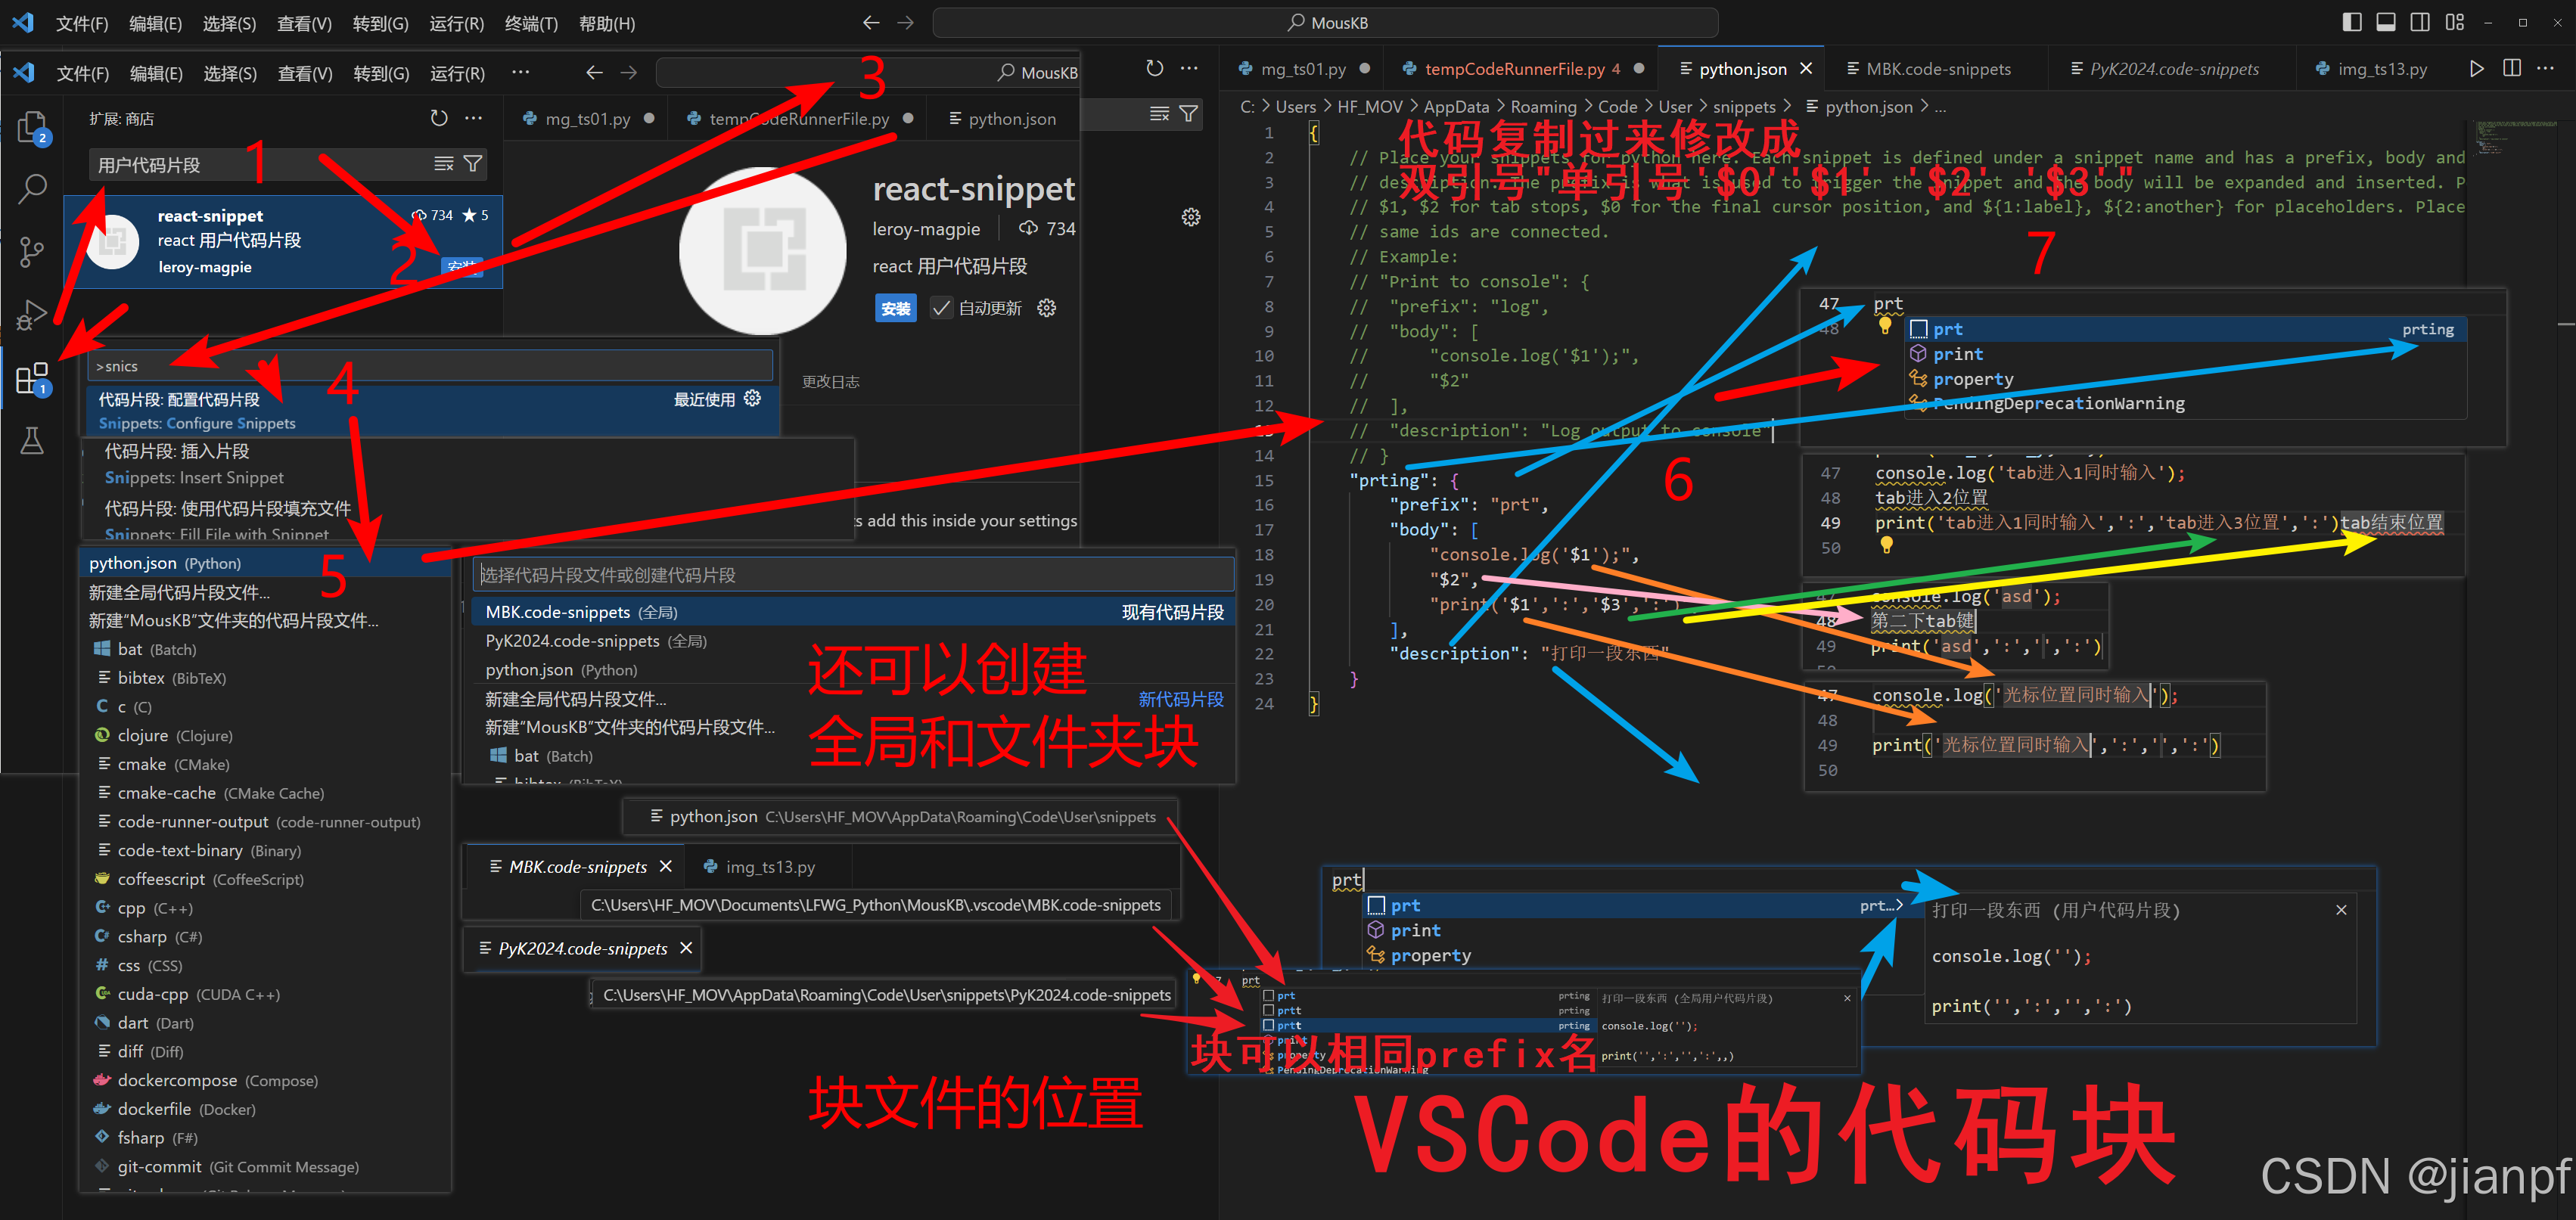

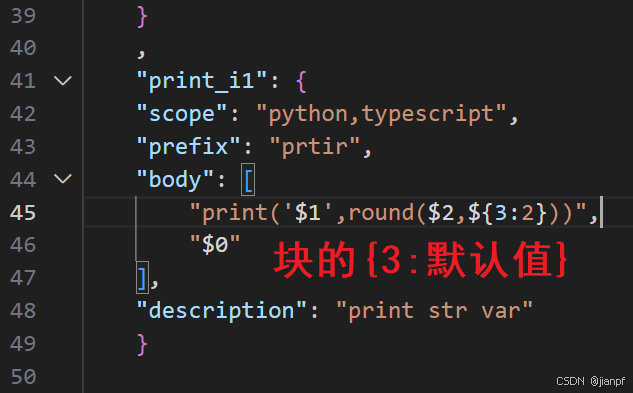
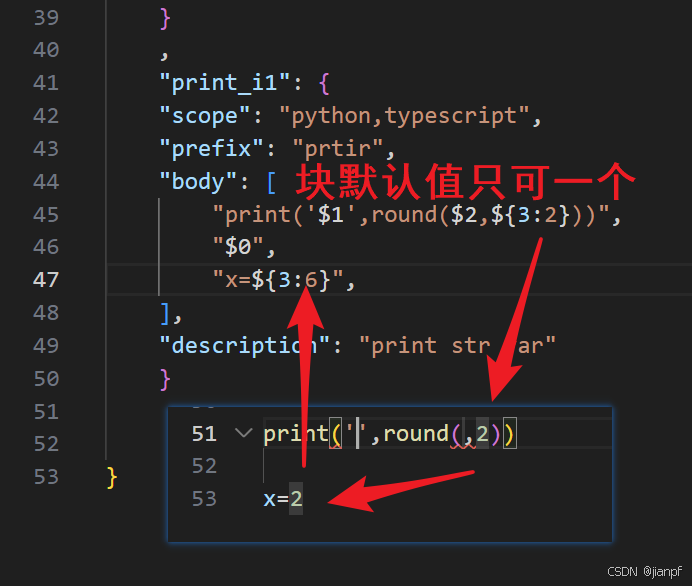
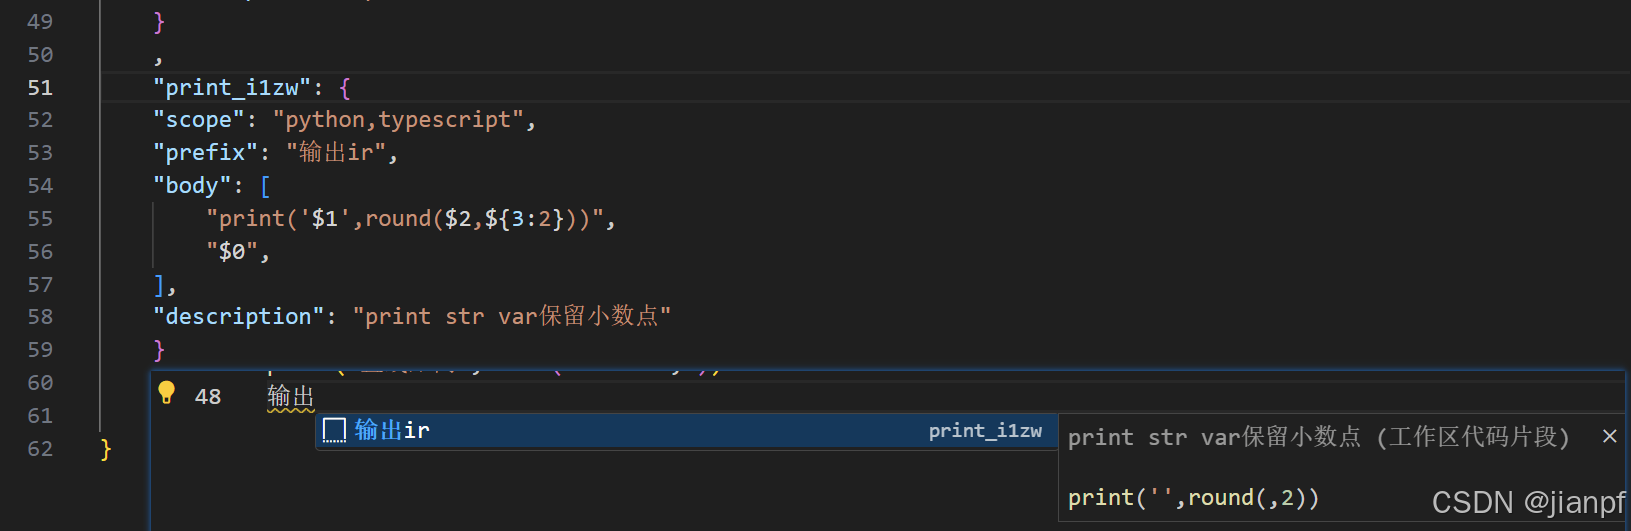
VScode代码块插件snippet后Ctrl+Shif+P>scs选择语言块>python>修改代码块成双引号,行>可以prefix同名
CMD:
用vscode打开当前目录
code -r .
Crtl+u:(pull)上次光标位置
Ctrl+d:选择单词,直到非单词
Alt+上下:上下移动多行
shift+Alt+上下:复制所选行到上下方
shift+Alt+A:块注释
shift+Alt+F:文档格式化(需要安装语言插件black formatter&category:formatters python)
shift+Ctrl+P>tran up low:转换大侠写
S+C+P>合并行JoinLine
S+C+P>升降序所选SortAD
Alt+光标点击:跨位置行同时编辑
shift+Alt+i:所选行尾部同时编辑
ctrl+p:打开文件(支持冒号:跳转行号)
ctrl+tab:切换文件
ctrl+g:跳转到行
ctrl+shift+o:显示当前变量跳转
F2:非常用的函数名同步修改
F2:非常用的函数名同步修改
F2:非常用的函数名同步修改
2024.8.23.19:38下午睡了4小时,今晚继续干,只要干不死(改为喜欢的).

https://www.bilibili.com/video/BV12B4y1i7dw/?spm_id_from=333.788
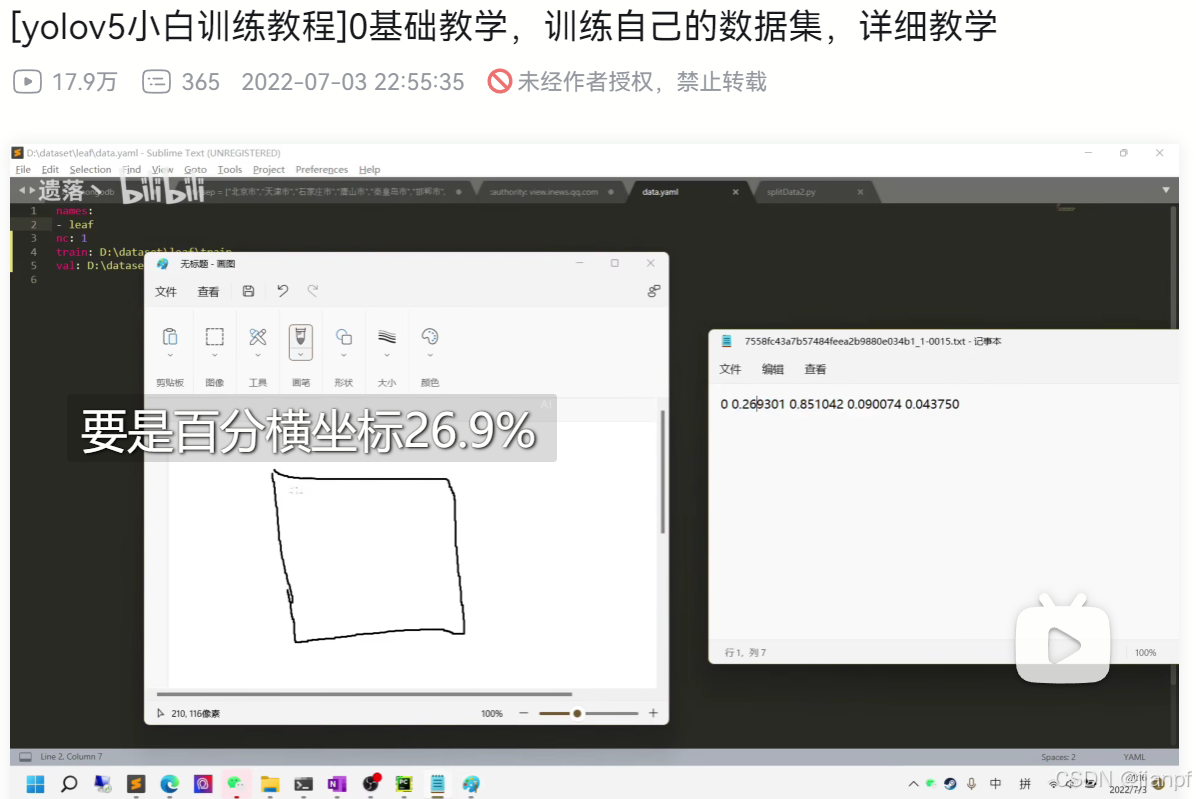
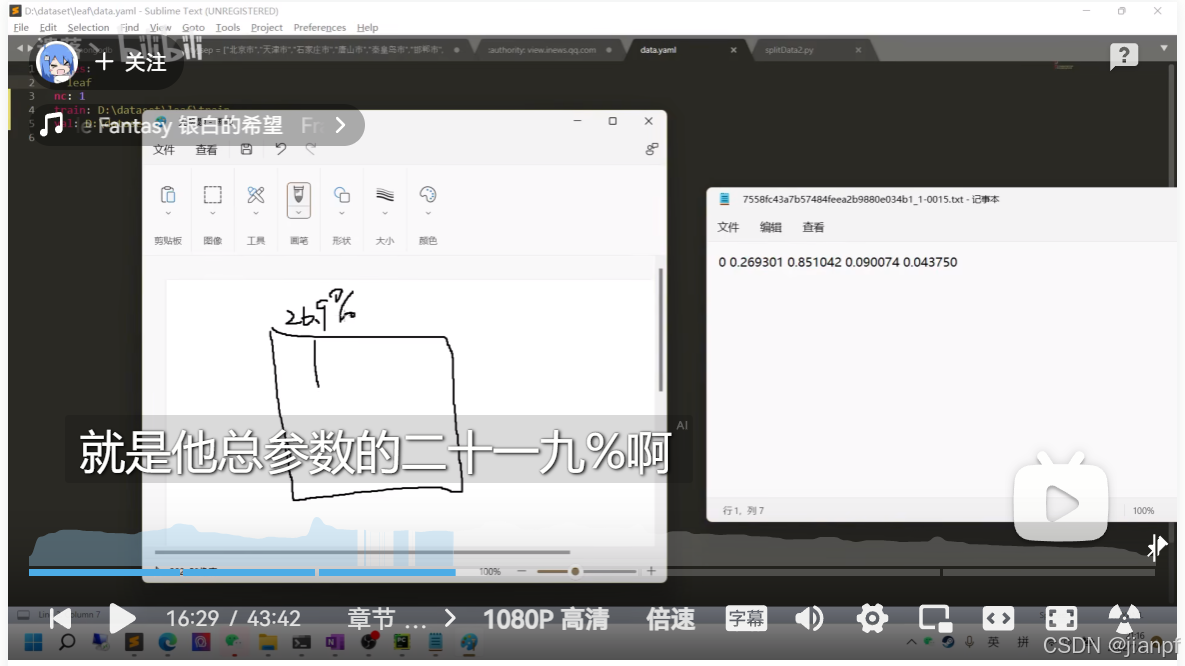
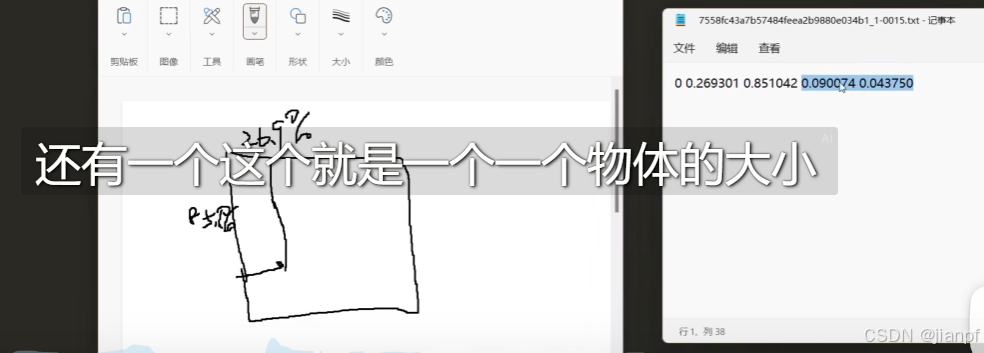
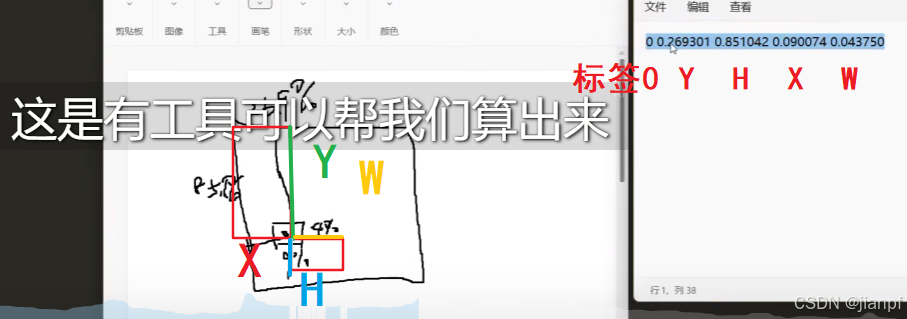
0.269想到是百分比,后面没猜对是Y轴开始(屏幕原点逆时针,原第四象限当第一象限)
0 Y X H W
名言:可能仅仅是因为我们理解不了它的意义(好比二进制,多一位不单单多一位的意义)
CNC的G代码圆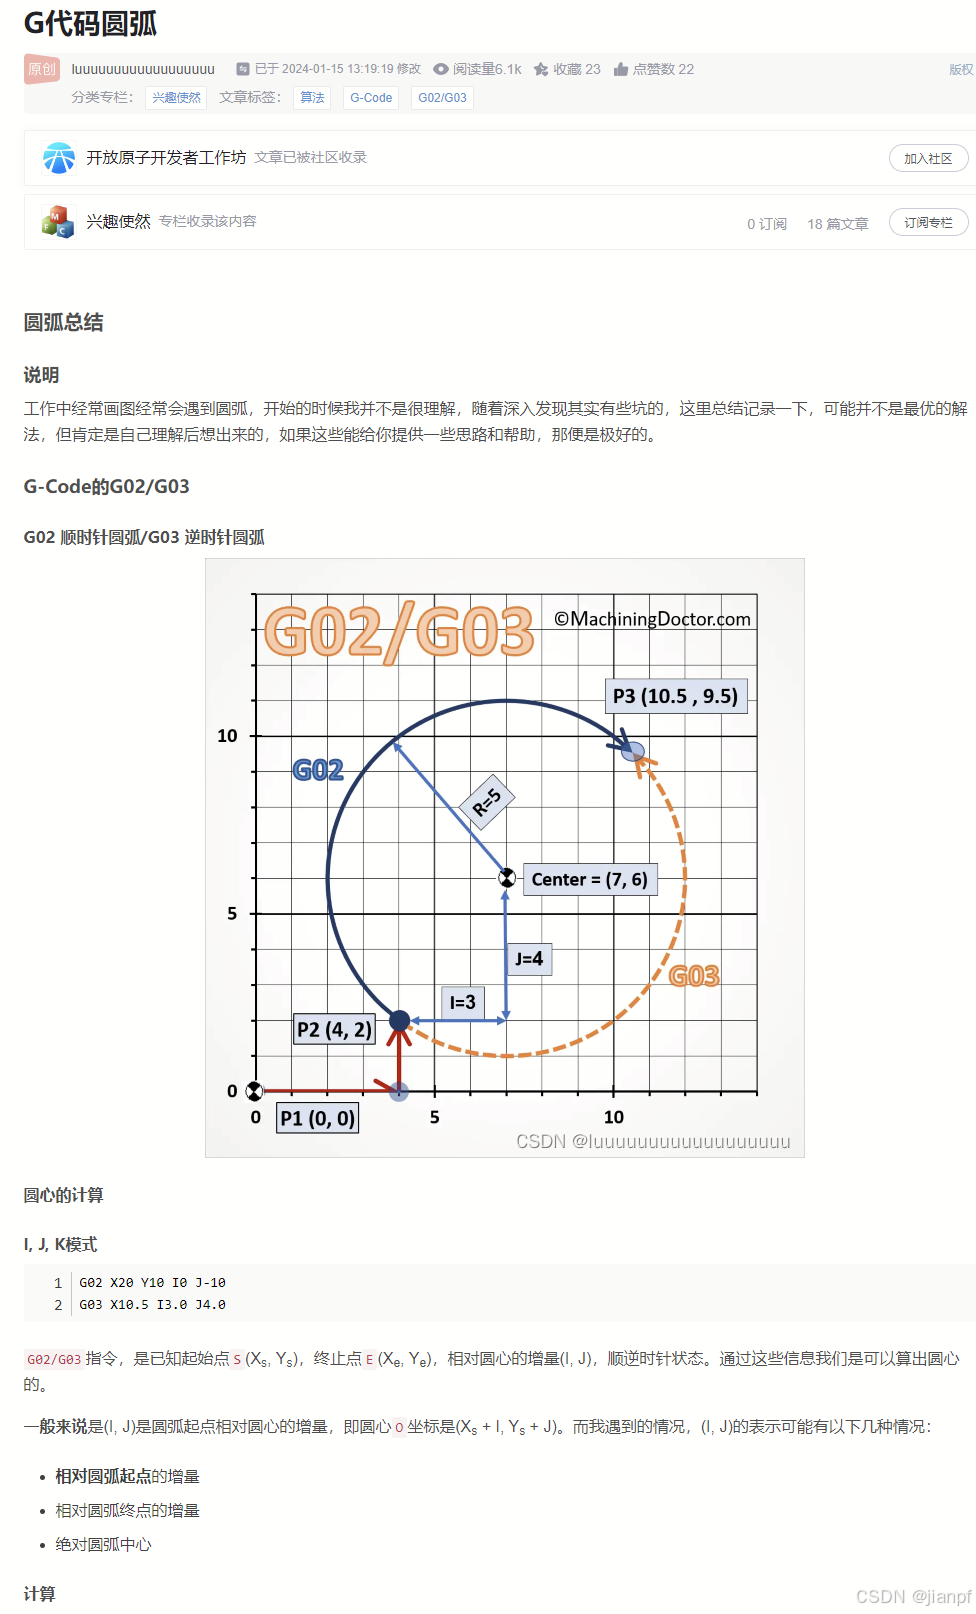
https://blog.csdn.net/yoyo18520/article/details/135351162
# 没有用的代码2024.8.24
# 鼠标画圆,鼠标慢是因为pyautogui默认时间0.1,PAUSE=0.001ms鼠标点击屏蔽了import pyautogui
import math
import timedef getPoints(cx,cy,r):# 定义圆的参数# center_x, center_y = 500, 500  # 圆心坐标# radius = 100  # 半径center_x, center_y = cx, cy  # 圆心坐标radius = r  # 半径# 定义角度的精度,例如每5度一个点angle_step = 5# 计算圆周上的点points = []for angle in range(0, 360, angle_step):# 将角度转换为弧度radians = math.radians(angle)# 计算点的坐标x = center_x + radius * math.cos(radians)y = center_y + radius * math.sin(radians)# 将点的坐标添加到列表中points.append((x, y))# # 打印圆周上的点# for point in points:#     print(f"Point: {point}")# print(points)return pointsdef MC(points):
# 画圆for i in range(len(points)):# 计算两点之间的距离dx = points[i][0] - points[i - 1][0]dy = points[i][1] - points[i - 1][1]distance = math.hypot(dx, dy)# 根据距离计算移动时间,保持最大速度move_time = min(distance, max_speed)# 等待一段时间以模拟进给速率FSS=(move_time / FS_speed)*dax_speed# # sss=(max_speed/100000)# # FS=FSS*sss# # print(move_time,FSS,"*",sss,":",FSS)FS=0.01print(round(move_time,3),":",round(FSS,3),":")# 移动到当前点# print(distance)# pyautogui.moveTo(points[i][0], points[i][1],FS)#,duration=move_time)#鼠标点击# pyautogui.click()#输出当前鼠标位置# print(pyautogui.position())# 设置等待时间1ms
pyautogui.PAUSE=0.001
# 定义圆的参数
center_x, center_y = 500, 600  # 圆心坐标
radius = 100  # 半径
max_speed = 10000  # 鼠标移动量最大值,以像素为单位
dax_speed=100
FS_speed=1000
# 计算圆周上的点
pointsx =getPoints(center_x,center_y,radius)
MC(pointsx)
# 完成画圆
print("Circle drawn!")
yolo模型训练不了LFZL,转换测试策略:
1.训练(PS)物体试试
2.拍照50张手机照片测试
3.换算法模式下,花10钱用百度的试试
2024.8.24.10:14
LiuXingIT这个包不开源
https://www.bilibili.com/video/BV1YD4y1g7VM/?spm_id_from=333.788
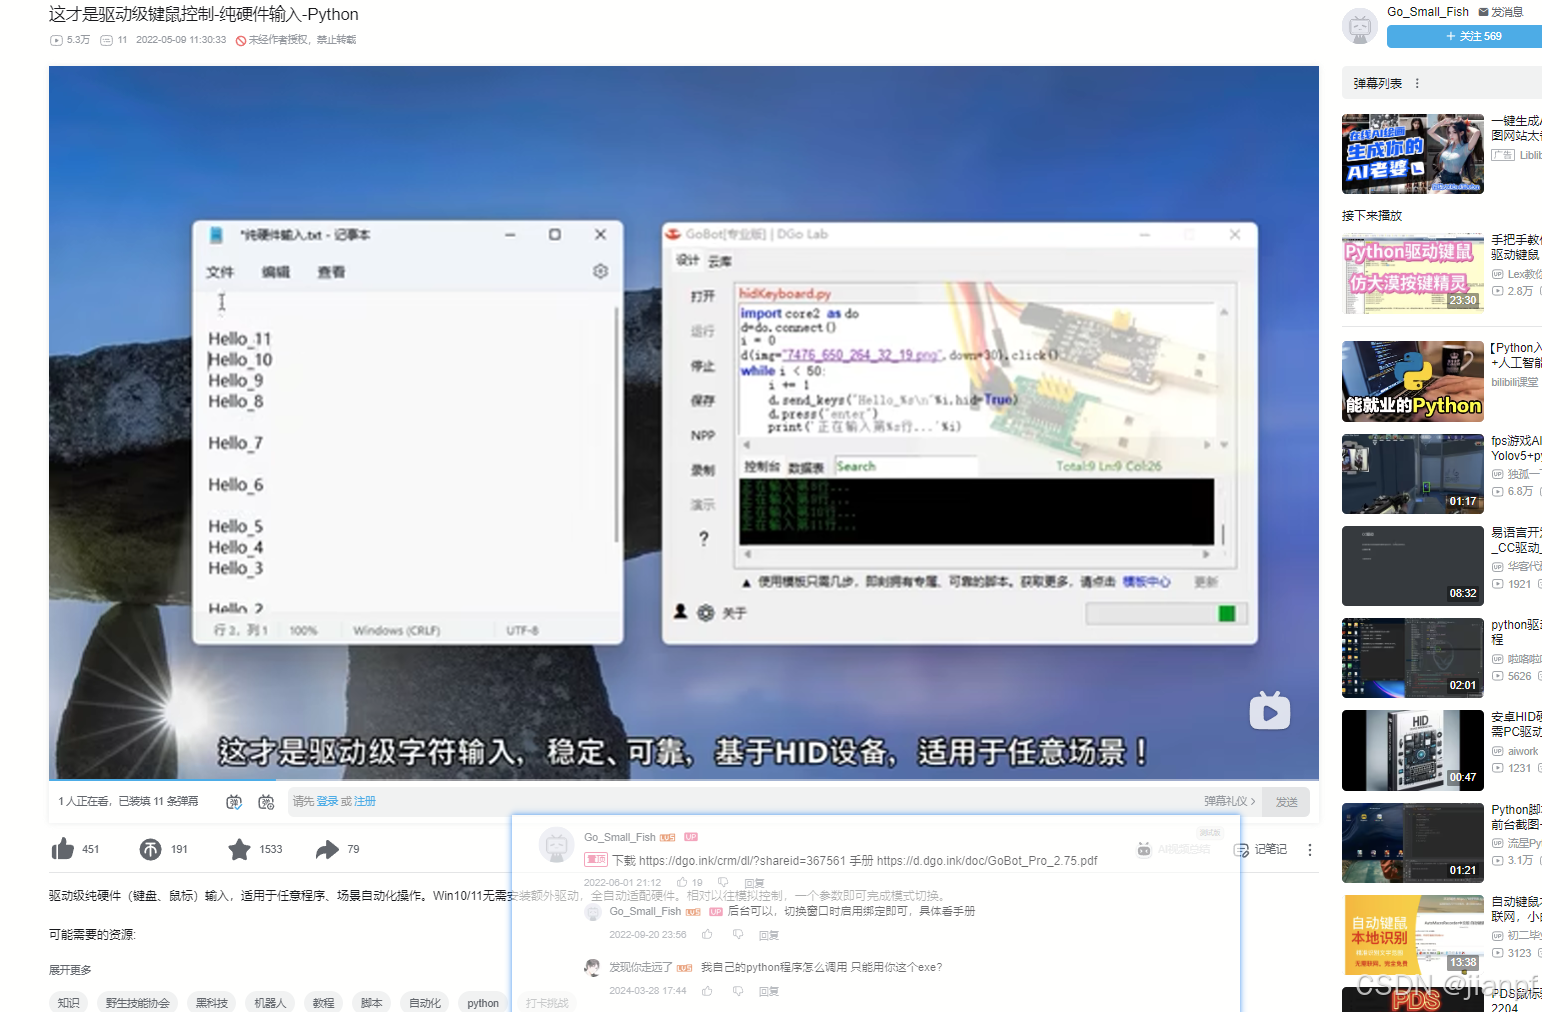
又是不开源的:这才是驱动级键鼠控制-纯硬件输入-Python
载 https://dgo.ink/crm/dl/?shareid=367561 手册 https://d.dgo.ink/doc/GoBot_Pro_2.75.pdf
https://www.bilibili.com/video/BV1dT4y167pY/?spm_id_from=333.788.recommend_more_video.5
2024.8.24.11:19得到了一个重大发现
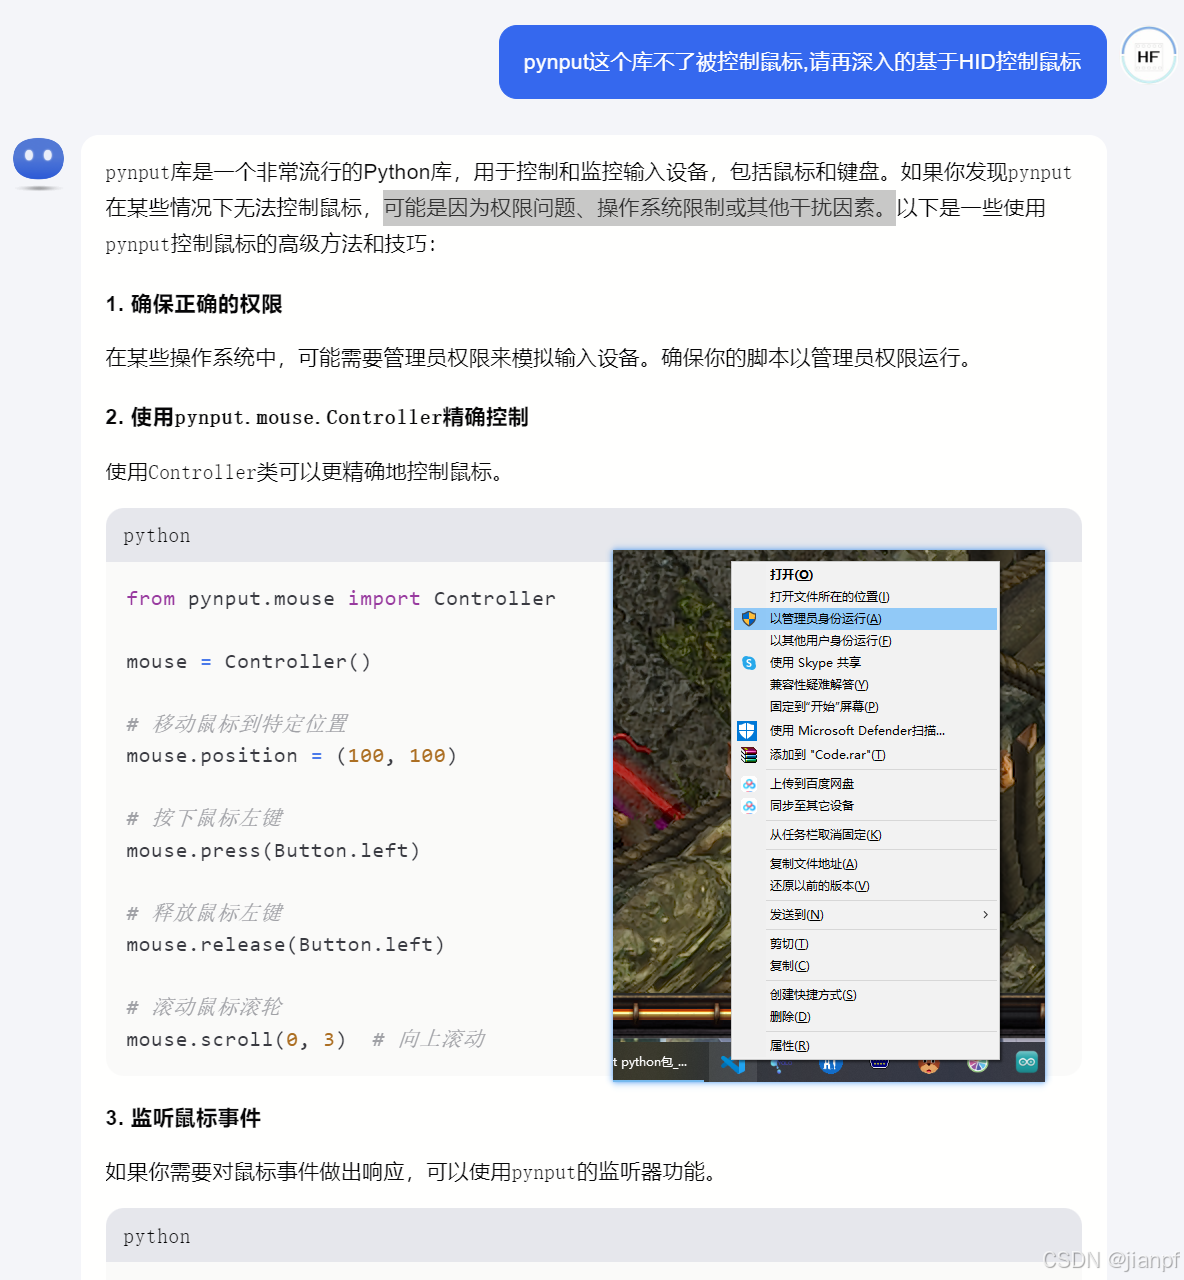
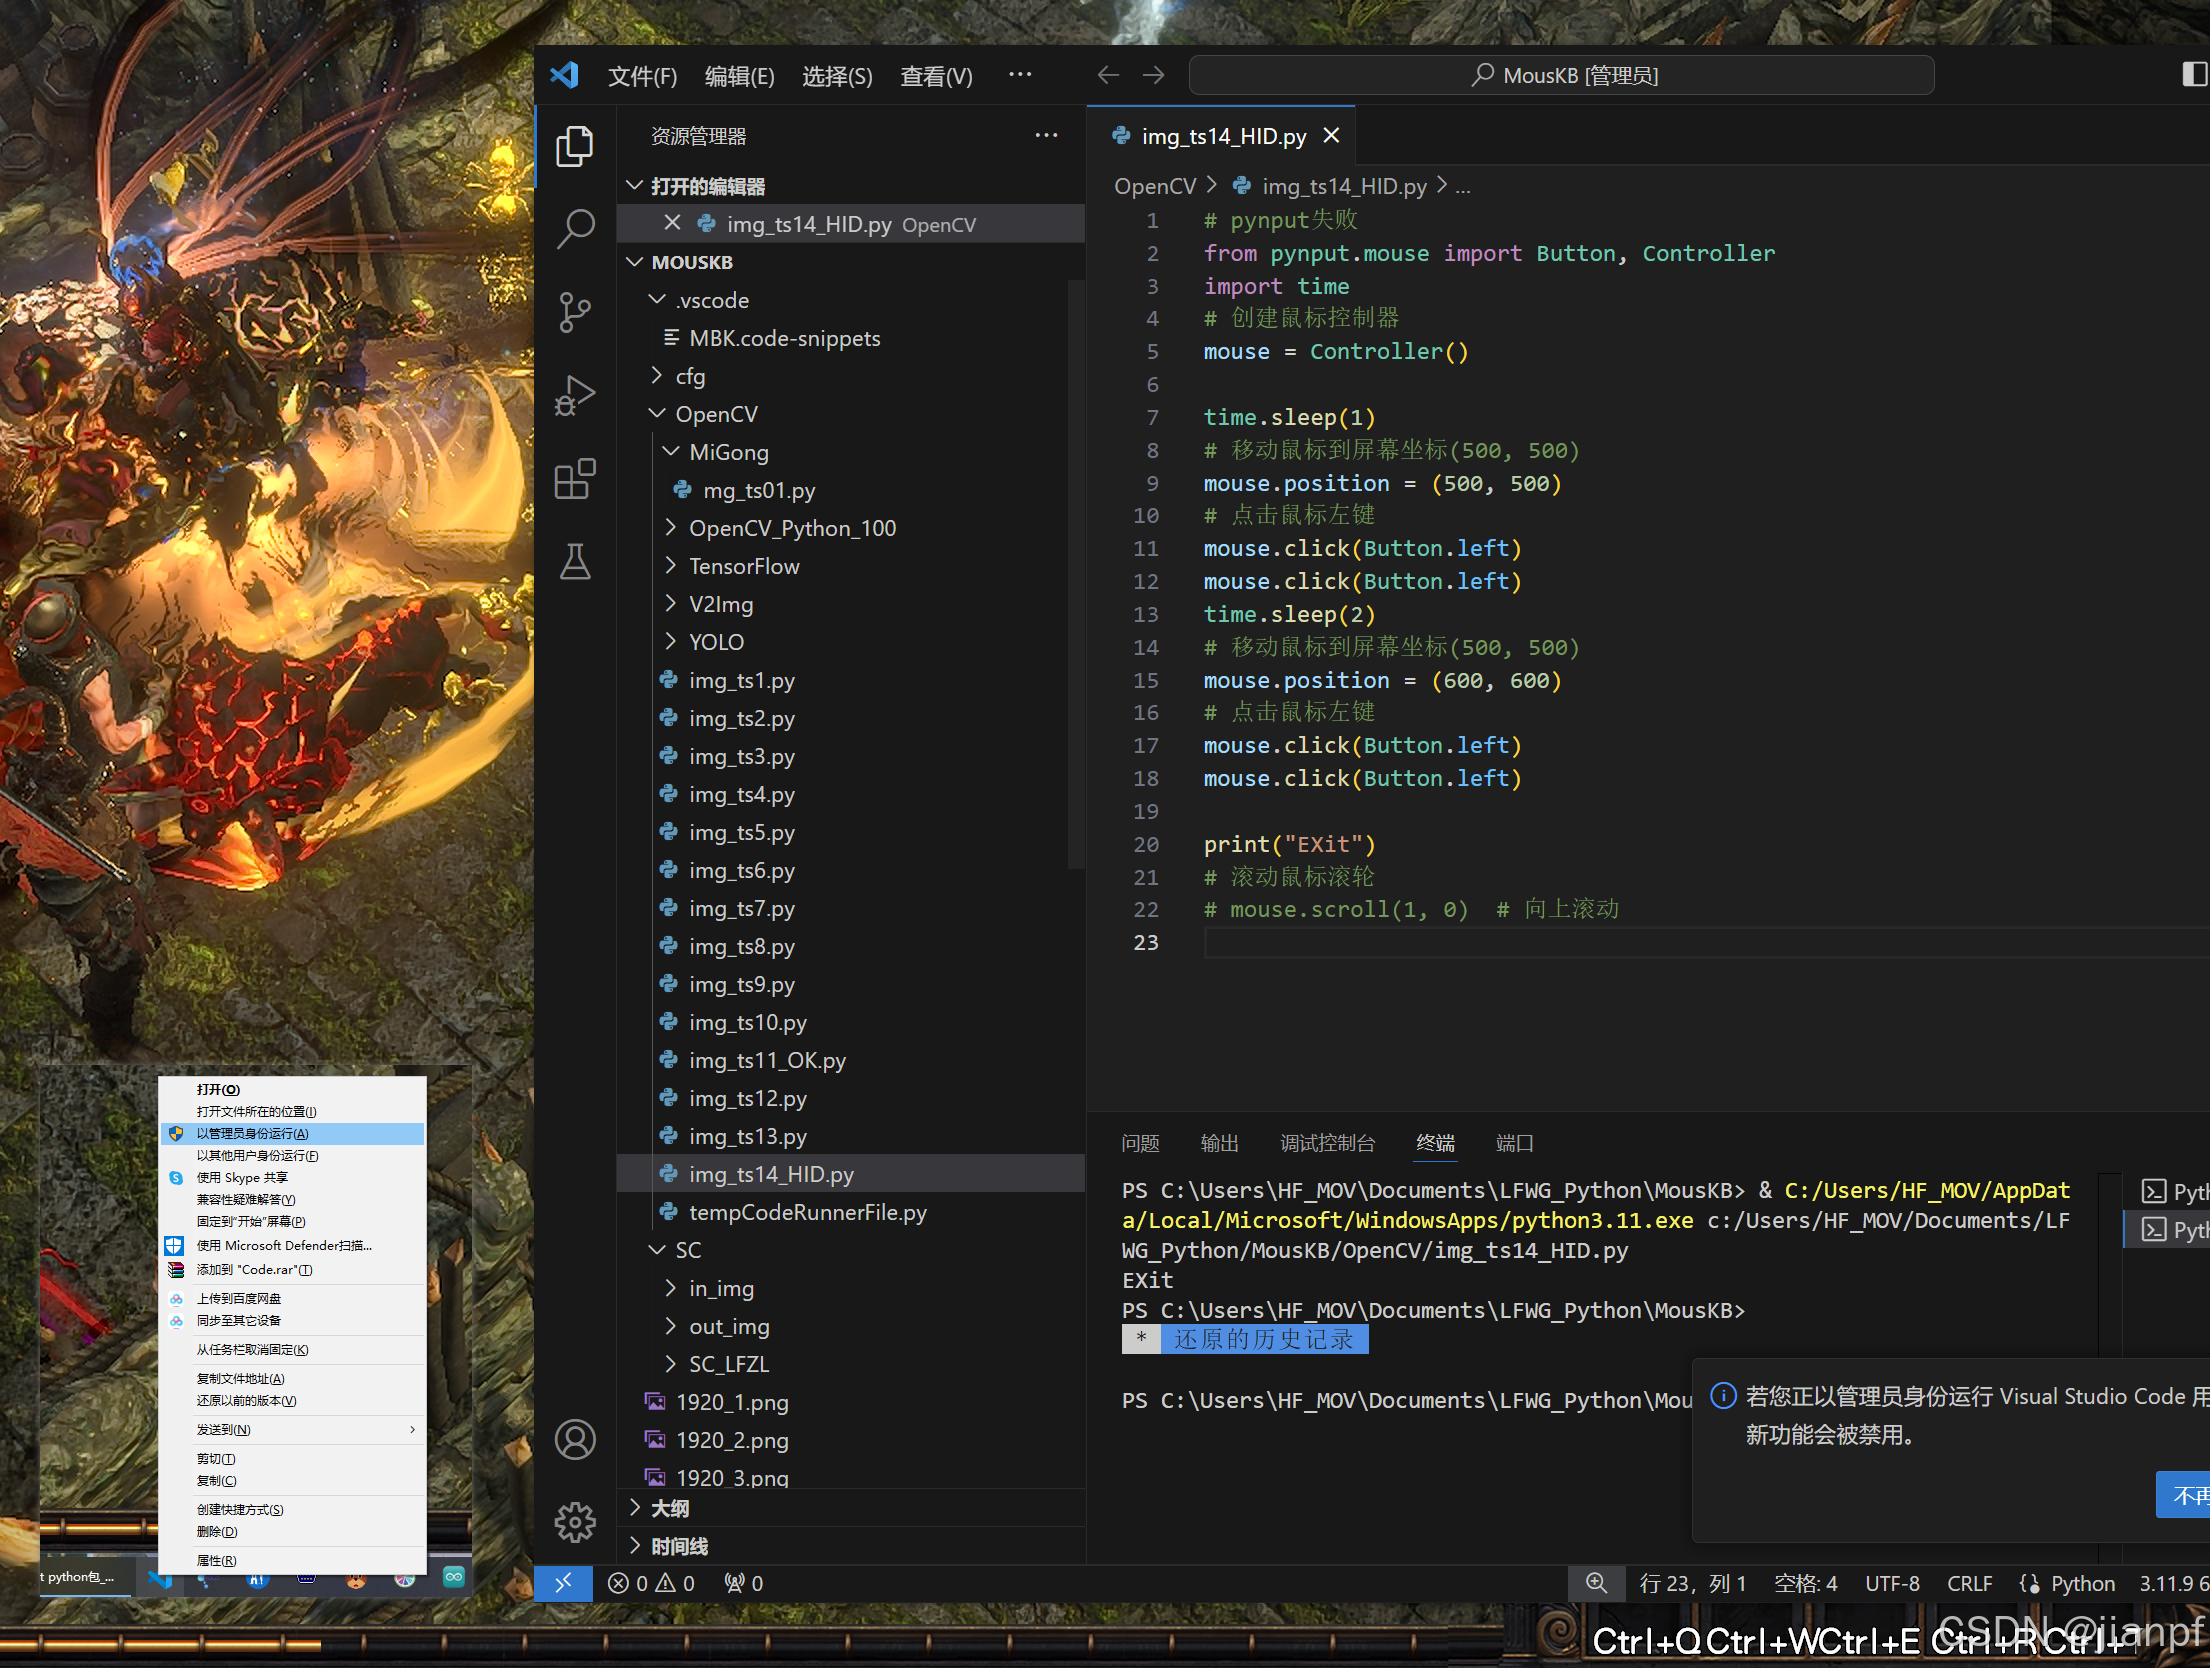
管理员模式运行代码,鼠标才能游戏
# pynput需要管理员运行
from pynput.mouse import Button, Controller
import time
# 创建鼠标控制器
mouse = Controller()i=0
while i<1000000:time.sleep(1)if(mouse.position==(0,0)):break# 移动鼠标到屏幕坐标(500, 500)mouse.position = (311, 347)# 点击鼠标左键mouse.click(Button.left)mouse.click(Button.left)time.sleep(1)# 移动鼠标到屏幕坐标(500, 500)if(mouse.position==(0,0)):breakmouse.position = (1024, 375)# 点击鼠标左键mouse.click(Button.left)mouse.click(Button.left)i+=1print(i)if(mouse.position==(0,0)):breakprint("EXit")
# 滚动鼠标滚轮
# mouse.scroll(1, 0)  # 向上滚动
2024.8.26.13:25沙滩旅游回来
创建数据集
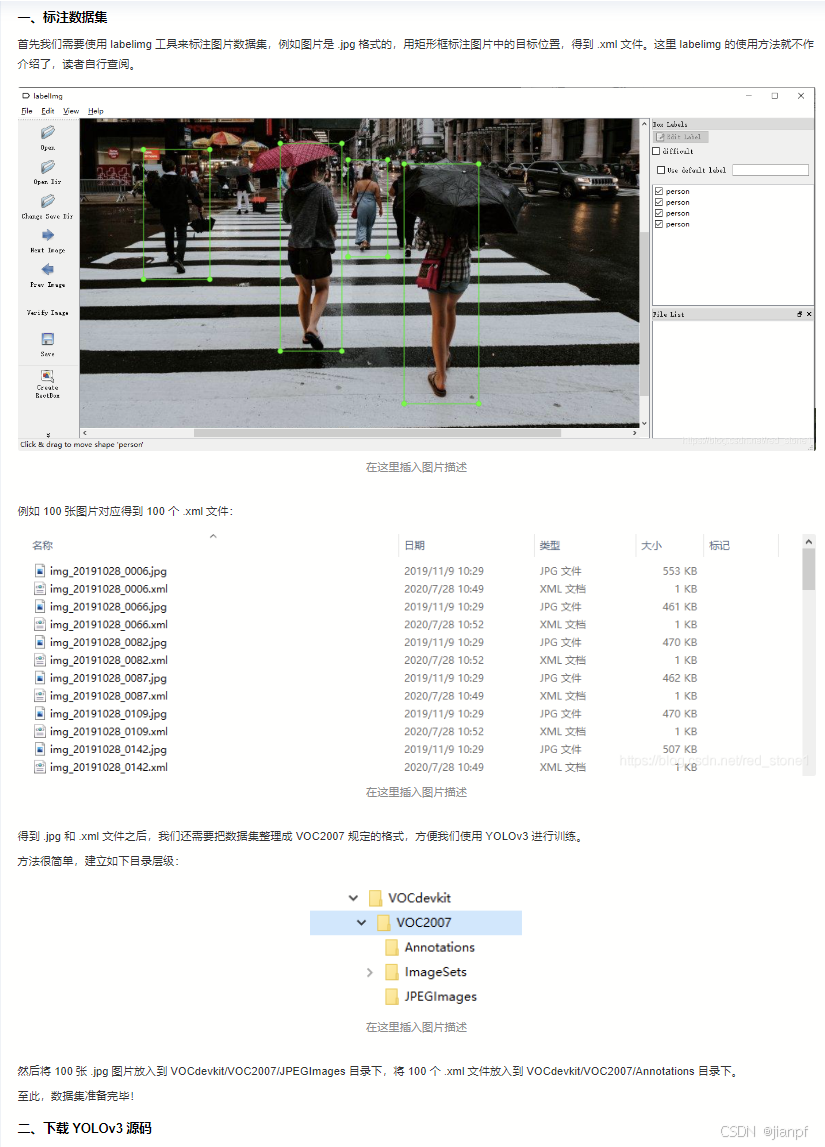
更新时间:2023-12-12
在训练之前需要在数据中心【创建数据集】,添加并标注数据
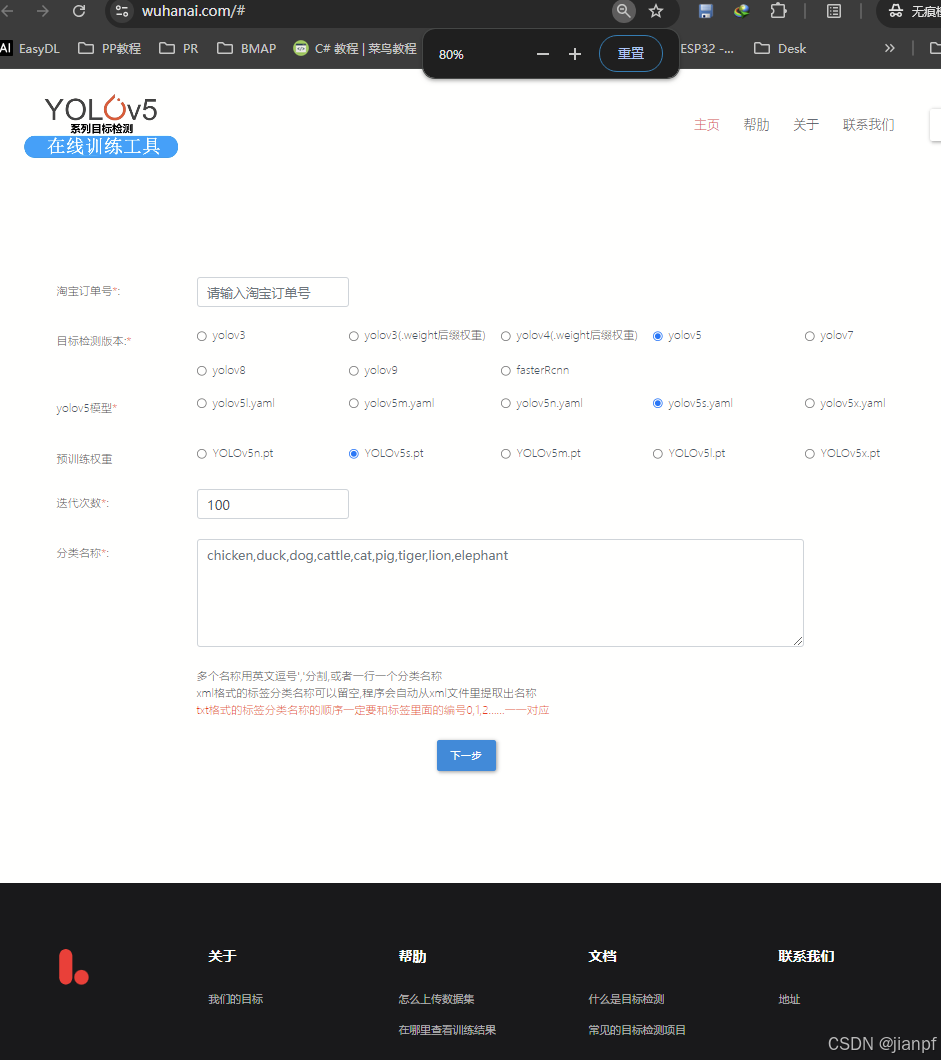
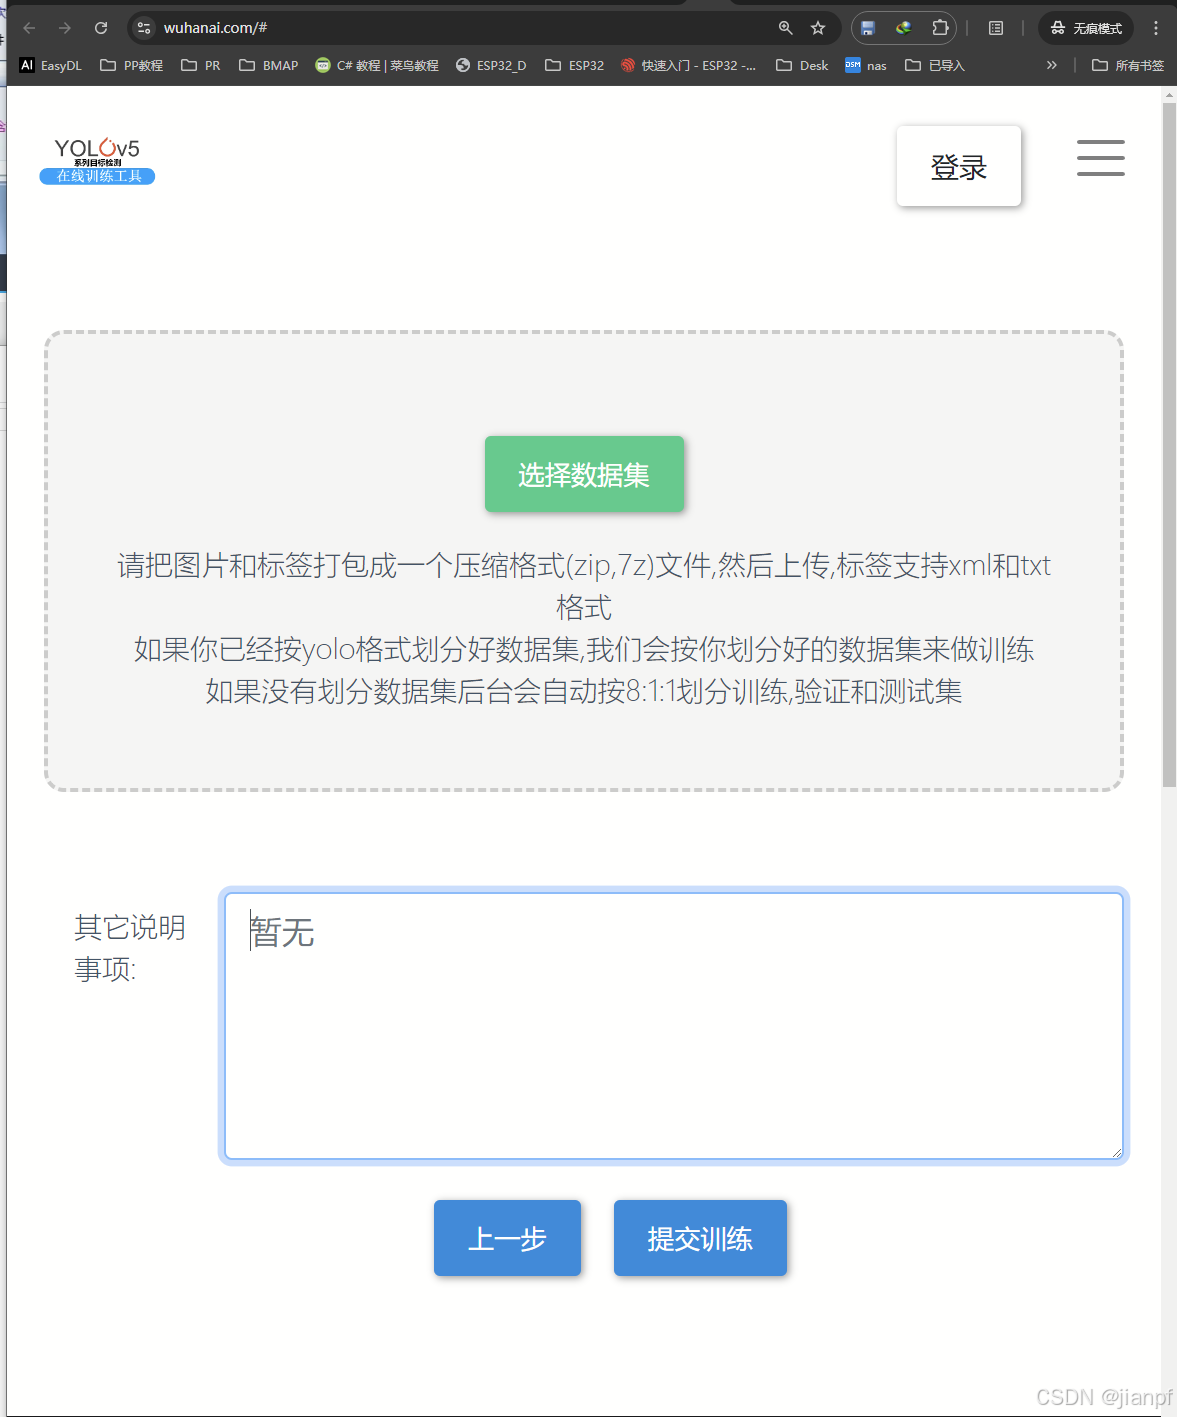
image.png
设计分类
首先想好分类如何设计,每个分类为你希望识别出的一种结果,如要识别水果,则可以以“apple”、“pear”等分别作为一个分类;如果是审核的场景判断合规性,可以以“qualified”、“unqualified”设计为两类,或者“qualified”、“unqualified1”、“unqualified2”、“unqualified3”……设计为多类。
注意: 目前单个模型的分类上限为1000类
准备数据
基于设计好的分类准备图片:
每个分类需要准备20张以上
如果想要较好的效果,建议每个分类准备不少于100张图片
如果不同分类的图片具有相似性,需要增加更多图片,尽量提升图片数据的丰富度
一个模型的图片总量限制10万张(每个账户的图片数量上限为10万张)
图片格式要求:
1、目前支持图片类型为png、jpg、bmp、jpeg,图片大小限制在14M以内
2、图片长宽比在3:1以内,其中最长边小于4096px,最短边大于30px
图片内容要求:
1、训练图片和实际场景要识别的图片拍摄环境一致,举例:如果实际要识别的图片是摄像头俯拍的,那训练图片就不能用网上下载的目标正面图片;如果是需要识别白天光照下的物体,就不能使用夜晚拍摄的图片数据
2、每个分类的图片需要覆盖实际场景里面的可能性,如拍照角度、光线明暗的变化,训练集覆盖的场景越多,模型的泛化能力越强
如果训练图片场景无法全部覆盖实际场景要识别的图片:
如果要识别的主体在图片中占比较大,模型本身的泛化能力可以保证模型的效果不受很大影响
如果识别的主体在图片中占比较小,且实际环境很复杂无法覆盖全部的场景,建议用物体检测的模型来解决问题(物体检测可以支持将要识别的主体从训练图片中框出的方式来标注,所以能适应更泛化的场景和环境)
如果需要寻求第三方数据采集团队协助数据采集,可以在百度智能云控制台内提交工单
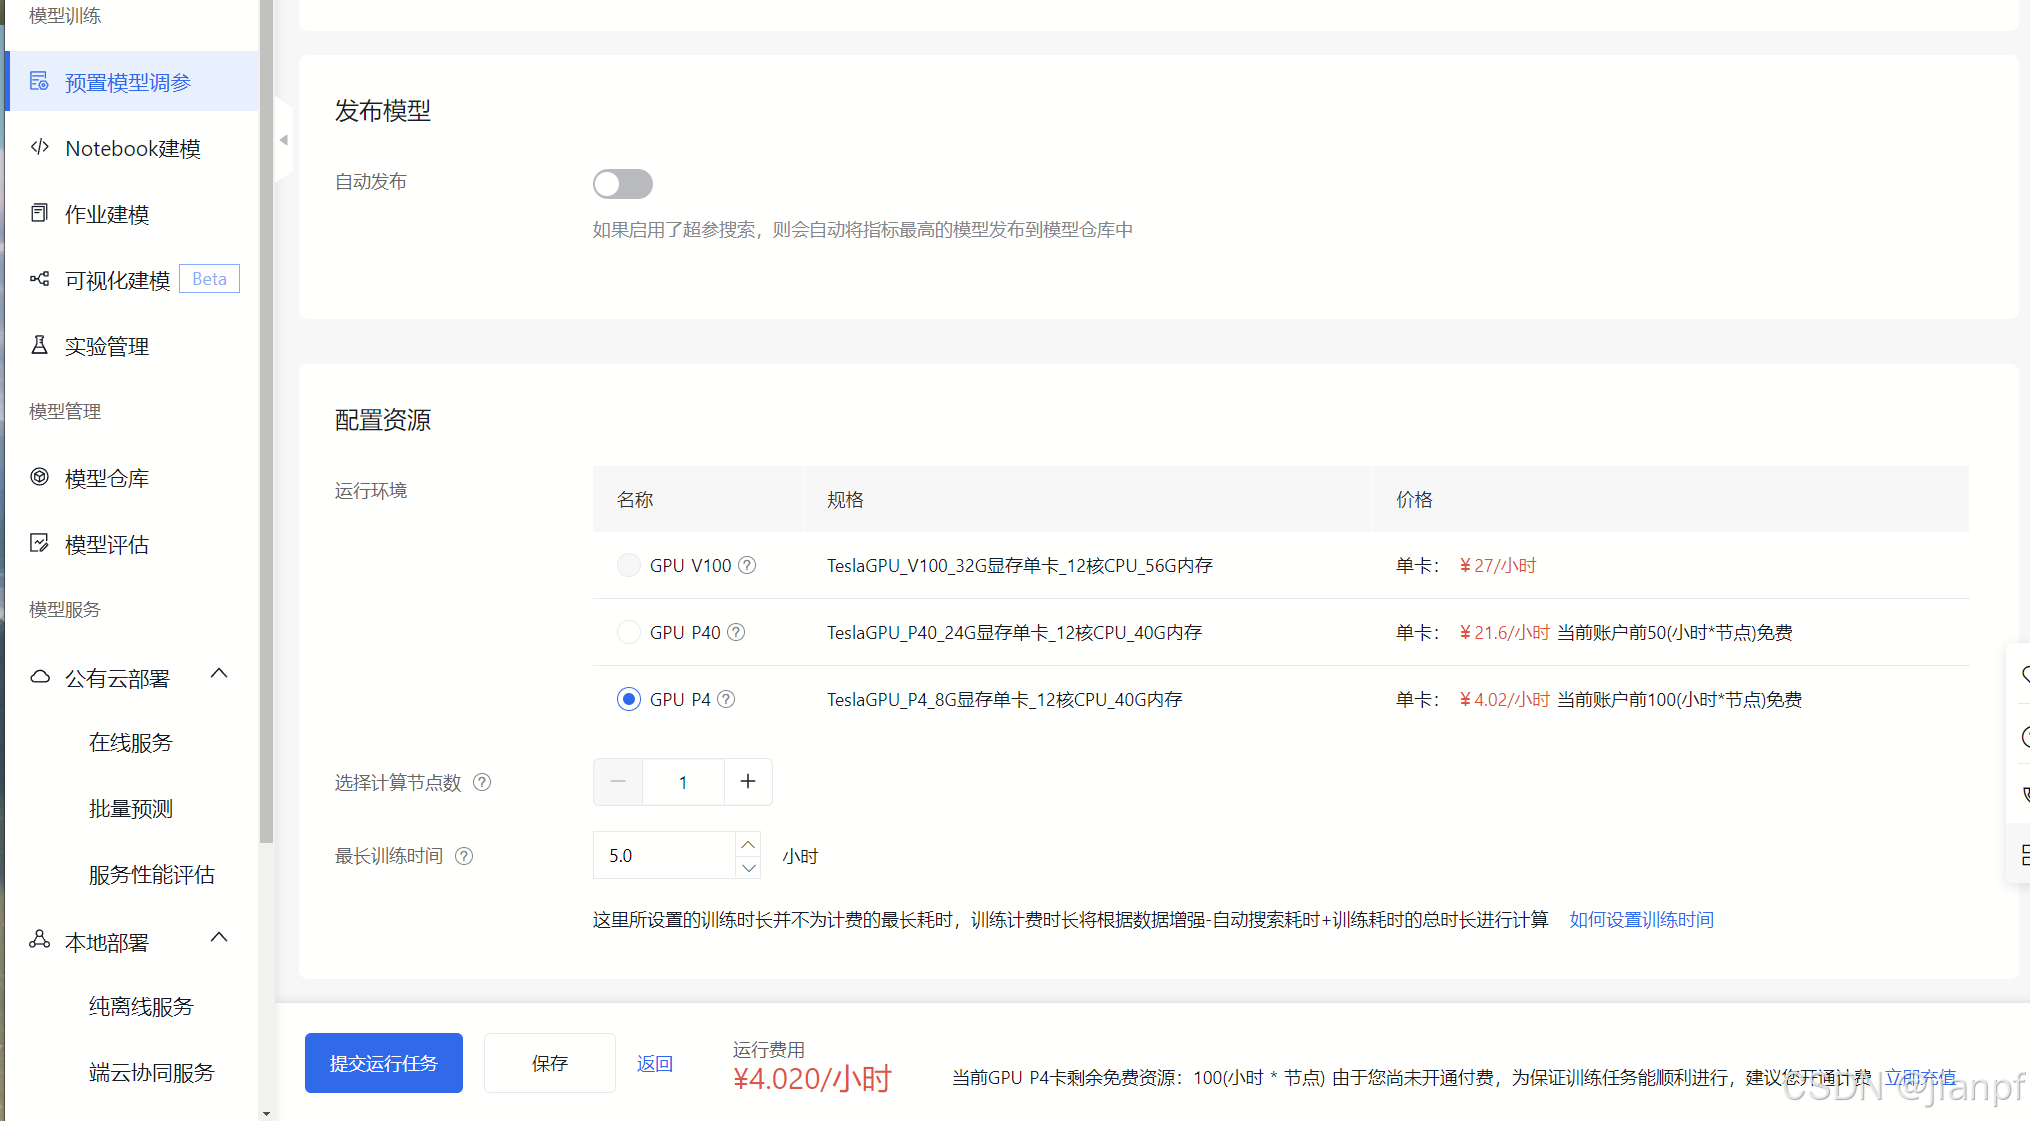
没钱,要考虑一下
2024.8.27 9:01
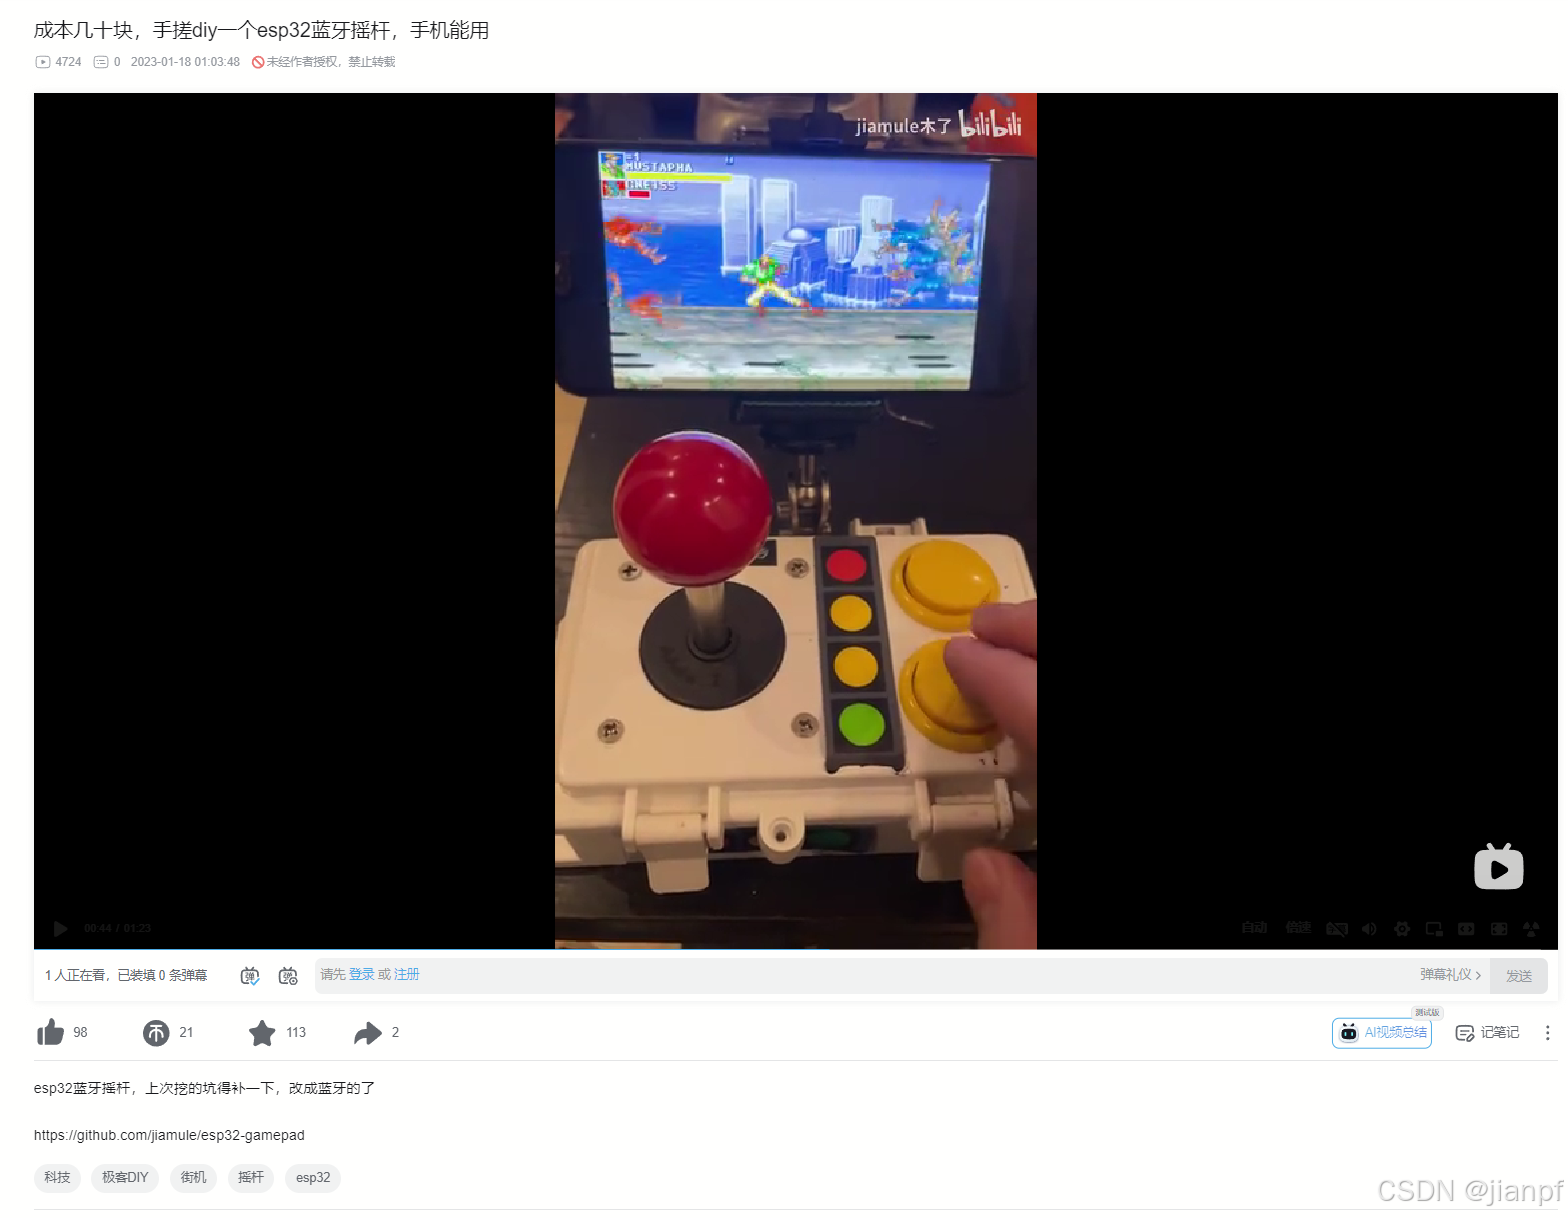
https://github.com/jiamule/esp32-gamepad
https://www.bilibili.com/video/BV1MM41187K2/
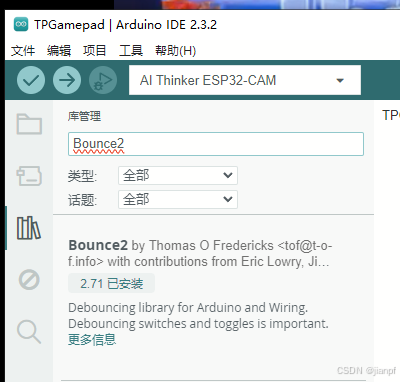
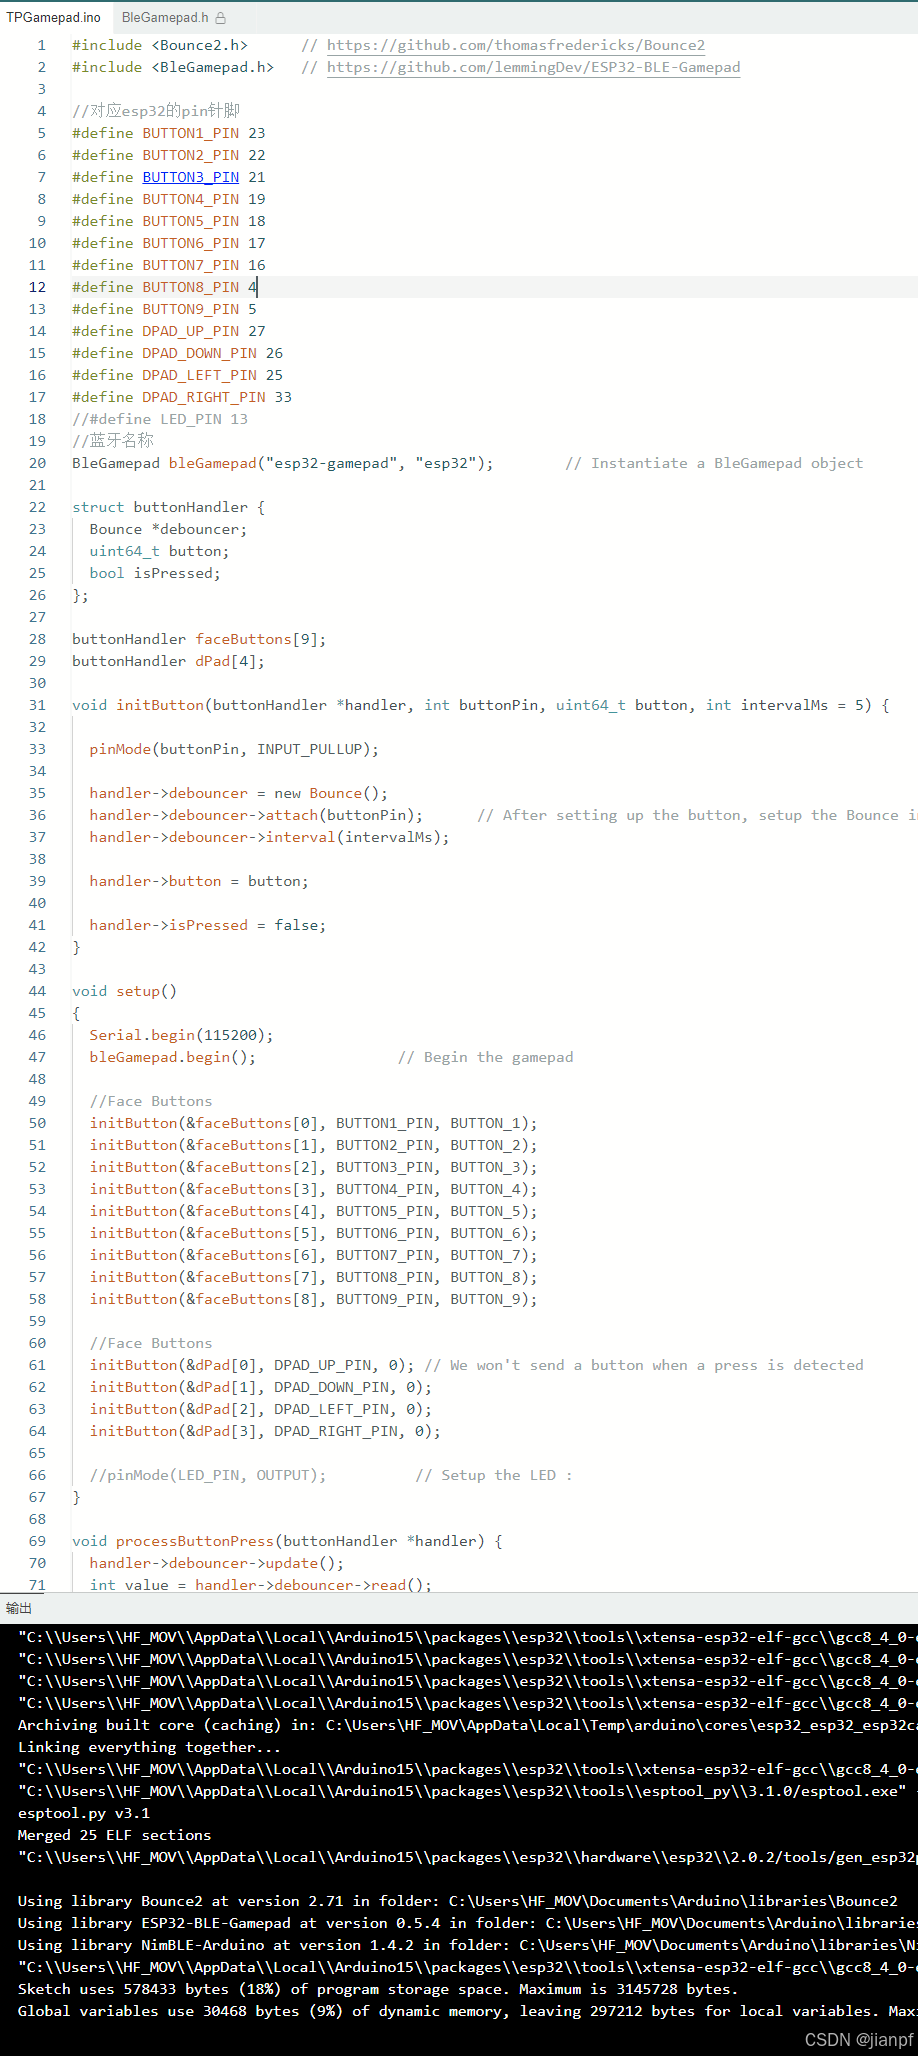
#include <Bounce2.h> // https://github.com/thomasfredericks/Bounce2
#include <BleGamepad.h> // https://github.com/lemmingDev/ESP32-BLE-Gamepad
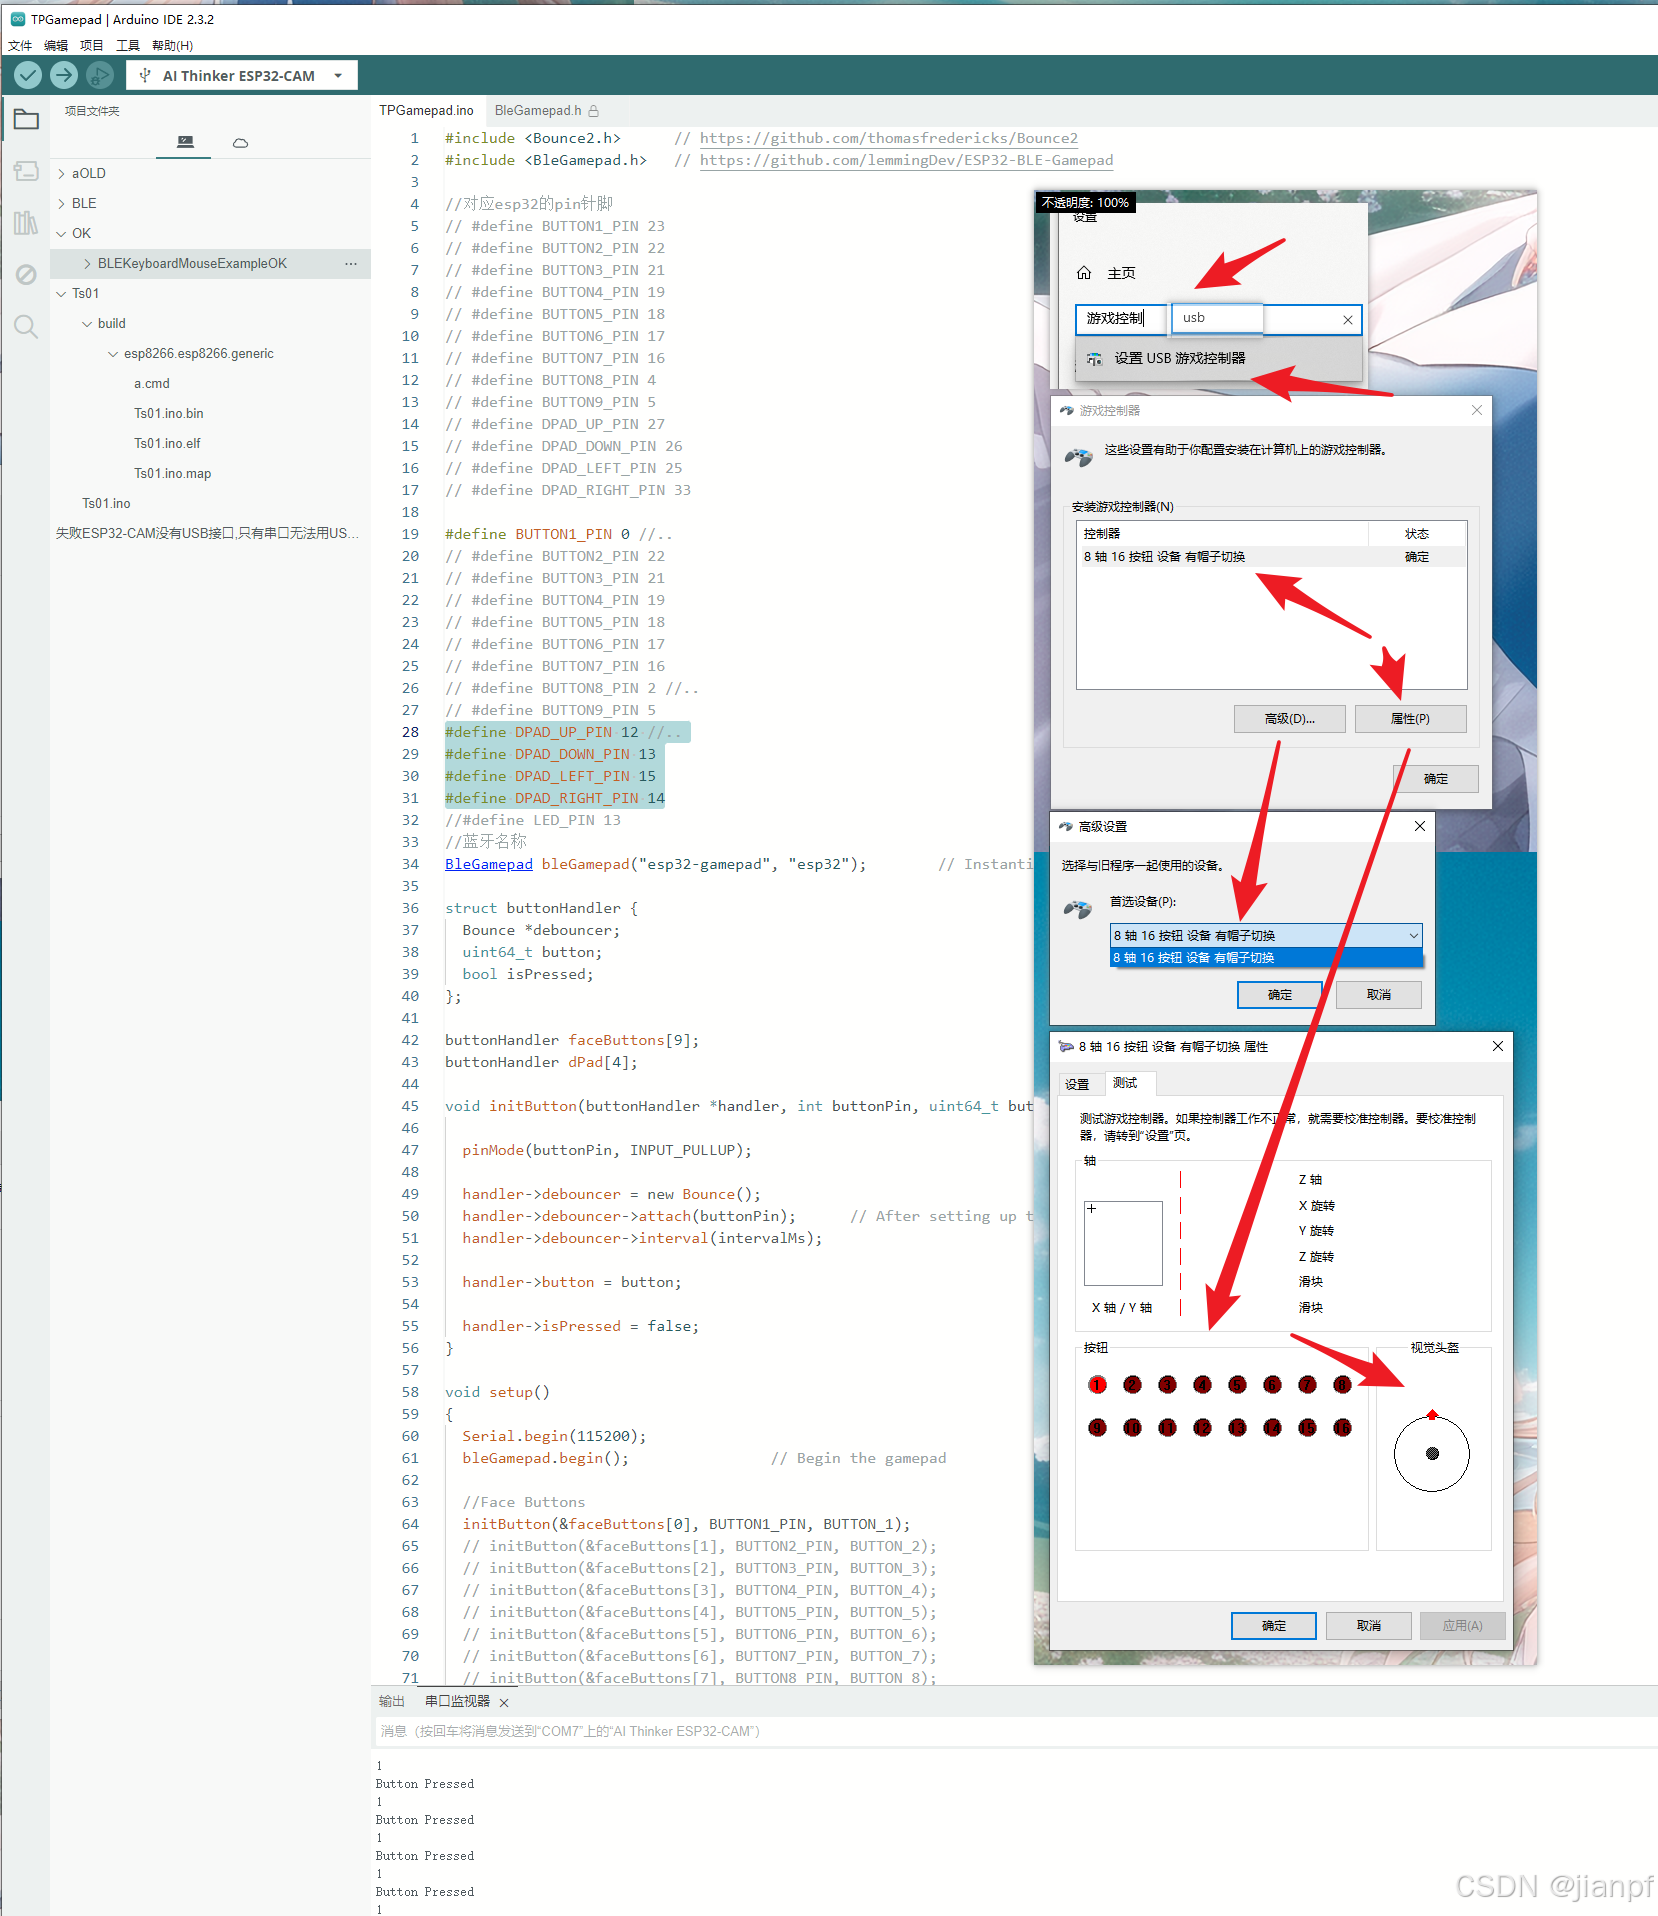
usb游戏控制>视觉头盔?要的是XY轴如何修改代码?
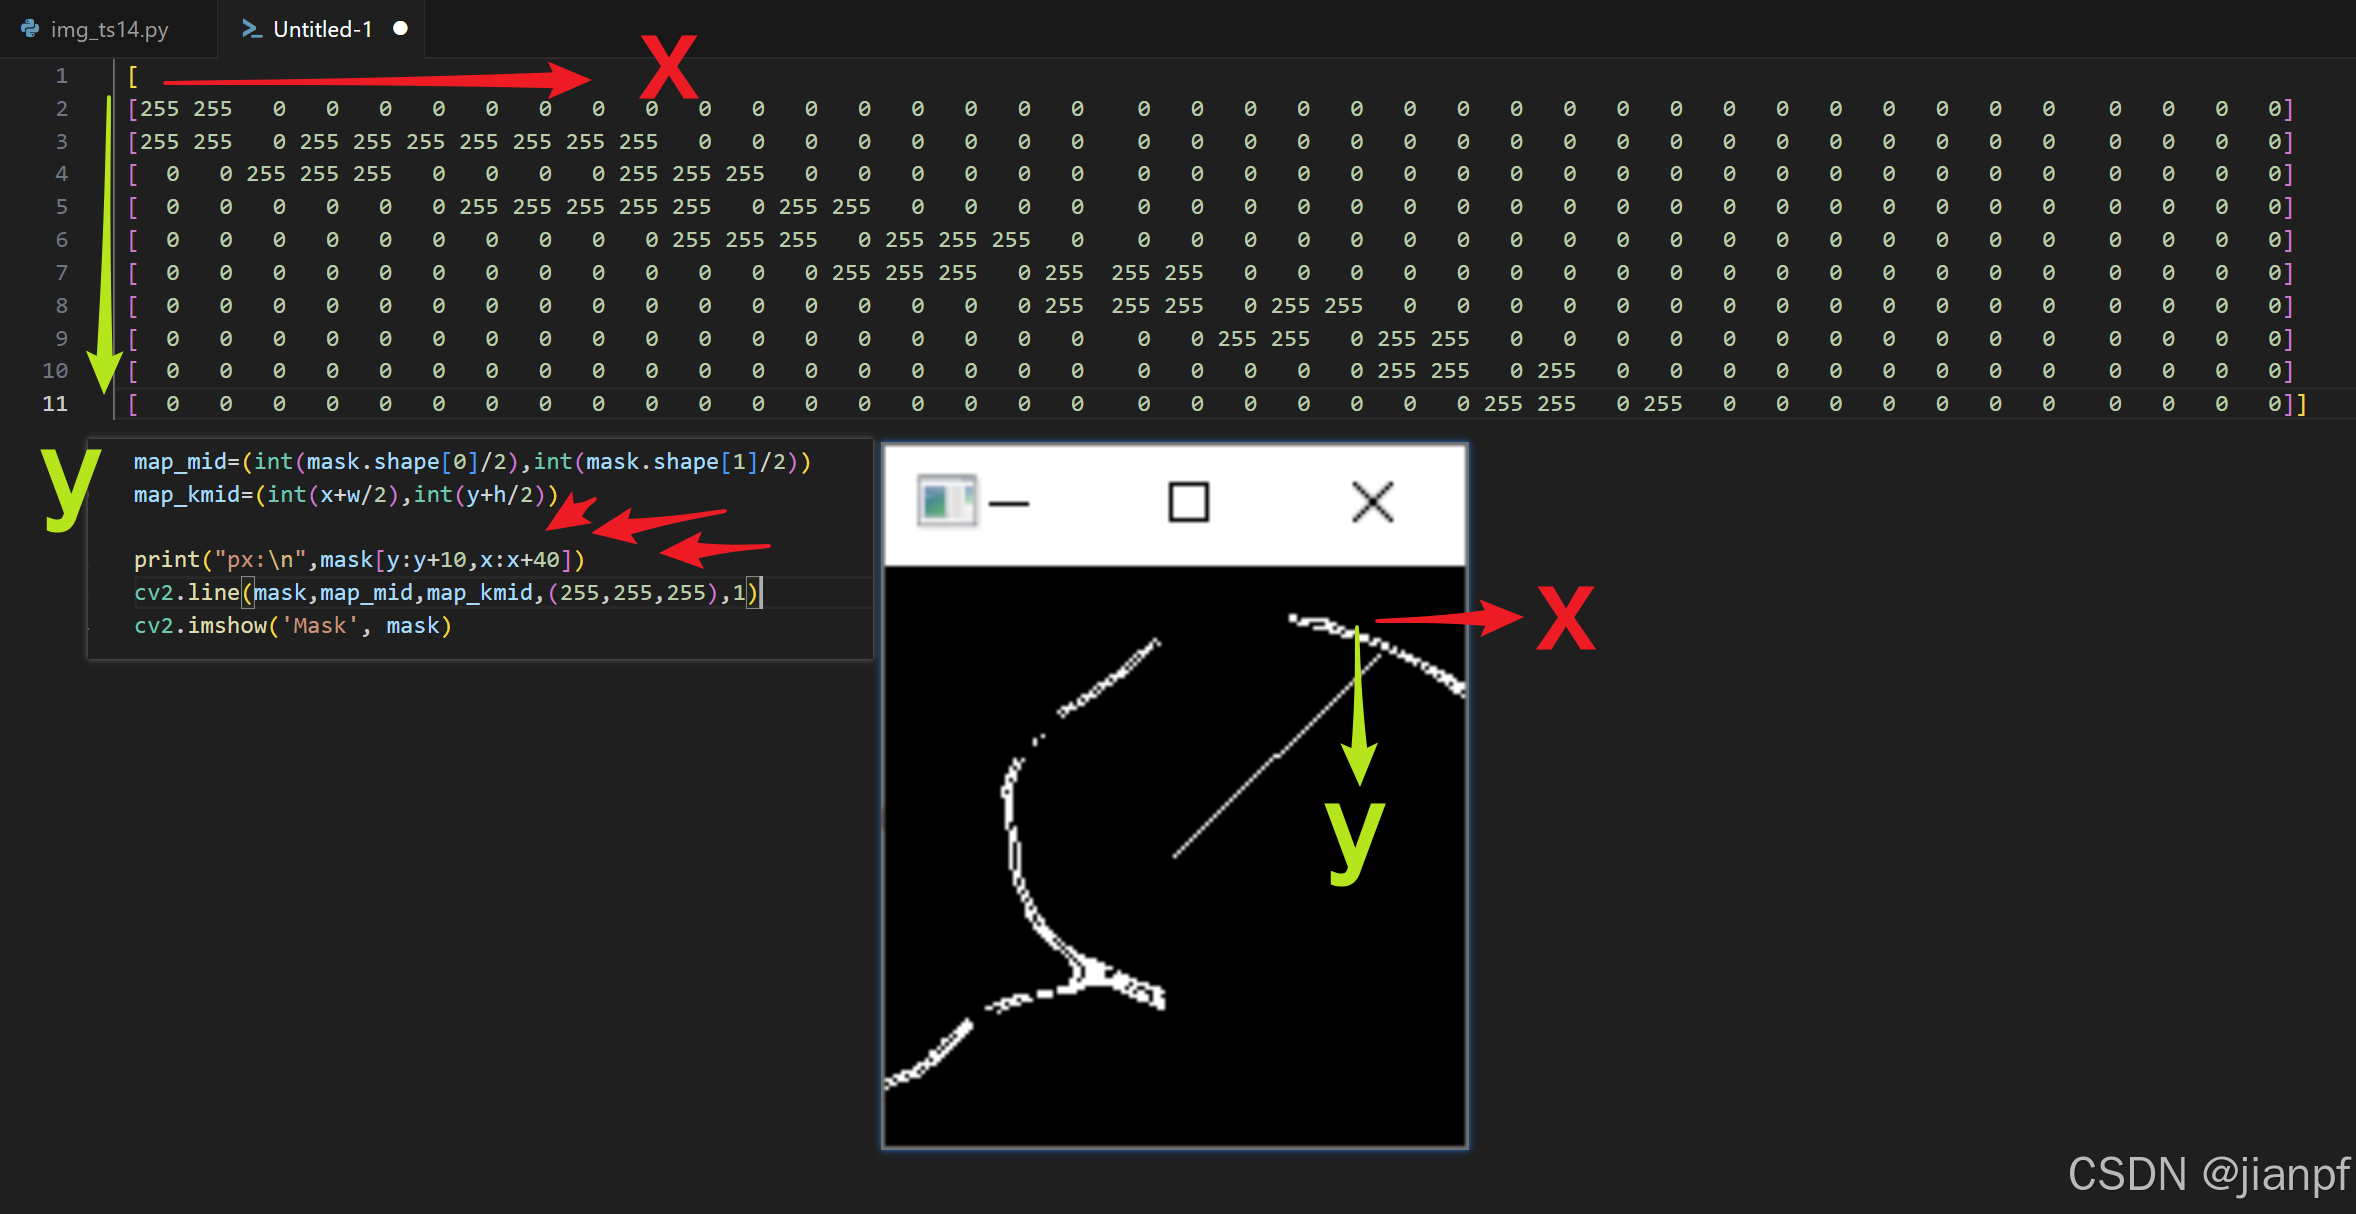
2024.8.29.05:33早,最后一周了,
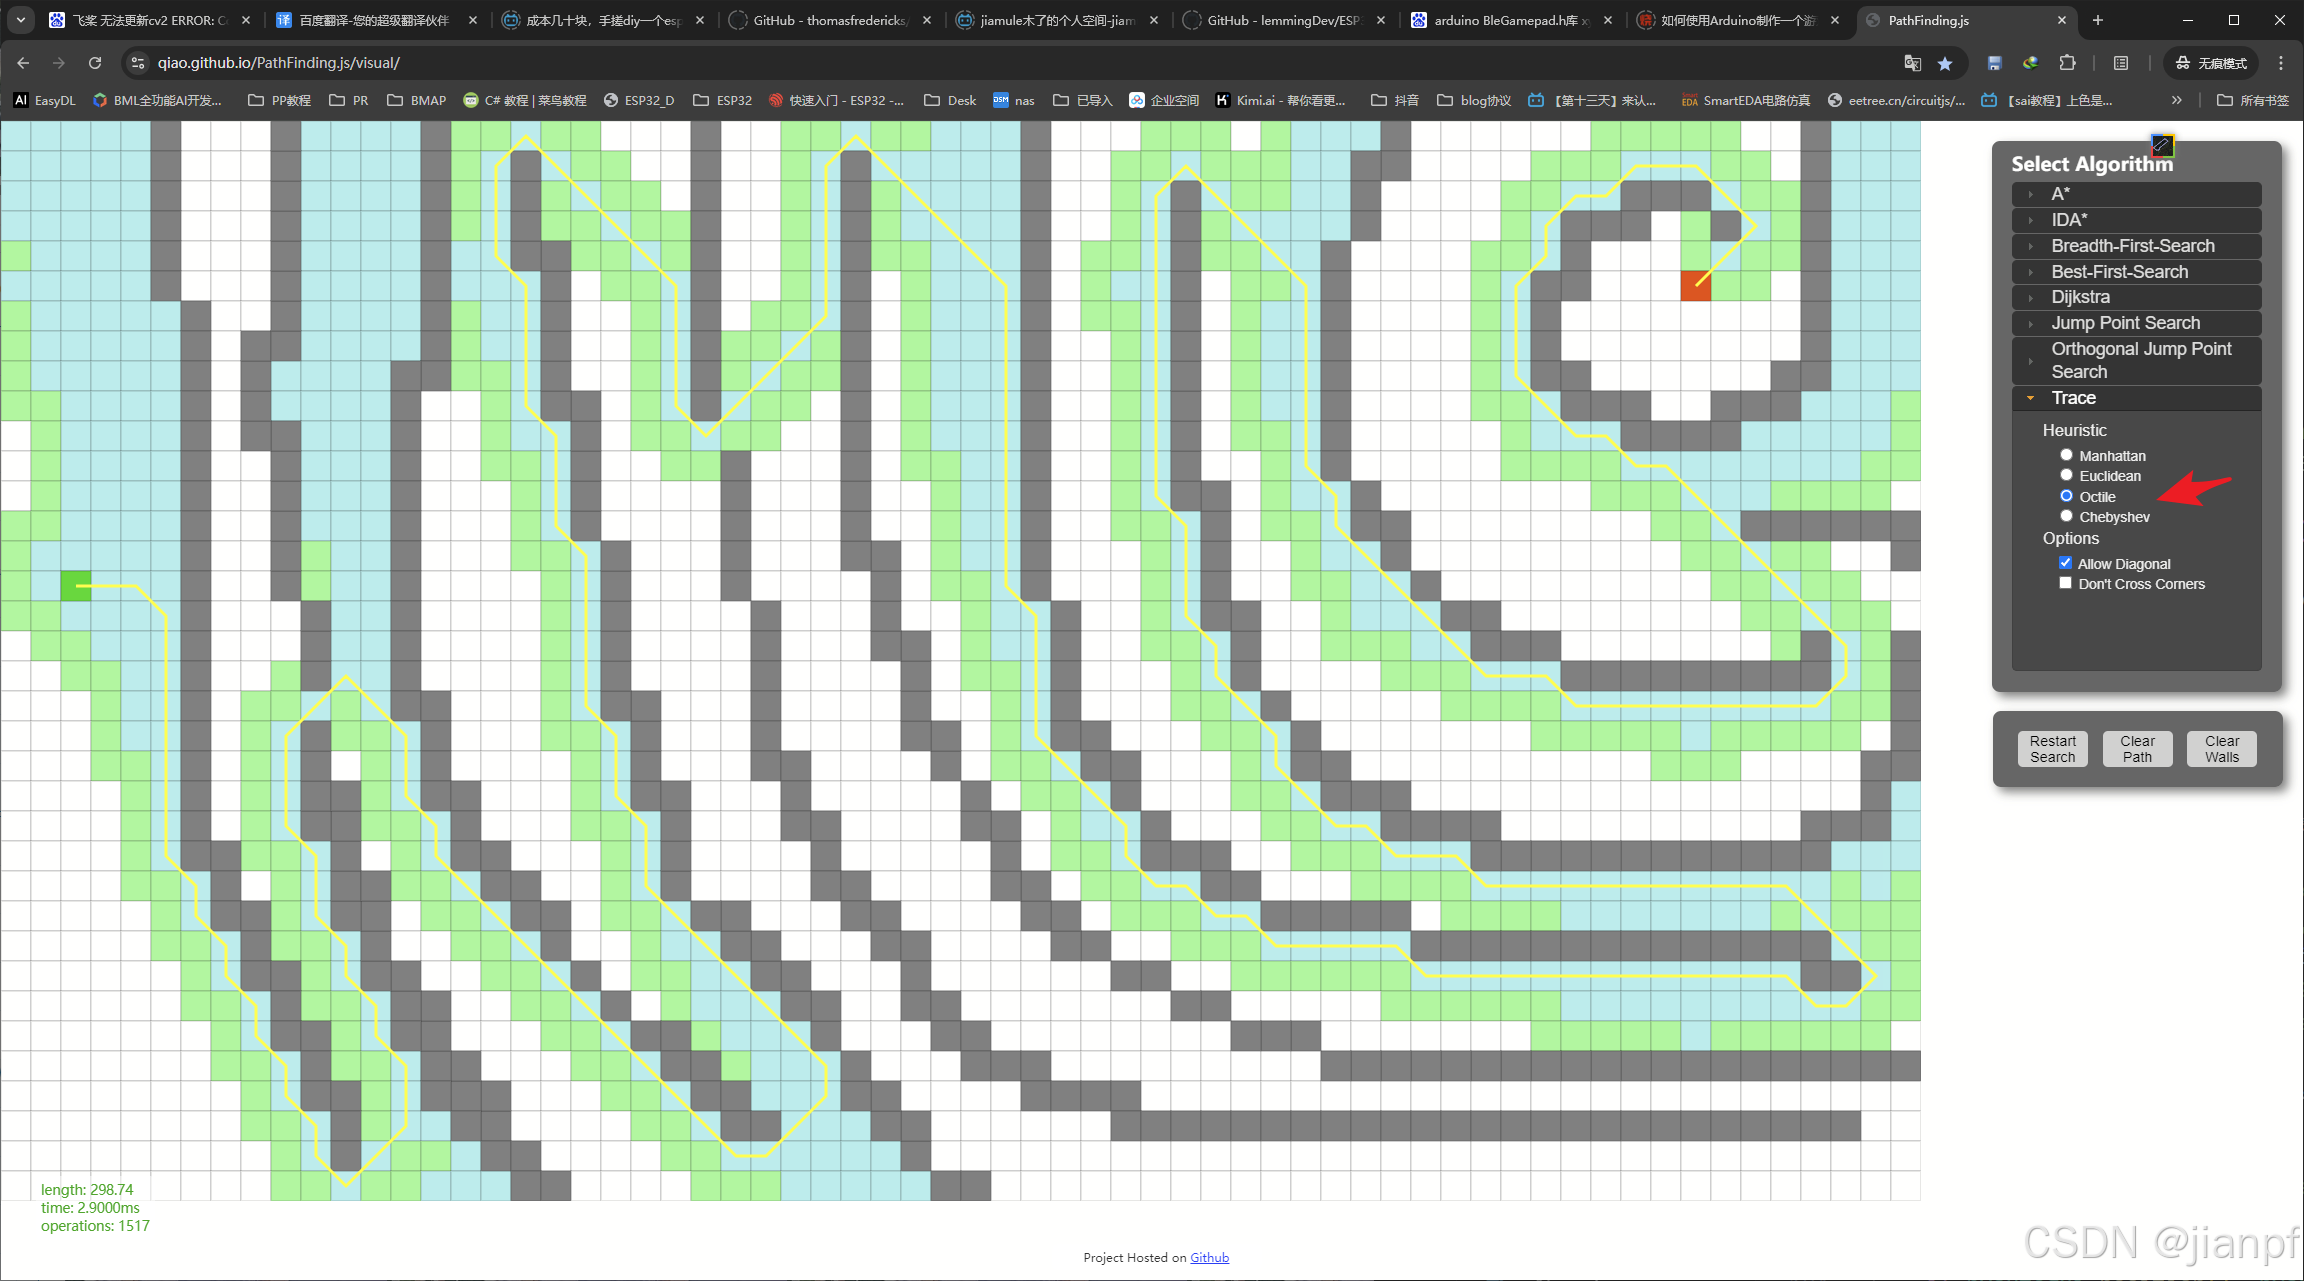
寻路算法A*A星算法
https://qiao.github.io/PathFinding.js/visual/
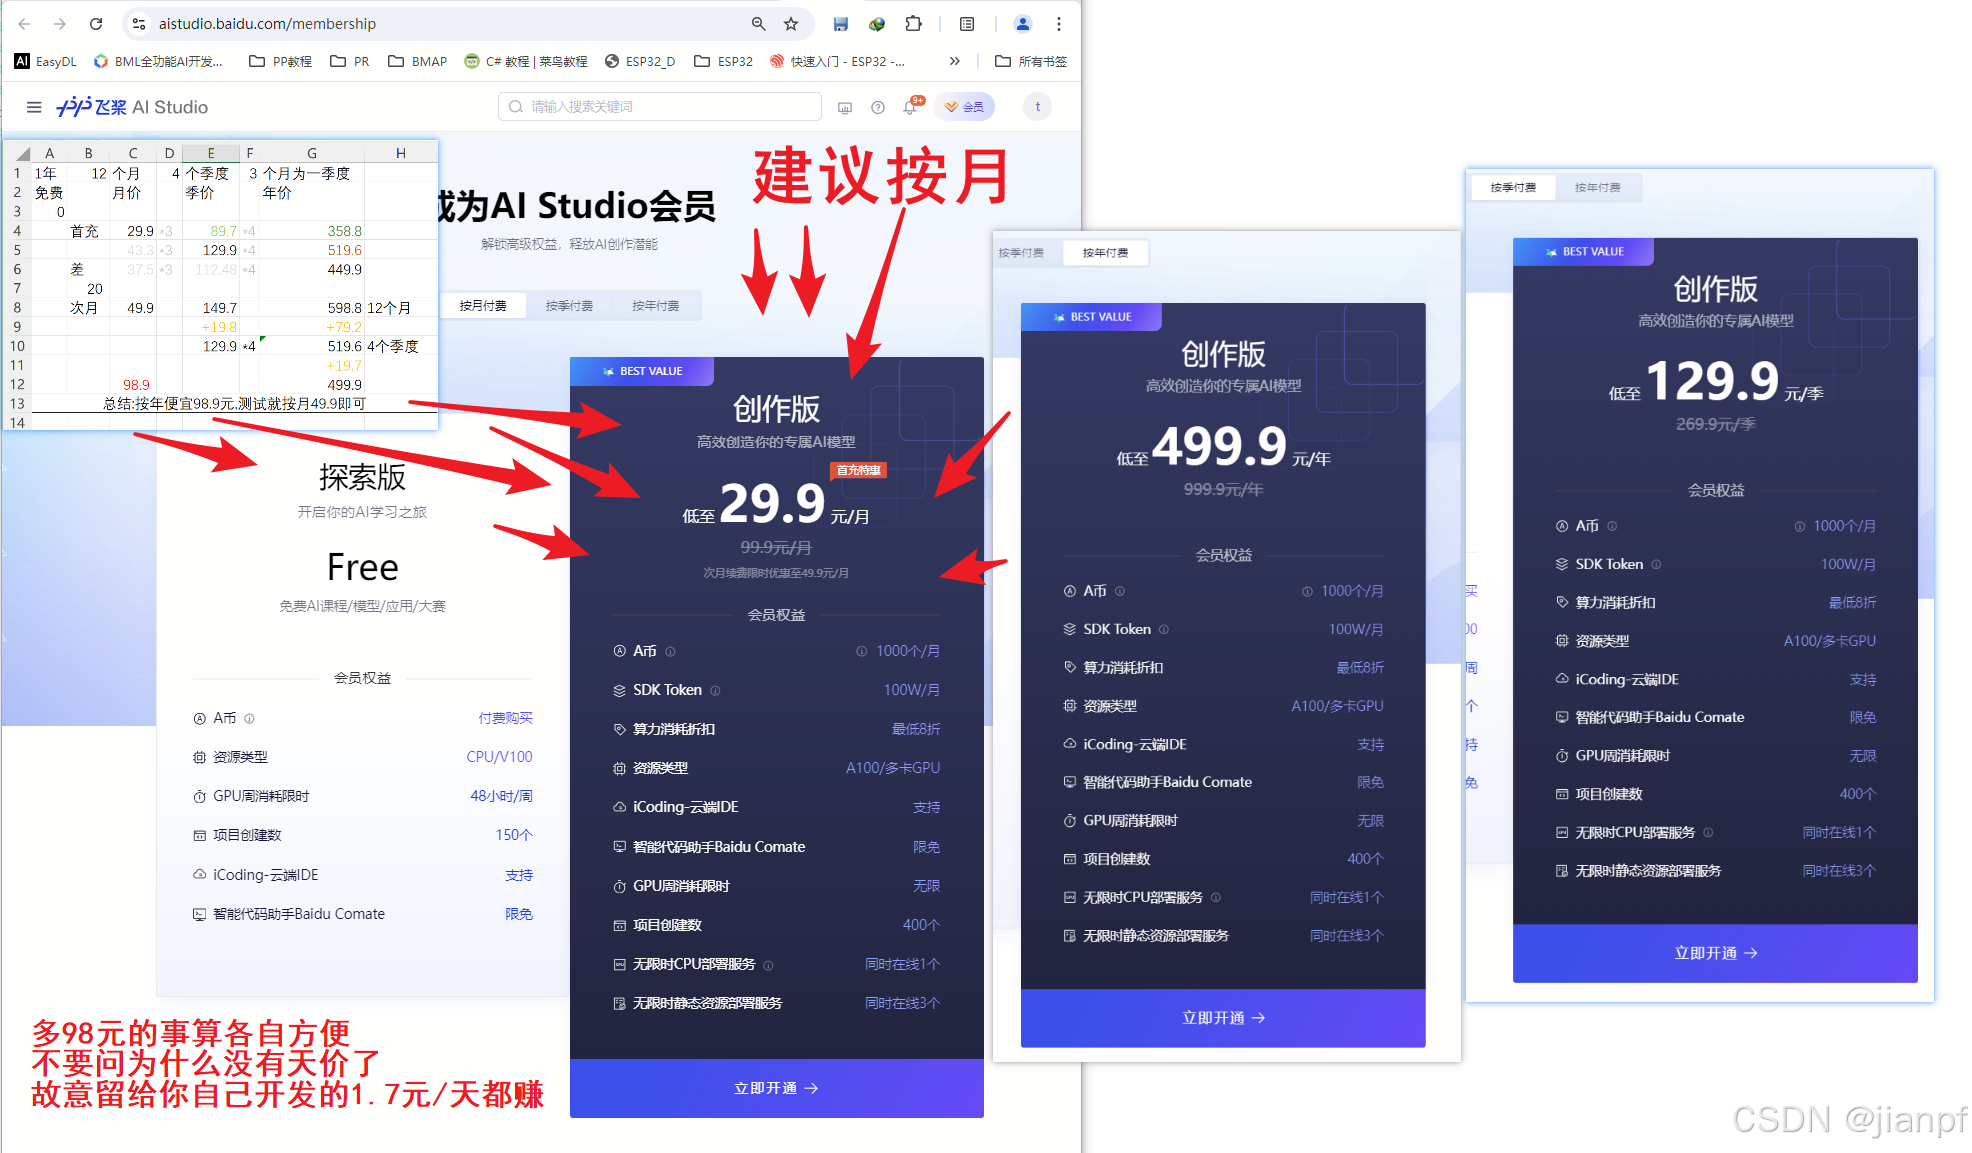
就开通个月试试
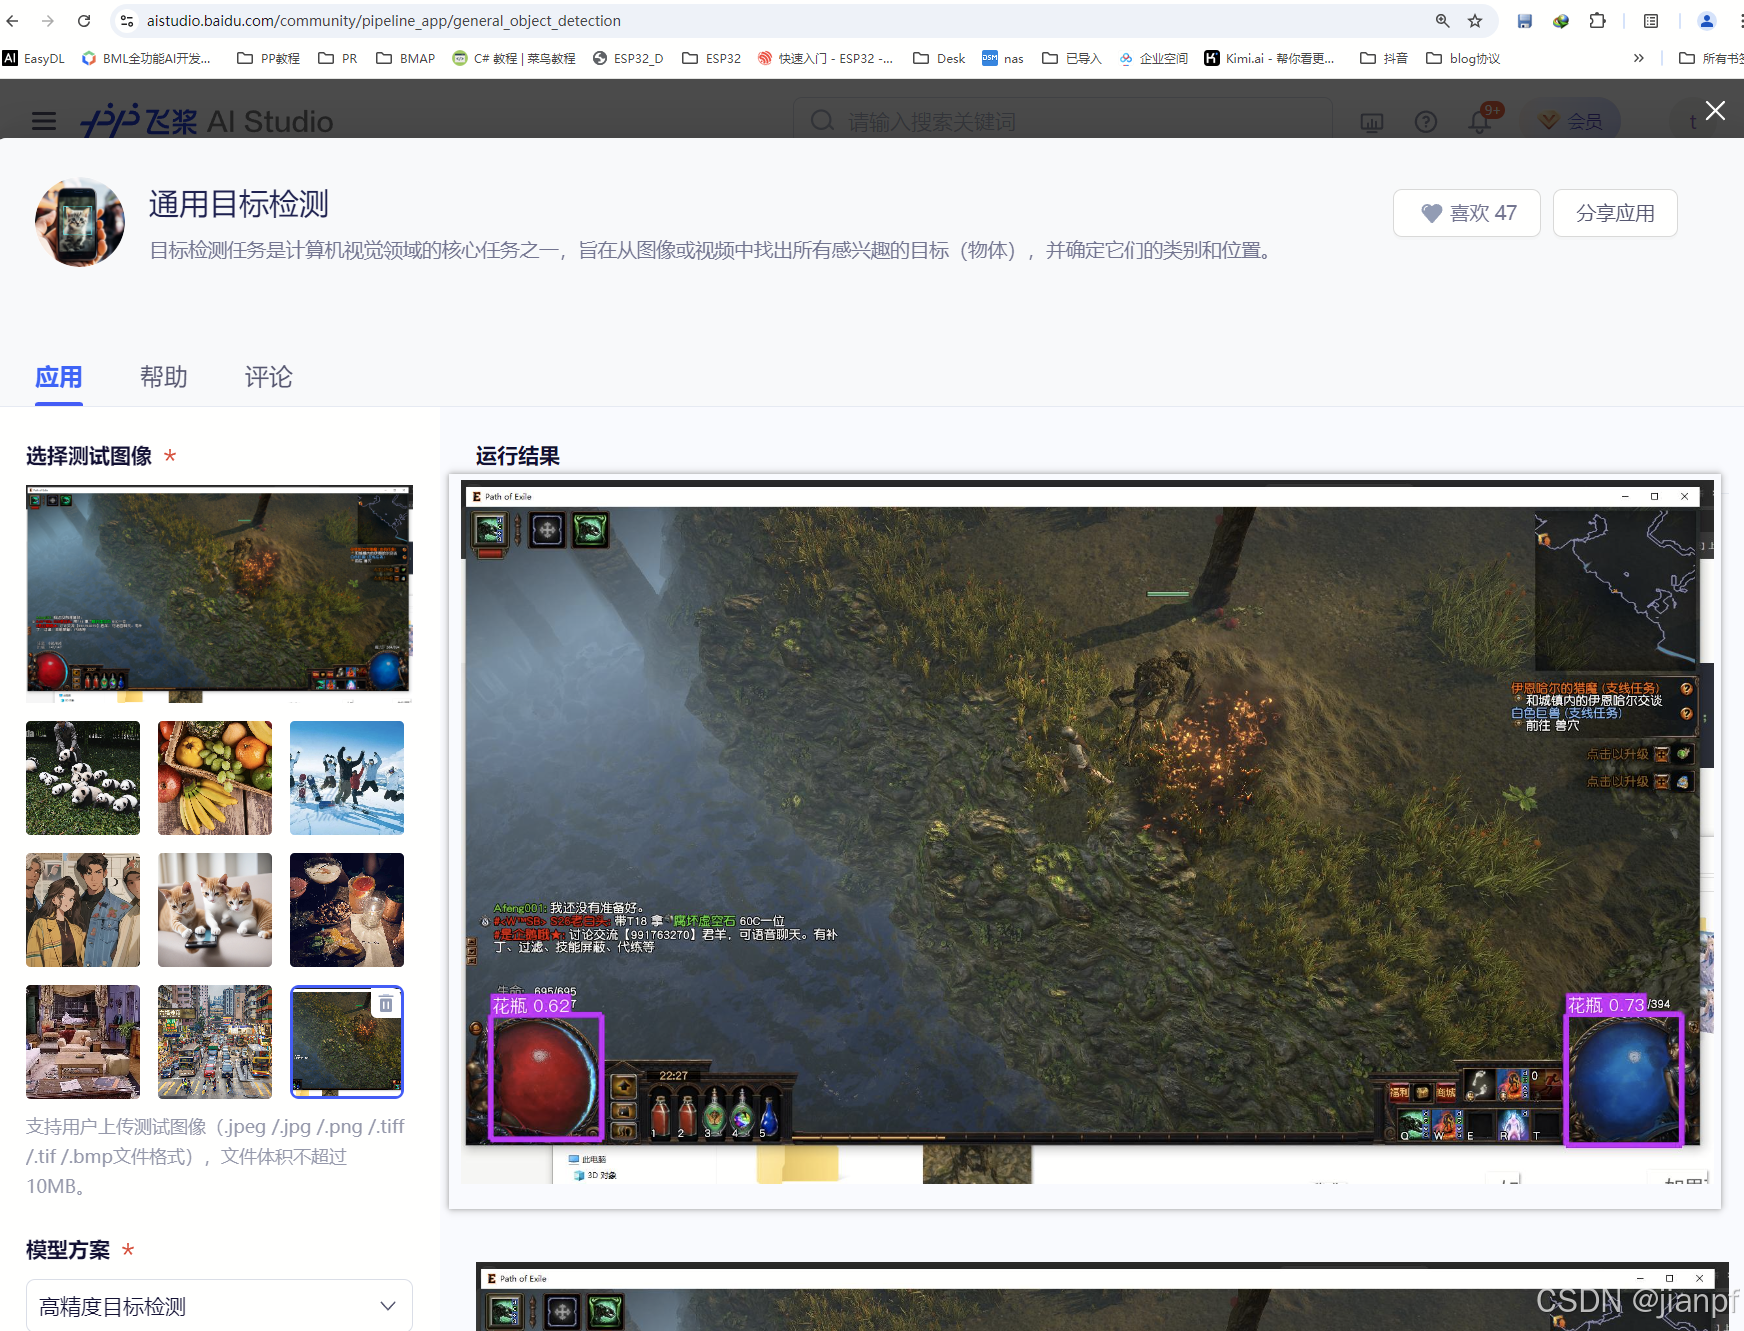
https://aistudio.baidu.com/community/pipeline_app/general_object_detection
花瓶??
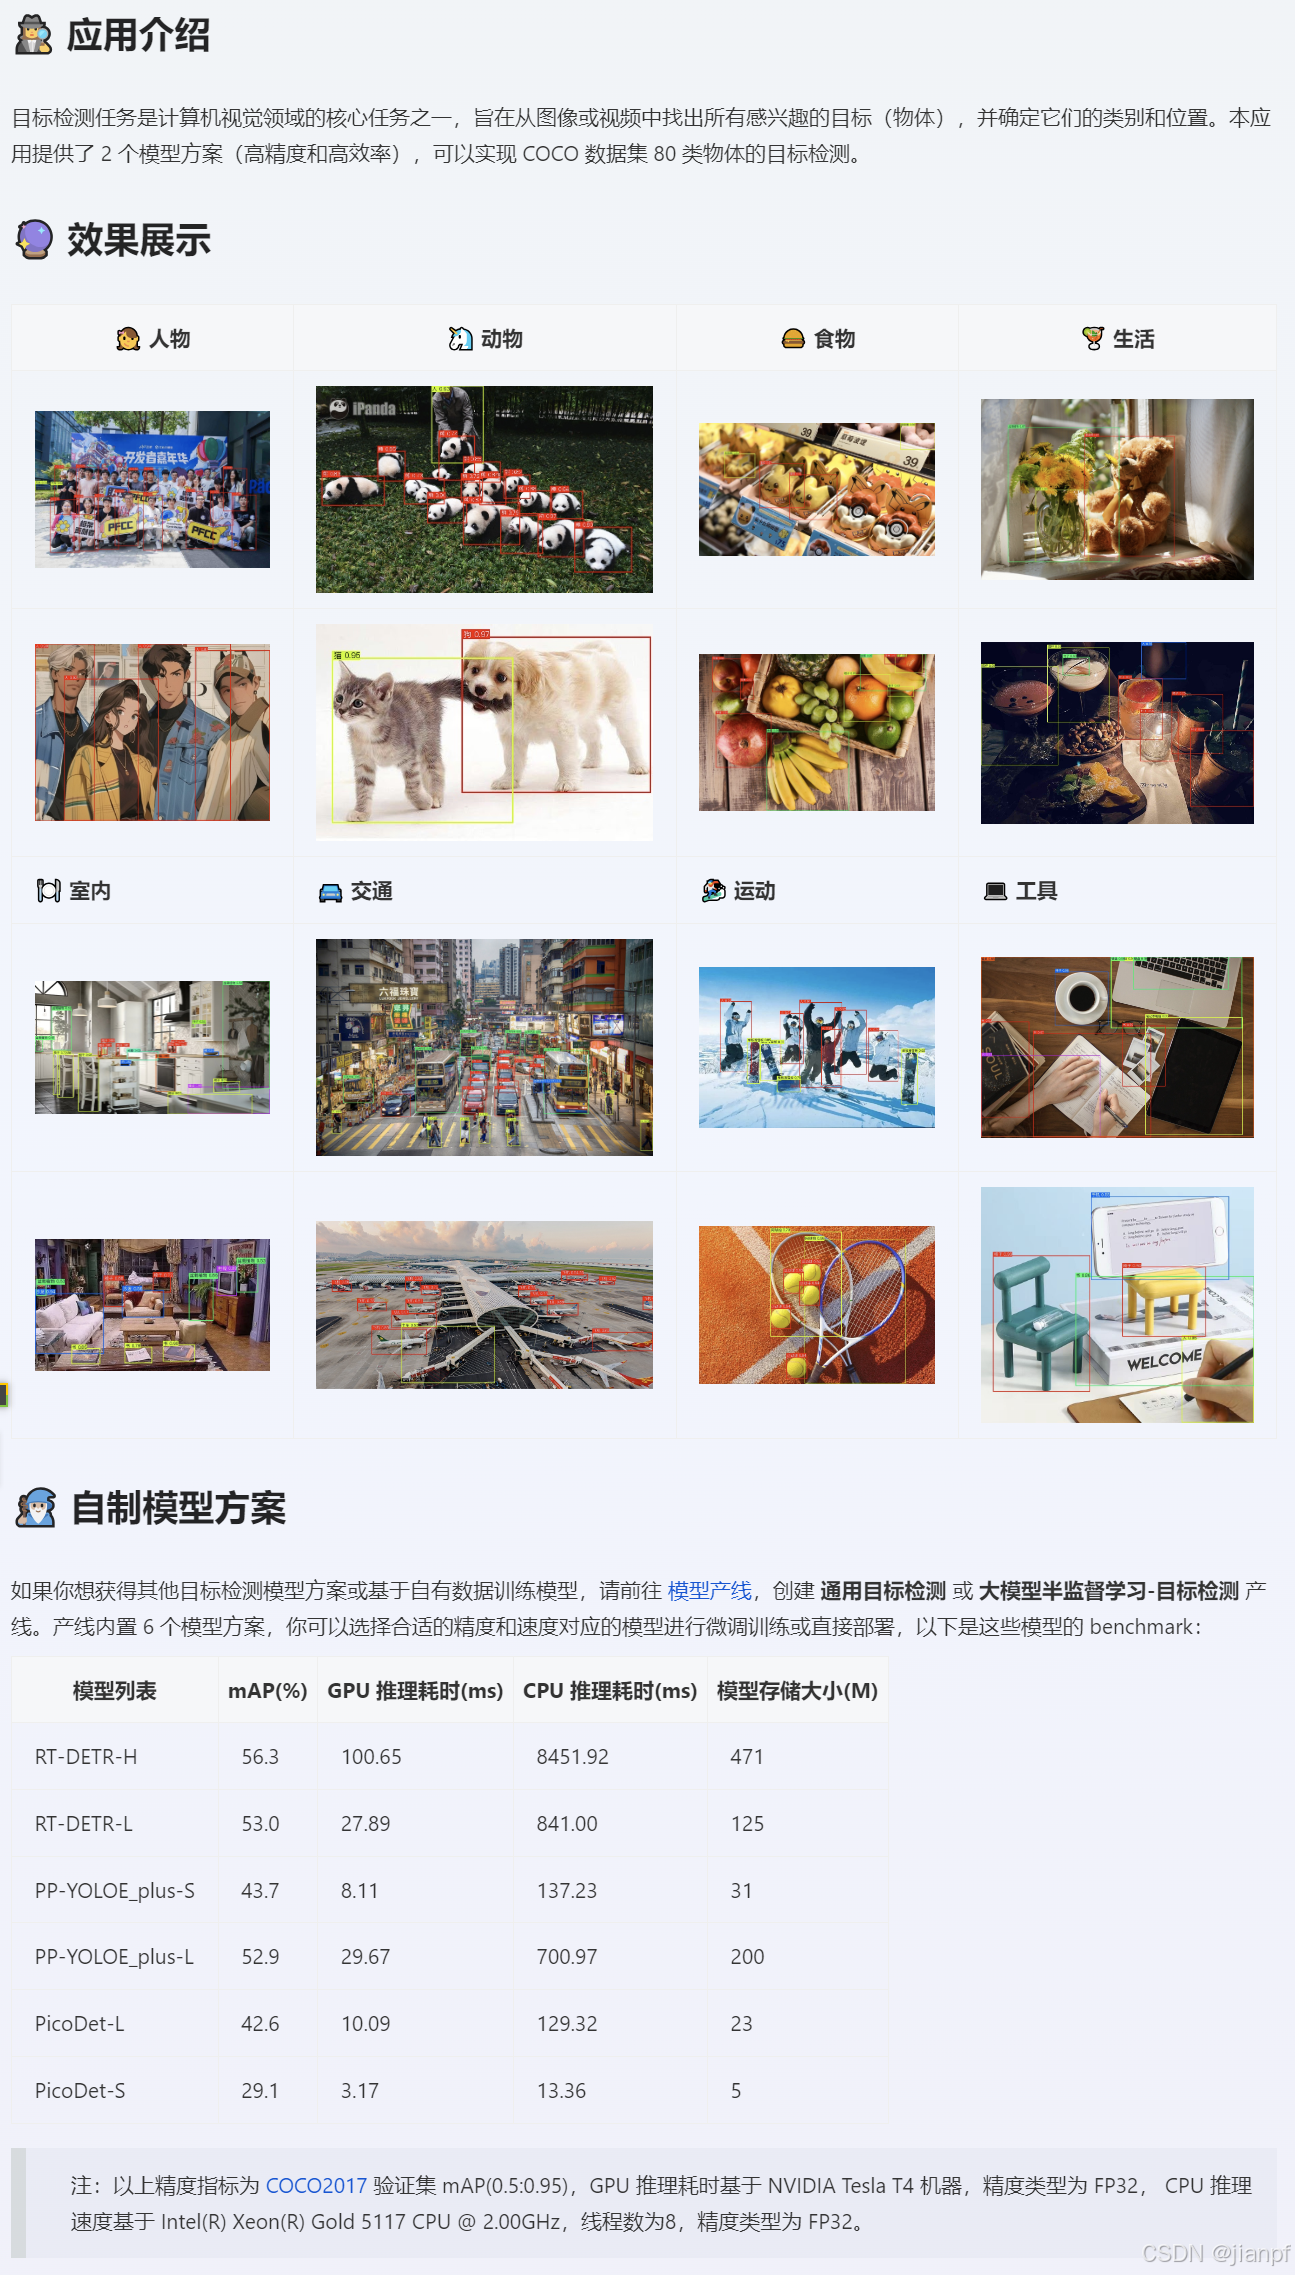
python 的路径写法 r"M:\dir\d1"
在字符串前面加上r来表示原始字符串
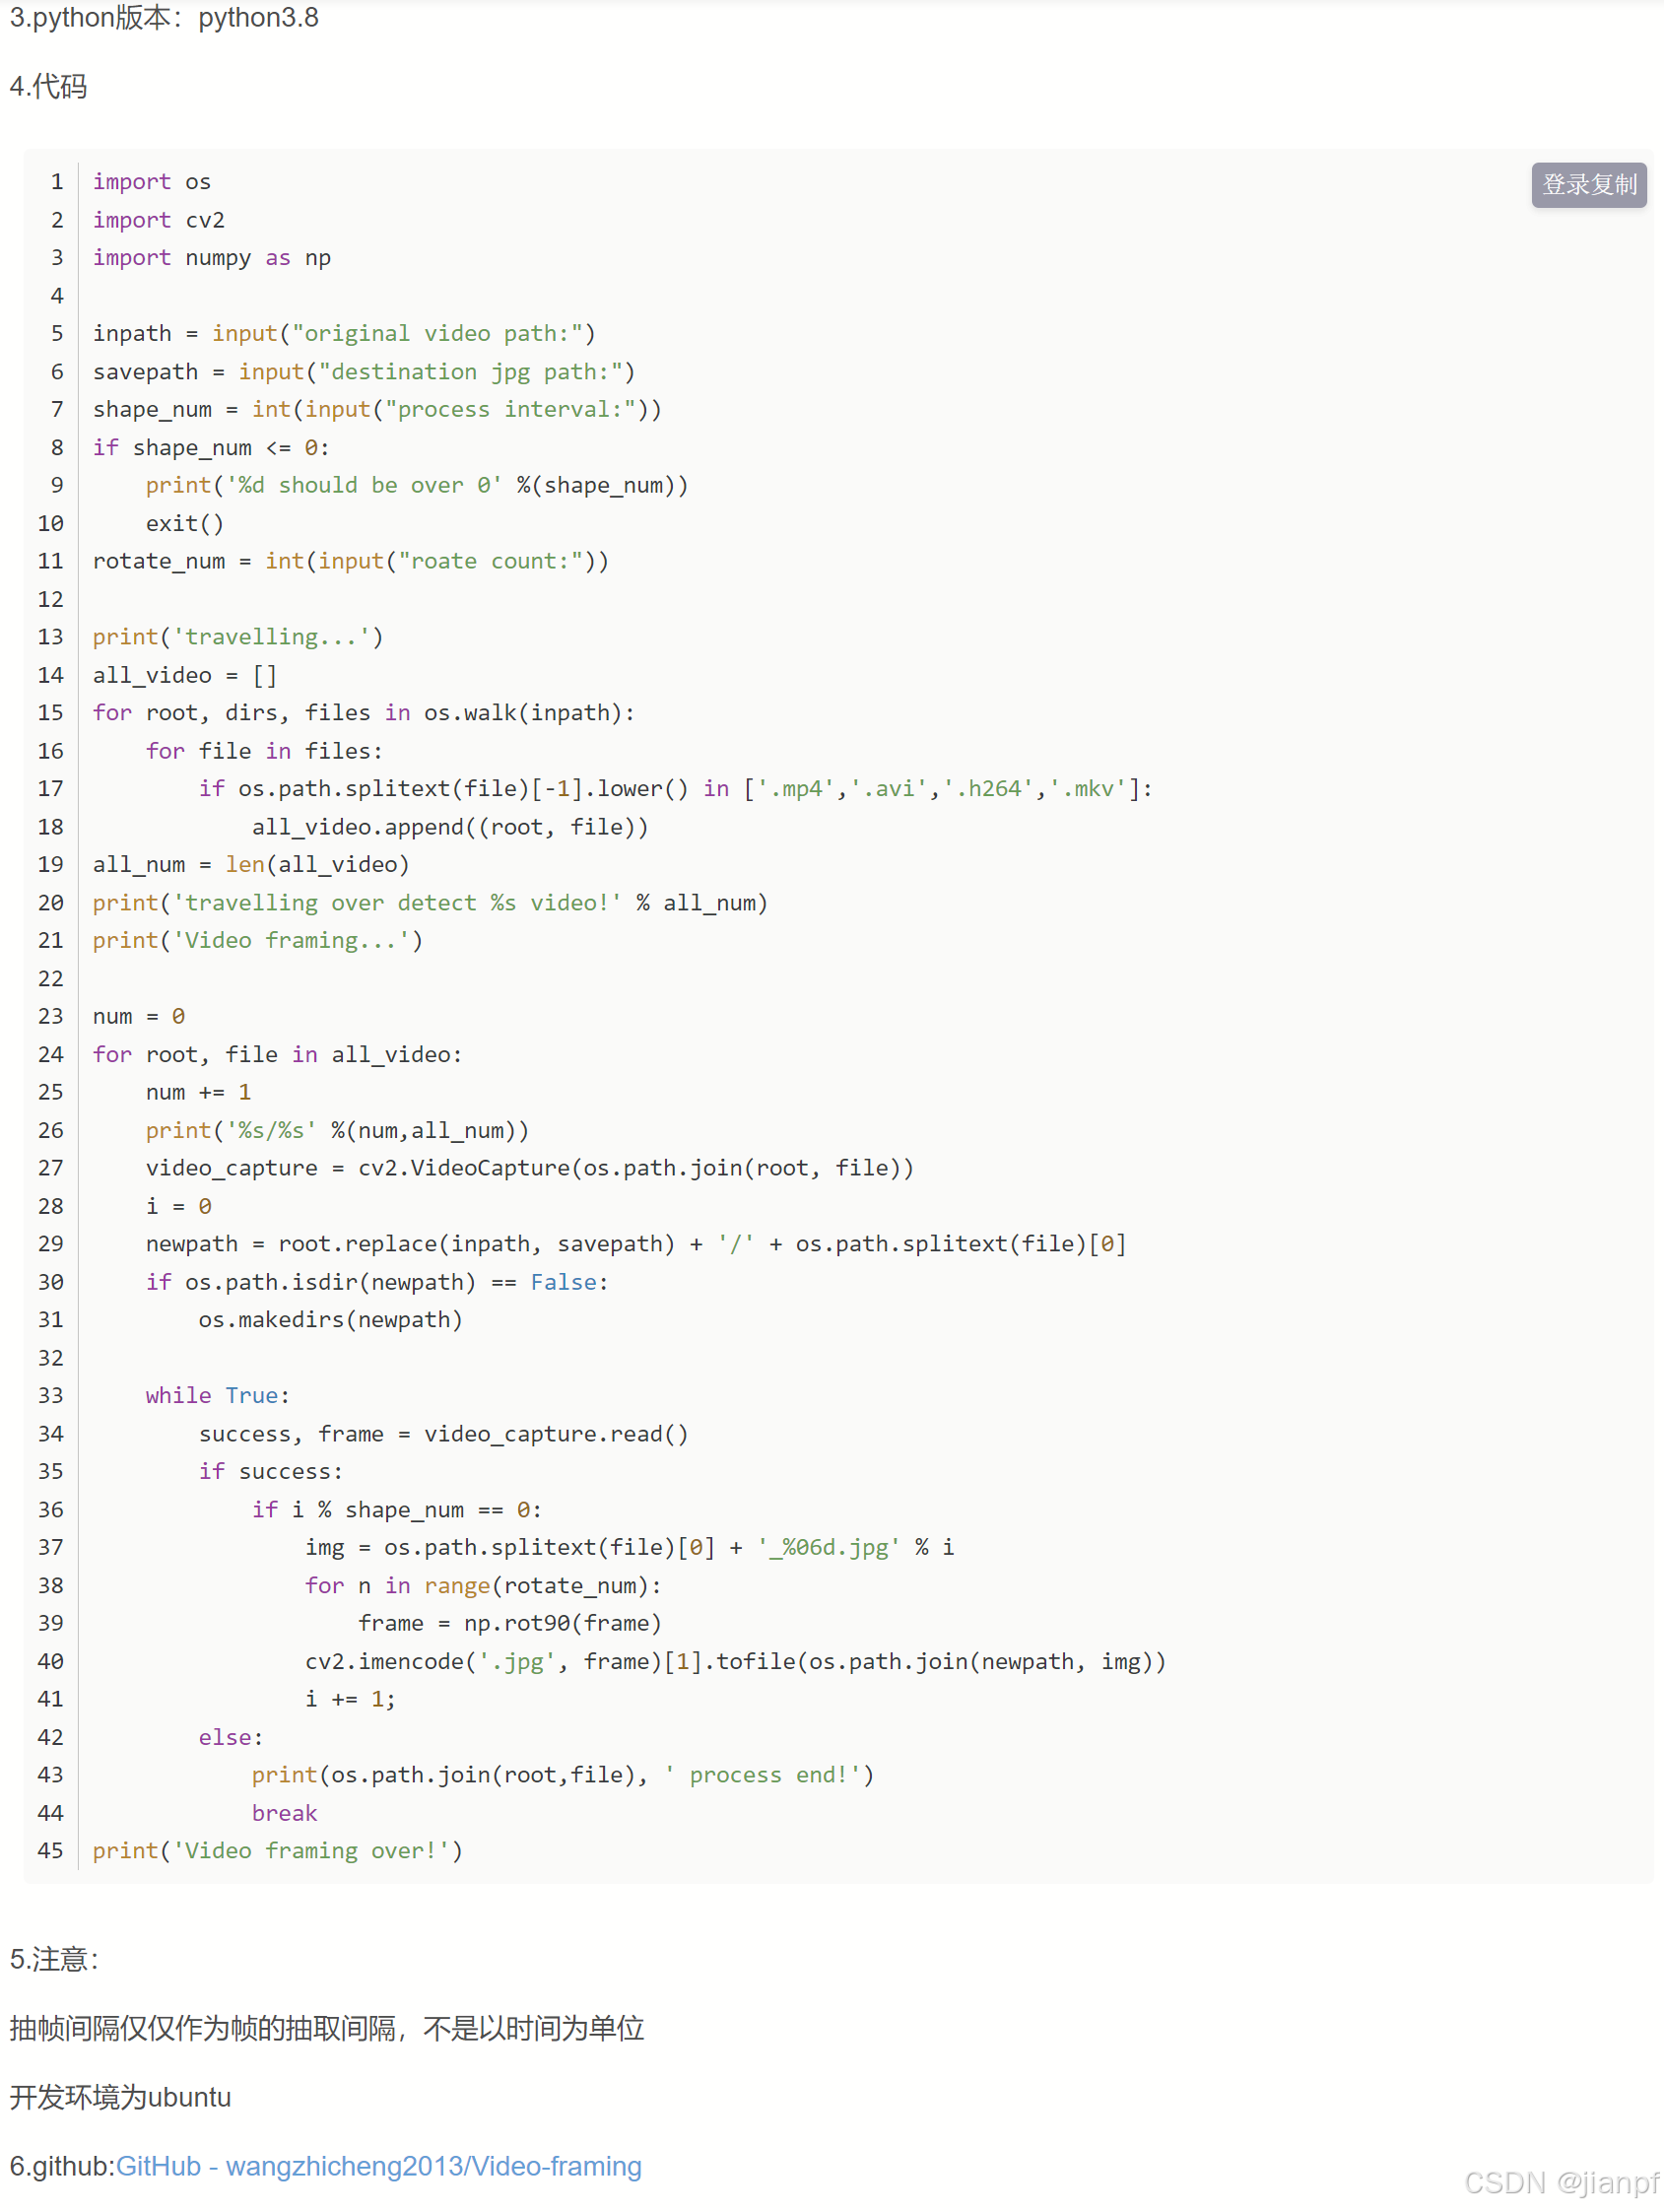
https://blog.csdn.net/wangzhicheng1983/article/details/126379562
视频抽取图片

图片拼接算法RANSAC算法
8G内存,PS不要拼图超过10张,76G不要超过50张
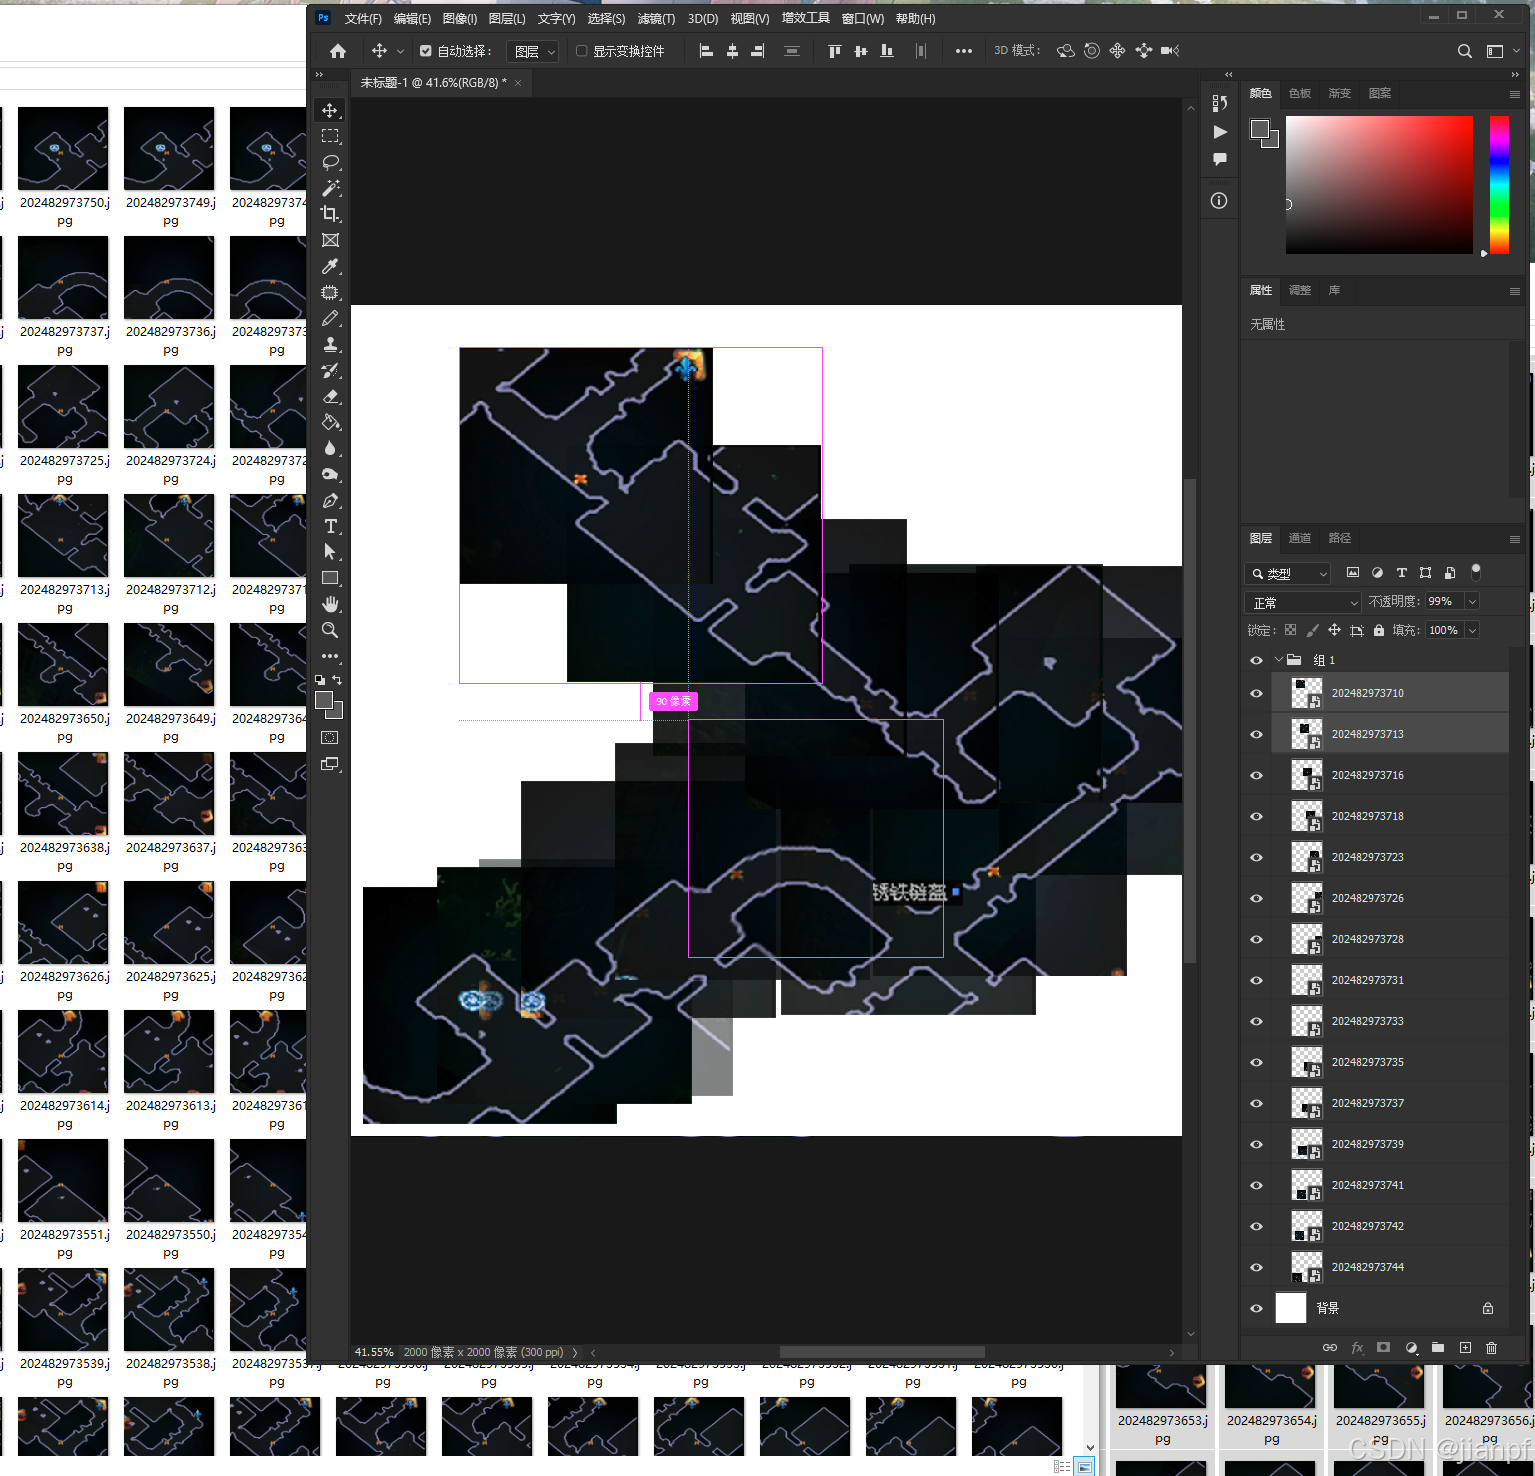
手动拼接可行,下次要自动拼接
获取窗口句柄
hwnd = window._hWnd
提示是大小写
AttributeError: ‘Win32Window’ object has no attribute ‘_hwnd’. Did you mean: ‘_hWnd’
移动窗口
window.moveTo(100,100)
import pygetwindow as gw
# 获取特定标题的窗口
try:# window = gw.getWindowsWithTitle('pipinf.txt')[0]  # 假设只有一个窗口具有此标题window = gw.getWindowsWithTitle('Path of Exile')[0]  # 假设只有一个窗口具有此标题
except IndexError:print("没有找到具有该标题的窗口")exit()# 获取窗口句柄(AI写的是没_小写)
hwnd = window._hWnd# 获取窗口的位置和大小(AI写的xy是错的,改成left.top)
# x, y = window.x, window.y
x, y = window.left, window.top
# width, height = window.width, window.height
width, height = window.width, window.heightprint(f"窗口句柄: {hwnd}")
print(f"窗口位置: x={x}, y={y}")
print(f"窗口大小: 宽={width}, 高={height}")window.moveTo(1500,1000)
# window.resize(-100,-100)
window.resizeTo(1800,500)
pip install *.whl
https://blog.csdn.net/weixin_46625757/article/details/122522741
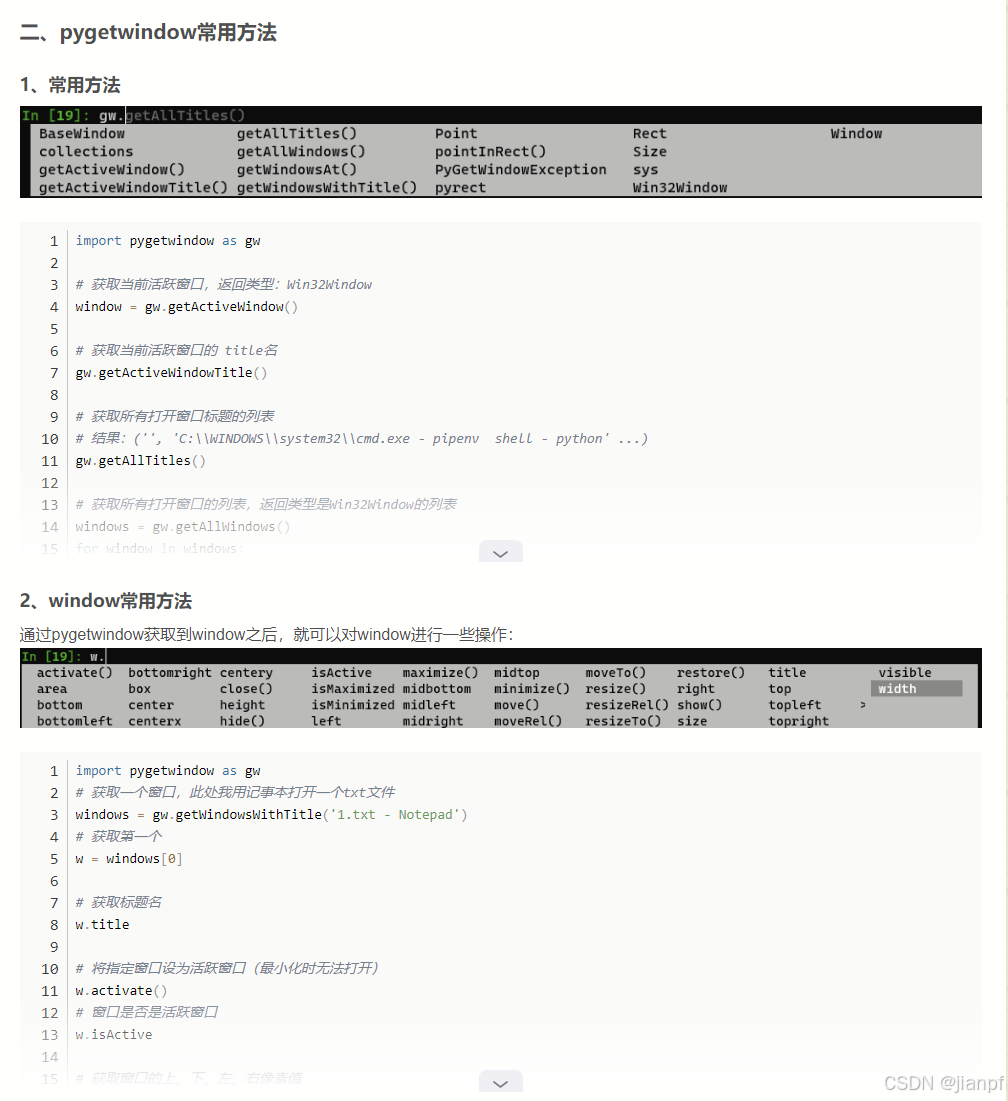
https://blog.csdn.net/A_art_xiang/article/details/134418744
https://www.jb51.net/python/306392bbb.htm
实时使用win32gui截屏用Mat格式显示的核心程序
https://www.jb51.net/python/306724xdf.htm
在这里插入代码片
2024.8.31.5:47
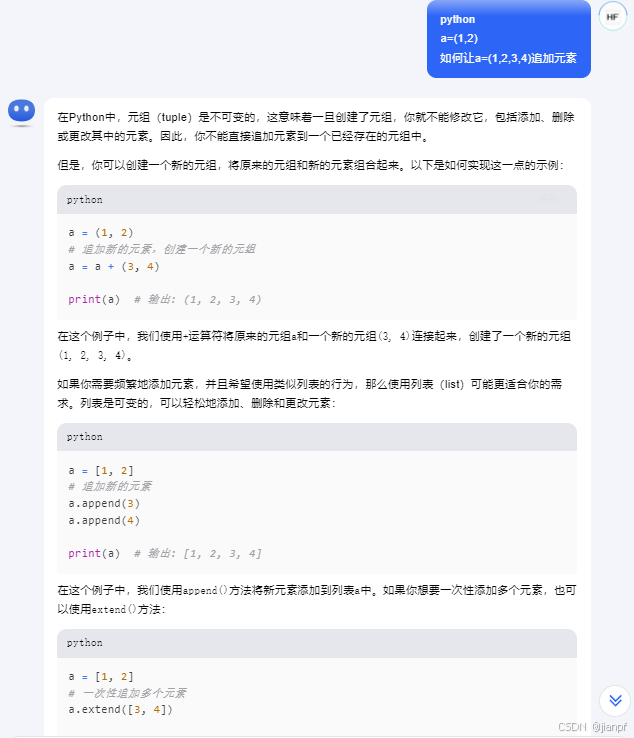

元组tuple()不能改,可以重新定义a=a+(元组)
别表list[]可变
互转构造函数或.方法
.tuple(列表转元组)
.list(元组转列表)
上图还可以用for导式(结果变量 for 结果变量 in 列表)
…
问题来了
截图时,用户有4种起点截图顺序(左上下右上下)(结束点也一样)如何判断区域
# 获取窗口左上角坐标和窗口宽高(x,y,w,h)
 # 获取窗口左上角坐标和窗口宽高(x,y,w,h)
def math_x_y_width_height(p1,p2):# 提取元组xy值x1,y1=p1x2,y2=p2#取最小值,获得窗口左上角坐标x0=min(x1,x2)y0=min(y1,y2)#取绝对值获得窗口宽高w=abs(x1-x2)h=abs(y1-y2)return (x0,y0,w,h)#以第一点p1为原点,判断p2点在第几象限,返回1234象限56xy轴
def math_quadrant(p1,p2):# 提取元组xy值x1,y1=p1x2,y2=p2# 判断象限1234象限5=x轴上,6=轴上if x2>x1 and y2<y1:return 1elif x2<x1 and y2<y1:return 2elif x2<x1 and y2>y1:return 3elif x2>x1 and y2>y1:return 4elif x1==x2:return 6elif y1==y2:return 5p1=(1,1)
p2=(4,4)
p3=(1,4)
p4=(4,1)print('象限:',math_quadrant(p1,p4))#5=x轴上
print('象限:',math_quadrant(p1,p3))#6=y轴上
print('象限:',math_quadrant(p1,p2))#4象限上
print('象限:',math_quadrant(p4,p3))#3
print('象限:',math_quadrant(p2,p1))#2
print('象限:',math_quadrant(p3,p4))#1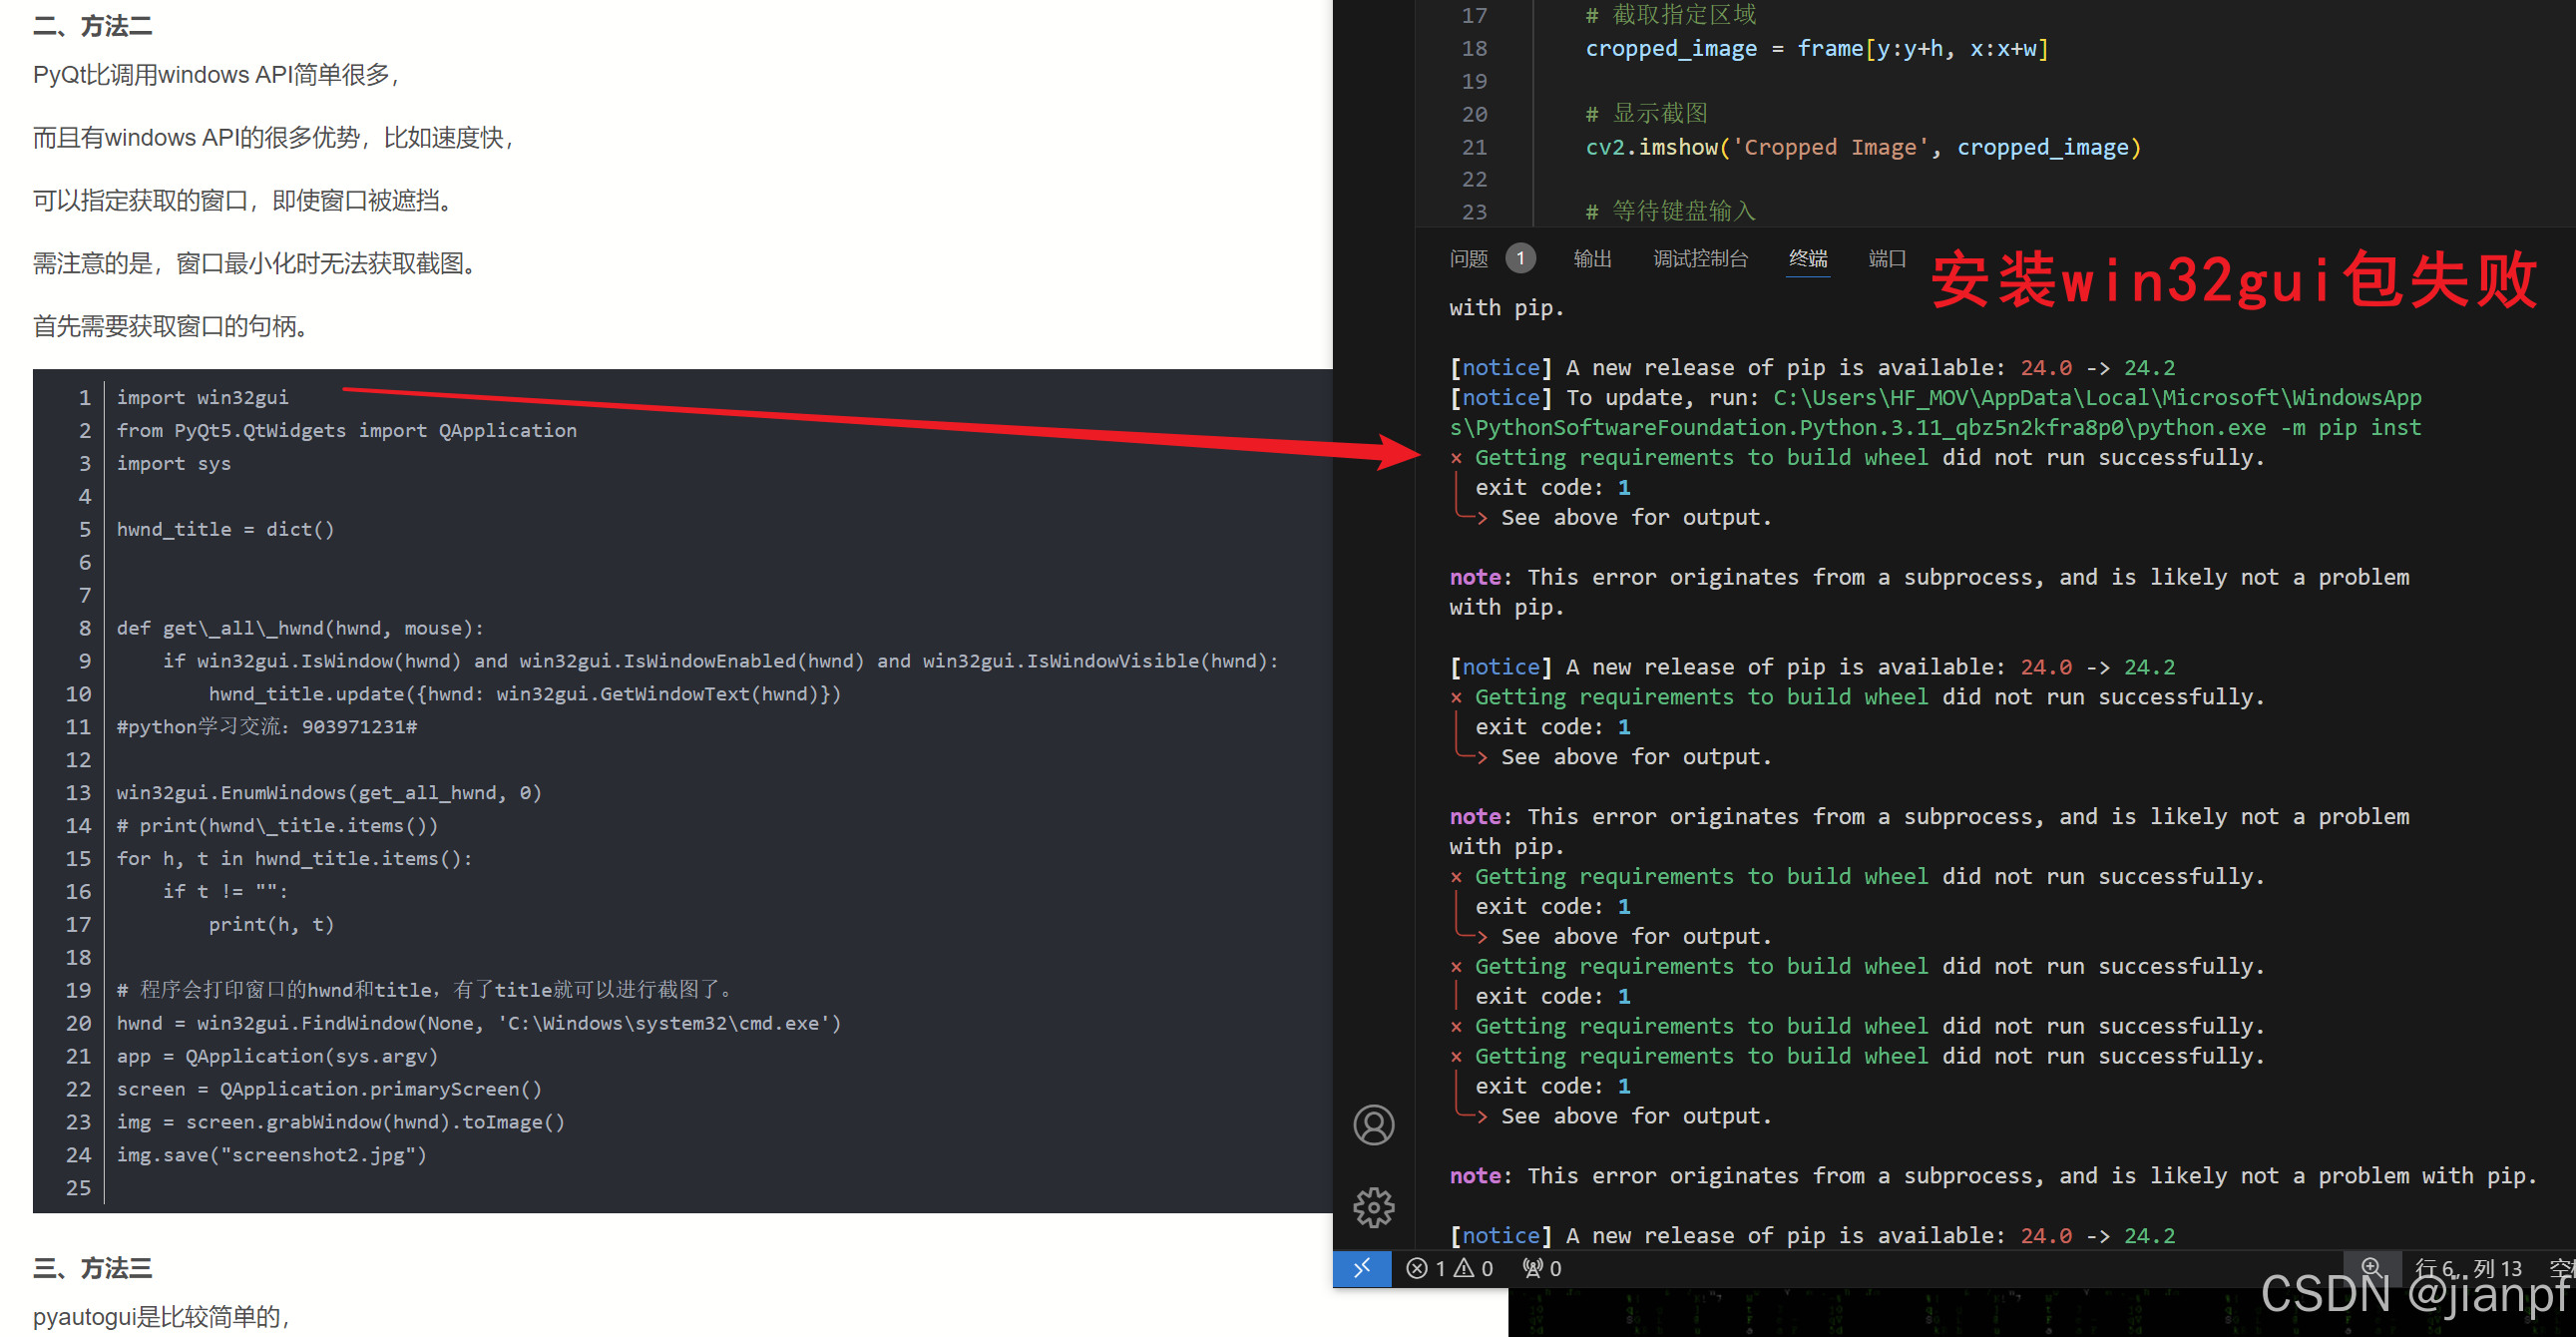
import numpy as np
from PIL import ImageGrab,Image
import cv2img=ImageGrab.grab(bbox=(0,0,1920,1080))
print('shap',list(img.size))
img.show()
img.save(r"M:/aaa.jpg") #ok
#输出当前时间毫秒
from datetime import datetime
imgname=datetime.now().strftime("%Y%m%d%H%M%S%f")
#2023-03-15 12:30:45.123456
#整型填充000
a = 00001
a = str(a).zfill(5)  # 将a转换为字符串,并在前面填充0,使其长度为5
print(a)  # 输出: 00001
 img00i=0
def on_click_cutSc(x, y, button, pressed):# 必须全局声明变量才能使用global img00iimg00i=img00i+1print('img00i',img00i)
# 创建鼠标监听器
with Listener(on_click=on_click_cutSc) as listener:listener.join()
封装
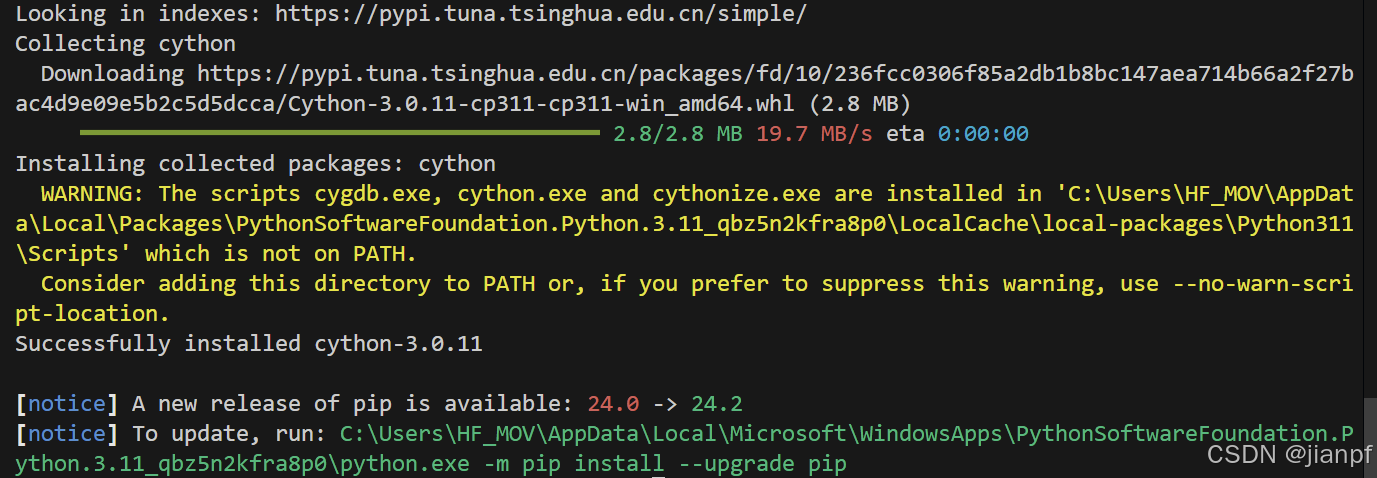
pip install -i https://pypi.tuna.tsinghua.edu.cn/simple/ cython
pyd是特定平台版本的python的加密编译库,不通用.
需要Microsoft Visual C++14.0或更高版本。使用“Microsoft C++构建工具”获取它:https://visualstudio.microsoft.com/visual-cpp-build-tools/
https://blog.csdn.net/hutaotaotao/article/details/137232903
发布到pypi官网库中的教程
https://test.pypi.org/
测试发布下载
pip install -i https://test.pypi.org/simple/yourtools
https://blog.csdn.net/qq794492789/article/details/136511610
发布到pypi官网库中的教程
https://test.pypi.org/
https://www.osgeo.cn/python-packaging/guides/using-testpypi.html
5b23e43636c67c51
b245cbca348f84f3
5b9d5a77f25e1347
25212dcf5a63cc1f
bcb862990cbf1b78
4a471deaed2d3e12
5697c1f0e31eb27d
c75cab7a6193da42
恢复码
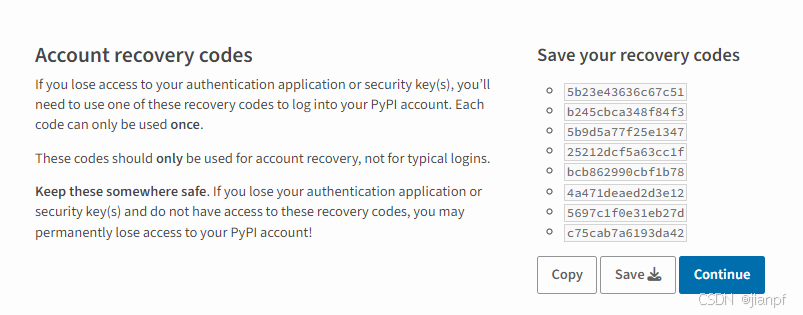
from 目录/文件.py import Class类名
a=Class类初始方法()
再同目录下就不需要from了
注意这里的build_ext是属性–inplace是原地参数
python.exe setup.py build_ext --inplace
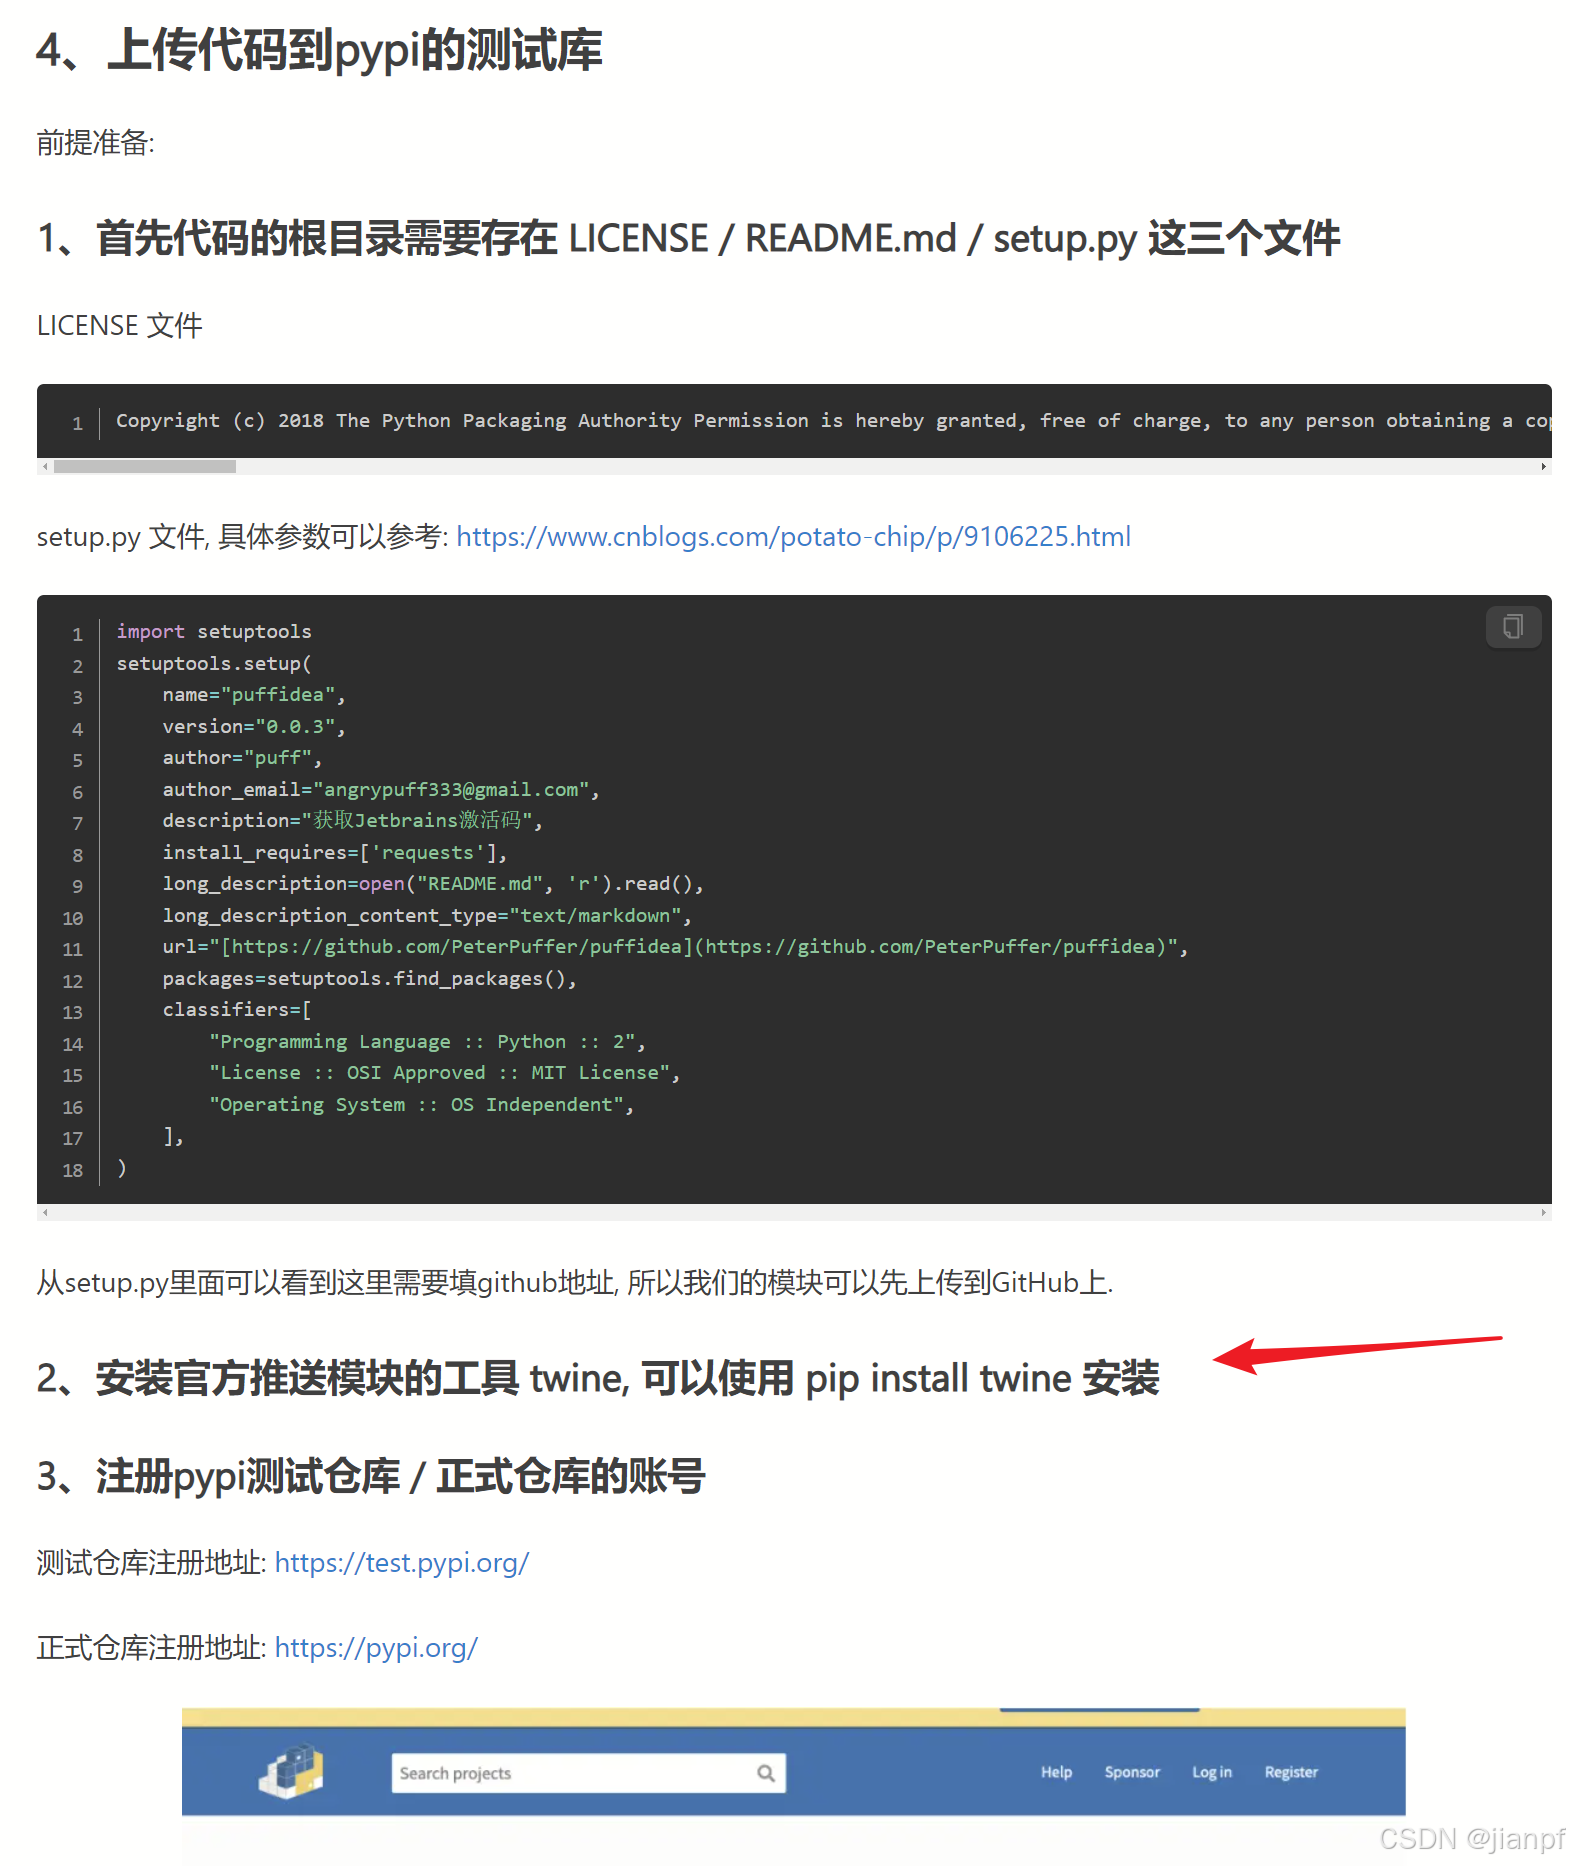
安装官方推送模块工具 pip install twine
twine upload --repository-url https://test.pypi.org/legacy/ dist/*
twine upload dist/*
https://www.jianshu.com/p/fbb083aebcc1
pypi中文教程
https://python-packaging-zh.readthedocs.io/zh-cn/latest/index.html
所以pip安装的时候包名可能是类名同名和目录文件名…
python定义类时加self和不加self的区别?
虽然在Python中定义类的方法时,使用self作为第一个参数是惯例
问题少年,继续问继续答,遇到的问题别人早遇到,AI时代还是会出现这种象限就悲催了.

https://ai.gitee.com/
code settings sync插件gitee
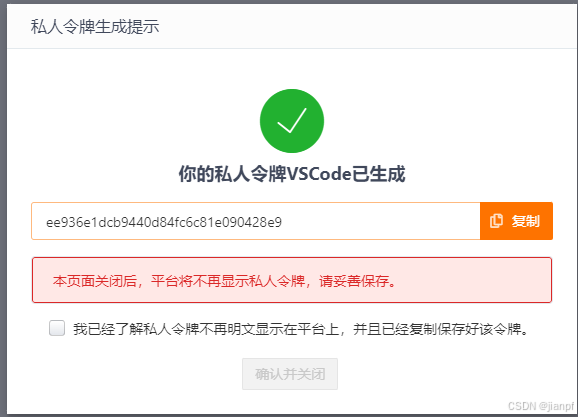
ee936e1dcb9440d84fc6c81e090428e9
签字名称,随便填
git config --global user.name “MAC_PC”
邮箱随便填
git config --global user.email “372191242@qq.com”
生成本地电脑硬件系统唯一密钥值-C是给此次生成的密钥值一个备注(下面长串的后面可以看到是明文)(所以都可以任意值)
ssh-keygen -t rsa -C “372191242@qq.com”
显示一下生成的密钥值
cat ~/.ssh/id_rsa.pub
在网页端添加SSH就可以了(下面标的是MAC_LFZL)
ssh-rsa AAAAB3NzaC1yc2EAAAADAQABAAABgQDVaqRM3VqTcz7iEwgtjKZnhrAN6NdUZwzfTqbKVlIVRtuGhTGQZX+J/KlQw3mEni81VSLpTjw47qeYF1LgOI7PbaWP+eVa67/12CBJFqPvKo+rFaE8ObrDUmC3M1jd/pdwXFjAmjK+qY6lqgFkV5Xrz8py9yyAbd1DpV5GZSKrH3zFLg88SlWLLdIPnG4N4JgZIqWY1LCu6YP+d6XEz7hCU84xrd8rGWV6btOpGHPdvRwUU9psOKscDn8kIA8qUEPasu0LyjXUe1LrgxKLRI9kKTP9M0wEpypIGHYRB8NwdGw4DBeuNtpV1WhQUz3NCrmXZc5apbx4yME2yFGSKEXbMfF9undi+72k1dqZsYBOqLeSospmJSLb1KAMoSIAt5SBpk/h8Au6I/btC62wAF4LOjpTknST7zcIPruC9hRAJ0kw7T1310/4AOzJj98VOZrMmXGeltsq54evPoXewCb90ZUCrY5jFtRmWJMq8VaPYPWN/BGH2OYyu5O4bmD4Uu0= 372191242@qq.com
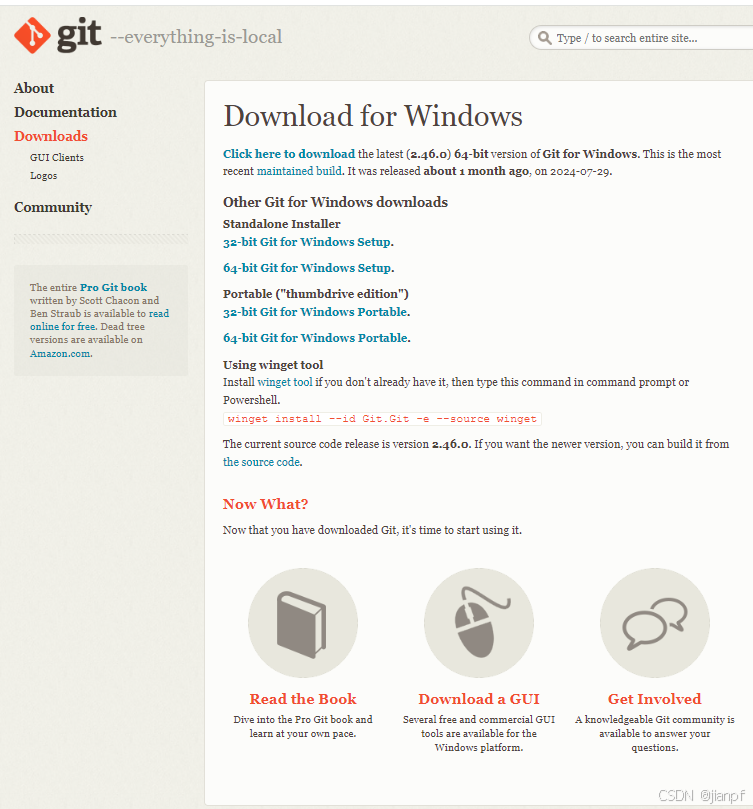
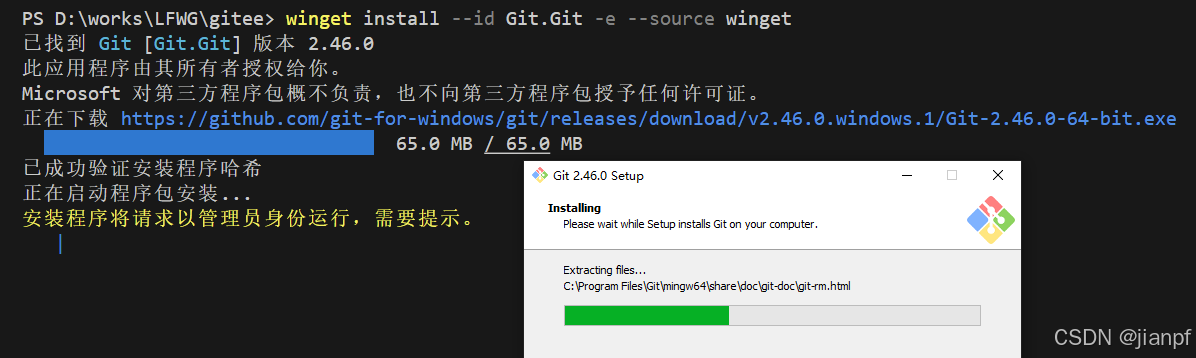

安装命令:
winget install --id Git.Git -e --source winget
安装目录:
C:\Program Files\Git
有400MB
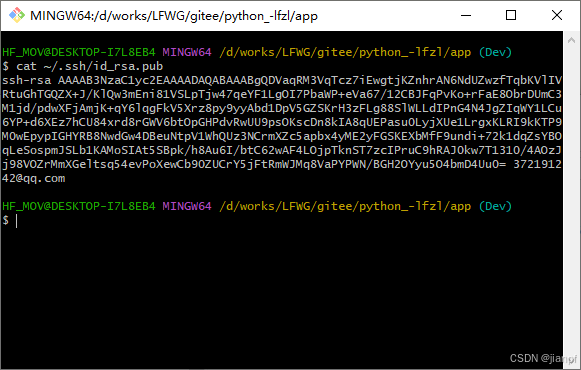
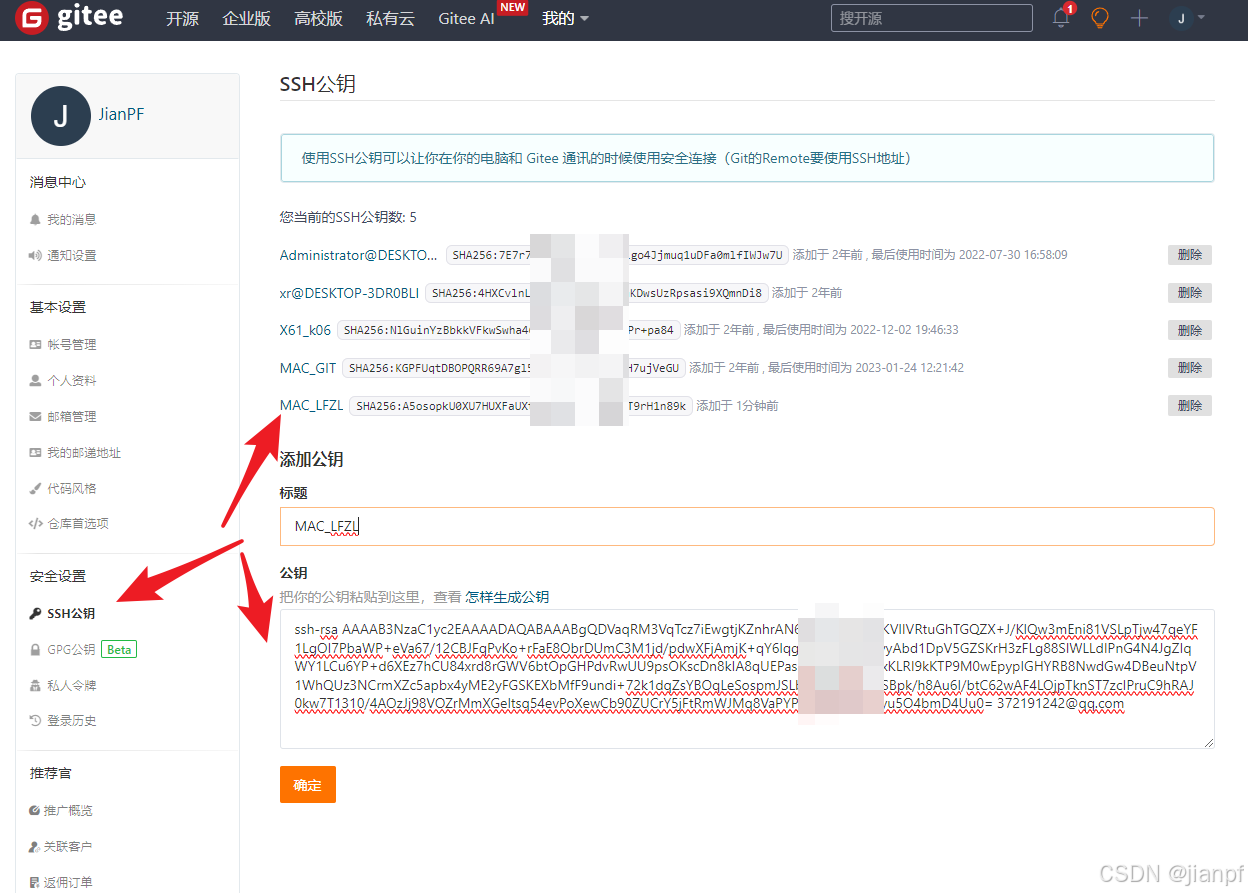
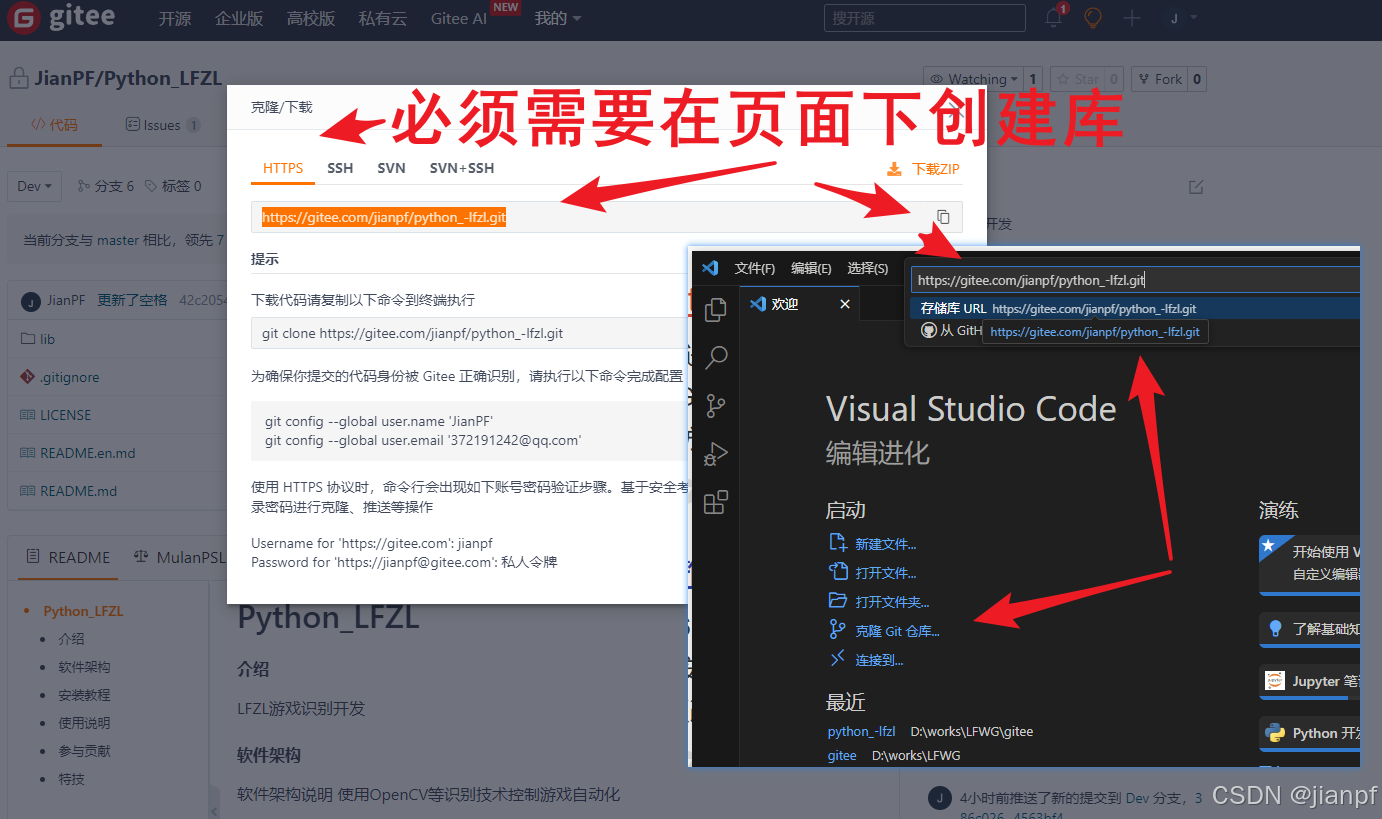

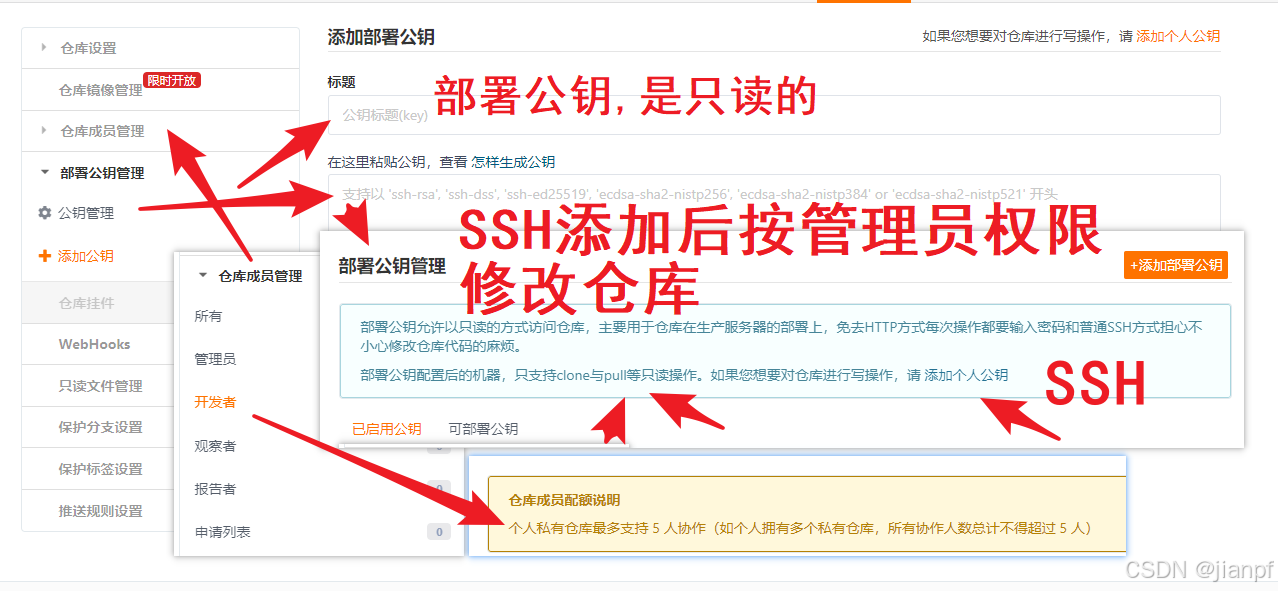
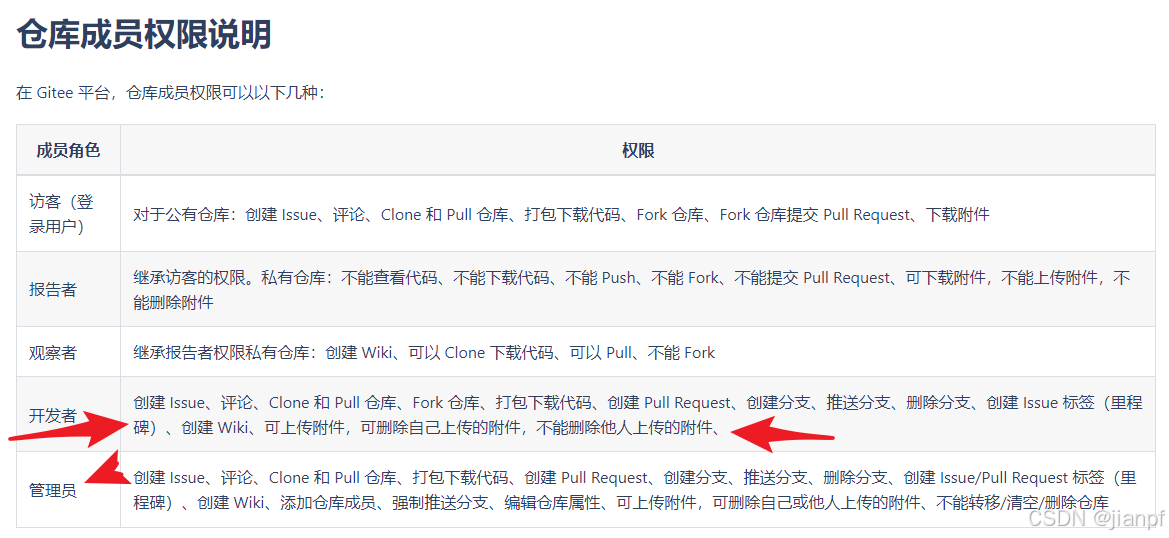
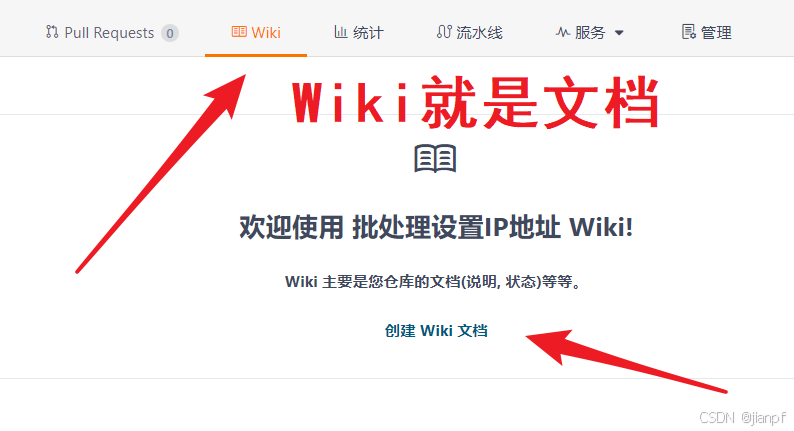
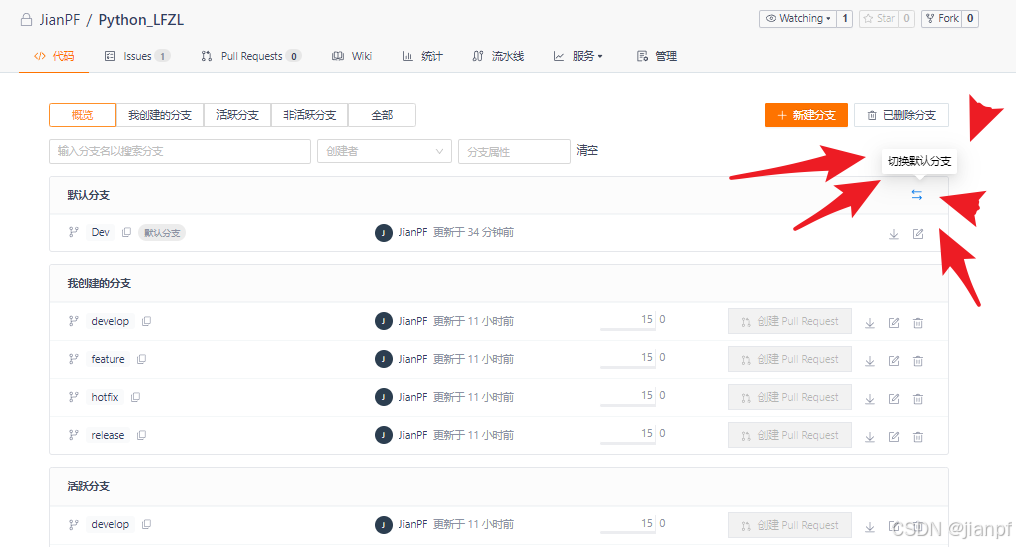
默认分支太隐蔽了,直接进入管理>保护设置
1.选择远程分支Dev或创建新分支(在当前所选状态下创建新分支)(按版本日期如JToolVer1.0.1.2024.8.31)
2.提交是本地,再同步云端
3.签出就是保存在本地,直接切换到分支(目录的文件直接剪切保存在隐藏的.git目录中)
没有提示的加载其他目录类
import sys
#需要进入APP目录执行.py
## 加载上级的库目录
#sys.path.append('../libJPF')
## 从../libJPF/JTool.py 加载JTool类别名为JT
## 这种方式是没有提示的
#from JTool import JTool as JT# 有提示加载方法
#需要进入APP目录执行.py
#直接加载上级目录(因为VScode提示按工作目录搜索的,如果进入了app目录,也是没有提示的)
sys.path.append(r'..')
x,y,w,h=JT.math_x_y_width_height((1000,1000),(500,600))print(x,y,w,h)
https://kimi.moonshot.cn/只支持20万字(2024.8.31.21:05)
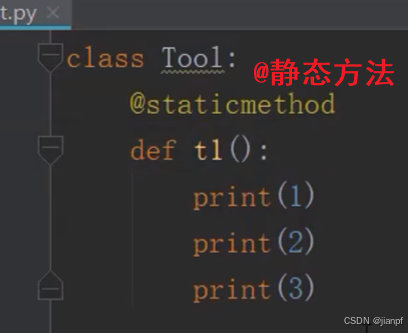
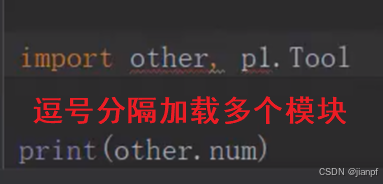

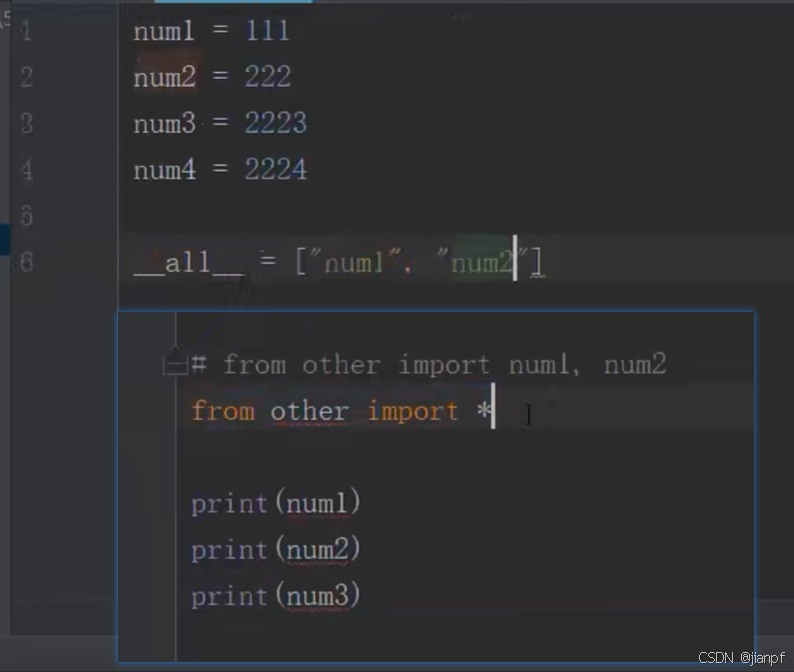
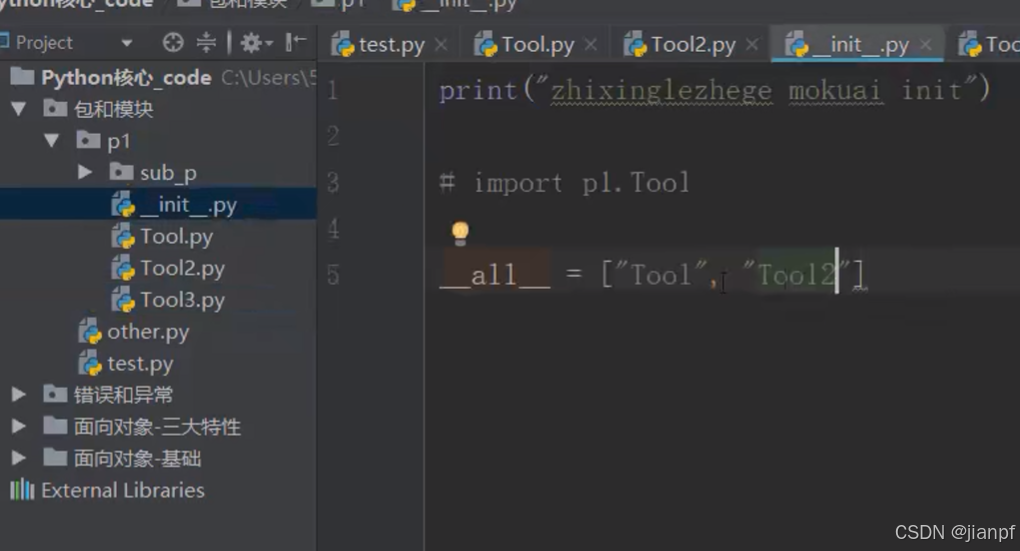
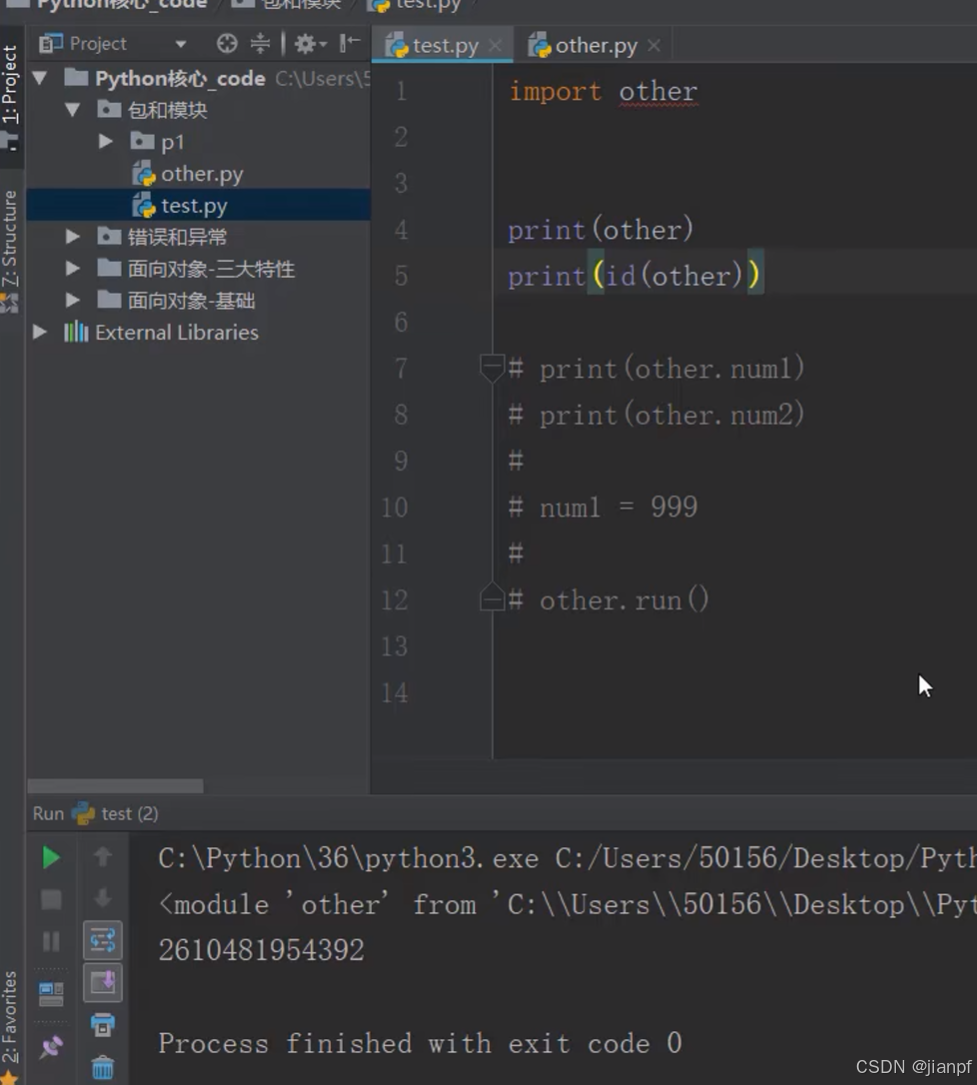
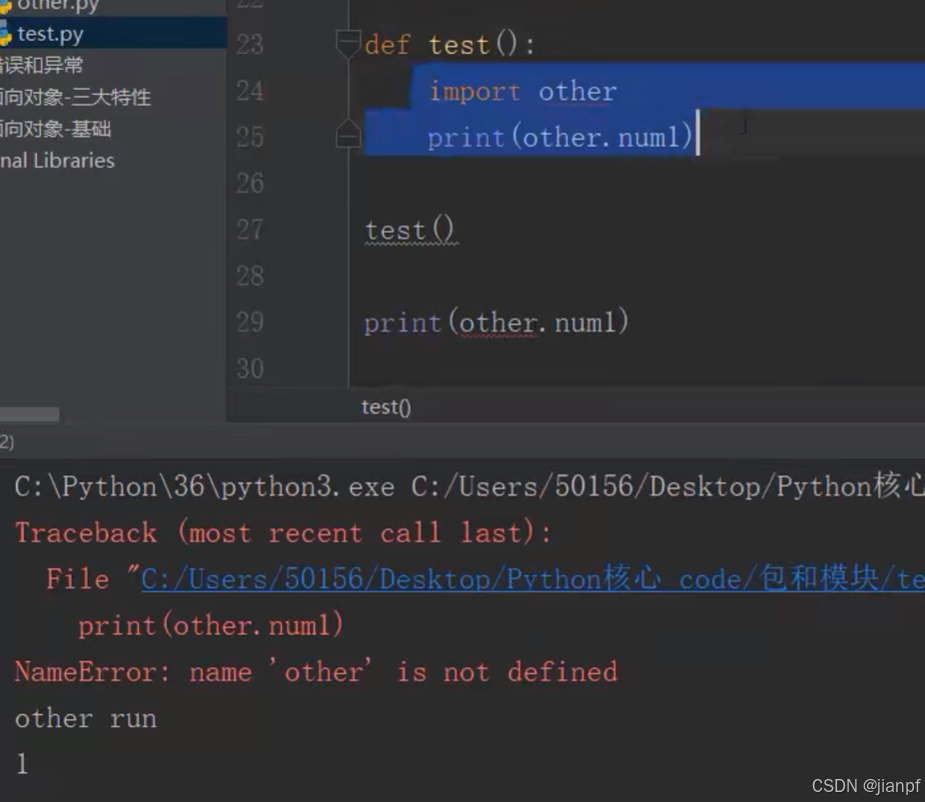
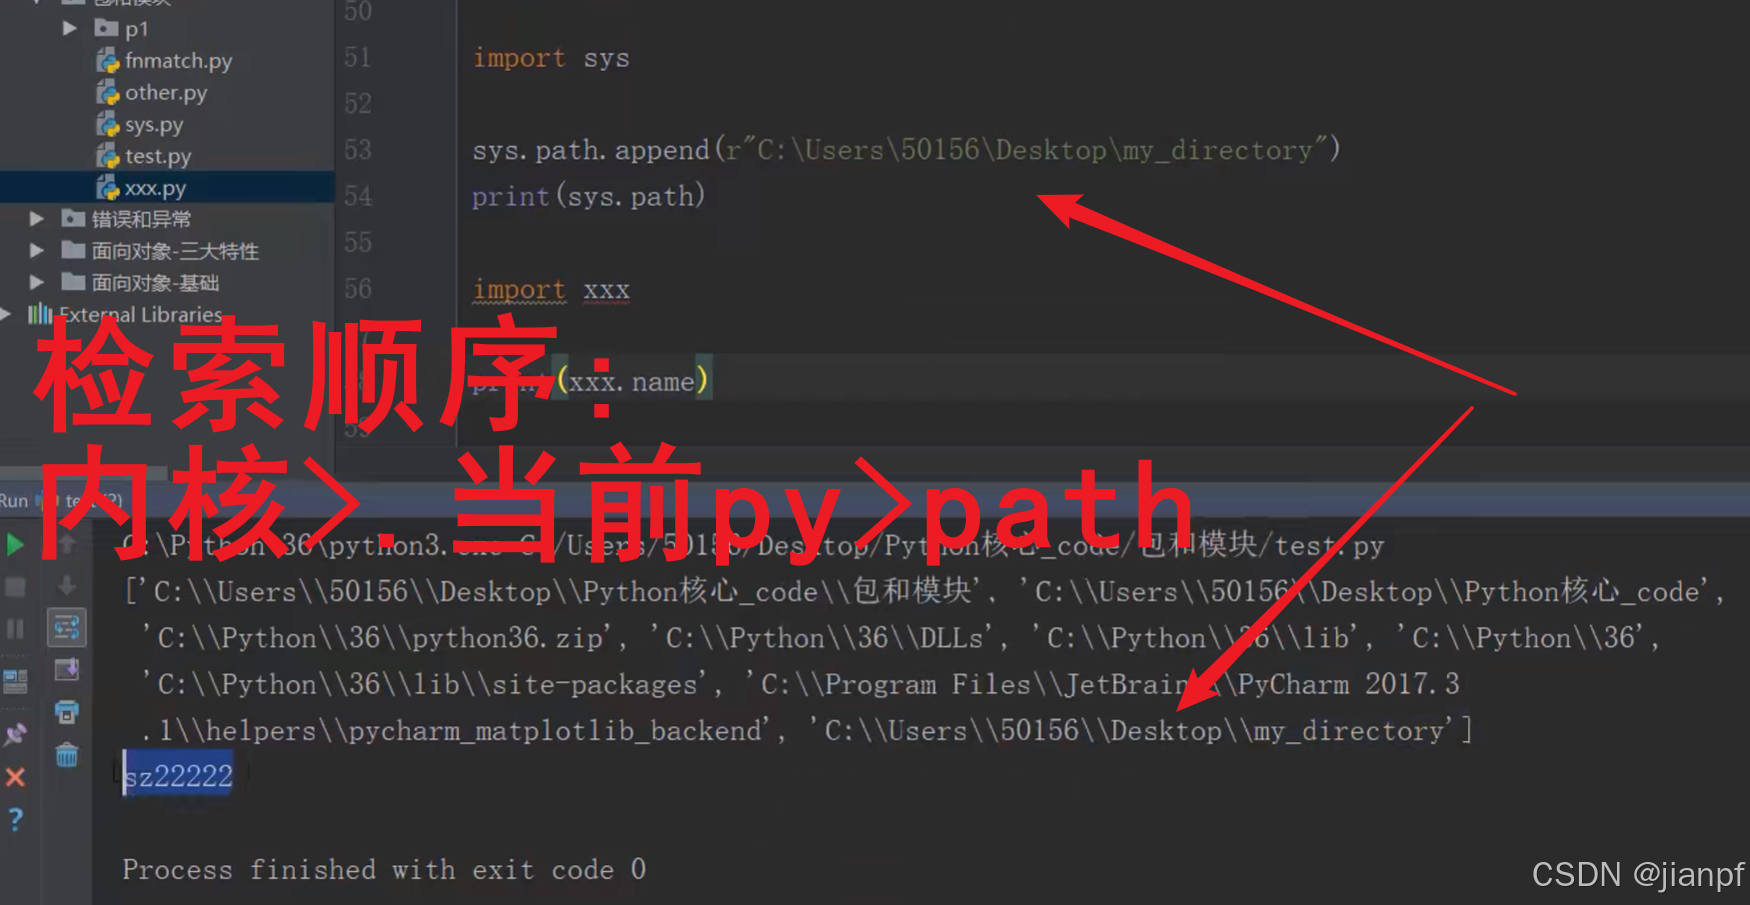
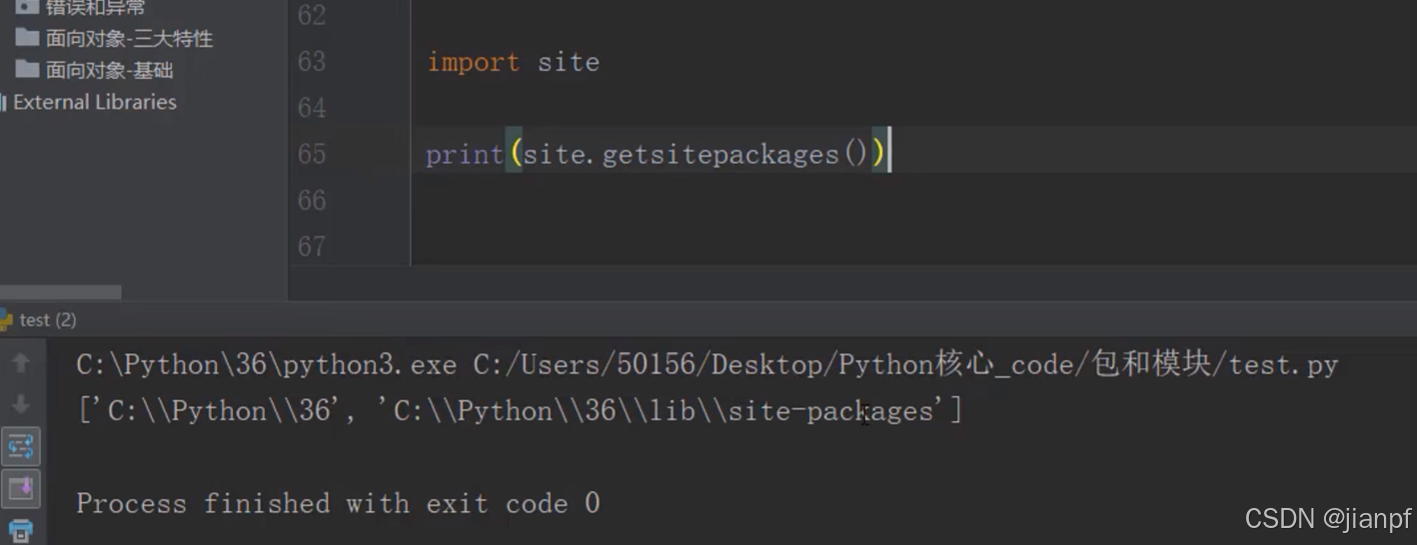
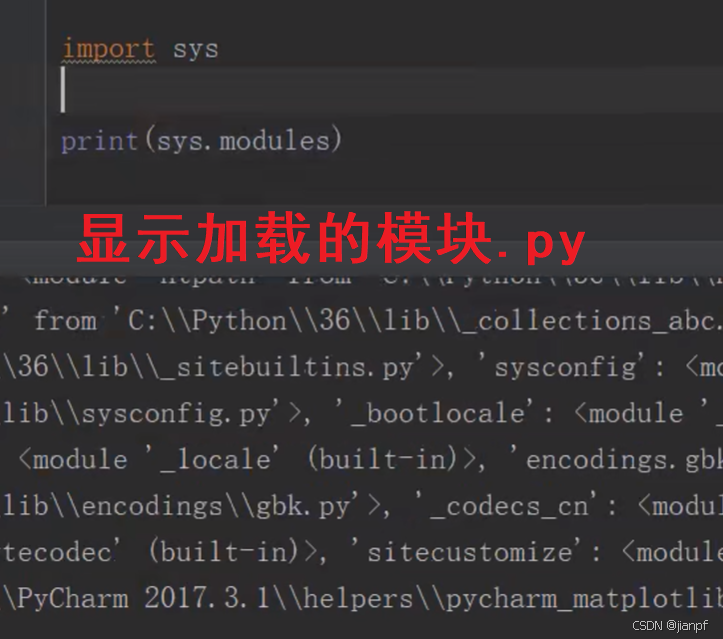
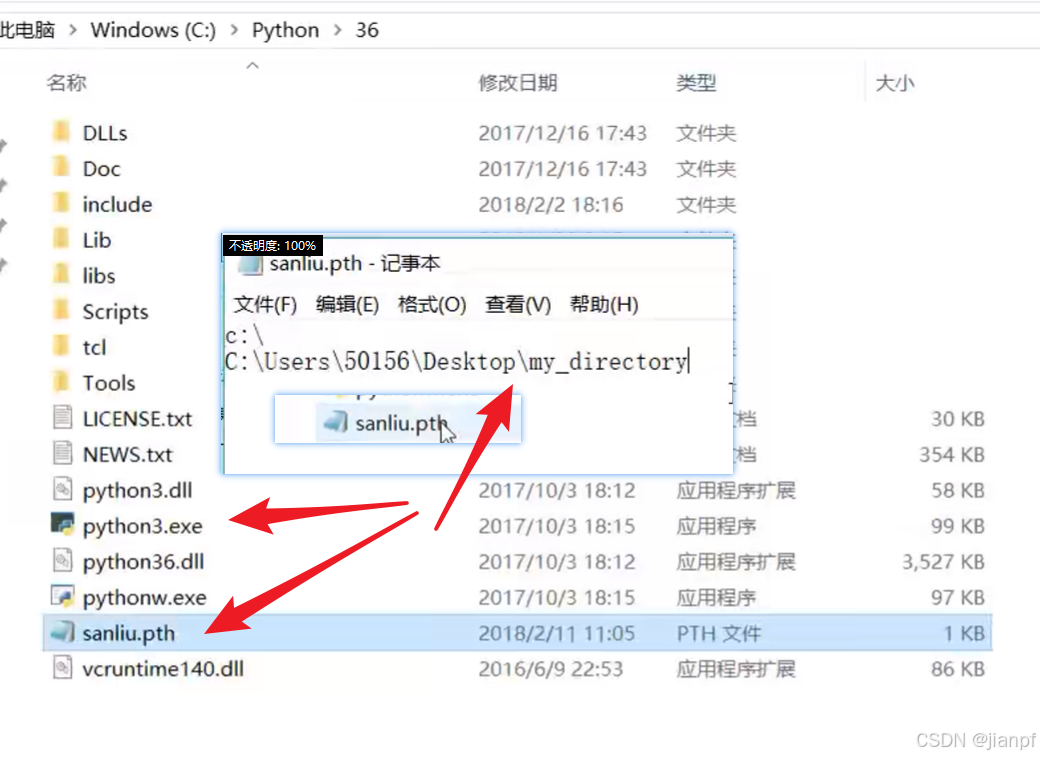
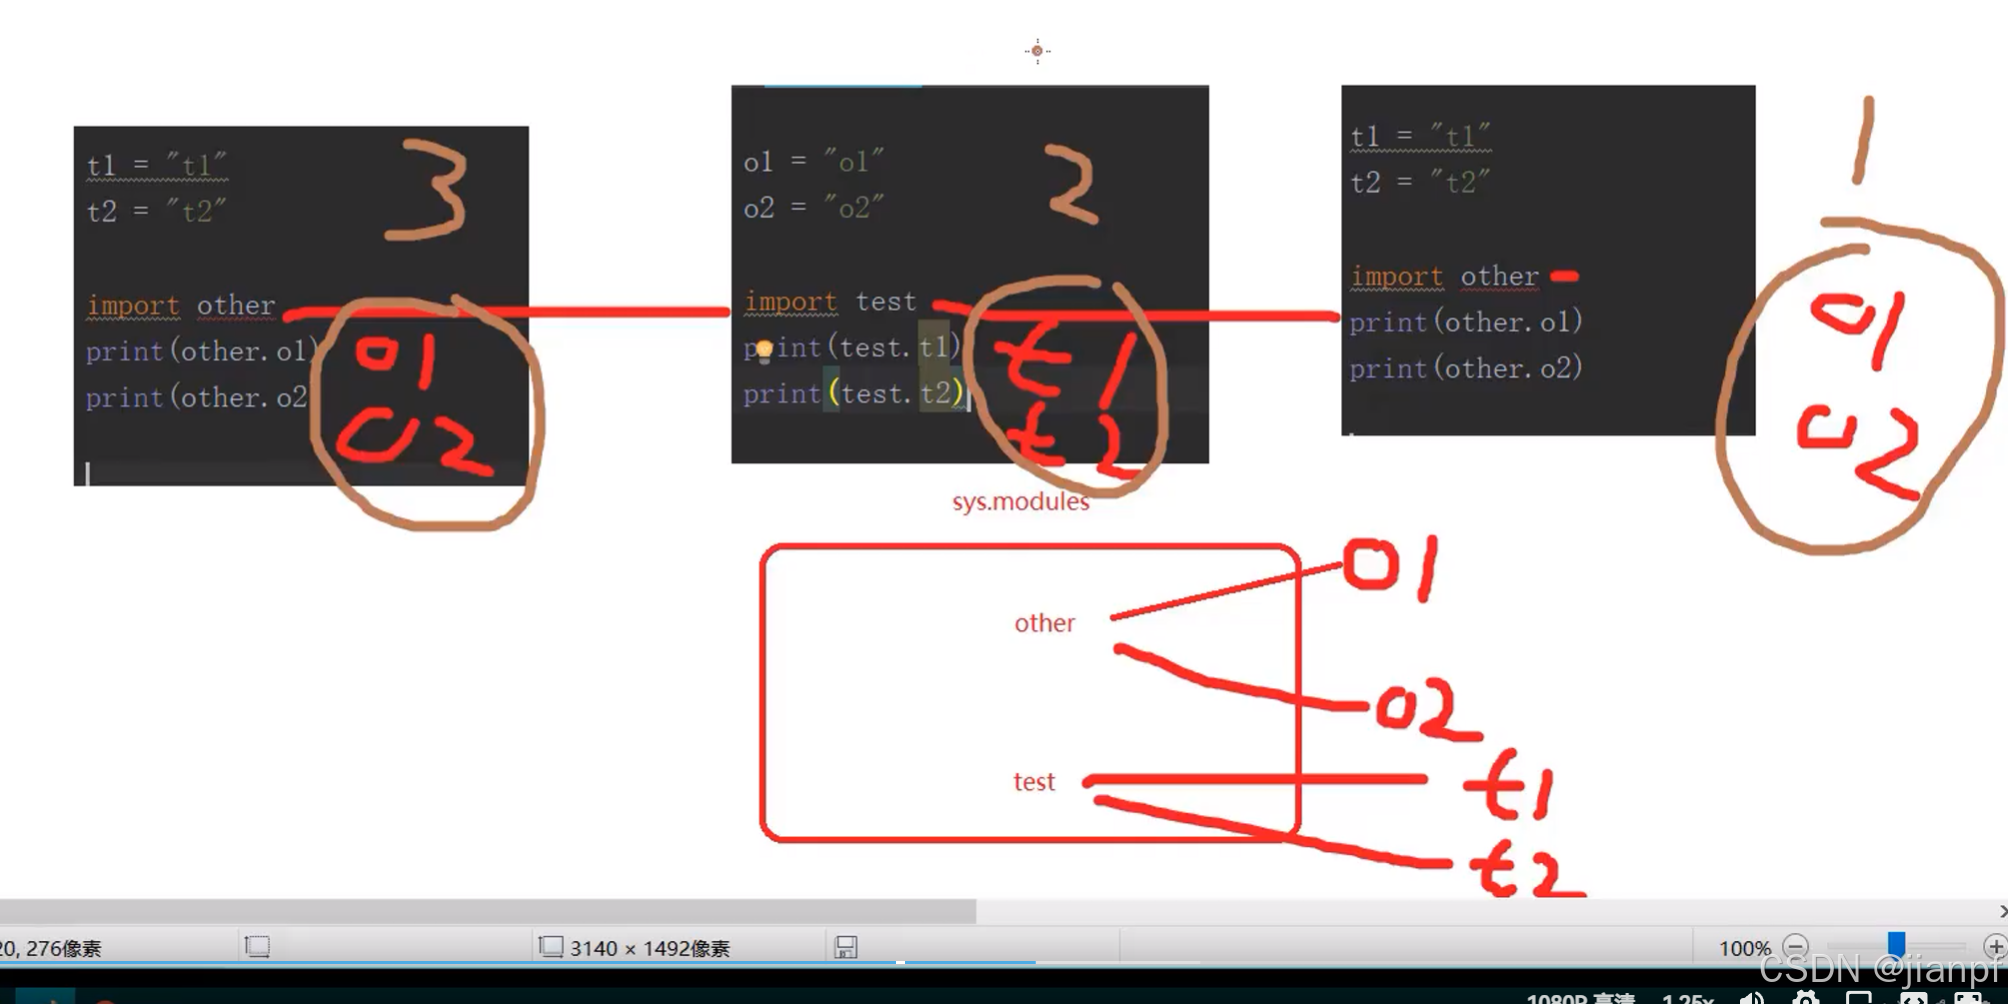
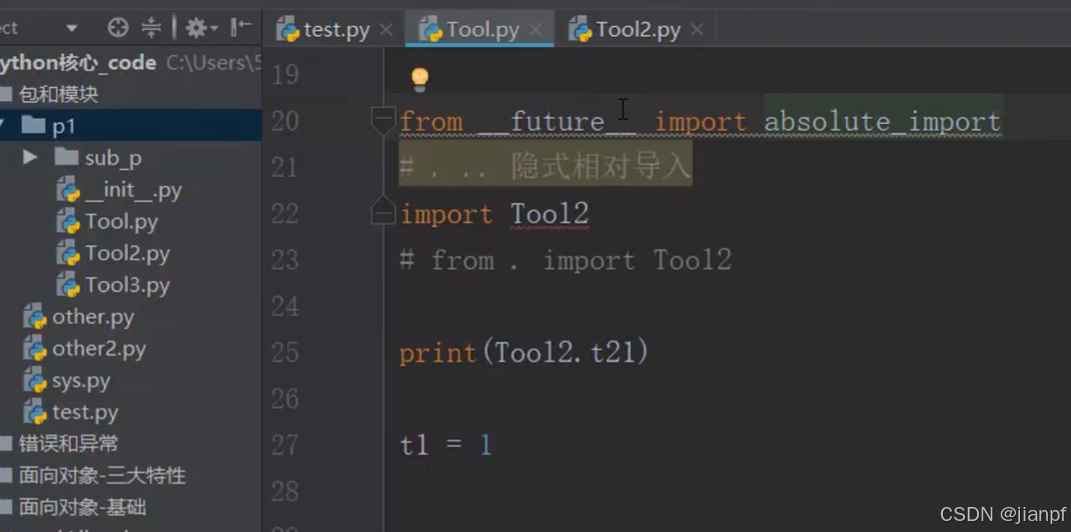
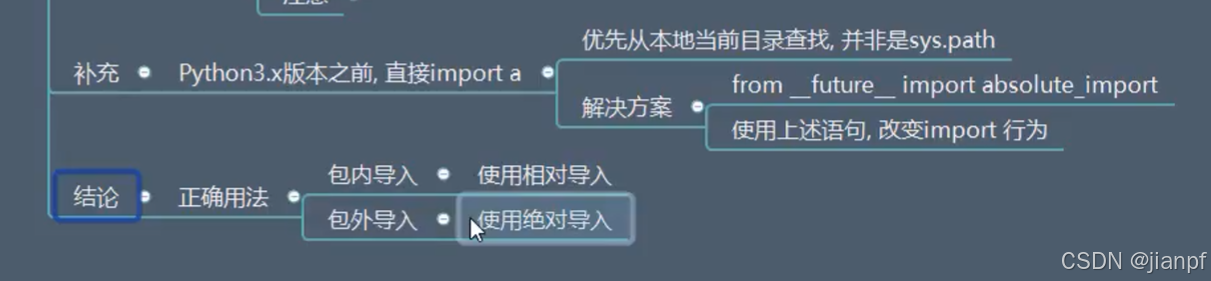
加载顺序:
内核>当前>lib>安装.pth>lib\三方site-package的.pth
模块=一个py文件
包=多个py文件
库=功能集合
框架=应用控件
import 模块1 as A1 ,模块2 as A2,dir1.dir0.mok3 as A3
if不会产生命名空间
while会 def会 class会
https://www.bilibili.com/video/BV194411r7a8?p=7&spm_id_from=pageDriver&vd_source=606d359e368cfd6b2c0e0b03ff16fa67
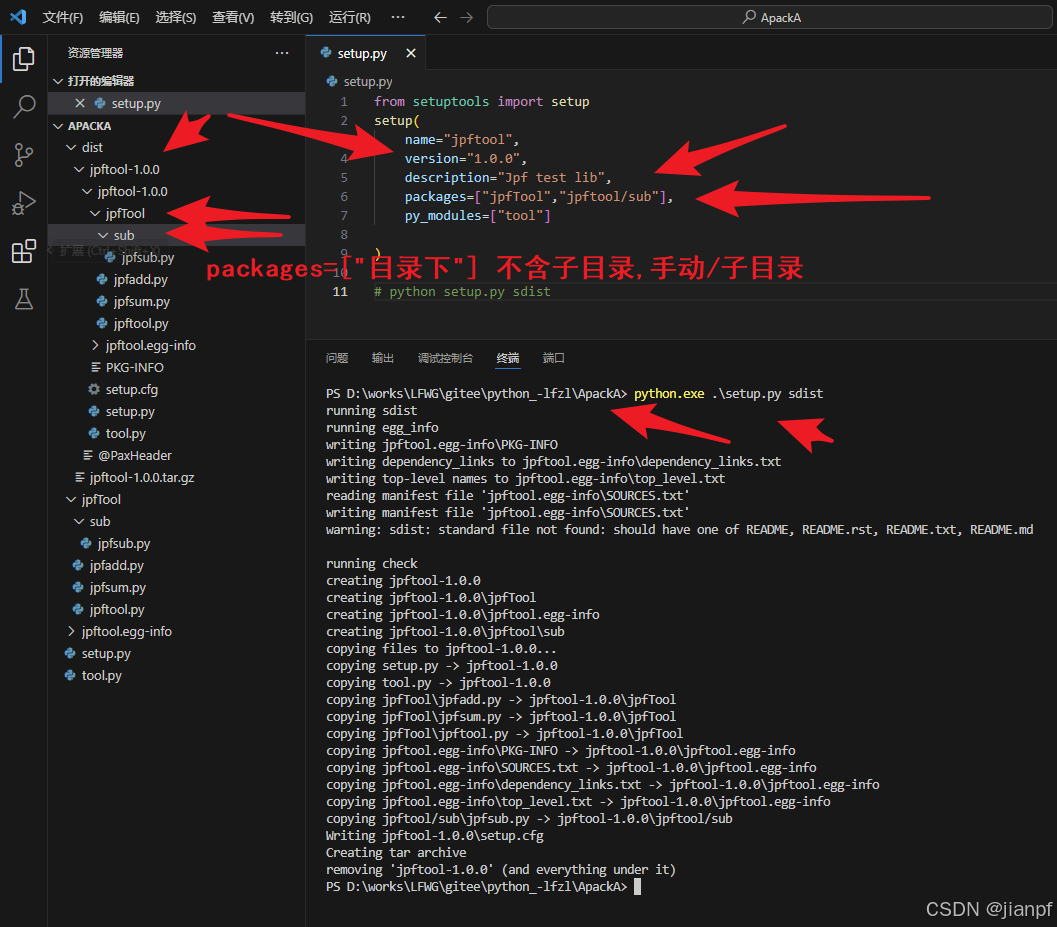
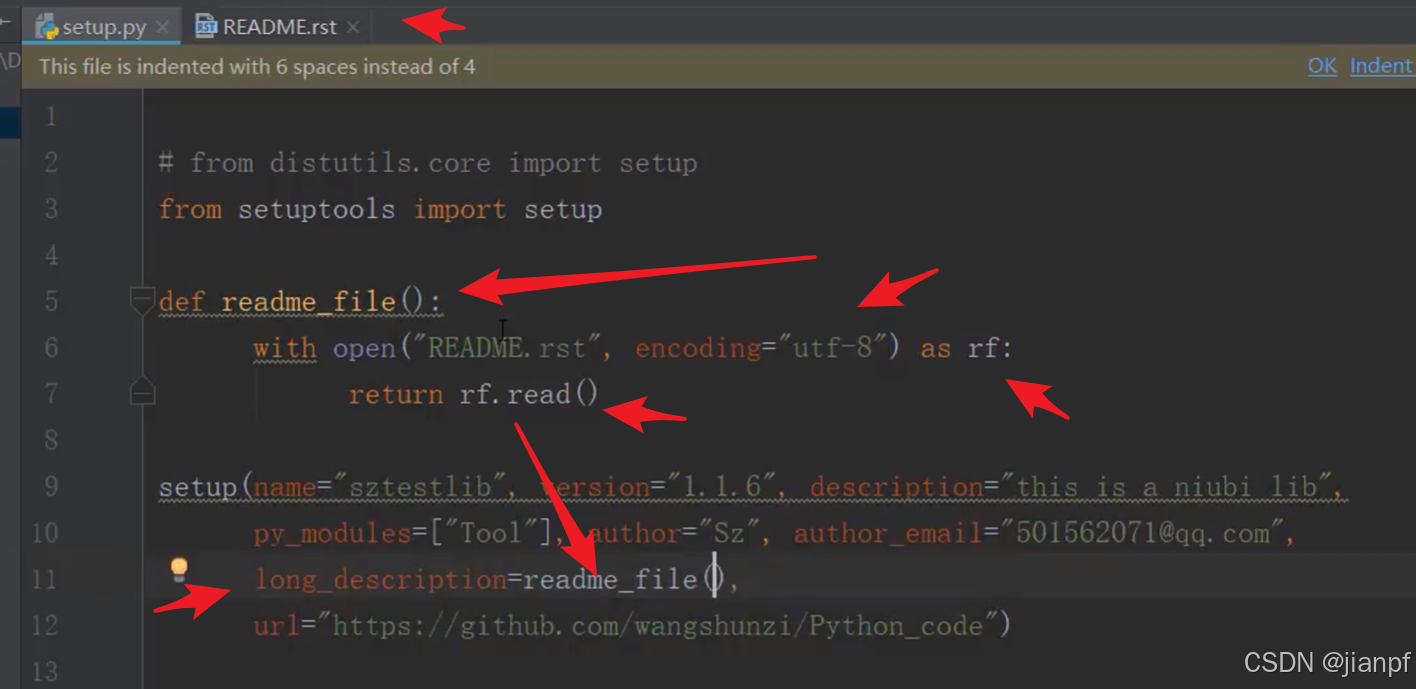
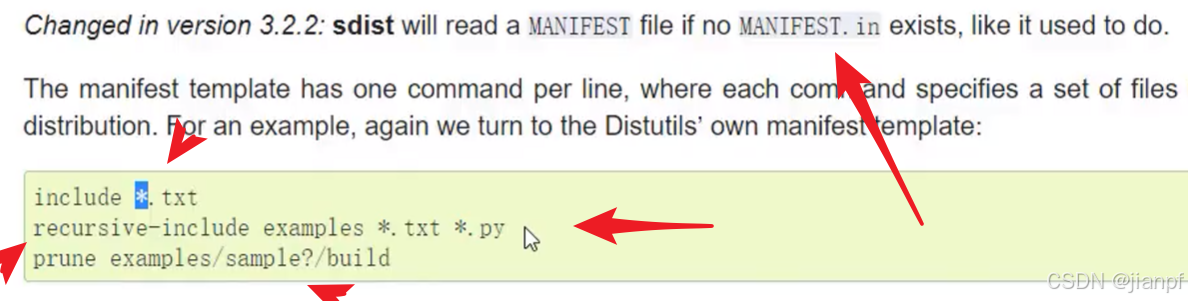

s=源文
dist=发布
s+dist=源文发布
b+dist=编译发布__pycach__目录的.pyc文件(含s源文件)
b+dist+wininst=发布.exe执行程序安装(手选安装位置?)
python setup.py install
所以直接github就把文件下载解压,看有没有setup.py就可以安装包了
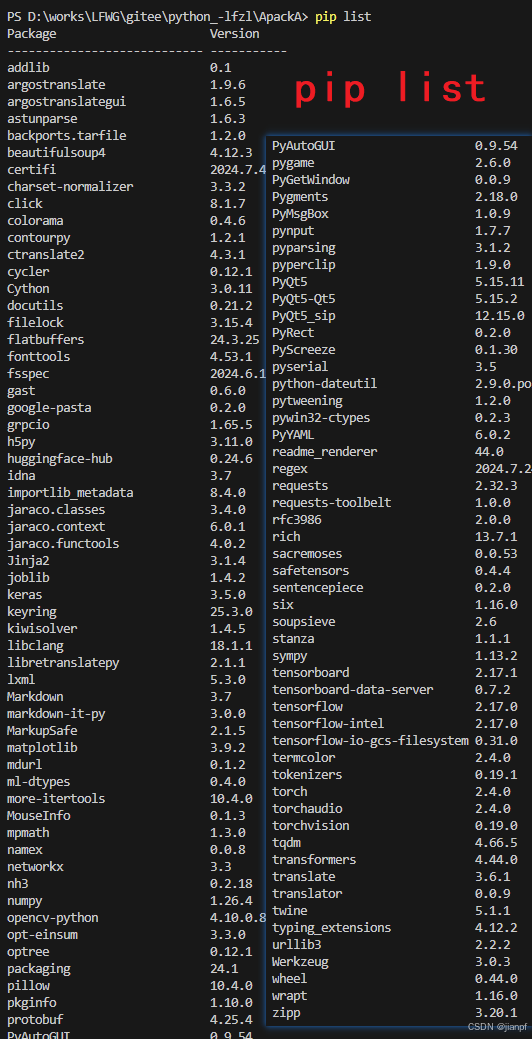
pip list显示已经下载的包

easy_install 是 对 压缩包 安装,免了解压过程,以egg格式存放.

pip install 也是可以安装压缩包的,免解压,当是以文件夹目录存放

bdis二进制发行包,手动拷贝到指定目录
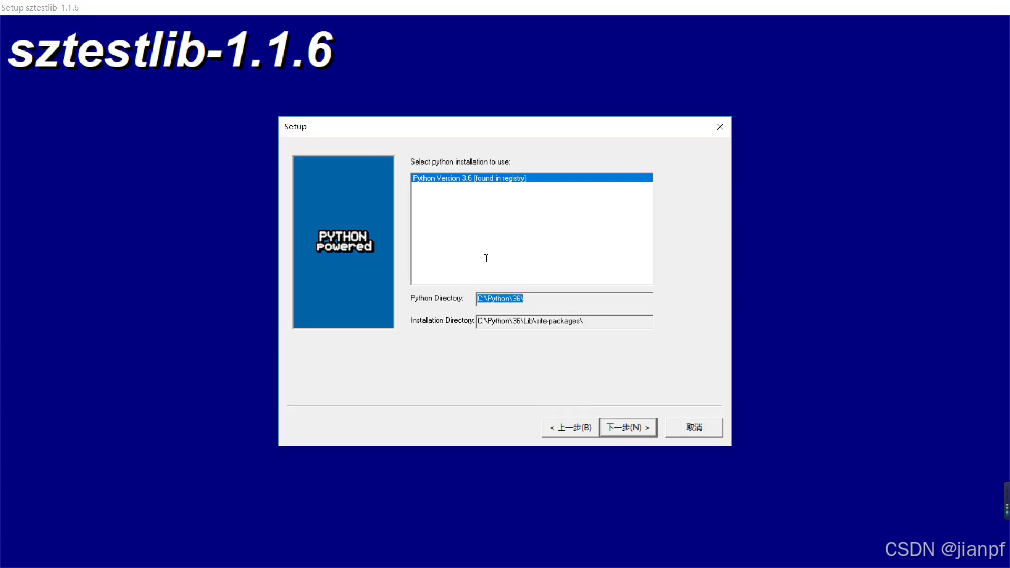
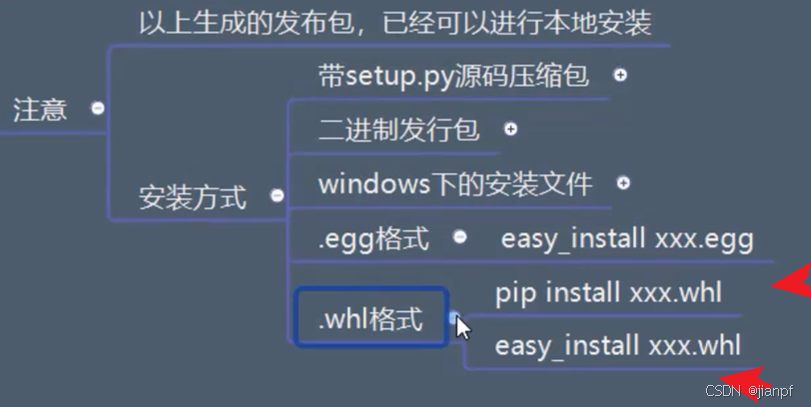
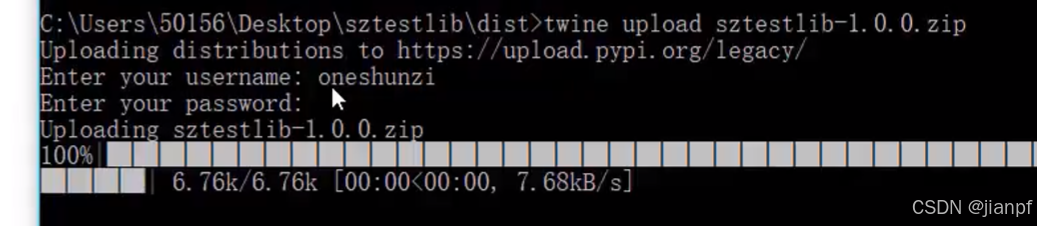
上传平台
twine upload a.zip
默认上传到pypi.org网站

pip指名版本号下载
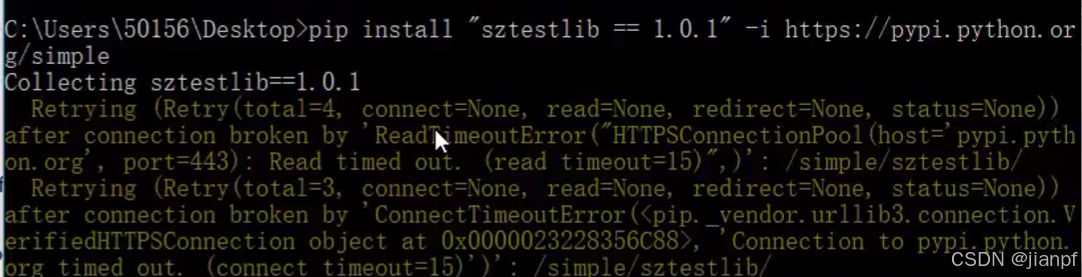
临时从其他地址下载的全称–index-url 简写-i.
pip install “cv2 == 1.0.1” -i https://pypi.python.org/simple
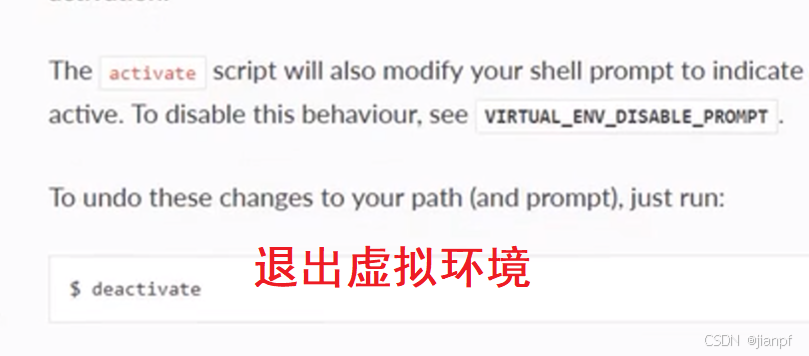
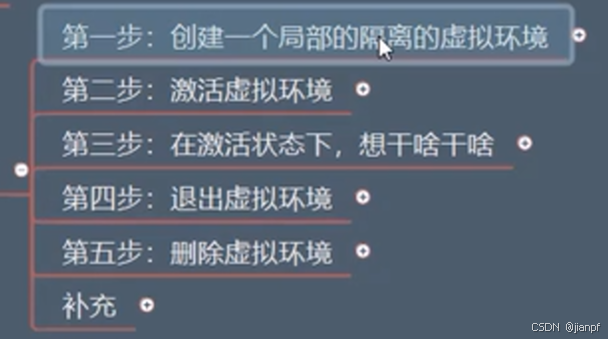
关闭退出环境,文件夹还在,虚拟环境保留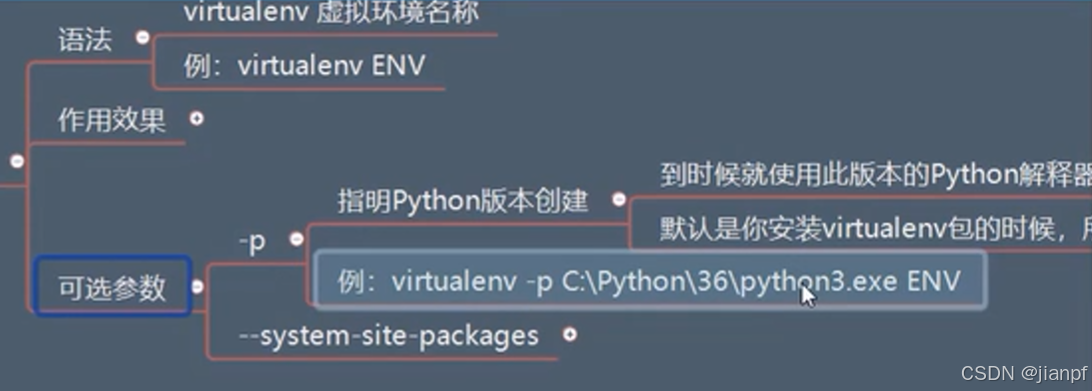

virtualenv -p python3.11.exe路径
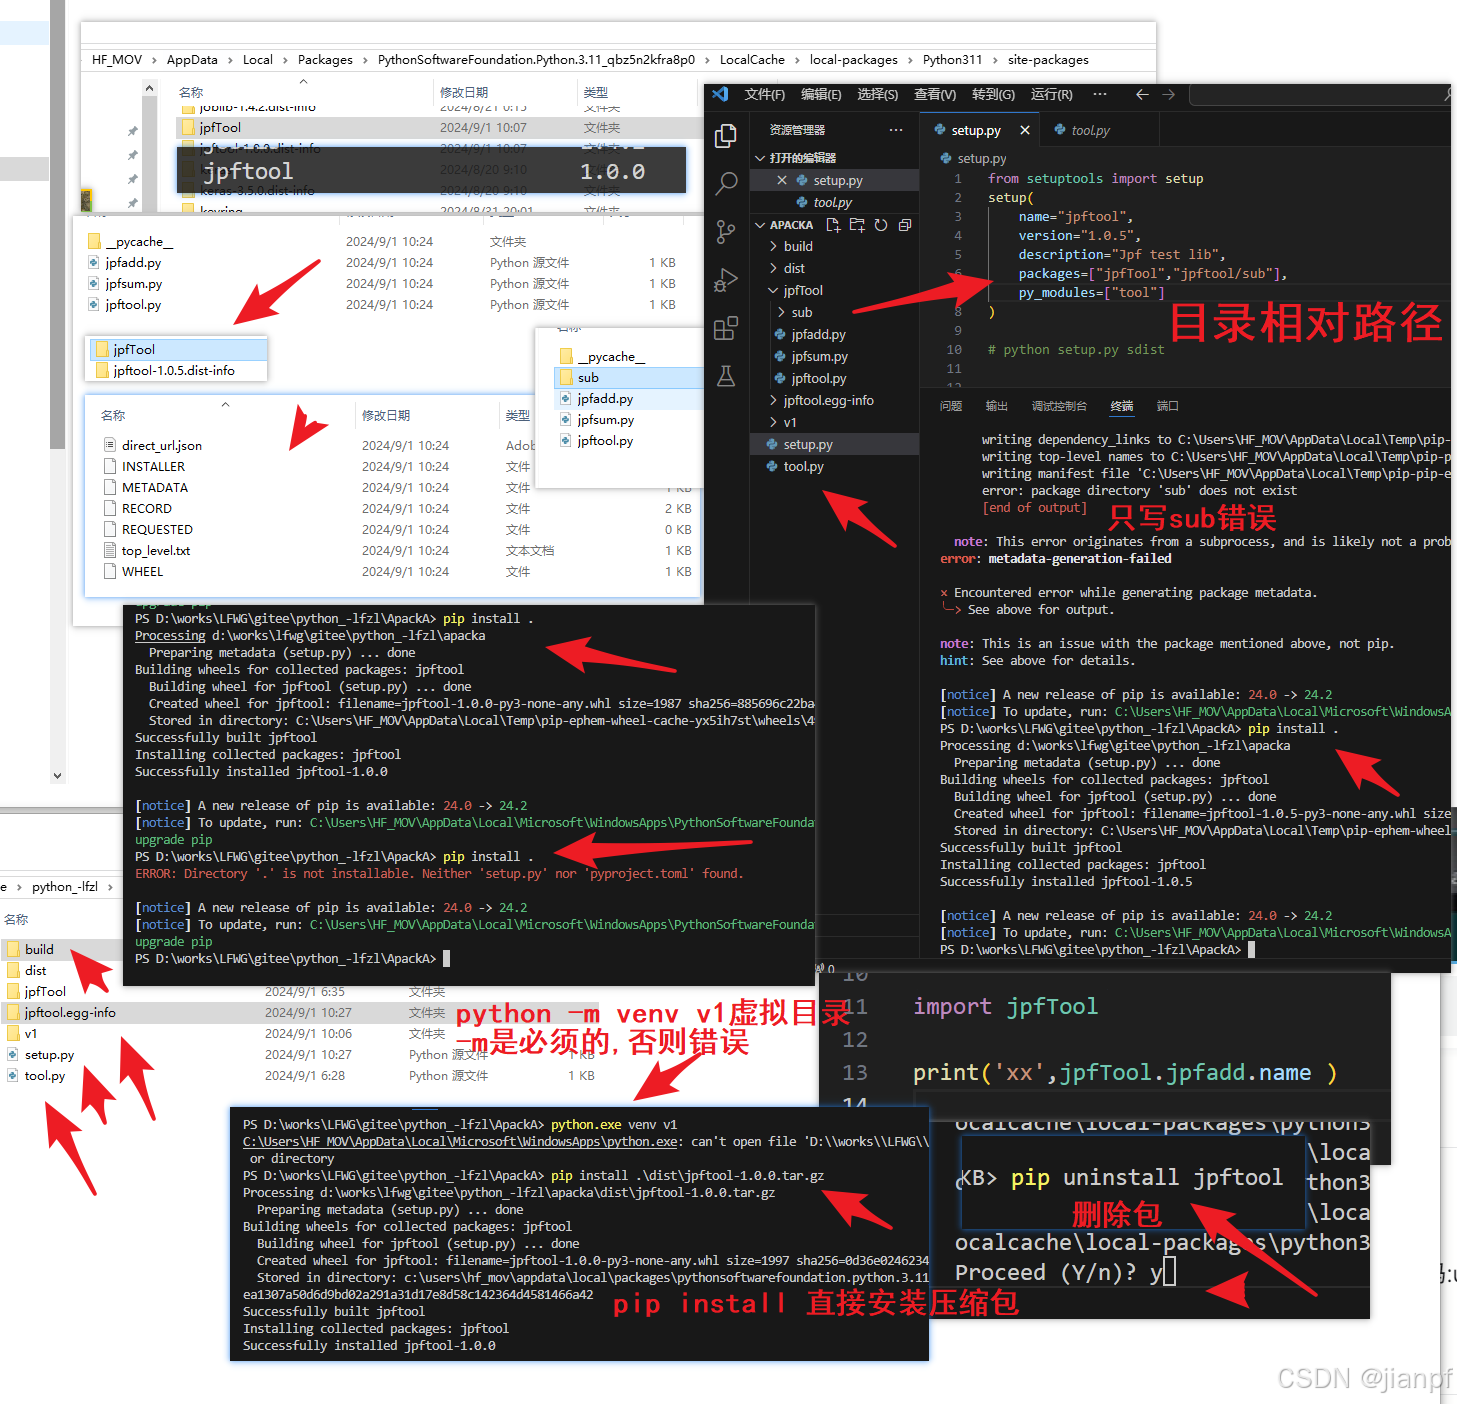
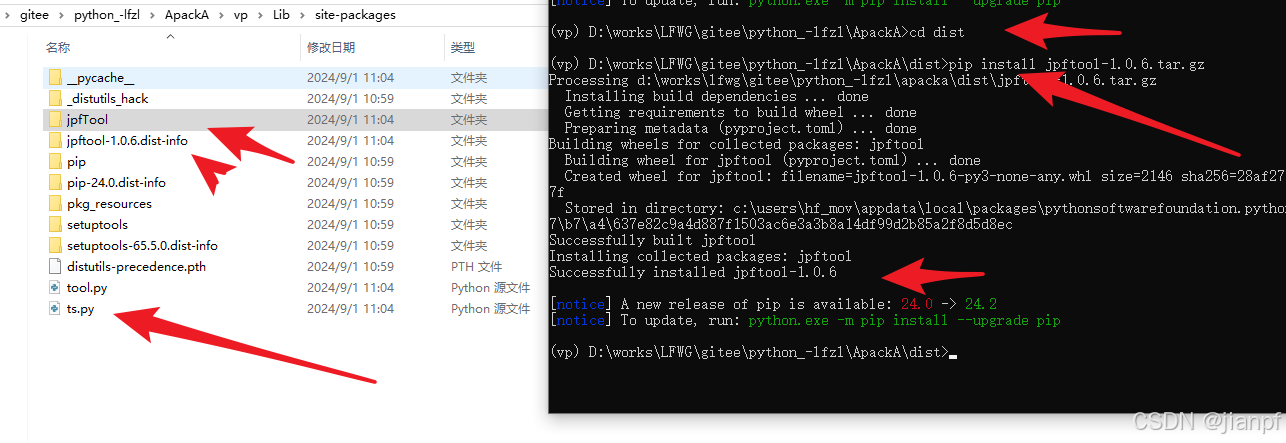
from setuptools import setup
setup(name="jpftool",version="1.0.6",description="Jpf test lib",packages=["jpfTool","jpftool/sub"],py_modules=["tool","ts"]
)
# 打包指定packages和py_modules(没指定的不打包)(注意py_modules的模块文件直接放包目录同级下)
# python setup.py sdist# 安装压缩包
# pip install dist/tag# 安装解压包(注意py_modules的模块文件直接放包目录同级下)
# pip install .# 显示包表
# pip list# 删除指定包
# pip uninstall jpftool# 虚拟空间vv(必须执行Scripts目录中激活activate.bat或deactivate.bat)
# python -m venv vv
# 目录地址栏上打开cmd到这个目录
# cd vv\scripts
# 设置cmd窗口临时path变量追加当前目录(关闭窗口消失)(可以在这个目录下创建p.cmd 把下面命令保存下次打开就不要输了(转义字符^6)
# echo set path=^%cd^%;^%path^% >p.cmd
# p.cmd
# 后面就可以在任意窗口都可以执行activate.bat和deactivate.bat了
# 太长了改名不如直接复制一份
# copy activate.bat act.bat
# copy deactivate.bat dea.bat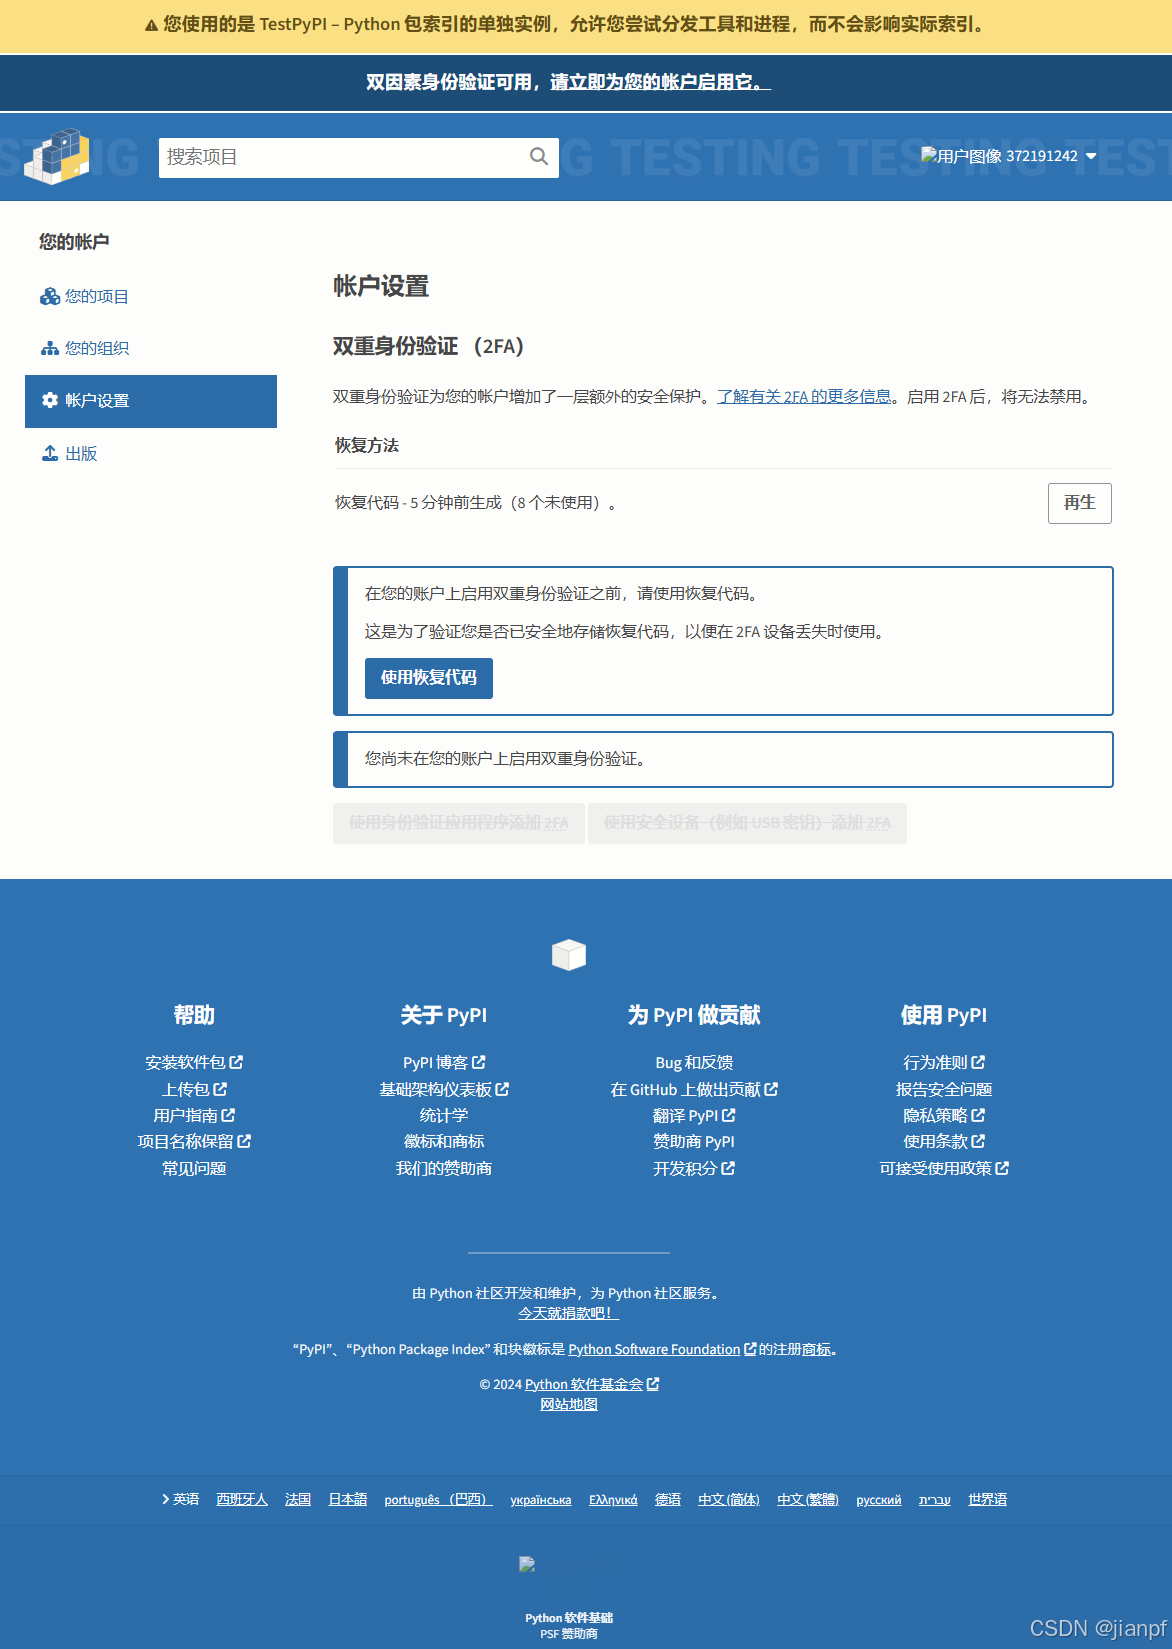
pypi页面下面有中文选择


双重验证,要钱的,缓缓先
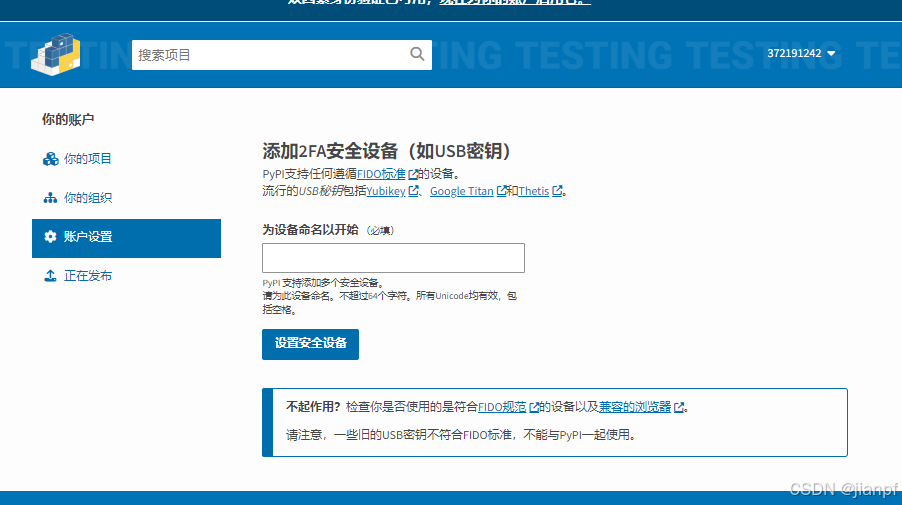
USB还行,但要制作加密u盘,下次吧
2019年开始的,5年了,下次一定.再等等
init.py空包问题解决了
虚拟环境中测试成功,pip install . 可以直接安装每次都更新到包中

命令列出当前环境下的包版本,直接输出就可以给
pip freeze >requirements.txt
安装文件中的包-r参数即可自动部署安装了
pip install -r requirements.txt
https://www.jb51.net/python/325468bo9.htm
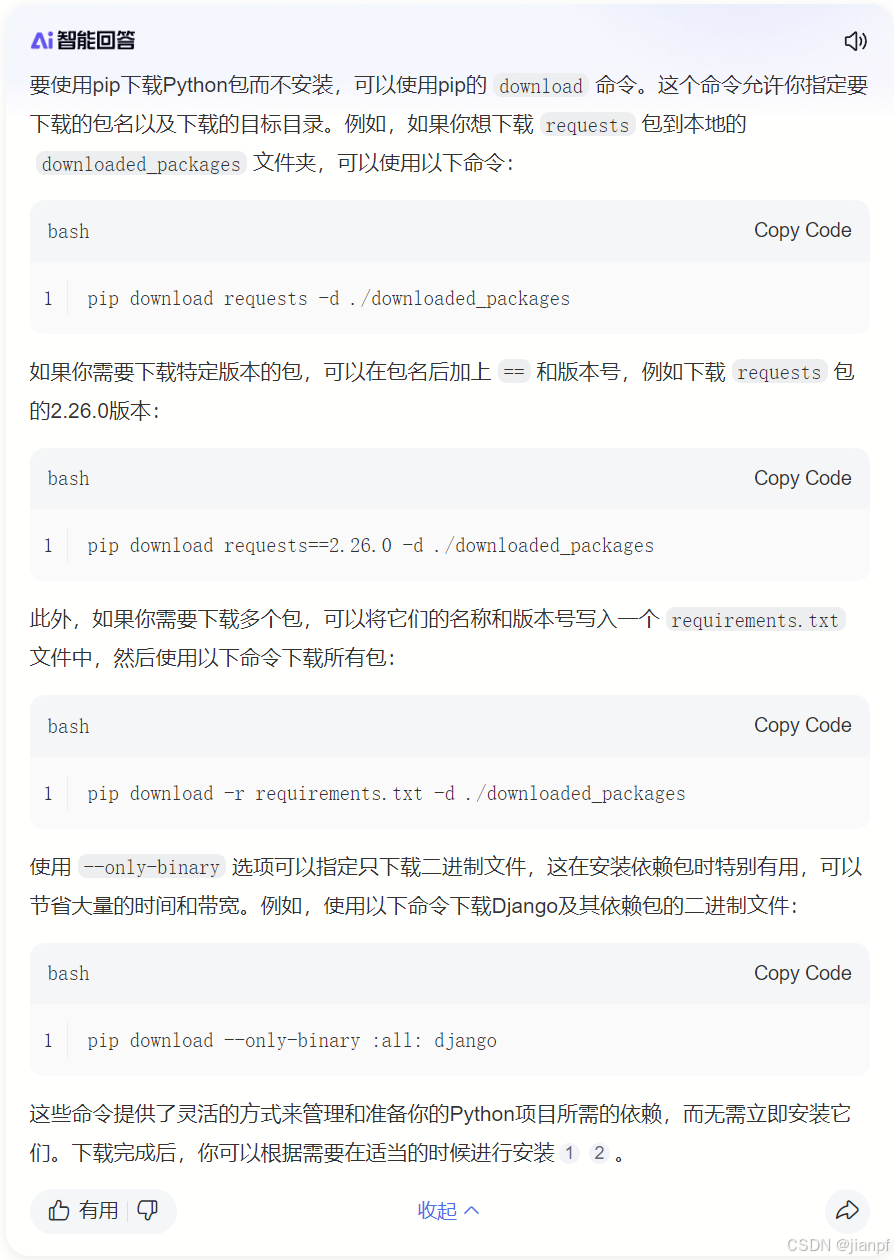
pip download 只下载包==版本 -d 保存位置
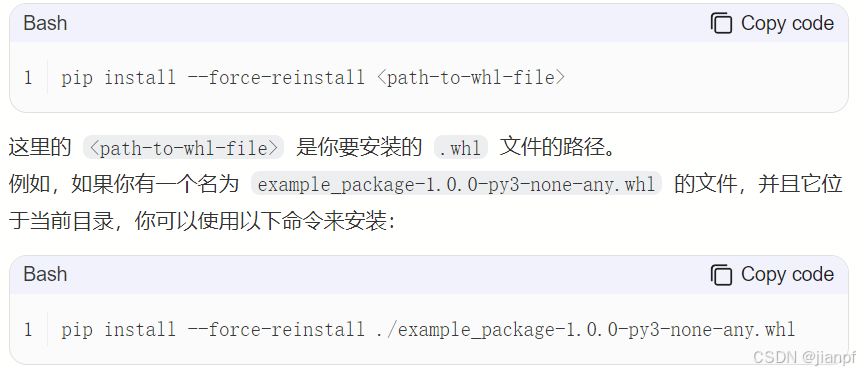
pip install --force-reinstall a.whl
强制安装.whl包
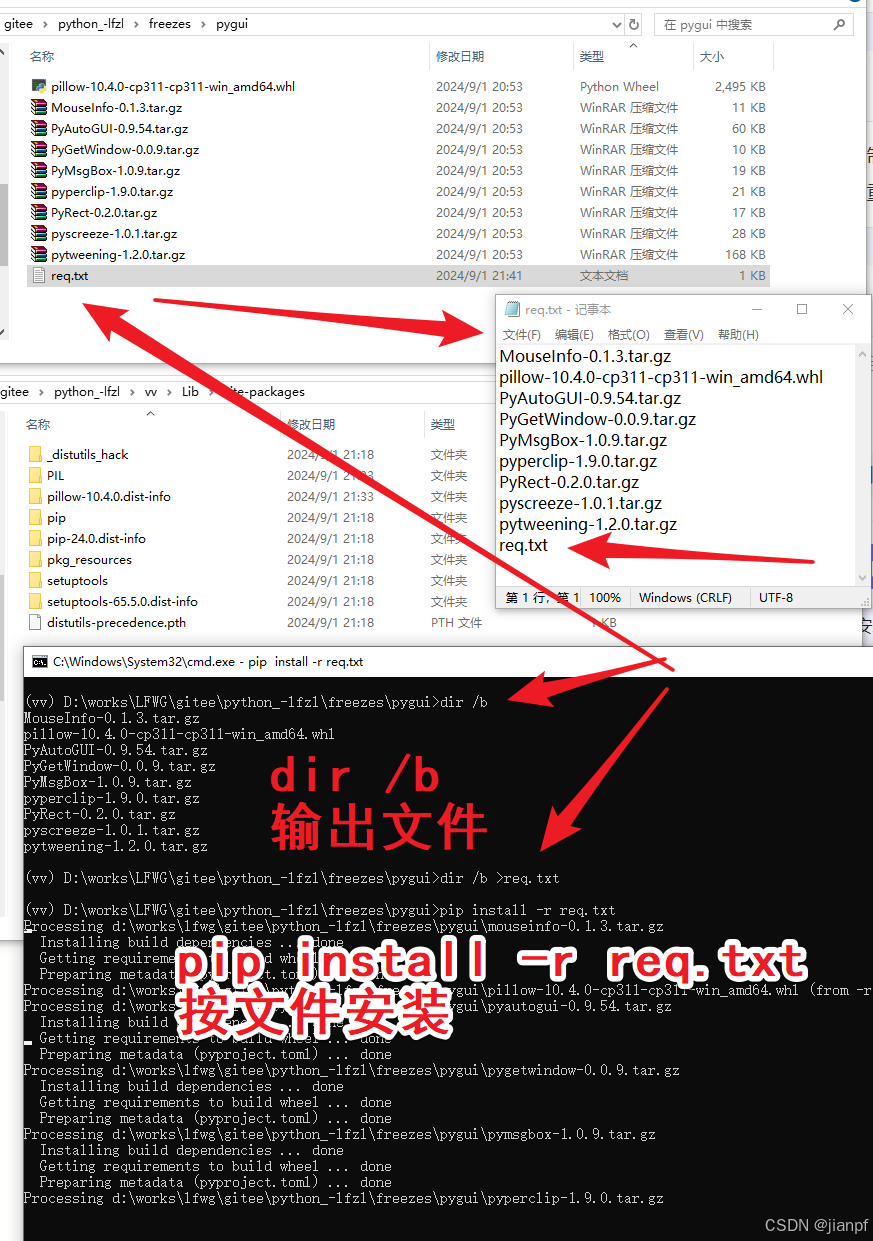
输出文件 dir /b
按文件安装 pip install -r req.txt(注意需要把req.txt删除,一行出错,撤回安装所有)