Java高级 | 【实验四】Springboot 获取前端数据与返回Json数据
隶属文章: Java高级 | (二十二)Java常用类库-CSDN博客
系列文章: Java高级 | 【实验一】Spring Boot安装及测试 最新-CSDN博客
Java高级 | 【实验二】Springboot 控制器类+相关注解知识-CSDN博客
Java高级 | 【实验三】Springboot 静态资源访问-CSDN博客
目录
一、搭建项目
1.1 创建项目
1.2 创建实体类
1.3 创建控制类
1.4 解决在前后端分离项目中的跨域问题
1.5 主类扫描控制器类
二、Spring Boot接收前端参数方式
2.1 接收非JSON数据
1. 名称一致
①postman工具测试
②通过Axios发送请求
2、名称不一致
①postman工具测试
②通过Axios发送请求
3、接收前端传数组参数
①postman工具测试
②通过Axios发送请求
4、接收实体(对象)参数
①postman工具测试
②通过Axios发送请求
5、前端参数与后端方法处理参数不一致的情况(RESTful风格)
①postman工具测试
②通过Axios发送请求
6、通过HttpServletRequest对象获取前端数据
①postman工具测试
②通过Axios发送请求
2.2 接收JSON数据
1、接收单个实体
①postman工具测试
②通过Axios发送请求
2、接收多个实体(一个实体嵌套另外一个实体)
在UserController类中添加add7()请求处理方法
①postman工具测试
②通过Axios发送请求
3、接收多个实体(一个实体嵌套另外一个实体集合)
①postman工具测试
②通过Axios发送请求
4、接收Map集合参数
①postman工具测试
②通过Axios发送请求
三、Spring Boot返回Json数据
3.1 Json简介
3.2 spring boot注解
3.3 实验验证
3.3.1对象转换为json
1、单个实体转换json并返回
①postman工具测试
2、多个实体转换json并返回
①postman工具测试
3、map集合转换json并返回
①postman工具测试
3.3.2字符串转换为json
1、引入依赖
2、编写控制器
3、postman测试
3.3.3封装统一的JSON返回数据结构
1、新建包和相关类
2、控制器类中编写处理自定义返回数据的方法
3、postman测试
在前后端项目交互中,前端传递的数据可以通过HTTP请求发送到后端。
一、搭建项目
1.1 创建项目
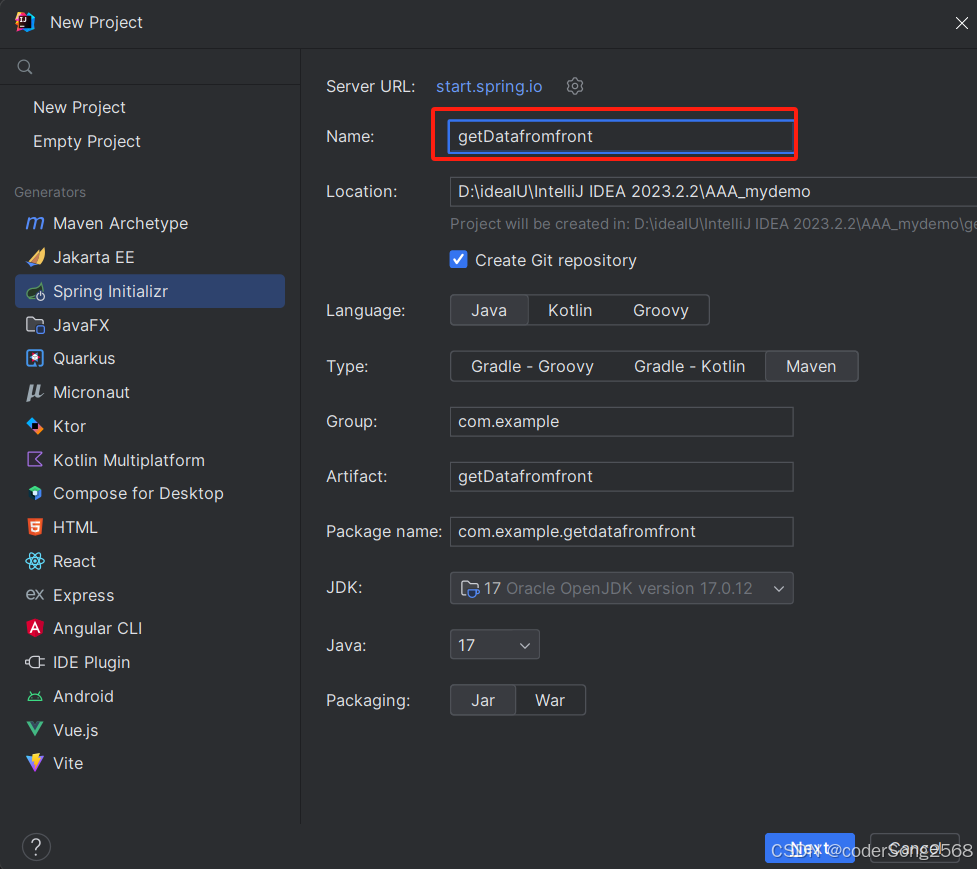
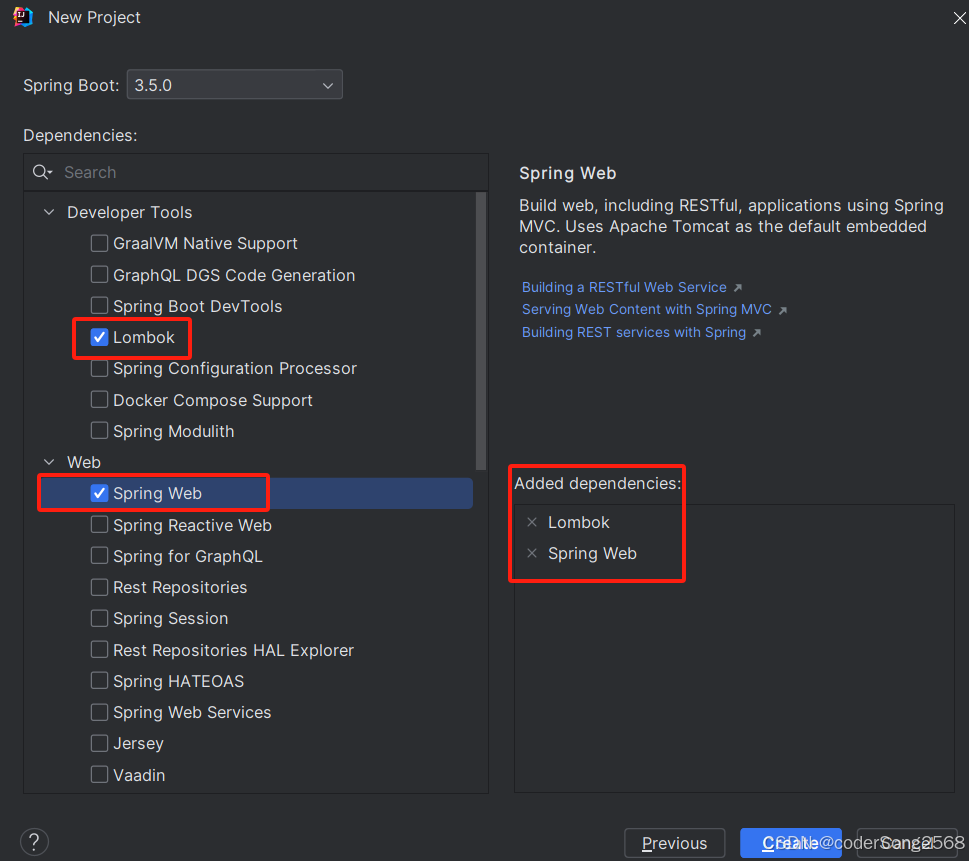
说明:如果没有安装Lombok工具,请自行安装。
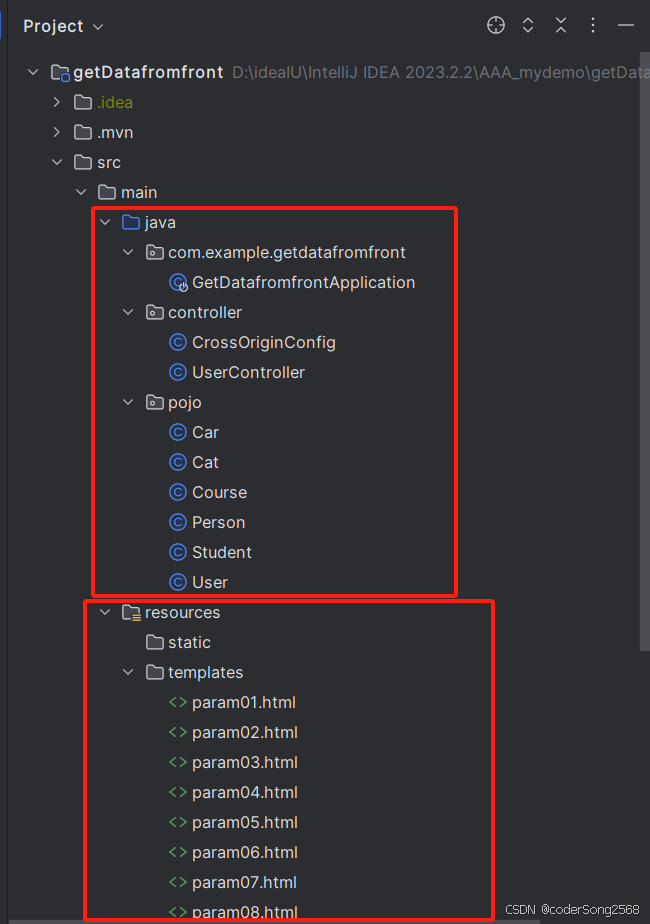
1.2 创建实体类
在java包下创建一个名为“pojo”的包。并在该包中创建User和Car类
package pojo;import lombok.Data;
import org.springframework.stereotype.Component;
import java.util.Date;
@Data
@Component
public class User {private Integer id;private String name;private Integer age;private Boolean isMarried;private Date birth;private Car car;
}
package pojo;import lombok.Data;
import org.springframework.stereotype.Component;
@Data
@Component
public class Car {private String name;private Double price;
}1.3 创建控制类
在java包下创建一个名为“controller”的包。并在该包中创建UserController类。
package controller;import org.springframework.web.bind.annotation.RequestMapping;
import org.springframework.web.bind.annotation.RestController;
@RequestMapping("users")
@RestController
public class UserController {}
1.4 解决在前后端分离项目中的跨域问题
在controller包中创建一个名为CrossOriginConfig的java类。
通过实现WebMvcConfigurer接口,并重写addCorsMappings(CorsRegistry registry)方法来实现。
1.5 主类扫描控制器类
在GetDatafromfrontApplication类中加入注解,使得该类启动时能扫描到我们自己创建的控制器类。
package com.example.getdatafromfront;import org.springframework.boot.SpringApplication;
import org.springframework.boot.autoconfigure.SpringBootApplication;
import org.springframework.context.annotation.ComponentScan;
@ComponentScan(basePackages = {"controller"})
@SpringBootApplication
public class GetDatafromfrontApplication {public static void main(String[] args) {SpringApplication.run(GetDatafromfrontApplication.class, args);}
}二、Spring Boot接收前端参数方式
2.1 接收非JSON数据
@RequestParam主要用于在Spring MVC后台控制层获取参数,它有三个常用参数。
| 参数名 | 描述 |
| defaultValue | 表示设置默认值 |
| required | 表示该参数是否必传 |
| value | 值表示接收传入的参数的key |
@PathVariable用于将请求URL中的模板变量映射到功能处理方法的参数上,即取出URL模板中的变量作为参数。
1. 名称一致
前端请求参数的key需和后端控制层处理请求的方法参数名称一致。
在UserController类中添加add1()请求处理方法
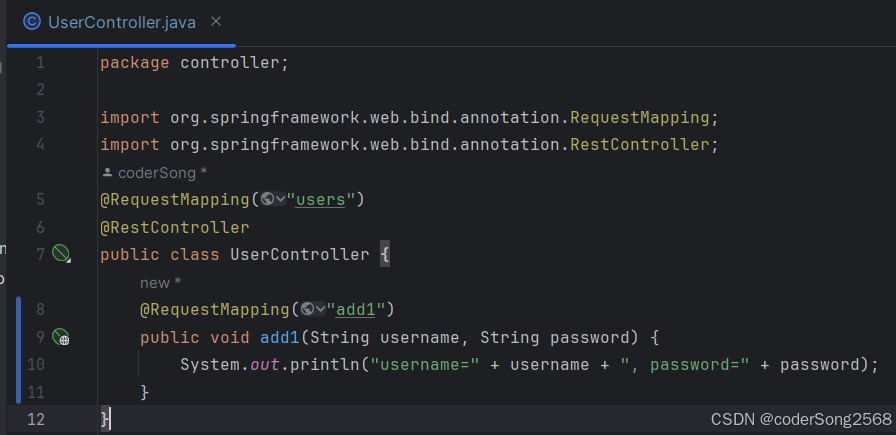
说明:spring boot能够接收两个参数:username和password。
前端参数名必须为:username和password。
GET和POST请求都支持。
前端的get请求格式为:
http://localhost:8080/users/add1?username=xxx&password=xxxxx
①postman工具测试
②通过Axios发送请求
创建param01.html页面,通过Axios发送请求。
<!DOCTYPE html>
<html>
<head><meta charset="utf-8"/><title>前后端参数传递</title><script src="https://unpkg.com/vue@next"></script><script src="https://unpkg.com/axios/dist/axios.min.js"></script><script src="https://unpkg.com/vue@3/dist/vue.global.js"></script>
</head>
<body>
<div id="app"></div><script>const app = {data() {return {username: '王小虎',password: '123456'}},mounted() {axios.get('http://localhost:8080/ users/add1', {params: {username: this.username,password: this.password}}).then(response => {console.log('success', response.data);}).catch(error => {console.log('fail', error.data);});}}Vue.createApp(app).mount('#app')
</script></body>
</html>
2、名称不一致
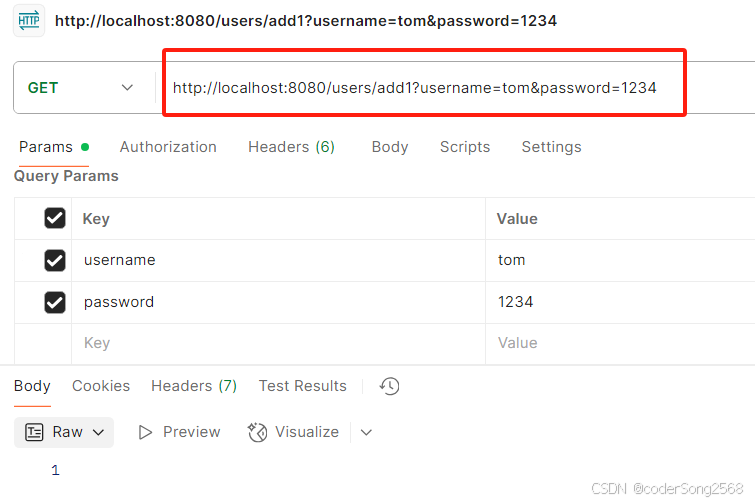
前端请求参数的key与后端控制层处理请求的方法参数 名称不一致
在UserController类中添加add2()请求处理方法,该方法使用@RequestParam注解来解决前后端参数不一致。
package controller;import org.springframework.web.bind.annotation.RequestMapping;
import org.springframework.web.bind.annotation.RequestParam;
import org.springframework.web.bind.annotation.RestController;
@RequestMapping("users")
@RestController
public class UserController {@RequestMapping("add1")public void add1(String username, String password) {System.out.println("username=" + username + ", password=" + password);}@RequestMapping("add2")public void add2(@RequestParam("name") String username, @RequestParam("pwd") String password) {System.out.println("username=" + username + ", password=" + password);}
}该方法对GET和POST请求都支持。
前端请求格式:http://localhost:8080/users/add2?name=xxx&pwd=xxx
①postman工具测试
②通过Axios发送请求
创建param02.html页面,通过Axios发送请求。
<!DOCTYPE html>
<html>
<head><meta charset="utf-8"/><title>前后端参数传递</title><script src="https://unpkg.com/vue@next"></script><script src="https://unpkg.com/axios/dist/axios.min.js"></script><script src="https://unpkg.com/vue@3/dist/vue.global.js"></script>
</head>
<body>
<div id="app"></div><script>const app = {data() {return {username: '张小三',password: '654321'}},mounted() {axios.get('http://localhost:8080/users/add2', {params: {name: this.username,pwd: this.password}}).then(response => {console.log('success', response.data);}).catch(error => {console.log('fail', error.data);});}}Vue.createApp(app).mount('#app')
</script>
</body>
</html>
3、接收前端传数组参数
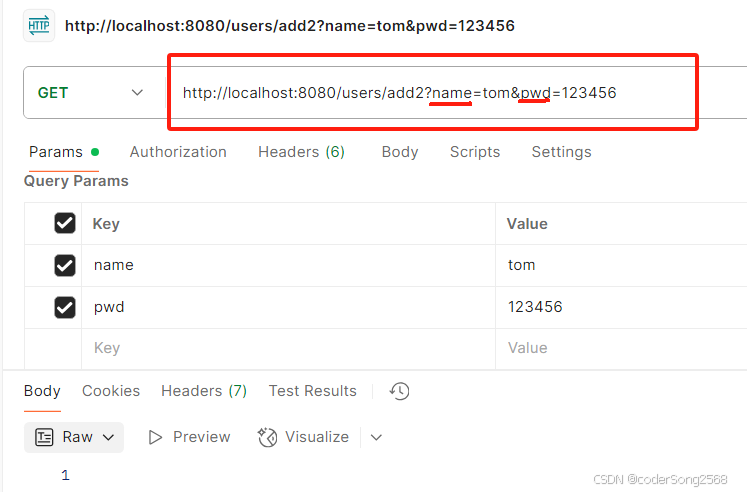
在UserController类中添加delete1()请求处理方法。
//处理前端数组参数@DeleteMapping("batch_delete1")public void delete1(@RequestParam(name = "ids") List<Integer> ids) {for (Integer id : ids) {System.out.println(id);}}①postman工具测试
②通过Axios发送请求
创建param03.html页面,通过Axios发送请求
<!DOCTYPE html>
<html>
<head><meta charset="utf-8" /><title>前后端参数传递</title><script src="https://unpkg.com/vue@next"></script><script src="https://unpkg.com/axios/dist/axios.min.js"></script><script src="https://unpkg.com/vue@next"></script><script src="https://unpkg.com/vue@3/dist/vue.global.js"></script>
</head>
<body>
<div id="app"></div><script>const app = {data() {return {ids: [3, 3, 5]}},mounted() {axios.delete('http://localhost:8080/users/batch_delete1', {params: {ids: this.ids.join(',')}}).then(response => {console.log('success', response.data);}).catch(error => {console.log('fail', error.data);});}}Vue.createApp(app).mount('#app')
</script>
</body>
</html>
4、接收实体(对象)参数
(1)前端请求参数的key需和后端控制层处理请求方法的参数pojo实体类的属性名称一致
在UserController类中添加add3()请求处理方法。
//把前端数据封装到一个对象中@RequestMapping("add3")public void add3(Car car) {System.out.println(car);}①postman工具测试
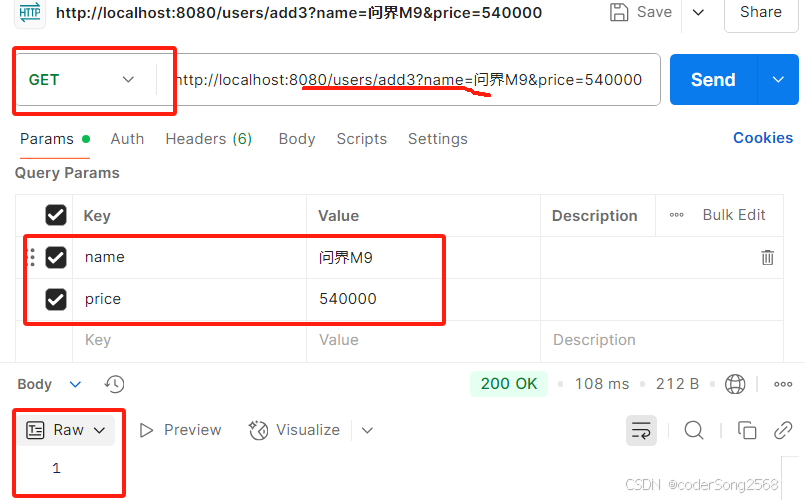
②通过Axios发送请求
创建param04.html页面,通过Axios发送请求
<!DOCTYPE html>
<html>
<head><meta charset="utf-8" /><title>前后端参数传递</title><script src="https://unpkg.com/vue@next"></script><script src="https://unpkg.com/axios/dist/axios.min.js"></script><script src="https://unpkg.com/vue@3/dist/vue.global.js"></script>
</head>
<body>
<div id="app">
</div>
<script>const app = {data() {return {name: '问界M9',price: 550000}},mounted() {axios.get('http://localhost:8080/users/add3', {params: {name: this.name,price: this.price}}).then(response => {console.log('success', response.data);}).catch(error => {console.log('fail', error.data);});}}Vue.createApp(app).mount('#app')
</script>
</body>
</html>5、前端参数与后端方法处理参数不一致的情况(RESTful风格)
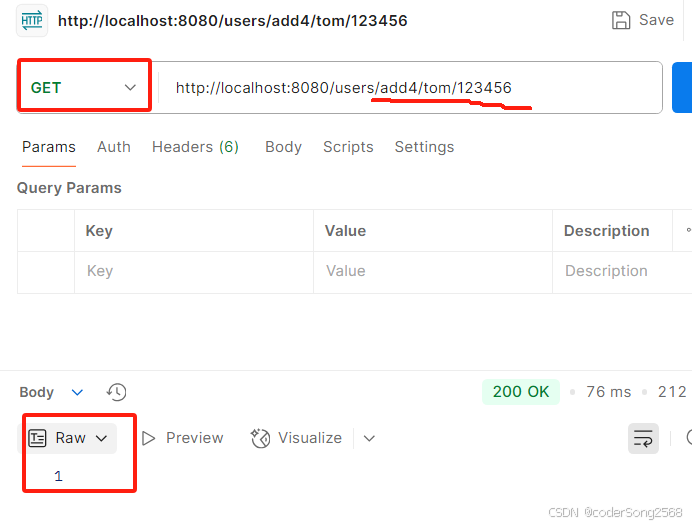
在UserController类中添加add4()请求处理方法。
@RequestMapping("add4/{username}/{pwd}")public void add4(@PathVariable String username, @PathVariable("pwd") String password) {System.out.println("username=" + username + ", password=" + password);}使用@PathVariable注解将请求URL中的模板变量映射到功能处理方法的参数上,如果模板变量名称和方法的参数名称不同需要在@PathVariable注解上显示的指定映射关系。
①postman工具测试
②通过Axios发送请求
创建param05.html页面,通过Axios发送请求
<!DOCTYPE html>
<html>
<head><meta charset="utf-8" /><title>前后端参数传递</title><script src="https://unpkg.com/vue@next"></script><script src="https://unpkg.com/axios/dist/axios.min.js"></script><script src="https://unpkg.com/vue@3/dist/vue.global.js"></script>
</head>
<body>
<div id="app">前后端参数传递</div>
<script>const app = {data() {return {username: 'Jack',password: '123456'}},mounted() {axios.post(`http://localhost:8080/users/add4/${this.username}/${this.password}`).then(response => {console.log('success', response.data);}).catch(error => {console.log('fail', error.data);});}}Vue.createApp(app).mount('#app')
</script>
</body>
</html>
6、通过HttpServletRequest对象获取前端数据
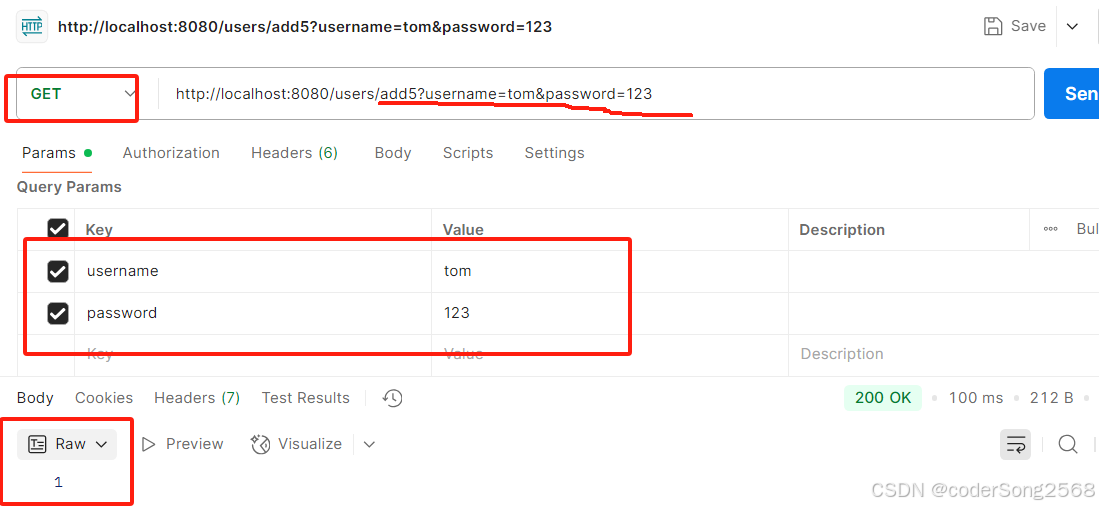
在UserController类中添加add5()请求处理方法。
@RequestMapping("add5")public void add5(HttpServletRequest request) {String username = request.getParameter("username");String password = request.getParameter("password");System.out.println("username=" + username + ", password=" + password);}通过HttpServletRequest对象获取数据,前端请求参数的key需和getParameter(String name)方法传递的参数名称一致。
①postman工具测试
②通过Axios发送请求
创建param06.html页面,通过Axios发送请求.
<!DOCTYPE html>
<html>
<head><meta charset="utf-8" /><title>前后端参数传递</title><script src="https://unpkg.com/vue@next"></script><script src="https://unpkg.com/axios/dist/axios.min.js"></script>
</head>
<body>
<div id="app"></div><script>const app = {data() {return {username: '章小花',password: '123456'}},mounted() {axios.post('http://localhost:8080/users/add5', null, {params: {username: this.username,password: this.password}}).then(response => {console.log('success', response.data);}).catch(error => {console.log('fail', error.data);});}}Vue.createApp(app).mount('#app')
</script>
</body>
</html>
2.2 接收JSON数据
@RequestBody主要用来接收前端传递给后端的json字符串中的数据的(请求体中的数据的);GET方式无请求体,所以使用@RequestBody接收数据时,前端不能使用GET方式提交数据,而是用POST方式进行提交。
在后端的同一个接收方法里,@RequestBody与@RequestParam()可以同时使用,@RequestBody最多只能有一个,而@RequestParam()可以有多个。
如果前端通过application/json类型提交JSON格式的数据给后端控制层处理请求的方法,方法的参数必须使用@RequestBody注解进行修饰,才能接收来自前端提交的JSON数据。
1、接收单个实体
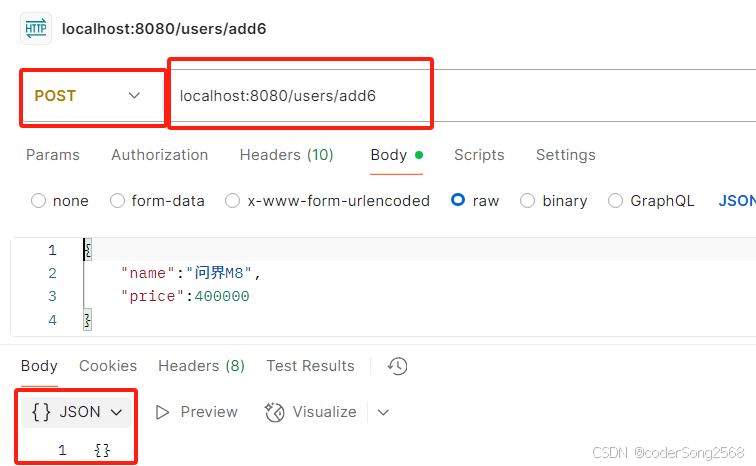
在UserController类中添加add6()请求处理方法。
@RequestMapping("add6")public Car add6(@RequestBody Car car){System.out.println(car);return car;}①postman工具测试
②通过Axios发送请求
创建param07.html页面,通过Axios发送请求
<!DOCTYPE html>
<html>
<head><meta charset="utf-8" /><title>前后端参数传递</title><script src="https://unpkg.com/vue@next"></script><script src="https://unpkg.com/axios/dist/axios.min.js"></script>
</head>
<body>
<div id="app"></div><script>const app = {data() {return {car: {name: '奔驰',price: 20000}}},mounted() {axios.post('http://localhost:8080/users/add6', this.car).then(response => {console.log('success', response.data);}).catch(error => {console.log('fail', error.data);});}}Vue.createApp(app).mount('#app')
</script>
</body>
</html>
2、接收多个实体(一个实体嵌套另外一个实体)
在pojo包下创建Cat实体类,在pojo包下的Person实体类中声明Cat类型的属性
package pojo;import lombok.AllArgsConstructor;
import lombok.Data;
import lombok.NoArgsConstructor;@Data
@NoArgsConstructor
@AllArgsConstructor
public class Cat {private Integer id;private String breed;private String name;
}
package pojo;import lombok.Data;
import lombok.ToString;@Data
@ToString
public class Person {private Integer id;private String username;private String password;private Cat cat;
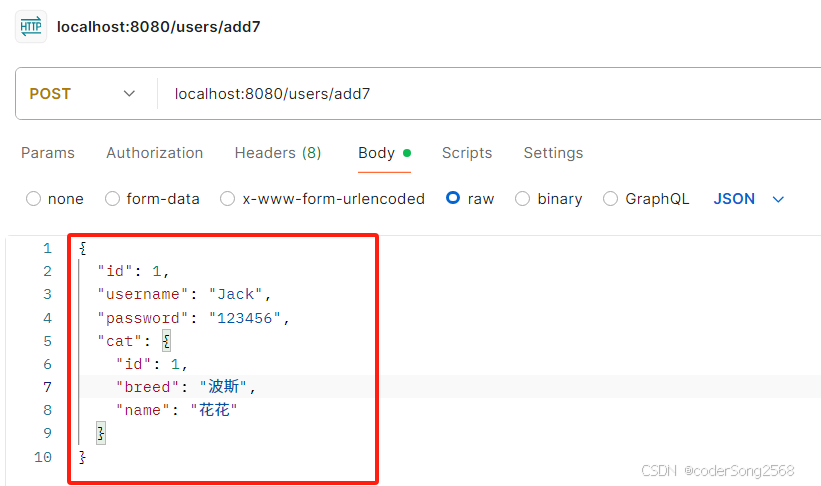
}在UserController类中添加add7()请求处理方法
@RequestMapping("add7")public Person add7(@RequestBody Person person) {System.out.println(person);return person;}①postman工具测试
{"id": 1,"username": "Jack","password": "123456","cat": {"id": 1,"breed": "波斯","name": "花花"}
}
②通过Axios发送请求
<!DOCTYPE html>
<html>
<head><meta charset="utf-8" /><title>前后端参数传递</title><script src="https://unpkg.com/vue@3/dist/vue.global.js"></script><script src="https://unpkg.com/axios/dist/axios.min.js"></script>
</head>
<body>
<div id="app"></div><script>const app = {data() {return {user: {id: 1,username: '张三',password: '123456',cat: {id: 1,breed: '波斯',name: '花花'}}}},mounted() {axios.post('http://localhost:8080/users/add7', this.user).then(response => {console.log('success', response.data);}).catch(error => {console.log('fail', error.response.data);});}}Vue.createApp(app).mount('#app')
</script>
</body>
</html>
3、接收多个实体(一个实体嵌套另外一个实体集合)
- 创建课程实体(Course):在pojo包下创建Course实体类,Student类,一个学生可以选修多门课程。
- 创建学生实体(Student)
package pojo;import lombok.AllArgsConstructor;
import lombok.Data;
import lombok.NoArgsConstructor;@Data
@NoArgsConstructor
@AllArgsConstructor
public class Course {private Integer id;private String courseName;private String lecturer;
}
package pojo;import lombok.Data;
import lombok.ToString;import java.util.List;@Data
@ToString
public class Student {private Integer id;private String username;private List<Course> courses;
}
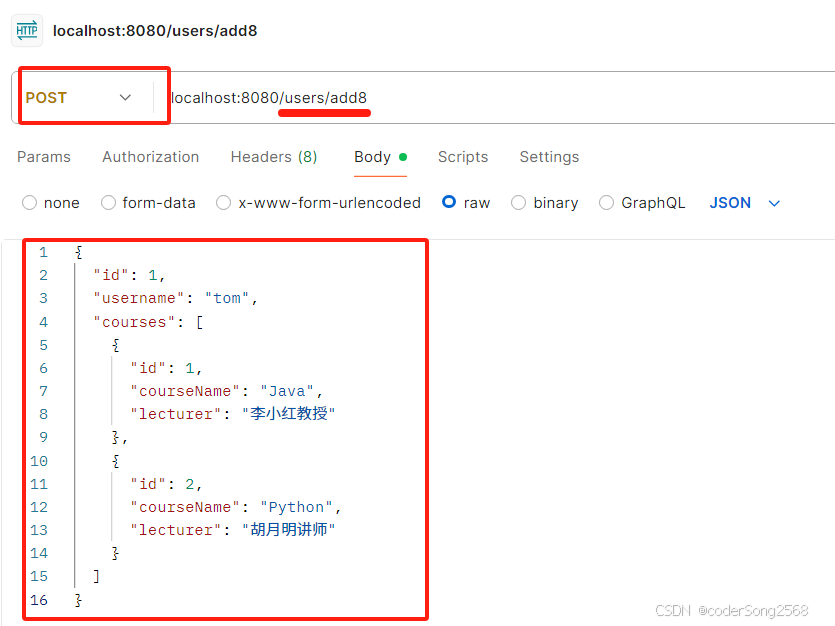
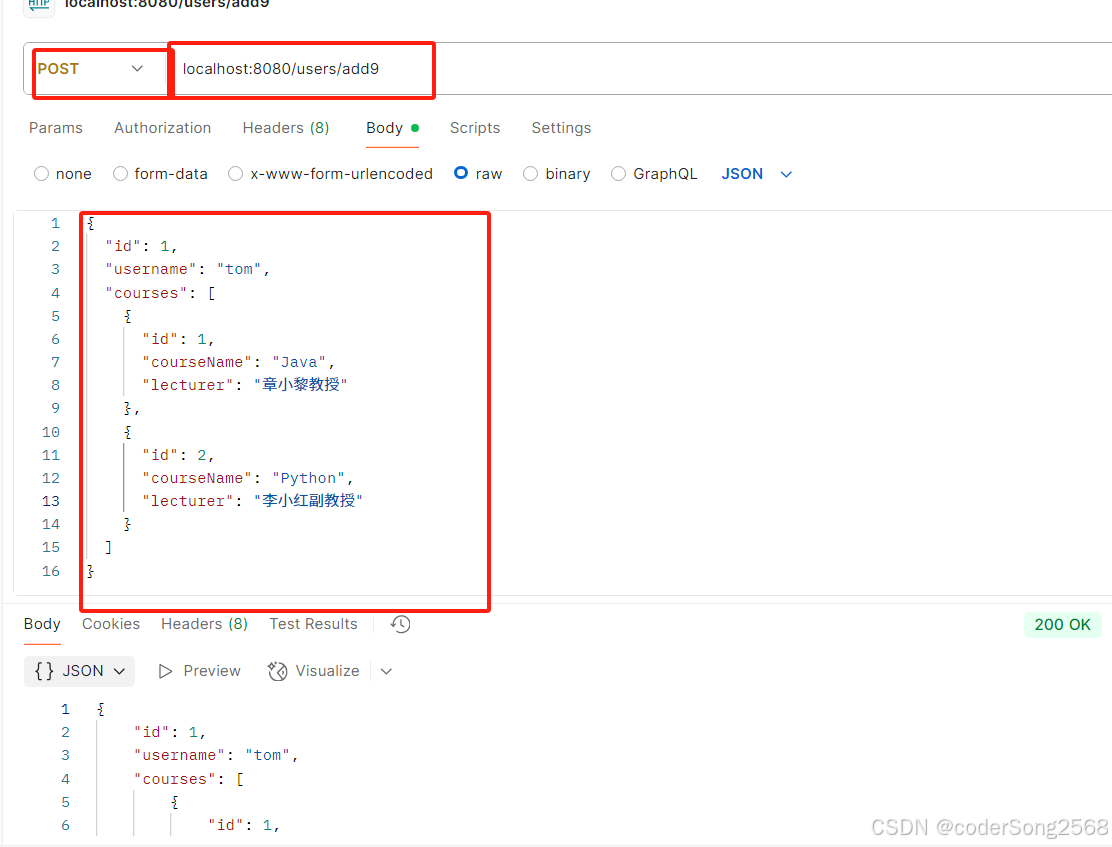
在UserController类中添加add8()请求处理方法
@RequestMapping("add8")public Student add8(@RequestBody Student student) {System.out.println(student);return student;}①postman工具测试
②通过Axios发送请求
<!DOCTYPE html>
<html>
<head><meta charset="utf-8"><title>前后端参数传递</title><!-- 使用单一Vue版本 --><script src="https://unpkg.com/vue@3/dist/vue.global.js"></script><script src="https://unpkg.com/axios/dist/axios.min.js"></script>
</head>
<body>
<div id="app"></div><script>const app = {data() {return {student: {id: 1,username: 'tom',courses: [{id: 1,courseName: "Java",lecturer: "李晓洪教授"},{id: 2,courseName: "Python",lecturer: "张晓东讲师"}]}}},mounted() {axios.post('http://localhost:8080/users/add8', this.student).then(response => {console.log('请求成功', response.data);}).catch(error => {console.error('请求失败', error.response?.data || error.message);});}}Vue.createApp(app).mount('#app');
</script>
</body>
</html>
4、接收Map集合参数
在UserController类中添加add9()请求处理方法
@RequestMapping("add9")public Map<String, Object> add9(@RequestBody Map<String, Object> map) {String username = (String) map.get("username");System.out.println("username : " + username);List<Map<String, Object>> courseMapList = (List<Map<String, Object>>) map.get("courses");for (Map<String, Object> courseMap : courseMapList) {Set<Map.Entry<String, Object>> courseSet = courseMap.entrySet();for (Map.Entry<String, Object> entry : courseSet) {String key = entry.getKey();Object value = entry.getValue();System.out.println(key + " : " + value);}}return map;}①postman工具测试
②通过Axios发送请求
<!DOCTYPE html>
<html>
<head><meta charset="utf-8"><title>前后端参数传递</title><!-- 使用单一Vue版本 --><script src="https://unpkg.com/vue@3/dist/vue.global.js"></script><script src="https://unpkg.com/axios/dist/axios.min.js"></script>
</head>
<body>
<div id="app"></div><script>const app = {data() {return {user: {id: 1,username: 'tom',courses: [{id: 1,courseName: "Java",lecturer: "黄晓明副教授"},{id: 2,courseName: "Python",lecturer: "张晓东教授"},{id: 3,courseName: "数据结构与算法",lecturer: "潘晓婷教授"}]}}},mounted() {axios.post('http://localhost:8080/users/add9', this.user).then(response => {console.log('请求成功', response.data);}).catch(error => {console.error('请求失败', error.response?.data || error.message);});}}Vue.createApp(app).mount('#app');
</script>
</body>
</html>
三、Spring Boot返回Json数据
通常在项目开发中,接口与接口之间,前后端之间的数据传输都是使用的JSON格式。
3.1 Json简介
- json是一种纯字符数据,不属于编程语言,json的语法与js中object的语法几乎一致。
- json数据中的键值对可以使用编程语言中所谓的关键字。
- json的数据可以用花括号{}或中括号[]包裹,对应js中的object和array,例如:
{"name":"admin","age":18}或者["SpringBoot",3.1415,"json"]- json数据以键值对形式存在,多个键值对之间用逗号,隔开,但数据结束后,不允许出现没有意义的逗号,键值对的键和值之间用冒号连接,键值对的键部分,必须用双引号包裹,单引号都不行;键值对的值部分,不允许出现函数function,undefined,NaN,但是可以有null。
3.2 spring boot注解
@RestController = @controller + @ResponseBody,而@ResponseBody注解的作用就是将返回的数据转换为JSON格式。因此在SpringBoot中 使用@RestController 注解即可将返回的数据结构转换成 JSON 格式。
3.3 实验验证
3.3.1对象转换为json
1、单个实体转换json并返回
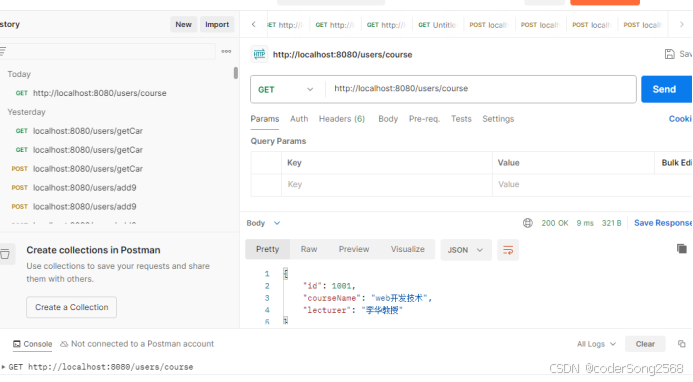
在UserController类中添加getCourse()请求处理方法。
@RequestMapping("/course")public Course getCourse(){return new Course(1001,"web开发技术","李华教授");}①postman工具测试
2、多个实体转换json并返回
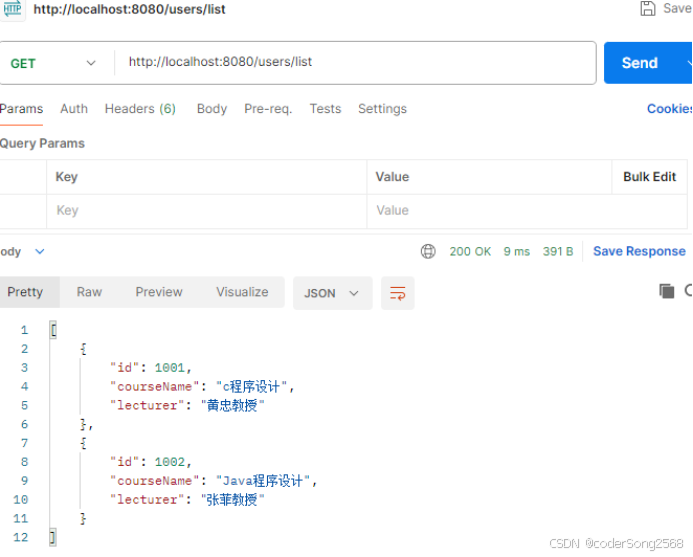
在UserController类中添加getCourseList()请求处理方法。
@RequestMapping("/list")
public List<Course> getCourseList() {List<Course> courseList = new ArrayList<>();Course course1 = new Course(1001, "c程序设计", "黄忠教授");Course course2 = new Course(1002, "Java程序设计", "张菲教授");courseList.add(course1);courseList.add(course2);return courseList;
}①postman工具测试
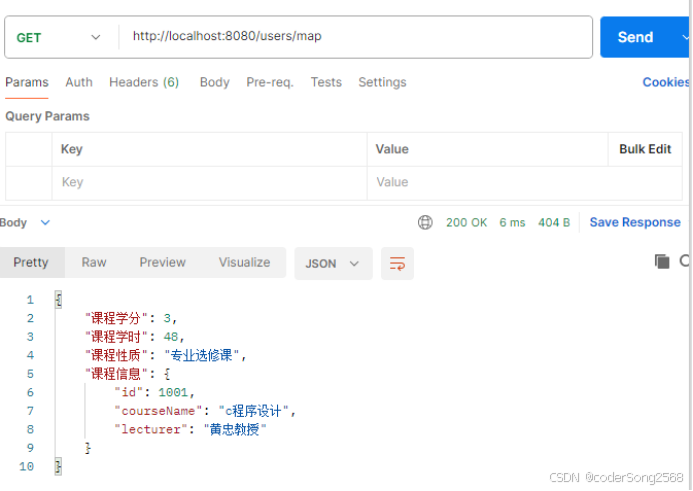
3、map集合转换json并返回
在UserController类中添加getMap()请求处理方法。
@RequestMapping("/map")public Map<String, Object> getMap() {Map<String, Object> courseMap = new HashMap<>();Course course = new Course(1001, "c程序设计", "黄忠教授");courseMap.put("课程信息", course);courseMap.put("课程学分", 3);courseMap.put("课程性质", "专业选修课");courseMap.put("课程学时", 48);return courseMap;}①postman工具测试
3.3.2字符串转换为json
如何将String类型转换成json格式?
我们知道@Controller如果遇到字符串会去寻找view的路径映射,而@RestController如果遇到字符串就会直接返回字符串。因此,@RestController无法将字符串直接转换成json。
1、引入依赖
这里我们引入fastjso,在pom.xml中加入如下依赖
<!-- 引入--><dependency><groupId>com.alibaba</groupId><artifactId>fastjson</artifactId><version>1.2.83</version></dependency>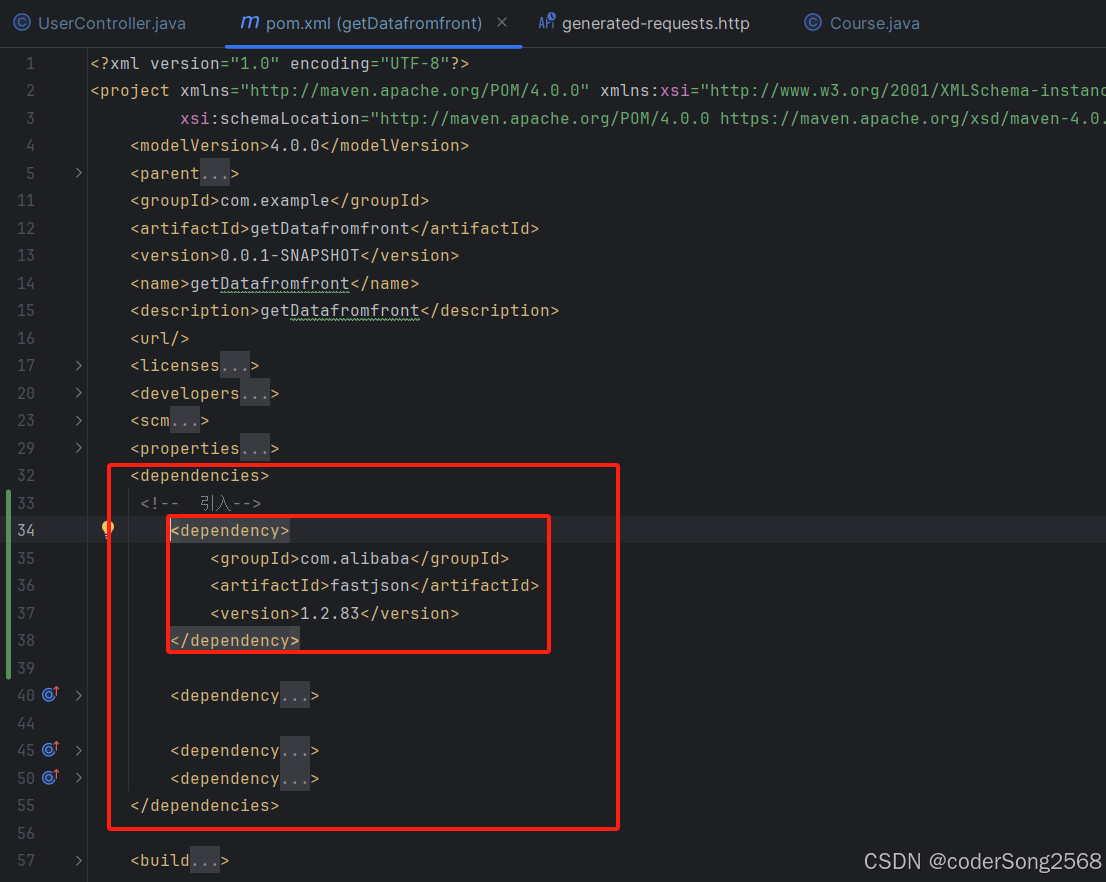
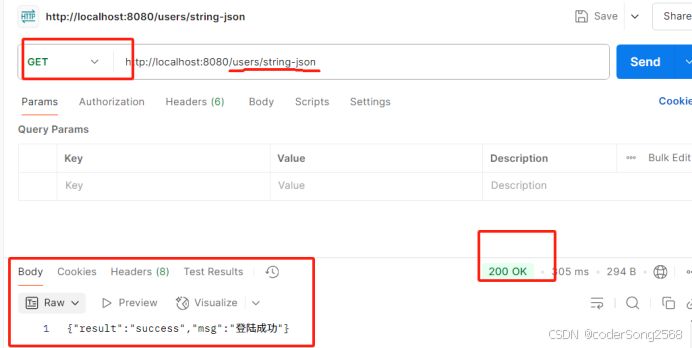
2、编写控制器
在UserController类中添加getStringToJson()请求处理方法。
@RequestMapping("/string-json")public String getStringToJson(){String str = "{'result': 'success','msg': '登陆成功'}";JSONObject jsonObject = JSON.parseObject(str);System.out.println(jsonObject);//提取json部分内容System.out.println(jsonObject.getString("cases"));return jsonObject .toJSONString();}3、postman测试
3.3.3封装统一的JSON返回数据结构
在项目开发中,我们不仅需要封装数据,还需要在返回的JSON数据中添加一些其他信息,比如返回状态码code,返回信息msg等,这些信息有助于调用者进行一些简单的逻辑判断。因此,我们需要封装一个统一的JSON返回数据结构。
封装的JSON数据类型的不确定,所以我们在定义统一的JSON结构时,需要利用泛型。
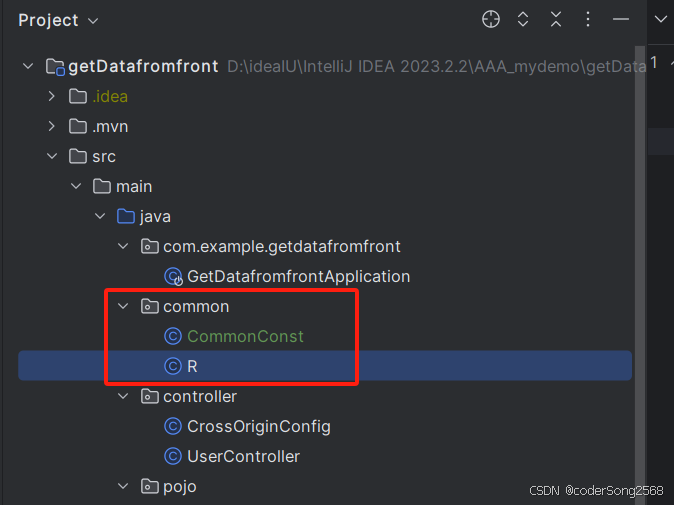
1、新建包和相关类
创建common包和CommonConst、R类
package common;/**
定义Json数据返回的一些常量*/
public class CommonConst {public static final String SUCCESS_RESULT = "获取信息成功";public static final String ERROR_RESULT = "获取信息成功";
}
package common;import lombok.Data;
@Data
public class R<T> {/*** 编码:1成功,0和其它数字为失败*/private Integer code;/*** 信息返回*/private String msg;/*** 信息返回数据*/private T data;public static <T> R<T> success(T object) {R<T> r = new R<T>();r.data = object;r.code = 1;r.msg = CommonConst.SUCCESS_RESULT;return r;}public static <T> R<T> error(String msg) {R r = new R();r.msg = msg;r.code = 0;return r;}
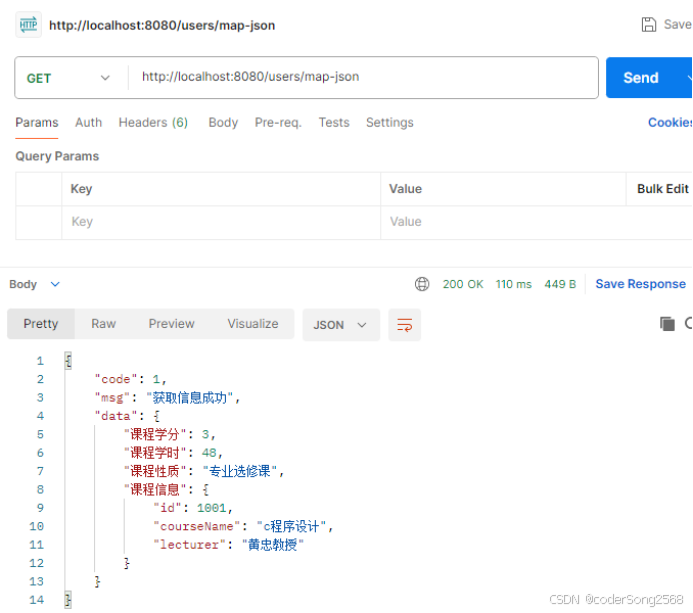
}2、控制器类中编写处理自定义返回数据的方法
在UserController类中添加getStringToJson()请求处理方法。
@RequestMapping("/map-json")public R<Map<String, Object>> getMapJson() {Map<String, Object> courseMap = new HashMap<>();Course course = new Course(1001, "c程序设计", "黄忠教授");courseMap.put("课程信息", course);courseMap.put("课程学分", 3);courseMap.put("课程性质", "专业选修课");courseMap.put("课程学时", 48);return R.success(courseMap);}3、postman测试