Linux进程间通信----简易进程池实现
进程池的模拟实现
1.进程池的原理:
是什么
进程池是一种多进程编程模式,核心思想是先创建好一定数量的子进程用作当作资源,这些进程可以帮助完成任务并且重复利用,避免频繁的进程的创建和销毁的开销。
下面我们举例子来帮助理解:
完成任务需要工作人员,在主任务执行的途中源源不断的有新的支线任务来临。比如校园社团展览大会的场地布置是主任务,但是不同的场地要有不同的布置任务布置结构,在整理真个场地的途中你需要帮手去帮你解决小任务,社团A来发任务,你现场去找一个人让他去做A任务,社团B来发放任务,你又得去找一个人去完成B任务,效率极低。这时候你提前找好了10个帮手,让他们待命,来了任务直接将帮手派发出去,帮手完成任务后回到等待任务队列,整体效率就提高了很多并且免去了频繁找人的过程。
上面的故事里,帮手就是组成进程池的子进程,你作为父进程需要组织并管理这些子进程,让他们去帮你完成任务。
为什么
为什么要有进程池?操作系统在创建进程时要给进程分配内存等资源,在任务短频率高的情况下消耗极高。同时子进程可以反复利用,可以将这些子进程的创建成本分摊到多次任务中。
怎么做
首先创建进程池就需要预设好一定数量的进程,第一步就是创建一定数量的子进程
第二步,为了能让子进程帮我们完成任务,我们需要和子进程通信,利用上次讲到的管道
第三步,任务的发布和负载均衡,发布任务的时候尽量让每个进程都被平均的使用到,发挥进程池的优势。
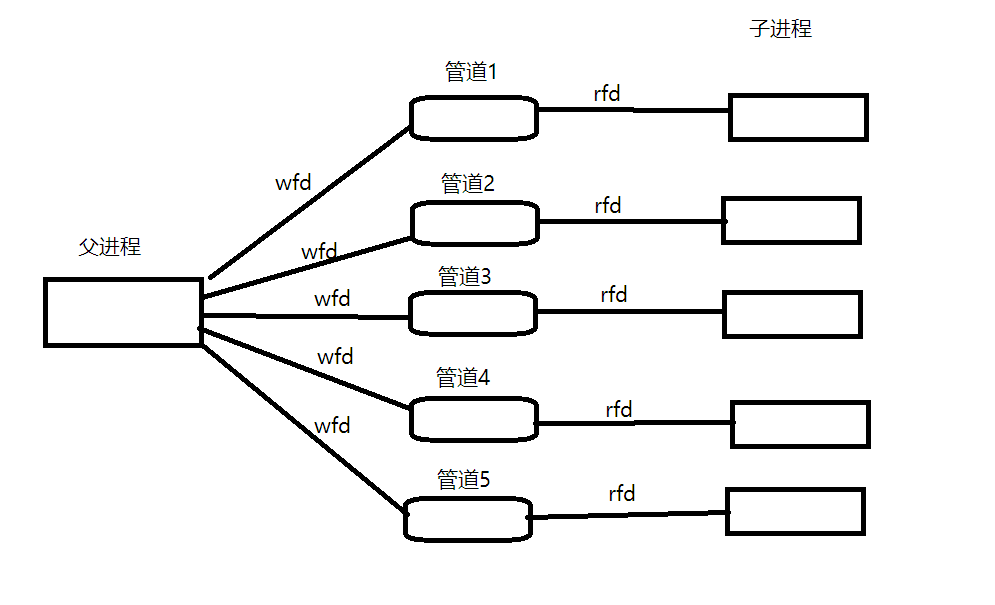
实现类似下图的结构:
代码实现:
第一步,完成任务一:所需数量的创建管道和子进程
#include <iostream>
#include <vector>
#include <unistd.h>using namespace std;
#define PIPEERRO 1int num = 5; // 全局变量,表示进程池内的进程数量int main()
{for (int i = 0; i < num; i++){// 1.创建管道和子进程int pipefd[2];int n = pipe(pipefd);if (n < 0){return PIPEERRO;}//2.创建子进程pid_t id=fork();if(id==0){//子进程代码//子进程负责读取任务 ,关闭写端close(pipefd[1]);//读取任务//执行任务//退出exit(0);}//父进程代码//父进程负责写任务,关闭读端close(pipefd[0]);}return 0;
}
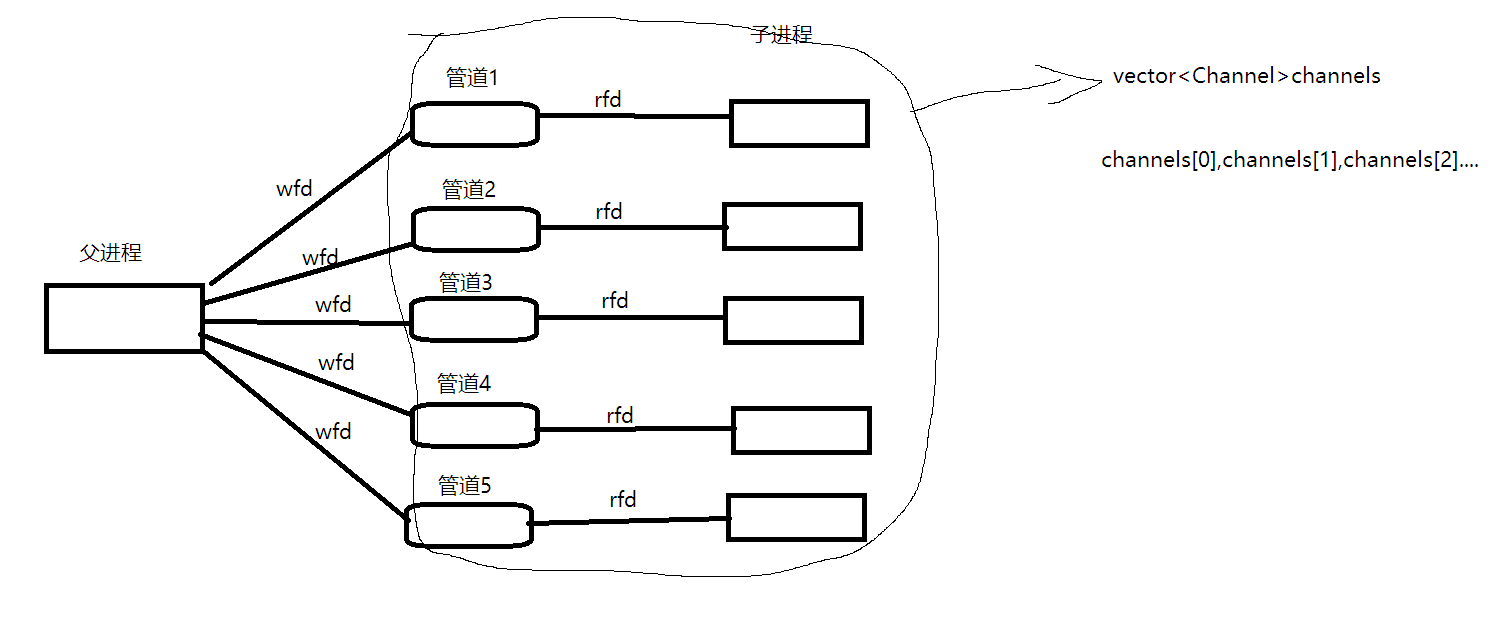
框架搭建完毕后,我们需要对创建出来的管道和子进程进行管理,管理的6字真言:先描述再组织
为了管理好我们创建的这么多管道和子进程我们创建一个管道类Channel去描述管道和子进程的关系,然后用vector去组织他们。
创建的所有管道都被放入channels vector数组里管理起来,以后我们想对单个子进程发送任务就只需要发给对应的数组成员就行了,操作十分方便。
现在我们完成了第一步,写一个假的work函数看看能不能工作吧:
void work()
{cout<<"I am child process: "<<getpid()<<endl;
} int main()
{vector<Channel> channels;for (int i = 0; i < num; i++){// 1.创建管道和子进程int pipefd[2];int n = pipe(pipefd);if (n < 0){return PIPEERRO;}//2.创建子进程pid_t id=fork();if(id==0){//子进程代码//子进程负责读取任务 ,关闭写端close(pipefd[1]);//读取任务//执行任务work();//退出exit(0);}//父进程代码//父进程负责写任务,关闭读端close(pipefd[0]);channels.emplace_back(id,pipefd[1]);}return 0;
}
执行结果:

十分成功,接下来我们去实现第二步:任务的发放
我们首先实现几种不同的任务函数,利用回调函数的方式让我们的子进程随机执行任务,为了完成这一步我们利用数组将task(任务)函数用数组管理起来,形成任务清单,任务的发放方式也改为向管道内发送task函数数组的下标,即发放task清单序号,子进程根据从管道内收到的序号去执行清单上对应task。
为了统一接口,我们定义一个进程池类统一接口去管理操作函数
class ProcessPool
{
public:ProcessPool(int num) : sub_proc_num(num){}int CreateProcessPool(){//vector<Channel> channels;  类成员变量无需再次定义for (int i = 0; i < num; i++){// 1.创建管道和子进程int pipefd[2];int n = pipe(pipefd);if (n < 0){return PIPEERRO;}// 2.创建子进程pid_t id = fork();if (id == 0){// 子进程代码// 子进程负责读取任务 ,关闭写端close(pipefd[1]);// 读取任务// 执行任务// 退出exit(0);}// 父进程代码// 父进程负责写任务,关闭读端close(pipefd[0]);channels.emplace_back(id, pipefd[1]);}}~ProcessPool(){}private:vector<Channel> channels;int sub_proc_num;
};int main()
{ProcessPool * pp=new ProcessPool(num);//num 个进程的进程池pp->CreateProcessPool();return 0;
}
接下来:创建一个头文件专门放置任务函数
#pragma once#include<iostream>
#include <unistd.h>
using namespace std;
typedef void(*work_t)();//执行任务总接口函数指针
typedef void(*task_t)();//任务函数指针,用于管理任务函数//task函数实现
void Singing()
{cout<<"I am singing.... lalala~"<<endl;
}void Dancing()
{cout<<"I am dancing.... siusiusiu~"<<endl;
}void Playing()
{cout<<"I am playing piano.... DoReMi~"<<endl;
}uint32_t NextTask()
{return rand()%3;//task数组下标
}task_t task[3]{Singing,Dancing,Playing};//数组管理task函数void worker()//总接口函数
{while(true){uint32_t command_code;//任务码ssize_t byte_read = read(0,&command_code,sizeof(command_code));//读取管道内容(任务码)if(byte_read == sizeof(command_code)){if(command_code>3)continue;task[command_code]();//任务码用作下标}}
}
实现任务清单,同时给出work总接口,兼具读取任务码和执行动作。
说明:
为什么死循环?死循环的目的是让子进程反复接受任务反复执行任务,这样能最大化利用进程池特性。
为什么command_code>3就continue?为了让子进程收到非法任务码时也能继续执行不影响后续任务执行。
主程序代码只需修改几个地方:
pp->CreateProcessPool(worker);//传总接口函数进去int CreateProcessPool(work_t worker){// vector<Channel> channels; 类成员变量无需再次定义for (int i = 0; i < num; i++){// 1.创建管道和子进程int pipefd[2];int n = pipe(pipefd);if (n < 0){return PIPEERRO;}// 2.创建子进程pid_t id = fork();if (id == 0){// 子进程代码// 子进程负责读取任务 ,关闭写端close(pipefd[1]);// 读取任务dup2(pipefd[0], 0); // 重定向,将从stdin读取重定向到从管道读端读取// 执行任务worker(); // 总接口内有真正的读取管道操作// 退出exit(0);}// 父进程代码// 父进程负责写任务,关闭读端close(pipefd[0]);channels.emplace_back(id, pipefd[1]);}return 0;}说明:
因为在create函数里面进行了重定向,所有worker接口里的read是从0也就是stdin里读取
准备好了任务码的读取,接下来我们来完成任务码的发放:
注意两点:
1.任务码随机发方
2.子进程的轮询调度(为了让所有进程分摊任务)
// 任务码发放while (true){// 选择任务码uint32_t code = NextTask();// 选择管道int index = pp->Select_Channel();// 发送任务码pp->SendCode(index,code);sleep(1);} int Select_Channel() // 轮询选择管道{static int next = 0; // static变量只定义一次int c = next;next++;next %= channels.size(); // next只能在channels的下标中循环return c;}void SendCode(int index, int code) // 向管道写入任务码{cout << "sending code : " << code << " to " << channels[index].getid()<< " " << channels[index].getname() << endl;write(channels[index].getfd(), &code, sizeof(code)); // 向管道写入任务码}uint32_t NextTask()
{return rand()%3;//task数组下标
}接下来看执行结果:
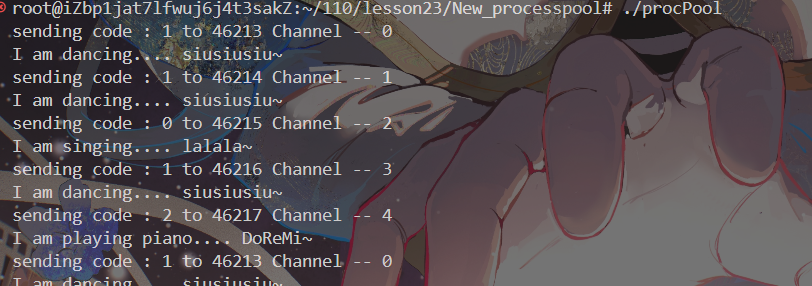
非常完美,任务自动不停的发送给每个管道内,由不同的子进程执行。
完整代码:
processpool.cc:
#pragma once#include<iostream>
#include <unistd.h>
using namespace std;
typedef void(*work_t)();//执行任务总接口函数指针
typedef void(*task_t)();//任务函数指针,用于管理任务函数//task函数实现
void Singing()
{cout<<"I am singing.... lalala~"<<endl;
}void Dancing()
{cout<<"I am dancing.... siusiusiu~"<<endl;
}void Playing()
{cout<<"I am playing piano.... DoReMi~"<<endl;
}uint32_t NextTask()
{return rand()%3;//task数组下标
}task_t task[3]{Singing,Dancing,Playing};//数组管理task函数void worker()//总接口函数
{while(true){uint32_t command_code;//任务码ssize_t byte_read = read(0,&command_code,sizeof(command_code));//读取管道内容(任务码)if(byte_read == sizeof(command_code)){if(command_code>3)continue;task[command_code]();//任务码用作下标}}
}
Task.hpp:
#pragma once#include <iostream>
#include <unistd.h>using namespace std;typedef void (*work_t)(int);
typedef void (*task_t)();void Singing()
{cout << "I am singing.... lalala" << endl;
}void Dancing()
{cout << "I am dancing.... hahaha" << endl;
}void Playing()
{cout << "I am playing piano.... doremi~" << endl;
}task_t task[3] = {Singing, Dancing, Playing};uint32_t Select_Task()
{return rand()%3;
}void worker(int task_num)
{while (task_num){uint32_t commandcode;ssize_t byte_read = read(0, &commandcode, sizeof(commandcode));if (byte_read == sizeof(commandcode)){if (commandcode > 3)continue;task[commandcode]();task_num--;}}
}