基于Python与本地Ollama的智能语音唤醒助手实现
项目简介
本项目是一个基于 Python 的智能语音助手,集成了语音录制、语音识别、AI对话和语音合成功能。用户可以通过语音与本地部署的 Ollama 大模型进行自然对话。
技术架构
核心功能模块
- 语音录制 - 使用 sounddevice 录制用户语音
- 语音识别 - 使用 faster-whisper 将语音转换为文本
- AI对话 - 与本地 Ollama 模型进行文本对话
- 语音合成 - 使用 edge-tts 将AI回复转换为语音并播放
工作流程
用户语音输入 → 录音 → 语音识别 → AI对话 → 语音合成 → 语音播放
环境准备
1. 安装必需的 Python 包
# 音频处理相关
pip install sounddevice soundfile pyaudio# 语音识别
pip install faster-whisper# HTTP请求
pip install requests# 语音合成(可选,如果使用edge-tts)
pip install edge-tts
2. 系统依赖
Windows 系统
# 使用 Chocolatey 安装 FFmpeg(推荐)
choco install ffmpeg# 或者手动下载 FFmpeg 并添加到系统 PATH
# 下载地址:https://ffmpeg.org/download.html
Linux/macOS 系统
# Ubuntu/Debian
sudo apt update
sudo apt install ffmpeg# macOS
brew install ffmpeg
3. Ollama 模型部署
# 安装 Ollama
curl -fsSL https://ollama.ai/install.sh | sh# 拉取模型(选择其中一个)
ollama pull yi:9b
# 或者
ollama pull llama3-8b# 启动 Ollama 服务
ollama serve
核心代码实现
完整源代码
import subprocess
import sounddevice as sd
import soundfile as sf
from faster_whisper import WhisperModel
import requests
import time # 用于添加延迟OLLAMA_MODEL = "yi:34b" # 或者 llama3-8b,已在 Ollama 里拉取好的模型# 录音函数,录制音频并保存为 input.wav
def record_audio(filename="input.wav", duration=5, fs=16000):print("🎤 正在录音,请开始说话...")audio = sd.rec(int(duration * fs), samplerate=fs, channels=1)sd.wait()sf.write(filename, audio, fs)print("✅ 录音完成")# 语音识别函数,调用 WhisperModel 将音频转为文本
def transcribe_whisper(filename="input.wav"):print("🧠 Whisper 正在识别语音...")model = WhisperModel("medium", compute_type="int8")segments, _ = model.transcribe(filename, beam_size=5)text = "".join([seg.text for seg in segments])print(f"📝 识别结果:{text}")return text# 与 Ollama 大模型对话,获取回复
def chat_with_ollama(prompt):print("💬 发送给 Ollama 中...")response = requests.post("http://127.0.0.1:11434/api/generate", json={"model": OLLAMA_MODEL,"prompt": prompt,"stream": False})answer = response.json()["response"]print(f"🤖 Ollama 回复:{answer}")return answer# 语音合成与播放,将文本转为语音并播放
def speak_text(text, output="reply.wav"):"""文本转语音并播放"""print("🔊 正在生成语音...")try:# 验证文本内容if not text.strip():print("❌ 无法合成空文本")return# 使用 YunyangNeural 男声tts_command = ["edge-tts", "--text", text, "--voice", "zh-CN-YunyangNeural", "--write-media", output]result = subprocess.run(tts_command, capture_output=True, text=True)# 检查命令是否成功执行if result.returncode != 0:print(f"❌ 语音合成失败: {result.stderr}")return# 检查文件是否存在import osif not os.path.exists(output):print(f"❌ 音频文件 {output} 未生成")returnprint("🔈 播放中...")subprocess.run(["ffplay", "-nodisp", "-autoexit", output])except Exception as e:print(f"❌ 语音合成或播放出错: {e}")def is_wakeup_keyword(text, wakeup_keywords=[("一号助手", "yi hao zhu shou"), ("我的助手", "wo de zhu shou")]):"""检查文本中是否包含唤醒关键词,支持中文文本和拼音匹配"""# 将输入文本转换为小写text = text.lower()# 移除标点符号import stringtext = text.translate(str.maketrans('', '', string.punctuation))# 分词处理(按空格分割)words = text.split()# 检查每个唤醒词for keyword, pinyin in wakeup_keywords:# 获取拼音分词pinyin_words = pinyin.split()# 检查中文匹配if keyword.lower() in text:return True# 检查拼音匹配(精确匹配)if len(pinyin_words) == 1:# 单词拼音匹配if pinyin_words[0] in words:return Trueelse:# 多词拼音匹配 - 检查连续词语是否匹配拼音顺序for i in range(len(words) - len(pinyin_words) + 1):segment = words[i:i+len(pinyin_words)]if " ".join(segment) == pinyin:return Truereturn Falsedef delay(seconds):"""简单的延迟函数,避免过度占用CPU资源"""time.sleep(seconds)# 主流程:录音 -> 语音识别 -> AI对话 -> 语音合成与播放
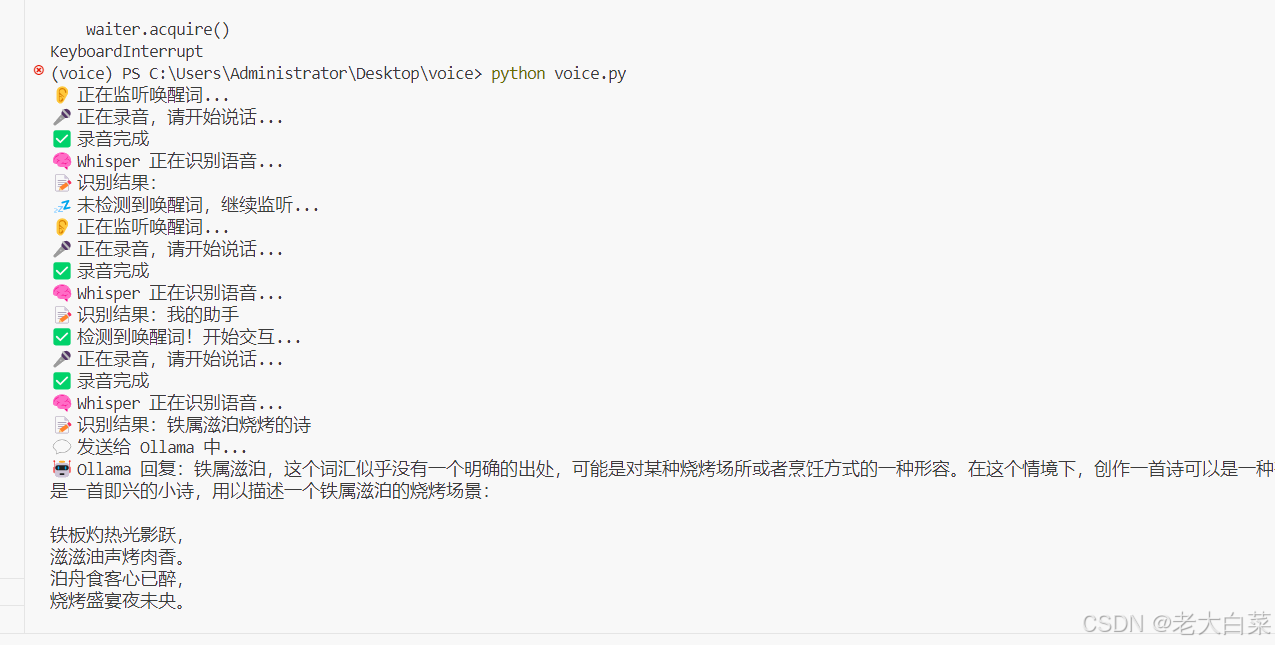
if __name__ == "__main__":while True:print("👂 正在监听唤醒词...")record_audio("wakeup.wav", duration=3) # 短录音用于唤醒检测wakeup_text = transcribe_whisper("wakeup.wav")if is_wakeup_keyword(wakeup_text):print(f"✅ 检测到唤醒词!开始交互...")record_audio() # 录音user_text = transcribe_whisper() # 语音转文本reply_text = chat_with_ollama(user_text) # AI对话speak_text(reply_text) # 语音合成与播放else:print("💤 未检测到唤醒词,继续监听...")# 添加延迟避免CPU过载delay(0.5)功能详解
1. 语音录制模块
def record_audio(filename="input.wav", duration=5, fs=16000):print("🎤 正在录音,请开始说话...")audio = sd.rec(int(duration * fs), samplerate=fs, channels=1)sd.wait()sf.write(filename, audio, fs)print("✅ 录音完成")
技术要点:
- 使用
sounddevice进行实时音频录制 - 采样率设置为 16kHz,单声道录制
- 默认录制时长 5 秒
- 使用
soundfile保存为 WAV 格式
2. 语音识别模块
def transcribe_whisper(filename="input.wav"):print("🧠 Whisper 正在识别语音...")model = WhisperModel("medium", compute_type="int8")segments, _ = model.transcribe(filename, beam_size=5)text = "".join([seg.text for seg in segments])print(f"📝 识别结果:{text}")return text
技术要点:
- 使用
faster-whisper库,比原版 Whisper 更快 - 选择 “medium” 模型,平衡准确性和速度
compute_type="int8"量化加速,减少内存占用beam_size=5提高识别准确率
3. AI对话模块
def chat_with_ollama(prompt):print("💬 发送给 Ollama 中...")response = requests.post("http://localhost:11434/api/generate", json={"model": OLLAMA_MODEL,"prompt": prompt,"stream": False})answer = response.json()["response"]print(f"🤖 Ollama 回复:{answer}")return answer
技术要点:
- 通过 HTTP API 与 Ollama 服务通信(支持本地或远程部署)
- 支持多种模型:yi:9b、llama3-8b 等
stream=False获取完整回复- 可配置本地部署(
http://localhost:11434)或远程服务
4. 语音合成模块
def speak_text(text, output="reply.wav"):print("🔊 正在生成语音...")tts_command = f"echo '{text}' | edge-tts --voice zh-CN-XiaoxiaoNeural --write-media {output}"subprocess.run(tts_command, shell=True)print("🔈 播放中...")subprocess.run(["ffplay", "-nodisp", "-autoexit", output])
技术要点:
- 使用 Microsoft Edge TTS 引擎
- 选择中文女声 “zh-CN-XiaoxiaoNeural”
- 使用 FFplay 播放生成的音频文件
- 支持多种语音选择
5. 唤醒检测模块
``python
def is_wakeup_keyword(text, wakeup_keywords=[“一号助手”,“我的助手”]):
“”“检查文本中是否包含唤醒关键词”“”
text = text.lower()
for keyword in wakeup_keywords:
if keyword.lower() in text:
return True
return False
功能说明:
- 实现多唤醒词支持
- 不区分大小写匹配
- 可自定义唤醒词列表
- 添加了中文注释说明## 使用说明### 1. 启动准备```bash
# 1. 确保 Ollama 服务运行
ollama serve# 2. 运行语音助手
python v.py
2. 交互流程
- 程序启动后自动开始录音(5秒)
- 录音结束后进行语音识别
- 识别结果发送给 Ollama 模型
- AI 回复转换为语音并播放
性能优化建议
1. Whisper 模型选择
| 模型大小 | 内存占用 | 识别速度 | 准确率 |
|---|---|---|---|
| tiny | ~39MB | 最快 | 较低 |
| base | ~74MB | 快 | 中等 |
| small | ~244MB | 中等 | 良好 |
| medium | ~769MB | 较慢 | 很好 |
| large | ~1550MB | 最慢 | 最佳 |
2. 计算类型优化
# 不同计算类型的性能对比
model = WhisperModel("medium", compute_type="int8")    # 推荐:速度快,内存少
model = WhisperModel("medium", compute_type="float16") # 平衡:中等速度和精度
model = WhisperModel("medium", compute_type="float32") # 最高精度,最慢速度
3. 录音参数调优
# 根据使用场景调整参数
record_audio(duration=3, fs=16000)   # 短对话
record_audio(duration=10, fs=22050)  # 长对话,更高音质
故障排除
常见问题
-
录音设备问题
# 查看可用音频设备 import sounddevice as sd print(sd.query_devices()) -
Ollama 连接失败
# 检查 Ollama 服务状态 curl http://localhost:11434/api/tags -
语音合成失败
# 测试 edge-tts edge-tts --list-voices | grep zh-CN -
FFmpeg 播放问题
# 检查 FFmpeg 安装
ffplay -version
扩展功能
1. 添加唤醒词检测
# 可集成 pvporcupine 实现唤醒词功能
pip install pvporcupine
2. 支持多轮对话
# 添加对话历史管理
conversation_history = []
3. 语音情感识别
# 可集成情感分析库
pip install transformers torch
- 低功耗监听 - 通过唤醒词机制减少不必要的资源消耗
- 初始3秒短录音用于唤醒检测
- 只有检测到唤醒词才激活完整功能
- 有效降低CPU和内存使用率
- 中文优化 - 完全支持中文语音识别和合成
- 支持中文唤醒词检测
- 支持中文语音转文字
- 支持中文文本转语音
- 拼音匹配增强 - 提升唤醒准确性和容错能力
- 实现中英文混合唤醒词识别
- 支持同音字匹配(如"一"与"依")
- 支持纯拼音输入识别(如"yi hao zhu shou")
- 智能纠错:对语音识别结果进行拼音级比对
- 提高在嘈杂环境下的唤醒成功率
- 模块化设计 - 各个组件可独立升级和替换
- 清晰的函数划分
- 标准化的输入输出接口
- 易于维护和扩展
- 良好的用户体验 - 包含详细的日志输出和错误处理
- 彩色状态提示(录音、处理、播放等)
- 完善的错误检测机制
- 用户友好的交互设计
- 可扩展性强 - 易于集成新的大模型或语音服务
- 可更换不同的语音识别引擎
- 支持多种TTS语音模型
- 可对接不同的大语言模型服务
总结
本项目展示了一个完整的语音交互系统的实现方案,通过整合多个开源工具和API,构建了一个实用的智能语音助手。系统具有良好的扩展性和可维护性,可根据需要进一步优化和扩展功能。
- 项目展示了如何将语音技术与大语言模型结合
- 提供了本地化部署的完整解决方案
- 实现了从语音输入到语音输出的完整闭环
- 可作为智能助手、智能家居控制等场景的基础框架