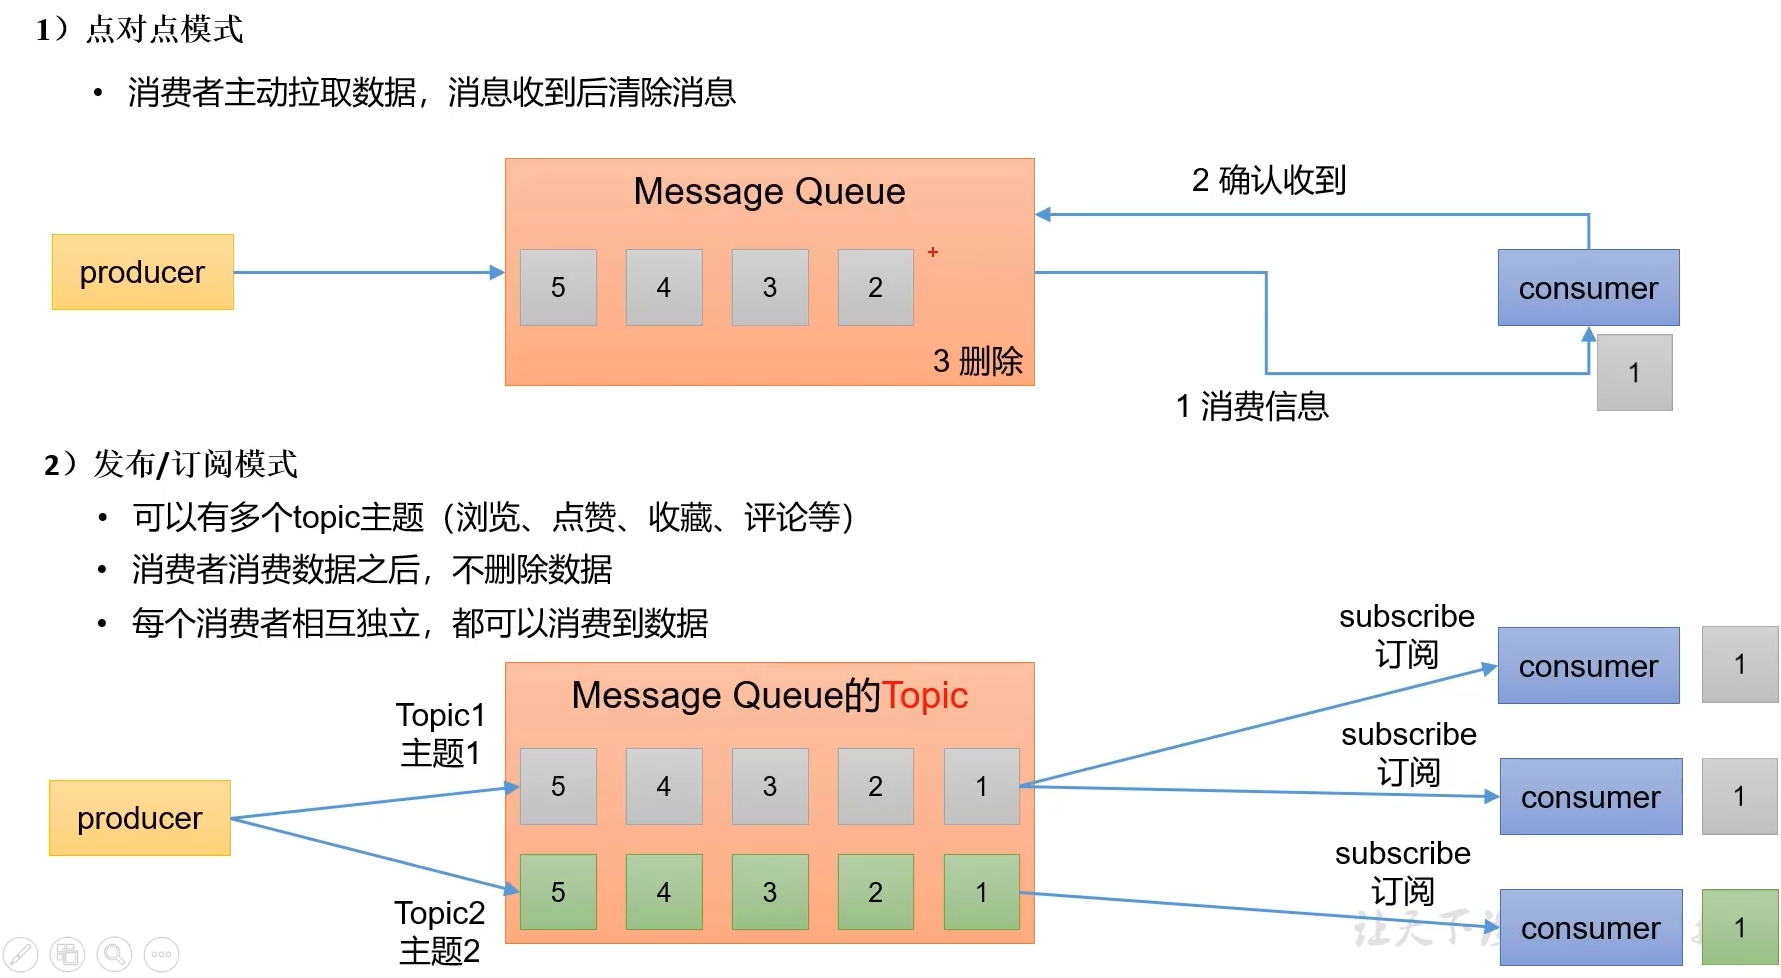
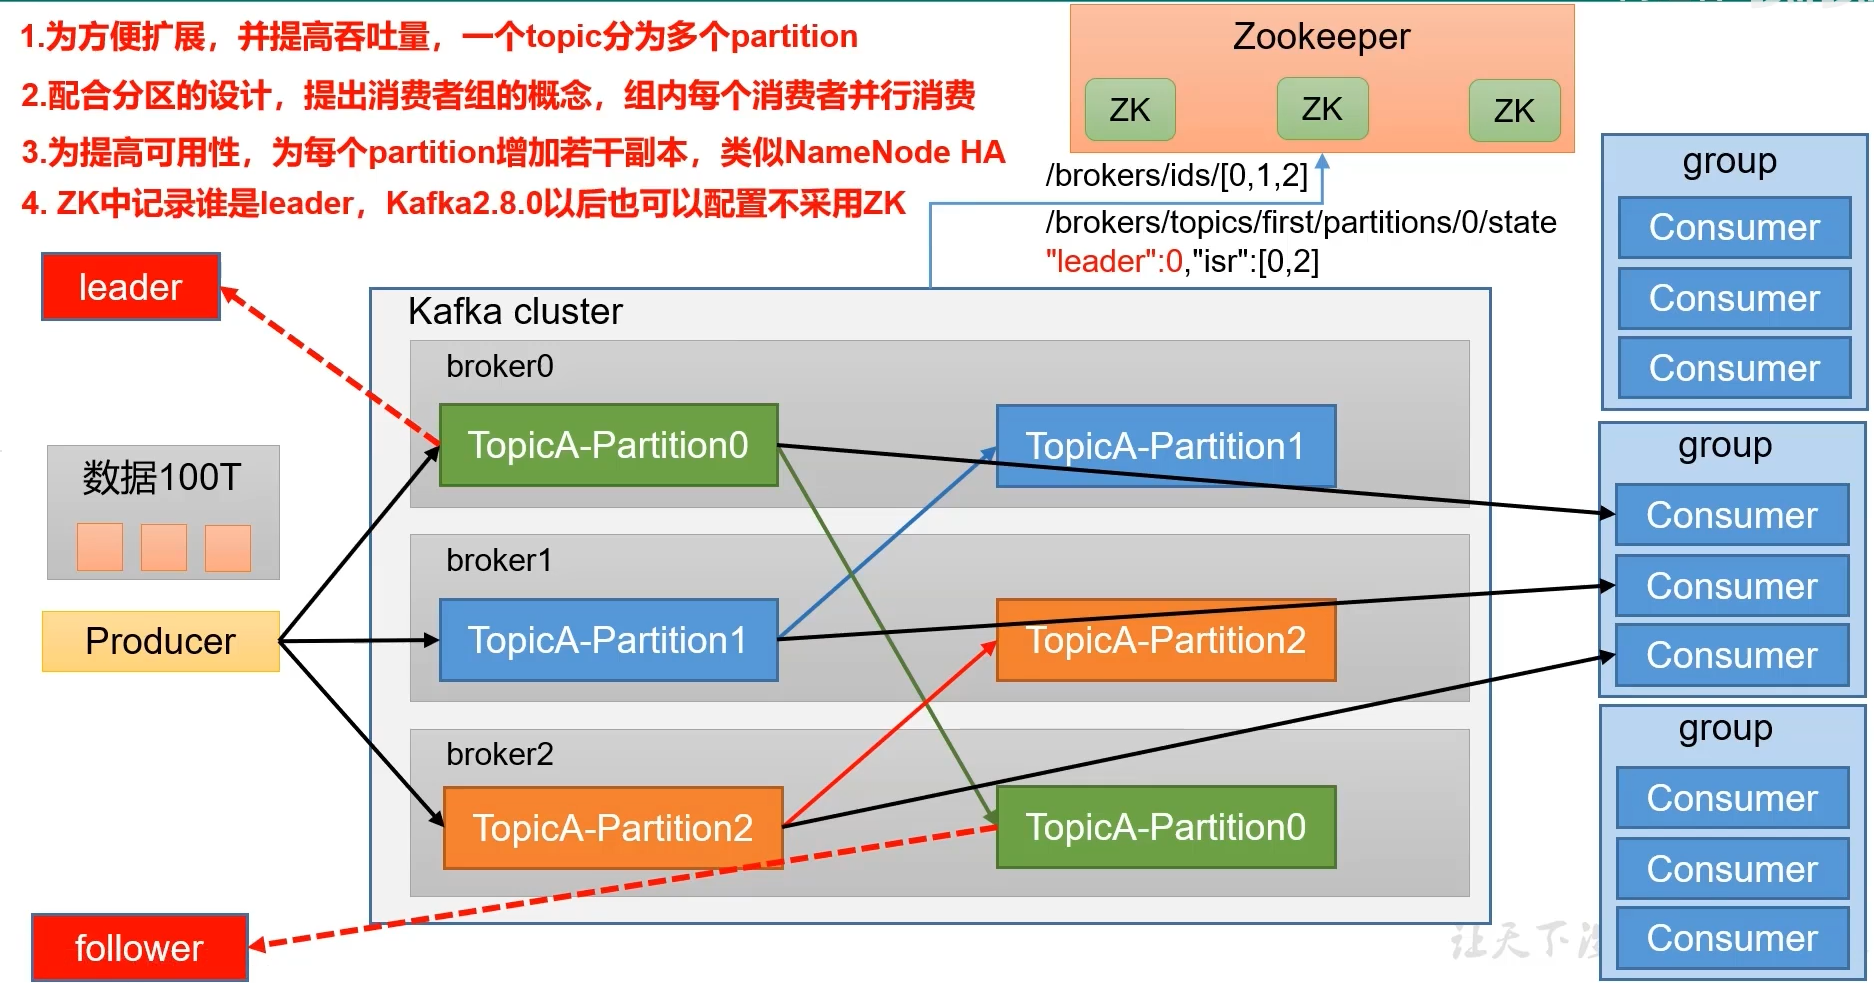
Kafka消息中间件
window中的安装
①、下载并解压kafka压缩包,进入config目录下修改zookeeper.properties配置文件
因为kafka内置了zookeeper,所以不需安装zookeeper。设置zookeeper数据存储位置,如果该路径不存在,则自动创建
dataDir = E:/kafka/data/zk
②、进入bin目录下(linux脚本命令),进入window下属于window命令
cd bin/windows
执行:zookeeper-server-start.bat …/…/config/zookeeper.properties
为了后续的方便启动,可以创建一个zk.cmd文件
文件内容如下:

③、进入kafka的config目录下,修改server.properties配置文件
log.dirs=E:/kafka/local/data/
④、进入bin/windows目录下启动:kafka-server-start.bat …/…/config/server.properties
为了后续的方便启动,可以创建一个kfk.cmd文件
文件内容如下:

⑤、查看启动后的进程

集群规划安装
①、准备三台服务器

②、在其中一台服务器上操作:

server.properties主要修改的内容:


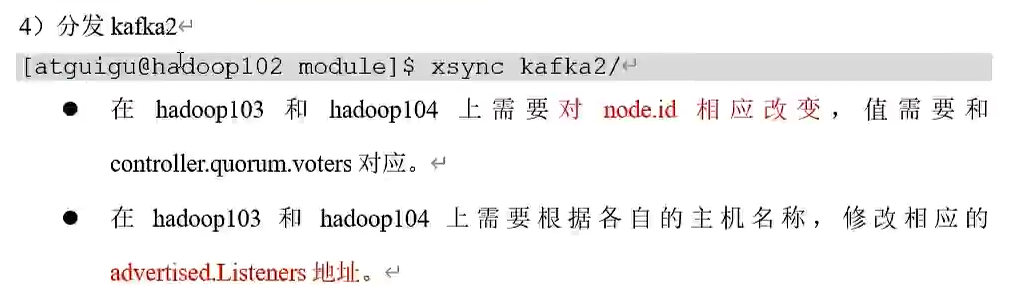
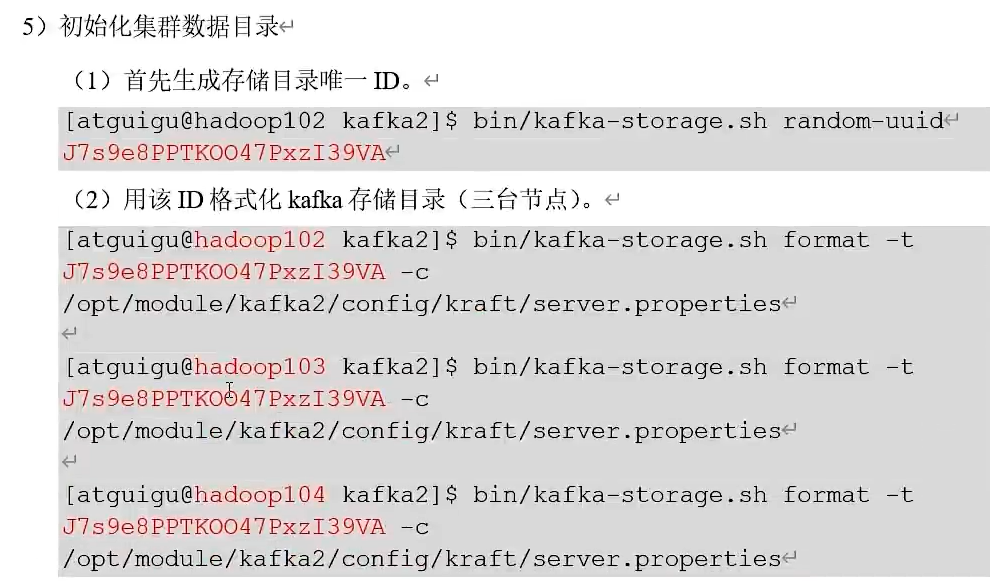
③、通过命令xsync kafka 将其分发到其他服务器,并修改每台服务器的server.properties中broker.id的值


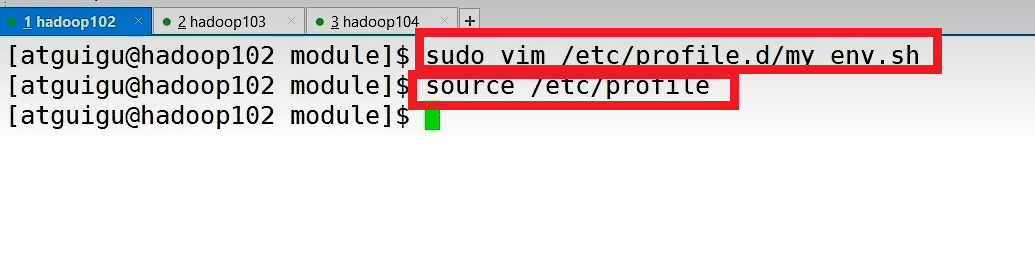
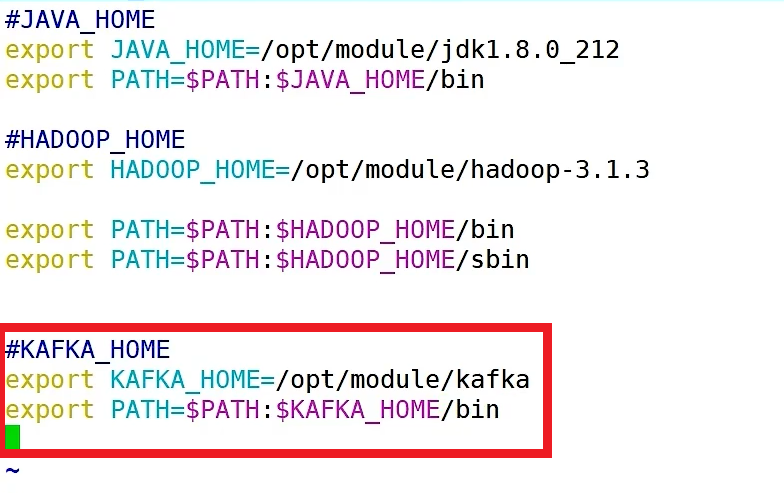
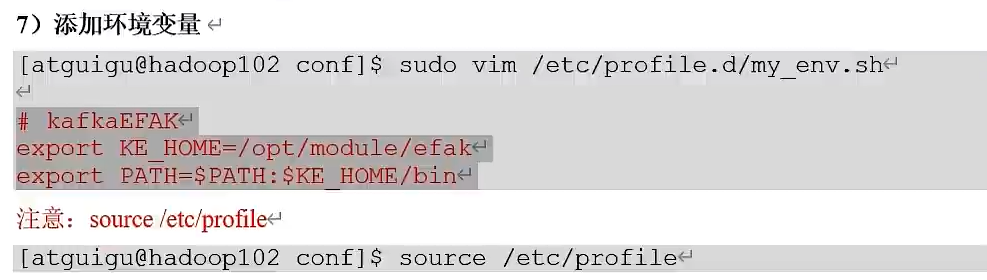
④、配置kafka环境变量
将xsync脚本分发到其他服务器

④、启动zookeeper:sk.sh start
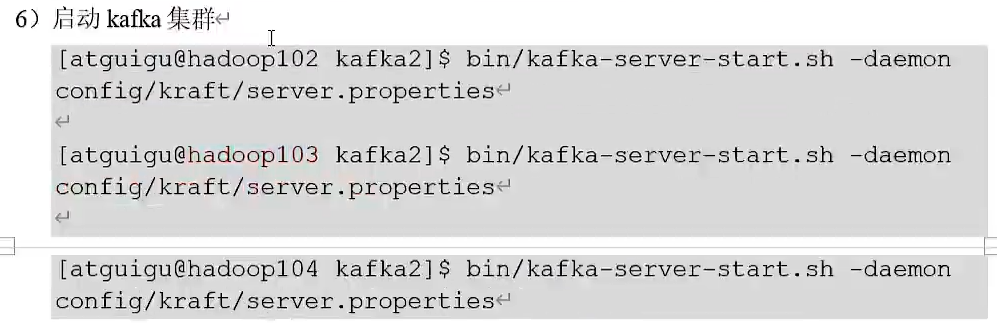
启动kafka:

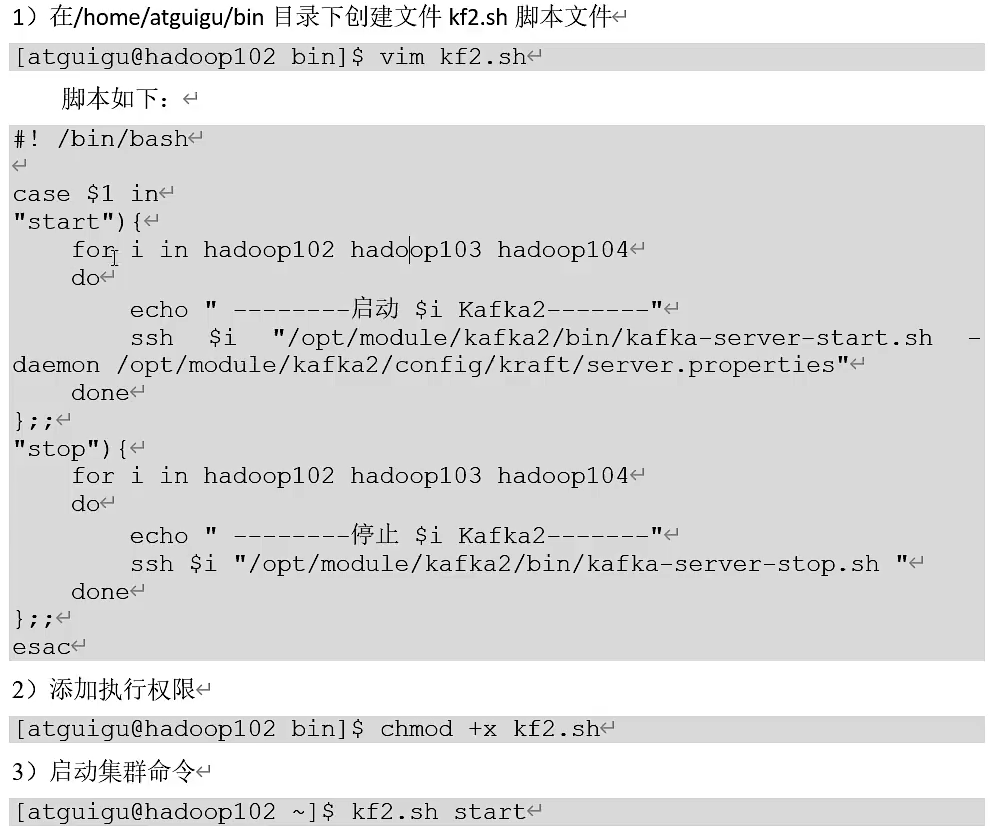
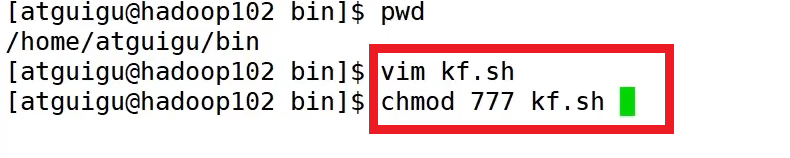
启动、停止脚本
#!/bin/bashcase $1 in
"start")for i in hadoop102 hadoop103 hadoop104 doecho "---启动 $i kafka ---"ssh $i "/opt/module/kafka/bin/kafka-server-start.sh -ddaemon /opt/module/kafka/config/server.properties" done
;;"stop")for i in hadoop102 hadoop103 hadoop103doecho "---停止 $i kafka ---"ssh $i "/opt/module/kafka/bin/kafka-server-stop.sh" done
;;
esac

命令行操作:
-
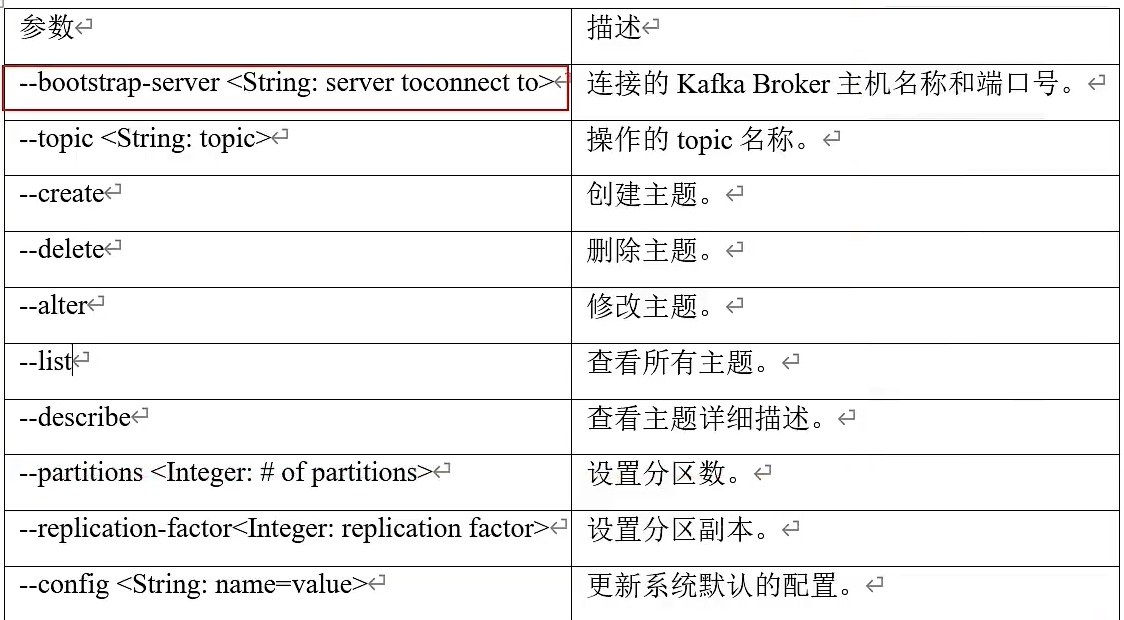
主题 kafka-topic.sh
(1) --bootstrap-server hadoop102:9092,hadoop103:9092 连接服务器
(2) --topic first
(3) --create
(4) --delete
(5) --partitions 分区
(6) --replication-factor 副本 -
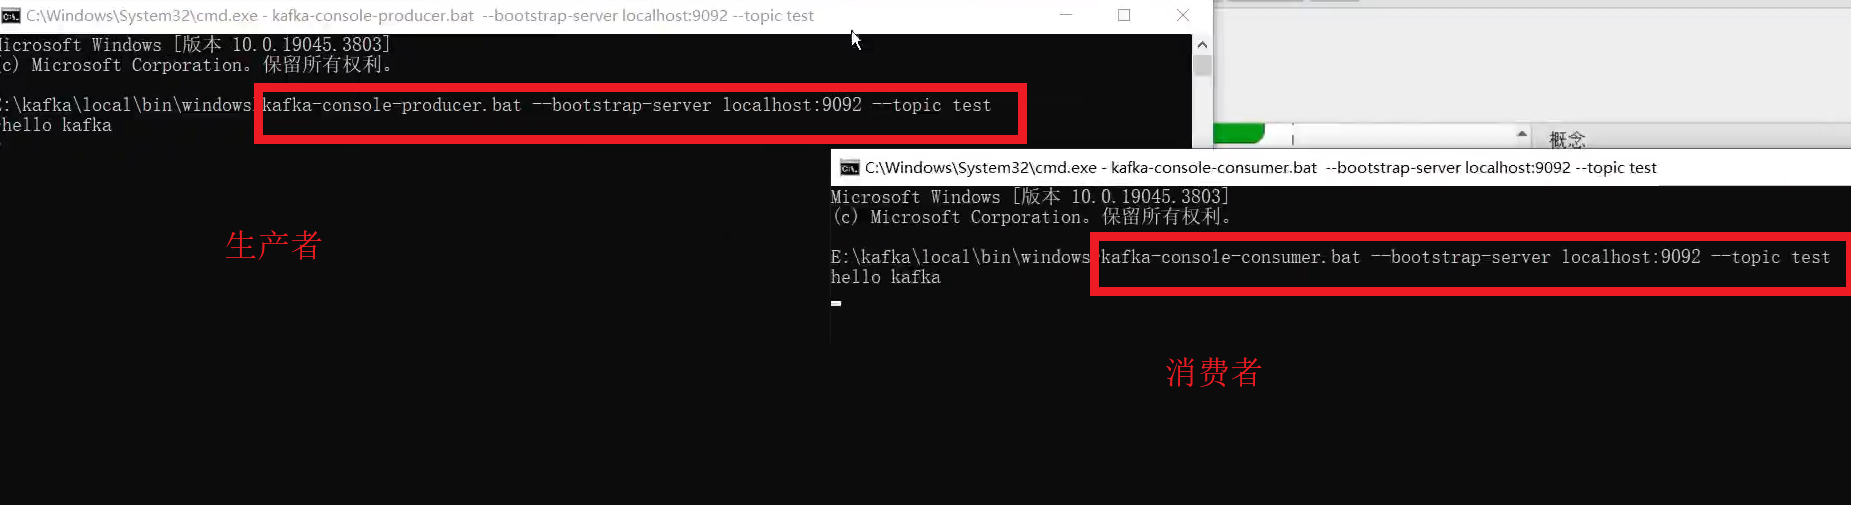
生产者 kafka-console-producer.sh
(1) --bootstrap-server hadoop102:9092,hadoop103:9092 连接服务器
(2) --topic first -
消费者 kafka-console-consumer.sh
(1) --bootstrap-server hadoop102:9092,hadoop103:9092 连接服务器
(2) --topic first
window命令行
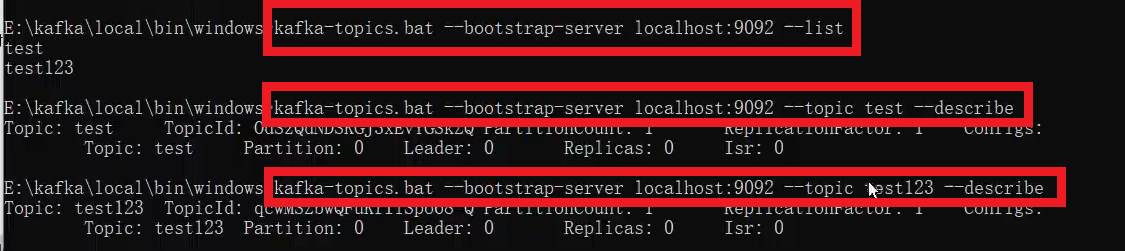
主题创建

如果JDK版本过低,会出现很多日志,所以提高JDK的版本,再创建主题

可以修改以下文件,重新设置JDK环境变量:

查看(包括详细查看):
修改:

生产者和消费者
linux命令行
bin/kafka-topics.sh # 显示所有操作选项bin/kafka-topics.sh --bootstrap-server hadoop102:9092 --list #查看当前服务器所有的topic#创建first主题,指定分区,指定副本数
bin/kafka-topics.sh --bootstrap-server hadoop102:9092 --topic first --create --partitions 1 --replication-factor 3

# 修改分区数,只能增加,不能减少
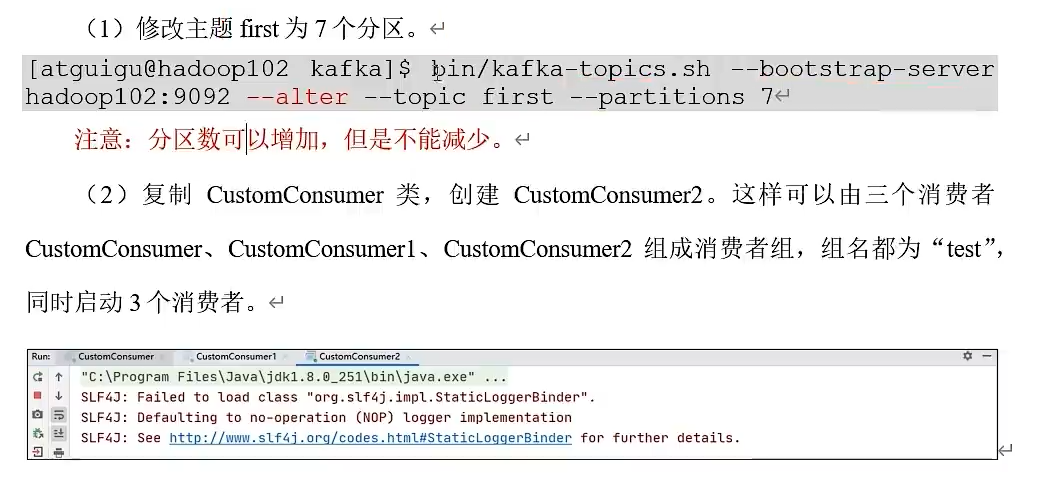
bin/kafka-topics.sh --bootstrap=server hadoop102:9092 --topic first --alter --partitions 3
# 生产者连接 hadoop102:9092的first主题,生产消息
bin/kafka-console-producer.sh --bootstrap-server hadoop102:9092 --topic first
>hello# 消费者相对应地消费消息
bin/kafla-console-consumer.sh --bootstrap-server hadoop102:9092 --topic firstbin/kafla-console-consumer.sh --bootstrap-server hadoop102:9092 --topic first --from-beginning #查看消费所有的历史记录
代码操作
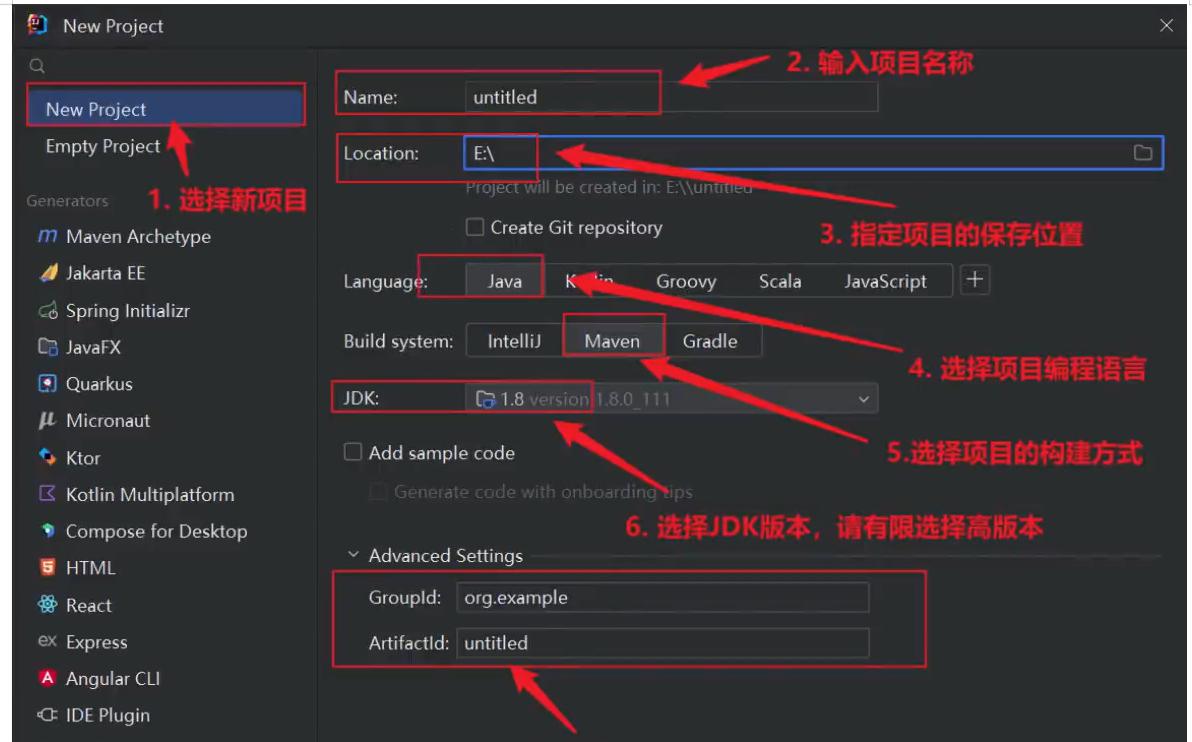
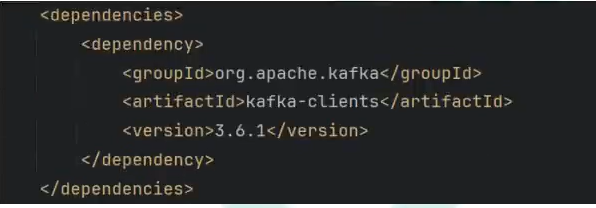
①、创建项目并添加依赖
②、生产者
public class KafkaProducerTest{public static void main(String[] args){//创建配置对象Map<String,Object> configMap = new HashMap<>();configMap.put(ProducerConfig.BOOTSTRAP_SERVERS_CONFIG,"localhost:9092");configMap.put(ProducerConfig.KEY_SERIALIZER_CLASS_CONFIG,StringSerializer.class.getName());//对key/value进行序列化configMap.put(ProducerConfig.VALUE_SERIALIZER_CLASS_CONFIG,StringSerializer.class.getName());//创建生产者KafkaProducer<String,String> producer = new KafkaProducer<>(configMap);//创建数据ProducerRecord<String,String> record = new ProducerRecord<>("test","key","value");//通过生产者对象将数据发送到kafkaproducer.send(record);//关闭生产者对象producer.close();}
}
③、消费者
public class KafkaConsumerTest{public static void main(String[] args){Map<String,Object> consumerConfig = new HashMap<>();consumerConfig.put(ConsumerConfig.BOOTSTRAP_ERVERS_CONFIG,"localhost:9092");consumerConfig.put(ConsumerConfig.KEY_DESERIALIZER_CLASS_CONFIG,StringDeserializer.class.getName());//对key/value进行反序列化consumerConfig.put(ConsumerConfig.VALUE_DESERIALIZER_CLASS_CONFIG,StringDeserializer.class.getName());consumerConfig.put(ConsumerConfig.GROUP_ID_CONFIG,"atguigu")KafkaConsumer<String,String> consumer = new KafkaConsumer<>(consumerConfig);//订阅主题consumer.subscribe(Collections.singletonList("test"));//从kafka的主题中获取数据,参数为超时时间final ConsumerRecords<String,String> datas = consumer.poll(100);for(ConsumerRecord<String,String> data:datas){System.out.println(data);}//关闭消费者对象consumer.close();}
}
Kafka工具

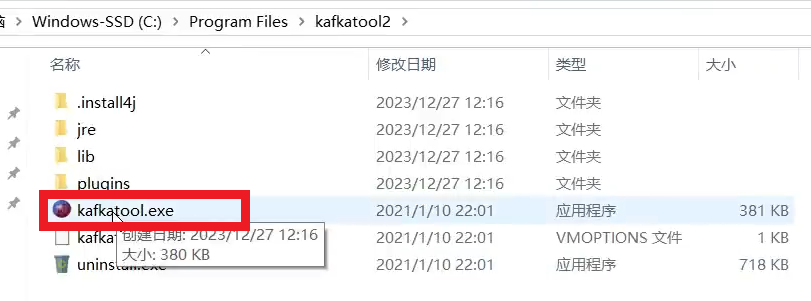
双击安装之后
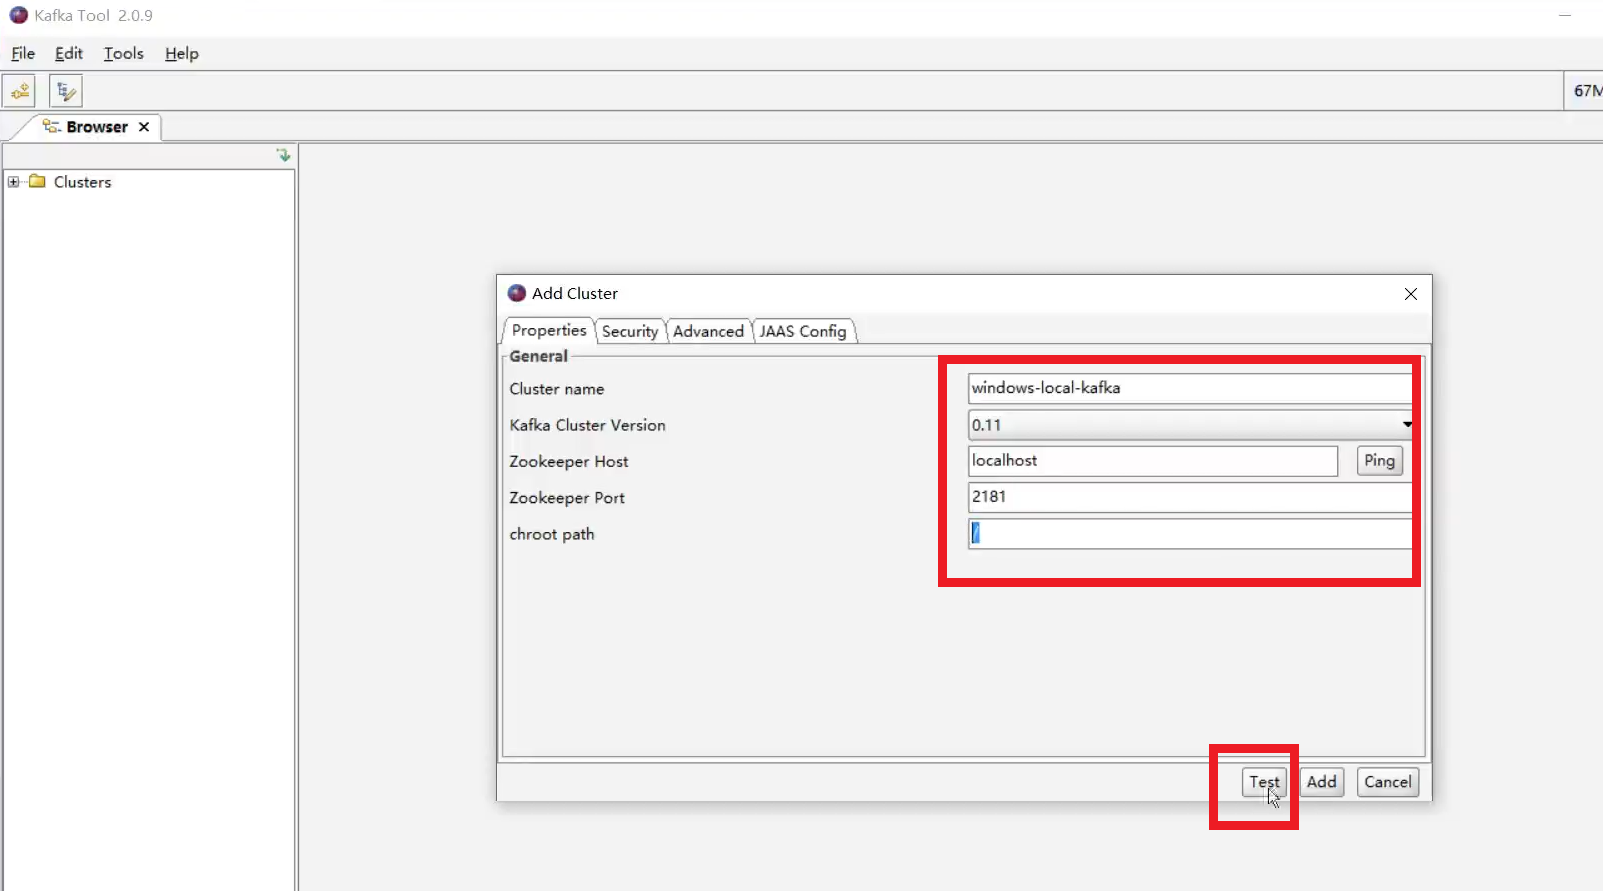
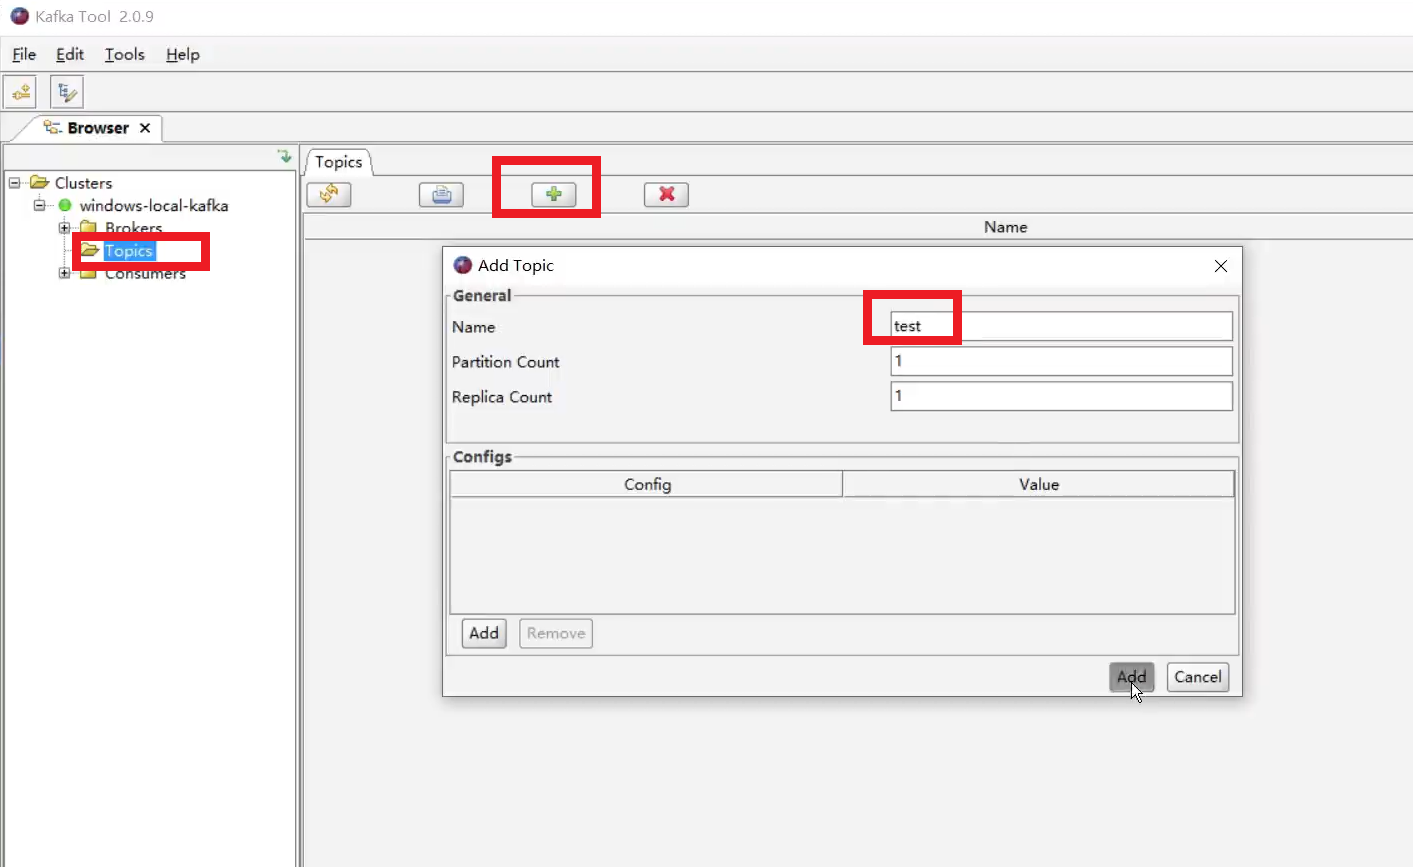
创建主题
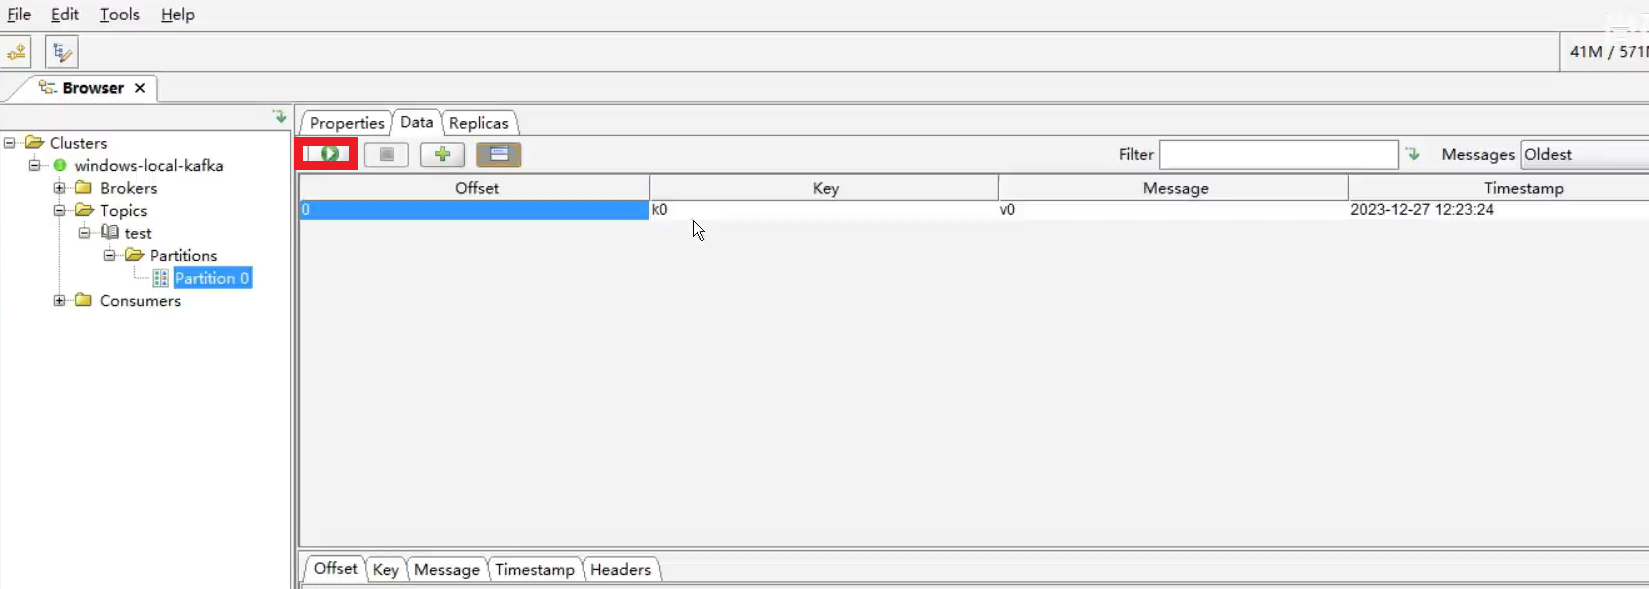
添加数据

查看数据
生产者
生产者三种发送方式:
- 异步发送 kafkaProducer.send(new ProducerRecord<>(“first”,“atguigu”+i));
- 异步回调发送 kafkaProducer.send(new ProducerRecord<>(“first”,“atguigu” + i),new Callback(){}
- 同步发送 kafkaProducer.send(new ProducerRecord<>(“first”,“atguigu”+i)).get();
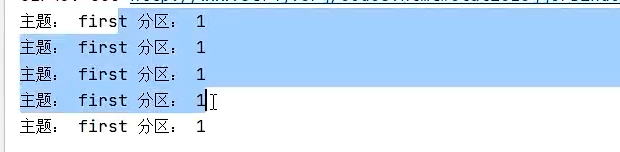
public class CustomProducer{public static void main(){//配置Properteis properties = new Properties();//连接集群properties.put(ProducerConfig.BOOTSTRAP_SERVERS_CONFIG,"hadoop102:9092,hadoop103:9092");properties.put(PorducerConfig.KEY_SERIALIZER_CLASS_CONFIG,StringSerializer.class.getName());properties.put(PorducerConfig.VALUE_SERIALIZER_CLASS_CONFIG,StringSerializer.class.getName());//1.创建Kafka生产者对象KafkaProducer<String,String> kafkaProducer = new KafkaProducer<>(properties);//2.发送数据for(int i=0;i<5;i++){//异步发送kafkaProducer.send(new ProducerRecord<>("first","atguigu"+i));	//回调异步发送kafkaProducer.send(new ProducerRecord<>("first","atguigu" + i),new Callback(){@Overridepublic void onCompletion(RecordMetadata metadata,Exception exception){if(exception == null){System.out.println("主题:"+metadata.topic()+"分区:"+metadata.partition());}}});//发送同步数据kafkaProducer.send(new ProducerRecord<>("first","atguigu"+i)).get();}//3.关闭资源kafkaProducer.close();}
}
分区
- 默认分区
- 自定义分区
//参数中指定分区
kafkaProducer.send(new ProducerRecord<>("first",1,"","atguigu"+i),new Callback(){@Overridepublic void onCompletion(RecordMetadata metadata,Exception exception){if(exception == null){System.out.println("主题:"+metadata.topic()+" 分区: "+metadata.partition());}}
});
自定义分区器
①、发送过来的数据如果包含atguigu,就发往0号分区;不包含atguigu,就发往1号区
②、分区策略配置
public class MyPartitioner implements Partitioner{@Overridepublic int partition(String topic,Object key,byte[] keyBytes,Object value,byte[] valueBytes,cluster cluster){String msgValues = value.toString();int patition;if(msgValues.contains("atguigu")){partition = 0;}else{partition = 1;}return partition;}@Overridepublic void close(){}@Overridepublic void configure(Map<String,?> configs){}
}
③、生产者
//配置
Properteis properties = new Properties();
//连接集群
properties.put(ProducerConfig.BOOTSTRAP_SERVERS_CONFIG,"hadoop102:9092,hadoop103:9092");properties.put(PorducerConfig.KEY_SERIALIZER_CLASS_CONFIG,StringSerializer.class.getName());
properties.put(PorducerConfig.VALUE_SERIALIZER_CLASS_CONFIG,StringSerializer.class.getName());//关联自定义分区策略
properties.put(ProducerConfig.APRITIONER_CLASS_CONFIG,"MyPartitioner");KafkaProducer<String,String> kafkaProducer = new KafkaProducer<>(properties);//消息发送
//........
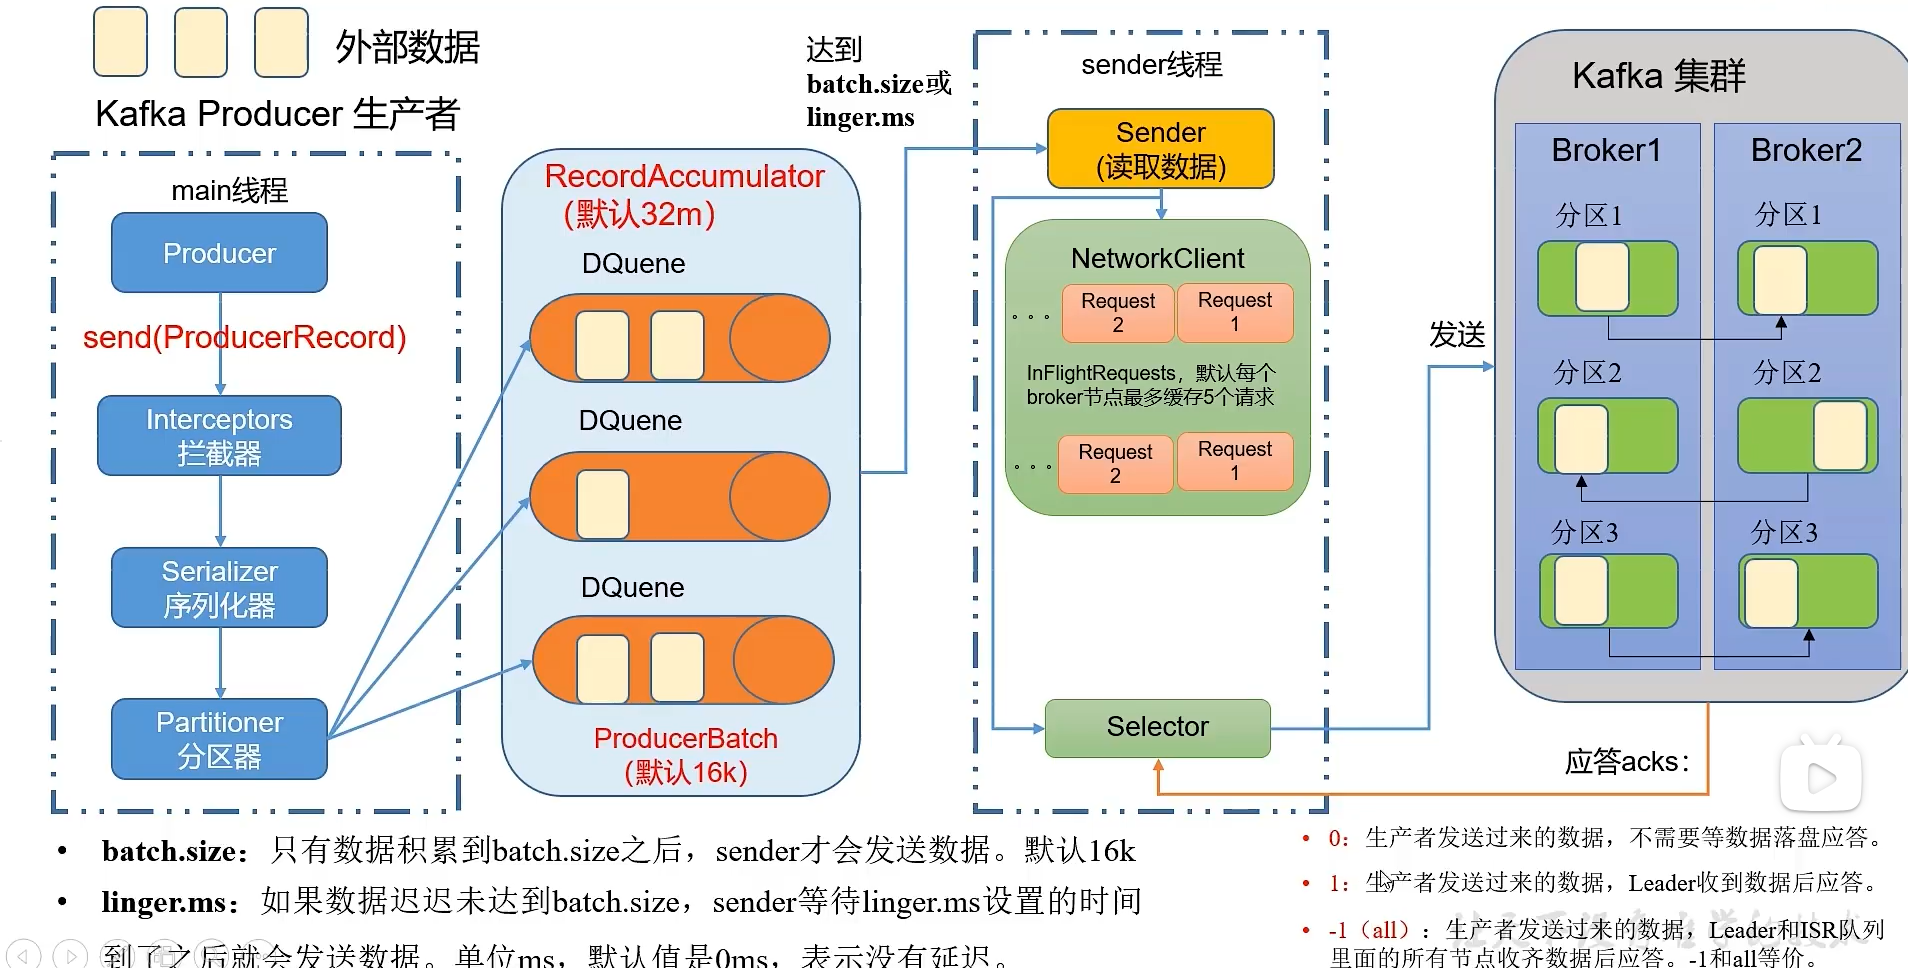
提供生产者吞吐量
四个提高吞吐量的参数
public class CustomProducerParameters{public static void main(){//配置Properties properties = new Properties();properties.put(ProducerConfig.BOOTSTRAP_SERVERS_CONFIG,"hadoop102:9092,hadoop103:9092");properties.put(ProducerConfig.KEY_SERIALIZER_CLASS_CONFIG,StringSerializer.class.getName());properties.put(ProducerConfig.VALUE_SERIALIZER_CLASS_CONFIG,StringSerializer.class.getName());//缓存区大小properties.put(ProducerConfig.BUFFER_MEMORY_CONFIG,33554432);//批次大小properties.put(ProducerConfig.BATCH_SIZE_CONFIG,16384);//linger.msproperties.put(ProducerConfig.LINGER-MS_CONFIG,1);//压缩properties.put(ProducerConfig.COMPRESSION_TYPE_CONFIG,"snappy");//生产者KafkaProducer<String,String> kafkaProducer = new KafkaProducer<>(properties);//发送数据for(int i = 0;i<5;i++){kafkaProducer.send(new ProducerRecord<>("first","atguigu"+i));}//关闭资源kafkaProducer.close();}
}
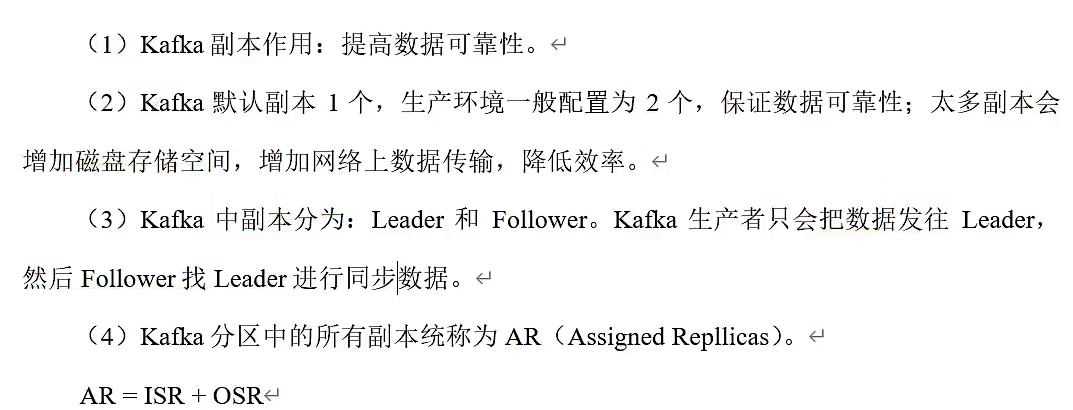
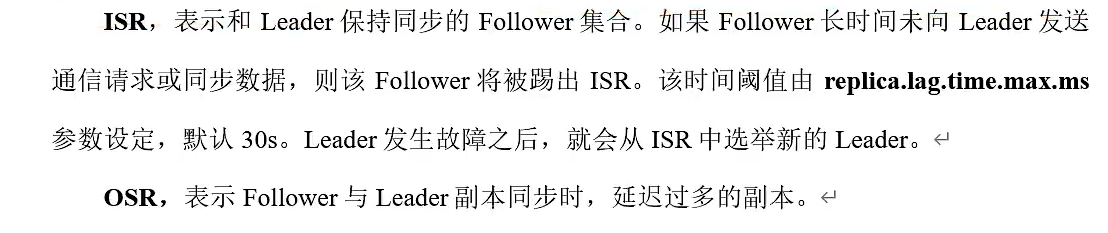
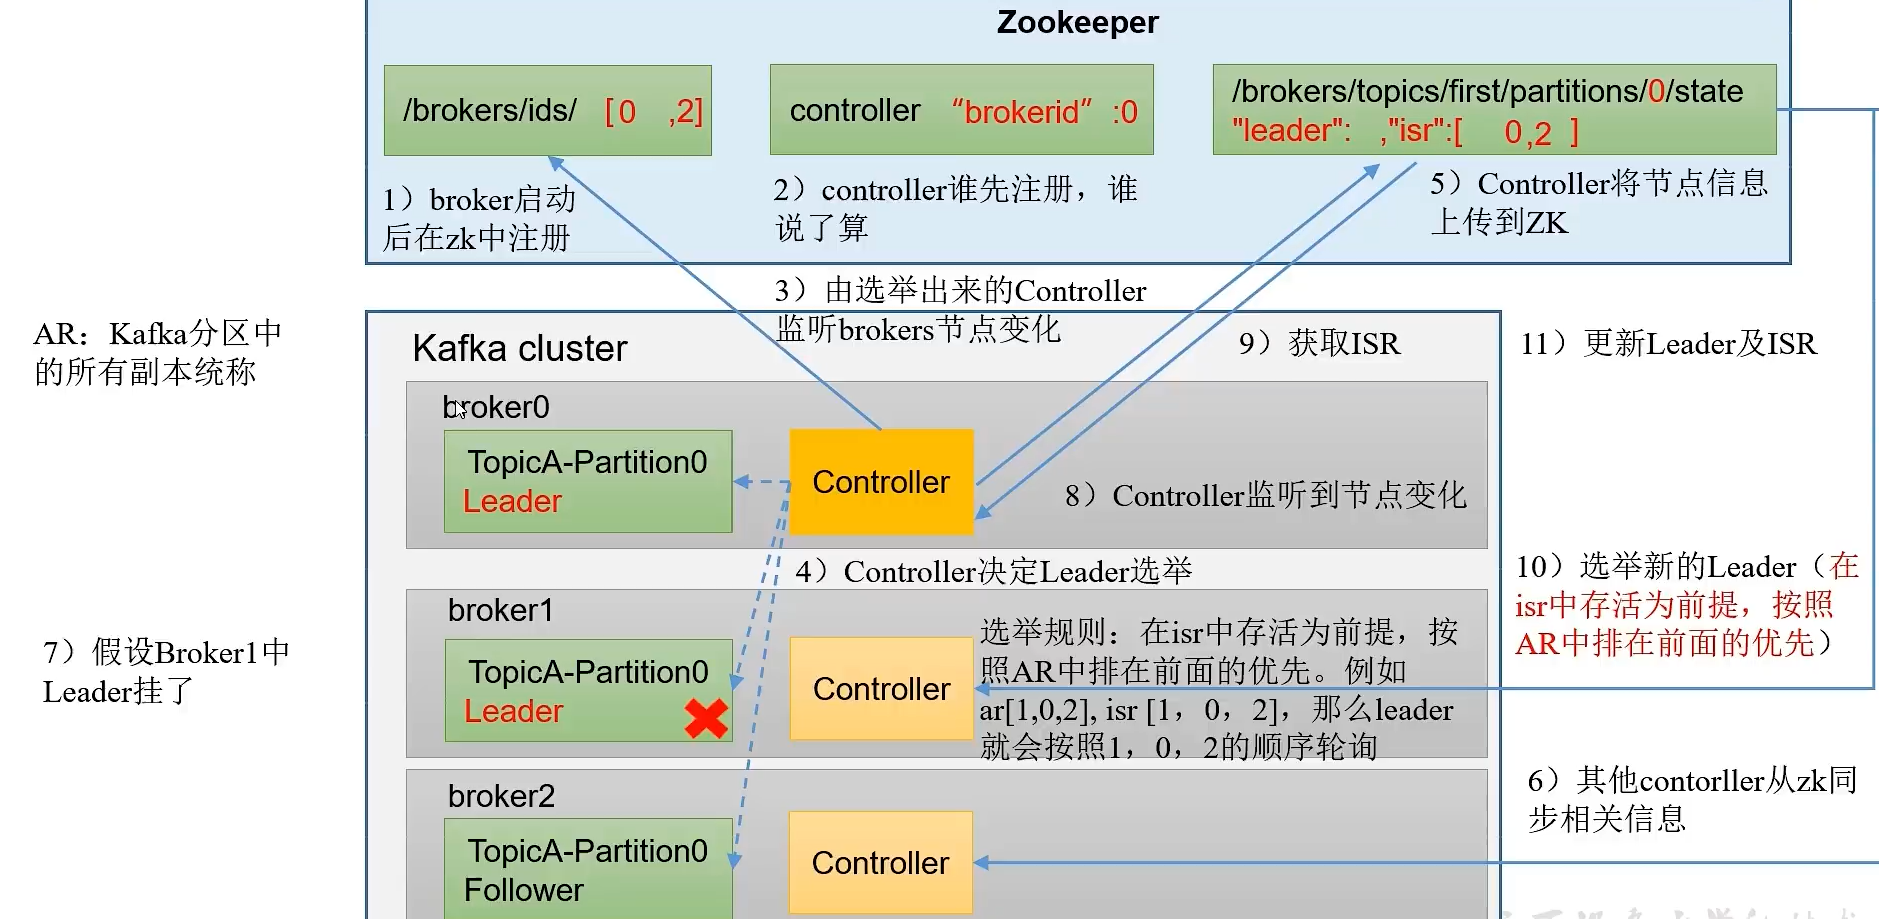
数据可靠性

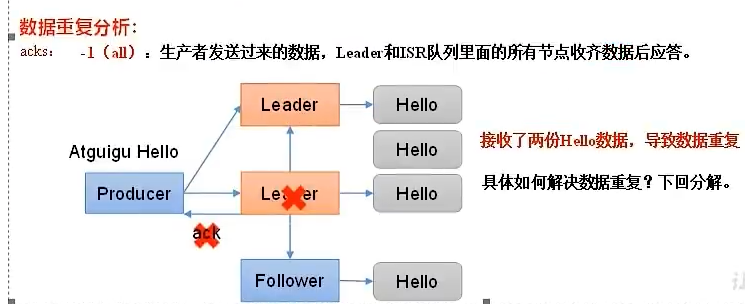
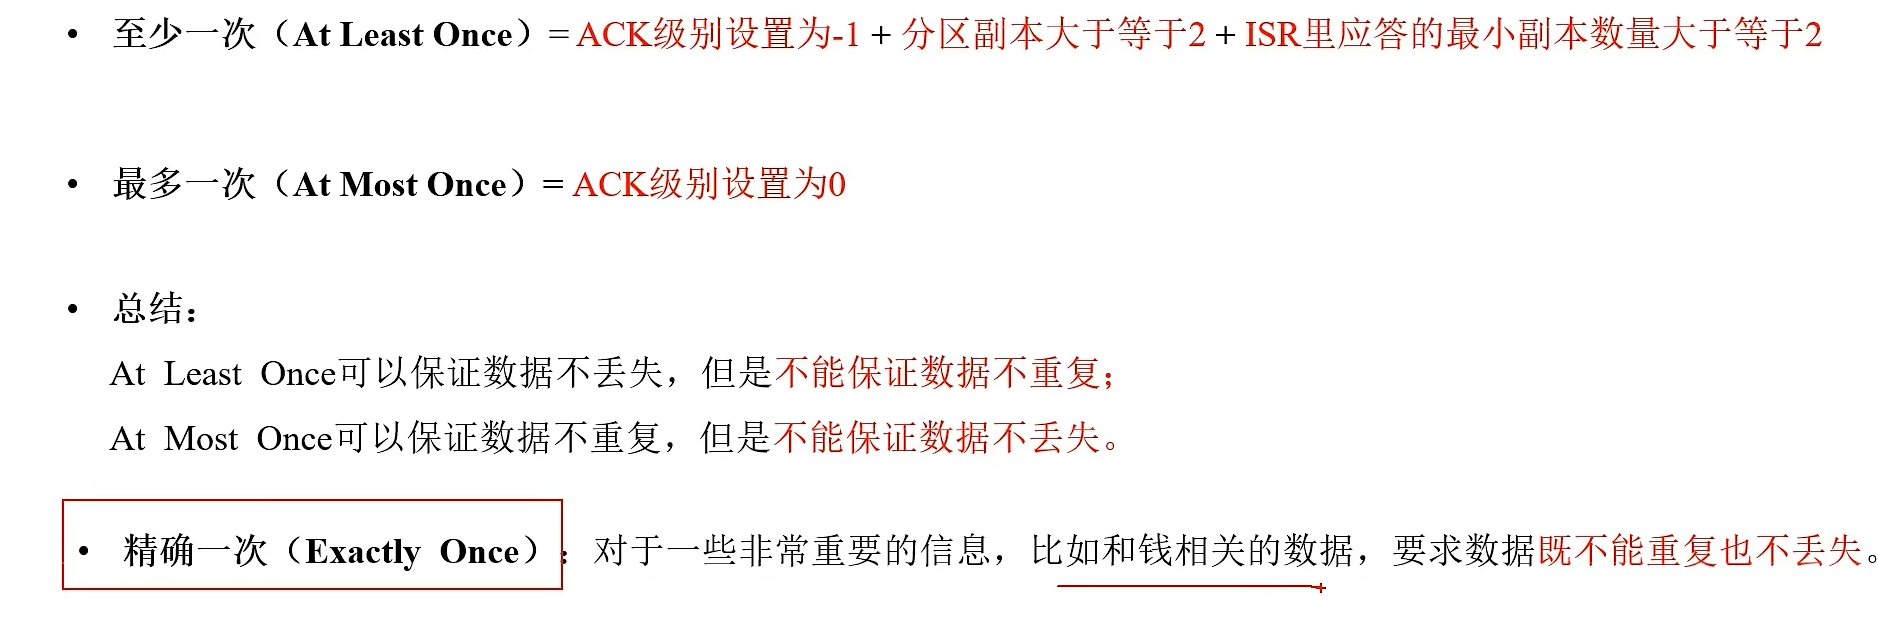
public class CustomProducerParameters{public static void main(){//配置Properties properties = new Properties();properties.put(ProducerConfig.BOOTSTRAP_SERVERS_CONFIG,"hadoop102:9092,hadoop103:9092");properties.put(ProducerConfig.KEY_SERIALIZER_CLASS_CONFIG,StringSerializer.class.getName());properties.put(ProducerConfig.VALUE_SERIALIZER_CLASS_CONFIG,StringSerializer.class.getName());//acks,数据的可靠性properties.put(ProducerConfig.ACKS_CONFIG,"1");//重复次数properties.put(ProduceConfig.RETRIES_CONFIG,3);//发送数据for(int i = 0;i<5;i++){kafkaProducer.send(new ProducerRecord<>("first","atguigu"+i));}//关闭资源kafkaProducer.close();}
}
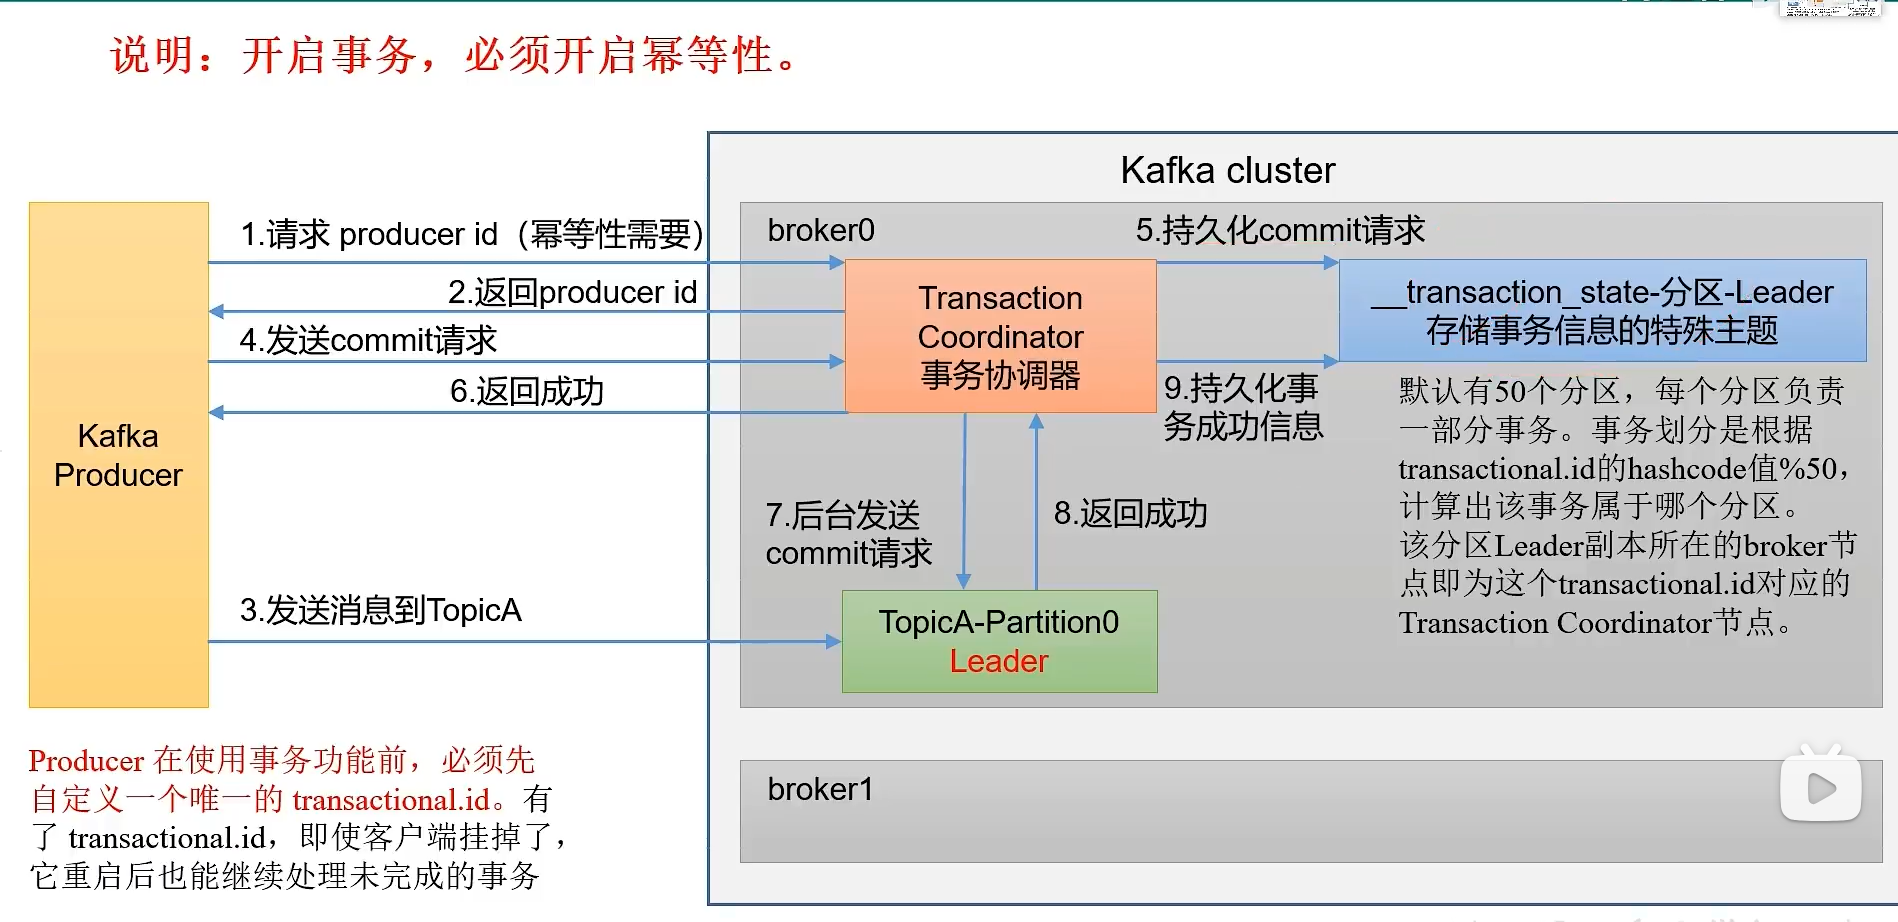
事务
Properties properties = new Properties();
properties.put(ProducerConfig.BOOTSTRAP_SERVERS_CONFIG,"hadoop102:9092,hadoop103:9092");
properties.put(ProducerConfig.KEY_SERIALIZER_CLASS_CONFIG,StringSerializer.class.getName());
properties.put(ProducerConfig.VALUE_SERRIALIZER_CLASS_CONFIG,StringSerializer.class.getName());properties.put(ProducerConfig.TRANSACTIONAL_ID_CONFIG,"transactional_id_01");//指定事务idKafkaProducer<String,String> kafkaProducer = new KafkaProducer<>(properties);kafkaProducer.initTransactions();//初始化
kafkaProducer.beginTransaction();//开始事务try{for(int i = 0;i < 5;i++){kafkaProducer.send(new ProducerRecord<>("first","atguigu"+i));kafkaProducer.commitTransaction();//提交事务
}
}catch(Exception e){kafkaProducer.abortTransaction();//终止事务
}finally{kafkaProducer.close();
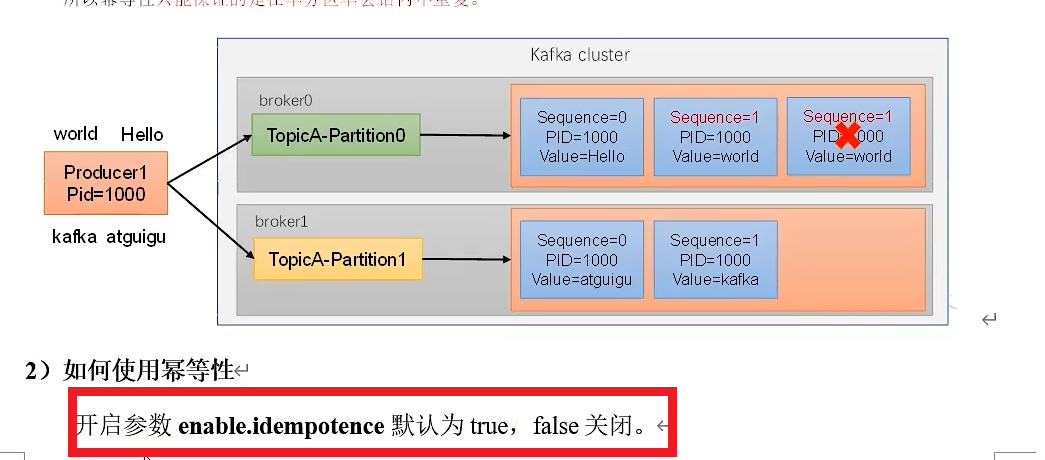
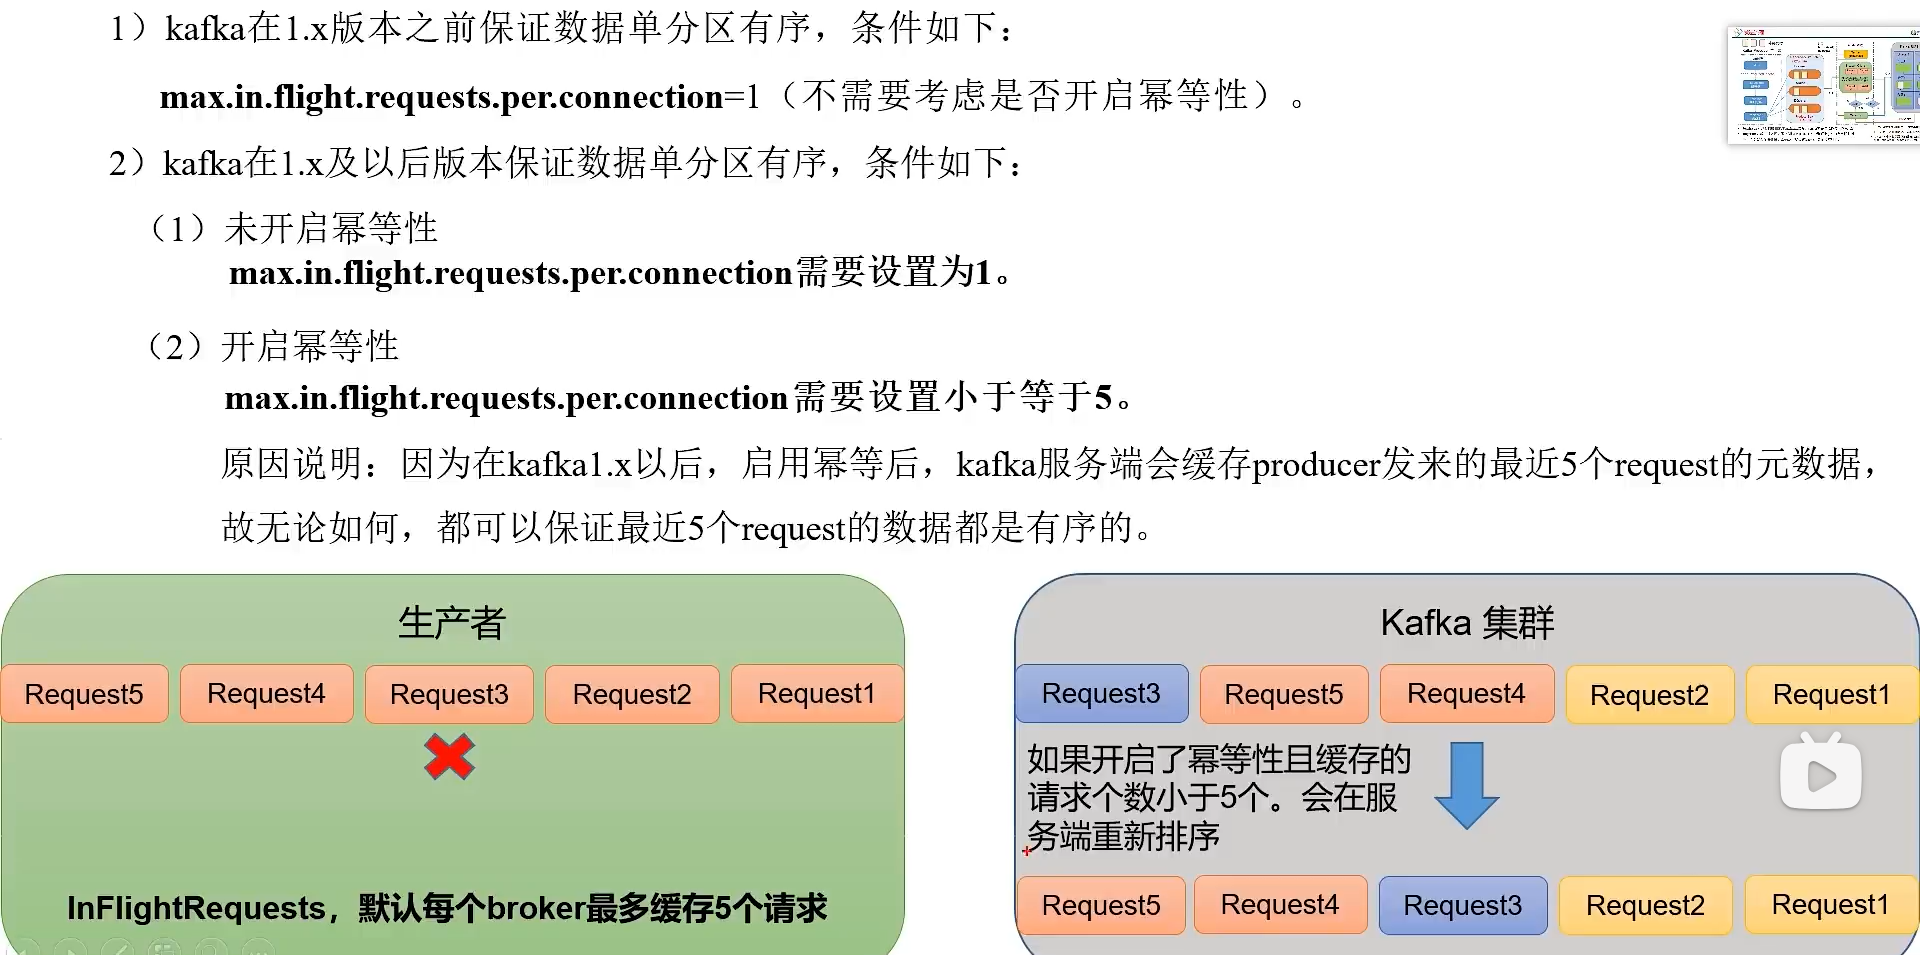
}数据乱序
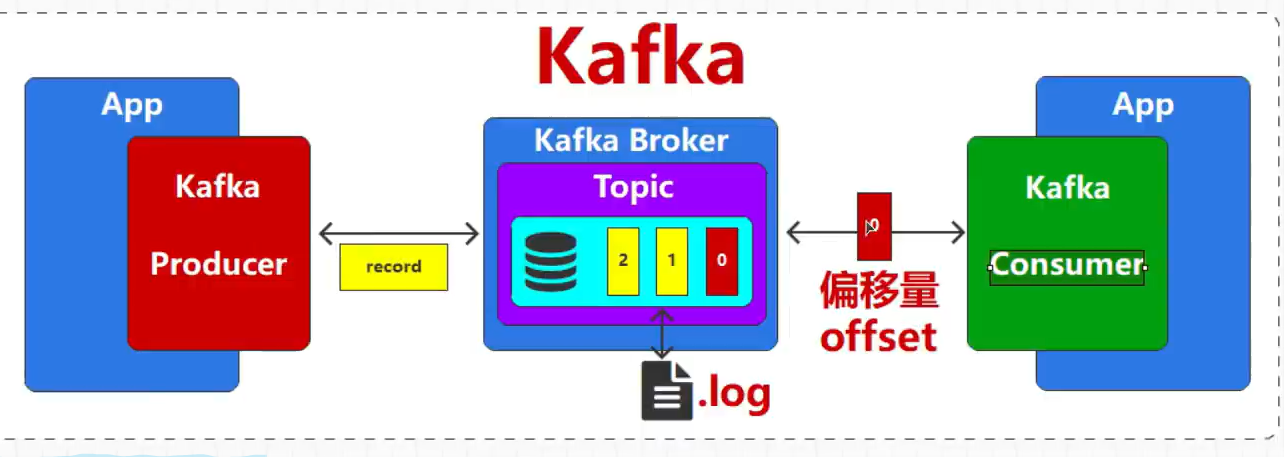
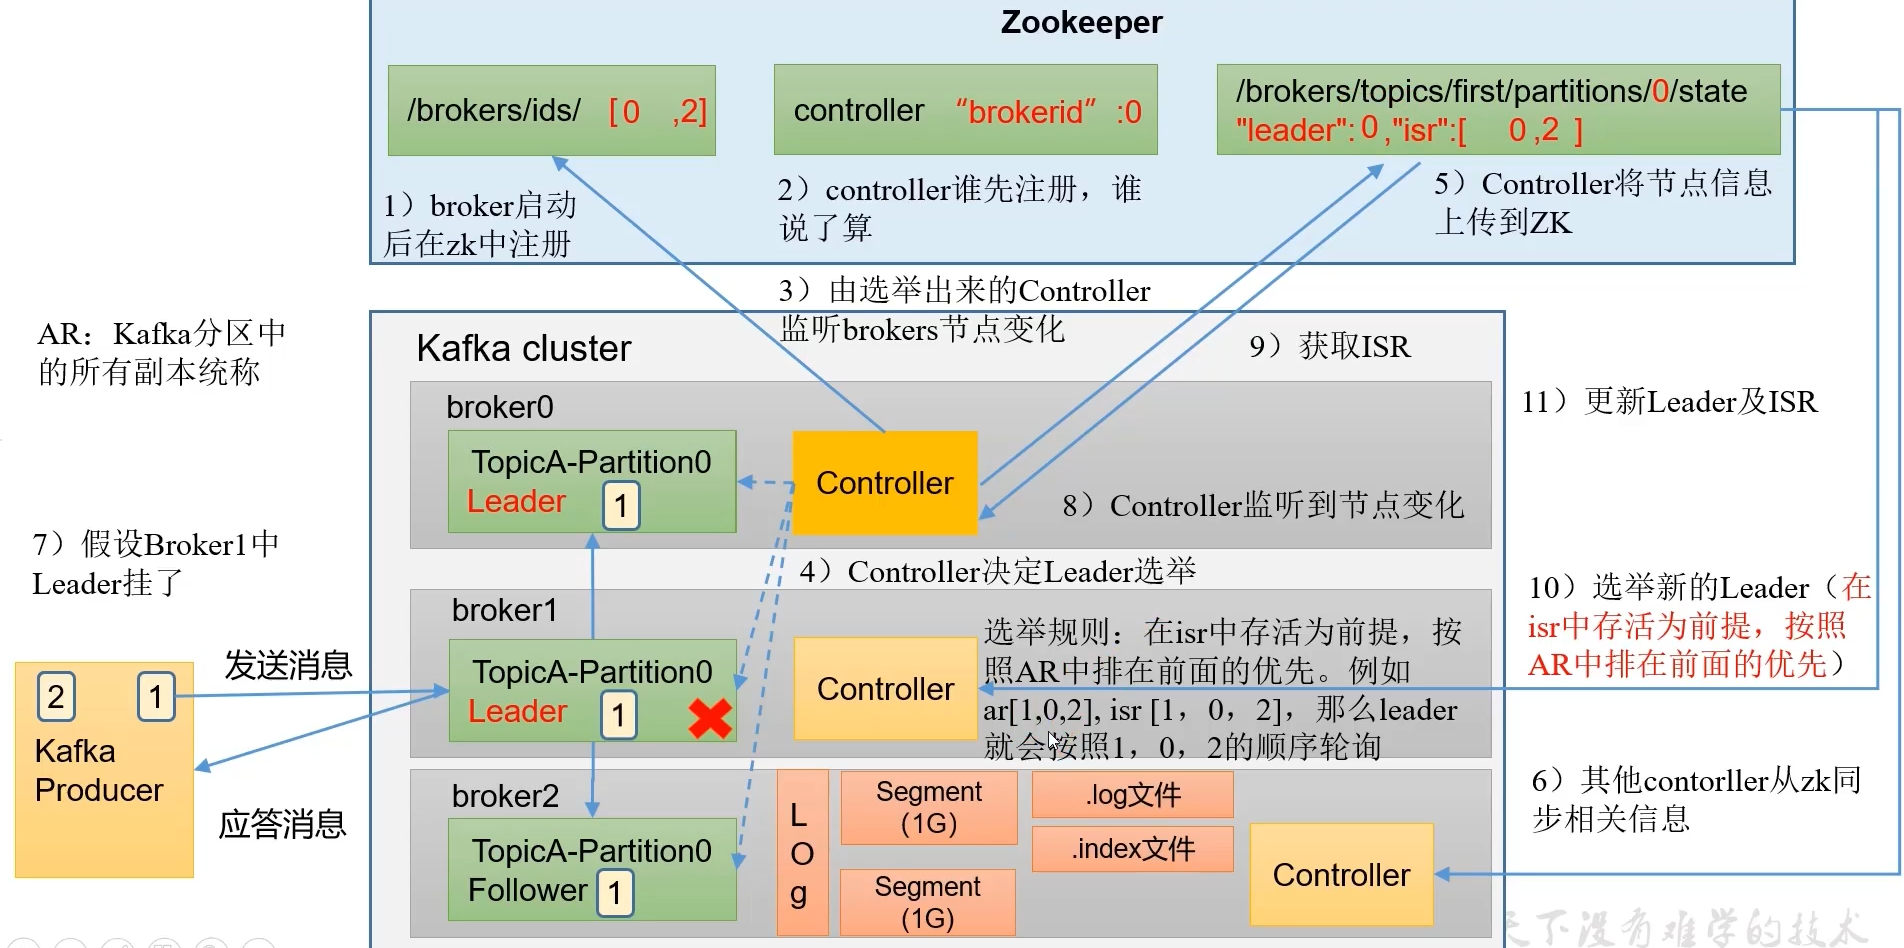
Kafka_Broker
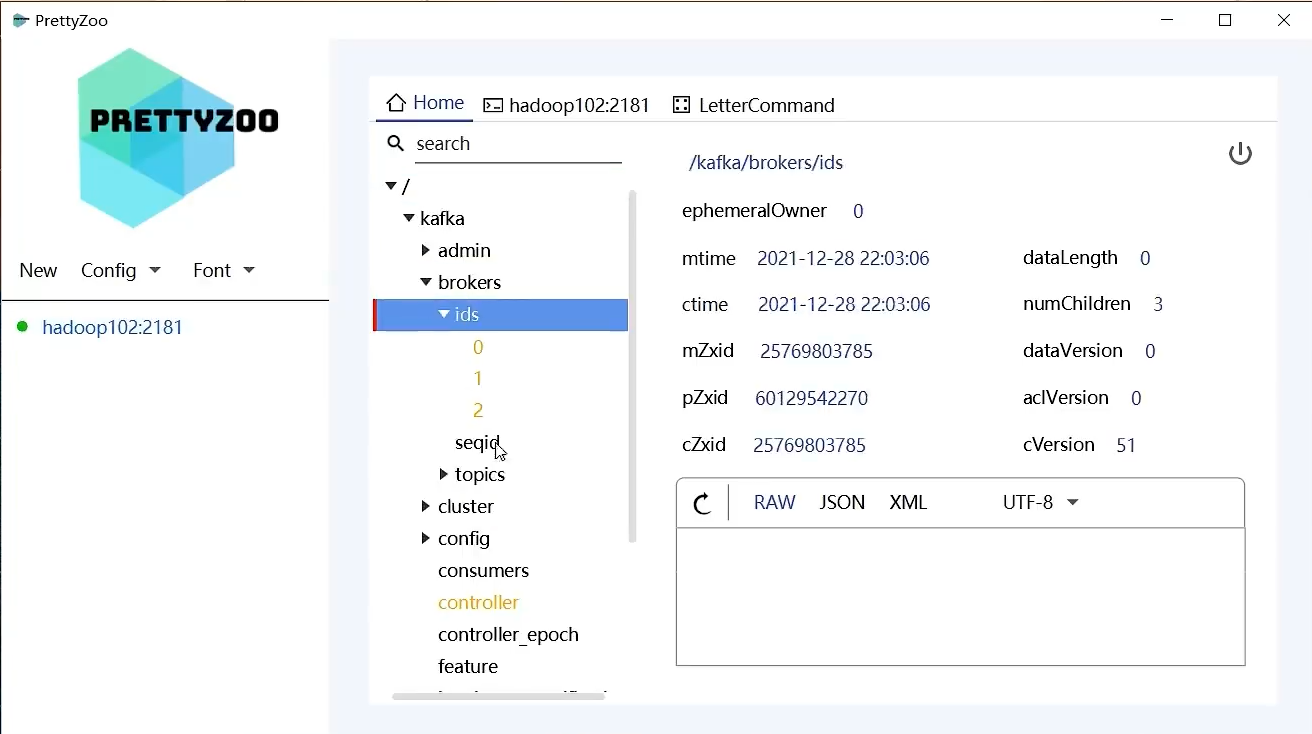
连接zookeeper工具


服役新节点
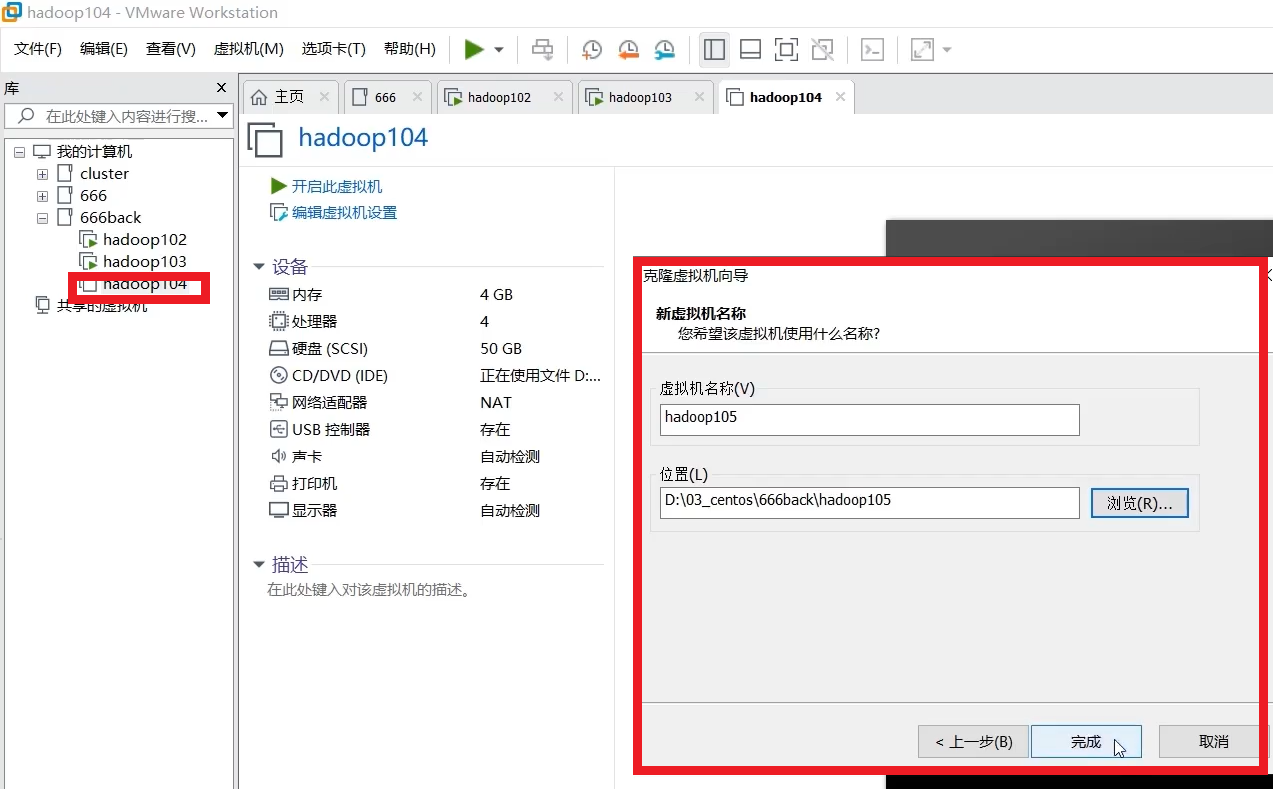
①、关闭hadoop104(克隆的方式,不需重新安装JDK,Kafka),开启hadoop105(修改IP)
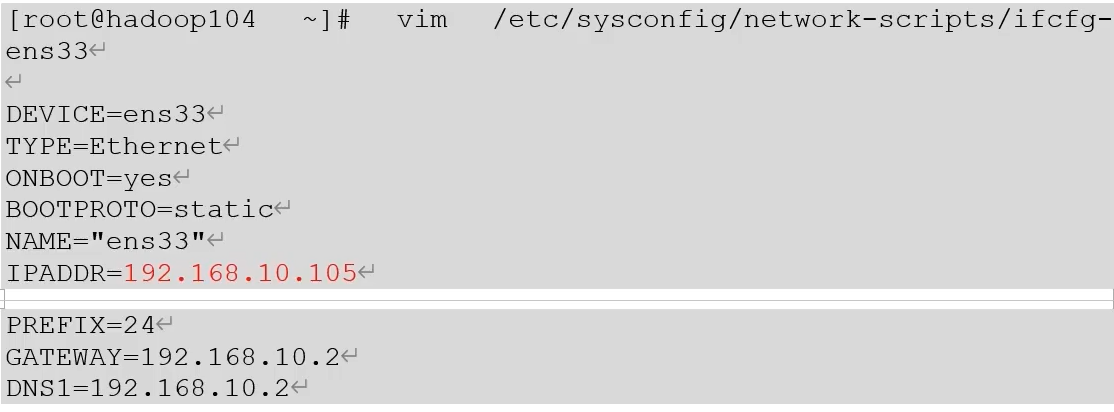
②、hadoop105上,修改主机名称hadoop105

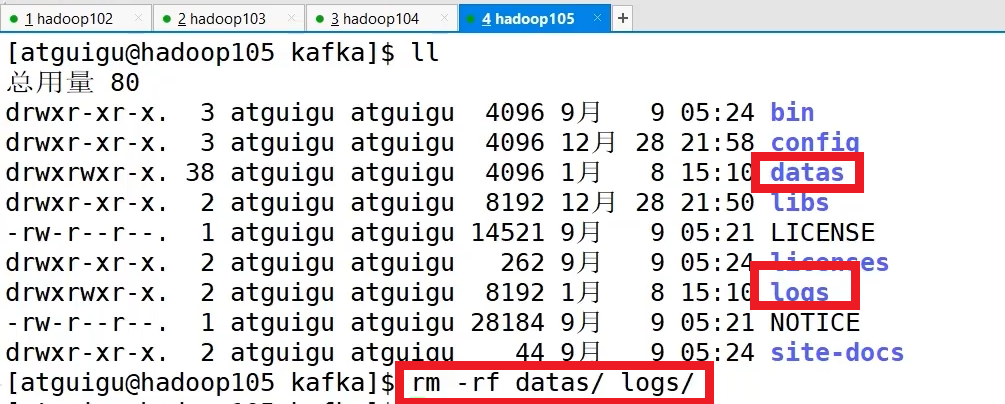
删除克隆后,原先主机的内容
修改kafka/config目录下的配置文件server.properties内容
- broker.id=3
③、启动hadoop105的kafka
bin/kafka-server-start.sh -daema config/server.properties
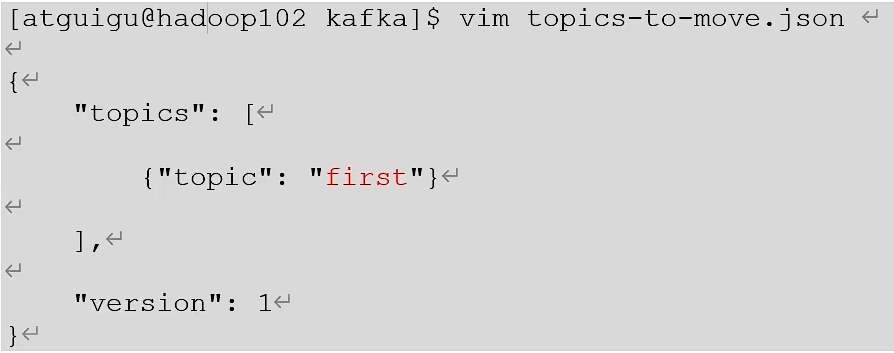
④、执行负载均衡操作
创建一个要均衡的主题(可以对多个主题):vim topics-to-move.json
{"topics":[{"topic":"first"}],"version":1
}

为4台服务器生成负载均衡计划

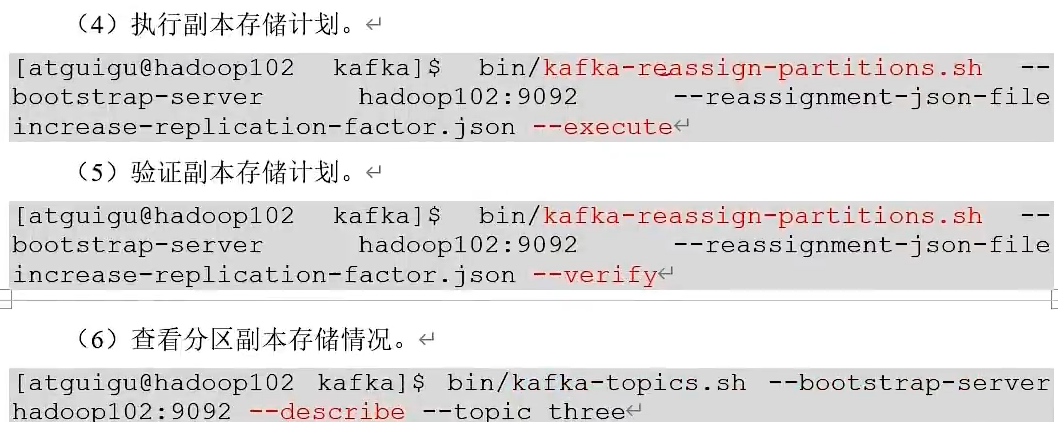
⑤、创建副本存储计划(所有副本存储在broker0,broker1,broker2,broker3)
将第④步的生成计划复制到lication-factor.json文件中
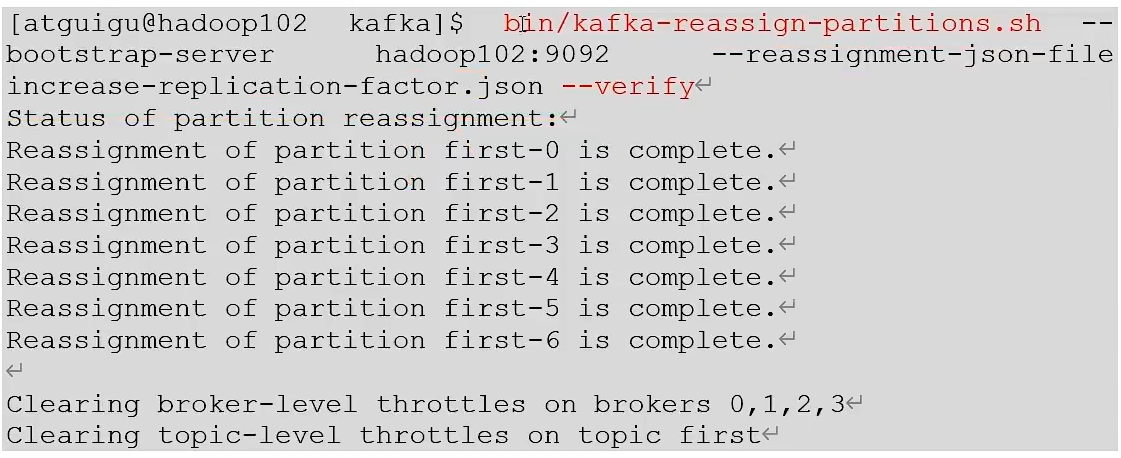
执行副本存储计划

验证副本存储计划
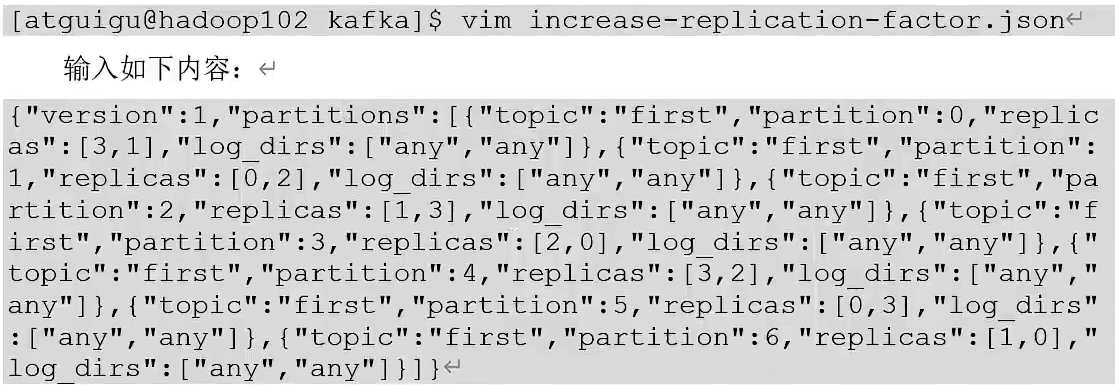
退役旧节点
①、执行负载均衡操作,创建一个要均衡的主题
②、创建执行计划
将生成的内容复制到:vim increase-replication-factor.json
③、创建副本存储计划(所有副本存储在broker0 broker1 broker2)

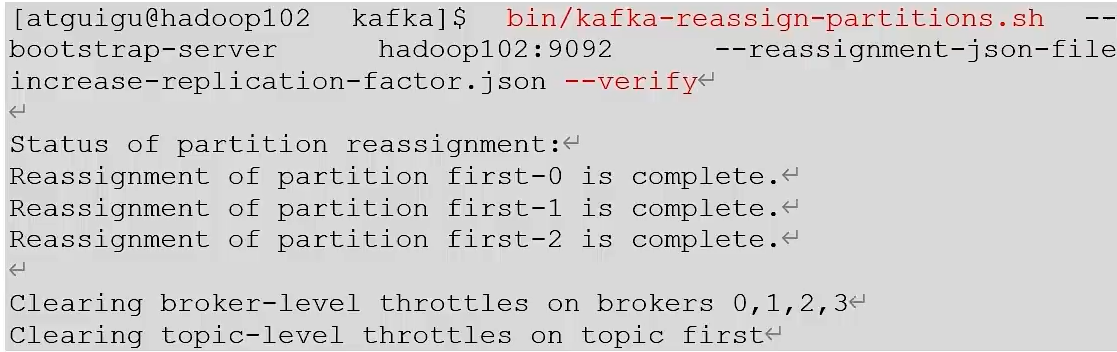
④、验证副本计划
副本
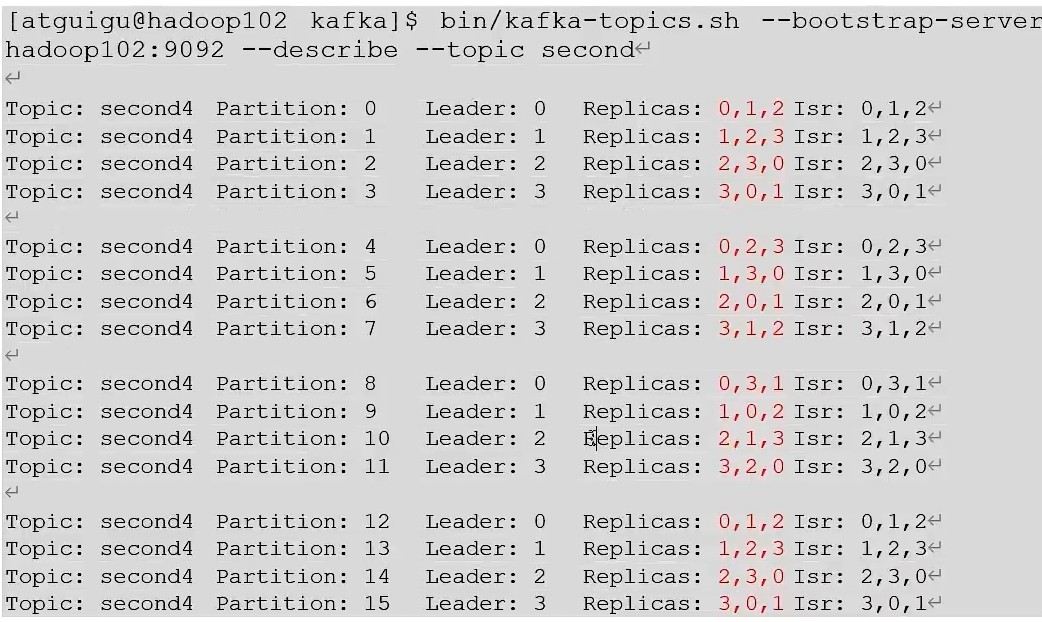
依照命令创建主题atguigu2,并查看详细情况

进入对应的服务器中,停用对应的kafka,再查看详细情况

进入对应的服务器中,恢复对应的kafka,再查看详细情况

分区副本分配

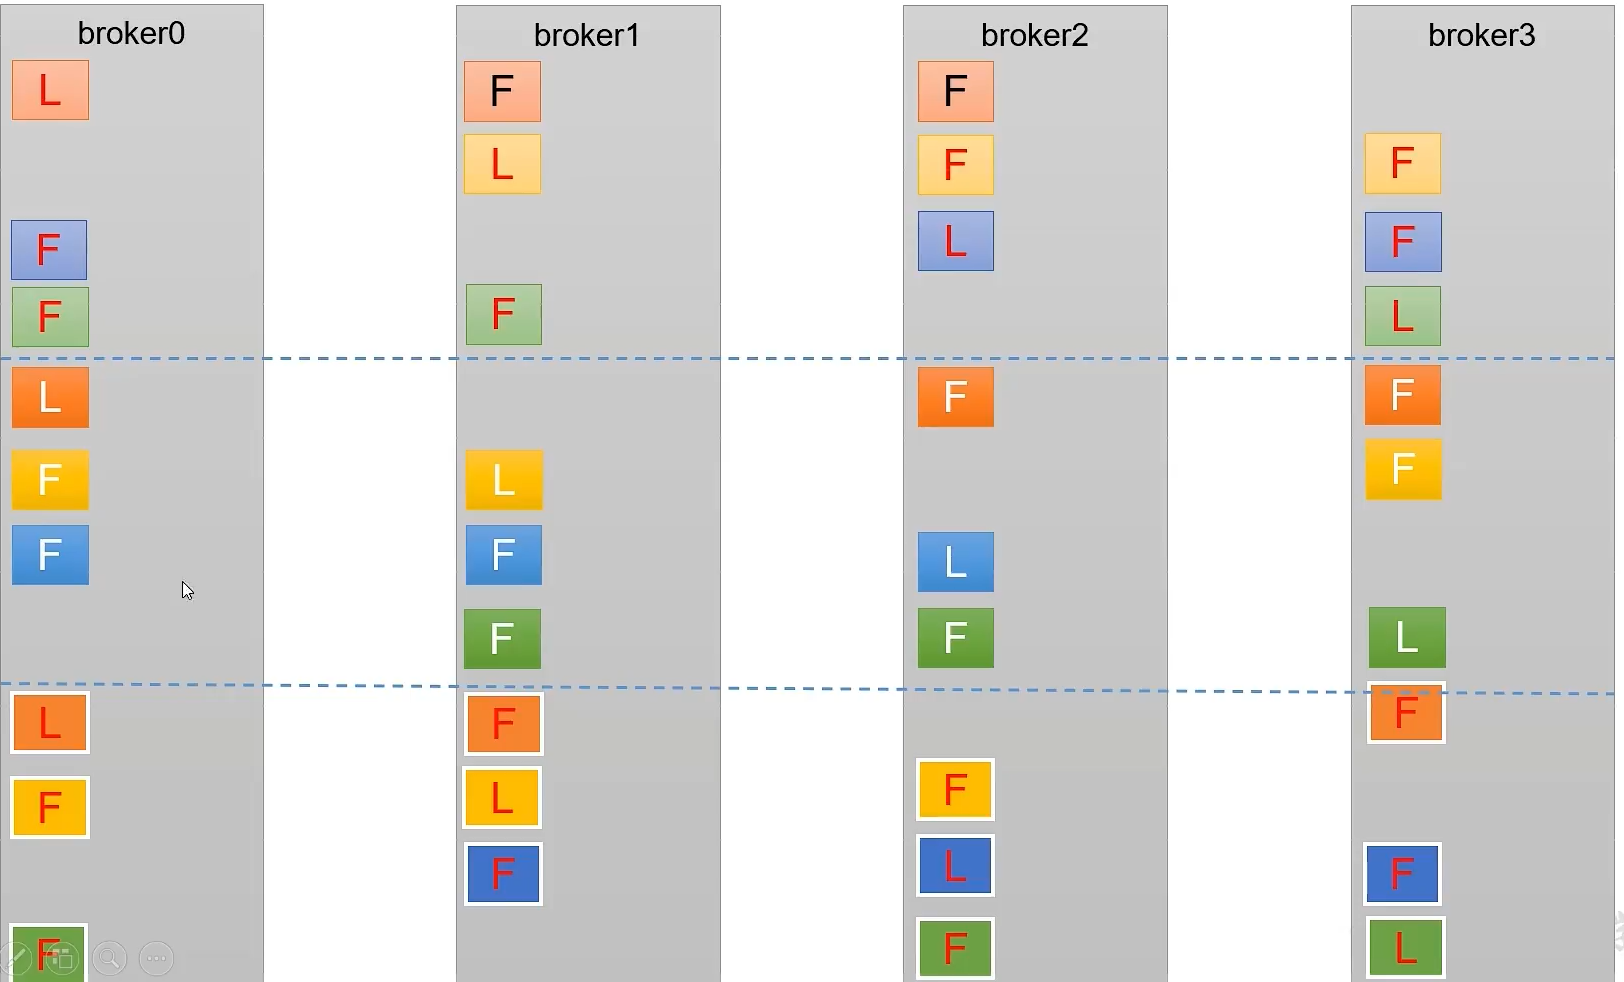
生产环境中,每台服务器的配置和性能不一致,但是kafka只会根据自己的代码规则创建对应的分区副本
就会导致个别的服务器存储压力较大,所以需要手动调整分区副本的存储
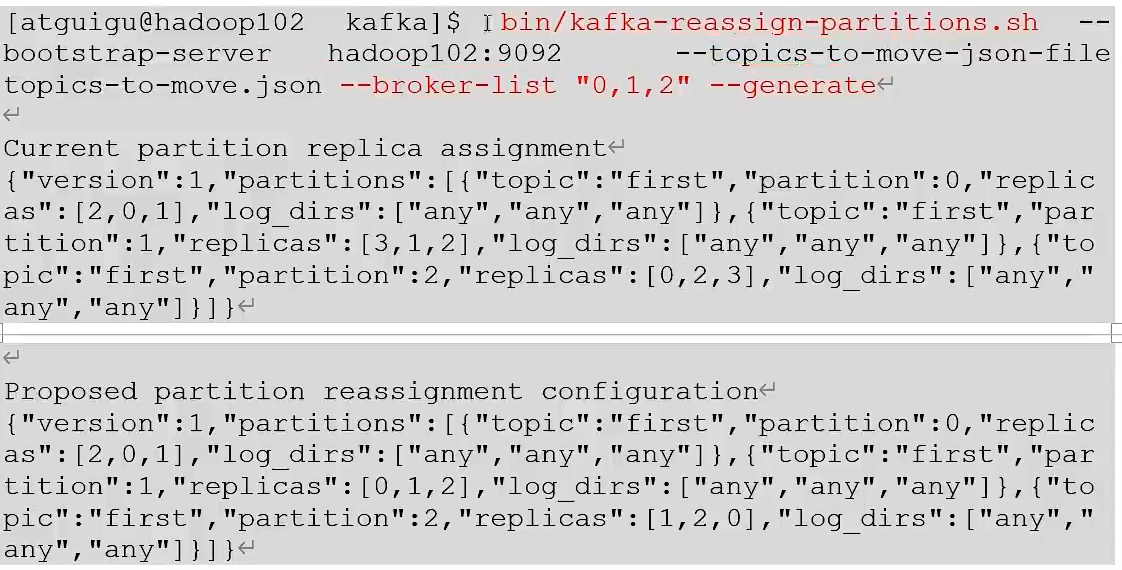
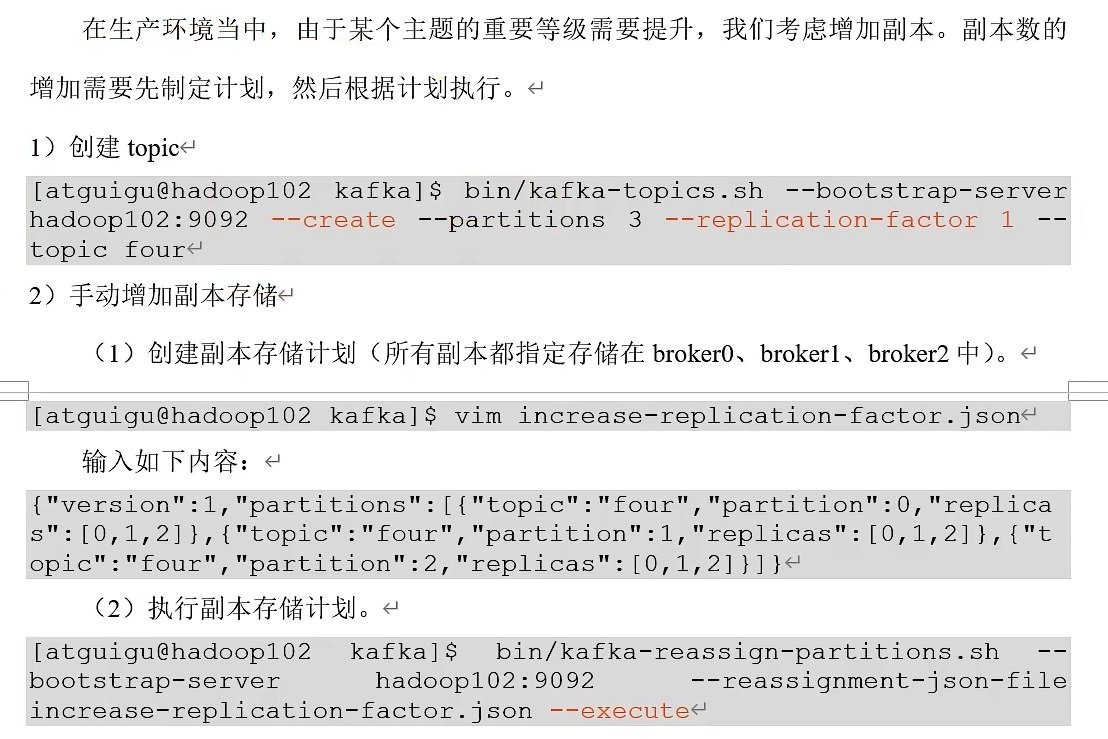
需求:创建一个新的topic,4个分区,两个副本,名称为three。
将该topic所有副本存储到broker0和broker1两台服务器上
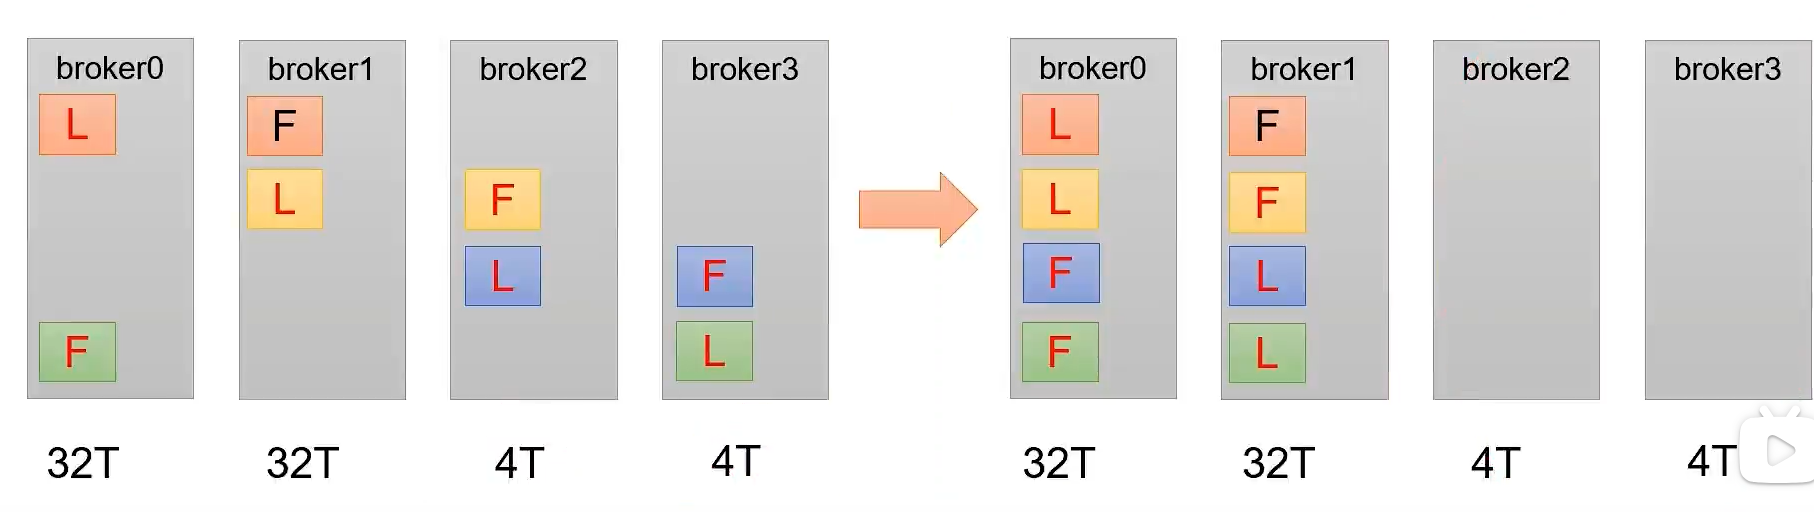
手动调整分区副本存储:
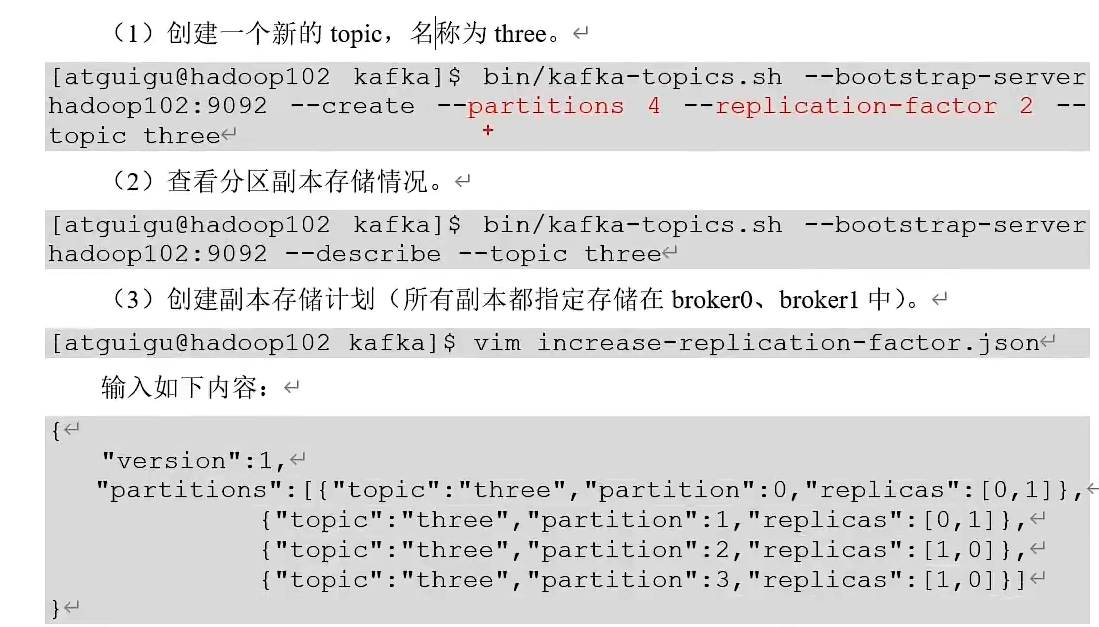
增加副本因子
通过命令无法提高副本,需要通过文件计划的方式
文件存储
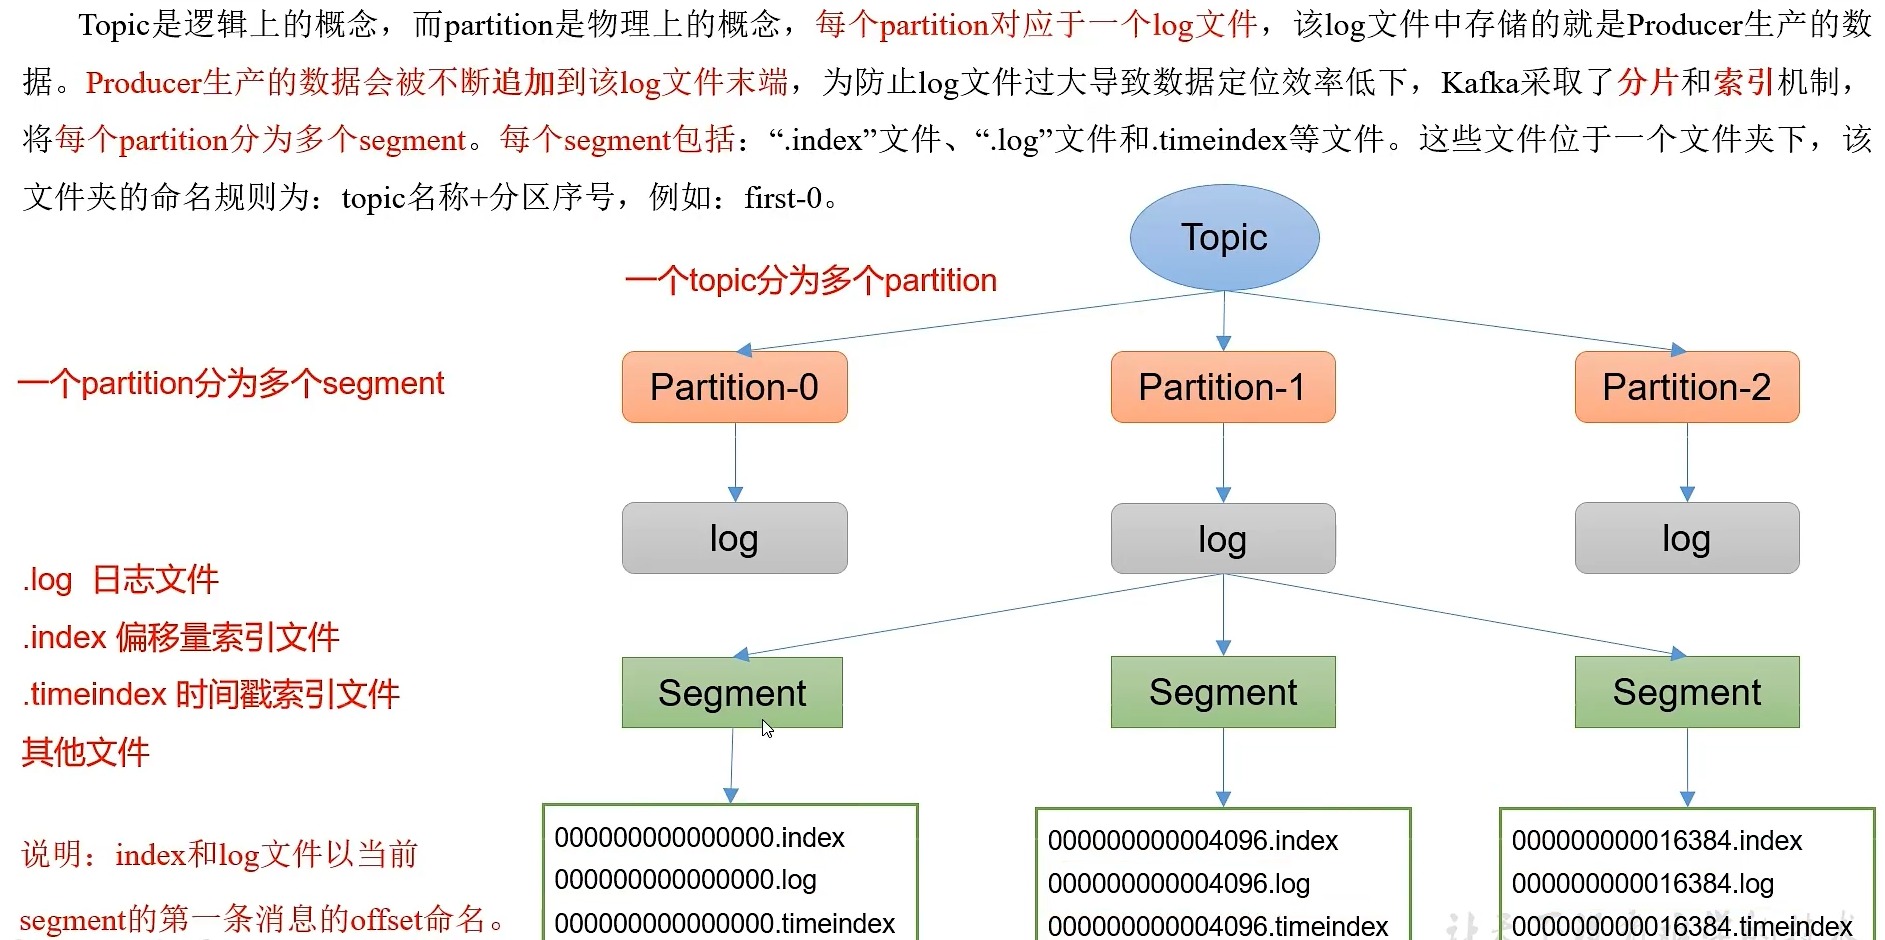
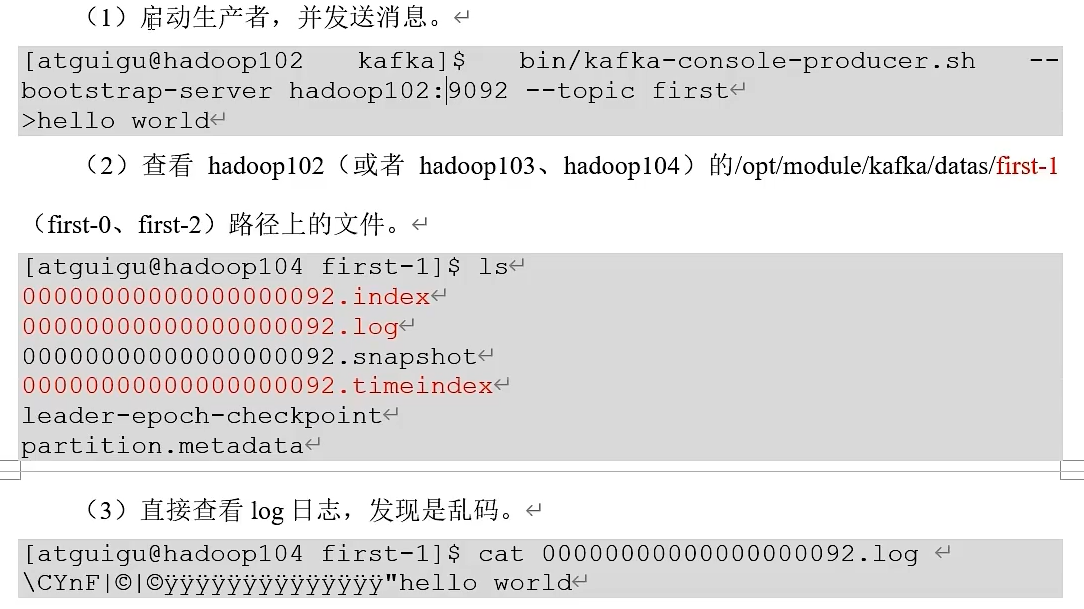
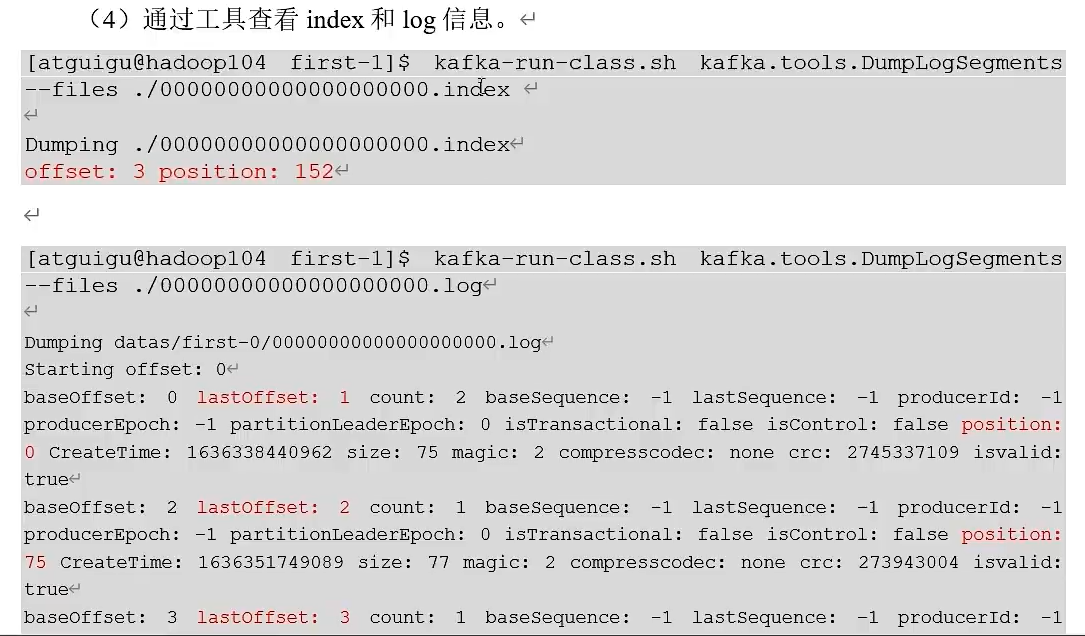
topic数据存储的位置
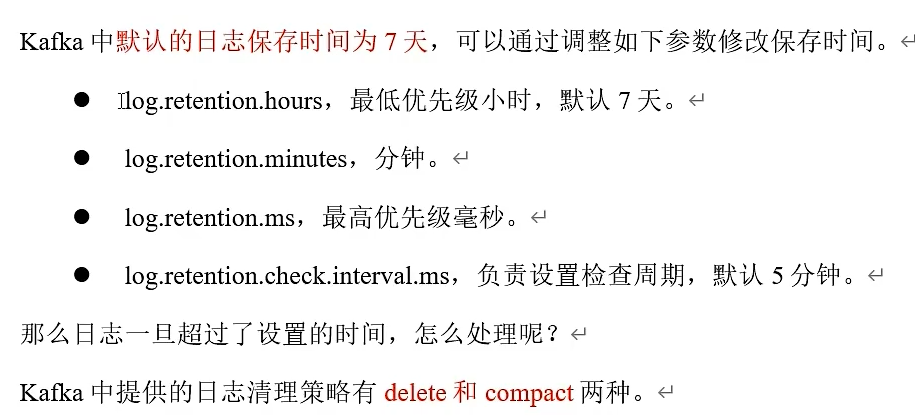
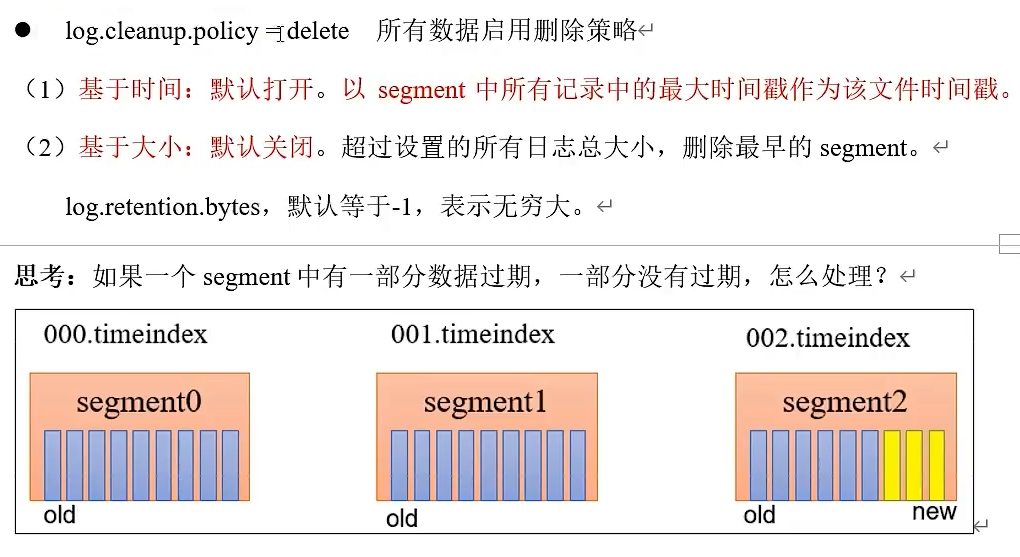
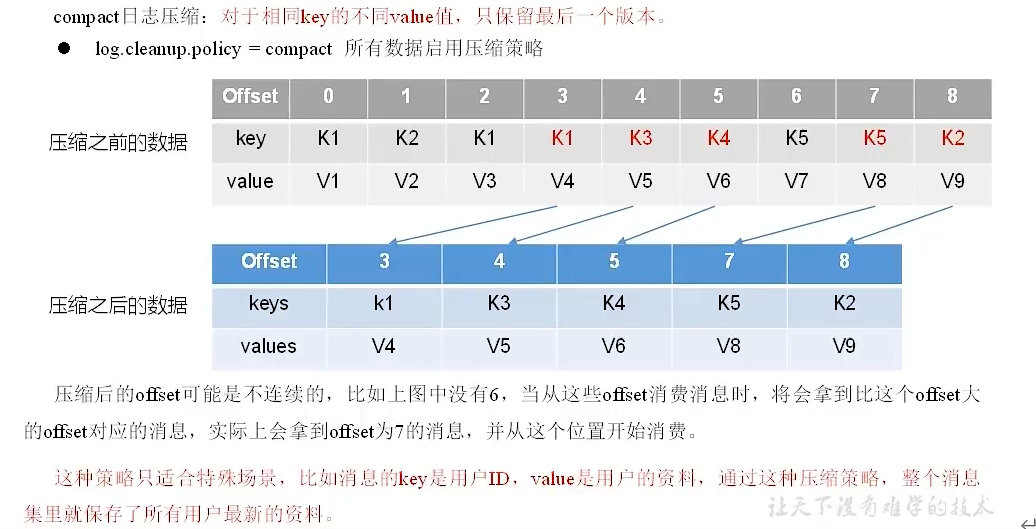
文件清理策略
消费者
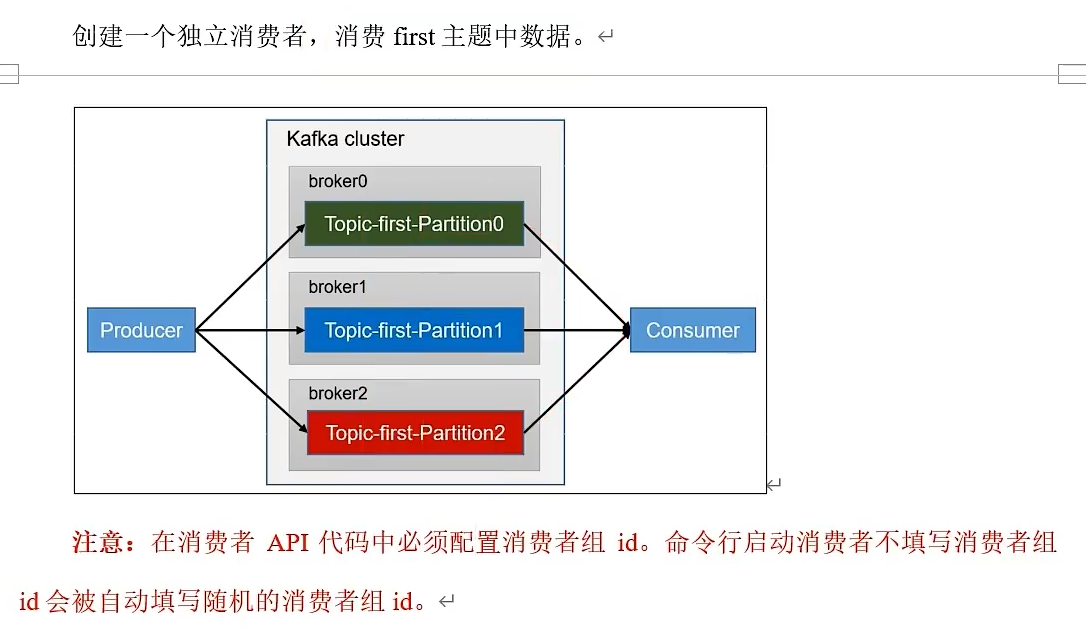
public class CustomerConsumer{public static void main(String[] args){//配置Properties properteis = new Properties();properties.put(ConsumerConfig.BOOTSTRAP_SERVERS_CONFIG,"hadoop102:9092,hadoop103:9092");//连接properties.put(ConsumerConfig.KEY_DESERIALIZER_CLASS_CONFIG,StringDeserializer.class.getName());//反序列化properties.put(ConsumerConfig.VALUE_DESERIALIZER_CLASS_CONFIG,StringDeserializer.class.getName());//配置消费组idproperties.put(ConsumerConfig.GROUP_ID_CONFIG,"test");//创建一个消费者KafkaConsumer<String,String> kafkaConsumer = new KafkaConsumer<>(properties);//订阅主题ArrayList<String> topics = new ArrayList<>();topics.add("first");kafkaConsumer.subscribe(topics);//消费数据while(true){ConsumerRecords<String,String> consumerRecords = kafkaConsumer.poll(Duration.ofSeconds(1));for(ConsumerRecord<String,String> consumerRecord:consumerRecords){System.out.println(consumerRecord);}}}
}
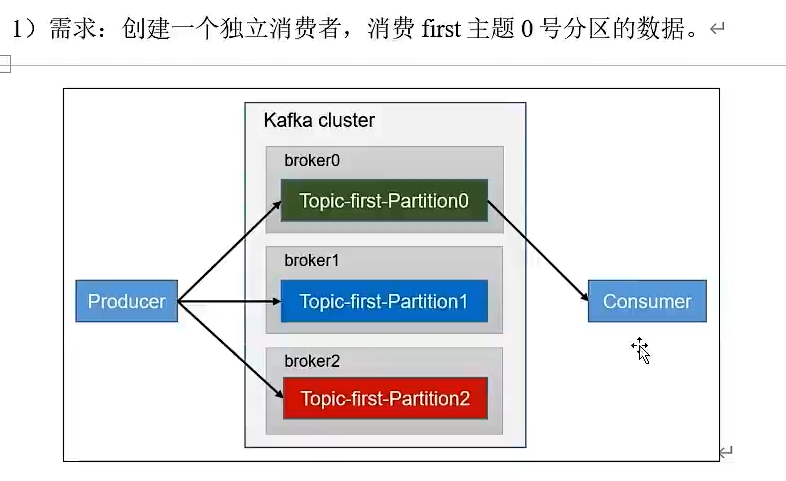
public class CustomerConsumer{public static void main(String[] args){//配置Properties properteis = new Properties();properties.put(ConsumerConfig.BOOTSTRAP_SERVERS_CONFIG,"hadoop102:9092,hadoop103:9092");//连接properties.put(ConsumerConfig.KEY_DESERIALIZER_CLASS_CONFIG,StringDeserializer.class.getName());//反序列化properties.put(ConsumerConfig.VALUE_DESERIALIZER_CLASS_CONFIG,StringDeserializer.class.getName());//配置消费组idproperties.put(ConsumerConfig.GROUP_ID_CONFIG,"test");//创建一个消费者KafkaConsumer<String,String> kafkaConsumer = new KafkaConsumer<>(properties);//订阅主题对应的分区ArrayList<String> topicPartitions = new ArrayList<>();topicPartitions.add(new TopicPartition("first",0));//指定分区发送数据kafkaConsumer.subscribe(topicPartitions);//消费数据while(true){ConsumerRecords<String,String> consumerRecords = kafkaConsumer.poll(Duration.ofSeconds(1));for(ConsumerRecord<String,String> consumerRecord:consumerRecords){System.out.println(consumerRecord);}}}
}
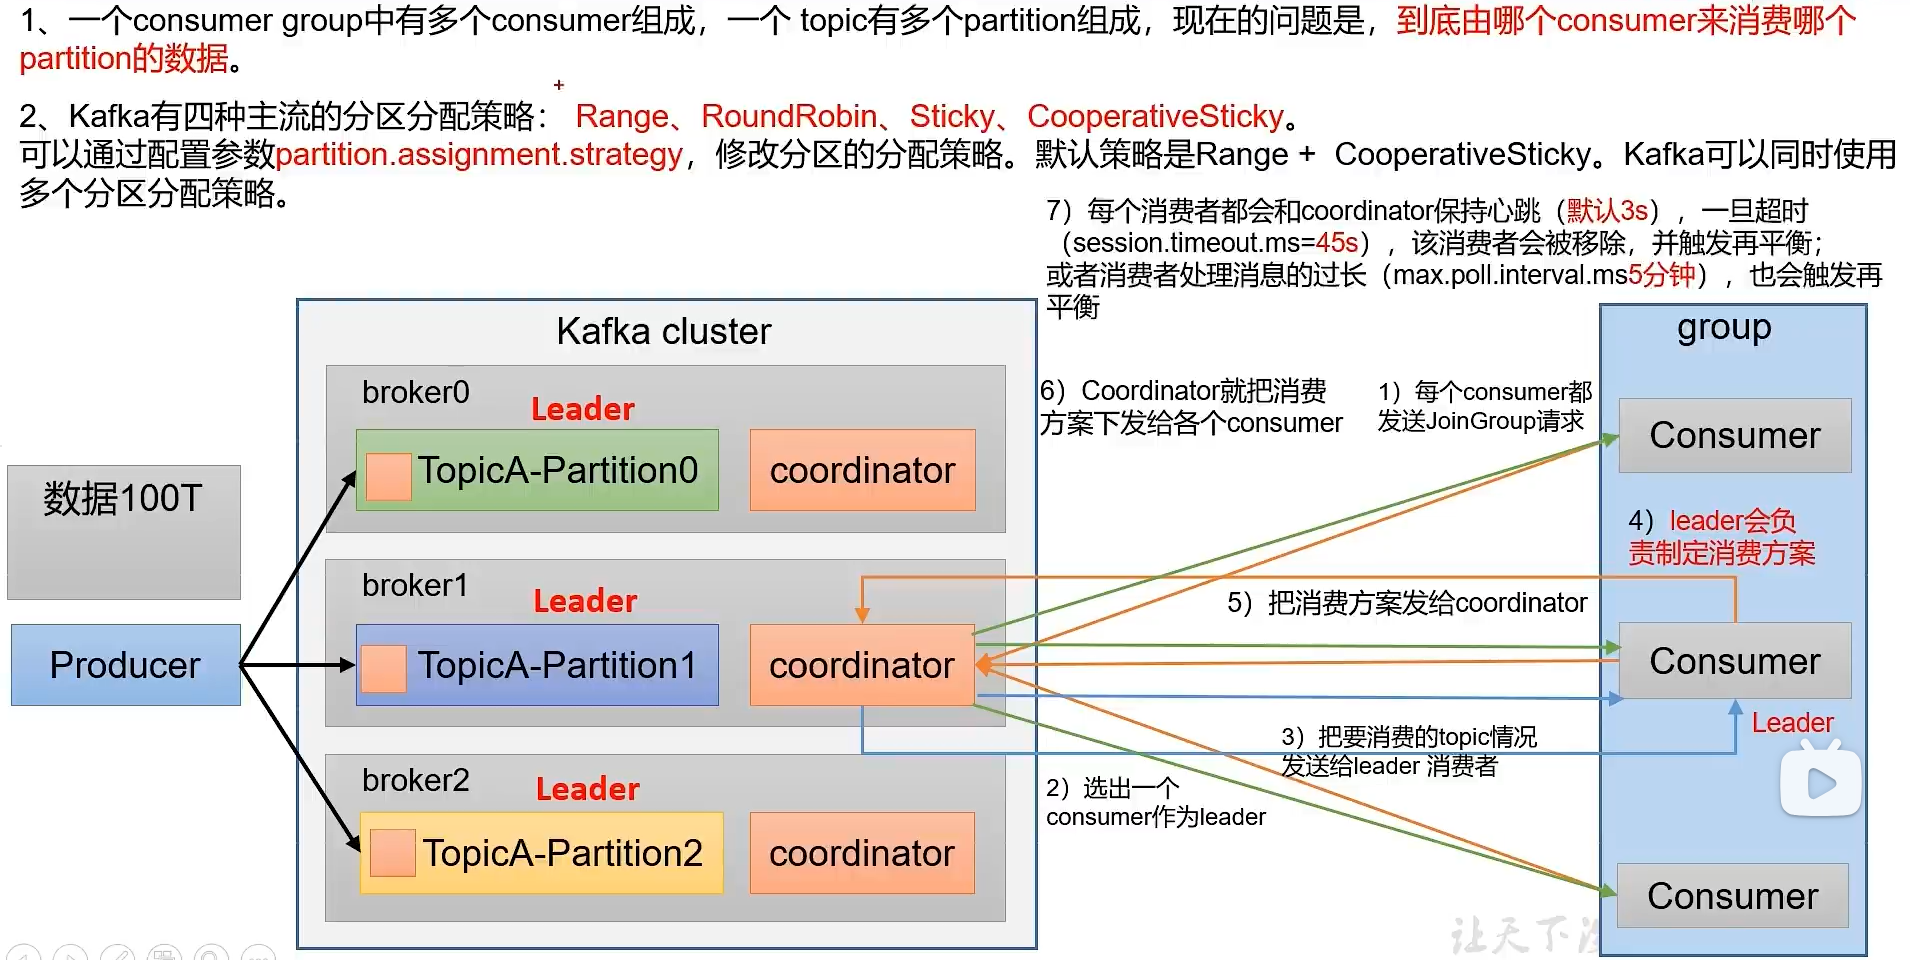
分区的分配以及再平衡
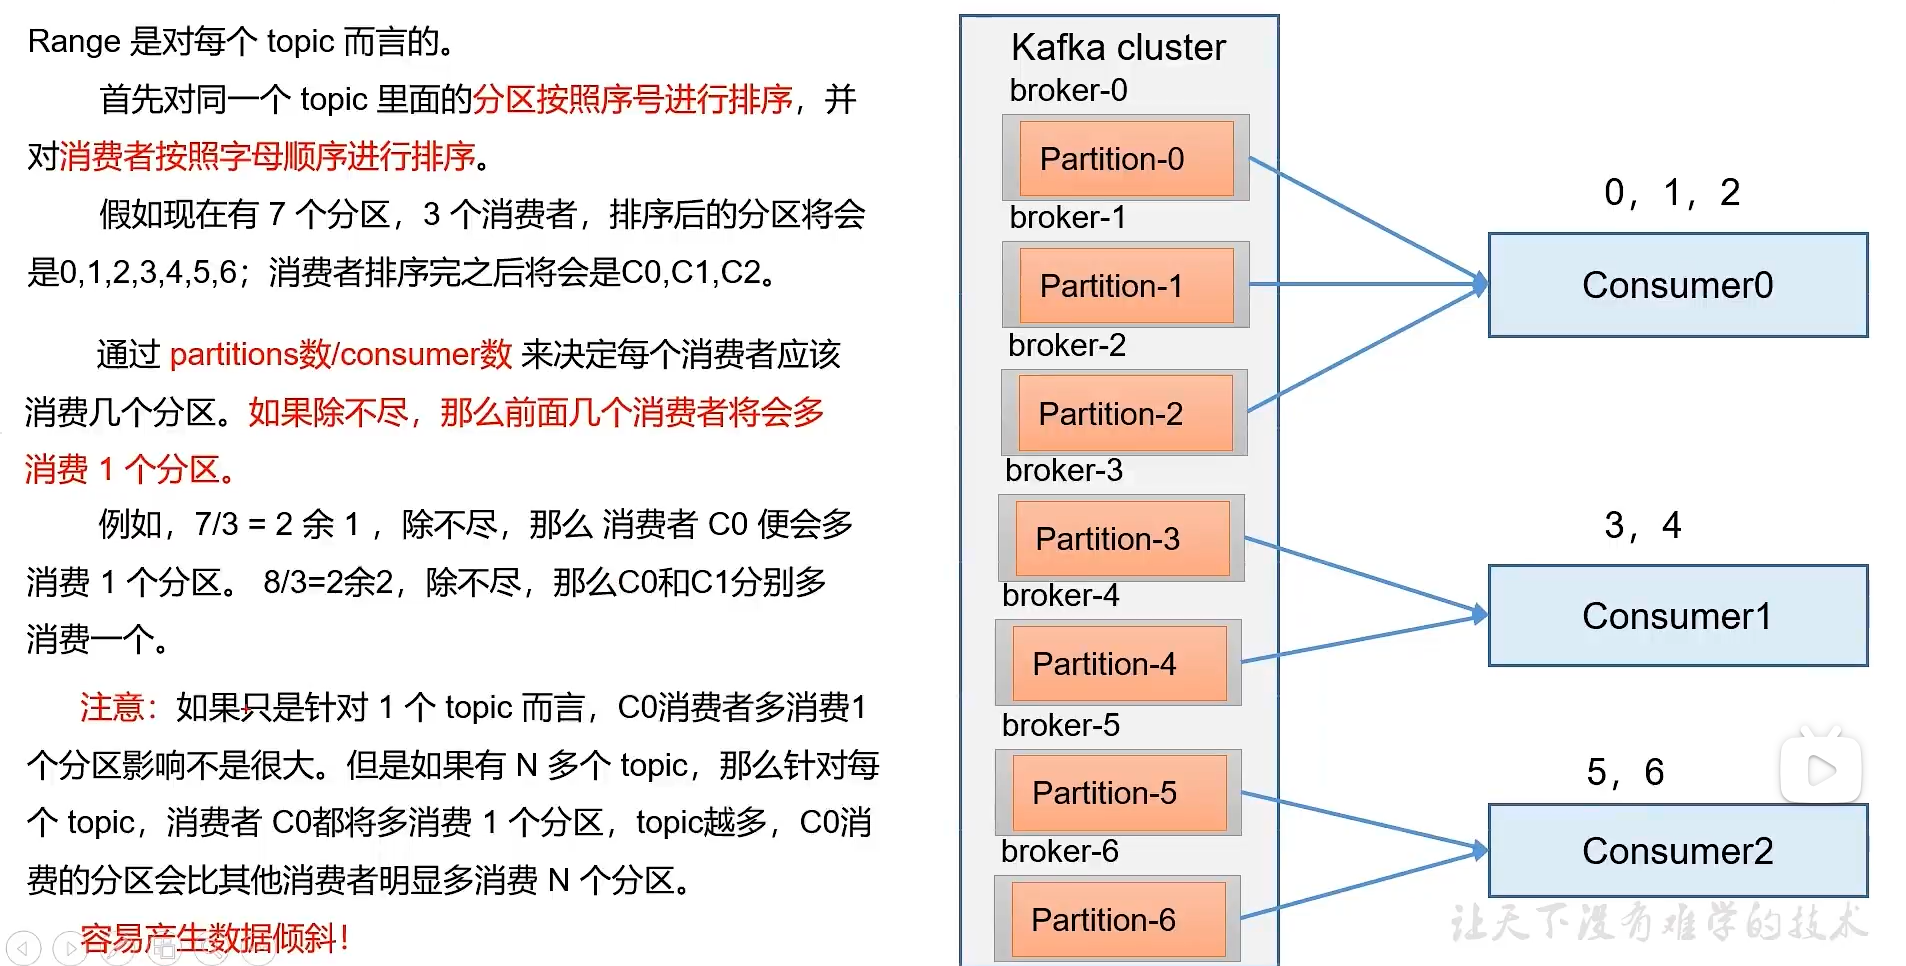
- Range以及再平衡
- RoundRobin以及再平衡
- Sticky以及再平衡
自动提交offset
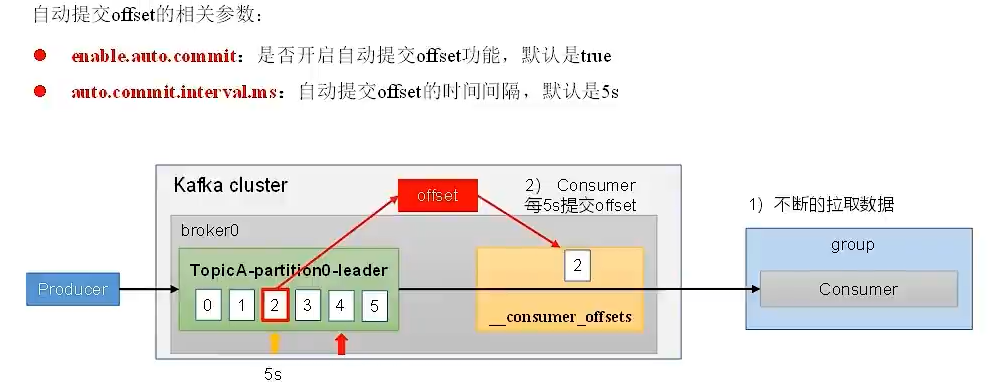
//自动提交
properties.put(ConsumerConfig.ENABLE_AUTO_COMMIT_CONFIG,true);//提交时间间隔
properties.put(ConsumerConfig.AUTO_COMMIT_INTERVAL_MS_CONFIG,1000);
手动提交offset
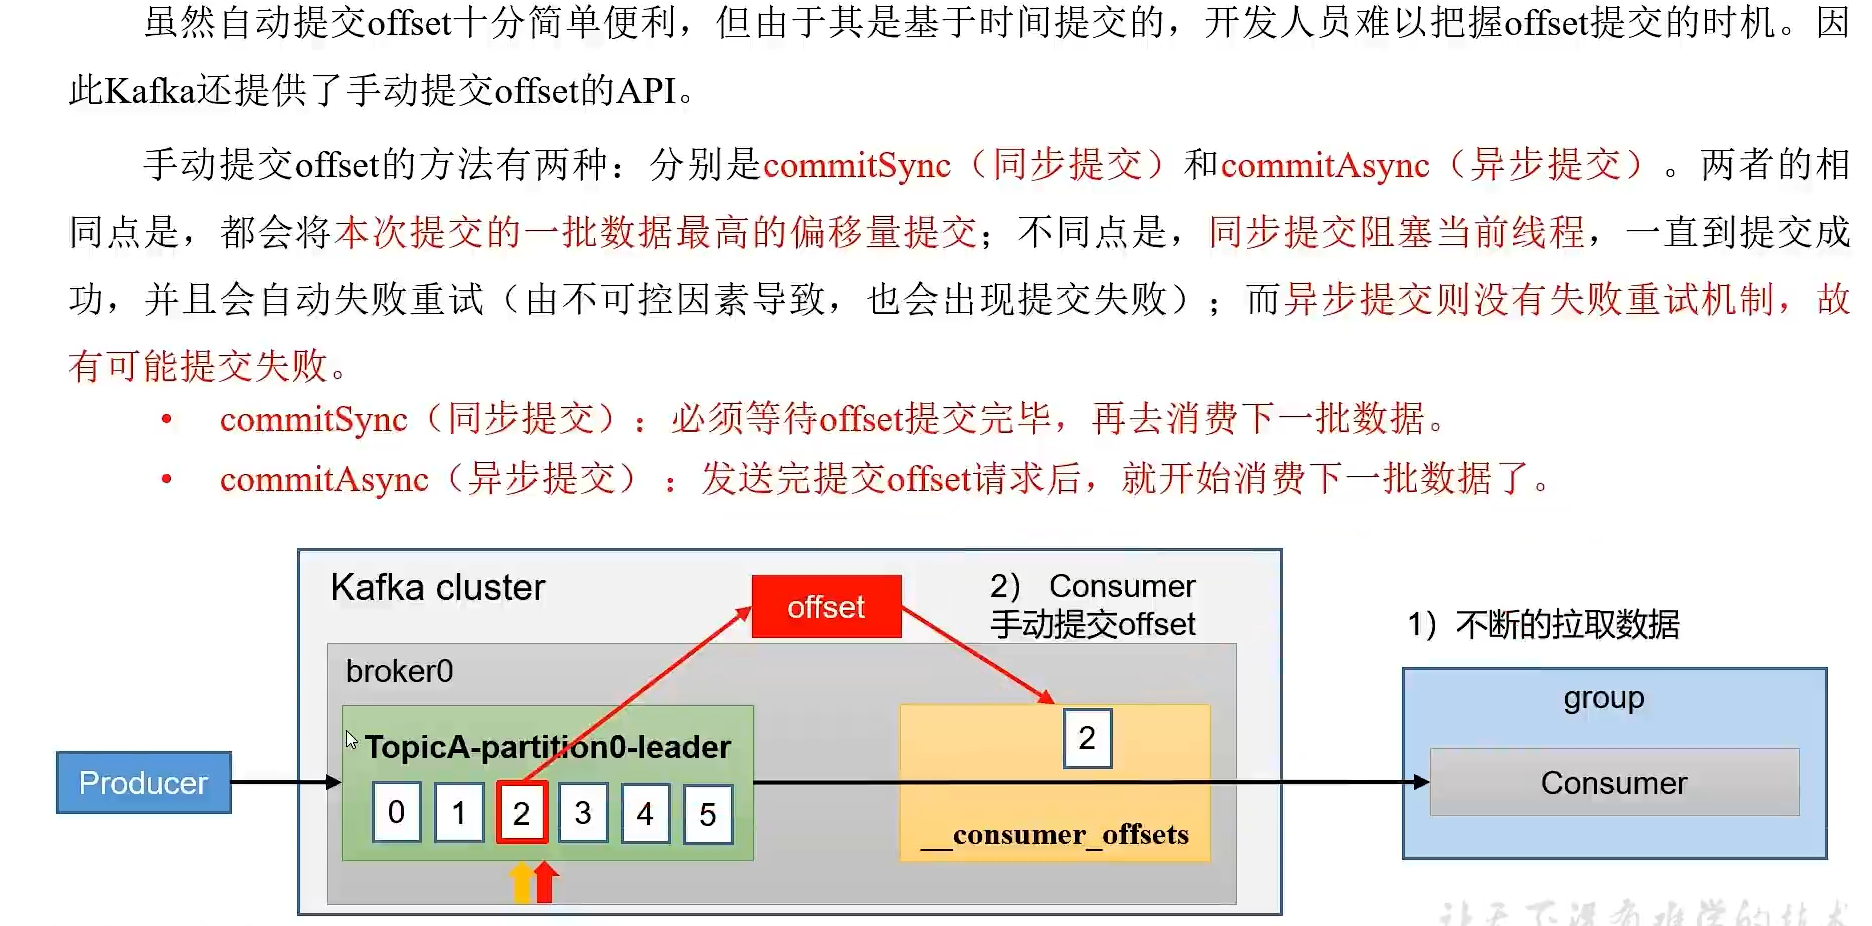
properties.put(ConsumerConfig.ENABLE_AUTO_COMMIT_CONFIG,false);//.......while(true){ConsumerRecords<String,String> consumerRecords = kafkaConsumer.poll(Duration.ofSeconds(1));for(ConsumerRecord<String,String> consumerRecord:consumerRecords){System.out.println(consumerRecord);}//手动提交offsetkafkaConsumer.commitSync();//同步提交//kafkaConsumer.commitAsync(); 异步提交
}
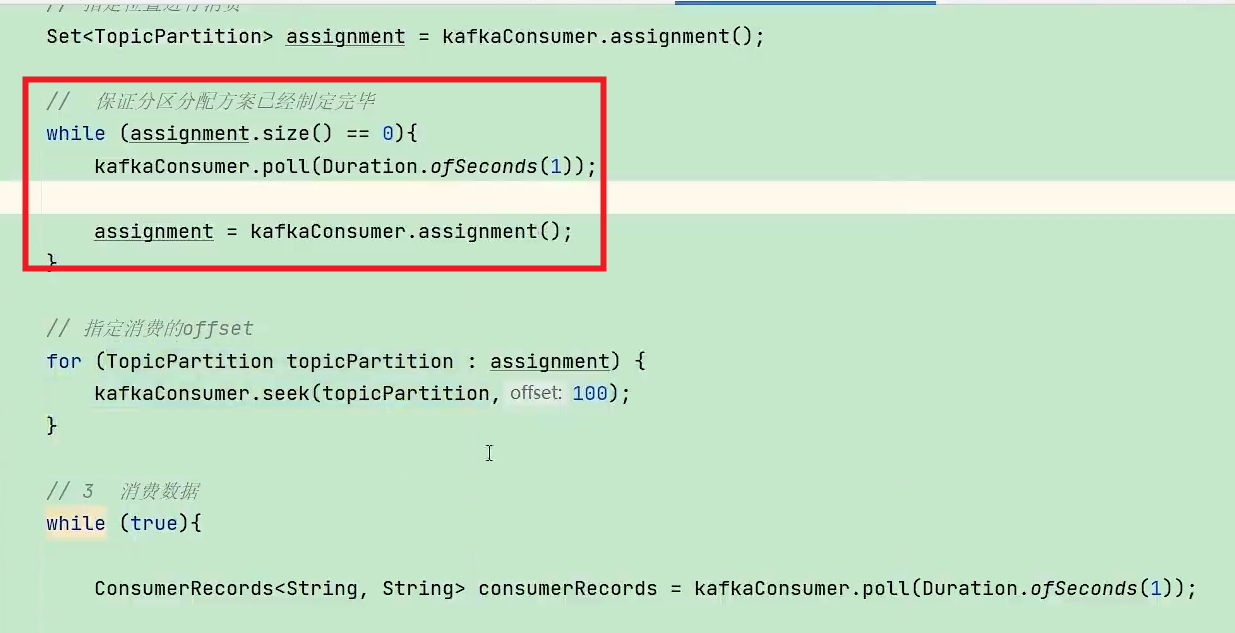
指定offset消费
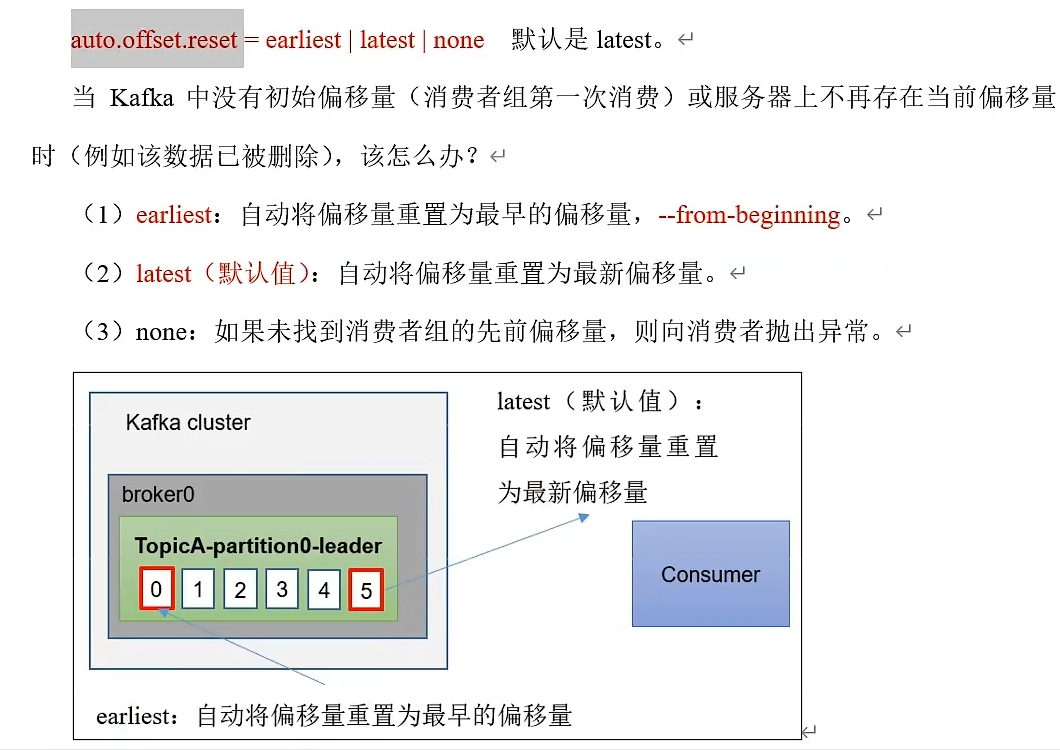

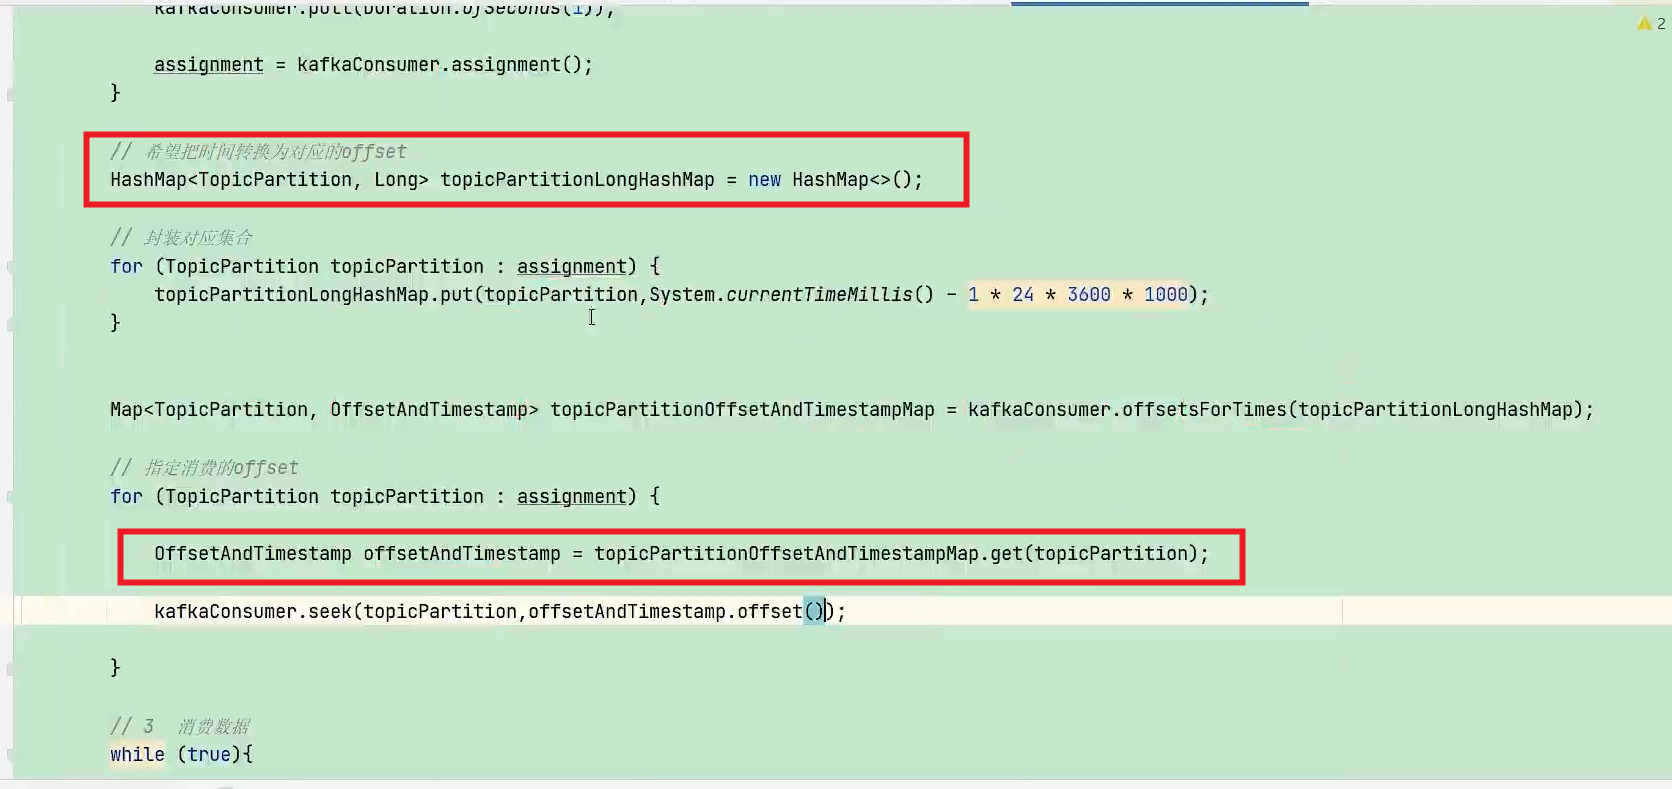
按照时间进行消费
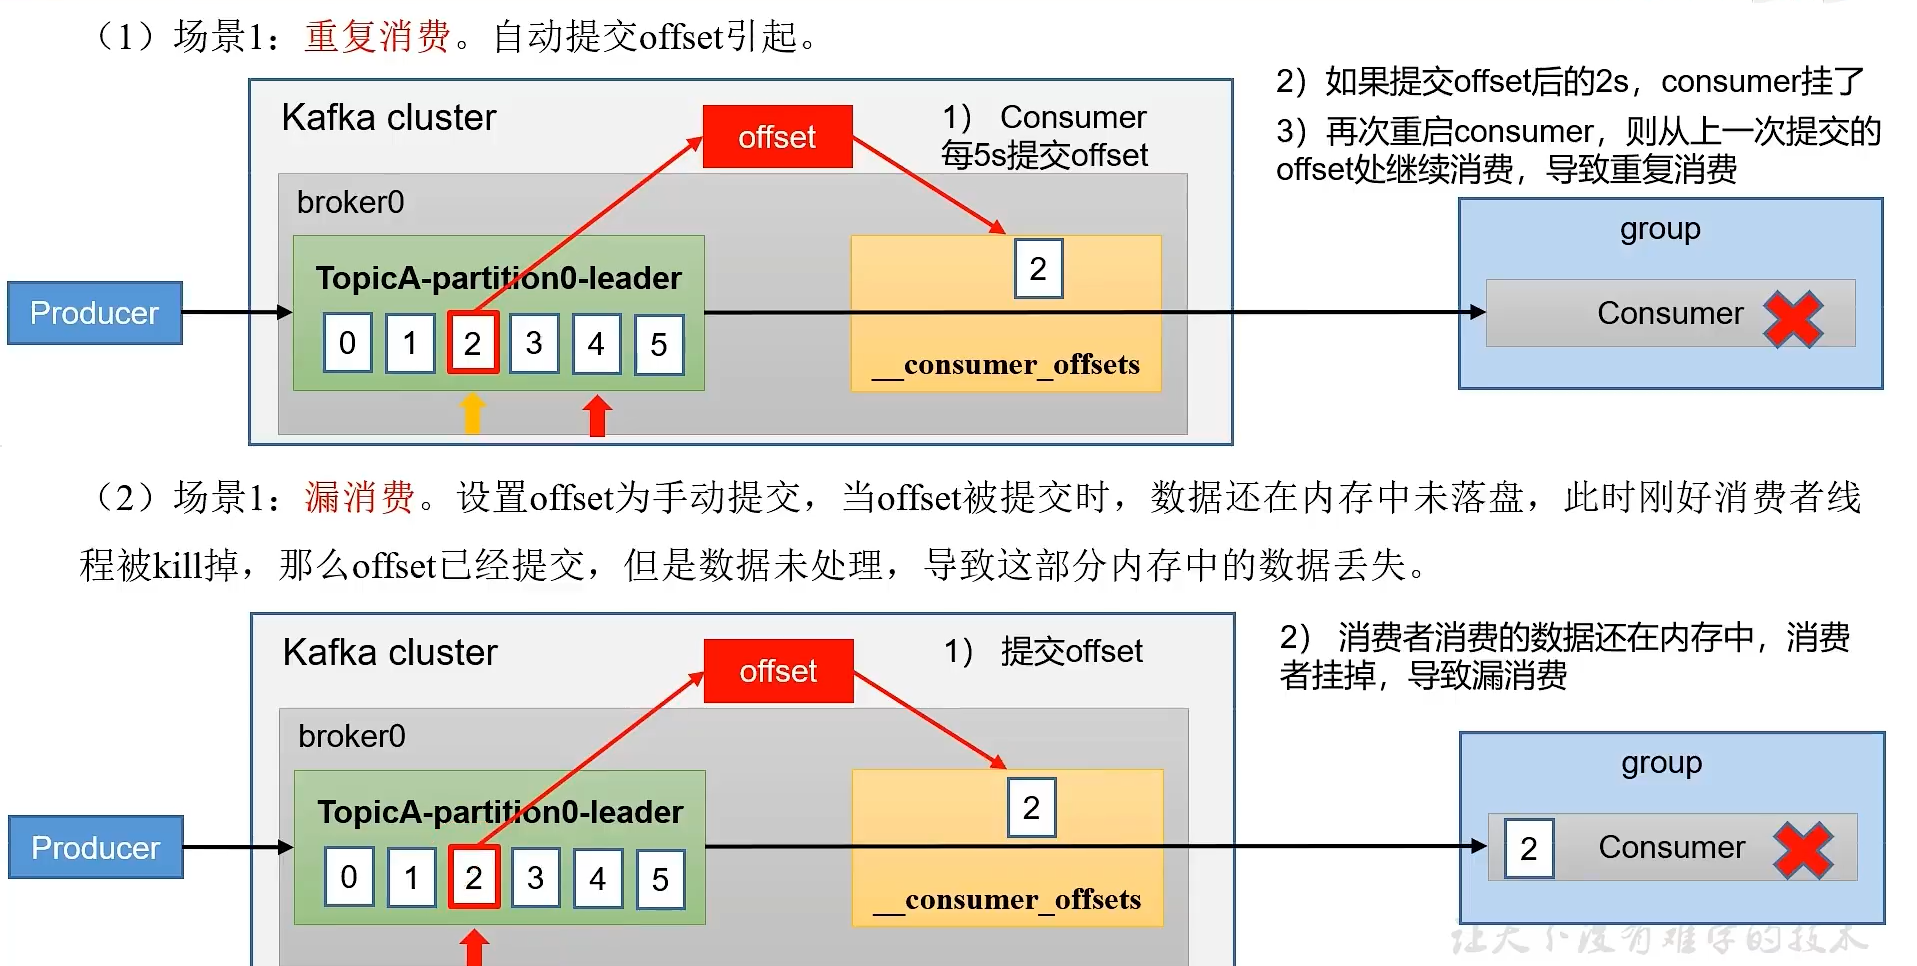
重复消费:已经消费的数据,但是offset没提交
漏消费:先提交offset后消费,有可能会造成数据的漏消费
消费者事务
- 生产端——》集群
- 集群——》消费者
- 消费者——》下游的框架
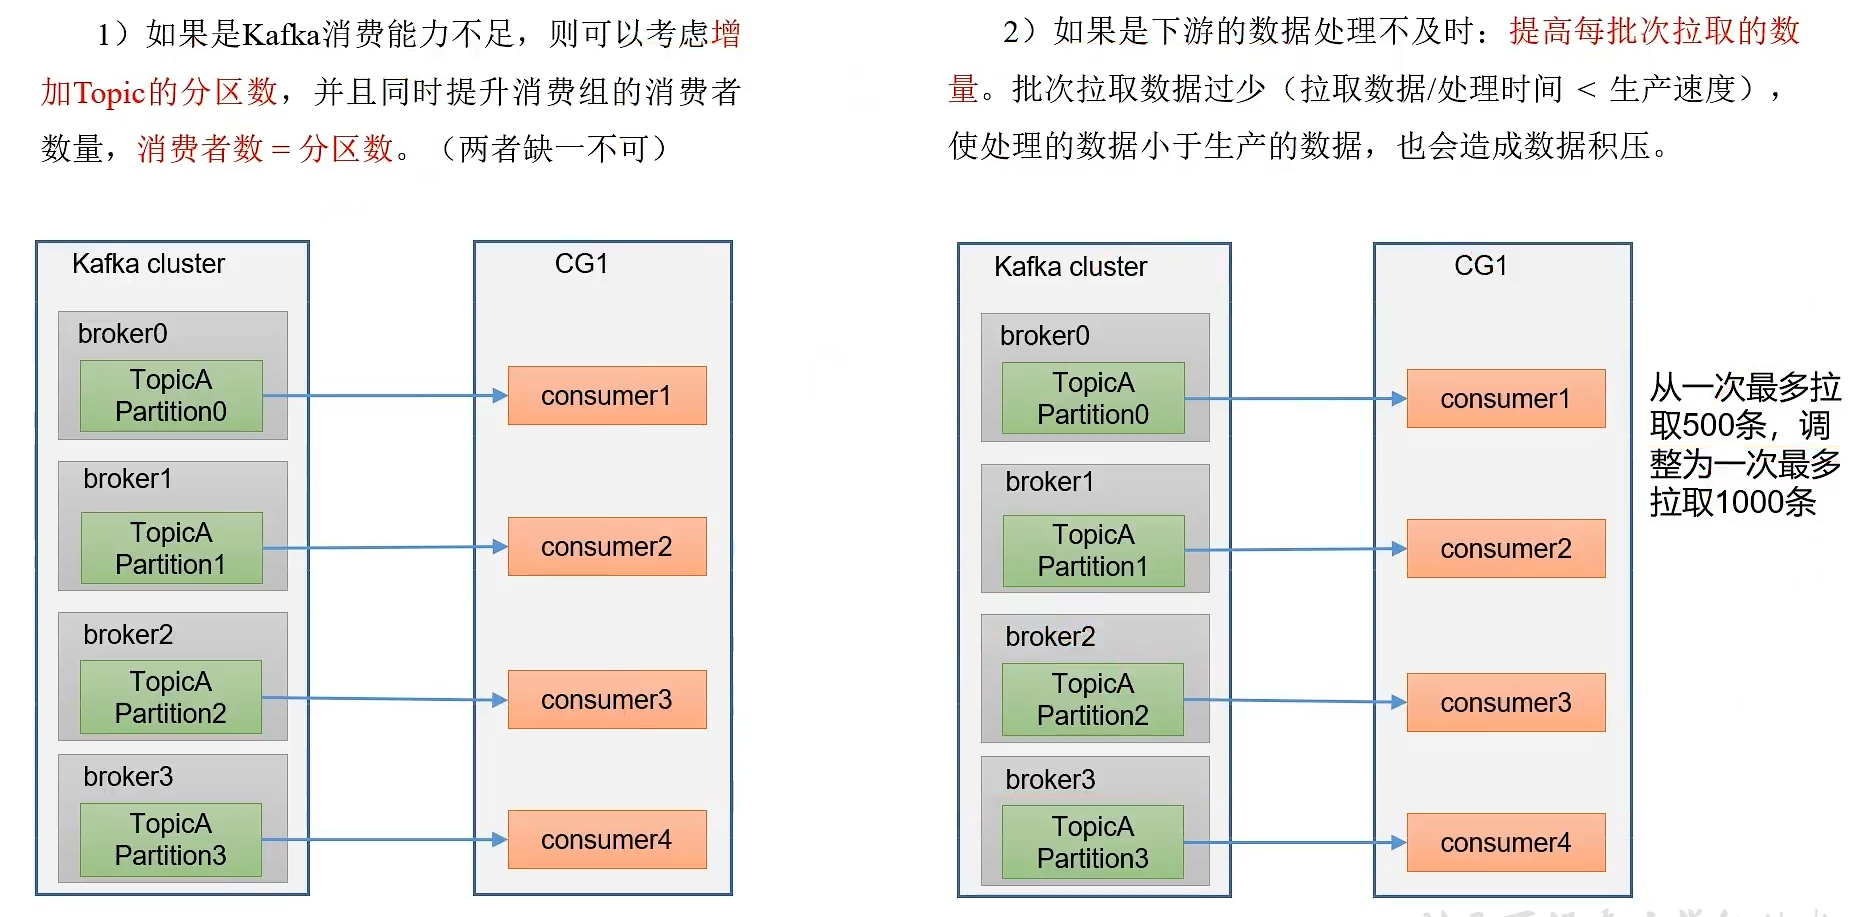
数据积压(消费者如何提高吞吐量)
- 增加分区,增加消费者个数
- 生产=》集群 4个参数
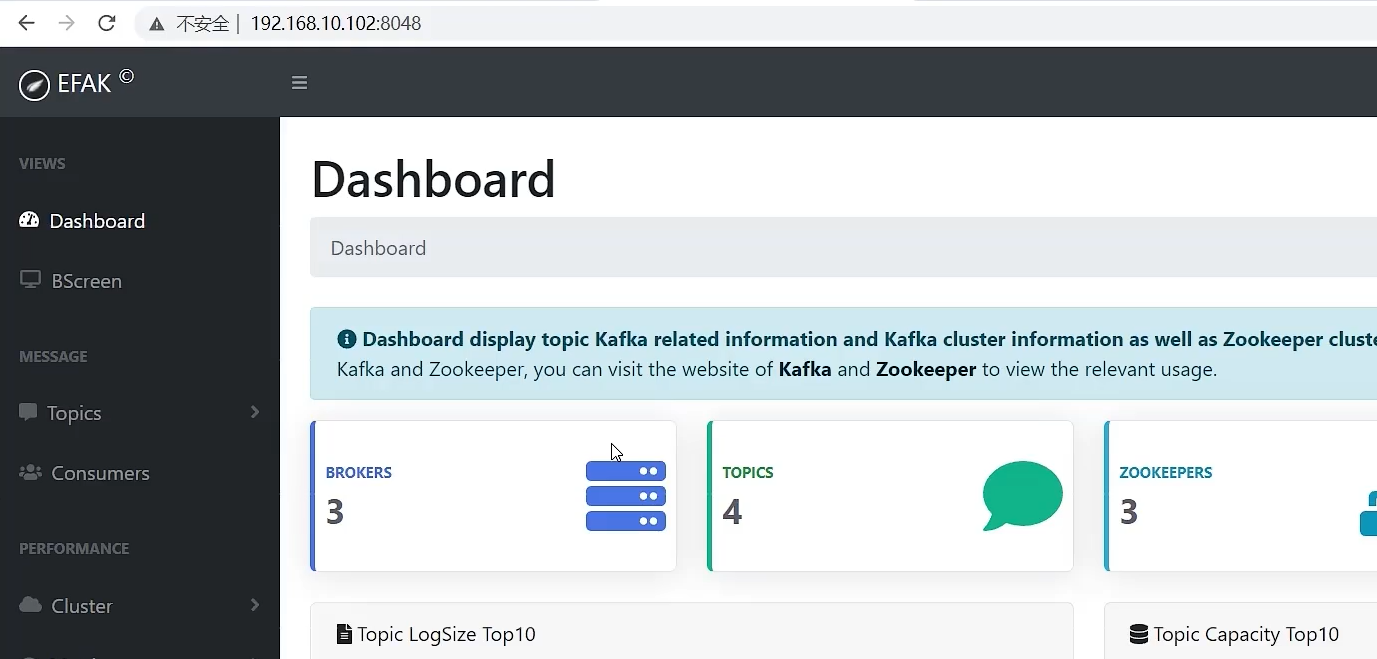
Kafka-Eagle框架监控
监控kafka集群
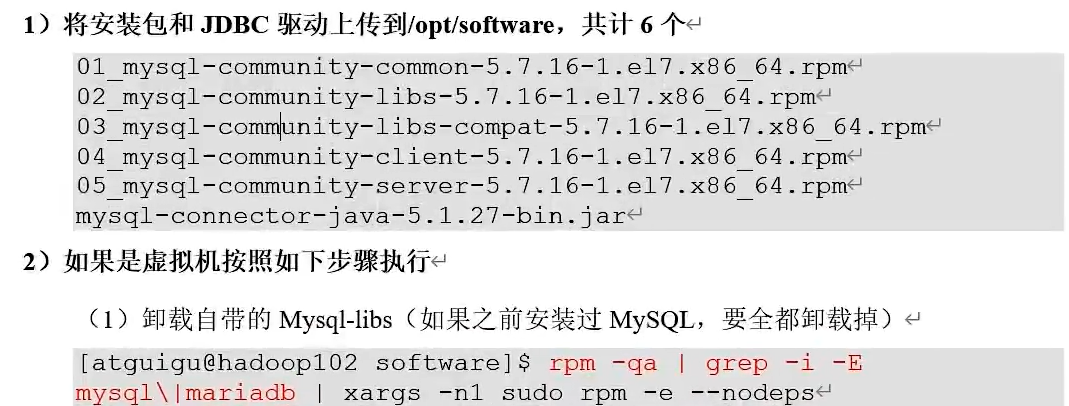
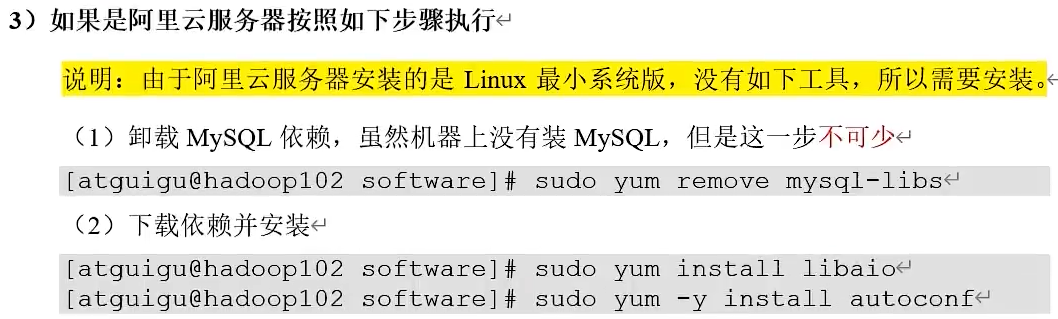
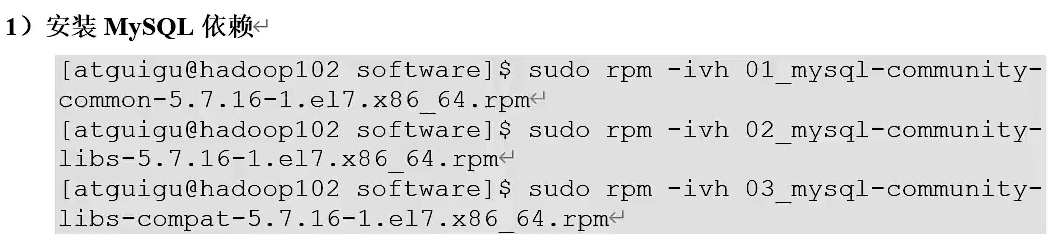
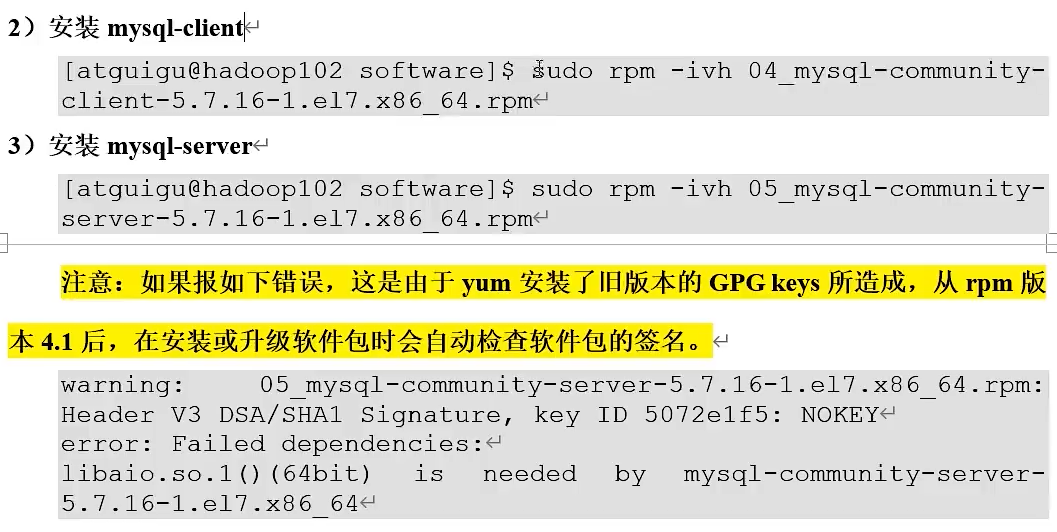
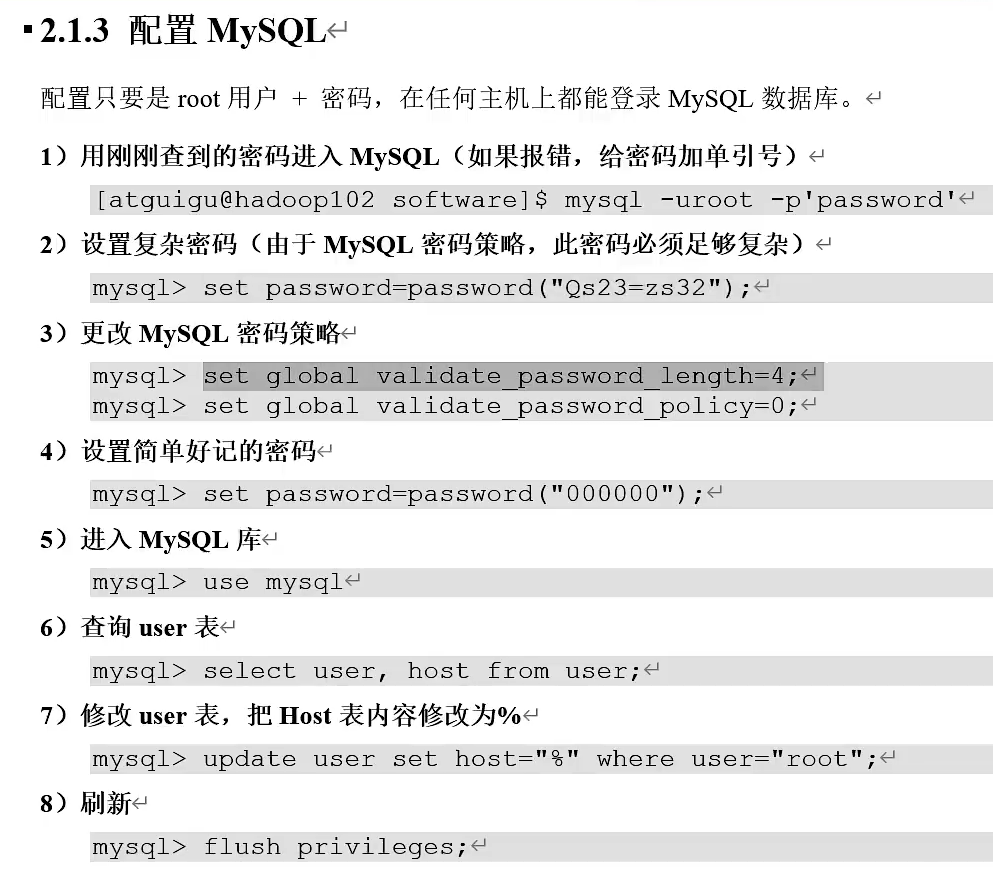
①、准备MySQL


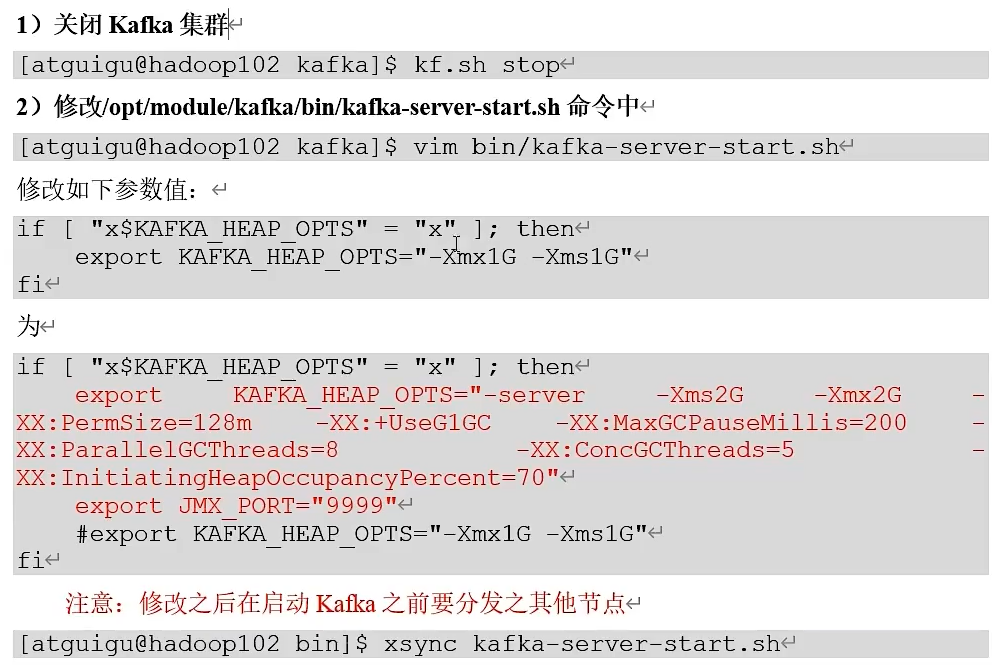
②、Kafka环境准备
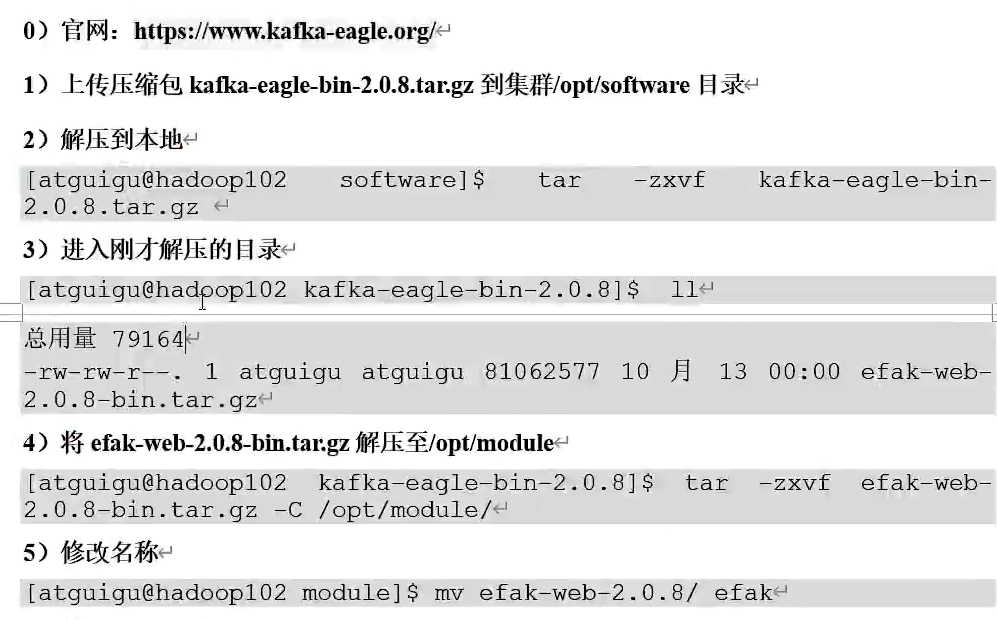
③、Kafka-Eagle安装


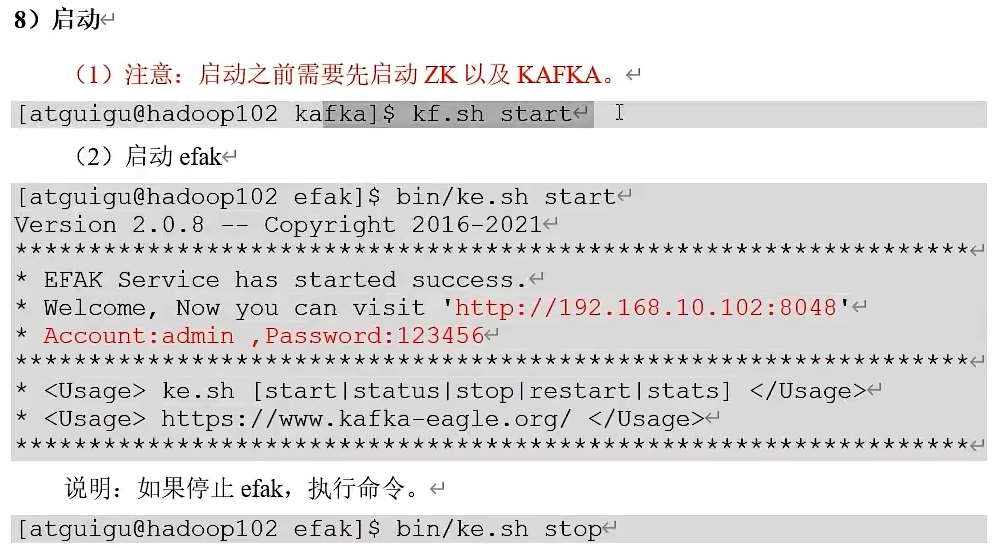
访问用户名admin 密码123456
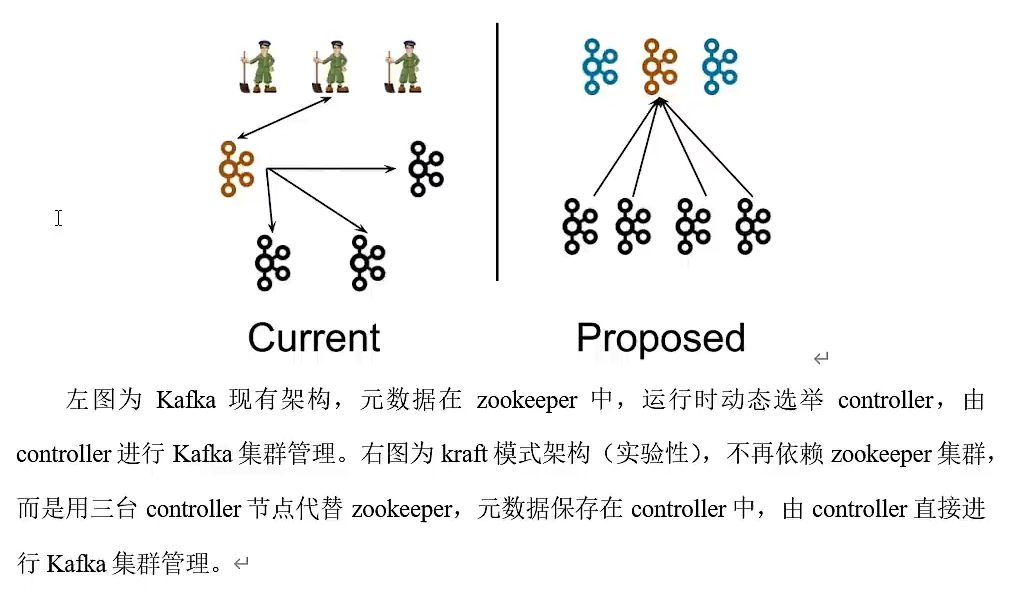
Kafka-Kafka模式
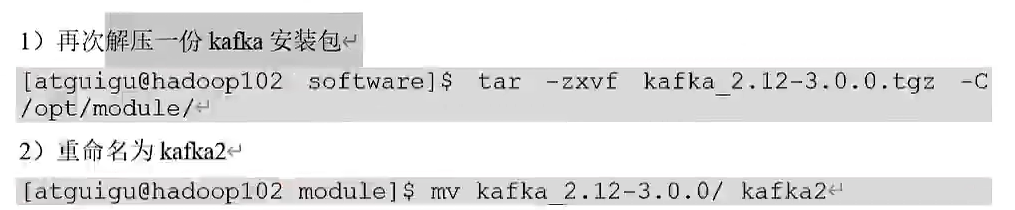
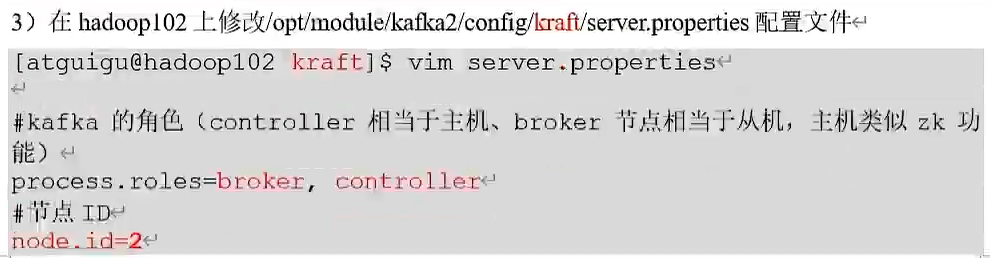
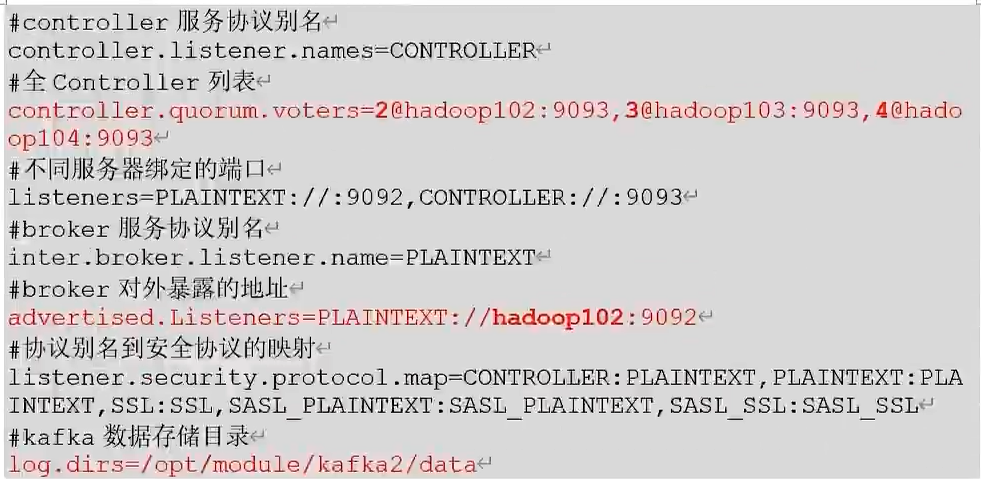
取代Zookeeper
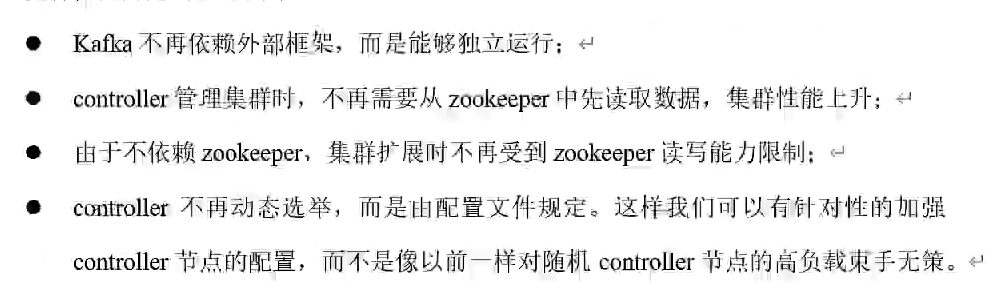
集群部署

Kafka-Kafka模式集群启动和停止脚本