Ubuntu下实现nginx反向代理
1. 多个ngx实例安装
脚本已经在deepseek的指导下完成啦!
deepseek写的脚本支持ubuntu/centos两种系统。
ins_prefix="/usr/local/"
makefile_gen() {ngx=$1	ngx_log_dir="/var/log/"$ngx"/"ngx_temp_path="/var/temp/"${ngx}"/"ngx_run_dir="/var/run/${ngx}/"ngx_lock_dir="/var/lock/"echo "nginx log directory: "${ngx_log_dir}echo "nginx temp path: "${ngx_temp_path}mkdir -p ${ngx_temp_path} ${ngx_log_dir} ${ngx_run_dir} ${ngx_lock_dir}
echo "Created directories:"
echo " - ${ngx_temp_path}"
echo " - ${ngx_log_dir}"
echo " - ${ngx_run_dir}"
echo " - ${ngx_lock_dir}"./configure \
--prefix=${ins_prefix}${ngx} \
--pid-path="/var/run/"${ngx}"/nginx.pid" \
--lock-path="/var/lock/"${ngx}".lock" \
--error-log-path=${ngx_log_dir}"error.log" \
--http-log-path=${ngx_log_dir}"access.log" \
--with-http_gzip_static_module \
--http-client-body-temp-path=${ngx_temp_path}"client" \
--http-proxy-temp-path=${ngx_temp_path}"proxy" \
--http-fastcgi-temp-path=${ngx_temp_path}"fastcgi" \
--http-uwsgi-temp-path=${ngx_temp_path}"uwsgi" \
--http-scgi-temp-path=${ngx_temp_path}"scgi"if [ $? -ne 0 ]; thenecho "Configure failed! Exiting..."exit 1fi
}# should have super user priveledge
if [ `whoami` != root ]; thenecho "please run this scripit with sudo or as root!"exit 1
fiif command -v apt-get &> /dev/null; thenapt-get updateapt-get install -y libpcre3 libpcre3-dev zlib1g-dev wget make gcc openssl
elif command -v yum &> /dev/null; thenyum install -y libpcre3 libpcre3-dev zlib1g-dev wget make gcc openssl
elseecho "Unsupported package manager! Please install dependencies manually."exit 1
fiif [ ! -d "nginx-1.26.3" ]; thenif [ ! -f "nginx-1.26.3.tar.gz" ]; thenwget https://nginx.org/download/nginx-1.26.3.tar.gz || { echo "Download failed"; exit 1;}fitar -xvf nginx-1.26.3.tar.gz || { echo "Extraction failed!"; exit 1;}
fi
cd nginx-1.26.3 || { echo "Entering source directory failed!"; exit 1;}# find location and name to locate:
# /usr/local/nginx
# /usr/local/nginx1
# /usr/local/nginx2
# ...
ngx="nginx"
if [ ! -e ${ins_prefix}${ngx} ];thenecho ${ins_prefix}${ngx_nm}" not exits!";
elseid=0while [ -e ${ins_prefix}${ngx} ]; doid=$(($id+1))ngx="nginx"${id}done
fi
echo "nginx will be installed to :"${ins_prefix}${ngx}makefile_gen "${ngx}"make && make install || { echo "Build/Install failed!"; exit 1; }echo "Installation completed successfully!"
echo "Binary path: ${ins_prefix}${ngx}/sbin/nginx"
2. ssl自签名证书
如果要免费的,需要在Lets encrypt上去申请。
这里按照博客使用自签名证书。
openssl req -x509 -nodes -days 365 -newkey rsa:2048 cert.key -out cert.crt
3. nginx反向代理配置
示意图
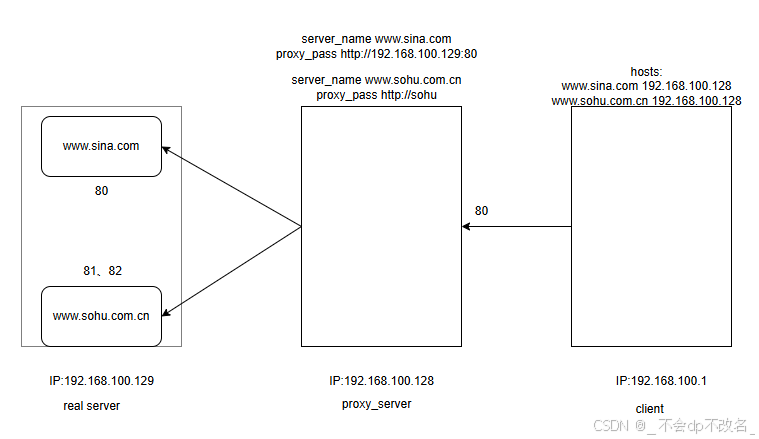
在客户端上修改hosts配置文件,这步主要是为了将想用的域名给对上内网的IP。
192.168.100.128 www.sina.com.cn
192.168.100.128 www.sohu.com
之后就是在proxy上安装一个nginx,配置如下代理文件
#user  nobody;
worker_processes  1;#error_log  logs/error.log;
#error_log  logs/error.log  notice;
#error_log  logs/error.log  info;#pid        logs/nginx.pid;events {worker_connections  1024;
}http {include       mime.types;default_type  application/octet-stream;#log_format  main  '$remote_addr - $remote_user [$time_local] "$request" '#                  '$status $body_bytes_sent "$http_referer" '#                  '"$http_user_agent" "$http_x_forwarded_for"';#access_log  logs/access.log  main;sendfile        on;#tcp_nopush     on;#keepalive_timeout  0;keepalive_timeout  65;#gzip  on;upstream sina {server 192.168.100.129:80 weight=1;   server 192.168.100.129:82 weight=2;
}server {listen 80;server_name www.sina.com.cn;location / {proxy_pass http://sina;proxy_set_header Host $host;proxy_set_header X-Real-IP $remote_addr;proxy_set_header X-Forwarded-For $proxy_add_x_forwarded_for;proxy_set_header X-Forwarded-Proto $scheme;proxy_connect_timeout 60s;proxy_read_timeout 600s;proxy_send_timeout 600s;}}upstream sohu {server 192.168.100.129:81;
}server {listen       80;server_name  www.sohu.com;#charset koi8-r;#access_log  logs/host.access.log  main;location / {proxy_pass http://192.168.100.129:81;# 以下为常用代理参数配置proxy_set_header Host $host;proxy_set_header X-Real-IP $remote_addr;proxy_set_header X-Forwarded-For $proxy_add_x_forwarded_for;proxy_set_header X-Forwarded-Proto $scheme;proxy_connect_timeout 60s;proxy_read_timeout 600s;proxy_send_timeout 600s;}#error_page  404              /404.html;# redirect server error pages to the static page /50x.html#error_page   500 502 503 504  /50x.html;location = /50x.html {root   html;}}}
在real server上安装3个nginx, 只需要将监听的端口稍微改一个就好了。
4. nginx负载均衡配置
负载均衡的配置其实很简单。。。
upstream sina {server 192.168.100.129:80 weight=1; server 192.168.100.129:82 weight=2;}server {listen 80;server_name www.sina.com.cn;location / {proxy_pass http://sina;proxy_set_header Host $host;proxy_set_header X-Real-IP $remote_addr;proxy_set_header X-Forwarded-For $proxy_add_x_forwarded_for;proxy_set_header X-Forwarded-Proto $scheme;proxy_connect_timeout 60s;proxy_read_timeout 600s;proxy_send_timeout 600s;}}
3. 参考
ngx-r-proxy-csdn
multi-ngx
ngx-r-proxy-aliyun
ngx-load-balance
ssl-ngx-proxy
openssl-sign-cnblog