Nacos 配置管理案例:nacos-spring-cloud-config-example详解
一、结构说明:基于Spring Cloud Alibaba的微服务示例
nacos-spring-cloud-config-example : 服务提供者
二、技术栈:Spring Boot+Spring Cloud+Spring Cloud Alibaba Nacos + Actuator(可选:监控)
三、使用环境
安装nacos参考:
Nacos 安装配置步骤详解_nacos:2.5.1 mysql-CSDN博客
Nacos 服务注册与发现参考:Nacos 服务注册发现案例:nacos-spring-cloud-example 详解-CSDN博客
- 安装Nacos服务(nacos-server-2.5.1)
- 确保JDK17环境(根据pom.xml中的配置)
- Maven环境 3.6.3 +
四、项目结构示例:
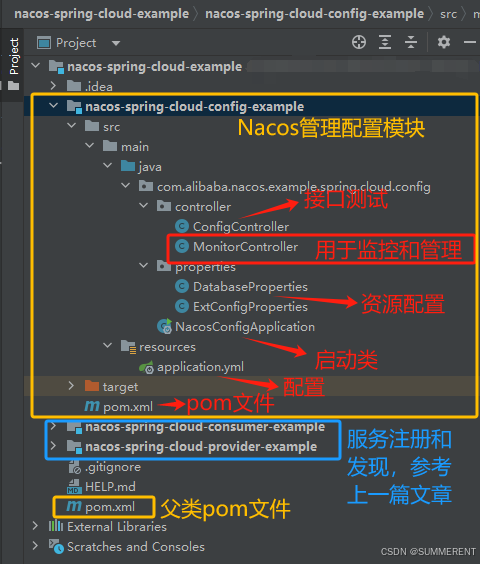
五、代码详解配置:
(1):nacos-spring-cloud-example----父pom.xml文件
<?xml version="1.0" encoding="UTF-8"?>
<project xmlns="http://maven.apache.org/POM/4.0.0"xmlns:xsi="http://www.w3.org/2001/XMLSchema-instance"xsi:schemaLocation="http://maven.apache.org/POM/4.0.0 http://maven.apache.org/xsd/maven-4.0.0.xsd"><modelVersion>4.0.0</modelVersion><groupId>com.alibaba.nacos</groupId><artifactId>nacos-spring-cloud-example</artifactId><packaging>pom</packaging><version>0.2.0-SNAPSHOT</version><modules><module>nacos-spring-cloud-provider-example</module><module>nacos-spring-cloud-consumer-example</module></modules><properties><spring-boot.version>3.0.2</spring-boot.version><spring-cloud.version>2022.0.0</spring-cloud.version><spring-cloud-alibaba.version>2022.0.0.0</spring-cloud-alibaba.version><maven.compiler.source>17</maven.compiler.source><maven.compiler.target>17</maven.compiler.target></properties><dependencyManagement><dependencies><!-- Spring Boot --><dependency><groupId>org.springframework.boot</groupId><artifactId>spring-boot-dependencies</artifactId><version>${spring-boot.version}</version><type>pom</type><scope>import</scope></dependency><!-- Spring Cloud --><dependency><groupId>org.springframework.cloud</groupId><artifactId>spring-cloud-dependencies</artifactId><version>${spring-cloud.version}</version><type>pom</type><scope>import</scope></dependency><!-- Spring Cloud Alibaba --><dependency><groupId>com.alibaba.cloud</groupId><artifactId>spring-cloud-alibaba-dependencies</artifactId><version>${spring-cloud-alibaba.version}</version><type>pom</type><scope>import</scope></dependency></dependencies></dependencyManagement><build><plugins><plugin><groupId>org.springframework.boot</groupId><artifactId>spring-boot-maven-plugin</artifactId><executions><execution><goals><goal>repackage</goal></goals></execution></executions></plugin></plugins></build>
</project>
(2):配置管理 nacos-spring-cloud-config-example
1、添加依赖:pom.xml文件
<?xml version="1.0" encoding="UTF-8"?>
<project xmlns="http://maven.apache.org/POM/4.0.0"xmlns:xsi="http://www.w3.org/2001/XMLSchema-instance"xsi:schemaLocation="http://maven.apache.org/POM/4.0.0 http://maven.apache.org/xsd/maven-4.0.0.xsd"><parent><artifactId>nacos-spring-cloud-example</artifactId><groupId>com.alibaba.nacos</groupId><version>0.2.0-SNAPSHOT</version></parent><modelVersion>4.0.0</modelVersion><artifactId>nacos-spring-cloud-config-example</artifactId><dependencies><!-- Spring Boot Web 启动器 --><dependency><groupId>org.springframework.boot</groupId><artifactId>spring-boot-starter-web</artifactId></dependency><!-- Nacos 配置中心依赖 --><dependency><groupId>com.alibaba.cloud</groupId><artifactId>spring-cloud-starter-alibaba-nacos-config</artifactId></dependency><!-- Spring Cloud 基础依赖提供了 Spring Cloud 的核心功能包含 @RefreshScope 等注解的支持--><dependency><groupId>org.springframework.cloud</groupId><artifactId>spring-cloud-context</artifactId></dependency><!-- Spring Boot 配置处理器用于处理 @ConfigurationProperties 注解提供配置属性的元数据支持--><dependency><groupId>org.springframework.boot</groupId><artifactId>spring-boot-configuration-processor</artifactId><optional>true</optional></dependency><!-- 添加 actuator 监控 --><dependency><groupId>org.springframework.boot</groupId><artifactId>spring-boot-starter-actuator</artifactId></dependency><!-- Spring Boot 注解处理器提供 AOP 支持用于实现配置刷新等功能 --><dependency><groupId>org.springframework.boot</groupId><artifactId>spring-boot-starter-aop</artifactId></dependency></dependencies><build><plugins><plugin><groupId>org.springframework.boot</groupId><artifactId>spring-boot-maven-plugin</artifactId><executions><execution><goals><goal>repackage</goal></goals></execution></executions></plugin><plugin><artifactId>maven-compiler-plugin</artifactId><configuration><source>17</source><target>17</target></configuration></plugin></plugins></build>
</project> 2、配置application.yml中配置 Nacos server 的地址:
server:port: 8080spring:application:name: nacos-config-exampleprofiles:active: devconfig:import:- optional:nacos:${spring.application.name}-${spring.profiles.active}.yaml  # 主配置文件   # optional 表示配置可选,找不到也不报错- optional:nacos:common-db.yaml  # 共享配置-数据库- optional:nacos:common-redis.yaml  # 共享配置-Redis- optional:nacos:ext-config-common.yaml  # 扩展配置-通用- optional:nacos:ext-config-${spring.profiles.active}.yaml  # 扩展配置-环境特定cloud:nacos:config:server-addr: localhost:8848namespace: publicgroup: DEFAULT_GROUPfile-extension: yamlrefresh-enabled: true# actuator 配置:用于监控和管理应用程序
management:endpoints:web:exposure:include: '*'  # 开启所有监控端点endpoint:health:show-details: always # 显示详细的健康信息
通过spring:config:import:- optional:nacos: 后面跟的是dataId是在Nacos配置中心配置将 dataId 为common-db.yaml共享配置-数据库
group: DEFAULT_GROUP的配置作为配置源
3、在 Nacos 控制台配置:访问地址http://localhost:8848/nacos 默认用户名nacos 密码nacos
需要在 Nacos 控制台创建以下配置:
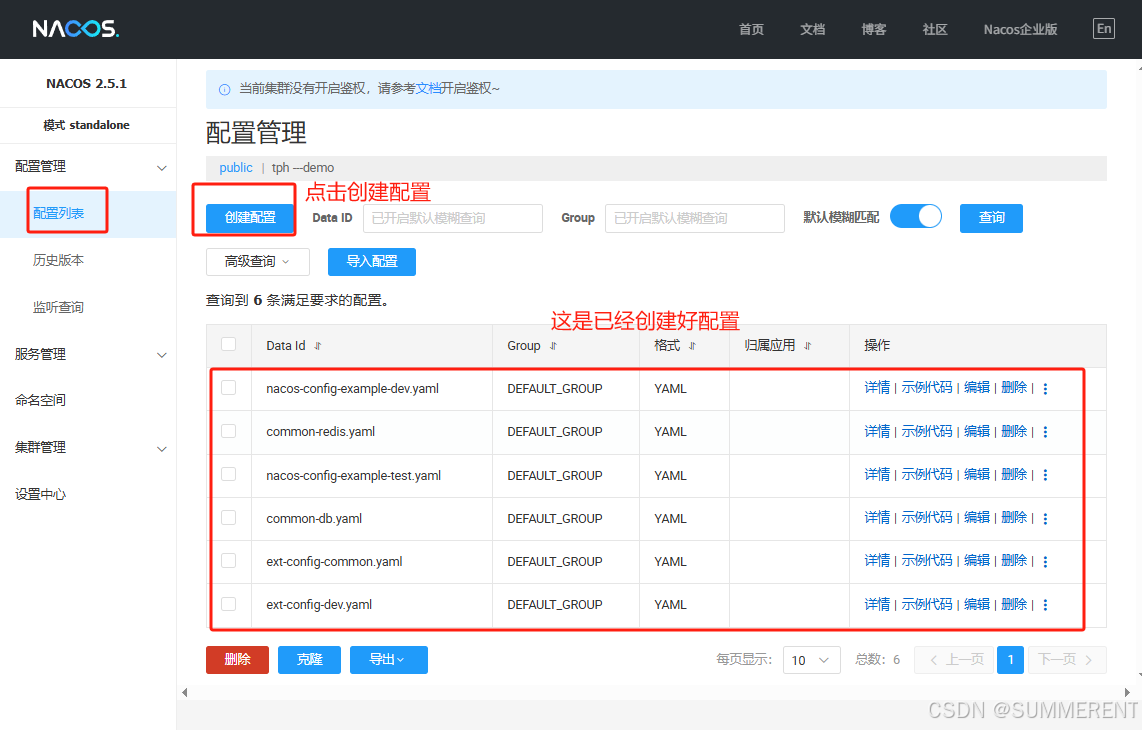
3.1. 主配置文件-dev环境: nacos-config-example-dev.yaml
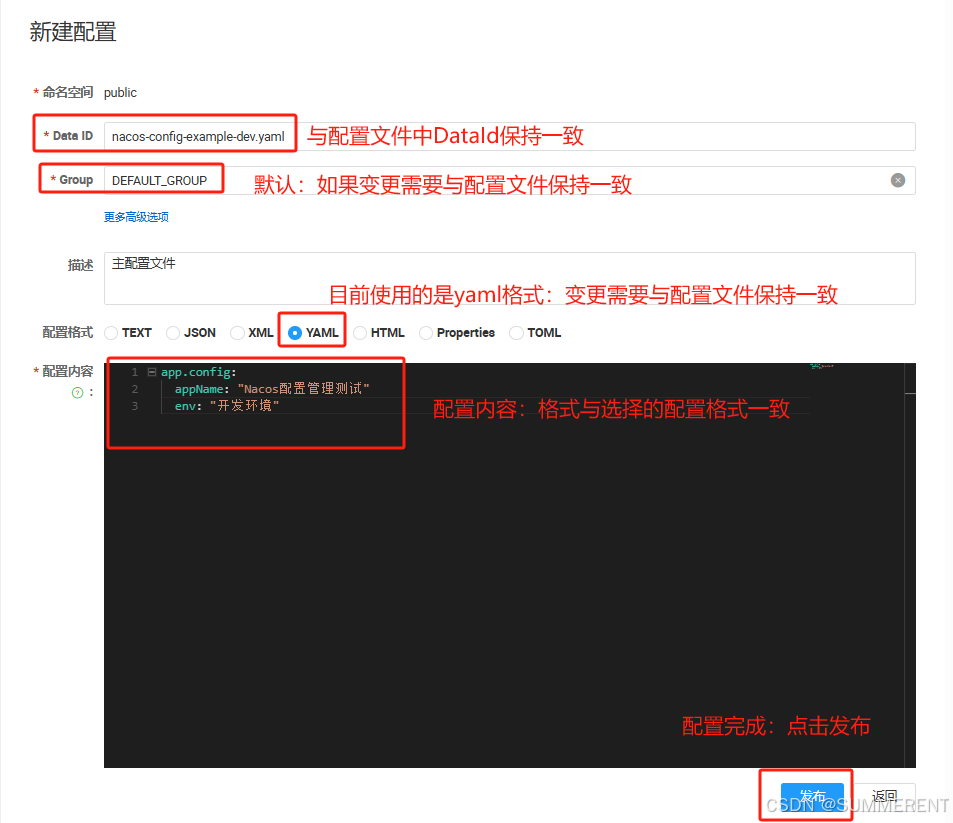
填写好配置:点击发布即可
3.2. 主配置文件-test环境: nacos-config-example-test.yaml ,参照上述图创建如下信息:
# Data ID: nacos-config-example-test.yaml
# Group: DEFAULT_GROUP
# 配置格式选择 YAML
# 配置内容⬇️
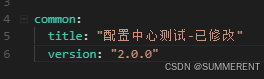
app.config:appName: "Nacos配置管理测试"env: "测试环境"3.3. Redis配置文件-通用: common-redis.yaml
# Data ID: common-redis.yaml
# Group: DEFAULT_GROUP
# 配置格式选择 YAML
# 配置内容⬇️
common:title: "配置中心测试"version: "1.0.0"
3.4. 数据库配置文件-通用: common-db.yaml
# Data ID: common-db.yaml
# Group: DEFAULT_GROUP
# 配置格式选择 YAML
# 配置内容⬇️
database:url: jdbc:mysql://localhost:3306/test2222username: rootpassword: 123456driverClassName: com.mysql.cj.jdbc.Driver
3.5. 扩展配置文件-通用: ext-config-common.yaml
# Data ID: ext-config-common.yaml
# Group: DEFAULT_GROUP
# 配置格式选择 YAML
# 配置内容⬇️
ext.config:timeout: 3000        # 通用超时时间maxRetry: 3          # 通用重试次数appName: "配置中心示例"  # 应用名称
3.6. 扩展配置文件-dev环境: ext-config-dev.yaml
# Data ID: ext-config-dev.yaml
# Group: DEFAULT_GROUP
# 配置格式选择 YAML
# 配置内容⬇️
ext.config:env: "开发环境"        # 环境标识debug: true          # 是否开启调试logLevel: "DEBUG"    # 日志级别
4、编写属性类
4.1.数据库属性类--DatabaseProperties
package com.alibaba.nacos.example.spring.cloud.config.properties;import org.springframework.boot.context.properties.ConfigurationProperties;
import org.springframework.cloud.context.config.annotation.RefreshScope;
import org.springframework.stereotype.Component;/*** @RefreshScope:* 实现配置的动态刷新* 当配置更新时,使用此注解的类会重新注入新的配置值*/
@Component
@RefreshScope
@ConfigurationProperties(prefix = "database")// 对应配置文件中 database 前缀的配置
public class DatabaseProperties {/***  数据库地址 - 来自数据库配置*/private String url;/***  数据库用户名 - 来自数据库配置*/private String username;/***  数据库密码 - 来自数据库配置*/private String password;/***  数据库驱动程序类名称 - 来自数据库配置*/private String driverClassName;// Getters and Setterspublic String getUrl() {return url;}public void setUrl(String url) {this.url = url;}public String getUsername() {return username;}public void setUsername(String username) {this.username = username;}public String getPassword() {return password;}public void setPassword(String password) {this.password = password;}public String getDriverClassName() {return driverClassName;}public void setDriverClassName(String driverClassName) {this.driverClassName = driverClassName;}
}
4.2.扩展配置属性类属性类--ExtConfigProperties
package com.alibaba.nacos.example.spring.cloud.config.properties;import org.springframework.boot.context.properties.ConfigurationProperties;
import org.springframework.cloud.context.config.annotation.RefreshScope;
import org.springframework.stereotype.Component;/*** 扩展配置属性类* 用于映射 ext.config 前缀的配置项* 包含通用配置和环境特定配置的属性*/
@Component
@RefreshScope  // 支持配置动态刷新
@ConfigurationProperties(prefix = "ext.config")  // 对应配置文件中 ext.config 前缀的配置
public class ExtConfigProperties {/*** 应用名称 - 来自通用配置*/private String appName;/*** 超时时间 - 来自通用配置*/private Integer timeout;/*** 最大重试次数 - 来自通用配置*/private Integer maxRetry;/*** 环境标识 - 来自环境特定配置*/private String env;/*** 是否开启调试 - 来自环境特定配置*/private Boolean debug;/*** 日志级别 - 来自环境特定配置*/private String logLevel;// Getters and Setterspublic String getAppName() {return appName;}public void setAppName(String appName) {this.appName = appName;}public Integer getTimeout() {return timeout;}public void setTimeout(Integer timeout) {this.timeout = timeout;}public Integer getMaxRetry() {return maxRetry;}public void setMaxRetry(Integer maxRetry) {this.maxRetry = maxRetry;}public String getEnv() {return env;}public void setEnv(String env) {this.env = env;}public Boolean getDebug() {return debug;}public void setDebug(Boolean debug) {this.debug = debug;}public String getLogLevel() {return logLevel;}public void setLogLevel(String logLevel) {this.logLevel = logLevel;}
}
5、配置控制器ConfigController:用于展示各种配置的获取方式和使用方法
package com.alibaba.nacos.example.spring.cloud.config.controller;import com.alibaba.nacos.example.spring.cloud.config.properties.DatabaseProperties;
import com.alibaba.nacos.example.spring.cloud.config.properties.ExtConfigProperties;
import org.springframework.beans.factory.annotation.Autowired;
import org.springframework.beans.factory.annotation.Value;
import org.springframework.cloud.context.config.annotation.RefreshScope;
import org.springframework.web.bind.annotation.GetMapping;
import org.springframework.web.bind.annotation.RequestMapping;
import org.springframework.web.bind.annotation.RestController;import java.util.HashMap;
import java.util.Map;/*** 配置控制器* 用于展示各种配置的获取方式和使用方法* @RefreshScope:* 实现配置的动态刷新* 当配置更新时,使用此注解的类会重新注入新的配置值* @Value:* 注入配置值* 格式:@Value("${key:defaultValue}")* defaultValue 为配置不存在时的默认值,如果没有设置默认值:不存在是就是为空*/
@RestController
@RequestMapping("/config")
@RefreshScope  // 支持配置动态刷新
public class ConfigController {/*** 使用 @Value 注解直接注入配置项* 来自共享配置文件 nacos-config-example-dev.yaml 或 nacos-config-example-test.yaml 动态配置*/@Value("${ext.config.appName:}")private String appName;@Value("${ext.config.env:}")private String env;/*** 使用 @Value 注解直接注入配置项* 来自共享配置文件 common-redis.yaml*/@Value("${common.title:}")private String commonTitle;@Value("${common.version:}")private String commonVersion;/*** 注入扩展配置属性类* 通过 @ConfigurationProperties 方式注入的配置*/@Autowiredprivate ExtConfigProperties extConfigProperties;/*** 注入数据库配置属性类*/@Autowiredprivate DatabaseProperties databaseProperties;/*** 获取所有配置信息* 包括:通用Redis配置、环境特定配置、数据库配置等*/@GetMapping("/get")public Map<String, Object> getConfig() {Map<String, Object> config = new HashMap<>();// 应用配置   nacos-config-example-dev.yaml 或 nacos-config-example-test.yaml 动态配置Map<String, Object> applicationConfig = new HashMap<>();applicationConfig.put("applicationName", appName);applicationConfig.put("environment", env);config.put("application", applicationConfig);// 数据库配置  common-db.yamlMap<String, String> dbConfig = new HashMap<>();dbConfig.put("url", databaseProperties.getUrl());dbConfig.put("username", databaseProperties.getUsername());dbConfig.put("password", databaseProperties.getPassword());dbConfig.put("driverClassName", databaseProperties.getDriverClassName());config.put("common-db", dbConfig);// 通用配置  common-redis.yamlMap<String, Object> commonConfig = new HashMap<>();commonConfig.put("title", commonTitle);commonConfig.put("version", commonVersion);config.put("common-redis", commonConfig);// 扩展配置ext-config-common.yaml(包含通用和环境特定的配置ext-config-dev.yaml)Map<String, Object> extConfig = new HashMap<>();extConfig.put("appName", extConfigProperties.getAppName());extConfig.put("timeout", extConfigProperties.getTimeout());extConfig.put("maxRetry", extConfigProperties.getMaxRetry());extConfig.put("env", extConfigProperties.getEnv());extConfig.put("debug", extConfigProperties.getDebug());extConfig.put("logLevel", extConfigProperties.getLogLevel());config.put("extConfig", extConfig);return config;}
}
6、测试步骤:
6.1 首先启动Nacos服务
访问地址:http://localhost:8848/nacos
默认用户名/密码:nacos/nacos
配置上述的数据库,reids等配置
6.2启动应用程序服务
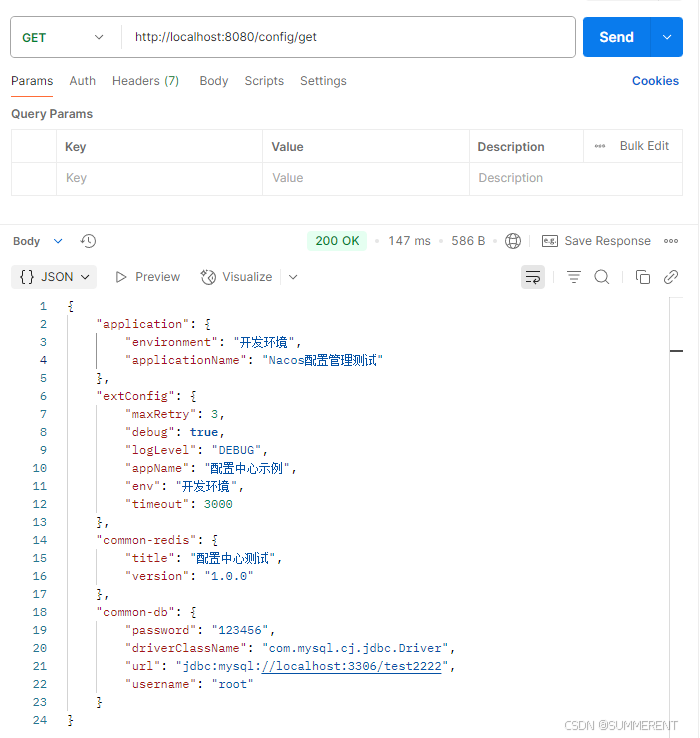
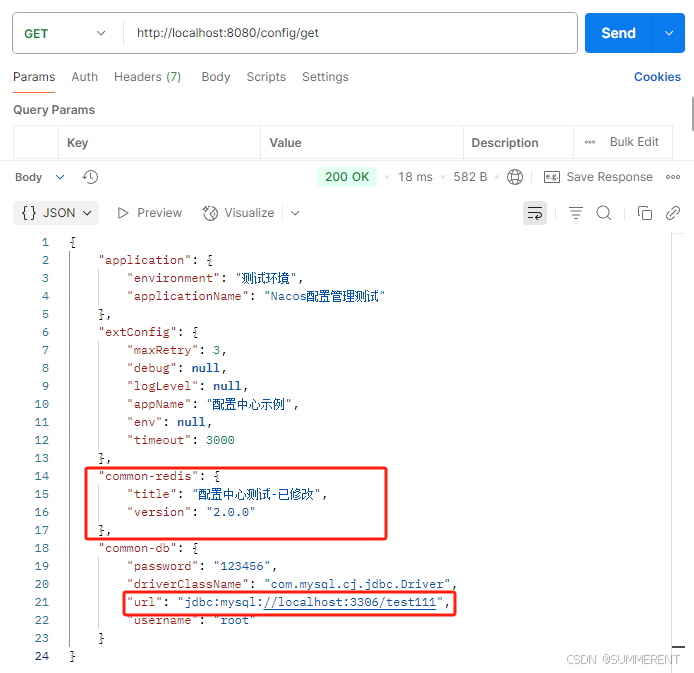
6.3访问接口 http://localhost:8080/config/get
返回数据成功:开始是使用的是dev环境
6.4 修改配置测试动态刷新
测试1:修改application.yml文件,换成test环境
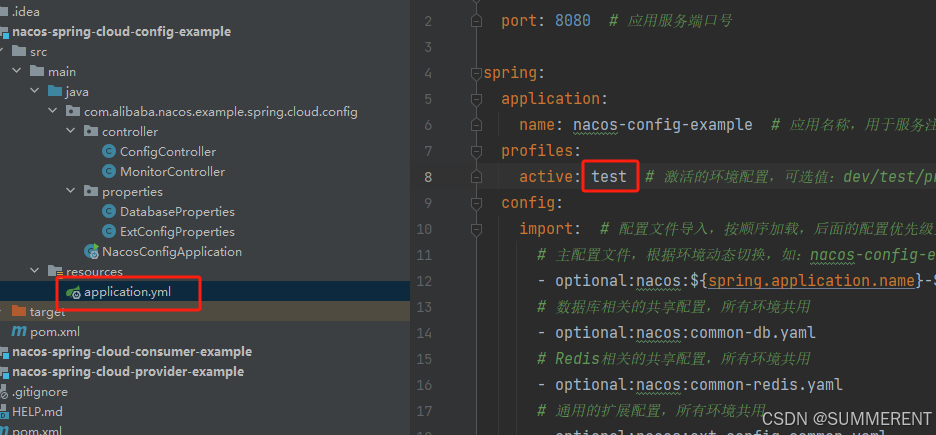
访问接口:测试结果:配置成功------调用的是nacos-config-example-test.yaml 中的配置

测试2:在nacos配置管理:动态修改common-redis.yaml配置文件
 点击发布:--->确认发布
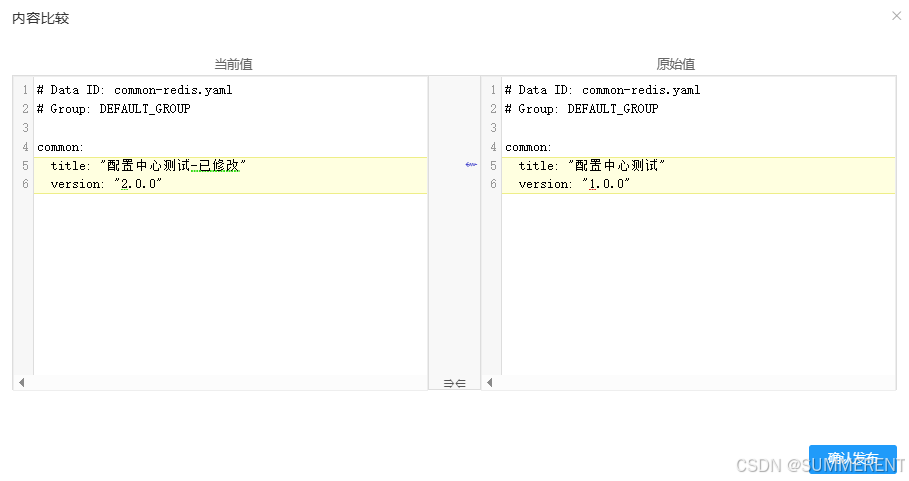
在修改一个数据库配置:common-db.yaml :修改数据库名为test111
 修改完成后点击发布
再次访问接口:测试结果:动态修改成功
六、监控控制:用于展示 Actuator 监控功能
Spring Boot Actuator 是一个用于监控和管理应用程序的强大功能模块
Actuator 的主要作用
1、健康检查检查应用程序的健康状态监控数据库连接、磁盘空间等
2、配置信息查看查看当前应用的所有配置信息查看配置的来源和优先级
3、度量指标监控JVM 内存使用线程使用
4、HTTP 请求统计运行时信息查看运行环境系统属性环境变量
package com.alibaba.nacos.example.spring.cloud.config.controller;import org.springframework.beans.factory.annotation.Autowired;
import org.springframework.boot.actuate.health.HealthComponent;
import org.springframework.boot.actuate.health.HealthEndpoint;
import org.springframework.web.bind.annotation.GetMapping;
import org.springframework.web.bind.annotation.RequestMapping;
import org.springframework.web.bind.annotation.RestController;import java.lang.management.ManagementFactory;
import java.lang.management.RuntimeMXBean;
import java.util.HashMap;
import java.util.Map;/*** 监控控制器* 用于展示 Actuator 监控功能*/
@RestController
@RequestMapping("/monitor")
public class MonitorController {@Autowiredprivate HealthEndpoint healthEndpoint;/*** 获取应用健康状态* 包括:* - 应用状态* - 磁盘空间* - 数据库连接* 等系统组件的状态*/@GetMapping("/health")public HealthComponent health() {return healthEndpoint.health();}/*** 获取应用基本信息* 包括:* - 应用名称* - 启动时间* - JVM 信息* - 系统信息等*/@GetMapping("/info")public Map<String, Object> info() {Map<String, Object> info = new HashMap<>();// 运行时信息Runtime runtime = Runtime.getRuntime();Map<String, Object> jvm = new HashMap<>();jvm.put("totalMemory", runtime.totalMemory());//JVM 当前总内存jvm.put("freeMemory", runtime.freeMemory());//JVM 当前可用内存jvm.put("maxMemory", runtime.maxMemory());//JVM 最大可申请内存jvm.put("availableProcessors", runtime.availableProcessors());//可用CPU核心数// 获取JVM启动参数(如 -Xmx 设置的值)RuntimeMXBean runtimeMxBean = ManagementFactory.getRuntimeMXBean();jvm.put("inputArguments", runtimeMxBean.getInputArguments());info.put("jvm", jvm);// 系统信息Map<String, String> system = new HashMap<>();system.put("javaVersion", System.getProperty("java.version"));//Java 版本system.put("osName", System.getProperty("os.name"));//操作系统名称system.put("osArch", System.getProperty("os.arch"));//操作系统架构system.put("osVersion", System.getProperty("os.version"));//操作系统版本info.put("system", system);return info;}
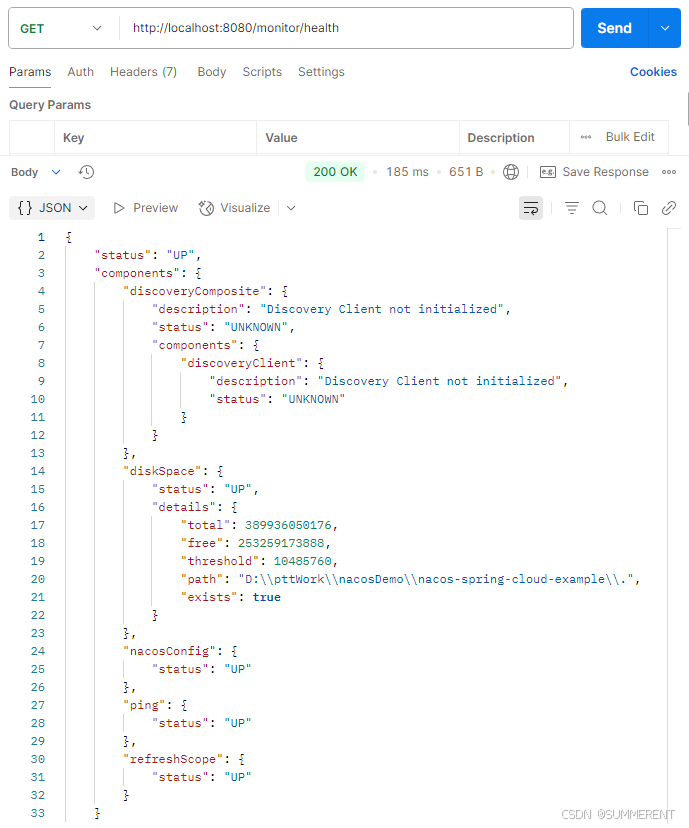
} 接口测试---获取应用健康状态 http://localhost:8080/monitor/health
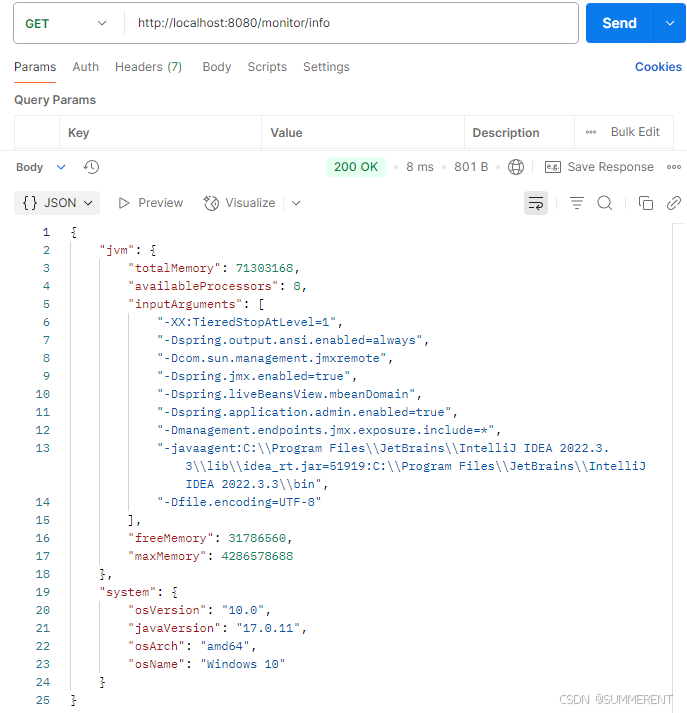
接口测试---获取应用基本信息 :http://localhost:8080/monitor/info
直接访问接口:查看对应的信息
# 查看应用健康状态
http://localhost:8080/actuator/health# 查看所有配置属性
http://localhost:8080/actuator/configprops# 查看环境信息
http://localhost:8080/actuator/env# 查看所有可用的指标
http://localhost:8080/actuator/metrics# 手动刷新配置
POST
http://localhost:8080/actuator/refresh# 查看 JVM 内存指标
http://localhost:8080/actuator/metrics/jvm.memory.used# 查看 HTTP 请求指标
http://localhost:8080/actuator/metrics/http.server.requests