FileZillaServer(1) -- 记录
1. 前言
记录一下FileZilla Server程序的使用。
2. 安装
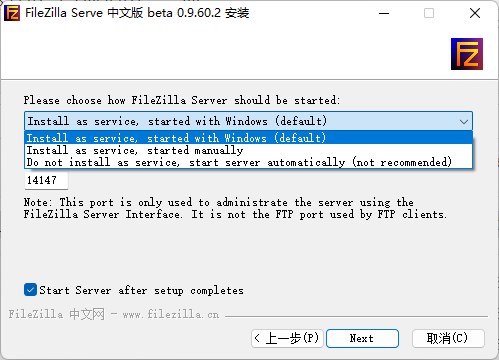
FileZillaServer下载,我下载的是FileZilla_Server-cn-0_9_60_2.exe,这个界面是中文版本的,大概1.89MB。需要安装运行,安装的目的是将其配置成服务,并设置自动开启。
进入安装目录C:\Program Files (x86)\FileZilla Serve 中文版,其中关键文件如下,该目录也可以直接拷贝到其他电脑上运行。
| 文件 | 描述 |
|---|---|
| FileZilla Server Interface.exe | 这是个图形程序,通过网络连接FileZilla Server.exe,并配置它,配置的结果会写入FileZilla Server.xml文件 |
| FileZilla Server.exe | FTP Server的程序,直接运行会提示安装服务,可增加-compat -start直接运行,使用-compat -stop停止运行 |
| FileZilla Server.xml | 配置文件,可以通过FileZilla Server Interface.exe进行修改 |
| libeay32.dll | FileZilla Server Interface.exe程序依赖的动态库 |
| ssleay32.dll | FileZilla Server Interface.exe程序依赖的动态库 |
3. 运行
我计划将其放入git-bash环境中运行,因此编写了~/tools/bash/filezilla.sh脚本。我将FileZilla Serve的文件存放在~/other/目录下。
#!/bin/bashSERVER_EXE=""$MYTOOLS/other/FileZilla Serve/FileZilla Server.exe"
CONF_EXE=""$MYTOOLS/other/FileZilla Serve/FileZilla Server Interface.exe"if [[ $# == 0 ]]; then# 无参数时,打印帮助文档echo filezilla [conf] [start] [stop]exit -1
ficase $1 instart)# 检查是否已经运行,netstat命令可能执行的比较慢netstat -a | grep "0.0.0.0:21\s" > /dev/null 2>&1if [[ $? == 0 ]]; thenecho filezilla has been running, exitexit -1fi# 后台运行servernohup "$SERVER_EXE" -compat -start > /dev/null 2>&1 &;;stop)# 停止后台程序的运行# 也可通过taskkill -f -im 'FileZilla Server.exe'终止这些进程"$SERVER_EXE" -compat -stop;;conf)# 启动配置程序nohup "$CONF_EXE" > /dev/null 2>&1 &;;*)echo filezilla [conf] [start] [stop]exit -1;;
esac
# 在~/tools/tools.sh中添加别名
$ alias filezilla="$MYTOOLS/bash/filezilla.sh"
# 启动服务
$ filezilla start
# 启动配置程序
$ filezilla conf
# 关闭服务
$ filezilla stop
4. 配置
点击【编辑】》【用户】》【General】》【添加】》【anonymous】,anonymous表示匿名用户。
再点击【Share folders】》【添加(D)】》【添加一个共享目录,并设置权限】》【确定】。之后可以退出Filezilla Server Interface程序了。在资源管理器中输入ftp://127.0.0.1即可访问到共享目录。

关联文档
phpstudy(1) – 记录