大厂缓存架构方案-Caffeine+Redis双层缓存架构
前言
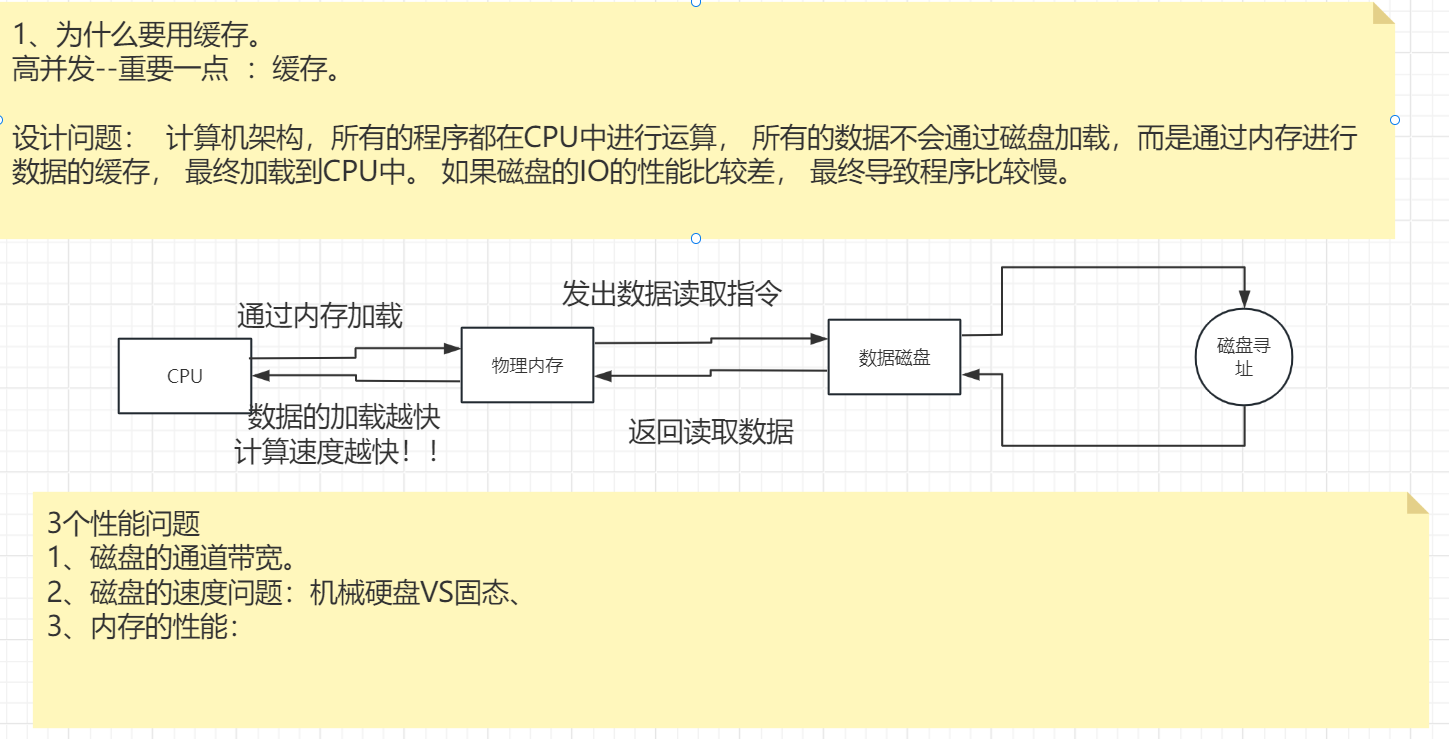
1、为什么要用缓存
2、缓存要怎么才好用
作为缓存,无非就是内存,我们也可以使用HashMap来达到缓存的作用?那为什么我们还要使用Redis或者使用Caffeine之类的缓存呢?所以这里我们重点讨论一下缓存要满足哪些功能,或者说缓存要怎么才好用!!!
1、内存淘汰策略:缓存意味着占用内存,内存是稀缺资源,所以缓存一定要有内存淘汰策略才能确保服务器内存不会被爆掉,同时也能确保内存中的是热点数据。
2、缓存过期机制:比如基于频次、基于最近访问的过期机制。比如Redis的TTL
3、方便的数据加载到缓存的功能
4、缓存组件支持的数据类型:比如Redis五大基本数据类型。
3、讲解Caffeine+Redis
在分布式缓存中,Redis家喻户晓,速度快,稳定性高,支持各种数据类型,持久化,分布式解决方案这些造就了Redis的强势。所以Redis属于缓存中必讲的内容。
另外,虽然Redis很厉害,但是毕竟Redis属于分布式缓存,也就是应用程序还是需要通过网络与Redis交互;如果是极致追求性能的业务场景,我们还必须使用本地缓存,所以本次课选用Caffeine作为本地缓存来讲解。其核心原因:在Spring5 (SpringBoot 2.x)后,Spring 官方放弃了 Guava Cache 作为缓存机制,而是使用性能更优秀的 Caffeine 作为默认缓存组件。
Caffeine Cache基础入门
Caffeine Cache 以其高性能和可扩展性赢得「 本地缓存之王 」的称号,它是一个 Java 缓存库。
Spring Boot 1.x 版本中的默认本地缓存是 Guava Cache。但在Spring5 (SpringBoot 2.x)后,Spring 官方放弃了 Guava Cache 作为缓存机制,而是使用性能更优秀的 Caffeine 作为默认缓存组件。
Caffeine 官方测试报告:Benchmarks zh CN · ben-manes/caffeine Wiki · GitHub
任何的组件最好先讲原生的Demo版本,后面再讲Spring的集成,我们按照这个顺序来讲
Caffeine特点
1、自动将数据加载到缓存中,同时也可以采用异步的方式加载。
2、内存淘汰策略:基于频次、基于最近访问、最大容量。
3、根据上一次的缓存访问\上一次的数据写入决定缓存的过期的设置。
4、当一条缓存数据过期了,自动清理,清理的时候也是异步线程来做。
5、考虑JVM的内存管理机制,加入弱引用、软引用。
6、缓存数据被清理后,会收到相关的通知信息
7、缓存数据的写入可以传播到外部的存储。
8、统计功能:被访问次数,命中,清理的个数,加载个数
Caffeine Cache入门
官网地址:GitHub - ben-manes/caffeine: A high performance caching library for Java
Maven引入
<!-- Spring boot Cache--><dependency><groupId>org.springframework.boot</groupId><artifactId>spring-boot-starter-cache</artifactId></dependency><!--for caffeine cache--><dependency><groupId>com.github.ben-manes.caffeine</groupId><artifactId>caffeine</artifactId><version>2.7.0</version></dependency>
Cache是一个核心的接口,里面定义了很多方法,我们要使用缓存一般是使用Cache的的子类,根据官方的方法,我们通过caffeine这个类来获得实现Cache的类。
基本使用-简单
Cache是一个核心的接口,里面定义了很多方法,我们要使用缓存一般是使用Cache的的子类,根据官方的方法,我们通过caffeine这个类来获得实现Cache的类。
public static void Cache() throws Exception{Cache<String, String> cache = Caffeine.newBuilder()//构建一个新的Caffeine实例.maximumSize(100)//设置缓存中保存的最大数量.expireAfterAccess(3L, TimeUnit.SECONDS)//如无访问则3秒后失效.build();//构建Cache接口实例
cache.put("mca","www.mashibing.com");//设置缓存项cache.put("baidu","www.baidu.com");//设置缓存项cache.put("spring","www.spring.io");//设置缓存项
log.info("获取缓存[getIfPresent]:mca={}",cache.getIfPresent("mca"));//获取数据TimeUnit.SECONDS.sleep(5);//休眠5秒
log.info("获取缓存[getIfPresent]:mca={}",cache.getIfPresent("mca"));//获取数据
}
最普通的一种缓存,无需指定加载方式,需要手动调用 put()进行加载。需要注意的是,put()方法对于已存在的 key 将进行覆盖。如果这个值不存在,调用 getIfPresent()方法,则会立即返回 null,不会被阻塞。
上面显示效果如下:

Caffeine 配置说明:
-
initialCapacity=[integer]: 初始的缓存空间大小
-
maximumSize=[long]: 缓存的最大条数
-
maximumWeight=[long]: 缓存的最大权重
-
expireAfterAccess=[duration]: 最后一次写入或访问后经过固定时间过期
-
expireAfterWrite=[duration]: 最后一次写入后经过固定时间过期
-
refreshAfterWrite=[duration]: 创建缓存或者最近一次更新缓存后经过固定的时间间隔,刷新缓存
-
weakKeys: 打开 key 的弱引用
-
weakValues:打开 value 的弱引用
-
softValues:打开 value 的软引用
-
recordStats:开发统计功能
基本使用-过期数据的同步加载1
有些时候当缓存数据失效的时候,我们可能希望拿到缓存的时候不返回一个null,可以进行一些数的处理,自定义的进行一些操作,这就要用到Cache接口的get方法,这个get方法里面可以实现一个函数式接口,让我们对数据进行自定义的处理:
public static void CacheExpire() throws Exception{Cache<String, String> cache = Caffeine.newBuilder()//构建一个新的Caffeine实例.maximumSize(100)//设置缓存中保存的最大数量.expireAfterAccess(3L, TimeUnit.SECONDS)//如无访问则3秒后失效.build();//构建Cache接口实例
cache.put("mca","www.mashibing.com");//设置缓存项cache.put("baidu","www.baidu.com");//设置缓存项cache.put("spring","www.spring.io");//设置缓存项
TimeUnit.SECONDS.sleep(5);//休眠5秒log.info("获取缓存[getIfPresent]:baidu={}",cache.getIfPresent("baidu"));//获取数据
log.info("获取缓存[get]获取缓存:baidu={}",cache.get("baidu",(key)->{log.info("进入[失效处理]函数");try {TimeUnit.SECONDS.sleep(3);//休眠3秒} catch (InterruptedException e) {throw new RuntimeException(e);}log.info("[失效处理]:mca={}",cache.getIfPresent("mca"));//失效处理return key.toUpperCase();}));}显示效果:

如果数据已经过期,然后调用了get方面里面的函数式接口之后,会自动的给缓存重新赋值,赋的值就是return返回的值。同时看打印的时间,就知道这里的重新赋值是同步的,会阻塞的。
基本使用-过期数据的同步加载2
Caffeine还提供有一个较为特殊的 Cacheloader 接口,这个接口的触发机制有些不太一样,它所采用的依然是同步的加载处理。
处理流程是:
1)首先在builder()的时候写上一个函数式接口(编写重新加载数据的流程)
2)获取数据的时候,通过getAll( )方法触发builder中的函数式接口流程,进行重新加载数据。
public static void LoadingCache() throws Exception{LoadingCache<String, String> cache = Caffeine.newBuilder().maximumSize(100)//设置缓存中保存的最大数量.expireAfterAccess(3L, TimeUnit.SECONDS)//如无访问则3秒后失效.build(new CacheLoader<String, String>() {@Overridepublic String load( String key) throws Exception {log.info("正在重新加载数据...");TimeUnit.SECONDS.sleep(1);return key.toUpperCase();}
});
cache.put("mca","www.mashibing.com");//设置缓存项cache.put("baidu","www.baidu.com");//设置缓存项cache.put("spring","www.spring.io");//设置缓存项
TimeUnit.SECONDS.sleep(5);
//创建key的列表,通过cache.getAll()拿到所有key对应的值ArrayList<String> keys = new ArrayList<>();keys.add("mca");keys.add("baidu");keys.add("spring");//拿到keys对应缓存的值Map<String, String> map = cache.getAll(keys);for (Map.Entry<String, String> entry : map.entrySet()) {log.info("缓存的键:{}、缓存值:{}",entry.getKey(),entry.getValue());//获取数据}log.info("LoadingCache 方法结束");
}运行效果:
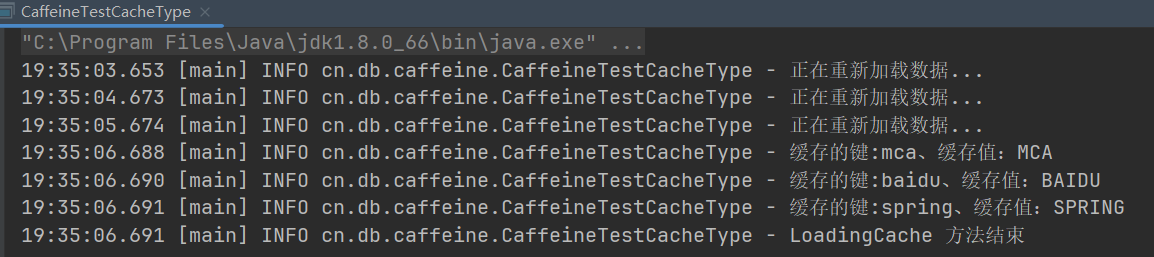
与之前的 get()的同步加载操作不同的是,这里使用了专属的功能接口完成了数据的加载,从实现的结构上来说的更加的标准化,符合于 Caffeine 自己的设计要求。
第一种方式是针对于临时的一种使用方法,第二种更加的统一,同时有模板效应
基本使用-过期数据的异步加载
假如你在拿去缓存数据的时候,如果有3个值都过期了,你使用的同步的方式得依次加载,这样阻塞等待的时间较长,所以这里可以使用异步的方式,就能同时进行加载。
public static void AsyncLoadingCache () throws Exception{AsyncLoadingCache<String, String> cache = Caffeine.newBuilder().maximumSize(100)//设置缓存中保存的最大数量.expireAfterAccess(3L, TimeUnit.SECONDS).buildAsync(new CacheLoader<String, String>() {@Overridepublic String load( String key) throws Exception {log.info("正在重新加载数据...");TimeUnit.SECONDS.sleep(1);return key.toUpperCase();}});//使用了异步的缓存之后,缓存的值都是被CompletableFuture给包裹起来的//所以在追加缓存和得到缓存的时候要通过操作CompletableFuture来进行cache.put("mca",CompletableFuture.completedFuture("www.mashibing.com"));//设置缓存项cache.put("baidu",CompletableFuture.completedFuture("www.baidu.com"));//设置缓存项cache.put("spring",CompletableFuture.completedFuture("www.spring.io"));//设置缓存项
TimeUnit.SECONDS.sleep(5);
//创建key的列表,通过cache.getAll()拿到所有key对应的值ArrayList<String> keys = new ArrayList<>();keys.add("mca");keys.add("baidu");keys.add("spring");//拿到keys对应缓存的值Map<String, String> map = cache.getAll(keys).get();for (Map.Entry<String, String> entry : map.entrySet()) {log.info("缓存的键:{}、缓存值:{}",entry.getKey(),entry.getValue());//获取数据}log.info("AsyncLoadingCache 方法结束");}显示效果:

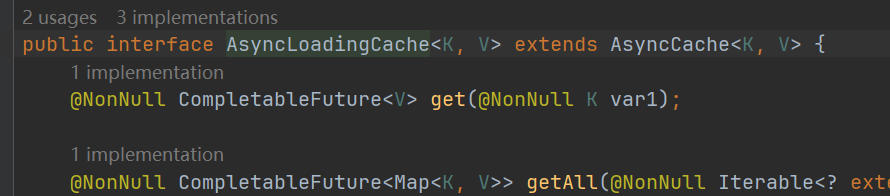
AsyncLoadingCache的父接口是AsyncCache,而AsycnCache和Cache接口是同级的。
缓存淘汰机制
缓存之中的数据内容不可能一直被保留,因为只要时间一到,缓存就应该将数据进行驱逐,但是除了时间之外还需要考虑到个问题,缓存数据满了之后呢?是不是也应该进行一些无用数据的驱逐处理呢?
Caffeine提供三类驱逐策略:基于大小(size-based),基于时间(time-based)和基于引用(reference-based)
基于大小
最大容量 和 最大权重 只能二选一作为缓存空间的限制
最大容量
最大容量,如果缓存中的数据量超过这个数值,Caffeine 会有一个异步线程来专门负责清除缓存,按照指定的清除策略来清除掉多余的缓存。
public static void ExpireMaxType() throws Exception{//Caffeine 会有一个异步线程来专门负责清除缓存Cache<String, String> cache = Caffeine.newBuilder()//将最大数量设置为一.maximumSize(1).expireAfterAccess(3L, TimeUnit.SECONDS).build();cache.put("name","张三");cache.put("age","18");System.out.println(cache.getIfPresent("name"));TimeUnit.MILLISECONDS.sleep(100);System.out.println(cache.getIfPresent("name"));System.out.println(cache.getIfPresent("age"));
}
可以看到,"name"的数据已经被清除了
最大权重
最大权重,存入缓存的每个元素都要有一个权重值,当缓存中所有元素的权重值超过最大权重时,就会触发异步清除。
weigher 方法设置权重规则。
public static void ExpireWeigherType() throws Exception{Cache<String, String> cache = Caffeine.newBuilder().maximumWeight(100).weigher(((key, value) -> {System.out.println("权重处理,key="+key+" value="+value);//这里直接返回一个固定的权重,真实开发会有一些业务的运算if(key.equals("age")){return 30;}return 50;})).expireAfterAccess(3L, TimeUnit.SECONDS).build();cache.put("name","张三");cache.put("age","18");cache.put("sex","男");TimeUnit.MILLISECONDS.sleep(100);System.out.println(cache.getIfPresent("name"));System.out.println(cache.getIfPresent("age"));System.out.println(cache.getIfPresent("sex"));}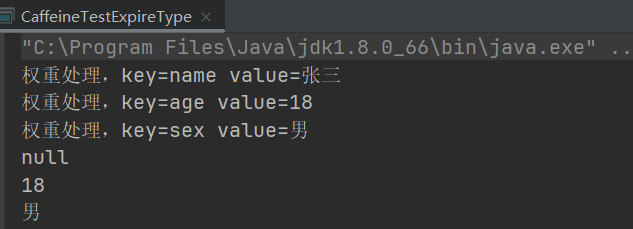
运行结果:第一个数据被清除了,因为第三个进来权重大于100,导致被清理。
最后一次读
public static void ExpireAfterAccess() throws Exception{Cache<String, String> cache = Caffeine.newBuilder().maximumSize(100).expireAfterAccess(1L,TimeUnit.SECONDS).build();cache.put("name","张三");for (int i = 0; i < 10; i++) {System.out.println("第"+i+"次读:"+cache.getIfPresent("name"));TimeUnit.SECONDS.sleep(2);}}最后一次写
//时间驱逐策略--最后一次写public static void ExpireAfterWrite() throws InterruptedException {Cache<String, String> cache = Caffeine.newBuilder().maximumSize(100).expireAfterWrite(1L,TimeUnit.SECONDS).build();cache.put("name","张三");for (int i = 0; i < 10; i++) {System.out.println("第"+i+"次读:"+cache.getIfPresent("name"));TimeUnit.SECONDS.sleep(1);}}自定义失效策略
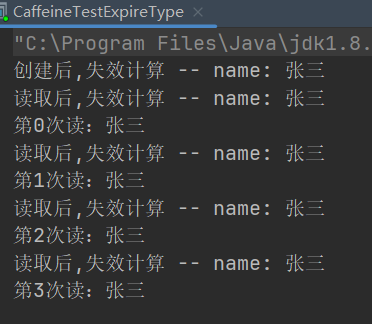
public static void MyExpire() throws InterruptedException {Cache<String, String> cache = Caffeine.newBuilder().maximumSize(100).expireAfter(new MyExpire()).build();cache.put("name", "张三");for (int i = 0; i < 10; i++) {System.out.println("第" + i + "次读:" + cache.getIfPresent("name"));TimeUnit.SECONDS.sleep(1);}}
package cn.db.caffeine;
import com.github.benmanes.caffeine.cache.Expiry;
import java.util.concurrent.TimeUnit;
class MyExpire implements Expiry<String,String> {//创建后(多久失效)@Overridepublic long expireAfterCreate( String key, String value, long currentTime) {//创建后System.out.println("创建后,失效计算 -- "+key+": "+value);//将两秒转换为纳秒,并返回;代表创建后两秒失效return TimeUnit.NANOSECONDS.convert(2,TimeUnit.SECONDS);}//更行后(多久失效)@Overridepublic long expireAfterUpdate( String key, String value, long currentTime, long currentDuration) {//更新后System.out.println("更新后,失效计算 -- "+key+": "+value);return TimeUnit.NANOSECONDS.convert(5,TimeUnit.SECONDS);}//读取后(多久失效)@Overridepublic long expireAfterRead( String key, String value, long currentTime, long currentDuration) {//读取后System.out.println("读取后,失效计算 -- "+key+": "+value);return TimeUnit.NANOSECONDS.convert(100,TimeUnit.SECONDS);}
}
基于引用驱逐策略
软引用
//基于引用驱逐策略--软引用:-Xms20m -Xmx20mpublic static void ExpireSoft() throws InterruptedException {Cache<String, Object> cache = Caffeine.newBuilder().maximumSize(100).softValues().build();
cache.put("name",new SoftReference<>("张三"));System.out.println("第1次读:"+cache.getIfPresent("name"));List<byte[]> list = new LinkedList<>();try {for(int i=0;i<100;i++) {list.add(new byte[1024*1024*1]); //1M的对象}} catch (Throwable e) {//抛出了OOM异常时TimeUnit.SECONDS.sleep(1);System.out.println("OOM时读:"+cache.getIfPresent("name"));System.out.println("Exception*************"+e.toString());}}
弱引用
//基于引用驱逐策略--弱引用public static void ExpireWeak() throws InterruptedException {Cache<String, Object> cache = Caffeine.newBuilder().maximumSize(100).weakValues().build();cache.put("name",new WeakReference<>("张三"));
System.out.println("第1次读:"+cache.getIfPresent("name"));System.gc();//进行一次GC垃圾回收System.out.println("GC后读:"+cache.getIfPresent("name"));}
状态收集器
Caffeine 开发组件有一个最为重要的特点是自带有数据的统计功能,例如:你的缓存查询了多少次,有多少次是查询准确(指定数据的 KEY 存在并且可以返回最终的数据),查询有多少次是失败的。默认情况下是没有开启此数据统计信息,如果要想获取到统计信息,则通过在build之前,添加 recordStats()来开启数据统计功能
public static void CacheStats () throws Exception{Cache<String, String> cache = Caffeine.newBuilder().maximumSize(2).recordStats() //开启统计功能.expireAfterAccess(200L,TimeUnit.SECONDS).build();cache.put("name","张三");cache.put("sex","男");cache.put("age","18");//设置的key有些是不存在的,通过这些不存在的进行非命中操作String[] keys = new String[]{"name","age","sex","phone","school"};for (int i = 0; i < 1000; i++) {cache.getIfPresent(keys[new Random().nextInt(keys.length)]);}CacheStats stats = cache.stats();System.out.println("用户请求查询总次数:"+stats.requestCount());System.out.println("命中个数:"+stats.hitCount());System.out.println("命中率:"+stats.hitRate());System.out.println("未命中次数:"+stats.missCount());System.out.println("未命中率:"+stats.missRate());
System.out.println("加载次数:"+stats.loadCount());System.out.println("总共加载时间:"+stats.totalLoadTime());System.out.println("平均加载时间(单位-纳秒):"+stats.averageLoadPenalty ());System.out.println("加载失败率:"+stats.loadFailureRate()); //加载失败率,= 总共加载失败次数 / 总共加载次数System.out.println("加载失败次数:"+stats.loadFailureCount());System.out.println("加载成功次数:"+stats.loadSuccessCount());
System.out.println("被淘汰出缓存的数据总个数:"+stats.evictionCount());System.out.println("被淘汰出缓存的那些数据的总权重:"+stats.evictionWeight());
}caffeine支持自定义状态收集
package cn.db.caffeine;
import com.github.benmanes.caffeine.cache.stats.CacheStats;
import com.github.benmanes.caffeine.cache.stats.StatsCounter;
public class MyStatsCounter implements StatsCounter {@Overridepublic void recordHits( int count) {System.out.println("命中之后执行的操作");}@Overridepublic void recordMisses( int count) {}@Overridepublic void recordLoadSuccess( long loadTime) {}@Overridepublic void recordLoadFailure( long loadTime) {}@Overridepublic void recordEviction() {}@Overridepublic CacheStats snapshot() {return null;}
}
清除、更新异步监听
缓存中的数据发送更新,或者被清除时,就会触发监听器,在监听器里可以自定义一些处理手段。可以查看哪个数据被清除,清除的原因等。这个触发和监听的过程是异步的。
Cache<String, String> cache = Caffeine.newBuilder().maximumSize(2).removalListener(((key, value, cause) -> System.out.println("键:"+key+" 值:"+value+" 清除原因:"+cause))).expireAfterAccess(1, TimeUnit.SECONDS).build();cache.put("name","张三");cache.put("sex","男");cache.put("age","18");TimeUnit.SECONDS.sleep(2);cache.put("name2","张三");cache.put("age2","18");cache.invalidate("age2");TimeUnit.SECONDS.sleep(10);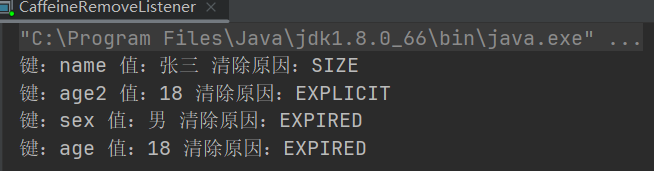
Caffeine与SpringBoot的集成
在 spring中,提供了 CacheManager 接口和对应的注解
-
@Cacheable:根据键从缓存中取值,如果缓存存在,那么获取缓存成功之后,直接返回这个缓存的结果。如果缓存不存在,那么执行方法,并将结果放入缓存中。
-
@CachePut:不管之前的键对应的缓存是否存在,都执行方法,并将结果强制放入缓存。
-
@CacheEvict:执行完方法后,会移除掉缓存中的数据。
使用注解,就需要配置 spring 中的 CacheManager ,在这个CaffeineConfig类中
@Beanpublic CacheManager cacheManager(){CaffeineCacheManager cacheManager=new CaffeineCacheManager();cacheManager.setCaffeine(Caffeine.newBuilder().initialCapacity(128).maximumSize(1024).expireAfterWrite(15, TimeUnit.SECONDS));return cacheManager;}EnableCaching
在启动类上再添加上 @EnableCaching 注解

在UserService类对应的方法上添加 @Cacheable 注解
//Caffeine+Redis两级缓存查询-- 使用注解@Cacheable(value = "user", key = "#userId")public User query2_2(long userId){String key = "user-"+userId;//先查询 Redis (2级缓存)Object obj = redisTemplate.opsForValue().get(key);if (Objects.nonNull(obj)) {log.info("get data from redis:"+key);return (User)obj;}// Redis没有则查询 DB(MySQL)User user = userMapper.selectById(userId);log.info("get data from database:"+userId);redisTemplate.opsForValue().set(key, user, 30, TimeUnit.SECONDS);
return user;}然后就可以达到类似的效果。
@Cacheable 注解的属性:
| 参数 | 解释 | 举例 |
|---|---|---|
| key | 缓存的key,可以为空,如果指定要按照SpEL表达式编写,如不指定,则按照方法所有参数组合 | @Cacheable(value=”testcache”, key=”#userName”) #userName表示使用方法的入参userName作为缓存的key |
| value | 缓存的名称,在 spring 配置文件中定义,必须指定至少一个 | 例如:@Cacheable(value=”mycache”) |
| condition | 缓存的条件,可以为空,使用 SpEL 编写,返回 true 或者 false,只有为 true 才进行缓存 | @Cacheable(value=”testcache”, condition=”#userName.length()>2”) |
| methodName | 当前方法名 | #root.methodName |
| method | 当前方法 | #root.method.name |
| target | 当前被调用的对象 | #root.target |
| targetClass | 当前被调用的对象的class | #root.targetClass |
| args | 当前方法参数组成的数组 | #root.args[0] |
| caches | 当前被调用的方法使用的Cache | #root.caches[0].name |
这里有一个condition属性指定发生的条件
示例表示只有当userId为偶数时才会进行缓存
//只有当userId为偶数时才会进行缓存@Cacheable(value = "user", key = "#userId", condition="#userId%2==0")public User query2_3(long userId){String key = "user-"+userId;//先查询 Redis (2级缓存)Object obj = redisTemplate.opsForValue().get(key);if (Objects.nonNull(obj)) {log.info("get data from redis:"+key);return (User)obj;}// Redis没有则查询 DB(MySQL)User user = userMapper.selectById(userId);log.info("get data from database:"+userId);redisTemplate.opsForValue().set(key, user, 30, TimeUnit.SECONDS);
return user;}CacheEvict
@CacheEvict是用来标注在需要清除缓存元素的方法或类上的。
当标记在一个类上时表示其中所有的方法的执行都会触发缓存的清除操作。
@CacheEvict可以指定的属性有value、key、condition、allEntries和beforeInvocation。其中value、key和condition的语义与@Cacheable对应的属性类似。即value表示清除操作是发生在哪些Cache上的(对应Cache的名称);key表示需要清除的是哪个key,如未指定则会使用默认策略生成的key;condition表示清除操作发生的条件。下面我们来介绍一下新出现的两个属性allEntries和beforeInvocation。
//清除缓存(所有的元素)@CacheEvict(value="user", key = "#userId",allEntries=true)public void deleteAll(long userId) {System.out.println(userId);}//beforeInvocation=true:在调用该方法之前清除缓存中的指定元素@CacheEvict(value="user", key = "#userId",beforeInvocation=true)public void delete(long userId) {System.out.println(userId);}