【案例篇】 实现简单SSM工程-后端
简介
本篇文章将带你从0到1的实现一个SSM项目,通过此案例可以让你在项目中对SpringBoot的使用有一个更加详细的认识,希望这个简单的案例能够帮到你。文章内容若存在错误或需改进的地方,欢迎大家指正!若对操作有任何疑问欢迎留言!非常感谢!
目录
一、创建SpringBoot工程
二、项目初始化
1、初始化MySQL的库和表
2、初始化实体类
三、实现数据访问层
1、实现
2、测试
3、拓展
(1)开启MyBatis-Plus的日志
(2)实现分页查询
(3)条件查询
(4)处理异常IllegalArgumentException: argument type mismatch
四、实现业务逻辑层
1、实现
2、测试
3、拓展
(1)业务逻辑层整合MyBatis-Plus
(2)分页校验
五、实现表现层
1、实现
2、测试
3、拓展
(1)表现层消息一致性处理
六、统一异常处理类
1、场景
2、解决办法
一、创建SpringBoot工程
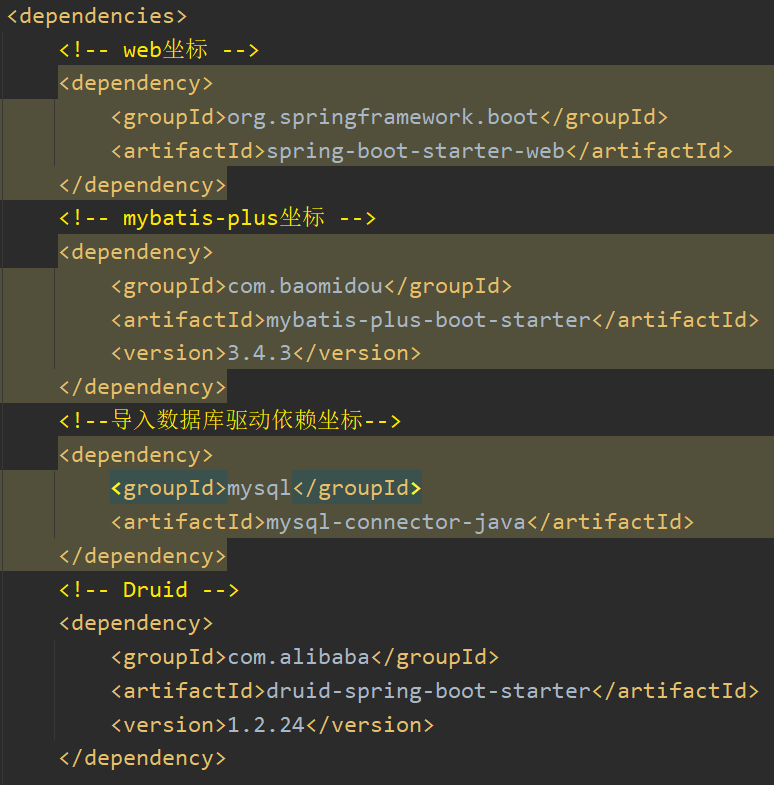
首先,创建一个SpringBoot工程,然后在pom里面导入web、MyBatis-Plus、MySQL驱动、Druid的坐标依赖,若这里如果有不太清晰怎么使用的可以看【第四篇】 SpringBoot整合第三方技术文章的内容。
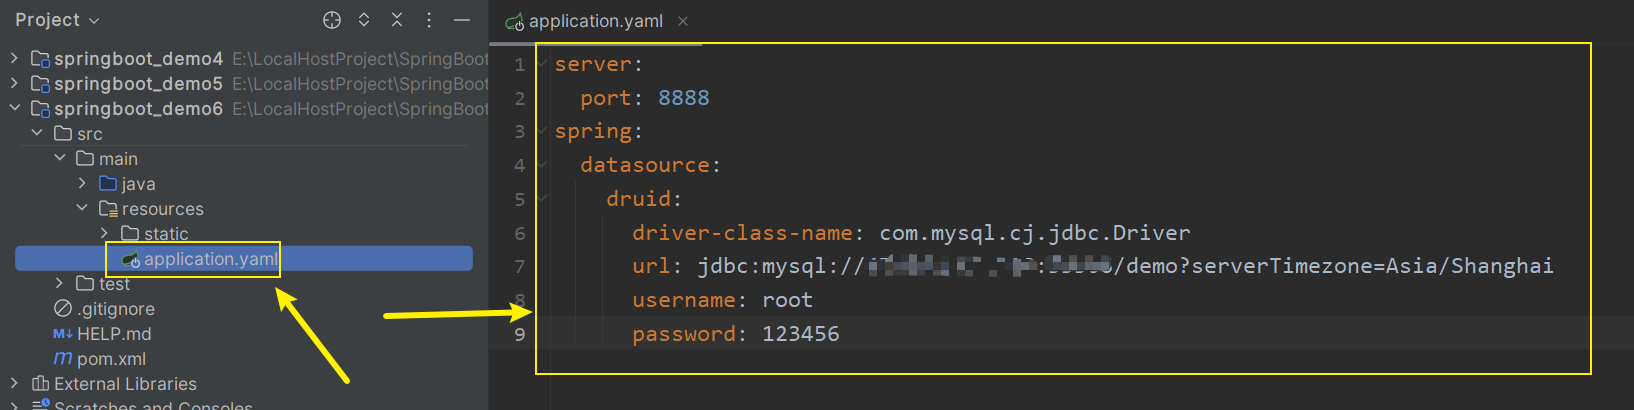
然后配置文件使用.yaml文件,并且还在文件中配置了项目的启动端口号为8888,防止8080端口出现冲突,另外设置了数据库的连接信息配置。
二、项目初始化
1、初始化MySQL的库和表
create schema demo;create table demo.student
(id      int auto_increment comment '主键'primary key,name    varchar(128) null comment '名字',age     int          null comment '年龄',address varchar(128) null comment '家庭住址'
)comment '学生表';INSERT INTO demo.student (id, name, age, address) VALUES (1, '张三', 18, '北京');
INSERT INTO demo.student (id, name, age, address) VALUES (2, '李四', 19, '南京');
INSERT INTO demo.student (id, name, age, address) VALUES (3, '王五', 20, '苏州');
INSERT INTO demo.student (id, name, age, address) VALUES (4, '赵六', 21, '杭州');
INSERT INTO demo.student (id, name, age, address) VALUES (5, '马七', 22, '成都');
INSERT INTO demo.student (id, name, age, address) VALUES (6, '刘八', 23, '重庆');
INSERT INTO demo.student (id, name, age, address) VALUES (7, '蔡九', 24, '上海');
INSERT INTO demo.student (id, name, age, address) VALUES (8, '康十', 25, '深圳');
INSERT INTO demo.student (id, name, age, address) VALUES (9, '杨十一', 26, '广州');
INSERT INTO demo.student (id, name, age, address) VALUES (10, '杨十二', 27, '珠海');
INSERT INTO demo.student (id, name, age, address) VALUES (11, '杨十三', 28, '太原');
INSERT INTO demo.student (id, name, age, address) VALUES (12, '杨十四', 29, '西安');
INSERT INTO demo.student (id, name, age, address) VALUES (13, '杨十五', 30, '济南');
2、初始化实体类
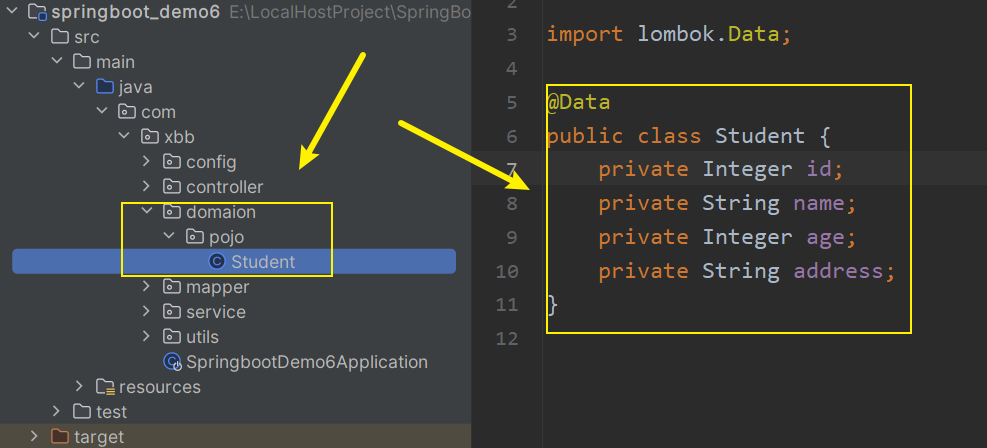
在引导类所在包下创建domain.pojo包,然后在pojo包里创建Student实体类,并给出get/set、toString、equals/hashCode方法。这里使用的Lombok的@Data实现实体类方法的简化。下面会说明Lombok的用法。
Lombok的用法
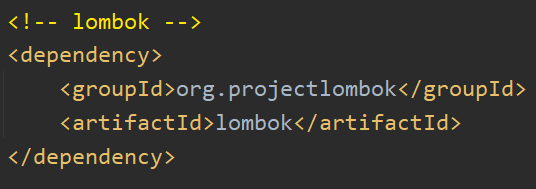
(1)导入对应的依赖坐标
(2)使用
Lombok提供的主要注解:
- @Data:为当前实体类在编译期设置对应的get/set、toString、equals/hashCode方法。
- @AllArgsConstructor:为当前实体类在编译期设置对应的全参构造方法
- @NoArgsConstructor:为当前实体类在编译期设置对应的空参构造方法
三、实现数据访问层
1、实现
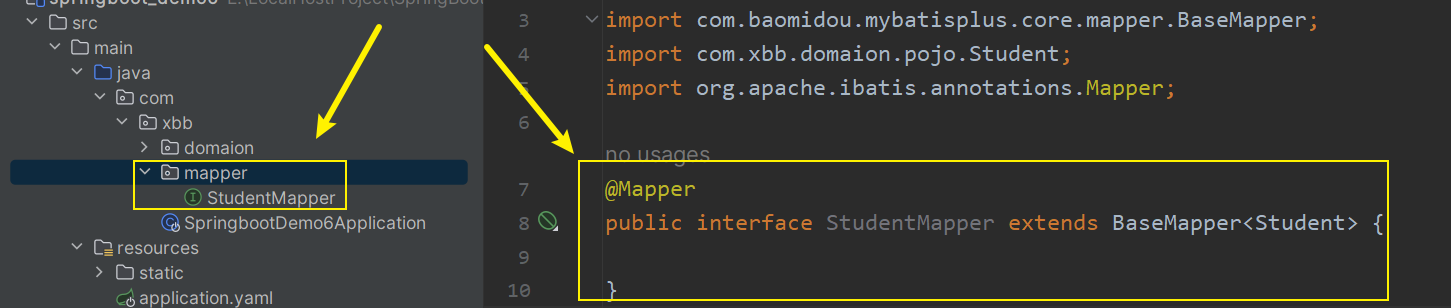
在引导类所在包下创建一个mapper包,然后在mapper包中创建一个StudentMapper的接口,使用@Mapper注解标注该类,并且让该接口继承BaserMapper接口指定泛型为与数据库表映射的实体类。这样数据访问层的基础接口就已经写好了,因为BaserMapper接口中已经提供了各种用于操作数据库的接口,所以在使用的使用直接注入StudentMapper接口,然后调用即可。
2、测试
在test包下同样的目录下创建一个mapper包,然后在mapper包中创建一个StudentMapper的测试类,然后再类中注入StudentMapper的对象,最后编写测试方法即可。
@SpringBootTest
public class StudentMapperTest {@Autowiredprivate StudentMapper studentMapper;/*** 测试查询单个数据*//*** 测试查询单个数据*/@Testvoid testGetById() {System.out.println(studentMapper.selectById(1));}/*** 测试新增数据*/@Testvoid testSave() {Student student = new Student();student.setName("demo1");student.setAge(18);student.setAddress("青海");studentMapper.insert(student);}/*** 测试修改数据*/@Testvoid testUpdate() {Student student = new Student();student.setName("demo1");student.setAge(18);student.setAddress("青海");studentMapper.updateById(student);}/*** 测试删除数据*/@Testvoid testDelete() {studentMapper.deleteById(1);}/*** 测试查询所有数据*/@Testvoid testGetaAll() {System.out.println(studentMapper.selectList(null));}
}
3、拓展
(1)开启MyBatis-Plus的日志
只需要在application.yaml配置文件中配置MyBatis-Plus开启日志打印的配置即可。
mybatis-plus:configuration:log-impl: org.apache.ibatis.logging.stdout.StdOutImpl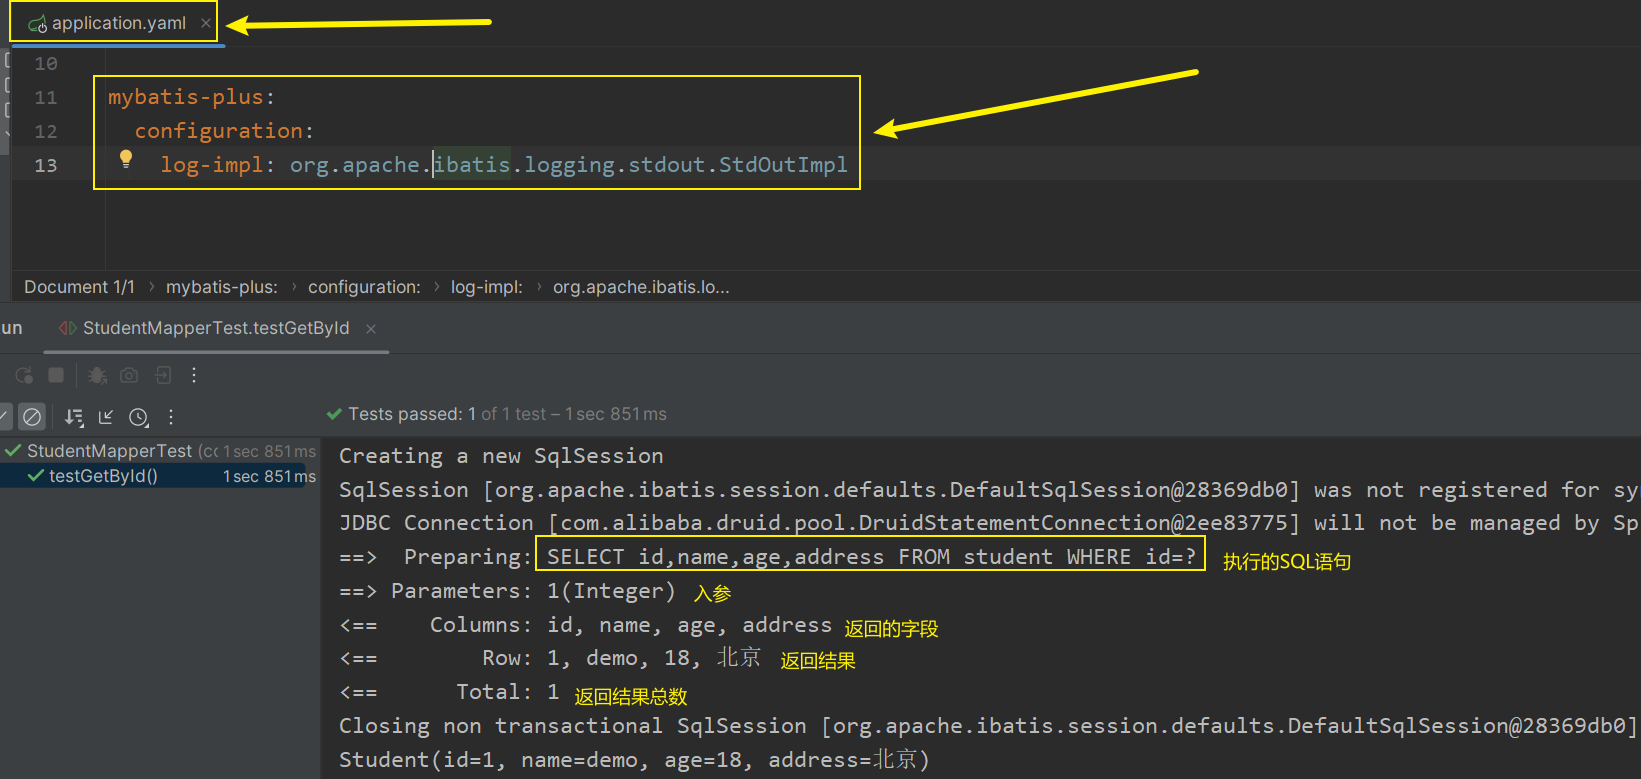
(2)实现分页查询
MyBatis-Plus中是提供了分页查询的功能的,但是需要手动显示的配置。只需要将MyBatis-Plus的拦截器的对象注册为IOC的Bean,并在注册之前在这个拦截器的Bean里面添加想要的配置即可,比如添加分页功能。
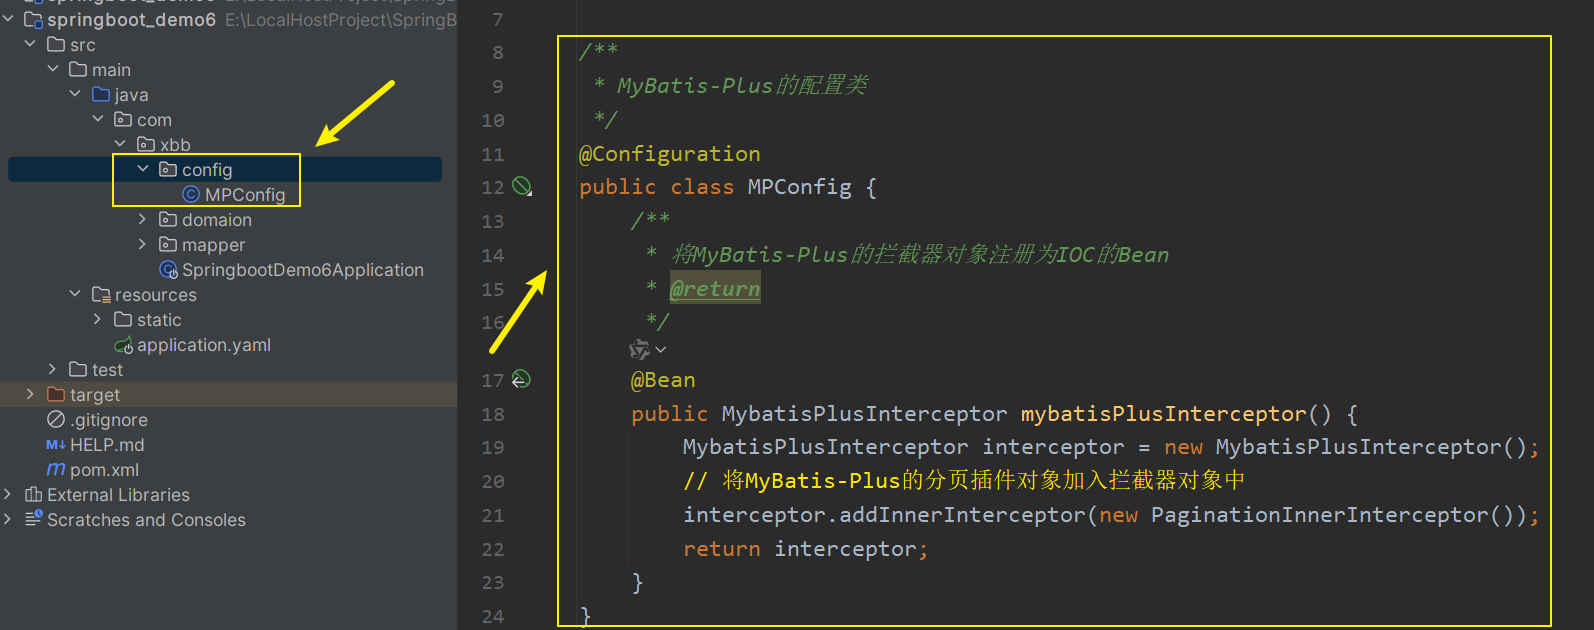
步骤:在启动类所在包下创建config包,用于存放配置类,在config包下创建MyBatis-Plus的配置类,并将MyBatis-Plus的拦截器的对象注册为IOC的Bean。
/*** MyBatis-Plus的配置类*/
@Configuration
public class MPConfig {/*** 将MyBatis-Plus的拦截器对象注册为IOC的Bean* @return*/@Beanpublic MybatisPlusInterceptor mybatisPlusInterceptor() {MybatisPlusInterceptor interceptor = new MybatisPlusInterceptor();// 将MyBatis-Plus的分页插件对象加入拦截器对象中interceptor.addInnerInterceptor(new PaginationInnerInterceptor());return interceptor;}
}
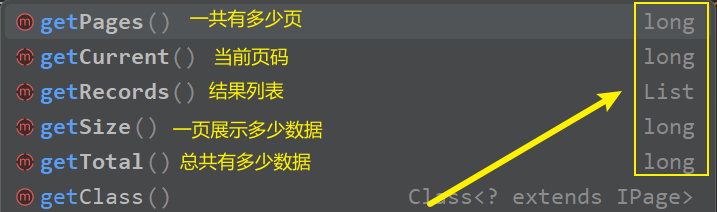
测试分页查询,MyBatis-Plus提供的有分页查询方法selectPage,其中接收Page对象和条件构造器,条件构造器会在下面说明。创建一个IPage对象,然后传参给查询第几页和一页展示多少数据,然后调用分页查询方法,方法的返回值还是这个page对象,然后page对象提供了一些方法,具体方法什么含义在下面截图中有说明。
@Testvoid testPage() {IPage page = new Page(1,5);studentMapper.selectPage(page,null);}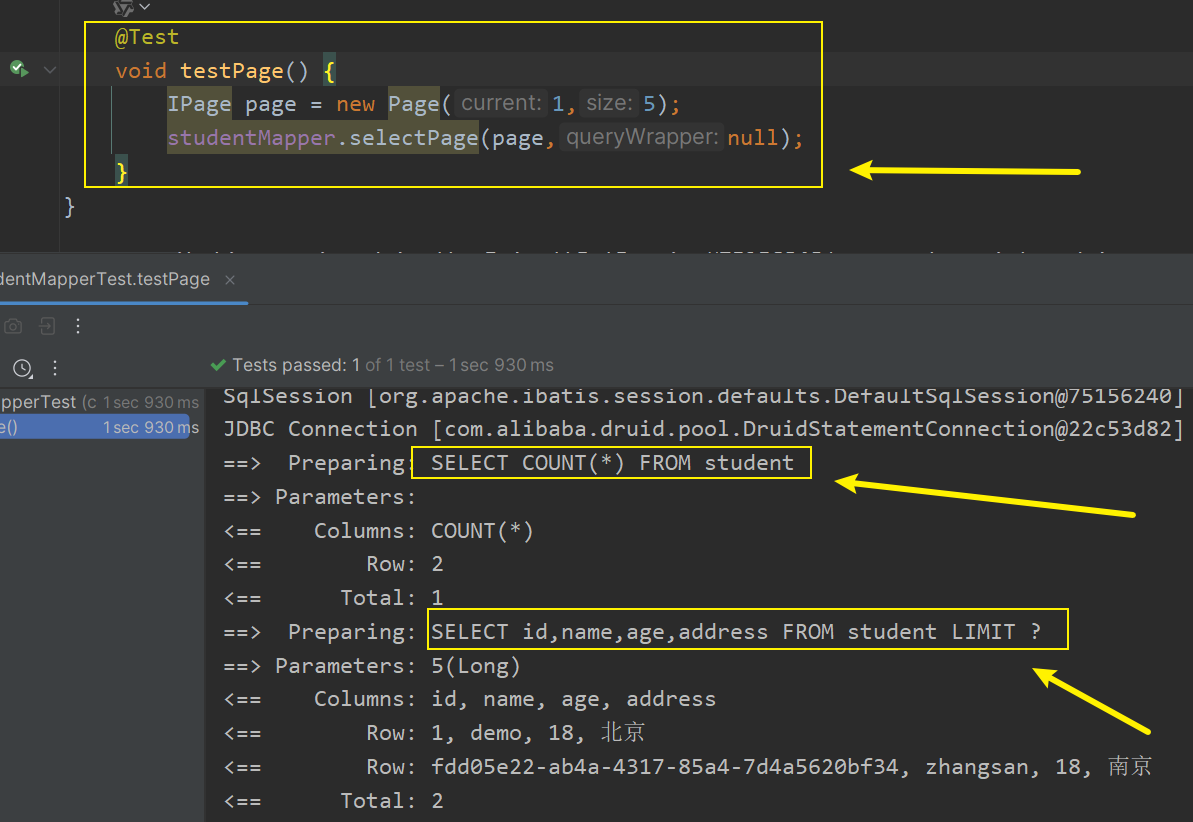
(3)条件查询
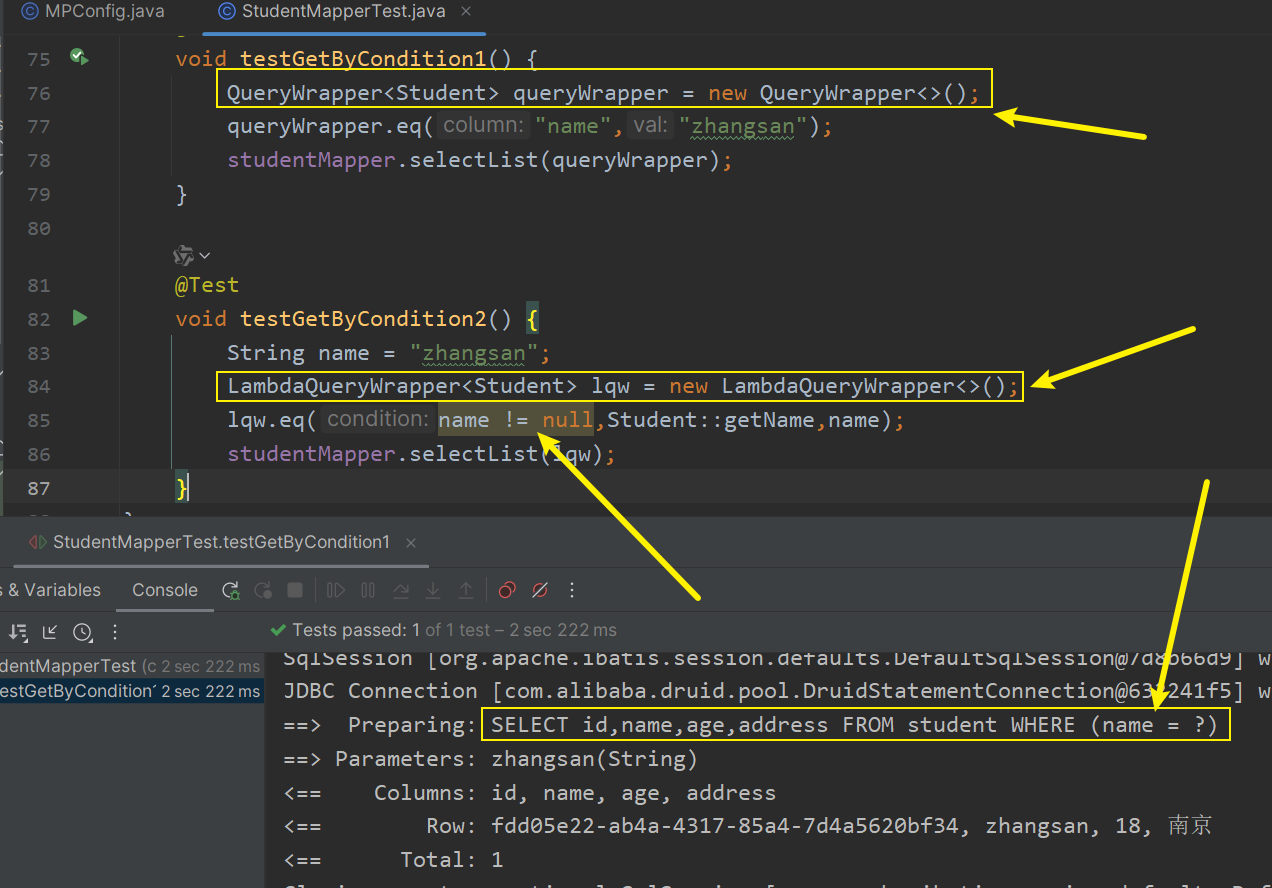
使用MyBatis-Plus提供的QueryWrapper和LambdaQueryWrapper,两个选一个就行,区别在于QueryWrapper的条件构造中是直接使用的字符串参数,LambdaQueryWrapper是在字符串的基础上使用了方法引用,QueryWrapper是有可能因为人为原因写错的,而LambdaQueryWrapper则避免了这个问题,所以今后推荐使用LambdaQueryWrapper。另外在条件表达式中还支持添加判断表达式,若为true则拼接该条件,反之则不拼接,这样可以对接收到的参数进行一个非空判断,防止接收空参报错。
(4)处理异常IllegalArgumentException: argument type mismatch
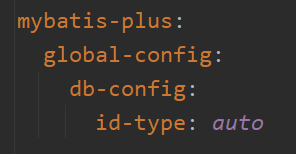
产生这个问题的原因是因为MyBatis-Plus自动生成id值的策略是采用雪花算法,然而雪花算法生成的值是超出了int的范围,于是就产生了这个异常,可以在配置文件中设置id的策略为数据库自增
四、实现业务逻辑层
1、实现
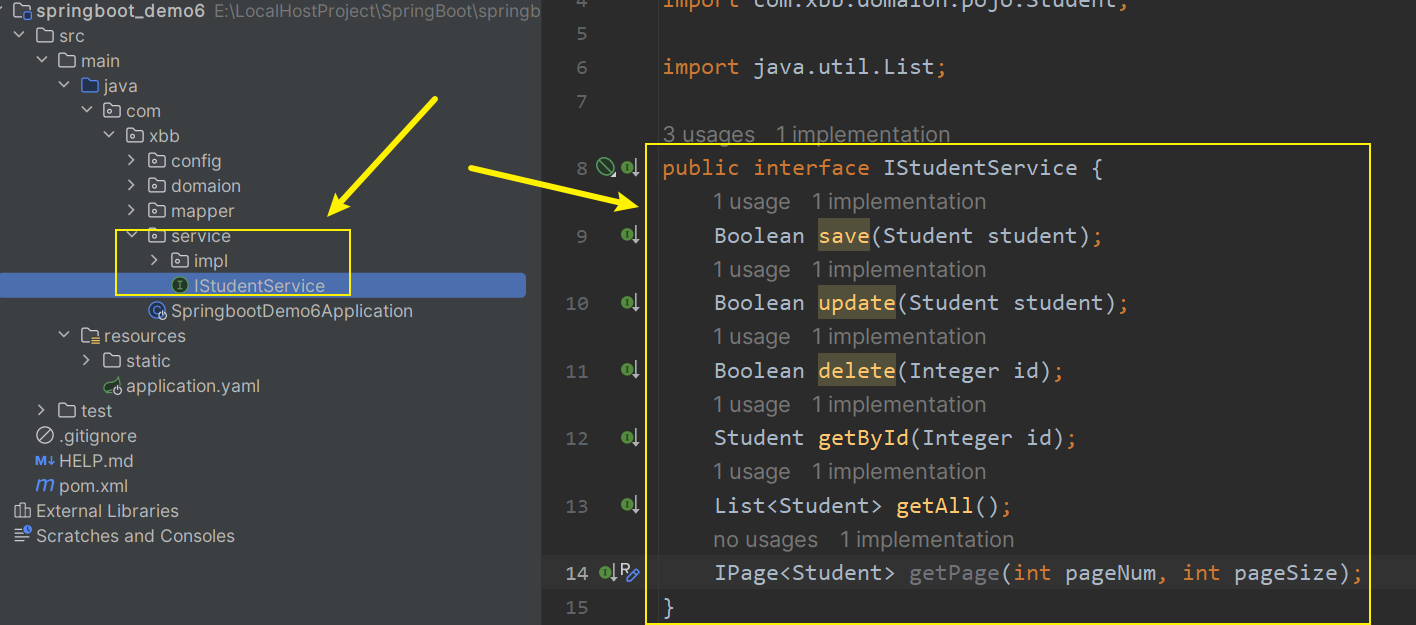
首先,在启动类所在包下创建一个service包,然后在service包中创建IStudentService接口,并在接口中定义所要使用方法,这里简单列举了几个。
然后,在service包中创建一个impl包,在里面创建实现类StudentServiceImpl并实现IStudentService接口,重写所有方法。在该类上标注@Service注解,并在类里面注入数据访问层StudentMapper的对象。
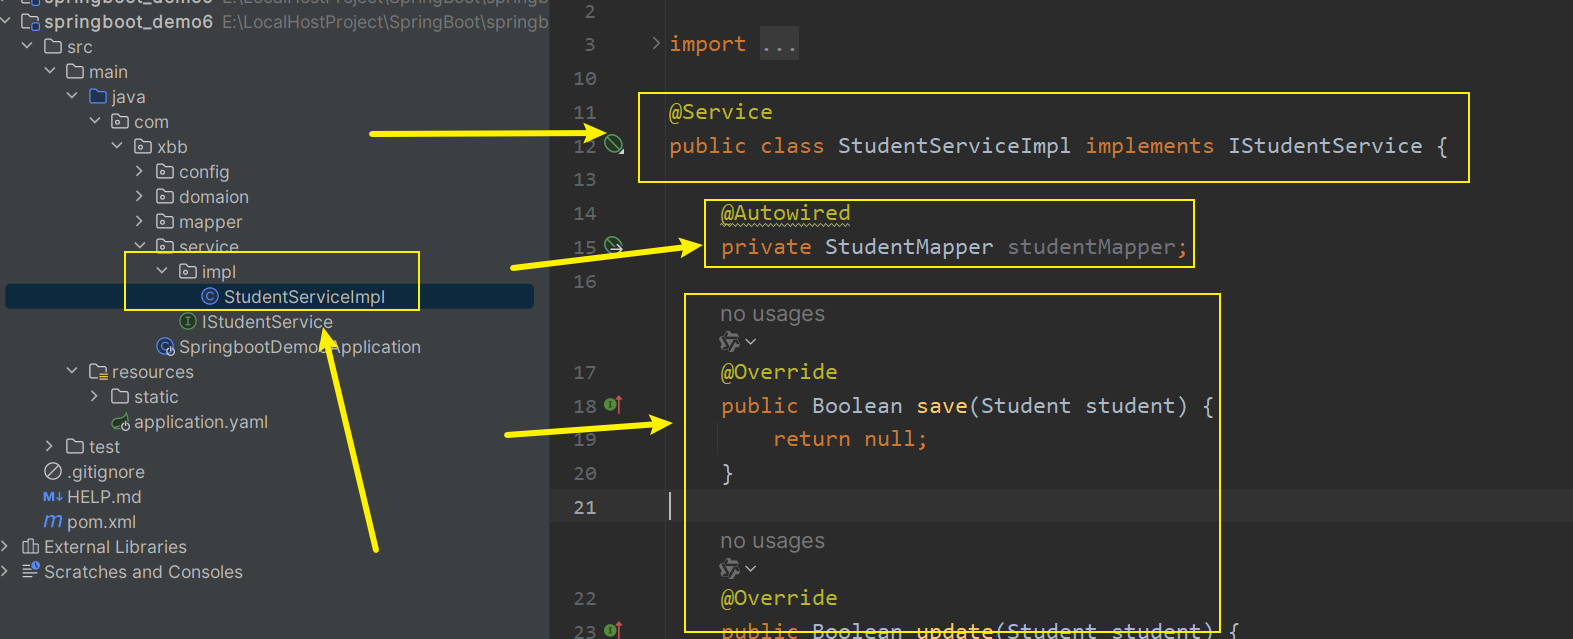
最后,编写实现类StudentServiceImpl中方法的逻辑,并使用数据访问层对象操作数据库。
@Service
public class StudentServiceImpl implements IStudentService {@Autowiredprivate StudentMapper studentMapper;@Overridepublic Boolean save(Student student) {return studentMapper.insert(student) > 0;}@Overridepublic Boolean update(Student student) {return studentMapper.updateById(student) > 0;}@Overridepublic Boolean delete(Integer id) {return studentMapper.deleteById(id) > 0;}@Overridepublic Student getById(Integer id) {return studentMapper.selectById(id);}@Overridepublic List<Student> getAll() {return studentMapper.selectList(null);}@Overridepublic IPage<Student> getPage(int pageNum, int pageSize) {IPage<Student> page = new Page<>(pageNum, pageSize);studentMapper.selectPage(page, null);return page;}
}
2、测试
在test包下同样的目录下创建一个servicer包,然后在servicer包中创建一个IStudentServicer的测试类,然后再类中注入IStudentServicer的对象,最后编写测试方法即可。
@SpringBootTest
public class IStudentServiceTest {@Autowiredprivate IStudentService studentService;/*** 测试查询单个数据*/@Testvoid testGetById() {System.out.println(studentService.getById(1));}/*** 测试新增数据*/@Testvoid testSave() {Student student = new Student();student.setName("demo1");student.setAge(18);student.setAddress("青海");studentService.save(student);}/*** 测试修改数据*/@Testvoid testUpdate() {Student student = new Student();student.setId(14);student.setName("demo1");student.setAge(18);student.setAddress("青海");studentService.update(student);}/*** 测试删除数据*/@Testvoid testDelete() {studentService.delete(14);}/*** 测试查询所有数据*/@Testvoid testGetaAll() {System.out.println(studentService.getAll());}/*** 测试分页查询*/@Testvoid testPage() {IPage<Student> page = studentService.getPage(1, 5);System.out.println(page.getPages());System.out.println(page.getTotal());System.out.println(page.getRecords());System.out.println(page.getCurrent());System.out.println(page.getSize());}
}
3、拓展
(1)业务逻辑层整合MyBatis-Plus
MyBatis-Plus提供了业务逻辑层通用接口(IService<T>)和业务逻辑层通用实现类(ServiceImpl<M,T>),基于这二者能够直接在业务层对数据库进行操作。注意:如果通用类提供的方法不足以满足业务逻辑层中的需求,那么可以在通用类的基础上做功能重载或者功能追加,千万不能覆盖原始方法!
步骤:
- 业务层接口继承通用接口(IService<T>),并指定实体类泛型
- 业务实现层
- 继承通用实现类(ServiceImpl<M,T>),第一个泛型数据访问层,第二个是实体类。
- 实现业务层接口。
- 使用@Service注解声明


经过上面业务逻辑层整合MyBatis-Plus,下面是测试示例:
@SpringBootTest
public class IStudentService2Test {@Autowiredprivate IStudentService2 studentService2;/*** 测试查询单个数据*/@Testvoid testGetById() {System.out.println(studentService2.getById(1));}/*** 测试新增数据*/@Testvoid testSave() {Student student = new Student();student.setName("demo1");student.setAge(18);student.setAddress("青海");studentService2.save(student);}/*** 测试修改数据*/@Testvoid testUpdate() {Student student = new Student();student.setId(14);student.setName("demo1");student.setAge(18);student.setAddress("青海");studentService2.updateById(student);}/*** 测试删除数据*/@Testvoid testDelete() {studentService2.removeById(14);}/*** 测试查询所有数据*/@Testvoid testGetaAll() {System.out.println(studentService2.list());}/*** 测试分页查询*/@Testvoid testPage() {IPage<Student> page = new Page<>(1, 5);studentService2.page(page);System.out.println(page.getPages());System.out.println(page.getTotal());System.out.println(page.getRecords());System.out.println(page.getCurrent());System.out.println(page.getSize());}
}
(2)分页校验
当前的分页是存在一点点问题的,因为没有对分页参数进行校验,当页码和页展示数对不上的时候就会发生异常。例如,在最后一页只有一条数据,如果删除之后,还是在当前页,但是当前页已经没有数据了。后端校验是有弊端的,有并发风险,假如正在重查,然后别人又删除了,就会有问题,所以后端校验属于补救措施。
处理办法
- 前端在做删除的操作之后,立即返回第一页(推荐)
- 后端做校验
- 若页码或者页展示数是非法值,那么就给默认值;
- 若查询页与返回页对不上,那么再重查一次;
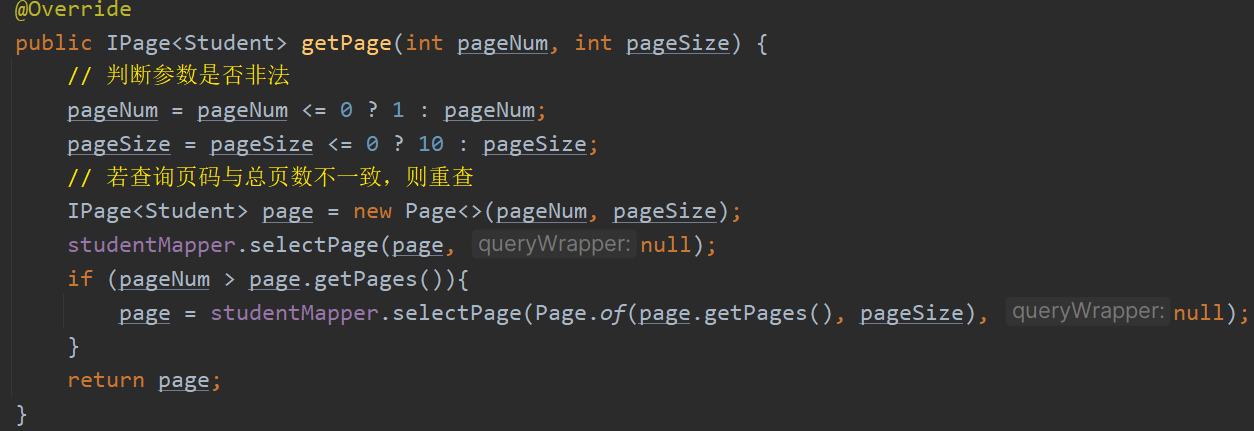
@Overridepublic IPage<Student> getPage(int pageNum, int pageSize) {// 判断参数是否非法pageNum = pageNum <= 0 ? 1 : pageNum;pageSize = pageSize <= 0 ? 10 : pageSize;// 若查询页码与总页数不一致,则重查IPage<Student> page = new Page<>(pageNum, pageSize);studentMapper.selectPage(page, null);if (pageNum > page.getPages()){page = studentMapper.selectPage(Page.of(page.getPages(), pageSize), null);}return page;}五、实现表现层
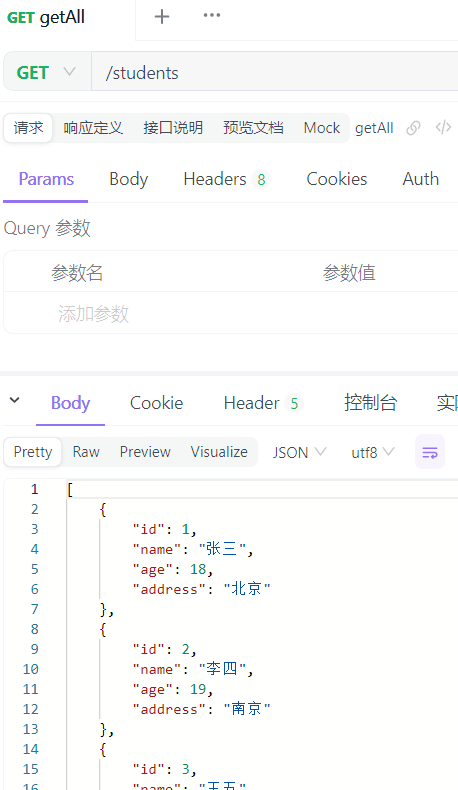
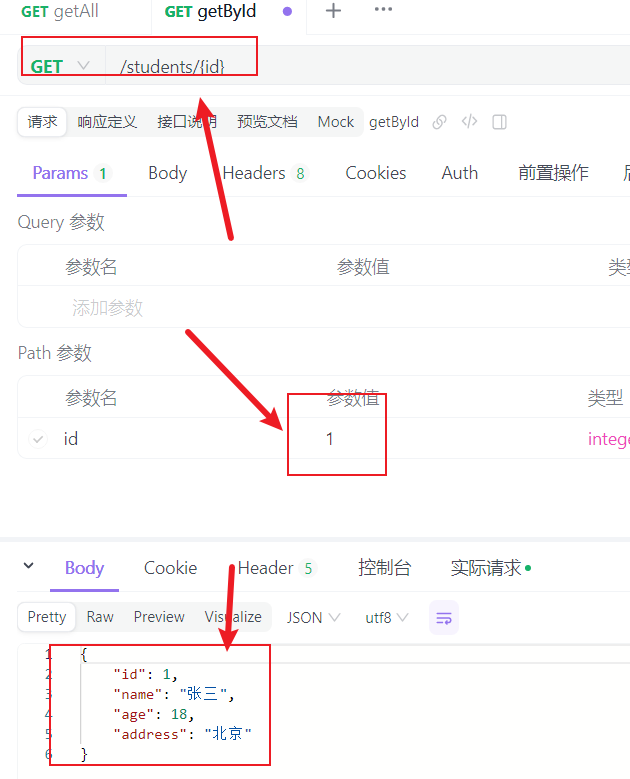
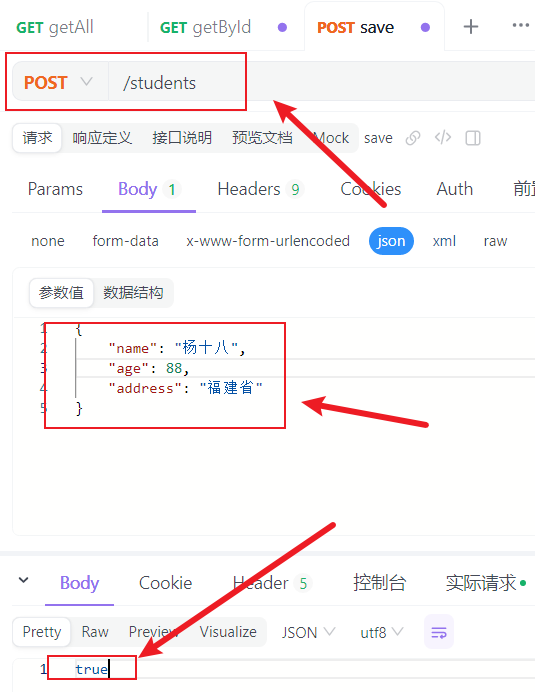
表现层基于Restful开发,并且使用APIfox进行接口测试
1、实现
首先,在启动类所在包下创建一个controller包,然后在controller包中创建StudentController接口,然后使用@RestController注解声明为表现层类、@RequestMapping("/students")声明请求路径前缀并在接口中定义所要使用方法,这里简单列举了几个。
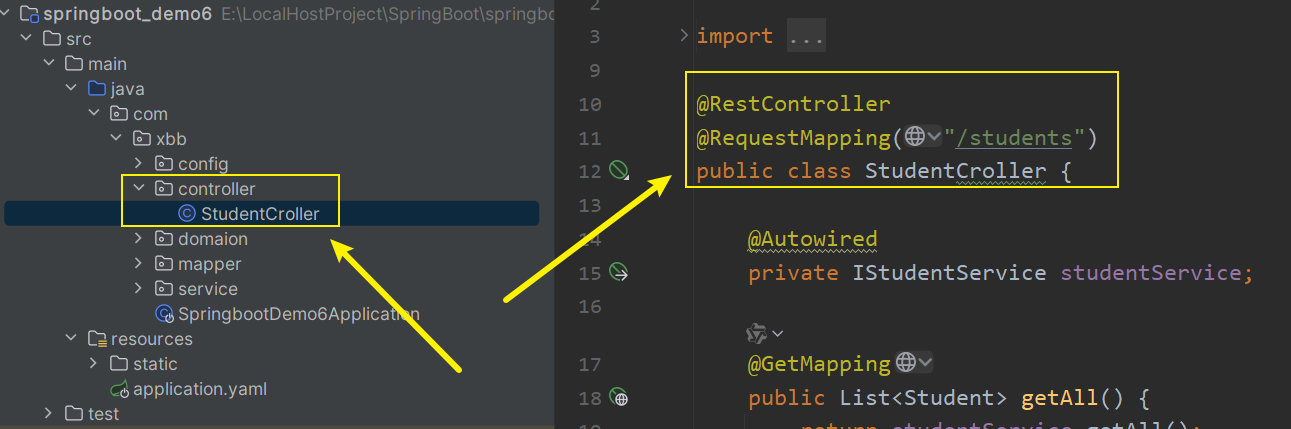
@RestController
@RequestMapping("/students")
public class StudentCroller {@Autowiredprivate IStudentService studentService;@GetMappingpublic List<Student> getAll() {return studentService.getAll();}@GetMapping("/{id}")public Student getById(@PathVariable Integer id) {return studentService.getById(id);}@PostMappingpublic Boolean save(@RequestBody Student student) {return studentService.save(student);}@PutMappingpublic Boolean update(@RequestBody Student student) {return studentService.update(student);}@DeleteMappingpublic Boolean delete(Integer id) {return studentService.delete(id);}
}
2、测试
这里使用的APIfox构造的请求,也可以使用Postman。
3、拓展
(1)表现层消息一致性处理
设计表现层返回结果的模型类,用于后端与前端进行数据格式统一,也称为前后端数据协议。在启动类所在包下创建一个utilsr包,然后在utilsr包中创建R类,并给三个属性code、msg、data,code等于200时代表请求成功500代表失败,其余响应码可以看约定。msg是响应信息,data是响应数据。也可以定义一些静态方法,方便调用。
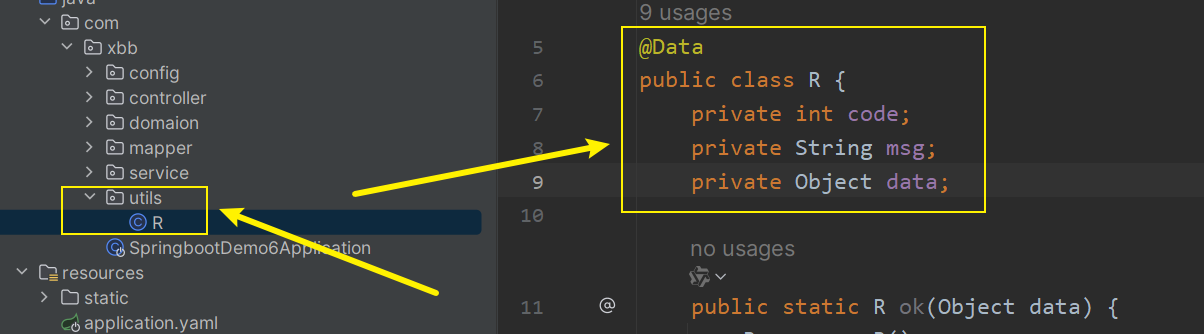
@Data
public class R {private int code;private String msg;private Object data;public static R ok(Object data) {R r = new R();r.setCode(200);r.setMsg("success");r.setData(data);return r;}public static R ok() {R r = new R();r.setCode(200);r.setMsg("success");r.setData(null);return r;}public static R fail(String msg) {R r = new R();r.setCode(500);r.setMsg(msg);r.setData(null);return r;}
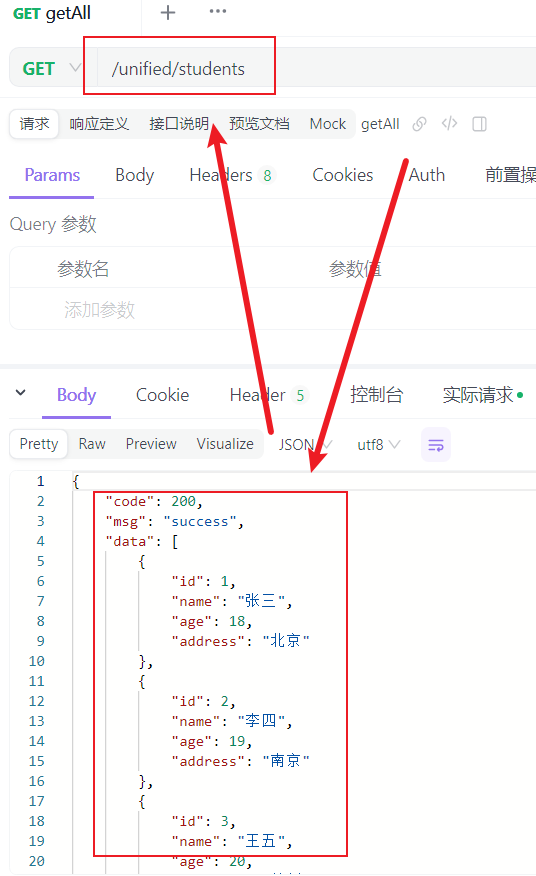
}然后在表现层就需要统一返回值为R,那么前端就可以根据code的值来进行不同操作,也知道数据一定在daata里面,这样就形成了统一。
@RestController
@RequestMapping("/unified/students")
public class StudentCroller2 {@Autowiredprivate IStudentService studentService;@GetMappingpublic R getAll() {return R.ok(studentService.getAll());}@GetMapping("/{id}")public R getById(@PathVariable Integer id) {return R.ok(studentService.getById(id));}@GetMapping("/{pageNum}/{pageSize}")public R page(@PathVariable Integer pageNum, @PathVariable Integer pageSize) {return R.ok(studentService.getPage(pageNum, pageSize));}@PostMappingpublic R save(@RequestBody Student student) {return studentService.save(student) ? R.ok() : R.fail("添加失败");}@PutMappingpublic R update(@RequestBody Student student) {return studentService.update(student) ? R.ok() : R.fail("修改失败");}@DeleteMappingpublic R delete(Integer id) {return studentService.delete(id) ? R.ok() : R.fail("删除失败");}
}
六、统一异常处理类
1、场景
开发中难免会遇到错误,那么当程序中出现错误的时候就会抛异常,如果按照上面的方式来写项目的话,一旦程序中发生异常,那么就会直接抛给前端,导致无法正确解析数据,下面是一个演示。

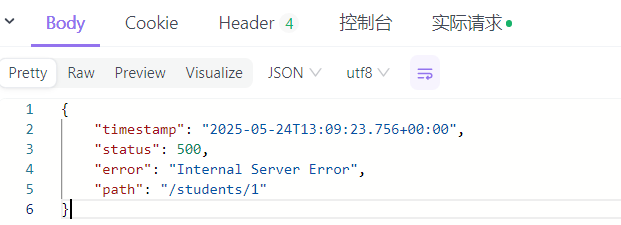
2、解决办法
尽管代码出现了异常,那后端也应该将异常统一做处理,做成前端能够统一处理的格式。SpingBoot也提供的有统一异常类的实现,先在utils中创建一个异常处理类,并使用@RestControllerAdvice注解声明,然后可以在类中写异常处理的方法,并通过@ExceptionHandler注解声明要拦截什么样的异常,可以针对不同的异常做不同的处理,下面示例是直接将所有的异常捕获并统一处理。
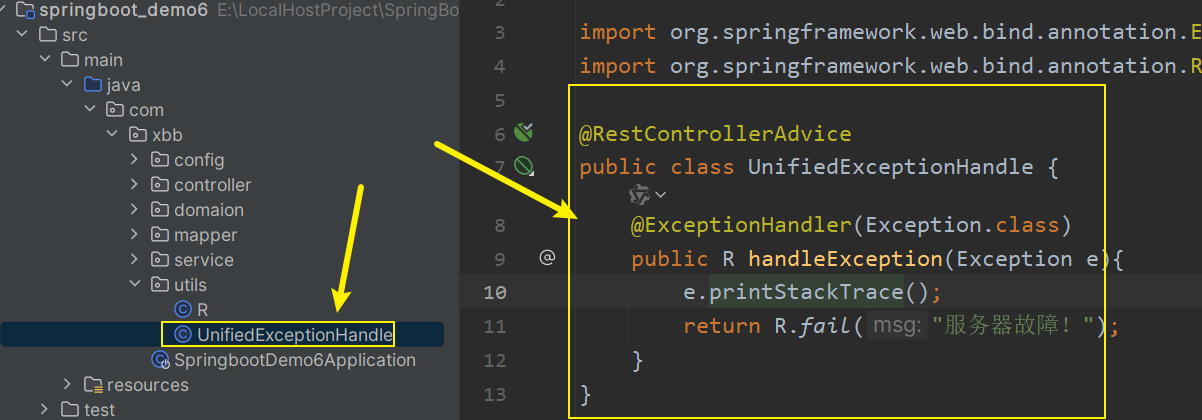
@RestControllerAdvice
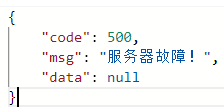
public class UnifiedExceptionHandle {@ExceptionHandler(Exception.class)public R handleException(Exception e){e.printStackTrace();return R.fail("服务器故障!");}
}