NFS服务小实验
实验1
-
建立NFS服务器,使的客户端顺序共享数据
-
第一步:服务端及客户端的准备工作
# 恢复快照 [root@server ~]# setenforce 0 [root@server ~]# systemctl stop firewalld [root@server ~]# yum install nfs-utils -y # 服务端及客户端都安装
-
第二步:服务端建立共享文件目录,并设置权限
[root@server ~]# mkdir  /nfsfile
[root@server ~]# echo  "welcome to www.openlab.com" > /nfsfile/readme
[root@server ~]# chmod  -Rf  777  /nfsfile
-
第三步:服务端编辑配置文件
[root@server ~]# vim  /etc/exports  # 添加以下内容
/nfsfile        192.168.48.131/24(rw,sync,all_squash)
-
第四步:服务端先启动rpc服务,在启动nfs服务
[root@server ~]# systemctl start  rpcbind
[root@server ~]# systemctl start  nfs-server
[root@server ~]# systemctl enable  rpcbind
[root@server ~]# systemctl enable  nfs-server
Created symlink /etc/systemd/system/multi-user.target.wants/nfs-server.service → /usr/lib/systemd/system/nfs-server.service.
# 注意:若systemctl start  rpcbind后报错,显示启动失败,应先停止服务,在重启服务
[root@server ~]# systemctl stop rpcbind
[root@server ~]# systemctl start  rpcbind
-
第五步:客户端使用本地挂载方式访问远程共享目录
-
先查询有哪些远程共享目录可用
-
[root@node1 ~]# showmount  -e  192.168.48.130  # 别忘了安装nfs-utils
# -e 表示显示服务器共享信息列表
-
新建本地挂载目录
-
[root@node1 ~]# mkdir /nfs1 # 新建本地挂载目录 # 使用mount远程挂载命令挂载服务器的目录到客户端本地目录,-t nfs 表示使用的文件系统类型 [root@node1 ~]# mount -t nfs 192.168.48.130:/nfsfile /nfs1 [root@node1 ~]# cd /nfs1 # 通过本地目录访问远程共享数据 [root@node1 nfs1]# ls readme [root@node1 nfs1]# cat readme welcome to www.openlab.com [root@node1 nfs1]# cd ~
-
-
第六步:客户端使用开机挂载实现永久挂载
[root@node1 ~]# vim /etc/fstab # 编辑开机挂载配置文件,最后一行添加如下内容 192.168.48.130:/nfsfile /nfs1 nfs defaults 0 0 [root@node1 ~]# mount -a # 测试 [root@node1 nfs1]# df -h # 查看挂载信息 文件系统 容量 已用 可用 已用% 挂载点 devtmpfs 4.0M 0 4.0M 0% /dev tmpfs 714M 0 714M 0% /dev/shm tmpfs 286M 4.2M 282M 2% /run tmpfs 4.0M 0 4.0M 0% /sys/fs/cgroup /dev/mapper/openeuler-root 27G 1.6G 24G 7% / tmpfs 714M 0 714M 0% /tmp /dev/sda1 974M 151M 756M 17% /boot 192.168.48.130:/nfsfile 27G 1.6G 24G 7% /nfs1
NFS账户映射
实验2:
-
基于上例,将/nfsfile权限修改后,查看客户端是否可以访问成功,是否可以修改数据
# 定位服务端 [root@server ~]# cat /etc/exports # 确认是否为rw可读可写的权限 [root@server ~]# cd /nfsfile [root@server nfsfile]# ll # 查看原有权限 总用量 4 -rwxrwxrwx 1 root root 27 6月 1 14:43 readme -rw-r--r-- 1 nobody nobody 0 6月 1 14:56 test1.txt [root@server nfsfile]# cd ~ [root@server ~]# chmod -Rf 444 /nfsfile # 设置新权限,没有wx [root@server ~]# ll -d /nfsfile/ dr--r--r-- 2 root root 37 6月 1 14:56 /nfsfile/ [root@server ~]# ll /nfsfile/ 总用量 4 -r--r--r-- 1 root root 27 6月 1 14:43 readme -r--r--r-- 1 nobody nobody 0 6月 1 14:56 test1.txt # 定位客户端 [root@node1 ~]# cd /nfs1 -bash: cd: /nfs1: 权限不够 # 显示无权限,即使服务端exports中有rw权限最后还是以文件系统权限为准
实验3
-
客户端访问服务端,默认使用服务端的账户映射为nobody,uid与gid均为65534,其值可以修改
# 定位服务端 [root@server ~]# chmod -Rf 777 /nfsfile # 先将上例的权限修改回原样 [root@server ~]# ll -d /nfsfile/ drwxrwxrwx 2 root root 37 6月 1 14:56 /nfsfile/ [root@server ~]# vim /etc/exports # 修改映射方式为 /nfsfile 192.168.48.131/24(rw,sync,root_squash) [root@server ~]# systemctl restart rpcbind [root@server ~]# systemctl restart nfs-server exporting 192.168.48.131/24:/nfsfile # 定位客户端 [root@node1 ~]# cd /nfs1 [root@node1 nfs1]# touch test2.txt [root@node1 nfs1]# ll 总用量 4 -rwxrwxrwx 1 root root 27 6月 1 14:43 readme -rwxrwxrwx 1 nobody nobody 0 6月 1 14:56 test1.txt -rw-r--r-- 1 nobody nobody 0 6月 1 15:15 test2.txt # root映射为nobody [root@node1 nfs1]# su fox [fox@node1 nfs1]$ touch test3.txt [fox@node1 nfs1]$ ll 总用量 4 -rwxrwxrwx 1 root root 27 6月 1 14:43 readme -rwxrwxrwx 1 nobody nobody 0 6月 1 14:56 test1.txt -rw-r--r-- 1 nobody nobody 0 6月 1 15:15 test2.txt -rw-rw-r-- 1 fox fox 0 6月 1 15:16 test3.txt # fox映射为fox [fox@node1 nfs1]$ su root 密码: # 定位服务端 [root@server ~]# vim /etc/exports /nfsfile 192.168.48.131/24(rw,sync,all_squash,anonuid=2000,anongid=2000) [root@server ~]# systemctl restart rpcbind [root@server ~]# systemctl restart nfs-server # 定位客户端 [root@node1 nfs1]# touch test4.txt [root@node1 nfs1]# ll 总用量 4 -rwxrwxrwx 1 root root 27 6月 1 14:43 readme -rwxrwxrwx 1 nobody nobody 0 6月 1 14:56 test1.txt -rw-r--r-- 1 nobody nobody 0 6月 1 15:15 test2.txt -rw-rw-r-- 1 fox fox 0 6月 1 15:16 test3.txt -rw-r--r-- 1 2000 2000 0 6月 1 15:19 test4.txt # 自定义udi及gid [root@node1 nfs1]# cd ~
autofs自动挂载服务
产生原因
-
在一般NFS文件系统的使用过程中,如果客户端要使用服务端所提供的文件系统,可以在
/etc/fstab中设置开机时自动挂载,也可以在登录系统后手动利用mount来挂载。 -
由于网络的问题,NFS服务器与客户端的连接不会一直存在,当我们挂载了NFS服务器之后,任何一方脱机都可能造成另外一方等待超时,如果在资源挂载后长期不使用,也会造成服务器硬件资源的浪费。
-
为了解决这样的问题,就出现了下面的想法:
-
当客户端在有使用NFS文件系统的需求时才让系统自动挂载。
-
当NFS文件系统使用完毕后(autofs默认自动卸载时间为300s即5分钟),让NFS自动卸载。
-
-
autofs 自动挂载服务可以帮我们解决这一问题,该服务是运行在客户端的一种 Linux 系统守护进程,在用户需要使用该文件系统时才去动态挂载,从而节约了网络资源和服务器的硬件资源。
安装
[root@node1 ~]# yum install autofs -y # 客户端安装
配置文件分析
-
配置文件路径:/etc/auto.master
-
作用:处于生产环境中的 Linux 服务器,一般会同时管理许多设备的挂载操作。如果把这些设备挂载信息都写入到 autofs 服务的主配置文件中,无疑会让主配置文件臃肿不堪,不利于服务执行效率,也不利于日后修改里面的配置内容,则需要将挂载的设备独立配置形成子文件,主配置文件只存储配置挂载设置的文件名
-
/etc/auto.master文件内容格式:挂载父目录 子配置文件
-
挂载目录:不需要事先存在,因为autofs会主动建立该目录
-
子配置文件:文件名可自定义
-
例:/nfs /etc/auto.nfs
-
-
子配置文件由自己创建,内容格式:
-
本地挂载子目录 [-挂载参数] 服务器地址:目录
-
例:testmnt 192.168.48.130:/data
-
挂载参数:
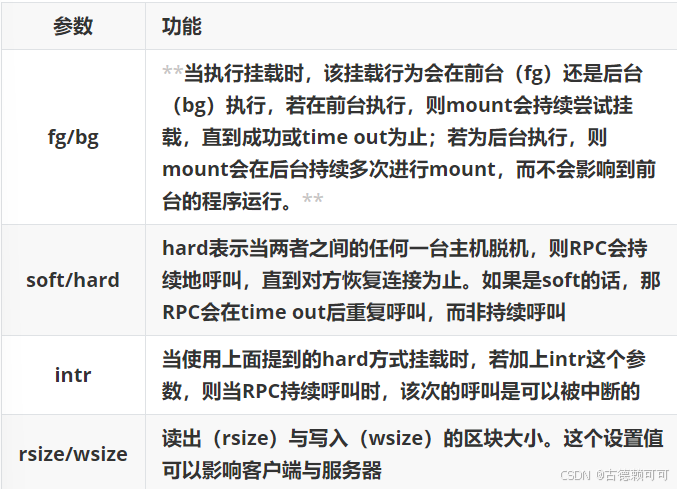
-