FART 自动化脱壳框架简介与脱壳点的选择
版权归作者所有,如有转发,请注明文章出处:https://cyrus-studio.github.io/blog/
FART简介
ART 环境下基于主动调用的自动化脱壳方案,可以解决函数抽取壳。
关于函数抽取壳的实现原理可以参考:基于 art 下的类加载机制,实现函数抽取壳
FART 的作用就是所有这些被抽空的函数的还原和修复,把加固的 dex 整体 dump 下来。
项目地址:https://github.com/hanbinglengyue/FART
FART 框架
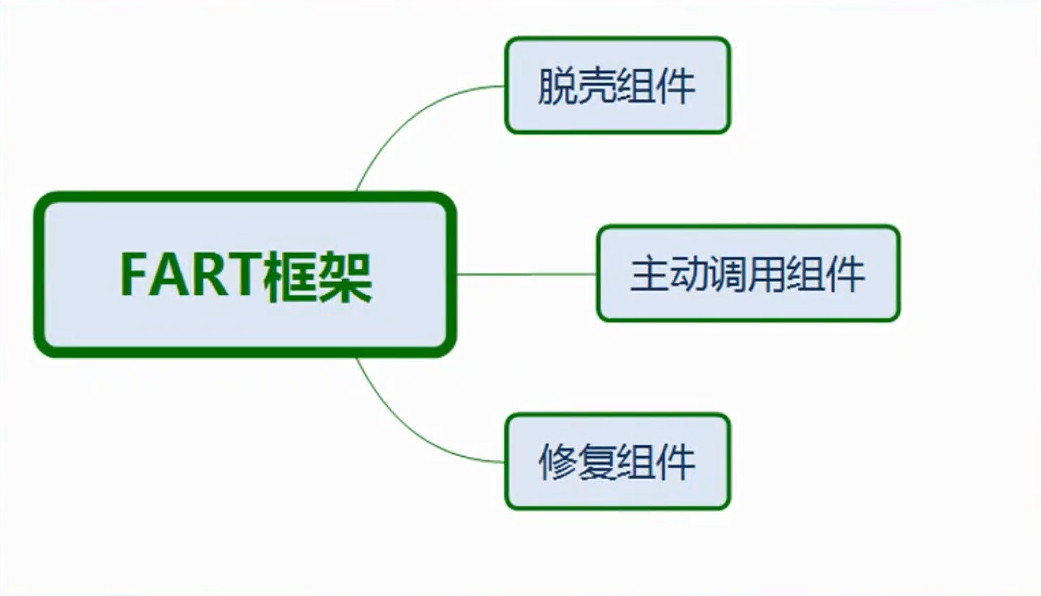
脱壳组件:将内存中的 Dex 数据完整 dump 出来
主动调用组件:构造主动调用链,完成对函数粒度的主动调用并完成 CodeItem 的 dump
修复组件:利用脱壳组件得到的 dex 和主动调用 dump 下来的函数体,完成函数粒度的修复
FART 中的脱壳点
其中 FART 脱壳组件 选择 Execute 作为脱壳点,它是 Interpreter 模式执行所有 Java 方法的统一入口,能够稳定截获和提取所有解释执行的真实方法,从而达到通用脱壳的目的。
ART 下函数在运行时可能是解释执行(Interpreter 模式)或编译执行(Quick 模式)。
为何选择 Execute 作为脱壳点?
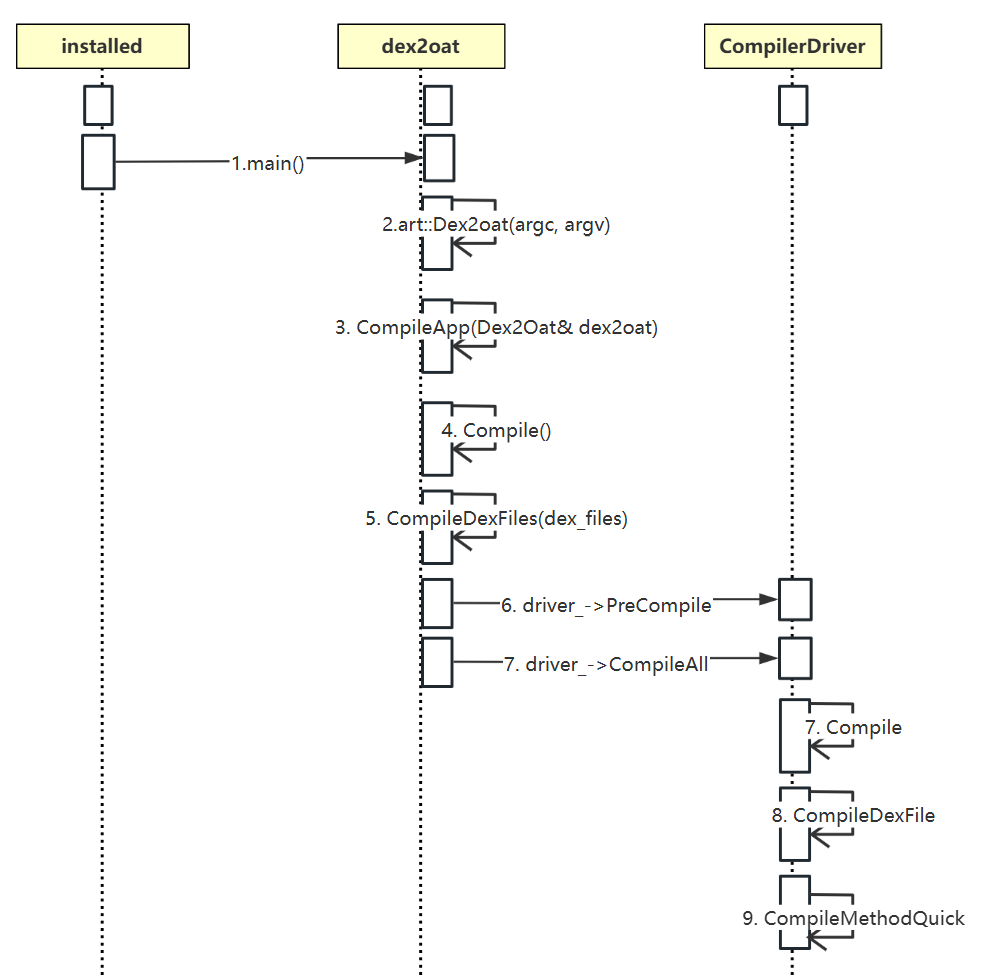
dex2oat 编译流程
关于 dex2oat 以及 vdex、cdex、dex 格式转换
dex2oat 编译流程入口函数:
int main(int argc, char** argv) {int result = static_cast<int>(art::Dex2oat(argc, argv));// Everything was done, do an explicit exit here to avoid running Runtime destructors that take// time (bug 10645725) unless we're a debug or instrumented build or running on a memory tool.// Note: The Dex2Oat class should not destruct the runtime in this case.if (!art::kIsDebugBuild && !art::kIsPGOInstrumentation && !art::kRunningOnMemoryTool) {_exit(result);}return result;
}
https://cs.android.com/android/platform/superproject/+/android10-release:art/dex2oat/dex2oat.cc;l=3027
apk 安装时进行的 dex2oat 编译流程,dex2oat 的编译驱动会对函数逐个编译
https://www.processon.com/i/6825c4e0c168ca282c1b9fb4?full_name=PO_iNeoB2
模板函数 CompileDexFile:编译 dex 文件中的所有类和方法,最后会调用 compile_fn 进行函数粒度编译
// 模板函数:编译 dex 文件中的所有类和方法
template <typename CompileFn>
static void CompileDexFile(CompilerDriver* driver,jobject class_loader,const DexFile& dex_file,const std::vector<const DexFile*>& dex_files,ThreadPool* thread_pool,size_t thread_count,TimingLogger* timings,const char* timing_name,CompileFn compile_fn) {// 用于性能分析记录这段编译过程的时间TimingLogger::ScopedTiming t(timing_name, timings);// 创建一个用于并行编译的上下文管理器ParallelCompilationManager context(Runtime::Current()->GetClassLinker(),class_loader,driver,&dex_file,dex_files,thread_pool);// 编译单个类的回调函数auto compile = [&context, &compile_fn](size_t class_def_index) {const DexFile& dex_file = *context.GetDexFile();SCOPED_TRACE << "compile " << dex_file.GetLocation() << "@" << class_def_index;ClassLinker* class_linker = context.GetClassLinker();jobject jclass_loader = context.GetClassLoader();ClassReference ref(&dex_file, class_def_index);const dex::ClassDef& class_def = dex_file.GetClassDef(class_def_index);ClassAccessor accessor(dex_file, class_def_index);CompilerDriver* const driver = context.GetCompiler();// 跳过验证失败的类(这些类在运行时也会失败)if (driver->GetCompilerOptions().GetVerificationResults()->IsClassRejected(ref)) {return;}// 进入托管代码环境,访问 Java 对象ScopedObjectAccess soa(Thread::Current());StackHandleScope<3> hs(soa.Self());// 解码 class_loader 对象Handle<mirror::ClassLoader> class_loader(hs.NewHandle(soa.Decode<mirror::ClassLoader>(jclass_loader)));// 查找类对象Handle<mirror::Class> klass(hs.NewHandle(class_linker->FindClass(soa.Self(), accessor.GetDescriptor(), class_loader)));Handle<mirror::DexCache> dex_cache;if (klass == nullptr) {// 类加载失败,清除异常并使用 dex cachesoa.Self()->AssertPendingException();soa.Self()->ClearException();dex_cache = hs.NewHandle(class_linker->FindDexCache(soa.Self(), dex_file));} else if (SkipClass(jclass_loader, dex_file, klass.Get())) {// 判断是否跳过该类(如外部类、系统类等)return;} else if (&klass->GetDexFile() != &dex_file) {// 重复类(已从另一个 dex 文件加载),跳过return;} else {dex_cache = hs.NewHandle(klass->GetDexCache());}// 没有方法的类无需编译if (accessor.NumDirectMethods() + accessor.NumVirtualMethods() == 0) {return;}// 进入 native 状态,避免阻塞 GCScopedThreadSuspension sts(soa.Self(), kNative);// 判断是否启用 dex-to-dex 编译(可能是省略优化过程)optimizer::DexToDexCompiler::CompilationLevel dex_to_dex_compilation_level =GetDexToDexCompilationLevel(soa.Self(), *driver, jclass_loader, dex_file, class_def);// 编译类中所有 direct 和 virtual 方法int64_t previous_method_idx = -1;for (const ClassAccessor::Method& method : accessor.GetMethods()) {const uint32_t method_idx = method.GetIndex();if (method_idx == previous_method_idx) {// 处理非法 smali 文件:可能多个 method 共用同一个 method_idx(重复定义)continue;}previous_method_idx = method_idx;// 调用外部传入的 compile_fn 进行实际方法编译compile_fn(soa.Self(),driver,method.GetCodeItem(),method.GetAccessFlags(),method.GetInvokeType(class_def.access_flags_),class_def_index,method_idx,class_loader,dex_file,dex_to_dex_compilation_level,dex_cache);}};// 并发执行 compile 回调,对 dex 文件中的所有 class 进行编译context.ForAllLambda(0, dex_file.NumClassDefs(), compile, thread_count);
}
https://cs.android.com/android/platform/superproject/+/android10-release:art/dex2oat/driver/compiler_driver.cc;l=2559
compile_fn 是一个回调函数,用于处理每个方法的编译过程(通常是 JIT/AOT 编译器提供的函数指针或 Lambda)。
https://cs.android.com/android/platform/superproject/+/android10-release:art/dex2oat/driver/compiler_driver.cc;l=2632
在 dex2oat 编译流程中,compile_fn 是 CompileMethodQuick 函数,它是 Quick 编译器(AOT) 编译每个方法的核心入口。
// 快速编译指定方法的包装函数,用于传入 CompileDexFile 进行批量编译。
static void CompileMethodQuick(Thread* self,CompilerDriver* driver,const dex::CodeItem* code_item,uint32_t access_flags,InvokeType invoke_type,uint16_t class_def_idx,uint32_t method_idx,Handle<mirror::ClassLoader> class_loader,const DexFile& dex_file,optimizer::DexToDexCompiler::CompilationLevel dex_to_dex_compilation_level,Handle<mirror::DexCache> dex_cache) {// 实际执行编译的 lambda 函数,传给 CompileMethodHarness 执行auto quick_fn = [](Thread* self,CompilerDriver* driver,const dex::CodeItem* code_item,uint32_t access_flags,InvokeType invoke_type,uint16_t class_def_idx,uint32_t method_idx,Handle<mirror::ClassLoader> class_loader,const DexFile& dex_file,optimizer::DexToDexCompiler::CompilationLevel dex_to_dex_compilation_level,Handle<mirror::DexCache> dex_cache) {DCHECK(driver != nullptr);CompiledMethod* compiled_method = nullptr;MethodReference method_ref(&dex_file, method_idx);  // 方法引用(用于 profile 与验证等)// 如果是 native 方法if ((access_flags & kAccNative) != 0) {// 如果禁用了 JNI 编译但目标平台支持通用 stub,则跳过生成 stub,使用默认实现if (!driver->GetCompilerOptions().IsJniCompilationEnabled() &&InstructionSetHasGenericJniStub(driver->GetCompilerOptions().GetInstructionSet())) {// 什么也不做,走 generic jni stub} else {// 读取方法上的 @FastNative 或 @CriticalNative 注解(优化调用约定)access_flags |= annotations::GetNativeMethodAnnotationAccessFlags(dex_file, dex_file.GetClassDef(class_def_idx), method_idx);// 使用编译器生成 JNI stub(桥接 Java 和 native 函数的中间代码)compiled_method = driver->GetCompiler()->JniCompile(access_flags, method_idx, dex_file, dex_cache);CHECK(compiled_method != nullptr);  // 确保 JNI 编译成功}// 如果是 abstract 方法,无需编译(没有实现体)} else if ((access_flags & kAccAbstract) != 0) {// Do nothing// 普通 Java 方法} else {const VerificationResults* results = driver->GetCompilerOptions().GetVerificationResults();DCHECK(results != nullptr);const VerifiedMethod* verified_method = results->GetVerifiedMethod(method_ref);// 判断该方法是否应该被编译bool compile =results->IsCandidateForCompilation(method_ref, access_flags) &&verified_method != nullptr &&!verified_method->HasRuntimeThrow() &&  // 验证阶段没有失败(verified_method->GetEncounteredVerificationFailures() &(verifier::VERIFY_ERROR_FORCE_INTERPRETER | verifier::VERIFY_ERROR_LOCKING)) == 0 &&driver->ShouldCompileBasedOnProfile(method_ref);  // 在 profile 中标记为热点if (compile) {// 编译方法(返回 CompiledMethod 对象)compiled_method = driver->GetCompiler()->Compile(code_item,access_flags,invoke_type,class_def_idx,method_idx,class_loader,dex_file,dex_cache);// 根据设置校验 profile 方法是否一定要被编译成功ProfileMethodsCheck check_type =driver->GetCompilerOptions().CheckProfiledMethodsCompiled();if (UNLIKELY(check_type != ProfileMethodsCheck::kNone)) {bool violation = driver->ShouldCompileBasedOnProfile(method_ref) &&(compiled_method == nullptr);if (violation) {std::ostringstream oss;oss << "Failed to compile "<< method_ref.dex_file->PrettyMethod(method_ref.index)<< "[" << method_ref.dex_file->GetLocation() << "]"<< " as expected by profile";switch (check_type) {case ProfileMethodsCheck::kNone:break;case ProfileMethodsCheck::kLog:LOG(ERROR) << oss.str();  // 仅记录错误日志break;case ProfileMethodsCheck::kAbort:LOG(FATAL_WITHOUT_ABORT) << oss.str();  // 直接终止程序_exit(1);}}}}// 如果 Quick 编译失败,且允许 Dex-to-Dex 编译,则走 D2D 优化路径if (compiled_method == nullptr &&dex_to_dex_compilation_level !=optimizer::DexToDexCompiler::CompilationLevel::kDontDexToDexCompile) {DCHECK(!Runtime::Current()->UseJitCompilation());  // AOT 模式driver->GetDexToDexCompiler().MarkForCompilation(self, method_ref);  // 标记用于 D2D}}return compiled_method;  // 返回最终生成的 CompiledMethod 对象或 nullptr};// 使用通用包装器调用 lambda,用于处理计时、线程控制、异常处理等CompileMethodHarness(self,driver,code_item,access_flags,invoke_type,class_def_idx,method_idx,class_loader,dex_file,dex_to_dex_compilation_level,dex_cache,quick_fn);
}
https://cs.android.com/android/platform/superproject/+/android10-release:art/dex2oat/driver/compiler_driver.cc;l=2671
https://cs.android.com/android/platform/superproject/+/android10-release:art/dex2oat/driver/compiler_driver.cc;l=527
并不是所有函数都会被编译!
比如类的初始化函数 <clinit>。因此,对于当一个类被初始化时,该类的初始化函数始终运行在 Interpreter 模式
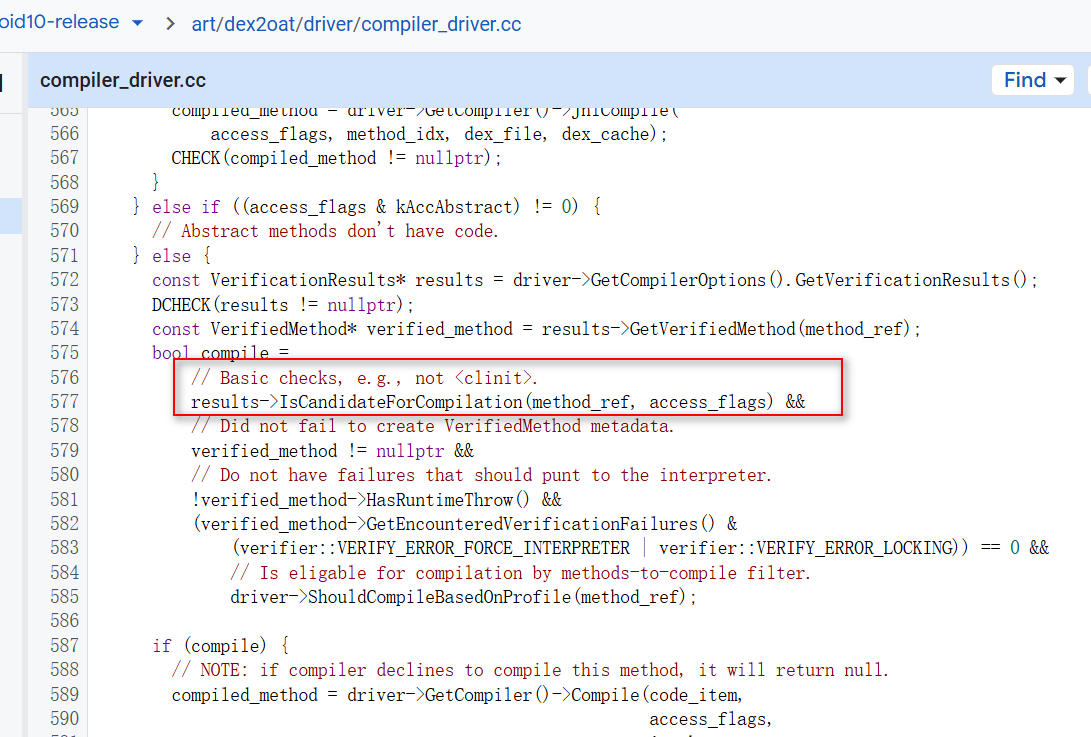
https://cs.android.com/android/platform/superproject/+/android10-release:art/dex2oat/driver/compiler_driver.cc;l=577
ART 下函数执行模式
ART 下函数执行模式:
-
Interpreter 模式:使用 ART 自带的解释器逐条解释执行 DEX 字节码
-
Quick 模式:直接运行 DEX 字节码 通过 dex2oat 编译后的 平台相关的机器码(如 ARM64 指令)
调用 ArtMethod::Invoke 执行一个 Java 方法,执行流程大概如下:
ArtMethod::Invoke(...)├─ 判断是否需要解释执行(Interpreter 模式)│ └─ 是:调用 EnterInterpreterFromInvoke(...)│ └─ 构造 shadow frame(解释器需要的栈帧)│ └─ 如果是非 native 方法:调用 Execute(...) 开始解释执行│ └─ 如果是 native 方法:走 InterpreterJni(...)└─ 否:调用快速入口点 art_quick_invoke_stub 或 art_quick_invoke_static_stub
Interpreter 模式流程
从 ArtMethod 类中的 Invoke 方法开始
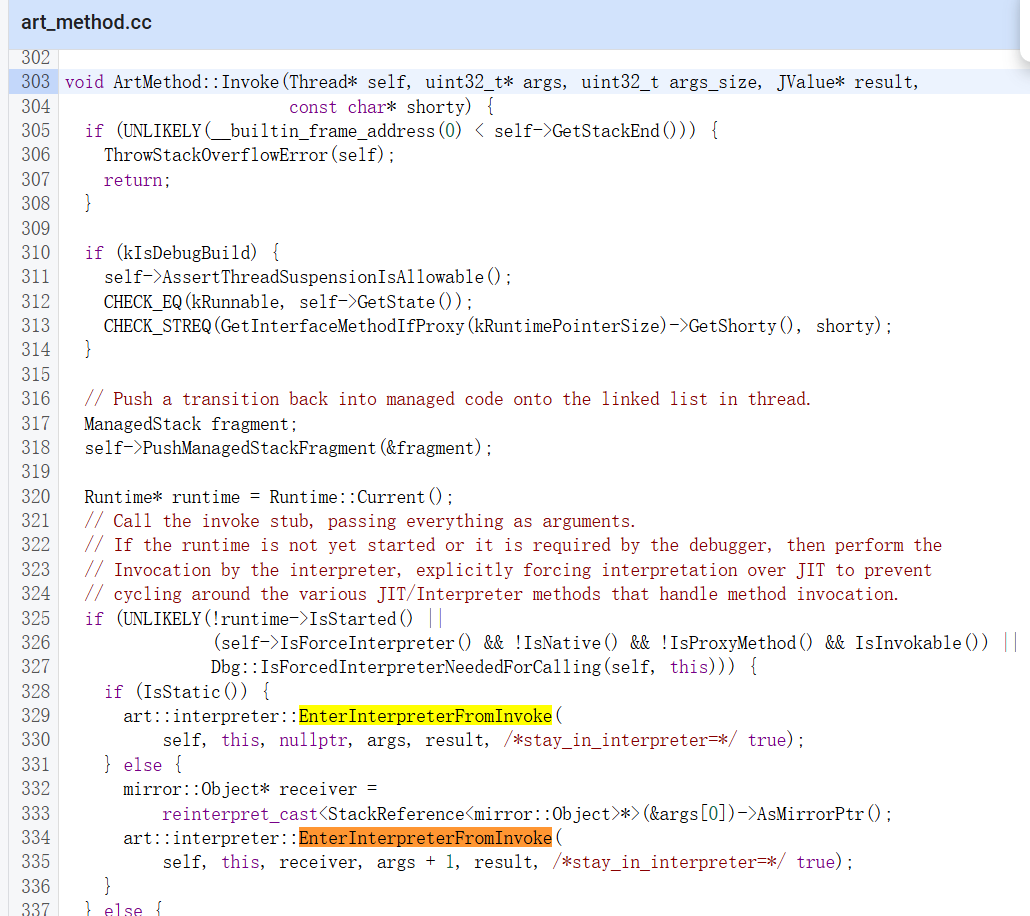
https://cs.android.com/android/platform/superproject/+/android10-release:art/runtime/art_method.cc;l=303
art::interpreter::EnterInterpreterFromInvoke 是解释器模式的入口方法。
void EnterInterpreterFromInvoke(Thread* self,ArtMethod* method,ObjPtr<mirror::Object> receiver,uint32_t* args,JValue* result,bool stay_in_interpreter) {DCHECK_EQ(self, Thread::Current());// 🔒 检查是否栈溢出(防止非法栈访问)bool implicit_check = !Runtime::Current()->ExplicitStackOverflowChecks();if (UNLIKELY(__builtin_frame_address(0) < self->GetStackEndForInterpreter(implicit_check))) {ThrowStackOverflowError(self);return;}// ⚠️ 检查是否调用了已经过时(Obsolete)的方法if (UNLIKELY(method->IsObsolete())) {ThrowInternalError("Attempting to invoke obsolete version of '%s'.",method->PrettyMethod().c_str());return;}// 🧵 禁止线程挂起,防止中间被 GC 打断const char* old_cause = self->StartAssertNoThreadSuspension("EnterInterpreterFromInvoke");// 🎯 获取该方法的 CodeItem 数据,用于获取寄存器数和入参数CodeItemDataAccessor accessor(method->DexInstructionData());uint16_t num_regs;uint16_t num_ins;if (accessor.HasCodeItem()) {// Java 方法:从 CodeItem 中获取寄存器数和参数数num_regs =  accessor.RegistersSize();num_ins = accessor.InsSize();} else if (!method->IsInvokable()) {// 方法无法被调用(比如 abstract),抛出错误self->EndAssertNoThreadSuspension(old_cause);method->ThrowInvocationTimeError();return;} else {// Native 方法:计算参数数量(静态方法不需要接收者)DCHECK(method->IsNative());num_regs = num_ins = ArtMethod::NumArgRegisters(method->GetShorty());if (!method->IsStatic()) {num_regs++;num_ins++;}}// 🧱 创建 ShadowFrame(栈帧结构体),用于解释器执行ShadowFrame* last_shadow_frame = self->GetManagedStack()->GetTopShadowFrame();ShadowFrameAllocaUniquePtr shadow_frame_unique_ptr =CREATE_SHADOW_FRAME(num_regs, last_shadow_frame, method, /* dex pc */ 0);ShadowFrame* shadow_frame = shadow_frame_unique_ptr.get();self->PushShadowFrame(shadow_frame);  // 压入当前线程的 shadow frame 栈// 📦 将参数填充到 shadow frame 中(包括 this/receiver)size_t cur_reg = num_regs - num_ins;if (!method->IsStatic()) {// 实例方法的第一个参数是 receiverCHECK(receiver != nullptr);shadow_frame->SetVRegReference(cur_reg, receiver);++cur_reg;}// 根据方法签名(shorty)将参数依次放入 shadow frame 的寄存器中uint32_t shorty_len = 0;const char* shorty = method->GetShorty(&shorty_len);for (size_t shorty_pos = 0, arg_pos = 0; cur_reg < num_regs; ++shorty_pos, ++arg_pos, cur_reg++) {DCHECK_LT(shorty_pos + 1, shorty_len);switch (shorty[shorty_pos + 1]) {case 'L': {  // 对象引用ObjPtr<mirror::Object> o =reinterpret_cast<StackReference<mirror::Object>*>(&args[arg_pos])->AsMirrorPtr();shadow_frame->SetVRegReference(cur_reg, o);break;}case 'J': case 'D': {  // long 或 double,占两个寄存器uint64_t wide_value = (static_cast<uint64_t>(args[arg_pos + 1]) << 32) | args[arg_pos];shadow_frame->SetVRegLong(cur_reg, wide_value);cur_reg++;  // 多占一个寄存器arg_pos++;break;}default:  // 其他基本类型(int、float等)shadow_frame->SetVReg(cur_reg, args[arg_pos]);break;}}self->EndAssertNoThreadSuspension(old_cause);  // 恢复线程挂起状态// 🧪 如果是静态方法,确保类已初始化(可能触发类初始化)if (method->IsStatic() && UNLIKELY(!method->GetDeclaringClass()->IsInitialized())) {ClassLinker* class_linker = Runtime::Current()->GetClassLinker();StackHandleScope<1> hs(self);Handle<mirror::Class> h_class(hs.NewHandle(method->GetDeclaringClass()));if (UNLIKELY(!class_linker->EnsureInitialized(self, h_class, true, true))) {// 初始化失败,抛出异常,退出CHECK(self->IsExceptionPending());self->PopShadowFrame();return;}}// 🧠【解释器执行路径】if (LIKELY(!method->IsNative())) {// 🎯 执行解释器主函数// 🔥 这一步真正进入 Execute(根据配置进入 mterp 或 switch 实现)JValue r = Execute(self, accessor, *shadow_frame, JValue(), stay_in_interpreter);if (result != nullptr) {*result = r;  // 保存执行结果}} else {// 💡 Native 方法:JNI 函数不会走普通解释器路径// 但在 image 写入或测试时会通过 InterpreterJni 执行args = shadow_frame->GetVRegArgs(method->IsStatic() ? 0 : 1);if (!Runtime::Current()->IsStarted()) {// image 构建期模拟调用 native 方法UnstartedRuntime::Jni(self, method, receiver.Ptr(), args, result);} else {// 正常 JNI 方法调用InterpreterJni(self, method, shorty, receiver, args, result);}}// 🧹 弹出 shadow frame,恢复执行栈self->PopShadowFrame();
}
https://cs.android.com/android/platform/superproject/+/android10-release:art/runtime/interpreter/interpreter.cc;l=399
Interpreter 模式下,Java 函数最终都会走到 Execute。
总体调用流程
ArtMethod::Invoke↓
interpreter::EnterInterpreterFromInvoke↓
interpreter::Execute ← 解释器执行核心↓
[use_mterp ?] → ExecuteMterpImplExecuteSwitchImpl
可以看到,对于任何一个运行在 interpreter 模式的 java 函数来说,最终都会进入到 ART 下的解释器中进行解释执行。
Execute
Execute 函数负责在 ART 虚拟机中根据当前执行环境选择合适的解释器(如 Mterp 或 Switch)执行指定的 Java 方法字节码。
static inline JValue Execute(Thread* self,const CodeItemDataAccessor& accessor,ShadowFrame& shadow_frame,JValue result_register,bool stay_in_interpreter = false,bool from_deoptimize = false) REQUIRES_SHARED(Locks::mutator_lock_) {// 方法不能是 abstract 或 native,因为解释器无法执行它们DCHECK(!shadow_frame.GetMethod()->IsAbstract());DCHECK(!shadow_frame.GetMethod()->IsNative());// 检查当前线程是否使用了正确类型的解释器(比如 mterp)if (kIsDebugBuild && self->UseMterp() != CanUseMterp()) {MutexLock tll_mu(self, *Locks::thread_list_lock_);DCHECK_EQ(self->UseMterp(), CanUseMterp());}// 如果不是从 deoptimization 进入(正常调用路径)if (LIKELY(!from_deoptimize)) {if (kIsDebugBuild) {// 新进入方法,DexPC 应为 0,且不能有异常待处理CHECK_EQ(shadow_frame.GetDexPC(), 0u);self->AssertNoPendingException();}// 获取当前运行时的 instrumentation 组件(用于调试/监控方法调用)instrumentation::Instrumentation* instrumentation = Runtime::Current()->GetInstrumentation();ArtMethod* method = shadow_frame.GetMethod();// 如果注册了方法进入监听器,则调用监听逻辑if (UNLIKELY(instrumentation->HasMethodEntryListeners())) {instrumentation->MethodEnterEvent(self,shadow_frame.GetThisObject(accessor.InsSize()),method,0);// 如果 instrumentation 指定需要强制退出该帧if (UNLIKELY(shadow_frame.GetForcePopFrame())) {DCHECK(Runtime::Current()->AreNonStandardExitsEnabled());DCHECK(PrevFrameWillRetry(self, shadow_frame));return JValue(); // 不执行,直接返回}// 如果 instrumentation 导致了异常,也直接返回if (UNLIKELY(self->IsExceptionPending())) {instrumentation->MethodUnwindEvent(self,shadow_frame.GetThisObject(accessor.InsSize()),method,0);return JValue();}}// 如果允许切换到 JIT 编译执行(非强制 stay_in_interpreter 且非强制解释器)if (!stay_in_interpreter && !self->IsForceInterpreter()) {jit::Jit* jit = Runtime::Current()->GetJit();if (jit != nullptr) {// 通知 JIT 方法已进入jit->MethodEntered(self, method);// 如果该方法已经被编译过了,则可以直接调用机器码if (jit->CanInvokeCompiledCode(method)) {JValue result;// 先弹出 ShadowFrameself->PopShadowFrame();// 计算参数偏移量(输入参数寄存器在高位)uint16_t arg_offset = accessor.RegistersSize() - accessor.InsSize();// 通过桥接方法跳转到已编译代码执行ArtInterpreterToCompiledCodeBridge(self, nullptr, &shadow_frame, arg_offset, &result);// 执行完成后重新压回 ShadowFrameself->PushShadowFrame(&shadow_frame);return result;}}}}// 获取当前方法ArtMethod* method = shadow_frame.GetMethod();// 验证方法静态状态DCheckStaticState(self, method);// 如果启用了访问检查,则必须关闭锁计数器检查DCHECK(!method->SkipAccessChecks() || !method->MustCountLocks());bool transaction_active = Runtime::Current()->IsActiveTransaction();// 判断是否跳过访问权限检查if (LIKELY(method->SkipAccessChecks())) {// === 进入 "无需访问检查" 模式 ===if (kInterpreterImplKind == kMterpImplKind) {// 解释器是 mterpif (transaction_active) {// mterp 不支持事务,回退到 switch 模式return ExecuteSwitchImpl<false, true>(self, accessor, shadow_frame, result_register, false);} else if (UNLIKELY(!Runtime::Current()->IsStarted())) {// Runtime 尚未启动,mterp 不可用,回退 switch 模式return ExecuteSwitchImpl<false, false>(self, accessor, shadow_frame, result_register, false);} else {// 可使用 mterpwhile (true) {// mterp 不支持调试/断点等,所以如果当前线程不允许用 mterp,就退回 switchif (!self->UseMterp()) {return ExecuteSwitchImpl<false, false>(self, accessor, shadow_frame, result_register, false);}// 调用 mterp 执行指令bool returned = ExecuteMterpImpl(self,accessor.Insns(),  // 获取指令序列&shadow_frame,&result_register);if (returned) {// mterp 执行成功(正常返回)return result_register;} else {// mterp 无法处理该指令,改用 switch 解释器单步执行result_register = ExecuteSwitchImpl<false, false>(self, accessor, shadow_frame, result_register, true);if (shadow_frame.GetDexPC() == dex::kDexNoIndex) {// 已执行 return 或发生未捕获异常,直接返回return result_register;}}}}} else {// 当前解释器类型是 switchDCHECK_EQ(kInterpreterImplKind, kSwitchImplKind);if (transaction_active) {return ExecuteSwitchImpl<false, true>(self, accessor, shadow_frame, result_register, false);} else {return ExecuteSwitchImpl<false, false>(self, accessor, shadow_frame, result_register, false);}}} else {// === 进入 "需要访问检查" 模式 ===// 启动路径不应该运行到这里,除非是软验证失败或者在 AOT 编译中DCHECK(method->GetDeclaringClass()->GetClassLoader() != nullptr|| Runtime::Current()->IsVerificationSoftFail()|| Runtime::Current()->IsAotCompiler())<< method->PrettyMethod();if (kInterpreterImplKind == kMterpImplKind) {// mterp 不支持访问检查,强制使用 switch 模式if (transaction_active) {return ExecuteSwitchImpl<true, true>(self, accessor, shadow_frame, result_register, false);} else {return ExecuteSwitchImpl<true, false>(self, accessor, shadow_frame, result_register, false);}} else {// switch 模式解释器分支DCHECK_EQ(kInterpreterImplKind, kSwitchImplKind);if (transaction_active) {return ExecuteSwitchImpl<true, true>(self, accessor, shadow_frame, result_register, false);} else {return ExecuteSwitchImpl<true, false>(self, accessor, shadow_frame, result_register, false);}}}
}
https://cs.android.com/android/platform/superproject/+/android10-release:art/runtime/interpreter/interpreter.cc;l=247
ExecuteMterpImpl 和 ExecuteSwitchImpl
ExecuteMterpImpl 和 ExecuteSwitchImpl 是 ART 虚拟机中两种解释器的执行实现方式,它们的主要区别在于 执行效率、可调试性 和 支持的功能。
-
ExecuteMterpImpl:使用 高性能的汇编模板代码(如 x86、arm64 手写汇编)执行字节码,效率非常高。
-
ExecuteSwitchImpl:基于 C++ 的 switch-case 控制流,每条字节码指令有一个 case 分支。
它们是如何被选择执行的? 在 Execute 函数中:
if (kInterpreterImplKind == kMterpImplKind) {if (transaction_active) {return ExecuteSwitchImpl<...>();  // Mterp 不支持事务,退回 Switch} else if (!Runtime::Current()->IsStarted()) {return ExecuteSwitchImpl<...>();  // VM 没启动也不能用 Mterp} else {while (true) {if (!self->UseMterp()) {return ExecuteSwitchImpl<...>();  // 当前线程禁用了 Mterp}bool returned = ExecuteMterpImpl(...);if (returned) {return result_register;  // Mterp 成功执行完成} else {// Mterp 遇到不支持的指令或状态,单步回退到 Switchresult_register = ExecuteSwitchImpl(...);if (shadow_frame.GetDexPC() == dex::kDexNoIndex) {return result_register;  // 已返回或异常抛出}}}}
}
脱壳实现
对于函数抽取壳的 dex 来说,因为需要禁用了 dex2oat ,所以都会以解释模式运行,进入到 Execute 函数里面。
Execute 参数中有 ShadowFrame,能拿到 ArtMethod,再通过 GetDexFile() 函数获得 DEX 字节码等信息。
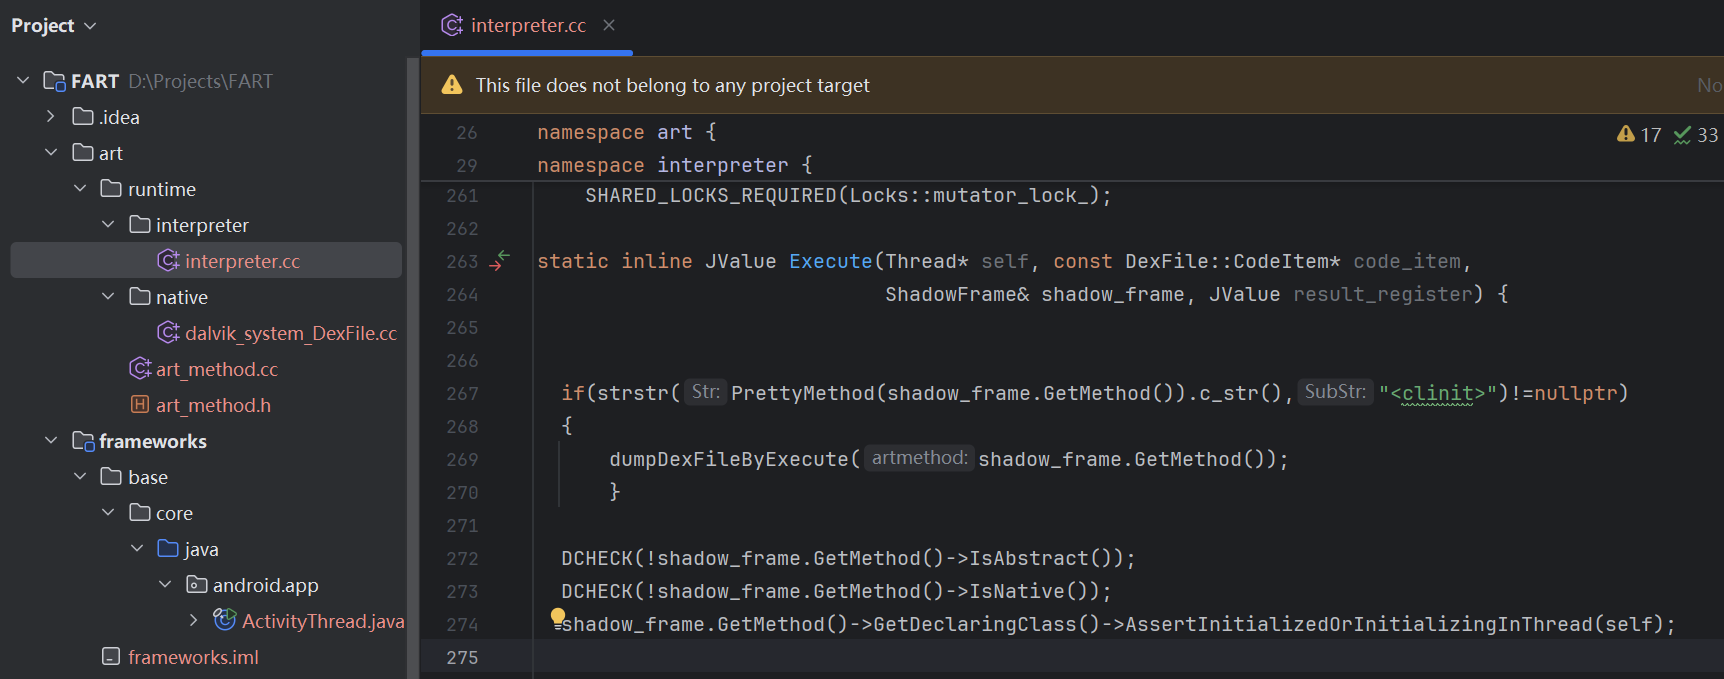
在 dex 中第一个类初始化的时候调用 dumpDexFileByExecute 脱壳
static inline JValue Execute(Thread* self, const DexFile::CodeItem* code_item,ShadowFrame& shadow_frame, JValue result_register) {// 在类初始化的时候脱壳 if(strstr(PrettyMethod(shadow_frame.GetMethod()).c_str(),"<clinit>")!=nullptr) {dumpDexFileByExecute(shadow_frame.GetMethod());}...}
在 dumpDexFileByExecute 中判断 如果 dex 文件不存在就 dump
// 该函数在 ART 执行期间调用,用于在 Execute 函数内完成 dex 脱壳
extern "C" void dumpDexFileByExecute(ArtMethod *artmethod)SHARED_LOCKS_REQUIRED(Locks::mutator_lock_) {// 为 dex 文件保存路径分配内存char *dexfilepath = (char *) malloc(sizeof(char) * 2000);if (dexfilepath == nullptr) {// 分配失败,打印日志并返回LOG(INFO) << "ArtMethod::dumpDexFileByExecute, methodname: "<< PrettyMethod(artmethod).c_str()<< " malloc 2000 byte failed";return;}// 获取当前进程的 cmdline 名称,用于后续命名脱壳文件int fcmdline = -1;char szCmdline[64] = { 0 };char szProcName[256] = { 0 };int procid = getpid();sprintf(szCmdline, "/proc/%d/cmdline", procid);fcmdline = open(szCmdline, O_RDONLY, 0644);if (fcmdline > 0) {read(fcmdline, szProcName, 256);close(fcmdline);}// 若成功获取到进程名if (szProcName[0]) {// 获取当前 ArtMethod 所属 dex 文件及其起始地址和大小const DexFile *dex_file = artmethod->GetDexFile();const uint8_t *begin_ = dex_file->Begin();  // dex 文件起始地址size_t size_ = dex_file->Size();            // dex 文件大小int size_int_ = (int) size_;  // 用于命名文件// 创建保存路径:/sdcard/fart/<process_name>/memset(dexfilepath, 0, 2000);sprintf(dexfilepath, "/sdcard/fart");mkdir(dexfilepath, 0777);  // 创建 fart 目录memset(dexfilepath, 0, 2000);sprintf(dexfilepath, "/sdcard/fart/%s", szProcName);mkdir(dexfilepath, 0777);  // 创建子目录为进程名// 拼接最终保存路径,如:/sdcard/fart/com.xxx.xxx/123456_dexfile_execute.dexmemset(dexfilepath, 0, 2000);sprintf(dexfilepath,"/sdcard/fart/%s/%d_dexfile_execute.dex",szProcName, size_int_);// 检查该文件是否已经存在,若存在则跳过写入int dexfilefp = open(dexfilepath, O_RDONLY, 0666); // 以只读方式尝试打开指定路径的 dex 文件if (dexfilefp > 0) {close(dexfilefp);  // 已存在,关闭文件dexfilefp = 0;} else {// 不存在则创建并写入 dex 内容dexfilefp = open(dexfilepath, O_CREAT | O_RDWR, 0666);if (dexfilefp > 0) {write(dexfilefp, (void *) begin_, size_);fsync(dexfilefp);  // 刷新到磁盘close(dexfilefp);  // 关闭文件}}}// 释放申请的内存if (dexfilepath != nullptr) {free(dexfilepath);dexfilepath = nullptr;}
}
路径:art/runtime/art_method.cc
这时候已经可以把 Dex 整体 dump 下来了,但是还没有把抽空的函数修复,这个就需要 FART 中的主动调用组件来解决了。
相关文章:
-
FART 主动调用组件设计和源码分析
-
拨云见日:安卓APP脱壳的本质以及如何快速发现ART下的脱壳点