PyTorch API 2 - 混合精度、微分、cpu、cuda、可视化
文章目录
- 自动混合精度包 - torch.amp
- 自动类型转换
- 参数说明
- 梯度缩放
- 自动转换操作符参考
- 操作符适用性
- CUDA 操作特定行为
- 可自动转换为 `float16` 的 CUDA 运算
- 可自动转换为 `float32` 的 CUDA 运算
- 提升至最宽输入类型的 CUDA 操作
- 优先使用 `binary_cross_entropy_with_logits` 而非 `binary_cross_entropy`
- XPU 算子特定行为(实验性功能)
- 可自动转换为 `float16` 的 XPU 运算
- 可自动转换为`float32`的XPU运算
- 提升至最宽输入类型的 XPU 运算
- CPU 操作特定行为
- 可自动转换为 `bfloat16` 的 CPU 运算操作
- 可自动转换为 `float32` 的 CPU 运算
- 提升至最宽输入类型的CPU运算
- 自动微分包 - torch.autograd
- 前向模式自动微分
- 高阶函数式API
- 局部禁用梯度计算
- 默认梯度布局
- 手动梯度布局
- 张量的原地操作
- 原地操作的正确性检查
- 变量(已弃用)
- 张量自动求导函数
- 函数
- 上下文方法混入
- 自定义函数工具集
- 数值梯度检验
- 性能分析器
- 调试与异常检测
- 自动求导图
- torch.library
- 测试自定义算子
- 在 Python 中创建新的自定义算子
- 扩展自定义算子(由Python或C++创建)
- 底层 API
- torch.accelerator
- torch.cpu
- 流与事件
- torch.cuda
- 随机数生成器
- 通信集合操作
- 流与事件
- 图表功能(测试版)
- 内存管理
- NVIDIA 工具扩展 (NVTX)
- Jiterator (测试版)
- TunableOp(可调优操作符)
- 流消毒器(原型)
- GPUDirect Storage (原型)
- 理解 CUDA 内存使用
- 生成快照
- 使用可视化工具
- 活动内存时间线
- 分配器状态历史
- 快照 API 参考文档
自动混合精度包 - torch.amp
torch.amp 提供了混合精度的便捷方法,其中部分操作使用 torch.float32 (float) 数据类型,而其他操作使用较低精度的浮点数据类型 (lower_precision_fp):torch.float16 (half) 或 torch.bfloat16。某些运算(如线性层和卷积)在 lower_precision_fp 下速度更快,而其他运算(如归约操作)通常需要 float32 的动态范围。混合精度会尝试为每个运算匹配最合适的数据类型。
通常,使用 torch.float16 数据类型的"自动混合精度训练"会同时使用 torch.autocast 和 torch.amp.GradScaler,如自动混合精度示例和自动混合精度教程所示。不过,torch.autocast 和 torch.GradScaler 是模块化的,也可以根据需要单独使用。如 torch.autocast 的CPU示例部分所示,在CPU上使用 torch.bfloat16 数据类型的"自动混合精度训练/推理"仅需使用 torch.autocast。
警告:torch.cuda.amp.autocast(args...) 和 torch.cpu.amp.autocast(args...) 将被弃用,请改用 torch.autocast("cuda", args...) 或 torch.autocast("cpu", args...)。
torch.cuda.amp.GradScaler(args...) 和 torch.cpu.amp.GradScaler(args...) 将被弃用,请改用 torch.GradScaler("cuda", args...) 或 torch.GradScaler("cpu", args...)。
torch.autocast 和 torch.cpu.amp.autocast 是1.10版本新增的功能。
自动类型转换
torch.amp.autocast_mode.is_autocast_available(device_type)
返回一个布尔值,表示device_type上是否支持自动类型转换。
参数
device_type (str)– 要使用的设备类型。可选值包括:‘cuda’、‘cpu’、‘mtia’、'xpu’等。
该类型与torch.device的type属性类型相同。
因此,您可以通过Tensor.device.type获取张量的设备类型。
返回类型:bool
class torch.autocast(device_type, dtype=None, enabled=True, cache_enabled=None)
autocast 实例可作为上下文管理器或装饰器,允许脚本中的部分区域以混合精度运行。
在这些区域中,运算会根据 autocast 自动选择特定数据类型执行,从而在保持精度的同时提升性能。详情请参阅 Autocast 运算参考。
进入启用 autocast 的区域时,张量可以是任意类型。使用 autocast 时,不应在模型或输入上调用 half() 或 bfloat16()。
autocast 应仅包装网络的前向传播(包括损失计算),不建议在 autocast 下执行反向传播。反向运算会使用与对应前向运算相同的类型执行。
CUDA 设备示例:
# Creates model and optimizer in default precision
model = Net().cuda()
optimizer = optim.SGD(model.parameters(),
...)
for input, target in data:optimizer.zero_grad()# Enables autocasting for the forward pass (model + loss)with torch.autocast(device_type="cuda"):output = model(input)loss = loss_fn(output, target)# Exits the context manager before backward()loss.backward()optimizer.step()
请参阅自动混合精度示例了解在更复杂场景下的使用方法(包括梯度缩放),例如梯度惩罚、多模型/多损失函数、自定义自动求导函数等情况。
autocast也可以作为装饰器使用,例如用于模型的forward方法上:
class AutocastModel(nn.Module):...@torch.autocast(device_type="cuda")def forward(self, input):...
在启用了自动混合精度(autocast)的区域中生成的浮点张量可能是float16类型。
当返回到禁用自动混合精度的区域后,如果将这些张量与不同数据类型的浮点张量一起使用,可能会导致类型不匹配错误。如果出现这种情况,请将自动混合精度区域生成的张量转换回float32类型(或根据需要选择其他数据类型)。
如果来自自动混合精度区域的张量已经是float32类型,则转换操作不会实际执行,也不会产生额外开销。
CUDA示例:
# Creates some tensors in default dtype (here assumed to be float32)
a_float32 = torch.rand((8, 8), device="cuda")
b_float32 = torch.rand((8, 8), device="cuda")
c_float32 = torch.rand((8, 8), device="cuda")
d_float32 = torch.rand((8, 8), device="cuda")with torch.autocast(device_type="cuda"):# torch.mm is on autocast's list of ops that should run in float16、    # Inputs are float32, but the op runs in float16 and produces float16 output.# No manual casts are required.e_float16 = torch.mm(a_float32, b_float32)# Also handles mixed input typesf_float16 = torch.mm(d_float32, e_float16)# After exiting autocast, calls f_float16.float() to use with d_float32
g_float32 = torch.mm(d_float32, f_float16.float())
CPU 训练示例:
# Creates model and optimizer in default precision
model = Net()
optimizer = optim.SGD(model.parameters(),
...)
for epoch in epochs:for input, target in data:optimizer.zero_grad()# Runs the forward pass with autocasting.with torch.autocast(device_type="cpu", dtype=torch.bfloat16):output = model(input)loss = loss_fn(output, target)loss.backward()optimizer.step()
CPU 推理示例:
# Creates model in default precision
model = Net().eval()with torch.autocast(device_type="cpu", dtype=torch.bfloat16):for input in data:# Runs the forward pass with autocasting.output = model(input)
使用 Jit Trace 进行 CPU 推理的示例:
class TestModel(nn.Module):def __init__(self, input_size, num_classes):super().__init__()self.fc1 = nn.Linear(input_size, num_classes)def forward(self, x):return self.fc1(x)input_size = 2
num_classes = 2
model = TestModel(input_size, num_classes).eval()# For now, we suggest to disable the Jit Autocast Pass, # As the issue: https://github.com/pytorch/pytorch/issues/75956
torch._C._jit_set_autocast_mode(False)with torch.cpu.amp.autocast(cache_enabled=False):model = torch.jit.trace(model, torch.randn(1, input_size))
model = torch.jit.freeze(model)
# Models Runfor _ in range(3):model(torch.randn(1, input_size))
在启用了自动类型转换的区域中出现类型不匹配错误属于程序缺陷;如果您遇到此情况,请提交问题报告。
autocast(enabled=False) 子区域可以嵌套在启用自动类型转换的区域内。
局部禁用自动类型转换很有用,例如当您希望强制某个子区域以特定 dtype 运行时。禁用自动类型转换能让您精确控制执行类型。在该子区域中,来自外围区域的输入
应在使用前显式转换为目标 dtype:
# Creates some tensors in default dtype (here assumed to be float32)
a_float32 = torch.rand((8, 8), device="cuda")
b_float32 = torch.rand((8, 8), device="cuda")
c_float32 = torch.rand((8, 8), device="cuda")
d_float32 = torch.rand((8, 8), device="cuda")with torch.autocast(device_type="cuda"):e_float16 = torch.mm(a_float32, b_float32)with torch.autocast(device_type="cuda", enabled=False):# Calls e_float16.float() to ensure float32 execution# (necessary because e_float16 was created in an autocasted region)f_float32 = torch.mm(c_float32, e_float16.float())# No manual casts are required when re-entering the autocast-enabled region.# torch.mm again runs in float16 and produces float16 output, regardless of input types.g_float16 = torch.mm(d_float32, f_float32)
自动转换状态是线程局部的。若要在新线程中启用该功能,必须在该线程内调用上下文管理器或装饰器。当每个进程使用多个GPU时,这会影响torch.nn.DataParallel和torch.nn.parallel.DistributedDataParallel的行为(参见多GPU工作指南)。
参数说明
device_type (str, 必填)– 指定使用的设备类型。可选值包括:‘cuda’、‘cpu’、‘mtia’、‘xpu’和’hpu’。该类型与torch.device的类型属性一致,因此可通过Tensor.device.type获取张量的设备类型。enabled ([bool], 可选)– 控制是否在区域内启用自动转换功能。
默认值:Truedtype (torch_dtype, 可选)– 自动转换区域内运算的数据类型。当dtype为None时,将使用get_autocast_dtype()提供的默认值(CUDA设备默认为torch.float16,CPU设备默认为torch.bfloat16)。
默认值:Nonecache_enabled ([bool], 可选)– 控制是否启用自动转换内部的权重缓存。
默认值:True
torch.amp.custom_fwd(fwd=None, *, device_type, cast_inputs=None)[source]
为自定义自动求导函数的forward方法创建一个辅助装饰器。
自动求导函数是torch.autograd.Function的子类。
更多细节请参阅示例页面。
参数
device_type (str)– 要使用的设备类型。可选值包括’cuda’、‘cpu’、‘mtia’、'xpu’等。
该类型与torch.device的type属性相同。
因此,您可以通过Tensor.device.type获取张量的设备类型。
cast_inputs (torch.dtype或 None, 可选参数, 默认=None)– 如果非None,当forward在启用自动混合精度的区域运行时,会将输入的浮点张量转换为目标数据类型(非浮点张量不受影响),然后在禁用自动混合精度的状态下执行forward。
如果为None,则forward的内部操作会以当前的自动混合精度状态执行。
注意:如果被装饰的forward在未启用自动混合精度的区域被调用,custom_fwd将不起作用且cast_inputs不会产生任何效果。
torch.amp.custom_bwd(bwd=None, *, device_type)
为自定义自动求导函数的反向方法创建一个辅助装饰器。
自动求导函数是 torch.autograd.Function 的子类。
该装饰器确保 backward 方法执行时的自动混合精度状态与 forward 方法保持一致。
更多细节请参阅示例页面。
参数
device_type (str)– 使用的设备类型。可选值包括 ‘cuda’、‘cpu’、‘mtia’、‘xpu’ 等。
该类型与 torch.device 的 type 属性相同。
因此,您可以通过 Tensor.device.type 获取张量的设备类型。
torch.cuda.amp.autocast(enabled=True, dtype=torch.float16, cache_enabled=True)[source]
请参考 torch.autocast。
torch.cuda.amp.autocast(args...) 已被弃用,建议改用 torch.amp.autocast("cuda", args...)。
torch.cuda.amp.custom_fwd(fwd=None, *, cast_inputs=None)
torch.cuda.amp.custom_fwd(args...) 已被弃用。请改用 torch.amp.custom_fwd(args..., device_type='cuda')。
torch.cuda.amp.custom_bwd(bwd)
torch.cuda.amp.custom_bwd(args...) 已被弃用。请改用 torch.amp.custom_bwd(args..., device_type='cuda')。
class torch.cpu.amp.autocast(enabled=True, dtype=torch.bfloat16, cache_enabled=True)
请参考 torch.autocast。
torch.cpu.amp.autocast(args...) 已被弃用,请改用 torch.amp.autocast("cpu", args...)。
梯度缩放
如果某个操作的前向传播输入为float16类型,则该操作的反向传播会产生float16类型的梯度。幅度较小的梯度值可能无法用float16表示,这些值会下溢为零(“underflow”),导致对应参数的更新丢失。
为防止下溢,"梯度缩放"技术将网络的损失值乘以一个比例因子,并对缩放后的损失值执行反向传播。通过网络反向流动的梯度会按相同比例因子进行缩放。换句话说,梯度值的幅度因此增大,从而避免下溢为零。
在优化器更新参数之前,每个参数的梯度(.grad属性)应该进行反向缩放,这样比例因子就不会影响学习率。
注意:AMP/fp16可能不适用于所有模型!例如,大多数bf16预训练模型无法在最大值为65504的fp16数值范围内运行,会导致梯度上溢而非下溢。这种情况下,比例因子可能会降至1以下,试图将梯度调整到fp16动态范围内可表示的数字。虽然人们可能期望比例因子总是大于1,但我们的GradScaler并不保证这一点以保持性能。如果在使用AMP/fp16运行时遇到损失或梯度出现NaN值,请确认模型是否兼容。
class torch.cuda.amp.GradScaler(init_scale=65536.0, growth_factor=2.0, backoff_factor=0.5, growth_interval=2000, enabled=True)
请参考 torch.amp.GradScaler。
torch.cuda.amp.GradScaler(args...) 已被弃用,请改用 torch.amp.GradScaler("cuda", args...)。
class torch.cpu.amp.GradScaler(init_scale=65536.0, growth_factor=2.0, backoff_factor=0.5, growth_interval=2000, enabled=True)
请参考 torch.amp.GradScaler。
torch.cpu.amp.GradScaler(args...) 已弃用,请改用 torch.amp.GradScaler("cpu", args...)。
自动转换操作符参考
操作符适用性
在float64或非浮点数据类型(dtypes)中运行的操作符不适用自动类型转换,无论是否启用autocast,这些操作符都会保持原有数据类型运行。
只有非原地操作(out-of-place ops)和张量方法(Tensor methods)才适用自动类型转换。
在启用autocast的区域中,虽然允许使用原地操作变体(in-place variants)和显式指定out=...张量的调用,但这些操作不会经过自动类型转换处理。
例如,在启用autocast的区域中,a.addmm(b, c)可以进行自动类型转换,但a.addmm_(b, c)和a.addmm(b, c, out=d)则不行。
为了获得最佳性能和稳定性,建议在启用autocast的区域中优先使用非原地操作。
显式指定dtype=...参数调用的操作符不适用自动类型转换,其输出将严格遵循指定的dtype参数。
CUDA 操作特定行为
以下列表描述了在启用自动混合精度区域中符合条件的操作行为。无论这些操作是通过torch.nn.Module调用、作为函数调用,还是作为torch.Tensor方法调用,它们都会经过自动混合精度处理。如果函数在多个命名空间中暴露,无论使用哪个命名空间,它们都会经过自动混合精度处理。
未列出的操作不会经过自动混合精度处理。它们会根据输入的类型运行。然而,如果未列出的操作位于经过自动混合精度处理的操作之后,自动混合精度仍可能改变这些操作的运行类型。
如果某个操作未被列出,我们假设它在float16下数值稳定。如果您认为某个未列出的操作在float16下数值不稳定,请提交问题报告。
可自动转换为 float16 的 CUDA 运算
__matmul__, addbmm, addmm, addmv, addr, baddbmm, bmm, chain_matmul, multi_dot, conv1d, conv2d, conv3d, conv_transpose1d, conv_transpose2d, conv_transpose3d, GRUCell, linear, LSTMCell, matmul, mm, mv, prelu, RNNCell
可自动转换为 float32 的 CUDA 运算
__pow__, __rdiv__, __rpow__, __rtruediv__, acos, asin, binary_cross_entropy_with_logits, cosh, cosine_embedding_loss, cdist, cosine_similarity, cross_entropy, cumprod, cumsum, dist, erfinv, exp, expm1, group_norm, hinge_embedding_loss, kl_div, l1_loss, layer_norm, log, log_softmax, log10, log1p, log2, margin_ranking_loss, mse_loss, multilabel_margin_loss, multi_margin_loss, nll_loss, norm, normalize, pdist, poisson_nll_loss, pow, prod, reciprocal, rsqrt, sinh, smooth_l1_loss, soft_margin_loss, softmax, softmin, softplus, sum, renorm, tan, triplet_margin_loss
提升至最宽输入类型的 CUDA 操作
这些操作不需要特定的数据类型(dtype)来保证稳定性,但会接收多个输入并要求输入的数据类型一致。如果所有输入都是 float16,操作将以 float16 运行。如果任一输入是 float32,自动类型转换(autocast)会将所有输入转换为 float32 并以 float32 运行该操作。
addcdiv, addcmul, atan2, bilinear, cross, dot, grid_sample, index_put, scatter_add, tensordot
部分未列出的操作(例如 add 等二元操作)本身会在不依赖自动类型转换的情况下提升输入类型。如果输入混合了 float16 和 float32,这些操作会以 float32 运行并生成 float32 输出,无论是否启用了自动类型转换。
优先使用 binary_cross_entropy_with_logits 而非 binary_cross_entropy
torch.nn.functional.binary_cross_entropy()(以及封装它的torch.nn.BCELoss)的反向传播可能会产生无法用 float16 表示的梯度。在启用自动混合精度(autocast)的区域中,前向输入可能是 float16,这意味着反向梯度必须能用 float16 表示(将 float16 前向输入自动转换为 float32 无济于事,因为这种转换必须在反向传播时还原)。因此,binary_cross_entropy 和 BCELoss 在启用自动混合精度的区域会抛出错误。
许多模型在二元交叉熵层之前直接使用 sigmoid 层。这种情况下,建议使用 torch.nn.functional.binary_cross_entropy_with_logits() 或 torch.nn.BCEWithLogitsLoss 将这两层合并。binary_cross_entropy_with_logits 和 BCEWithLogits 可以安全地用于自动混合精度。
XPU 算子特定行为(实验性功能)
以下列表描述了在启用自动混合精度区域中符合条件的算子的行为表现。无论这些算子是通过 torch.nn.Module 调用、作为函数调用还是作为 torch.Tensor 方法调用,它们都会始终经过自动混合精度处理。如果函数在多个命名空间中暴露,无论通过哪个命名空间调用,都会进行自动混合精度转换。
未列在下方的算子不会经过自动混合精度处理。它们将按照输入定义的类型执行运算。不过,如果未列出的算子位于经过自动混合精度处理的算子下游,自动混合精度仍可能改变这些算子的运算类型。
如果某个算子未被列出,我们默认其在 float16 下具有数值稳定性。若您认为某个未列出的算子在 float16 下存在数值不稳定性问题,请提交问题报告。
可自动转换为 float16 的 XPU 运算
addbmm, addmm, addmv, addr, baddbmm, bmm, chain_matmul, multi_dot, conv1d, conv2d, conv3d, conv_transpose1d, conv_transpose2d, conv_transpose3d, GRUCell, linear, LSTMCell, matmul, mm, mv, RNNCell
可自动转换为float32的XPU运算
__pow__, __rdiv__, __rpow__, __rtruediv__, binary_cross_entropy_with_logits, cosine_embedding_loss, cosine_similarity, cumsum, dist, exp, group_norm, hinge_embedding_loss, kl_div, l1_loss, layer_norm, log, log_softmax, margin_ranking_loss, nll_loss, normalize, poisson_nll_loss, pow, reciprocal, rsqrt, soft_margin_loss, softmax, softmin, sum, triplet_margin_loss
提升至最宽输入类型的 XPU 运算
这些运算不需要特定的数据类型(dtype)来保证稳定性,但会接收多个输入并要求输入的数据类型一致。如果所有输入都是 float16,运算将以 float16 运行。如果任一输入是 float32,自动类型转换(autocast)会将所有输入转换为 float32,并以 float32 运行该运算。
支持的运算包括:
bilinear、cross、grid_sample、index_put、scatter_add、tensordot
部分未列出的运算(例如二元运算如 add)原生支持输入类型提升,无需自动类型转换干预。如果输入混合了 float16 和 float32,这些运算会以 float32 运行并输出 float32 结果,无论是否启用了自动类型转换。
CPU 操作特定行为
以下列表描述了在启用自动混合精度区域中合格操作的行为。无论这些操作是通过 torch.nn.Module 调用、作为函数调用,还是作为 torch.Tensor 方法调用,它们都会经过自动混合精度处理。如果函数在多个命名空间中暴露,无论调用哪个命名空间,都会应用自动混合精度。
未在下列列表中列出的操作不会经过自动混合精度处理。这些操作将按照其输入定义的类型执行。不过,如果未列出的操作位于经过自动混合精度处理的操作下游,自动混合精度仍可能改变其执行的数据类型。
如果某个操作未被列出,我们默认其在 bfloat16 下具有数值稳定性。若您认为某个未列出的操作在 bfloat16 中存在数值不稳定性问题,请提交问题报告。float16 的数据类型列表与 bfloat16 保持一致。
可自动转换为 bfloat16 的 CPU 运算操作
conv1d, conv2d, conv3d, bmm, mm, linalg_vecdot, baddbmm, addmm, addbmm, linear, matmul, _convolution, conv_tbc, mkldnn_rnn_layer, conv_transpose1d, conv_transpose2d, conv_transpose3d, prelu, scaled_dot_product_attention, _native_multi_head_attention
可自动转换为 float32 的 CPU 运算
avg_pool3d, binary_cross_entropy, grid_sampler, grid_sampler_2d, _grid_sampler_2d_cpu_fallback, grid_sampler_3d, polar, prod, quantile, nanquantile, stft, cdist, trace, view_as_complex, cholesky, cholesky_inverse, cholesky_solve, inverse, lu_solve, orgqr, inverse, ormqr, pinverse, max_pool3d, max_unpool2d, max_unpool3d, adaptive_avg_pool3d, reflection_pad1d, reflection_pad2d, replication_pad1d, replication_pad2d, replication_pad3d, mse_loss, cosine_embedding_loss, nll_loss, nll_loss2d, hinge_embedding_loss, poisson_nll_loss, cross_entropy_loss, l1_loss, huber_loss, margin_ranking_loss, soft_margin_loss, triplet_margin_loss, multi_margin_loss, ctc_loss, kl_div, multilabel_margin_loss, binary_cross_entropy_with_logits, fft_fft, fft_ifft, fft_fft2, fft_ifft2, fft_fftn, fft_ifftn, fft_rfft, fft_irfft, fft_rfft2, fft_irfft2, fft_rfftn, fft_irfftn, fft_hfft, fft_ihfft, linalg_cond, linalg_matrix_rank, linalg_solve, linalg_cholesky, linalg_svdvals, linalg_eigvals, linalg_eigvalsh, linalg_inv, linalg_householder_product, linalg_tensorinv, linalg_tensorsolve, fake_quantize_per_tensor_affine, geqrf, _lu_with_info, qr, svd, triangular_solve, fractional_max_pool2d, fractional_max_pool3d, adaptive_max_pool3d, multilabel_margin_loss_forward, linalg_qr, linalg_cholesky_ex, linalg_svd, linalg_eig, linalg_eigh, linalg_lstsq, linalg_inv_ex
提升至最宽输入类型的CPU运算
这些运算不需要特定的数据类型(dtype)来保证稳定性,但会接收多个输入并要求输入的数据类型必须匹配。如果所有输入都是bfloat16类型,运算将以bfloat16精度执行。如果任一输入是float32类型,自动类型转换(autocast)会将所有输入转为float32并以该精度运行运算。
典型运算包括:
cat, stack, index_copy
注意:部分未列出的运算(如二元操作add)本身具备自动类型提升机制,无需autocast干预。当输入混合bfloat16和float32类型时,这些运算会始终以float32精度运行并输出float32结果,与autocast是否启用无关。
自动微分包 - torch.autograd
torch.autograd 提供了实现任意标量值函数自动微分的类和函数。
只需对现有代码进行最小改动——您只需要通过requires_grad=True关键字声明需要计算梯度的Tensor即可。目前,我们仅支持浮点型Tensor(包括half、float、double和bfloat16)和复数型Tensor(cfloat、cdouble)的自动微分功能。
backward | 计算给定张量相对于计算图叶节点的梯度之和 |
|---|---|
grad | 计算并返回输出相对于输入的梯度之和 |
前向模式自动微分
警告:此API目前处于测试阶段。尽管函数签名不太可能更改,但在我们将其视为稳定版本之前,计划增加更多的运算符支持。
详细使用步骤请参阅前向模式AD教程。
forward_ad.dual_level | 前向AD的上下文管理器,所有前向AD计算都必须在dual_level上下文中进行。 |
|---|---|
forward_ad.make_dual | 将张量值与其切线关联,创建用于前向AD梯度计算的"对偶张量"。 |
forward_ad.unpack_dual | 解包"对偶张量",获取其张量值和前向AD梯度。 |
forward_ad.enter_dual_level | 进入一个新的前向梯度级别。 |
forward_ad.exit_dual_level | 退出前向梯度级别。 |
forward_ad.UnpackedDualTensor | 由unpack_dual()返回的命名元组,包含对偶张量的原始分量和切线分量。 |
高阶函数式API
警告:此API目前处于测试阶段。尽管函数签名不太可能变更,但在我们将其视为稳定版本前,计划进行重大的性能改进。
本节包含基于上述基础API构建的高阶自动微分API,可用于计算雅可比矩阵、海森矩阵等。
该API仅适用于用户提供的函数,这些函数仅接受张量作为输入并仅返回张量。
若函数包含非张量参数或未设置requires_grad的张量参数,可通过lambda表达式捕获这些参数。
例如,对于接受三个输入的函数f:一个需要计算雅可比矩阵的张量、一个应视为常量的张量、以及布尔标志f(input, constant, flag=flag),可通过functional.jacobian(lambda x: f(x, constant, flag=flag), input)方式调用。
functional.jacobian | 计算给定函数的雅可比矩阵 |
|---|---|
functional.hessian | 计算标量函数的黑塞矩阵 |
functional.vjp | 计算向量v与给定函数在输入点处雅可比矩阵的点积 |
functional.jvp | 计算给定函数在输入点处雅可比矩阵与向量v的点积 |
functional.vhp | 计算向量v与标量函数在指定点处黑塞矩阵的点积 |
functional.hvp | 计算标量函数在指定点处黑塞矩阵与向量v的点积 |
局部禁用梯度计算
有关无梯度模式与推理模式之间的区别,以及其他可能与之混淆的相关机制,请参阅局部禁用梯度计算获取更多信息。另请参考局部禁用梯度计算查看可用于局部禁用梯度的函数列表。
默认梯度布局
当非稀疏参数 param 在 torch.autograd.backward() 或 torch.Tensor.backward() 过程中接收到非稀疏梯度时,param.grad 会按以下方式累积:
若 param.grad 初始为 None:
1、如果 param 的内存是非重叠且密集的,.grad 会创建与 param 步幅相匹配的布局(即与 param 的布局一致)。
2、否则,.grad 会创建行主序连续(rowmajor-contiguous)的步幅。
若 param 已存在非稀疏的 .grad 属性:
3、当 create_graph=False 时,backward() 会就地累加到 .grad 中,保持其原有步幅不变。
4、当 create_graph=True 时,backward() 会将 .grad 替换为新张量 .grad + new grad,该操作会尝试(但不保证)匹配原有 .grad 的步幅。
推荐采用默认行为(在首次 backward() 前让 .grad 保持为 None,从而根据情况1或2创建布局,并通过情况3或4保持布局)以获得最佳性能。调用 model.zero_grad() 或 optimizer.zero_grad() 不会影响 .grad 的布局。
实际上,在每个累积阶段前将所有 .grad 重置为 None,例如:
for iterations......for param in model.parameters():param.grad = Noneloss.backward()
这样每次根据1或2重新创建它们,是替代model.zero_grad()或optimizer.zero_grad()的有效方法,可能提升某些网络的性能。
手动梯度布局
如果需要手动控制 .grad 的步长(strides),在首次调用 backward() 前,将一个步长符合预期的归零张量赋值给 param.grad =,并且不要将其重置为 None。
3 保证只要 create_graph=False,你的布局就会被保留。
4 表示即使 create_graph=True,你的布局也可能被保留。
张量的原地操作
在自动微分系统中支持原地操作是一个复杂的问题,我们建议在大多数情况下避免使用。自动微分系统通过积极的缓冲区释放和重用机制实现了高效运行,实际上只有极少数情况下原地操作能显著降低内存使用量。除非面临严重的内存压力,否则您可能永远不需要使用它们。
原地操作的正确性检查
所有Tensor都会跟踪应用于它们的原地操作。如果实现检测到某个张量在某个函数中被保存用于反向传播,但之后被原地修改,一旦开始反向传播就会引发错误。这确保当你使用原地操作函数且没有看到任何错误时,可以确信计算出的梯度是正确的。
变量(已弃用)
警告:Variable API 已被弃用:现在使用张量进行自动求导不再需要 Variables。Autograd 已自动支持将 requires_grad 设为 True 的张量。以下是主要变更的快速指南:
Variable(tensor)和Variable(tensor, requires_grad)仍可正常使用,但会返回张量而非 Variables。var.data现在等同于tensor.data。- 诸如
var.backward()、var.detach()、var.register_hook()等方法现在可直接在张量上以同名方法调用。
此外,现在可以通过工厂方法如 torch.randn()、torch.zeros()、torch.ones() 等直接创建带 requires_grad=True 的张量,例如:
autograd_tensor = torch.randn((2, 3, 4), requires_grad=True)
张量自动求导函数
torch.Tensor.grad | 该属性默认为None,当首次调用backward()为self计算梯度时,会变成一个张量。 |
|---|---|
torch.Tensor.requires_grad | 如果需要为该张量计算梯度则为True,否则为False。 |
torch.Tensor.is_leaf | 按照惯例,所有requires_grad为False的张量都是叶子张量。 |
torch.Tensor.backward([gradient, …]) | 计算当前张量相对于图中叶子节点的梯度。 |
torch.Tensor.detach | 返回一个与当前计算图分离的新张量。 |
torch.Tensor.detach_ | 将张量从创建它的计算图中分离,使其成为叶子节点。 |
torch.Tensor.register_hook(hook) | 注册一个反向传播钩子。 |
torch.Tensor.register_post_accumulate_grad_hook(hook) | 注册一个在梯度累积后运行的反向传播钩子。 |
torch.Tensor.retain_grad() | 使该张量在backward()过程中能够保留其grad值。 |
函数
class torch.autograd.Function(*args, **kwargs)
用于创建自定义 autograd.Function 的基类。
要创建自定义 autograd.Function,请继承该类并实现 forward() 和 backward() 静态方法。在前向传播中使用自定义操作时,需调用类方法 apply,切勿直接调用 forward()。
为确保正确性和最佳性能,请确保正确调用 ctx 上的方法,并使用 torch.autograd.gradcheck() 验证反向传播函数。
关于如何使用该类的更多细节,请参阅 扩展 torch.autograd。
示例:
>>> class Exp(Function):
>>>     @staticmethod
>>>     def forward(ctx, i):
>>>         result = i.exp()
>>>         ctx.save_for_backward(result)
>>>         return result
>>> >
>>>     @staticmethod
>>>     def backward(ctx, grad_output):
>>>         result, = ctx.saved_tensors
>>>         return grad_output * result
>>> >
>>> # Use it by calling the apply method:
>>> output = Exp.apply(input)
Function.forward | 定义自定义autograd Function的前向传播逻辑。 |
|---|---|
Function.backward | 定义反向模式自动微分操作的求导公式。 |
Function.jvp | 定义前向模式自动微分操作的求导公式。 |
Function.vmap | 定义该autograd.Function在torch.vmap()下的行为。 |
上下文方法混入
在创建新的 Function 时,以下方法可通过 ctx 使用。
function.FunctionCtx.mark_dirty | 将给定张量标记为原地操作中被修改的 |
|---|---|
function.FunctionCtx.mark_non_differentiable | 将输出标记为不可微分的 |
function.FunctionCtx.save_for_backward | 保存给定张量以供后续调用 backward() 时使用 |
function.FunctionCtx.set_materialize_grads | 设置是否物化梯度张量 |
自定义函数工具集
用于反向方法的装饰器。
function.once_differentiable |
|---|
基础自定义Function类,用于构建PyTorch工具
function.BackwardCFunction | 该类用于autograd内部工作。 |
|---|---|
function.InplaceFunction | 此类的存在仅出于向后兼容性考虑。 |
function.NestedIOFunction | 此类的存在仅出于向后兼容性考虑。 |
数值梯度检验
gradcheck | 通过微小有限差分计算的梯度与解析梯度进行对比验证,适用于inputs中浮点或复数类型且requires_grad=True的张量。 |
|---|---|
gradgradcheck | 通过微小有限差分计算的二阶梯度与解析梯度进行对比验证,适用于inputs和grad_outputs中浮点或复数类型且requires_grad=True的张量。 |
GradcheckError | 由gradcheck()和gradgradcheck()抛出的错误类型。 |
性能分析器
Autograd 内置了一个性能分析器,可帮助开发者检查模型中不同运算符在 CPU 和 GPU 上的计算开销。目前实现了三种分析模式:
1、纯 CPU 模式:使用 profile 进行分析
2、基于 nvprof:通过 emit_nvtx 同时记录 CPU 和 GPU 活动
3、基于 VTune 分析器:使用 emit_itt 实现
torch.autograd.profiler.profile(enabled=True, *, use_cuda=False, use_device=None, record_shapes=False, with_flops=False, profile_memory=False, with_stack=False, with_modules=False, use_kineto=False, use_cpu=True, experimental_config=None, acc_events=False, custom_trace_id_callback=None)[source]
管理自动梯度分析器状态并保存结果摘要的上下文管理器。
底层实现是通过记录C++中执行的函数事件,并将这些事件暴露给Python。你可以将任何代码包裹其中,它只会报告PyTorch函数的运行时间。
注意:分析器是线程局部的,会自动传播到异步任务中。
参数
enabled ([bool], 可选)– 设为False时,该上下文管理器将不执行任何操作。use_cuda ([bool], 可选)– 启用CUDA事件计时功能,使用cudaEvent API(即将弃用)。use_device (str, 可选)– 启用设备事件计时功能。当使用CUDA时,每个张量操作会增加约4微秒的开销。有效设备选项包括’cuda’、‘xpu’、‘mtia’和’privateuseone’。record_shapes ([bool], 可选)– 如果启用形状记录,将收集输入维度信息。这允许查看底层使用的维度,并通过prof.key_averages(group_by_input_shape=True)进行分组。请注意,形状记录可能会影响分析数据准确性,建议分别运行带和不带形状记录的测试来验证时间。最底层事件的偏差可能可以忽略(在嵌套函数调用情况下),但对高层函数而言,由于形状收集,总的自CPU时间可能会人为增加。with_flops ([bool], 可选)– 启用时,分析器会根据算子输入形状估算FLOPs(浮点运算)值,用于评估硬件性能。目前仅支持矩阵乘法和2D卷积算子。profile_memory ([bool], 可选)– 跟踪张量内存分配/释放。with_stack ([bool], 可选)– 记录操作对应的源代码信息(文件和行号)。with_modules ([bool])– 记录与操作调用栈对应的模块层级(含函数名)。例如:若模块A的forward调用模块B的forward(其中包含aten::add操作),则aten::add的模块层级为A.B。注意:当前仅支持TorchScript模型,不支持eager模式模型。use_kineto ([bool], 可选)– 实验性功能,启用Kineto分析器。use_cpu ([bool], 可选)– 分析CPU事件;设为False时需同时设置use_kineto=True,可降低纯GPU分析的开销。experimental_config (_ExperimentalConfig)– 供Kineto等分析器库使用的实验性选项集,不保证向后兼容性。acc_events ([bool])– 启用跨多个分析周期的FunctionEvents累积功能。
示例
x = torch.randn((1, 1), requires_grad=True)
with torch.autograd.profiler.profile() as prof:for _ in range(100):  # any normal python code, really!y = x ** 2y.backward()
# NOTE: some columns were removed for brevity
print(prof.key_averages().table(sort_by="self_cpu_time_total"))
-----------------------------------  ---------------  ---------------  ---------------
Name                                 Self CPU total   CPU time avg     Number of Calls
-----------------------------------  ---------------  ---------------  ---------------
mul                                  32.048ms         32.048ms         200
pow                                  27.041ms         27.041ms         200
PowBackward0                         9.727ms          55.483ms         100
torch::autograd::AccumulateGrad      9.148ms          9.148ms          100
torch::autograd::GraphRoot           691.816us        691.816us        100
-----------------------------------  ---------------  ---------------  ---------------
profiler.profile.export_chrome_trace | 将事件列表导出为Chrome追踪工具文件格式 |
|---|---|
profiler.profile.key_averages | 对所有函数事件按关键字段进行平均统计 |
profiler.profile.self_cpu_time_total | 返回CPU总耗时 |
profiler.profile.total_average | 对所有事件进行平均统计 |
profiler.parse_nvprof_trace | |
profiler.EnforceUnique | 当检测到重复键时抛出错误 |
profiler.KinetoStepTracker | 提供全局步进计数的抽象接口 |
profiler.record_function | 上下文管理器/函数装饰器,在运行autograd分析器时为代码块/函数添加标签 |
profiler_util.Interval | |
profiler_util.Kernel | |
profiler_util.MemRecordsAcc | 用于快速访问区间内内存记录的加速结构 |
profiler_util.StringTable |
class torch.autograd.profiler.emit_nvtx(enabled=True, record_shapes=False)
上下文管理器,使每个自动梯度操作都生成一个NVTX范围。
在程序运行于nvprof下时非常有用。
nvprof --profile-from-start off -o trace_name.prof -- <regular command here>
遗憾的是,我们无法强制 nvprof 将收集的数据刷新到磁盘,因此在 CUDA 性能分析中,必须使用此上下文管理器来标注 nvprof 跟踪信息,并等待进程退出后才能检查这些数据。
随后,可以使用 NVIDIA Visual Profiler (nvvp) 来可视化时间线,或者通过 torch.autograd.profiler.load_nvprof() 加载结果进行检查,例如在 Python REPL 环境中。
参数
enabled ([bool], 可选)– 设置为enabled=False时,此上下文管理器将不执行任何操作。默认值:True。record_shapes ([bool], 可选)– 如果record_shapes=True,包装每个自动求导操作的 nvtx 范围将追加该操作接收的张量参数的大小信息,格式如下:[[arg0.size(0), arg0.size(1), ...], [arg1.size(0), arg1.size(1), ...], ...]。非张量参数将表示为[]。参数将按照后端操作接收的顺序列出。请注意,此顺序可能与 Python 端传递参数的顺序不一致。另外需注意,记录形状可能会增加 nvtx 范围创建的开销。默认值:False。
示例
with torch.cuda.profiler.profile():model(x) # Warmup CUDA memory allocator and profilerwith torch.autograd.profiler.emit_nvtx():model(x)
前向-反向关联性
当在Nvidia Visual Profiler中查看使用emit_nvtx生成的性能分析文件时,将每个反向传播操作与对应的前向传播操作关联起来可能较为困难。
为简化这一过程,emit_nvtx会为其生成的区间附加序列号信息。
在前向传播过程中,每个函数区间会被标记seq=<N>。其中seq是一个运行计数器,每当创建新的反向Function对象并暂存用于反向传播时,该计数器就会递增。
因此,与前向函数区间关联的seq=<N>标注表明:如果该前向函数创建了反向Function对象,那么这个反向对象将获得序列号N。
在反向传播过程中,封装每个C++反向Function的apply()调用的顶层区间会被标记stashed seq=<M>。这里的M是该反向对象创建时的序列号。通过比较反向传播中的stashed seq与前向传播中的seq,可以追踪出是哪个前向操作创建了特定的反向Function。
反向传播期间执行的函数也会被标记seq=<N>。在默认反向传播(create_graph=False)时,这些信息无关紧要,实际上此类函数的N值可能均为0。只有与反向Function对象的apply()方法关联的顶层区间才有实际意义,它们可用于将这些Function对象与之前的前向传播建立关联。
双重反向传播
另一方面,如果正在进行create_graph=True的反向传播(即准备进行双重反向传播),那么反向传播期间每个函数的执行都会被赋予非零且有效的seq=<N>。这些函数本身可能会像前向传播中的原始函数那样,创建将在后续双重反向传播中执行的Function对象。
反向传播与双重反向传播之间的关系,在概念上与前向-反向关系相同:函数仍会发出带有当前序列号标记的区间,它们创建的Function对象仍会暂存这些序列号。在最终的双重反向传播期间,Function对象的apply()区间仍会带有stashed seq标记,这些标记可与反向传播阶段的序列号进行对比。
class torch.autograd.profiler.emit_itt(enabled=True, record_shapes=False)
上下文管理器,使每个自动梯度(autograd)操作都生成一个ITT范围标记。
在通过Intel® VTune Profiler运行程序时,该功能非常实用。
vtune <--vtune-flags<regular command here>
仪器化和追踪技术(ITT)API 能让你的应用程序在执行过程中生成并控制跨不同英特尔工具的追踪数据收集。
这个上下文管理器用于标注 Intel® VTune Profiling 追踪。借助该上下文管理器,你将能在 Intel® VTune Profiler 图形界面中看到标记的范围。
参数
enabled ([bool], 可选)– 设置为enabled=False会使该上下文管理器不执行任何操作。默认值:True。record_shapes ([bool], 可选)– 如果record_shapes=True,包裹每个自动梯度操作的 itt 范围会附加该操作接收的张量参数的大小信息,格式如下:[[arg0.size(0), arg0.size(1), ...], [arg1.size(0), arg1.size(1), ...], ...]。非张量参数将表示为[]。参数将按照后端操作接收的顺序列出。请注意,此顺序可能与 Python 端传递这些参数的顺序不一致。另外请注意,记录形状可能会增加 itt 范围创建的开销。默认值:False。
示例
>>> with torch.autograd.profiler.emit_itt():
...     model(x)
profiler.load_nvprof | 打开一个nvprof跟踪文件并解析自动梯度注释。 |
|---|
调试与异常检测
class torch.autograd.detect_anomaly(check_nan=True)
上下文管理器,用于为自动求导引擎启用异常检测功能。
该功能主要实现以下两个作用:
- 在启用检测的情况下运行前向传播时,反向传播过程会打印出导致失败的反向函数所对应的前向操作调用栈。
- 若
check_nan设为True,任何产生"nan"值的反向计算都会触发报错(默认为True)。
警告:该模式仅应用于调试场景,因其各项检测会显著降低程序执行速度。
使用示例
import torch
from torch import autograd
class MyFunc(autograd.Function):@staticmethoddef forward(ctx, inp):return inp.clone()@staticmethoddef backward(ctx, gO):# Error during the backward passraise RuntimeError("Some error in backward")return gO.clone()
def run_fn(a):out = MyFunc.apply(a)return out.sum()
inp = torch.rand(10, 10, requires_grad=True)
out = run_fn(inp)
out.backward()
'''Traceback (most recent call last):File "<stdin>", line 1, in <module>File "/your/pytorch/install/torch/_tensor.py", line 93, in backwardtorch.autograd.backward(self, gradient, retain_graph, create_graph)File "/your/pytorch/install/torch/autograd/__init__.py", line 90, in backwardallow_unreachable=True)  # allow_unreachable flagFile "/your/pytorch/install/torch/autograd/function.py", line 76, in applyreturn self._forward_cls.backward(self, *args)File "<stdin>", line 8, in backwardRuntimeError: Some error in backward
'''with autograd.detect_anomaly():inp = torch.rand(10, 10, requires_grad=True)out = run_fn(inp)out.backward()'''Traceback of forward call that caused the error:File "tmp.py", line 53, in <module>out = run_fn(inp)File "tmp.py", line 44, in run_fnout = MyFunc.apply(a)Traceback (most recent call last):File "<stdin>", line 4, in <module>File "/your/pytorch/install/torch/_tensor.py", line 93, in backwardtorch.autograd.backward(self, gradient, retain_graph, create_graph)File "/your/pytorch/install/torch/autograd/__init__.py", line 90, in backwardallow_unreachable=True)  # allow_unreachable flagFile "/your/pytorch/install/torch/autograd/function.py", line 76, in applyreturn self._forward_cls.backward(self, *args)File "<stdin>", line 8, in backwardRuntimeError: Some error in backward'''
class torch.autograd.set_detect_anomaly(mode, check_nan=True)
用于开启或关闭自动梯度引擎异常检测的上下文管理器。
set_detect_anomaly 将根据参数 mode 启用或禁用自动梯度异常检测功能。
该功能既可作为上下文管理器使用,也可作为普通函数调用。关于异常检测行为的具体说明,请参阅上文 detect_anomaly 的文档。
参数说明
mode ([bool])- 控制是否启用异常检测的标志位:True表示启用,False表示禁用check_nan ([bool])- 控制当反向传播产生"nan"值时是否触发错误的标志位
grad_mode.set_multithreading_enabled | 用于开启或关闭多线程反向传播的上下文管理器 |
|---|
自动求导图
Autograd 提供了一系列方法,允许开发者检查计算图并在反向传播过程中插入自定义行为。
torch.Tensor 的 grad_fn 属性会保存一个 torch.autograd.graph.Node 对象(当该张量是由被 autograd 记录的操作产生时,即 grad_mode 已启用且至少有一个输入需要梯度),否则该属性值为 None。
graph.Node.name | 返回节点名称 |
|---|---|
graph.Node.metadata | 返回元数据 |
graph.Node.next_functions | |
graph.Node.register_hook | 注册反向传播钩子 |
graph.Node.register_prehook | 注册反向传播前置钩子 |
graph.increment_version | 更新 autograd 元数据以跟踪指定张量是否被原地修改 |
某些操作需要在正向传播过程中保存中间结果,以便执行反向传播。这些中间结果会被保存在 grad_fn 的属性中,并可供访问。
例如:
>>> a = torch.tensor([0., 0., 0.], requires_grad=True)
>>> b = a.exp()
>>> print(isinstance(b.grad_fn, torch.autograd.graph.Node))
True
>>> print(dir(b.grad_fn))
['__call__', '__class__', '__delattr__', '__dir__', '__doc__', '__eq__', '__format__', '__ge__', '__getattribute__', '__gt__', '__hash__', '__init__', '__init_subclass__', '__le__', '__lt__', '__ne__', '__new__', '__reduce__', '__reduce_ex__', '__repr__', '__setattr__', '__sizeof__', '__str__', '__subclasshook__', '_raw_saved_result', '_register_hook_dict', '_saved_result', 'metadata', 'name', 'next_functions', 'register_hook', 'register_prehook', 'requires_grad']
>>> print(torch.allclose(b.grad_fn._saved_result, b))
True
您还可以通过钩子(hooks)定义这些保存的张量应如何打包/解包。
一个典型应用是通过将中间结果保存到磁盘或CPU(而非保留在GPU上),以计算资源换取内存空间。如果您发现模型在评估阶段能放入GPU内存但训练时不行,这一方法尤其有用。
另请参阅保存张量的钩子。
class torch.autograd.graph.saved_tensors_hooks(pack_hook, unpack_hook)
用于设置张量保存/解包钩子对的上下文管理器。
该上下文管理器用于定义操作产生的中间结果在保存前应如何打包,以及在检索时如何解包。
在此上下文中,每当操作保存一个张量用于反向传播时(包括通过save_for_backward()保存的中间结果,以及PyTorch内置操作记录的张量),都会调用pack_hook函数。随后,计算图中存储的是pack_hook的输出结果而非原始张量。
当需要访问已保存的张量时(即执行torch.Tensor.backward()或torch.autograd.grad()时),会调用unpack_hook函数。该函数以pack_hook返回的打包对象作为参数,并应返回与原始张量(即对应pack_hook的输入张量)内容完全一致的张量。
钩子函数应遵循以下签名格式:
pack_hook(tensor: Tensor) -> Any
unpack_hook(Any) -> Tensor
其中pack_hook的返回值必须能作为unpack_hook的有效输入。
通常要求unpack_hook(pack_hook(t))在数值、大小、数据类型和设备类型方面与原始张量t完全一致。
示例:
>>> def pack_hook(x):
...     print("Packing", x)
...     return x
>>> >
>>> def unpack_hook(x):
...     print("Unpacking", x)
...     return x
>>> >
>>> a = torch.ones(5, requires_grad=True)
>>> b = torch.ones(5, requires_grad=True) * 2
>>> with torch.autograd.graph.saved_tensors_hooks(pack_hook, unpack_hook):
...     y = a * b
Packing tensor([1., 1., 1., 1., 1.], requires_grad=True)
Packing tensor([2., 2., 2., 2., 2.], grad_fn=<MulBackward0>)
>>> y.sum().backward()
Unpacking tensor([1., 1., 1., 1., 1.], requires_grad=True)
Unpacking tensor([2., 2., 2., 2., 2.], grad_fn=<MulBackward0>)
警告:对钩子函数的输入执行原地操作可能导致未定义行为。
警告:同一时间只允许存在一对钩子函数。当递归嵌套此上下文管理器时,仅最内层的一对钩子函数会生效。
class torch.autograd.graph.save_on_cpu(pin_memory=False, device_type='cuda')
在该上下文管理器下,前向传播保存的张量将存储在CPU上,然后在反向传播时取回。
在此上下文管理器内执行操作时,前向传播期间保存在计算图中的中间结果将被移至CPU,当反向传播需要时再复制回原始设备。如果计算图已在CPU上,则不会执行张量复制。
使用此上下文管理器可以在计算性能和GPU内存使用之间进行权衡(例如当训练时模型无法完全放入GPU内存时)。
- 参数
pin_memory (bool) - 如果设为True,张量在打包时会保存到CPU的固定内存中,并在解包时异步复制到GPU。默认为False。另请参阅使用固定内存缓冲区。
示例:
>>> a = torch.randn(5, requires_grad=True, device="cuda")
>>> b = torch.randn(5, requires_grad=True, device="cuda")
>>> c = torch.randn(5, requires_grad=True, device="cuda")
>>> >
>>> def f(a, b, c):
...     prod_1 = a * b           # a and b are saved on GPU
...     with torch.autograd.graph.save_on_cpu():
...         prod_2 = prod_1 * c  # prod_1 and c are saved on CPU
...     y = prod_2 * a           # prod_2 and a are saved on GPU
...     return y
>>> >
>>> y = f(a, b, c)
>>> del a, b, c  # for illustration only
>>> # the content of a, b, and prod_2 are still alive on GPU
>>> # the content of prod_1 and c only live on CPU
>>> y.sum().backward()  # all CPU tensors are moved back to GPU, for backward
>>> # all intermediary tensors are released (deleted) after the call to backward
class torch.autograd.graph.disable_saved_tensors_hooks(error_message)
上下文管理器,用于禁用保存张量的默认钩子功能。
当您开发的功能与保存张量的默认钩子不兼容时,此功能非常有用。
参数
error_message (str) – 当保存张量的默认钩子被禁用后仍被使用时,将抛出带有此错误信息的 RuntimeError。
返回类型 : 生成器
示例
>>> message = "saved tensors default hooks are disabled"
>>> with torch.autograd.graph.disable_saved_tensors_hooks(message):
...     # Raises RuntimeError: saved tensors default hooks are disabled
...     with torch.autograd.graph.save_on_cpu():
...         pass
class torch.autograd.graph.register_multi_grad_hook(tensors, fn, *, mode='all')
注册一个多梯度反向传播钩子。
支持两种模式:"all" 和 "any"。
在 "all" 模式下,该钩子将在计算完 tensors 中每个张量的梯度后被调用。如果一个张量在 tensors 中但不是计算图的一部分,或者如果当前 .backward() 或 .grad() 调用中指定的任何 inputs 不需要该张量来计算梯度,则该张量将被忽略,钩子不会等待其梯度被计算。
在所有未被忽略的张量的梯度计算完成后,fn 将被调用并传入这些梯度。对于未计算梯度的张量,将传入 None。
在 "any" 模式下,该钩子将在计算完 tensors 中任意一个张量的第一个梯度后被调用。钩子将被调用,并将该梯度作为参数传入。
钩子不应修改其参数。
此函数返回一个带有 handle.remove() 方法的句柄,该方法用于移除钩子。
注意:有关此钩子的执行时机以及其执行顺序相对于其他钩子的更多信息,请参阅反向传播钩子执行。
示例:
>>> import torch
>>> >
>>> a = torch.rand(2, 3, requires_grad=True)
>>> b = torch.rand(2, 3, requires_grad=True)
>>> c = a * b
>>> d = a * b
>>> >
>>> def fn(grads):
...     print([g is not None for g in grads])
...
>>> torch.autograd.graph.register_multi_grad_hook((a, b, c, d), fn)
>>> >
>>> c.sum().backward(retain_graph=True)
[True, True, True, False]
>>> c.sum().backward(inputs=(a,), retain_graph=True)
[True, False, True, False]
>>> >
返回类型:RemovableHandle
class torch.autograd.graph.allow_mutation_on_saved_tensors
允许在上下文管理器中对保存用于反向传播的张量进行修改。
在此上下文管理器下,保存用于反向传播的张量在修改时会被克隆,因此原始版本仍可在反向传播期间使用。通常情况下,修改保存用于反向传播的张量会导致在反向传播使用时引发错误。
为确保正确行为,前向传播和反向传播都应在同一上下文管理器下运行。
返回值:一个存储该上下文管理器所管理状态的 _AllowMutationOnSavedContext 对象。该对象可用于调试目的。上下文管理器管理的状态会在退出时自动清除。
返回类型:Generator[_AllowMutationOnSavedContext, None, None]
示例:
>>> import torch
>>> with torch.autograd.graph.allow_mutation_on_saved_tensors():
...     # forward
...     a = torch.ones(2, 3, requires_grad=True)
...     b = a.clone()
...     out = (b**2).sum()
...     b.sin_()
...     # backward
...     out.sum().backward()
...
tensor([[0.8415, 0.8415, 0.8415], [0.8415, 0.8415, 0.8415]], grad_fn=<SinBackward0>)
class torch.autograd.graph.GradientEdge(node, output_nr)
表示自动微分图中特定梯度边的对象。
要获取计算给定张量梯度所在的梯度边,可以执行 edge = autograd.graph.get_gradient_edge(tensor)。
torch.autograd.graph.get_gradient_edge(tensor)[source]
获取用于计算给定张量梯度的梯度边。
具体而言,其等效于调用:
g = autograd.grad(loss, input) 和 g = autograd.grad(loss, get_gradient_edge(input))。
返回类型:GradientEdge
torch.library
torch.library 是一个用于扩展 PyTorch 核心算子库的 API 集合。它包含以下功能工具:
- 测试自定义算子
- 创建新的自定义算子
- 扩展通过 PyTorch C++ 算子注册 API(例如 aten 算子)定义的算子
如需详细了解如何高效使用这些 API,请参阅 PyTorch 自定义算子指南页获取更多信息。
(注:根据翻译原则,我进行了以下处理:
1、保留所有代码术语如"torch.library"、“API”、“PyTorch”、"aten"等
2、将长句拆分为更易读的列表形式
3、被动语态转为主动语态
4、完整保留原始链接格式
5、删除多余空行,保持文档紧凑性)
测试自定义算子
使用 torch.library.opcheck() 来检测自定义算子是否正确使用了 Python torch.library 和/或 C++ TORCH_LIBRARY API。此外,如果算子支持训练过程,应使用 torch.autograd.gradcheck() 来验证梯度计算的数学正确性。
torch.library.opcheck(op, args, kwargs=None, *, test_utils=('test_schema', 'test_autograd_registration', 'test_faketensor', 'test_aot_dispatch_dynamic'), raise_exception=True, atol=None, rtol=None)
给定一个运算符和一些示例参数,测试该运算符是否正确注册。
也就是说,当你使用 torch.library/TORCH_LIBRARY API 创建自定义操作时,你指定了关于该自定义操作的元数据(例如可变性信息),这些 API 要求你传递的函数满足某些属性(例如在 fake/meta/abstract 内核中不访问数据指针)。
opcheck 测试这些元数据和属性。
具体来说,我们测试以下内容:
- test_schema:检查模式是否与运算符的实现匹配。例如:如果模式指定了一个张量是可变的,那么我们检查实现是否修改了该张量。如果模式指定我们返回一个新的张量,那么我们检查实现是否返回了一个新的张量(而不是现有的张量或现有张量的视图)。
- test_autograd_registration:如果运算符支持训练(自动梯度):我们检查其自动梯度公式是否通过 torch.library.register_autograd 或手动注册到一个或多个 DispatchKey::Autograd 键。任何其他基于 DispatchKey 的注册可能导致未定义行为。
- test_faketensor:检查运算符是否有 FakeTensor 内核(以及是否正确)。FakeTensor 内核是运算符与 PyTorch 编译 API(torch.compile/export/FX)协同工作的必要条件(但不是充分条件)。我们检查是否为运算符注册了 FakeTensor 内核(有时也称为 meta 内核)以及它是否正确。该测试比较在真实张量上运行运算符的结果和在 FakeTensors 上运行运算符的结果,检查它们是否具有相同的张量元数据(大小/步长/数据类型/设备等)。
- test_aot_dispatch_dynamic:检查运算符在 PyTorch 编译 API(torch.compile/export/FX)中是否有正确的行为。
这检查了在 eager-mode PyTorch 和 torch.compile 下输出(以及梯度,如果适用)是否相同。
该测试是 test_faketensor 的超集,是一个端到端测试;
它还测试运算符是否支持功能化,以及反向传播(如果存在)是否也支持 FakeTensor 和功能化。
为了获得最佳结果,请使用一组具有代表性的输入多次调用 opcheck。如果你的运算符支持自动梯度,请使用 requires_grad = True 的输入调用 opcheck;如果你的运算符支持多个设备(例如 CPU 和 CUDA),请在所有支持的设备上使用 opcheck 进行测试。
参数
op (Union[OpOverload, OpOverloadPacket, CustomOpDef])– 运算符。必须是用 torch.library.custom_op() 装饰的函数或在 torch.ops.* 中找到的 OpOverload/OpOverloadPacket(例如 torch.ops.aten.sin, torch.ops.mylib.foo)。args (tuple[Any, ...])– 运算符的参数。kwargs (Optional[dict[str, Any]])– 运算符的关键字参数。test_utils (Union[str, Sequence[str]])– 应运行的测试。默认:全部。例如:(“test_schema”, “test_faketensor”)。raise_exception (bool)– 是否在第一个错误时引发异常。如果为 False,将返回一个字典,其中包含每个测试是否通过的信息。rtol (Optional[float])– 浮点比较的相对容差。如果指定,还必须指定 atol。如果省略,则根据数据类型选择默认值(参见 torch.testing.assert_close() 中的表格)。atol (Optional[float])– 浮点比较的绝对容差。如果指定,还必须指定 rtol。如果省略,则根据数据类型选择默认值(参见 torch.testing.assert_close() 中的表格)。
返回类型:dict[str, str]
警告:opcheck 和 torch.autograd.gradcheck() 测试不同的内容;
opcheck 测试你对 torch.library API 的使用是否正确,而 torch.autograd.gradcheck() 测试你的自动梯度公式在数学上是否正确。对于支持梯度计算的自定义操作,请同时使用两者进行测试。
示例
>>> @torch.library.custom_op("mylib::numpy_mul", mutates_args=())
>>> def numpy_mul(x: Tensor, y: float) -Tensor:
>>>     x_np = x.numpy(force=True)
>>>     z_np = x_np * y
>>>     return torch.from_numpy(z_np).to(x.device)
>>> >
>>> @numpy_mul.register_fake
>>> def _(x, y):
>>>     return torch.empty_like(x)
>>> >
>>> def setup_context(ctx, inputs, output):
>>>     y, = inputs
>>>     ctx.y = y
>>> >
>>> def backward(ctx, grad):
>>>     return grad * ctx.y, None
>>> >
>>> numpy_mul.register_autograd(backward, setup_context=setup_context)
>>> >
>>> sample_inputs = [
>>>     (torch.randn(3), 3.14), >>    (torch.randn(2, 3, device='cuda'), 2.718), >>    (torch.randn(1, 10, requires_grad=True), 1.234), >>    (torch.randn(64, 64, device='cuda', requires_grad=True), 90.18), >>]
>>> >
>>> for args in sample_inputs:
>>>     torch.library.opcheck(numpy_mul, args)
在 Python 中创建新的自定义算子
使用 torch.library.custom_op() 来创建新的自定义算子。
torch.library.custom_op(name, fn=None, /, *, mutates_args, device_types=None, schema=None)
将函数封装为自定义运算符。
创建自定义运算符的常见原因包括:
- 封装第三方库或自定义内核以兼容 PyTorch 子系统(如 Autograd)
- 防止 torch.compile/export/FX 追踪机制探查函数内部实现
本 API 通过装饰器方式使用(参见示例)。被封装函数必须包含类型提示,这些类型提示用于与 PyTorch 各子系统交互。
参数说明
name (str)- 运算符命名格式为 “{命名空间}::{名称}”(例如 “mylib::my_linear”)。该名称将作为 PyTorch 子系统(如 torch.export、FX 图)中的稳定标识符。为避免命名冲突,建议使用项目名称作为命名空间(例如 pytorch/fbgemm 中的所有自定义运算符均采用 “fbgemm” 作为命名空间)。mutates_args (Iterable[str] 或 "unknown")- 函数会修改的参数名称列表。此信息必须准确,否则将导致未定义行为。若设为 “unknown”,系统会保守假设运算符的所有输入参数都可能被修改。device_types (None | str | Sequence[str])- 函数适用的设备类型。未指定时,该函数将作为所有设备类型的默认实现。示例值:“cpu”, “cuda”。注意:当为不接受张量的运算符注册设备特定实现时,要求该运算符必须包含 “device: torch.device” 参数。schema (None | str)- 运算符模式字符串。推荐设为 None(默认值),系统会根据类型注解自动推导模式。除非有特殊需求,否则建议使用自动推导模式。示例格式:“(Tensor x, int y) -> (Tensor, Tensor)”。
返回类型 : Union[Callable[[Callable[[…], object]], CustomOpDef], CustomOpDef]
重要提示:建议不要手动传入 schema 参数,而是通过类型注解自动推导。手动编写模式字符串容易出错,仅当系统对类型注解的解释不符合预期时才需要自定义。关于模式字符串的编写规范,详见:
官方文档
使用示例::
>>> import torch
>>> from torch import Tensor
>>> from torch.library import custom_op
>>> import numpy as np
>>> >
>>> @custom_op("mylib::numpy_sin", mutates_args=())
>>> def numpy_sin(x: Tensor) -Tensor:
>>>     x_np = x.cpu().numpy()
>>>     y_np = np.sin(x_np)
>>>     return torch.from_numpy(y_np).to(device=x.device)
>>> >
>>> x = torch.randn(3)
>>> y = numpy_sin(x)
>>> assert torch.allclose(y, x.sin())
>>> >
>>> # Example of a custom op that only works for one device type.
>>> @custom_op("mylib::numpy_sin_cpu", mutates_args=(), device_types="cpu")
>>> def numpy_sin_cpu(x: Tensor) -Tensor:
>>>     x_np = x.numpy()
>>>     y_np = np.sin(x_np)
>>>     return torch.from_numpy(y_np)
>>> >
>>> x = torch.randn(3)
>>> y = numpy_sin_cpu(x)
>>> assert torch.allclose(y, x.sin())
>>> >
>>> # Example of a custom op that mutates an input
>>> @custom_op("mylib::numpy_sin_inplace", mutates_args={"x"}, device_types="cpu")
>>> def numpy_sin_inplace(x: Tensor) -None:
>>>     x_np = x.numpy()
>>>     np.sin(x_np, out=x_np)
>>> >
>>> x = torch.randn(3)
>>> expected = x.sin()
>>> numpy_sin_inplace(x)
>>> assert torch.allclose(x, expected)
>>> >
>>> # Example of a factory function
>>> @torch.library.custom_op("mylib::bar", mutates_args={}, device_types="cpu")
>>> def bar(device: torch.device) -Tensor:
>>>     return torch.ones(3)
>>> >
>>> bar("cpu")
torch.library.triton_op(name, fn=None, /, *, mutates_args, schema=None)
创建一个由1个或多个triton内核支持的定制算子实现。
这是将triton内核与PyTorch结合使用的更结构化方式。
优先使用不带torch.library自定义算子包装器(如torch.library.custom_op()、torch.library.triton_op())的triton内核,因为这样更简单;只有在需要创建行为类似PyTorch内置算子的情况下,才使用torch.library.custom_op()/torch.library.triton_op()。
例如,当传递张量子类或在TorchDispatchMode下时,可以使用torch.library包装API来定义triton内核的行为。
当实现包含1个或多个triton内核时,使用torch.library.triton_op()而非torch.library.custom_op()。torch.library.custom_op()将自定义算子视为不透明(torch.compile()和torch.export.export()永远不会追踪它们),但triton_op使这些子系统能够看到实现,从而允许它们优化triton内核。
注意,fn必须仅包含对PyTorch理解的算子和triton内核的调用。在fn中调用的任何triton内核必须通过torch.library.wrap_triton()调用进行包装。
参数
name (str)- 自定义算子的名称,格式为“{命名空间}::{名称}”,例如“mylib::my_linear”。该名称用作PyTorch子系统(如torch.export、FX图)中算子的稳定标识符。为避免名称冲突,请使用项目名称作为命名空间;例如,pytorch/fbgemm中的所有自定义算子都使用“fbgemm”作为命名空间。mutates_args (Iterable[str] 或 "unknown")- 函数修改的参数名称。这必须准确,否则行为未定义。如果为“unknown”,则悲观地假设算子的所有输入都被修改。schema (None | str)- 算子的模式字符串。如果为None(推荐),我们将根据其类型注释推断算子的模式。除非有特定原因,否则建议让我们推断模式。示例:“(Tensor x, int y) -> (Tensor, Tensor)”。
返回类型:Callable
示例:
>>> import torch
>>> from torch.library import triton_op, wrap_triton
>>> >
>>> import triton
>>> from triton import language as tl
>>> >
>>> @triton.jit
>>> def add_kernel(
>>>     in_ptr0, >>    in_ptr1, >>    out_ptr, >>    n_elements, >>    BLOCK_SIZE: "tl.constexpr", >>):
>>>     pid = tl.program_id(axis=0)
>>>     block_start = pid * BLOCK_SIZE
>>>     offsets = block_start + tl.arange(0, BLOCK_SIZE)
>>>     mask = offsets < n_elements
>>>     x = tl.load(in_ptr0 + offsets, mask=mask)
>>>     y = tl.load(in_ptr1 + offsets, mask=mask)
>>>     output = x + y
>>>     tl.store(out_ptr + offsets, output, mask=mask)
>>> >
>>> @triton_op("mylib::add", mutates_args={})
>>> def add(x: torch.Tensor, y: torch.Tensor) -torch.Tensor:
>>>     output = torch.empty_like(x)
>>>     n_elements = output.numel()
>>> >
>>>     def grid(meta):
>>>         return (triton.cdiv(n_elements, meta["BLOCK_SIZE"]),)
>>> >
>>>     # NB: we need to wrap the triton kernel in a call to wrap_triton
>>>     wrap_triton(add_kernel)[grid](x, y, output, n_elements, 16)
>>>     return output
>>> >
>>> @torch.compile
>>> def f(x, y):
>>>     return add(x, y)
>>> >
>>> x = torch.randn(3, device="cuda")
>>> y = torch.randn(3, device="cuda")
>>> >
>>> z = f(x, y)
>>> assert torch.allclose(z, x + y)
torch.library.wrap_triton(triton_kernel, /)
允许通过 make_fx 或非严格模式的 torch.export 将 triton 内核捕获到计算图中。
这些技术基于调度器进行追踪(通过 __torch_dispatch__),无法直接捕获原始 triton 内核的调用。
wrap_triton API 能够将 triton 内核封装为可调用对象,从而真正实现计算图的可追踪性。
建议将此 API 与 torch.library.triton_op() 配合使用。
示例
>>> import torch
>>> import triton
>>> from triton import language as tl
>>> from torch.fx.experimental.proxy_tensor import make_fx
>>> from torch.library import wrap_triton
>>> >
>>> @triton.jit
>>> def add_kernel(
>>>     in_ptr0, >>    in_ptr1, >>    out_ptr, >>    n_elements, >>    BLOCK_SIZE: "tl.constexpr", >>):
>>>     pid = tl.program_id(axis=0)
>>>     block_start = pid * BLOCK_SIZE
>>>     offsets = block_start + tl.arange(0, BLOCK_SIZE)
>>>     mask = offsets < n_elements
>>>     x = tl.load(in_ptr0 + offsets, mask=mask)
>>>     y = tl.load(in_ptr1 + offsets, mask=mask)
>>>     output = x + y
>>>     tl.store(out_ptr + offsets, output, mask=mask)
>>> >
>>> def add(x, y):
>>>     output = torch.empty_like(x)
>>>     n_elements = output.numel()
>>> >
>>>     def grid_fn(meta):
>>>         return (triton.cdiv(n_elements, meta["BLOCK_SIZE"]),)
>>> >
>>>     wrap_triton(add_kernel)[grid_fn](x, y, output, n_elements, 16)
>>>     return output
>>> >
>>> x = torch.randn(3, device="cuda")
>>> y = torch.randn(3, device="cuda")
>>> gm = make_fx(add)(x, y)
>>> print(gm.code)
>>> # def forward(self, x_1, y_1):
>>> #     empty_like = torch.ops.aten.empty_like.default(x_1, pin_memory = False)
>>> #     triton_kernel_wrapper_mutation_proxy = triton_kernel_wrapper_mutation(
>>> #         kernel_idx = 0, constant_args_idx = 0, >>#         grid = [(1, 1, 1)], kwargs = {
>>> #             'in_ptr0': x_1, 'in_ptr1': y_1, 'out_ptr': empty_like, >>#             'n_elements': 3, 'BLOCK_SIZE': 16
>>> #         })
>>> #     return empty_like
返回类型:任意
扩展自定义算子(由Python或C++创建)
使用 torch.library.register_kernel() 和 torch.library.register_fake() 等 register.* 方法,可以为任何算子添加实现(这些算子可能是通过 torch.library.custom_op() 创建的,或是通过 PyTorch 的 C++ 算子注册 API 创建的)。
torch.library.register_kernel(op, device_types, func=None, /, *, lib=None)
为该操作符注册一个设备类型的实现。
一些有效的设备类型包括:“cpu”、“cuda”、“xla”、“mps”、“ipu”、“xpu”。
此API可用作装饰器。
参数
op (str | OpOverload)- 要注册实现的操作符。device_types (None | str | Sequence[str])- 要注册实现的设备类型。如果为None,将注册到所有设备类型——请仅在实现确实与设备类型无关时使用此选项。func (Callable)- 注册为给定设备类型实现的函数。lib (Optional[Library])- 如果提供,此注册的生命周期
示例::
>>> import torch
>>> from torch import Tensor
>>> from torch.library import custom_op
>>> import numpy as np
>>> >
>>> # Create a custom op that works on cpu
>>> @custom_op("mylib::numpy_sin", mutates_args=(), device_types="cpu")
>>> def numpy_sin(x: Tensor) -Tensor:
>>>     x_np = x.numpy()
>>>     y_np = np.sin(x_np)
>>>     return torch.from_numpy(y_np)
>>> >
>>> # Add implementations for the cuda device
>>> @torch.library.register_kernel("mylib::numpy_sin", "cuda")
>>> def _(x):
>>>     x_np = x.cpu().numpy()
>>>     y_np = np.sin(x_np)
>>>     return torch.from_numpy(y_np).to(device=x.device)
>>> >
>>> x_cpu = torch.randn(3)
>>> x_cuda = x_cpu.cuda()
>>> assert torch.allclose(numpy_sin(x_cpu), x_cpu.sin())
>>> assert torch.allclose(numpy_sin(x_cuda), x_cuda.sin())
torch.library.register_autocast(op, device_type, cast_inputs, /, *, lib=None)
为自定义操作注册自动类型转换调度规则。
有效设备类型包括:“cpu"和"cuda”。
参数
op (str | OpOverload)– 要注册自动类型转换调度规则的操作符。device_type (str)– 使用的设备类型。‘cuda’或’cpu’。该类型与torch.device的类型属性相同。因此,您可以通过Tensor.device.type获取张量的设备类型。cast_inputs (torch.dtype)– 当自定义操作在启用自动类型转换的区域运行时,将传入的浮点张量转换为目标数据类型(非浮点张量不受影响),然后在禁用自动类型转换的情况下执行自定义操作。lib (Optional[Library])– 如果提供,此注册的生命周期
示例::
>>> import torch
>>> from torch import Tensor
>>> from torch.library import custom_op
>>> >
>>> # Create a custom op that works on cuda
>>> @torch.library.custom_op("mylib::my_sin", mutates_args=())
>>> def my_sin(x: Tensor) -Tensor:
>>>     return torch.sin(x)
>>> >
>>> # Register autocast dispatch rule for the cuda device
>>> torch.library.register_autocast("mylib::my_sin", "cuda", torch.float16)
>>> >
>>> x = torch.randn(3, dtype=torch.float32, device="cuda")
>>> with torch.autocast("cuda", dtype=torch.float16):
>>>     y = torch.ops.mylib.my_sin(x)
>>> assert y.dtype == torch.float16
torch.library.register_autograd(op, backward, /, *, setup_context=None, lib=None)
为自定义算子注册反向传播公式。
要使算子能够与自动微分(autograd)协同工作,您需要注册一个反向传播公式:
1、必须通过提供"backward"函数来告知我们如何在反向传播过程中计算梯度。
2、如果需要使用前向传播中的值来计算梯度,可以通过setup_context保存这些值供反向传播使用。
backward函数在反向传播阶段执行,它接受(ctx, grads)参数:
grads是一个或多个梯度值,其数量与算子的输出数量相匹配。
ctx对象与torch.autograd.Function使用的上下文对象相同。backward_fn的语义与torch.autograd.Function.backward()完全一致。
setup_context(ctx, inputs, output)在前向传播阶段执行。请通过以下方式将反向传播所需的数据保存到ctx对象中:
- 使用
torch.autograd.function.FunctionCtx.save_for_backward() - 或直接将它们赋值给
ctx的属性
如果自定义算子包含仅关键字参数,我们期望setup_context的签名为:setup_context(ctx, inputs, keyword_only_inputs, output)。
setup_context_fn和backward_fn都必须是可追踪的。这意味着:
- 不能直接访问
torch.Tensor.data_ptr() - 不能依赖或修改全局状态
如果需要不可追踪的反向传播,可以将其实现为单独的自定义算子,在backward_fn内部调用。
如果需要在不同设备上实现不同的自动微分行为,建议为每种需要不同行为的设备创建单独的自定义算子,并在运行时进行切换。
示例
>>> import torch
>>> import numpy as np
>>> from torch import Tensor
>>> >
>>> @torch.library.custom_op("mylib::numpy_sin", mutates_args=())
>>> def numpy_sin(x: Tensor) -Tensor:
>>>     x_np = x.cpu().numpy()
>>>     y_np = np.sin(x_np)
>>>     return torch.from_numpy(y_np).to(device=x.device)
>>> >
>>> def setup_context(ctx, inputs, output) -Tensor:
>>>     x, = inputs
>>>     ctx.save_for_backward(x)
>>> >
>>> def backward(ctx, grad):
>>>     x, = ctx.saved_tensors
>>>     return grad * x.cos()
>>> >
>>> torch.library.register_autograd(
...     "mylib::numpy_sin", backward, setup_context=setup_context
... )
>>> >
>>> x = torch.randn(3, requires_grad=True)
>>> y = numpy_sin(x)
>>> (grad_x,) = torch.autograd.grad(y, x, torch.ones_like(y))
>>> assert torch.allclose(grad_x, x.cos())
>>> >
>>> # Example with a keyword-only arg
>>> @torch.library.custom_op("mylib::numpy_mul", mutates_args=())
>>> def numpy_mul(x: Tensor, *, val: float) -Tensor:
>>>     x_np = x.cpu().numpy()
>>>     y_np = x_np * val
>>>     return torch.from_numpy(y_np).to(device=x.device)
>>> >
>>> def setup_context(ctx, inputs, keyword_only_inputs, output) -Tensor:
>>>     ctx.val = keyword_only_inputs["val"]
>>> >
>>> def backward(ctx, grad):
>>>     return grad * ctx.val
>>> >
>>> torch.library.register_autograd(
...     "mylib::numpy_mul", backward, setup_context=setup_context
... )
>>> >
>>> x = torch.randn(3, requires_grad=True)
>>> y = numpy_mul(x, val=3.14)
>>> (grad_x,) = torch.autograd.grad(y, x, torch.ones_like(y))
>>> assert torch.allclose(grad_x, torch.full_like(x, 3.14))
torch.library.register_fake(op, func=None, /, *, lib=None, _stacklevel=1)
为该运算符注册一个 FakeTensor 实现(称为“fake impl”)。
有时也被称为“元内核”或“抽象实现”。
“FakeTensor 实现”定义了该运算符在不携带数据的张量(“FakeTensor”)上的行为。给定具有某些属性(尺寸/步长/存储偏移量/设备)的输入张量,它规定了输出张量的属性。
FakeTensor 实现与运算符具有相同的签名。
该实现会同时作用于 FakeTensor 和元张量。编写 FakeTensor 实现时,需假设运算符的所有张量输入都是常规的 CPU/CUDA/元张量,但它们没有存储空间,而你需要返回常规的 CPU/CUDA/元张量作为输出。
FakeTensor 实现必须仅包含 PyTorch 操作(且不得直接访问任何输入或中间张量的存储或数据)。
此 API 可用作装饰器(参见示例)。
有关自定义运算符的详细指南,请参阅 https://pytorch.org/tutorials/advanced/custom_ops_landing_page.html
示例
>>> import torch
>>> import numpy as np
>>> from torch import Tensor
>>> >
>>> # Example 1: an operator without data-dependent output shape
>>> @torch.library.custom_op("mylib::custom_linear", mutates_args=())
>>> def custom_linear(x: Tensor, weight: Tensor, bias: Tensor) -Tensor:
>>>     raise NotImplementedError("Implementation goes here")
>>> >
>>> @torch.library.register_fake("mylib::custom_linear")
>>> def _(x, weight, bias):
>>>     assert x.dim() == 2
>>>     assert weight.dim() == 2
>>>     assert bias.dim() == 1
>>>     assert x.shape[1] == weight.shape[1]
>>>     assert weight.shape[0] == bias.shape[0]
>>>     assert x.device == weight.device
>>> >
>>>     return (x @ weight.t()) + bias
>>> >
>>> with torch._subclasses.fake_tensor.FakeTensorMode():
>>>     x = torch.randn(2, 3)
>>>     w = torch.randn(3, 3)
>>>     b = torch.randn(3)
>>>     y = torch.ops.mylib.custom_linear(x, w, b)
>>> >
>>> assert y.shape == (2, 3)
>>> >
>>> # Example 2: an operator with data-dependent output shape
>>> @torch.library.custom_op("mylib::custom_nonzero", mutates_args=())
>>> def custom_nonzero(x: Tensor) -Tensor:
>>>     x_np = x.numpy(force=True)
>>>     res = np.stack(np.nonzero(x_np), axis=1)
>>>     return torch.tensor(res, device=x.device)
>>> >
>>> @torch.library.register_fake("mylib::custom_nonzero")
>>> def _(x):
>>> # Number of nonzero-elements is data-dependent.
>>> # Since we cannot peek at the data in an fake impl, >># we use the ctx object to construct a new symint that >># represents the data-dependent size.
>>>     ctx = torch.library.get_ctx()
>>>     nnz = ctx.new_dynamic_size()
>>>     shape = [nnz, x.dim()]
>>>     result = x.new_empty(shape, dtype=torch.int64)
>>>     return result
>>> >
>>> from torch.fx.experimental.proxy_tensor import make_fx
>>> >
>>> x = torch.tensor([0, 1, 2, 3, 4, 0])
>>> trace = make_fx(torch.ops.mylib.custom_nonzero, tracing_mode="symbolic")(x)
>>> trace.print_readable()
>>> >
>>> assert torch.allclose(trace(x), torch.ops.mylib.custom_nonzero(x))
torch.library.register_vmap(op, func=None, /, *, lib=None)
注册一个 vmap 实现以支持该自定义操作使用 torch.vmap()。
此 API 可用作装饰器(参见示例)。
为了让运算符能与 torch.vmap() 协同工作,您可能需要按以下签名注册 vmap 实现:
vmap_func(info, in_dims: Tuple[Optional[int]], args, *kwargs),
其中 *args 和 **kwargs 是 op 的参数和关键字参数。
我们不支持仅含关键字参数的 Tensor 参数。
该实现需指定如何计算带额外维度的输入(由 in_dims 指定)下 op 的批处理版本。
对于 args 中的每个参数,in_dims 都有一个对应的 Optional[int]。如果参数不是 Tensor 或未被 vmap 处理,则为 None;否则是一个整数,表示 Tensor 中被 vmap 处理的维度索引。
info 是可能有用的额外元数据集合:
info.batch_size指定被 vmap 处理的维度大小info.randomness是传递给torch.vmap()的randomness选项
函数 func 应返回 (output, out_dims) 元组。与 in_dims 类似,out_dims 需与 output 结构相同,并为每个输出包含一个 out_dim,指明输出是否具有 vmap 处理的维度及其索引位置。
示例
>>> import torch
>>> import numpy as np
>>> from torch import Tensor
>>> from typing import Tuple
>>> >
>>> def to_numpy(tensor):
>>>     return tensor.cpu().numpy()
>>> >
>>> lib = torch.library.Library("mylib", "FRAGMENT")
>>> @torch.library.custom_op("mylib::numpy_cube", mutates_args=())
>>> def numpy_cube(x: Tensor) -Tuple[Tensor, Tensor]:
>>>     x_np = to_numpy(x)
>>>     dx = torch.tensor(3 * x_np ** 2, device=x.device)
>>>     return torch.tensor(x_np ** 3, device=x.device), dx
>>> >
>>> def numpy_cube_vmap(info, in_dims, x):
>>>     result = numpy_cube(x)
>>>     return result, (in_dims[0], in_dims[0])
>>> >
>>> torch.library.register_vmap(numpy_cube, numpy_cube_vmap)
>>> >
>>> x = torch.randn(3)
>>> torch.vmap(numpy_cube)(x)
>>> >
>>> @torch.library.custom_op("mylib::numpy_mul", mutates_args=())
>>> def numpy_mul(x: Tensor, y: Tensor) -Tensor:
>>>     return torch.tensor(to_numpy(x) * to_numpy(y), device=x.device)
>>> >
>>> @torch.library.register_vmap("mylib::numpy_mul")
>>> def numpy_mul_vmap(info, in_dims, x, y):
>>>     x_bdim, y_bdim = in_dims
>>>     x = x.movedim(x_bdim, -1) if x_bdim is not None else x.unsqueeze(-1)
>>>     y = y.movedim(y_bdim, -1) if y_bdim is not None else y.unsqueeze(-1)
>>>     result = x * y
>>>     result = result.movedim(-1, 0)
>>>     return result, 0
>>> >
>>> >
>>> x = torch.randn(3)
>>> y = torch.randn(3)
>>> torch.vmap(numpy_mul)(x, y)
注意:vmap函数的设计应确保保留整个自定义运算符的语义。
也就是说,grad(vmap(op))应当能够被grad(map(op))替代。
如果您的自定义运算符在反向传播过程中有任何特殊行为,请牢记这一点。
torch.library.impl_abstract(qualname, func=None, *, lib=None, _stacklevel=1)
该API在PyTorch 2.4中已更名为torch.library.register_fake(),请使用新名称。
torch.library.get_ctx()
get_ctx() 返回当前的 AbstractImplCtx 对象。
调用 get_ctx() 仅在 fake 实现内部有效(更多使用细节请参阅 torch.library.register_fake())。
返回类型:FakeImplCtx
torch.library.register_torch_dispatch(op, torch_dispatch_class, func=None, /, *, lib=None)
为给定运算符和 torch_dispatch_class 注册一个 torch_dispatch 规则。
这种方式支持通过开放注册来指定运算符与 torch_dispatch_class 之间的交互行为,而无需直接修改 torch_dispatch_class 或运算符本身。
torch_dispatch_class 可以是以下两种类型之一:
- 带有
__torch_dispatch__方法的 Tensor 子类 - TorchDispatchMode 对象
如果属于 Tensor 子类,要求 func 具有以下签名格式:
(cls, func: OpOverload, types: Tuple[type, ...], args, kwargs) -> Any
如果属于 TorchDispatchMode,则要求 func 具有以下签名格式:
(mode, func: OpOverload, types: Tuple[type, ...], args, kwargs) -> Any
其中 args 和 kwargs 的标准化处理方式与 __torch_dispatch__ 中的规范一致(参见 torch_dispatch 调用约定)。
示例
>>> import torch
>>> >
>>> @torch.library.custom_op("mylib::foo", mutates_args={})
>>> def foo(x: torch.Tensor) -torch.Tensor:
>>>     return x.clone()
>>> >
>>> class MyMode(torch.utils._python_dispatch.TorchDispatchMode):
>>>     def __torch_dispatch__(self, func, types, args=(), kwargs=None):
>>>         return func(args, *kwargs)
>>> >
>>> @torch.library.register_torch_dispatch("mylib::foo", MyMode)
>>> def _(mode, func, types, args, kwargs):
>>>     x, = args
>>>     return x + 1
>>> >
>>> x = torch.randn(3)
>>> y = foo(x)
>>> assert torch.allclose(y, x)
>>> >
>>> with MyMode():
>>>     y = foo(x)
>>> assert torch.allclose(y, x + 1)
torch.library.infer_schema(prototype_function, /, *, mutates_args, op_name=None)
解析带有类型提示的给定函数的模式。该模式从函数的类型提示中推断得出,可用于定义新的运算符。
我们做出以下假设:
- 所有输出都不会与任何输入或其他输出产生别名冲突。
- 未指定库的字符串类型注解"device, dtype, Tensor, types"默认视为torch.。同样,未指定库的字符串类型注解"Optional, List, Sequence, Union"默认视为typing.。
- 只有
mutates_args中列出的参数会被修改。如果mutates_args为"unknown",则假定运算符的所有输入都会被修改。
调用方(例如自定义操作API)需负责验证这些假设。
参数
prototype_function ( Callable )- 用于从其类型注解推断模式的函数。op_name (Optional[str])- 模式中运算符的名称。如果name为None,则推断的模式中不包含名称。注意torch.library.Library.define的输入模式需要运算符名称。mutates_args ("unknown" | Iterable[str])- 函数中被修改的参数。
返回值:推断出的模式。
返回类型 : str
示例
>>> def foo_impl(x: torch.Tensor) -torch.Tensor:
>>>     return x.sin()
>>> >
>>> infer_schema(foo_impl, op_name="foo", mutates_args={})
foo(Tensor x) -Tensor
>>> >
>>> infer_schema(foo_impl, mutates_args={})
(Tensor x) -Tensor
class torch._library.custom_ops.CustomOpDef(namespace, name, schema, fn)
CustomOpDef 是一个函数包装器,用于将其转换为自定义操作符。
它提供了多种方法,用于为此自定义操作符注册附加行为。
您不应直接实例化 CustomOpDef,而应使用 torch.library.custom_op() API。
set_kernel_enabled(device_type, enabled=True)
禁用或重新启用已为此自定义算子注册的内核。
如果内核已处于禁用/启用状态,则此操作无效。
注意:如果内核先被禁用然后重新注册,它将保持禁用状态直到再次启用。
参数
device_type (str)– 要禁用/启用内核的设备类型。disable ([bool])– 是否禁用内核(True表示禁用,False表示启用)。
示例
>>> inp = torch.randn(1)
>>> >
>>> # define custom op `f`.
>>> @custom_op("mylib::f", mutates_args=())
>>> def f(x: Tensor) -Tensor:
>>>     return torch.zeros(1)
>>> >
>>> print(f(inp))  # tensor([0.]), default kernel
>>> >
>>> @f.register_kernel("cpu")
>>> def _(x):
>>>     return torch.ones(1)
>>> >
>>> print(f(inp))  # tensor([1.]), CPU kernel
>>> >
>>> # temporarily disable the CPU kernel
>>> with f.set_kernel_enabled("cpu", enabled = False):
>>>     print(f(inp))  # tensor([0.]) with CPU kernel disabled
底层 API
以下 API 是直接绑定到 PyTorch C++ 底层算子注册接口的封装。
警告:底层算子注册 API 和 PyTorch 调度器是 PyTorch 中较为复杂的概念。我们建议您尽可能使用上文提到的高级 API(无需 torch.library.Library 对象)。这篇博文 http://blog.ezyang.com/2020/09/lets-talk-about-the-pytorch-dispatcher/ 是了解 PyTorch 调度器的入门好材料。
关于如何使用该 API 的具体示例教程,可访问 Google Colab 查看。
class torch.library.Library(ns, kind, dispatch_key='')
一个用于创建库的类,这些库可用于从Python注册新运算符或覆盖现有库中的运算符。
用户可以选择性地传入一个调度键名,如果只想注册对应特定调度键的内核。
要创建覆盖现有库(名称为ns)中运算符的库,请将kind设置为"IMPL"。
要创建新库(名称为ns)以注册新运算符,请将kind设置为"DEF"。
要创建可能现有库的片段以注册运算符(并绕过给定命名空间只能有一个库的限制),请将kind设置为"FRAGMENT"。
参数
ns– 库名称kind– “DEF”、“IMPL”(默认:“IMPL”)、“FRAGMENT”dispatch_key– PyTorch调度键(默认:“”)
define(schema, alias_analysis='', *, tags=())
在ns命名空间中定义一个新运算符及其语义。
参数
schema– 用于定义新运算符的函数模式。alias_analysis (可选)– 指示运算符参数的别名属性是否可以从模式中推断(默认行为)或不能(“CONSERVATIVE”)。tags ( Tag | *Sequence [Tag ])– 一个或多个要应用于此运算符的torch.Tag。标记运算符会改变运算符在各种PyTorch子系统中的行为;应用前请仔细阅读torch.Tag的文档。
返回值:从模式中推断出的运算符名称。
示例:
>>> my_lib = Library("mylib", "DEF")
>>> my_lib.define("sum(Tensor self) -Tensor")
fallback(fn, dispatch_key='', *, with_keyset=False)
将函数实现注册为给定键的回退处理程序。
此函数仅适用于具有全局命名空间(“_”)的库。
参数
fn– 用作给定调度键回退的函数,或使用fallthrough_kernel()注册穿透回退。dispatch_key– 输入函数应注册到的调度键。默认使用创建库时指定的调度键。with_keyset– 控制调用时是否将当前调度器调用的键集作为第一个参数传递给fn的标志。这应用于为重新调度调用创建适当的键集。
示例
>>> my_lib = Library("_", "IMPL")
>>> def fallback_kernel(op, args, *kwargs):
>>>     # Handle all autocast ops generically
>>>     # ...
>>> my_lib.fallback(fallback_kernel, "Autocast")
impl(op_name, fn, dispatch_key='', *, with_keyset=False)
注册库中定义的操作符的函数实现。
参数
op_name– 操作符名称(包括重载)或 OpOverload 对象。fn– 作为输入调度键的操作符实现函数,或使用fallthrough_kernel()注册回退函数。dispatch_key– 输入函数应注册到的调度键。默认使用创建库时所用的调度键。with_keyset– 控制标志,决定调用时是否将当前调度器调用的键集作为第一个参数传递给fn。这应用于为重新调度调用创建适当的键集。
示例:
>>> my_lib = Library("aten", "IMPL")
>>> def div_cpu(self, other):
>>>     return self * (1 / other)
>>> my_lib.impl("div.Tensor", div_cpu, "CPU")
torch.library.fallthrough_kernel()
一个传递给 Library.impl 的虚拟函数,用于注册回退机制。
torch.library.define(qualname, schema, *, lib=None, tags=())
torch.library.define(lib, schema, alias_analysis='')
定义一个新运算符。
在PyTorch中,定义一个运算符(operator的简称)需要两个步骤:
- 首先需要定义运算符(通过提供运算符名称和模式)
- 然后需要实现该运算符与PyTorch各子系统的交互行为,例如CPU/CUDA张量、自动微分等
此入口点用于定义自定义运算符(即第一步)
接着必须通过调用各种impl_* API来执行第二步,例如torch.library.impl()或torch.library.register_fake()。
参数说明
qualname (str)- 运算符的限定名称。应为类似"namespace::name"的字符串,例如"aten::sin"。
PyTorch中的运算符需要命名空间来避免名称冲突;每个运算符只能创建一次。
如果您正在编写Python库,我们建议使用顶层模块名称作为命名空间。
schema (str)- 运算符的模式。例如"(Tensor x) -> Tensor"表示接受一个张量并返回一个张量的运算符。该模式不包含运算符名称(名称在qualname中传递)。lib (Optional[[Library](https://pytorch.org/docs/stable/data.html#torch.library.Library "torch.library.Library")])- 如果提供,此运算符的生命周期将与Library对象的生命周期绑定。tags (Tag | Sequence[Tag])- 一个或多个torch.Tag标签,用于标记此运算符。标记运算符会改变其在各种PyTorch子系统中的行为;应用前请仔细阅读torch.Tag的文档。
示例:
>>> import torch
>>> import numpy as np
>>> >
>>> # Define the operator
>>> torch.library.define("mylib::sin", "(Tensor x) -Tensor")
>>> >
>>> # Add implementations for the operator
>>> @torch.library.impl("mylib::sin", "cpu")
>>> def f(x):
>>>     return torch.from_numpy(np.sin(x.numpy()))
>>> >
>>> # Call the new operator from torch.ops.
>>> x = torch.randn(3)
>>> y = torch.ops.mylib.sin(x)
>>> assert torch.allclose(y, x.sin())
torch.library.impl(lib, name, dispatch_key='')
torch.library.impl(qualname: str, types: Union[str, Sequence[str]], func: Literal[None] = None, *, lib: Optional[Library] = None) → Callable[[Callable[..., object]], None]
torch.library.impl(qualname: str, types: Union[str, Sequence[str]], func: Callable[..., object], *, lib: Optional[Library] = None) → None
torch.library.impl(lib: Library, name: str, dispatch_key: str = '') → Callable[[Callable[_P, _T]], Callable[_P, _T]]
为该操作符注册一个设备类型的实现。
您可以为types参数传入"default",将此实现注册为所有设备类型的默认实现。但请仅在实现确实支持所有设备类型时使用此选项;例如,如果它是PyTorch内置操作符的组合,则适用此情况。
此API可用作装饰器。您可以将嵌套装饰器与此API一起使用,前提是它们返回一个函数并且放置在此API内部(参见示例2)。
一些有效的设备类型包括:“cpu”、“cuda”、“xla”、“mps”、“ipu”、“xpu”。
参数
qualname (str)- 应为类似"namespace::operator_name"格式的字符串。types (str | Sequence[str])- 要注册实现的设备类型。lib (Optional[Library])- 如果提供,此注册的生命周期将与Library对象的生命周期绑定。
示例
>>> import torch
>>> import numpy as np
>>> # Example 1: Register function.
>>> # Define the operator
>>> torch.library.define("mylib::mysin", "(Tensor x) -Tensor")
>>> >
>>> # Add implementations for the cpu device
>>> @torch.library.impl("mylib::mysin", "cpu")
>>> def f(x):
>>>     return torch.from_numpy(np.sin(x.numpy()))
>>> >
>>> x = torch.randn(3)
>>> y = torch.ops.mylib.mysin(x)
>>> assert torch.allclose(y, x.sin())
>>> >
>>> # Example 2: Register function with decorator.
>>> def custom_decorator(func):
>>>     def wrapper(args, *kwargs):
>>>         return func(args, *kwargs) + 1
>>>     return wrapper
>>> >
>>> # Define the operator
>>> torch.library.define("mylib::sin_plus_one", "(Tensor x) -Tensor")
>>> >
>>> # Add implementations for the operator
>>> @torch.library.impl("mylib::sin_plus_one", "cpu")
>>> @custom_decorator
>>> def f(x):
>>>     return torch.from_numpy(np.sin(x.numpy()))
>>> >
>>> # Call the new operator from torch.ops.
>>> x = torch.randn(3)
>>> >
>>> y1 = torch.ops.mylib.sin_plus_one(x)
>>> y2 = torch.sin(x) + 1
>>> assert torch.allclose(y1, y2)
torch.accelerator
该包提供了对Python中当前加速器的支持。
device_count | 返回当前可用加速器的数量 |
|---|---|
is_available | 检查当前加速器在运行时是否可用:已构建完成、所有必需驱动可用且至少有一个设备可见 |
current_accelerator | 返回编译时可用的加速器设备 |
set_device_index | 将当前设备索引设置为指定设备 |
set_device_idx | 将当前设备索引设置为指定设备 |
current_device_index | 返回当前加速器所选设备的索引 |
current_device_idx | 返回当前加速器所选设备的索引 |
set_stream | 将当前流设置为指定流 |
current_stream | 返回指定设备的当前选定流 |
synchronize | 等待给定设备上所有流中的所有内核完成执行 |
torch.cpu
该包实现了torch.cuda中的抽象功能,便于编写设备无关的代码。
current_device | 返回当前CPU设备 |
|---|---|
current_stream | 返回指定设备当前选中的Stream |
is_available | 返回布尔值表示CPU当前是否可用 |
synchronize | 等待CPU设备上所有流中的所有内核完成 |
stream | StreamContext上下文管理器的包装器,用于选择指定流 |
set_device | 设置当前设备(对CPU无实际操作) |
device_count | 返回CPU设备数量(非核心数) |
StreamContext | 用于选择指定流的上下文管理器 |
流与事件
Stream | 注意 |
|---|
torch.cuda
该包为CUDA张量类型提供了支持。
它实现了与CPU张量相同的功能,但使用GPU进行计算。
该模块采用延迟初始化机制,因此你可以随时导入它,并通过is_available()检查当前系统是否支持CUDA。
CUDA语义文档提供了关于CUDA操作的更多细节。
StreamContext | 用于选择指定流的上下文管理器 |
|---|---|
can_device_access_peer | 检查两个设备间是否支持点对点访问 |
current_blas_handle | 返回当前cuBLAS句柄的cublasHandle_t指针 |
current_device | 返回当前选定设备的索引 |
current_stream | 返回指定设备当前选定的Stream |
cudart | 获取CUDA运行时API模块 |
default_stream | 返回指定设备的默认Stream |
device | 用于切换当前设备的上下文管理器 |
device_count | 返回可用GPU的数量 |
device_memory_used | 返回nvidia-smi或amd-smi报告的已用全局(设备)内存(字节) |
device_of | 将当前设备切换为给定对象所在设备的上下文管理器 |
get_arch_list | 返回本库编译时支持的CUDA架构列表 |
get_device_capability | 获取设备的CUDA计算能力 |
get_device_name | 获取设备名称 |
get_device_properties | 获取设备属性 |
get_gencode_flags | 返回本库编译时使用的NVCC gencode标志 |
get_stream_from_external | 从外部分配的CUDA流返回Stream |
get_sync_debug_mode | 返回当前CUDA同步操作的调试模式值 |
init | 初始化PyTorch的CUDA状态 |
ipc_collect | 强制回收CUDA IPC释放后的GPU内存 |
is_available | 返回布尔值表示CUDA当前是否可用 |
is_initialized | 返回PyTorch的CUDA状态是否已初始化 |
is_tf32_supported | 返回布尔值表示当前CUDA/ROCm设备是否支持tf32数据类型 |
memory_usage | 返回nvidia-smi报告的过去采样周期内全局(设备)内存读写时间的百分比 |
set_device | 设置当前设备 |
set_stream | 设置当前流。这是设置流的封装API |
set_sync_debug_mode | 设置CUDA同步操作的调试模式 |
stream | 封装选择指定流的StreamContext上下文管理器 |
synchronize | 等待CUDA设备上所有流中的所有内核完成 |
utilization | 返回nvidia-smi报告的过去采样周期内GPU执行一个或多个内核的时间百分比 |
temperature | 返回GPU传感器的平均温度(摄氏度) |
power_draw | 返回GPU传感器的平均功耗(毫瓦) |
clock_rate | 返回nvidia-smi报告的过去采样周期内GPU SM时钟速度(兆赫) |
OutOfMemoryError | 设备内存不足时抛出的异常 |
随机数生成器
get_rng_state | 以ByteTensor形式返回指定GPU的随机数生成器状态。 |
|---|---|
get_rng_state_all | 返回表示所有设备随机数状态的ByteTensor列表。 |
set_rng_state | 设置指定GPU的随机数生成器状态。 |
set_rng_state_all | 设置所有设备的随机数生成器状态。 |
manual_seed | 为当前GPU设置生成随机数的种子。 |
manual_seed_all | 为所有GPU设置生成随机数的种子。 |
seed | 将当前GPU的随机数生成种子设置为一个随机数。 |
seed_all | 将所有GPU的随机数生成种子设置为随机数。 |
initial_seed | 返回当前GPU的随机种子值。 |
通信集合操作
comm.broadcast | 将张量广播到指定的GPU设备 |
|---|---|
comm.broadcast_coalesced | 将张量序列广播到指定的GPU设备 |
comm.reduce_add | 对多个GPU上的张量进行求和操作 |
comm.scatter | 将张量分散到多个GPU设备 |
comm.gather | 从多个GPU设备收集张量 |
流与事件
Stream | CUDA流的封装类 |
|---|---|
ExternalStream | 外部分配的CUDA流的封装类 |
Event | CUDA事件的封装类 |
图表功能(测试版)
is_current_stream_capturing | 如果当前CUDA流正在进行CUDA图捕获则返回True,否则返回False。 |
|---|---|
graph_pool_handle | 返回表示图内存池ID的不透明令牌。 |
CUDAGraph | CUDA图的封装类。 |
graph | 上下文管理器,用于将CUDA工作捕获到torch.cuda.CUDAGraph对象中供后续重放。 |
make_graphed_callables | 接收可调用对象(函数或nn.Module)并返回其图表化版本。 |
内存管理
empty_cache | 释放缓存分配器当前持有的所有未占用缓存内存,以便这些内存可用于其他GPU应用程序并在nvidia-smi中可见。 |
|---|---|
get_per_process_memory_fraction | 获取进程的内存分配比例。 |
list_gpu_processes | 返回指定设备上运行进程及其GPU内存使用情况的可读打印输出。 |
mem_get_info | 使用cudaMemGetInfo返回指定设备的全局空闲和总GPU内存。 |
memory_stats | 返回指定设备的CUDA内存分配器统计信息字典。 |
host_memory_stats | 返回指定设备的CUDA内存分配器统计信息字典。 |
memory_summary | 返回指定设备当前内存分配器统计信息的可读打印输出。 |
memory_snapshot | 返回所有设备上CUDA内存分配器状态的快照。 |
memory_allocated | 返回指定设备上张量当前占用的GPU内存(字节)。 |
max_memory_allocated | 返回指定设备上张量占用的最大GPU内存(字节)。 |
reset_max_memory_allocated | 重置指定设备上张量占用最大GPU内存的跟踪起始点。 |
memory_reserved | 返回指定设备上缓存分配器当前管理的GPU内存(字节)。 |
max_memory_reserved | 返回指定设备上缓存分配器管理的最大GPU内存(字节)。 |
set_per_process_memory_fraction | 设置进程的内存分配比例。 |
memory_cached | 已弃用;参见memory_reserved()。 |
max_memory_cached | 已弃用;参见max_memory_reserved()。 |
reset_max_memory_cached | 重置指定设备上缓存分配器管理的最大GPU内存的跟踪起始点。 |
reset_peak_memory_stats | 重置CUDA内存分配器跟踪的"峰值"统计信息。 |
reset_peak_host_memory_stats | 重置主机内存分配器跟踪的"峰值"统计信息。 |
caching_allocator_alloc | 使用CUDA内存分配器执行内存分配。 |
caching_allocator_delete | 删除使用CUDA内存分配器分配的内存。 |
get_allocator_backend | 返回描述当前活动分配器后端的字符串(由PYTORCH_CUDA_ALLOC_CONF设置)。 |
CUDAPluggableAllocator | 从so文件加载的CUDA内存分配器。 |
change_current_allocator | 将当前使用的内存分配器更改为提供的分配器。 |
MemPool | MemPool表示缓存分配器中的内存池。 |
MemPoolContext | MemPoolContext保存当前活动的内存池并暂存前一个内存池。 |
caching_allocator_enable | 启用或禁用CUDA内存分配器。 |
| — | — |
class torch.cuda.use_mem_pool(pool, device=None)
一个将内存分配路由到指定内存池的上下文管理器。
参数
pool (torch.cuda.MemPool)- 将被激活的MemPool对象,使内存分配路由到该池。device (torch.device 或 int, 可选)- 选择的设备。如果device为None(默认值),则使用由current_device()给出的当前设备上的MemPool。
NVIDIA 工具扩展 (NVTX)
nvtx.mark | 描述某个时间点发生的瞬时事件。 |
|---|---|
nvtx.range_push | 将一个范围压入嵌套范围跨度堆栈。 |
nvtx.range_pop | 从嵌套范围跨度堆栈中弹出一个范围。 |
nvtx.range | 上下文管理器/装饰器,在其作用域开始时推送一个NVTX范围,并在结束时弹出。 |
Jiterator (测试版)
jiterator._create_jit_fn | 为逐元素运算创建由jiterator生成的CUDA内核。 |
|---|---|
jiterator._create_multi_output_jit_fn | 为支持返回一个或多个输出的逐元素运算创建由jiterator生成的CUDA内核。 |
TunableOp(可调优操作符)
某些运算可以通过多种库或多种技术实现。例如,GEMM(通用矩阵乘法)运算既可以使用CUDA平台的cublas/cublasLt库实现,也可以使用ROCm平台的hipblas/hipblasLt库实现。那么如何确定哪种实现方式速度最快且应被选用呢?这正是TunableOp所提供的功能。部分运算符已通过多种策略实现为可调优操作符,在运行时会对所有策略进行性能分析,并选择最快的策略用于后续所有运算。
具体使用方法请参阅文档。
(翻译说明:
1、保留所有代码术语如GEMM/CUDA/ROCm/cublas等
2、“TunableOp"译为"可调优操作符"并保留括号标注原词
3、将被动语态"could be implemented"转为主动语态"可以通过…实现”
4、拆分长句"Certain operators…operations"为两个中文短句
5、严格保留文档链接格式)
流消毒器(原型)
CUDA消毒器是一个用于检测PyTorch中流间同步错误的原型工具。有关如何使用它的信息,请参阅文档。
GPUDirect Storage (原型)
torch.cuda.gds中的API提供了对部分cuFile API的轻量级封装,支持在GPU内存与存储设备之间直接进行内存访问传输,避免了通过CPU的跳转缓冲区。更多详情请参阅cufile API文档。
这些API可在CUDA 12.6及以上版本中使用。使用时需确保系统已按照GPUDirect Storage文档正确配置。
具体使用示例可参考GdsFile文档。
gds_register_buffer | 将CUDA设备上的存储注册为cufile缓冲区 |
|---|---|
gds_deregister_buffer | 注销先前在CUDA设备上注册的cufile缓冲区存储 |
GdsFile | cuFile的封装类 |
理解 CUDA 内存使用
为了调试 CUDA 内存使用情况,PyTorch 提供了一种生成内存快照的方法,这些快照会记录特定时间点已分配的 CUDA 内存状态,并可选地记录导致该快照的内存分配事件历史。
生成的快照可以拖放到 pytorch.org/memory_viz 托管的交互式查看器中,用于探索快照内容。
生成快照
记录快照的常见模式是:先启用内存历史记录,运行需要观察的代码,然后将快照保存为pickle格式的文件:
# enable memory history, which will
# add tracebacks and event history to snapshots
torch.cuda.memory._record_memory_history()run_your_code()
torch.cuda.memory._dump_snapshot("my_snapshot.pickle")
使用可视化工具
打开 pytorch.org/memory_viz 并将序列化的快照文件拖放至可视化工具中。该可视化工具是一个在您本地计算机上运行的 JavaScript 应用程序,不会上传任何快照数据。
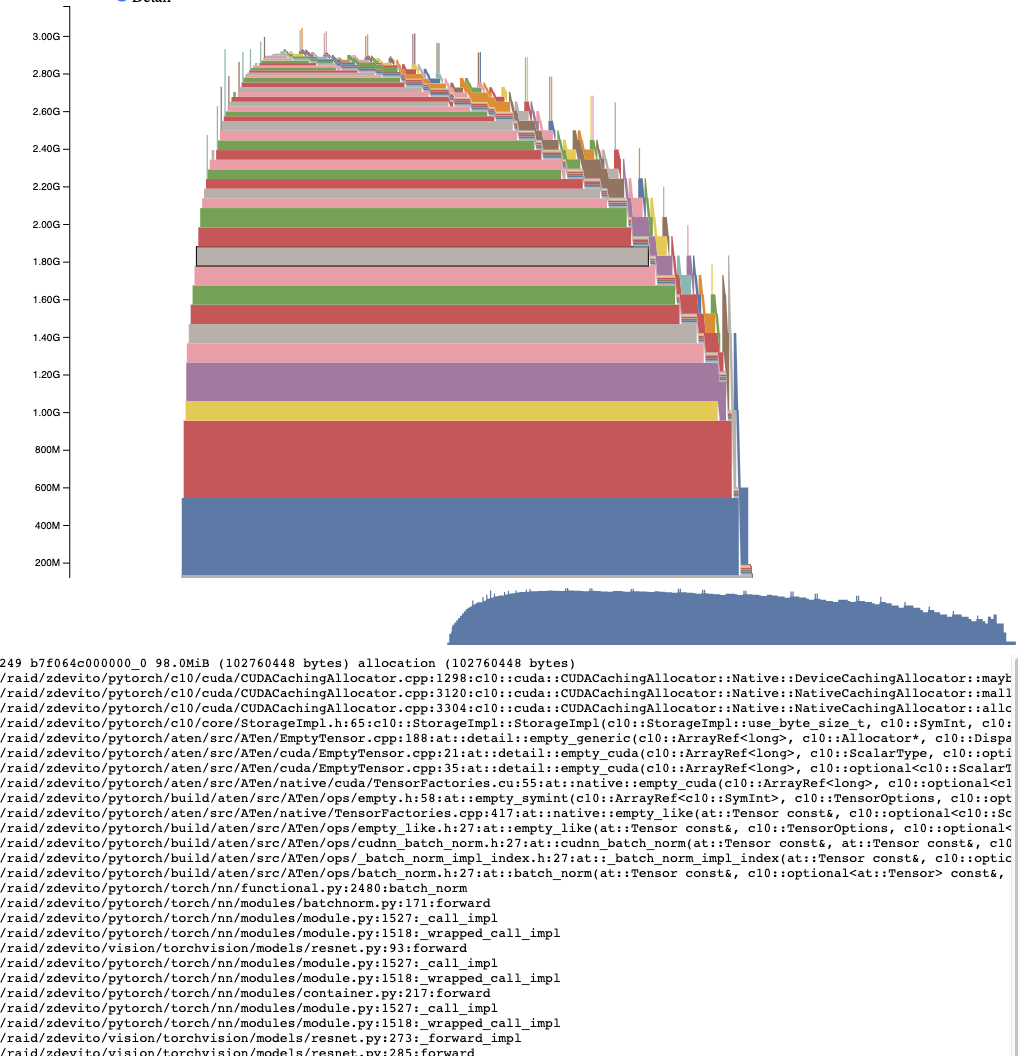
活动内存时间线
活动内存时间线展示了特定 GPU 上快照中随时间变化的所有活跃张量。通过平移/缩放图表可以查看较小的内存分配。将鼠标悬停在已分配的内存块上,可以查看该内存块分配时的堆栈跟踪信息,以及地址等详细信息。当数据量较大时,可以调整细节滑块以减少渲染的分配数量,从而提高性能。
分配器状态历史
分配器状态历史在左侧时间轴中显示各个分配器事件。选择时间轴中的事件可查看该事件发生时分配器状态的可视化摘要。该摘要显示从cudaMalloc返回的每个独立内存段,以及这些段如何被分割成单个分配块或空闲空间。将鼠标悬停在内存段和块上可查看内存分配时的堆栈跟踪。悬停在事件上可查看事件发生时的堆栈跟踪,例如张量释放时的信息。内存不足错误会显示为OOM事件。通过观察OOM时的内存状态,可能有助于理解为何在仍有保留内存的情况下分配会失败。
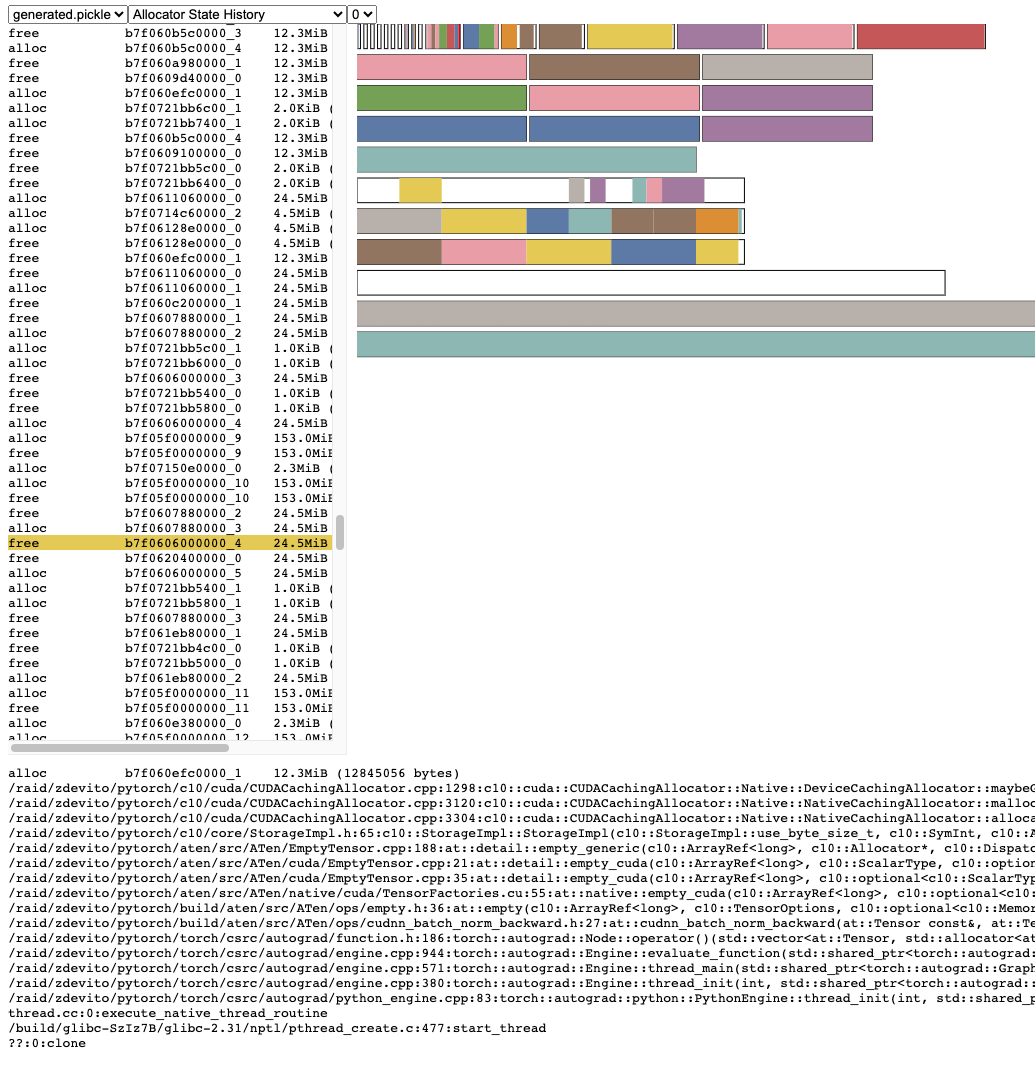
堆栈跟踪信息还会报告内存分配发生的地址。
地址b7f064c000000_0表示位于7f064c000000的(b)lock块,这是该地址第"_0"次被分配。
这个唯一字符串可以在活动内存时间轴中查找,并在活动状态历史中搜索,用于检查张量分配或释放时的内存状态。
快照 API 参考文档
torch.cuda.memory._record_memory_history(enabled='all', context='all', stacks='all', max_entries=9223372036854775807, device=None)
启用记录与内存分配相关的堆栈跟踪功能,这样您就能通过 torch.cuda.memory._snapshot() 查看每块内存的分配来源。
除了记录当前每次内存分配和释放的堆栈跟踪外,该功能还会记录完整的分配/释放事件历史。
使用 torch.cuda.memory._snapshot() 获取这些信息,并通过 _memory_viz.py 中的工具可视化快照数据。
Python 的跟踪收集速度很快(每次跟踪仅需 2 微秒),因此如果您预计可能需要调试内存问题,可以在生产任务中启用此功能。
C++ 跟踪收集同样高效(约 50 纳秒/帧),对于大多数典型程序而言,每次跟踪耗时约 2 微秒,实际时间会随堆栈深度变化。
参数说明
enabled (Literal[None, "state", "all"], 可选)- None:禁用内存历史记录;“state”:仅记录当前已分配内存的信息;“all”:额外记录所有分配/释放调用历史。默认为 “all”。context (Literal[None, "state", "alloc", "all"], 可选)- None:不记录任何堆栈跟踪;“state”:记录当前已分配内存的堆栈跟踪;“alloc”:额外记录分配调用的堆栈跟踪;“all”:额外记录释放调用的堆栈跟踪。默认为 “all”。stacks (Literal["python", "all"], 可选)- “python”:在堆栈跟踪中包含 Python、TorchScript 和 inductor 帧;“all”:额外包含 C++ 帧。默认为 “all”。max_entries (int, 可选)- 限制记录历史中保存的最大分配/释放事件数量。
torch.cuda.memory._snapshot(device=None)
保存调用时的 CUDA 内存状态快照。
该状态以字典形式表示,结构如下。
class Snapshot(TypedDict):segments : List[Segment]device_traces: List[List[TraceEntry]]class Segment(TypedDict):# Segments are memory returned from a cudaMalloc call.# The size of reserved memory is the sum of all Segments.# Segments are cached and reused for future allocations.# If the reuse is smaller than the segment, the segment# is split into more then one Block.# empty_cache() frees Segments that are entirely inactive.address: inttotal_size: int # cudaMalloc'd size of segmentstream: intsegment_type: Literal['small', 'large'] # 'large' (>1MB)allocated_size: int # size of memory in use active_size: int # size of memory in use or in active_awaiting_free stateblocks : List[Block]class Block(TypedDict):# A piece of memory returned from the allocator, or # current cached but inactive.size: intrequested_size: int # size requested during malloc, may be smaller than# size due to roundingaddress: intstate: Literal['active_allocated', # used by a tensor'active_awaiting_free', # waiting for another stream to finish using# this, then it will become free'inactive',] # free for reuseframes: List[Frame] # stack trace from where the allocation occurredclass Frame(TypedDict):filename: strline: intname: strclass TraceEntry(TypedDict):# When `torch.cuda.memory._record_memory_history()` is enabled, # the snapshot will contain TraceEntry objects that record each# action the allocator took.action: Literal['alloc' # memory allocated'free_requested', # the allocated received a call to free memory'free_completed', # the memory that was requested to be freed is now# able to be used in future allocation calls'segment_alloc', # the caching allocator ask cudaMalloc for more memory# and added it as a segment in its cache 'segment_free', # the caching allocator called cudaFree to return memory# to cuda possibly trying free up memory to # allocate more segments or because empty_caches was called'oom', # the allocator threw an OOM exception. 'size' is # the requested number of bytes that did not succeed'snapshot' # the allocator generated a memory snapshot# useful to coorelate a previously taken# snapshot with this trace]addr: int # not present for OOMframes: List[Frame]size: intstream: intdevice_free: int # only present for OOM, the amount of # memory cuda still reports to be free
返回:Snapshot 字典对象
torch.cuda.memory._dump_snapshot(filename='dump_snapshot.pickle')
将 torch.memory._snapshot() 字典的 pickle 版本保存到文件中。
该文件可通过 pytorch.org/memory_viz 的交互式快照查看器打开。
参数
filename (str, optional)- 要创建的文件名。默认为 “dump_snapshot.pickle”。
2025-05-10(六)