Linux服务之nginx中高级配置
目录
一.高级配置
1.网页的状态页
2. Nginx 第三方模块 —— ehco模块
3.变量
4.自定义日志格式
5.nginx压缩功能
6.https实现
7.升级 openssl
8.自定义图标
一.高级配置
1.网页的状态页
#配置示例:
location /nginx_status {
#stub_status;
auth_basic "auth login";
auth_basic_user_file /apps/nginx/conf/.htpasswd;
allow 192.168.0.0/16;
allow 127.0.0.1;
deny all;
}
增加验证模块
server{
listen 80;
server_name www.pc.com;
root /data/nginx/pc;
location /admin{
stub_status;
auth_basic "admin site";
auth_basic_user_file /apps/nginx/conf.d/.httpuser;
}
}
2. Nginx 第三方模块 —— ehco模块
location /ip {
default_type text/html;
echo "welcome, your ip addr: ";
echo $remote_addr;
}
[root@localhost opt]#yum install git -y
#安装git
[root@localhost opt]#git clone https://github.com/openresty/echo-nginx-module.git
./configure --prefix=/apps/nginx --user=nginx --group=nginx --with-http_ssl_module --with-http_v2_module --with-http_realip_module --with-http_stub_status_module --with-http_gzip_static_module --with-pcre --with-stream --with-stream_ssl_module --with-stream_realip_module --add-module=/opt/echo-nginx-module-master
make && make install
[root@localhost nginx-1.18.0]#nginx -t
nginx: the configuration file /apps/nginx/conf/nginx.conf syntax is ok
nginx: configuration file /apps/nginx/conf/nginx.conf test is successful
[root@localhost nginx-1.18.0]#systemctl stop nginx
[root@localhost nginx-1.18.0]#systemctl start nginx
vim /apps/nginx/conf.d/pc.conf
location /hello {
default_type text/html;
echo "hello world ";
}
第二台机器
curl www.pc.com/hello
3.变量
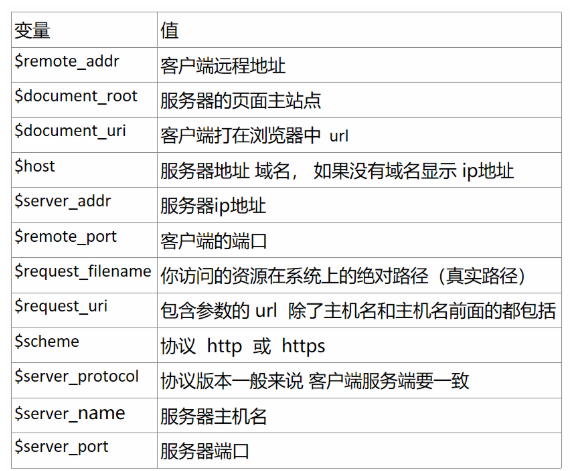
实际操作
nginx
location /main {
index index.html;
default_type text/html;
echo "hello world,main-->";
echo $remote_addr;
echo $args;
echo $arg_user;
echo $document_root;
echo $document_uri;
echo $host;
echo $http_user_agent;
echo $http_cookie;
echo $request_filename;
echo $scheme;
echo $scheme://$host$document_uri?$args;
}
加入此段后 去主机2上进行测试
curl http://www.pc.com/main
curl 'http://www.pc.com/main?user=zhou&title=cto'
curl -b uid=100 'http://www.pc.com/main?user=zhou&title=cto'
-b 加上cookie
自定义变量
假如需要自定义变量名称和值,使用指令set $variable value;
语法格式:
Syntax: set $variable value;
Default: —
Context: server, location, if
范例:
set $name kgc;
echo $name;
set $my_port $server_port;
echo $my_port;
echo "$server_name:$server_port"; #输出信息如下
[root@centos6 ~]#curl www.kgc.org/main
kgc
80
www.kgc.org:80
实际例子:
location /test {
set $name kgc;
echo $name;
set $my_port $server_port;
echo $my_port;
}
4.自定义日志格式
自定义json 格式日志
vim /apps/nginx/conf/nginx.conf
log_format access_json '{"@timestamp":"$time_iso8601",'
'"host":"$server_addr",'
'"clientip":"$remote_addr",'
'"size":$body_bytes_sent,'
'"responsetime":$request_time,'
'"upstreamtime":"$upstream_response_time",'
'"upstreamhost":"$upstream_addr",'
'"http_host":"$host",'
'"uri":"$uri",'
'"xff":"$http_x_forwarded_for",'
'"referer":"$http_referer",'
'"tcp_xff":"$proxy_protocol_addr",'
'"http_user_agent":"$http_user_agent",'
'"status":"$status"}';
vim /apps/nginx/conf.d/pc.conf
location / {
root /data/nginx/pc/;
access_log logs/access.log access_json;
}
tail -f /apps/nginx/logs/access.log
主机2 去访问问 www.pc.com
'"http_user_agent":"Mozilla/5.0 (Windows NT 10.0; Win64; x64) AppleWebKit/537.36 (KHTMLe/101.0.4951.54 Safari/537.36",' '"status":"304"}'
5.nginx压缩功能
#启用或禁用gzip压缩,默认关闭
gzip on | off;
#压缩比由低到高从1到9,默认为1
gzip_comp_level level;
#禁用IE6 gzip功能
gzip_disable "MSIE [1-6]\.";
#gzip压缩的最小文件,小于设置值的文件将不会压缩
gzip_min_length 1k;
#启用压缩功能时,协议的最小版本,默认HTTP/1.1
gzip_http_version 1.0 | 1.1;
#指定Nginx服务需要向服务器申请的缓存空间的个数和大小,平台不同,默认:32 4k或者16 8k;
gzip_buffers number size;
#指明仅对哪些类型的资源执行压缩操作;默认为gzip_types text/html,不用显示指定,否则出错
gzip_types mime-type ...; a.txt
#如果启用压缩,是否在响应报文首部插入“Vary: Accept-Encoding”,一般建议打开
gzip_vary on | off;
#预压缩,先压缩好,不用临时压缩,消耗cpu
gzip_static on | off;
#重启nginx并进行访问测试压缩功能
[root@centos8 ~]# cp /apps/nginx/logs/access.log /data/nginx/html/pc/m.txt
[root@centos8 ~]# echo "test" > /data/nginx/html/pc/test.html #小于1k的文件测试是否会压缩
[root@centos8 ~]# vim /apps/nginx/conf/nginx.conf
gzip on;
gzip_comp_level 5;
gzip_min_length 1k;
gzip_types text/plain application/javascript application/x-javascript text/css application/xml text/javascript application/x-httpd-php image/gif image/png;
gzip_vary on;
#重启Nginx并访问测试:
[root@centos8 ~]# curl --head --compressed 192.168.91.100/test.html
HTTP/1.1 200 OK
Server: nginx
Date: Fri, 22 Feb 2019 01:52:23 GMT
Content-Type: text/html
Last-Modified: Thu, 21 Feb 2019 10:31:18 GMT
Connection: keep-alive
Keep-Alive: timeout=65
Vary: Accept-Encoding
ETag: W/"5c6e7df6-171109"
Content-Encoding: gzip #压缩传输
#验证不压缩访问的文件大小
6.https实现
[root@localhost tls]#vim /etc/pki/tls/openssl.cnf
[ CA_default ]
dir = /etc/pki/CA # Where everything is kept
certs = $dir/certs # Where the issued certs are kept
crl_dir = $dir/crl # Where the issued crl are kept
database = $dir/index.txt # database index file.
#unique_subject = no # Set to 'no' to allow creation of
# several certs with same subject.
new_certs_dir = $dir/newcerts # default place for new certs.
certificate = $dir/cacert.pem # The CA certificate
serial = $dir/serial # The current serial number
crlnumber = $dir/crlnumber # the current crl number
# must be commented out to leave a V1 CRL
crl = $dir/crl.pem # The current CRL
private_key = $dir/private/cakey.pem# The private key
1、创建CA所需要的文件
#生成证书索引数据库文件
touch /etc/pki/CA/index.txt
#指定第一个颁发证书的序列号
echo 01 > /etc/pki/CA/serial
2、 生成CA私钥
cd /etc/pki/CA/
(umask 066; openssl genrsa -out private/cakey.pem 2048)
2048 是位数 位数越长越安全
3、生成CA自签名证书
openssl req -new -x509 -key /etc/pki/CA/private/cakey.pem -days 3650 -out /etc/pki/CA/cacert.pem
选项说明:
-new:生成新证书签署请求
-x509:专用于CA生成自签证书
-key:生成请求时用到的私钥文件
-days n:证书的有效期限
-out /PATH/TO/SOMECERTFILE: 证书的保存路径
image-20240603173013273
[root@localhost CA]#openssl x509 -in cacert.pem -noout -text
Certificate:
Data:
Version: 3 (0x2)
Serial Number:
82:5a:02:66:96:ba:e1:e2
Signature Algorithm: sha256WithRSAEncryption
Issuer: C=cn, ST=js, L=nj, O=kgc, OU=it, CN=www.kgc.com
Validity
Not Before: Jun 3 09:30:00 2024 GMT
Not After : Jun 1 09:30:00 2034 GMT
Subject: C=cn, ST=js, L=nj, O=kgc, OU=it, CN=www.kgc.com
Subject Public Key Info:
Public Key Algorithm: rsaEncryption
Public-Key: (2048 bit)
自动化完成
openssl req -utf8 -newkey rsa:1024 -subj "/CN=www.kgc.org" -keyout app.key -nodes -x509 -out app.crt
自签名证书
[root@localhost certs]#cd /etc/pki/tls/certs
[root@localhost certs]#make /mnt/www.pc.com.crt
[root@localhost certs]#ls
ca-bundle.crt ca-bundle.trust.crt make-dummy-cert Makefile renew-dummy-cert
[root@localhost certs]#vim Makefile
55 %.key:
56 umask 77 ; \
57 #/usr/bin/openssl genrsa -aes128 $(KEYLEN) > $@
58 /usr/bin/openssl genrsa $(KEYLEN) > $@
实例:
#所有的证书需要放在一起不能移开
mkdir ssl
bash certificate.sh
cat kgc.com.crt ca.crt > www.kgc.com.crt
mv kgc.com.key www.kgc.com.key
ll www.kgc.com*
server{
listen 80;
listen 443 ssl;
ssl_certificate /apps/nginx/conf.d/ssl/www.kgc.com.crt;
ssl_certificate_key /apps/nginx/conf.d/ssl/www.kgc.com.key;
ssl_session_cache shared:sslcache:20m;
ssl_session_timeout 10m;
server_name www.kgc.com;
root /data/nginx/pc/;
gzip on;
gzip_comp_level 9;
gzip_min_length 1k;
gzip_static on;
location / {
root /apps/nginx/html;
if ( $scheme = http) {
rewrite ^/(.*)$ https://www.kgc.com/$1 redirect;
}
}
https://192.168.91.100/
7.升级 openssl
./configure --prefix=/apps/nginx --user=nginx --group=nginx --with-http_ssl_module --with-http_v2_module --with-http_realip_module --with-http_stub_status_module --with-http_gzip_static_module --with-pcre --with-stream --with-stream_ssl_module --with-stream_realip_module --add-module=/data/echo-nginx-module-master --with-openssl=/data/openssl-1.1.1k
8.自定义图标
#方法一:服务器不记录访问日志:
location = /favicon.ico {
log_not_found off;
access_log off;
}
#方法二:将图标保存到指定目录访问:
#location ~ ^/favicon\.ico$ {
location = /favicon.ico {
root /data/nginx/html/pc/images;
expires 365d; #设置文件过期时间
}