Model Context Protocol (MCP)笔记
目录
- 摘要
- MCP理论
- MCP的作用
- MCP 传输机制 Stdio 与 SSE
- STDIO
- SSE 传输
- 部署模式
- 模型是如何确定工具的选用的?
- Fc x MCP x LangChain
- MCP快速开始
- 编写客户端
- 基于golang的mcp
摘要
Model Context Protocol(MCP,模型上下文协议)是由 Anthropic 于 2024 年 11 月推出的一项开放标准,旨在解决大型语言模型(LLMs)与外部工具和数据源集成的复杂性问题。在 MCP 出现之前,开发者通常需要为每个数据源或工具编写定制的连接器,导致集成工作繁琐且难以维护。(维基百科,自由的百科全书, Wikipedia)
MCP 的核心理念是提供一个统一的通信协议,使得 LLMs 能够通过标准化的方式访问外部资源、调用工具函数,并利用预设提示模板来增强其功能。该协议基于 JSON-RPC 2.0,支持多种通信方式,包括本地的标准输入输出(stdio)和网络传输(如 HTTP 和 Server-Sent Events)。(维基百科,自由的百科全书, Wikipedia)
自发布以来,MCP 得到了广泛的支持和应用。例如,开发者可以通过 MCP 让 AI 助手直接访问 GitHub 仓库,执行代码检索和提交操作;或连接企业内部的数据库,实现实时数据查询和分析。目前,已有多家知名公司和开源项目采用 MCP,包括 OpenAI、Google DeepMind、Replit 和 Sourcegraph 等。(全栈开发网, Wikipedia)
MCP 的出现标志着 AI 系统向更高效、可扩展和标准化方向发展的重要一步,为构建更智能、灵活的 AI 应用奠定了坚实的基础。(维基百科,自由的百科全书)
MCP理论
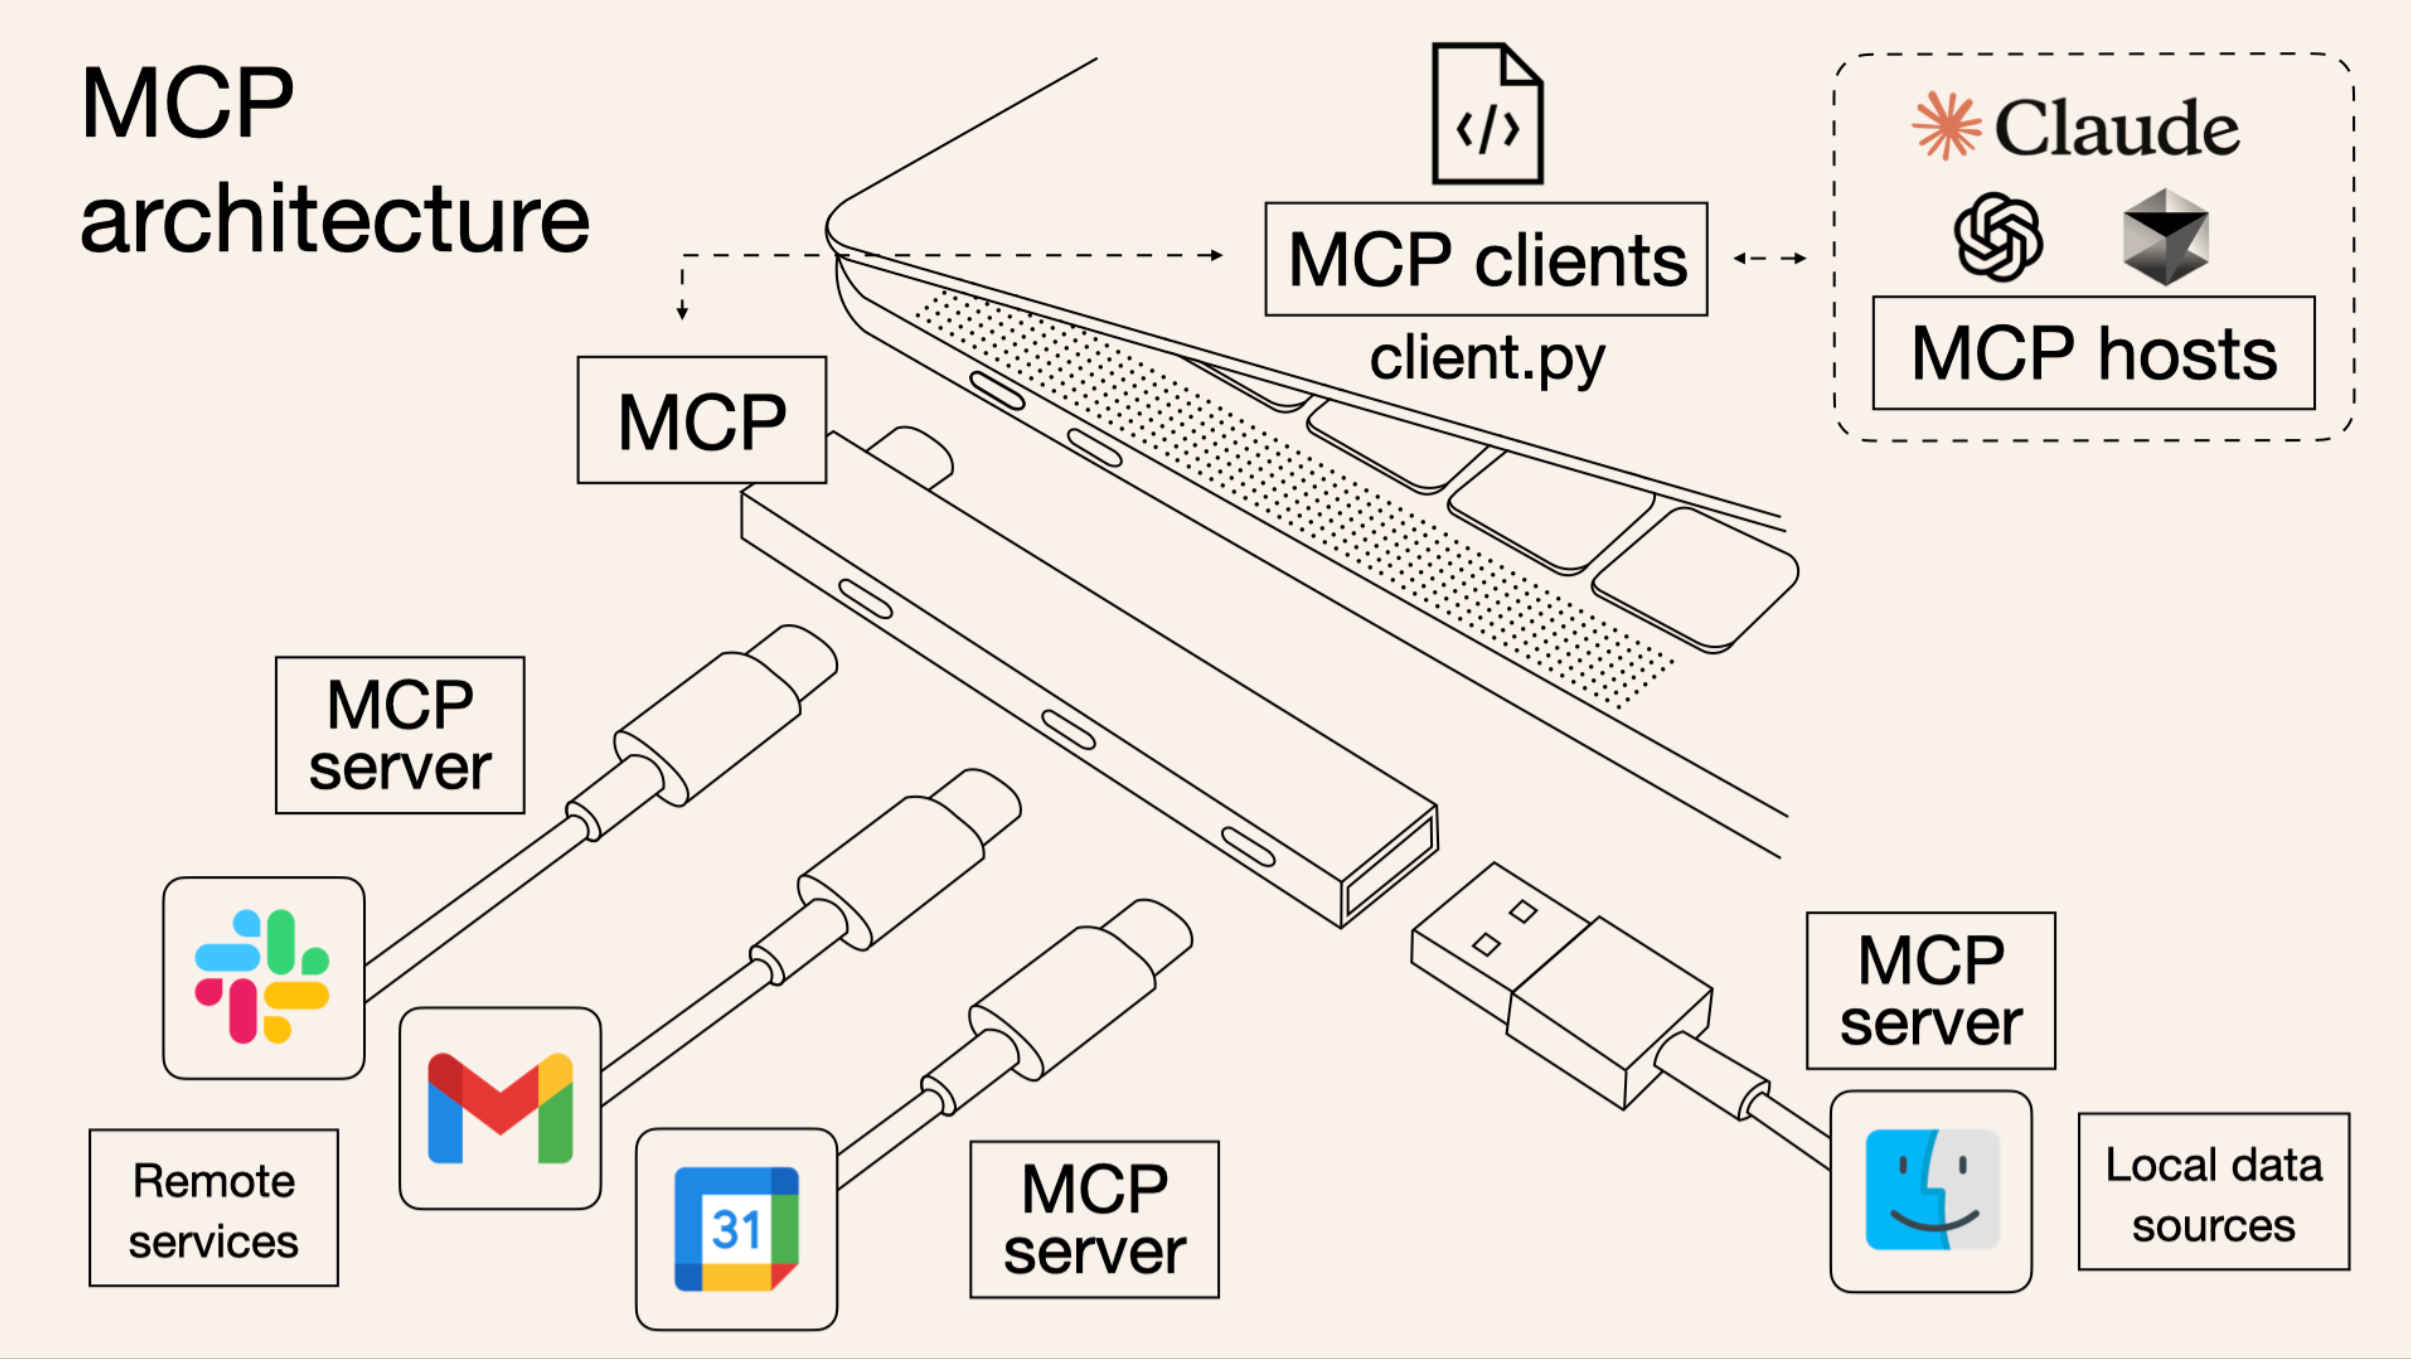
MCP 是一个开放协议,用于标准化应用程序向大语言模型(LLMs)提供上下文的方式。
可以将 MCP 想象成 AI 应用中的 USB-C 接口。就像 USB-C 提供了一个标准化的方式,让设备可以连接各种外设和配件一样,MCP 提供了一个统一的标准,使 AI 模型能够连接到不同的数据源和工具。
为什么选择 MCP?
MCP 帮助你在 LLM 之上构建智能代理和复杂的工作流。由于 LLM 通常需要集成数据和工具,MCP 提供了以下优势:
- 越来越多的预构建集成,可供你的 LLM 直接连接使用
- 在不同的 LLM 提供商和厂商之间灵活切换的能力
- 实现数据在你自有基础设施内安全使用的最佳实践
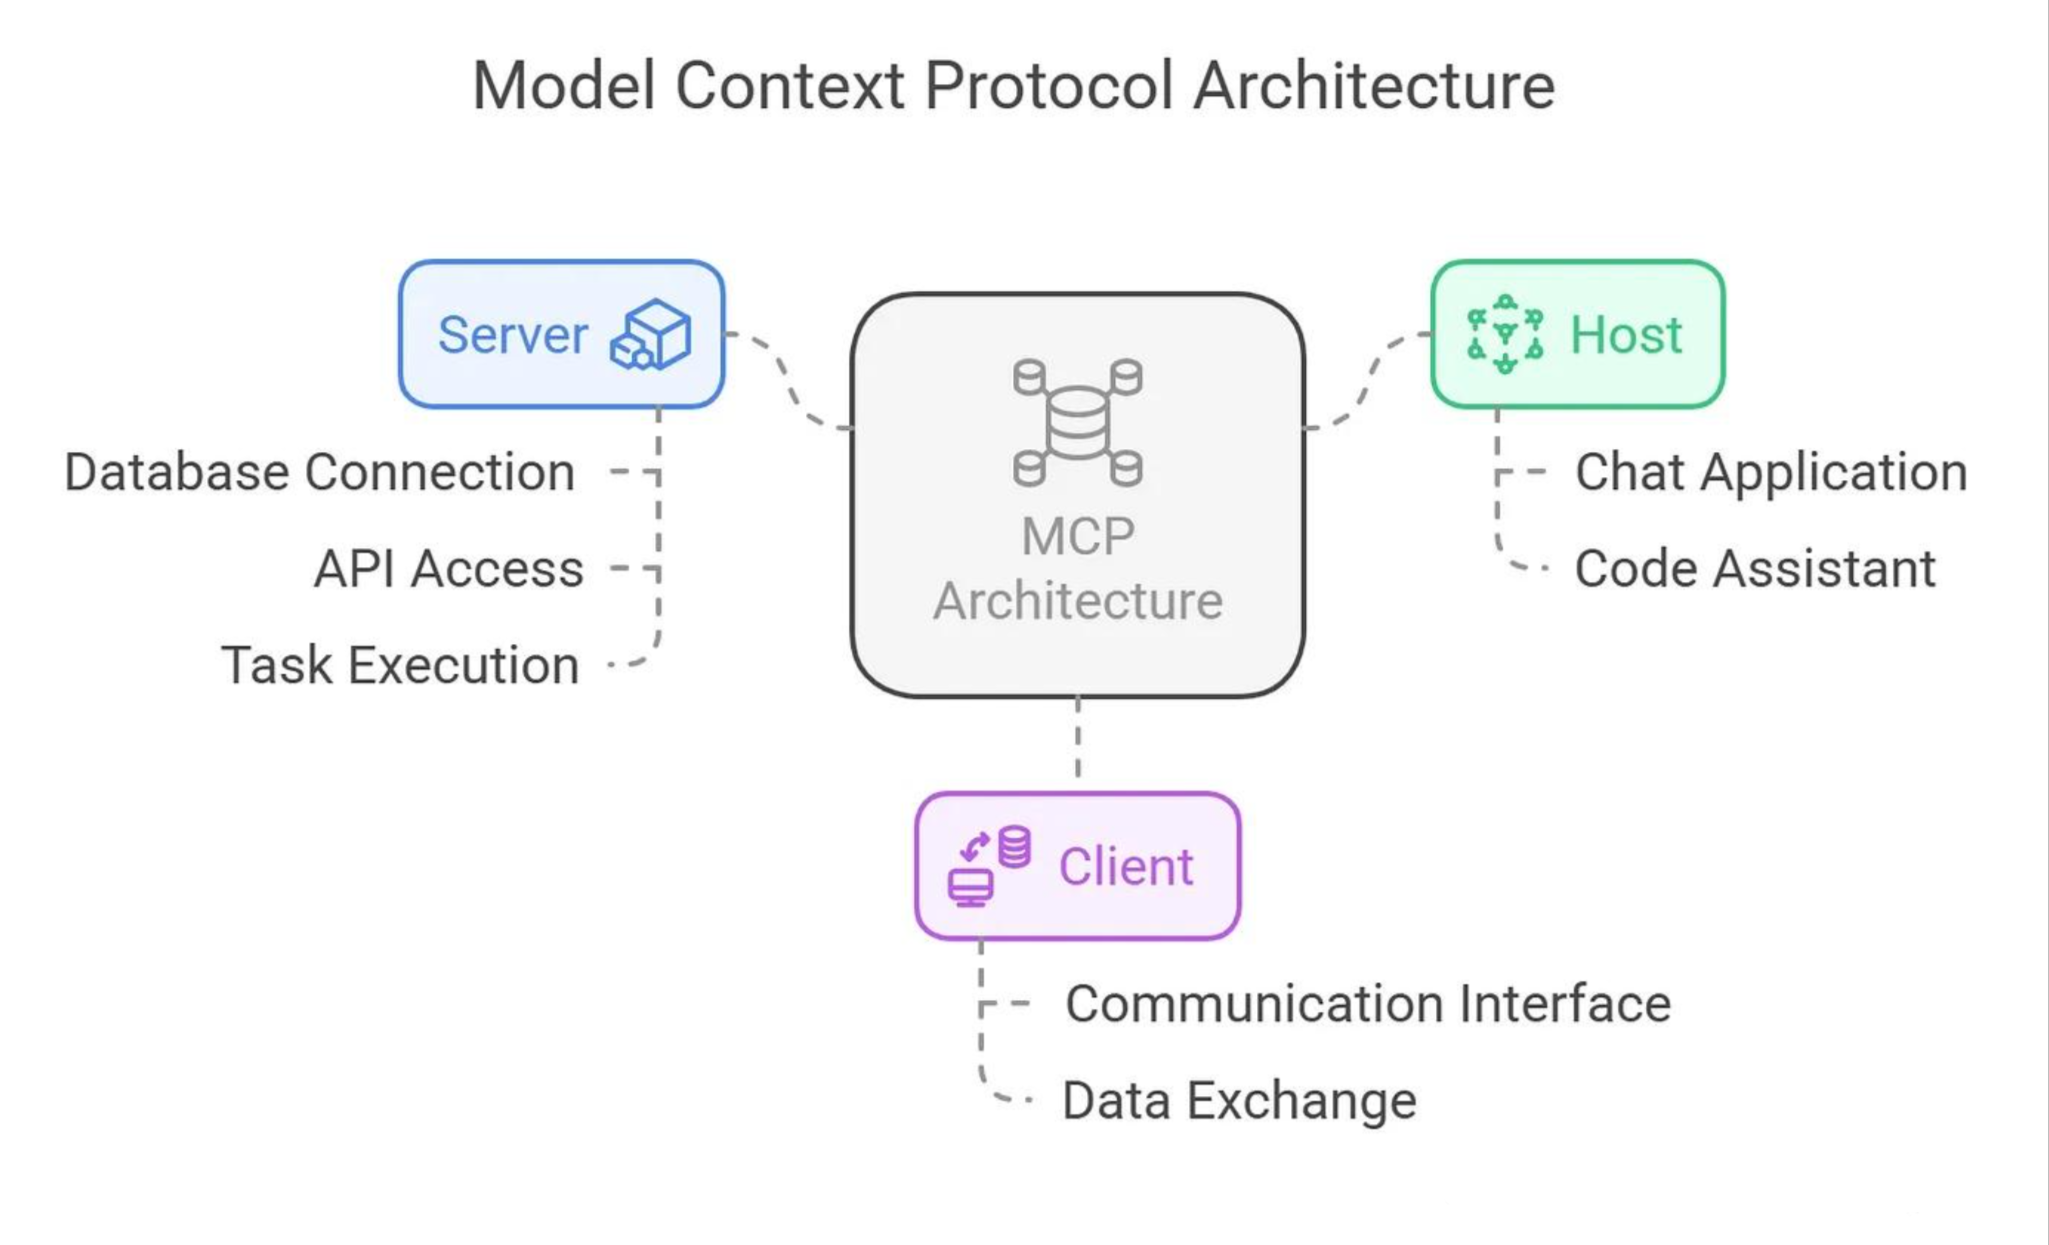
通用架构:
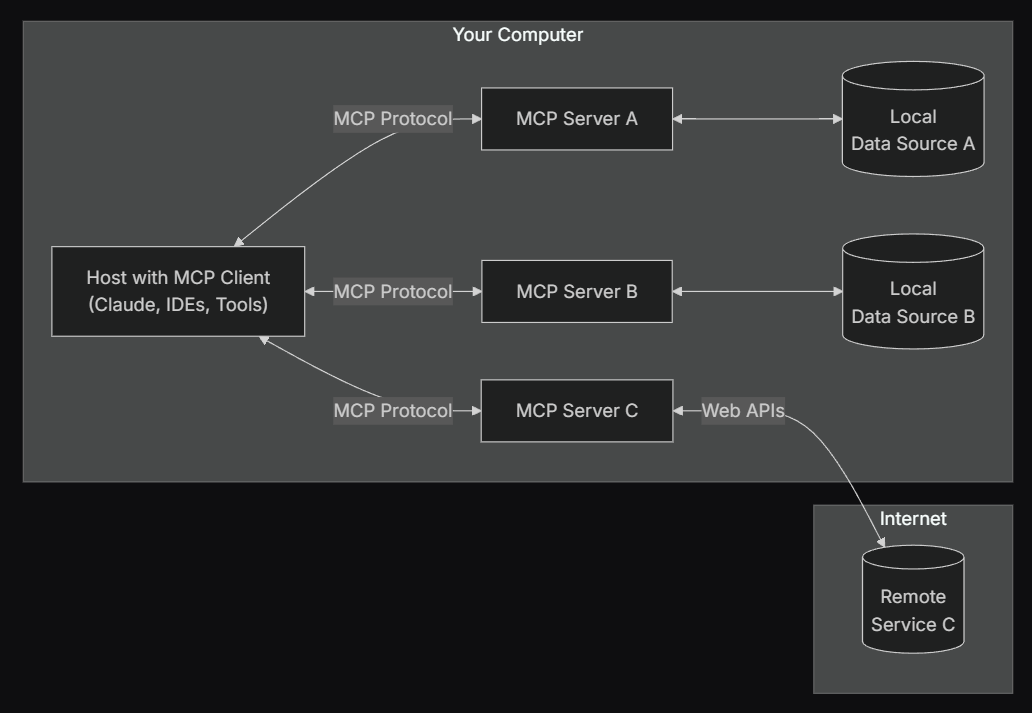
从本质上讲,MCP 采用的是一种客户端-服务器架构,其中一个宿主应用可以连接多个服务器:
- MCP 宿主(MCP Hosts):如 Claude Desktop、集成开发环境(IDEs)或其他希望通过 MCP 访问数据的 AI 工具
- MCP 客户端(MCP Clients):协议客户端,负责与每个服务器建立 1:1 的连接
- MCP 服务器(MCP Servers):轻量级程序,每个服务器通过标准化的 Model Context Protocol 提供特定功能
- 本地数据源(Local Data Sources):如计算机上的文件、数据库和服务,MCP 服务器可以安全地访问这些资源
- 远程服务(Remote Services):可通过互联网访问的外部系统(例如通过 API 提供服务),MCP 服务器可以与其建立连接
假设你正在使用支持 MCP(Model Context Protocol)的 AI 应用(如 Claude Desktop)询问“明天天气怎么样?”时,整个请求的处理流程如下:
-
用户输入请求
你在 Claude Desktop 中输入:“明天天气怎么样?” -
LLM 解析意图并生成函数调用
Claude 的语言模型(LLM)解析你的自然语言请求,识别出需要获取天气预报的信息。它生成一个结构化的函数调用请求,例如:{"method": "get-forecast","arguments": {"location": "Osaka","date": "2025-05-06"} } -
MCP 客户端转发请求
Claude Desktop 内置的 MCP 客户端接收到这个函数调用请求,并通过 MCP 协议将其转发给已连接的 MCP 服务器。 -
MCP 服务器处理请求
MCP 服务器是一个轻量级程序,专门处理特定功能。在本例中,它提供了一个名为get-forecast的工具,用于获取天气预报。服务器接收到请求后,调用相应的天气 API(如 OpenWeatherMap)获取大阪市 2025 年 5 月 6 日的天气预报数据。 -
MCP 服务器返回响应
MCP 服务器将获取到的天气信息封装成响应,返回给 MCP 客户端。例如:{"forecast": "2025年5月6日,大阪市多云,最高气温22°C,最低气温15°C,有小雨。" } -
LLM 生成自然语言回复
Claude 的语言模型接收到天气信息后,将其转化为自然语言回复,例如:“明天大阪市多云,最高气温22°C,最低气温15°C,有小雨。” -
用户收到回复
最终,你在 Claude Desktop 中看到 AI 的回复,完成整个请求流程。
MCP的作用
上文提到,MCP定义了应用程序和 AI 模型之间交换上下文信息的方式。
这就使得开发者能够以一致的方式将各种数据源、工具和功能连接到 AI 模型,就像 USB-C 让不同设备能够通过相同的接口连接一样。MCP 的目标是创建一个通用标准,使 AI 应用程序的开发和集成变得更加简单和统一。
想象一下没有 MCP 之前我们会怎么做?
我们可能会人工从数据库中筛选或者使用工具检索可能需要的信息,手动的粘贴到 prompt 中。随着我们要解决的问题越来越复杂,手工把信息引入到 prompt 中会变得越来越困难。
为了克服手工 prompt 的局限性,许多 LLM 平台(如 OpenAI、Google)引入了 function call 功能。这一机制允许模型在需要时调用预定义的函数来获取数据或执行操作,显著提升了自动化水平。
但是 function call 也有其局限性,不同 LLM 平台的 function call API 实现差异较大。例如,OpenAI 的函数调用方式与 Google 的不兼容,开发者在切换模型时需要重写代码,增加了适配成本。再比如,虽然许多 LLM 提供商都采用了类似的 JSON schema 来定义函数调用,但在具体实现上仍存在一些关键差异。
-
OpenAI:使用符合 OpenAPI JSON schema 的结构,函数定义包含
name、description和parameters等字段。(DEV Community) -
Anthropic Claude:采用类似的结构,但参数定义字段为
input_schema,而不是 OpenAI 的parameters。(Superface: Connect AI agents) -
Cohere Command-R:使用
parameter_definitions字段,并在每个参数中显式指定是否为必需项,而不是使用单独的required数组。(DEV Community) -
Google Gemini:遵循 OpenAPI JSON schema,但在请求结构上有所不同,例如使用
function_declarations来包装函数,并在tool_config中指定函数调用配置。(Medium)
这些差异意味着,开发者在从一个平台切换到另一个平台时,可能需要调整函数定义的结构,以确保兼容性。除此之外,还有安全性,交互性等问题。
-
安全性:研究表明,LLM 的函数调用功能可能被滥用,导致执行未经授权的操作。例如,攻击者可能通过精心设计的输入诱导模型调用敏感函数,如删除用户账户等。
-
交互性:早期的实现中,模型通常在每次交互中只能调用一个函数,这限制了多步骤工作流的实现。虽然一些平台已经开始支持并行或多函数调用,但仍需开发者手动协调函数之间的依赖关系。(mikelev.in)
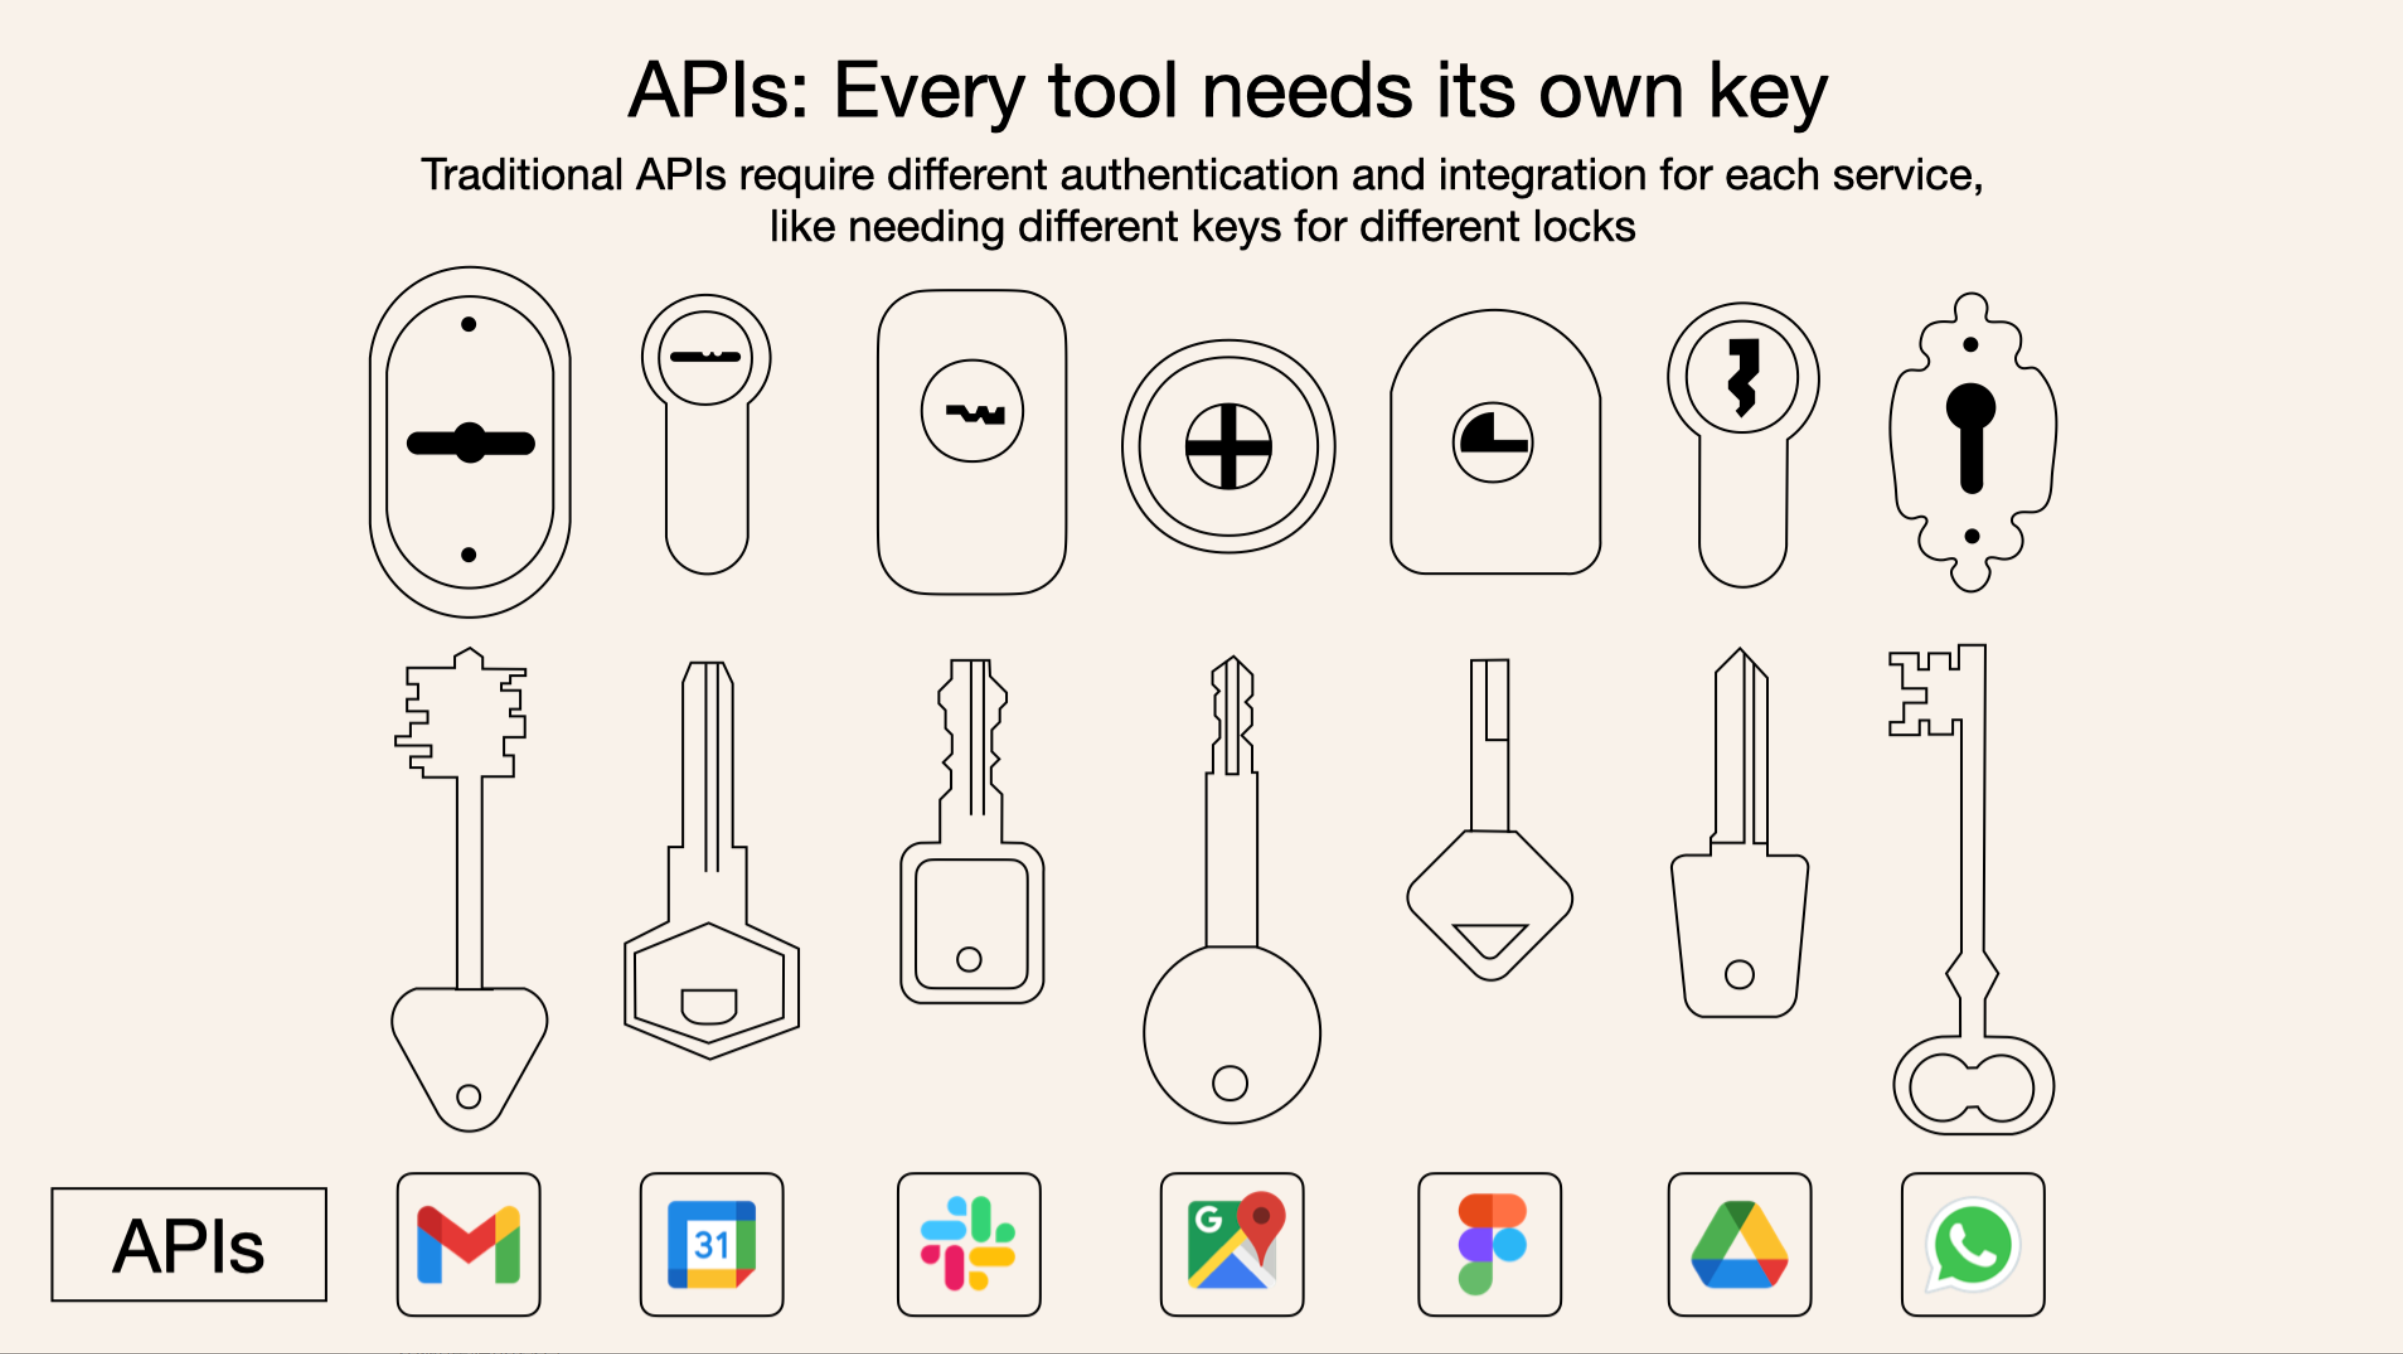
API 就像一扇扇独立的门——每扇门都有各自的钥匙和规则
MCP 传输机制 Stdio 与 SSE
Model Context Protocol (MCP) 支持两种主要的传输机制,用于 Cline 和 MCP 服务器之间的通信:标准输入/输出 (STDIO) 和服务器发送事件 (SSE)。每种机制都有其独特的特点、优势和适用场景。
STDIO
STDIO 传输在本地机器上运行,并通过标准输入/输出流进行通信:
- 客户端 (Cline) 将 MCP 服务器作为子进程启动
- 通信通过进程流进行:客户端写入服务器的 STDIN,服务器通过 STDOUT 响应
- 每条消息以换行符分隔
- 消息格式为 JSON-RPC 2.0
客户端 服务器| ||<---- JSON消息 ----->| (通过STDIN)| | (处理请求)|<---- JSON消息 ------| (通过STDOUT)| |
STDIO 特性:
- 本地性:与 Cline 在同一台机器上运行
- 性能:非常低的延迟和开销(不涉及网络栈)
- 简单性:无需网络配置的直接进程通信
- 关系:客户端和服务器之间是一对一关系
- 安全性:由于没有网络暴露,因此本质上更安全
STDIO 传输适用于:
- 在同一机器上运行的本地集成和工具
- 安全敏感操作
- 低延迟需求
- 单客户端场景(每个服务器一个 Cline 实例)
- 命令行工具或 IDE 扩展
SSE 传输
服务器发送事件 (SSE) 传输在远程服务器上运行,并通过 HTTP/HTTPS 进行通信:
- 客户端 (Cline) 通过 HTTP GET 请求连接到服务器的 SSE 端点
- 这建立了一个持久连接,服务器可以通过该连接向客户端推送事件
- 对于客户端到服务器的通信,客户端向单独的端点发出 HTTP POST 请求
- 通信通过两个通道进行:
- 事件流 (GET):服务器到客户端的更新
- 消息端点 (POST):客户端到服务器的请求
客户端 服务器| ||---- HTTP GET /events ----------->| (建立 SSE 连接)|<---- SSE 事件流 --------------| (持久连接)| ||---- HTTP POST /message -------->| (客户端请求)|<---- 带响应的 SSE 事件 ---------| (服务器响应)| |
SSE 特性
- 远程访问:可以托管在与您的 Cline 实例不同的机器上
- 可扩展性:可以同时处理多个客户端连接
- 协议:通过标准 HTTP 工作(不需要特殊协议)
- 持久性:为服务器到客户端的消息维持持久连接
- 认证:可以使用标准 HTTP 认证机制
SSE 传输更适合:
- 跨网络的远程访问
- 多客户端场景
- 公共服务
- 许多用户需要访问的集中式工具
- 与 Web 服务集成
部署模式
MCP 支持两种主要的传输方式:STDIO 与 SSE,它们决定了服务器的部署模式——是本地运行,还是作为远程服务托管运行。
🖥️ STDIO:本地部署模型
STDIO 模式下,MCP 服务作为 子进程 与客户端运行在 同一台机器,适合本地模型接入场景。
✅ 特点:
- 安装:每台用户机器都需要安装服务器(例如通过 pip、npm、pkg)
- 分发:需要为不同平台打包安装器(Windows/macOS/Linux)
- 更新:每台设备需要手动或自动更新
- 资源占用:使用本地 CPU、内存、磁盘资源
- 权限控制:继承本地文件系统的访问权限
- 系统集成:方便访问文件、运行 shell 命令、控制本地服务等
- 生命周期:随着客户端进程一起启动与销毁
- 依赖管理:服务所需依赖必须安装在用户的本地环境
📌 示例:
本地文件搜索工具:
- 安装在用户机器
- 直接访问本地磁盘
- 用户点击时自动调用
- 不需要网络
- 与前端一起打包或通过包管理器安装
☁️ SSE:托管部署模型
SSE 模式通过 HTTP 网络通信,允许 MCP 服务运行在远程服务器、容器或云平台上,适合集中管理和多用户共享场景。
✅ 特点:
- 安装:仅需在服务端部署一次
- 分发:一个服务支持多个客户端连接
- 更新:服务端统一更新即生效
- 资源使用:使用远程服务器资源
- 权限控制:使用认证/授权机制(如 Token、OAuth)
- 集成能力:访问受控远程资源(如数据库、API)
- 运行模式:常驻后台服务,持续运行
- 依赖管理:集中在服务端维护依赖,客户端无需关心
📌 示例:
数据库查询工具:
- 运行在远程服务器
- 使用统一配置连接数据库
- 多用户共享服务
- 需要网络访问
- 可通过 Docker/K8s 等方式部署
🔁 混合部署(Hybrid)
根据需求,您还可以使用混合策略:
- STDIO + 网络访问:本地代理连接远程服务
- SSE + 本地回调:远程服务通过回调控制本地操作
- 网关模式:本地服务器代理访问多个远程功能模块
📊 STDIO vs SSE 对比表
| 考虑因素 | STDIO(本地) | SSE(托管) |
|---|---|---|
| 位置 | 本地机器 | 本地或远程服务器 |
| 客户端 | 单客户端 | 多客户端共享 |
| 性能 | 低延迟,无网络开销 | 网络延迟可能较高 |
| 部署复杂度 | 简单(无服务端) | 高(需要 HTTP 服务) |
| 安全性 | 继承本地权限,安全性好 | 需配置认证/授权 |
| 网络要求 | 无需网络 | 需要稳定网络连接 |
| 可扩展性 | 有限,受限于本机资源 | 高,可水平扩展 |
| 更新管理 | 每台机器各自更新 | 服务端集中更新 |
| 资源占用 | 使用客户端资源 | 使用服务器资源 |
| 依赖管理 | 安装在本地 | 安装在服务器端 |
模型是如何确定工具的选用的?
当你在使用支持 MCP(Model Context Protocol)的 AI 应用(如 Claude Desktop 或 Cursor)提出问题时,例如“明天天气怎么样?”,整个请求的处理流程可以分为两个主要阶段:
🧠 阶段一:LLM 决策与工具选择
-
用户输入请求
你在 Claude Desktop 中输入:“明天天气怎么样?” -
LLM 解析意图
Claude 的语言模型(LLM)解析你的自然语言请求,识别出需要获取天气预报的信息。 -
工具选择
LLM 检查可用的 MCP 工具列表,决定使用哪个工具来获取所需信息。例如,选择名为get-forecast的天气预报工具。
⚙️ 阶段二:工具调用与结果处理
-
MCP 客户端转发请求
Claude Desktop 内置的 MCP 客户端将函数调用请求通过 MCP 协议转发给相应的 MCP 服务器。 -
MCP 服务器处理请求
MCP 服务器接收到请求后,调用相应的天气 API(如 OpenWeatherMap)获取天气预报数据。 -
返回响应
MCP 服务器将获取到的天气信息封装成响应,返回给 MCP 客户端。 -
LLM 生成回复
Claude 的语言模型接收到天气信息后,将其转化为自然语言回复,例如:“明天大阪市多云,最高气温22°C,最低气温15°C,有小雨。” -
用户收到回复
最终,你在 Claude Desktop 中看到 AI 的回复,完成整个请求流程。
🔄 总结:两阶段协同工作
- 阶段一(决策层):由 LLM 解析用户意图并选择合适的工具。
- 阶段二(执行层):通过 MCP 协议调用选定的工具,获取并处理结果。
这种架构使得 AI 应用能够高效、安全地与各种数据源和工具集成,实现如获取天气信息等功能,提升用户体验。

模型如何确定该使用哪些工具?这里以 MCP 官方提供的 client example 为例。通过阅读代码,可以发现模型是通过 prompt 来确定当前有哪些工具。
async def start(self):# 初始化所有的 mcp serverfor server in self.servers:await server.initialize()# 获取所有的 tools 命名为 all_toolsall_tools = []for server in self.servers:tools = await server.list_tools()all_tools.extend(tools)# 将所有的 tools 的功能描述格式化成字符串供 LLM 使用# tool.format_for_llm() 我放到了这段代码最后,方便阅读。tools_description = "\n".join([tool.format_for_llm() for tool in all_tools])# 这里就不简化了,以供参考,实际上就是基于 prompt 和当前所有工具的信息# 询问 LLM(Claude) 应该使用哪些工具。system_message = ("You are a helpful assistant with access to these tools:\n\n"f"{tools_description}\n""Choose the appropriate tool based on the user's question. ""If no tool is needed, reply directly.\n\n""IMPORTANT: When you need to use a tool, you must ONLY respond with ""the exact JSON object format below, nothing else:\n""{\n"' "tool": "tool-name",\n'' "arguments": {\n'' "argument-name": "value"\n'" }\n""}\n\n""After receiving a tool's response:\n""1. Transform the raw data into a natural, conversational response\n""2. Keep responses concise but informative\n""3. Focus on the most relevant information\n""4. Use appropriate context from the user's question\n""5. Avoid simply repeating the raw data\n\n""Please use only the tools that are explicitly defined above.")messages = [{"role": "system", "content": system_message}]...class Tool:"""Represents a tool with its properties and formatting."""def __init__(self, name: str, description: str, input_schema: dict[str, Any]) -> None:self.name: str = nameself.description: str = descriptionself.input_schema: dict[str, Any] = input_schemadef format_for_llm(self) -> str:"""Format tool information for LLM.Returns:A formatted string describing the tool."""args_desc = []if "properties" in self.input_schema:for param_name, param_info in self.input_schema["properties"].items():arg_desc = (f"- {param_name}: {param_info.get('description', 'No description')}")if param_name in self.input_schema.get("required", []):arg_desc += " (required)"args_desc.append(arg_desc)return f"""Tool: {self.name}Description: {self.description}Arguments:{chr(10).join(args_desc)}""""""
那 tool 的描述和代码中的 input_schema 是从哪里来的呢?通过进一步分析 MCP 的 Python SDK 源代码可以发现:大部分情况下,当使用装饰器 @mcp.tool() 来装饰函数时,对应的 name 和 description 等其实直接源自用户定义函数的函数名以及函数的 docstring 等。
@classmethod
def from_function(cls,fn: Callable,name: str | None = None,description: str | None = None,context_kwarg: str | None = None,
) -> "Tool":"""Create a Tool from a function."""func_name = name or fn.__name__ # 获取函数名
if func_name == "<lambda>":raise ValueError("You must provide a name for lambda functions")
func_doc = description or fn.__doc__ or ""is_async = inspect.iscoroutinefunction(fn)
总结:模型是通过 prompt engineering,即提供所有工具的结构化描述和 few-shot 的 example 来确定该使用哪些工具。
写到这里突然想到了langChain的Tool抽象,就是为了更方便的定义工具,让LLM可以正常使用。从函数创建工具可能足以满足大多数用例,可以通过简单的 @tool 装饰器 来完成。
比如我们要生成一个加法计算的工具,我们可以这样做:
from langchain_core.tools import tool@tool
def multiply(a: int, b: int) -> int:"""Multiply two numbers."""return a * b# Let's inspect some of the attributes associated with the tool.
print(multiply.name)
print(multiply.description)
print(multiply.args)multiply
Multiply two numbers.
{'a': {'title': 'A', 'type': 'integer'}, 'b': {'title': 'B', 'type': 'integer'}}
而一个tool最重要的三要素:参数,name,描述,也是通过函数签名部分可以直接拿到。那么至此,我们就可以总结出 Function calling x MCP x LangChain的关系!
Fc x MCP x LangChain
🔧 Function Calling:LLM 与外部函数的桥梁
Function Calling 是 OpenAI 于 2023 年推出的功能,允许大语言模型(LLM)生成结构化的函数调用请求。开发者可以预定义函数的名称、参数和描述,模型在解析用户输入后,生成相应的函数调用请求,开发者再根据请求调用实际的后端函数或 API。
特点:
- 结构化调用:模型生成的函数调用请求为 JSON 格式,易于解析和处理。
- 平台依赖性:不同平台(如 OpenAI、Anthropic、Google)的函数调用实现存在差异,可能导致兼容性问题。
- 适用于简单任务:适合处理单步、明确的任务调用。
🧰 LangChain:构建 LLM 应用的开发框架
LangChain 是一个用于构建由 LLM 驱动的应用程序的开发框架。它提供了工具、链(Chains)和代理(Agents)等组件,帮助开发者管理与 LLM 的交互,并集成外部工具和数据源。(CSDN博客)
特点:
- 模块化设计:通过工具、链和代理等组件,支持构建复杂的应用逻辑。
- 工具集成:允许开发者将外部函数或 API 封装为工具,供代理在任务执行中调用。
- 支持多模型:兼容多种 LLM 提供商,提供统一的接口。
🔌 MCP(Model Context Protocol):标准化的模型上下文协议
MCP 是 Anthropic 提出的开放协议,旨在标准化 LLM 与外部工具和数据源的交互方式。它采用客户端-服务器架构,允许 LLM 通过 MCP 客户端与多个 MCP 服务器通信,从而访问各种工具和数据。(CSDN博客)
特点:
- 标准化接口:定义统一的协议和数据格式,促进工具和数据源的互操作性。
- 多样化工具接入:支持通过 MCP 服务器接入本地或远程的工具和数据源。
- 灵活的传输协议:支持多种通信方式,如 HTTP、WebSocket、标准输入输出等。(CSDN博客)
🔄 三者关系总结
| 维度 | Function Calling | LangChain | MCP(Model Context Protocol) | |
|---|---|---|---|---|
| 定位 | LLM 与外部函数的桥梁 | 构建 LLM 应用的开发框架 | 标准化的模型上下文协议 | |
| 核心功能 | 结构化函数调用 | 工具集成、链式处理、代理任务管理 | 标准化工具和数据源的接入与通信 | |
| 扩展性 | 受限于平台实现 | 高度模块化,支持自定义扩展 | 支持多种工具和数据源的接入 | |
| 适用场景 | 简单、单步的函数调用 | 构建复杂的 LLM 应用 | 构建具备上下文感知的智能代理系统 | |
| 与其他组件关系 | 可作为 LangChain 工具的调用方式 | 可集成 Function Calling 和 MCP 工具 | 可通过适配器集成到 LangChain 中 |
🧩 实际应用中的协同方式
在实际应用中,Function Calling、LangChain 和 MCP 可以协同工作,构建功能强大的 LLM 应用。例如:
-
Function Calling 与 LangChain:开发者可以将 Function Calling 定义的函数封装为 LangChain 的工具,供代理在任务执行中调用。
-
MCP 与 LangChain:通过使用如
langchain-mcp-adapters这样的适配器库,开发者可以将 MCP 服务器提供的工具和资源转换为 LangChain 可用的格式,实现无缝集成 。(CSDN博客) -
综合应用:在一个复杂的 LLM 应用中,LangChain 作为框架,集成了通过 Function Calling 定义的函数和通过 MCP 接入的工具,代理根据任务需求调用相应的工具,完成多步骤的任务执行。
说到协同就涉及到传统的开发范式和MCP下的开发范式了:
在传统的开发模式中,工具函数通常被直接集成在应用程序的代码库中,作为内部函数存在。而在 MCP 架构中,工具被定义在 MCP 服务器中,并通过标准化的接口向 MCP 客户端(如 Claude Desktop、Cursor 等)暴露。这种设计允许 LLM(大语言模型)通过 MCP 客户端调用这些外部工具,实现与外部系统的交互、数据处理等功能。
具体而言,MCP 工具的定义包括:
- 名称(name):工具的唯一标识符。
- 描述(description):供人类阅读的工具说明。
- 输入模式(inputSchema):定义工具所需参数的 JSON Schema。(首页, MCP 中文文档)
MCP 客户端可以通过 tools/list 接口获取可用工具列表,并通过 tools/call 接口调用特定工具。 (首页)
传统的工具集成方式通常将工具函数直接嵌入到应用程序中,这种方式的特点是:
- 紧耦合:工具函数与应用程序代码紧密集成,修改或替换工具可能需要更改应用程序代码。
- 扩展性差:添加新工具或修改现有工具可能涉及到应用程序的重新部署。
而 MCP 的外部化机制具有以下优势:
- 模块化:工具作为独立服务存在,便于开发、测试和部署。
- 灵活性:可以根据需要动态添加、修改或移除工具,而无需修改主应用程序。
- 可扩展性:支持多种通信协议(如 HTTP、WebSocket 等),便于与不同系统集成。
以 mcp_function_call_server 项目为例,该项目实现了一个兼容 MCP 协议的工具服务器,提供了如 Web 搜索、天气查询等功能。这些工具被定义在服务器的 tools/ 目录中,并通过 MCP 协议向外部暴露。LLM 应用程序可以通过 MCP 客户端调用这些工具,实现相应的功能。 (MCP)
同时langChain也提供了langchain_mcp_adapters用于连接MCP Server将远程的服务转为本地的Tool:
from langgraph.prebuilt import create_react_agent
from langchain_openai import ChatOpenAI
from langchain_mcp_adapters.client import MultiServerMCPClientimport asyncioasync def main():async with MultiServerMCPClient({"weather": {# make sure you start your weather server on port 8000"url": "http://localhost:8990/sse","transport": "sse",}}) as client:avTools = client.get_tools()print(avTools)if __name__ == "__main__":asyncio.run(main())
通过 MCP 的架构设计,工具函数被外部化为独立的服务,主应用程序通过标准化的协议与这些工具进行交互。这种方式提高了系统的模块化程度,增强了灵活性和可扩展性,适应了现代 AI 应用对动态集成和快速迭代的需求。
MCP快速开始
MCP 和 LLMs 没有直接关系,只要模型具备一定的指令遵循能力,就可以使用 MCP,这也是 MCP 区别于 Function Call 的地方,就是为了更通用。
MCP 虽然是 Anthropic 提出来的,但完全可以脱离 Claude 的环境和生态进行使用,也就是说,你既不需要用 Claude 的服务器或客户端,也不需要用 Claude 的模型或 API,可以自己写 MCP Server,可以用第三方的 Client,可以用任何一个模型进行对话和工具调用。
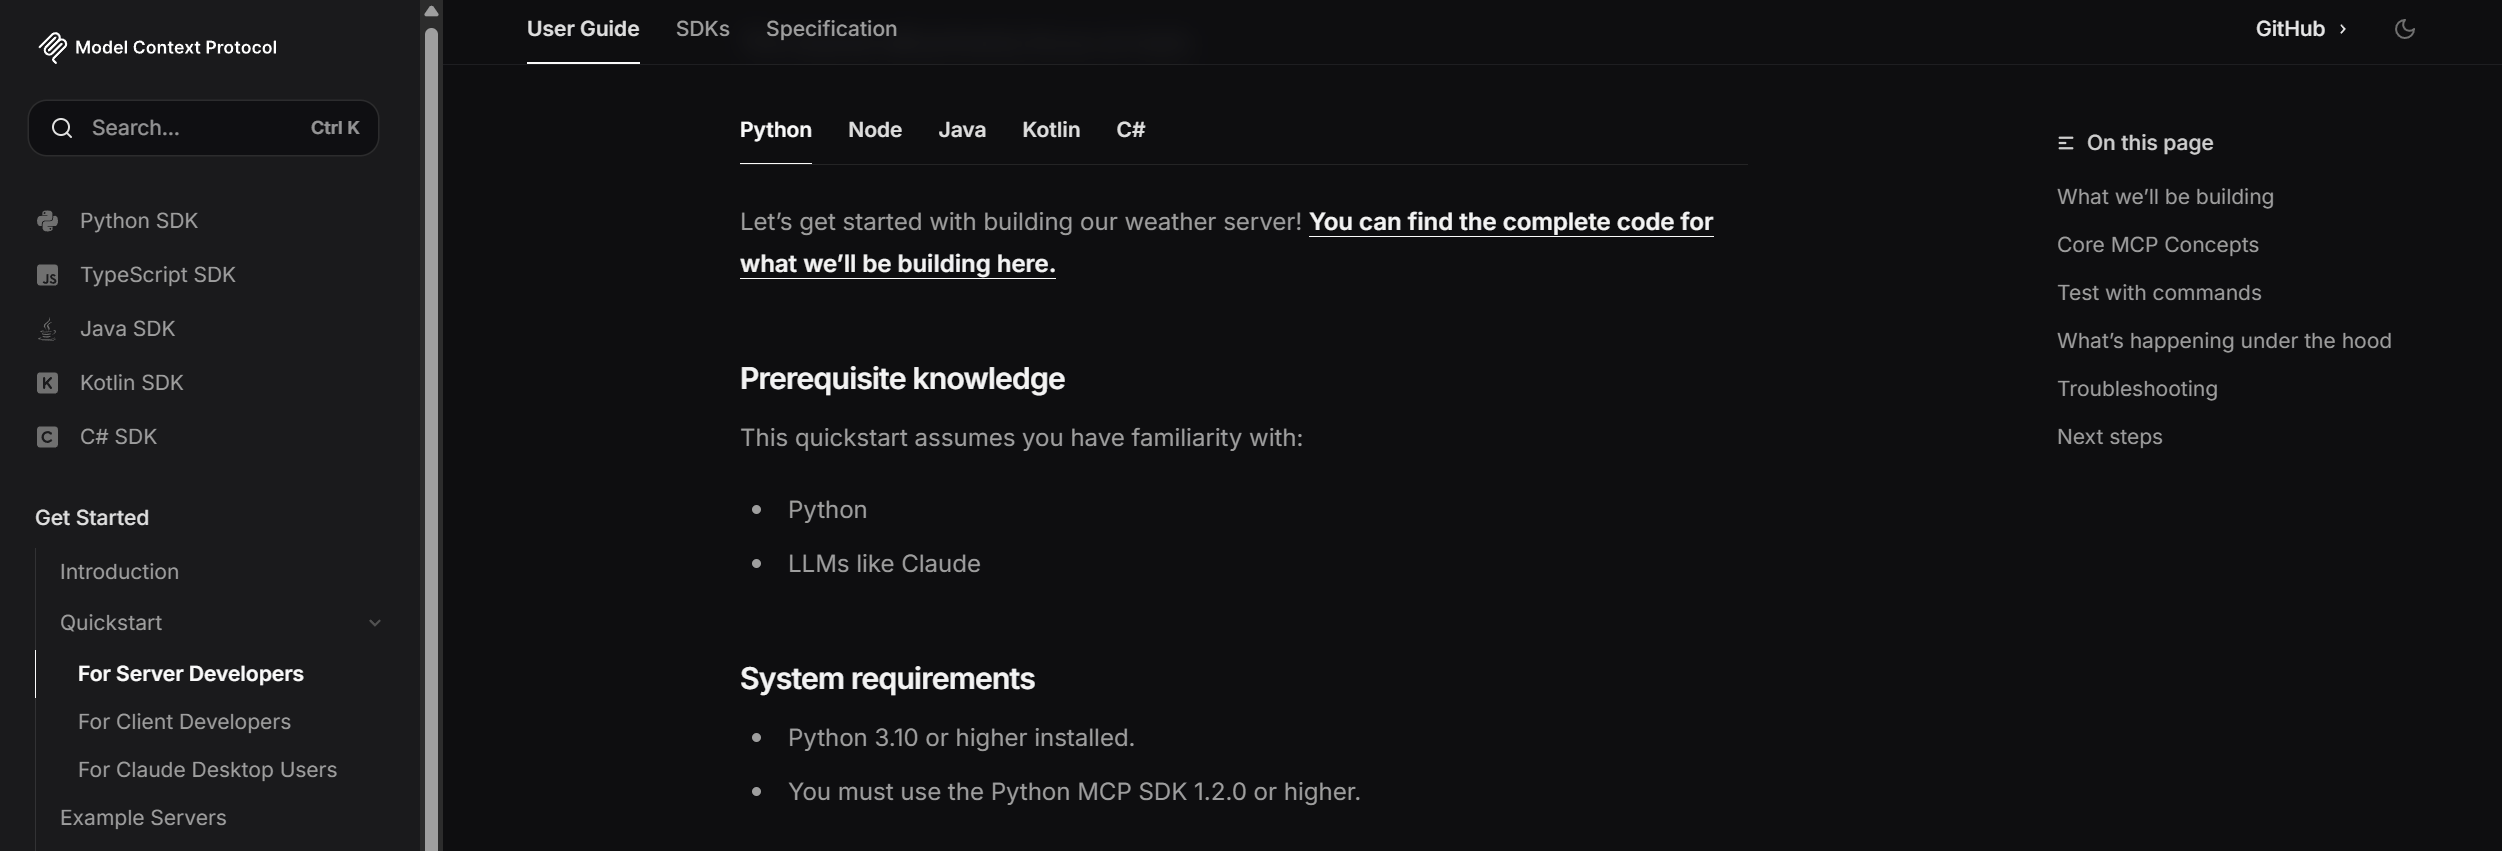
这里我们使用官方的python案例:
使用pip快速安装MCP的python实现:pip install mcp,然后我们可以集成一系列操作到app中,比如物联网设备的操作,网络请求web search,数据库查询操作,宿主机操作…
除此之外还需要:uv工具,uv是一个Python依赖管理工具,可以通过pip install uv来安装!
from mcp.server.fastmcp import FastMCP# Initialize FastMCP server
mcp_app = FastMCP("weather")@mcp_app.tool()
async def get_forecast(latitude: float, longitude: float) -> str:"""Get weather forecast for a location.Args:latitude: Latitude of the locationlongitude: Longitude of the location"""return f"--{latitude}°--{longitude}°--的温度是: 37°C"@mcp_app.tool()
def read_file(file_path: str) -> str:"""读取指定路径的文件内容。Args:file_path: 文件的完整路径Returns:文件的内容"""with open(file_path, 'r', encoding='utf-8') as file:return file.read()@mcp_app.tool()
def open_the_fucking_door(ip: str) -> str:"""打开指定ip的智能门Args:ip: ip地址"""return f"ip为:{ip}的门已打开!"if __name__ == "__main__":# Initialize and run the servermcp_app.run(transport='stdio')
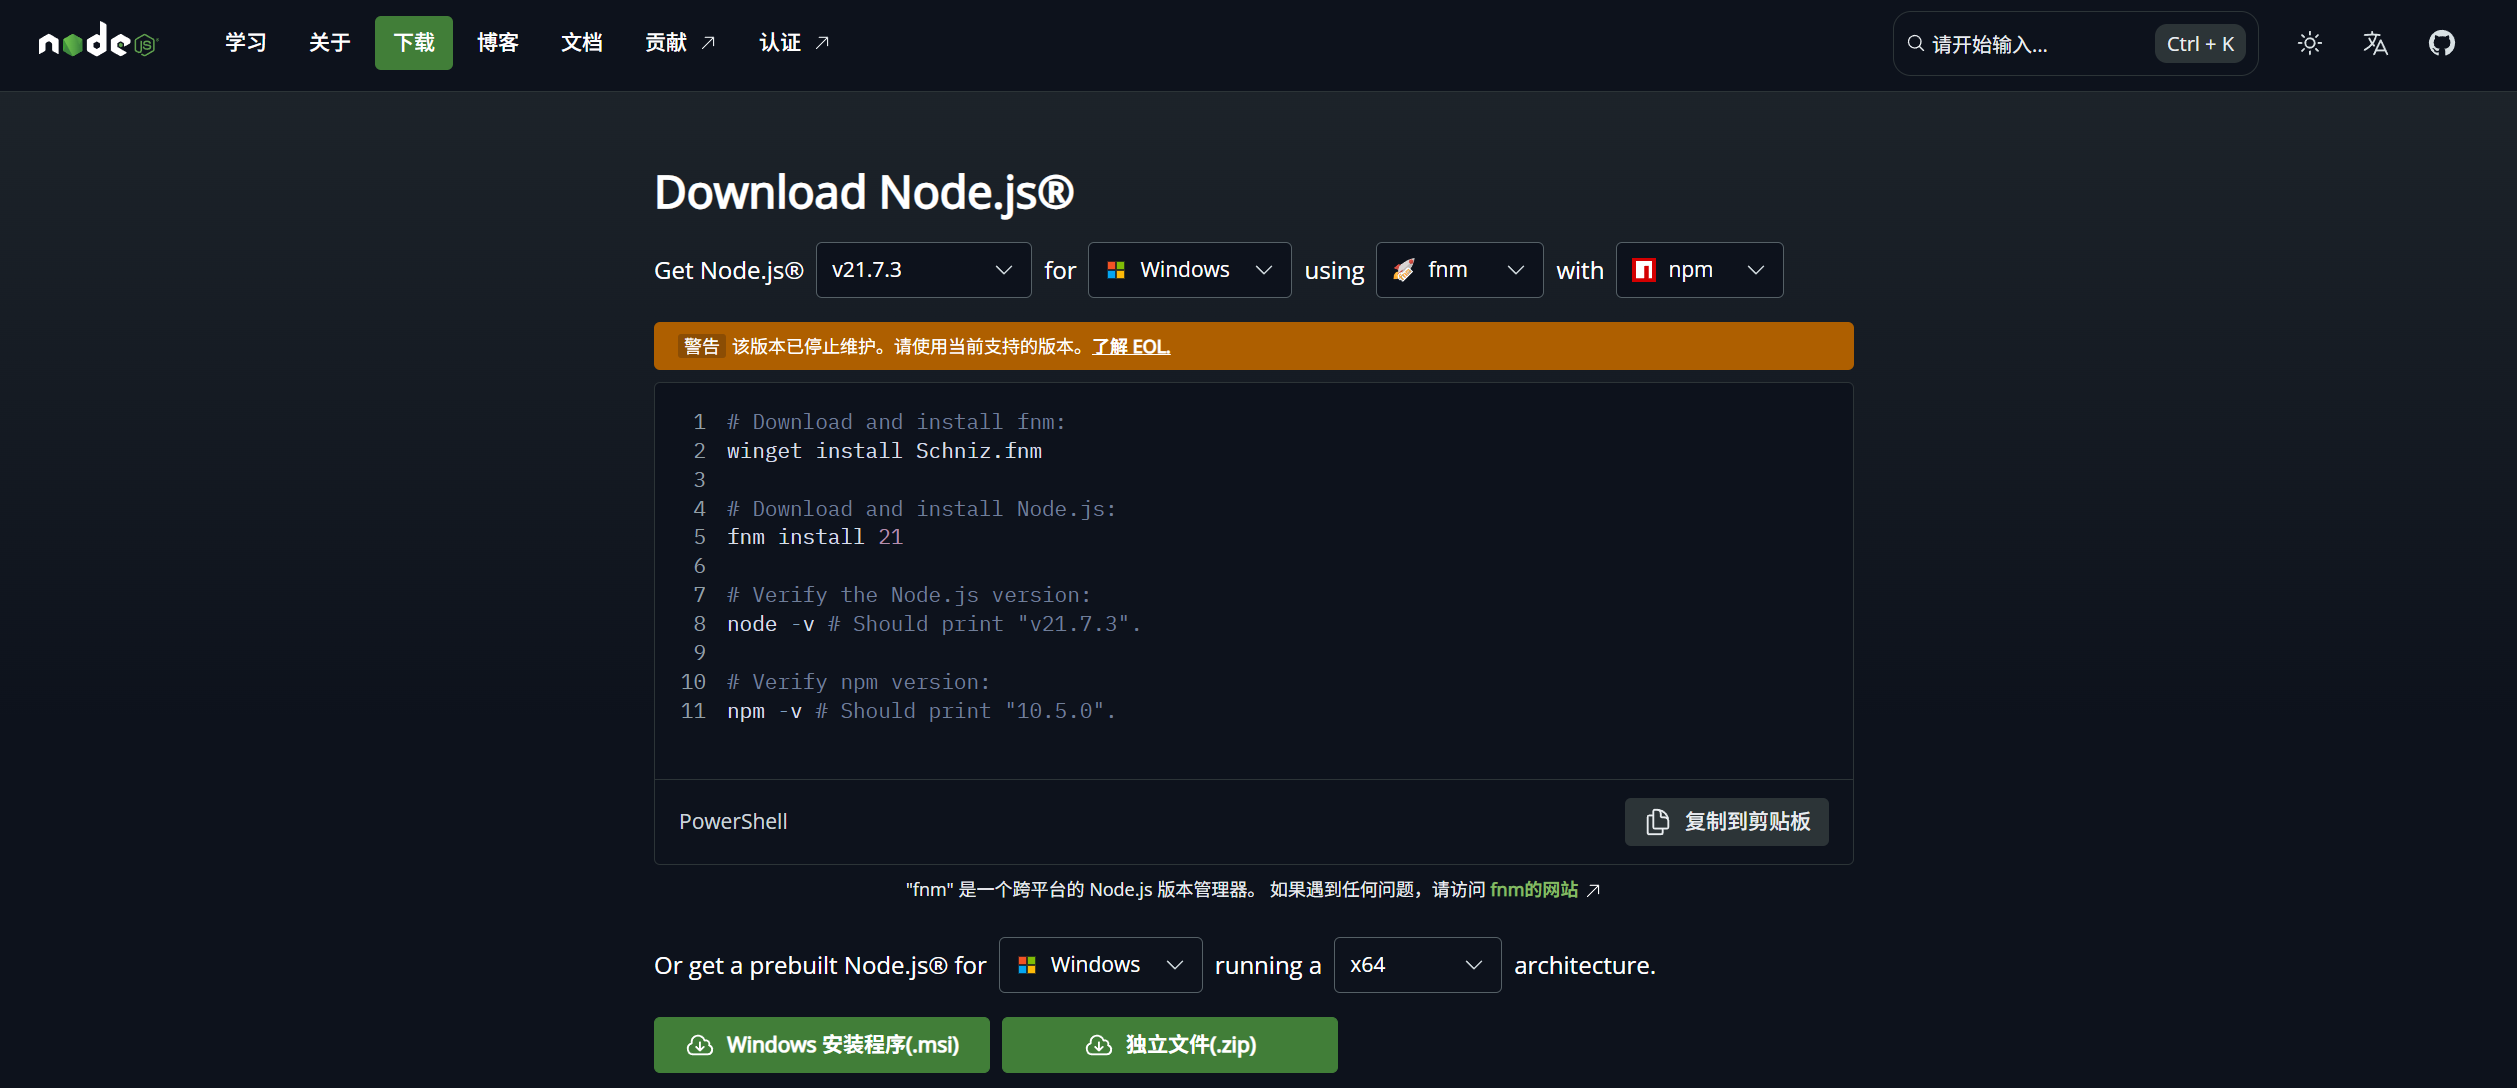
然后我们启动服务,如果没有node和npm可能需要提前安装:
这些命令会将 npm 的全局安装路径和缓存路径分别设置为您指定的目录:
npm config set prefix "D:\nodejs\node_global"
npm config set cache "D:\nodejs\node_cache"验证:
npm config get prefix
npm config get cache

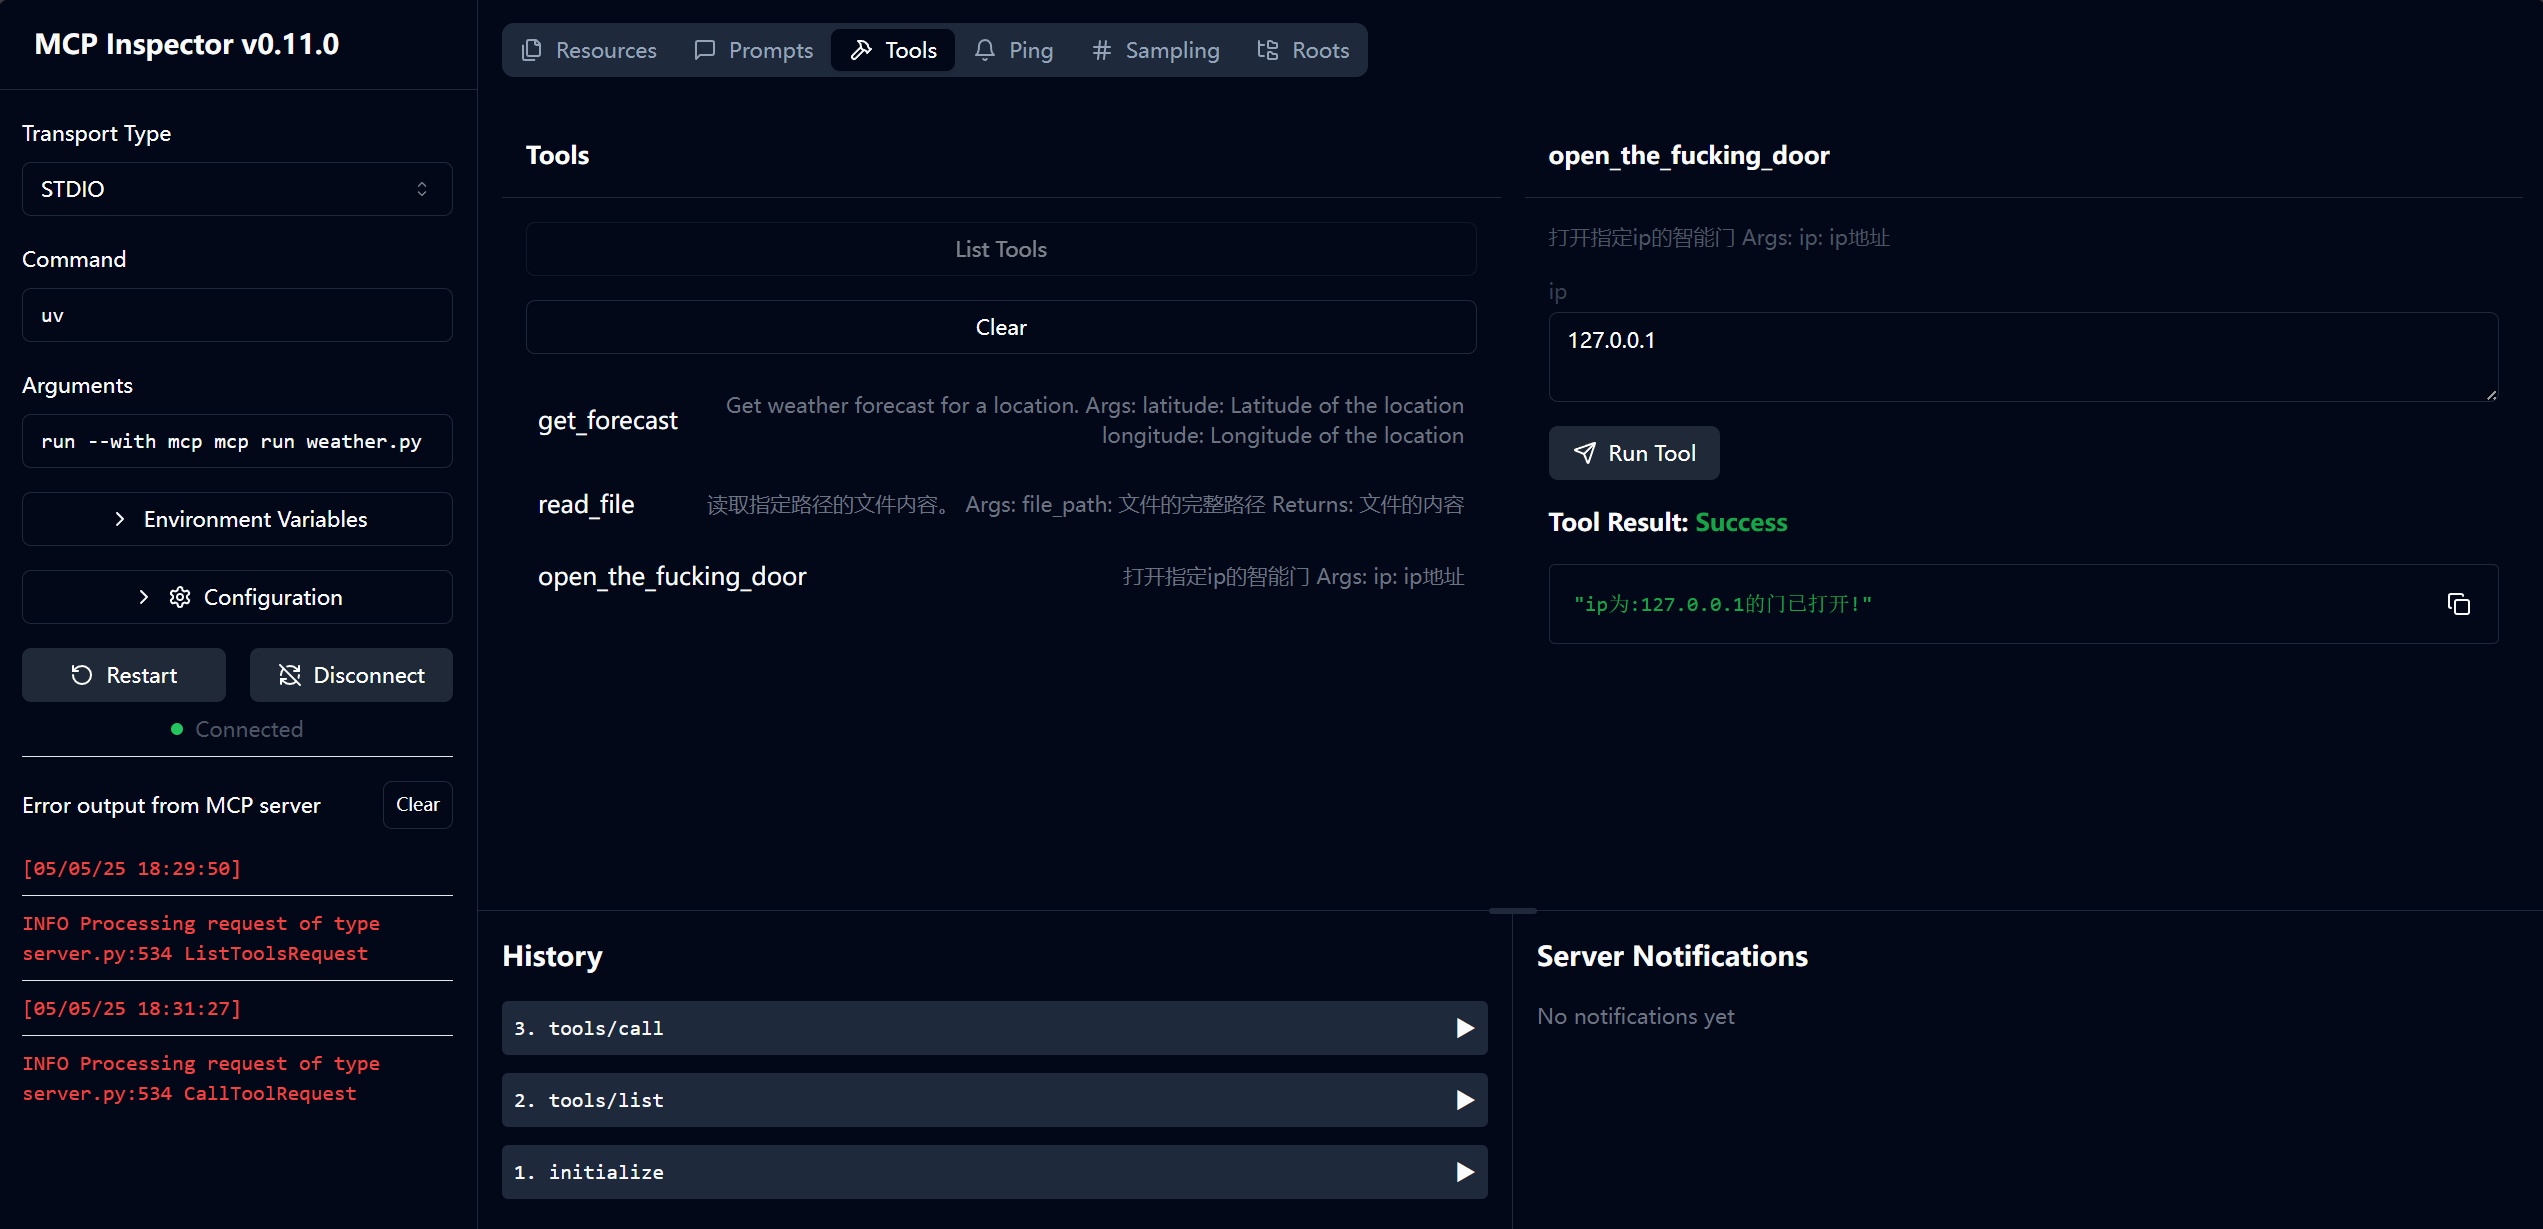
打开上文地址:http://127.0.0.1:6274/,就可以看到开发者模式下的看板:
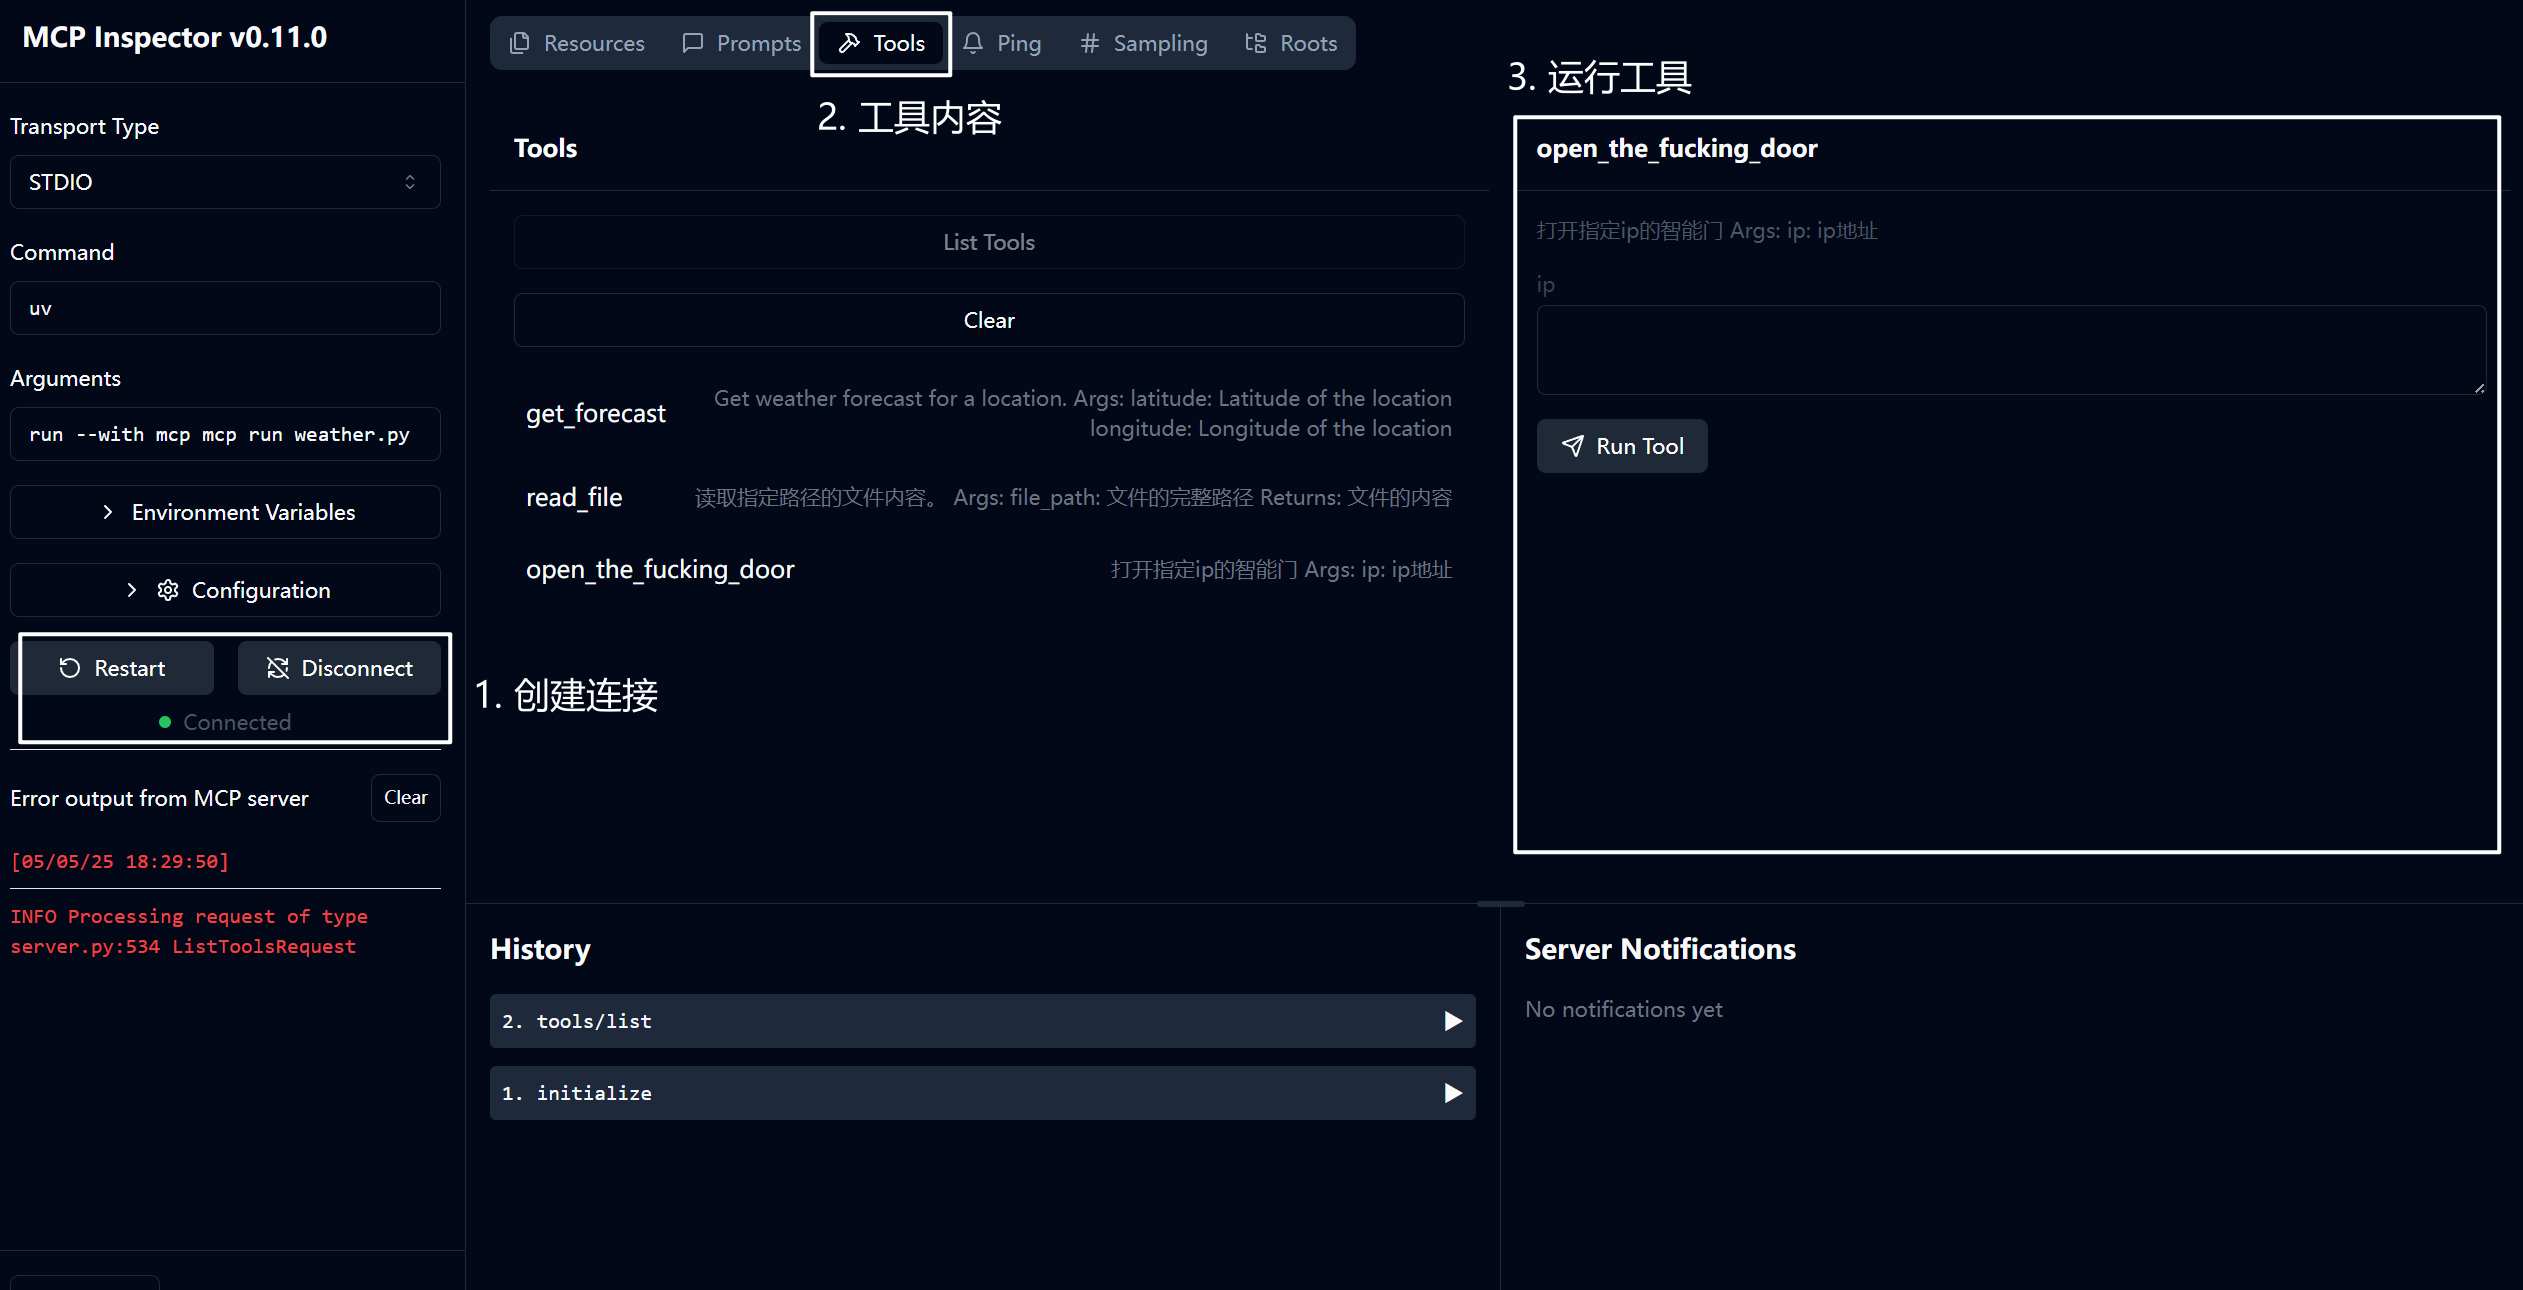
我们让其打开一扇门,可以看到右边输出了我们的debug信息!
编写客户端
MCP是典型的C/S架构! 我们作为开发者,除了要写MCP Server外,还需要编写客户端将工具|模型|用户输入糅和在一起产生一个理想的输出!
import asyncio
from typing import Optional
from contextlib import AsyncExitStack
from mcp import ClientSession, StdioServerParameters
from mcp.client.stdio import stdio_clientclass MCPClient:def __init__(self):# Initialize session and client objectsself.session: Optional[ClientSession] = Noneself.exit_stack = AsyncExitStack()# 暂时不初始化self.llm = Noneasync def connect_to_server(self):server_script_path = "./weather.py"is_python = server_script_path.endswith('.py')is_js = server_script_path.endswith('.js')if not (is_python or is_js):raise ValueError("Server script must be a .py or .js file")command = "python" if is_python else "node"server_params = StdioServerParameters(command=command,args=[server_script_path],env=None)stdio_transport = await self.exit_stack.enter_async_context(stdio_client(server_params))self.stdio, self.write = stdio_transportself.session = await self.exit_stack.enter_async_context(ClientSession(self.stdio, self.write))await self.session.initialize()# List available toolsresponse = await self.session.list_tools()tools = response.toolsprint("\nConnected to server with tools:", [tool.name for tool in tools])async def process_query(self, query: str) -> str:"""Process a query using Claude and available tools"""messages = [{"role": "user","content": query}]response = await self.session.list_tools()available_tools = [{"name": tool.name,"description": tool.description,"input_schema": tool.inputSchema} for tool in response.tools]# Initial Claude API callresponse = self.anthropic.messages.create(model="claude-3-5-sonnet-20241022",max_tokens=1000,messages=messages,tools=available_tools)# Process response and handle tool callsfinal_text = []assistant_message_content = []for content in response.content:if content.type == 'text':final_text.append(content.text)assistant_message_content.append(content)elif content.type == 'tool_use':tool_name = content.nametool_args = content.input# Execute tool callresult = await self.session.call_tool(tool_name, tool_args)final_text.append(f"[Calling tool {tool_name} with args {tool_args}]")assistant_message_content.append(content)messages.append({"role": "assistant","content": assistant_message_content})messages.append({"role": "user","content": [{"type": "tool_result","tool_use_id": content.id,"content": result.content}]})# Get next response from Clauderesponse = self.anthropic.messages.create(model="claude-3-5-sonnet-20241022",max_tokens=1000,messages=messages,tools=available_tools)final_text.append(response.content[0].text)return "\n".join(final_text)async def chat_loop(self):"""Run an interactive chat loop"""print("\nMCP Client Started!")print("Type your queries or 'quit' to exit.")while True:try:query = input("\nQuery: ").strip()if query.lower() == 'quit':breakresponse = await self.process_query(query)print("\n" + response)except Exception as e:print(f"\nError: {str(e)}")async def cleanup(self):"""Clean up resources"""await self.exit_stack.aclose()async def main():client = MCPClient()try:await client.connect_to_server()await client.chat_loop()finally:await client.cleanup()if __name__ == "__main__":asyncio.run(main())
[05/05/25 19:16:40] INFO     Processing request of type           server.py:534ListToolsRequest                                  Connected to server with tools: ['get_forecast', 'read_file', 'open_the_fucking_door']MCP Client Started!
Type your queries or 'quit' to exit.Query: quit
这样我们就可以连接到MCP Server,接下来就是搞定模型的问题!(MCP 和 LLMs 没有直接关系,只要模型具备一定的指令遵循能力,就可以使用 MCP)
上文我们定义的工具实际上会生成如下schema:
[{'description': 'Get weather forecast for a location.\n''\n'' Args:\n'' latitude: Latitude of the location\n'' longitude: Longitude of the location\n'' ','input_schema': {'properties': {'latitude': {'title': 'Latitude','type': 'number'},'longitude': {'title': 'Longitude','type': 'number'}},'required': ['latitude', 'longitude'],'title': 'get_forecastArguments','type': 'object'},'name': 'get_forecast'},{'description': '\n'' 读取指定路径的文件内容。\n''\n'' Args:\n'' file_path: 文件的完整路径\n''\n'' Returns:\n'' 文件的内容\n'' ','input_schema': {'properties': {'file_path': {'title': 'File Path','type': 'string'}},'required': ['file_path'],'title': 'read_fileArguments','type': 'object'},'name': 'read_file'},{'description': '\n 打开指定ip的智能门\n\n Args:\n ip: ip地址\n ','input_schema': {'properties': {'ip': {'title': 'Ip', 'type': 'string'}},'required': ['ip'],'title': 'open_the_fucking_doorArguments','type': 'object'},'name': 'open_the_fucking_door'}]
查询Qwen官方,我们需要的格式是这样的:
TOOLS = [{"type": "function","function": {"name": "get_current_temperature","description": "Get current temperature at a location.","parameters": {"type": "object","properties": {"location": {"type": "string","description": 'The location to get the temperature for, in the format "City, State, Country".',},"unit": {"type": "string","enum": ["celsius", "fahrenheit"],"description": 'The unit to return the temperature in. Defaults to "celsius".',},},"required": ["location"],},},},{"type": "function","function": {"name": "get_temperature_date","description": "Get temperature at a location and date.","parameters": {"type": "object","properties": {"location": {"type": "string","description": 'The location to get the temperature for, in the format "City, State, Country".',},"date": {"type": "string","description": 'The date to get the temperature for, in the format "Year-Month-Day".',},"unit": {"type": "string","enum": ["celsius", "fahrenheit"],"description": 'The unit to return the temperature in. Defaults to "celsius".',},},"required": ["location", "date"],},},},
]
因此,我们改为Qwen适配的格式:
qwen_tools = [{"type": "function","function": {"name": tool.name,"description": tool.description,"parameters": tool.inputSchema}}for tool in response.tools]
当我们询问经纬度为x的地区天气状况时,模型已经可以给出正确的函数调用了!
model='qwen2.5:7b' created_at='2025-05-05T11:45:09.210411Z' done=True done_reason='stop' total_duration=8104453800 load_duration=3359794600 prompt_eval_count=347 prompt_eval_duration=569000000 eval_count=108 eval_duration=3811000000 message=Message(role='assistant', content='', images=None, tool_calls=[ToolCall(function=Function(name='get_forecast', arguments={'latitude': 1, 'longitude': 1}))])
最后改造为:
import asyncio
from typing import Optional
from contextlib import AsyncExitStack
from mcp import ClientSession, StdioServerParameters
from mcp.client.stdio import stdio_client
from ollama import AsyncClient
from pprint import pprint
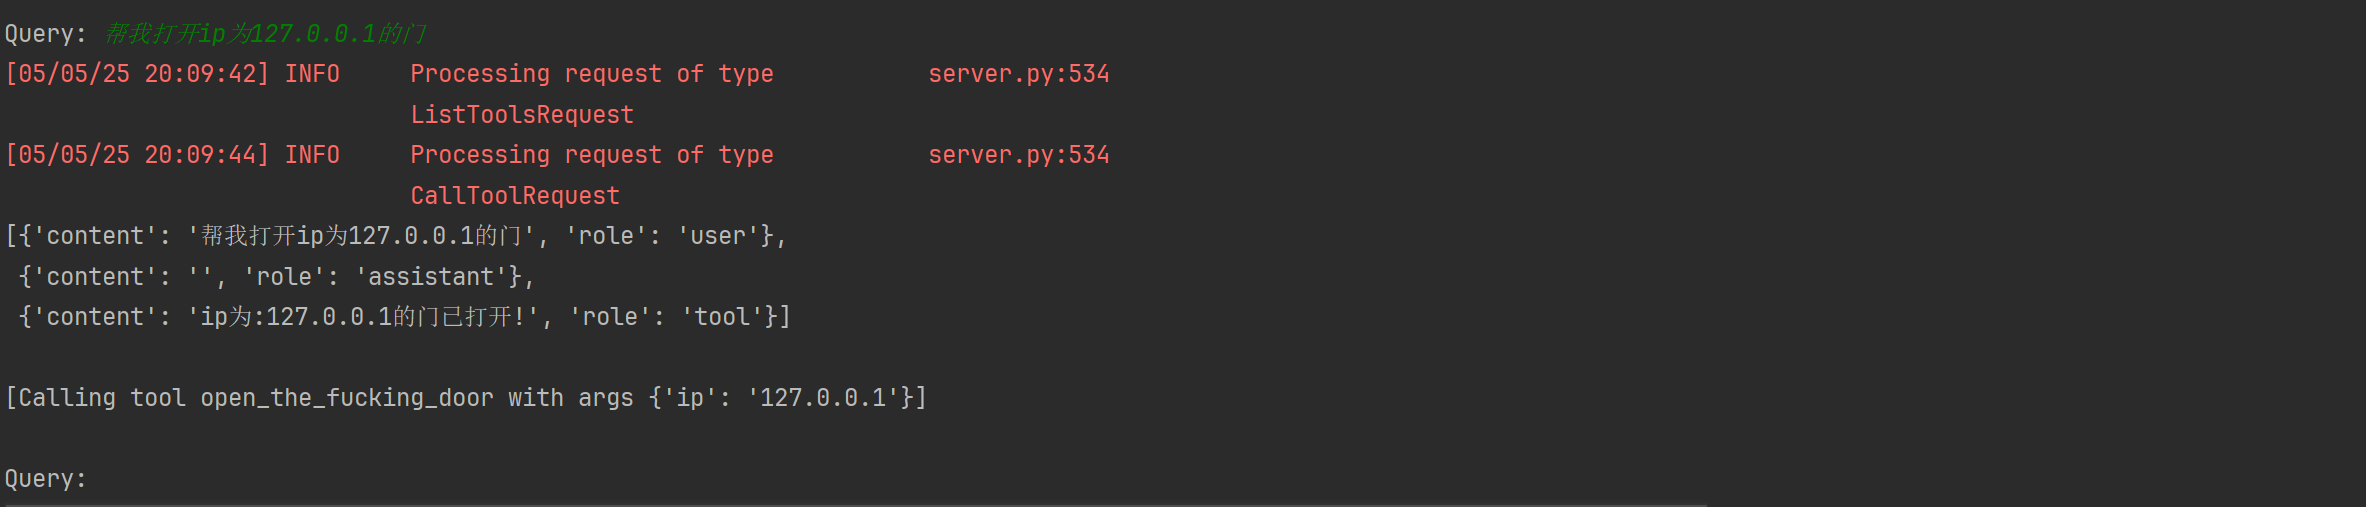
from ollama import ChatResponseclass MCPClient:def __init__(self):# Initialize session and client objectsself.session: Optional[ClientSession] = Noneself.exit_stack = AsyncExitStack()# 暂时不初始化self.llm = AsyncClient()async def connect_to_server(self):server_script_path = "./weather.py"is_python = server_script_path.endswith('.py')is_js = server_script_path.endswith('.js')if not (is_python or is_js):raise ValueError("Server script must be a .py or .js file")command = "python" if is_python else "node"server_params = StdioServerParameters(command=command,args=[server_script_path],env=None)stdio_transport = await self.exit_stack.enter_async_context(stdio_client(server_params))self.stdio, self.write = stdio_transportself.session = await self.exit_stack.enter_async_context(ClientSession(self.stdio, self.write))await self.session.initialize()# List available toolsresponse = await self.session.list_tools()tools = response.toolsprint("\nConnected to server with tools:", [tool.name for tool in tools])async def process_query(self, query: str) -> str:"""Process a query using Claude and available tools"""messages = [{"role": "user","content": query}]response = await self.session.list_tools()qwen_tools = [{"type": "function","function": {"name": tool.name,"description": tool.description,"parameters": tool.inputSchema}}for tool in response.tools]ollama_response: ChatResponse = await self.llm.chat(model="qwen2.5:7b", messages=messages, tools=qwen_tools)# Process response and handle tool callsfinal_text = []# 得到对话内容message = ollama_response.messagemessages.append({"content": message.content,"role": message.role})# 函数调用for t in message.tool_calls or []:fn = t.functionresult = await self.session.call_tool(fn.name, fn.arguments)final_text.append(f"[Calling tool {fn.name} with args {fn.arguments}]")messages.append({"role": "tool","content": result.content[0].text,})pprint(messages)return "\n".join(final_text)async def chat_loop(self):"""Run an interactive chat loop"""print("\nMCP Client Started!")print("Type your queries or 'quit' to exit.")while True:try:query = input("\nQuery: ").strip()if query.lower() == 'quit':breakresponse = await self.process_query(query)print("\n" + response)except Exception as e:print(f"\nError: {str(e)}")async def cleanup(self):"""Clean up resources"""await self.exit_stack.aclose()async def main():client = MCPClient()try:await client.connect_to_server()await client.chat_loop()finally:await client.cleanup()if __name__ == "__main__":asyncio.run(main())
基于golang的mcp
目前官方没有给出对golang的实现,不过你可以在awesome-mcp-servers项目中找到基于go的SDK,如foxy-contexts、mcp-go、mcp-golang、当前这些库使用的golang版本均比较高,使用的时候需要注意下,目前,MCP 的 Golang 实现主要由 mark3labs/mcp-go 提供。这个库为开发者提供了一套完整的工具,用于创建和管理 MCP Server。它支持工具定义、参数处理、工具调用等功能,并且提供了丰富的配置选项和日志记录功能。
以https://github.com/mark3labs/mcp-go为例,下载:go get github.com/mark3labs/mcp-go
package mainimport ("context""errors""fmt""github.com/mark3labs/mcp-go/mcp""github.com/mark3labs/mcp-go/server"
)func main() {// Create a new MCP servers := server.NewMCPServer("Calculator Demo","1.0.0",server.WithResourceCapabilities(true, true),server.WithLogging(),server.WithRecovery(),)// Add a calculator toolcalculatorTool := mcp.NewTool("calculate",mcp.WithDescription("Perform basic arithmetic operations"),mcp.WithString("operation",mcp.Required(),mcp.Description("The operation to perform (add, subtract, multiply, divide)"),mcp.Enum("add", "subtract", "multiply", "divide"),),mcp.WithNumber("x",mcp.Required(),mcp.Description("First number"),),mcp.WithNumber("y",mcp.Required(),mcp.Description("Second number"),),)// Add the calculator handlers.AddTool(calculatorTool, func(ctx context.Context, request mcp.CallToolRequest) (*mcp.CallToolResult, error) {op := request.Params.Arguments["operation"].(string)x := request.Params.Arguments["x"].(float64)y := request.Params.Arguments["y"].(float64)var result float64switch op {case "add":result = x + ycase "subtract":result = x - ycase "multiply":result = x * ycase "divide":if y == 0 {return mcp.NewToolResultError("cannot divide by zero"), nil}result = x / y}return mcp.NewToolResultText(fmt.Sprintf("%.2f", result)), nil})// Start the serverif err := server.ServeStdio(s); err != nil {fmt.Printf("Server error: %v\n", err)}
}
在实现 MCP Server 后,需要将其配置到客户端插件中。以下是一个在 Windows 系统中配置cline插件的 MCP Server 的示例 JSON 文件:
{"mcpServers": {"culculate_server": {"command": "C:\\Users\\Administrator\\go\\bin\\calculator.exe","args": [],"env": {"GOPATH": "C:\\Users\\Administrator\\go","GOMODCACHE": "C:\\Users\\Administrator\\go\\pkg\\mod"}}}
}
配置完成后,你可以通过对话框向大语言模型提问,例如计算 89989 + 4378247 的结果。大语言模型会自动调用 MCP Server 来完成计算任务,并返回结果。
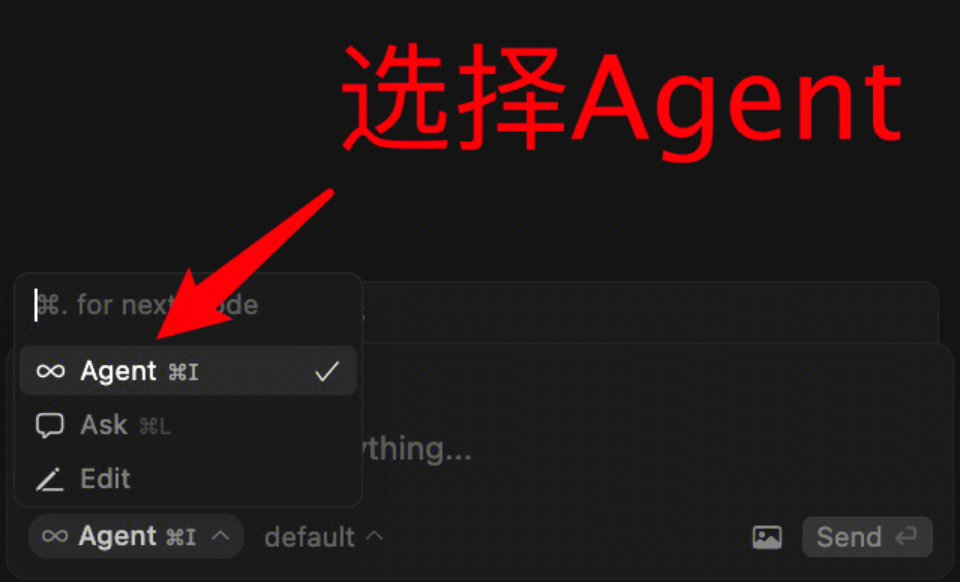
除此之外,也可以通过一些支持 MCP Server 的客户端(AI代码编辑器)进行调试,比如Cursor,cline。
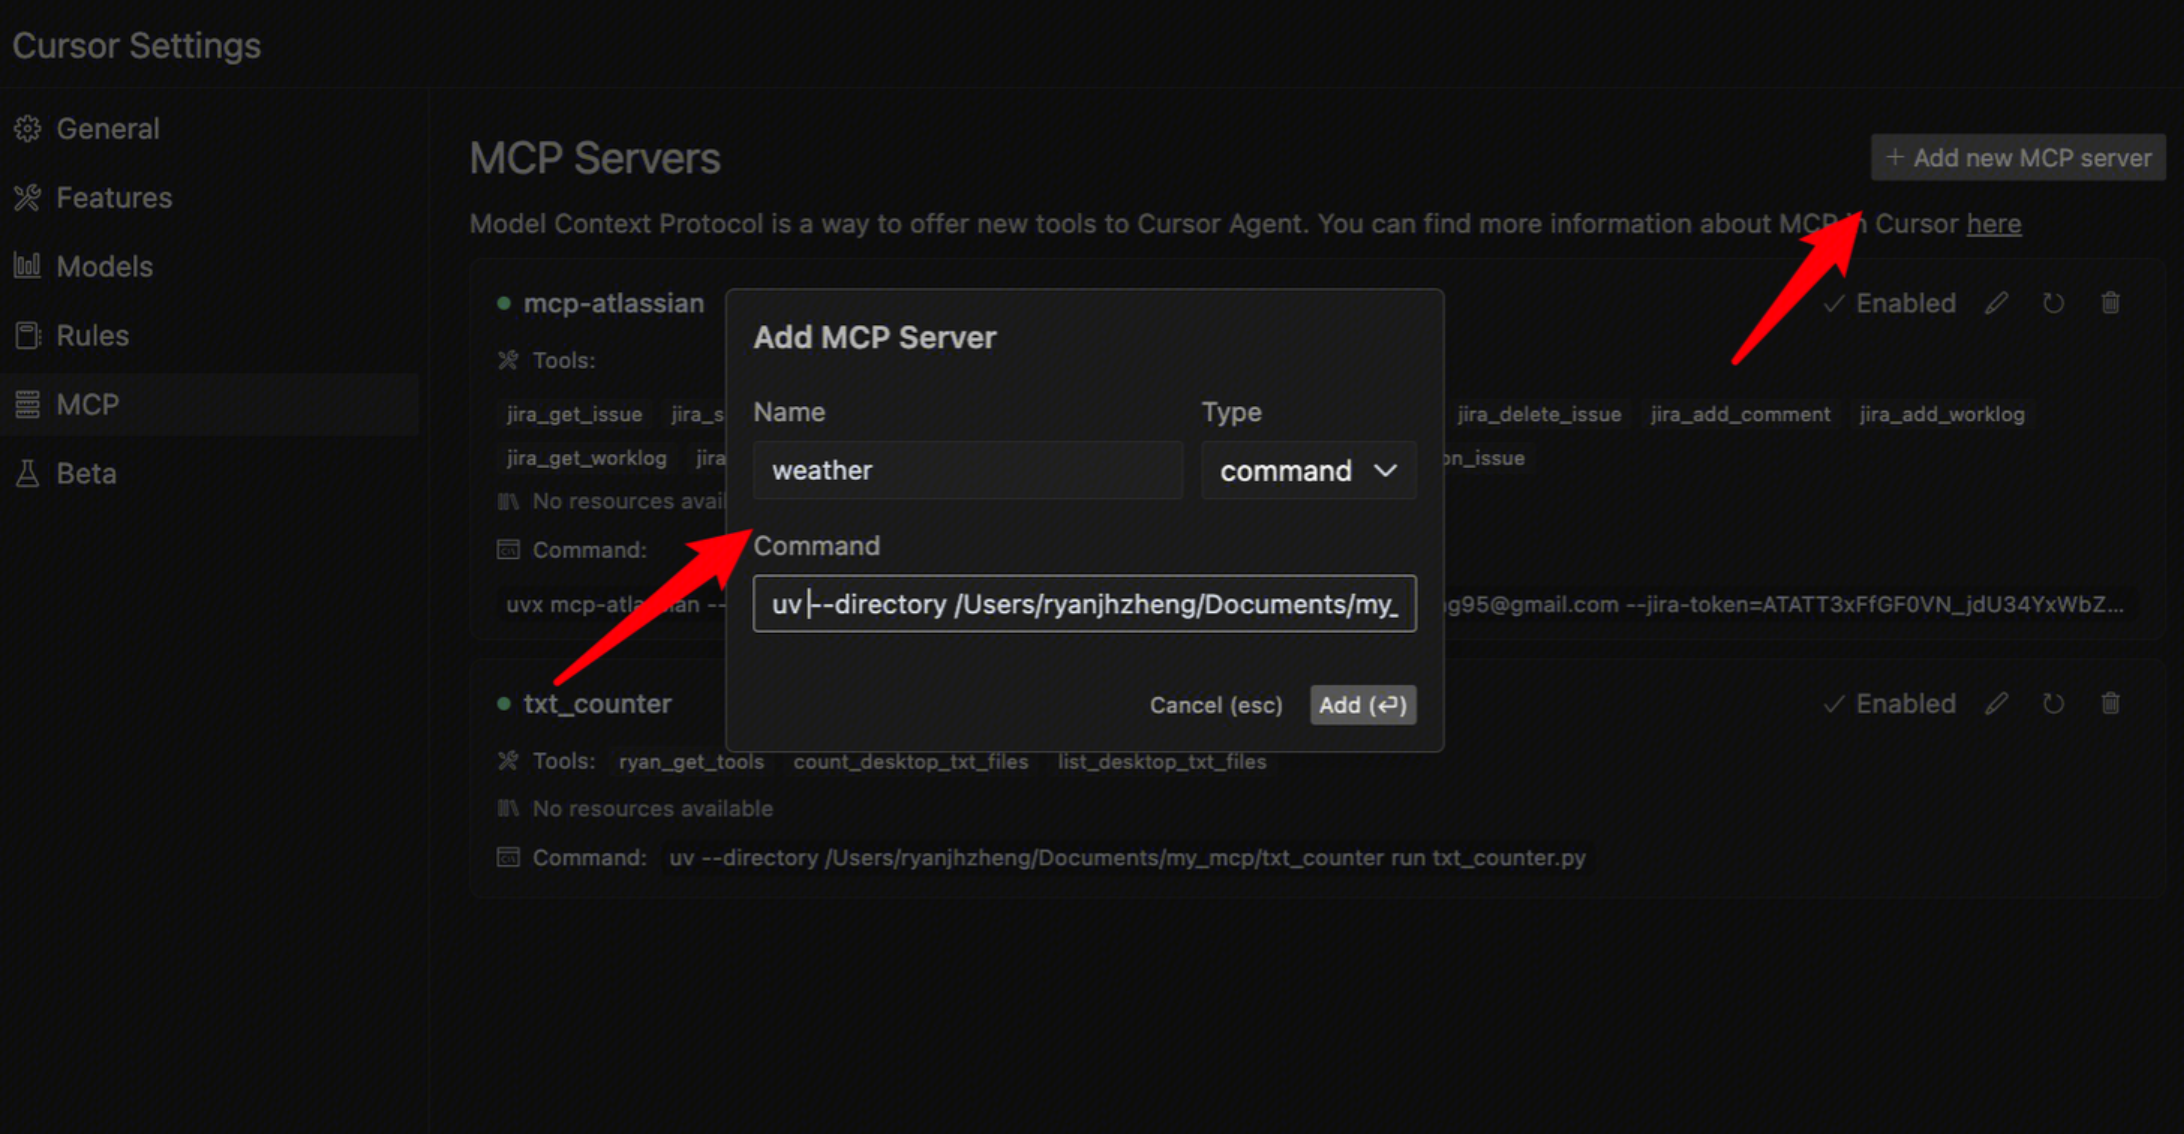
比如上面的python代码可以配置到Cursor:
uv --directory /Users/ryanjhzheng/Documents/my_mcp/weather run weather.py
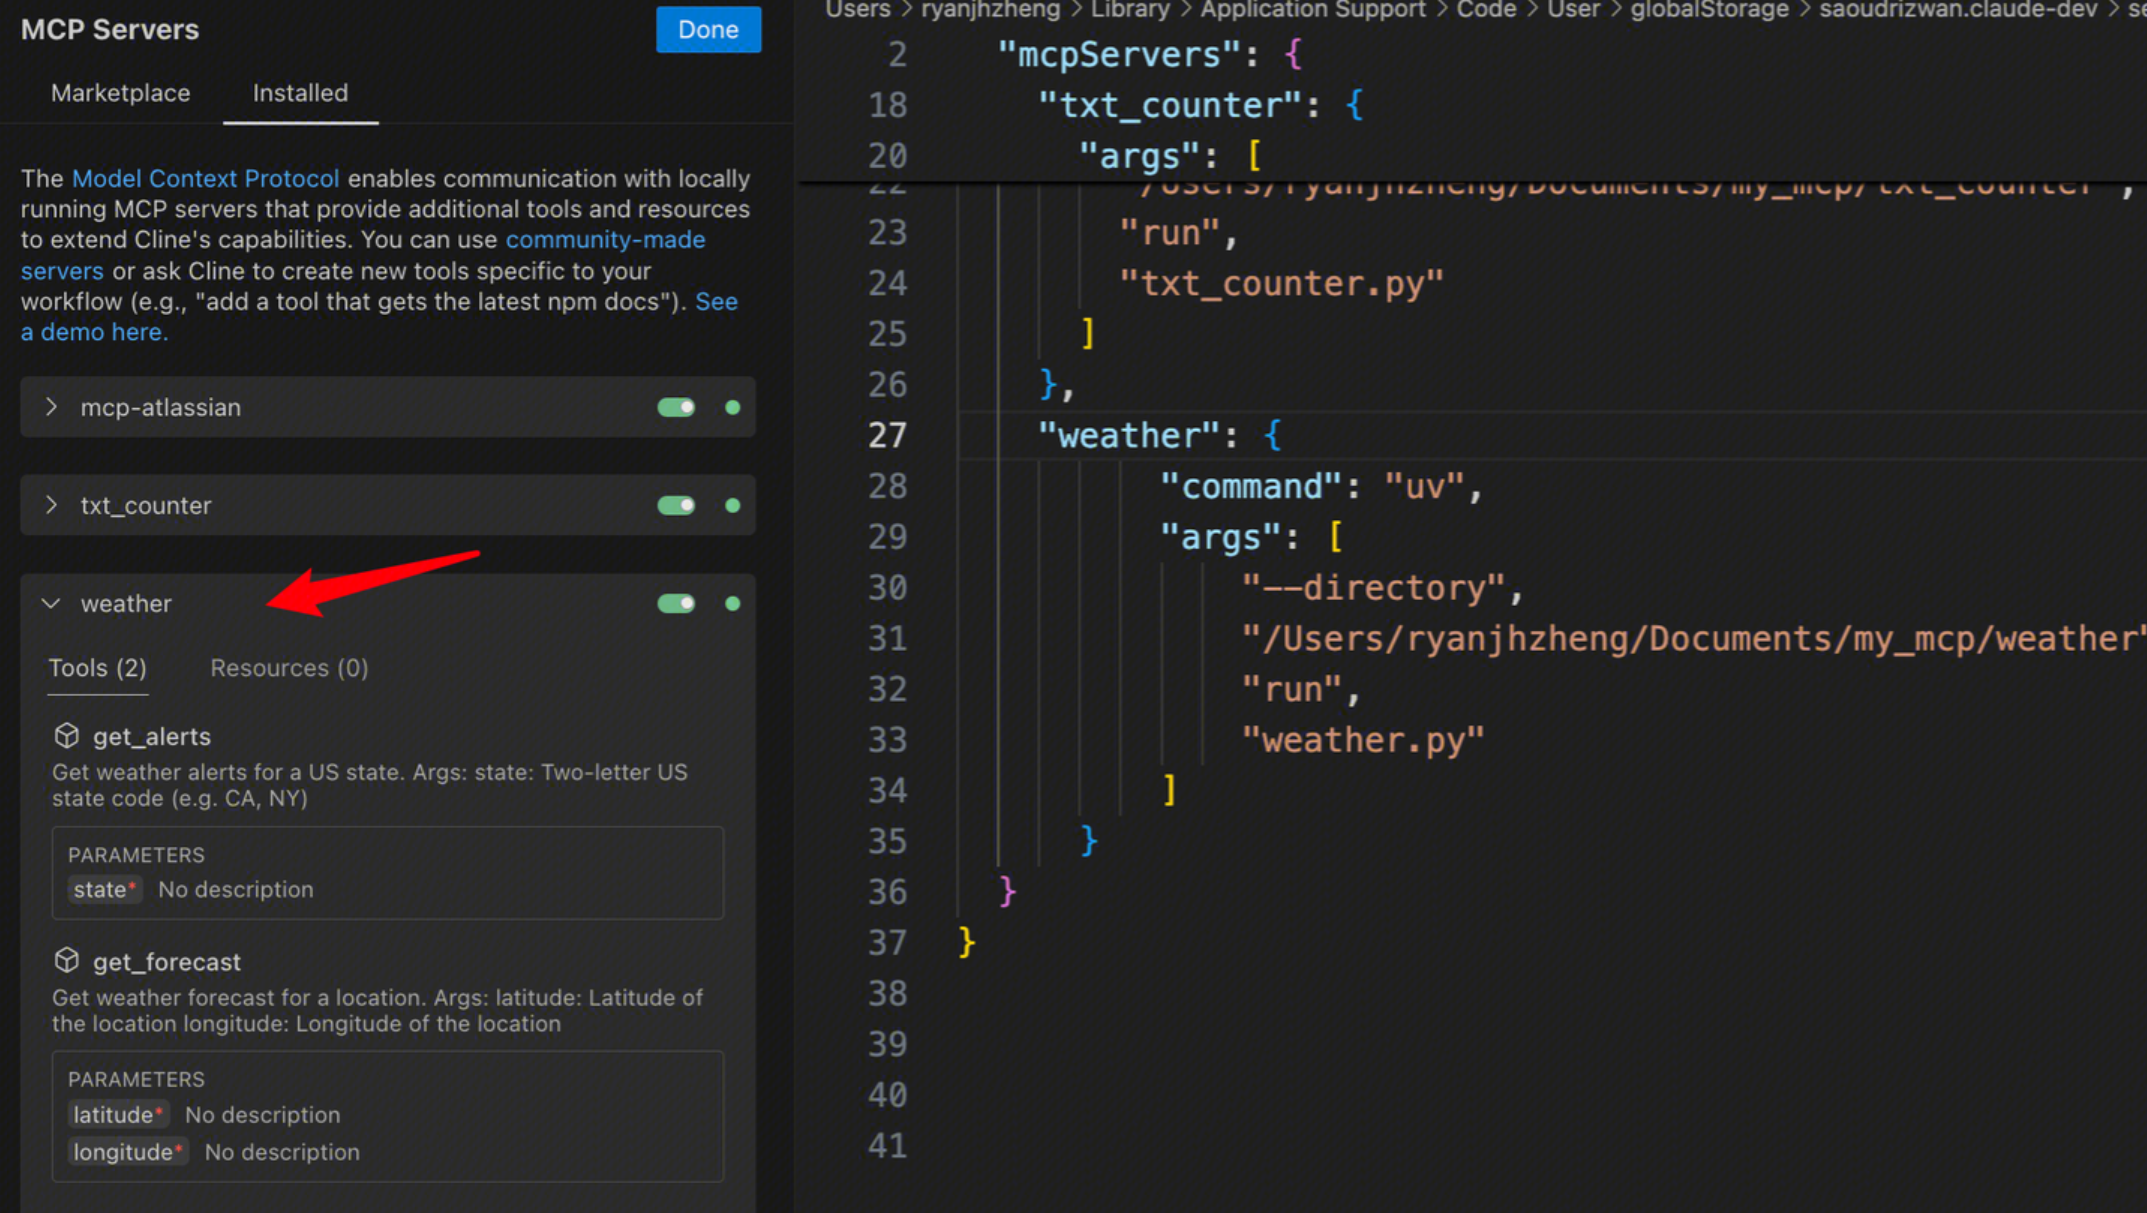
cline则需要添加配置文件:
{"mcpServers": {"weather": {"command": "uv","args": ["--directory","/ABSOLUTE/PATH/TO/PARENT/FOLDER/weather","run","weather.py"]}}
}