GitHub修炼法则:第一次提交代码教学(Liunx系统)
前言
github是广大程序员们必须要掌握的一个技能,万事开头难,如果成功提交了第一次代码,那么后来就会简单很多。网上的相关资料往往都不是从第一次开始,导致很多新手们会在过程中遇到很多权限认证相关的问题,进而被卡住。为了解决这些问题,我整理了github第一次提交的教程,希望可以帮助大家掌握github的使用。
需要的环境:
VS code编辑环境。
WMware虚拟机与ubuntu系统。
这里我通过将我们本地写的一个项目ChatServer上传到github仓库来带领大家学习github的使用。
配置环境
1、安装git工具
对于一个新的ubuntu环境,先需要安装git工具,运行下面的指令:
hyl@hylPC:~/Desktop/Chat$ sudo apt install git
[sudo] password for hyl:
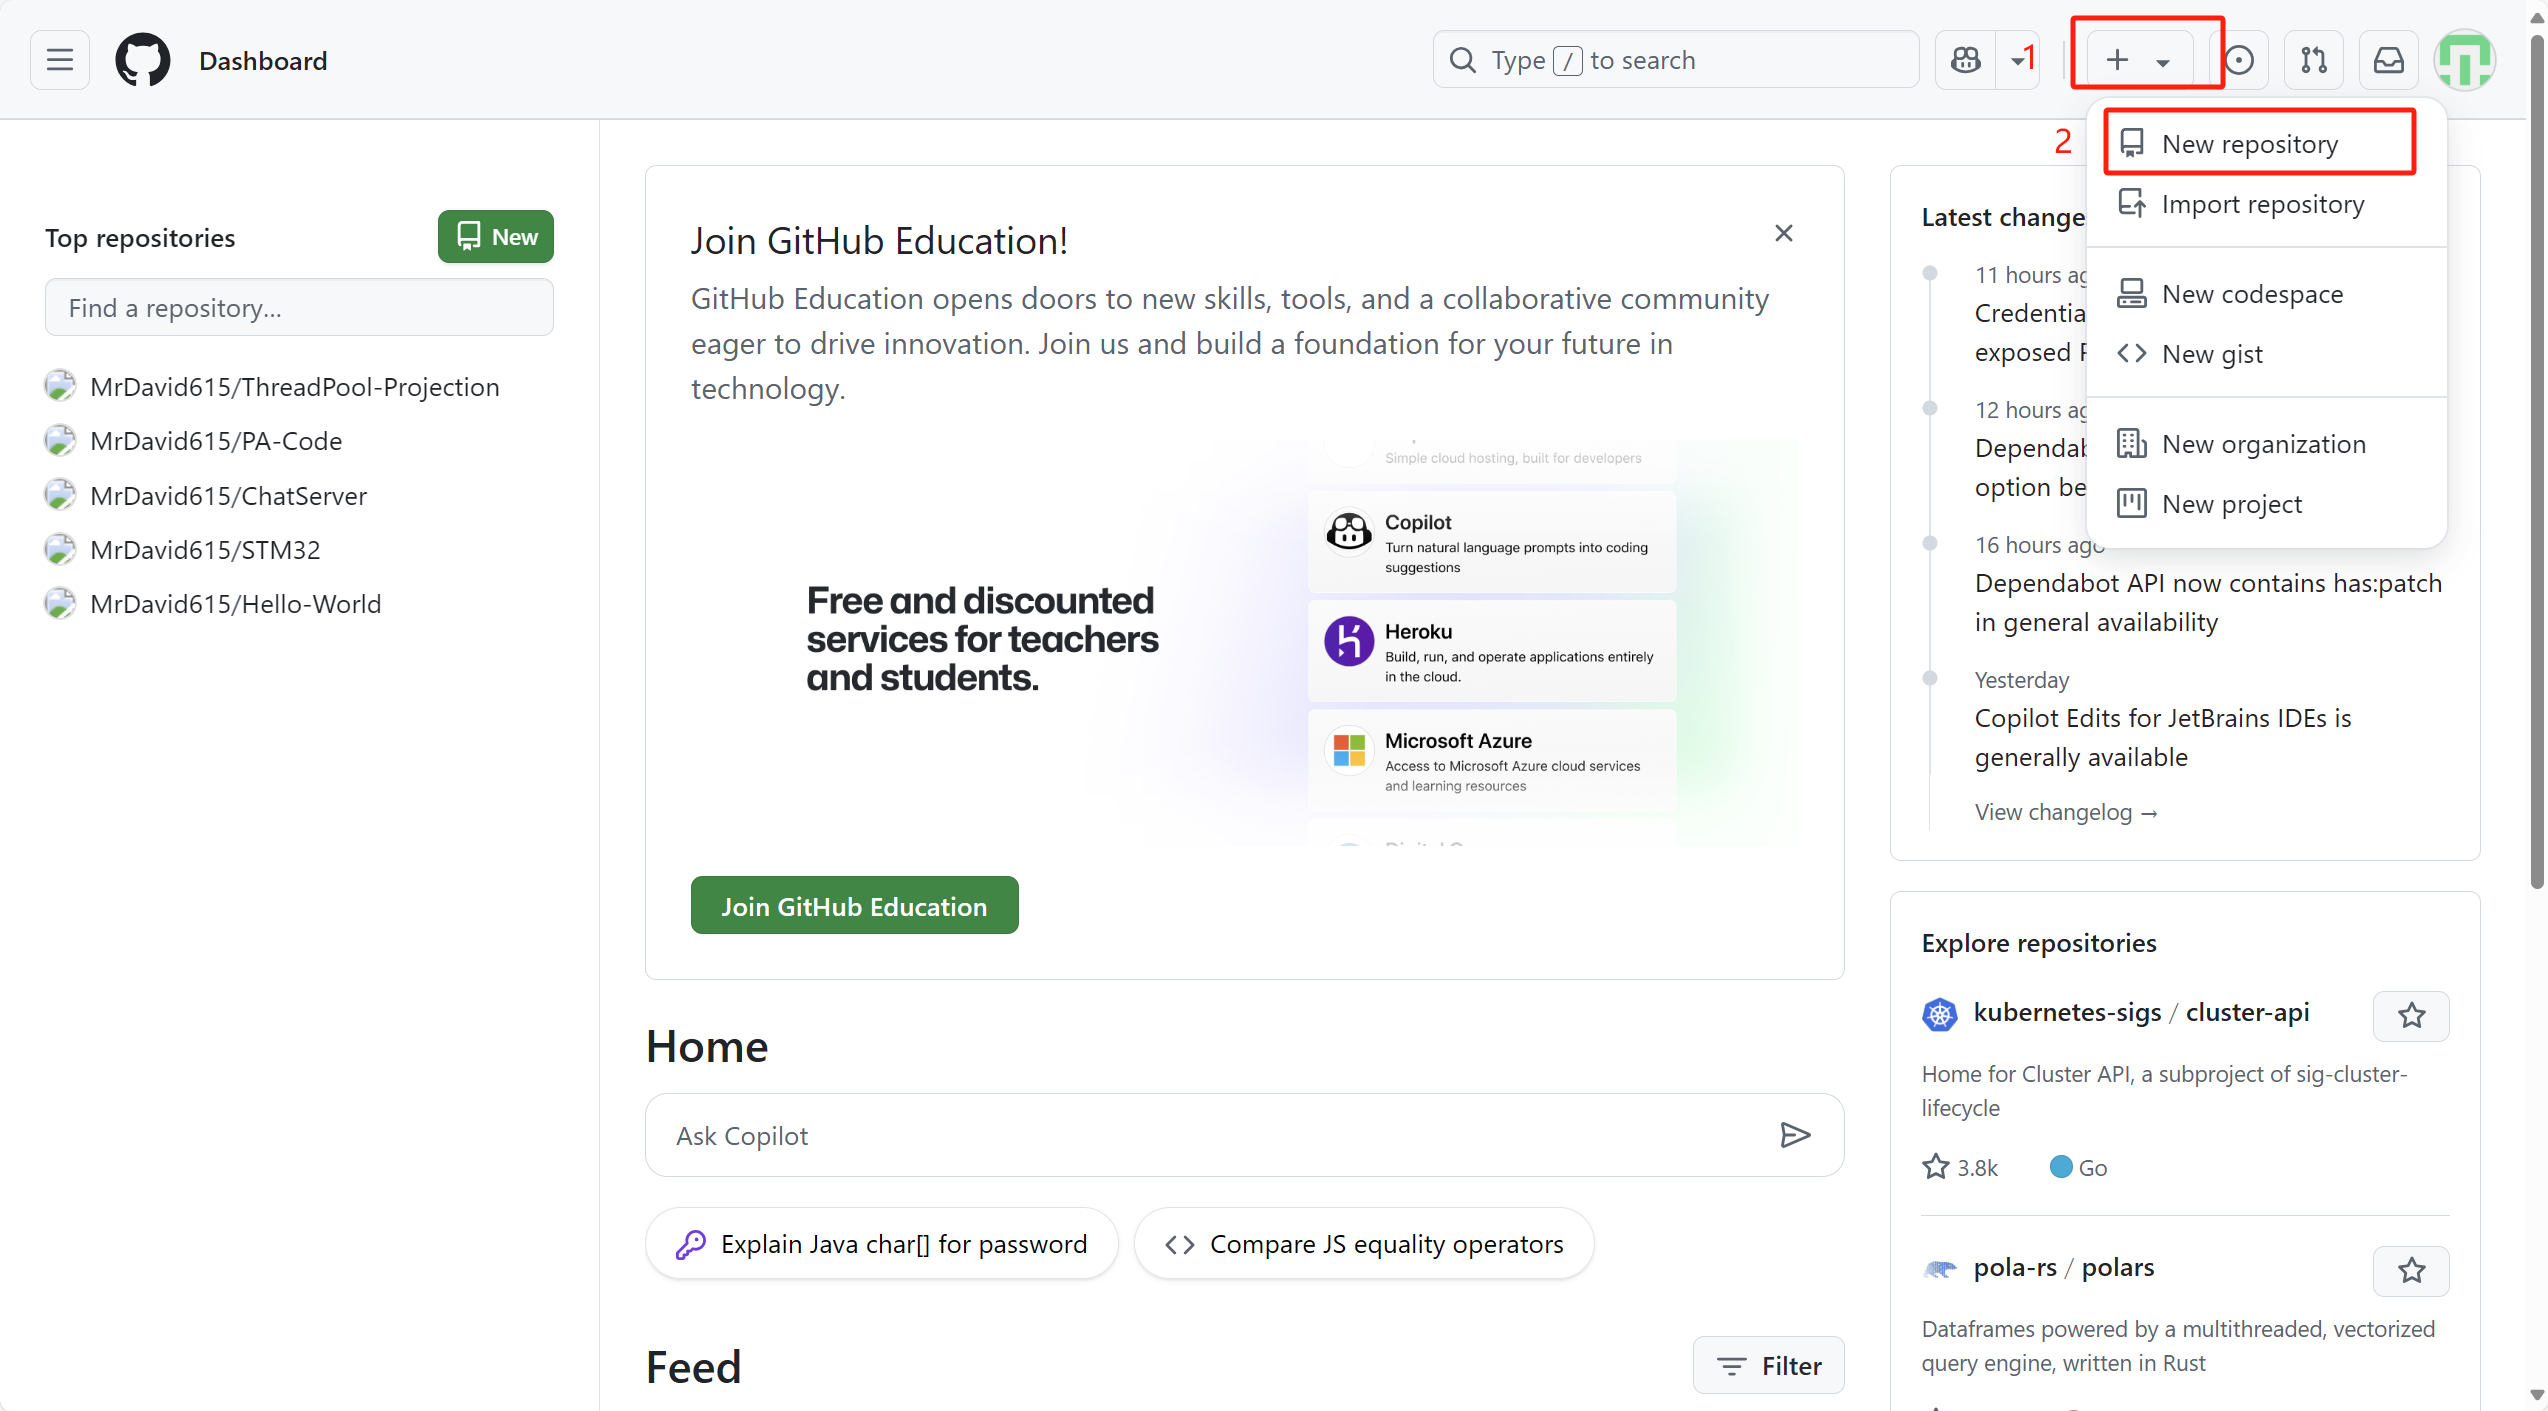
2、创建仓库
在github网站上创建一个仓库,这个操作过于基础,不做过多讲解了。
3、克隆仓库
首先需要仓库的地址,如下图所示进入到刚刚创建的仓库中,复制图中的网址。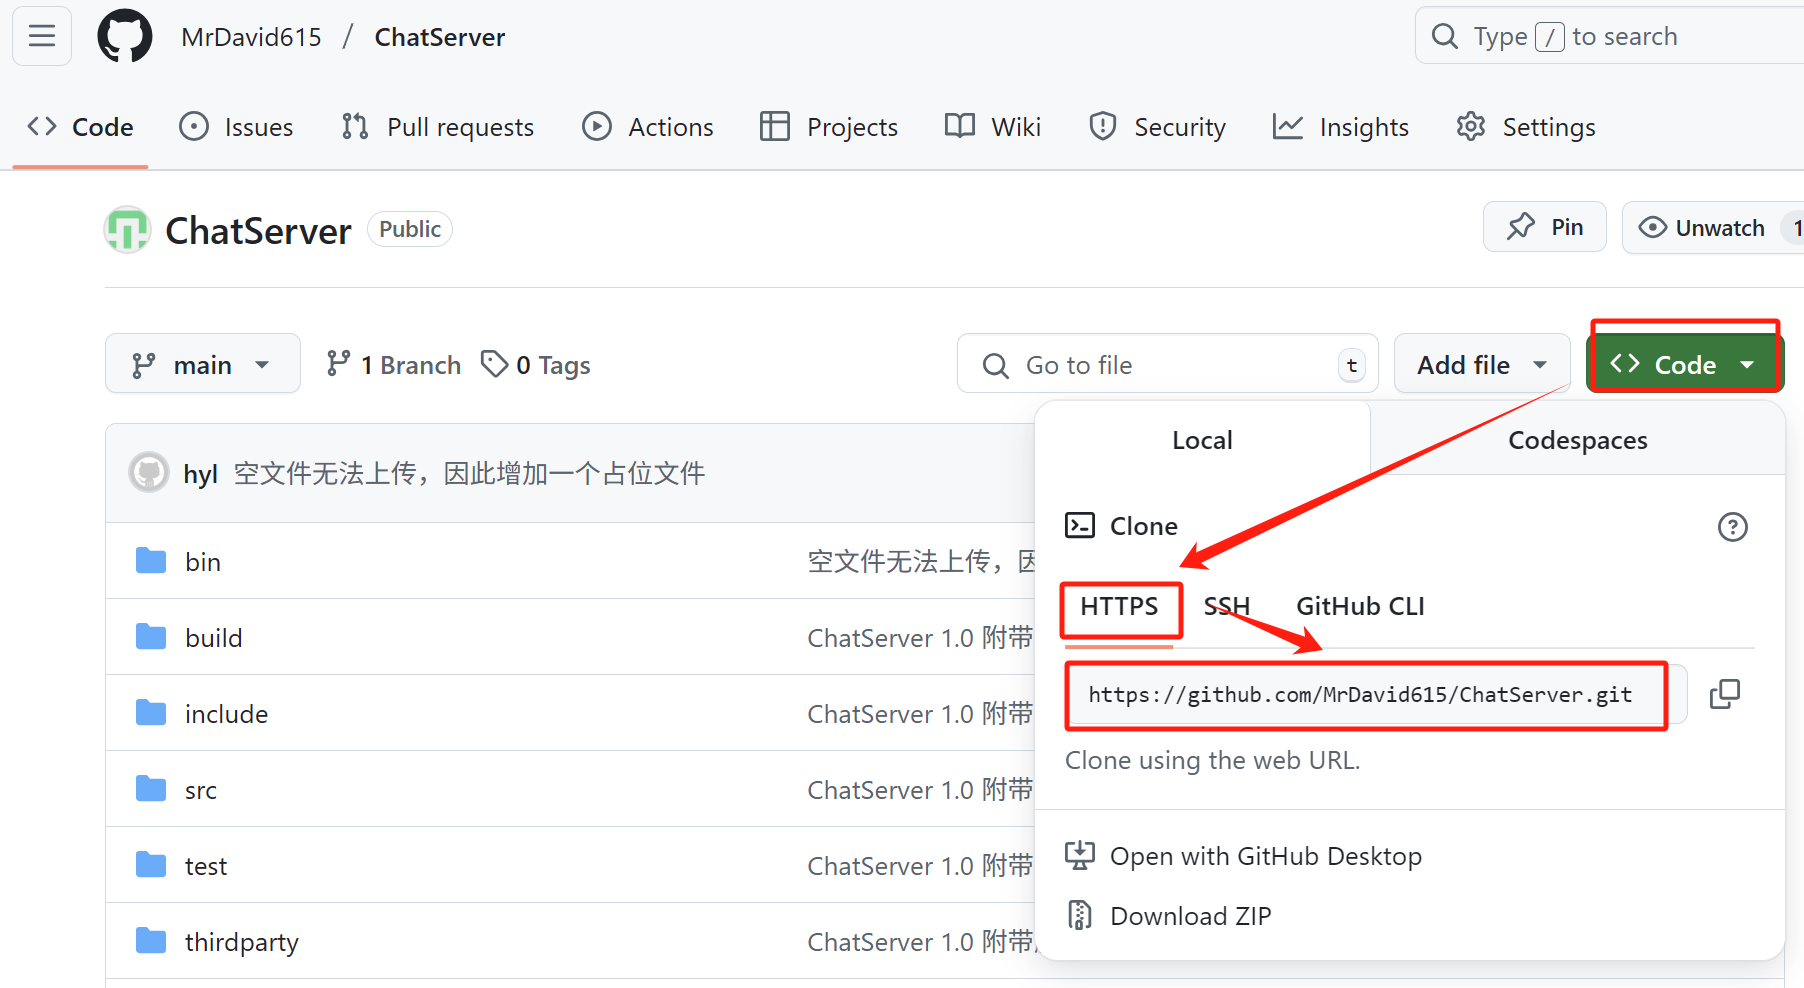 接下来切换到我们项目的目录下,我这里是:
~/Desktop/Chat,输入下面的指令进行克隆仓库:
hyl@hylPC:~/Desktop/Chat$ git clone https://github.com/MrDavid615/ChatServer.git
如上图所示,克隆后本地目录下会出现一个ChatServer文件夹,这取决于你的仓库的名字,这里文件夹就是一个github的仓库,在该文件夹下会有一个隐藏文件.git。在其他的文件夹下运行git类指令是无法运行的(git clone除外),类似于git pull;git push等指令都要在git仓库对应的文件夹下运行,因为这些仓库里面有.git这个隐藏文件。
这样我们就成功在本地克隆了一个github仓库。
代码提交
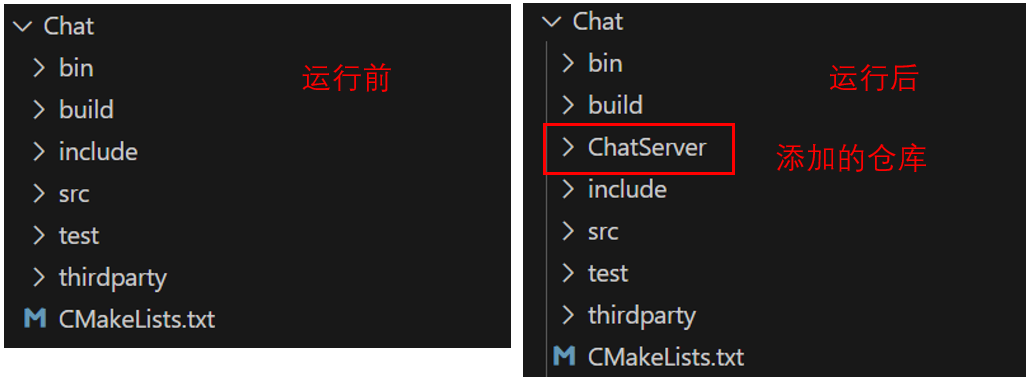
1、在ChatServer内进行开发
现在我们的代码都是在本地电脑上,不在仓库中,因此我们需要把本地的文件移动到ChatServer文件夹中。假设我们是在ChatServer目录下进行的开发。大家可以直接使用光标在VS Code左侧的目录树下操作文件,我这里用命令行的方式都是一样的。
hyl@hylPC:~/Desktop/Chat$ mv bin/ ChatServer/
hyl@hylPC:~/Desktop/Chat$ mv build ChatServer
hyl@hylPC:~/Desktop/Chat$ mv include/ ChatServer/
hyl@hylPC:~/Desktop/Chat$ mv src/ ChatServer/
hyl@hylPC:~/Desktop/Chat$ mv thirdparty/ ChatServer/
hyl@hylPC:~/Desktop/Chat$ mv test/ ChatServer/
hyl@hylPC:~/Desktop/Chat$ mv CMakeLists.txt  ChatServer/
hyl@hylPC:~/Desktop/Chat$ ls
ChatServer
这个操作实际上就是对我们仓库内的代码进行了一个修改(可以认为这些代码都是在ChatServer下编写的),之后我们继续开发都在ChatServer文件夹下,就不需要移动文件夹了。
执行完上面的操作后,我们本地的仓库与远程的仓库就会出现差异。
2、跟踪修改
我们切换到ChatServer下,输入git status指令与git add .指令(上面讲过了,除git clone外的其他指令要在在git仓库下才能运行)
hyl@hylPC:~/Desktop/Chat/ChatServer$ git status
On branch main
Your branch is up to date with 'origin/main'.Untracked files:(use "git add <file>..." to include in what will be committed)CMakeLists.txtbuild/include/src/test/thirdparty/nothing added to commit but untracked files present (use "git add" to track)
hyl@hylPC:~/Desktop/Chat/ChatServer$ git add .
# git add .指令的输出省略
这里显示了我们当前的本地仓库与远程仓库所有的文件上的差异,因为我们刚刚在本地修改了ChatServer的内容(增加了一些文件),远程没有同步。因此我们需要使用git add .指令将我们的修改增加到暂存区。
这里git add后面跟的是一个路径,后面跟一个“点”表示将当前目录内的所有修改都加入暂存区。通过后面指定具体目录,我们可以选择需要加入暂存区的文件的范围。比如我输入git add ./build/就表示将当前目录下的build子目录下的文件加入暂存区。
3、提交修改
接下来将代码提交,输入git commit -m "your descrip" ,引号内为这次提交的文字描述,没有格式要求,随便写一些文字来描述这次提交的改动。对与第一次提交的同学,走到这一步可能出现问题。
hyl@hylPC:~/Desktop/Chat/ChatServer$ git commit -m "ChatServer 1.0 附带服务器端所有源代码"
Author identity unknown*** Please tell me who you are.Rungit config --global user.email "you@example.com"git config --global user.name "Your Name"to set your account's default identity.
Omit --global to set the identity only in this repository.fatal: unable to auto-detect email address (got 'hyl@hylPC.(none)')
上面的问题主要是没有配置当前的用户与邮箱,因此需要进行配置,输入git config ...注意这里的邮箱和用户名其实只是一个标识符,没有实际意义
hyl@hylPC:~/Desktop/Chat/ChatServer$ git config user.email "hyl@hyl.com"
hyl@hylPC:~/Desktop/Chat/ChatServer$ git config user.name "hyl"
重新提交:
hyl@hylPC:~/Desktop/Chat/ChatServer$ git commit -m "ChatServer 1.0 附带服务器端所有源代码"
[main 4e741ec] ChatServer 1.0 附带服务器端所有源代码61 files changed, 47062 insertions(+)create mode 100644 CMakeLists.txt# 。。。省略create mode 100644 thirdparty/json.hpp
4、推送代码
走到这一步后,我们远程的仓库还没有实际的修改,想要改变远程仓库,我们需要输入最后一个指令git push。对于第一次操作的朋友,这里一定需要进行身份认证,这里有两种方法:Token或SSH,推荐使用SSH,如何配置我在下面有详细的讲述。
hyl@hylPC:~/Desktop/Chat/ChatServer$ git push
Username for 'https://github.com':
验证身份后再次运行git push即可。
解决身份验证问题
SSH
1、回到git hub网页,点击右上角头像,点击Settings,进入下图页面
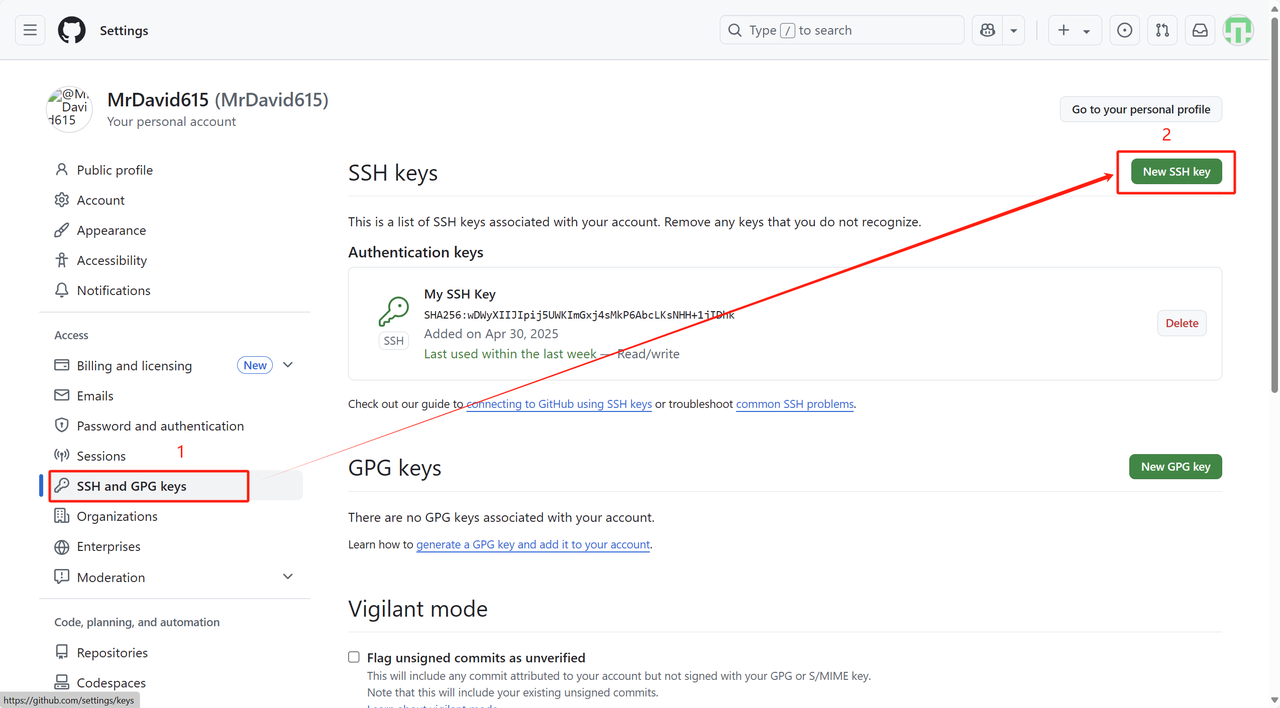
2、点击后进入这里,需要输入一个密钥(这里图片标准不准确,应该是填入我们复制的公钥,懒得改了)
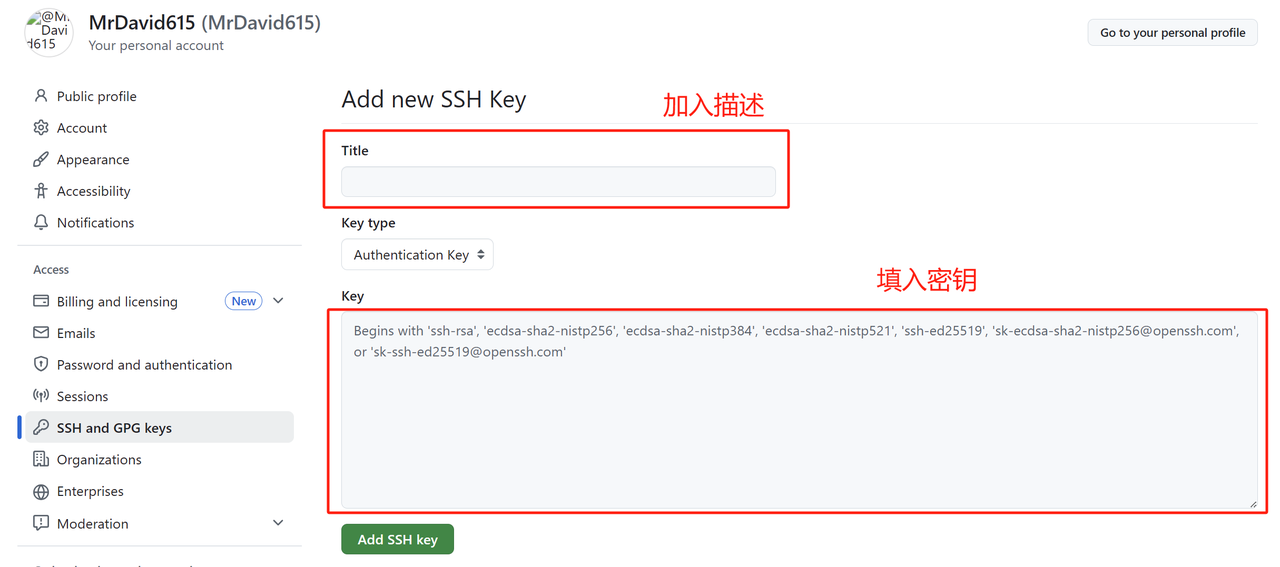
3、我们需要生成这个密钥。终端输入如下指令,这里的邮箱是刚刚我们设置的那个虚假的邮箱,之后疯狂回车,会生成一个密钥文件存储在路径/home/hyl/.ssh/id_rsa
ssh-keygen -t rsa -b 4096 -C "your_email@example.com"# 下面是指令的输出,有省略,不一样不要慌
Generating public/private rsa key pair.
Enter file in which to save the key (/home/hyl/.ssh/id_rsa):
4、前往路径下,可以看到一个.pub后缀的文件,里面的文本对应公钥:
hyl@hylPC:~/Desktop/Chat/ChatServer$ cd /home/hyl/.ssh/
hyl@hylPC:~/.ssh$ ls
authorized_keys  id_rsa  id_rsa.pub  known_hosts  known_hosts.old
5、使用cat查看内容并复制.pub文件的内容(公钥很长,这里有省略)
hyl@hylPC:~/.ssh$ cat id_rsa.pub
ssh-rsa AAAAB3NzaC1yc2....ZrNAK+jiEqoQ== hyl@hyl.com
6、把复制的文本填入(这里图片标准不准确,应该是填入我们复制的公钥,懒得改了)

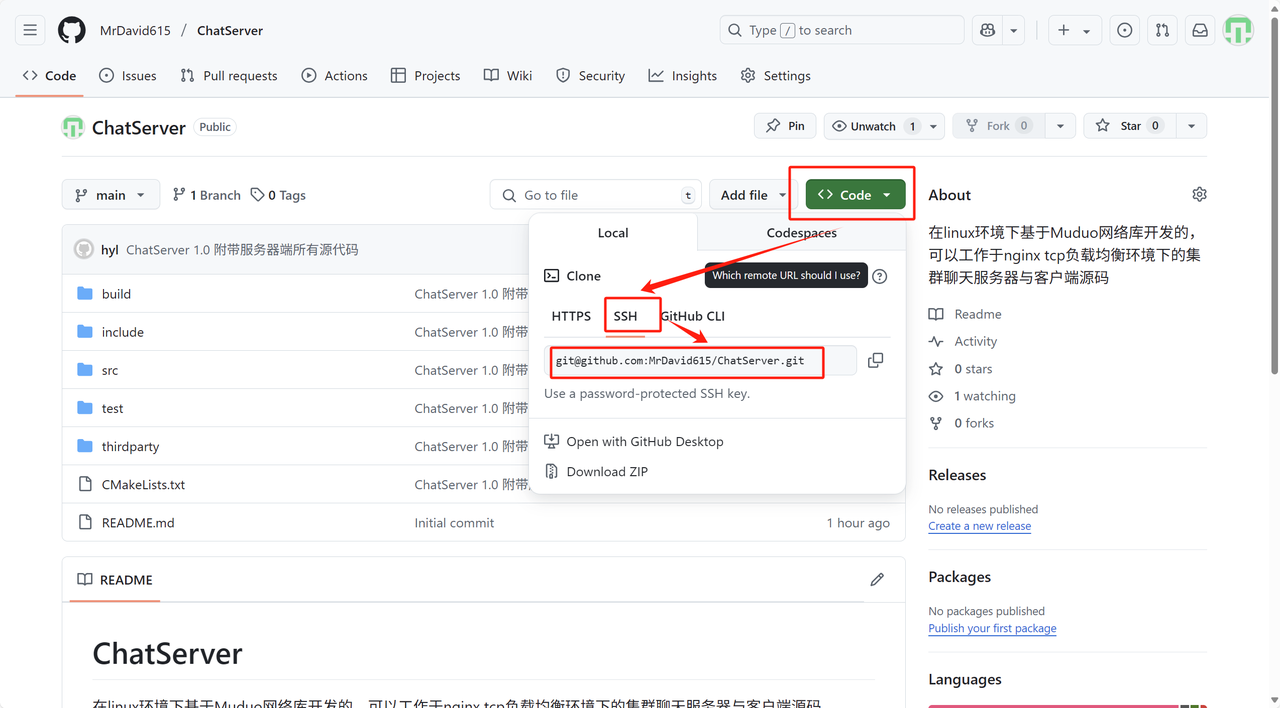
7、需要切换到ssh推送模式,由于之前克隆时用的是HTTPS方式来获取仓库网址,这里使用SSH需要修改一下仓库的网址,在终端输入:
git remote set-url origin git@github.com:MrDavid615/ChatServer.git
这里的网址用下图下图的方式获取:
8、检测ssh配置状态,输入指令后狂按回车,最后会显示出最下面一行文字证明配置成功
hyl@hylPC:~/.ssh$ ssh -T git@github.com
# 下面是输出
The authenticity of host 'github.com (20.205.243.166)' can't be established.
ED25519 key fingerprint is SHA256....4UvCOqU.
This key is not known by any other names.
Are you sure you want to continue connecting (yes/no/[fingerprint])? yes(这里输入yes)
Warning: Permanently added 'github.com,20.205.243.166' (ED25519) to the list of known hosts.
Hi hyl! You've successfully authenticated, but GitHub does not provide shell access
9、可以推送代码了!
Token
使用令牌的方式进行验证很不稳定,而且经常遇到令牌过期的问题,推荐大家使用SSH方法,这里就先不讲Token了,有时间再更新
(未完待续)