华为云IoT平台与MicroPython实战:从MQTT协议到物联网设备开发
目录
前言
1. 华为云
1.1. 创建实例
1.2. 创建产品
1.3. 编辑服务模型
1.4. 注册设备
1.4.1. 复制设备连接参数
1.5. 连接参考代码
2. micropython版-物联网
2.1. 环境搭建
2.2. 实现步骤
2.3. 示例代码
结语
前言
物联网(IoT)技术的快速发展,使得设备间的智能互联成为现实。MQTT协议凭借其轻量级、低功耗和高可靠性,成为物联网通信的核心技术之一。本文以华为云IoT平台和MicroPython开发为主线,详细介绍如何通过MQTT协议实现设备与云端的双向通信。
内容涵盖:
-
华为云IoT平台的实例创建、产品定义、设备注册及连接配置
-
MicroPython环境搭建,实现ESP32等嵌入式设备的Wi-Fi连接与MQTT通信
-
完整的代码示例,包括设备属性上报、云端指令接收与响应
无论您是物联网开发者、嵌入式工程师,还是对IoT技术感兴趣的爱好者,本文都将帮助您快速掌握设备上云的完整流程,并实现稳定、高效的物联网通信。
1. 华为云
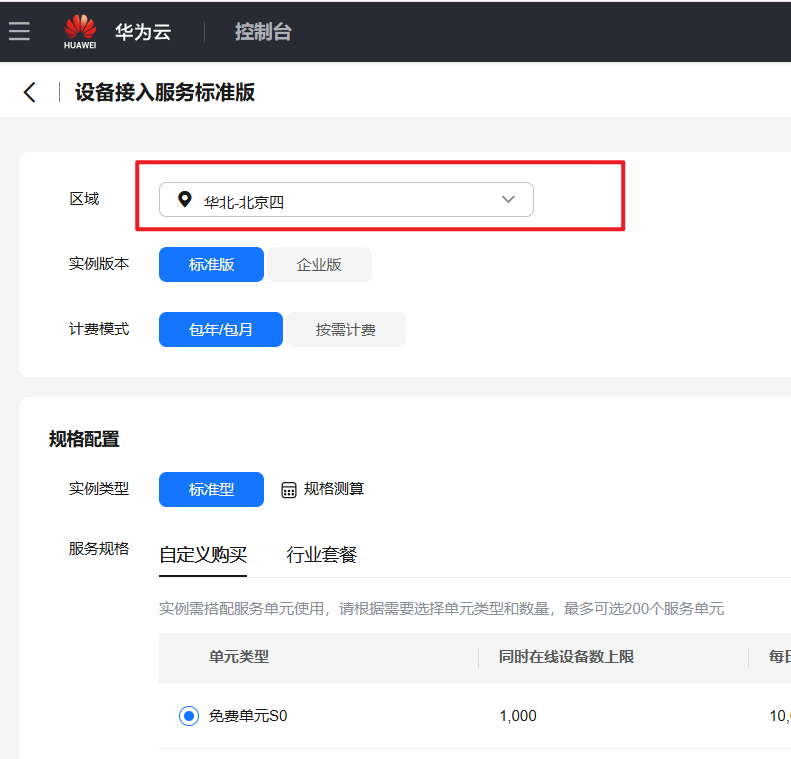
1.1. 创建实例
记得选择华北-北京四区
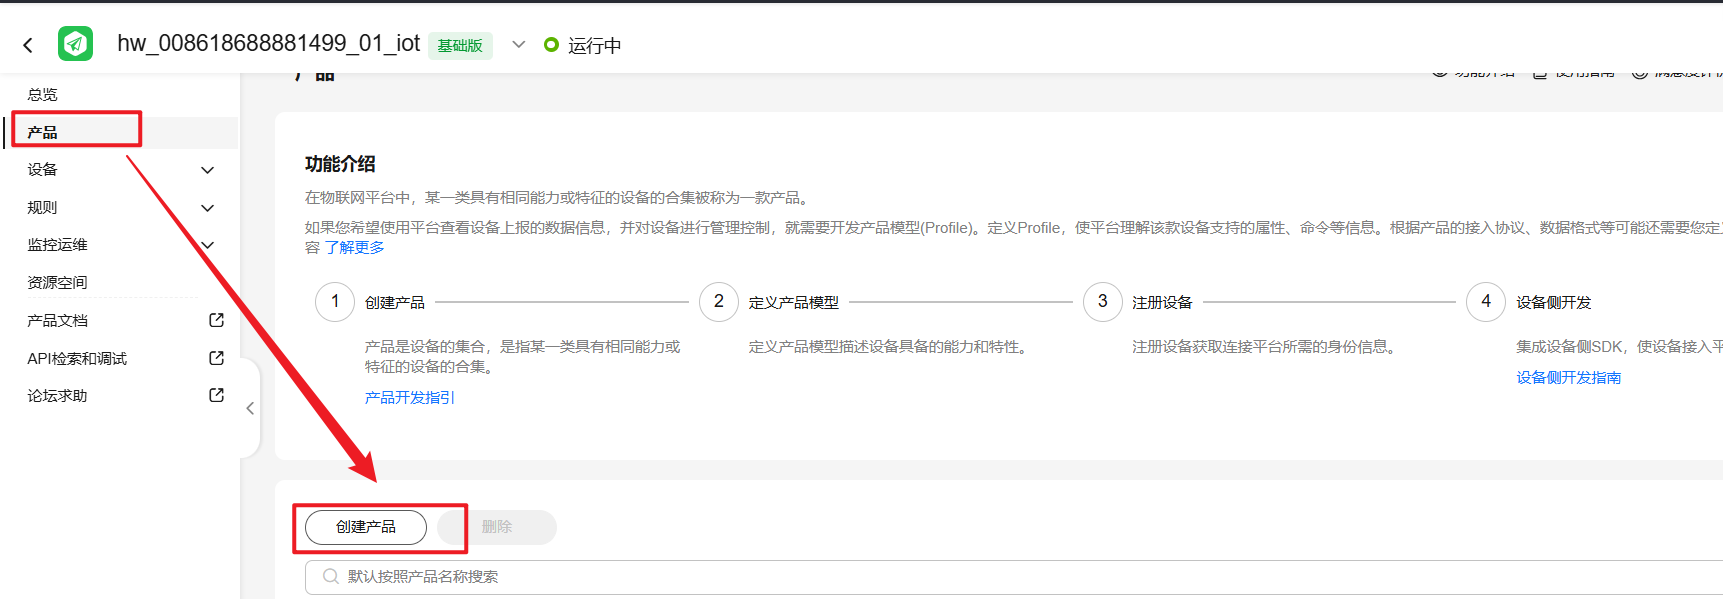
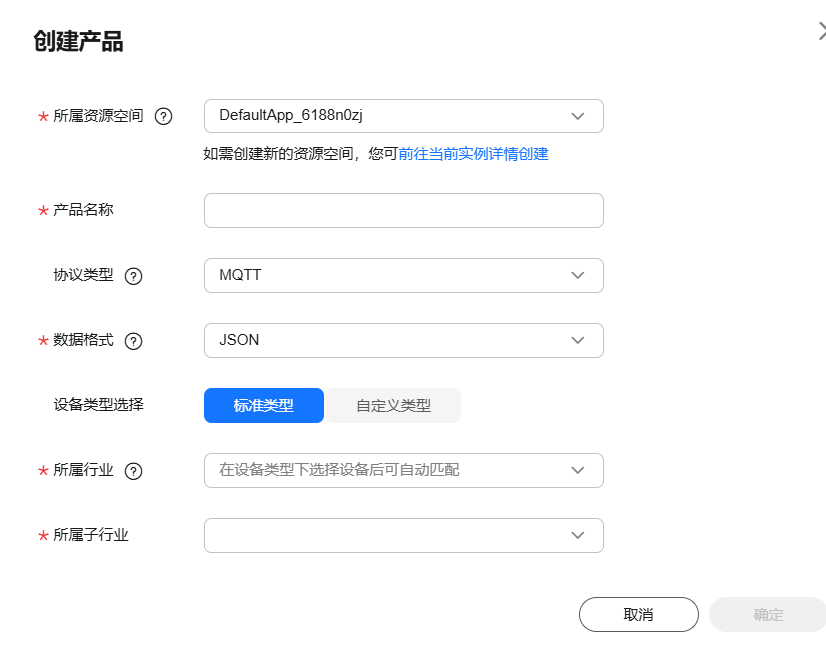
1.2. 创建产品
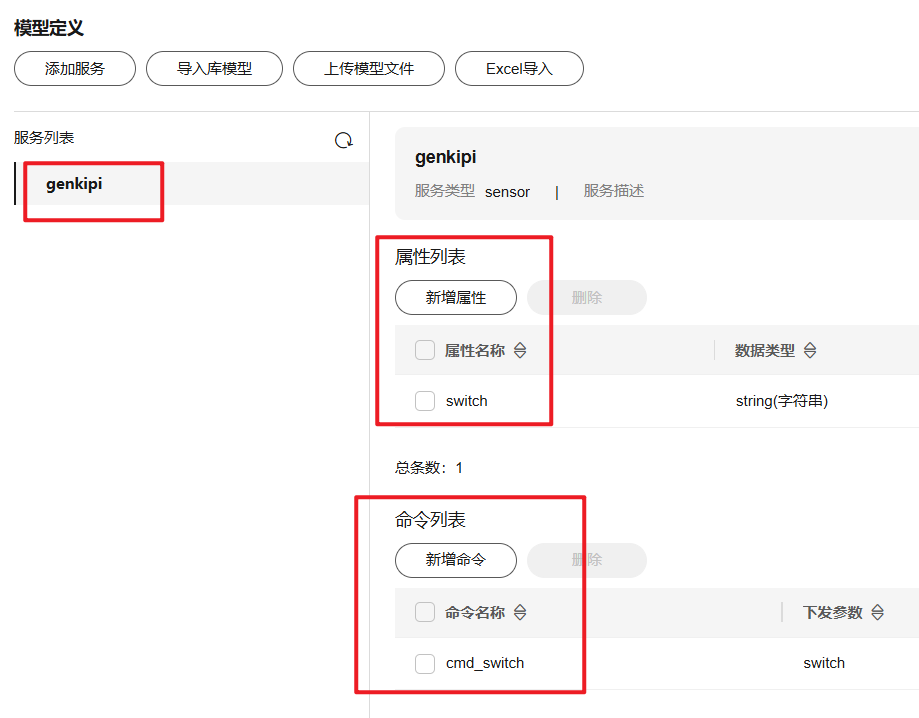
1.3. 编辑服务模型
1.4. 注册设备
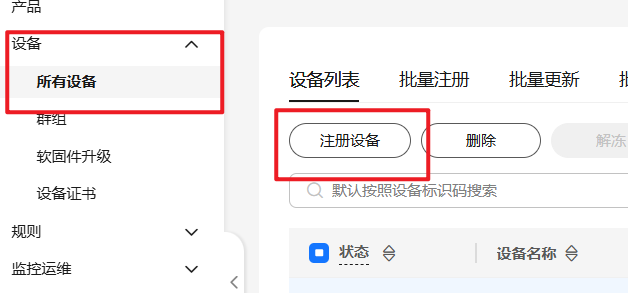
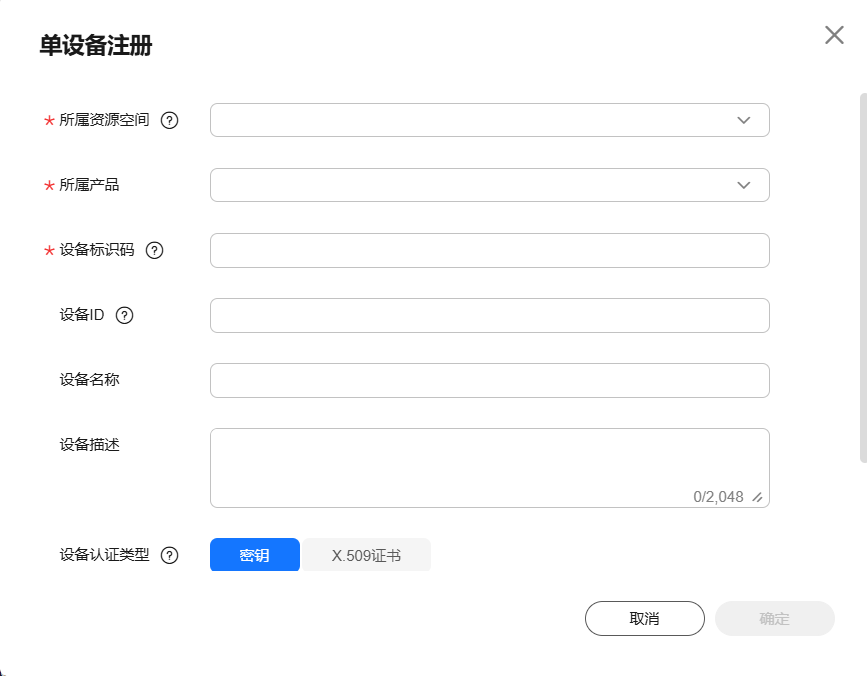
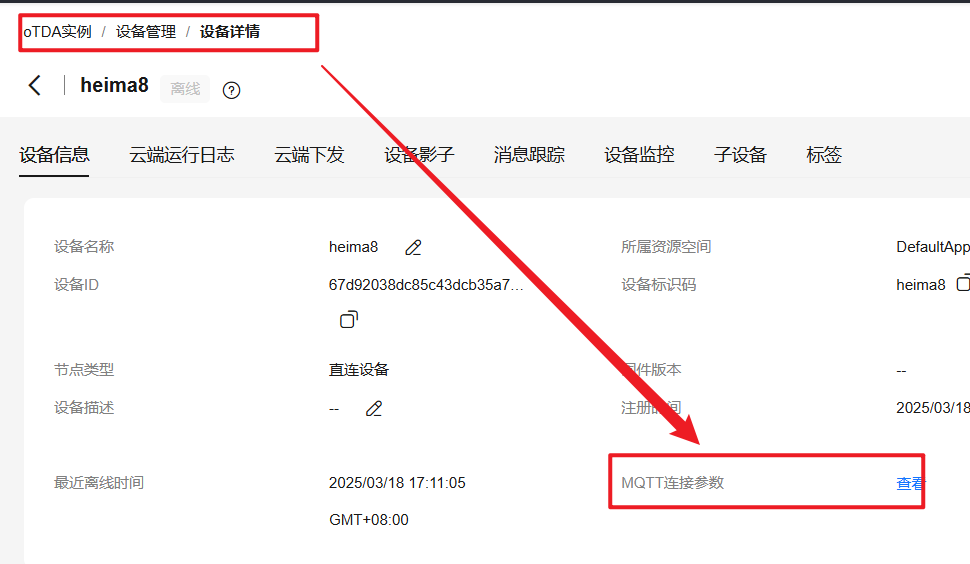
1.4.1. 复制设备连接参数
1.5. 连接参考代码
参考连接:设备属性上报_设备接入 IoTDA_华为云
参考代码:
import json
import time
import paho.mqtt.client as mqtt
from MqttSign import AuthIfo# pip install paho-mqtt==1.6.1
# 1. 去到设备界面复制设备ID
# 2. 复制设备mqtt联网参数# 订阅的话题
subTopic = "$oc/devices/xxxxxxxxxxxxxxx/sys/properties/set/request_id=123"
# 发布的话题
pubTopic = "$oc/devices/xxxxxxxxxxxxxx/sys/properties/report"port = 1883keepAlive = 300"""
{"username": "x","password": "x","clientId": "x","hostname": "x.iot-x.cn-north-4.myhuaweicloud.com","port": 8883,"protocol": "MQTTS"
}
"""
username="x"
password= "x"
clientId= "x"
hostname= "x.iot-mqtts.cn-north-4.myhuaweicloud.com"client = mqtt.Client(clientId)
client.username_pw_set(username=username, password=password)def on_connect(client, userdata, flags, rc):if rc == 0:print("Connect huaweicloud IoT Cloud Sucess")else:print("Connect failed...  error code is:" + str(rc))def on_message(client, userdata, msg):topic = msg.topicpayload = msg.payload.decode()print("receive message ---------- topic is : " + topic)print("receive message ---------- payload is : " + payload)# {"paras":{"switch":1},"service_id":"heima8","command_name":"cmd_switch"}# json格式的字符串转成python里面的数据结构,字典data = json.loads(payload)print("switch:",data['paras']['switch'])# 回复服务器# $oc/devices/{device_id}/sys/properties/set/response/request_id={request_id}topic = "$oc/devices/67d92038dc85c43dcb35a707_heima8/sys/properties/set/response/request_id=123"client.publish(topic, "post_payload")if ("thing/service/property/set" in topic):on_thing_prop_changed(client, msg.topic, msg.payload)def on_thing_prop_changed(client, topic, payload):post_topic = topic.replace("service","event")post_topic = post_topic.replace("set","post")Msg = json.loads(payload)params = Msg['params']post_payload = "{\"params\":" + json.dumps(params) + "}"print("reveice property_set command, need to post ---------- topic is: " + post_topic)print("reveice property_set command, need to post ---------- payload is: " + post_payload)client.publish(post_topic, post_payload)def connect_mqtt():client.connect(hostname, port, keepAlive)return clientdef publish_message():# publish 5 messages to pubTopic("/a1LhUsK****/python***/user/update")for i in range(50):data = {"services": [{"service_id": "heima8","properties": {"switch": i,},}]}message = json.dumps(data)client.publish(pubTopic, message)print("publish msg: " + str(i))print("publish msg: " + message)time.sleep(2)def subscribe_topic():# subscribe to subTopic("/a1LhUsK****/python***/user/get") and request messages to be deliveredclient.subscribe(subTopic)print("subscribe topic: " + subTopic)client.on_connect = on_connect
client.on_message = on_message
client = connect_mqtt()
client.loop_start()
time.sleep(2)subscribe_topic()
publish_message()while True:time.sleep(1)
2. micropython版-物联网
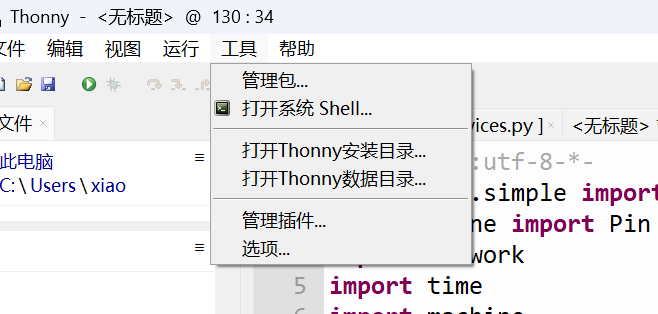
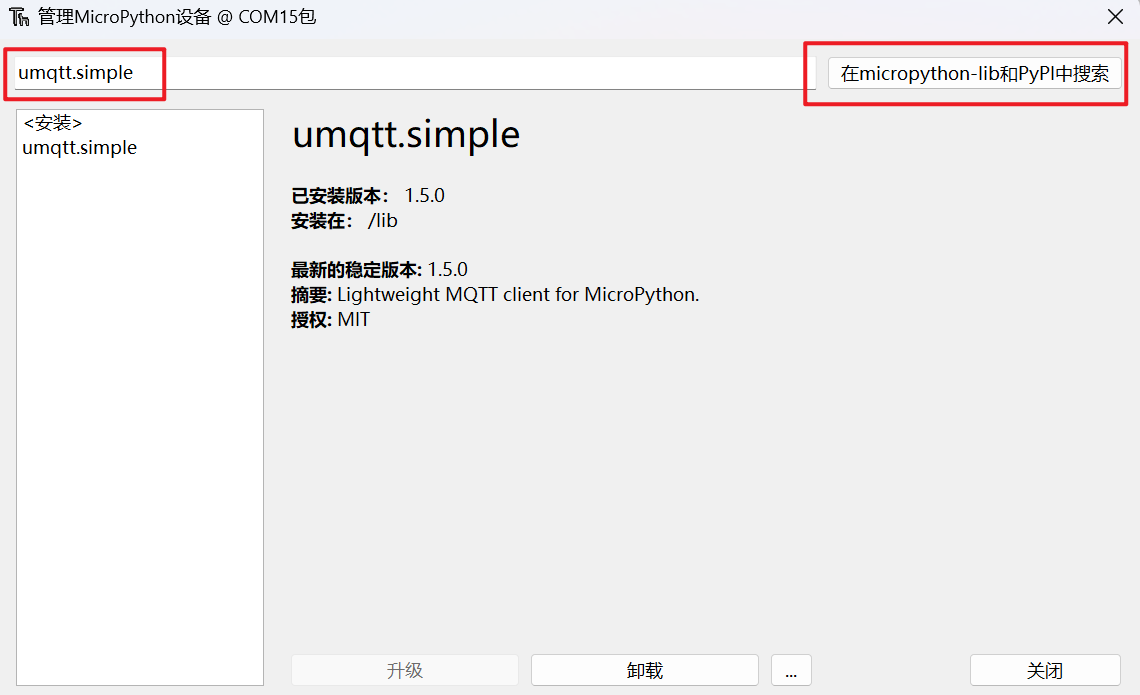
2.1. 环境搭建
安装umqtt.simple包
2.2. 实现步骤
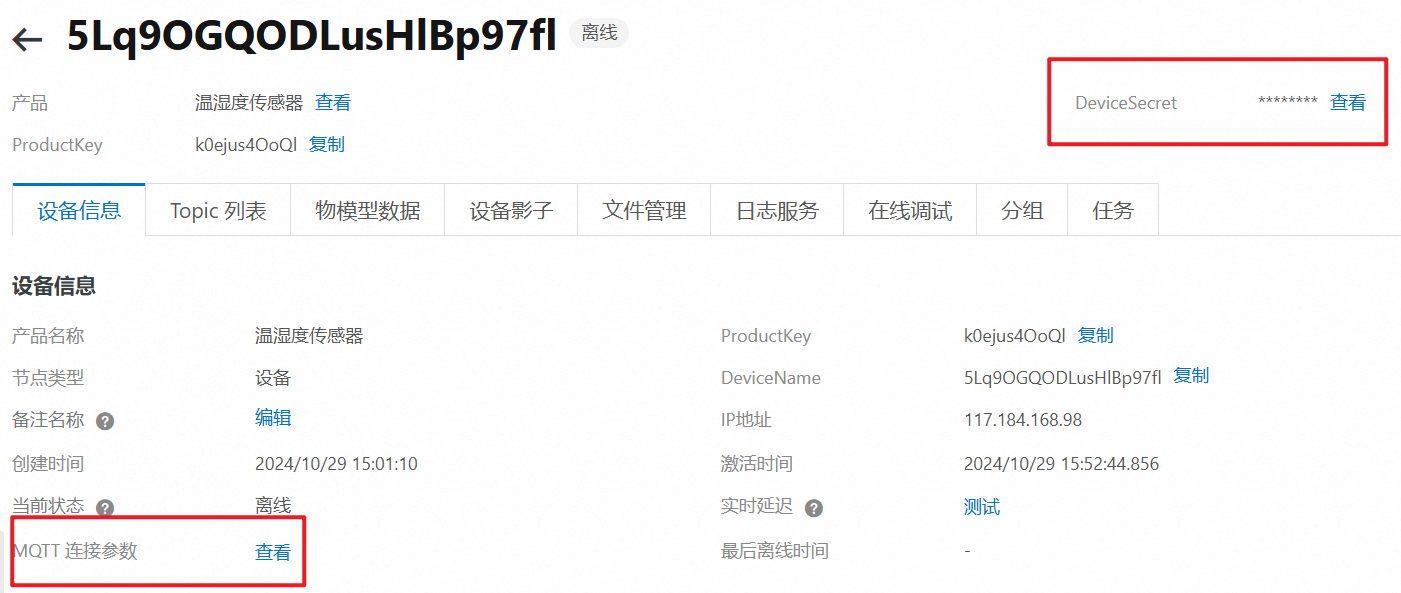
- 准备好阿里云设备连接参数
- 连接wifi
- 创建MQTTClient对象
- 订阅消息
- 定时发布消息
- 准备阿里云设备参数
- 连接wifi
def ConnectWifi(ssid, passwd):global wlanwlan = network.WLAN(network.STA_IF) # create a wlan objectwlan.active(True) # Activate the network interfacewlan.disconnect() # Disconnect the last connected WiFiwlan.connect(ssid, passwd) # connect wifiprint("开始联网...")while (wlan.ifconfig()[0] == '0.0.0.0'):time.sleep(1)print("联网成功:",wlan.ifconfig())- 创建MQTTClient
该操作api最后参数为维持心跳的时长,每隔60s就给服务器发消息,告诉服务器设备还活着
client = MQTTClient(CLIENT_ID, SERVER, 1883, username, password, 60) - 订阅消息
def subscribe_callback(topic, msg):msg = json.loads(msg)topic = topic.decode()print("接收到topic",topic)if(topic == subscribe_TOPIC):if msg['params']['AlarmSwitch'] !=0:         led.value(0)   else: led.value(1)# 设置订阅消息回调函数
client.set_callback(subscribe_callback)  # set callback
# 订阅话题
client.subscribe(subscribe_TOPIC) # client subscribes to a topic- 等待用户数据
while True:client.wait_msg() 2.3. 示例代码
#-*-coding:utf-8-*-
from umqtt.simple import MQTTClient
from machine import Pin
import network
import time
import machine
import dht
from machine import Timer
import json"""
{"ProductKey": "k0ejus4OoQl","DeviceName": "5Lq9OGQODLusHlBp97fl","DeviceSecret": "307bf81677628905e79784b4d2f65ace"
}{"clientId":"k0ejus4OoQl.5Lq9OGQODLusHlBp97fl|securemode=2,signmethod=hmacsha256,timestamp=1733748536747|",
"username":"5Lq9OGQODLusHlBp97fl&k0ejus4OoQl",
"mqttHostUrl":"iot-06z00epnznwak8t.mqtt.iothub.aliyuncs.com",
"passwd":"929e8ea099ddb639608637e4088e6ff75f617c358b954ab3c7d6f0f15f24fecc",
"port":1883}"""#---以下的参数值都需要根据自己的环境修改-----------------------------------------------
led=Pin(48,Pin.OUT) #ESP32的引脚2接了LED灯,可根据自己的ESP32板子的LED引脚来设置SSID = "icheima"  #填写自己的WIFI名称
PASSWORD = "abcdefgh"   #填写自己的WIFI密码SSID = "SUIXING-Hotel"  #填写自己的WIFI名称
PASSWORD = ""   #填写自己的WIFI密码SERVER = "iot-06z00epnznwak8t.mqtt.iothub.aliyuncs.com"  # mqttHostUrl
CLIENT_ID = "k0ejus4OoQl.5Lq9OGQODLusHlBp97fl|securemode=2,signmethod=hmacsha256,timestamp=1733748536747|"  # clientId
username = "5Lq9OGQODLusHlBp97fl&k0ejus4OoQl" #username
password = "929e8ea099ddb639608637e4088e6ff75f617c358b954ab3c7d6f0f15f24fecc"  #密码
publish_TOPIC = "/sys/k0ejus4OoQl/5Lq9OGQODLusHlBp97fl/thing/event/property/post"
subscribe_TOPIC = "/sys/k0ejus4OoQl/5Lq9OGQODLusHlBp97fl/thing/service/property/set"
#---以上的参数值都需要根据自己的环境修改-----------------------------------------------client = Nonewlan = Nonei = 0def ConnectWifi(ssid, passwd):global wlanwlan = network.WLAN(network.STA_IF)  # create a wlan objectwlan.active(True)  # Activate the network interfacewlan.disconnect()  # Disconnect the last connected WiFiwlan.connect(ssid, passwd)  # connect wifiprint("开始联网...")while (wlan.ifconfig()[0] == '0.0.0.0'):time.sleep(1)print("联网成功:",wlan.ifconfig())def subscribe_callback(topic, msg):msg = json.loads(msg)topic = topic.decode()print("接收到topic",topic)if(topic == subscribe_TOPIC):if msg['params']['AlarmSwitch'] !=0:         led.value(0)   else: led.value(1)def publish_message(mytimer):global clientglobal ii+=1try:request_params = {"CurrentTemperature": 11+i,"CurrentHumidity": 120+i,"CurrentVoltage": 120+i,"AlarmSwitch":1+i}request = {"id": 1,"version": "1.0","params": request_params,"method": "thing.event.property.post"}message = json.dumps(request)print('发布消息============================')print(message)client.publish(topic=publish_TOPIC, msg=message, retain=False, qos=0)print("发布消息成功")except Exception as e:print('exception:', e)mytimer.deinit()def wifi_deng_run():global clientglobal ledglobal wlanprint('物联网点灯大师启动...')try:ConnectWifi(SSID, PASSWORD)client = MQTTClient(CLIENT_ID, SERVER, 0, username, password, 60)  # create a mqtt clientprint('client:%s' % str(client))led.value(1)client.set_callback(subscribe_callback)  # set callbackclient.connect()  # connect mqttclient.subscribe(subscribe_TOPIC)  # client subscribes to a topicmytimer = Timer(0)mytimer.init(mode=Timer.PERIODIC, period=2000, callback=publish_message)while True:client.wait_msg()  # wait messageexcept Exception  as ex_results:print('exception1', ex_results)return "FAILED"finally:if (client is not None):led.value(0)client.disconnect()wlan.disconnect()wlan.active(False)print("重新连接")return 'FAILED'while (True):if wifi_deng_run() == 'FAILED':print('FAILED,retry to connect')time.sleep(5)
结语
本文通过华为云IoT平台和MicroPython的结合,展示了MQTT协议在物联网中的强大能力。从云端实例配置到嵌入式设备开发,我们一步步实现了设备与云的高效通信,并完成了数据上报与远程控制功能。
未来,随着5G、边缘计算等技术的发展,物联网的应用场景将更加丰富。希望本文的实战指南能为您提供清晰的开发思路,助力您构建更智能、更可靠的物联网系统。如果您在实践过程中遇到问题,欢迎查阅华为云官方文档或社区论坛,共同探索物联网的无限可能! 🚀