Spring系列五:手动实现Spring底层机制 第一部分
Spring系列五:手动实现Spring底层机制
- 🍝类加载器和classpath详解
- 💗实现任务阶段1
- 🍚编写自己Spring容器, 扫描包得到bean的class对象
- 💗实现任务阶段2
- 🍚扫描将bean信息封装到BeanDefinition对象, 并放入到Map
上文中, 我们学习到了 Spring系列四:AOP切面编程
接下来我们学习, 手动实现Spring底层机制

语法学习
- 类名首字母小写
import org.apache.commons.lang.StringUtils;
StringUtils.uncapitalize(className);- 判断类对象(clazz)是否实现某个接口
接口.class.isAssignableFrom(clazz)
🍝类加载器和classpath详解
● java的类加载器 3 种
- Bootstrap类加载器---------------------对应路径jre\lib
- Ext类加载器------------------------------对应路径jre\lib\ext
- App类加载器-----------------------------对应路径classpath
●classpath 类路径, 就是 java.exe 执行时, 指定的路径, 比如

复制, 粘贴到txt文档中,,如下
"D:\Program Files\Java\jdk1.8.0_361\bin\java.exe " -agentlib:jdwp=transport=dt_socket,address=127.0.0.1:55339,suspend=y,server=n -javaagent:C:\Users\97896\AppData\Local\JetBrains\IntelliJIdea2022.3\captureAgent\debugger-agent.jar -Dfile.encoding=GBK -classpath “D:\Program Files\Java\jdk1.8.0_361\jre\lib\charsets.jar;D:\Program Files\Java\jdk1.8.0_361\jre\lib\deploy.jar;D:\Program Files\Java\jdk1.8.0_361\jre\lib\ext\access-bridge-64.jar;D:\Program Files\Java\jdk1.8.0_361\jre\lib\ext\cldrdata.jar;D:\Program Files\Java\jdk1.8.0_361\jre\lib\ext\dnsns.jar;D:\Program Files\Java\jdk1.8.0_361\jre\lib\ext\jaccess.jar;D:\Program Files\Java\jdk1.8.0_361\jre\lib\ext\jfxrt.jar;D:\Program Files\Java\jdk1.8.0_361\jre\lib\ext\localedata.jar;D:\Program Files\Java\jdk1.8.0_361\jre\lib\ext\nashorn.jar;D:\Program Files\Java\jdk1.8.0_361\jre\lib\ext\sunec.jar;D:\Program Files\Java\jdk1.8.0_361\jre\lib\ext\sunjce_provider.jar;D:\Program Files\Java\jdk1.8.0_361\jre\lib\ext\sunmscapi.jar;D:\Program Files\Java\jdk1.8.0_361\jre\lib\ext\sunpkcs11.jar;D:\Program Files\Java\jdk1.8.0_361\jre\lib\ext\zipfs.jar;D:\Program Files\Java\jdk1.8.0_361\jre\lib\javaws.jar;D:\Program Files\Java\jdk1.8.0_361\jre\lib\jce.jar;D:\Program Files\Java\jdk1.8.0_361\jre\lib\jfr.jar;D:\Program Files\Java\jdk1.8.0_361\jre\lib\jfxswt.jar;D:\Program Files\Java\jdk1.8.0_361\jre\lib\jsse.jar;D:\Program Files\Java\jdk1.8.0_361\jre\lib\management-agent.jar;D:\Program Files\Java\jdk1.8.0_361\jre\lib\plugin.jar;D:\Program Files\Java\jdk1.8.0_361\jre\lib\resources.jar;D:\Program Files\Java\jdk1.8.0_361\jre\lib\rt.jar;D:\idea_project\zzw_spring\zzw-spring\target\classes;D:\maven\repository\org\springframework\spring-context\5.3.8\spring-context-5.3.8.jar;D:\maven\repository\org\springframework\spring-aop\5.3.8\spring-aop-5.3.8.jar;D:\maven\repository\org\springframework\spring-beans\5.3.8\spring-beans-5.3.8.jar;D:\maven\repository\org\springframework\spring-core\5.3.8\spring-core-5.3.8.jar;D:\maven\repository\org\springframework\spring-jcl\5.3.8\spring-jcl-5.3.8.jar;D:\maven\repository\org\springframework\spring-expression\5.3.8\spring-expression-5.3.8.jar;D:\maven\repository\org\springframework\spring-aspects\5.3.8\spring-aspects-5.3.8.jar;D:\maven\repository\org\aspectj\aspectjweaver\1.9.6\aspectjweaver-1.9.6.jar;D:\Program Files\IntelliJ IDEA 2022.3.2\lib\idea_rt.jar” com.zzw.spring.AppMain
💗实现任务阶段1
🍚编写自己Spring容器, 扫描包得到bean的class对象
编写自己Spring容器, 扫描包得到bean的class对象

第一阶段的代码参考👉Spring系列三:基于注解配置bean
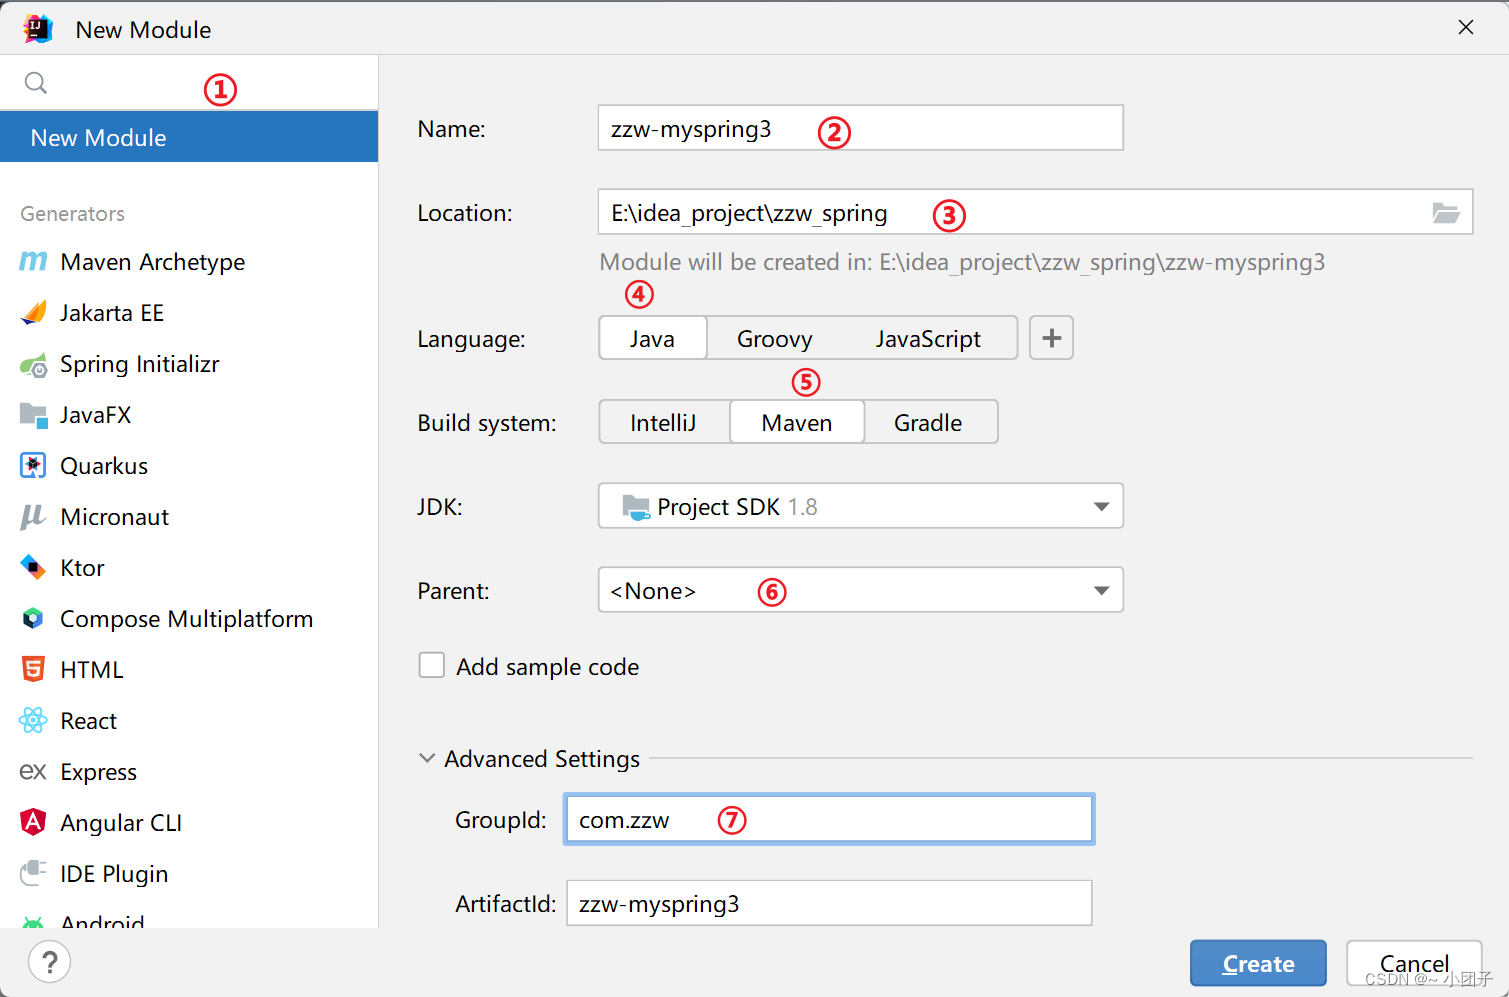
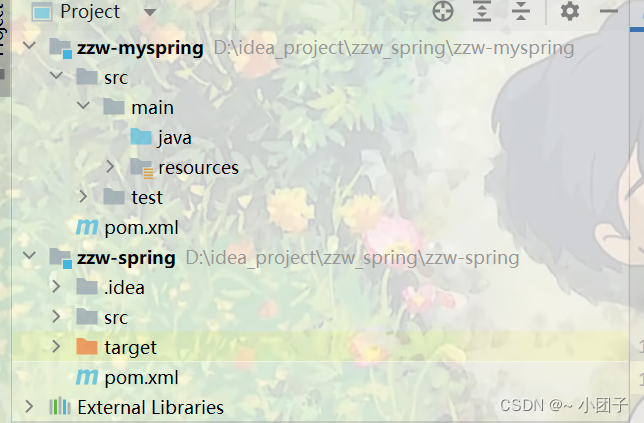
1.在zzw-spring项目创建子模块(java maven module) zzw-myspring项目
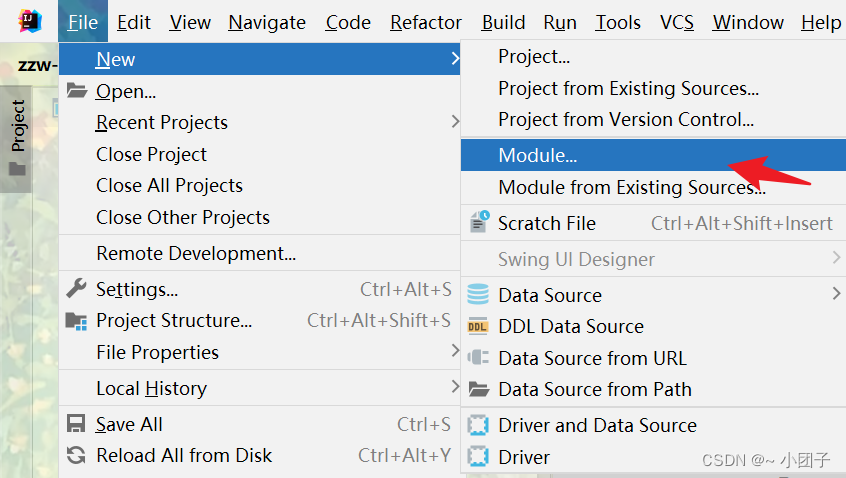
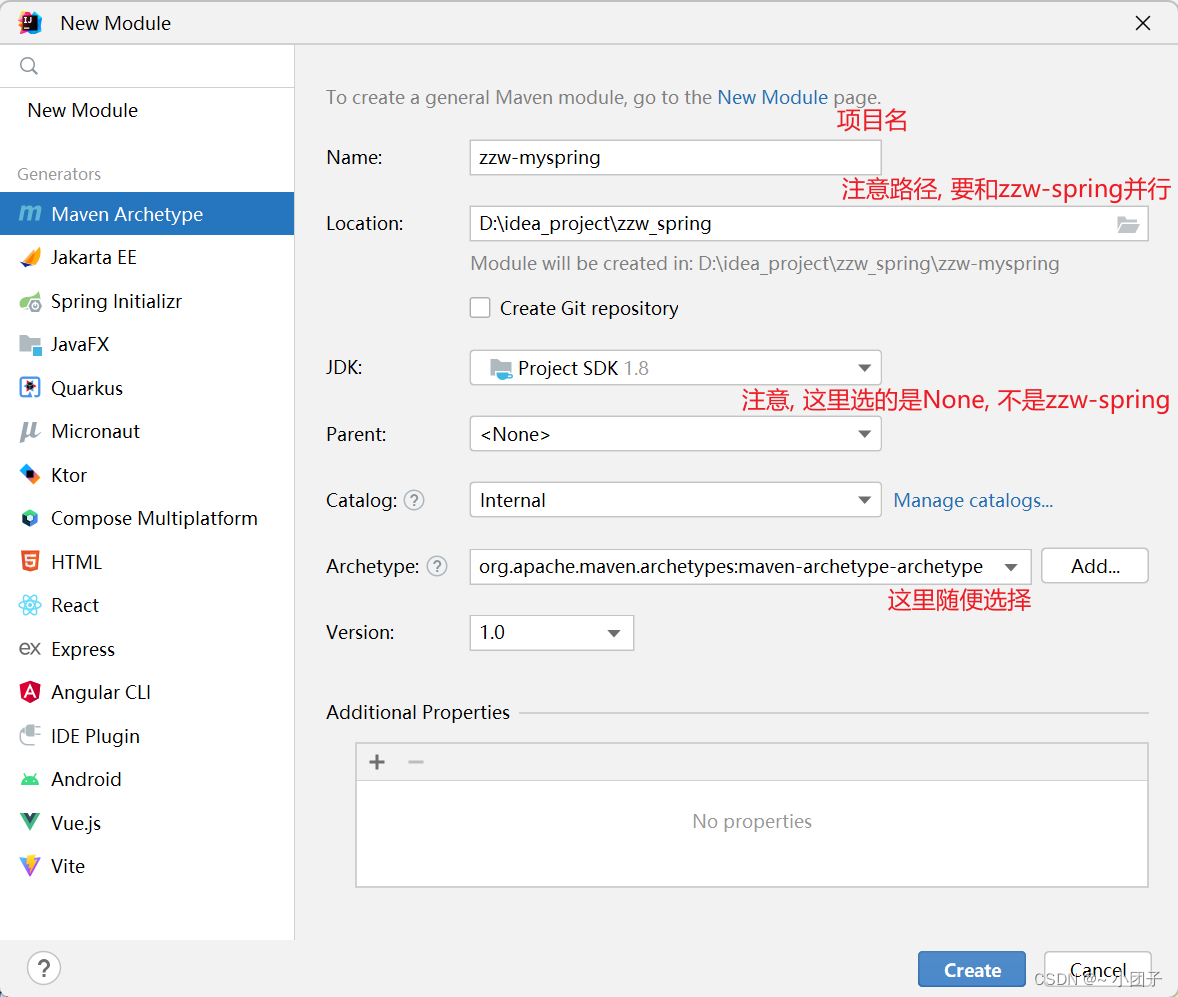
或者

1.在com.zzw.spring.annotation包下新建注解ComponentScan
@Target(ElementType.TYPE)
@Retention(RetentionPolicy.RUNTIME)
public @interface ComponentScan {//通过value可以指定要扫描的包String value() default "";
}
2.在com.zzw.spring.annotation包下新建注解 Component
@Target(ElementType.TYPE)
@Retention(RetentionPolicy.RUNTIME)
public @interface Component {//通过value可以给注入的bean/对象指定名字String value() default "";
}
3.在com.zzw.spring.ioc包下新建 ZzwSpringConfig
//这是一个配置类, 作用类似于我们原生spring的 beans.xml 容器配置文件
@ComponentScan(value = "com.zzw.spring.component")
public class ZzwSpringConfig {
}
4.在com.zzw.spring.component包下新建 MonsterService
//MonsterService 是一个Service
//1.如果指定了value, 那么在注入spring容器时, 以我们指定的为准
//2.如果没有指定value, 则使用类名首字母小写的方式命名
@Component(value = "monsterService")// 把MonsterService注入我们自己写的spring容器中
public class MonsterService {}
5.在com.zzw.spring.component包下新建MonsterDao
@Component(value = "monsterDao")
public class MonsterDao {
}
6.在com.zzw.spring.ioc包下新建 ZzwSpringApplicationContext
//模拟spring-ioc容器
//ZzwSpringApplicationContext 类的作用类似于Spring原生ioc容器
public class ZzwSpringApplicationContext {private Class configClass;//构造器public ZzwSpringApplicationContext(Class configClass) {//获取要扫描的包//1.先得到ZzwSpringConfig配置类的 @ComponentScan(value = "com.zzw.spring.component")ComponentScan componentScan =(ComponentScan) this.configClass.getDeclaredAnnotation(ComponentScan.class);//2.通过componentScan的value => 即要扫描的包String path = componentScan.value();System.out.println("要扫描的包=" + path);//com.zzw.spring.component//得到要扫描的包下的所有资源(.class 类)//1.得到类的加载器->APP 类加载器ClassLoader classLoader = ZzwSpringApplicationContext.class.getClassLoader();//2.通过类的加载器获取到要扫描包的资源url =>类似一个路径path = path.replace(".", "/");//一定要把 .替换成 / com/zzw/spring/componentURL resource = classLoader.getResource(path);System.out.println("resource=" + resource);//resource=file:/D:/idea_project/zzw_spring/zzw-myspring/target/classes/com/zzw/spring/component//3.将要加载的资源(.class) 路径下的文件进行遍历File file = new File(resource.getFile());//在io中, 目录也是文件if (file.isDirectory()) {File[] files = file.listFiles();for (File f : files) {//System.out.println(f.getAbsolutePath());//D:\idea_project\zzw_spring\zzw-myspring\target\classes\com\zzw\spring\component\MonsterDao.classString fileAbsolutePath = f.getAbsolutePath();//这里我们只处理.class文件if (fileAbsolutePath.endsWith(".class")) {//1.获取类名String className =fileAbsolutePath.substring(fileAbsolutePath.lastIndexOf("\\") + 1, fileAbsolutePath.lastIndexOf(".class"));//2.获取类的完整的路径(全类名)// path.replace("/", ".") => com.zzw.spring.componentString classFullName = path.replace("/", ".") + "." + className;//比如 com.zzw.spring.component.UserDao//3.判断该类是不是需要注入到容器, 就看该类是不是有注解 @Component @Controller...try {Class<?> clazz = classLoader.loadClass(classFullName);//这里就是演示了一下机制if (clazz.isAnnotationPresent(Component.class)) {//如果该类使用了@Component注解, 说明是Spring beanSystem.out.println("是一个Spring bean=" + clazz + " 类名=" + className);} else {//如果该类没有使用@Component注解, 说明不是Spring beanSystem.out.println("不是一个Spring bean=" + clazz + " 类名=" + className);}} catch (Exception e) {throw new RuntimeException(e);}}}System.out.println("=====================================================================================");}}//编写方法返回容器对象public Object getBean(String name) {return null;}
}
7.在 com.zzw.spring 包下新建 AppMain.java
public class AppMain {public static void main(String[] args) {ZzwSpringApplicationContext ioc =new ZzwSpringApplicationContext(ZzwSpringConfig.class);}
}
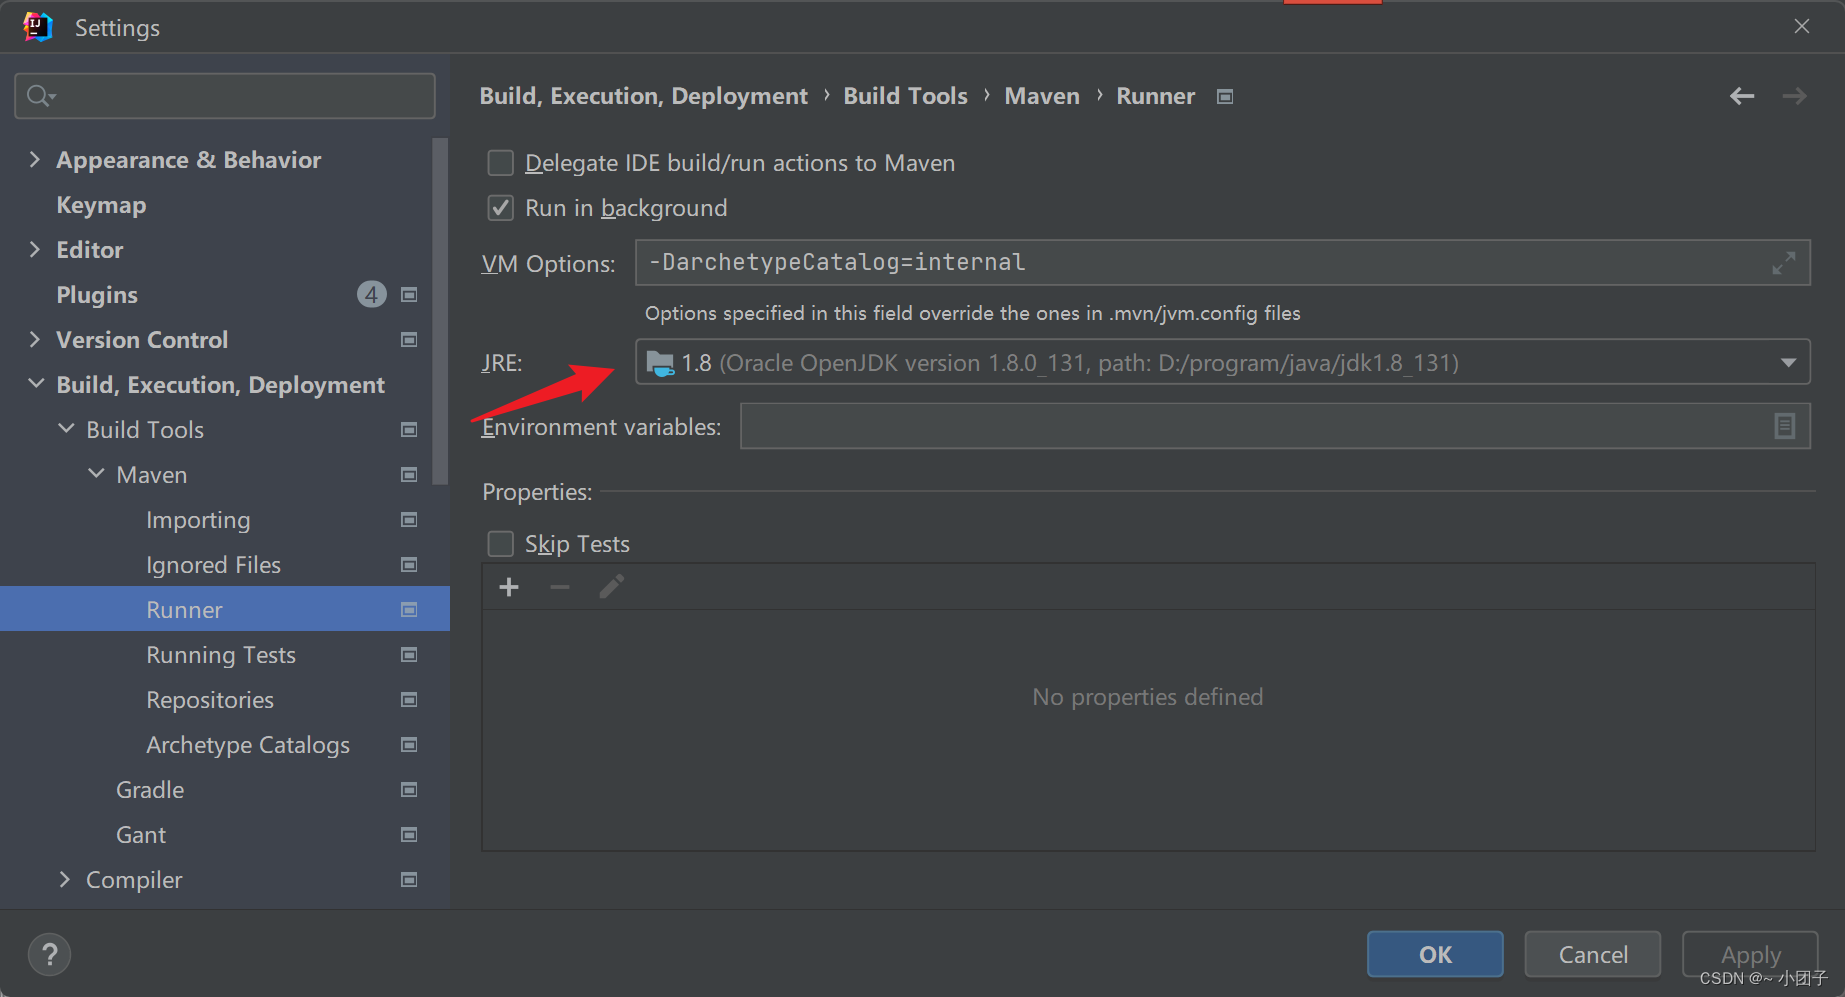
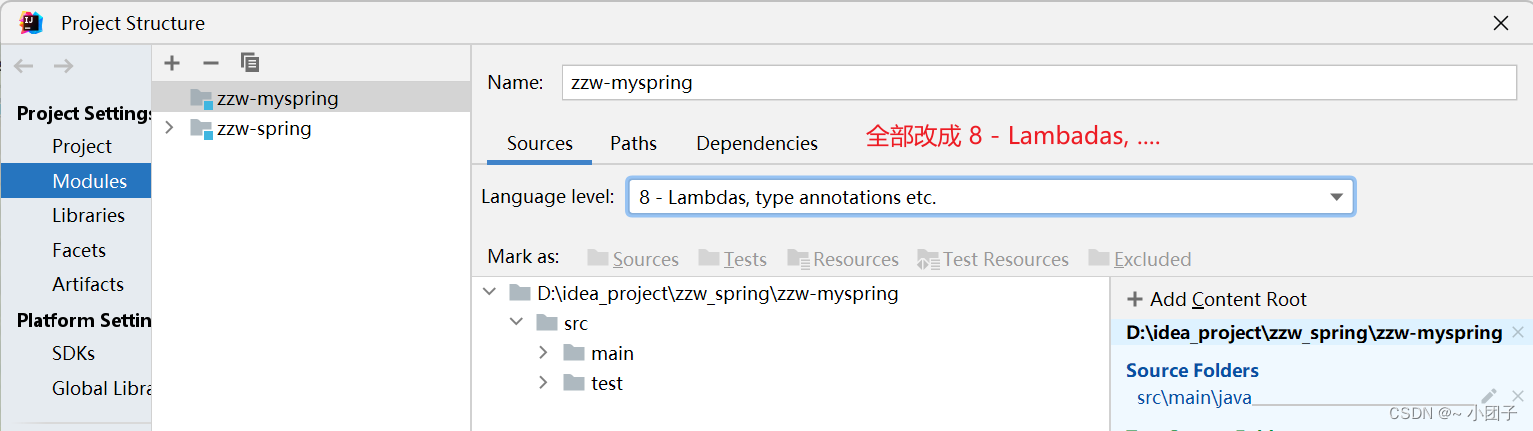
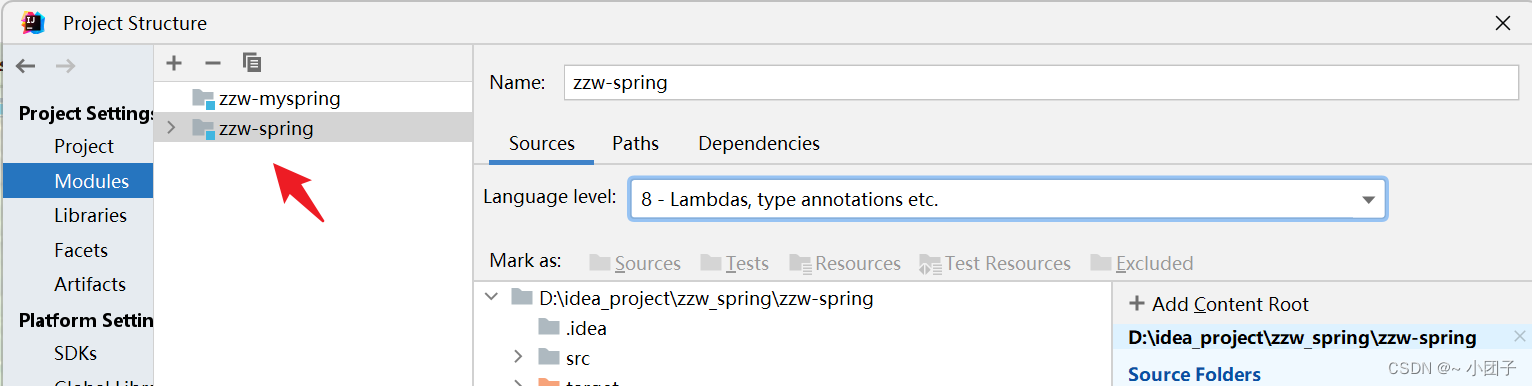
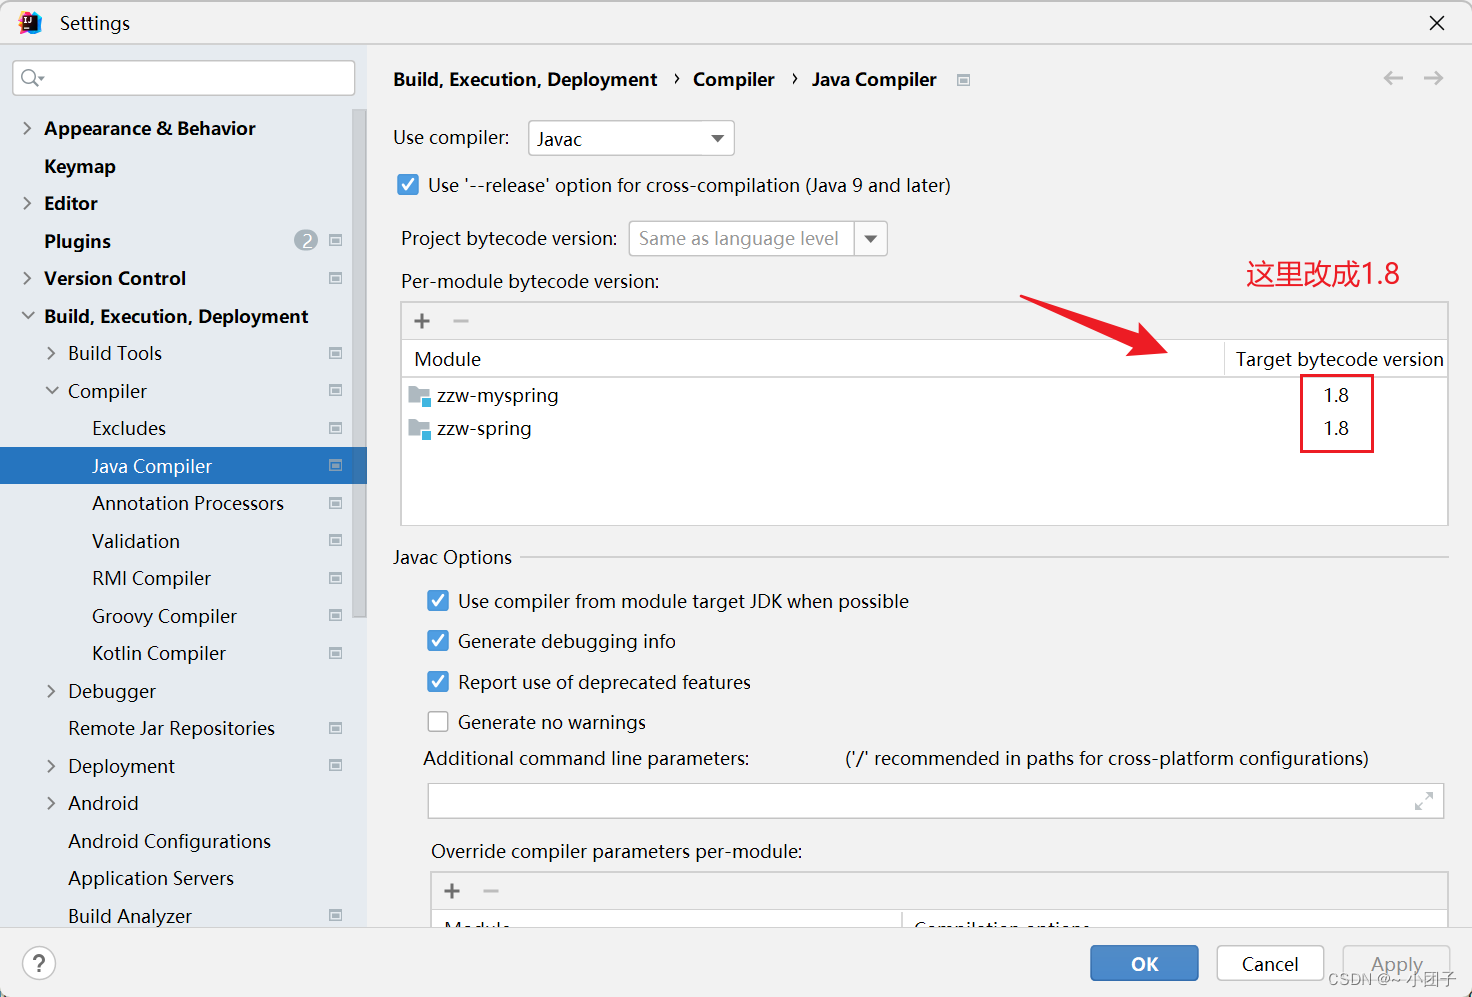
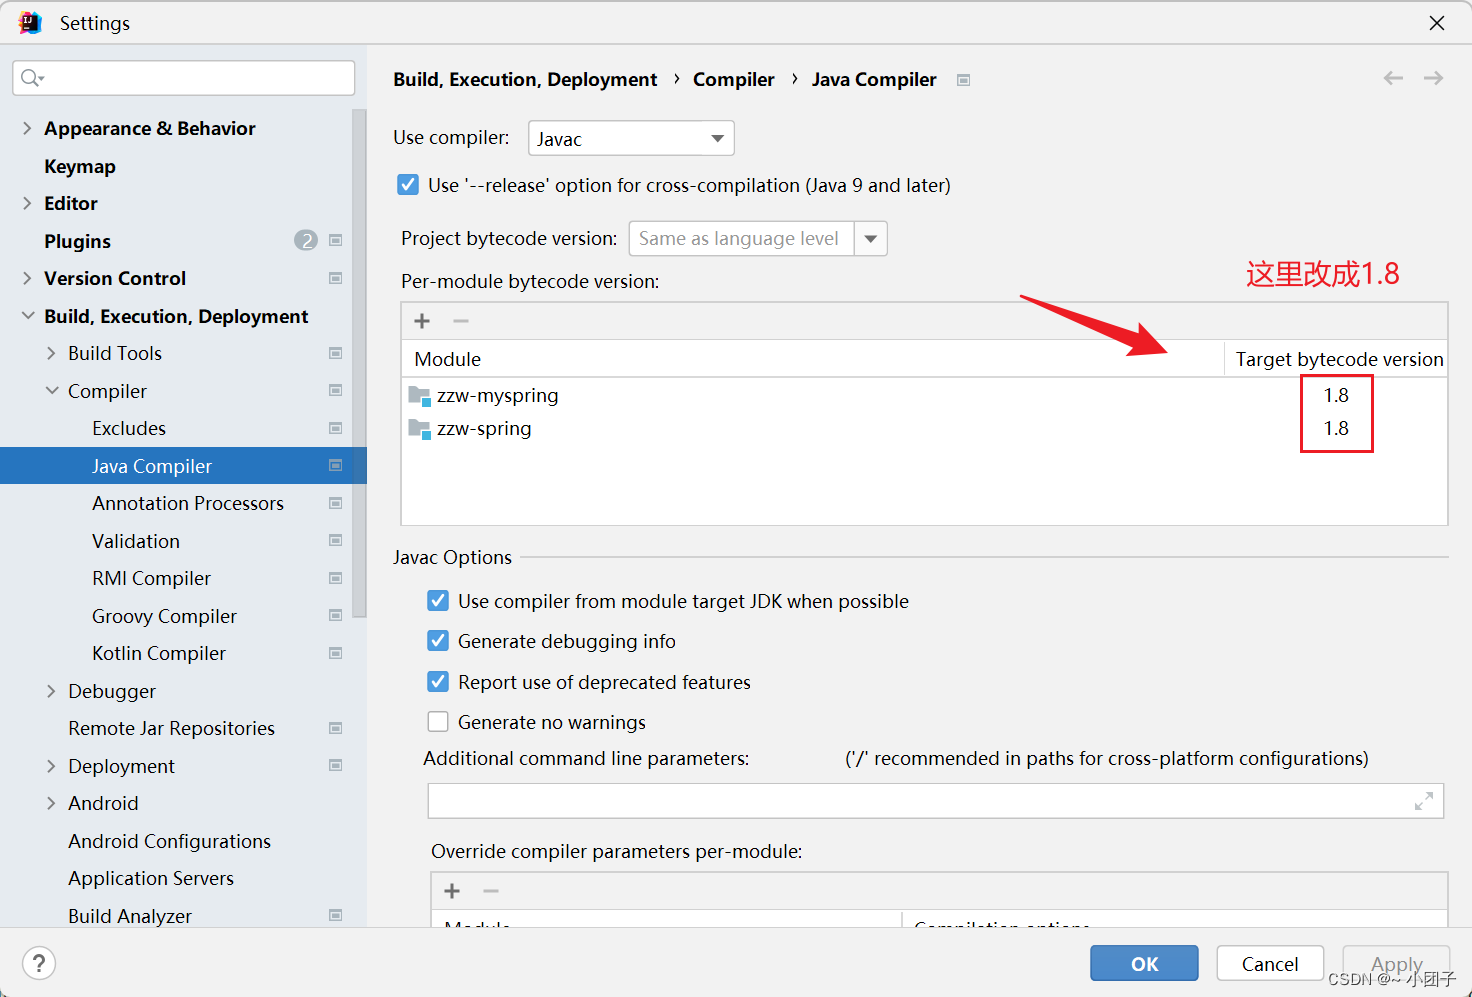
运行, 发现报错 java: Compilation failed: internal java compiler error. 这个错误一般是版本造成的.
改正之后, 运行结果 (这个Car类是component包下新建的, 没有被@Component修饰)
this.configClass=class com.zzw.spring.ioc.ZzwSpringConfig
要扫描的包=com.zzw.spring.component
resource=file:/D:/idea_project/zzw_spring/zzw-myspring/target/classes/com/zzw/spring/component
不是一个Spring bean=class com.zzw.spring.component.Car 类名=Car
是一个Spring bean=class com.zzw.spring.component.MonsterDao 类名=MonsterDao
是一个Spring bean=class com.zzw.spring.component.MonsterService 类名=MonsterService
=============================
💗实现任务阶段2
🍚扫描将bean信息封装到BeanDefinition对象, 并放入到Map
扫描将bean信息封装到BeanDefinition对象, 并放入到Map

1.在 com.zzw.spring.annotation 包下新建注解 Scope
//Scope 可以指定Bean的作用范围[singleton, prototype]
@Target(ElementType.TYPE)
@Retention(RetentionPolicy.RUNTIME)
public @interface Scope {//通过value可以指定singleton, prototypeString value() default "";
}
2.给MonsterService添加自定义注解@Scope
@Component(value = "monsterService")// 把MonsterService注入我们自己写的spring容器中
@Scope(value = "prototype")
public class MonsterService {}
3.在com.zzw.spring.ioc包下新建BeanDefinition类
//BeanDefinition 用于封装/记录Bean的信息[1. scope 2. Bean对应的class对象, 反射可以生成对应的对象]
public class BeanDefinition {private String scope;private Class clazz;//可以根据需求, 进行扩展//getter, setter方法, toString方法
}
4.ZzwSpringApplicationContext 增添代码 -> 封装BeanDefinition 放入到Map
//定义属性BeanDefinitionMap -> 存放BeanDefinition对象
private ConcurrentHashMap<String, BeanDefinition> beanDefinitionMap= new ConcurrentHashMap<>();
//定义singletonObjects -> 存放单例对象
private ConcurrentHashMap<String, Object> singletonObjects= new ConcurrentHashMap<>();//这里就是演示了一下机制
if (clazz.isAnnotationPresent(Component.class)) {//如果该类使用了@Component注解, 说明是Spring beanSystem.out.println("是一个Spring bean=" + clazz + " 类名=" + className);//先得到beanName//1.得到Component注解Component componentAnnotation = clazz.getDeclaredAnnotation(Component.class);//2.得到配置的value值 如果程序员没有配置value[后续处理...]String beanName = componentAnnotation.value();if ("".equals(beanName)) {//如果没有写value//将该类的类名首字母小写作为beanName//StringUtils - import org.apache.commons.lang.StringUtils;beanName = StringUtils.uncapitalize(className);}//3.将Bean的信息封装到BeanDefinition对象中 -> 放入到beanDifinitionMapBeanDefinition beanDefinition = new BeanDefinition();beanDefinition.setClazz(clazz);//4.获取Scope值if (clazz.isAnnotationPresent(Scope.class)) {//如果配置了Scope, 获取它指定的值Scope scopeAnnotation = clazz.getDeclaredAnnotation(Scope.class);beanDefinition.setScope(scopeAnnotation.value());} else {//如果没有配置Scope, 就配置默认值-singletonbeanDefinition.setScope("singleton");}//将beanDefinition, 对象放入到MapbeanDefinitionMap.put(beanName, beanDefinition);
} else {//如果该类没有使用@Component注解, 说明不是Spring beanSystem.out.println("不是一个Spring bean=" + clazz + " 类名=" + className);
}
Spring原生框架可以使用StringUtils工具类, 即import org.springframework.util.StringUtils; 但我们这里是手写的spring容器, 所以StringUtils无法使用.
StringUtils在commons-lang包下也有, 所以为解决StringUtils问题, 我们在pom.xml 引入依赖. 但是ZzwSpringApplicationContext类的代码会报错
<dependencies><dependency><groupId>commons-lang</groupId><artifactId>commons-lang</artifactId><version>2.6</version></dependency>
</dependencies>
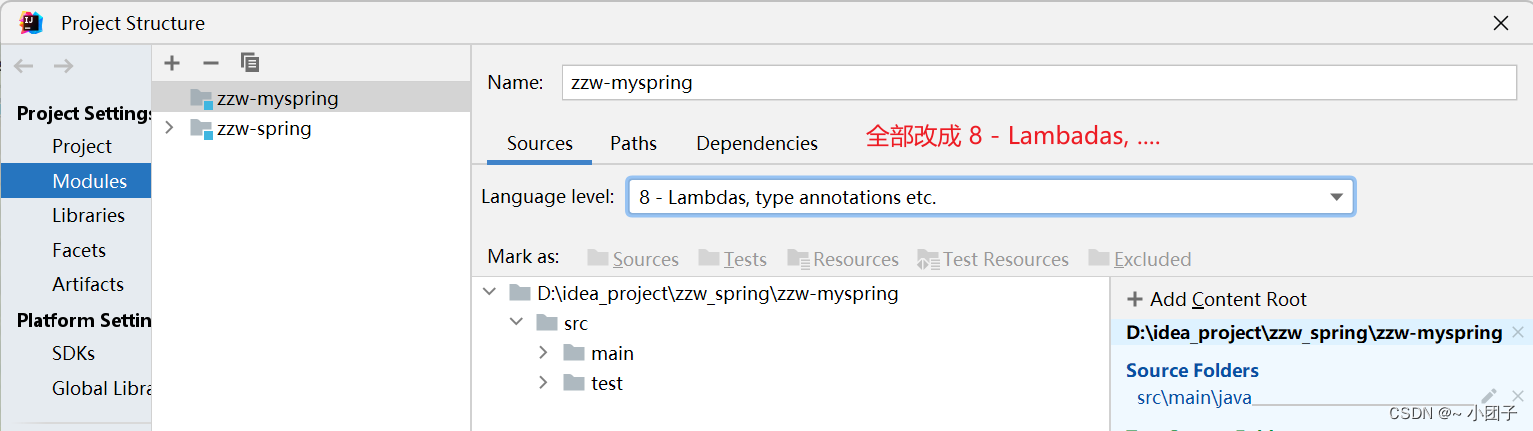
为了解决上述错误, 引入下面方案临时切换版本, 可以作为一个临时方案.

5.将构造器中的全部代码挪到本类的beanDefinitionsByScan方法内
//该方法完成对指定包的扫描, 并将Bean信息封装到BeanDefinition对象, 再放入到Map
public void beanDefinitionsByScan(Class configClass) {}
6.那么ZzwSpringApplicationContext类大体面貌如下
public class ZzwSpringApplicationContext {private Class configClass;//定义属性BeanDefinitionMap -> 存放BeanDefinition对象private ConcurrentHashMap<String, BeanDefinition> beanDefinitionMap= new ConcurrentHashMap<>();//定义singletonObjects -> 存放单例对象private ConcurrentHashMap<String, Object> singletonObjects= new ConcurrentHashMap<>();//构造器public ZzwSpringApplicationContext(Class configClass) {//完成扫描指定的包beanDefinitionsByScan(configClass);System.out.println("beanDefinitionMap=" + beanDefinitionMap);}//该方法完成对指定包的扫描, 并将Bean信息封装到BeanDefinition对象, 再放入到Mappublic void beanDefinitionsByScan(Class configClass) {//代码省略...}//编写方法返回容器对象public Object getBean(String name) {return null;}
}