vllm 本地部署qwen2.5/Qwen2.5-32B-Instruct-AWQ模型
vllm 本地部署qwen2.5/Qwen2.5-32B-Instruct-AWQ 量化版 模型
因 ollama 并发效果没有 vllm 好,目前只能使用 vllm 部署
( 基于 docker )
目前作者环境如下:
| 驱动 | CUDA | 显卡型号 | 显卡块数 |
|---|---|---|---|
| 560.35.03 | 12.6.1 | 4090 48G | 8 |
下载模型
modelscope download --model Qwen/Qwen2.5-32B-Instruct-AWQ --local_dir /data/qwen2.5/Qwen2.5-32B-Instruct-AWQ
开始配置
docker 配置
vim /etc/docker/daemon.json
{
"registry-mirrors": ["https://docker.cloudmessage.top","https://kfp63jaj.mirror.aliyuncs.com","https://j47dskil.mirror.aliyuncs.com"],
"ipv6": false,
"max-concurrent-downloads": 10,
"log-driver": "json-file",
"log-level": "warn",
"log-opts": {
"max-size": "10m",
"max-file": "3"},"runtimes": {"nvidia": {"path": "/usr/bin/nvidia-container-runtime","runtimeArgs": []}},
"default-runtime": "nvidia",
"data-root": "/data/docker"
}
docker 安装 vllm
###镜像比较大16G多,还是先拉下来再运行
docker pull vllm/vllm-openai:latest
运行 程序
--dtype float16 \  # 混合精度推理
--block-size 16 \  #  KV缓存块大小
--use-v2-block-manager \  # 新版显存管理器
--max-num-batched-tokens 8192 \ # 最大批处理tokens(4096-16384)
--max-num-seqs 32 最大并发请求数# 以此类推 8 块卡
# 第一块卡 显存占用了 70%,留了30% 给 openwebui 使用docker run --runtime nvidia --gpus "device=0" --name vllm-qwen2.5-32b_AWQ \
--restart always \
-v /data/qwen2.5:/data/qwen2.5 \
-v /data/vllm_cache:/root/.cache/vllm \
-p 8000:8000 \
-e CUDA_VISIBLE_DEVICES=0 \
-d vllm/vllm-openai:latest \
--model /data/qwen2.5/Qwen2.5-32B-Instruct-AWQ \
--dtype float16 \
--block-size 16 \
--use-v2-block-manager \
--gpu-memory-utilization 0.7 \
--max-num-batched-tokens 8192 \
--max-num-seqs 32 \
--max_model_len 8192docker run --runtime nvidia --gpus "device=1" --name vllm-qwen2.5-32b_AWQ_01 \
--restart always \
-v /data/qwen2.5:/data/qwen2.5 \
-v /data/vllm_cache:/root/.cache/vllm \
-p 8111:8000 \
-e CUDA_VISIBLE_DEVICES=0 \
-d vllm/vllm-openai:latest \
--model /data/qwen2.5/Qwen2.5-32B-Instruct-AWQ \
--dtype float16 \
--block-size 16 \
--use-v2-block-manager \
--gpu-memory-utilization 1 \
--max-num-batched-tokens 8192 \
--max-num-seqs 32 \
--max_model_len 8192
测试程序
# 创建虚拟环境
conda create -n qwenvl python=3.11 -y
conda activate qwenvl# 安装模块pip install vllm -i https://pypi.tuna.tsinghua.edu.cn/simplepip install git+https://github.com/huggingface/transformers acceleratepip install torch  -i https://pypi.tuna.tsinghua.edu.cn/simplepip install flash-attn --no-build-isolation  -i https://pypi.tuna.tsinghua.edu.cn/simplepip install "huggingface_hub[hf_transfer]"  -i https://pypi.tuna.tsinghua.edu.cn/simplepip install modelscope  -i https://pypi.tuna.tsinghua.edu.cn/simplepip install qwen_vl_utils  -i https://pypi.tuna.tsinghua.edu.cn/simple
from openai import OpenAI
import time# 记录开始时间
start_time = time.time()try:client = OpenAI(base_url="http://192.168.0.88:8110/v1",api_key="NOT_NEED")# 测试列出可用模型print("Available models:", [m.id for m in client.models.list().data])# 调用模型response = client.chat.completions.create(model="/data/qwen2.5/Qwen2.5-32B-Instruct-AWQ",messages=[{"role": "system", "content": "You are a helpful assistant."},# {"role": "user", "content": "Give me a short introduction to large language model."}{"role": "user", "content": "请始终使用中文回答用户问题"}],max_tokens=512,timeout=30.0)# 输出结果和耗时print("\nResponse:", response.choices[0].message.content)print(f"\nTime used: {time.time()-start_time:.2f} seconds")except Exception as e:print(f"Error: {str(e)}")print(f"Time used: {time.time()-start_time:.2f} seconds")
openwebui
docker run --gpus all -d \
-p 13000:8080 \
--add-host=host.docker.internal:192.168.0.100 \
-v open-webui-data:/app/backend/data \
-e OLLAMA_API_BASE_URL=http://192.168.0.100:8000 \
--name open-webui-vllm \
--restart always \
registry.cn-shenzhen.aliyuncs.com/funet8/open-webui:cuda
配置docker 容器中配置
docker exec -it  openwebui-vllm /bin/bash
设置完成之后,去到服务器上,进到这个docker容器中
apt update
apt install -y iputils-ping vim net-tools telnet
# 查看IP
ifconfigvim /etc/hosts
192.168.0.100   host.docker.internal退出容器
在 iptables 中 放开所有
iptables -I INPUT -s 172.17.0.11 -p tcp --dport 8110 -j ACCEPT
service iptables save 													默认的是访问8000端口,如果想改为其他端口
docker exec -it open-webui /bin/bash
进到容器中
/app/backend# vim config.py
:%s/11434/11449/g  (改为你想修改的端口即可)
docker restart open-webui
登录到 openwebui
http://192.168.0.100:13000 # 注册账户,通过自己的邮箱创建就行
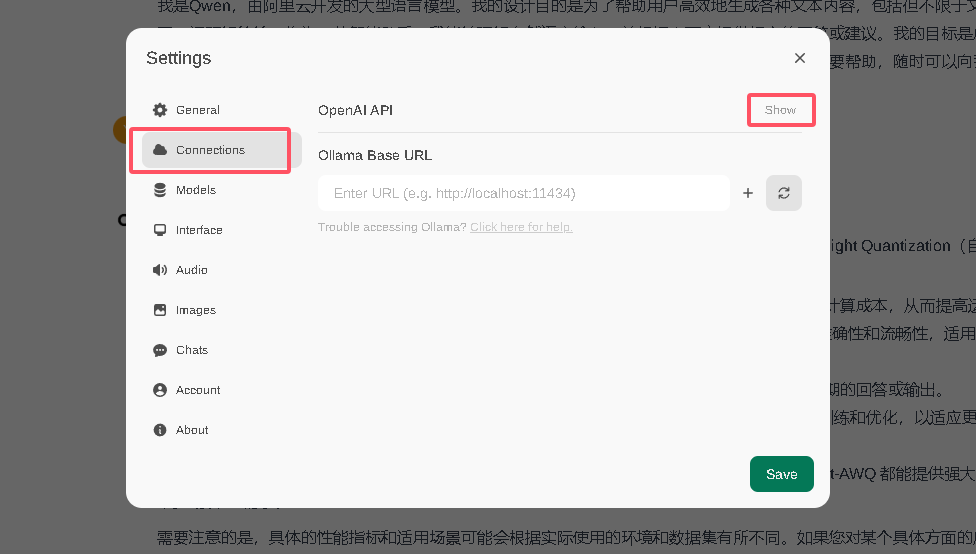
登录上来发现如果找不到模型,如下配置即可
点击 左下角的设置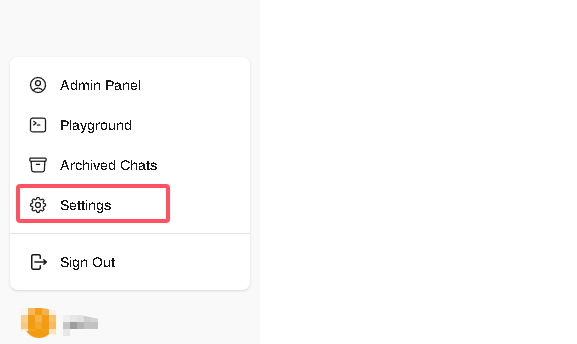
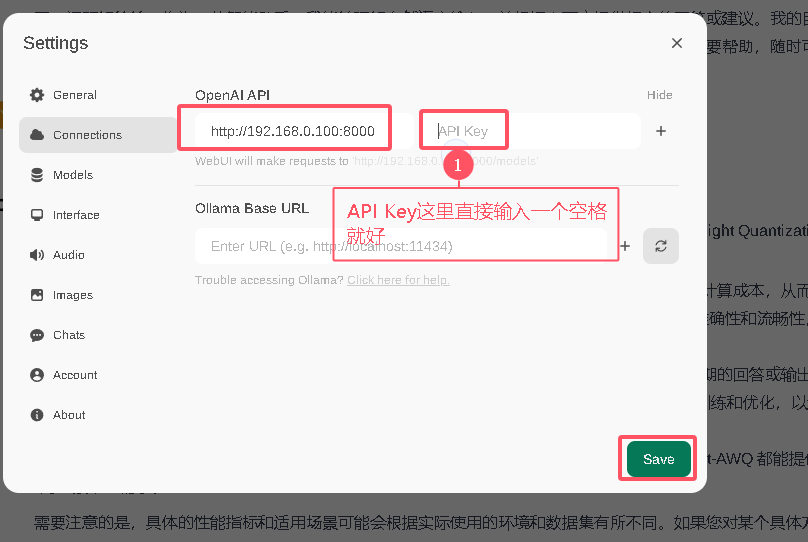
刷新,在重新进网页,发现模型已经有了也可以查看 docker 日志
docker logs -f  openwebui