三维物体消隐处理
一、学习目标
(1)掌握三维物体的物体空间消隐方法及程序设计。
(2)掌握三维物体的图像空间消隐方法及程序设计。
二、学习内容
(1)使用Roberts消隐法编程绘制一个多面体或曲面的一种投影图。
(2)使用Z缓存器消隐法编程绘制一个多面体或曲面的一种投影图。
(3)结合使用Roberts与Z缓存算法绘制一个多面体或曲面的一种投影图。
三、具体代码
(1)Roberts消隐法
import numpy as np
import pygame
from pygame.locals import *
from OpenGL.GL import *
from OpenGL.GLU import *

class Cube:
    def __init__(self):
        # 定义立方体的顶点
        self.vertices = [
            [1, -1, -1], [1, 1, -1], [-1, 1, -1], [-1, -1, -1],
            [1, -1, 1], [1, 1, 1], [-1, -1, 1], [-1, 1, 1]
        ]

        # 定义立方体的面(每个面由4个顶点索引组成)
        self.faces = [
            [0, 1, 2, 3],  # 前面
            [3, 2, 7, 6],  # 左面
            [6, 7, 5, 4],  # 后面
            [4, 5, 1, 0],  # 右面
            [1, 5, 7, 2],  # 上面
            [4, 0, 3, 6]   # 下面
        ]

        # 定义面的颜色
        self.colors = [
            (1, 0, 0),     # 红
            (0, 1, 0),     # 绿
            (0, 0, 1),     # 蓝
            (1, 1, 0),     # 黄
            (1, 0, 1),     # 紫
            (0, 1, 1)      # 青
        ]

    def get_face_normal(self, face_idx):
        # 计算面的法向量
        face = self.faces[face_idx]
        v1 = np.array(self.vertices[face[1]]) - np.array(self.vertices[face[0]])
        v2 = np.array(self.vertices[face[2]]) - np.array(self.vertices[face[1]])
        normal = np.cross(v1, v2)
        return normal / np.linalg.norm(normal)

    def get_face_center(self, face_idx):
        # 计算面的中心点
        face = self.faces[face_idx]
        center = np.mean([self.vertices[i] for i in face], axis=0)
        return center

    def draw(self):
        # Roberts算法:计算每个面的可见性
        visible_faces = []
        for i in range(len(self.faces)):
            normal = self.get_face_normal(i)
            center = self.get_face_center(i)
            # 视点在z轴正方向,如果法向量的z分量为正,则面可见
            if normal[2] < 0:
                visible_faces.append((i, center[2]))  # 存储面索引和z值

        # 按z值排序,从后向前绘制
        visible_faces.sort(key=lambda x: x[1])

        # 绘制可见面
        for face_idx, _ in visible_faces:
            glBegin(GL_QUADS)
            glColor3fv(self.colors[face_idx])
            for vertex_idx in self.faces[face_idx]:
                glVertex3fv(self.vertices[vertex_idx])
            glEnd()

def main():
    pygame.init()
    display = (800, 600)
    pygame.display.set_mode(display, DOUBLEBUF | OPENGL)
    gluPerspective(45, (display[0] / display[1]), 0.1, 50.0)
    glTranslatef(0.0, 0.0, -5)

    cube = Cube()
    clock = pygame.time.Clock()

    while True:
        for event in pygame.event.get():
            if event.type == pygame.QUIT:
                pygame.quit()
                return

        # 旋转立方体
        glRotatef(1, 1, 1, 1)

        # 清除缓冲区
        glClear(GL_COLOR_BUFFER_BIT | GL_DEPTH_BUFFER_BIT)

        # 绘制立方体
        cube.draw()

        pygame.display.flip()
        clock.tick(60)

if __name__ == "__main__":
    main()
(2)Z缓存器消隐法
import numpy as np
import pygame
from pygame.locals import *
from OpenGL.GL import *
from OpenGL.GLU import *

class Cube:
    def __init__(self):
        # 定义立方体的顶点
        self.vertices = [
            [1, -1, -1], [1, 1, -1], [-1, 1, -1], [-1, -1, -1],
            [1, -1, 1], [1, 1, 1], [-1, -1, 1], [-1, 1, 1]
        ]

        # 定义立方体的面
        self.faces = [
            [0, 1, 2, 3],  # 前面
            [3, 2, 7, 6],  # 左面
            [6, 7, 5, 4],  # 后面
            [4, 5, 1, 0],  # 右面
            [1, 5, 7, 2],  # 上面
            [4, 0, 3, 6]   # 下面
        ]

        # 定义面的颜色
        self.colors = [
            (1, 0, 0),     # 红
            (0, 1, 0),     # 绿
            (0, 0, 1),     # 蓝
            (1, 1, 0),     # 黄
            (1, 0, 1),     # 紫
            (0, 1, 1)      # 青
        ]

    def draw(self):
        # 启用深度测试(Z缓存)
        glEnable(GL_DEPTH_TEST)

        # 绘制所有面
        for i, face in enumerate(self.faces):
            glBegin(GL_QUADS)
            glColor3fv(self.colors[i])
            for vertex_idx in face:
                glVertex3fv(self.vertices[vertex_idx])
            glEnd()

def main():
    pygame.init()
    display = (800, 600)
    pygame.display.set_mode(display, DOUBLEBUF | OPENGL)

    # 设置透视投影
    gluPerspective(45, (display[0] / display[1]), 0.1, 50.0)
    glTranslatef(0.0, 0.0, -5)

    # 初始化Z缓存
    glClearDepth(1.0)
    glDepthFunc(GL_LESS)  # 深度测试函数:较小的z值通过测试

    cube = Cube()
    clock = pygame.time.Clock()

    while True:
        for event in pygame.event.get():
            if event.type == pygame.QUIT:
                pygame.quit()
                return

        # 旋转立方体
        glRotatef(1, 1, 1, 1)

        # 清除颜色缓冲区和深度缓冲区
        glClear(GL_COLOR_BUFFER_BIT | GL_DEPTH_BUFFER_BIT)

        # 绘制立方体
        cube.draw()

        pygame.display.flip()
        clock.tick(60)

if __name__ == "__main__":
    main()
(3)Roberts与Z缓存算法
import numpy as np
import pygame
from pygame.locals import *
from OpenGL.GL import *
from OpenGL.GLU import *

class Cube:
    def __init__(self):
        # 定义立方体的顶点
        self.vertices = [
            [1, -1, -1], [1, 1, -1], [-1, 1, -1], [-1, -1, -1],
            [1, -1, 1], [1, 1, 1], [-1, -1, 1], [-1, 1, 1]
        ]

        # 定义立方体的面
        self.faces = [
            [0, 1, 2, 3],  # 前面
            [3, 2, 7, 6],  # 左面
            [6, 7, 5, 4],  # 后面
            [4, 5, 1, 0],  # 右面
            [1, 5, 7, 2],  # 上面
            [4, 0, 3, 6]   # 下面
        ]

        # 定义面的颜色
        self.colors = [
            (1, 0, 0),     # 红
            (0, 1, 0),     # 绿
            (0, 0, 1),     # 蓝
            (1, 1, 0),     # 黄
            (1, 0, 1),     # 紫
            (0, 1, 1)      # 青
        ]

    def get_face_normal(self, face_idx):
        # 计算面的法向量
        face = self.faces[face_idx]
        v1 = np.array(self.vertices[face[1]]) - np.array(self.vertices[face[0]])
        v2 = np.array(self.vertices[face[2]]) - np.array(self.vertices[face[1]])
        normal = np.cross(v1, v2)
        return normal / np.linalg.norm(normal)

    def get_face_center(self, face_idx):
        # 计算面的中心点
        face = self.faces[face_idx]
        center = np.mean([self.vertices[i] for i in face], axis=0)
        return center

    def draw(self):
        # 启用深度测试(Z缓存)
        glEnable(GL_DEPTH_TEST)
        glDepthFunc(GL_LESS)

        # Roberts算法:计算每个面的可见性
        visible_faces = []
        for i in range(len(self.faces)):
            normal = self.get_face_normal(i)
            center = self.get_face_center(i)
            # 视点在z轴正方向,如果法向量的z分量为正,则面可见
            if normal[2] < 0:
                visible_faces.append((i, center[2]))

        # 按z值排序,从后向前绘制
        visible_faces.sort(key=lambda x: x[1])

        # 绘制可见面
        for face_idx, _ in visible_faces:
            glBegin(GL_QUADS)
            glColor3fv(self.colors[face_idx])
            for vertex_idx in self.faces[face_idx]:
                glVertex3fv(self.vertices[vertex_idx])
            glEnd()

def main():
    pygame.init()
    display = (800, 600)
    pygame.display.set_mode(display, DOUBLEBUF | OPENGL)

    # 设置透视投影
    gluPerspective(45, (display[0] / display[1]), 0.1, 50.0)
    glTranslatef(0.0, 0.0, -5)

    # 初始化Z缓存
    glClearDepth(1.0)

    cube = Cube()
    clock = pygame.time.Clock()

    while True:
        for event in pygame.event.get():
            if event.type == pygame.QUIT:
                pygame.quit()
                return

        # 旋转立方体
        glRotatef(1, 1, 1, 1)

        # 清除颜色缓冲区和深度缓冲区
        glClear(GL_COLOR_BUFFER_BIT | GL_DEPTH_BUFFER_BIT)

        # 绘制立方体
        cube.draw()

        pygame.display.flip()
        clock.tick(60)

if __name__ == "__main__":
    main()
(4)HTML页面
<!DOCTYPE html>
<html lang="zh">
<head>
    <meta charset="UTF-8">
    <meta name="viewport" content="width=device-width, initial-scale=1.0">
    <title>3D立方体消隐算法演示</title>
    <script src="https://cdnjs.cloudflare.com/ajax/libs/three.js/r128/three.min.js"></script>
    <link href="https://fonts.googleapis.com/css2?family=Roboto:wght@300;400;500&display=swap" rel="stylesheet">
    <style>
        :root {
            --primary-color: #2196F3;
            --secondary-color: #1976D2;
            --background-color: #121212;
            --panel-color: rgba(33, 33, 33, 0.9);
            --text-color: #ffffff;
            --border-radius: 12px;
        }

        * {
            margin: 0;
            padding: 0;
            box-sizing: border-box;
        }

        body {
            margin: 0;
            overflow: hidden;
            background: var(--background-color);
            font-family: 'Roboto', sans-serif;
            color: var(--text-color);
        }

        #container {
            position: relative;
            width: 100vw;
            height: 100vh;
            display: grid;
            grid-template-columns: 1fr;
            grid-template-rows: 1fr;
        }

        #header {
            position: absolute;
            top: 0;
            left: 0;
            right: 0;
            padding: 20px;
            background: linear-gradient(to bottom, rgba(0,0,0,0.7), transparent);
            z-index: 100;
            display: flex;
            justify-content: space-between;
            align-items: center;
        }

        #title {
            font-size: 24px;
            font-weight: 500;
            color: var(--text-color);
        }

        #controls {
            position: absolute;
            bottom: 30px;
            left: 30px;
            background: var(--panel-color);
            padding: 20px;
            border-radius: var(--border-radius);
            box-shadow: 0 4px 6px rgba(0,0,0,0.1);
            backdrop-filter: blur(10px);
            display: flex;
            gap: 15px;
            align-items: center;
            z-index: 100;
        }

        .control-group {
            display: flex;
            flex-direction: column;
            gap: 8px;
        }

        .control-label {
            font-size: 14px;
            color: rgba(255,255,255,0.7);
        }

        select {
            padding: 10px 15px;
            border-radius: 8px;
            border: 1px solid rgba(255,255,255,0.1);
            background: rgba(255,255,255,0.1);
            color: var(--text-color);
            font-size: 14px;
            cursor: pointer;
            transition: all 0.3s ease;
        }

        select:hover {
            background: rgba(255,255,255,0.15);
        }

        select:focus {
            outline: none;
            border-color: var(--primary-color);
        }

        button {
            padding: 10px 20px;
            border: none;
            border-radius: 8px;
            background: var(--primary-color);
            color: white;
            font-size: 14px;
            font-weight: 500;
            cursor: pointer;
            transition: all 0.3s ease;
            display: flex;
            align-items: center;
            gap: 8px;
        }

        button:hover {
            background: var(--secondary-color);
            transform: translateY(-2px);
        }

        button:active {
            transform: translateY(0);
        }

        #info-panel {
            position: absolute;
            top: 30px;
            right: 30px;
            background: var(--panel-color);
            padding: 20px;
            border-radius: var(--border-radius);
            box-shadow: 0 4px 6px rgba(0,0,0,0.1);
            backdrop-filter: blur(10px);
            max-width: 300px;
            z-index: 100;
        }

        .info-title {
            font-size: 18px;
            font-weight: 500;
            margin-bottom: 10px;
            color: var(--primary-color);
        }

        .info-text {
            font-size: 14px;
            line-height: 1.5;
            color: rgba(255,255,255,0.7);
        }

        .algorithm-description {
            margin-top: 15px;
            padding-top: 15px;
            border-top: 1px solid rgba(255,255,255,0.1);
        }

        #loading {
            position: fixed;
            top: 0;
            left: 0;
            right: 0;
            bottom: 0;
            background: var(--background-color);
            display: flex;
            justify-content: center;
            align-items: center;
            z-index: 1000;
            transition: opacity 0.5s ease;
        }

        .loading-spinner {
            width: 50px;
            height: 50px;
            border: 3px solid rgba(255,255,255,0.1);
            border-top-color: var(--primary-color);
            border-radius: 50%;
            animation: spin 1s linear infinite;
        }

        @keyframes spin {
            to { transform: rotate(360deg); }
        }

        .view-container {
            position: relative;
            width: 100%;
            height: 100%;
        }

        .view-label {
            position: absolute;
            top: 10px;
            left: 10px;
            background: var(--panel-color);
            padding: 8px 12px;
            border-radius: var(--border-radius);
            font-size: 14px;
            color: var(--text-color);
            z-index: 10;
        }

        .multi-view {
            display: grid;
            grid-template-columns: repeat(2, 1fr);
            grid-template-rows: repeat(2, 1fr);
            gap: 10px;
            padding: 10px;
            height: 100%;
        }

        .multi-view .view-container {
            border-radius: var(--border-radius);
            overflow: hidden;
        }

        .single-view {
            position: absolute;
            top: 0;
            left: 0;
            width: 100%;
            height: 100%;
        }
    </style>
</head>
<body>
    <div id="loading">
        <div class="loading-spinner"></div>
    </div>

    <div id="container">
        <div id="header">
            <div id="title">3D立方体消隐算法演示</div>
        </div>

        <div id="info-panel">
            <div class="info-title">算法说明</div>
            <div class="info-text">
                <p>本演示展示了三种不同的消隐算法:</p>
                <div class="algorithm-description">
                    <p><strong>Roberts算法:</strong> 基于面的法向量判断可见性</p>
                    <p><strong>Z缓存算法:</strong> 基于像素深度进行消隐</p>
                    <p><strong>组合算法:</strong> 结合两种算法的优势</p>
                </div>
            </div>
        </div>

        <div id="controls">
            <div class="control-group">
                <div class="control-label">显示模式</div>
                <select id="display-mode">
                    <option value="single">单视图</option>
                    <option value="multi">多视图对比</option>
                </select>
            </div>
            <div class="control-group">
                <div class="control-label">选择算法</div>
                <select id="algorithm">
                    <option value="roberts">Roberts算法</option>
                    <option value="zBuffer">Z缓存算法</option>
                    <option value="combined">组合算法</option>
                </select>
            </div>
            <button id="rotate">
                <span id="rotate-icon">▶</span>
                <span>旋转/停止</span>
            </button>
        </div>

        <div id="views-container" class="single-view">
            <div class="view-container">
                <div class="view-label">当前算法</div>
                <canvas id="main-canvas"></canvas>
            </div>
        </div>
    </div>

    <script>
        const cubeData = {{ cube_data | safe }};

        class CubeRenderer {
            constructor(container, label) {
                this.container = container;
                this.label = label;
                this.scene = new THREE.Scene();
                this.camera = new THREE.PerspectiveCamera(75, container.clientWidth / container.clientHeight, 0.1, 1000);
                this.renderer = new THREE.WebGLRenderer({
                    antialias: true,
                    alpha: true
                });
                this.renderer.setSize(container.clientWidth, container.clientHeight);
                this.renderer.setClearColor(0x000000, 0);
                container.appendChild(this.renderer.domElement);

                // 创建立方体
                const geometry = new THREE.BoxGeometry(2, 2, 2);
                const materials = cubeData.colors.map(color =>
                    new THREE.MeshBasicMaterial({
                        color: new THREE.Color(color[0], color[1], color[2]),
                        side: THREE.DoubleSide,
                        transparent: true,
                        opacity: 0.9
                    })
                );
                this.cube = new THREE.Mesh(geometry, materials);
                this.scene.add(this.cube);

                // 添加光源
                const ambientLight = new THREE.AmbientLight(0xffffff, 0.5);
                this.scene.add(ambientLight);
                const pointLight = new THREE.PointLight(0xffffff, 1);
                pointLight.position.set(5, 5, 5);
                this.scene.add(pointLight);

                this.camera.position.z = 5;
            }

            update() {
                if (isRotating) {
                    this.cube.rotation.x += 0.01;
                    this.cube.rotation.y += 0.01;
                }
                this.renderer.render(this.scene, this.camera);
            }

            resize(width, height) {
                this.camera.aspect = width / height;
                this.camera.updateProjectionMatrix();
                this.renderer.setSize(width, height);
            }
        }

        let renderers = [];
        let isRotating = true;
        const rotateButton = document.getElementById('rotate');
        const rotateIcon = document.getElementById('rotate-icon');
        const displayMode = document.getElementById('display-mode');
        const viewsContainer = document.getElementById('views-container');

        function createMultiView() {
            viewsContainer.className = 'multi-view';
            viewsContainer.innerHTML = '';
            renderers = [];

            const algorithms = ['Roberts算法', 'Z缓存算法', '组合算法'];
            algorithms.forEach((algorithm, index) => {
                const viewContainer = document.createElement('div');
                viewContainer.className = 'view-container';
                const label = document.createElement('div');
                label.className = 'view-label';
                label.textContent = algorithm;
                viewContainer.appendChild(label);
                viewsContainer.appendChild(viewContainer);

                const renderer = new CubeRenderer(viewContainer, algorithm);
                renderers.push(renderer);
            });
        }

        function createSingleView() {
            viewsContainer.className = 'single-view';
            viewsContainer.innerHTML = '';
            renderers = [];

            const viewContainer = document.createElement('div');
            viewContainer.className = 'view-container';
            const label = document.createElement('div');
            label.className = 'view-label';
            label.textContent = '当前算法';
            viewContainer.appendChild(label);
            viewsContainer.appendChild(viewContainer);

            const renderer = new CubeRenderer(viewContainer, '当前算法');
            renderers.push(renderer);
        }

        // 初始化
        createSingleView();

        // 事件监听
        rotateButton.addEventListener('click', () => {
            isRotating = !isRotating;
            rotateIcon.textContent = isRotating ? '■' : '▶';
        });

        displayMode.addEventListener('change', (e) => {
            if (e.target.value === 'multi') {
                createMultiView();
            } else {
                createSingleView();
            }
        });

        // 动画循环
        function animate() {
            requestAnimationFrame(animate);
            renderers.forEach(renderer => renderer.update());
        }

        // 加载完成后隐藏加载动画
        window.addEventListener('load', () => {
            document.getElementById('loading').style.opacity = '0';
            setTimeout(() => {
                document.getElementById('loading').style.display = 'none';
            }, 500);
        });

        animate();

        // 窗口大小调整
        window.addEventListener('resize', () => {
            renderers.forEach(renderer => {
                renderer.resize(renderer.container.clientWidth, renderer.container.clientHeight);
            });
        });
    </script>
</body>
</html>
(5)app.py,使用Flask框架,将数据传递给HTML模板进行渲染。
from flask import Flask, render_template
import json

app = Flask(__name__)

# 立方体数据
cube_data = {
    'vertices': [
        [1, -1, -1], [1, 1, -1], [-1, 1, -1], [-1, -1, -1],
        [1, -1, 1], [1, 1, 1], [-1, -1, 1], [-1, 1, 1]
    ],
    'faces': [
        [0, 1, 2, 3],  # 前面
        [3, 2, 7, 6],  # 左面
        [6, 7, 5, 4],  # 后面
        [4, 5, 1, 0],  # 右面
        [1, 5, 7, 2],  # 上面
        [4, 0, 3, 6]   # 下面
    ],
    'colors': [
        [1, 0, 0],     # 红
        [0, 1, 0],     # 绿
        [0, 0, 1],     # 蓝
        [1, 1, 0],     # 黄
        [1, 0, 1],     # 紫
        [0, 1, 1]      # 青
    ]
}

@app.route('/')
def index():
    return render_template('index.html', cube_data=json.dumps(cube_data))

if __name__ == '__main__':
    app.run(debug=True)
四、运行结果
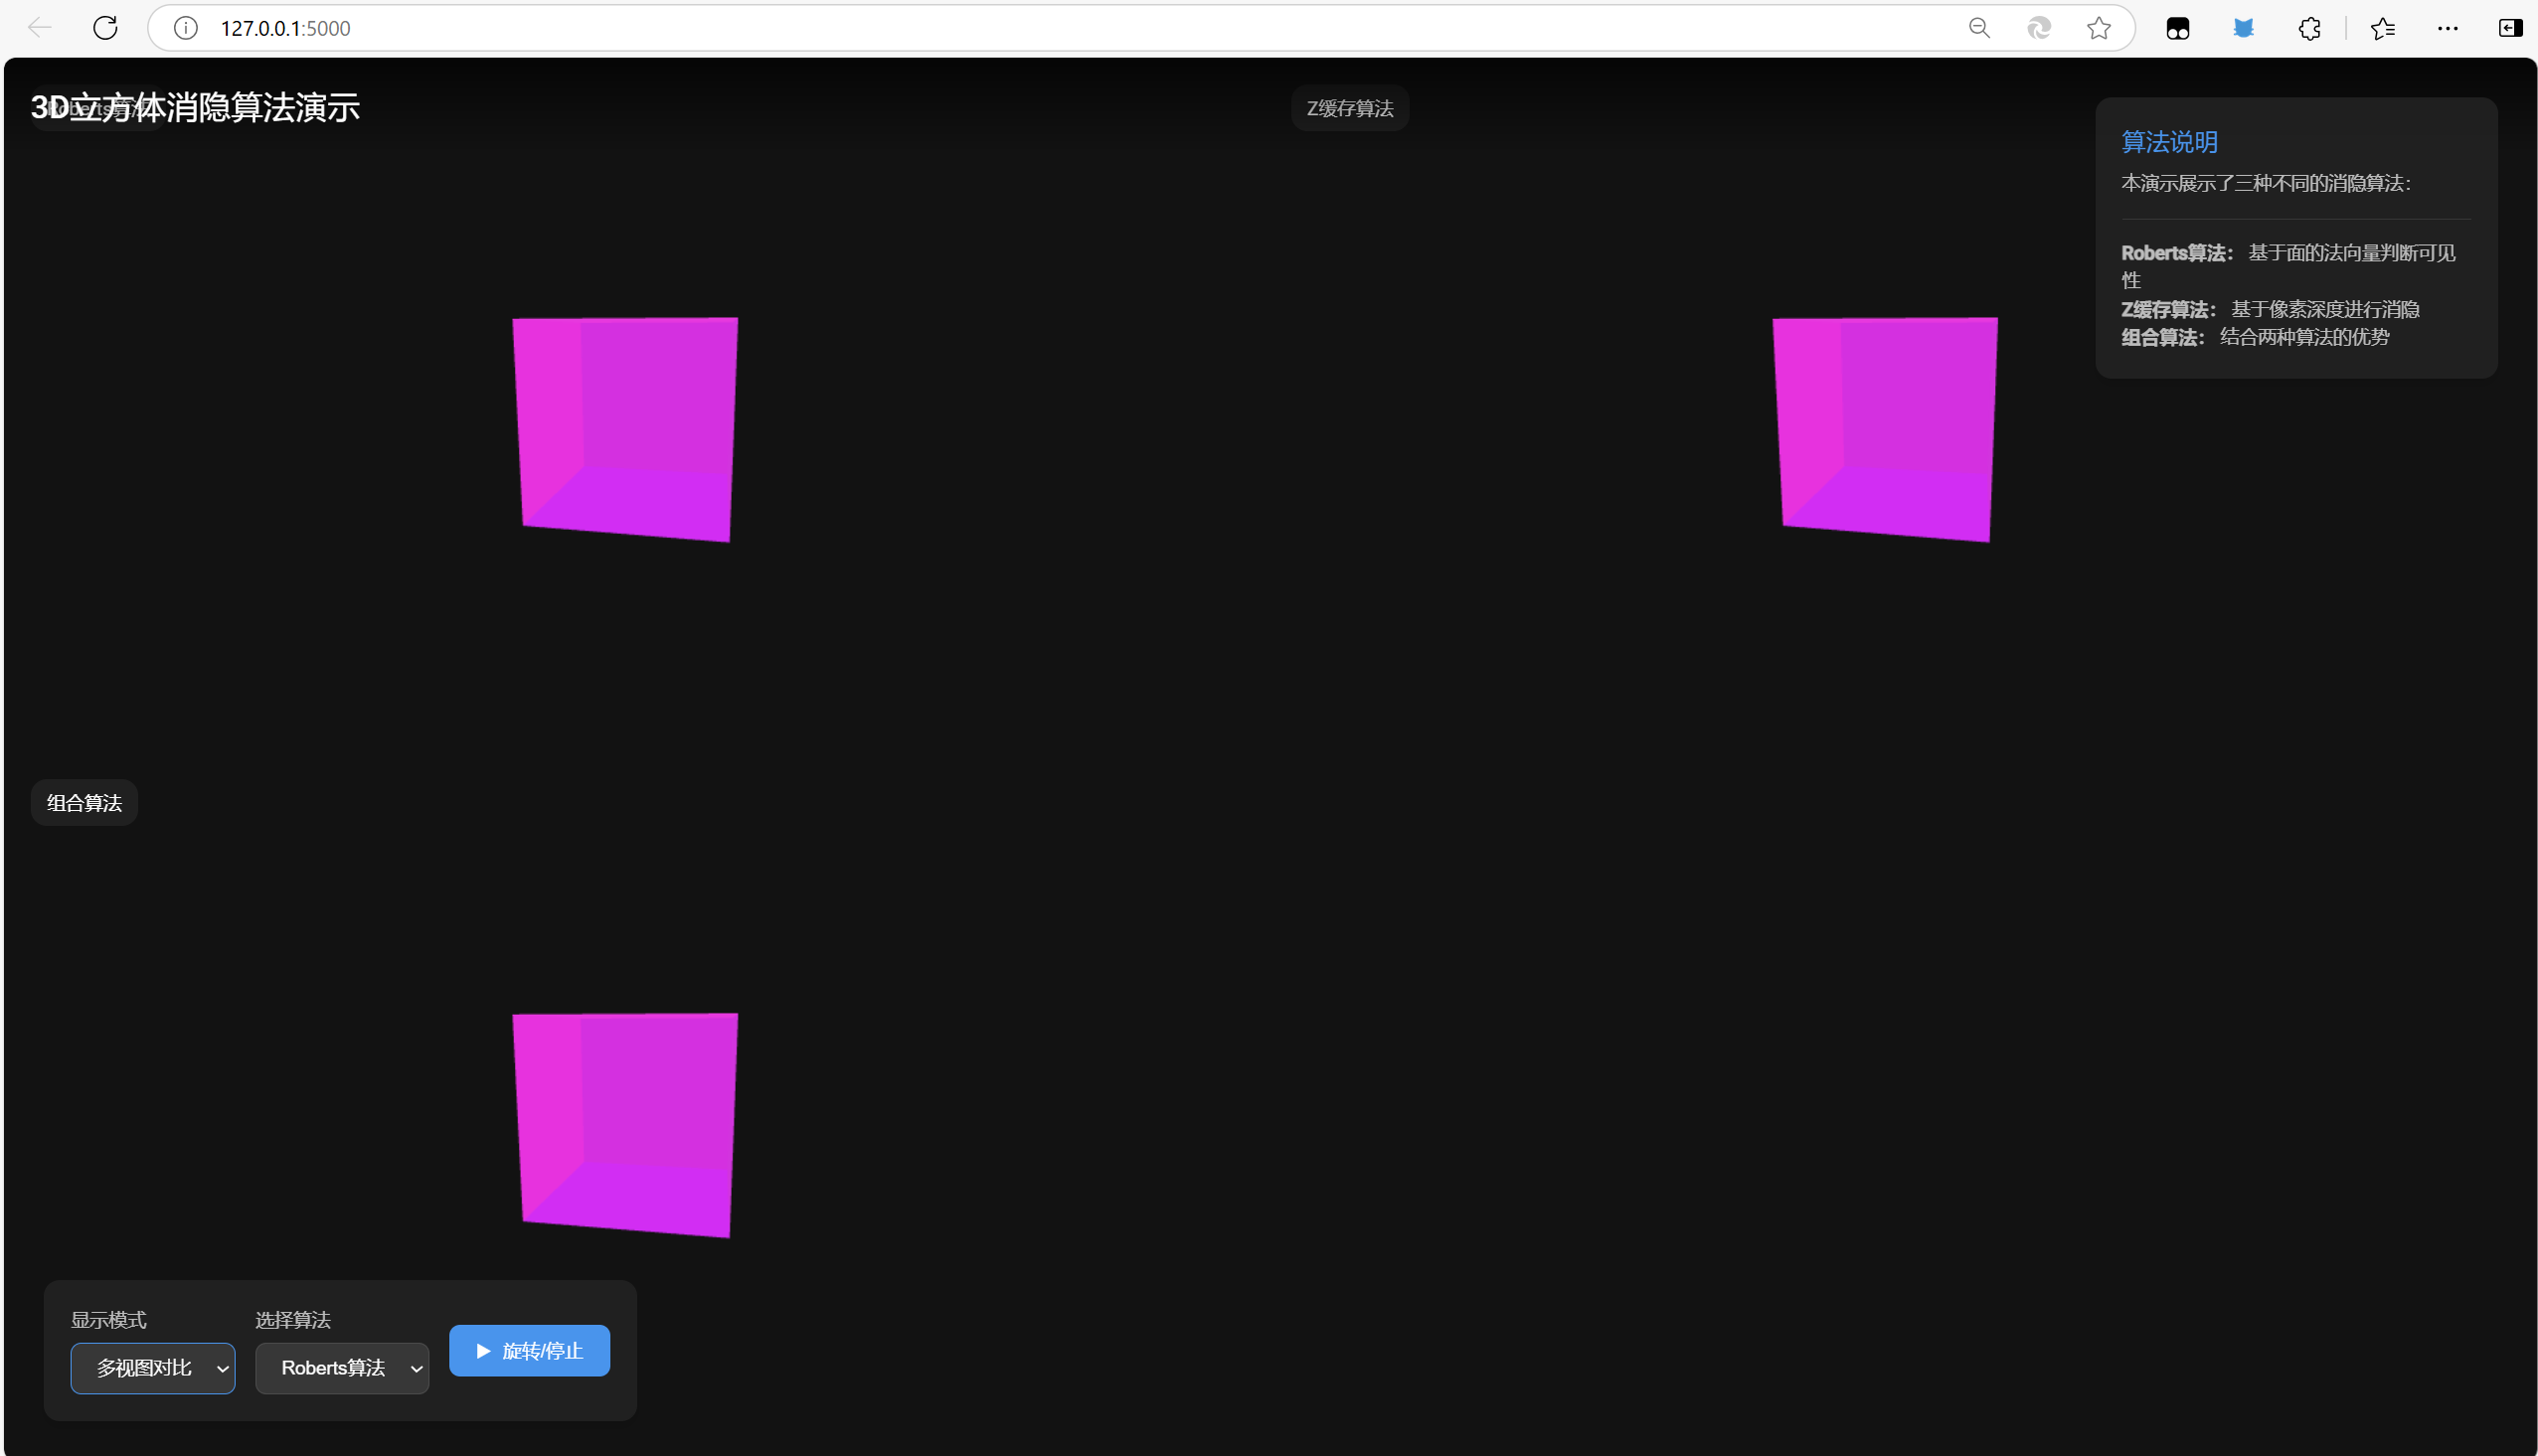
(1)多视图展示
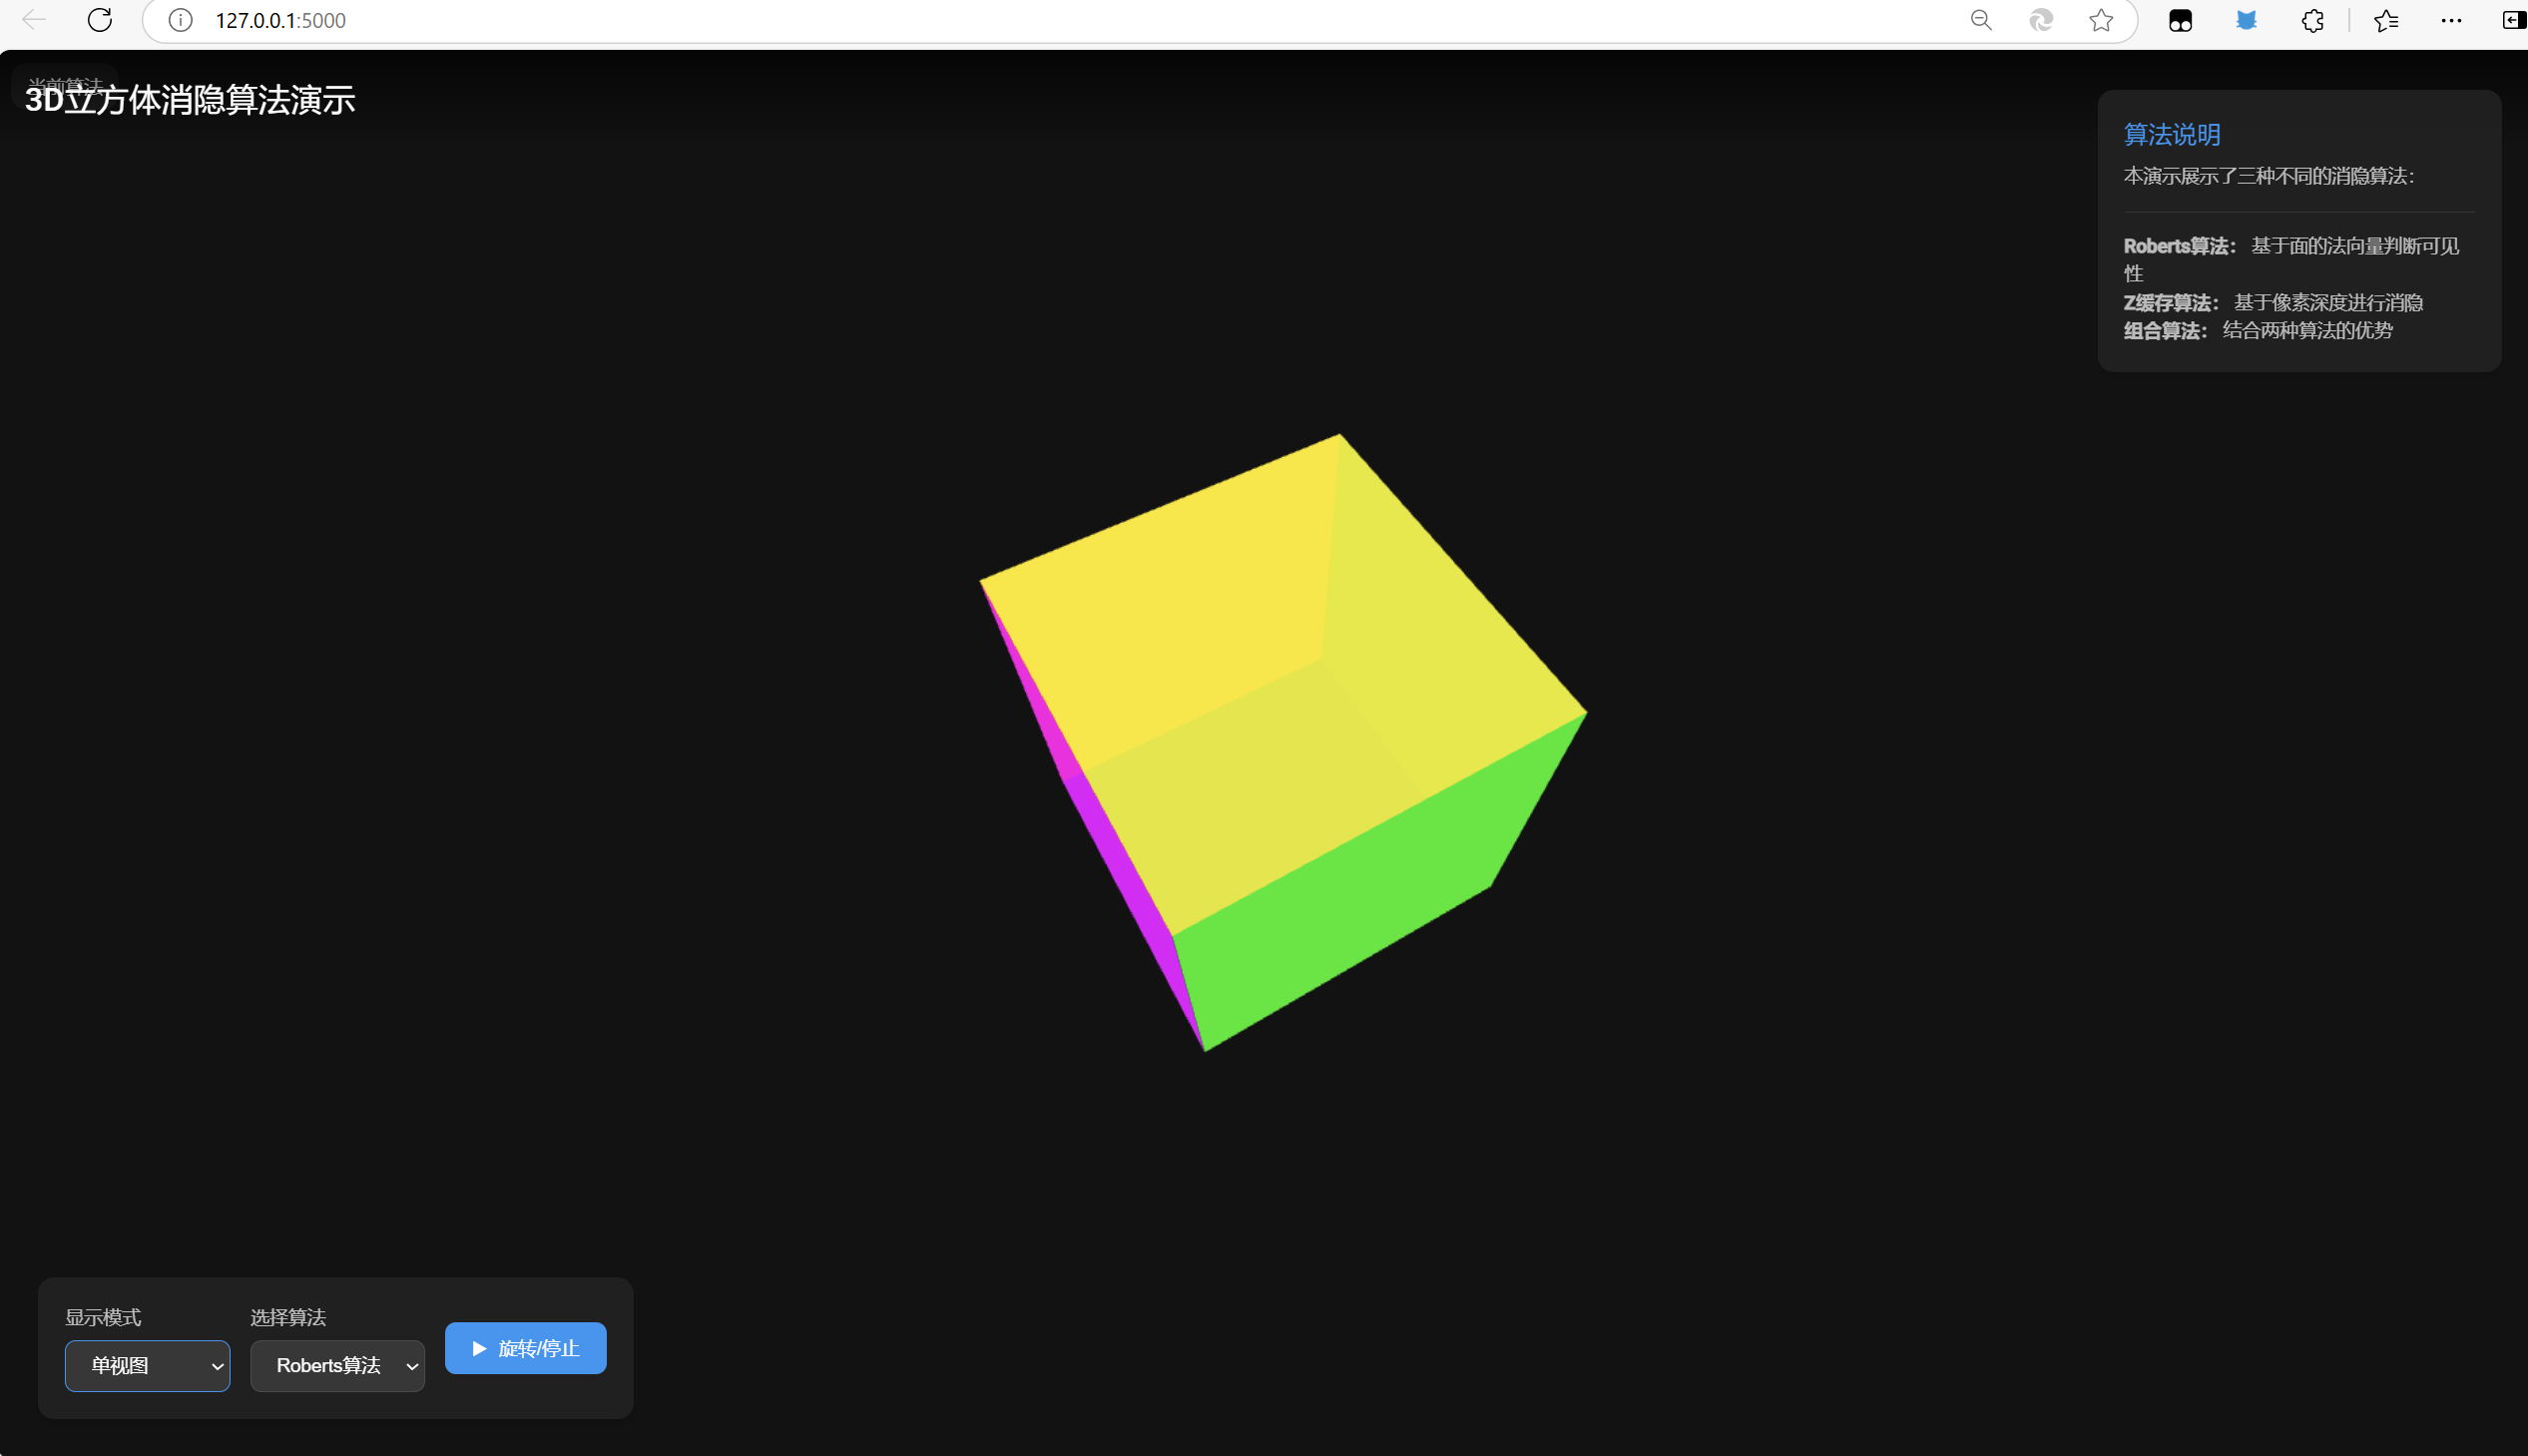
(2)单视图展示
五、项目简介
# 3D渲染消隐算法项目
## 项目简介
本项目实现了三种3D渲染消隐算法:
1. `z_buffer_hidden_surface.py` - Z缓冲算法实现
2. `roberts_hidden_surface.py` - Roberts算法实现
3. `combined_hidden_surface.py` - 综合消隐算法实现
还包含一个Flask Web应用(`app.py`)用于展示这些算法效果。
## 使用步骤
1. 安装依赖:
```bash
pip install -r requirements.txt
```
2. 运行算法演示:
```bash
python z_buffer_hidden_surface.py
python roberts_hidden_surface.py
python combined_hidden_surface.py
```
3. 运行Web应用:
```bash
python app.py
```
然后访问 http://127.0.0.1:5000
## 算法说明
- **Z缓冲算法**:通过深度缓冲区确定可见面
- **Roberts算法**:通过背面剔除实现消隐
- **综合算法**:结合多种消隐技术
项目使用PyOpenGL和Pygame实现3D渲染。