[MSPM0开发]之五 MSPM0G3507 SysTick定时器的配置与使用(systick中断实现延时函数)
1、 硬件环境
1个LED,PB22,高电平点亮
使用外部晶振作为时钟源,晶振频率40MHz。
2、 工程准备
使用[链接 [MSPM0开发]之四 使用不同时钟源配置主时钟点亮LED(SYSCONFIG配置时钟)]中的例程。
时钟配置如下(没有使用锁相环PLL):

3、systick初始化探究
3.1 systick配置初始化
打开systick配置页面,单击“add”
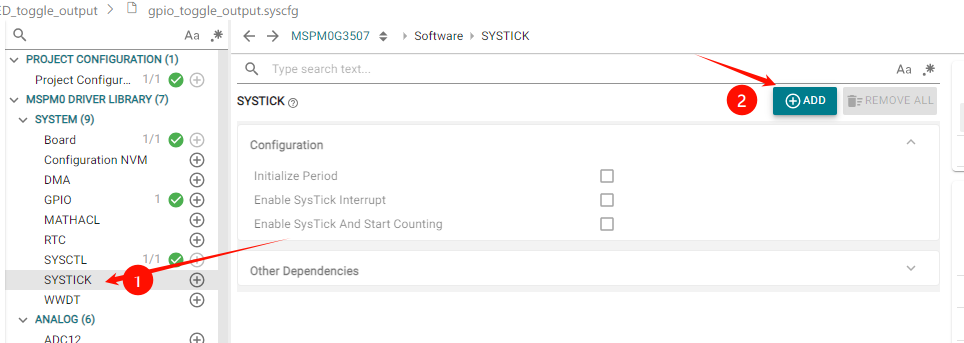
systick参数配置,这里配置定时周期1ms。
为了查看相关函数,可以把中断、使能、开始计数都选上。

TI的DL库偏底层,在完成以上配置后,编译项目一次。
可以在ti_msp_dl_config.c文件中,看到一下systick的初始化代码:
SYSCONFIG_WEAK void SYSCFG_DL_SYSTICK_init(void)
{
    /*
     * Initializes the SysTick period to 1.00 ms,
     * enables the interrupt, and starts the SysTick Timer
     */
    DL_SYSTICK_config(40000);
}
而里边的DL_SYSTICK_config()这个函数通过定位可以看到使用了CMSIS接口函数。
/**
 *  @brief Redirects DL_SYSTICK_config to CMSIS standard SysTick_Config
 */
#define DL_SYSTICK_config(x)                                   SysTick_Config(x)
这里将配置过程中,systick使能计数选项去掉。

重新生成配置文件,可以看到systick初始化初始化函数中使用了以下DL库函数
SYSCONFIG_WEAK void SYSCFG_DL_SYSTICK_init(void)
{
    /* Initialize the period to 1.00 ms */
    DL_SYSTICK_init(40000);
    DL_SYSTICK_enableInterrupt();
    NVIC_SetPriority(SysTick_IRQn, 2);
}
通过查询sdk文档或者看源码dl_systick.h,可以发现DL_SYSTICK_enable()函数是使能systick,并开始计数。
__STATIC_INLINE void 	DL_SYSTICK_init (uint32_t period)
 	Initializes the System Tick Timer (SysTick) More...

__STATIC_INLINE void 	DL_SYSTICK_setPeriod (uint32_t period)
 	Set the period for the SysTick. More...

__STATIC_INLINE void 	DL_SYSTICK_resetValue (void)
 	Reset the current value of the SysTick. More...

__STATIC_INLINE uint32_t 	DL_SYSTICK_getPeriod (void)
 	Get the period for the SysTick. More...

__STATIC_INLINE uint32_t 	DL_SYSTICK_getValue (void)
 	Get the current value of SysTick counter. More...

__STATIC_INLINE void 	DL_SYSTICK_enableInterrupt (void)
 	Enable the SysTick interrupt.

__STATIC_INLINE void 	DL_SYSTICK_disableInterrupt (void)
 	Disable the SysTick interrupt.

__STATIC_INLINE void 	DL_SYSTICK_enable (void)
 	Enable the SysTick, starts counting once enabled. More...

__STATIC_INLINE void 	DL_SYSTICK_disable (void)
 	Disable the SysTick, stops counting once disabled.

__STATIC_INLINE bool 	DL_SYSTICK_isEnabled (void)
 	Checks if the SysTick is enabled. More...
3.2 中断服务函数实现
在startup_mspm0g350x_ticlang.c文件中可以看到systick的中断服务入口函数为:SysTick_Handler(),在main.c中实现该函数。
void SysTick_Handler(void)
{
    if( delay_times != 0 )
    {
        delay_times--;
    }
}
3.3 delay_ms()函数实现
void delay_ms(unsigned int ms)
{
    delay_times = ms;
    while( delay_times != 0 );
}
3.4 完整源码
systick初始化部分
SYSCONFIG_WEAK void SYSCFG_DL_SYSTICK_init(void)
{
    /*
     * Initializes the SysTick period to 1.00 ms,
     * enables the interrupt, and starts the SysTick Timer
     */
    DL_SYSTICK_config(40000);
}
main.c部分
#include "ti_msp_dl_config.h"

volatile unsigned int delay_times = 0;

//搭配滴答定时器实现的精确ms延时
void delay_ms(unsigned int ms)
{
    delay_times = ms;
    while( delay_times != 0 );
}

int main(void) {
  /* Power on GPIO, initialize pins as digital outputs */
  SYSCFG_DL_init();

  /* Default: LED1 and LED3 ON, LED2 OFF */
  DL_GPIO_setPins(GPIO_LEDS_PORT, GPIO_LEDS_USER_LED_1_PIN);

  while (1) {
    delay_ms(1000);
    // delay_cycles(DELAY);
    DL_GPIO_togglePins(GPIO_LEDS_PORT, GPIO_LEDS_USER_LED_1_PIN);
  }
}

//滴答定时器中断服务函数
void SysTick_Handler(void)
{
    if( delay_times != 0 )
    {
        delay_times--;
    }
}
4 systick相关函数自定义
使用sysconfig每一次编译都会重新初始化硬件配置,不方便程序移植。
另外systick硬件功能相对简单,涉及的寄存器和库函数也相对较少,这里可以将其相关初始化等函数做成自定义函数,做到拿来即用的效果,避免每次都需要进行sysconfig配置的过程。
4.1 在项目根目录添加2个文件 bsp_tick.c和bsp_tick.h
比如:项目路径为:C:\Users\adminFish\workspace_ccstheia\LED_toggle_output
即将以上.c和.h文件放入LED_toggle_output文件夹。这样的话,不用在项目属性中增加编译器include path(增加文件较少)。
并且,.c和.h文件可以自动添加到ccs项目中,并且在编译时可以自动添加到项目中。
编写如下代码:
bsp_tick.h
#ifndef bsp_tick_h
#define bsp_tick_h

#include "ti_msp_dl_config.h"

void systick_init(uint32_t period);
uint64_t systick_get_tick(void);
void systick_set_tick(uint64_t tick);
void systicks_clear_tick(void);
void delay_ms(uint64_t ms);

#endif
bsp_tick.c
#include "bsp_tick.h"

static volatile uint64_t mTick = 0;

void systick_init(uint32_t period) {
  /* Initialize the period to 1.00 ms */
  DL_SYSTICK_init(period);
  DL_SYSTICK_enableInterrupt();
  NVIC_SetPriority(SysTick_IRQn, 1);
  DL_SYSTICK_enable();
}
static void systick_inc_tick(void) { mTick++; }
uint64_t systick_get_tick(void) { return mTick; }
void systick_set_tick(uint64_t tick) { mTick = tick; }
void systick_clear_tick(void) { mTick = 0; }
void delay_ms(uint64_t ms) {
  uint64_t tick = systick_get_tick();
  while (systick_get_tick() - tick < ms) ;
}
// 滴答定时器中断服务函数
void SysTick_Handler(void) { systick_inc_tick(); }
4.2 使用
回到第2步,使用高速时钟,并生成LED闪烁的程序。
main.c按照如下的方式做修改:
#include "bsp_tick.h"
#include "ti_msp_dl_config.h"

int main(void) {
  /* Power on GPIO, initialize pins as digital outputs */
  SYSCFG_DL_init();

  systick_init(40000); //使用自定义初始化函数初始化并启动systick
  /* Default: LED1 and LED3 ON, LED2 OFF */
  DL_GPIO_setPins(GPIO_LEDS_PORT, GPIO_LEDS_USER_LED_1_PIN);

  while (1) {
    delay_ms(100); // 延时100ms
    DL_GPIO_togglePins(GPIO_LEDS_PORT, GPIO_LEDS_USER_LED_1_PIN);
  }
}
这样,后面在使用的时候,只需要将.c和.h两个文件复制到项目文件夹下,就可以直接拿来用了(注意MCLK时钟频率)。
5 技术参考手册
2000页的手册,systick仅仅不到一页… 

