Vue3+Vite+TypeScript+Element Plus开发-04.静态菜单设计
系列文档目录
Vue3+Vite+TypeScript安装
Element Plus安装与配置
主页设计与router配置
静态菜单设计
Pinia引入
文章目录
目录
系列文档目录
文章目录
前言
一、Aside设计
二、动态增加菜单
三.布局引用在Main中显示
参考文献:
前言
在本系列文档中,将以一个实际的项目为例,逐步展示如何搭建菜单,设计主页布局,配置路由,实现静态和动态菜单等功能。
一、Aside设计
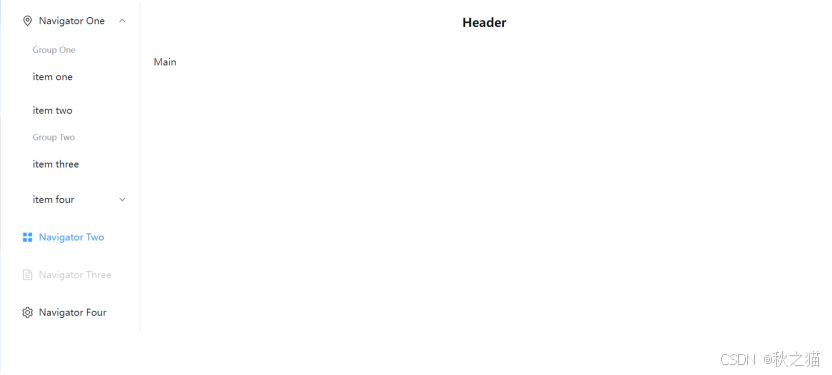
1.新建文件src\components\MainAsideCont.vue
完整代码如下:
// 主页左边的容器组件
<template>

  <el-menu
    default-active="2"
    class="el-menu-vertical-demo"  >
    <el-sub-menu index="1">
      <template #title>
        <el-icon><location /></el-icon>
        <span>Navigator One</span>
      </template>
      <el-menu-item-group>
        <template #title><span>Group One</span></template>
        <el-menu-item index="1-1">item one</el-menu-item>
        <el-menu-item index="1-2">item two</el-menu-item>
      </el-menu-item-group>
      <el-menu-item-group title="Group Two">
        <el-menu-item index="1-3">item three</el-menu-item>
      </el-menu-item-group>
      <el-sub-menu index="1-4">
        <template #title><span>item four</span></template>
        <el-menu-item index="1-4-1">item one</el-menu-item>
      </el-sub-menu>
    </el-sub-menu>
    <el-menu-item index="2">
      <el-icon><icon-menu /></el-icon>
      <template #title>Navigator Two</template>
    </el-menu-item>
    <el-menu-item index="3" disabled>
      <el-icon><document /></el-icon>
      <template #title>Navigator Three</template>
    </el-menu-item>
    <el-menu-item index="4">
      <el-icon><setting /></el-icon>
      <template #title>Navigator Four</template>
    </el-menu-item>
  </el-menu>
</template>

<script lang="ts" setup>
import { ref } from 'vue'
import {
  Document,
  Menu as IconMenu,
  Location,
  Setting,
} from '@element-plus/icons-vue'


</script>

<style>
.el-menu{
  height: 100%; /* 设置整个布局的高度为 100%,确保布局占满整个视口 */
}
.el-menu-vertical-demo:not(.el-menu--collapse) {
  width: 200px;
  min-height: 400px;
}
</style>
此处代码element plus官方代码,删除一些不需要部分,参考网址:http://element-plus.org/zh-CN/component/menu.html
2.调整Main.vue样式
只增加 style
<template>
    <div class="common-layout">
      <el-container>
        <el-aside >
          <MainAsideCont />
        </el-aside>
        <el-container>
          <el-header>Header</el-header>
          <el-main>Main</el-main>
        </el-container>
      </el-container>
    </div>
  </template>
  <script lang="ts" setup>
  import { defineComponent } from 'vue';
  import MainAsideCont from '@/components/MainAsideCont.vue';


  </script>

  <style lang="less" scoped>
  .common-layout {
    height: 100%; /* 设置整个布局的高度为 100%,确保布局占满整个视口 */
    width: 100%; /* 设置整个布局的宽度为 100%,确保布局占满整个视口 */
    .el-container {
      height: 100%; /* 确保内部的 el-container 也占满整个父容器的高度 */
    }
    .el-header {
      background-color: #fff ; /* 设置表头的背景色为深黑色 */
      color: #141515; /* 设置表头文字颜色为白色,以便在深色背景上更清晰 */
      display: flex; /* 使用 flex 布局,方便对齐内容 */
      align-items: center; /* 垂直居中对齐内容 */
      justify-content: center; /* 水平居中对齐内容 */
      font-size: 18px; /* 设置文字大小为 18px */
      font-weight: bold; /* 设置文字为加粗 */
    }
    .el-aside {
      background-color:rgba(242, 242, 242, 0.19); /* 设置侧边栏的背景色为浅灰色 */
      color: #333; /* 设置侧边栏文字颜色为深灰色 */
      display: flex; /* 使用 flex 布局,方便对齐内容 */
      align-items: center; /* 垂直居中对齐内容 */
      justify-content: center; /* 水平居中对齐内容 */
      font-size: 16px; /* 设置文字大小为 16px */
      font-weight: normal; /* 设置文字为正常粗细 */
      height: 100%; /* 确保侧边栏高度占满 */
      width: 200px;
    }
    .el-main {
      background-color: #fff; /* 设置主内容区域的背景色为白色 */
      color: #333; /* 设置主内容区域文字颜色为深灰色 */
      padding: 20px; /* 添加内边距,使内容不紧贴边缘 */
      font-size: 14px; /* 设置文字大小为 14px */
    }
  }
  </style>
3、运行效果
二、动态增加菜单
1.增加src\views\home.vue
<template>
<h1> Home</h1>
</template>
2.增加src\views\SysSettings\UserInfo.vue
<template>
<h1> 用户信息</h1>
</template>
3.增加src\views\SysSettings\AccountSetting.vue
<template>
<h1> 账户设定</h1>
</template>
4.调整路由router\index.ts
重点:children定义
完整代码
import { createRouter, createWebHistory } from 'vue-router';
import Main from '@/views/Main.vue'; //
import Home from '@/views/Home.vue'
import UserInfo from '@/views/SysSettings/UserInfo.vue'
import AccountSetting from '@/views/SysSettings/AccountSetting.vue'


const routes = [
  {
    path: '/',
    name: 'main',
    component: Main,
    children: [
      {
        path: 'home',
        name: 'home',
        component: Home,

      },
      {
        path: 'UserInfo',
        name: 'UserInfo',
        component: UserInfo,

      },
      {
        path: 'AccountSetting',
        name: 'AccountSetting',
        component:AccountSetting
      },
    ],
  },


];

const router = createRouter({
  history: createWebHistory(),
  routes,
});

export default router;
5.调整Aside
路径:src\components\MainAsideCont.vue
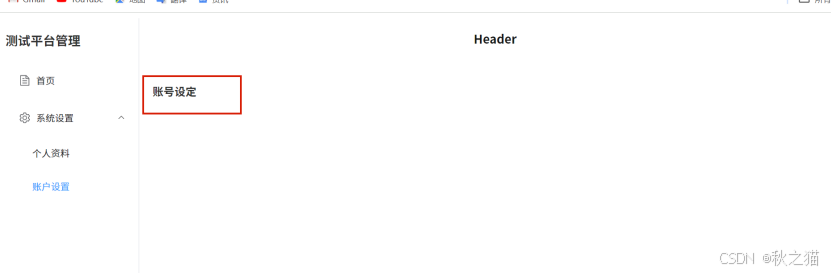
通过数据自动增加菜单,为后期调用API产生菜单做好准备
<template>
  <el-menu
    :default-active="activeIndex"
    class="el-menu-vertical-demo"
  >
    <!-- 渲染没有子菜单的项 -->
    <el-menu-item
      v-for="item in noChilden"
      :key="item.index"
      :index="item.index"
      @click="handlemenu(item)"
    >
      <component class="icon" :is="item.icon"></component>
      <span>{{ item.label }}</span>
    </el-menu-item>

    <!-- 渲染有子菜单的项 -->
    <el-sub-menu
      v-for="item in hasChilden"
      :key="item.index"
      :index="item.index"
    >
      <template #title>
        <component class="icon" :is="item.icon"></component>
        <span>{{ item.label }}</span>
      </template>
      <el-menu-item
        v-for="subItem in item.children"
        :key="subItem.index"
        :index="subItem.index"
        @click="handlemenuchild(item, subItem)"
      >
        <span>{{ subItem.label }}</span>
      </el-menu-item>
    </el-sub-menu>
  </el-menu>
</template>

<script lang="ts" setup>
import { ref, computed, onMounted } from 'vue';
import { useRouter } from 'vue-router';
import {
  Document,
  Setting,
} from '@element-plus/icons-vue';

interface MenuItem {
  index: string;
  label: string;
  icon?: any;
  children?: MenuItem[];
}

const menuData = ref<MenuItem[]>([
  { index: 'Home', label: '首页', icon: Document },
  {
    index: 'SysSettings',
    label: '系统设置',
    icon: Setting,
    children: [
      { index: 'UserInfo', label: '个人资料' },
      { index: 'AccountSetting', label: '账户设置' },
    ],
  },
]);

const hasChilden = computed(() => menuData.value.filter(item => item.children && item.children.length > 0));
const noChilden = computed(() => menuData.value.filter(item => !item.children || item.children.length === 0));

const activeIndex = ref('Home');
const router = useRouter();

const handlemenu = (item: MenuItem) => {
  router.push(item.index);
};

const handlemenuchild = (item: MenuItem, subItem: MenuItem) => {
  router.push(subItem.index);
};
</script>

<style>
.el-menu {
  height: 100%; /* 设置整个布局的高度为 100%,确保布局占满整个视口 */
}
.el-menu-vertical-demo:not(.el-menu--collapse) {
  width: 200px;
  min-height: 400px;
}
.icon {
  margin-right: 8px; /* 图标与文字之间的间距 */
  font-size: 18px;   /* 图标的大小 */
  width:18px;
  height:18px;
  size:8px;
  color: #606266;    /* 图标的默认颜色 */
  vertical-align: middle; /* 垂直居中对齐 */
}

/* 鼠标悬停时的样式 */
.icon:hover {
  color: #409eff; /* 鼠标悬停时图标的颜色 */
}

</style>
6.运行效果
点击菜单时候,注意地址栏变化。

三.布局引用在Main中显示
1.修改src\views\main.vue
重点: <router-view></router-view>
完整代码:
<template>
    <div class="common-layout">
      <el-container>
        <el-aside >
          <MainAsideCont />
        </el-aside>
        <el-container>
          <el-header>Header</el-header>
          <el-main>
            <router-view></router-view>
          </el-main>
        </el-container>
      </el-container>
    </div>
  </template>
  <script lang="ts" setup>
  import { defineComponent } from 'vue';
  import MainAsideCont from '@/components/MainAsideCont.vue';


  </script>

  <style lang="less" scoped>
  .common-layout {
    height: 100%; /* 设置整个布局的高度为 100%,确保布局占满整个视口 */
    width: 100%; /* 设置整个布局的宽度为 100%,确保布局占满整个视口 */
    .el-container {
      height: 100%; /* 确保内部的 el-container 也占满整个父容器的高度 */
    }
    .el-header {
      background-color: #fff ; /* 设置表头的背景色为深黑色 */
      color: #141515; /* 设置表头文字颜色为白色,以便在深色背景上更清晰 */
      display: flex; /* 使用 flex 布局,方便对齐内容 */
      align-items: center; /* 垂直居中对齐内容 */
      justify-content: center; /* 水平居中对齐内容 */
      font-size: 18px; /* 设置文字大小为 18px */
      font-weight: bold; /* 设置文字为加粗 */
    }
    .el-aside {
      background-color:rgba(242, 242, 242, 0.19); /* 设置侧边栏的背景色为浅灰色 */
      color: #333; /* 设置侧边栏文字颜色为深灰色 */
      display: flex; /* 使用 flex 布局,方便对齐内容 */
      align-items: center; /* 垂直居中对齐内容 */
      justify-content: center; /* 水平居中对齐内容 */
      font-size: 16px; /* 设置文字大小为 16px */
      font-weight: normal; /* 设置文字为正常粗细 */
      height: 100%; /* 确保侧边栏高度占满 */
      width: 200px;
    }
    .el-main {
      background-color: #fff; /* 设置主内容区域的背景色为白色 */
      color: #333; /* 设置主内容区域文字颜色为深灰色 */
      padding: 20px; /* 添加内边距,使内容不紧贴边缘 */
      font-size: 14px; /* 设置文字大小为 14px */
    }
  }
  </style>
2.运行效果
参考文献:
1.element plus menu:http://element-plus.org/zh-CN/component/menu.html