Spring的基本用法
目录
1.依赖注入的类型
1.1 Bean的配置
1.2 基于构造函数的依赖注入
1.3 基于setter的依赖注入
2.依赖配置的方式
2.1 简单属性的依赖的配置
2.2 配置合作者Bean的依赖的配置
2.3 集合属性的依赖的配置
2.4 注入嵌套 bean
3.Bean的作用域范围
3.1 singleton作用域
3.2 prototype作用域
4.Bean的自动装配方式
5.Bean的基于Annotation的装配方法
5.1 用于创建对象的注解
5.2 用于注入数据的注解
5.3 用于指定 Bean 作用域的注解
5.4 用于将外部的值动态注入 Bean
介绍了依赖注入的概念及依赖注入的类型、配置依赖、Bean的作用域和Bean的自动装配方式,以及基于注解的装配。
1.依赖注入的类型
依赖注入(DI)是一个过程,通过这个过程,Spring IoC容器创建对象时会动态地将其依赖的对象注入Bean对象中。
Spring 容器支持多种形式的Bean的配置,基于XML的配置所支持的依赖注入的类型常用的有两种,一种是基于构造函数的依赖注入,另一种是基于setter的依赖注入。
1.1 Bean的配置
作为 Spring核心机制的依赖注入,改变了传统的编程习惯,对组件的实例化不再由应用程序完成,转而交由 Spring 容器完成,在需要时注入应用程序中,从而对组件之间的依赖关系进行了解耦。这一切都离不开 Spring 配置文件中使用的 bean 元素。也就是 Spring 容器需要根据Bean 的配置创建 Bean 对象及配置 Bean 之间的依赖关系。Spring 容器支持XML和 Properties两种格式的配置文件,在实际项目开发中最常用的是XML格式配置方式。
定义Bean的示例代码如下所示。
<beans xmlns="http://www.springframework.org/schema/beans" xmlns:xsi="http://www.w3.org/2001/XMLSchema-instance" xsi:schemaLocation="http://www.springframework.org/schema/beans http://www.springframework.org/schema/beans/spring-beans.xsd">
    <bean id="UserDao" class="com.rainpet.dao.impl.UserDaoImpl"> </bean>
    <bean id="UserService" class="com.rainpet.service.impl.UserServiceImpl"> </bean>
</beans>
1.2 基于构造函数的依赖注入
基于构造函数的依赖注入由Spring Ioc容器调用具有多个参数的构造函数来完成,每个参数均表示一个依赖项。
验证构造器依赖注入:
(1)User.java
public class User{
    private int userId;
    private String name;
    private int age;
    public User(int userId,String name,int age){
        this.userId =userId;
        this.name =name;
        this.age = age;

    }
    @Override
    public String tostring(){
        return "用户信息[userId="+userId +"',name="+ name + ",",age="+ age + "]";
    }
}
(2)beans.xml
<?xml version="1.0" encoding="UTF-8"?>
<beans xmlns="http://www.springframework.org/schema/beans"xmlns:xsi="http://www.w3.org/2001/XMLSchema-instance"xsi:schemaLocation="http://www.springframework.org/schema/beanshttp://www.springframework.org/schema/beans/spring-beans.xsd">
    <bean id="user" class="com.hl.entity.User">
        <constructor-arg name="userld" value="1"></constructor-arg>
        <constructor-arg name="name" value="tom"></constructor-arg>
        <constructor-arg name="age" value="21"></constructor-arg>
    </bean>
</beans>
(3)Test.java
import org.springframework.context.ApplicationContext;
import org.springframework,context.support.ClassPathXmlApplicationContext;
import com.hl.entity.User;
public class Test{
    public static void main(String]arqs){
        ApplicationContext applicationContext = new ClassPathXmlApplicationContext("beans.xml");
        User user = (User)applicationContext.getBean("user");
        System.out.println(user.toString());
    }
}
1.3 基于setter的依赖注入
在调用无参数构造函数实例化Bean之后,基于setter的依赖注入由Bean上的容器调用setter方法完成。
验证setter依赖注入:
(1)User.java
@Data
public class User{
    private int userId;
    private String name;
    private int age;

    @Override
    public String tostring(){
        return "用户信息[userId="+userId +"',name="+ name + ",",age="+ age + "]";
    }
}
(2)beans.xml
<?xml version="1.0" encoding="UTF-8"?>
<beans xmlns="http://www.springframework.org/schema/beans"xmlns:xsi="http://www.w3.org/2001/XMLSchema-instance"xsi:schemaLocation="http://www.springframework.org/schema/beanshttp://www.springframework.org/schema/beans/spring-beans.xsd">
    <bean id="user" class="com.hl.entity.User">
        <property name="userId" value="1l"></property>
        <property name="name" value="tom"></property>
        <property name="age" value="20"></property>
    </bean>
</beans>
(3)Test.java
import org.springframework.context.ApplicationContext;
import org.springframework,context.support.ClassPathXmlApplicationContext;
import com.hl.entity.User;
public class Test{
    public static void main(String]arqs){
        ApplicationContext applicationContext = new ClassPathXmlApplicationContext("beans.xml");
        User user = (User)applicationContext.getBean("user");
        System.out.println(user.toString());
    }
}
Spring 通过配置文件实现初始化实例![]() https://download.csdn.net/download/m0_74808313/90519433
https://download.csdn.net/download/m0_74808313/90519433
2.依赖配置的方式
2.1 简单属性的依赖的配置
如果 JavaBean 的简单属性为 Java的基本数据类型 byte、short、int、long、float、double、boolean、char 或 String时,在 Spring 配置文件中配置可以使用<value/>,用于指定字符串、基本类型的属性值。Spring 使用XML 解析器解析这些数据,然后利用java.beans.PropertyEditor完成类型转换,从String类型转换到所需要的参数值类型。
2.2 配置合作者Bean的依赖的配置
如果 JavaBean 的属性值是容器中的另一个Bean实例时,在 Spring 配置文件中配置 Bean时,可以使用ref属性指定另一个 bean 实例的 id。语法为<bean name=""ref="">。
<?xml version="1.0" encoding="UTF-8"?>
<beans xmlns="http://www.springframework.org/schema/beans"xmlns:xsi="http://www.w3.org/2001/XMLSchema-instance"xsi:schemaLocation="http://www.springframework.org/schema/beanshttp://www.springframework.org/schema/beans/spring-beans.xsd">

    <bean id="user" class="com.hl.entity.User">
        <property name="birth" ref="birthDate"></property>
    </bean>

    <bean id="birthDate" class="com.Util.Date"></bean>
</beans>
2.3 集合属性的依赖的配置
如果 JavaBean 的属性值的类型是 Collection的 List、Set、Map和 Properties 集合时,则在Spring 配置文件中可以使用集合元素,<list/><set/><map/>和<props/>可用来设置类型为 List、Set、Map和Properties 的集合属性值。
<?xml version="1.0" encoding="UTF-8"?>
<beans xmlns="http://www.springframework.org/schema/beans"xmlns:xsi="http://www.w3.org/2001/XMLSchema-instance"xsi:schemaLocation="http://www.springframework.org/schema/beanshttp://www.springframework.org/schema/beans/spring-beans.xsd">

    <bean id="user" class="com.hl.entity.User">
        <property name="lists">
            <list>
                <value>English</value>
                <value>Math</value>
            </list>
        </property>
        <property name="sets">
            <set>
                <value>English</value>
                <value>Math</value>
            </set>
        </property>
        <property name="map">
            <map>
                <entry key="enghish" value="9" />
            </map>
        </property>
    </bean>
</beans>
2.4 注入嵌套 bean
如果某个JavaBean所依赖的JavaBean对象不想被 Spring 容器直接访问,可以使用嵌套bean。在 Spring 配置文件中<bean/>用来定义嵌套 bean,嵌套 bean 只对嵌套它的外部 bean 有效Spring 容器无法直接访问嵌套bean,因此定义嵌套 bean 时无须指定 id 属性。
<?xml version="1.0" encoding="UTF-8"?>
<beans xmlns="http://www.springframework.org/schema/beans"xmlns:xsi="http://www.w3.org/2001/XMLSchema-instance"xsi:schemaLocation="http://www.springframework.org/schema/beanshttp://www.springframework.org/schema/beans/spring-beans.xsd">

    <bean id="user" class="com.hl.entity.User">
        <property name="address">
            <bean class="com.hl.entity.Address">
                <property name="city" value="henan">
            </bean>
        </property>
    </bean>

</beans>
3.Bean的作用域范围
Spring 容器可以创建 JavaBean 实例,也可以指定其特定的作用域。
3.1 singleton作用域
singleton 是 Spring 容器中的默认 Bean 范围。它告诉 Spring 容器,为整个 Web 应用程序只创建和管理一个 Bean类的实例。
<bean id="accountService" class="com.something.DefaultAccountService"/>
<bean id="accountService" class="com.something.DefaultAccountService"scope="singleton"/>
3.2 prototype作用域
prototype 作用域是指应用程序代码每次对Bean发出请求时,Spring 容器都会创建一个新的 Bean 实例来处理请求。
<bean id="accountService" class="com.something.DefaultAccountService"
scope="prototype"/>
4.Bean的自动装配方式
通过Bean的自动装配,Spring 容器可以自动装配协作 Bean 之间的依赖关系,即在 Spring 配置文件中无须使用 ref显式指定依赖 Bean。由 BeanFactory 检查 XML配置文件内容,根据某种规则,为主调用者Bean 注入依赖关系。
Bean 的自动装配具有以下优点:自动装配可以大大减少指定属性或构造函数参数的需要,从而减少了配置文件的工作量。
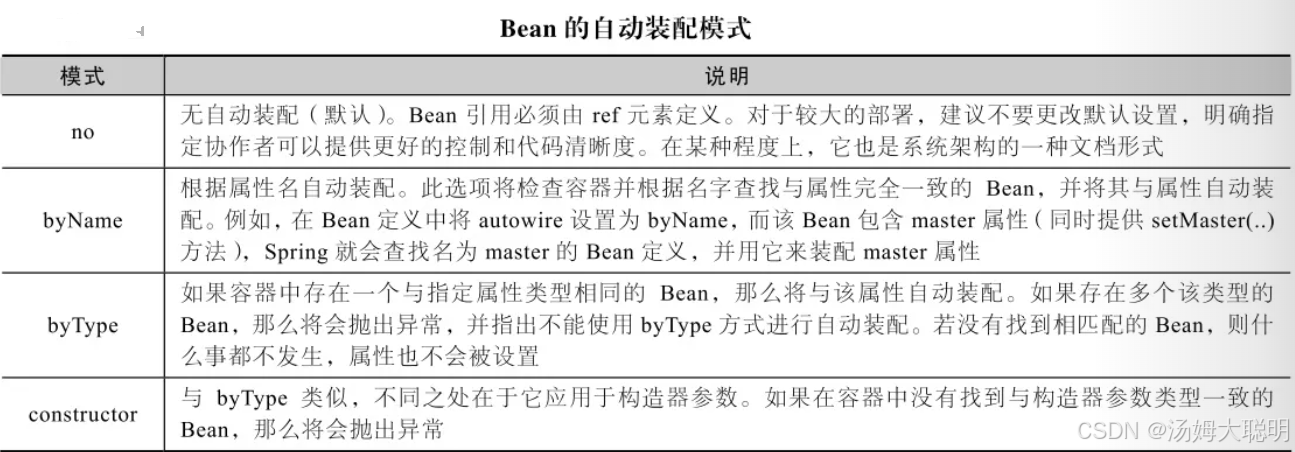
使用基于 XML的配置时,Spring的自动装配可通过<beans/>的 default-autowire 属性指定也可通过<bean/>的 autowire 属性指定。
验证 Bean的自动装配方式 byName 的案例。
(1)Beanl.iava
public class Beanl{
    private String name;
    private int age;
    public void setName(String name){
        this.name =name;
    }
    public void setAge(int age){this.age = age;}
}
(2)Bean2.java
public class Bean2{
    private String email;
    public void setEmail(String email){
        this.email= email;
    }
}
(3)Bean3.java
public class Bean3{
    private Beanl beanl;
    private Bean2 bean2;
    public Beanl getBeanl(){
        return beanl;
    }
    public void setBean1l(Beanl beanl){this.beanl =beanl;}
    public Bean2 getBean2(){
        return bean2;
    }
    public void setBean2(Bean2 bean2){this.bean2 =bean2;}
}
(4)beans.xml
<?xml version="1.0" encoding="UTF-8"?><beans xmlns="http://www.springframework.org/schema/beans"xmlns:xsi="http://www.w3.0rg/2001/XMLSchema-instance"xsi:schemaLocation="http://www.springframework.org/schema/beanshttp://www.springframework.org/schema/beans/spring-beans.xsd"default-autowire="byName">
    <bean id="beanl" class="com.inspur.entity.Beanl"/>
    <bean id="bean2" class="com.inspur.entity.Bean2"/>
    <bean id="bean3" class="com.inspur.entity.Bean3"/>
</beans>
(5)Test.java
import org.springframework.context.ApplicationContext;
import org.springframework.context.support.ClassPathXmlApplicationContext;
import com.inspur.entity.Bean3;
public class Test{
    public static void main(String]args){
        ApplicationContext ac=new ClassPathXmlApplicationContext("config/beans.xml");
        Bean3 bean3=(Bean3)ac.getBean("bean3");
        System.out.println(bean3.getBeanl());
        System.out.println(bean3.getBean2());
    }
}
5.Bean的基于Annotation的装配方法
Spring 中定义的关于 Bean 装配的常用注解,可以分为创建对象的注解和注入数据的注解两类。
5.1 用于创建对象的注解
@Component可标注一个普通的Spring Bean类,把普通 Bean 实例化到Spring 容器中,相当于 XML配置文件中的<bean id="" class=""/>。该注解的value属性可用于指定Bean的id。当不写时,默认值是当前类名首字母小写。
- @Controller:是@Component 的衍生注解,一般用于表现层,标注个控制器组件类。
- @Service:是@Component 的衍生注解,一般用于业务逻辑层,标注一个业务逻辑组件类。
- @Repository:是@Component的衍生注解,一般用于持久层,标注一个DAO 组件类
5.2 用于注入数据的注解
@AutoWired 用于注入数据的注解,数据类型为其他类型的 Bean。装配过程为,自动按照类型进行匹配,如果Spring容器中有唯一类型匹配成功则可以直接注入。如果有多个同类型的匹配时,可用变量名称作为Bean的id从Spring 容器中查找,如果找到也可以注入成功。如果没有匹配的,则报错。
@Resource后面没有任何内容,默认通过 name 属性去匹配 Bean,找不到再按 type 去匹配。指定了name或者type,则根据指定的类型去匹配 Bean。指定了 name 和 type,则根据指定的 name 和 type 去匹配 Bean,任何一处不匹配都将报错。
@Autowired和@Resource注解的区别:
① @Autowired 默认按照 byType 方式进行 Bean 匹配,@Resource 默认按照 byName 方式
进行 Bean 匹配。
② @Autowired 是 Spring的注解,@Resource是 Java EE的注解,看导入注解时这两个注解的包名就一清二楚了。Spring属于第三方,JavaEE则是 Java自己的,因此建议使用@Resource注解,以减少代码和 Spring 之间的耦合。
5.3 用于指定 Bean 作用域的注解
@Scope 可指定 Bean 的作用域范围,其范围取值和XML 配置是一致的,默认值为 singleton。使用属性 value 可指定作用域范围。
5.4 用于将外部的值动态注入 Bean
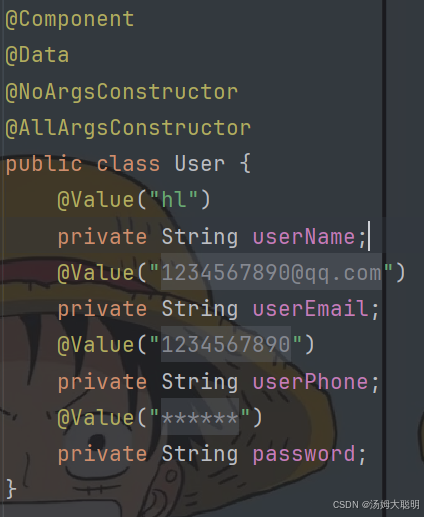
@Value 用于不通过 XML配置文件注入属性的情况,通过@Value可将外部的值动态注入Bean中。
验证@Value
(1)application.properties
user.userEmail=1234567890@qq.com
user.userPhone=1234567890
user.password=******
(2)Appconfig.java
@Configuration
@ComponentScan("org.rainpet")
@EnableAspectJAutoProxy
@PropertySource({"classpath:application.properties"})
public class AppConfig {
    @Bean
    public static PropertySourcesPlaceholderConfigurer propertySourcesPlaceholderConfigurer() {
        return new PropertySourcesPlaceholderConfigurer();
    }
}
(3)User.java
如下图:不用运行即可看到idea已自动读取