Linux 访问控制列表(ACLs)| getfacl / setfacl | 应用案例
注:本文为 “Linux ACLs” 相关文章合辑。
英文引文,机翻未校。
中文引文,未整理去重。
An introduction to Linux Access Control Lists (ACLs)
February 6, 2020 Glen Newell
Among the challenges of administering Linux in the modern business environment is the expectation that we can and should manage who has access to what information. Once upon a time, the only folks who needed access to Linux filesystems could be categorized in a general way: through Linux filesystem permissions.
在现代商业环境中管理 Linux 面临的挑战之一是,我们期望并且应该能够管理谁可以访问哪些信息。曾经,只有那些需要访问 Linux 文件系统的人可以通过 Linux 文件系统权限进行大致分类。
Reviewing the basics
回顾基础知识
The Linux filesystem gives us three types of permissions. Here is a simplified review:
Linux 文件系统为我们提供了三种类型的权限。以下是一个简化的回顾:
- User (or user owner)
- Group (or owner group)
- Other (everyone else)
With these permissions, we can grant three (actually five, but we’ll get to that in a minute) types of access:
有了这些权限,我们可以授予三种(实际上是五种,但我们稍后会讲到)类型的访问权限:
- Read
- Write
- eXecute
These levels of access are often adequate in many cases. Say that you have a directory where files from the accounting department live. You might set these permissions to:
在很多情况下,这些访问级别通常就足够了。假设你有一个目录,里面存放着会计部门的文件。你可能会将这些权限设置为:
drwxrwxr-x 2 accounting accounting 12 Jan 8 15:13
The accounting service user (the user owner) can read and write to the directory, and members of the accounting group (or owner group) can read and write. Others (users not in the accounting department) can, however, see and execute what’s in there, which some might think is a bad idea.
会计服务用户(用户所有者)可以对该目录进行读写操作,accounting 组(或所有者组)的成员也可以读写。然而,其他用户(不在会计部门的用户)可以查看并执行其中的内容,有些人可能认为这不是个好主意。
So, we might change the permissions to this:
所以,我们可能会将权限更改为以下设置:
drwxrwx--- 2 accounting accounting 12 Jan 8 15:13 .
Note:You can also use special permissions to control settings like who actually owns new files created in that directory, as well as thesticky bitwhich controls whether members of the group can delete each other’s files. However, that’s outside the scope of this discussion.
注意:你还可以使用特殊权限来控制一些设置,比如在该目录中创建的新文件的实际所有者,以及控制组内成员是否可以删除彼此文件的粘性位。然而,这超出了本次讨论的范围。
Viewing the current ACL
查看当前的访问控制列表(ACL)
What if you have an accounting intern (Kenny) who needs to be able to read certain files (or even just the files owned by Fred, his manager)? Or maybe people in the sales department also need access to the accounting owner’s files to create invoices for Fred’s team in order to bill customers, but you don’t want the sales team to see the other reports that Fred’s team generates. This situation can be tricky because, with regular permissions, each file and directory can have only one user and group owner at a time. This type of situation is what Linux Access Control Lists (ACLs) were intended to resolve.
如果你有一个会计实习生(Kenny),他需要能够读取某些文件(甚至只是他的经理 Fred 拥有的文件),该怎么办?或者,销售部门的人员也需要访问 accounting 所有者的文件,以便为 Fred 的团队创建发票来向客户收费,但你不想让销售团队看到 Fred 团队生成的其他报告。这种情况可能会很棘手,因为使用常规权限时,每个文件和目录一次只能有一个用户和组所有者。Linux 访问控制列表(ACLs)就是为了解决这类情况而设计的。
ACLs allow us to apply a more specific set of permissions to a file or directory without (necessarily) changing the base ownership and permissions. They let us “tack on” access for other users or groups.
ACLs 允许我们在不(一定)改变基本所有权和权限的情况下,为文件或目录应用更具体的权限集。它们让我们能够为其他用户或组 “附加” 访问权限。
We can view the current ACL using the getfacl command:
我们可以使用 getfacl 命令查看当前的 ACL:
[root]# getfacl /accounting
getfacl: Removing leading '/' from absolute path names
# file: accounting
# owner: accounting
# group: accounting
user::rwx
group::rwx
other::---
We can see that right now, there are no ACLs on this directory because the only permissions listed are for the user, group, and other. In this case, that’s to be expected, because I just created this directory in the lab and haven’t done anything other than assigning ownership. So, let’s start by adding a default ACL:
我们可以看到,目前这个目录上没有 ACL,因为列出的唯一权限是用户、组和其他的权限。在这种情况下,这是可以预料到的,因为我刚刚在实验室中创建了这个目录,除了分配所有权之外没有做任何其他操作。那么,让我们从添加一个默认的 ACL 开始:
Setting an ACL
设置 ACL
The syntax for setting an ACL looks like this:
设置 ACL 的语法如下:
setfacl [option] [action/specification] file
The ‘action’ would be -m (modify) or -x (remove), and the specification would be the user or group followed by the permissions we want to set. In this case, we would use the option -d (defaults). So, to set the default ACL for this directory, we would execute:
“操作” 可以是 -m(修改)或 -x(移除),而 “规范” 则是用户或组,后面跟着我们想要设置的权限。在这种情况下,我们会使用选项 -d(默认值)。所以,要为这个目录设置默认的 ACL,我们可以执行以下命令:
[root]# setfacl -d -m accounting:rwx /accounting
After which we can now see the default ACL info for that directory:
之后,我们现在可以看到该目录的默认 ACL 信息:
[root]# getfacl /accounting
[root]# getfacl: Removing leading '/' from absolute path names
# file: accounting
# owner: accounting
# group: accounting
user::rwx
group::rwx
other::---
default:user::rwx
default:user:accounting:rwx
default:group::rwx
default:mask::rwx
default:other::---
What if Fred creates a file in that directory?
如果 Fred 在那个目录中创建了一个文件会怎样呢?
[fred]$ touch test
[fred]$ ls -la
drwxrwx---+ 2 accounting accounting 18 Jan 8 17:51 .
dr-xr-xr-x. 18 root root 262 Jan 8 15:13 ..
-rw-rw----+ 1 fred accounting 0 Jan 8 17:51 test
[fred]$ getfacl test
# file: test
# owner: fred
# group: accounting
user::rw-
user:accounting:rwx #effective:rw-
group::rwx #effective:rw-
What happens if Kenny tries to create a file? You may be able to guess that because kenny is not in the accounting group, he won’t have permission. But we want Kenny to have a good experience working with us, so we need to give him the ability to see what files are in the accounting directory, and we want him to be able to create new files:
如果 Kenny 尝试创建一个文件会怎样呢?你可能会猜到,因为 kenny 不在 accounting 组中,他将没有权限。但我们希望 Kenny 在与我们合作时能有良好的体验,所以我们需要让他能够查看 accounting 目录中有哪些文件,并且希望他能够创建新文件:
[root@lab1 accounting] setfacl -m kenny:rwx /accounting
[root] getfacl ./
# file: .
# owner: accounting
# group: accounting
user::rwx
user:kenny:rwx
So far so good. But what if we don’t want this user to create files in the accounting directory? Instead, we only want to let him read the files there, and he can create new files in his own folder.
到目前为止一切顺利。但如果我们不想让这个用户在 accounting 目录中创建文件呢?相反,我们只想让他读取那里的文件,并且他可以在自己的文件夹中创建新文件。
We can set Kenny’s access on the accounting folder like this:
我们可以像这样设置 Kenny 对 accounting 文件夹的访问权限:
[root@lab1 accounting]# setfacl -m kenny:r-x /accounting
[root]# getfacl ./
# file: .
# owner: accounting
# group: accounting
user::rwx
User:kenny:r-x
Now we make Kenny his own folder, give him ownership, and then make the accounting group the group owner so that other people in the accounting group can see what’s in there:
现在,我们为 Kenny 创建他自己的文件夹,将所有权交给他,然后将 accounting 组设置为组所有者,这样 accounting 组中的其他人就可以看到里面的内容:
[root@lab1 accounting]# mkdir ./kenny
[root]# chown kenny:accounting ./kenny
[root]# getfacl ./kenny
# file: kenny
# owner: kenny
# group: accounting
user::rwx
user:accounting:rwx
group::rwx
You’ve created a folder within the accounting group that’s owned by the user kenny. He now is able to see the accounting folder, but only create files in his own folder:
你已经在 accounting 组中创建了一个由用户 kenny 拥有的文件夹。他现在能够查看会计文件夹,但只能在自己的文件夹中创建文件:
[root@lab1 accounting]# su kenny
[kenny]$ touch test
touch: cannot touch ‘test’: Permission denied
[kenny]$ cd ./kenny
[kenny]$ touch test
[kenny]$ ls
test
Note that because the folder is owned by the accounting group, anyone in that group can put files there. Because we’re dealing with an intern, this factor is probably fine. However, what if we give Kenny a promotion to chief auditor and want to keep his work a secret from Fred?
请注意,由于该文件夹由 accounting 组拥有,该组中的任何人都可以在那里存放文件。因为我们处理的是一名实习生,这个因素可能没问题。然而,如果我们将 Kenny 晋升为首席审计师,并且想对 Fred 保密他的工作内容,该怎么办呢?
[root]# setfacl -m fred:- ./kenny
[root]# getfacl ./kenny
# file: kenny
# owner: kenny
# group: accounting
user::rwx
user:accounting:---
user:fred:---
What if we didn’t want anyone to see what Kenny is working on?
如果我们不想让 * 任何人 * 看到 Kenny 正在处理的工作内容呢?
[root]# setfacl -m g:accounting:- ./kenny
Note: When we want to set a group ACL, we need to specify this by putting g: in front of the group’s name. For users, just change the g to a u, but setfacl will assume we are talking about a user if you don’t put anything in that spot.
注意:当设置一个 组 的 ACL 时,需要在组名前加上 g: 来指定。对于用户,只需将 g 改为 u,但如果在那个位置不输入任何内容,setfacl 会默认是用户。
We still have to remove the base permissions for the group owner so that the rest of the accounting team can’t snoop into Kenny’s reports:
我们仍然需要移除组所有者的基本权限,这样会计团队的其他成员就无法窥探 Kenny 的报告:
[root]# chmod g-rwx ./kenny
[root]# ls -al
total 0
drwxrwx-wx+ 3 accounting accounting 44 Jan 9 16:38 .
dr-xr-xr-x. 18 root    root    262 Jan 8 15:13 ..
drwx------+ 2 kenny   accounting 18 Jan 9 17:07 kenny
-rw-rw----+ 1 root    root     0 Jan 9 16:33 test
-rw-rw----+ 1 kenny   accounting  0 Jan 9 16:27 test2
[root]# getfacl ./kenny
# file: kenny
# owner: kenny
# group: accounting
user::rwx
user:accounting:---
user:fred:---
group::rwx #effective:---
[root]# su jan
[jan]$ touch ./kenny/test
touch: cannot touch ‘./kenny/test’: Permission denied
Now we can manage who else can see or write to Kenny’s folder without changing the ownership. Let’s give the CEO (Lisa, who is not a member of the accounting team, and won’t have access to the rest of the folder) access to Kenny’s stuff:
现在,我们可以在不改变所有权的情况下管理还有谁可以查看或写入 Kenny 的文件夹。让我们给 CEO(Lisa,她不是会计团队的成员,也无法访问该文件夹的其他部分)访问 Kenny 的文件的权限:
[root@lab1 accounting]# useradd lisa
[root]# setfacl -m u:lisa:rwx ./kenny
[root]# su lisa
[lisa]$ touch ./kenny/lisa
[lisa]$ ls ./kenny
lisa test
[lisa]$ touch test
touch: cannot touch ‘test’: Permission denied
[root]# getfacl ./kenny
# file: kenny
# owner: kenny
# group: accounting
user::rwx
user:accounting:---
user:fred:---
user:lisa:rwx
group::rwx
group:accounting:---
Note again that the group owner permissions remain wide open, but the accounting group (which is still the owner), no longer has access to that folder. So, who owns it?
再次注意,组所有者的权限仍然很开放,但会计组(仍然是所有者)不再有权访问该文件夹。那么,谁拥有它呢?
drwxrwx---+ 2 kenny accounting 30 Jan 9 17:16 kenny
This part is tricky. It’s useful to know that we can take away the owner’s permissions without changing ownership, but you might want to consider whether this is the result you want.
这部分比较棘手。知道我们可以在不改变所有权的情况下剥夺所有者的权限是很有用的,但你可能需要考虑这是否是你想要的结果。
Conclusion
结论
So these are the basics. ACLs can be confusing, so I encourage you to give the man pages for setfacl and getfacl a good read. There are many more interesting and useful things you can do with these tools, but hopefully, you now understand enough to get you started.
以上就是基础知识。ACLs 可能会让人困惑,所以我鼓励你仔细阅读 setfacl 和 getfacl 的手册页。使用这些工具你还可以做很多更有趣和有用的事情,但希望你现在已经有足够的了解来开始使用它们了。
How to Use Filesystem ACLs (Access Control Lists) on Linux
如何在 Linux 上使用文件系统 ACL(访问控制列表)
By Jordan Erickson
Published Jan 19, 2024
Are you in charge of a shared file server between multiple groups of people, who all need varying access? In this tutorial we’ll go over the basics of ACLs and employ them in a fictional office scenario.
您是否负责多组人员之间的共享文件服务器,这些人员都需要不同的访问权限?在本教程中,我们将介绍 ACL 的基础知识,并在虚构的 office 场景中使用它们。
What Are ACLs?
什么是 ACL?
Access Control Lists (ACLs) supplement the standard file system permissions model on Linux and Unix.. In a nutshell, they allow you to go beyond the “user/group/other” concept to create additional sets of permissions for files and directories. They also do neat things like automatically applying permissions to new files and directories. But first, let’s cover some basic Linux file system permissions concepts in which ACLs work alongside.
访问控制列表 (ACL) 是对 Linux 和 Unix 上的标准文件系统权限模型的补充。简而言之,它们允许您超越 “user/group/other” 概念,为文件和目录创建额外的权限集。它们还可以做一些巧妙的事情,例如自动将权限应用于新文件和目录。但首先,让我们介绍一些基本的 Linux 文件系统权限概念,其中 ACL 与之协同工作。
Standard File System Permissions
标准文件系统权限
To understand file system permissions under Linux, first you need to know that Linux is a “multi-user operating system”. This means there exist multiple user accounts. which essentially allow more than one person to log into the system, each having their own freedoms and restrictions.
要了解 Linux 下的文件系统权限,首先您需要知道 Linux 是一个“多用户作系统”。这意味着存在多个用户帐户,这些帐户基本上允许不止一个人登录系统,每个帐户都有自己的自由和限制。
Some user accounts are “system” accounts; not ones that are used by a person, but rather by a piece of software, for instance. Processes run under these special accounts to allow and restrict them to various parts of the OS, just as a normal user account would.
某些用户帐户是“系统”帐户;例如,不是供人使用的,而是供某个软件使用的。进程在这些特殊帐户下运行,以允许和限制它们到作系统的各个部分,就像普通用户帐户一样。
Now that we understand users, I can introduce you to “groups.” Groups are pretty easy to understand—they’re simply collections of existing users. To assign permission for a resource to lots of users at the same time, you can create a new group and grant specific users membership to that group. You then assign permission for the resource to the group, instead of each individual user. This makes administration easier and more streamlined.
现在我们已经了解了用户,我可以向您介绍“组”。组很容易理解 — 它们只是现有用户的集合。要同时将资源权限分配给大量用户,您可以创建一个新组并授予特定用户该组的成员资格。然后,您将资源的权限分配给该组,而不是每个单独的用户。这使得管理更轻松、更简化。
OK, let’s talk about files and directories. These are the resources we care about granting and protecting access to.
好,我们来谈谈文件和目录。这些是我们关心授予和保护访问权限的资源。
Most Linux file systems (EXT4, XFS and ZFS for example) allow you to apply 3 primary permissions to files and directories. These permissions are:
大多数 Linux 文件系统(例如 EXT4、XFS 和 ZFS)允许您对文件和目录应用 3 个主要权限。这些权限是:
-
Read: Allow a file to be read (or list contents inside a directory)
Read:允许读取文件(或列出目录中的内容)
-
Write: Allow a file to be written to or modified (or create files and subdirectories inside a directory)
写入:允许写入或修改文件(或在目录中创建文件和子目录)
-
Execute: Allow to run a program or script (or enter into a directory, for example with the cd command.)
Execute:允许运行程序或脚本(或进入目录,例如使用 cd 命令)
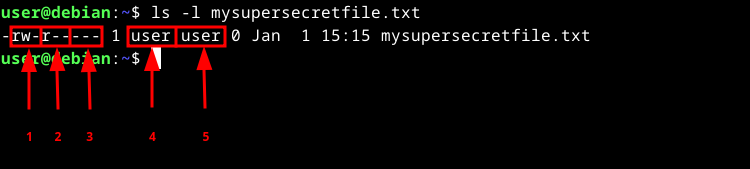
All files and directories on a file system have standard permission assigned to 3 distinct entities: the user who owns it, the group owner and all other users. Each entity may have a combination of read, write and execute (r/w/x) permissions assigned. You can use the ls command. to look at all of this info:
文件系统上的所有文件和目录都具有分配给 3 个不同实体的标准权限:拥有它的用户、组所有者和所有其他用户。每个实体都可以分配读取、写入和执行 (r/w/x) 权限的组合。您可以使用 ls 命令查看所有这些信息:
ls -l mysupersecretfile.txt
-
[U]ser (owner) permissions
-
[G]roup permissions
-
All [O]ther users’ permissions
-
Owning username
-
Owning group name
By default, each newly created user is also assigned to a new primary group of the same name. In the example above, #4 is the username “user” and #5 is the group name “user”. Keep that in mind when looking at output such as this as it may be confusing at first.
默认情况下,每个新创建的用户也会分配到一个同名的新主组。在上面的示例中,#4 是用户名 “user”,#5 是组名称 “user”。在查看此类输出时请记住这一点,因为一开始可能会令人困惑。
The files and directories that users are allowed to modify depend on a couple of things, including whether the user “owns” it or if they otherwise have the appropriate permissions to via a group membership. Note that the root user. can modify any file on the system, regardless of ownership.
允许用户修改的文件和目录取决于几个因素,包括用户是否 “拥有” 它,或者他们是否通过组成员身份拥有适当的权限。请注意,root 用户可以修改系统上的任何文件,无论其所有权如何。
This approach to file system permissions works well for most at-home and standalone setups. Of course, when you’re working with systems where multiple users are accessing the same file hierarchy, and you must give certain people access to some areas (and restrict them from others), you’ll start to understand the standard “1 owner, 1 group” methodology falls a bit short.
这种文件系统权限方法适用于大多数家庭和独立设置。当然,当您使用多个用户访问同一文件层次结构的系统时,您必须为某些人提供对某些区域的访问权限(并限制他们访问其他区域),您将开始理解标准的“1 个所有者,1 个组”方法有点不足。
How ACLs Enhance the Standard Permissions Model
ACL 如何增强标准权限模型
Access Control Lists add the ability to apply permission entries to multiple users and groups for files and directories. One example where ACLs are a good option is when you want to assign a certain user permission to a file that already has specific owner and group owner permissions assigned.
访问控制列表添加了将权限条目应用于文件和目录的多个用户和组的功能。ACL 是一个不错的选择,例如,当您希望将特定用户权限分配给已分配了特定所有者和组所有者权限的文件时。
ACLs for directories follow the standard permissions r/w/x model in that they give you the ability to (r)ead (list contents, but not enter) the directory, (w)rite (create) new files and directories inside the directory, and e(x)ecute (enter) the directory.
目录的 ACL 遵循标准权限 r/w/x 模型,因为它们使您能够 (r) ead(列出内容,但不输入)目录、(w)rite(创建)目录内的新文件和目录,以及 e(x) ecut(enter) 目录。
How about an example? Let’s say you have a file, report.pdf, owned by a user, peter, with read+write permissions. You’ve additionally granted group ownership of this file to the accounting group. Now you’ve received a request to grant read access to the user named lumberg.
举个例子怎么样?假设您有一个文件 report.pdf,由具有读 + 写权限的用户 peter 拥有。您还将此文件的组所有权授予了 accounting 组。现在,您已收到向名为 lumberg 的用户授予读取访问权限的请求。
Let’s assume you’re using the standard permissions model. Here are a few (futile) ideas for completing this request:
假设您使用的是标准权限模型。以下是完成此请求的一些(徒劳的)想法:
-
You can’t grant lumberg membership to the accounting group (that would give him access to all sorts of other files he shouldn’t be looking at).
您不能授予 Lumberg 会计组的成员资格(这将使他能够访问他不应该查看的各种其他文件)。
-
You also don’t want to, as a matter of proper administrative practice, create a whole new group with users from the accounting group plus lumberg, just for this file.
作为适当的管理实践,您也不想创建一个全新的组,其中包含来自 accounting 组和 lumberg 的用户,仅用于此文件。
-
You especially don’t want to open up permissions to all other users, for obvious security reasons.
出于明显的安全原因,您尤其不希望向所有其他用户开放权限。
ls -l report.pdf

What to do? Well, you could just take an early lunch break. However, let’s instead employ ACLs!
该怎么办?好吧,你可以早点午休。但是,让我们改用 ACL!
Checking for ACL Support on Your System
检查系统上的 ACL 支持
Most modern Linux distributions support ACLs out-of-the-box. Most common file systems support them, their default mount options include ACL support and default installations should include the proper packages.
大多数现代 Linux 发行版都支持开箱即用的 ACL。大多数常见的文件系统都支持它们,它们的默认挂载选项包括 ACL 支持,默认安装应该包含适当的软件包。
To verify on ext2/3/4 file systems, use tune2fs. For example, if you want to check /dev/sda1 (which contains an ext4 file system):
要在 ext2/3/4 文件系统上进行验证,请使用 tune2fs。例如,如果要检查 /dev/sda1(其中包含 ext4 文件系统):
sudo tune2fs -l /dev/sda1 | grep "Default mount options"

For reference, here’s a list of different file system support for ACLs, grouped by platform, written by IBM….
以下是 IBM 编写的 ACL 的不同文件系统支持列表,按平台分组,以供参考。
The getfacl Command
getfacl 命令
The getfacl command displays (gets) file access control lists for files and directories. If you run getfacl on our report file from above, you’ll see:
getfacl 命令显示 (gets) 文件和目录的文件访问控制列表。如果您从上面对我们的报告文件运行 getfacl,您将看到:
getfacl report.pdf
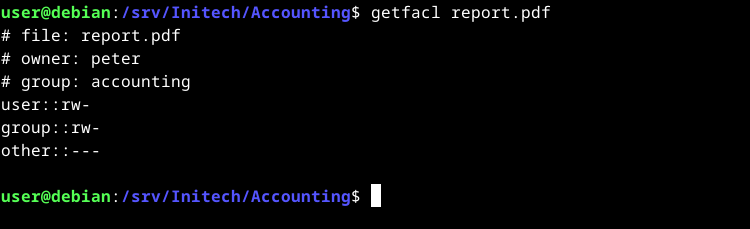
Right now the output shows the minimum ACL of the file. The minimum ACL comprises the standard permissions for the owner, owning group and all other users.
现在,输出显示文件的最小 ACL。最小 ACL 包括所有者、拥有组和所有其他用户的标准权限。
If there were an extended ACL entry for another user, let’s call them michael, we’d see this:
如果另一个用户有一个扩展的 ACL 条目,我们称他们为 michael,我们会看到这个:
getfacl report.pdf
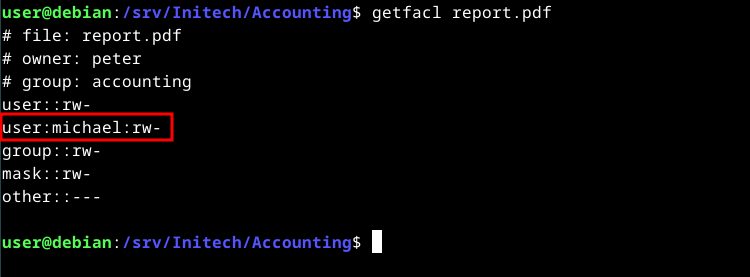
In addition to the minimum ACLs, we now have an extended ACL entry for user michael (read+write permissions). If you list the file again with extended ACLs, you’ll notice a plus (+) sign to the right of the “other users” permissions, indicating that extended ACL entries exist:
除了最小 ACL 之外,我们现在还为用户 michael 提供了一个扩展的 ACL 条目(读 + 写权限)。如果您再次使用扩展 ACL 列出文件,您会注意到“其他用户”权限右侧有一个加号 (+),表示存在扩展 ACL 条目:
ls -l report.pdf

The setfacl Command
setfacl 命令
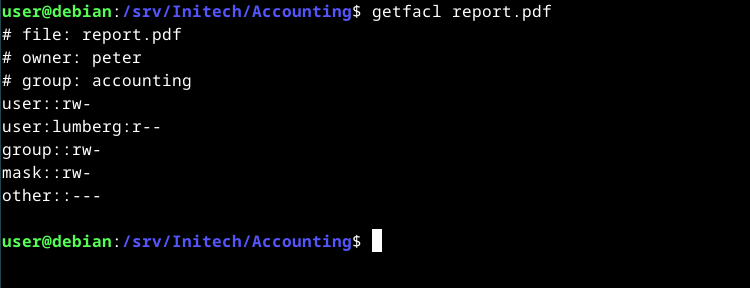
The setfacl command is what actually sets ACLs for files and directories. It adds and removes user and group entries, modifies permissions and other tasks like setting default ACLs on directories and working with masks. We’ll use it to complete the request above by granting the lumberg user read access to report.pdf.
setfacl 命令实际上是为文件和目录设置 ACL 的命令。它添加和删除用户和组条目、修改权限和其他任务,例如在目录上设置默认 ACL 和使用掩码。我们将使用它来完成上述请求,授予 lumberg 用户对 report.pdf 的读取访问权限。
To add the new user ACL entry, you’ll use setfacl with this syntax (which I’ll break down below):
要添加新的用户 ACL 条目,您将使用带有此语法的 setfacl(我将在下面进行分解):
sudo setfacl -m u:lumberg:r report.pdf

-
-m means we’re modifying an ACL entry for the file
-m 表示我们正在修改文件的 ACL 条目
-
u: means it’s a user we’re adding, followed by a colon (
:) separator (a g: adds a group and o: adds all other users’ permissions)u:表示这是我们正在添加的用户,后跟冒号(
:) 分隔符(a g:添加组,o:添加所有其他用户的权限) -
lumberg: is the username we’re adding, followed by another colon separator
lumberg: 是我们要添加的用户名,后跟另一个冒号分隔符
-
r means we’re adding read permissions (only) to the entry
r 表示我们向条目添加读取权限
-
report.pdf is the name of the file we’re adding the ACL entry to
report.pdf 是我们要添加 ACL 条目的文件的名称
Now that this is set we can take a look, using getfacl, once again:
现在,我们已经设置好了,我们可以再次使用 getfacl 看一下:
getfacl report.pdf
Default ACLs
默认 ACL
Default ACLs only apply to directories (folders). When you set a default ACL on a directory, the entry you specify will automatically be applied to every new file and directory within it, regardless of who creates them. It’s sort of a catch-all, recursive approach which makes it pretty useful when you’re planning your file system hierarchy.
默认 ACL 仅适用于目录(文件夹)。当您在目录上设置默认 ACL 时,您指定的条目将自动应用于其中的每个新文件和目录,而不管它们由谁创建。这是一种包罗万象的递归方法,在规划文件系统层次结构时非常有用。
Let’s make sure Lumberg will be able to read new files and enter new directories that are created under Accounting. We’ll use the -d option for adding a default ACL:
我们确保 Lumberg 能够读取新文件并输入在 Accounting(会计)下创建的新目录。我们将使用 -d 选项来添加默认 ACL:
sudo setfacl -d -m u:lumberg:rX Accounting
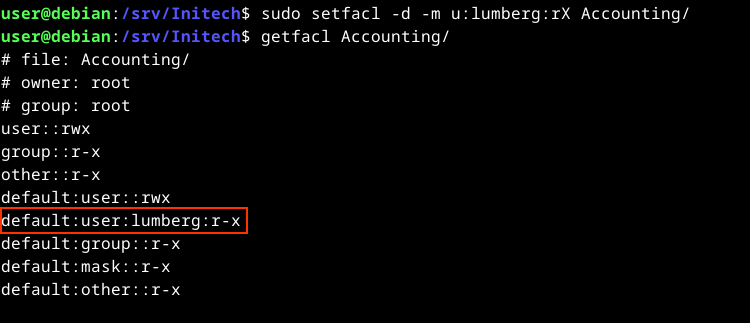
An upper-case X applies the execute permission only against new subdirectories; not files.
大写的 X 仅对新子目录应用 execute 权限;而不是文件。
ACLs Kernel support
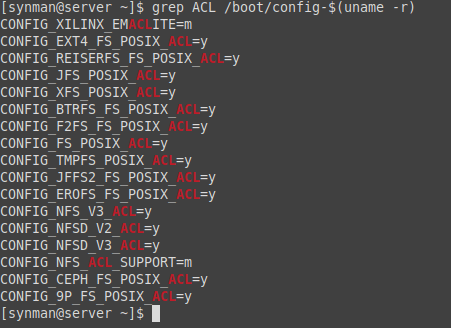
July 25, 2021 Mr. SynMan

[synman@server ~]$ grep ACL /boot/config-$(uname -r)
Summary
总结
-
To view ACLs Kernel support ACLs
查看 ACLs 内核支持grep ACL /boot/config-$(uname -r) -
To view all ACL entries for a file
查看文件的所有 ACL 条目getfacl filename -
To set a new ACL entry for a file
为文件设置新的 ACL 条目setfacl -m u:username:rwx filename -
To set a Default ACL entry on a directory
在目录上设置默认 ACL 条目setfacl -d -m u:username:rwx dirname
Linux 命令之 getfacl 和 setfacl 命令
恒悦 sunsite 发布 2022-08-29 08:00:00
一、命令简介
getfacl 命令是 “get file access control list” 的缩写,其功能为显示文件或目录的 ACL(Access Control List,访问控制列表)策略。在对指定文件或目录进行精准权限控制时,FACL(File Access Control List,文件访问控制列表)是理想选择。对于每个文件,getfacl 会显示文件名、所有者、组以及访问控制列表(ACL)。若目录具有默认 ACL,getfacl 也会显示默认 ACL,而非目录不能拥有默认 ACL。
setfacl,顾名思义,用于设置文件或目录的访问控制列表,即 ACL 规则。该命令常用于对文件或目录执行扩展授权。例如,若文件属于用户 user1,但希望为 user2 也添加授权,使其能够对文件进行操作,便可通过 setfacl 命令实现。
二、getfacl 使用示例
2.1 查看 getfacl 版本
[root@s142 ~]# getfacl -v
getfacl 2.2.51
2.2 获取 getfacl 命令帮助
[root@s142 ~]# getfacl --help
getfacl 2.2.51 – get file access control lists
Usage: getfacl [-aceEsRLPtpndvh] file …
…
2.3 查看文件所有权限
[root@s142 home]# getfacl -a /home
getfacl: Removing leading ‘/’ from absolute path names
# file: home
# owner: root
# group: root
user::rwx
group::r-x
other::r-x
2.4 查看目录默认权限
当出现如下输出时,表明该目录未设置默认权限。
[root@s142 home]# getfacl -d /home/abc
getfacl: Removing leading ‘/’ from absolute path names
# file: home/abc
# owner: root
# group: root
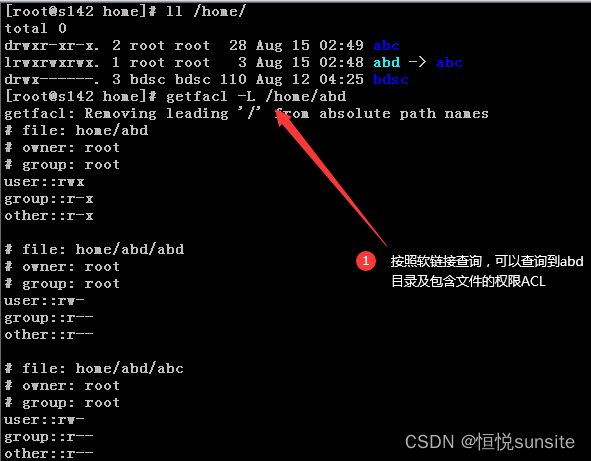
2.5 按照物理路径查询
如下所示,abd 为软链接。使用 -P 参数按照物理路径查询时无输出,而使用 -L 参数查询时会输出 abd 及其下面文件的权限 ACL 规则。

2.6 按照逻辑路径查询
2.7 不显示注释头
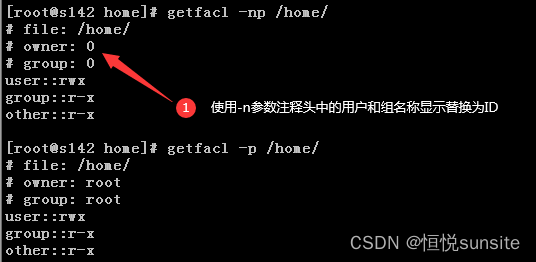
[root@s142 home]# getfacl -c /home
getfacl: Removing leading ‘/’ from absolute path names
user::rwx
group::r-x
other::r-x
2.8 显示路径包含根 /
[root@s142 home]# getfacl -p /home
# file: /home
# owner: root
# group: root
user::rwx
group::r-x
other::r-x
2.9 显示用户和用户组 ID
2.10 表格格式输出权限 ACL

三、setfacl 使用示例
3.1 查看命令版本
[root@s142 home]# setfacl -v
setfacl 2.2.51
3.2 获取命令帮助
[root@s142 home]# setfacl --help
setfacl 2.2.51 – set file access control lists
Usage: setfacl [-bkndRLP] { -m|-M|-x|-X … } file …
…
3.3 修改文件 ACL
使用 setfacl -m u:username:perms files 设置权限,其中 u:username:perms 针对用户授权。也可使用 g:groupname:perms 对用户组授权,或使用 m::perms 对所有用户和组进行授权,以及使用 o::perms 对其他用户组进行授权。

[root@s142 home]# setfacl -m u:wuhs:rwx /home/abd/abc
[root@s142 home]# getfacl -a /home/abd/abc
getfacl: Removing leading ‘/’ from absolute path names
# file: home/abd/abc
# owner: root
# group: root
user::rw-
user:wuhs:rwx
group::r–
mask::rwx
other::r–
3.4 从 ACL 移除条目
使用 setfacl -x 参数移除指定的 ACL 条目,一次仅能移除一条。
[root@s142 home]# setfacl -x u:wuhs /home/abd/abc
[root@s142 home]# getfacl /home/abd/abc
getfacl: Removing leading ‘/’ from absolute path names
# file: home/abd/abc
# owner: root
# group: root
user::rw-
group::r–
mask::r–
other::r–
3.5 拷贝文件权限到另外一个文件
可结合 setfacl 与 getfacl 命令,将文件 A 的权限拷贝到文件 B 的 ACL 规则中,通过 set-file=- 的方式完成 ACL 权限拷贝。
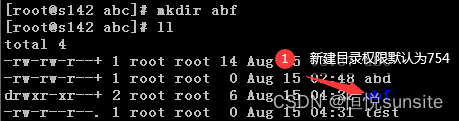
[root@s142 home]# setfacl -m u:wuhs:6 /home/abc/abc
[root@s142 home]# getfacl /home/abc/abc | setfacl --set-file=- /home/abc/abd
getfacl: Removing leading ‘/’ from absolute path names
[root@s142 home]# getfacl /home/abc/abd
getfacl: Removing leading ‘/’ from absolute path names
# file: home/abc/abd
# owner: root
# group: root
user::rw-
user:wuhs:rw-
group::r–
mask::rw-
other::r–
3.6 设置默认 ACL 规则
使用 -d 和 -m 参数共同完成默认 ACL 的设置,还可结合 -R 参数,使目录下的所有子目录权限与设置目录权限一致。
[root@s142 home]# setfacl -d -R -m u::7 /home/abc
[root@s142 home]# setfacl -d -R -m g::5 /home/abc
[root@s142 home]# setfacl -d -R -m o::4 /home/abc
[root@s142 home]# getfacl /home/abc
getfacl: Removing leading ‘/’ from absolute path names
# file: home/abc
# owner: root
# group: root
user::rwx
group::r-x
other::r-x
default:user::rwx
default:group::r-x
default:other::r–
3.7 清除默认 ACL 规则
[root@s142 home]# setfacl -k /home/abc
[root@s142 home]# getfacl /home/abc
getfacl: Removing leading ‘/’ from absolute path names
# file: home/abc
# owner: root
# group: root
user::rwx
group::r-x
other::r-x
3.8 清除所有扩展 ACL 规则
使用 -b 参数可清除所有的扩展 ACL 规则,但创建文件属主关联的基本规则不会被清除。
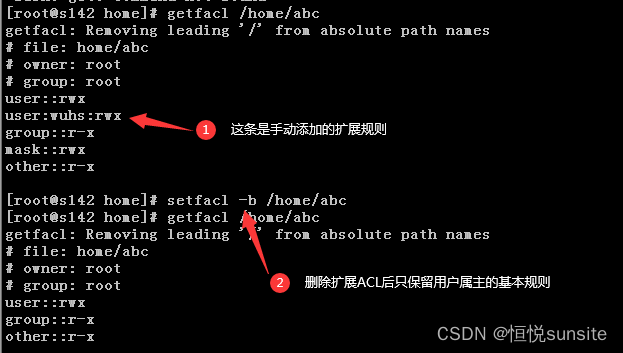
[root@s142 home]# setfacl -b /home/abc
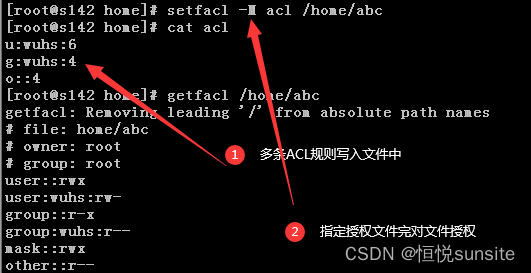
3.9 通过文件完成 ACL 授权
可使用 -M 参数指定授权 ACL 文件,一次完成多条目授权规则授权,也可同时对多个文件或目录进行授权。
四、参数说明
4.1 使用语法
$ getfacl [参数] file …
$ setfacl --restore=file 或者 setfacl [参数] file …
4.2 getfacl 参数说明
| 参数 | 参数说明 |
|---|---|
-a, --access | 仅显示文件的 ACL |
-d, --default | 仅显示文件的默认 ACL |
-c, --omit-header | 不显示注释标题 |
-e, --all-effective | 显示所有的有效权限 |
-E, --no-effective | 显示没有的有效权限 |
-s, --skip-base | 跳过文件,只具有基本条目(实际测试使用此参数后,输出为空) |
-R, --recursive | 递归查询 |
-L, --logical | 按照逻辑路径,包括软链接 |
-P, --physical | 按照物理路径,不包括软链接 |
-t, --tabular | 使用表格输出格式 |
-n, --numeric | 显示用户的 UID 和组群的 GID |
-p, --absolute-names | 保留路径中开始的根 / |
-v, --version | 显示版本信息 |
-h, --help | 获取命令帮助信息 |
4.3 setfacl 参数说明
| 参数 | 参数说明 |
|---|---|
-m, --modify=acl | 更改文件的访问控制列表 |
-M, --modify-file=file | 从文件读取访问控制列表条目更改 |
-x, --remove=acl | 从文件访问控制列表移除条目 |
-X, --remove-file=file | 从文件读取访问控制列表条目并删除 |
-b, --remove-all | 删除所有扩展访问控制列表条目 |
-k, --remove-default | 移除默认访问控制列表 |
–set=acl | 设定替换当前的文件访问控制列表 |
–set-file=file | 从文件中读取访问控制列表条目设定 |
–mask | 重新计算有效权限掩码 |
-n, --no-mask | 不重新计算有效权限掩码 |
-d, --default | 应用到默认访问控制列表的操作 |
-R, --recursive | 递归操作子目录 |
-L, --logical | 按照逻辑路径,包括软链接 |
-P, --physical | 按照物理路径,不包括软链接 |
–restore=file | 恢复访问控制列表 |
–test | 测试模式,并不真正修改访问控制列表属性 |
-v, --version | 查看版本信息 |
-h, --help | 显示帮助信息 |
linux 设置权限_setfacl_getfacl
Guff_hys 修改时间 2023-12-29 22:37:45
设置权限 ACL(access control list)
假设:/data 所有者与所属组均为 root,在不改变所有者的前提下,要求用户 tom 对该目录有完全访问权限(rwx)。可考虑的方法如下:
方法一:给 /data 的其他人增加 rwx 权限。
方法二:将 tom 加入到 root 组中,并为 root 组分配 rwx 权限。
ACL 文件权限管理:可对不同用户设置不同的基本权限(rwx),且可设置对象数量不限。
ACL 是 UGO(User/Group/Others,用户 / 组 / 其他用户)权限管理的补充,优先级别高于 UGO。
setfacl
setfacl 命令可用于细分 Linux 下的文件权限,能够对每个文件或目录设置更精确的文件权限,从而更精准地控制权限分配。例如,可使某一个用户对某一个文件具有特定权限。
ACL 可针对单一用户、单一文件或目录进行读(r)、写(w)、执行(x)权限的控制,对于有特殊权限需求的场景具有一定帮助。例如,可设置某一个文件禁止特定用户访问。
setfacl 命令的基本语法如下:
setfacl [选项] [目录 | 文件]
参数说明
-m:设置后续 acl 参数。-x:删除后续 acl 参数。-b:删除全部的 acl 参数。-k:删除默认的 acl 参数。-R:递归设置 acl,包括子目录。-d:设置默认 acl。
示例
- 为用户 sam 设置文件 file1 的读写权限,为 li 设置无权限
useradd sam
useradd li
setfacl -m  u:sam:rw    /tmp/file1
setfacl -m  u:li:-  /tmp/file1
#        对象:对象名:权限
- 为组 group2 设置文件 file1 的读写执行权限
setfacl -m g:group2:rwx /tmp/file1
- 将其他人对文件 file1 的权限设置为可读写
setfacl -m o::rw /tmp/file1
- 删除 sam 对文件 file1 的权限
setfacl -x u:sam /tmp/file1
- 删除文件 file1 所有扩展访问权限
setfacl -b /tmp/file1
getfacl
使用 getfacl 命令可查看文件的 ACL 信息。对于每个文件和目录,getfacl 命令会显示文件的名称、用户所有者、组群所有者以及访问控制列表(ACL)。
getfacl 命令的基本语法如下:
getfacl [选项] [目录 | 文件]
参数说明
-a:--access,仅显示文件访问控制列表。-d:--default,仅显示默认的访问控制列表。-c:--omit-header,不显示注释表头。-e:--all-effective,打印所有有效权限注释,即使与 ACL 条目定义的权限相同。-E:--no-effective,显示无效权限。-s:--skip-base,跳过仅包含基本 ACL 条目(owner、group 和 others)的文件。-R:--recursive,递归显示子目录。
示例
查看文件 file1 的 ACL 信息
[root@centos-1 ~]# getfacl /tmp/file1
getfacl: Removing leading '/' from absolute path names
# file: tmp/file1
# owner: 1008
# group: root
user::rw-
group::r--
other::r--
ACL 权限列表的常见配置
我菜故我在 发布时间:2018-10-15 10:06:04
一、什么是 ACL
定义
ACL(Access Control List)即访问控制列表,它是一系列规则的集合。ACL 通过这些规则对不同的报文进行分类,进而对不同的报文实施不同的处理。
ACL 的基本原理
ACL 负责管理用户配置的所有规则,并提供报文匹配规则的算法。
ACL 规则的匹配
报文到达设备后,设备从报文中提取信息,并将提取到的信息与 ACL 规则进行匹配。若提取的信息与某条规则匹配成功,即称作命中规则,之后便停止查找,并根据匹配的规则执行相应动作;若查找完所有匹配规则,都没有一条规则能匹配成功,则称为未命中规则。
简单来说,匹配过程会产生两种结果:命中规则和未命中规则。命中规则又可分为命中 permit(允许)规则和命中 deny(拒绝)规则。
二、访问控制列表的查看
对文件设置 ACL 规则后,ACL 即对该文件开启。如下展示了未开启 ACL 前的文件属性显示状态和开启后的属性显示状态,可发现属性信息后面多了一个小 “+” 号:

要查看 ACL 列表,可使用命令:getfacl filename

如上图所示:显示的数据前面带 “#” 的表示是文件的默认属性,前三行即为这个文件的默认属性;第四行用户名栏为空,代表该文件所有者的权限;第五行表示针对 “aporai” 这个用户的权限是 “rwx”,这是通过 setfacl 命令设置的 ACL 规则;第六行用户组栏为空,代表该文件所属用户组的权限;第七行表示此文件的权限阈值,即所设置的用户和组的权限必须在 mask 所定的权限最大值以内才会生效;第八行表示该文件的其他人权限。
三、ACL 列表的管理
1. ACL 列表的管理即规则的匹配,以下介绍几条常见的管理命令:
-
setfacl -m u:aporai:rw file.acl:指定 “aporai” 这个用户对 “file.acl” 文件有 “rw” 的权限。 -
setfacl -m g:student:rx file.acl:指定 “student” 这个组的用户对 “file.acl” 文件有 “rx” 的权限。 -
setfacl -x u:aporai file.acl:删除指定的用户 “aporai” 的匹配规则。 -
setfacl -x g:student file.acl:删除指定的组 “student” 的匹配规则。 -
setfacl -b file.acl:关闭在该文件上开启的 ACL 列表,同时删除所有的 ACL 参数。
假如要给 “file.acl” 这个文件指定 “aporai” 用户有读写权限,操作如下:

假如要给 “file.acl” 这个文件指定某个用户组对其有 “r” 权限,操作如下:

2. ACL 的有效权限 mask
mask 的含义是所指定的用户和组的权限必须在 mask 的权限设置范围内才会生效,即权力阈值。
假设延续上一步的实验结果,给了 “aporai” 这个用户 “rw” 的权限,给了 “student” 这个用户组 “r” 的权限。若此时将权限阈值改变为仅有 “r”,观察会出现的现象,如下图所示:

可以发现,在 “aporai” 这个用户的指定匹配规则后面出现了一个 “#” 提示的内容,意思是有效的权限仅有 “r”。而指定组 “student” 后并未出现任何提示,原因是设置的 mask 值为 “r”,即最大有效权限为 “r”。所以 “aporai” 指定的权限已超出 mask 指定的范围,而 “student” 这个组指定的权限并未超出 mask 的最大值。通过这个实验可大致理解 mask 的含义。
需要注意,chmod g+r/w/z 也会改变 mask 的默认值。通常使用 setfacl -m m:xxx file 这一命令来更改 mask 的值。
3. ACL 默认权限的设定
还有一种常见的应用场景,若希望在开启 ACL 列表的目录下,每新建一个文件或目录,都能继承上层目录 ACL 列表的匹配规则,上述配置方法无法实现,如图所示:

这时可使用命令:setfacl -m d:u:aporai:rw important.txt 来解决。
与之前的命令相比,此命令多了一个 “d” 参数。该参数代表的含义是:设置默认 ACL 参数,它只对目录有效,且只有在该目录下新建的文件和目录才会继承上一级目录的 ACL 匹配规则,对添加 “d” 参数之前建立的数据不起作用。
下面通过实验进行验证:
首先,在 “/” 下建立一个目录 “important.txt”,并对它设置 ACL 规则为:“aporai” 用户可以对其有 “rwx” 权限。

然后,在该目录下建立新文件 “file” 和新目录 “dir”,观察发现 “file” 和 “dir” 都未开启 ACL 列表:

接着,使用 setfacl -m d:u:student:rwx important.txt 这条命令对目录 “importan.txt” 进行配置,发现 ACL 列表出现了新的内容:

继续在该目录下创建对照组,文件 “file - mirro”、目录 “dir - mirro”,并观察它们的属性信息,发现对照组的文件和目录已经继承了上层目录的 ACL 列表的匹配规则:


再在 “dir - mirro” 目录下创建新目录 “dir1”,观察实验结果:

所以,“d” 参数具有递归性质。
setfacl -k important.txt:删除目录的默认 ACL 参数。
注意:默认 ACL 只对目录生效,且只对目录下新建的目录或文件会继承默认匹配规则。
Linux ACL(访问控制列表)权限管理举例详解(含默认权限)
Zheng__Huang 发布时间:2020-08-02 14:40:51
ACL 权限简介
ACL(Access Control List)访问控制列表,是 Linux 系统中的访问权限控制系统。可用于解决 Linux 基本文件权限系统中权限分配空白问题。类似于 Windows 的文件权限设置,它可以独立设置除所有者和所属组以外的某个特定组或特定用户的访问权限。
应用场景举例
学校中有一个 NAS 系统,获取了一些 “珍贵的学习资料” 并上传到 NAS 中,与寝室同学共享(本人和舍友同属于一个寝室组)。目录权限设置为 “rwxr - x—”,但在与张三交谈中无意透露了资料的存在,需将其中一些与他分享。
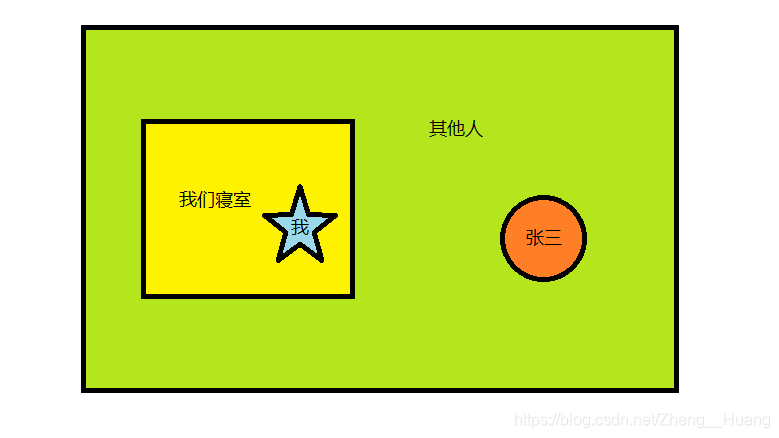
此时产生问题:按照传统权限控制,张三该如何设置权限?
-
成为属主,属主权限下降:会产生属主权限比所属组还要低以及本人权限如何处理的问题。
-
加入寝室组:不仅会出现寝室组加入非寝室成员的问题,还会导致其他文件泄露。
-
提高其他人(Others)权限:这样非寝室的其他人也能访问该文件,组内共享失去意义。
在这种情况下,可独立设置特定用户权限的 ACL 权限控制系统能发挥很好的作用。
ACL 权限的准备工作
查看 ACL 权限管理是否启动
由于 ACL 权限管理基于分区文件系统,可在查看分区信息中找到相关信息。命令为:
dumpe2fs -h <Filesystem Name>
其中 <Filesystem Name> 为目标工作目录所挂载的文件系统名,可用 df 命令查看,-h 选项仅显示 superblock 中的信息。
得到结果较长,找到其中的 “Default mount options”,如下:
Default mount options: user_xattr acl
若含有 “acl”,则表示已经开启 ACL(一般默认开启)。
启动 ACL 权限管理
- 临时启动(以根目录为例):
mount -o remount,acl /
- 永久启动:更改配置文件
/etc/fstab(系统开机自动挂载配置文件),在根目录挂载行的 “options” 栏后添加 “,acl”,保存并重启即可。
ACL 权限查看和设置
ACL 权限查看
getfacl [options] <filename>
不加选项直接查看,后几行信息如下:
user::rwx
group::r-x
other::---
被 “:” 分成三段,分别为类型、组 / 用户名、权限。中间为空表示其他所有用户。
ACL 权限设置
setfacl -m <parameter> <filename>
一般使用 -m 选项配合参数来设置 ACL 权限。参数分为三段(默认权限除外),分类与查看时相同:
-
第一段一般根据设定的组或者用户设为 “g” 或 “u”。
-
第二段为要设置的特定用户名。
-
第三段为要设置的权限。
例如:赋予其他用户 “test” 对目录 “a” 的 “r - x” 权限,命令为:
setfacl -m u:test:r - x a
权限也可用八进制数字表示,权限赋予可重复修改、删除。
再次查看 ACL 权限:
user::rwx
user:test:r - x
group::r - x
mask::r - x
other::---
对 “test” 赋予了 “r - x” 权限,而其他人没有权限,同时产生了一个分类 “mask”。
最大有效权限(权限阈值)mask
顾名思义,mask 设置了该文件可设置的最大 ACL 权限,超过该权限的赋予会被 mask 限制。
user::rwx
user:test:r - x                   #effective:---
group::r - x                      #effective:---
mask::---
other::---
其中注释后的 “effective” 为实际上的有效权限,说明被 mask 的 “—” 限制。
修改 mask 时,只需将参数第一段中的 “u” 或 “g” 改为 “m”,其他与设置用户 / 组的权限方法相同。
默认权限
一般用于目录中,默认权限独立于该目录本身的权限,规定了在该目录中创建的文件的默认 ACL 权限。
user::rwx
user:test:r - x
group::r - x
mask::r - x
other::---
default:user::rwx
default:user:test:r - x
default:group::r - x
default:mask::r - x
default:other::---
设置后,该目录下的所有文件创建时都会拥有其规定的 ACL 权限。
修改时,参数最前加一段为 “d” 即可(注意分隔)。
删除权限
-
删除特定用户:将选项
-m改为-x,参数最后一段舍去即可。例如:setfacl -x u:test a此命令删除了赋予 “test” 用户的 ACL 权限。
-
删除所有 ACL 权限:选项改为
-d,参数不加。 -
删除默认 ACL 权限:选项改为
-k,参数不加。
递归设置 ACL 权限
对该目录及其下所有子文件 / 目录进行同样的设置,使用选项 -R。
Linux 文件权限与属性详解之 ACL
发布于 2017-07-28 16:18,作者 Jimmy_Nie
ACL 权限
1. 什么是 ACL
ACL(Access Control List)即访问控制列表。为了理解其用途,考虑如下场景:假设用户 Jimmy 创建了一个项目文件夹,Jimmy 和其开发团队 Rocket 对该目录均具备 rwx 权限。由于文件夹下包含源码等内容,不能对外开放,所以对其他用户的权限设为 0,即文件夹目录权限为 drwxrwx---。然而,Jimmy 的好友 Sherry 希望查看该项目。此时,有以下三种选择:
- 让 Sherry 成为所有者(此方法显然不可行)。
- 让 Sherry 成为项目组成员(但她未参与开发,且可能因不懂代码而误删部分代码)。
- 给其他用户赋予
r - x权限(但 other 用户群体过大,可能导致代码在未发布前被竞争对手复制)。
可见,上述三种方式均不理想。那么,能否为 Sherry 单独设置特定权限,使其以单用户身份获得权限,而不属于任何一个组呢?这种方式实际上就是 ACL 权限。
ACL 可以针对单一用户、单一文件或目录进行 r、w、x 的权限设置,对于有特殊权限需求的场景非常有帮助。
2. ACL 的操作
0). 查看系统是否支持 ACL
首先查看 Linux 系统中的硬盘:
[niesh@niesh ~]$ df -Th
文件系统                      类型      容量  已用  可用 已用 % 挂载点
/dev/mapper/centos_niesh-root xfs        18G  8.5G  9.1G   49% /
devtmpfs                      devtmpfs  348M     0  348M    0% /dev
tmpfs                         tmpfs     363M   84K  363M    1% /dev/shm
tmpfs                         tmpfs     363M  5.5M  358M    2% /run
tmpfs                         tmpfs     363M     0  363M    0% /sys/fs/cgroup
/dev/sda1                     xfs       497M  158M  339M   32% /boot
.host:/                       vmhgfs    271G   42G  229G   16% /mnt/hgfs
tmpfs                         tmpfs      73M   16K   73M    1% /run/user/42
tmpfs                         tmpfs      73M     0   73M    0% /run/user/1000
根目录(/)的挂载点为 /dev/mapper/centos_niesh-root,可查看其是否支持 ACL 权限:
[root@niesh ~]# dumpe2fs -h /dev/centos_niesh/root
dumpe2fs 1.42.9 (28-Dec-2013)
dumpe2fs: Bad magic number in super-block 当尝试打开 /dev/centos_niesh/root 时
找不到有效的文件系统超级块.
出现此错误是因为 dumpe2fs 命令属于 ext 文件系统家族,而该系统为 CentOS 7,文件系统是 XFS。XFS 默认支持 ACL:
[root@niesh ~]# lsb_release -a
LSB Version:    :core-4.1-amd64:core-4.1-noarch:cxx-4.1-amd64:cxx-4.1-noarch:desktop-4.1-amd64:desktop-4.1-noarch:languages-4.1-amd64:languages-4.1-noarch:printing-4.1-amd64:printing-4.1-noarch
Distributor ID: CentOS
Description:    CentOS Linux release 7.2.1511 (Core)
Release:        7.2.1511
Codename:       Core

[root@niesh ~]# df -Th
文件系统                      类型      容量  已用  可用 已用 % 挂载点
/dev/mapper/centos_niesh-root xfs        18G  8.5G  9.1G   49% /
可使用 xfs_info /dev/xxx 查看 XFS 文件系统信息:
[root@niesh ~]# xfs_info /dev/centos_niesh/root
meta-data=/dev/mapper/centos_niesh-root isize=256    agcount=4, agsize=1144832 blks
=                       sectsz=512   attr=2, projid32bit=1
=                       crc=0        finobt=0
data     =                       bsize=4096   blocks=4579328, imaxpct=25
=                       sunit=0      swidth=0 blks
naming   =version 2              bsize=4096   ascii-ci=0 ftype=0
log      =internal               bsize=4096   blocks=2560, version=2
=                       sectsz=512   sunit=0 blks, lazy-count=1
realtime =none                   extsz=4096   blocks=0, rtextents=0
虽然从上述输出中无法直接看出是否支持 ACL 权限,但 XFS 默认支持 ACL。
1). 安装 ACL
系统默认不会安装 ACL 权限,需手动安装:
- RPM 包安装:
- 前提:能够获取系统安装包。
- 命令:
rpm -ivh libacl-x.x.xx-x.x acl-x.x.xx-x.x.rpm
- yum 安装:
- 前提:主机已联网且 yum 可用。
- 命令:
yum -y install libacl acl
2). 开启 ACL
首先查看 Linux 系统的 ACL 权限是否开启,使用 mount 命令:
[root@niesh ~]# mount
/dev/mapper/centos_niesh-root on /type xfs (rw,relatime,seclabel,attr2,inode64,noquota)
selinuxfs on /sys/fs/selinux type selinuxfs (rw,relatime)
systemd-1 on /proc/sys/fs/binfmt_misc type autofs (rw,relatime,fd=34,pgrp=1,timeout=300,minproto=5,maxproto=5,direct)
可见,/dev/mapper/centos_nie-root 没有 ACL 权限,需手动开启。开启方式有两种:
- 命令开启:
- 命令:
mount -o remount,acl / - 特点:临时性,重启失效。
- 命令:
- 文件开启:
- 命令:
vim /etc/fstab,在对应分区的挂载选项中添加acl。例如,对于根分区,找到类似/dev/mapper/centos_niesh-root/xfs defaults 0 0的行,修改为/dev/mapper/centos_niesh-root/xfs defaults,acl 0 0。 - 特点:永久开启。
完成修改后,需重启或者重新挂载设置的分区。例如,重新挂载根分区:
- 命令:
- 挂载:
mount -o remount / - 重启:
reboot
3). ACL 文件设置
常用的有以下两个命令:
- getfacl:获取文件或目录的 ACL 设置信息。
- 命令:
getfacl [-bkndRLP] { -m|-M|-x|-X... } file... - 参数:
-a, --access:显示文件或目录的访问控制列表。-d, --default:显示文件或目录的默认(缺省)的访问控制列表。-c, --omit - header:不显示默认的访问控制列表。-R, --recursive:操作递归到子目录。
- 命令:
- setfacl:设置文件或目录的 ACL 设置信息。
- 命令:
setfacl [-bkndRLP] { -m|-M|-x|-X... } file... - 参数:
-m, --modify=acl:修改文件或目录的扩展 ACL 设置信息。-x, --remove=acl:从文件或目录删除一个扩展的 ACL 设置信息。-b, --remove - all:删除所有的扩展的 ACL 设置信息。-k, --remove - default:删除缺省的 acl 设置信息。-n, --no - mask:不要重新计算有效权限。setfacl 默认会重新计算 ACL mask,除非 mask 被明确指定。-d, --default:设置默认的 ACL 设置信息(只对目录有效)。-R, --recursive:操作递归到所有子目录和文件。
- 命令:
针对前面讨论的场景进行实战练习:
首先,创建一个目录 Project:
[niesh@niesh tmp]$ mkdir -m 770 Project
[niesh@niesh tmp]$ ll
总用量 0
drwxrwx---. 2 niesh niesh 6 7 月  28 15:44 Project
其次,添加一个新用户 Sherry:
[root@niesh ~]# useradd Sherry
[root@niesh ~]# passwd Sherry
[root@niesh ~]#
再次,查看当前用户和 Sherry 分别属于哪个组:
[root@niesh ~]# groups Sherry
Sherry : Sherry
[root@niesh ~]# groups niesh
niesh : niesh wheel
显然,二者不属于同一组,所以 Sherry 对创建的 Project 目录不具备任何权限:
[Sherry@niesh tmp]$ cd Project/
bash: cd: Project/: 权限不够
[Sherry@niesh tmp]$ ^C
[Sherry@niesh tmp]$ ll Project/
ls: 无法打开目录 Project/: 权限不够
然后,为 Sherry 添加 ACL 权限:
[niesh@niesh tmp]$ setfacl -m u:Sherry:rx Project/
[niesh@niesh tmp]$ ll
总用量 4
drwxrwx---+ 2 niesh niesh 6 7 月  28 15:44 Project
可以看到,权限的第 11 位出现了一个 + 号,代表该文件或目录设置了 ACL 权限。
4). 查看 ACL 权限
使用 getfacl 命令查看刚才设置的权限:
设置之前:
[niesh@niesh tmp]$ getfacl Project/
# file: Project/
# owner: niesh
# group: niesh
user::rwx
group::rwx
other::---
设置之后:
[niesh@niesh tmp]$ getfacl Project/
# file: Project/
# owner: niesh
# group: niesh
user::rwx
user:Sherry:r-x
group::rwx
mask::rwx
other::---
新增的内容说明:
user:Sherry:r - x:表示 Sherry 具备的 ACL 权限为r - x。mask::rwx:表示 ACL 的最大权限,用户实际获得的权限是其分配权限与 mask 权限的交集(类似于子网掩码的作用)。
5). 删除 ACL
采用 setfacl -b <dir> 命令删除 ACL 权限:
[niesh@niesh tmp]$ setfacl -b Project/
[niesh@niesh tmp]$ ll
总用量 0
drwxrwx---. 2 niesh niesh 6 7 月  28 15:44 Project

[niesh@niesh tmp]$ getfacl Project/
# file: Project/
# owner: niesh
# group: niesh
user::rwx
group::rwx
other::---
最后,删除之前创建的 Sherry 用户:
[root@niesh ~]# userdel -r Sherry
[root@niesh ~]# cat /etc/passwd
via:
-
An introduction to Linux Access Control Lists (ACLs)
https://www.redhat.com/en/blog/linux-access-control-lists -
How to Use Filesystem ACLs (Access Control Lists) on Linux
https://www.howtogeek.com/how-to-use-filesystem-acl-on-linux/ -
Linux 命令之 getfacl 和 setfacl 命令 - CSDN 博客
https://blog.csdn.net/carefree2005/article/details/126287340 -
linux 设置权限_setfacl_getfacl_linux setfacl-CSDN 博客
https://blog.csdn.net/HYSliuliuliu/article/details/134690235 -
setfacl 和 getfacl 的使用方法_setfacl -m-CSDN 博客
https://blog.csdn.net/bpb_cx/article/details/82702989 -
深入理解 ACL 访问控制 - CSDN 博客
https://blog.csdn.net/qq_40628106/article/details/83048768 -
Linux ACL(访问控制列表)权限管理举例详解(含默认权限)_linux 访问控制列表应用案例 - CSDN 博客
https://blog.csdn.net/Zheng__Huang/article/details/107743768 -
Linux文件权限与属性详解 之 ACL - Jimmy_Nie - 博客园
https://www.cnblogs.com/Jimmy1988/p/7249844.html