详解ESP32使用select函数来监听串口数据
一. uart理论
uart理论我们在前面的文章已经介绍过了,我们就不再赘述了,可以看看之前的文章:
UART协议就应该这么理解_uart是全双工还是半双工-CSDN博客
二. select使用方式介绍
1. select 的出处与原理
1.1 出处
select 是 POSIX 标准的一部分,最早出现在 Berkeley Socket API 中,用于实现网络编程中的多路复用。它被广泛应用于需要同时处理多个 I/O 操作的场景,例如:
- 监控多个网络套接字。
- 监控串口、管道、文件等文件描述符。
- 实现非阻塞 I/O 操作。
优点
- 跨平台,支持多种操作系统。
- 可以同时监控多个文件描述符。
- 简单易用,适合轻量级的多路复用需求。
缺点
- 文件描述符数量有限(通常受
FD_SETSIZE限制,默认 1024)。 - 每次调用
select都需要重新设置文件描述符集合,效率较低。 - 对于高并发场景,性能不如
epoll(Linux)或kqueue(BSD)。
1.2 原理
select 的核心原理是通过 阻塞等待 的方式监控一组文件描述符,直到以下任一条件满足:
- 有文件描述符可读(数据可读取)。
- 有文件描述符可写(可以写入数据)。
- 有文件描述符发生异常(如带外数据到达)。
- 超时(如果设置了超时时间)。
select 通过 位掩码(fd_set)来表示需要监控的文件描述符集合,并通过返回值告知程序哪些文件描述符已经准备好。
2. select 的使用方式
2.1 函数原型
#include <sys/select.h>

int select(int nfds, fd_set *readfds, fd_set *writefds, fd_set *exceptfds, struct timeval *timeout);
2.2 参数说明
nfds: 需要监控的文件描述符的最大值加 1(即max_fd + 1)。readfds: 指向fd_set的指针,表示需要监控可读的文件描述符集合。writefds: 指向fd_set的指针,表示需要监控可写的文件描述符集合。exceptfds: 指向fd_set的指针,表示需要监控异常的文件描述符集合。timeout: 超时时间。如果为NULL,select会一直阻塞,直到有文件描述符准备好;如果为0,select会立即返回;否则,select会在指定时间内等待。
2.3 返回值
- > 0: 准备好的文件描述符的数量。
- = 0: 超时,没有文件描述符准备好。
- -1: 出错,可以通过
errno获取错误码。
2.4 相关宏
FD_ZERO(fd_set *set): 清空文件描述符集合。FD_SET(int fd, fd_set *set): 将文件描述符fd添加到集合中。FD_CLR(int fd, fd_set *set): 将文件描述符fd从集合中移除。FD_ISSET(int fd, fd_set *set): 检查文件描述符fd是否在集合中。
3. select 的使用步骤
3.1 初始化文件描述符集合
- 使用
FD_ZERO清空集合。 - 使用
FD_SET将需要监控的文件描述符添加到集合中。
3.2 调用 select
调用 select 函数,传入文件描述符集合和超时时间。
3.3 检查返回值
- 如果返回值大于 0,表示有文件描述符准备好。
- 使用
FD_ISSET检查具体是哪个文件描述符准备好。
3.4 处理 I/O 操作
根据准备好的文件描述符进行读写或异常处理。
4. select 的通用示例
以下是一个通用的 select 示例,监控标准输入(stdin)和串口(假设串口文件描述符为 uart_fd):
#include <stdio.h>
#include <stdlib.h>
#include <sys/select.h>
#include <unistd.h>
#include <fcntl.h>
#include <errno.h>

int main() {
    int uart_fd; // 假设串口文件描述符已经打开
    fd_set read_fds;
    struct timeval timeout;

    while (1) {
        // 清空文件描述符集合
        FD_ZERO(&read_fds);

        // 添加标准输入和串口到集合中
        FD_SET(STDIN_FILENO, &read_fds); // STDIN_FILENO 是标准输入的文件描述符
        FD_SET(uart_fd, &read_fds);

        // 设置超时时间为 1 秒
        timeout.tv_sec = 1;
        timeout.tv_usec = 0;

        // 调用 select
        int ret = select(uart_fd + 1, &read_fds, NULL, NULL, &timeout);
        if (ret < 0) {
            perror("select error");
            break;
        } else if (ret == 0) {
            printf("Timeout, no data received\n");
        } else {
            // 检查标准输入是否有数据
            if (FD_ISSET(STDIN_FILENO, &read_fds)) {
                char buf[128];
                int len = read(STDIN_FILENO, buf, sizeof(buf));
                if (len > 0) {
                    buf[len] = '\0';
                    printf("Received from stdin: %s", buf);
                }
            }

            // 检查串口是否有数据
            if (FD_ISSET(uart_fd, &read_fds)) {
                uint8_t data[128];
                int len = read(uart_fd, data, sizeof(data));
                if (len > 0) {
                    data[len] = '\0';
                    printf("Received from UART: %s\n", data);
                }
            }
        }
    }

    return 0;
}
三.esp32使用select介绍
我们先直接上代码,然后介绍下原理
/* UART Select Example

   This example code is in the Public Domain (or CC0 licensed, at your option.)

   Unless required by applicable law or agreed to in writing, this
   software is distributed on an "AS IS" BASIS, WITHOUT WARRANTIES OR
   CONDITIONS OF ANY KIND, either express or implied.
*/
#include <stdio.h>
#include <string.h>
#include <sys/fcntl.h>
#include <sys/errno.h>
#include <sys/unistd.h>
#include <sys/select.h>
#include "freertos/FreeRTOS.h"
#include "freertos/task.h"
#include "esp_log.h"
#include "driver/uart_vfs.h"
#include "driver/uart.h"

static const char* TAG = "uart_select_example";

#define UART_JSON_BUFFER_SIZE 512
char uart_json_buf[UART_JSON_BUFFER_SIZE] = {0};

static void uart_select_task(void *arg)
{
    if (uart_driver_install(UART_NUM_0, 2 * 1024, 0, 0, NULL, 0) != ESP_OK) {
        ESP_LOGE(TAG, "Driver installation failed");
        vTaskDelete(NULL);
    }

    uart_config_t uart_config = {
        .baud_rate = 115200,
        .data_bits = UART_DATA_8_BITS,
        .parity    = UART_PARITY_DISABLE,
        .stop_bits = UART_STOP_BITS_1,
        .flow_ctrl = UART_HW_FLOWCTRL_DISABLE,
        .source_clk = UART_SCLK_DEFAULT,
    };

    uart_param_config(UART_NUM_0, &uart_config);

    while (1) {
        int fd;

        if ((fd = open("/dev/uart/0", O_RDWR)) == -1) {
            ESP_LOGE(TAG, "Cannot open UART");
            vTaskDelay(5000 / portTICK_PERIOD_MS);
            continue;
        }

        // We have a driver now installed so set up the read/write functions to use driver also.
        uart_vfs_dev_use_driver(UART_NUM_0);

        while (1) {
            int s;
            fd_set rfds;
            struct timeval tv = {
                .tv_sec = 5,
                .tv_usec = 0,
            };

            FD_ZERO(&rfds);
            FD_SET(fd, &rfds);

            s = select(fd + 1, &rfds, NULL, NULL, &tv);

            if (s < 0) {
                ESP_LOGE(TAG, "Select failed: errno %d (%s)", errno, strerror(errno));
                break;
            } else if (s == 0) {
                ESP_LOGI(TAG, "Timeout has been reached and nothing has been received");
            } else {
                if (FD_ISSET(fd, &rfds)) {
                    memset(uart_json_buf,0,UART_JSON_BUFFER_SIZE);
                    if (read(fd, uart_json_buf, UART_JSON_BUFFER_SIZE) > 0) {
                        ESP_LOGI(TAG, "Received: %s", uart_json_buf);
                        // Note: Only one character was read even the buffer contains more. The other characters will
                        // be read one-by-one by subsequent calls to select() which will then return immediately
                        // without timeout.
                    } else {
                        ESP_LOGE(TAG, "UART read error");
                        break;
                    }
                } else {
                    ESP_LOGE(TAG, "No FD has been set in select()");
                    break;
                }
            }
        }

        close(fd);
    }

    vTaskDelete(NULL);
}

void app_main(void)
{
    xTaskCreate(uart_select_task, "uart_select_task", 4 * 1024, NULL, 5, NULL);
}
1. 创建线程
xTaskCreate(uart_select_task, "uart_select_task", 4 * 1024, NULL, 5, NULL);xTaskCreate 是 FreeRTOS 中用于创建任务的函数。FreeRTOS 是一个流行的实时操作系统(RTOS),广泛应用于嵌入式系统中,例如 ESP32。通过 xTaskCreate,你可以创建一个新的任务,该任务会在 FreeRTOS 调度器的管理下并发运行。
以下是对 xTaskCreate 函数的详细介绍,以及你提供的代码片段的解释:
a. xTaskCreate 函数原型
BaseType_t xTaskCreate(
    TaskFunction_t pvTaskCode,       // 任务函数指针
    const char * const pcName,       // 任务名称(字符串)
    configSTACK_DEPTH_TYPE usStackDepth, // 任务堆栈大小(以字为单位)
    void *pvParameters,             // 传递给任务函数的参数
    UBaseType_t uxPriority,         // 任务优先级
    TaskHandle_t *pxCreatedTask      // 任务句柄(用于引用任务)
);
b. 参数说明
pvTaskCode
- 类型:
TaskFunction_t(函数指针) - 说明:任务函数的指针。任务函数是一个无限循环的函数,任务启动后会一直运行该函数。
示例:
void uart_select_task(void *pvParameters) {
    while (1) {
        // 任务逻辑
    }
}
pcName
- 类型:
const char * - 说明:任务的名称,是一个字符串,用于调试和标识任务。
usStackDepth
- 类型:
configSTACK_DEPTH_TYPE(通常是uint16_t或uint32_t) - 说明:任务的堆栈大小,以字(word)为单位。ESP32 中,一个字通常是 4 字节。
pvParameters
- 类型:
void * - 说明:传递给任务函数的参数。可以是任意类型的指针,任务函数中可以通过
pvParameters访问。
uxPriority
- 类型:
UBaseType_t - 说明:任务的优先级。优先级越高,任务越容易获得 CPU 时间。优先级范围通常是 0 到
configMAX_PRIORITIES - 1。
pxCreatedTask
- 类型:
TaskHandle_t * - 说明:用于存储任务句柄的指针。任务句柄可以用于后续操作任务,例如删除任务、修改优先级等。
2. uart驱动install
if (uart_driver_install(UART_NUM_0, 2 * 1024, 0, 0, NULL, 0) != ESP_OK) {
        ESP_LOGE(TAG, "Driver installation failed");
        vTaskDelete(NULL);
    }
esp_err_t uart_driver_install(uart_port_t uart_num, int rx_buffer_size, int tx_buffer_size, int queue_size, QueueHandle_t *uart_queue, int intr_alloc_flags)Install UART driver and set the UART to the default configuration.
UART ISR handler will be attached to the same CPU core that this function is running on.
备注
Rx_buffer_size should be greater than UART_HW_FIFO_LEN(uart_num). Tx_buffer_size should be either zero or greater than UART_HW_FIFO_LEN(uart_num).
参数
- uart_num -- UART port number, the max port number is (UART_NUM_MAX -1).
- rx_buffer_size -- UART RX ring buffer size.
- tx_buffer_size -- UART TX ring buffer size. If set to zero, driver will not use TX buffer, TX function will block task until all data have been sent out.
- queue_size -- UART event queue size/depth.
- uart_queue -- UART event queue handle (out param). On success, a new queue handle is written here to provide access to UART events. If set to NULL, driver will not use an event queue.
- intr_alloc_flags -- Flags used to allocate the interrupt. One or multiple (ORred) ESP_INTR_FLAG_* values. See esp_intr_alloc.h for more info. Do not set ESP_INTR_FLAG_IRAM here (the driver's ISR handler is not located in IRAM)
返回
- ESP_OK Success
- ESP_FAIL Parameter error
3. uart驱动配置
uart_config_t uart_config = {
    .baud_rate = 115200,
    .data_bits = UART_DATA_8_BITS,
    .parity    = UART_PARITY_DISABLE,
    .stop_bits = UART_STOP_BITS_1,
    .flow_ctrl = UART_HW_FLOWCTRL_DISABLE,
    .source_clk = UART_SCLK_DEFAULT,
};

uart_param_config(UART_NUM_0, &uart_config);
esp_err_t uart_param_config(uart_port_t uart_num, const uart_config_t *uart_config)Set UART configuration parameters.
参数
- uart_num -- UART port number, the max port number is (UART_NUM_MAX -1).
- uart_config -- UART parameter settings
返回
- ESP_OK Success
- ESP_FAIL Parameter error
重点介绍下uart_config_t这个参数,就是初始化常见的uart参数
/**
 * @brief UART configuration parameters for uart_param_config function
 */
typedef struct {
    int baud_rate;                      /*!< UART baud rate*/
    uart_word_length_t data_bits;       /*!< UART byte size*/
    uart_parity_t parity;               /*!< UART parity mode*/
    uart_stop_bits_t stop_bits;         /*!< UART stop bits*/
    uart_hw_flowcontrol_t flow_ctrl;    /*!< UART HW flow control mode (cts/rts)*/
    uint8_t rx_flow_ctrl_thresh;        /*!< UART HW RTS threshold*/
    union {
        uart_sclk_t source_clk;             /*!< UART source clock selection */
#if (SOC_UART_LP_NUM >= 1)
        lp_uart_sclk_t lp_source_clk;       /*!< LP_UART source clock selection */
#endif
    };
    struct {
        uint32_t backup_before_sleep: 1;    /*!< If set, the driver will backup/restore the HP UART registers before entering/after exiting sleep mode.
                                                 By this approach, the system can power off HP UART's power domain.
                                                 This can save power, but at the expense of more RAM being consumed */
    } flags;                                /*!< Configuration flags */
} uart_config_t;
4. 打开创建
fd = open("/dev/uart/0", O_RDWR)这个不用过多介绍下,就是打开串口0,但是为什么设备节点是/dev/uart/0呢,这个要看下下面的vfs介绍
5. 启用uart vfs
uart_vfs_dev_use_driver(UART_NUM_0);ESP32的uart可以同构vfs像Linux select函数来实现监测读,整个select的使用原理是:
select系统调用时用来让我们的程序监视多个文件句柄的状态变化的。程序会停在select这里等待,直到被监视的文件句柄有一个或多个发生了状态改变。
6. 监听串口数据
while (1) {
            int s;
            fd_set rfds;
            struct timeval tv = {
                .tv_sec = 5,
                .tv_usec = 0,
            };

            FD_ZERO(&rfds);
            FD_SET(fd, &rfds);

            s = select(fd + 1, &rfds, NULL, NULL, &tv);

            if (s < 0) {
                ESP_LOGE(TAG, "Select failed: errno %d (%s)", errno, strerror(errno));
                break;
            } else if (s == 0) {
                ESP_LOGI(TAG, "Timeout has been reached and nothing has been received");
            } else {
                if (FD_ISSET(fd, &rfds)) {
                    memset(uart_json_buf,0,UART_JSON_BUFFER_SIZE);
                    if (read(fd, uart_json_buf, UART_JSON_BUFFER_SIZE) > 0) {
                        ESP_LOGI(TAG, "Received: %s", uart_json_buf);
                        // Note: Only one character was read even the buffer contains more. The other characters will
                        // be read one-by-one by subsequent calls to select() which will then return immediately
                        // without timeout.
                    } else {
                        ESP_LOGE(TAG, "UART read error");
                        break;
                    }
                } else {
                    ESP_LOGE(TAG, "No FD has been set in select()");
                    break;
                }
            }
        }
这个不用说哈,我们已经在select介绍过了
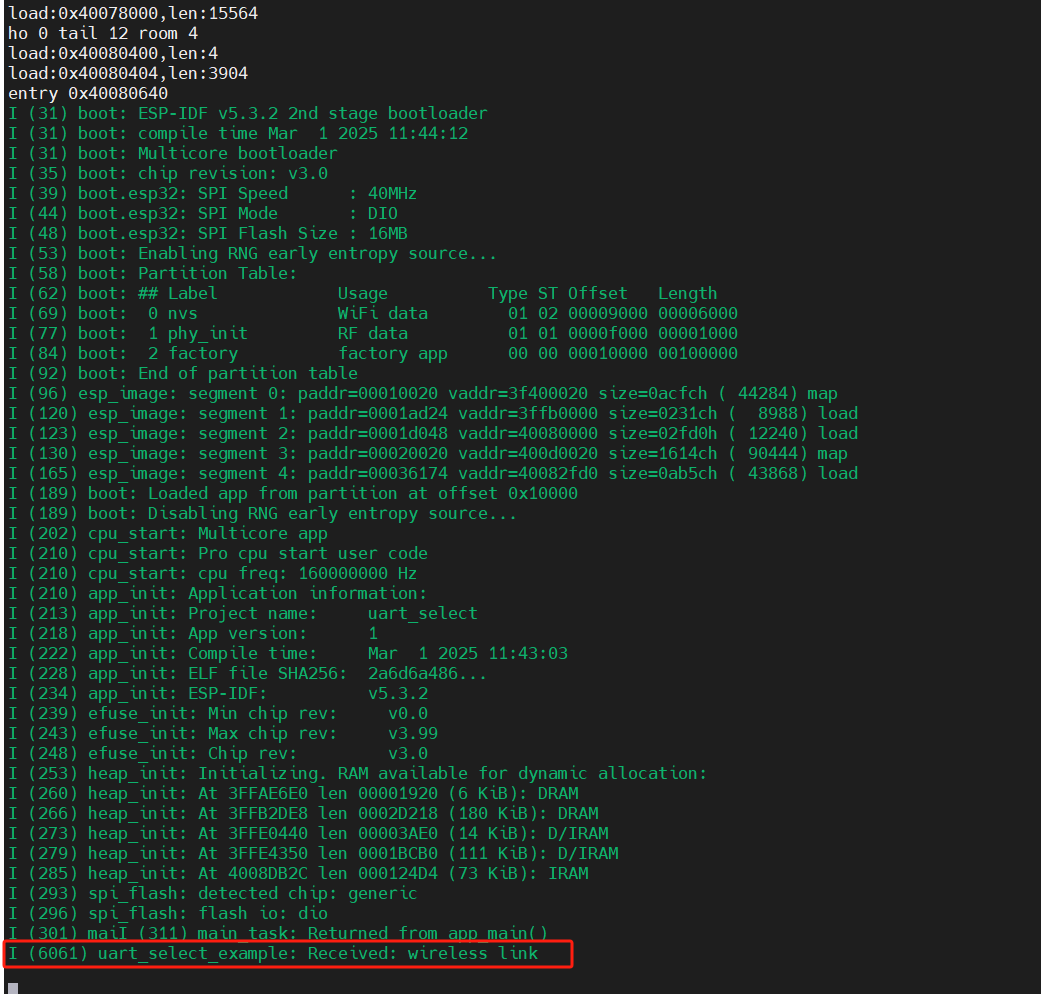
运行图如图,我敲进去wireless link,就打印出来了!!