C++ 学习笔记精要(二)
第一节 特殊类的设计
1. 一个类: 只能在堆上创建对象
关键点:自己控制析构
1.1 方法一: 使用delete禁掉默认析构函数
#include <iostream>
using namespace std;class HeapOnly
{
public:HeapOnly(){_str = new char[10];}~HeapOnly() = delete;void Destroy(){delete[] _str;operator delete(this);}private:char* _str;//...
};int main()
{HeapOnly* ptr = new HeapOnly;ptr->Destroy();return 0;
}- 只要在堆上申请空间,并且使用delete把析构函数禁掉就行了
- 自己再实现一个释放空间的函数
1.2 方法二: 将析构函数私有化
#include <iostream>
#include <stdlib.h>
using namespace std;
class HeapOnly
{
public:/*static void Delete(HeapOnly* p){delete p;}*/void Delete(){delete this;}private:// 析构函数私有~HeapOnly(){cout << "~HeapOnly()" << endl;}
private:int _a;
};int main()
{//HeapOnly hp1;// error//static HeapOnly hp2;// errorHeapOnly* ptr = new HeapOnly;ptr->Delete();return 0;
}
1.3 方法三: 将构造函数私有化(禁掉拷贝)
#include <iostream>
#include <stdlib.h>
using namespace std;
class HeapOnly
{
public:// 提供一个公有的,获取对象的方式,对象控制是new出来的static HeapOnly* CreateObj(){return new HeapOnly;}// 防拷贝HeapOnly(const HeapOnly& hp) = delete;HeapOnly& operator=(const HeapOnly& hp) = delete;
private:// 构造函数私有HeapOnly():_a(0){}
private:int _a;
};int main()
{/*HeapOnly hp1;static HeapOnly hp2;HeapOnly* hp3 = new HeapOnly;delete hp3;*/HeapOnly* hp3 = HeapOnly::CreateObj();//HeapOnly copy(*hp3);delete hp3;return 0;
}直接将构造函数私有化,然后再实现一个CreatObj创建对象,返回值是static;
创建的是堆的话,需要禁掉那2个函数
2. 一个类: 只能在栈上创建对象
关键点: 自己控制构造
2.1 方法一: 构造函数私有化(禁掉new)
#include <iostream>
#include <stdlib.h>
using namespace std;
class StackOnly
{
public:static StackOnly CreateObj(){StackOnly st;return st;}// 不能防拷贝//StackOnly(const StackOnly& st) = delete;//StackOnly& operator=(const StackOnly& st) = delete;void* operator new(size_t n) = delete;
private:// 构造函数私有StackOnly():_a(0){}
private:int _a;
};int main()
{/*StackOnly st1;static StackOnly st2;StackOnly* st3 = new StackOnly;*/StackOnly st1 = StackOnly::CreateObj();// 拷贝构造static StackOnly copy2(st1); // 不好处理,算是一个小缺陷//StackOnly* copy3 = new StackOnly(st1);return 0;
}
3. 一个类:不能被继承
3.1 给父类加final关键字
#include <iostream>
#include <string>
using namespace std;//C98
//class A
//{
//private:
//	A()
//	{}
//
//protected:
//	int _a;
//};// C++11中引用的final
class A final
{
public:A(){}protected:int _a;
};class B : public A
{};int main()
{B bb;// 这里对象实例化才会报错return 0;
}-
C++98中:a. 父类构造函数私有-- 子类是不可见,b. 这种只有对象实例化才会报错
-
C++11中:给父类加上了final关键字,使子类不能继承父类,
4. 一个类: 只能创建一个对象(单例模式)
4.1 单例模式(饿汉模式 && 懒汉模式)
那两种模式都是将构造函数私有化,自己实现一个构造生成一个静态对象
- 一个类只能创建一个对象,即单例模式,该模式可以保证系统中该类只有一个实例,并提供一个 访问它的全局访问点,该实例被所有程序模块共享
4.2 饿汉模式: 程序启动时就创建一个唯一的实例对象
class Singleton
{
public:static Singleton* GetInstance(){return &m_instance;}
private:// 构造函数私有Singleton() {};// C++11 : 防拷贝Singleton(Singleton const&) = delete;Singleton& operator=(Singleton const&) = delete;static Singleton m_instance;// 声明
};Singleton Singleton::m_instance;// 定义
-
优点:简单
-
缺点:可能会导致进程启动慢,且如果有多个单例类对象实例启动顺序不确定。
-
总结: 如果这个单例对象在多线程高并发环境下频繁使用,性能要求较高,那么显然使用饿汉模式来避 免资源竞争,提高响应速度更好。
4.3 懒汉模式 : 第一次使用对象再创建实例对象
- 如果单例对象构造十分耗时或者占用很多资源,比如加载插件啊, 初始化网络连接啊,读取 文件啊等等,而有可能该对象程序运行时不会用到,那么也要在程序一开始就进行初始化,
- 就会导致程序启动时非常的缓慢。 所以这种情况使用懒汉模式(延迟加载)更好。
#include <iostream>
#include <stdlib.h>
using namespace std;
class MemoryPool
{
public:static MemoryPool* GetInstance(){if (_pinst == nullptr) {_pinst = new MemoryPool;}return _pinst;}void* Alloc(size_t n){void* ptr = nullptr;// ....return ptr;}void Dealloc(void* ptr){// ...}// 实现一个内嵌垃圾回收类    class CGarbo {public:~CGarbo(){if (_pinst)delete _pinst;}};private:// 构造函数私有化MemoryPool(){// ....}char* _ptr = nullptr;// ...static MemoryPool* _pinst; // 声明
};// 定义
MemoryPool* MemoryPool::_pinst = nullptr;// 回收对象,main函数结束后,他会调用析构函数,就会释放单例对象
static MemoryPool::CGarbo gc;int main()
{void* ptr1 = MemoryPool::GetInstance()->Alloc(10);MemoryPool::GetInstance()->Dealloc(ptr1);
}- 优点: 有控制顺序, 不影响启动速度
- 缺点: 相对复杂, 存在线程安全问题
4.4 单例对象释放问题:
- 一般情况下,单例对象不需要释放的。因为一般整个程序运行期间都可能会用它。单例对象在进程正常结束后,也会资源释放。
- 有些特殊场景需要释放,比如单例对象析构时,要进行一些持久化(往文件、数据库写)操作。
第二节 C++的类型转换&&IO流
1. C语言的类型转换
#include <iostream>
#include <string>
using namespace std;void Insert(size_t pos, char ch)
{size_t _size = 5;//....int end = _size - 1;// size_t end = _size - 1;while (end >= pos) // end隐式类型转换{//_str[end + 1] = _str[end];--end;}
}void Test1()
{int i = 1;// 隐式类型转换(意义相近的类型)double d = i;printf("%d, %.2f\n", i, d);int* p = &i;// 显示的强制类型转换(意义不相近的类型,值转换后有意义)int address = (int)p;printf("%x, %d\n", p, address);Insert(3, 'a');Insert(0, 'a');// 触发死循环
}int main()
{Test1();return 0;
}- 隐式类型转换(意义相近的类型)
- 显示的强制类型转换(意义不相近的类型,值转换后有意义)
2. C语言类型转换的缺陷
- 隐式类型转化有些情况下可能会出现问题: 比如数据精度丢失
- 显示类型转换将所有情况混合在一起,代码不够清晰
3. C++强制类型转换
标准C++为了加强类型转换的可视性,引入了四种命名的强制类型转换操作符
3.1 static_cast关键字 -> 隐式类型转换
#include <iostream>
#include <string>
using namespace std;int main()
{double d = 12.34;int a = static_cast<int>(d);cout << a << endl;int* p = &a;//int address = static_cast<int>(p);// 不支持的return 0;
}- static_cast用于非多态类型的转换(静态转换),编译器隐式执行的任何类型转换都可用static_cast就像C语言的隐式类型转换,常用于意义相近的类型
- 但是它不能用于两个不相关的类型进行转换
3.2 reinterpret_cast关键字 -> 强制类型转换
#include <iostream>
#include <string>
using namespace std;int main()
{int a = 100;int* p = &a;int address = reinterpret_cast<int>(p);return 0;
}-
reinterpret_cast操作符通常为操作数的位模式提供较低层次的重新解释,用于将一种类型转换为另一种不同的类型,
-
reinterpret_cast就像C语言的强制类型转换
-
常用于两个类型不相关的
3.3 const_cast关键字->取消变量的const属性

- const_cast最常用的用途就是删除变量的const属性,方便赋值
- volatile关键字取消编译器的优化
3.4 dynamic_cast->父类指针 转换 子类指针
dynamic_cast用于将一个父类对象的指针/引用转换为子类对象的指针或引用(动态转换)
向上转型:子类对象指针/引用->父类指针/引用(不需要转换,赋值兼容规则)->切片
向下转型:父类对象指针/引用->子类指针/引用(用dynamic_cast转型是安全的)
案例一
#include <iostream>
using namespace std;class A
{
public:virtual void f(){}
public:int _a = 0;
};class B : public A
{
public:int _b = 1;
};// A*指针pa有可能指向父类,有可能指向子类
void fun(A* pa)
{// 如果pa是指向子类,那么可以转换,转换表达式返回正确的地址// 如果pa是指向父类,那么不能转换,转换表达式返回nullptrB* pb = dynamic_cast<B*>(pa); // 安全的//B* pb = (B*)pa;             // 不安全if (pb){cout << "转换成功" << endl;pb->_a++;pb->_b++;cout << pb->_a << ":" << pb->_b << endl;}else{cout << "转换失败" << endl;}
}int main()
{A aa;// 父类对象无论如何都是不允许转换成子类对象的//B bb = dynamic_cast<B>(aa);// error//B bb = (B)aa;// errorB bb;fun(&aa);fun(&bb);fun(nullptr);return 0;
}-
dynamic_cast只能用于父类含有虚函数的类
-
dynamic_cast会先检查是否能转换成功,能成功则转换,不能则返回0
案例二
#include <iostream>
using namespace std;
class A1
{
public:virtual void f(){}
public:int _a1 = 0;
};class A2
{
public:virtual void f(){}
public:int _a2 = 0;
};class B : public A1, public A2
{
public:int _b = 1;
};int main()
{B bb;A1* ptr1 = &bb;A2* ptr2 = &bb;cout << ptr1 << endl;cout << ptr2 << endl << endl;B* pb1 = (B*)ptr1;B* pb2 = (B*)ptr2;cout << pb1 << endl;cout << pb2 << endl << endl;B* pb3 = dynamic_cast<B*>(ptr1);B* pb4 = dynamic_cast<B*>(ptr2);cout << pb3 << endl;cout << pb4 << endl << endl;return 0;
} 
3.5 类型转换的实质
类型转换是通过临时对象来实现的,且临时对象具有常性,

- 但是尽量不要使用强制类型转换
3.6 常见面试题
- C++中的4种类型转换分别是:____ 、____ 、____ 、____。
- 分别是static_cast、reinterpret_cast、const_cast和dynamic_cast。
- 说说4种类型转换的应用场景。
- static_cast用于相近类型的类型之间的转换,编译器隐式执行的任何类型转换都可用
- reinterpret_cast用于两个不相关类型之间的转换。
- const_cast用于删除变量的const属性,方便赋值。
- dynamic_cast用于安全的将父类的指针(或引用)转换成子类的指针(或引用)
4. RTTI->运行时类型识别
RTTI:Run-time Type identifification的简称,即:运行时类型识别
C++通过以下方式来支持RTTI:
- typeid运算符(获取对象类型字符串)
- dynamic_cast运算符(父类的指针指向父类对象或者子类对象)
- decltype(推导一个对象类型,这个类型可以用来定义另一个对象)
5. C语言的输入与输出
printf/scanf
fprintf/fscanf
sprintf/sscanf

#include <iostream>
using namespace std;
class A
{
public:// explicit A(int a)A(int a):_a(a){}operator int(){return _a;}private:int _a;
};int main()
{// 内置类型 转换成自定义类型A aa1 = 1; // 隐式类型转换 用1构造A临时对象,再拷贝构造aa1,优化后直接1构造aa1// 自定义类型 转换成内置类型int i = aa1;return 0;
}
说明一下:
- int i = aa1;能将自定义类型转换成内置类型,主要因为operator int()
-
explicit关键字: 不允许隐式类型的转换
5.1 多组输入
#include <iostream>
using namespace std;
class Date
{friend ostream& operator << (ostream& out, const Date& d);friend istream& operator >> (istream& in, Date& d);
public:Date(int year = 1, int month = 1, int day = 1):_year(year), _month(month), _day(day){}operator bool(){// 这里是随意写的,假设输入_year为0,则结束if (_year == 0)return false;elsereturn true;}
private:int _year;int _month;int _day;
};istream& operator >> (istream& in, Date& d)
{in >> d._year >> d._month >> d._day;return in;
}ostream& operator << (ostream& out, const Date& d)
{out << d._year << " " << d._month << " " << d._day;return out;
}// C++ IO流,使用面向对象+运算符重载的方式
// 能更好的兼容自定义类型,流插入和流提取
int main()
{// 自动识别类型的本质--函数重载// 内置类型可以直接使用--因为库里面ostream类型已经实现了int i = 1;double j = 2.2;cout << i << endl;cout << j << endl;// 自定义类型则需要我们自己重载<< 和 >>Date d(2022, 4, 10);cout << d;while (d){cin >> d;cout << d;}return 0;
}
- while(cin >> d){}遇到文件退出符才结束,因为库里面实现了operator bool()
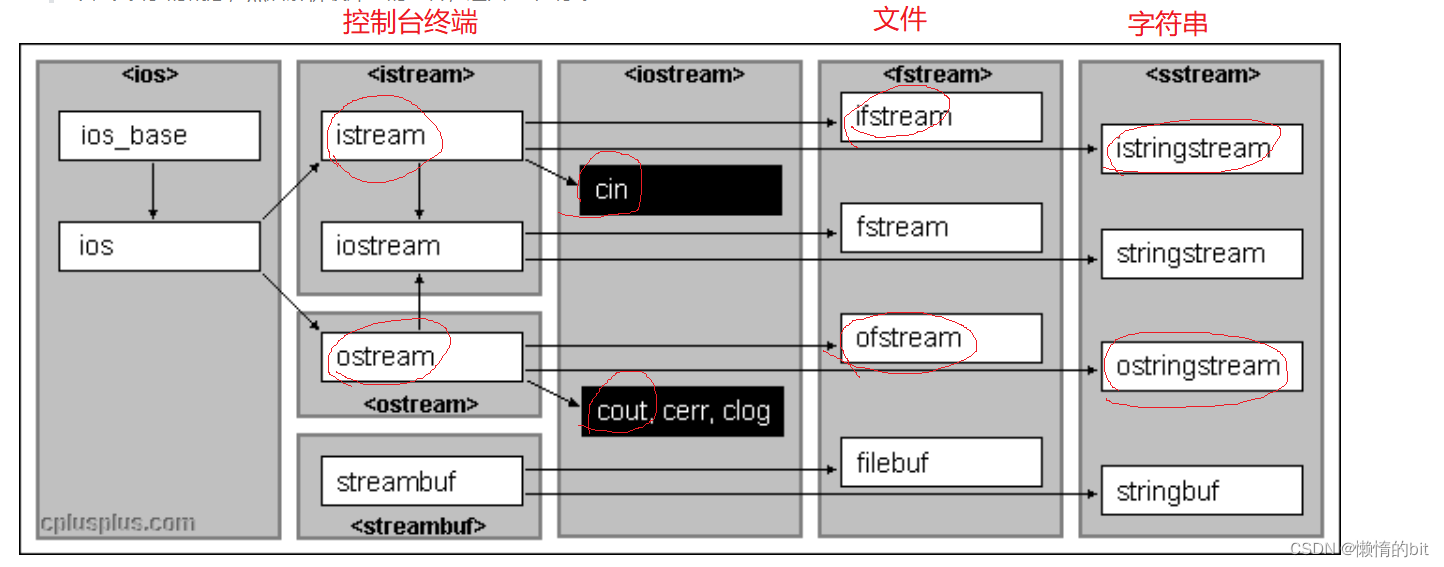
5.2 fstream文件流

#include <iostream>
#include <fstream>
using namespace std;
int main()
{ifstream ifs("Test.cpp");char ch = ifs.get();while (ifs){cout << ch;ch = ifs.get();}return 0;
} 
- C++中也有对文件进行操作的流fstream
- 它的使用就可以不用打开文件和关闭文件
- 库里面写的是一个类它会自己调构造,调析构
5.3 C++ 文件操作
#include <iostream>
#include <fstream>
using namespace std;
class Date
{friend ostream& operator << (ostream& out, const Date& d);friend istream& operator >> (istream& in, Date& d);
public:Date(int year = 1, int month = 1, int day = 1):_year(year), _month(month), _day(day){}operator bool(){// 这里是随意写的,假设输入_year为0,则结束if (_year == 0)return false;elsereturn true;}
private:int _year;int _month;int _day;
};istream& operator >> (istream& in, Date& d)
{in >> d._year >> d._month >> d._day;return in;
}ostream& operator << (ostream& out, const Date& d)
{out << d._year << " " << d._month << " " << d._day;return out;
}int main()
{ifstream ifs("test.txt");// 默认以读的方式打开//fscanf("%d%s%f", )int i;string s;double d;Date de;ifs >> i >> s >> d >> de;cout << i << s << d << de;return 0;
}
5.4 二进制文件的读写 && 文本文件的读写

#include <iostream>
#include <fstream>
using namespace std;
struct ServerInfo
{char _address[32];//string _address;int _port;  // 100// Date _date;
};struct ConfigManager
{
public:ConfigManager(const char* filename = "server.config"):_filename(filename){}// 二进制文件的写void WriteBin(const ServerInfo& info){ofstream ofs(_filename, ios_base::out | ios_base::binary);ofs.write((char*)&info, sizeof(info));}// 二进制文件的写void ReadBin(ServerInfo& info){ifstream ifs(_filename, ios_base::in | ios_base::binary);ifs.read((char*)&info, sizeof(info));}// 文本文件的写void WriteText(const ServerInfo& info){ofstream ofs(_filename, ios_base::out);ofs << info._address << info._port;}// 文本文件的读void ReadText(ServerInfo& info){ifstream ifs(_filename, ios_base::in | ios_base::binary);ifs >> info._address >> info._port;}private:string _filename; // 配置文件
};
int main()
{// 二进制的写ServerInfo winfo = { "127.0.0.1", 888 };ConfigManager cm;cm.WriteBin(winfo);// cm.WriteText(winfo);// 文本的写// 二进制的读ServerInfo rinfo;ConfigManager rm;rm.ReadBin(rinfo);// rm.ReadText(rinfo);// 文本的读cout << rinfo._address << endl;cout << rinfo._port << endl;return 0;
}

-
二进制读写:在内存如何存储,就如何写到磁盘文件
-
优点:快
-
缺点:写出去内容看不见
-
- 文本读写:对象数据序列化字符串写出来,读回来也是字符串,反序列化转成对象数据
-
优点:可以看见写出去是什么
-
缺点:存在一个转换过程,要慢一些
-
5.5 字符串流-- stringstream
#include <iostream>
#include <fstream>
#include<sstream>using namespace std;
struct ChatInfo
{string _name; // 名字int _id;      // idstring _msg;  // 聊天信息
};int main()
{// 序列化ChatInfo winfo = { "张三", 135246, "晚上一起看电影吧" };//ostringstream oss;stringstream oss;oss << winfo._name << endl;oss << winfo._id << endl;oss << winfo._msg << endl;string str = oss.str();cout << str << endl;// 网络传输str,另一端接收到了字符串串信息数据// 反序列化ChatInfo rInfo;//istringstream iss(str);stringstream iss(str);iss >> rInfo._name;iss >> rInfo._id;iss >> rInfo._msg;cout << "----------------------------------" << endl;cout << rInfo._name << "[" << rInfo._id << "]:>" << rInfo._msg << endl;cout << "----------------------------------" << endl;return 0;
} 
第三节 多线程
1.线程库
1.1 thread类的简单介绍
C++11中引入了对线程的支持了,使得C++在并行编程时不需要依赖第三方库
而且在原子操作中还引入了原子类的概念。要使用标准库中的线程,必须包含< thread >头文件
| 函数名 | 功能 |
| thread() | 构造一个线程对象,没有关联任何线程函数,即没有启动任何线程 |
| thread(fn, args1, args2, ...) | 构造一个线程对象,并关联线程函数fn,args1,args2,...为线程函数的 参数 |
| get_id() | 获取线程id |
| jionable() | 线程是否还在执行,joinable代表的是一个正在执行中的线程。 |
| jion() | 该函数调用后会阻塞住线程,当该线程结束后,主线程继续执行 |
| detach() | 在创建线程对象后马上调用,用于把被创建线程与线程对象分离开,分离 的线程变为后台线程,创建的线程的"死活"就与主线程无关 |
-
线程是操作系统中的一个概念,线程对象可以关联一个线程,用来控制线程以及获取线程的
状态。
-
当创建一个线程对象后,没有提供线程函数,该对象实际没有对应任何线程
1.2 线程对象关联线程函数

#include <iostream>
using namespace std;
#include <thread>
void ThreadFunc(int a)
{cout << "Thread1" << a << endl;
}
class TF
{
public:void operator()(){cout << "Thread3" << endl;}
};
int main()
{// 线程函数为函数指针thread t1(ThreadFunc, 10);// 线程函数为lambda表达式thread t2([](){cout << "Thread2" << endl; });// 线程函数为函数对象TF tf;thread t3(tf);t1.join();t2.join();t3.join();cout << "Main thread!" << endl;return 0;
}- 线程对象可以关联1.函数指针2.lambda表达式3.函数对象
- 当创建一个线程对象后,没有提供线程函数,该对象实际没有对应任何线程
注意
-
thread类是防拷贝的,不允许拷贝构造以及赋值,但是可以移动构造和移动赋值,即将一个
线程对象关联线程的状态转移给其他线程对象,转移期间不意向线程的执行。
- 可以通过jionable()函数判断线程是否是有效的,如果是以下任意情况,则线程无效
- 采用无参构造函数构造的线程对象
- 线程对象的状态已经转移给其他线程对象
-
线程已经调用jion或者detach结束
1.3 线程函数参数

#include<iostream>
#include<thread>
#include<mutex>
#include<condition_variable>
#include<vector>
#include<atomic>
using namespace std;void Print(int n, int& x,mutex& mtx)
{for (int i = 0; i < n; ++i){mtx.lock();cout <<this_thread::get_id()<<":"<< i << endl;std::this_thread::sleep_for(std::chrono::milliseconds(100));++x;mtx.unlock();}}int main()
{mutex m;int count = 0;thread t1(Print, 10, ref(count),ref(m));thread t2(Print, 10, ref(count),ref(m);t1.join();t2.join();cout << count << endl;return 0;
}
- 线程函数的参数是先传递给thread的,并以值拷贝的方式拷贝到线程栈空间中的
-
如果不给线程函数的参数不借助ref函数
-
即使线程参数为引用类型,在线程中修改后也不能修改外部实参,
-
因为其实际引用的是线程栈中的拷贝,而不是外部实参
-
#include<iostream>
#include<thread>
#include<mutex>
#include<condition_variable>
#include<vector>
#include<atomic>
using namespace std;int main()
{mutex mtx;int x = 0;int n = 10;int m;cin >> m;vector<thread> v(m);//v.resize(m);for (int i = 0; i < m; ++i){// 移动赋值给vector中线程对象v[i] = thread([&](){for (int i = 0; i < n; ++i){mtx.lock();cout << this_thread::get_id() << ":" << i << endl;std::this_thread::sleep_for(std::chrono::milliseconds(100));++x;mtx.unlock();}});}for (auto& t : v){t.join();}cout << x << endl;return 0;
}
- 借助lambda表达式中的引用捕捉也可以实现上面那个函数,就可以不用借助ref函数
线程并行 && 并发的讨论

- 并行:任务的同时进行
- 并发: 任务的调动和切换
- 在这个函数中其实是并行的速度更快,因为线程切换十分耗时间
join与detach
join方式
主线程创建新线程后,可以调用join函数等待新线程终止,当新线程终止时join函数就会自动清理线程相关的资源。
join函数清理线程的相关资源后,thread对象与已销毁的线程就没有关系了,因此一个线程对象一般只会使用一次join,否则程序会崩溃。比如:
void func(int n)
{for (int i = 0; i <= n; i++){cout << i << endl;}
}
int main()
{thread t(func, 20);t.join();t.join(); //程序崩溃return 0;
}
但如果一个线程对象join后,又调用移动赋值函数,将一个右值线程对象的关联线程的状态转移过来了,那么这个线程对象又可以调用一次join。比如:
void func(int n)
{for (int i = 0; i <= n; i++){cout << i << endl;}
}
int main()
{thread t(func, 20);t.join();t = thread(func, 30);t.join();return 0;
}
但采用join的方式结束线程,在某些场景下也可能会出现问题。比如在该线程被join之前,如果中途因为某些原因导致程序不再执行后续代码,这时这个线程将不会被join
void func(int n)
{for (int i = 0; i <= n; i++){cout << i << endl;}
}
bool DoSomething()
{return false;
}
int main()
{thread t(func, 20);//...if (!DoSomething())return -1;//...t.join(); //不会被执行return 0;
}
因此采用join方式结束线程时,join的调用位置非常关键,为了避免上述问题,可以采用RAII的方式对线程对象进行封装,也就是利用对象的生命周期来控制线程资源的释放。比如:
class myThread
{
public:myThread(thread& t):_t(t){}~myThread(){if (_t.joinable())_t.join();}//防拷贝myThread(myThread const&) = delete;myThread& operator=(const myThread&) = delete;
private:thread& _t;
};
- 每当创建一个线程对象后,就用myThread类对其进行封装产生一个myThread对象
- 当myThread对象生命周期结束时就会调用析构函数,在析构中会通过
joinable判断这个线程是否需要被join,如果需要那么就会调用join对其该线程进行等待。
例如刚才的代码中,使用myThread类对线程对象进行封装后,就能保证线程一定会被join
int main()
{thread t(func, 20);myThread mt(t); //使用myThread对线程对象进行封装//...if (!DoSomething())return -1;//...t.join();return 0;
}
detach方式
主线程创建新线程后,也可以调用detach函数将新线程与主线程进行分离,分离后新线程会在后台运行,其所有权和控制权将会交给C++运行库,此时C++运行库会保证当线程退出时,其相关资源能够被正确回收。
- 使用
detach的方式回收线程的资源,一般在线程对象创建好之后就立即调用detach函数 - 否则线程对象可能会因为某些原因,在后续调用
detach函数分离线程之前被销毁掉,这时就会导致程序崩溃 - 因为当线程对象被销毁时会调用thread的析构函数,而在thread的析构函数中会通过
joinable判断这个线程是否需要被join,如果需要那么就会调用terminate终止当前程序(程序崩溃)
1.4 原子性操作库(atomic)

多线程最主要的问题是共享数据带来的问题(即线程安全)
当一个或多个线程要修改共享数据时,就会产生很多潜在的麻烦
#include<iostream>
#include<thread>
#include<mutex>
#include<condition_variable>
#include<vector>
#include<atomic>
using namespace std;int main()
{mutex mtx;atomic<int> x = 0;// int x = 0;int n = 1000000;int m;cin >> m;vector<thread> v(m);for (int i = 0; i < m; ++i){// 移动赋值给vector中线程对象v[i] = thread([&](){for (int i = 0; i < n; ++i){// t1 t2 t3 t4++x;}});}for (auto& t : v){t.join();}cout << x << endl;return 0;
}


- C++98中传统的解决方式:可以对共享修改的数据加锁保护
- 加锁的问题: 这个线程执行的时候, 其他线程就会被阻塞,会影响程序运行的效率,而且锁如果控制不好,还容易造成死锁。
-
C++11中使用atomic类模板,定义出需要的任意原子类型
-
程序员不需要对原子类型变量进行加锁解锁操作,线程能够对原子类型变量互斥的访问。
-
注意
#include <atomic>
int main()
{atomic<int> a1(0);//atomic<int> a2(a1);   // 编译失败atomic<int> a2(0);//a2 = a1;               // 编译失败return 0;
}- 原子类型通常属于"资源型"数据,多个线程只能访问单个原子类型的拷贝,
- 因此在C++11 中,原子类型只能从其模板参数中进行构造,不允许原子类型进行拷贝构造、移动构造以及 operator=等,为了防止意外,标准库已经将atmoic模板类中的拷贝构造、移动构造、赋值运算符重载默认删除掉了
1.5 lock_guard与unique_lock
在多线程环境下,原子性只能保证某个变量的安全性
在多线程环境下,而需要保证一段代码的安全性,就只能通过加锁的方式实现
lock_guard
#include<iostream>
#include<thread>
#include<mutex>
#include<condition_variable>
#include<vector>
#include<atomic>
using namespace std;//RAII
template<class Lock>
class LockGuard
{
public:LockGuard(Lock& lk):_lock(lk){_lock.lock();cout << "thread:" << this_thread::get_id() << "加锁" << endl;}~LockGuard(){cout << "thread:" << this_thread::get_id() << "解锁" << endl << endl;_lock.unlock();}
private:Lock& _lock;// 成员变量是引用
};int main()
{mutex mtx;atomic<int> x = 0;//int x = 0;int n = 100;int m;cin >> m;vector<thread> v(m);for (int i = 0; i < m; ++i){// 移动赋值给vector中线程对象v[i] = thread([&](){for (int i = 0; i < n; ++i){{lock_guard<mutex> lk(mtx);cout << this_thread::get_id() << ":" << i << endl;}std::this_thread::sleep_for(std::chrono::milliseconds(100));}});}for (auto& t : v){t.join();}cout << x << endl;return 0;
}
- lock_guard类模板主要是通过RAII的方式,对其管理的互斥量进行了封装
-
调用构造函数成功上锁,出作用域前,lock_guard对象要被销毁,调用析构函数自动解锁,可以有效避免死锁问题。
-
lock_guard的缺陷:太单一,用户没有办法对该锁进行控制
unique_lock
与lock_guard不同的是,unique_lock更加的灵活,提供了更多的成员函数:
- 上锁/解锁操作:lock、try_lock、try_lock_for、try_lock_until和unlock
- 修改操作:移动赋值、交换(swap:与另一个unique_lock对象互换所管理的互斥量所有 权)、释放(release:返回它所管理的互斥量对象的指针,并释放所有权)
- 获取属性:owns_lock(返回当前对象是否上了锁)、operator bool()(与owns_lock()的功能相 同)、mutex(返回当前unique_lock所管理的互斥量的指针)。
1.6 条件变量库(condition_variable)
condition_variable中提供的成员函数,可分为wait系列和notify系列两类。
wait系列成员函数
wait系列成员函数的作用就是让调用线程进行阻塞等待,包括wait、wait_for和wait_until。
下面先以wait为例进行介绍,wait函数提供了两个不同版本的接口:
//版本一
void wait(unique_lock<mutex>& lck);
//版本二
template<class Predicate>
void wait(unique_lock<mutex>& lck, Predicate pred);
- 调用第一个版本的wait函数时只需要传入一个互斥锁,线程调用wait后会立即被阻塞,直到被唤醒。
- 调用第二个版本的wait函数时除了需要传入一个互斥锁,还需要传入一个返回值类型为bool的可调用对象,与第一个版本的wait不同的是,当线程被唤醒后还需要调用传入的可调用对象,如果可调用对象的返回值为false,那么该线程还需要继续被阻塞。
注意: 调用wait系列函数时,传入互斥锁的类型必须是unique_lock。
notify系列成员函数
notify系列成员函数的作用就是唤醒等待的线程,包括notify_one和notify_all
notify_one:唤醒等待队列中的首个线程,如果等待队列为空则什么也不做。-
notify_all:唤醒等待队列中的所有线程,如果等待队列为空则什么也不做
注意: 条件变量下可能会有多个线程在进行阻塞等待,这些线程会被放到一个等待队列中进行排队
1.7 实现两个线程交替打印1-100
#include<iostream>
#include<thread>
#include<mutex>
#include<condition_variable>
#include<vector>
#include<atomic>
using namespace std;int main()
{int i = 0;int n = 100;mutex mtx;thread t1([&](){while (i < n){mtx.lock();cout << this_thread::get_id() << ":" << i << endl;i += 1;mtx.unlock();}});this_thread::sleep_for(chrono::microseconds(100));thread t2([&](){while (i < n){mtx.lock();cout << this_thread::get_id() << ":" << i << endl;i += 1;mtx.unlock();}});t1.join();t2.join();return 0;
}
- 在线程切换的中间时间也会发现线程竞争抢锁的问题
正确解决方案(条件变量)


#include<iostream>
#include<thread>
#include<mutex>
#include<condition_variable>
#include<vector>
#include<atomic>
using namespace std;int main()
{int i = 0;int n = 100;mutex mtx;condition_variable cv;// 条件变量bool ready = true;// t1打印奇数thread t1([&](){while (i < n){{unique_lock<mutex> lock(mtx);cv.wait(lock, [&ready](){return !ready; });// 等待线程cout << "t1--" << this_thread::get_id() << ":" << i << endl;i += 1;ready = true;cv.notify_one();// 解除线程等待}//this_thread::yield();this_thread::sleep_for(chrono::microseconds(100));}});// t2打印偶数thread t2([&]() {while (i < n){unique_lock<mutex> lock(mtx);cv.wait(lock, [&ready](){return ready; });cout <<"t2--"<<this_thread::get_id() << ":" << i << endl;i += 1;ready = false;cv.notify_one();}});this_thread::sleep_for(chrono::seconds(3));cout << "t1:" << t1.get_id() << endl;cout << "t2:" << t2.get_id() << endl;t1.join();t2.join();return 0;
}
- cv.wait(lock, [&ready]() {return !ready; });
- 当ready返回的是false时,这个线程就会阻塞
- 阻塞当前线程,并自动调用lock.unlock(),允许其他锁定的线程继续执行
- cv.notify_one();
- 唤醒当前线程并自动调用lock.lock();就只允许自己一个线程执行
1.8 shared_ptr的多线程问题
#include<iostream>
#include<thread>
#include<mutex>
#include<vector>
#include<atomic>
#include<memory>
using namespace std;namespace bit
{template<class T>class shared_ptr{public:shared_ptr(T* ptr = nullptr):_ptr(ptr), _pRefCount(new int(1)), _pMutex(new mutex){}shared_ptr(const shared_ptr<T>& sp):_ptr(sp._ptr), _pRefCount(sp._pRefCount), _pMutex(sp._pMutex){AddRef();}void Release(){bool flag = false;_pMutex->lock();if (--(*_pRefCount) == 0 && _ptr){cout << "delete:" << _ptr << endl;delete _ptr;delete _pRefCount;flag = true;}_pMutex->unlock();if (flag)delete _pMutex;}void AddRef(){_pMutex->lock();++(*_pRefCount);_pMutex->unlock();}shared_ptr<T>& operator=(const shared_ptr<T>& sp){if (_ptr != sp._ptr){Release();_ptr = sp._ptr;_pRefCount = sp._pRefCount;_pMutex = sp._pMutex;AddRef();}return *this;}int use_count(){return *_pRefCount;}~shared_ptr(){Release();}// 像指针一样使用T& operator*(){return *_ptr;}T* operator->(){return _ptr;}T* get() const{return _ptr;}private:T* _ptr;int* _pRefCount;// 使用时需要加锁mutex* _pMutex;// 锁指针};
}int main()
{// shared_ptr是线程安全的吗?bit::shared_ptr<double> sp1(new double(1.11));bit::shared_ptr<double> sp2(sp1);mutex mtx;vector<thread> v(2);int n = 100000;for (auto& t : v){t = thread([&](){for (size_t i = 0; i < n; ++i){// 拷贝是线程安全的bit::shared_ptr<double> sp(sp1);// 访问资源不是mtx.lock();(*sp)++;mtx.unlock();}});}for (auto& t : v){t.join();}cout << sp1.use_count() << endl;cout << *sp1 << endl;return 0;
}-
在多线程中,shared_ptr也应该对自己的引用计数进行加锁处理
- 在多线程中, shared_ptr的拷贝是线程安全的,但访问资源不是,所以访问资源也需要加锁
1.9 单例模式的多线程问题
#include<iostream>
#include<thread>
#include<mutex>
using namespace std;
class Singleton
{
public:static Singleton* GetInstance(){// 保护第一次,后续不需要加锁// 双检查加锁if (_pInstance == nullptr){unique_lock<mutex> lock(_mtx);if (_pInstance == nullptr){_pInstance = new Singleton;}}return _pInstance;}private:// 构造函数私有Singleton(){};// C++11Singleton(Singleton const&) = delete;Singleton& operator=(Singleton const&) = delete;static Singleton* _pInstance;static mutex _mtx;
};Singleton* Singleton::_pInstance = nullptr;
mutex Singleton::_mtx; int main()
{Singleton::GetInstance();Singleton::GetInstance();return 0;
}- 在多线程的情况下, 第一次创建对象时也是需要加锁保护的
巧妙的解决方案
#include<iostream>
#include<thread>
#include<mutex>
using namespace std;class Singleton
{
public:static Singleton* GetInstance(){static Singleton _s;// 局部的静态对象,第一次调用时初始化return &_s;}private:// 构造函数私有Singleton() {};// C++11Singleton(Singleton const&) = delete;Singleton& operator=(Singleton const&) = delete;
};int main()
{Singleton::GetInstance();Singleton::GetInstance();return 0;
}- 局部的静态对象,第一次调用时初始化
- 在C++11之前是不能保证线程安全的
静态对象的构造函数调用初始化并不能保证线程安全的原子性 - C++11的时候修复了这个问题,所以这种写法,只能在支持C++11以后的编译器上玩
第四节 日期类
1. 日期类的实现
class Date
{
public:// 构造函数Date(int year = 0, int month = 1, int day = 1);// 打印函数void Print() const;// 日期+=天数Date& operator+=(int day);// 日期+天数Date operator+(int day) const;// 日期-=天数Date& operator-=(int day);// 日期-天数Date operator-(int day) const;// 前置++Date& operator++();// 后置++Date operator++(int);// 前置--Date& operator--();// 后置--Date operator--(int);// 日期的大小关系比较bool operator>(const Date& d) const;bool operator>=(const Date& d) const;bool operator<(const Date& d) const;bool operator<=(const Date& d) const;bool operator==(const Date& d) const;bool operator!=(const Date& d) const;// 日期-日期int operator-(const Date& d) const;// 析构,拷贝构造,赋值重载可以不写,使用默认生成的即可private:int _year;int _month;int _day;
};
1.1 构造函数
// 获取某年某月的天数
inline int GetMonthDay(int year, int month)
{// 数组存储平年每个月的天数static int dayArray[13] = { 0, 31, 28, 31, 30, 31, 30, 31, 31, 30, 31, 30, 31 };int day = dayArray[month];if (month == 2 && ((year % 4 == 0 && year % 100 != 0) || (year % 400 == 0))){//闰年2月的天数day = 29;}return day;
}
// 构造函数
Date::Date(int year, int month, int day)
{// 检查日期的合法性if (year >= 0&& month >= 1 && month <= 12&& day >= 1 && day <= GetMonthDay(year, month)){_year = year;_month = month;_day = day;}else{// 严格来说抛异常更好cout << "非法日期" << endl;cout << year << "年" << month << "月" << day << "日" << endl;}
}
- GetMonthDay函数会被多次调用,所以最好设置成内联函数
- 且该函数中的月天数用static修饰,避免每次调用该函数都需要重新开辟数组。
- 当函数声明和定义分开时,在声明时注明缺省参数,定义时不标出缺省参数
1.2 打印函数
// 打印函数
void Date::Print() const
{cout << _year << "年" << _month << "月" << _day << "日" << endl;
}
1.3 日期 += 天数
// 日期+=天数
Date& Date::operator+=(int day)
{if (day<0){// 复用operator-=*this -= -day;}else{_day += day;// 日期不合法,通过不断调整,直到最后日期合法为止while (_day > GetMonthDay(_year, _month)){_day -= GetMonthDay(_year, _month);_month++;if (_month > 12){_year++;_month = 1;}}}return *this;
}
-
首先判断日期是否合法
-
若日已满,则日减去当前月的天数,月加一
-
若月已满,则将年加一,月置为1
1.4 日期 + 天数
// 日期+天数
Date Date::operator+(int day) const
{Date tmp(*this);// 拷贝构造tmp,用于返回// 复用operator+=tmp += day;return tmp;
}
- 复用代码
1.5 日期 -= 天数
// 日期-=天数
Date& Date::operator-=(int day)
{if (day < 0){// 复用operator+=*this += -day;}else{_day -= day;// 日期不合法,通过不断调整,直到最后日期合法为止while (_day <= 0){_month--;if (_month == 0){_year--;_month = 12;}_day += GetMonthDay(_year, _month);}}return *this;
}
-
首先判断日期是否合法
-
若日为负数,则月减一
- 若月为0,则年减一,月置为12
- 日加上当前月的天数
1.6 日期 - 天数
// 日期-天数
Date Date::operator-(int day) const
{Date tmp(*this);// 拷贝构造tmp,用于返回// 复用operator-=tmp -= day;return tmp;
}
- 复用代码
1.8 自增自减运算符的实现
前置++
// 前置++
Date& Date::operator++()
{// 复用operator+=*this += 1;return *this;
}
- 复用代码
后置 ++
// 后置++
Date Date::operator++(int)
{Date tmp(*this);// 拷贝构造tmp,用于返回// 复用operator+=*this += 1;return tmp;
}
- 注意: 后置++需要多给一个参数
- 复用代码
前置 - -
// 前置--
Date& Date::operator--()
{// 复用operator-=*this -= 1;return *this;
}
- 复用代码
后置 - -
// 后置--
Date Date::operator--(int)
{Date tmp(*this);// 拷贝构造tmp,用于返回// 复用operator-=*this -= 1;return tmp;
}
- 注意: 后置++需要多给一个参数
- 复用代码
1.9 比较运算符的实现
> 运算符的重载
bool Date::operator>(const Date& d) const
{if (_year > d._year){return true;}else if (_year == d._year){if (_month > d._month){return true;}else if (_month == d._month){if (_day > d._day){return true;}}}return false;
}
== 运算符的重载
bool Date::operator==(const Date& d) const
{return _year == d._year&&_month == d._month&&_day == d._day;
}
>= 运算符的重载
bool Date::operator>=(const Date& d) const
{return *this > d || *this == d;
}
< 运算符的重载
bool Date::operator<(const Date& d) const
{return !(*this >= d);
}
<= 运算符的重载
bool Date::operator<=(const Date& d) const
{return !(*this > d);
}
!= 运算符的重载
bool Date::operator!=(const Date& d) const
{return !(*this == d);
}
1.10 日期 - 日期
// 日期-日期
int Date::operator-(const Date& d) const
{Date max = *this;// 假设第一个日期较大Date min = d;// 假设第二个日期较小int flag = 1;// 此时结果应该为正值if (*this < d){// 假设错误,更正max = d;min = *this;flag = -1;// 此时结果应该为负值}int n = 0;// 记录所加的总天数while (min != max){min++;// 较小的日期++n++;// 总天数++}return n*flag;
}
说明一下:
- 让较小的日期的天数一直加一,直到最后和较大的日期相等即可
- 代码中使用flag变量标记返回值的正负,
flag为1代表返回的是正值,flag为-1代表返回的是值,
最后返回总天数与flag相乘之后的值即可。