Arduino入门教程:5、按键输入
飞书文档![]() https://x509p6c8to.feishu.cn/docx/HrdjdmclEobLNPxQvzqc29zNned
https://x509p6c8to.feishu.cn/docx/HrdjdmclEobLNPxQvzqc29zNned
一、应用场景:
轻触开关、按键、电容开关、光栅传感器、微动、关电开关
二、原理:
通过IO读取引脚的电平,判断是否有信号触发。
什么是电压?什么是电平?高电平?低电平?
以TTL电路为例:
TTL电源电压是3.3V,高电平是2.4V--3.3V,低电平0V--0.8V,按照惯例,使用1来表示高电平,使用0表示低电平。
按键输入
接线:
参考代码:
#include <Arduino.h>//34 35 36 39仅可以作为输入INPUT,不支持INPUT_PULLUP
#define PIN_KEY 5void setup() {// put your setup code here, to run once:Serial.begin(9600);//设置为上拉输入,初始化后默认电平为高pinMode(PIN_KEY, INPUT_PULLUP); Serial.print("setup\n");
}void loop() {// put your main code here, to run repeatedly:// 此处进行按键去抖if(digitalRead(PIN_KEY)==LOW){Serial.print("KEY Click\n");delay(1000);}
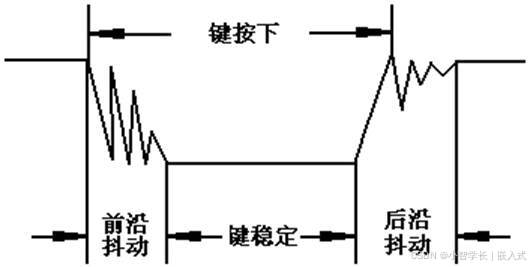
}按键消抖
#include <Arduino.h>//34 35 36 39仅可以作为输入INPUT,不支持INPUT_PULLUP
#define PIN_KEY 5void setup() {// put your setup code here, to run once:Serial.begin(9600);//设置为上拉输入,初始化后默认电平为高pinMode(PIN_KEY, INPUT_PULLUP); Serial.print("setup\n");
}void loop() {// put your main code here, to run repeatedly:// 此处进行按键去抖if(digitalRead(PIN_KEY)==LOW){delay(10);if(digitalRead(PIN_KEY)==LOW){Serial.print("KEY Click\n");delay(1000);}}
}与LED联动
接线:
参考代码:
#include <Arduino.h>//34 35 36 39仅可以作为输入INPUT,不支持INPUT_PULLUP
#define PIN_KEY 5
#define PIN_LED 18uint8_t button_presses = 0;void setup() {// put your setup code here, to run once:Serial.begin(9600);pinMode(PIN_KEY, INPUT_PULLUP); pinMode(PIN_LED, OUTPUT);Serial.print("setup\n");
}void loop() {// put your main code here, to run repeatedly:if(digitalRead(PIN_KEY)==LOW){digitalWrite(PIN_LED, HIGH);}else{digitalWrite(PIN_LED, LOW);}
}