征程 6E/M|如何解决量化部署时 mul 与 bool 类型数据交互的问题
一、引言
使用 征程 6 工具链进行量化部署时,涉及 bool 类型数据计算时,会有一些与全 float 计算不同的情况,需要特别注意。
本文将重点结合 PyTorch 的 torch.mul(逐元素相乘)以及张量的 类型提升(Type Promotion) 规则,分析在 征程 6 工具链上 量化部署时 mul 与 bool 类型数据交互的问题。
二、bool 计算示例
在 PyTorch 中,bool 类型的数据用于表示 掩码(mask),常见的操作包括 torch.logical_not()、比较运算符(如 ==)等。当 bool 类型数据与其他数据类型进行算术运算时,PyTorch 会遵循 类型提升(Type Promotion) 规则,将 bool 转换为更高精度的数值类型。例如:
import torch
x = torch.tensor([1.0, 2.0, 3.0])
y = torch.tensor([True, False, True])
result = x * y  # 逐元素相乘
print(result)  # tensor([1., 0., 3.])
print(result.dtype)  # torch.float32
在这个例子中,bool 类型的 y 在计算时被提升为 float32 类型,因此计算结果仍然是 float32。
torch.mul 官方文档里确实没明确说支持 bool 类型输入(官网链接),但 PyTorch 底层的张量操作支持 bool,是一种 隐式支持,官方文档默认大家了解 PyTorch 的 类型提升(type promotion)规则。
三、模型中 bool 量化问题分析
在量化模型中,当 bool 数据在计算过程中发生类型提升,特别是浮点数过了 quant,再进行比较,可能会出现很大的量化误差。代码示例如下:
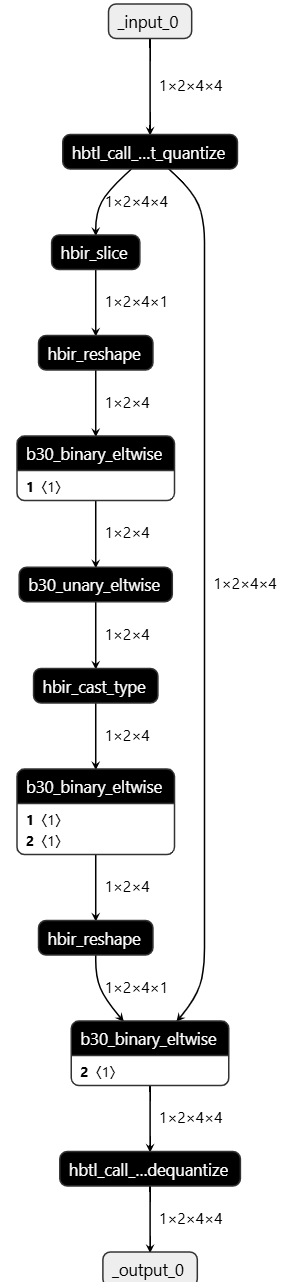
class small_model(nn.Module):def __init__(self):super(small_model, self).__init__()self.quant = QuantStub()self.dequant = DeQuantStub()def forward(self, actors_input):actors_input = self.quant(actors_input)print("actors_input:", actors_input)# actors_mask = torch.logical_not(actors_input[:, :, :, -1] == 0)    # 一定程度上正确写法actors_mask = actors_input[:, :, :, -1] == 1     # 错误写法,会导致 calib 指标崩掉print("actors_mask", actors_mask)print("actors_mask shape:", actors_mask.shape)print("actors_mask[:, :, :, None] shape:", actors_mask[:, :, :, None]。shape)actors_output = actors_input * actors_mask[:, :, :, None]return self.dequant(actors_output)model = small_model()## ================================================================#
# 生成随机数据
# torch.manual_seed(41)
# actors_data = torch.randn(1, 2, 4, 3)
# actors_mask = torch.randint(0, 2, (1, 2, 4, 1), dtype=torch.bool)
# example_input = torch.cat([actors_data, actors_mask], dim=-1)
example_input = torch.tensor([[[[ 0.2465, -0.4717, 60.5,  1.0000],[-0.2124,  0.5660, -1.6637,  0.0000],[ 0.3338,  1.6051, -1.5088,  1.0000],[-0.9215, -0.5901,  1.4871,  0.0000]],[[ 0.1650, -0.3785,  1.6710,  0.0000],[-0.3752,  0.2337,  0.4186,  0.0000],[-0.2221, -0.1745, -0.6064,  1.0000],[ 0.9174, -0.6317,  0.6133,  1.0000]]]])
print("example_input:", example_input)
## ================================================================#
output = model(example_input)
print("float output:", output)
使用 actors_mask = actors_data[:, :, :, -1] == 1 来生成布尔掩码。
example_input: tensor([[[[ 0.2465, -0.4717, 60.5,  1.0000],[-0.2124,  0.5660, -1.6637,  0.0000],[ 0.3338,  1.6051, -1.5088,  1.0000],[-0.9215, -0.5901,  1.4871,  0.0000]],[[ 0.1650, -0.3785,  1.6710,  0.0000],[-0.3752,  0.2337,  0.4186,  0.0000],[-0.2221, -0.1745, -0.6064,  1.0000],[ 0.9174, -0.6317,  0.6133,  1.0000]]]])
actors_input: tensor([[[[ 0.2465, -0.4717, 60.5,  1.0000],[-0.2124,  0.5660, -1.6637,  0.0000],[ 0.3338,  1.6051, -1.5088,  1.0000],[-0.9215, -0.5901,  1.4871,  0.0000]],[[ 0.1650, -0.3785,  1.6710,  0.0000],[-0.3752,  0.2337,  0.4186,  0.0000],[-0.2221, -0.1745, -0.6064,  1.0000],[ 0.9174, -0.6317,  0.6133,  1.0000]]]])
actors_mask tensor([[[ True, False,  True, False],[False, False,  True,  True]]])
actors_mask shape torch.Size([1, 2, 4])
actors_mask[:, :, :, None] shape torch.Size([1, 2, 4, 1])
float output: tensor([[[[ 0.2465, -0.4717, 60.5,  1.0000],[-0.0000,  0.0000, -0.0000,  0.0000],[ 0.3338,  1.6051, -1.5088,  1.0000],[-0.0000, -0.0000,  0.0000,  0.0000]],[[ 0.0000, -0.0000,  0.0000,  0.0000],[-0.0000,  0.0000,  0.0000,  0.0000],[-0.2221, -0.1745, -0.6064,  1.0000],[ 0.9174, -0.6317,  0.6133,  1.0000]]]])
打印的结果如上,可以看到,float 输出没有任何问题。
然而,在 量化模型 中,这种 bool mask 运算会由于微小的量化误差发生非常大的变化,原因在:
actors_data = self.quant(actors_data)
actors_mask = actors_data[:, :, :, -1] == 1
数值 1 经过量化反量化后,可能会产生一个或多个 scale 的误差,原本是 1 的位置就不再是 1 了,会变成 0.9x 或 1.0x,这样就==1 就不再是 True 了。

打印看到 actors_mask 全部均为 False。
=========set_fake_quantize(calib_model, FakeQuantState.VALIDATION)=========
actors_input: QTensor(data = tensor([[[[ 0.2474, -0.4708, 60.4991,  1.0007],[-0.2123,  0.5668, -1.6636,  0.0000],[ 0.3342,  1.6045, -1.5085,  1.0007],[-0.9213, -0.5908,  1.4863,  0.0000]],[[ 0.1643, -0.3785,  1.6709,  0.0000],[-0.3748,  0.2345,  0.4191,  0.0000],[-0.2216, -0.1754, -0.6056,  1.0007],[ 0.9176, -0.6314,  0.6130,  1.0007]]]]),scale = tensor([0.0018]),zero_point = tensor([0]),dtype = qint16,per_channel_axis = -1,is_quantized = False
)
actors_mask tensor([[[False, False, False, False],[False, False, False, False]]])
actors_mask shape: torch.Size([1, 2, 4])
actors_mask[:, :, :, None] shape: torch.Size([1, 2, 4, 1])
calib_model out: tensor([[[[0., 0., 0., 0.],[0., 0., 0., 0.],[0., 0., 0., 0.],[0., 0., 0., 0.]],[[0., 0., 0., 0.],[0., 0., 0., 0.],[0., 0., 0., 0.],[0., 0., 0., 0.]]]])
这种结果明显是不符合预期的。
四、bool 量化问题解决
怎么修改呢?如下所示
actors_mask = torch.logical_not(actors_data[:, :, :, -1] == 0) # 一定程度上正确写法# actors_mask = actors_data[:, :, :, -1] == 1 # 错误写法,会导致calib指标崩掉
0 经过对称量化,依旧是 0,再经过 logical_not 即可。此时输出变为:结果是正确的。
=========set_fake_quantize(calib_model, FakeQuantState.VALIDATION)=========
actors_input: QTensor(data = tensor([[[[ 0.2474, -0.4708, 60.4991,  1.0007],[-0.2123,  0.5668, -1.6636,  0.0000],[ 0.3342,  1.6045, -1.5085,  1.0007],[-0.9213, -0.5908,  1.4863,  0.0000]],[[ 0.1643, -0.3785,  1.6709,  0.0000],[-0.3748,  0.2345,  0.4191,  0.0000],[-0.2216, -0.1754, -0.6056,  1.0007],[ 0.9176, -0.6314,  0.6130,  1.0007]]]]),scale = tensor([0.0018]),zero_point = tensor([0]),dtype = qint16,per_channel_axis = -1,is_quantized = False
)
actors_mask tensor([[[ True, False,  True, False],[False, False,  True,  True]]])
actors_mask shape: torch.Size([1, 2, 4])
actors_mask[:, :, :, None] shape: torch.Size([1, 2, 4, 1])
calib_model out: tensor([[[[ 0.2474, -0.4708, 60.4991,  1.0007],[ 0.0000,  0.0000,  0.0000,  0.0000],[ 0.3342,  1.6045, -1.5085,  1.0007],[ 0.0000,  0.0000,  0.0000,  0.0000]],[[ 0.0000,  0.0000,  0.0000,  0.0000],[ 0.0000,  0.0000,  0.0000,  0.0000],[-0.2216, -0.1754, -0.6056,  1.0007],[ 0.9176, -0.6314,  0.6130,  1.0007]]]])
这种方案一定正确吗?答案:不一定是正确的,需要考虑极值问题。另外,由于 mul 不支持输入为 bool 类型,这儿还会出现 cpu 算子问题。

生成的 quantized.onnx 可以看到,确实 mul 运行在 cpu 上。
4.1 CPU 算子问题
主要原因是:右侧工具自动进行:bool->float32
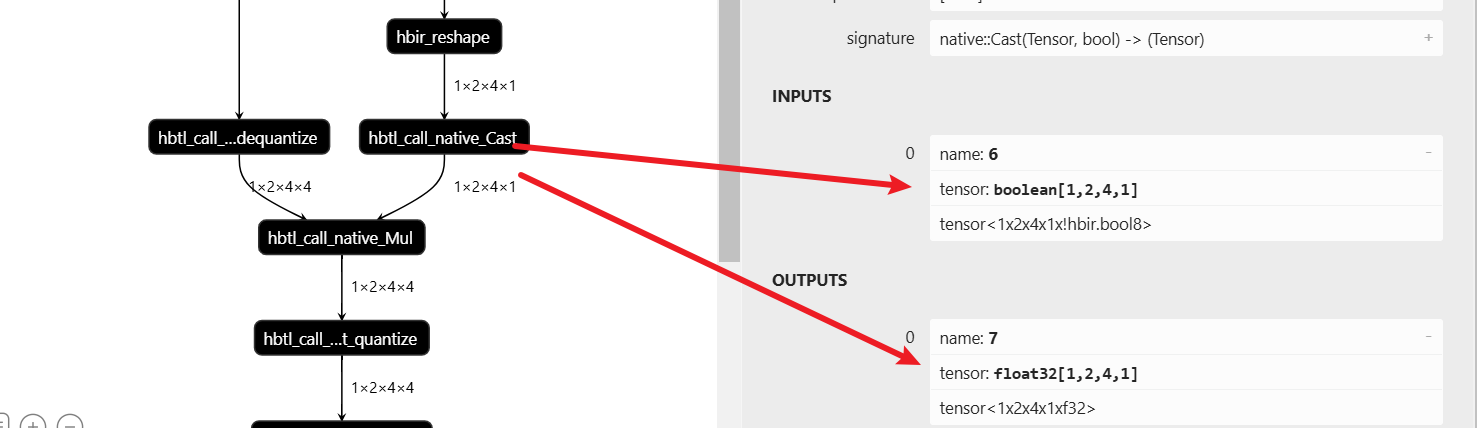
第一个思路是:直接将 actors_mask 转 torch.int16,
actors_mask = torch.logical_not(actors_input[:, :, :, -1] == 0).to(torch.int16)
这样是不行的。因为过了 quant 的 actors_input 是 Qtensor,而。to(torch.int16)强转的 actors_mask 是常规 torch tensor,这也是不行的。
接着就可以想到,应该转 float,然后过 quant,修改如下:
actors_mask = torch.logical_not(actors_input[:, :, :, -1] == 0).to(torch.float) # 一定程度上正确写法actors_mask = self.quant_mask(actors_mask)
此时 mul 左右两边都是 qtensor,打印信息如下:
=========set_fake_quantize(calib_model, FakeQuantState.VALIDATION)=========
actors_input: QTensor(data = tensor([[[[ 0.2474, -0.4708, 60.4991,  1.0007],[-0.2123,  0.5668, -1.6636,  0.0000],[ 0.3342,  1.6045, -1.5085,  1.0007],[-0.9213, -0.5908,  1.4863,  0.0000]],[[ 0.1643, -0.3785,  1.6709,  0.0000],[-0.3748,  0.2345,  0.4191,  0.0000],[-0.2216, -0.1754, -0.6056,  1.0007],[ 0.9176, -0.6314,  0.6130,  1.0007]]]]),scale = tensor([0.0018]),zero_point = tensor([0]),dtype = qint16,per_channel_axis = -1,is_quantized = False
)
actors_mask QTensor(data = tensor([[[1.0000, 0.0000, 1.0000, 0.0000],[0.0000, 0.0000, 1.0000, 1.0000]]]),scale = tensor([3.0518e-05]),zero_point = tensor([0]),dtype = qint16,per_channel_axis = -1,is_quantized = False
)
actors_mask shape: (1, 2, 4)
actors_mask[:, :, :, None] shape: (1, 2, 4, 1)
calib_model out: tensor([[[[ 0.2474, -0.4708, 60.4972,  1.0007],[ 0.0000,  0.0000,  0.0000,  0.0000],[ 0.3342,  1.6045, -1.5085,  1.0007],[ 0.0000,  0.0000,  0.0000,  0.0000]],[[ 0.0000,  0.0000,  0.0000,  0.0000],[ 0.0000,  0.0000,  0.0000,  0.0000],[-0.2216, -0.1754, -0.6056,  1.0007],[ 0.9176, -0.6314,  0.6130,  1.0007]]]])
可以看到,是全一段 BPU。
在不考虑极值的影响下,改动完成,此时代码如下:
class small_model(nn.Module):def __init__(self):super(small_model, self).__init__()self.quant = QuantStub()self.dequant = DeQuantStub()self.quant_mask = QuantStub()def forward(self, actors_input):actors_input = self.quant(actors_input)actors_mask = torch.logical_not(actors_input[:, :, :, -1] == 0).to(torch.float)    # 一定程度上正确写法actors_mask = self.quant_mask(actors_mask)actors_output = actors_input * actors_mask[:, :, :, None]  # + - * /return self.dequant(actors_output)model = small_model()## ================================================================#
# 生成随机数据
# torch.manual_seed(41)
# actors_data = torch.randn(1, 2, 4, 3)
# actors_mask = torch.randint(0, 2, (1, 2, 4, 1), dtype=torch.bool)
# example_input = torch.cat([actors_data, actors_mask], dim=-1)
example_input = torch.tensor([[[[ 0.2465, -0.4717, 60.5,  1.0000],[-0.2124,  0.5660, -1.6637,  0.0000],[ 0.3338,  1.6051, -1.5088,  1.0000],[-0.9215, -0.5901,  1.4871,  0.0000]],[[ 0.1650, -0.3785,  1.6710,  0.0000],[-0.3752,  0.2337,  0.4186,  0.0000],[-0.2221, -0.1745, -0.6064,  1.0000],[ 0.9174, -0.6317,  0.6133,  1.0000]]]])
print("example_input:", example_input)
## ================================================================#
output = model(example_input)
print("float output:", output)
4.2 极值问题
- bool 被其他极大值 影响
如果模型输入 actors_input 有极大值存在,例如 70000,int16 量化,会将 actors_mask 原本是 1 的地方给变为 0,量化输出示例如下:
=========set_fake_quantize(calib_model, FakeQuantState.VALIDATION)=========
actors_input: QTensor(data = tensor([[[[ 0.0000e+00,  0.0000e+00,  6.9999e+04,  0.0000e+00],[ 0.0000e+00,  0.0000e+00, -2.1363e+00,  0.0000e+00],[ 0.0000e+00,  2.1363e+00, -2.1363e+00,  0.0000e+00],[ 0.0000e+00,  0.0000e+00,  2.1363e+00,  0.0000e+00]],[[ 0.0000e+00,  0.0000e+00,  2.1363e+00,  0.0000e+00],[ 0.0000e+00,  0.0000e+00,  0.0000e+00,  0.0000e+00],[ 0.0000e+00,  0.0000e+00,  0.0000e+00,  0.0000e+00],[ 0.0000e+00,  0.0000e+00,  0.0000e+00,  0.0000e+00]]]]),scale = tensor([2.1363]),zero_point = tensor([0]),dtype = qint16,per_channel_axis = -1,is_quantized = False
)
actors_mask QTensor(data = tensor([[[0., 0., 0., 0.],[0., 0., 0., 0.]]]),scale = tensor([3.0518e-05]),zero_point = tensor([0]),dtype = qint16,per_channel_axis = -1,is_quantized = False
)
calib_model out: tensor([[[[0., 0., 0., 0.],[0., 0., 0., 0.],[0., 0., 0., 0.],[0., 0., 0., 0.]],[[0., 0., 0., 0.],[0., 0., 0., 0.],[0., 0., 0., 0.],[0., 0., 0., 0.]]]])
根据量化公式:
quantized=clamp(round(float/scale),qmin,qmax)
float:浮点数 数据,即 fp32(32-bit 浮点数)表示的张量值。
scale:缩放因子(scale factor),用于将浮点数缩放到整数范围(量化尺度)。
round(float/scale):对缩放后的值进行四舍五入,得到量化的整数表示。
clamp(…, qmin, qmax):将量化值限制在 最小值 qmin 和 最大值 qmax 之间,防止溢出。
在这个示例中,scale = 70000/32767 = 2.1263。bool 类型的 1,经过量化:round(1 / 2.1263)=0,由于 round 舍入误差的存在,原来的 1 也被变为了 0,再经过反量化也拯救不了这个舍入误差了。
- bool 1 作为 极大值 的影响
如果模型输入 actors_data 都是非常小的数值,由于 bool 类型 1 的存在,会导致 1 成为极大值,影响量化 scale 的统计,继而影响其他数值的量化精细程度。
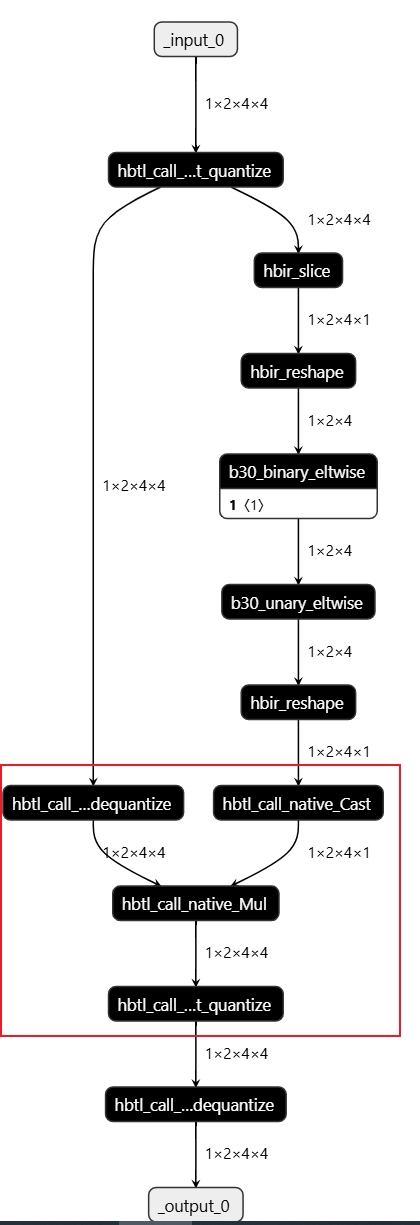
所以,最稳妥的方式,是将 actor_data 与 actor_mask 分开送入模型。actor_data 自己过 quant,actor_mask 自己过 quant_mask。
4.3 解决方案示例
- bool 类型已经变 为 0/1 的 float,可以这么写。需要注意,一定是只有 0 / 1 的 float,在模型中间也可以这么写。
class small_model(nn.Module):def __init__(self):super(small_model, self).__init__()self.quant = QuantStub()self.quant_mask = QuantStub()self.dequant = DeQuantStub()def forward(self, actors_input):actors_mask = actors_input[:, :, :, -1]actors_mask = self.quant_mask(actors_mask)  # 这种写法会导致模型输入位置有两个量化节点,且 scale 不同而删不掉, 未来用 vpu 可以这么写actors_data = actors_input[:,:,:,:-1]actors_data = self.quant(actors_data)       # 这种写法会导致模型输入位置有两个量化节点,且 scale 不同而删不掉, 未来用 vpu 可以这么写print("actors_data:", actors_data)print("actors_mask", actors_mask)actors_output = actors_data * actors_mask[:, :, :, None]  # + - * /return self.dequant(actors_output)model = small_model()## ================================================================#
# 生成随机数据
# torch.manual_seed(41)
# actors_data = torch.randn(1, 2, 4, 3)
# actors_mask = torch.randint(0, 2, (1, 2, 4, 1), dtype=torch.bool)
# example_input = torch.cat([actors_data, actors_mask], dim=-1)
example_input = torch.tensor([[[[ 0.2465, -0.4717, 70000,  1.0000],[-0.2124,  0.5660, -1.6637,  0.0000],[ 0.3338,  1.6051, -1.5088,  1.0000],[-0.9215, -0.5901,  1.4871,  0.0000]],[[ 0.1650, -0.3785,  1.6710,  0.0000],[-0.3752,  0.2337,  0.4186,  0.0000],[-0.2221, -0.1745, -0.6064,  1.0000],[ 0.9174, -0.6317,  0.6133,  1.0000]]]])
print("example_input:", example_input)
output = model(example_input)
print("float output:", output)

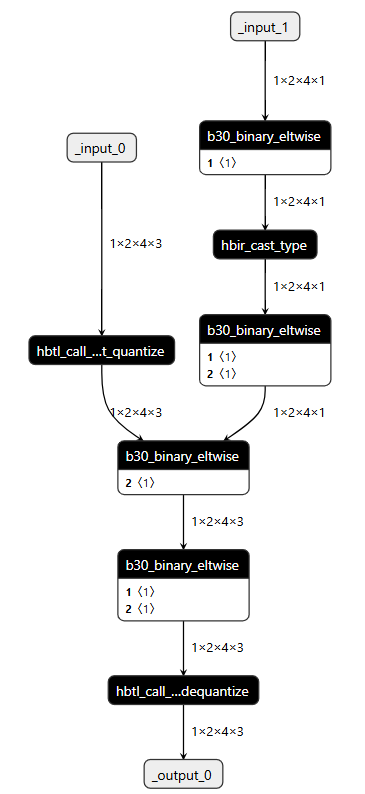
- 如果是模型首部,且确实是 bool 输入
class small_model(nn.Module):def __init__(self):super(small_model, self).__init__()self.quant = QuantStub()self.quant_mask = QuantStub()self.dequant = DeQuantStub()def forward(self, actors_input):actors_mask = actors_input["actors_mask"]actors_data = self.quant(actors_input["actors_data"])print("actors_data:", actors_data)print("actors_mask", actors_mask)actors_output = actors_data * self.quant_mask(actors_mask.to(torch.float)) # + - * /return self.dequant(actors_output)# 生成随机数据
torch.manual_seed(41)
actors_data = torch.randn(1, 2, 4, 3)
actors_mask = torch.randint(0, 2, (1, 2, 4, 1), dtype=torch.bool)
example_input = {"actors_data":actors_data, "actors_mask":actors_mask}
print("example_input:", example_input)
output = model(example_input)
print("float output:", output)
_output = actors_data * self.quant_mask(actors_mask.to(torch.float)) # + - * /
return self.dequant(actors_output)
生成随机数据
torch.manual_seed(41)
actors_data = torch.randn(1, 2, 4, 3)
actors_mask = torch.randint(0, 2, (1, 2, 4, 1), dtype=torch.bool)
example_input = {“actors_data”:actors_data, “actors_mask”:actors_mask}
print(“example_input:”, example_input)
output = model(example_input)
print(“float output:”, output)