Cursor配置python解释器方法
目录
一、直接下载python扩展
二、使用powershell配置版
问题:直接在终端使用conda命令不能执行
1.配置环境变量
2.修改脚本执行策略
3.验证修改有效性
三、附加内容
1.测试代码
2.预训练权重文件
3.一些数据集
一、直接下载python扩展
首先在应用拓展里面下载python扩展
然后右下角选择解释器
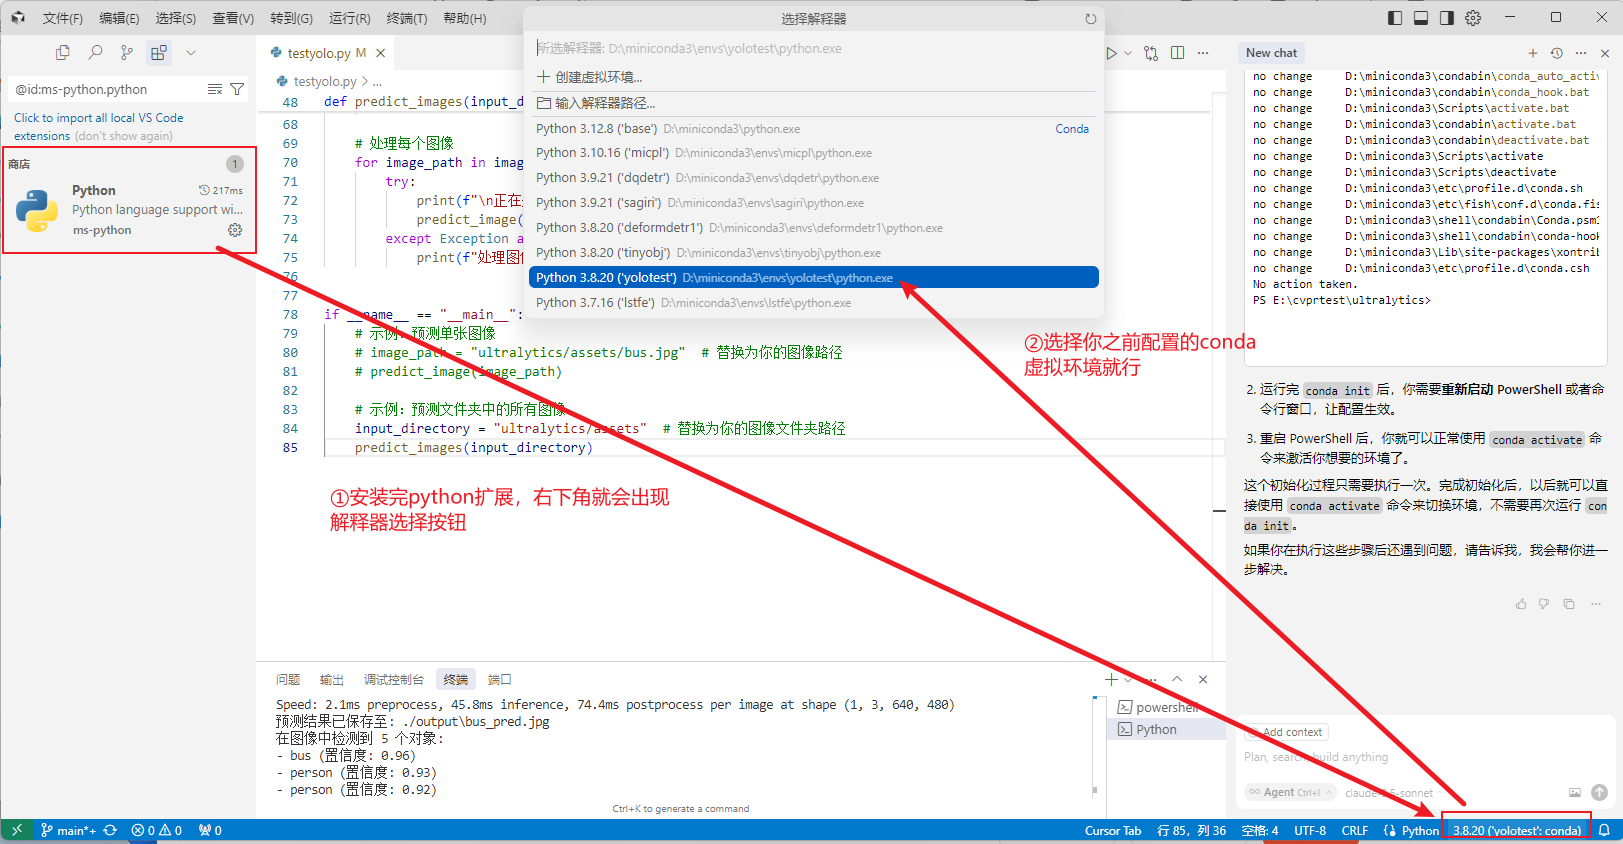
然后无论是使用脚本运行还是编译器运行都可以了!
在使用此方法之前我是通过Cursor内的power shell进行配置的,中间报了一些错误,我把解决过程放在第二章节内,有兴趣的同学可以看看。
二、使用powershell配置版
问题:直接在终端使用conda命令不能执行
1.配置环境变量
首先需要把conda环境配置到环境变量Path内:
(这里写你自己conda环境存放的地址,这里地址只是做一个演示)
D:\miniconda3\ScriptsD:\miniconda3\condabin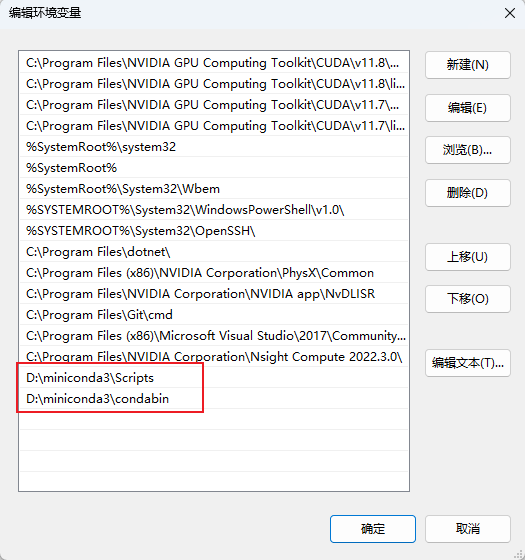
此时可能会报错:
无法加载文件 C:\Users\Administrator\Documents\WindowsPowerShell\profile.ps1,因为在此系统上禁止运行脚本。有关详细信息,请参阅 ht tps:/go.microsoft.com/fwlink/?LinkID=135170 中的 about_Execution_Policies。
那我们就需要修改一下系统设置:
2.修改脚本执行策略
还是在powershell终端,输入以下命令查看当前的执行策略:
Get-ExecutionPolicy默认情况下,可能显示 Restricted
输入以下命令来允许执行本地脚本:
Set-ExecutionPolicy RemoteSigned -Scope CurrentUser这个命令会将执行策略设置为 RemoteSigned,即允许本地脚本运行,但会要求来自互联网的脚本必须有签名。
3.验证修改有效性
关闭 PowerShell 窗口并重新打开它,执行以下命令来查看执行策略是否已成功更改:
Get-ExecutionPolicy然后执行:
conda init
conda activate yolotest
Conda 环境应该会被成功激活。
后记:此时运行python文件只能通过终端执行,cursor编译器还是不能直接点击运行按钮运行程序,所以直接省事选择上面下载python扩展即可!!!
三、附加内容
1.测试代码
from ultralytics import YOLO
from PIL import Image
import cv2
import os
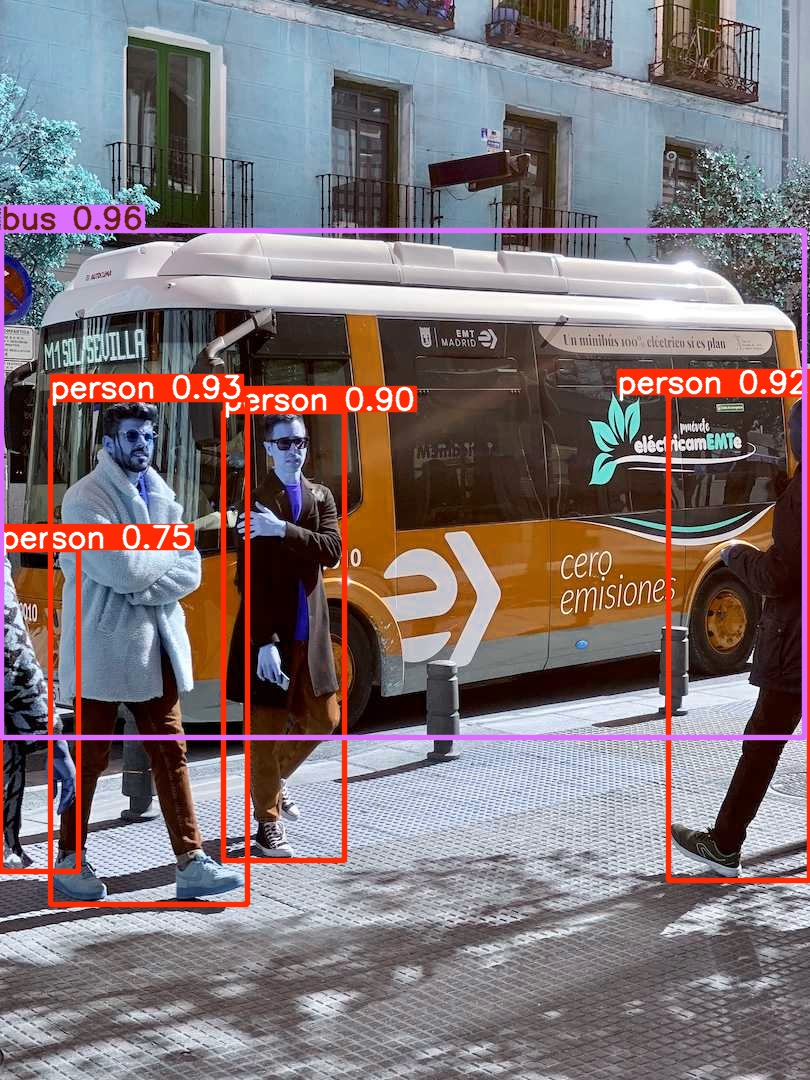
import globdef predict_image(image_path, model_path='ultralytics/premodels/yolov8m.pt', output_dir='./output'):"""使用 YOLOv8 模型对单张图像进行预测参数:image_path (str): 输入图像的路径model_path (str): 模型权重文件的路径output_dir (str): 输出结果的目录"""# 确保输出目录存在os.makedirs(output_dir, exist_ok=True)# 加载预训练模型model = YOLO(model_path)# 预测图像results = model(image_path)# 获取预测结果for i, result in enumerate(results):# 获取图像文件名image_filename = os.path.basename(image_path)name, ext = os.path.splitext(image_filename)# 保存带标注的图像output_path = os.path.join(output_dir, f"{name}_pred{ext}")annotated_frame = result.plot()cv2.imwrite(output_path, cv2.cvtColor(annotated_frame, cv2.COLOR_RGB2BGR))print(f"预测结果已保存至: {output_path}")# 打印检测到的对象boxes = result.boxesprint(f"在图像中检测到 {len(boxes)} 个对象:")for box in boxes:class_id = int(box.cls)conf = float(box.conf)class_name = model.names[class_id]print(f"- {class_name} (置信度: {conf:.2f})")def predict_images(input_dir, model_path='ultralytics/premodels/yolov8m.pt', output_dir='./output'):"""使用 YOLOv8 模型对文件夹中的所有图像进行预测参数:input_dir (str): 输入图像文件夹的路径model_path (str): 模型权重文件的路径output_dir (str): 输出结果的目录"""# 支持的图像文件扩展名image_extensions = ['*.jpg', '*.jpeg', '*.png', '*.bmp']# 获取所有图像文件的路径image_paths = []for ext in image_extensions:image_paths.extend(glob.glob(os.path.join(input_dir, ext)))if not image_paths:print(f"在 {input_dir} 中未找到图像文件!")return# 处理每个图像for image_path in image_paths:try:print(f"\n正在处理: {image_path}")predict_image(image_path, model_path, output_dir)except Exception as e:print(f"处理图像 {image_path} 时出错: {str(e)}")if __name__ == "__main__":# 示例:预测单张图像# image_path = "ultralytics/assets/bus.jpg" # 替换为你的图像路径# predict_image(image_path)# 示例:预测文件夹中的所有图像input_directory = "ultralytics/assets" # 替换为你的图像文件夹路径predict_images(input_directory)2.预训练权重文件
探索Ultralytics YOLOv8 -Ultralytics YOLO 文档
yolo项目下载地址:
https://github.com/ultralytics/ultralytics
3.一些数据集
- COCO128:
Coco128 Dataset and Pre-Trained Model by Slava
-
DOTA Aerial Image
https://universe.roboflow.com/felipe-coradesque-6gmum/dota-aerial-images/dataset/3