iOS —— UI 初探
简介
第一次新建时,你可能会好奇。为什么有这么多文件,他们都有什么用?
App 启动与生命周期管理相关
| 文件名 | 类型 | 作用 |
|---|---|---|
| main.m | m | 程序入口,main() 函数定义在这里 |
| AppDelegate.h/.m | h/m | App 启动/进入后台/退出等全局事件的管理者 |
| SceneDelegate.h/.m | h/m | iOS 13+ 的窗口场景管理器,加载第一个页面 |
main.m → AppDelegate → SceneDelegate → ViewController(显示)
界面与资源相关
| 文件名 | 类型 | 作用 |
|---|---|---|
| ViewController.h/.m | h/m | 默认页面的控制器,在这里写 UI 和交互逻辑 |
| LaunchScreen.storyboard | 📱 | 启动时显示的静态页面(类似“闪屏”Logo) |
| Main.storyboard | 📱 | 如果你使用 Storyboard,这里就是主界面布局 |
| Assets.xcassets | 📁 | 图片、颜色、App图标等资源文件存放处 |
| Info.plist | 📄 | App 的配置信息(名称、权限、图标路径等) |
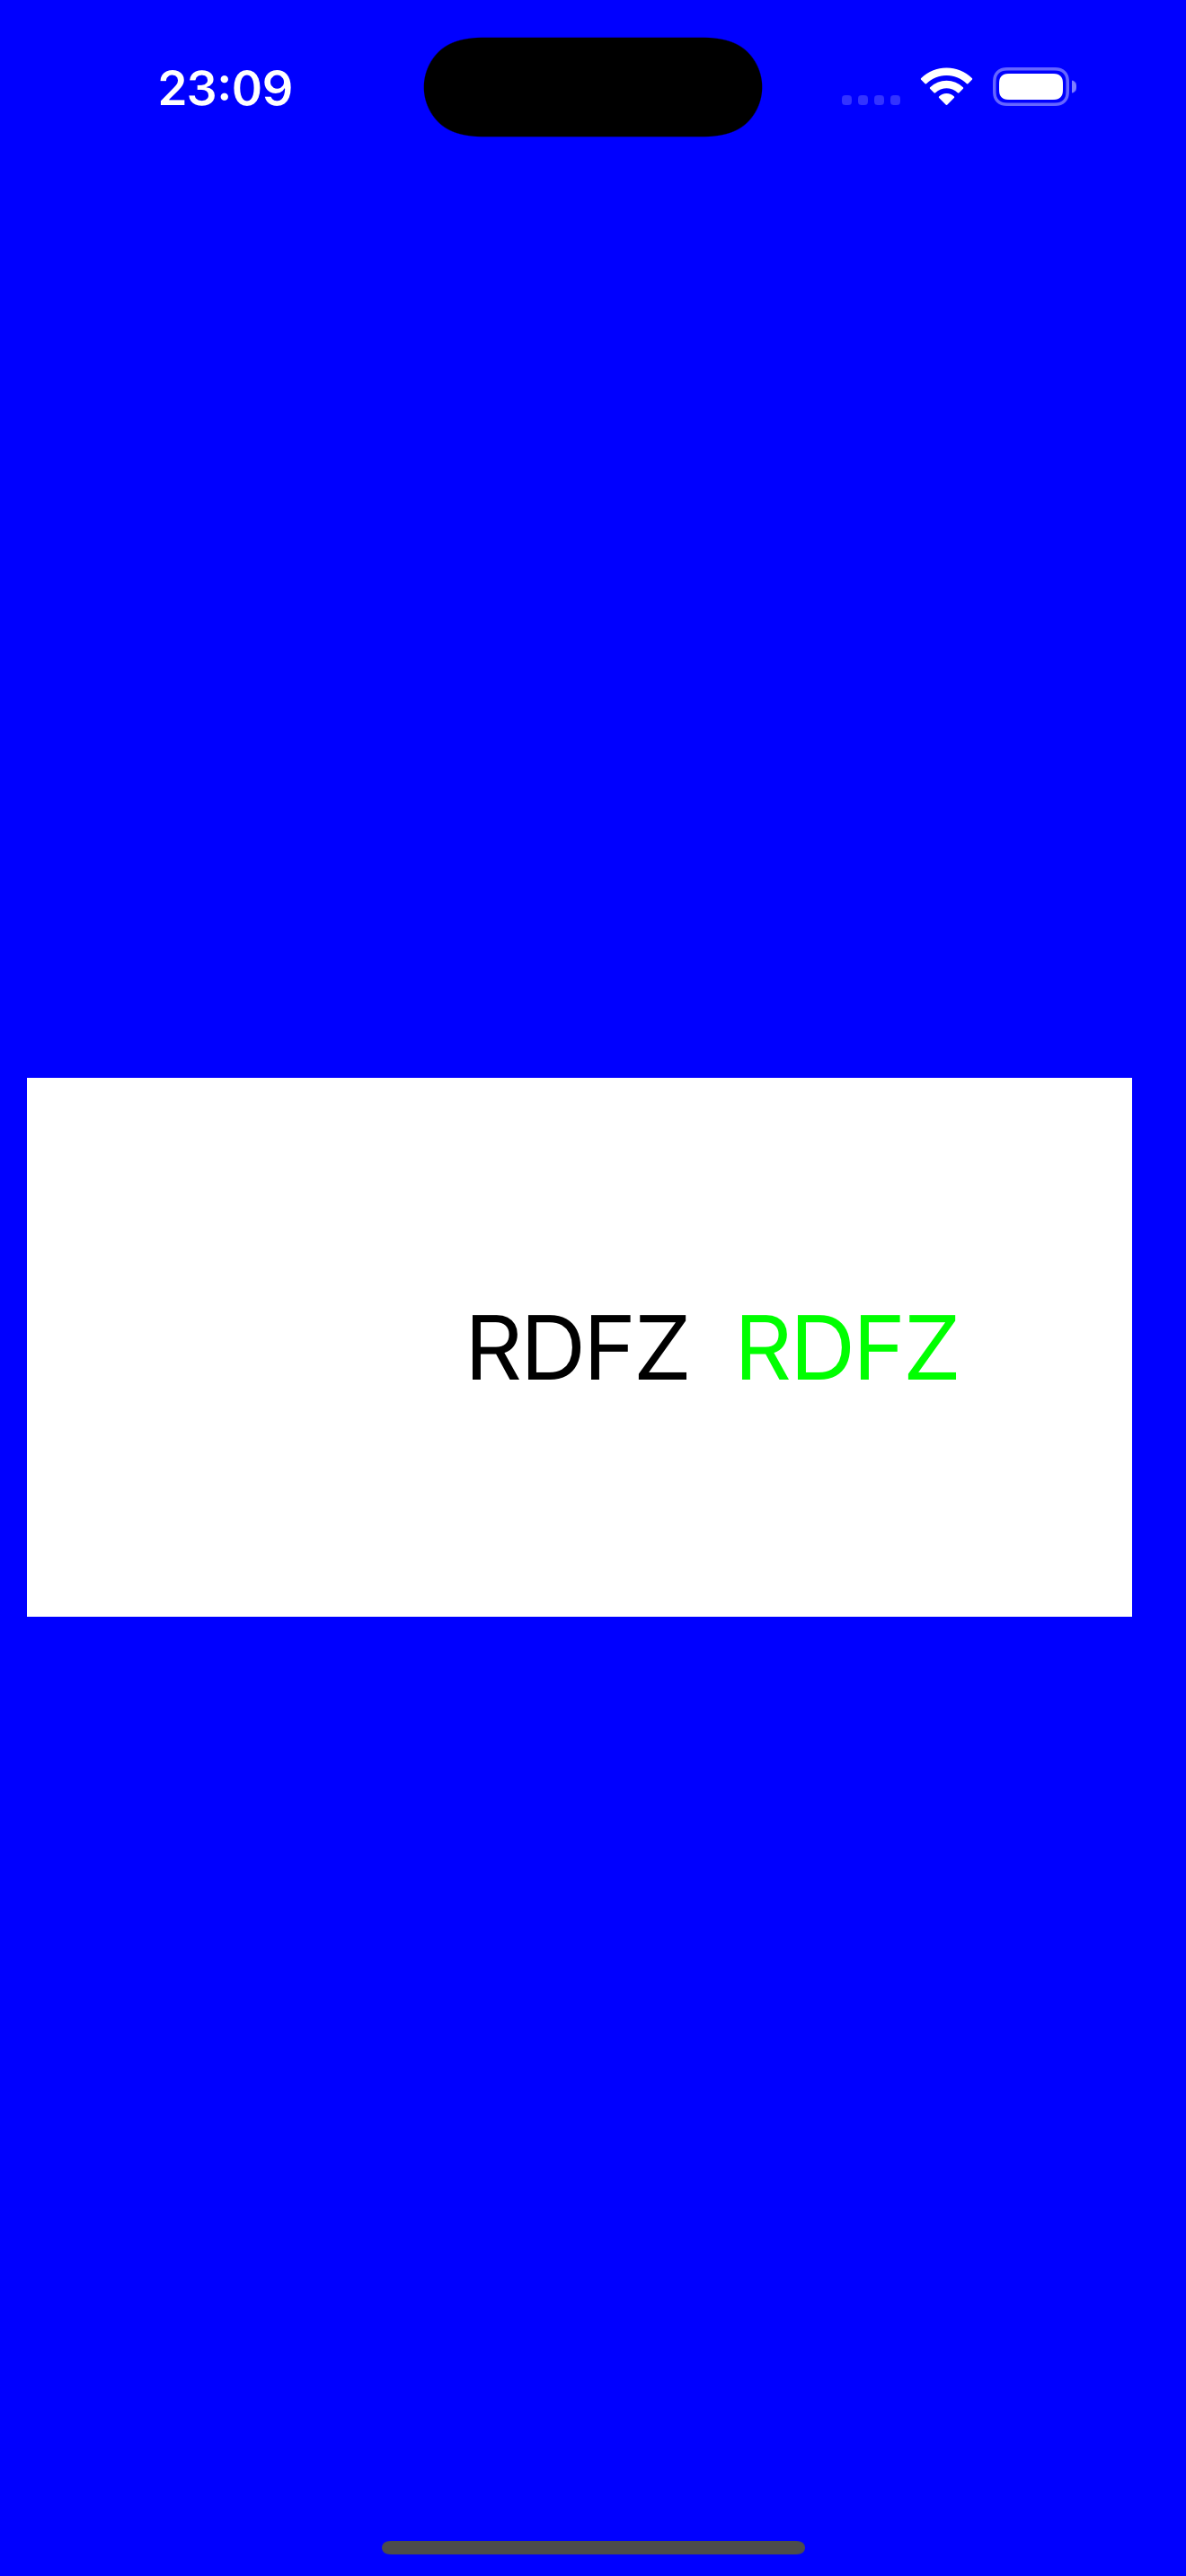
UILabel
UIlabel是一种可以显示在屏幕上,并且可以显示文字的一种UI视图
#import "ViewController.h"@interface ViewController ()@end@implementation ViewController
// 创建ui控件函数
-(void) createUI {//定义并创建一个uilabei对象//UILabel可以显示在屏幕上并且可以显示文字的一种UIUILabel* label = [[UILabel alloc]init];//显示文字,赋值label.text = @RDFZ";//显示位置label.frame = CGRectMake(10, 400, 410, 200);label.backgroundColor = [UIColor whiteColor];self.view.backgroundColor = [UIColor blueColor];[self.view addSubview:label];label.font = [UIFont systemFontOfSize:34];//labei大小和字体label.textColor = [UIColor blackColor];label.shadowColor = [UIColor greenColor];//字体阴影颜色label.shadowOffset = CGSizeMake(100, 0);//阴影偏离位置label.textAlignment = NSTextAlignmentCenter;//设置居中对齐label.numberOfLines = 3;//文字尽量按照设计的数来显示
}- (void)viewDidLoad {[super viewDidLoad];// Do any additional setup after loading the view.[self createUI];
}@end
这里主要注意的是两个类型,一个是CGRectMake类型(这个结构体又包括了origin和size两个成员变量),origin表示的是一个label的起始点,size表示的是一个显示出来的矩阵的宽和高,我们的坐标系是以屏幕左上角为基准点,向下为y,向右为x。
UIButton
图片按钮
- (void) creatImageButton {UIButton* btn = [UIButton buttonWithType:UIButtonTypeCustom];btn.frame = CGRectMake(10, 300, 150, 100);UIImage* icon1 = [UIImage imageNamed:@"btn02.jpeg"];//设置路径UIImage* icon2 = [UIImage imageNamed:@"btn03.jpg"];[btn setImage:icon1 forState:UIControlStateNormal];[btn setImage:icon2 forState:UIControlStateHighlighted];[self.view addSubview:btn];
}
UIButton事件触发
| 状态 | 枚举值 | 示例 |
|---|---|---|
| 普通状态 | UIControlStateNormal | 默认状态 |
| 高亮状态 | UIControlStateHighlighted | 按下时显示 |
| 被禁用状态 | UIControlStateDisabled | 不能点击时显示 |
| 被选中状态 | UIControlStateSelected | 可切换按钮时用 |
| UIButtonTypeSystem | 系统按钮(默认蓝色文字) | 有文字变化动画 | 登录按钮、普通按钮 |
| UIButtonTypeCustom | 自定义按钮 | 无边框、背景、动画 | 自定义 UI(图像按钮、透明按钮) |
| UIButtonTypeDetailDisclosure | 信息按钮 ⓘ | iOS 内置样式 | 表格行详情按钮 |
| UIButtonTypeContactAdd | 加号按钮 ➕ | iOS 内置样式 | 添加联系人 |
| UIButtonTypeInfoLight / InfoDark | info 图标按钮 | 灰或白 info 图标 | 显示提示信息 |
UIView
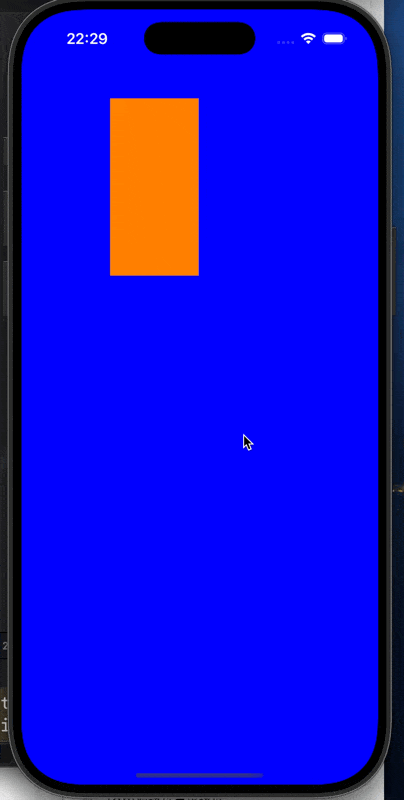
//所有看到的对象全部都是UIView的子类
- (void)viewDidLoad {[super viewDidLoad];UIView* view = [[UIView alloc] init];//设置一个位置view.frame = CGRectMake(10, 100, 230, 70);view.backgroundColor = [UIColor blueColor];self.view.backgroundColor = [UIColor orangeColor];[self.view addSubview:view];//父视图添加子视图//view.hidden = YES为不显示//view.alpha = 0.6;view.opaque = YES;//是否显示不透明//1不透明//0透明//将新建的视图显示到屏幕上//子视图会受到父视图的管理//[self creatUIRectButton];//[self creatImageButton];// Do any additional setup after loading the view.
}@end
多个视图之间的关系
- (void)viewDidLoad {[super viewDidLoad];UIView* view = [[UIView alloc] init];//设置一个位置view.frame = CGRectMake(100, 100, 150, 150);view.backgroundColor = [UIColor blueColor];[self.view addSubview:view];//父视图添加子视图UIView* view1 = [[UIView alloc] init];//设置一个位置view1.frame = CGRectMake(125, 125, 150, 150);view1.backgroundColor = [UIColor orangeColor];[self.view addSubview:view1];//父视图添加子视图UIView* view2 = [[UIView alloc] init];//设置一个位置view2.frame = CGRectMake(150, 150, 150, 150);view2.backgroundColor = [UIColor yellowColor];[self.view addSubview:view2];//父视图添加子视图//[self.view bringSubviewToFront:view];//将视图跳涨到最前面//[self.view sendSubviewToBack:view2];//调整到最后面UIView* viewfront = self.view.subviews[0];if (viewfront == view) {NSLog(@"dddd");}
}@end
我们的第三个视图会覆盖第二个,第二个会覆盖第一个,所以我们可以理解为一个后面的视图会覆盖前面的视图。
控制台会输出dddd,因此我们的添加视图到自己的subview中间的顺序是后添加的视图插入到后面部分
UIWindow
UIWindow 是所有视图的 顶级容器,承载整个 App 界面,是屏幕上所有内容的“根舞台”。
- (void)scene:(UIScene *)scene willConnectToSession:(UISceneSession *)session options:(UISceneConnectionOptions *)connectionOptions {//UIWindow继承于UIView,它是一个特殊的UIView//UIScreen:屏幕硬件表示类//mainScreen表示主屏幕的设备信息//bounds表示屏幕的宽高值self.window.rootViewController = [[UIViewController alloc] init];//创建根视图控制器self.window.backgroundColor = [UIColor blueColor];UIView* view = [[UIView alloc] initWithFrame:CGRectMake(100, 100, 150, 150)];view.backgroundColor = [UIColor orangeColor];UIView* backview = [[UIView alloc] initWithFrame:CGRectMake(100, 100, 240, 360)];backview.backgroundColor = [UIColor redColor];//子视图的坐标是参照父亲视图的坐标系//当父亲视图移动的时候,所有的子视图都会移动[backview addSubview: view];[self.window addSubview: backview];[self.window makeKeyAndVisible]; //显示我们的根视图NSLog(@"%@\n, %@\n, %@\n", view.window, backview.window, self.window);// Use this method to optionally configure and attach the UIWindow `window` to the provided UIWindowScene `scene`.// If using a storyboard, the `window` property will automatically be initialized and attached to the scene.// This delegate does not imply the connecting scene or session are new (see `application:configurationForConnectingSceneSession` instead).
}- (void)sceneDidDisconnect:(UIScene *)scene {// Called as the scene is being released by the system.// This occurs shortly after the scene enters the background, or when its session is discarded.// Release any resources associated with this scene that can be re-created the next time the scene connects.// The scene may re-connect later, as its session was not necessarily discarded (see `application:didDiscardSceneSessions` instead).
}- (void)sceneDidBecomeActive:(UIScene *)scene {// Called when the scene has moved from an inactive state to an active state.// Use this method to restart any tasks that were paused (or not yet started) when the scene was inactive.
}- (void)sceneWillResignActive:(UIScene *)scene {// Called when the scene will move from an active state to an inactive state.// This may occur due to temporary interruptions (ex. an incoming phone call).
}- (void)sceneWillEnterForeground:(UIScene *)scene {// Called as the scene transitions from the background to the foreground.// Use this method to undo the changes made on entering the background.
}- (void)sceneDidEnterBackground:(UIScene *)scene {// Called as the scene transitions from the foreground to the background.// Use this method to save data, release shared resources, and store enough scene-specific state information// to restore the scene back to its current state.
}@end
UIViewController
调用顺序
因为学长的博客提到了程序的调用顺序,我这里也做一下简单了解和分享。
main.m → UIApplicationMain() → AppDelegate → SceneDelegate → UIWindow → rootViewController
| 步骤 | 调用 | 说明 |
|---|---|---|
| ① | main.m 中的 UIApplicationMain() | 程序入口,创建 App 实例,启动主 runloop |
| ② | AppDelegate 的 application:didFinishLaunchingWithOptions: | App 启动完毕,适合做初始化,如设置窗口、SDK等 |
| ③ | (iOS13+)调用 SceneDelegate 的 scene:willConnectToSession: | 多窗口支持,创建 UIWindow 并设置 rootViewController |
| ④ | UIWindow 被设置为 keyWindow | 显示主界面 |
| ⑤ | rootViewController 的 viewDidLoad 被调用 | 加载主界面视图层 |
UIViewController的调用顺序(生命周期)
| 调用方法 | 时机 & 作用 |
|---|---|
| init / initWithNibName: | 创建控制器实例时 |
| loadView | 加载 view(可自定义视图) |
| viewDidLoad | 视图加载完毕,一般写 UI 初始化代码 |
| viewWillAppear: | 即将出现在屏幕上,适合刷新数据 |
| viewDidAppear: | 已经显示完毕,适合播放动画 |
| viewWillDisappear: | 页面即将被覆盖(如 push 到下一页) |
| viewDidDisappear: | 页面已被完全覆盖 |
他是iOS应用开发中非常核心的一个类,几乎所有的界面页面都是他的子类。他的作用就是帮你管理界面,响应用户交互,协调视图之间的切换和流转。
举个例子:
你在控制器写了一行
NSLog(@"viewDidLoad called");你会看到在 App 启动后打印了这句话,说明:
-
系统先从 main.m → AppDelegate → SceneDelegate → UIWindow → rootViewController
-
最终调用了 ViewController 的 viewDidLoad
UIViewController
它是 UIKit 框架中的一个类,表示应用中的一个“屏幕”或“页面”。每个视图控制器都负责管理:
-
一个视图(self.view)
-
该视图中的子视图(按钮、标签、图片等)
-
用户与这些视图的交互
-
页面之间的跳转逻辑
视图中的界面切换
首先新建一个view02类:
#import "ViewC02.h"@interface ViewC02 ()@end@implementation ViewC02- (void)viewDidLoad {[super viewDidLoad];self.view.backgroundColor = [UIColor orangeColor];NSLog(@"%@ load", [self class]);
}
- (void) touchesBegan:(NSSet<UITouch *> *)touches withEvent:(UIEvent *)event {//使当前的控制器消失掉,传入两个参数//第一个参数指是否有动画效果//第二个参数指结束后是否调用block块操作,不需要为nil[self dismissViewControllerAnimated: YES completion: nil];
}- (void) viewWillDisappear:(BOOL)animated {NSLog(@"%@ 视图即将消失", [self class]);
}- (void) viewDidDisappear:(BOOL)animated {NSLog(@"%@ 视图已消失", [self class]);
}- (void) viewDidAppear:(BOOL)animated {NSLog(@"%@ 视图已显示", [self class]);
}- (void) viewWillAppear:(BOOL)animated {NSLog(@"%@ 视图即将显示", [self class]);
}
然后写ViewController程序:
#import "ViewController.h"
#import "ViewC02.h"@interface ViewController ()@end@implementation ViewController//当屏幕被点击的时候,调用此函数
- (void)touchesBegan:(NSSet<UITouch *> *)touches withEvent:(UIEvent *)event {//创建视图控制器二ViewC02 *v2 = [[ViewC02 alloc] init];//显示一个新的视图控制器界面到屏幕上//该函数会传入三个参数:第一个参数指新的控制器对象//第二个参数指是否使用动画切换效果//第三个参数指切换结束后是否调用block块操作,不需要为nil[self presentViewController: v2 animated: YES completion: nil];
}//当视图控制器第一次被加载显示视图的时,调用此函数
//布局初始化视图来使用,初始化资源使用
- (void)viewDidLoad {//调用父类的加载视图函数[super viewDidLoad];self.view.backgroundColor = [UIColor blueColor];NSLog(@"viewDidLoad第一次加载视图");UIView *view = [[UIView alloc] init];view.frame = CGRectMake(100, 100, 100, 200);//将视图添加到当前控制视图上[self.view addSubview: view];view.backgroundColor = [UIColor orangeColor];self.view.backgroundColor = [UIColor blueColor];
}@end
我们留意一下这行代码:
[self presentViewController:v2 animated:YES completion:nil];这行代码是是用于以模态方式(modal)展示另一个视图控制器的方法。可能有同学会好奇,还有没有其他方法?
iOS 中常见的视图控制器切换方式总结
因为笔者目前进度较慢,因此还需借助ai帮助完成总结
当然有,除了 presentViewController:animated:completion: 这种 模态(Modal)方式 展示视图控制器外,iOS 中还有其他几种常见的方式来展示或切换视图控制器。下面是总结:
1. 模态展示(Modal Presentation)
[self presentViewController:vc animated:YES completion:nil];-
特点:当前控制器之上“弹出”一个新的控制器。
-
常见用途:登录界面、设置页、全屏内容展示。
-
可自定义样式(iOS 13+):
vc.modalPresentationStyle = UIModalPresentationFullScreen; // 或其他样式2. 导航控制器推送(Push)
[self.navigationController pushViewController:vc animated:YES];-
特点:需要当前控制器嵌套在 UINavigationController 中,使用“栈”的形式来管理。
-
常见用途:多层级界面导航(如设置 → 通知 → 声音)。
-
返回方式:自动带有返回按钮。
3. 切换根控制器(Root View Controller)
UIApplication.sharedApplication.delegate.window.rootViewController = vc;或在 SceneDelegate 中:
self.window.rootViewController = vc;-
特点:直接替换整个应用的根视图控制器。
-
常见用途:如登录完成后进入主界面,或退出登录返回登录页。
-
无动画,如需动画要手动添加。
4. 使用 Container View Controller(容器控制器)
包括:
-
UITabBarController
-
UINavigationController
-
UIPageViewController
-
自定义容器控制器
你可以使用这些容器来自定义多个子控制器的切换,比如:
[self addChildViewController:vc];
[self.view addSubview:vc.view];
[vc didMoveToParentViewController:self];-
特点:适合自定义嵌套视图控制器结构。
-
常见用途:页面内多个子控制器的嵌套、选项卡切换等。
5. 使用 Storyboard Segue(界面跳转)
在 Interface Builder 中设置 Segue:
[self performSegueWithIdentifier:@"ShowDetail" sender:self];-
特点:图形化管理界面跳转,适合 Storyboard 构建的应用。
-
可选方式:Push、Modal、Custom 等。
6. 使用转场动画(Transition Animation)
在根视图上添加过渡动画,手动控制切换效果:
[UIView transitionWithView:self.viewduration:0.5options:UIViewAnimationOptionTransitionFlipFromLeftanimations:^{[self.view addSubview:vc.view];
} completion:nil];-
特点:完全自定义切换动画。
-
适合:卡片翻转、淡入淡出、缩放等特殊场景。
总结对比表
| 方式 | 是否动画 | 是否返回 | 使用场景 |
|---|---|---|---|
| presentViewController | ✅ | ❌ | 模态弹窗、登录页面等 |
| pushViewController | ✅ | ✅ | 多层级导航 |
| set rootViewController | ❌(可自定义) | ❌ | 登录后进入主界面 |
| addChildViewController | ✅(自定义) | ❌ | 嵌套子控制器 |
| performSegueWithIdentifier | ✅ | 视情况而定 | Storyboard中界面跳转 |
| UIView transition | ✅ | ❌ | 自定义动画效果 |
iOS视图控制器的生命周期:
1 init函数(init;initWithFrame;initWithCoder;等)--初始化
2 awakeFromNib--在loadView之前的工作放在这里
3 viewDidLoad--注意,一个ViewController一个生命周期内这个函数只会调用一次
4 viewWillAppear -- view将要出现,每次View消失再出现都会调用
5 viewWillLayoutSubviews--简要对子试图进行布局
6 viewDidLayoutSubivews--完成对子试图布局
7 viewDidAppear--视图将要出现在屏幕上
---上述代码不含部分
8 viewWillDisappear--View将要消失
9 viewDidDisappear--View已经消失
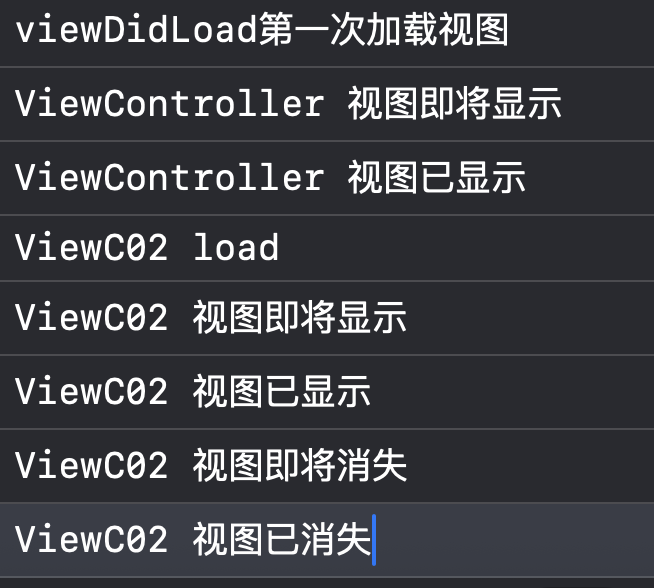
前三行为程序运行后的输出,单击屏幕后显示4-6,再次单击后显示最后两行。
作者在编写程序时发现,如下代码如果从viewC02中转移到ViewController,则只会有上图的前三行输出。在程序中加入了ViewC02 load的输出后,我没发现每次点击后都会创建并跳转到一个ViewC02视图控制器。
定时器与视图移动
NSTimer 是 iOS 中用来 按固定时间间隔重复执行某个操作 的工具。它可以让你设定一个时间间隔,让程序在这个间隔之后执行指定方法,并可选择是否重复执行。
NSTimer *timer = [NSTimer scheduledTimerWithTimeInterval:1.0target:selfselector:@selector(myFunction:)userInfo:nilrepeats:YES];| 参数 | 说明 |
|---|---|
| 1.0 | 每隔多少秒触发一次(单位是秒) |
| target | 谁来执行这个定时器方法(通常是 self) |
| selector | 要执行的方法(函数)名,格式是 @selector(methodName:) |
| userInfo | 可传递的附加信息,可为 nil |
| repeats | 是否重复触发:YES 为重复,NO 为只触发一次 |
| 功能 | 代码 |
|---|---|
| 创建定时器 | scheduledTimerWithTimeInterval:... |
| 停止定时器 | [timer invalidate]; 还要重置为nil |
| 暂停定时器 | [timer setFireDate:[NSDate distantFuture]]; |
| 恢复定时器 | [timer setFireDate:[NSDate date]]; |
#import "ViewController.h"
//
//@interface ViewController ()
//@property (nonatomic, strong) NSTimer *timeView;
//@end
//
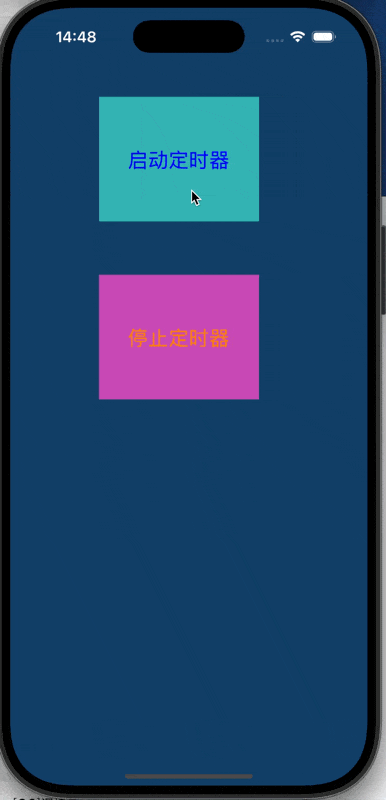
@implementation ViewController- (void)viewDidLoad {[super viewDidLoad];//设置颜色透明度self.view.backgroundColor = [UIColor colorWithRed: 0.1 green: 0.3 blue: 0.5 alpha: 0.8];//启动定时器按钮UIButton *btn = [UIButton buttonWithType: UIButtonTypeRoundedRect];btn.frame = CGRectMake(100, 100, 180, 140);btn.backgroundColor = [UIColor colorWithRed:0.2 green:0.7 blue:0.7 alpha:1];[btn setTitle: @"启动定时器" forState: UIControlStateNormal];btn.titleLabel.font = [UIFont systemFontOfSize: 24];btn.tintColor = [UIColor blueColor];//绑定点击事件[btn addTarget: self action: @selector(pressStart) forControlEvents: UIControlEventTouchUpInside];//添加到视图[self.view addSubview: btn];UIButton *stopBtn = [UIButton buttonWithType: UIButtonTypeRoundedRect];stopBtn.frame = CGRectMake(100, 300, 180, 140);stopBtn.backgroundColor = [UIColor colorWithRed: 0.79 green: 0.29 blue: 0.71 alpha: 1];[stopBtn setTitle: @"停止定时器" forState: UIControlStateNormal];stopBtn.titleLabel.font = [UIFont systemFontOfSize: 24];stopBtn.tintColor = [UIColor orangeColor];[stopBtn addTarget: self action: @selector(pressStop) forControlEvents: UIControlEventTouchUpInside];[self.view addSubview: stopBtn];//创建一个橙色视图,tag=101方便后续查找UIView *view = [[UIView alloc] init];view.backgroundColor = [UIColor orangeColor];//为view对象设置标签值view.tag = 101;[self.view addSubview: view];
}- (void) pressStart {//NSTimer的类方法创建一个定时器并启动,该定时器传入五个参数//第一个参数指每隔多少秒执行一次事件函数//第二个参数表示实现参数的对象//第三个参数表示事件函数//第四个参数表示可以为定时器函数传入一个函数,无参数可以传nil//第五个参数表示该定时器是否重复操作,YES则重复,NO则仅一次//返回值为一个新建好的定时器对象if (_timeView != nil) //[_timeView setFireDate:[NSDate dateWithTimeIntervalSinceNow:0.1]];return; //两种均可,上面的会在重复点击启动时一卡一卡,直接return则不会else {_timeView = [NSTimer scheduledTimerWithTimeInterval: 0.001 target: self selector: @selector(updateTimer:) userInfo: @"北京" repeats: YES];}
}//事件函数
//可以将定时器本身作为参数传入
- (void) updateTimer: (NSTimer*) timer {NSLog(@"六朝古都!%@", timer.userInfo);UIView *view = [self.view viewWithTag: 101];//修改视图位置(每次x,y增加0.1)view.frame = CGRectMake(view.frame.origin.x + 0.1, view.frame.origin.y + 0.1, 80, 80);
}- (void) pressStop {//停止定时器if (_timeView != nil) {[_timeView invalidate];//让定时器失效_timeView = nil; //非常重要 不加会导致暂停后不能重新在原来进度处启动}
}@end
在pressStop函数中,我们批注了一行代码“非常重要”。
如果不设为 nil:
-
下次启动时以为还在用原来的定时器,可能不创建新的。
-
或者多个定时器重复叠加,导致多个同时移动和打印。
-
运行结果如下:
-
UITextView和UITextField
-
UITextField:单行输入,适合填写表单(如用户名、密码、邮箱)
-
UITextView:多行输入,适合写段落(如评论、文章内容、聊天)
UITextField *textField = [[UITextField alloc] initWithFrame:CGRectMake(20, 100, 280, 40)];
textField.borderStyle = UITextBorderStyleRoundedRect;
textField.placeholder = @"请输入用户名";
textField.delegate = self;
[self.view addSubview:textField];
UITextView *textView = [[UITextView alloc] initWithFrame:CGRectMake(20, 160, 280, 100)];
textView.font = [UIFont systemFontOfSize:16];
textView.layer.borderColor = [UIColor grayColor].CGColor;
textView.layer.borderWidth = 1.0;
textView.delegate = self;
[self.view addSubview:textView];UITextFieldDelegate协议
UITextFieldDelegate 是 iOS 中 UITextField 的委托协议(protocol),用来监听和处理用户在文本输入框中的各种交互行为,比如开始编辑、结束编辑、内容变化、是否允许输入等。
在这个协议里有一些函数,在使用这些函数前要先在接口部分声明这个协议,函数如下:
1、- (void) textFieldDidBeginEditing:在手机键盘弹出的一瞬间开始调用,在这里可以为开始输入时添加动作
2、- (void) textFieldDidEndEditing:在手机键盘收回的一瞬间开始调用,在这里可以为结束输入时添加动作
3、- (BOOL) textFieldShouldBeginEditing:表示是否可以进行输入,返回值为YES的时候可以输入,反之不能输入,默认为YES
4、- (BOOL) textFieldShouldEndEditing:表示是否可以结束输入,返回值为YES的时候可以结束,反之不能结束,默认为YES
首先要遵守协议
@interface ViewController : UIViewController <UITextFieldDelegate> {//定义textfieldUITextField* _textField;
}
@property (retain, nonatomic) UITextField* textField;@end
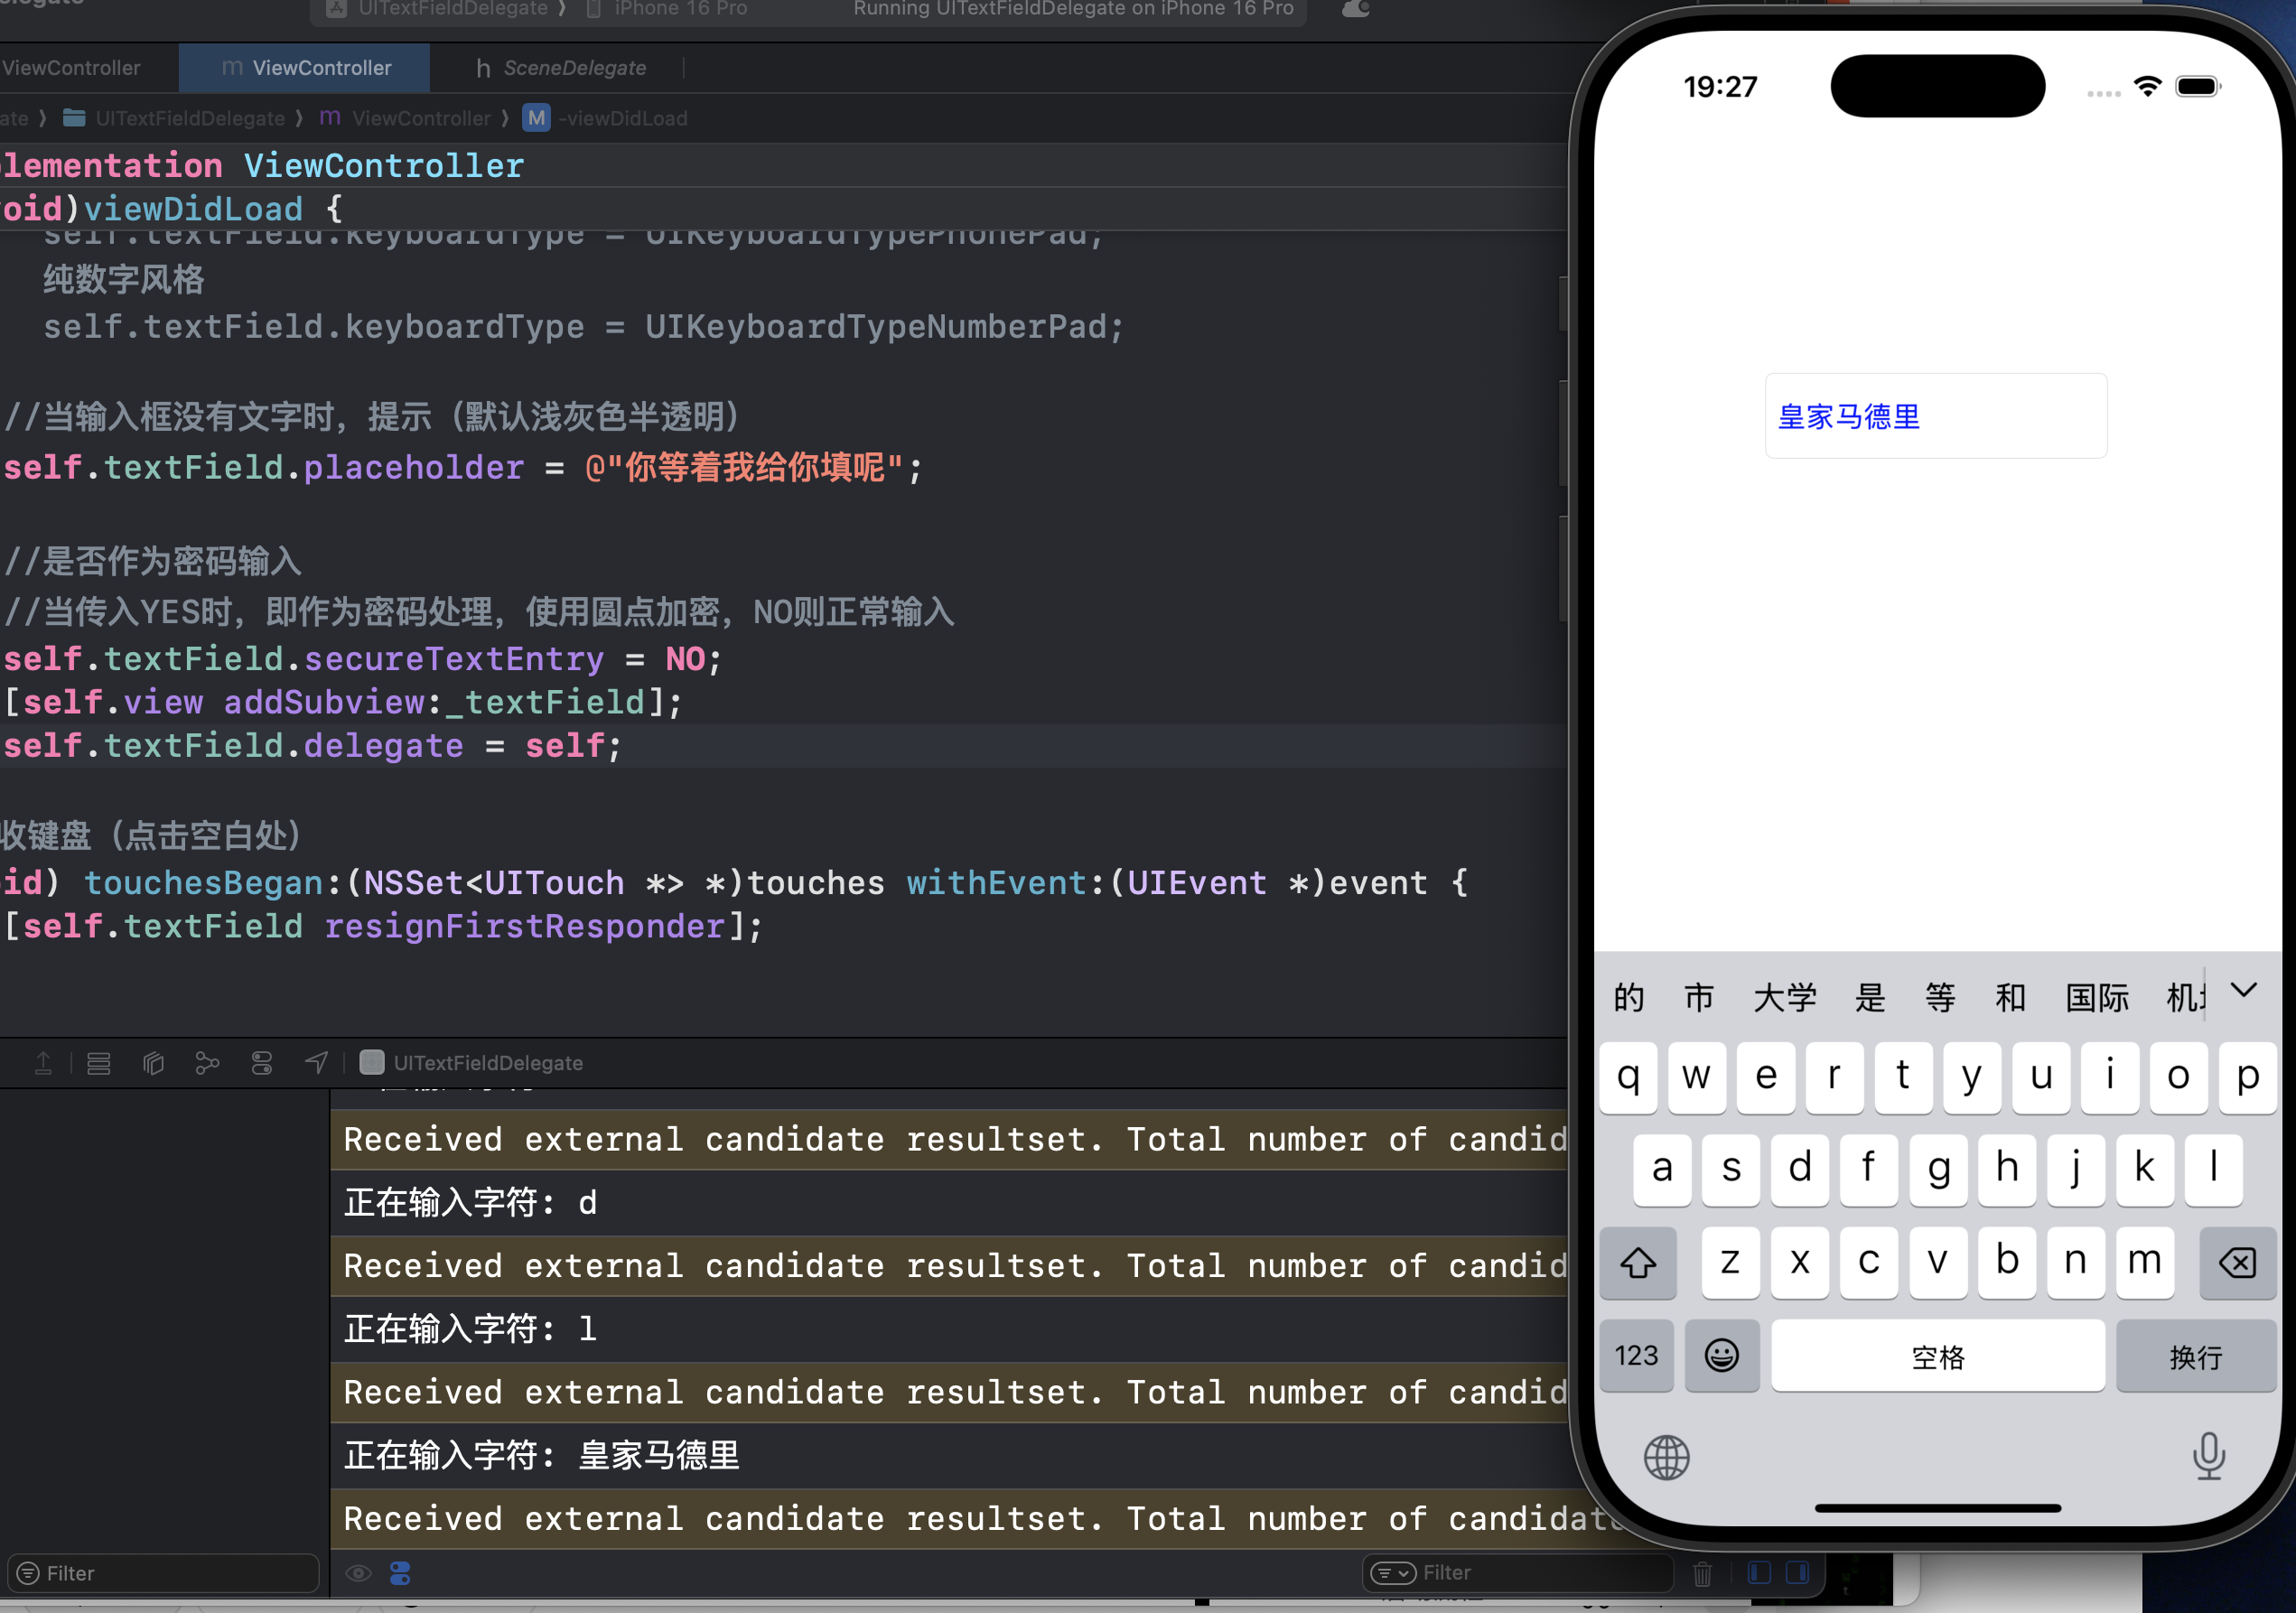
#import "ViewController.h"@interface ViewController ()@end@implementation ViewController@synthesize textField = _textField;- (void)viewDidLoad {[super viewDidLoad];//创建textField对象self.textField = [[UITextField alloc] init];self.textField.frame = CGRectMake(100, 200, 200, 50);self.textField.text = @"用户名";//为输入框的文字设置风格和大小self.textField.font = [UIFont systemFontOfSize:17];//设置字体颜色self.textField.textColor = [UIColor blueColor];//设置输入边框的风格//圆角风格(默认)self.textField.borderStyle = UITextBorderStyleRoundedRect;//线框风格//self.textField.borderStyle = UITextBorderStyleLine;//bezel线框//self.textField.borderStyle = UITextBorderStyleBezel;//无边框风格//self.textField.borderStyle = UITextBorderStyleNone;//设置键盘风格,在此处测试时虚拟的的手机键盘如没出现,只需直接cmd+k或点虚拟机然后在山东I/O选keyboard然后选第三即可self.textField.keyboardType = UIKeyboardTypeDefault;
// 字母与数字组合风格
// self.textField.keyboardType = UIKeyboardTypePhonePad;
// 纯数字风格
// self.textField.keyboardType = UIKeyboardTypeNumberPad;//当输入框没有文字时,提示(默认浅灰色半透明)self.textField.placeholder = @"你等着我给你填呢";//是否作为密码输入//当传入YES时,即作为密码处理,使用圆点加密,NO则正常输入self.textField.secureTextEntry = NO;[self.view addSubview:_textField];
}
//回收键盘(点击空白处)
-(void) touchesBegan:(NSSet<UITouch *> *)touches withEvent:(UIEvent *)event {[self.textField resignFirstResponder];
}//UITextField中的一些函数
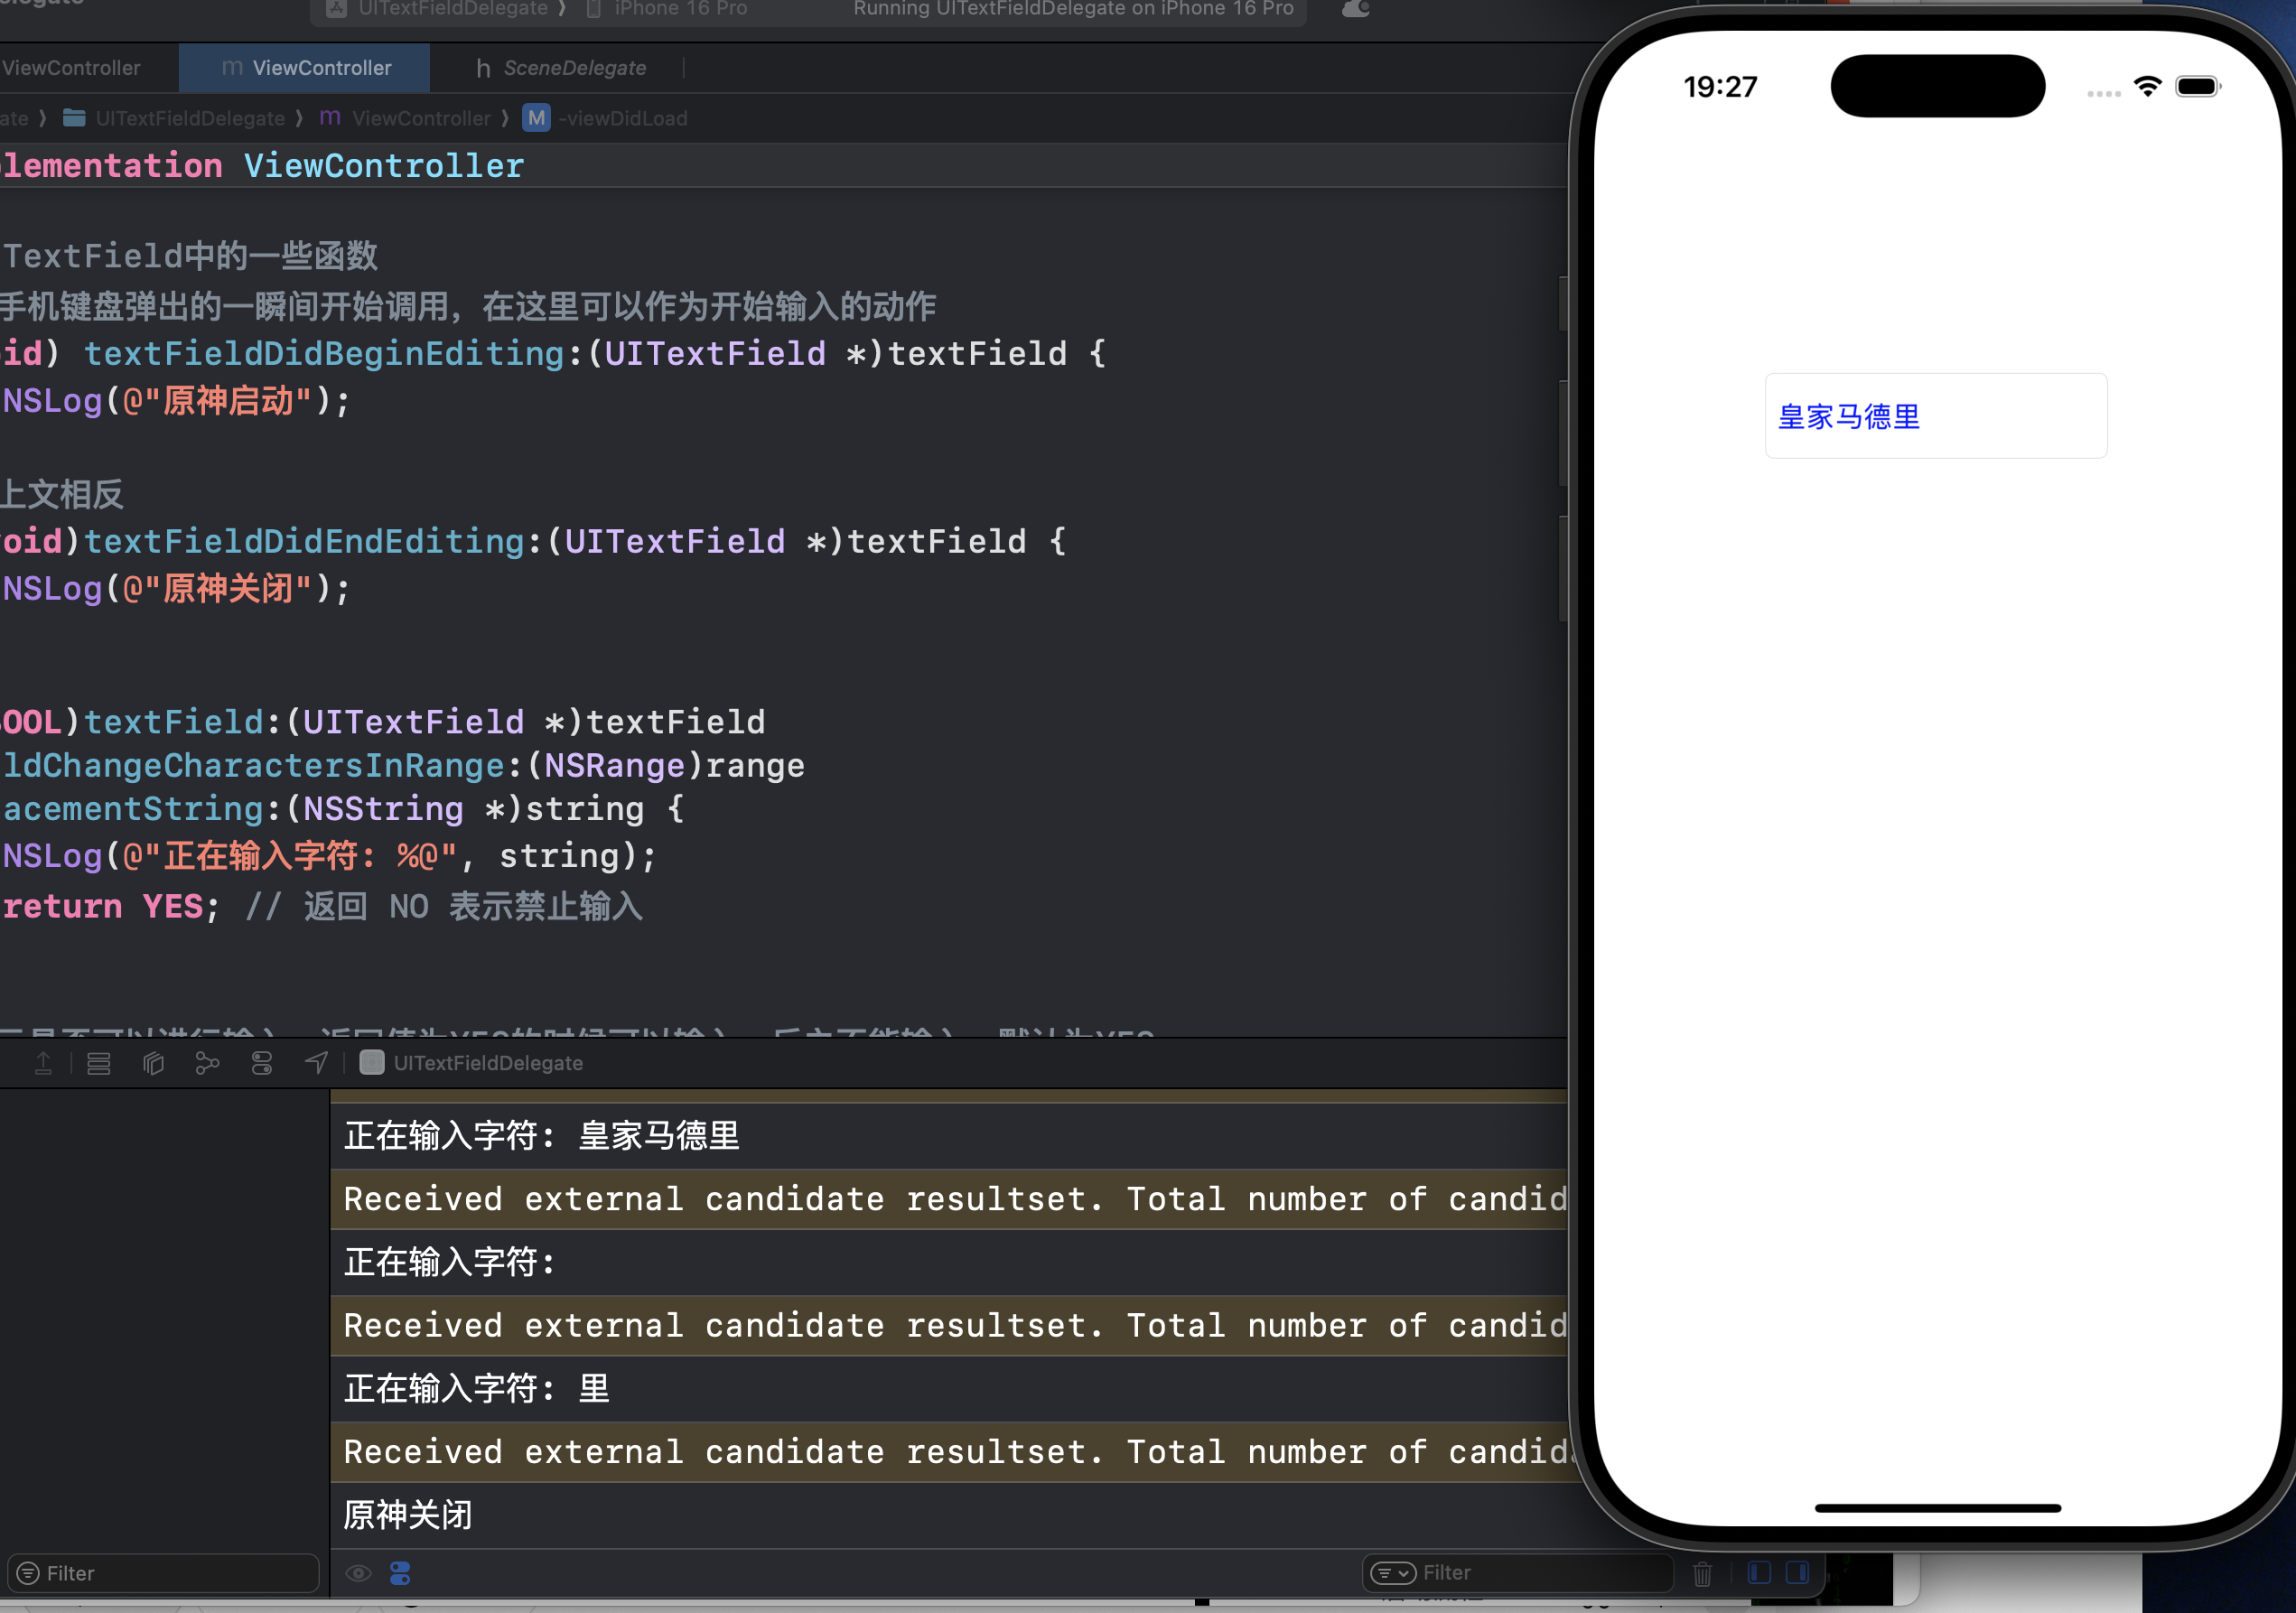
//在手机键盘弹出的一瞬间开始调用,在这里可以作为开始输入的动作
-(void) textFieldDidBeginEditing:(UITextField *)textField {NSLog(@"原神启动");
}
//与上文相反
-(void) textFieldDidBegEndEditing:(UITextField *)textField {NSLog(@"原神关闭");
}- (BOOL)textField:(UITextField *)textField
shouldChangeCharactersInRange:(NSRange)range
replacementString:(NSString *)string {NSLog(@"正在输入字符: %@", string);return YES; // 返回 NO 表示禁止输入
}//表示是否可以进行输入,返回值为YES的时候可以输入,反之不能输入,默认为YES
- (BOOL) textFieldShouldBeginEditing:(UITextField *)textField {return YES;
}//表示是否可以结束输入,返回值为YES的时候可以结束,反之不能结束,默认为YES
- (BOOL) textFieldShouldEndEditing:(UITextField *)textField {return YES;
}@end
如果你直接照抄原函数,是不能得到如下的自定义输出的。为什么呢
我们少了一行代码
self.textField.delegate = self;这行代码,是设置UITextField的代理(delegate)为当前的视图控制器self。
在iOS中,delegate(代理)是一种设计模式,他允许一个对象将某些任务“委托”给另一个对象处理。
对于UITextField来说:
它本身不会直接处理所有用户交互(如:输入时、点击 return 键、结束编辑等)。
它通过调用它的 delegate 中的特定方法,来询问或通知这些事件的发生。
而你设置了 delegate = self,就表示你这个视图控制器(ViewController)将会负责处理这些事件。

| 样式 | 效果 | 说明 |
|---|---|---|
| UITextBorderStyleNone | 无边框 | 输入框看不到边线 |
| UITextBorderStyleLine | 单线边框 | 四周是一条细线 |
| UITextBorderStyleBezel | 凸起边框 | 有阴影的边框(老式效果) |
| UITextBorderStyleRoundedRect | 圆角边框 | 常见的 iOS 输入框样式,推荐使用 |
UITextField
#import "ViewController.h"@interface ViewController ()@end@implementation ViewController
@synthesize textField = _textField;
- (void)viewDidLoad {[super viewDidLoad];self.textField = [[UITextField alloc] init];//创建一个文本输入区对象self.textField.frame = CGRectMake(100, 100, 100, 40);//设定位置self.textField.text = @"用户名";self.textField.font = [UIFont systemFontOfSize:15];//设置字体大小self.textField.textColor = [UIColor blackColor];self.textField.borderStyle = UITextBorderStyleRoundedRect;//设置圆角风格//self.textField.borderStyle = UITextBorderStyleLine; // 线框风格self.textField.keyboardType = UIKeyboardTypeNumberPad;//设置虚拟键盘风格//UIKeyboardTypeDefault默认风格//UIKeyboardTyprNamePhonePad字母和数字的组合风格//UIKeyboradTypeNumberPad:纯数字风格self.textField.placeholder = @"请输入用户名";//提示文字self.textField.secureTextEntry = NO;//是否为密码输入//YES:作为密码处理,原点加密//NO:正常显示[self.view addSubview:self.textField];self.textField.delegate = self;// Do any additional setup after loading the view.
}
-(void)touchesBegan:(NSSet<UITouch *> *)touches withEvent:(UIEvent *)event {[self.textField resignFirstResponder];//让虚拟键盘回收,不再作为第一消息响应者
}
-(void)textFieldDidBeginEditing:(UITextField *)textField {NSLog(@"开始编辑了");
}
-(void) textFieldDidEndEditing:(UITextField *)textField {self.textField.text = @"";NSLog(@"开始结束编辑了");
}
//是否可以进行输入
-(BOOL)textFieldShouldBeginEditing:(UITextField *)textField {return YES;
}
//是否可以结束输入
- (BOOL)textFieldShouldEndEditing:(UITextField *)textField {if (self.textField.text.length < 8) {return NO;} else {return YES;}}
@end
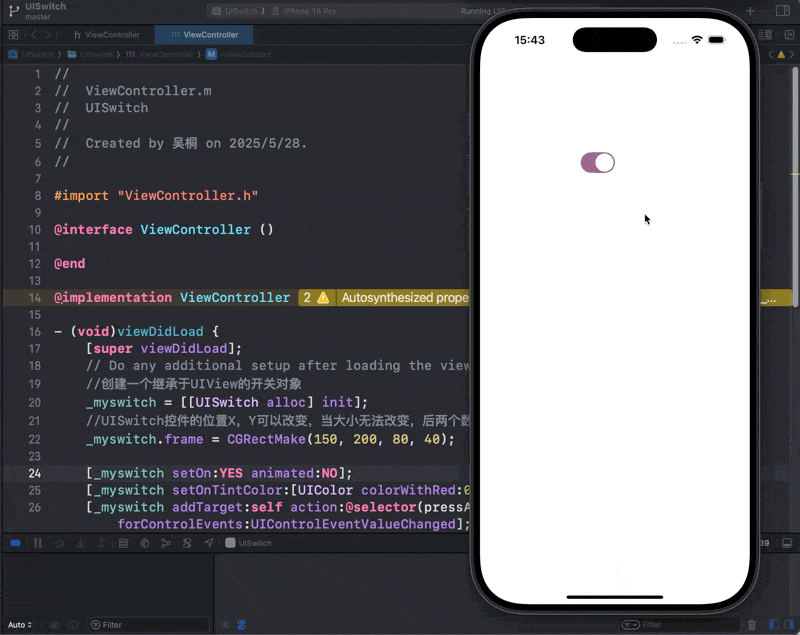
UISwitch
#import "ViewController.h"@interface ViewController ()@end@implementation ViewController- (void)viewDidLoad {[super viewDidLoad];// Do any additional setup after loading the view.//创建一个继承于UIView的开关对象_myswitch = [[UISwitch alloc] init];//UISwitch控件的位置X,Y可以改变,当大小无法改变,后两个数字没用_myswitch.frame = CGRectMake(150, 200, 80, 40);[_myswitch setOn:YES animated:NO];[_myswitch setOnTintColor:[UIColor colorWithRed:0.5 green:0.2 blue:0.4 alpha:0.7]];[_myswitch addTarget:self action:@selector(pressA) forControlEvents:UIControlEventValueChanged];[self.view addSubview:_myswitch];
}-(void) pressA {_myTimer = [NSTimer scheduledTimerWithTimeInterval:0.5 target:self selector:@selector(pressB) userInfo:@"一只酸奶牛" repeats:YES];
}-(void) pressB {NSLog(@"喝喝喝!%@", _myTimer.userInfo);
}@end
UISlider和UIProgressSlid
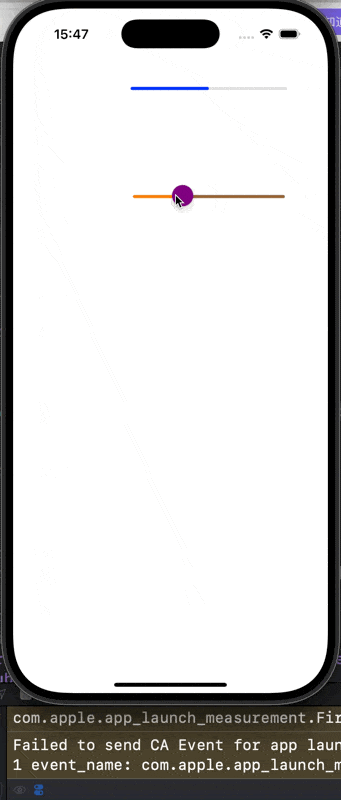
#import "ViewController.h"@interface ViewController ()@end@implementation ViewController- (void)viewDidLoad {[super viewDidLoad];//创建进度条_progressView = [[UIProgressView alloc] init];_progressView.frame = CGRectMake(150, 100, 200, 80);_progressView.progressTintColor = [UIColor blueColor];//设置进度条的进度,传入的参数是0~1的值_progressView.progress = 0.5;//设置进度条风格特征_progressView.progressViewStyle = UIProgressViewStyleDefault;[self.view addSubview: _progressView];//创建滑动条_slider = [[UISlider alloc] init];//滑动条的高度是不可改变的_slider.frame = CGRectMake(150, 200, 200, 80);_slider.tintColor = [UIColor orangeColor];//设置滑动条最大值,最小值,最小值可以为负_slider.maximumValue = 100;_slider.minimumValue = 0;//设置滑动条滑块的位置_slider.value = 30;//设置左侧滑条颜色_slider.minimumTrackTintColor = [UIColor orangeColor];//设置右侧滑条颜色_slider.maximumTrackTintColor = [UIColor brownColor];//设置滑块颜色_slider.thumbTintColor = [UIColor purpleColor];//为滑动条添加事件函数[_slider addTarget: self action: @selector(pressSlider) forControlEvents: UIControlEventValueChanged];[self.view addSubview: _slider];
}- (void) pressSlider {//使进度条随着滑动条的变化而变化_progressView.progress = (_slider.value - _slider.minimumValue) / (_slider.maximumValue - _slider.minimumValue);NSLog(@"value = %f", _slider.value);
}@end
UIScollView
UIScrollView 是 iOS 中非常重要的一个视图组件,用于滚动显示超出屏幕范围的内容。当你的页面内容太长(或太宽)放不下时,就可以用 UIScrollView 来滚动查看。
| 类型 | 说明 | |
|---|---|---|
| contentSize | CGSize | 内容区域的大小(超出部分才能滚动) |
| contentOffset | CGPoint | 当前滚动的偏移位置(默认是 (0,0)) |
| contentInset | UIEdgeInsets | 内容的内边距(上下左右留白) |
| isScrollEnabled | BOOL | 是否允许滚动(默认 YES) |
| bounces | BOOL | 滑到边缘是否回弹(默认 YES) |
| pagingEnabled | BOOL | 是否分页滑动(像翻页一样) |
| showsHorizontalScrollIndicator | BOOL | 是否显示水平滚动条 |
| showsVerticalScrollIndicator | BOOL | 是否显示垂直滚动条 |
| delegate | UIScrollViewDelegate | 设置代理,用于监听滚动事件等 |
最基本的垂直滚动
#import "ViewController.h"@interface ViewController ()
@end@implementation ViewController- (void)viewDidLoad {[super viewDidLoad];// 获取图片UIImage *image = [UIImage imageNamed:@"long_image.jpg"]; // 确保图片存在并且较高// 创建 UIImageView 显示图片UIImageView *imageView = [[UIImageView alloc] initWithImage:image];// 图片实际尺寸CGSize imageSize = image.size;// 按照屏幕宽度等比例缩放图片CGFloat screenWidth = self.view.frame.size.width;CGFloat scale = screenWidth / imageSize.width;CGFloat scaledHeight = imageSize.height * scale;imageView.frame = CGRectMake(0, 0, screenWidth, scaledHeight);imageView.contentMode = UIViewContentModeScaleToFill;// 创建 UIScrollView 并设置内容大小UIScrollView *scrollView = [[UIScrollView alloc] initWithFrame:self.view.bounds];scrollView.contentSize = CGSizeMake(screenWidth, scaledHeight);// 添加图片视图到滚动视图[scrollView addSubview:imageView];[self.view addSubview:scrollView];
}@end
横向分页滚动图片
#import "ViewController.h"@interface ViewController ()@end@implementation ViewController- (void)viewDidLoad {[super viewDidLoad];//定义并创建一个滚动视图并设置其位置,滚动视图可以对视图内容进行滚屏查看UIScrollView* sv = [[UIScrollView alloc] initWithFrame:CGRectMake(0, 0, 394, 852)];//是否按照整页滚动视图sv.pagingEnabled = YES;//是否可以开启滚动效果sv.scrollEnabled = YES;//设置画布的大小,画布显示在滚动视图的内部,一般大于frame的大小,第一个参数表示宽,第二个表示高sv.contentSize = CGSizeMake(394 * 5, 852);//是否可以边缘弹动效果sv.bounces = YES;//开启横向弹动效果sv.alwaysBounceHorizontal = YES;//开启纵向弹动效果sv.alwaysBounceVertical = YES;//是否显示横向滚动条sv.showsHorizontalScrollIndicator = YES;//是否显示纵向滚动条sv.showsVerticalScrollIndicator = YES;for (int i = 0; i < 5; i++) {NSString* imageName = [NSString stringWithFormat:@"微信图片_20250515214344_14.jpg", i + 1];UIImage* aImage = [UIImage imageNamed:imageName];UIImageView* aView = [[UIImageView alloc] initWithImage:aImage];aView.frame = CGRectMake(394*i, 0, 394, 852);[sv addSubview:aView];}sv.backgroundColor = [UIColor whiteColor];[self.view addSubview: sv];
}@end
缩放功能
#import "ViewController.h"@interface ViewController () <UIScrollViewDelegate>@property (nonatomic, strong) UIImageView *imageView;@end@implementation ViewController- (void)viewDidLoad {[super viewDidLoad];// 创建滚动视图UIScrollView *scrollView = [[UIScrollView alloc] initWithFrame:self.view.bounds];scrollView.backgroundColor = [UIColor blackColor];scrollView.delegate = self;// 设置缩放比例scrollView.minimumZoomScale = 1.0;scrollView.maximumZoomScale = 4.0;// 加载图片UIImage *image = [UIImage imageNamed:@"微信图片_20250515214344_14.jpg"];// 创建图片视图self.imageView = [[UIImageView alloc] initWithImage:image];self.imageView.frame = self.view.bounds;self.imageView.contentMode = UIViewContentModeScaleAspectFit;// 设置内容区域与图片大小一致scrollView.contentSize = self.imageView.frame.size;[scrollView addSubview:self.imageView];[self.view addSubview:scrollView];
}// 返回可缩放的视图
- (UIView *)viewForZoomingInScrollView:(UIScrollView *)scrollView {return self.imageView;
}@end
滚动事件监听
_scrolView.delegate = self;这行代码的作用是:
告诉 UIScrollView:“有滑动行为时,请通知当前这个控制器(self)。”
前提是你的 ViewController 遵守了 UIScrollViewDelegate 协议(在 .h 文件中一般这样声明):
@interface ViewController : UIViewController <UIScrollViewDelegate>| 方法名 | 触发时机 | 常见用途 |
|---|---|---|
| - (void)scrollViewDidScroll:(UIScrollView *)scrollView | 滚动过程中持续触发(每滑动一帧都会调用) | 实时监听滑动位置,做视差效果、懒加载等 |
| - (void)scrollViewWillBeginDragging:(UIScrollView *)scrollView | 用户开始拖动 scrollView 时触发 | 可用于暂停动画、记录起始位置等 |
| - (void)scrollViewWillEndDragging:(UIScrollView *)scrollView withVelocity:(CGPoint)velocity targetContentOffset:(inout CGPoint *)targetContentOffset | 手指即将离开屏幕,即将触发减速滑动时调用 | 可用于自定义目标滚动位置(翻页)等 |
| - (void)scrollViewWillBeginDecelerating:(UIScrollView *)scrollView | 用户松手后,scrollView 开始减速时调用 | 可用于记录状态、加载新内容提示等 |
| - (void)scrollViewDidEndDecelerating:(UIScrollView *)scrollView | 减速完成、滚动完全停止时触发 | 常用于:滚动结束后更新页码、加载数据 |
| - (void)scrollViewDidEndScrollingAnimation:(UIScrollView *)scrollView | 使用 setContentOffset:animated:或 scrollRectToVisible:animated:触发的滚动动画结束时调用 | 常用于:程序自动滚动后执行逻辑,比如跳转到特定位置后加载内容 |
#import "ViewController.h"@interface ViewController ()@end@implementation ViewController- (void)viewDidLoad {[super viewDidLoad];_scrolView = [[UIScrollView alloc] init];CGRect screenBounds = [[UIScreen mainScreen] bounds];_scrolView.frame = CGRectMake(0, 0, screenBounds.size.width, screenBounds.size.height*0.75);_scrolView.bounces = YES;//回弹效果,即滑到底后会不会继续拉动//_scrolView.userInteractionEnabled = NO;//是否接受触碰事件,yes接受,no不接受_scrolView.contentSize = CGSizeMake(screenBounds.size.width, screenBounds.size.height * 5 * 0.75);for (int i = 0; i < 5; i++) {NSString* str = [NSString stringWithFormat:@"image%d.jpg", i + 1];UIImage* image = [UIImage imageNamed:str];UIImageView* iView = [[UIImageView alloc] initWithImage:image];iView.frame = CGRectMake(0, screenBounds.size.height * i * 0.75, screenBounds.size.width, screenBounds.size.height * 0.75);[_scrolView addSubview:iView];}[self.view addSubview:_scrolView];_scrolView.contentOffset = CGPointMake(0, 0);_scrolView.pagingEnabled = NO;//是否开启分页效果。这里禁用了分页滑动(一个屏幕一页)。_scrolView.delegate = self;//设置 scrollView 的代理对象为当前控制器,用于接收滑动相关事件(实现代理方法)。// Do any additional setup after loading the view.
}
- (void)touchesBegan:(NSSet<UITouch *> *)touches withEvent:(UIEvent *)event {CGRect screenBounds = [[UIScreen mainScreen] bounds];[_scrolView scrollRectToVisible:CGRectMake(0, 0, screenBounds.size.width, screenBounds.size.height * 0.75) animated:YES];
}
//当视图移动时,都会调用这个函数
//调用这个协议的滚动视图对象
//使用这个函数来监控滚动视图的位置
- (void)scrollViewDidScroll:(UIScrollView *)scrollView {CGFloat offsetY = scrollView.contentOffset.x;NSLog(@"y = %lf", offsetY);CGFloat hight = scrollView.frame.size.height;NSInteger page = (scrollView.contentOffset.y + hight / 2) / hight;NSLog(@"当前页数:%ld", (long)page);
}//结束拖动的时候调用这个函数
- (void)scrollViewDidEndScrollingAnimation:(UIScrollView *)scrollView {NSLog(@"结束拖动的时候调用这个函数");
}
//滚动视图即将开始被拖动的时候
- (void)scrollViewWillBeginDragging:(UIScrollView *)scrollView {NSLog(@"滚动视图即将开始被拖动的时候");
}
//即将结束拖动的时候调用
-(void)scrollViewWillEndDragging:(UIScrollView *)scrollView withVelocity:(CGPoint)velocity targetContentOffset:(inout CGPoint *)targetContentOffset {NSLog(@"即将结束拖动的时候调用");
}
//视图即将减速的时候
- (void)scrollViewWillBeginDecelerating:(UIScrollView *)scrollView {NSLog(@"视图即将减速的时候");
}
//视图即将结束减速的时候调用,视图停止的瞬间调用
- (void)scrollViewDidEndDecelerating:(UIScrollView *)scrollView {NSLog(@"视图即将结束减速的时候调用");
}
@end 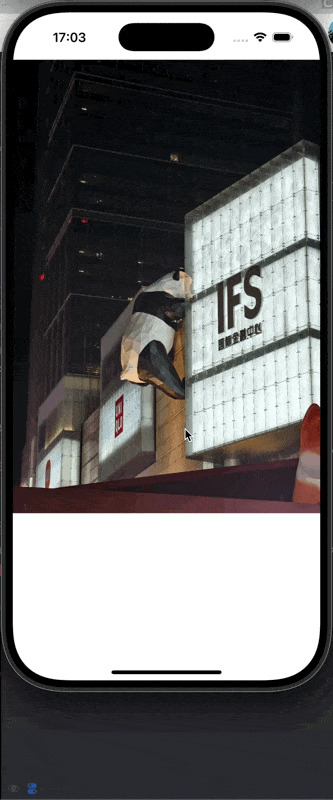
同理:
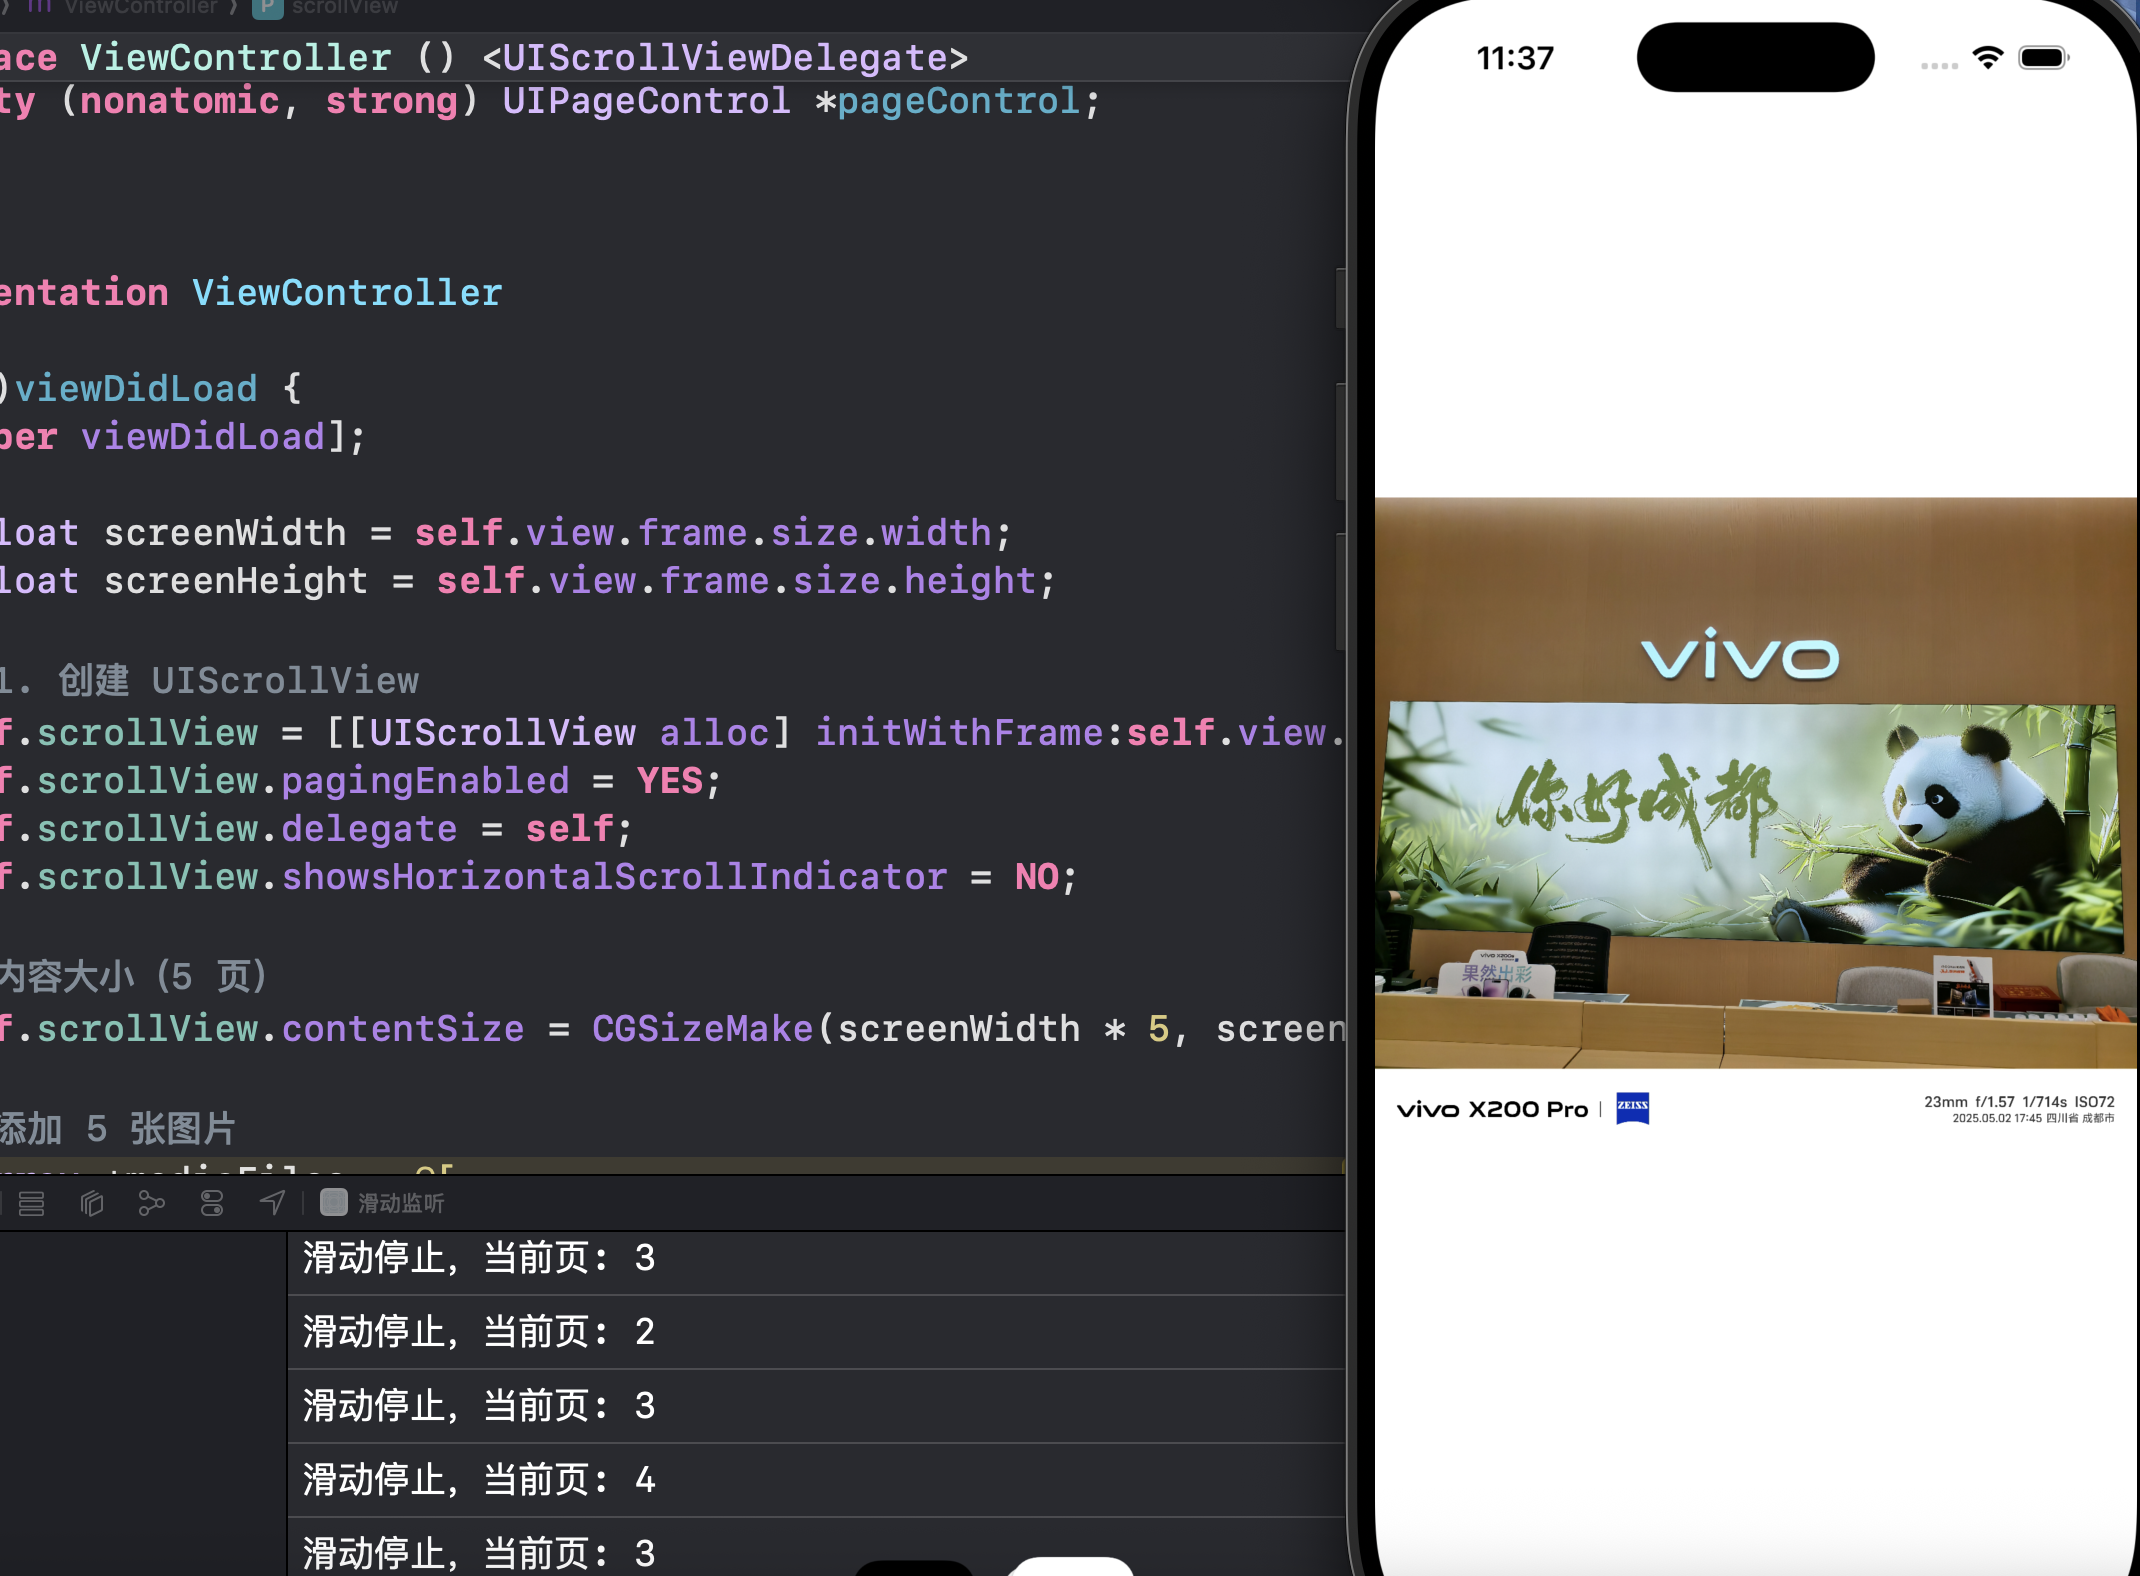
#import "ViewController.h"@interface ViewController () <UIScrollViewDelegate>@property (nonatomic, strong) UIScrollView *scrollView;
@property (nonatomic, strong) UIPageControl *pageControl;@end@implementation ViewController- (void)viewDidLoad {[super viewDidLoad];CGFloat screenWidth = self.view.frame.size.width;CGFloat screenHeight = self.view.frame.size.height;// 1. 创建 UIScrollViewself.scrollView = [[UIScrollView alloc] initWithFrame:self.view.bounds];self.scrollView.pagingEnabled = YES;self.scrollView.delegate = self;self.scrollView.showsHorizontalScrollIndicator = NO;// 内容大小(5 页)self.scrollView.contentSize = CGSizeMake(screenWidth * 5, screenHeight);// 添加 5 张图片NSArray *mediaFiles = @[@"image1.jpg",@"image2.jpg",@"image3.jpg",@"image4.jpg",@"image5.jpg"];for (int i = 0; i < 5; i++) {NSString *imageName = [NSString stringWithFormat:@"image%d.jpg", i + 1];UIImage *image = [UIImage imageNamed:imageName];UIImageView *imageView = [[UIImageView alloc] initWithImage:image];imageView.frame = CGRectMake(screenWidth * i, 0, screenWidth, screenHeight);imageView.contentMode = UIViewContentModeScaleAspectFit;[self.scrollView addSubview:imageView];}[self.view addSubview:self.scrollView];// 2. 创建 UIPageControlself.pageControl = [[UIPageControl alloc] initWithFrame:CGRectMake(0, screenHeight - 50, screenWidth, 30)];self.pageControl.numberOfPages = 5;self.pageControl.currentPage = 0;self.pageControl.pageIndicatorTintColor = [UIColor lightGrayColor];self.pageControl.currentPageIndicatorTintColor = [UIColor blackColor];[self.view addSubview:self.pageControl];
}#pragma mark - UIScrollViewDelegate// 滚动时持续触发
- (void)scrollViewDidScroll:(UIScrollView *)scrollView {CGFloat width = scrollView.frame.size.width;NSInteger page = (scrollView.contentOffset.x + width / 2) / width;self.pageControl.currentPage = page;
}// 滑动完全停止(也可以在这里设置当前页)
- (void)scrollViewDidEndDecelerating:(UIScrollView *)scrollView {NSLog(@"滑动停止,当前页: %ld", (long)self.pageControl.currentPage);
}@end
UIAlertController和UIActivityIndicatorView
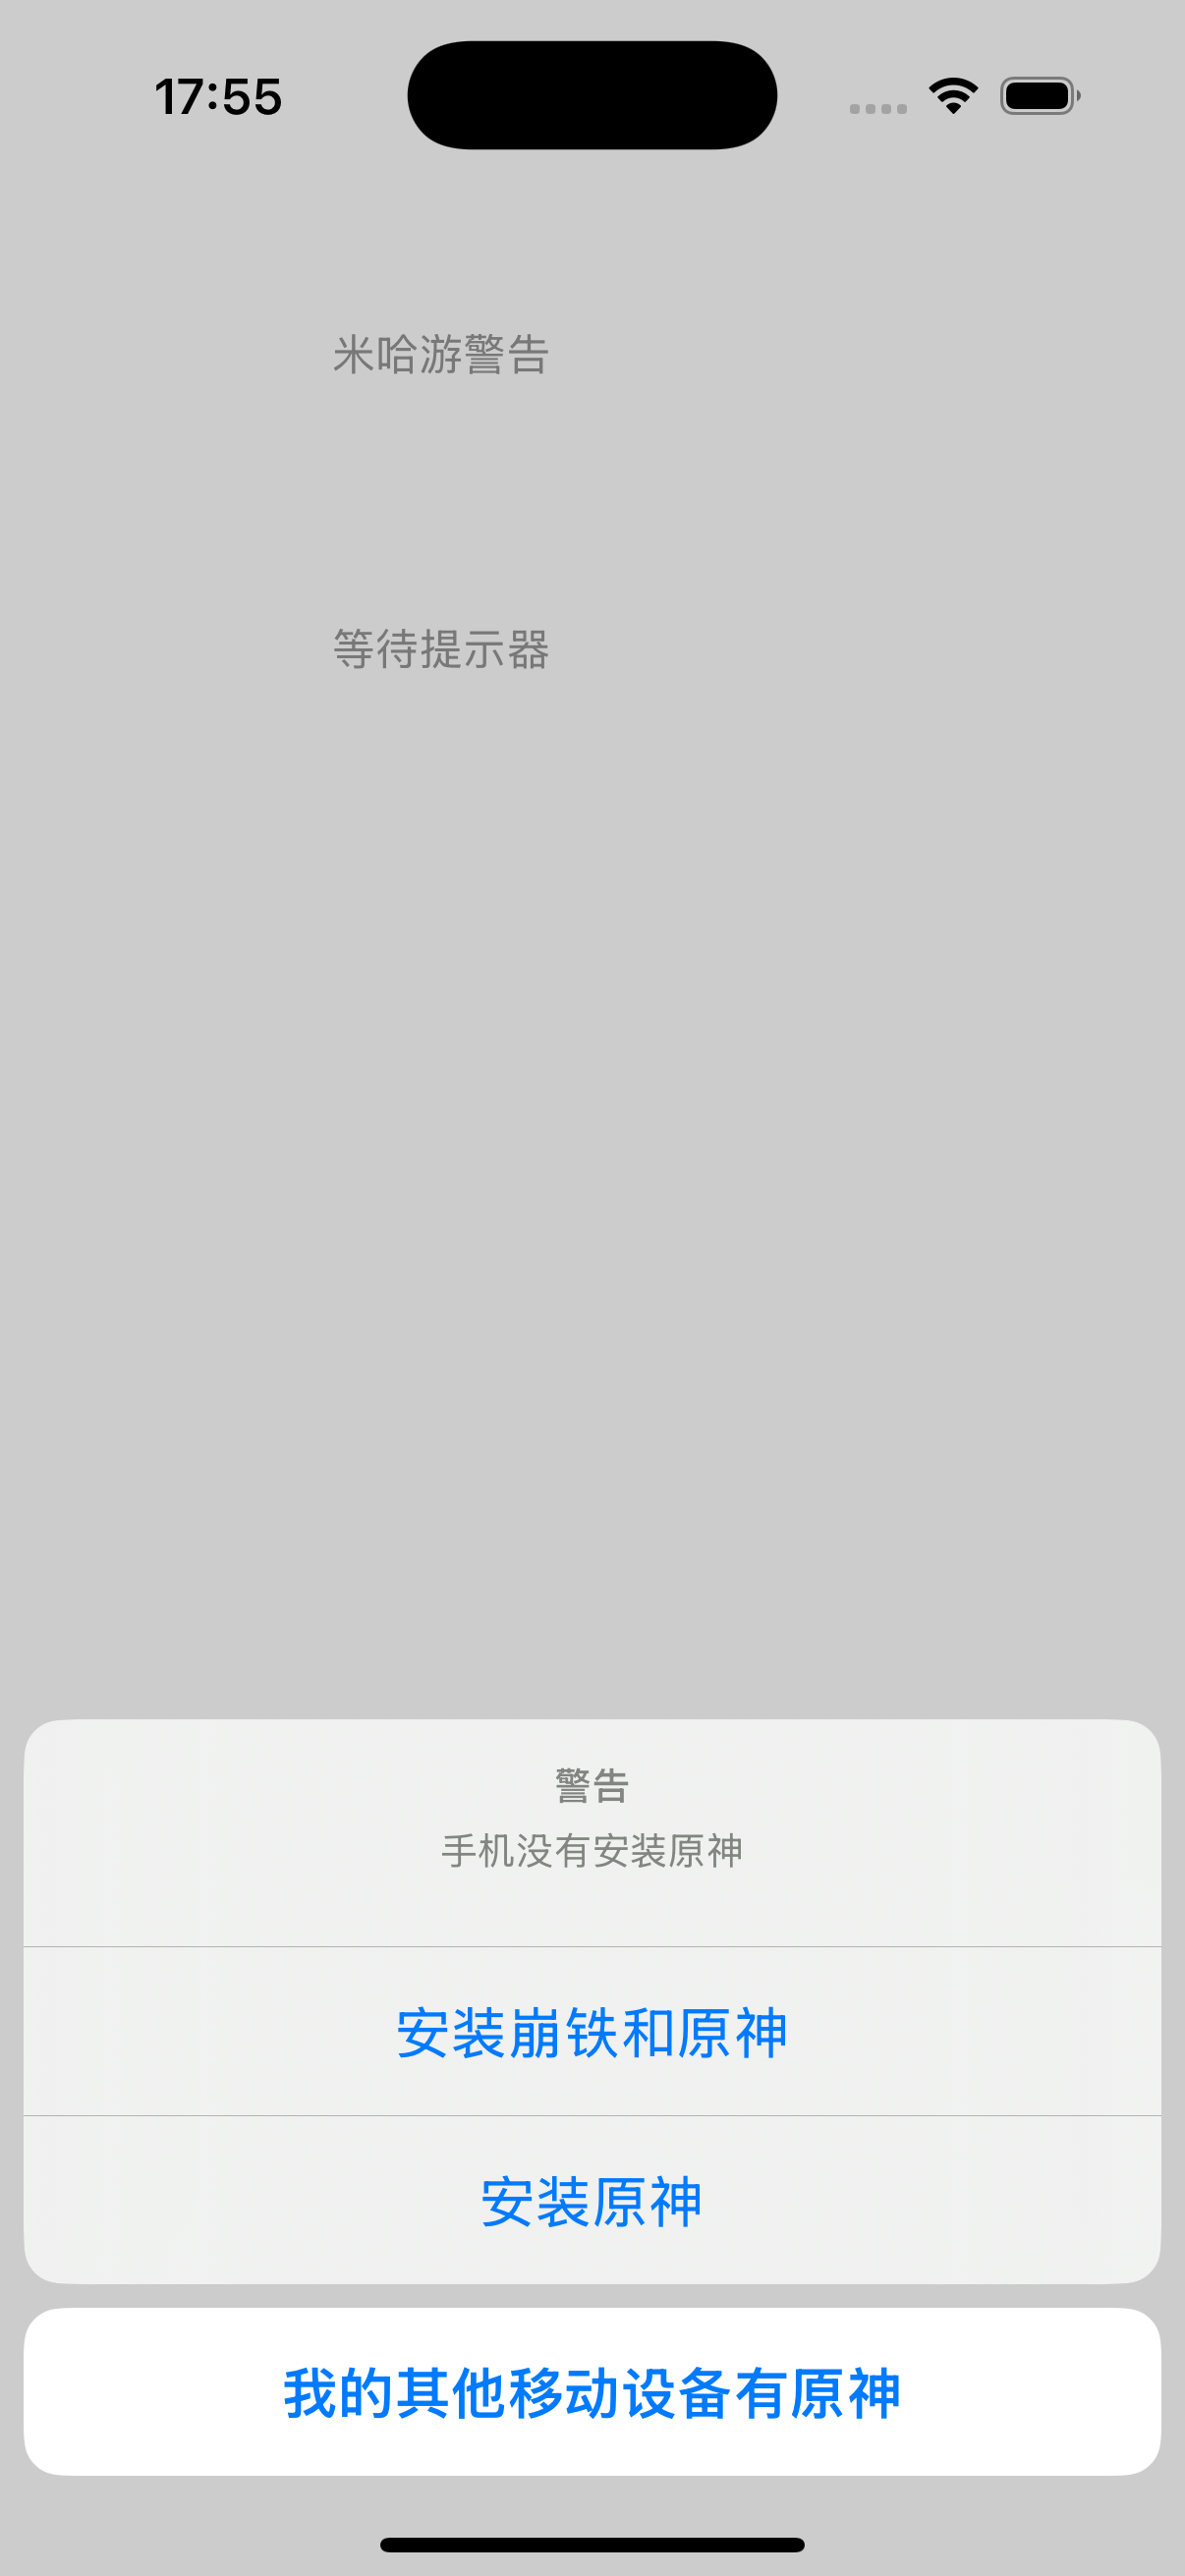
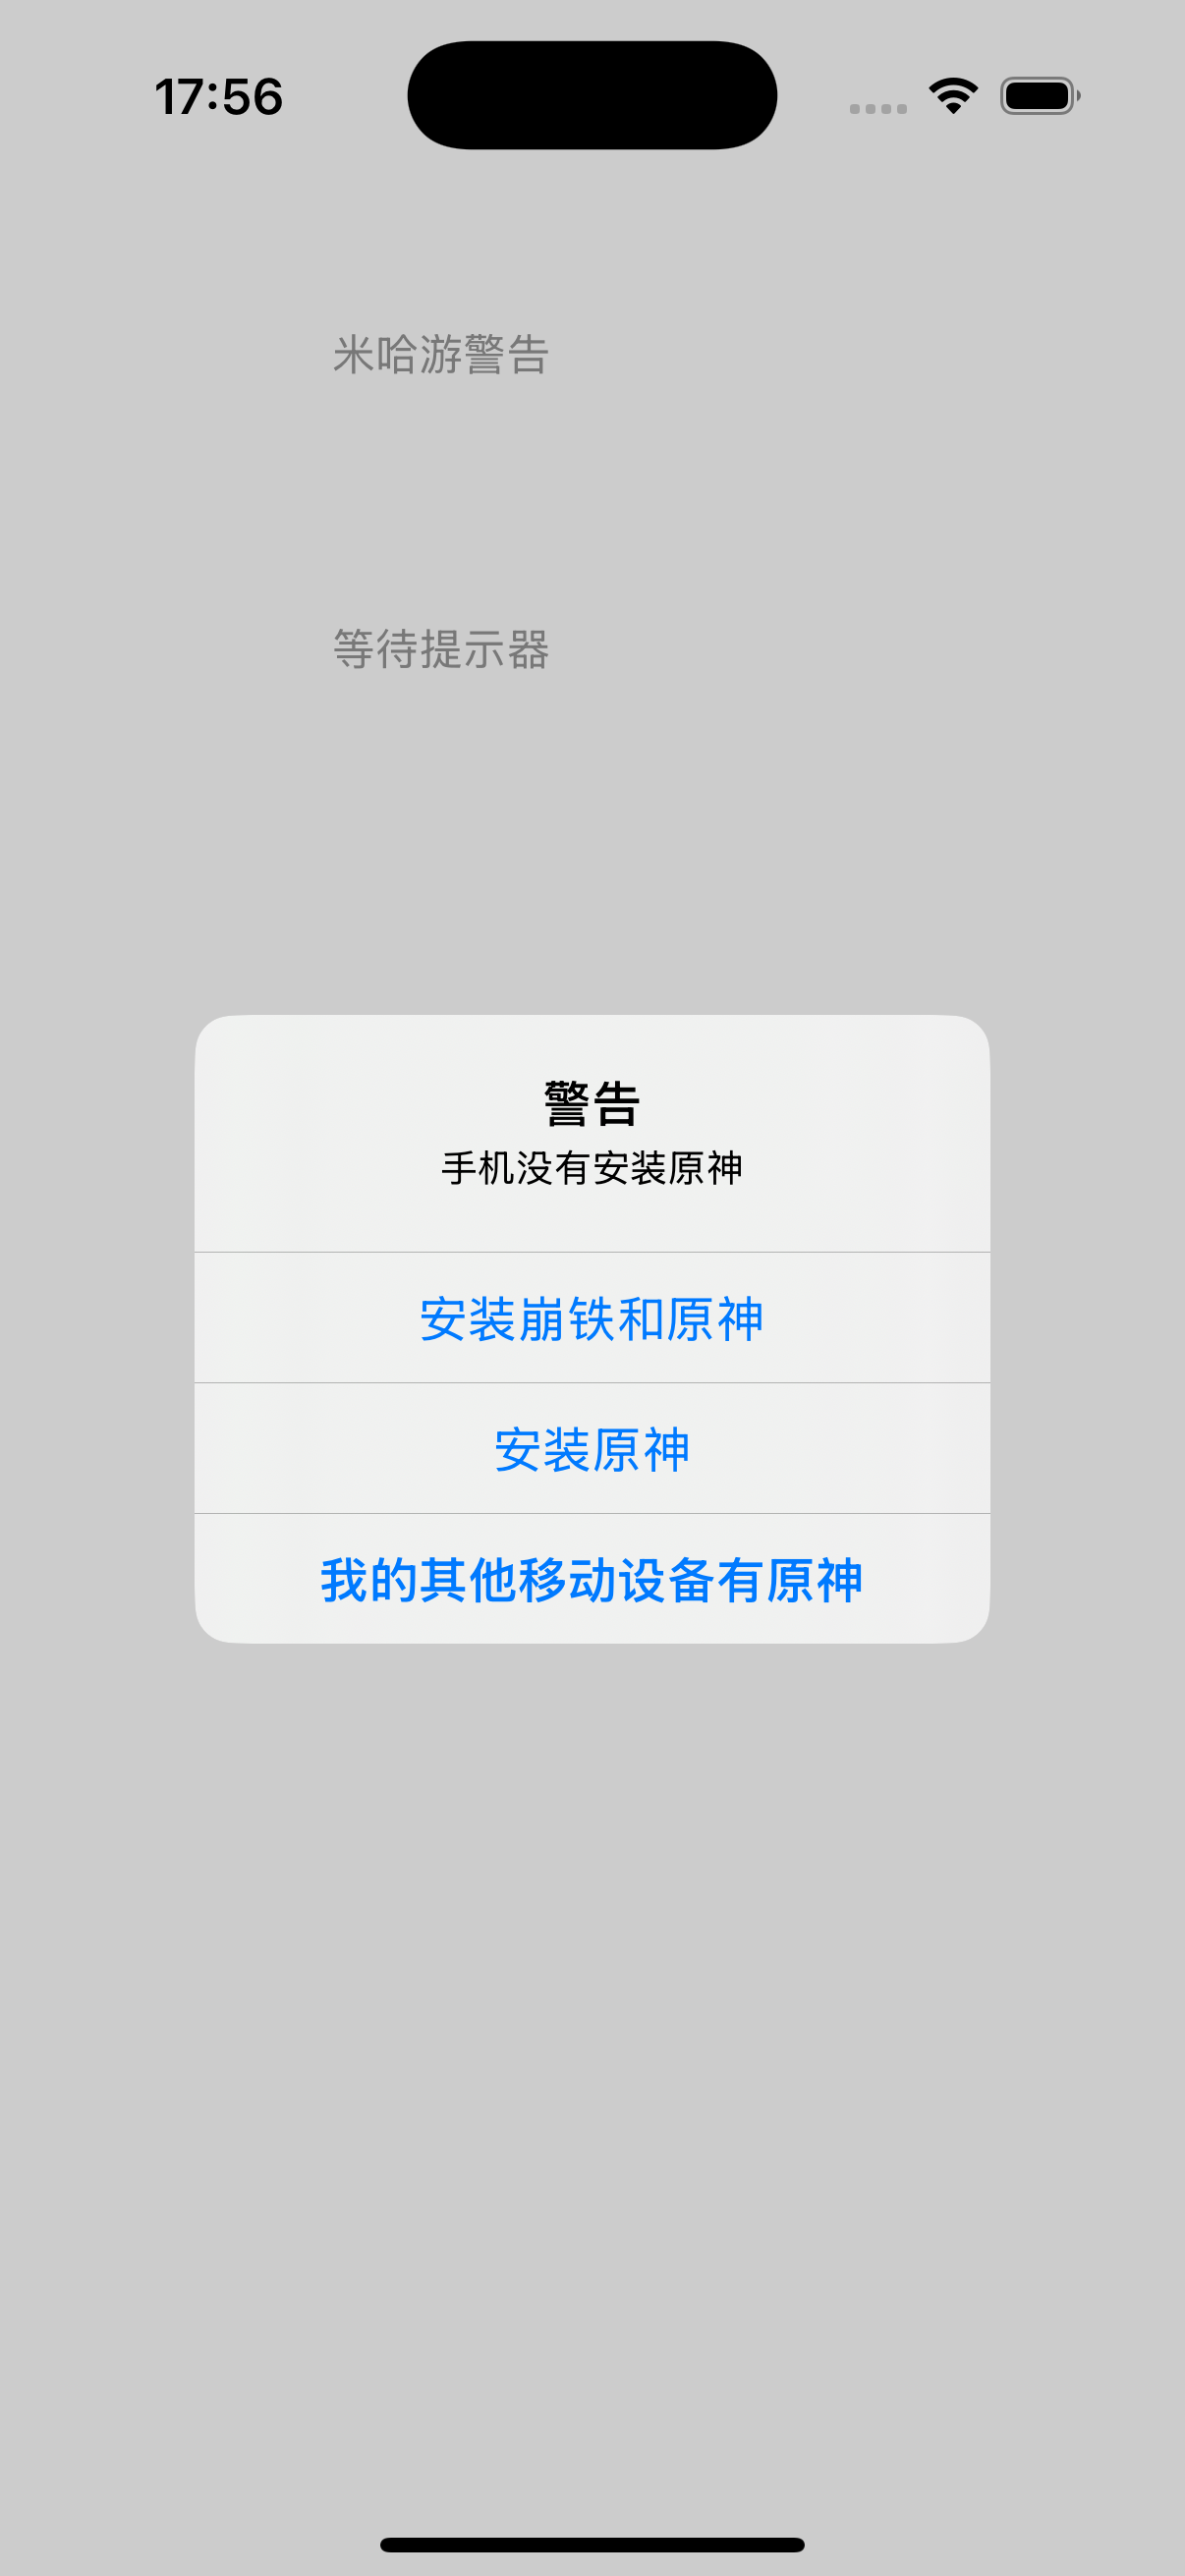
#import "ViewController.h"@interface ViewController ()@end@implementation ViewController- (void)viewDidLoad {[super viewDidLoad];for (int i = 0; i < 2; i++) {UIButton* btn = [UIButton buttonWithType:UIButtonTypeRoundedRect];btn.frame = CGRectMake(100, 100 + 100 * i, 100, 40);if (i == 0) {[btn setTitle:@"米哈游警告" forState:UIControlStateNormal];} else if (i == 1) {[btn setTitle:@"等待提示器" forState:UIControlStateNormal];}btn.tag = 101 + i;[btn addTarget:self action:@selector(press:) forControlEvents:UIControlEventTouchUpInside];[self.view addSubview: btn];}// Do any additional setup after loading the view.
}
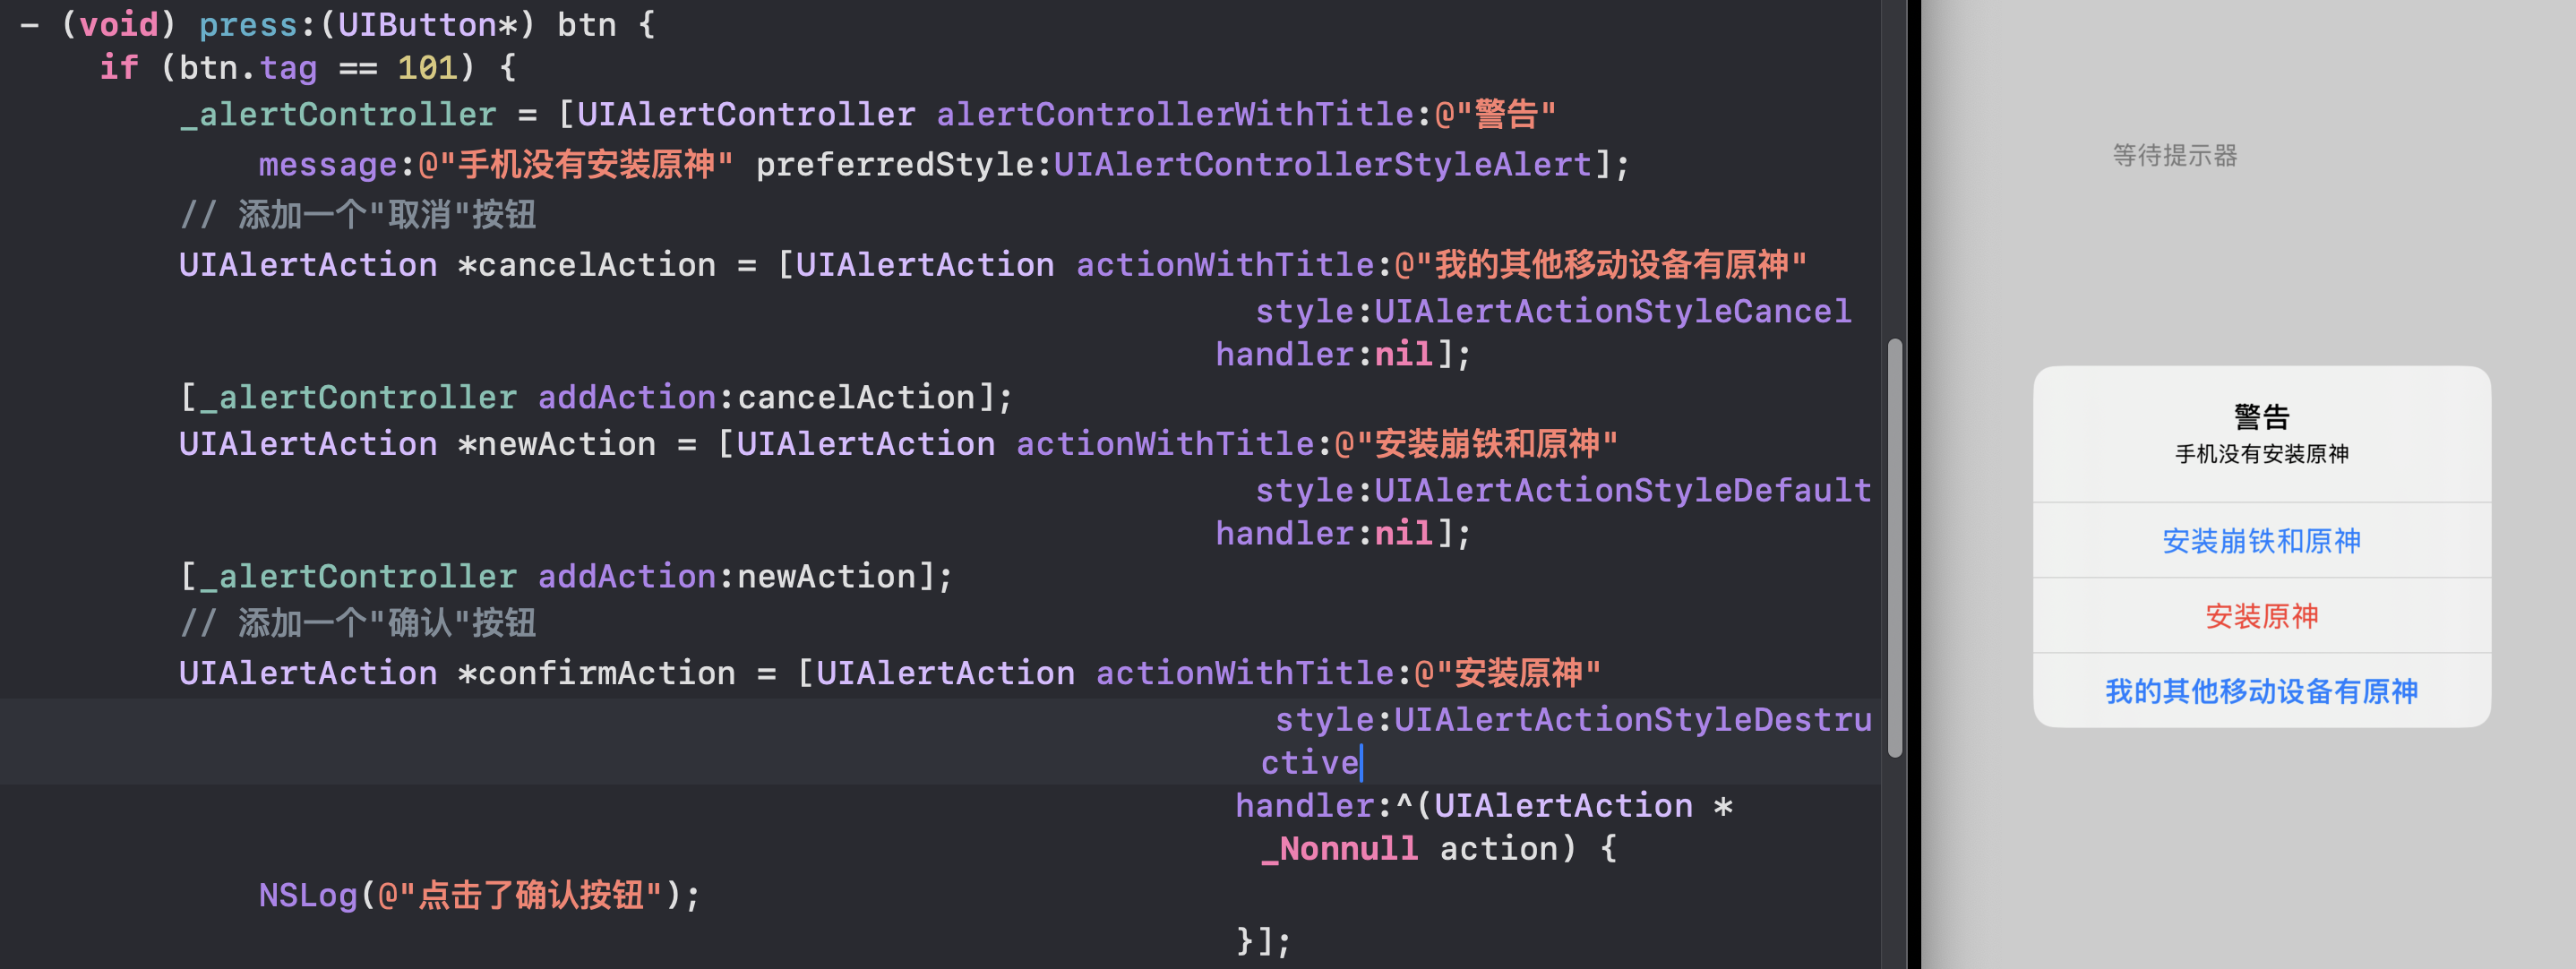
- (void) press:(UIButton*) btn {if (btn.tag == 101) {_alertController = [UIAlertController alertControllerWithTitle:@"警告" message:@"手机没有安装原神" preferredStyle:UIAlertControllerStyleAlert];// 添加一个"取消"按钮UIAlertAction *cancelAction = [UIAlertAction actionWithTitle:@"我的其他移动设备有原神"style:UIAlertActionStyleCancelhandler:nil];[_alertController addAction:cancelAction];UIAlertAction *newAction = [UIAlertAction actionWithTitle:@"安装崩铁和原神"style:UIAlertActionStyleDefaulthandler:nil];[_alertController addAction:newAction];// 添加一个"确认"按钮UIAlertAction *confirmAction = [UIAlertAction actionWithTitle:@"安装原神"style:UIAlertActionStyleDefaulthandler:^(UIAlertAction * _Nonnull action) {NSLog(@"点击了确认按钮");}];[_alertController addAction:confirmAction];[self presentViewController: _alertController animated:YES completion:nil];} else if (btn.tag == 102) {_activi = [[UIActivityIndicatorView alloc] initWithFrame:CGRectMake(100, 300, 80, 80)];_activi.activityIndicatorViewStyle = UIActivityIndicatorViewStyleMedium;[self.view addSubview:_activi];[_activi startAnimating];//[_activi stopAnimating];}
}
@end
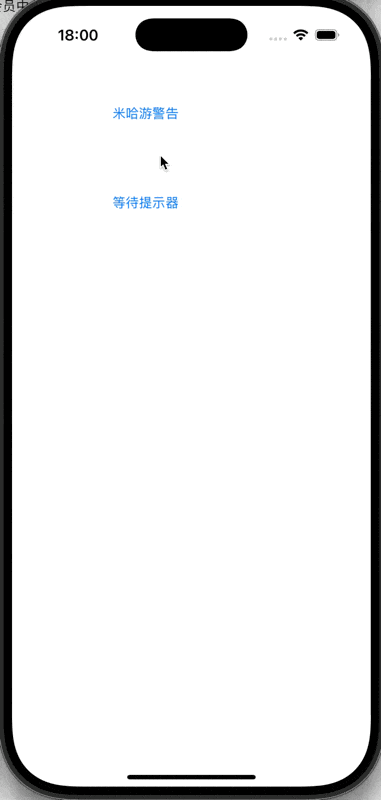
一些拓展:
-
preferredStyle:
-
UIAlertControllerStyleAlert:弹窗在屏幕中央
-
UIAlertControllerStyleActionSheet:底部弹出,适合操作选项选择(iPhone)
-
-
style 类型:
-
.Default:普通按钮
-
.Cancel:取消按钮(一个对话框最多只能有一个)
-
.Destructive:红色字体,表示“危险操作”
-