暗通道先验去雾算法实现
前言
雾天下的场景往往拍摄到的图像,存在对比度低、颜色失真等问题。基于暗通道先验的去雾算法由由何恺明等人在2009年提出,通过观察发现在绝大多数无雾图像的局部区域内,至少存在一个颜色通道的某些像素值非常低(接近0)。这一现象被称为暗通道先验。
本文实现的核心算法基于以下物理模型:
其中,I(x)是观测到的有雾图像;J(x)是要恢复的无雾图像;t(x)是透射率图;A是全局大气光。
算法实现
暗通道先验
def dark_channel(self, img):"""计算暗通道 (B, C, H, W) -> (B, H, W)"""return torch.min(img, dim=1)[0] # 取RGB通道最小值暗通道计算是算法的核心步骤,它通过取RGB三个通道的最小值来获得每个像素位置的暗通道值。这一操作有效地捕捉了图像中最暗的区域,这些区域通常是雾浓度最高的区域。
大气光估计
def estimate_atmosphere(self, img, dark_ch):"""估计大气光A"""B, H, W = dark_ch.shape# 选择暗通道中前0.1%最亮的像素num_pixels = int(H * W * self.top_percent)flattened_dark = dark_ch.view(B, -1)indices = torch.topk(flattened_dark, num_pixels, dim=1)[1]# 获取原始图像中对应位置的像素atmosphere = []for b in range(B):selected_pixels = img[b, :, indices[b] // W, indices[b] % W]atmosphere.append(torch.max(selected_pixels, dim=1)[0])return torch.stack(atmosphere).unsqueeze(-1).unsqueeze(-1)大气光A的估计基于一个关键观察,有雾图像中最亮的像素通常对应于大气光。算法选择暗通道中最亮的top_percent(默认为0.1%)像素,然后在原始图像中取这些位置对应像素的最大值作为大气光估计。
透射率计算
def transmission(self, dark_ch):"""计算透射率图"""transmission = 1 - self.omega * dark_chreturn torch.clamp(transmission, min=self.t0, max=1.0)透射率t(x)表示光线通过大气介质到达相机的比例。根据暗通道先验,透射率可以近似表示为:
其中ω是调整参数(默认为0.95),用于控制去雾程度。t0参数(默认为0.1)用于避免除零错误。
图像恢复
def forward(self, x):# 输入形状: (B, C, H, W),值域[0,1]if x.min() < 0: # 检测到输入是[-1,1]范围x = (x + 1) / 2 # 转换到[0,1]dark = self.dark_channel(x)A = self.estimate_atmosphere(x, dark)transmission = self.transmission(dark)# 根据物理模型恢复图像J = (x - A) / transmission + Areturn torch.clamp(J, 0, 1)图像恢复基于物理模型的逆向推导。算法首先自动检测输入范围(支持[0,1]或[-1,1]),然后结合前面计算的大气光A和透射率图t(x)恢复无雾图像J(x)。
完整算法
因为要做去雾实验的基线测试,看看所有的论文都在做对比,所以就写了一个,顺便做个记录。
import torch
import torch.nn as nnclass DCP(nn.Module):def __init__(self, omega=0.95, t0=0.1, top_percent=0.1):super(DCP, self).__init__()self.omega = omegaself.t0 = t0self.top_percent = top_percent  # 用于估计大气光的像素百分比def dark_channel(self, img):"""计算暗通道 (B, C, H, W) -> (B, H, W)"""return torch.min(img, dim=1)[0]  # 取RGB通道最小值def estimate_atmosphere(self, img, dark_ch):"""估计大气光A"""B, H, W = dark_ch.shape# 选择暗通道中前0.1%最亮的像素num_pixels = int(H * W * self.top_percent)flattened_dark = dark_ch.view(B, -1)indices = torch.topk(flattened_dark, num_pixels, dim=1)[1]# 获取原始图像中对应位置的像素atmosphere = []for b in range(B):selected_pixels = img[b, :, indices[b] // W, indices[b] % W]atmosphere.append(torch.max(selected_pixels, dim=1)[0])return torch.stack(atmosphere).unsqueeze(-1).unsqueeze(-1)def transmission(self, dark_ch):"""计算透射率图"""transmission = 1 - self.omega * dark_chreturn torch.clamp(transmission, min=self.t0, max=1.0)def forward(self, x):# 输入形状: (B, C, H, W),值域[0,1]if x.min() < 0:  # 检测到输入是[-1,1]范围x = (x + 1) / 2  # 转换到[0,1]dark = self.dark_channel(x)A = self.estimate_atmosphere(x, dark)transmission = self.transmission(dark)# 根据物理模型恢复图像J = (x - A) / transmission + Areturn torch.clamp(J, 0, 1)
评估指标
import torch
import torch.nn.functional as F
from pytorch_msssim import ssimdef calculate_index(output, target):# output = output*0.5 + 0.5  # target = target*0.5 + 0.5psnr = 10 * torch.log10(1/F.mse_loss(output, target)).item()_, _, H, W = output.size()down_ratio = max(1, round(min(H, W) / 256))ssim_val = ssim(F.adaptive_avg_pool2d(output, (int(H / down_ratio), int(W / down_ratio))),F.adaptive_avg_pool2d(target, (int(H / down_ratio), int(W / down_ratio))),data_range=1, size_average=False).item()return psnr, ssim_val
这里采用的是常见的psnr和ssim。其他的算法是在-1到1的范围内的,而dcp这里是要在0到1的范围内,所以要将这之间的转换搞清楚,不然会莫名的偏大。
去雾效果
这里就是将图像转换为常见的bchw的格式,然后输入到dcp网络里面。因为我自己实现过,用起来比较的方便。
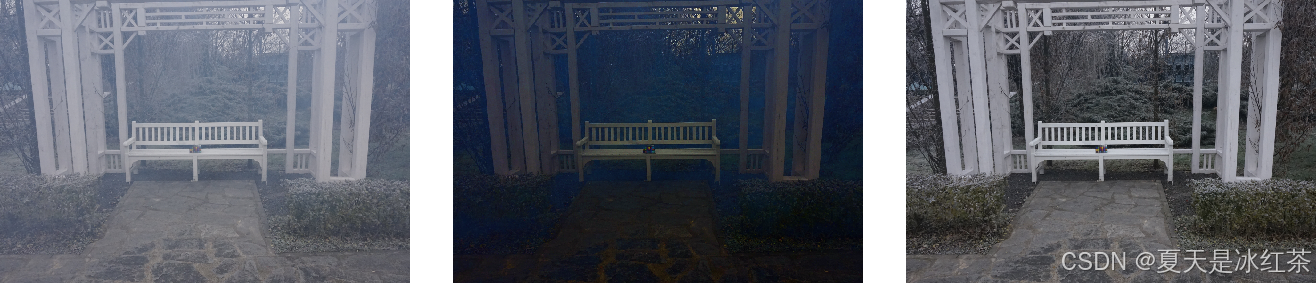
import pyzjrhazy_path = r"E:\PythonProject\DehazeProject\data\RICE_DATASET\test\hazy\21.png"gt_path = r"E:\PythonProject\DehazeProject\data\RICE_DATASET\test\GT\21.png"hazy_image = pyzjr.read_image(hazy_path, 'torch', target_shape=(512, 512)).cuda()target_image = pyzjr.read_image(gt_path, 'torch', target_shape=(512, 512)).cuda()dcp = DCP().cuda()out_image = dcp(hazy_image)p, s = calculate_index(out_image, target_image)print(p, s)pyzjr.imwrite("1.png", out_image)接下来看看去雾的效果吧,下面的排列方式从左到右分别为有雾图像,dcp去雾后图像,对应无雾的清晰图像。

psnr为19.14563298225403,ssim为0.5990961790084839。
psnr为11.955822706222534,ssim为0.3674911856651306。
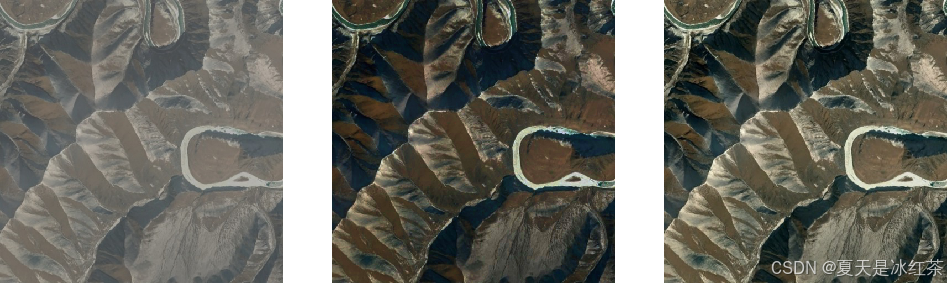
psnr为18.325926065444946,ssim为0.7651581168174744。
感觉dcp是在合成的浅浅朦胧雾上效果还行,问题也到是蛮多的。
参考文章
HE K M, SUN J, TANG X O. Single image haze removal using dark channel prior[J]. IEEE Transactions on Pattern Analysis and Machine Intelligence, 2009, 33(12): 2341-2353.
pytorch实现DCP暗通道先验去雾算法及其onnx导出_dcp算法代码-CSDN博客
基于 opencv暗通道去雾算法的实现与应用_opencv 去雾-CSDN博客