零基础设计模式——结构型模式 - 外观模式
第三部分:结构型模式 - 5. 外观模式 (Facade Pattern)
在学习了装饰器模式如何动态地为对象添加功能后,我们来探讨外观模式。外观模式隐藏系统的复杂性,并向客户端提供了一个客户端可以访问系统的接口。这种类型的设计模式属于结构型模式,它向现有的系统添加一个接口,来隐藏系统的复杂性。
- 核心思想:为子系统中的一组接口提供一个统一的高层接口,使得子系统更容易使用。
外观模式 (Facade Pattern)
“为子系统中的一组接口提供一个统一的、高层的接口,使得子系统更容易使用。” (Provide a unified interface to a set of interfaces in a subsystem. Facade defines a higher-level interface that makes the subsystem easier to use.)
想象一下启动一台家庭影院系统。你可能需要按顺序执行多个操作:打开电视机、打开DVD播放器、打开音响、调暗灯光、放下投影幕布等。每个设备都有自己的控制接口,操作起来很繁琐。
如果有一个“一键观影”的遥控器按钮(外观),按一下它,它内部会自动协调所有这些设备完成上述所有步骤。这个按钮就是外观,它简化了与复杂家庭影院子系统的交互。
- 子系统 (Subsystem):电视机、DVD播放器、音响、灯光控制器、投影幕布控制器等,它们各自有复杂的接口。
- 外观 (Facade):家庭影院遥控器上的“一键观影”功能,它提供了一个简单的
watchMovie()方法。
1. 目的 (Intent)
外观模式的主要目的:
- 简化接口:为复杂的子系统提供一个简单、统一的入口点。客户端只需要与外观对象交互,而不需要了解子系统内部的复杂结构和依赖关系。
- 降低耦合:将客户端与子系统解耦。子系统的内部实现可以改变,只要外观接口不变,客户端代码就不受影响。
- 分层:帮助构建分层系统。外观可以作为不同层之间的通信接口。
2. 生活中的例子 (Real-world Analogy)
-
电脑开机:
- 当你按下电脑的电源按钮时,实际上触发了一系列复杂的操作:CPU启动、内存检查、硬盘加载操作系统、初始化各种硬件驱动等。
- 电源按钮(外观)为你屏蔽了这些底层细节,提供了一个简单的
powerOn()接口。
-
去餐厅点餐:
- 你告诉服务员(外观)你要点什么菜。
- 服务员会去协调厨房(子系统:厨师、配菜员、洗碗工等)为你准备食物。
- 你不需要直接和厨师或配菜员打交道,服务员简化了这个过程。
-
汽车的一键启动:
- 按下“Start”按钮,汽车内部会完成点火、供油、检查传感器等一系列操作。
- “Start”按钮(外观)简化了启动汽车的复杂过程。
-
银行的客服电话或柜台:
- 你想办理一项业务(如查询余额、转账、挂失)。
- 你联系客服(外观)或去柜台(外观),他们会调用银行内部的多个系统(账户系统、交易系统、风控系统等)来完成你的请求。
3. 结构 (Structure)
外观模式通常包含以下角色:
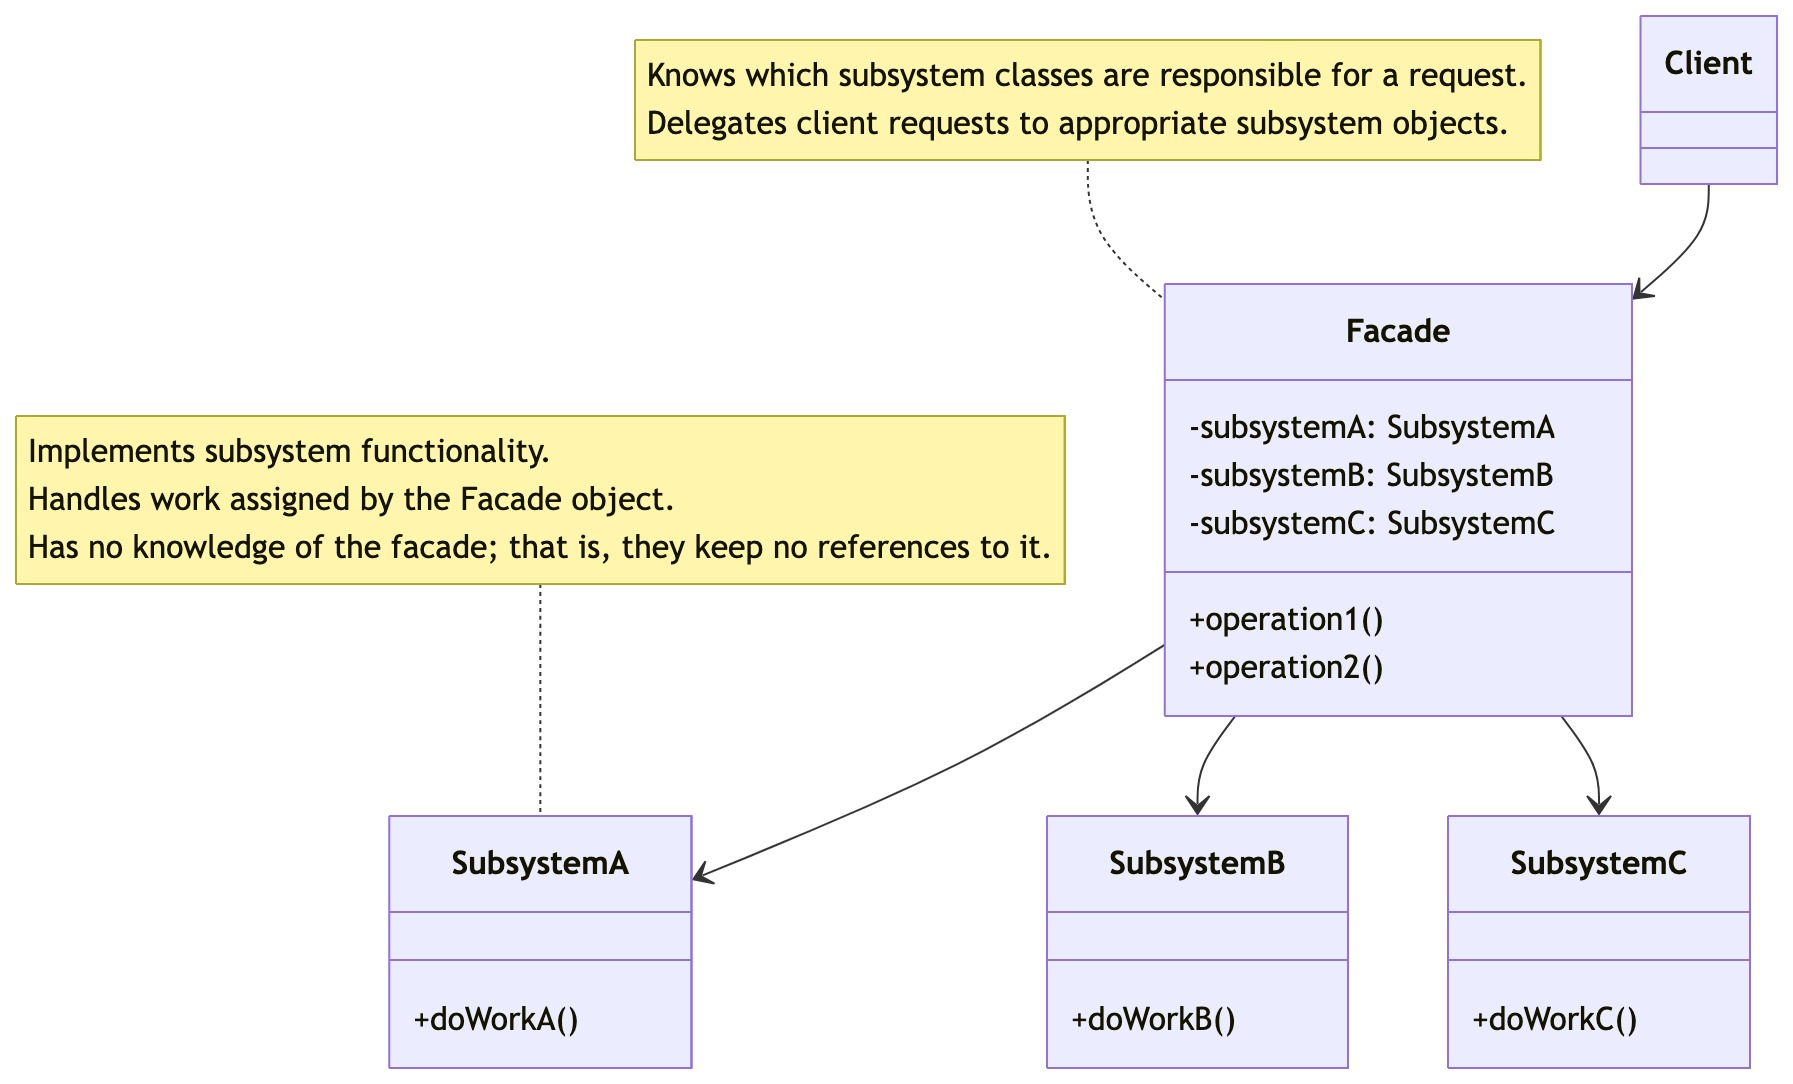
- Facade (外观类):
- 知道哪些子系统类负责处理请求。
- 将客户端的请求代理给适当的子系统对象。
- 它不添加任何新功能,只是封装调用。
- Subsystem classes (子系统类):
- 实现子系统的功能。
- 处理由 Facade 对象指派的任务。
- 它们对外观一无所知,即没有对外观的引用。
- Client (客户端):通过 Facade 与子系统交互。
工作流程:
- 客户端创建一个
Facade对象。 - 客户端调用
Facade对象提供的简化方法。 Facade对象接收到请求后,会根据需要调用一个或多个子系统类的方法来完成任务。- 子系统类执行具体的操作。
Facade可能会对子系统的结果进行组合或转换,然后返回给客户端。
客户端通常只与 Facade 交互,但如果需要,也可以直接访问子系统类(外观模式并不阻止直接访问子系统)。
4. 适用场景 (When to Use)
- 当你需要为一个复杂子系统提供一个简单的接口时。外观可以提供一个高层接口,使得子系统更易于使用。
- 当客户端与多个子系统之间存在大量的依赖关系时。引入外观将客户端与子系统解耦,从而提高子系统的独立性和可移植性。
- 当你希望对子系统进行分层时。使用外观定义每层入口点,如果子系统发生变化,只需修改外观的实现,而不会影响到调用外观的客户端。
- 当你想封装遗留代码或第三方库,提供一个更现代、更简洁的API时。
5. 优缺点 (Pros and Cons)
优点:
- 降低了客户端和子系统之间的耦合度:客户端只需要知道外观接口,而不需要了解子系统的内部实现。子系统的修改对客户端是透明的。
- 简化了客户端的使用:外观提供了一个高层接口,使得客户端更容易使用复杂的子系统。
- 提高了灵活性和可维护性:子系统可以独立地演化,只要外观接口不变。
- 更好地划分了访问层次:对于大型系统,可以使用外观模式将系统划分为若干个子系统,每个子系统都有一个外观接口,从而使得系统结构更加清晰。
缺点:
- 可能产生一个“上帝对象” (God Object):如果外观类承担了过多的职责,它可能会变得非常庞大和复杂,违反单一职责原则。
- 不符合开闭原则:如果需要为子系统增加新的行为,通常需要修改外观类的代码。当然,也可以通过引入新的外观类或使用其他模式(如装饰器或策略模式)来扩展外观的功能。
- 外观可能隐藏了子系统的有用特性:如果外观接口设计得过于简单,可能会屏蔽掉子系统提供的一些高级或不常用的功能,客户端如果需要这些功能,仍可能需要直接访问子系统。
6. 实现方式 (Implementations)
让我们以一个简化的计算机启动过程为例。计算机启动涉及CPU、内存、硬盘等多个子系统。
子系统类 (CPU, Memory, HardDrive)
// cpu.go (Subsystem Class)
package computerimport "fmt"type CPU struct{}func (c *CPU) Freeze() {fmt.Println("CPU: Freezing...")
}func (c *CPU) Jump(position int64) {fmt.Printf("CPU: Jumping to address %#x\n", position)
}func (c *CPU) Execute() {fmt.Println("CPU: Executing commands...")
}// memory.go (Subsystem Class)
package computerimport "fmt"type Memory struct{}func (m *Memory) Load(position int64, data []byte) {fmt.Printf("Memory: Loading data to address %#x (data length: %d)\n", position, len(data))// 实际加载数据到内存
}// hard_drive.go (Subsystem Class)
package computerimport "fmt"type HardDrive struct{}func (hd *HardDrive) Read(lba int64, size int) []byte {fmt.Printf("HardDrive: Reading %d bytes from LBA %d\n", size, lba)// 实际从硬盘读取数据return []byte("boot_sector_data_from_hdd")
}
// CPU.java (Subsystem Class)
package com.example.computer.subsystems;public class CPU {public void freeze() {System.out.println("CPU: Freezing...");}public void jump(long position) {System.out.printf("CPU: Jumping to address %#x%n", position);}public void execute() {System.out.println("CPU: Executing commands...");}
}// Memory.java (Subsystem Class)
package com.example.computer.subsystems;public class Memory {public void load(long position, byte[] data) {System.out.printf("Memory: Loading data to address %#x (data length: %d)%n", position, data.length);// 实际加载数据到内存}
}// HardDrive.java (Subsystem Class)
package com.example.computer.subsystems;public class HardDrive {public byte[] read(long lba, int size) {System.out.printf("HardDrive: Reading %d bytes from LBA %d%n", size, lba);// 实际从硬盘读取数据return "boot_sector_data_from_hdd".getBytes();}
}
外观类 (ComputerFacade)
// computer_facade.go (Facade Class)
package computerimport "fmt"const BOOT_ADDRESS int64 = 0x7C00
const BOOT_SECTOR_LBA int64 = 0
const SECTOR_SIZE int = 512// ComputerFacade 外观类
type ComputerFacade struct {cpu       *CPUmemory    *MemoryhardDrive *HardDrive
}func NewComputerFacade() *ComputerFacade {return &ComputerFacade{cpu:       &CPU{},memory:    &Memory{},hardDrive: &HardDrive{},}
}// Start 提供一个简化的启动接口
func (cf *ComputerFacade) Start() {fmt.Println("ComputerFacade: Starting computer...")cf.cpu.Freeze()                                      // 1. CPU 准备bootData := cf.hardDrive.Read(BOOT_SECTOR_LBA, SECTOR_SIZE) // 2. 从硬盘读取引导扇区cf.memory.Load(BOOT_ADDRESS, bootData)               // 3. 加载引导扇区到内存cf.cpu.Jump(BOOT_ADDRESS)                           // 4. CPU 跳转到引导地址cf.cpu.Execute()                                    // 5. CPU 开始执行fmt.Println("ComputerFacade: Computer started successfully.")
}// Shutdown (可以添加其他简化操作)
func (cf *ComputerFacade) Shutdown() {fmt.Println("ComputerFacade: Shutting down computer...")// 复杂的关机流程...fmt.Println("ComputerFacade: Computer shut down.")
}
// ComputerFacade.java (Facade Class)
package com.example.computer;import com.example.computer.subsystems.CPU;
import com.example.computer.subsystems.HardDrive;
import com.example.computer.subsystems.Memory;public class ComputerFacade {private static final long BOOT_ADDRESS = 0x7C00L;private static final long BOOT_SECTOR_LBA = 0L;private static final int SECTOR_SIZE = 512;private CPU cpu;private Memory memory;private HardDrive hardDrive;public ComputerFacade() {this.cpu = new CPU();this.memory = new Memory();this.hardDrive = new HardDrive();}// start 提供一个简化的启动接口public void startComputer() {System.out.println("ComputerFacade: Starting computer...");cpu.freeze();                                      // 1. CPU 准备byte[] bootData = hardDrive.read(BOOT_SECTOR_LBA, SECTOR_SIZE); // 2. 从硬盘读取引导扇区memory.load(BOOT_ADDRESS, bootData);               // 3. 加载引导扇区到内存cpu.jump(BOOT_ADDRESS);                            // 4. CPU 跳转到引导地址cpu.execute();                                     // 5. CPU 开始执行System.out.println("ComputerFacade: Computer started successfully.");}// shutdown (可以添加其他简化操作)public void shutdownComputer() {System.out.println("ComputerFacade: Shutting down computer...");// 复杂的关机流程...System.out.println("ComputerFacade: Computer shut down.");}
}
客户端使用
// main.go (示例用法)
/*
package mainimport ("./computer""fmt"
)func main() {fmt.Println("--- Client: Using Computer Facade ---")computer := computer.NewComputerFacade()computer.Start() // 客户端只需要调用一个简单的方法fmt.Println("\n--- Client: Later, shutting down computer ---")computer.Shutdown()// 如果需要,客户端仍然可以直接访问子系统(不推荐,除非外观未提供所需功能)// fmt.Println("\n--- Client: Directly accessing subsystem (not typical use of facade) ---")// cpu := &computer.CPU{}// cpu.Execute()
}
*/
// Main.java (示例用法)
/*
package com.example;import com.example.computer.ComputerFacade;
// import com.example.computer.subsystems.CPU; // For direct access examplepublic class Main {public static void main(String[] args) {System.out.println("--- Client: Using Computer Facade ---");ComputerFacade computer = new ComputerFacade();computer.startComputer(); // 客户端只需要调用一个简单的方法System.out.println("\n--- Client: Later, shutting down computer ---");computer.shutdownComputer();// 如果需要,客户端仍然可以直接访问子系统(不推荐,除非外观未提供所需功能)// System.out.println("\n--- Client: Directly accessing subsystem (not typical use of facade) ---");// CPU cpu = new CPU();// cpu.execute();}
}
*/
7. 与适配器模式的区别
外观模式和适配器模式都用于封装其他对象,但目的不同:
-
外观模式 (Facade):
- 意图:提供一个简化的、统一的接口来访问复杂的子系统。目标是“简化”接口。
- 解决的问题:降低客户端与复杂子系统之间的耦合,使子系统更易用。
- 接口:定义一个全新的、更高层的接口。
-
适配器模式 (Adapter):
- 意图:将一个类的接口转换成客户端期望的另一个接口。目标是“转换”或“适配”接口。
- 解决的问题:使原本由于接口不兼容而不能一起工作的类可以协同工作。
- 接口:适配已有的接口。
简单来说:
- 外观:我有一个复杂的系统,我想提供一个简单的“门面”让别人更容易使用它。
- 适配器:我有两个东西接口对不上,我想加个“转换头”让它们能接上。
8. 总结
外观模式通过提供一个统一的接口来封装子系统中一组复杂的接口,从而简化了客户端与子系统的交互。它有效地降低了耦合,提高了系统的可维护性和易用性。当你面对一个复杂的系统,并希望为客户端提供一个更简单、更直接的访问方式时,外观模式是一个非常好的选择。
记住它的核心:提供高层统一接口,简化子系统访问。