《仿盒马》app开发技术分享-- 地图选点(端云一体)
开发准备
上一节我们实现了地图的简单展示,这一节我们要实现的内容是,根据展示的地图,实现当前定位功能,当前位置的poi地址功能,以及列表的展示,给地图添加标记,展示自己的当前定位
功能分析
要想实现这些功能,首先我们需要在地图加载之前获取当前的经纬度,根据经纬度查询附近的poi地址,然后我们获取这些poi地址展示到列表内,同时我们根据当前位置计算出与列表内地址的直线差距
代码实现
首先我们在展示的地图中添加标记以及视线当前位置的蓝点展示
private marker?: map.Marker;
this.mapController = mapController;
let location = await geoLocationManager.getCurrentLocation();
this.mapController.setMyLocation(location);
this.mapController.setMyLocationEnabled(true);
this.mapController.setMyLocationControlsEnabled(true);
this.mapEventManager = this.mapController.getEventManager();let markerOptions: mapCommon.MarkerOptions = {position: {latitude: location.latitude,longitude: location.longitude},rotation: 0,visible: true,zIndex: 0,alpha: 1,anchorU: 0.5,anchorV: 1,clickable: true,draggable: true,flat: false};this.marker = await this.mapController.addMarker(markerOptions);this.marker!.setDraggable(false);this.marker!.setMarkerAnchor(1.0, 1.0);
这样我们就已经实现了地图上的标记以及当前位置的展示,我们执行一下代码查看一下效果
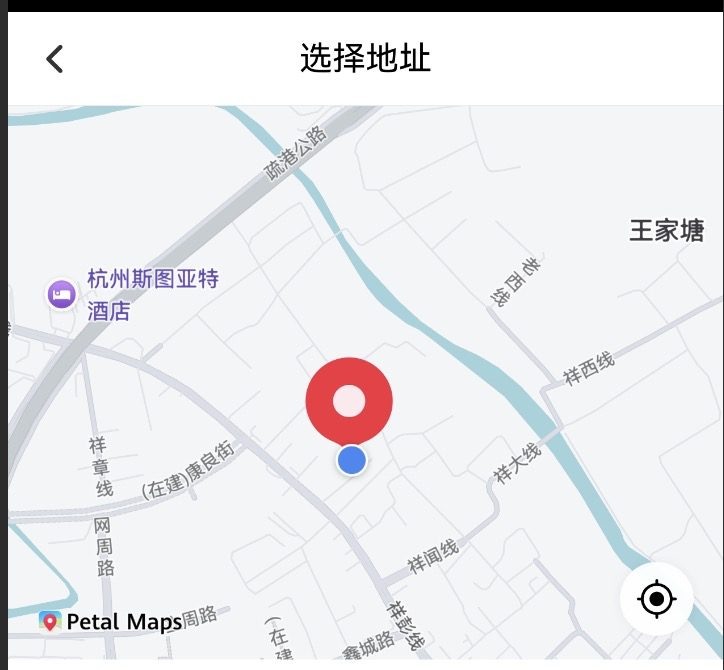
可以看到我们的定位小蓝点以及标记已经成功展示
接下来我们要实现的是获取到当前经纬度一定范围内的poi地址数据
首先定义一个加载完成的标识,以及接受列表
private addressList:Array<site.Site>|null=null
@State infoIsSuccess:boolean=false
然后根据当前的经纬度进行数据的请求
let params: site.NearbySearchParams = {
location: {
latitude: location.latitude,
longitude: location.longitude
},
radius: 5000,
poiTypes: [“EATING_DRINKING”,“SHOPPING”,“LEISURE”],
language: “ch”,
pageIndex: 1,
pageSize: 10
};
const result = await site.nearbySearch(params);
this.addressList=result.sites!
if (result.sites!.length>0) {
this.infoIsSuccess=true
}else {
this.infoIsSuccess=false
}
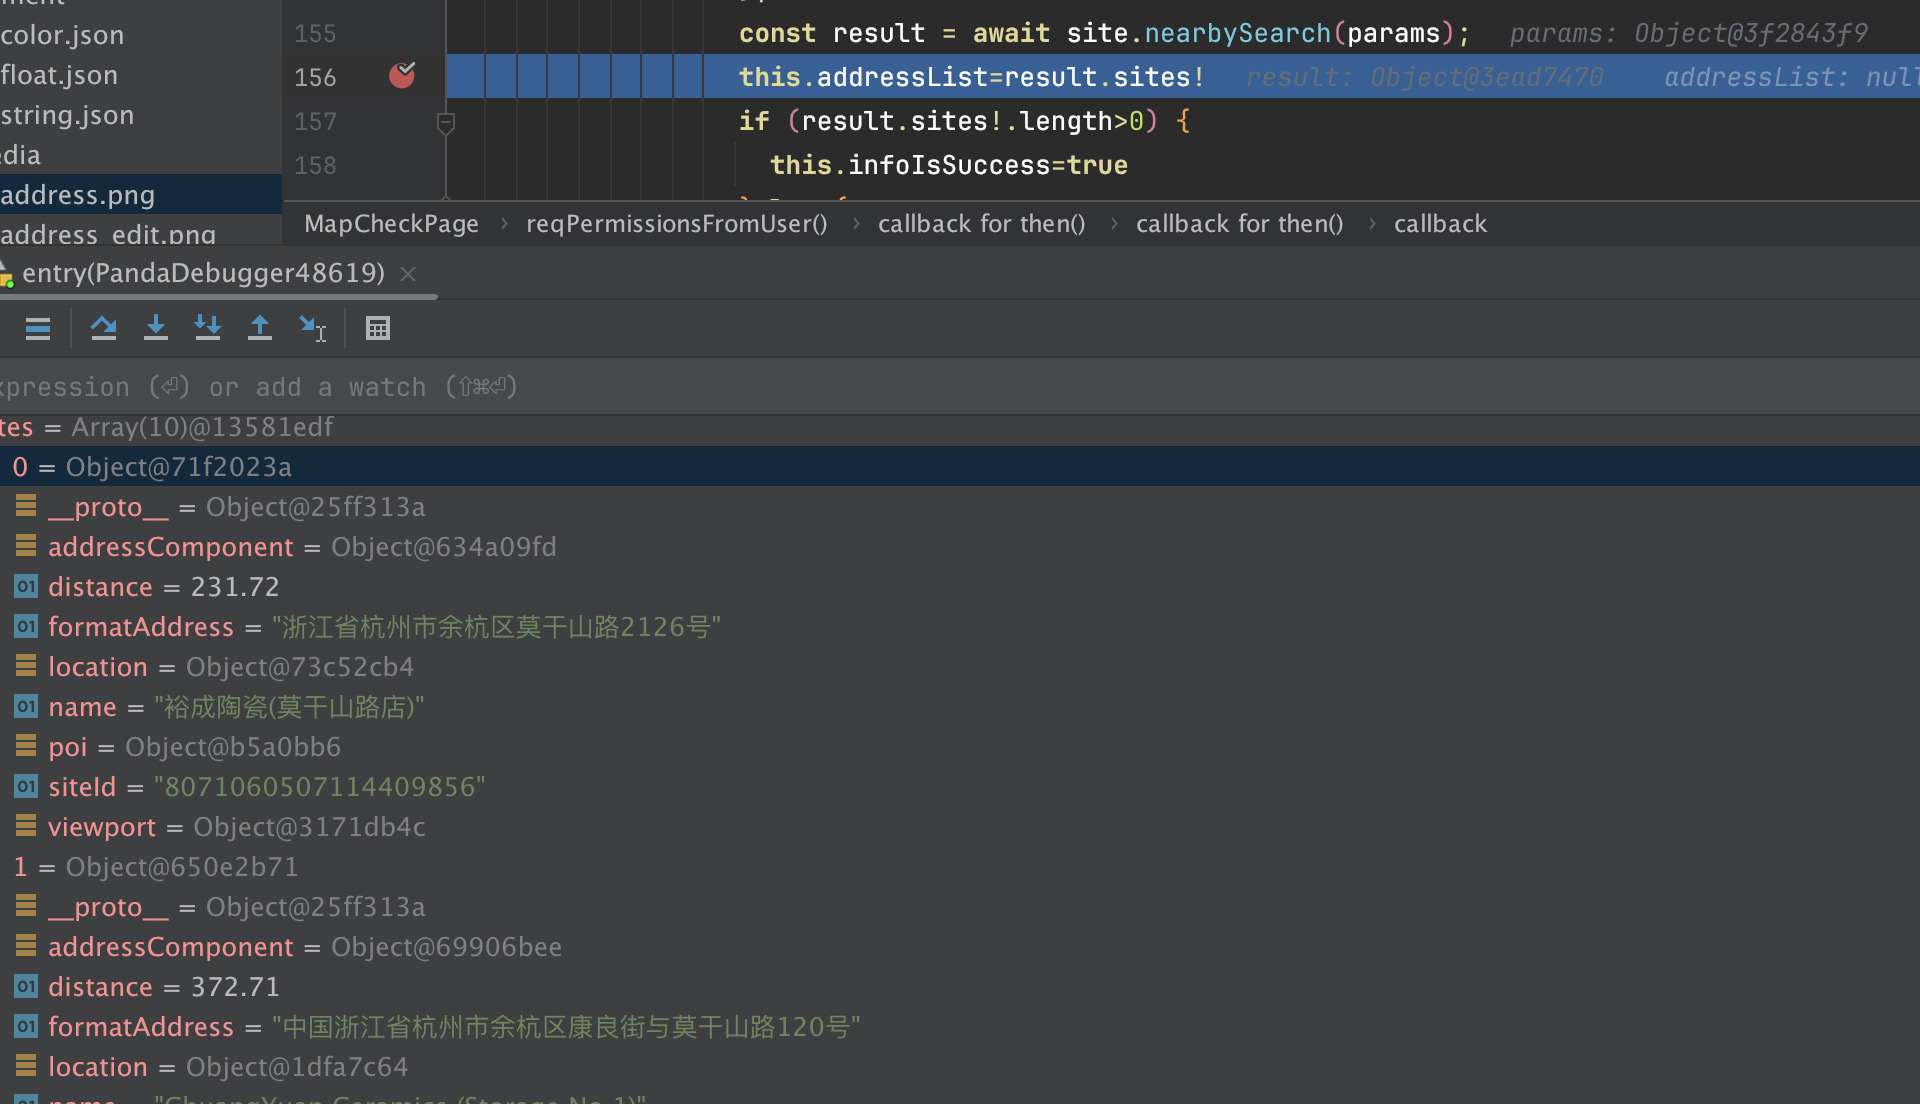
通过打断点可以看到我们已经获取到了数据,这时候只需要使用我们定义好的变量接收数据,然后展示到列表上
List(){
ForEach(this.addressList,(item:site.Site,index:number)=>{
ListItem(){
Column(){
Column({space:10}){
Text(item.name)
.fontColor(Color.Black)
.fontSize(16)
.fontWeight(FontWeight.Bold)
Row(){
Text(this.calculateDistance(item.location?.latitude,item.location?.longitude,this.location?.latitude,this.location?.longitude).toFixed(2)+“公里”)
.fontSize(14)
.fontColor(Color.Gray)
Text(" | ")
.fontSize(14)
.fontColor(Color.Gray)
Text(item.formatAddress).fontColor(Color.Gray).fontSize(14).textOverflow({ overflow: TextOverflow.Clip }).maxLines(1)}.width('100%').justifyContent(FlexAlign.Start)}.alignItems(HorizontalAlign.Start).padding(10).justifyContent(FlexAlign.Center)Divider().width('100%').height(0.8).color("#e6e6e6")}.onClick(()=>{showToast(JSON.stringify(item))})}})}.layoutWeight(1).backgroundColor(Color.White)
这里我们计算距离,截取最后两位即可
toRadians(degree: number): number {
return degree * Math.PI / 180;
}
calculateDistance(lat1: number, lon1: number, lat2: number, lon2: number): number {
const R = 6371; // 地球平均半径,单位为公里
const dLat = this.toRadians(lat2 - lat1);
const dLon = this.toRadians(lon2 - lon1);
const a =
Math.sin(dLat / 2) * Math.sin(dLat / 2) +
Math.cos(this.toRadians(lat1)) * Math.cos(this.toRadians(lat2)) *
Math.sin(dLon / 2) * Math.sin(dLon / 2);
const c = 2 * Math.atan2(Math.sqrt(a), Math.sqrt(1 - a));
const distance = R * c;
return distance;
}
到这里我们的数据展示就成功了,我们执行一下代码看一下效果
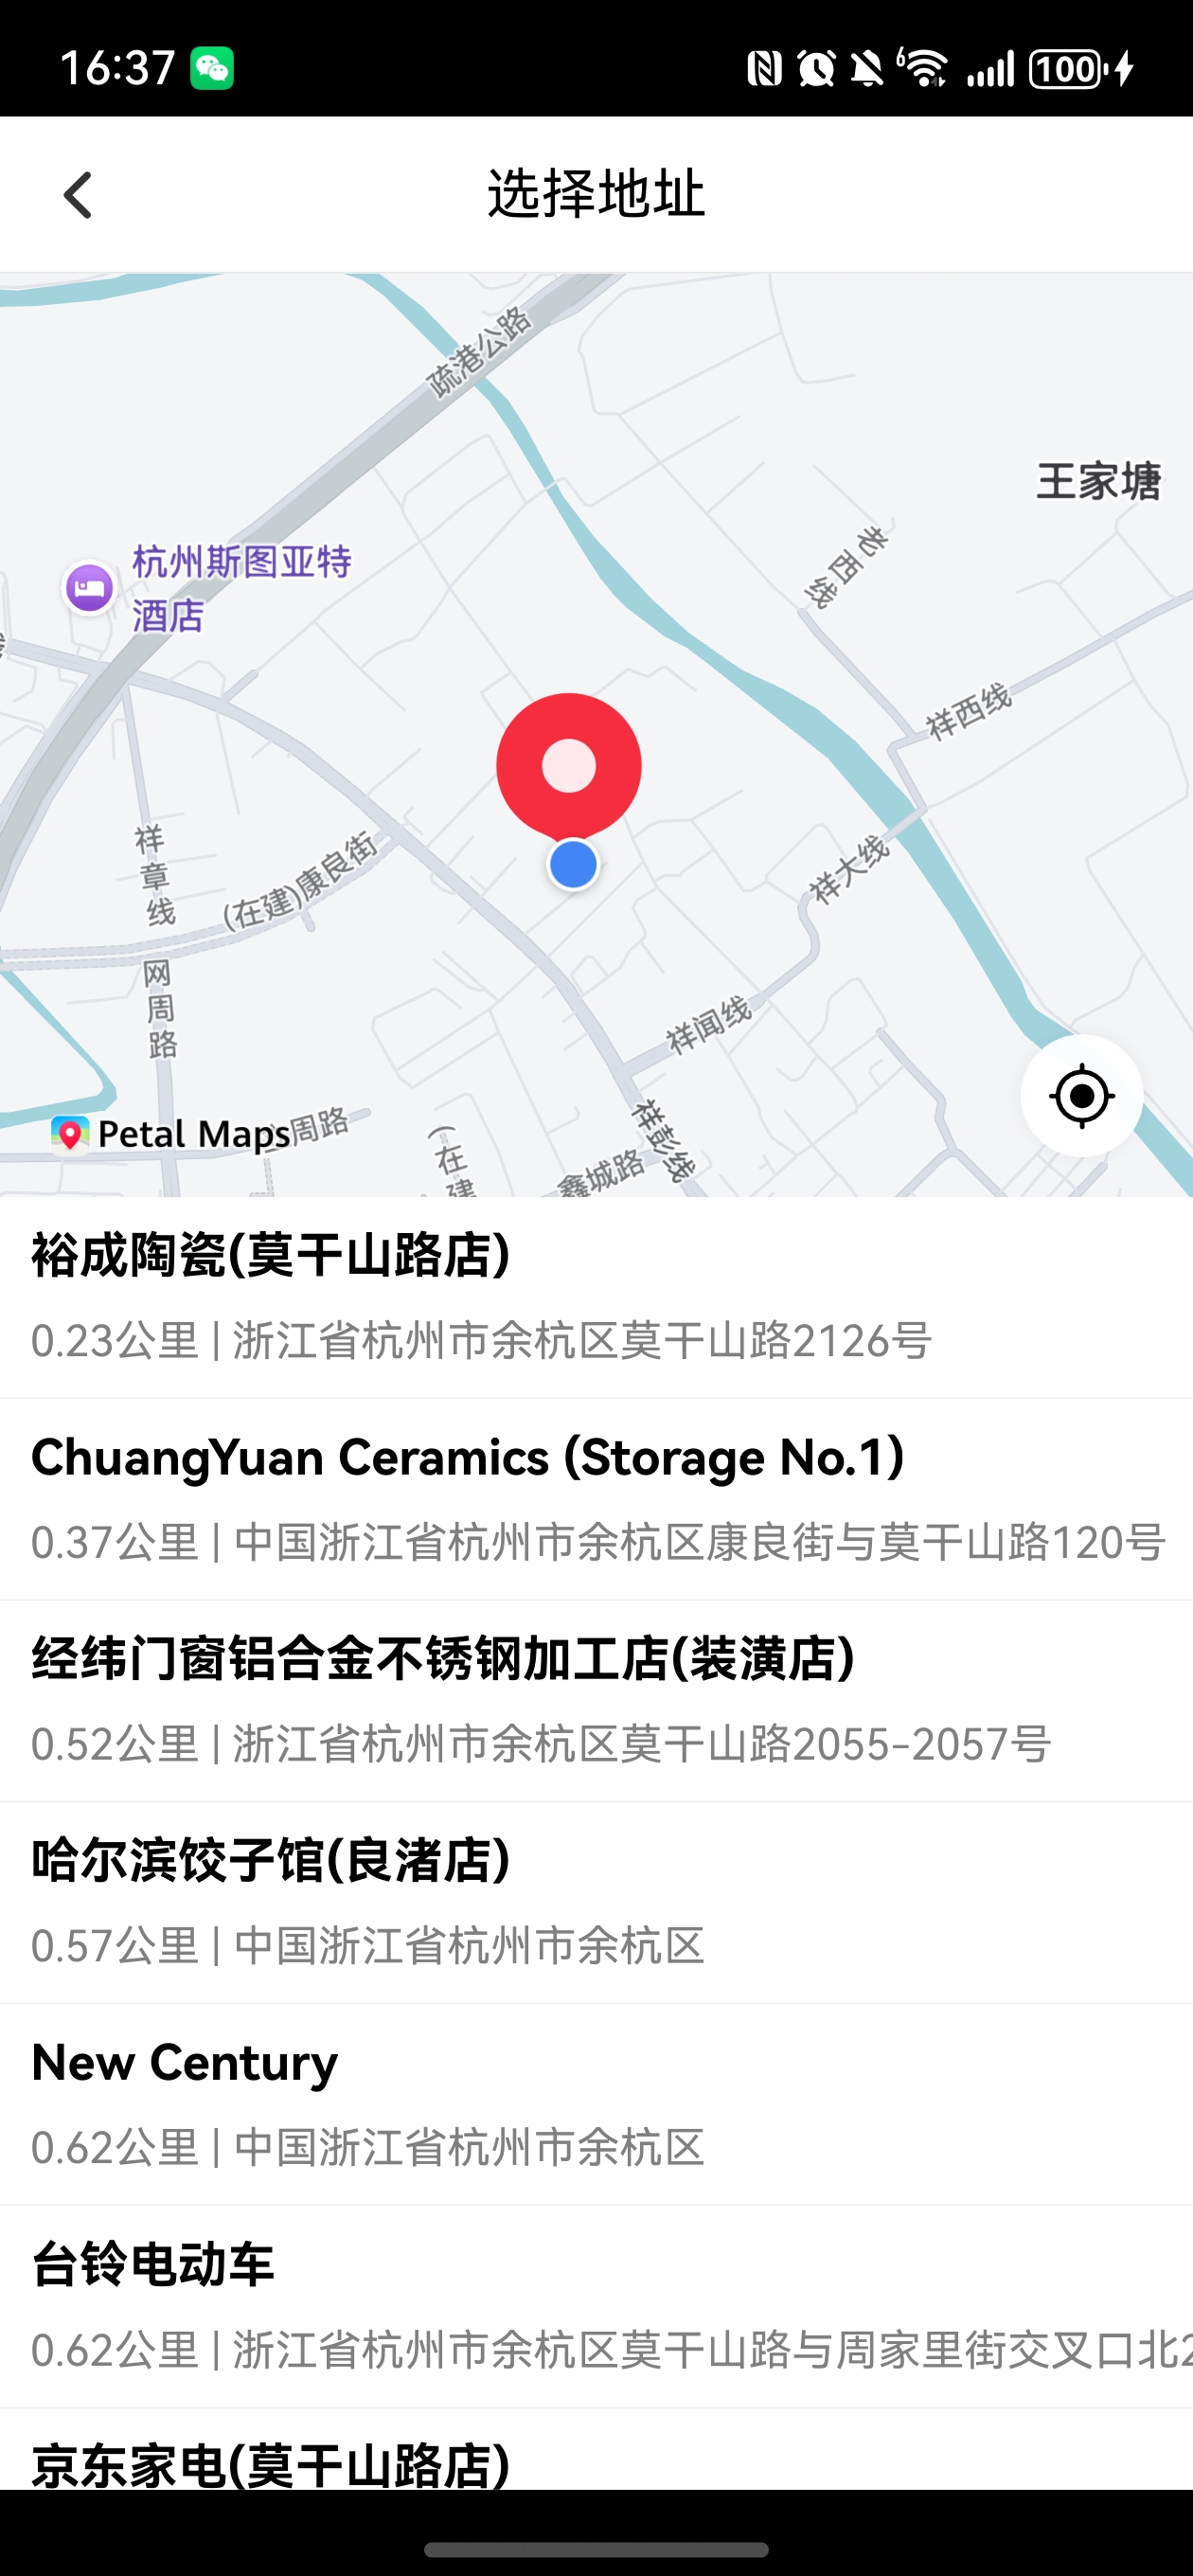
可以看到我们的数据已经成功的展示