【BotSharp详细介绍——一步步实现MCP+LLM的聊天问答实例】
BotSharp详细介绍——一步步实现MCP+LLM的聊天问答实例
- 一、MCP原理介绍
- 二、创建BotSharp的项目,实现LLM推理机器人
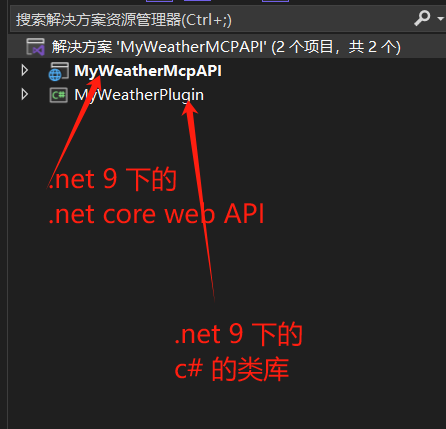
- 1、新建一个 解决方案,结构如下:
- 2、先看下 MyWeatherPlugin
- 3、创建MyWeatherMcpAPI
- 三、创建 MCP Server
- 1、添加引用
- 2、添加工具包
- 四、搭建 MCP Client和 MCP Host
- 1、查看web api 项目有没有添加 MCP 引用
- 2、打开 MCP 开关
- 3、Program.cs中添加 mcp支持
- 4、修改 agent
- 五、简单集成下 BotSharp-UI
还是本着投石问路、抛砖引玉、以此来引出更多对BotSharp这个优秀C#的AI框架的讨论的文章的态度,这个例子仔细研究 BotSharp 框架的示例代码实现以下内容:
1、通过BotSharp框架搭建一个简单的LLM模型的聊天机器人;
2、搭建一个MCP Server;
3、简单调整下 BotSharp的聊天机器人,搭建MCP Client、MCP Host 实现 MCP增强的LLM推理问答;
4、简单集成下 BotSharp-UI.实现一个可视的界面
一、MCP原理介绍
MCP是Model Context Protocol的简称,是 指的用于根据模型的上下文进行通讯的协议。它的作用主要还是用于语言模型,MCP 真正实现之后,一般分为
1、MCP Client 端,
2、MCP Server 端,
3、MCP Host 端
在MCP Server端上部署让 语言模型 去判断后调用的 工具集合,
MCP Client 是相对于 MCP Server 而言的,与MCP Server建立一对一的联系,MCP Host中部署语言大模型,是实际上请求 MCP Server的一端,但是 MCP Client和 MCP Host 物理上是一起的。
MCP Host 部署的应用启动后,语言大模型就开始工作,可以实现聊天,推理问答。语言模型 在获取到用户提出的问题后,根据MCP Client 的设置信息,可以找到MCP Server,根据 当前 设置的 与MCP Server 通信是 SSE 模式还是 Stdio 模式,最终都是获取 MCP Server的 Tools 的列表,然后 根据 参数、Description等信息判断,来决定是否 调用 其中的某个Tool,调用的话,返回 Tool的返回信息,不调用的话,返回 大模型自己的推理结果。
二、创建BotSharp的项目,实现LLM推理机器人
1、新建一个 解决方案,结构如下:
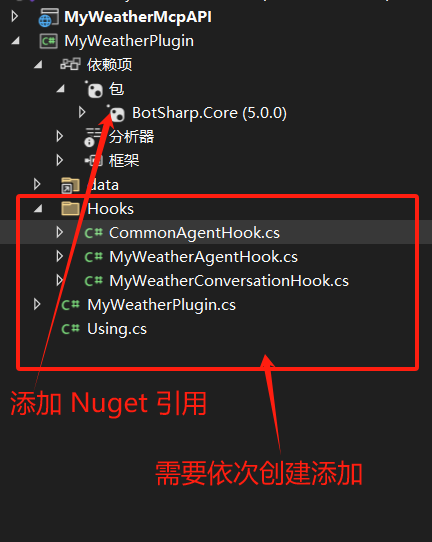
2、先看下 MyWeatherPlugin
这个项目 还是参考 PizzaBot 创建的,只是把 functions 的目录删掉了。
这个项目的作用还是 注册 anget插件、注册conversation插件。
(这个例子里不再利用 大模型的function calling,所以不用 functions)
结构如图:
using.cs
global using System;
global using System.Collections.Generic;
global using System.Text;
global using System.Threading.Tasks;
global using System.ComponentModel.DataAnnotations;
global using Microsoft.Extensions.Configuration;
global using Microsoft.Extensions.DependencyInjection;
global using BotSharp.Abstraction.Plugins;
global using BotSharp.Abstraction.Functions;
global using BotSharp.Abstraction.Agents.Settings;
CommonAgentHook.cs
using BotSharp.Abstraction.Agents;namespace MyWeatherPlugin.Hooks
{public class CommonAgentHook : AgentHookBase{public override string SelfId => string.Empty;public CommonAgentHook(IServiceProvider services, AgentSettings settings): base(services, settings){}public override bool OnInstructionLoaded(string template, Dictionary<string, object> dict){dict["current_date"] = DateTime.Now.ToString("MM/dd/yyyy");dict["current_time"] = DateTime.Now.ToString("hh:mm tt");dict["current_weekday"] = DateTime.Now.DayOfWeek;return base.OnInstructionLoaded(template, dict);}}}
MyWeatherAgentHook.cs
using BotSharp.Abstraction.Agents.Enums;
using BotSharp.Abstraction.Agents;
using BotSharp.Abstraction.Functions.Models;namespace MyWeatherPlugin.Hooks
{public class MyWeatherAgentHook : AgentHookBase{public override string SelfId => BuiltInAgentId.AIAssistant;public MyWeatherAgentHook(IServiceProvider services, AgentSettings settings): base(services, settings){}public override bool OnInstructionLoaded(string template, Dictionary<string, object> dict){return base.OnInstructionLoaded(template, dict);}}}
MyWeatherConversationHook.cs
using BotSharp.Abstraction.Conversations.Models;
using BotSharp.Abstraction.Conversations;namespace MyWeatherPlugin.Hooks
{public class MyWeatherConversationHook : ConversationHookBase{private readonly IServiceProvider _services;private readonly IConversationStateService _states;public MyWeatherConversationHook(IServiceProvider services,IConversationStateService states){_services = services;_states = states;}public override async Task OnPostbackMessageReceived(RoleDialogModel message, PostbackMessageModel replyMsg){if (replyMsg.FunctionName == "get_delicious_food"){// message.StopCompletion = true;}return;}public override Task OnTaskCompleted(RoleDialogModel message){return base.OnTaskCompleted(message);}#if USE_BOTSHARPpublic override async Task OnResponseGenerated(RoleDialogModel message){var agentService = _services.GetRequiredService<IAgentService>();var state = _services.GetRequiredService<IConversationStateService>();var agent = await agentService.LoadAgent(message.CurrentAgentId);if (agent.McpTools.Any(item => item.Functions.Any(x => x.Name == message.FunctionName))){var data = JsonDocument.Parse(JsonSerializer.Serialize(message.Data));state.SaveStateByArgs(data);}await base.OnResponseGenerated(message);}
#endif}}
MyWeatherPlugin.cs
using BotSharp.Abstraction.Agents;
using BotSharp.Abstraction.Conversations;
using BotSharp.Abstraction.Plugins;
using MyWeatherPlugin.Hooks;namespace MyWeatherPlugin
{public class MyWeatherPlugin: IBotSharpPlugin{public string Id => "1c8270eb-de63-4ca0-8903-654d83ce5ece";public string Name => "MyWeather AI Assistant";public string Description => "An example of an Weather AI Chatbot.";public string IconUrl => "https://cdn-icons-png.flaticon.com/512/6978/6978255.png";public string[] AgentIds => new[]{"c2b57a74-ae4e-4c81-b3ad-9ac5bff982bd","01fcc3e5-9af7-49e6-ad7a-a760bd12dc4a","6745151e-6d46-4a02-8de4-1c4f21c7da95","bba9c6a2-5efc-428c-8b4e-95fcc9d24e3e"};public void RegisterDI(IServiceCollection services, IConfiguration config){// Register hooksservices.AddScoped<IAgentHook, MyWeatherAgentHook>();//services.AddScoped<IConversationService, MyWeatherConversationHook>();}}
}
这个项目 在本例中没有特别的作用了,所以不过多介绍了,后续在 回调函数中增加一些信息时 ,会再次用到这个项目
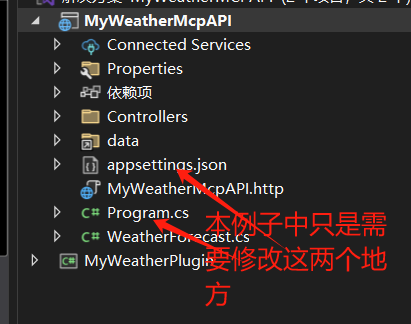
3、创建MyWeatherMcpAPI
结构如下:
添加的nuget 引用如下:
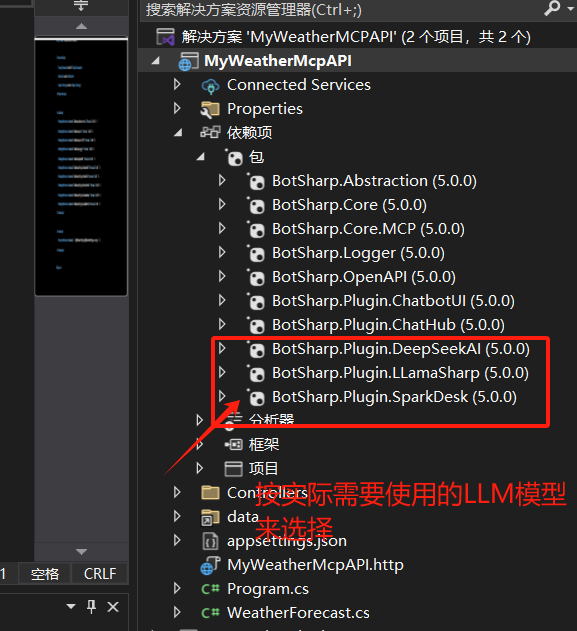
这个例子中使用的 是spark max。
appsettings.json
{"Logging": {"LogLevel": {"Default": "Information","Microsoft.AspNetCore": "Warning"}},"AllowedHosts": "*","AllowedOrigins": ["http://localhost:5015","http://0.0.0.0:5015","https://botsharp.scisharpstack.org","https://chat.scisharpstack.org"],"Jwt": {"Issuer": "botsharp","Audience": "botsharp","Key": "31ba6052aa6f4569901facc3a41fcb4adfd9b46dd00c40af8a753fbdc2b89869"},"LlmProviders": [{"Provider": "llama-sharp","Models": [{"Name": "llama-2-7b-guanaco-qlora.Q2_K.gguf","Type": "chat"}]},{"Provider": "sparkdesk","Models": [{"Name": "max","Type": "chat","PromptCost": 0.0015,"CompletionCost": 0.002}]},{"Provider": "deepseek-ai","Models": [{"Name": "deepseek-chat","ApiKey": "你的 apikey","Endpoint": "https://api.deepseek.com/v1/","Type": "chat","PromptCost": 0.0015,"CompletionCost": 0.002}]}],"Router": {},"Evaluator": {"AgentId": "01fcc3e5-9af7-49e6-ad7a-a760bd12dc4a"},"Agent": {"DataDir": "agents","TemplateFormat": "liquid","HostAgentId": "bba9c6a2-5efc-428c-8b4e-95fcc9d24e3e","EnableTranslator": false,"LlmConfig": {"Provider": "sparkdesk","Model": "max"//"Provider": "llama-sharp",//"Model": "llama-2-7b-guanaco-qlora.Q2_K.gguf"//"Provider": "deepseek-ai",//"Model": "deepseek-chat"}},"MCP": {"Enabled": false,"McpClientOptions": {"ClientInfo": {"Name": "SimpleToolsBotsharp","Version": "1.0.0"}},"McpServerConfigs": [{"Id": "FoodServer","Name": "FoodServer","TransportType": "sse","TransportOptions": [],"Location": "http://localhost:5103/sse"}]},"Conversation": {"DataDir": "conversations","ShowVerboseLog": false,"EnableLlmCompletionLog": false,"EnableExecutionLog": true,"EnableContentLog": true,"EnableStateLog": true,"EnableTranslationMemory": false,"CleanSetting": {"Enable": true,"BatchSize": 50,"MessageLimit": 2,"BufferHours": 12,"ExcludeAgentIds": []},"RateLimit": {"MaxConversationPerDay": 100,"MaxInputLengthPerRequest": 256,"MinTimeSecondsBetweenMessages": 2}},"ChatHub": {"EventDispatchBy": "group"},"LlamaSharp": {"Interactive": true,//如果使用LLama模型,需要下载到本地。还需要添加 更多的 nuget包,具体看见上一个示例"ModelDir": "F:/models", "DefaultModel": "llama-2-7b-guanaco-qlora.Q2_K.gguf","MaxContextLength": 1024,"NumberOfGpuLayer": 20},"SparkDesk": {"AppId": "你的appid","ApiKey": "你的appkey","ApiSecret": "你的 apisecret","ModelVersion": {"DisplayName": "max","Domain": "generalv3.5","AddressPart": "v3.5"}},"AzureOpenAi": {},"RoutingSpeeder": {},"Database": {"Default": "FileRepository","TablePrefix": "BotSharp","BotSharpMongoDb": "","Redis": "botsharp.redis.cache.windows.net:6380,password=,ssl=True,abortConnect=False","FileRepository": "data","Assemblies": [ "BotSharp.Core" ]},"Interpreter": {"Python": {"PythonDLL": "C:/Python313/python313.dll"}},"PluginLoader": {"Assemblies": ["BotSharp.Core","BotSharp.Core.Crontab","BotSharp.Logger","BotSharp.Plugin.OpenAI","BotSharp.Plugin.ChatHub","MyWeatherPlugin","BotSharp.Plugin.SparkDesk","BotSharp.Plugin.LLamaSharp","BotSharp.Plugin.DeepSeekAI","BotSharp.Plugin.ChatbotUI"],"ExcludedFunctions": ["McpToolAdapter"]}
}
因本例中使用的是 spark max ,所以 注意下,模型处 这几行要特别注意,
"SparkDesk": {"AppId": "你的appid","ApiKey": "你的appkey","ApiSecret": "你的 apisecret","ModelVersion": {"DisplayName": "max","Domain": "generalv3.5","AddressPart": "v3.5"}},LlmProviders": [{"Provider": "sparkdesk","Models": [{"Name": "max","Type": "chat","PromptCost": 0.0015,"CompletionCost": 0.002}]}]
另外因为暂时 还不使用 mcp 的功能,所以 MCP配置部分的 enable是 false
"MCP": {"Enabled": false,"McpClientOptions": {"ClientInfo": {"Name": "SimpleToolsBotsharp","Version": "1.0.0"}},"McpServerConfigs": [{"Id": "FoodServer","Name": "FoodServer","TransportType": "sse","TransportOptions": [],"Location": "http://localhost:5103/sse"}]},
然后看下 program.cs
此时 没有什么特殊的地方:
using BotSharp.Abstraction.Conversations;
using BotSharp.Abstraction.Messaging.JsonConverters;
using BotSharp.Abstraction.Users;
using BotSharp.Core;
using BotSharp.Core.Agents;
using BotSharp.Core.MCP;
using BotSharp.Logger;
using BotSharp.OpenAPI;
using BotSharp.Plugin.ChatHub;var builder = WebApplication.CreateBuilder(args);builder.Services.AddBotSharpCore(builder.Configuration, options =>
{options.JsonSerializerOptions.Converters.Add(new RichContentJsonConverter());options.JsonSerializerOptions.Converters.Add(new TemplateMessageJsonConverter());
}).AddBotSharpOpenAPI(builder.Configuration,
builder.Configuration.GetSection("AllowedOrigins").Get<string[]>() ?? new[]{"http://0.0.0.0:5015","https://botsharp.scisharpstack.org","https://chat.scisharpstack.org"}, builder.Environment, true).AddBotSharpLogger(builder.Configuration);builder.Services.AddControllers();
builder.Services.AddSignalR();
var app = builder.Build();
// Configure the HTTP request pipeline.
app.MapHub<SignalRHub>("/chatHub");
app.UseMiddleware<WebSocketsMiddleware>();app.UseBotSharp().UseBotSharpOpenAPI(app.Environment);
app.Run();
此时 就可以启动 项目,然后 通过 postman 访问,
Postman的位置:
https://botsharp.verdure-hiro.cn/guide/quick-start/get-started
中的 postman 链接 如下

在 copy workspace、调整 依次 执行
New User Account
Get Access Token
Create Agent
New Conversation
sendMessage
的操作 ,便可以 实现 通过 spark max 模型 实现 问答。
三、创建 MCP Server
新建一个 .net 9 下的 Asp.net core web API项目
结构如下:
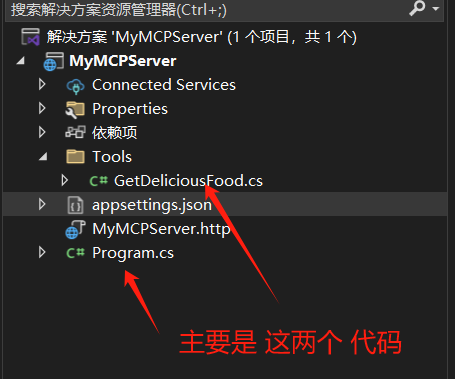
1、添加引用
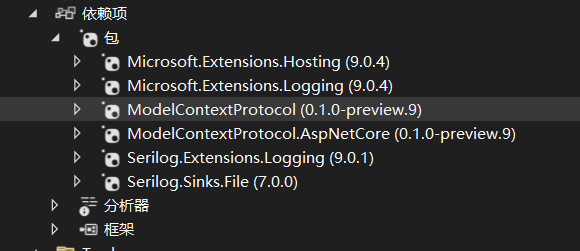
2、添加工具包
要注意的是,一定注意 参数 和 descritpion,这是 决定 LLM 是否调用 tool或者 调用哪个一个tool的依据
GetDeliciousFood.cs
using ModelContextProtocol.Server;
using System.ComponentModel;
using System.ComponentModel.DataAnnotations;namespace MyMCPServer.Tools
{[McpServerToolType]public class GetDeliciousFood{[McpServerTool(Name = "get_delicious_food"), Description("是一个按照城市的名称返回当地的美食的工具。")]public static string Get_delicious_food([Description("用于获取城市"), Required] string city){if (city is null){throw new Exception("请输入城市!");}string result = string.Empty;switch (city){case "安庆":result = "山粉阮子、糍粑、鸡汤泡炒米、大饼子包油条";break;case "桐城":result = "桐城丰糕、桐城水碗、桐城水芹菜";break;case "青草":result = "麻丰糕、酱油干子、朝笏牌子";break;default:result = "都还挺不错";break;}return result;           }}
}
Program.cs
var builder = WebApplication.CreateBuilder(args);// Add services to the container.
builder.Services.AddMcpServer().WithToolsFromAssembly().WithHttpTransport();builder.Services.AddControllers();var app = builder.Build();// Configure the HTTP request pipeline.
app.MapGet("/", () => "你是一个用于查询当地美食的MCP server!");
app.MapMcp();
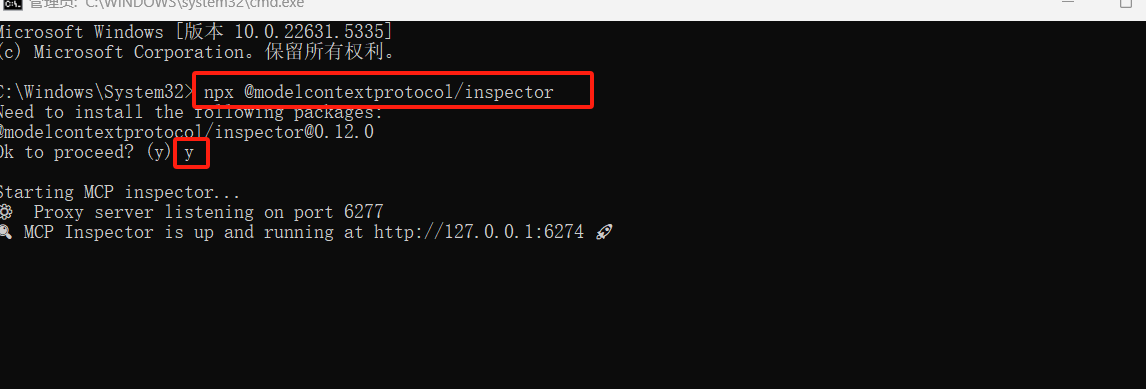
app.Run();启动后 可以直接 通过 npx 工具进行测试
1、要先安装 node.js
2、在cmd中 运行: npx @modelcontextprotocol/inspector
3、在浏览器中访问
1)先看下 mcp server 中的 launchSettings.json 中的 applicationUrl
2)按照上图 打开浏览器 访问 http://127.0.0.1:6274
3) 按照下图 操作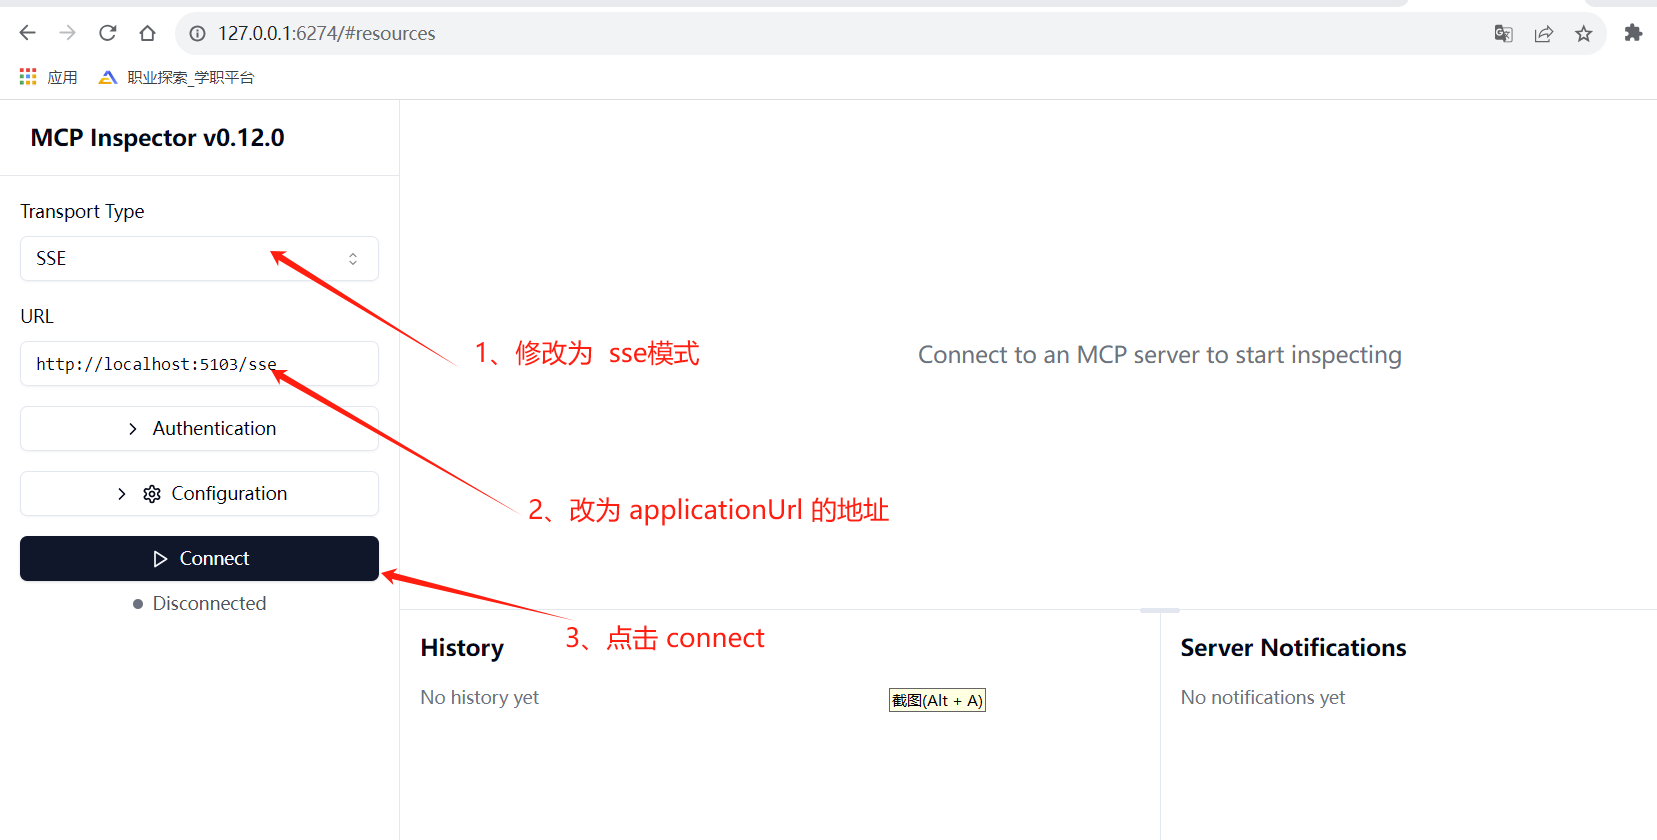
这样 MCP Server 就完成了,
四、搭建 MCP Client和 MCP Host
这步骤 其实就是调整下 刚才 BotSharp 创建的机器人就好。
1、查看web api 项目有没有添加 MCP 引用
添加 BotSharp.Core.MCP的引用。
appsettins.json中"PluginLoader要添加引用
2、打开 MCP 开关
"MCP": {
//注意,这个地方的开关调成true"Enabled": true,"McpClientOptions": {"ClientInfo": {"Name": "SimpleToolsBotsharp","Version": "1.0.0"}},//此处其实是注册 MCP Server,其实可以看到,//在 MCP Host 中,其实是可以注册多个 MCP Server的,//因为MCP开关已经打开,所以 下面的location 要正确"McpServerConfigs": [{"Id": "FoodServer","Name": "FoodServer","TransportType": "sse","TransportOptions": [],"Location": "http://localhost:5103/sse"}]},
3、Program.cs中添加 mcp支持
using BotSharp.Abstraction.Conversations;
using BotSharp.Abstraction.Messaging.JsonConverters;
using BotSharp.Abstraction.Users;
using BotSharp.Core;
using BotSharp.Core.Agents;
using BotSharp.Core.MCP;
using BotSharp.Logger;
using BotSharp.OpenAPI;
using BotSharp.Plugin.ChatHub;var builder = WebApplication.CreateBuilder(args);builder.Services.AddBotSharpCore(builder.Configuration, options =>
{options.JsonSerializerOptions.Converters.Add(new RichContentJsonConverter());options.JsonSerializerOptions.Converters.Add(new TemplateMessageJsonConverter());
}).AddBotSharpOpenAPI(builder.Configuration,
builder.Configuration.GetSection("AllowedOrigins").Get<string[]>() ?? new[]{"http://0.0.0.0:5015","https://botsharp.scisharpstack.org","https://chat.scisharpstack.org"}, builder.Environment, true).AddBotSharpLogger(builder.Configuration)// 此处需要添加mcp支持.AddBotSharpMCP(builder.Configuration);builder.Services.AddControllers();
builder.Services.AddSignalR();
var app = builder.Build();// Configure the HTTP request pipeline.
app.MapHub<SignalRHub>("/chatHub");
app.UseMiddleware<WebSocketsMiddleware>();app.UseBotSharp().UseBotSharpOpenAPI(app.Environment);//app.MapControllers();app.Run();
4、修改 agent
假设 在第一步创建 机器人时候 创建的 agent 是
bba9c6a2-5efc-428c-8b4e-95fcc9d24e3e
目录在:
MyWeatherMCPAPI\MyWeatherMcpAPI\bin\Debug\net9.0\data\agents
下,找到 agents\bba9c6a2-5efc-428c-8b4e-95fcc9d24e3e下的
agent.json 文件,打开它
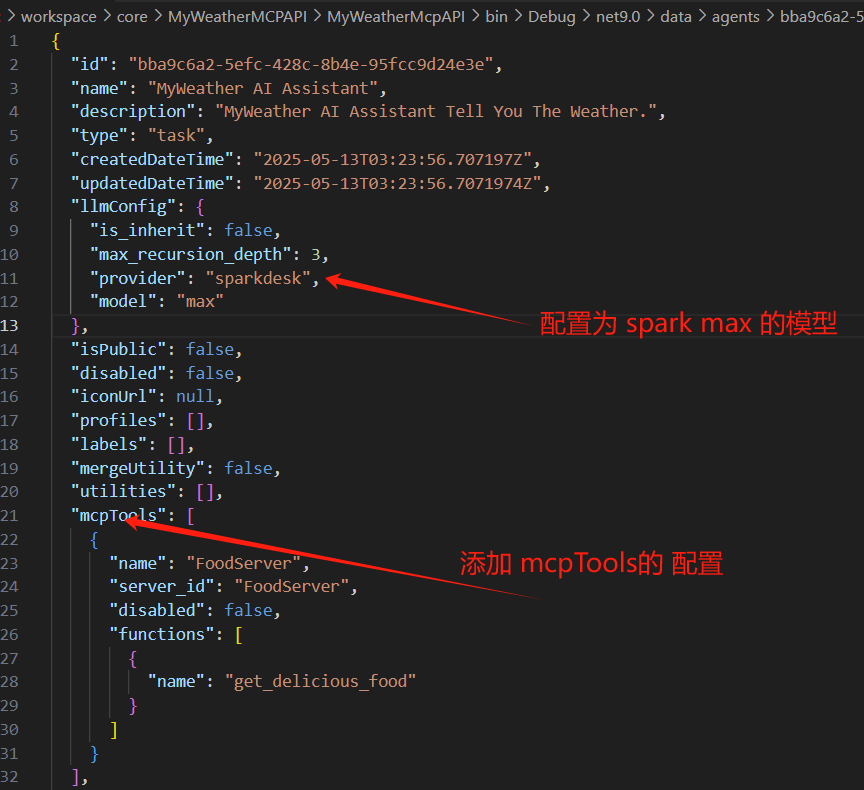
{"id": "bba9c6a2-5efc-428c-8b4e-95fcc9d24e3e","name": "MyWeather AI Assistant","description": "MyWeather AI Assistant Tell You The Weather.","type": "task","createdDateTime": "2025-05-13T03:23:56.707197Z","updatedDateTime": "2025-05-13T03:23:56.7071974Z","llmConfig": {"is_inherit": false,"max_recursion_depth": 3,"provider": "sparkdesk","model": "max"},"isPublic": false,"disabled": false,"iconUrl": null,"profiles": [],"labels": [],"mergeUtility": false,"utilities": [],"mcpTools": [{"name": "FoodServer","server_id": "FoodServer","disabled": false,"functions": [{"name": "get_delicious_food"}]}],"rules": [],"knowledgeBases": [],"inheritAgentId": null,"routingRules": []
}
然后 启动 mcp host,还是通过 POST man来 调用,注意 此时可以直接 使用 SendMessage的方法了,但是注意 调整 参数 agentId 的值为 刚才的 agentid,本例为:bba9c6a2-5efc-428c-8b4e-95fcc9d24e3e
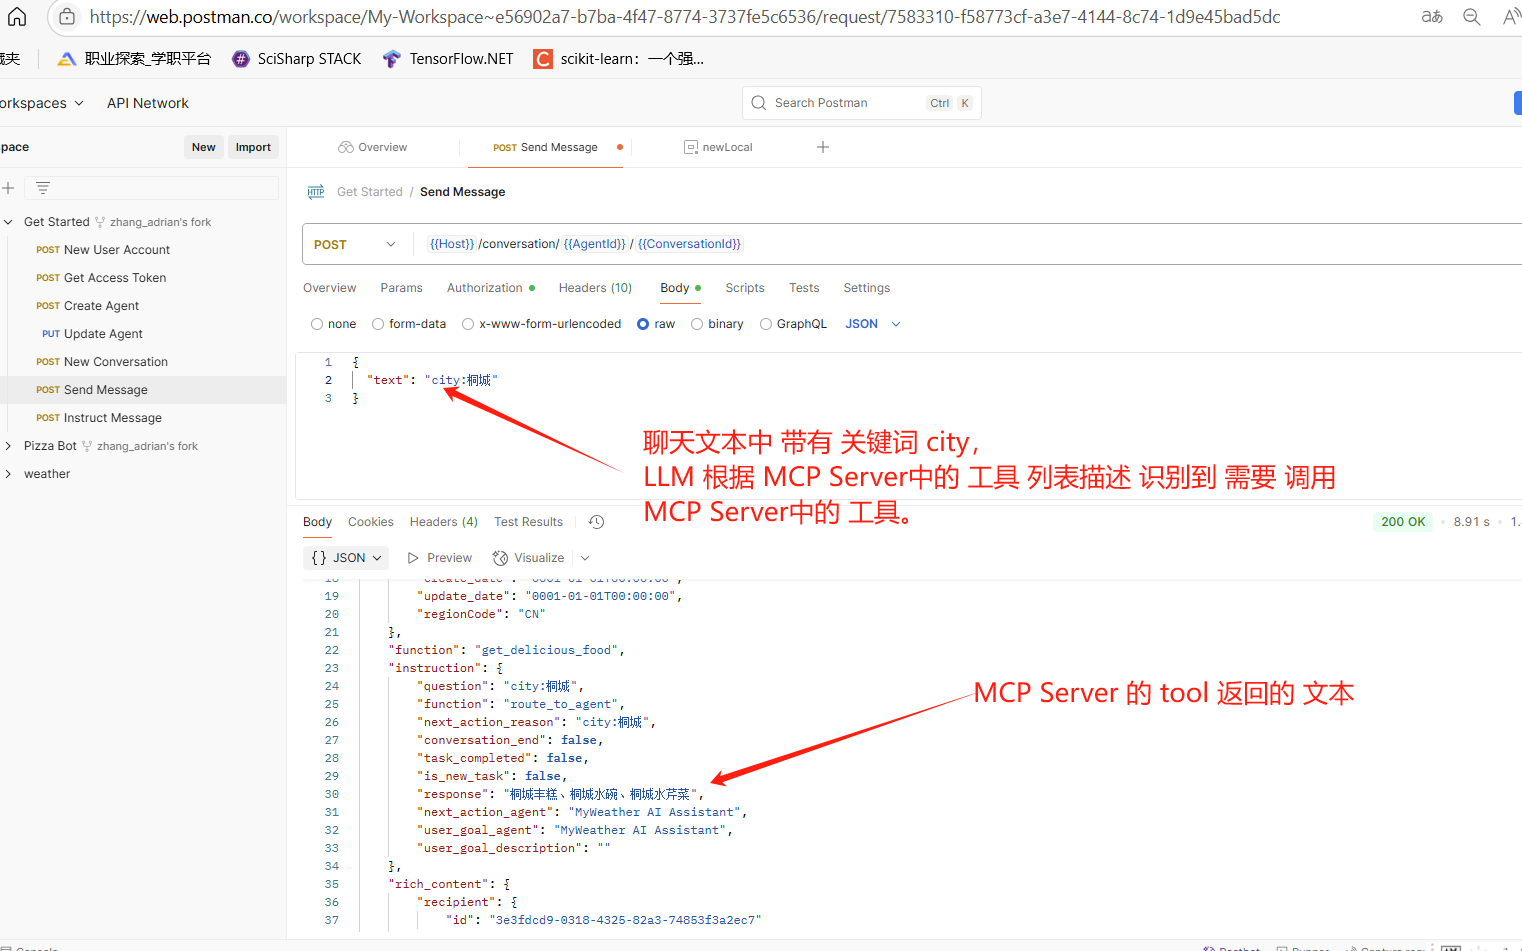
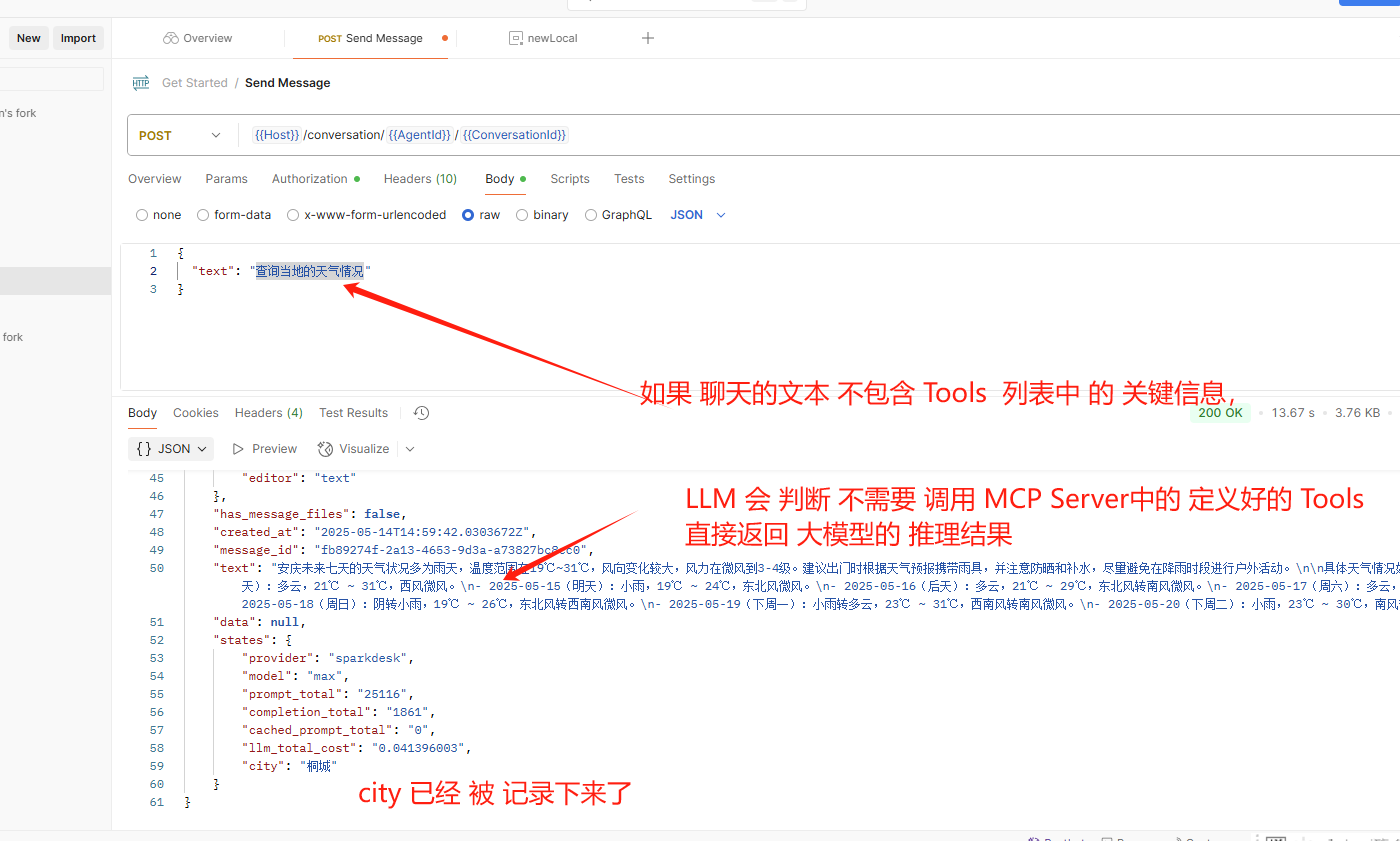
此时 如果 通过 sendMessage的方法 发送的文本 比如说:
city:桐城,那么 LLM 就会通过 参数及描述信息,决定调用tool:get_delicious_food 返回美食信息,如果 发送的文本 比如说是 天气怎样啊,那么 LLM 判断出 不需要调用 tool,就会根据 所选模型的自己的推理 进行返回,结果如图:
至此,MCP Client 和MCP Host 搭建完成 所用的LLM 是 Spark Max
五、简单集成下 BotSharp-UI
下载 BotSharp-UI:
https://github.com/SciSharp/BotSharp-UI
通过以下 命令 build:
git clone https://github.com/SciSharp/BotSharp-UI
cd BotSharp-UI
npm install
继续 run dev:
npm run dev
然后 修改下 后端地址:
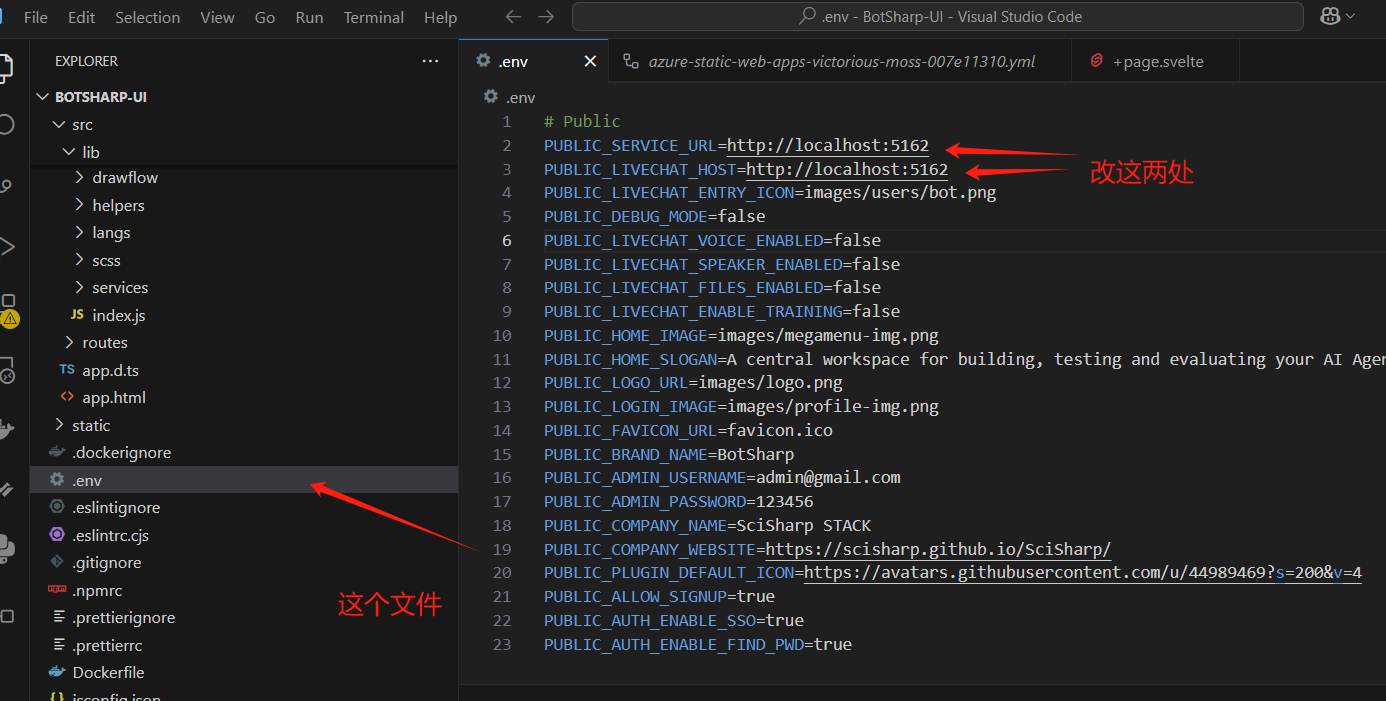
注意,修改的地址 是MCP Host 的地址,也就是 LLM所在的Web API的地址。
修改后,按照 run dev 获取的地址 直接访问,
输入 用户名 密码后 (注意:此处 输入的 是在 postman 中 通过
New User Account
Get Access Token
方法 创建的 username 和 password),进入主界面,侧边栏里找到 conversation 菜单栏,直接点击,可以获取 如下界面:
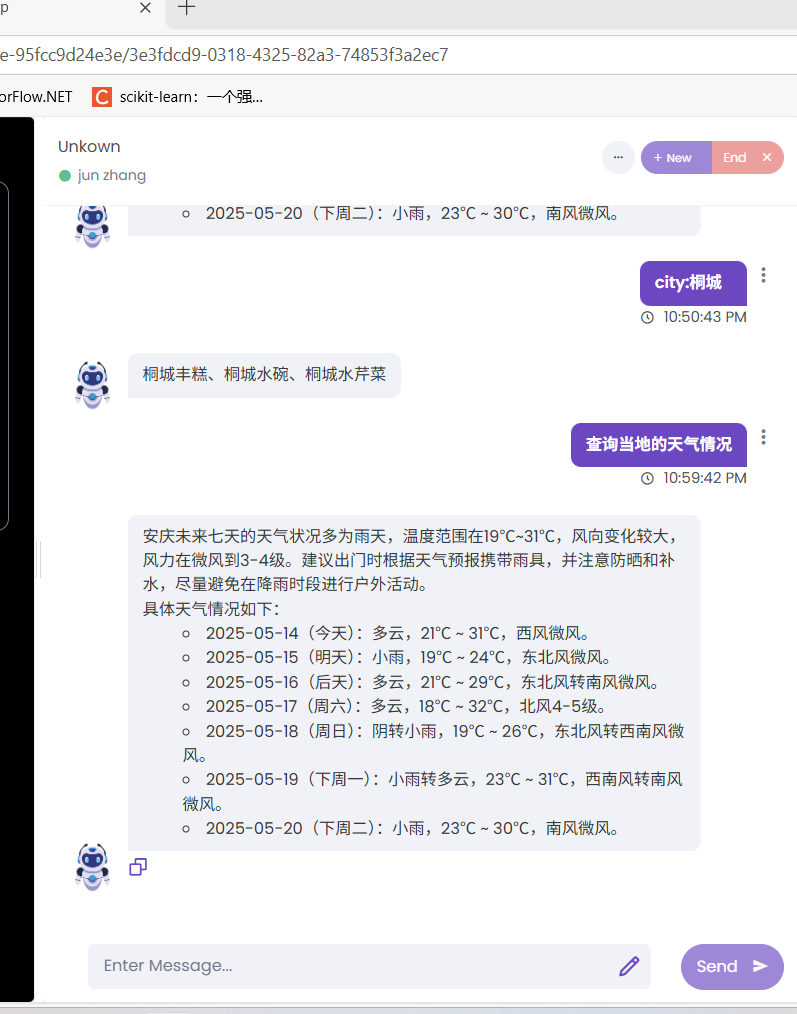
至此,简单了集成了 botsharp-ui