讯联云库项目开发日志(一)
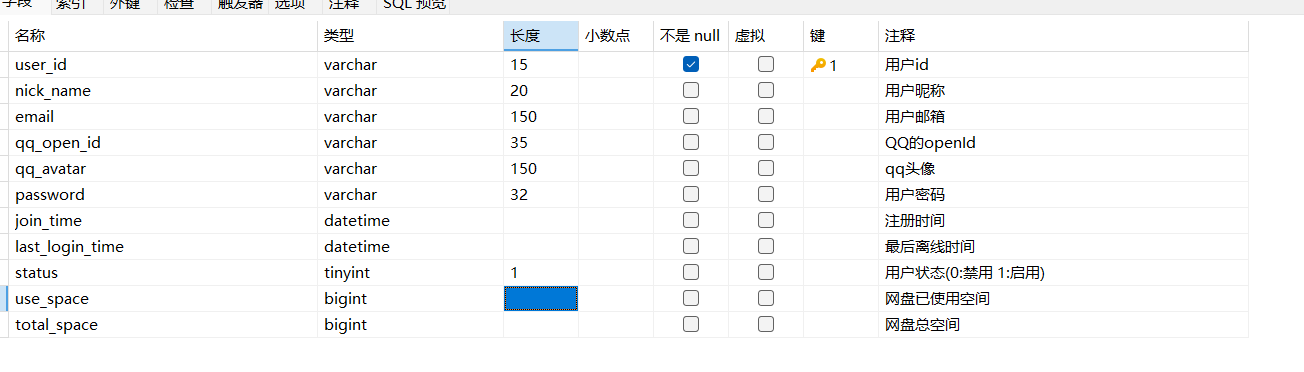
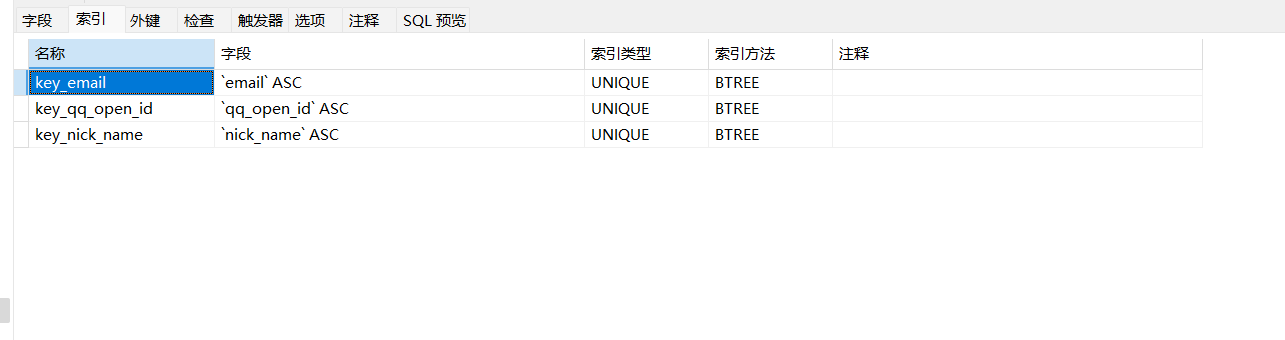
1、设计数据库
2、写基本框架
entity、controller、service、exception、utils、mapper
mapper层:
生成了一系列的CRUD方法
工具类:线程安全的日期工具类、 参数校验工具类
线程安全的日期工具类:主要用于 日期格式化(format)和解析(parse),并解决了 SimpleDateFormat 的线程安全问题
参数校验工具类:主要用于检查对象参数是否满足“至少有一个非空字段”的条件,并提供了一些字符串辅助方法(如首字母大写、判空)
3、登录验证码校验
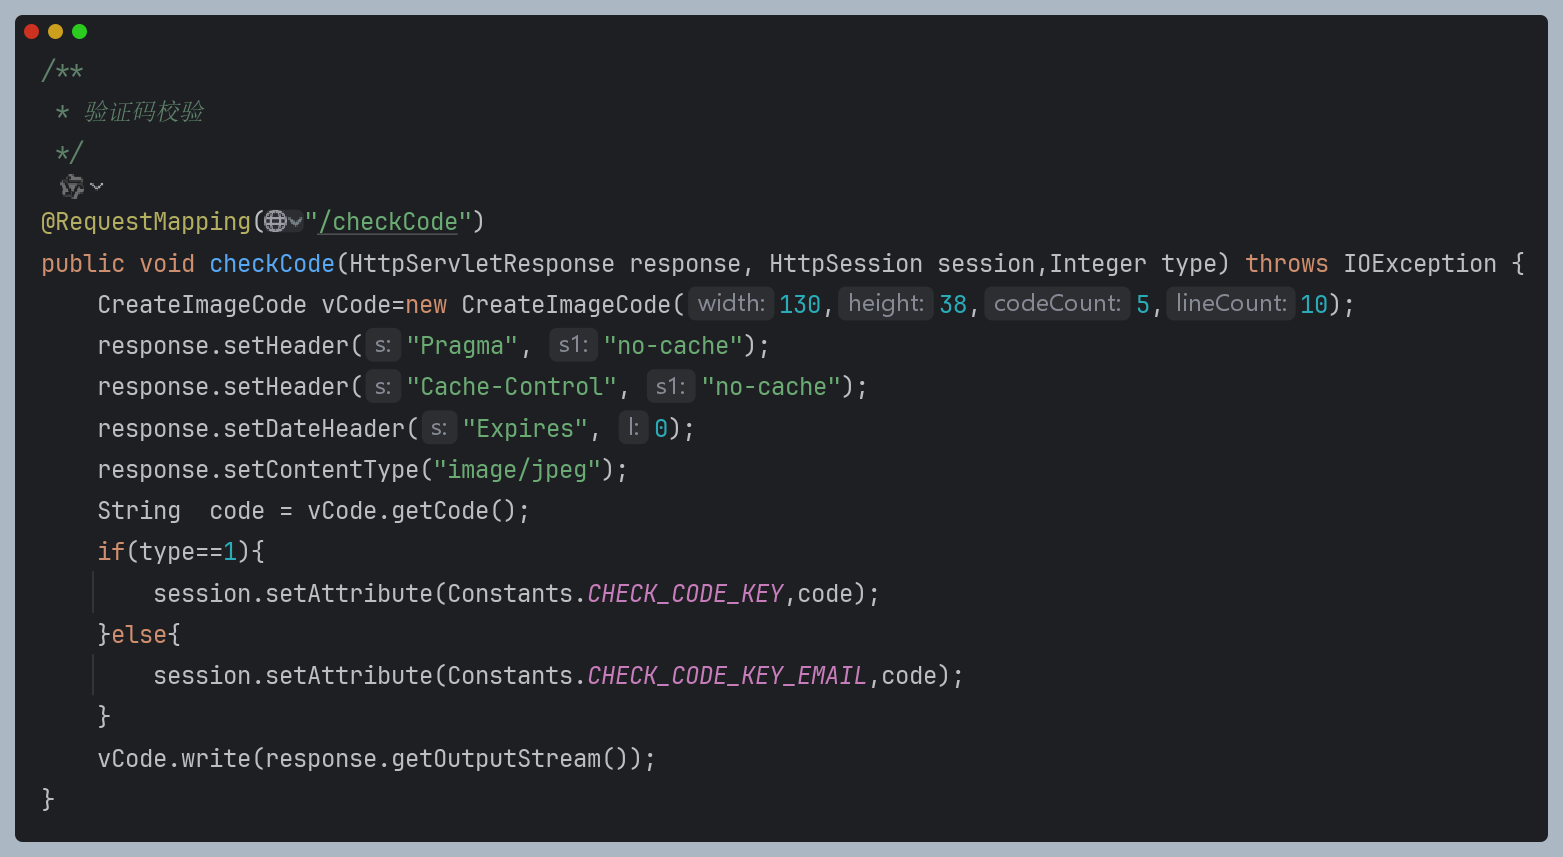
这段代码是一个 验证码生成与校验 的接口,主要用于生成图片验证码并存储到 HttpSession 中,以便后续验证用户输入的验证码是否正确
-
生成图片验证码
- 使用
CreateImageCode类创建一个 130x38 像素 的验证码图片,包含 5 个随机字符,干扰线数量为 10。 - 生成的验证码字符串存储在
code变量中。
- 使用
-
设置 HTTP 响应头
- 禁用缓存,确保每次请求都生成新的验证码:
response.setHeader("Pragma", "no-cache"); response.setHeader("Cache-Control", "no-cache"); response.setDateHeader("Expires", 0); - 设置响应类型为
image/jpeg,表示返回的是 JPEG 图片:response.setContentType("image/jpeg");
- 禁用缓存,确保每次请求都生成新的验证码:
-
存储验证码到 Session
- 根据
type参数决定验证码的用途:type=1:普通验证码(如登录验证),存储到Constants.CHECK_CODE_KEY。- 其他情况(如邮箱验证码),存储到
Constants.CHECK_CODE_KEY_EMAIL。
- 根据
-
输出验证码图片
- 调用
vCode.write(response.getOutputStream())将生成的图片写入 HTTP 响应流,返回给前端显示。
- 调用
为了辅助上述方法,因此创建了一个图形验证码生成工具类(CreateImageCode)
package com.cjl.entity.dto;import javax.imageio.ImageIO;
import java.awt.*;
import java.awt.image.BufferedImage;
import java.io.IOException;
import java.io.OutputStream;
import java.util.Random;public class CreateImageCode {//图片宽度private int width=160;//图片高度private int height=40;//验证码字符个数private int codeCount=4;//验证码干扰线数private int lineCount=20;//验证码private String code=null;//验证码图片bufferprivate BufferedImage  buffImg=null;Random random=new Random();public CreateImageCode(){createCode();}public CreateImageCode(int width, int height, int codeCount, int lineCount){this.width=width;this.height=height;this.codeCount=codeCount;this.lineCount=lineCount;createCode();}public CreateImageCode(int width, int height, int lineCount){this.width=width;this.height=height;this.lineCount=lineCount;createCode();}public CreateImageCode(int width, int height){this.width=width;this.height=height;createCode();}//生成图片private void createCode(){int fontWidth=width/codeCount; //字体宽度int fontHeight=height-5; //字体高度int codeY=height-8; //验证码y坐标//创建图像bufferbuffImg=new BufferedImage(width,height,BufferedImage.TYPE_INT_RGB);Graphics g=buffImg.getGraphics();//设置背景颜色g.setColor(getRandColor(200,250));g.fillRect(0,0,width,height);//设置字体Font font=new Font("Fixedsys",Font.BOLD,fontHeight);g.setFont(font);//设置干扰线for(int i=0;i<lineCount;i++){int xs=random.nextInt(width);int ys=random.nextInt(height);int xe=xs+random.nextInt(width);int ye=ys+random.nextInt(height);g.setColor(getRandColor(1,255));g.drawLine(xs,ys,xe,ye);}//添加噪点float yawpRate=0.01f; //噪声率int area=(int)(yawpRate*width*height); //像素个数for(int i=0;i<area;i++){int x=random.nextInt(width);int y=random.nextInt(height);buffImg.setRGB(x,y,random.nextInt(255));}String str1=RandomStr(codeCount); //随机生成验证码this.code=str1;for(int i=0;i<codeCount;i++){String strRand=str1.substring(i,i+1);g.setColor(getRandColor(1,255));//g.drawString(a,x,y);//a是要画出来的东西,x,y是坐标,基于要画的东西最左侧字符的基线g.drawString(strRand,i*fontWidth+3,codeY);}}//得到随机字符private String RandomStr(int n){String str1="ABCDEFGHIJKLMNOPQRSTUVWXYZabcdefghijklmnopqrstuvwxyz0123456789";String str2="";int len=str1.length()-1;double r;for(int i=0;i<n;i++){r=(Math.random())*len;str2=str2+str1.charAt((int)r);}return str2;}//得到随机颜色private Color getRandColor(int fc,int bc){if(fc>255) fc=255;if(bc>255) bc=255;int r=fc+random.nextInt(bc-fc);int g=fc+random.nextInt(bc-fc);int b=fc+random.nextInt(bc-fc);return new Color(r,g,b);}//画干扰线private void shearY(Graphics g,int w1,int h1,Color color){int period=random.nextInt(40)+10; //50; //振幅boolean borderGap=true;int frames=20;int phase=7;for(int i=0;i<w1;i++){double d=(double)(period>>1)* Math.sin((double)i/period+ (6.2831853071795862D* (double)phase/frames));g.copyArea(i,0,1,h1,0,(int)d);if(borderGap){g.setColor(color);g.drawLine(i, (int)d, i, 0);g.drawLine(i, (int)d+h1, i, h1);}}}public void write(OutputStream sos) throws IOException {ImageIO.write(buffImg,"png",sos);sos.close();}public BufferedImage   getBuffImg(){return buffImg;}public String getCode(){return code.toLowerCase();}
}
最终达到的效果:

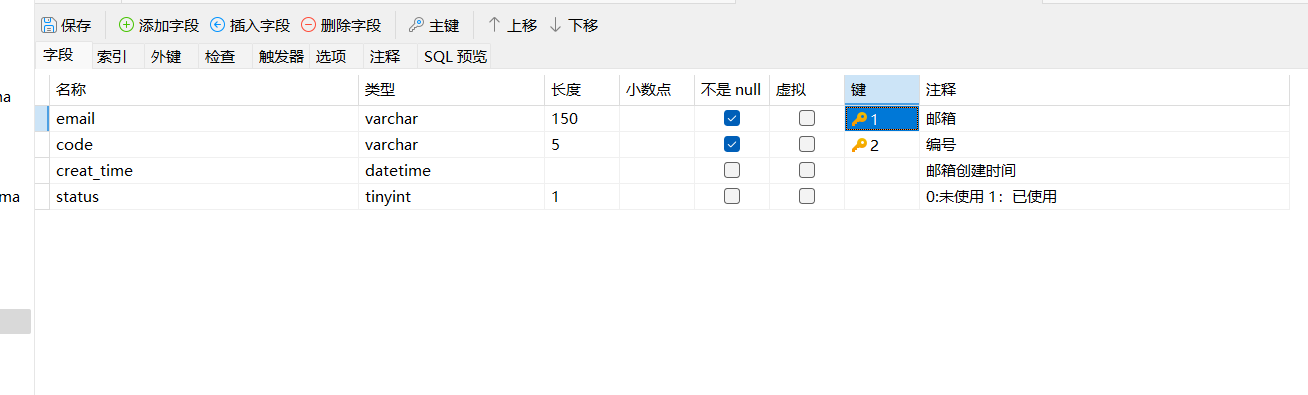
4、创建邮箱数据库
依旧通过java生成器生成,不过,第一次遇见这种:
<!-- 通用查询结果列--><sql id="base_column_list">e.email,e.code,e.creat_time,e.status</sql><sql id="base_condition_filed"><if test="query.email != null and query.email!=''">and e.email = #{query.email}</if><if test="query.code != null and query.code!=''">and e.code = #{query.code}</if><if test="query.creatTime != null and query.creatTime!=''"><![CDATA[ and e.creat_time=str_to_date(#{query.creatTime}, '%Y-%m-%d') ]]></if><if test="query.status != null">and e.status = #{query.status}</if></sql><!-- 通用条件列--><sql id="base_condition"><where><include refid="base_condition_filed" /></where></sql><!-- 通用查询条件列--><sql id="query_condition"><where><include refid="base_condition_filed" /><if test="query.emailFuzzy!= null and query.emailFuzzy!=''">and e.email like concat('%', #{query.emailFuzzy}, '%')</if><if test="query.codeFuzzy!= null and query.codeFuzzy!=''">and e.code like concat('%', #{query.codeFuzzy}, '%')</if><if test="query.creatTimeStart!= null and query.creatTimeStart!=''"><![CDATA[ and e.creat_time>=str_to_date(#{query.creatTimeStart}, '%Y-%m-%d') ]]></if><if test="query.creatTimeEnd!= null and query.creatTimeEnd!=''"><![CDATA[ and e.creat_time< date_sub(str_to_date(#{query.creatTimeEnd},'%Y-%m-%d'),interval -1 day) ]]></if></where></sql> <sql id="base_column_list"> ???我很好奇了这是什么
通过 <sql> 标签定义可重用的 SQL 片段,并通过 <include> 标签引用这些片段,从而提高代码的复用性和可维护性。
当 MyBatis 启动时,会解析这些 <sql> 片段并存储在内存中,形成可重用的 SQL 模板。
1. 片段注册
base_column_list→ 字段列表模板base_condition_filed→ 基础条件模板base_condition→ 完整 WHERE 条件(直接引用base_condition_filed)query_condition→ 扩展 WHERE 条件(引用base_condition_filed并追加模糊/范围查询)
2.逻辑关系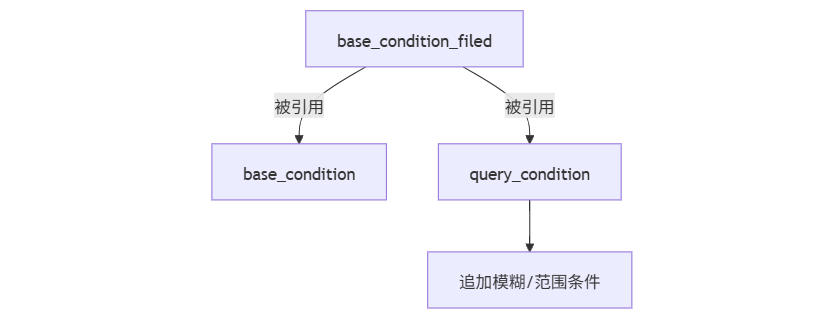
这段代码的核心思想就是 将常用的 SQL 片段拆解成可复用的模块,通过 MyBatis 的 <sql> 和 <include> 机制实现 逻辑复用 和 动态拼接。但它不仅仅是简单的“代码片段集合”,而是一种 模块化 SQL 设计模式
可能跟我一样第一次遇见的同学看见这里就有点蒙圈了,没事,我们来举例 一个简单的代码来理解:
1. 定义可复用的 SQL 片段(乐高积木块)
<!-- 基础车体(相当于字段列表) -->
<sql id="base_car_body">id, brand, model, color
</sql><!-- 基础轮子(相当于基础条件) -->
<sql id="base_wheels"><if test="wheelSize != null">AND wheel_size = #{wheelSize}</if>
</sql>
2.组装小车(简单查询)
<select id="selectBasicCar" resultType="Car">SELECT <include refid="base_car_body"/>  <!-- 插入车体 -->FROM cars<where><include refid="base_wheels"/>    <!-- 插入轮子条件 --></where>
</select>3.生成的SQL(当 wheelSize=18 时):
SELECT id, brand, model, color
FROM cars
WHERE wheel_size = 18
这样是不是就好理解一点了!!
5、实现发送邮箱验证码接口
就在主播写这个接口的发送邮箱验证的时候,命名mappers互相跳转都没有问题,困扰我一个多小时,结果发现没有在属性配置文件添加mybatis.mapper-locations=classpath:mappers/*.xml,因此虽然我可以互相跳转,但是代码自己找不到sql映射,属所以说写代码还是要规范
言归正传,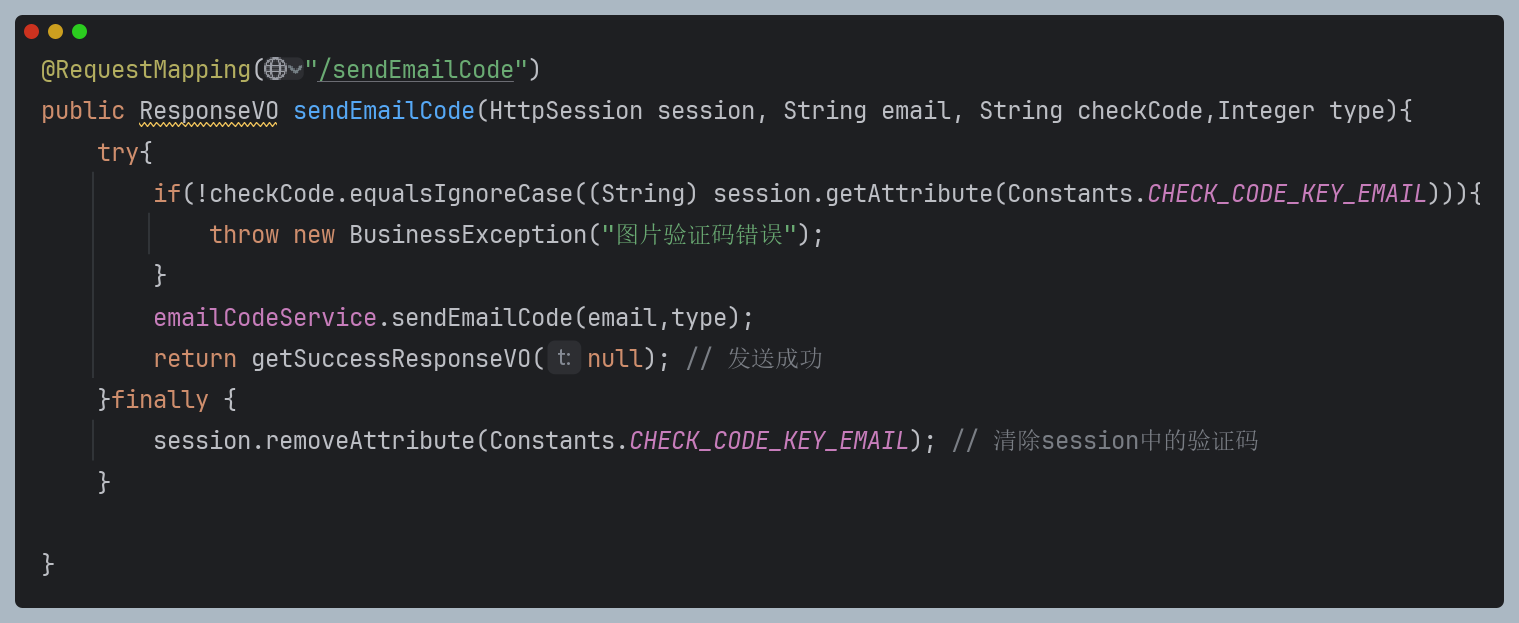
当我们写完这个接口,我们要考虑很多因素,首先就是用户输入的验证码是不是正确的,要根据之前定义的checkCode方法来查看,其次就要考虑status的问题,如果账户已经被注册了就没有必要了要进行判断,不仅如此,当用户多次点击发送的时候,我们只需要禁用之前的验证码,这个如何实现?
答案是在service层
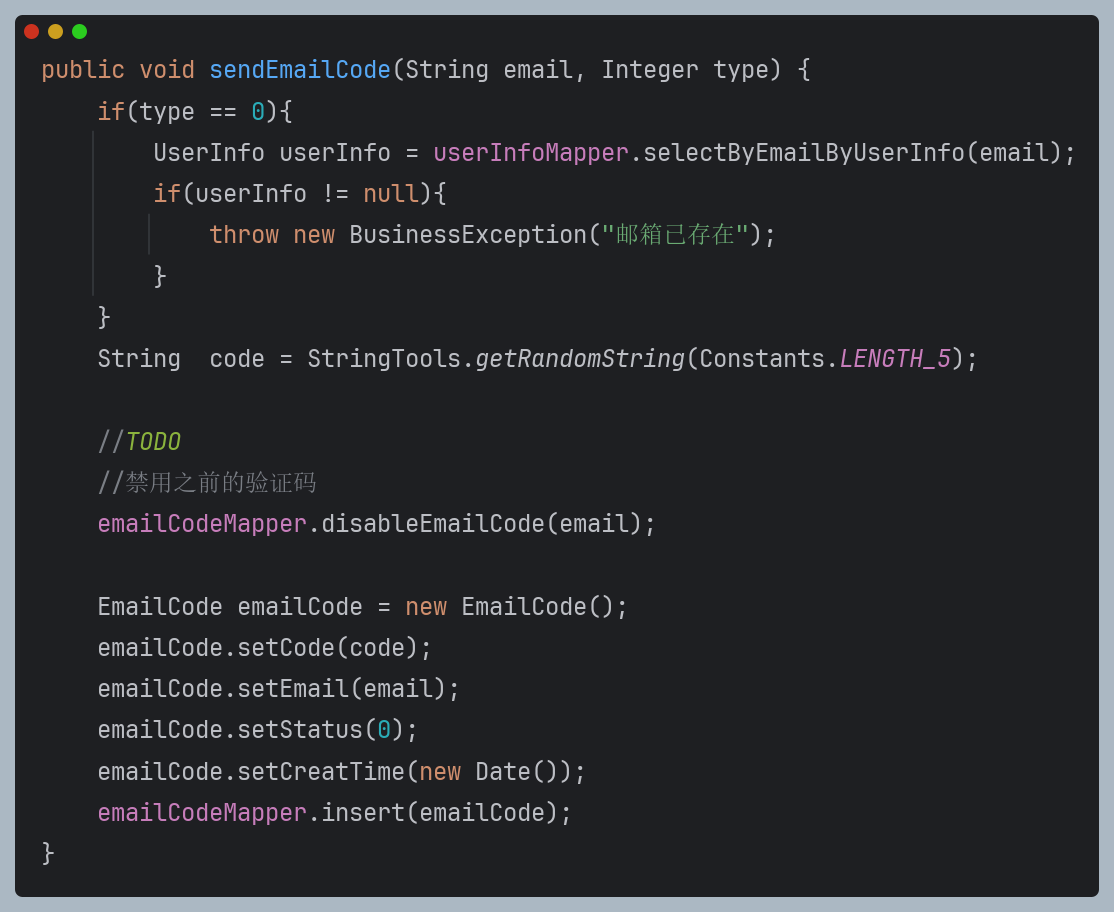
@Update("update email_code set status=1 where email=#{email} and status=0")为什么这样就可以?我们来分析,当检测到用户未注册的时候,代码的流程走到这里来的时候,此时他的status就会变成1,也就是说每次发送新验证码前,会先执行 disableEmailCode 方法,将所有该邮箱未使用的验证码(status=0)标记为被使用了已禁用(status=1)。因此能保证最晚(最新)的那一个验证码才会生效
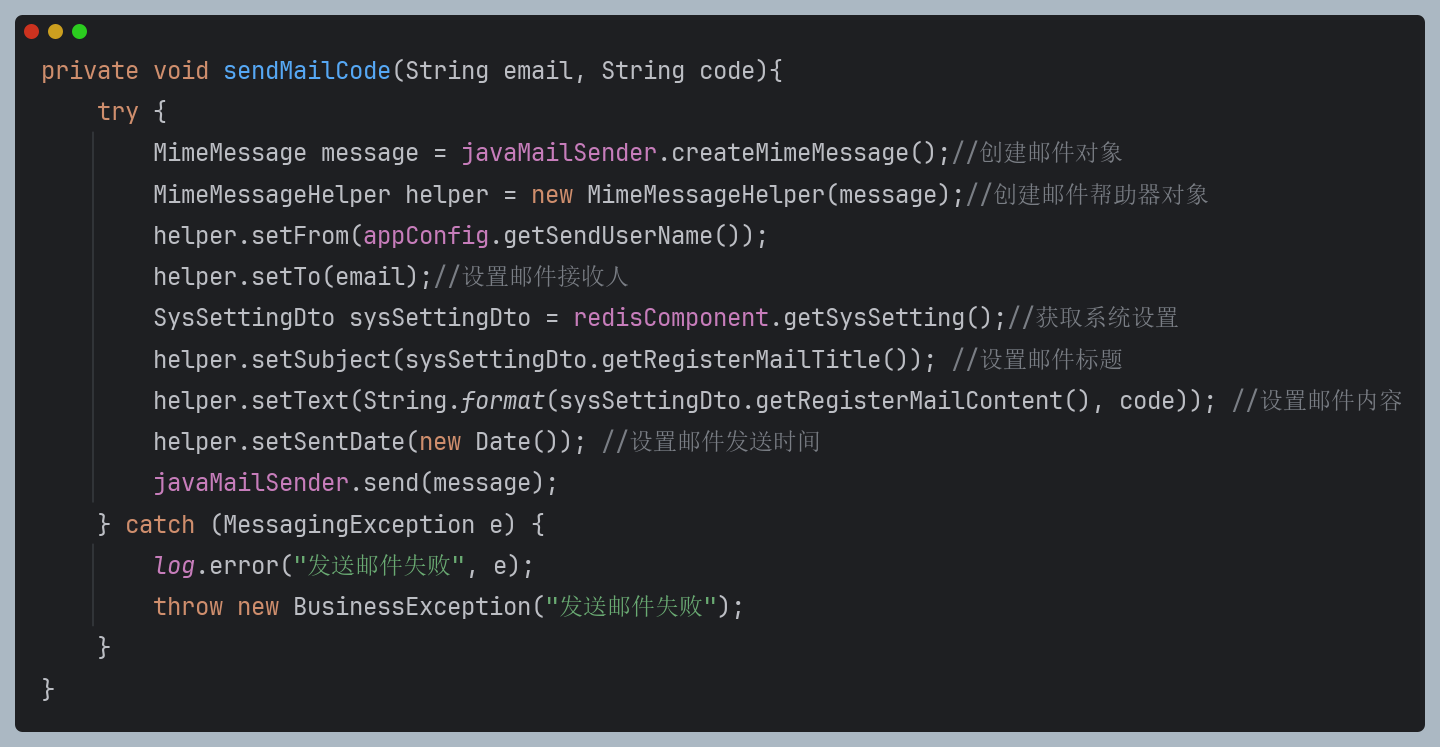
我们现在来发送邮件, JavaMailSender(Spring框架提供的邮件发送工具)来创建并发送一封简单的电子邮件:
流程:
1.入口:调用sendMailCode(email, code)方法,传入收件人邮箱和验证码
2.获取系统邮件模板
SysSettingDto sysSettingDto = redisComponent.getSysSetting();
 设置邮件发送的格式:
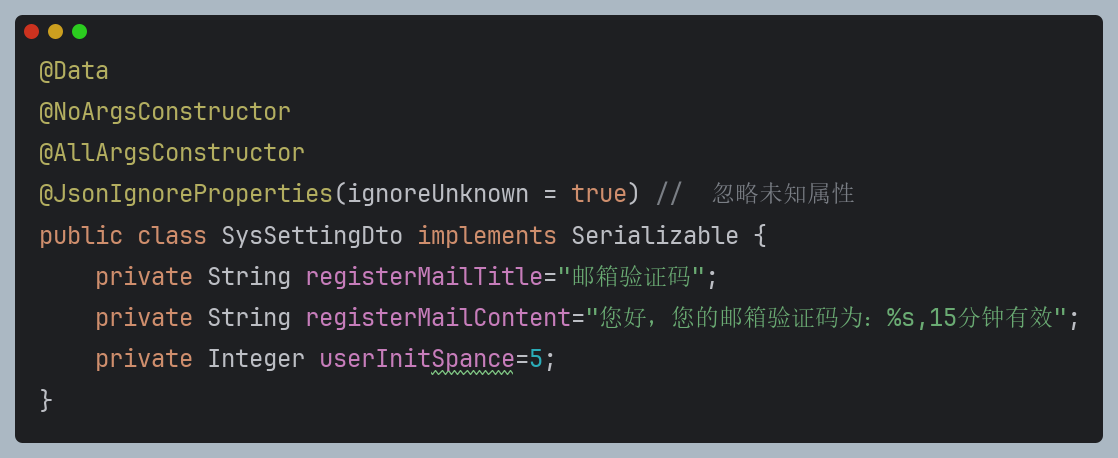
3.构建邮件内容
- 标题处理:直接使用系统配置的标题
helper.setSubject(sysSettingDto.getRegisterMailTitle()); - 内容格式化:将验证码插入模板
String.format("您好,您的邮箱验证码为:%s,15分钟有效", "A1B2C3")
提问:有人就好奇了,redis一开始是空的哪来的模板??
答案是 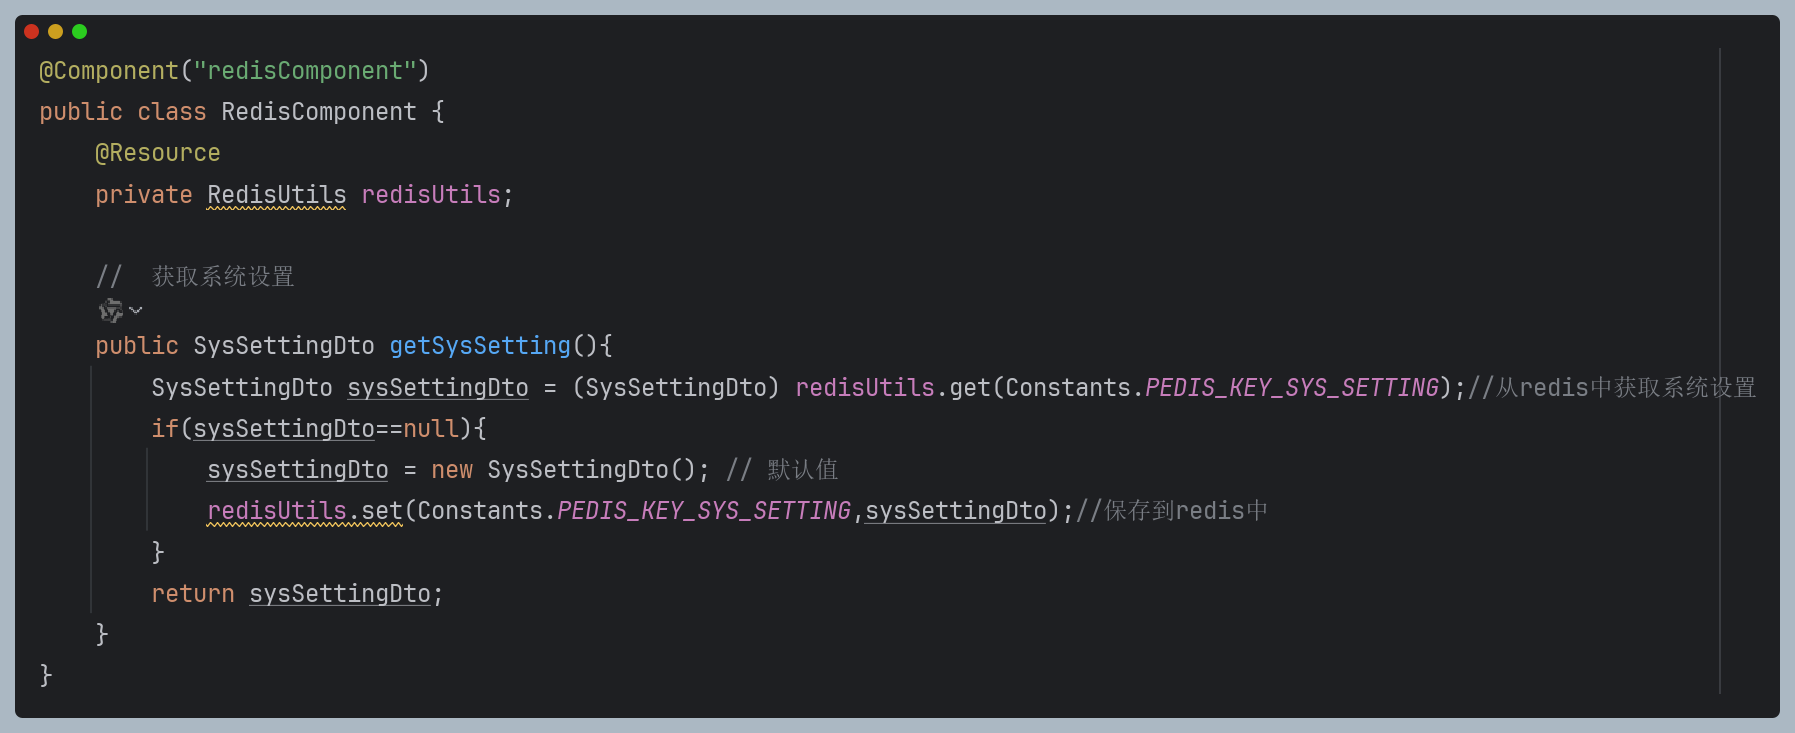
1. 尝试从Redis读取(此时返回null),发现为空时,创建默认配置
最后保存到Redis(无过期时间)
整个发邮件的大致过程就是这样,最后用户会收到: