02.使用cline(VSCode插件)、continue(IDEA插件)、cherry-studio玩转MCP
文章目录
- 安装环境
- uv(python)
- 为什么不用pip?
- 安装
- nvm(nodejs)
- cline插件
- window配置如下
- linux配置如下
- 测试MCP:time
- 现在几点了?
- 伦敦现在几点了?
- 当纽约是下午四点,那伦敦是几点?
- 将伦敦时间上午 9:30 转换为纽约时间
- continue插件
- cherry-studio
- 安装环境:bun和uv
- linux和windows配置
- 模型配置
- 测试MCP:filesystem
- homelab下有哪些文件?
安装环境
uv(python)
为什么不用pip?
使用 uv 时无需进行特定安装。使用 uvx 直接运行。
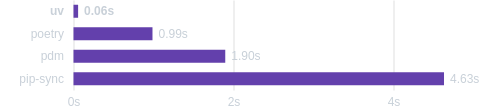
⚡️ 比pip快10-100x
https://github.com/pypa/pip
https://ossinsight.io/analyze/pypa/pip?vs=astral-sh%2Fuv#overview
安装
https://github.com/astral-sh/uv?tab=readme-ov-file#installation
# On macOS and Linux.
curl -LsSf https://astral.sh/uv/install.sh | sh
source $HOME/.local/bin/env

downloading uv 0.6.12 x86_64-unknown-linux-gnu
no checksums to verify
installing to /home/d/.local/bin
  uv
  uvx
everything's installed!

To add $HOME/.local/bin to your PATH, either restart your shell or run:

    source $HOME/.local/bin/env (sh, bash, zsh)
    source $HOME/.local/bin/env.fish (fish)
WARNING: The following commands are shadowed by other commands in your PATH: uv uvx
nvm(nodejs)
https://github.com/nvm-sh/nvm?tab=readme-ov-file#install–update-script
curl -o- https://raw.githubusercontent.com/nvm-sh/nvm/v0.40.2/install.sh | bash

=> Downloading nvm from git to '/home/d/.nvm'
=> 正克隆到 '/home/d/.nvm'...
remote: Enumerating objects: 382, done.
remote: Counting objects: 100% (382/382), done.
remote: Compressing objects: 100% (325/325), done.
remote: Total 382 (delta 43), reused 178 (delta 29), pack-reused 0 (from 0)
接收对象中: 100% (382/382), 386.80 KiB | 426.00 KiB/s, 完成.
处理 delta 中: 100% (43/43), 完成.
* (头指针在 FETCH_HEAD 分离)
  master
=> Compressing and cleaning up git repository

=> Appending nvm source string to /home/d/.bashrc
=> Appending bash_completion source string to /home/d/.bashrc
=> Close and reopen your terminal to start using nvm or run the following to use it now:

export NVM_DIR="$HOME/.nvm"
[ -s "$NVM_DIR/nvm.sh" ] && \. "$NVM_DIR/nvm.sh"  # This loads nvm
[ -s "$NVM_DIR/bash_completion" ] && \. "$NVM_DIR/bash_completion"  # This loads nvm bash_completion
cline插件
一个一个安装太费劲,我给大家准备好了。其中windows麻烦点,需要linux命令前加上cmd /c xxx

window配置如下
{
  "mcpServers": {

    "time": {
      "disabled": false,
      "timeout": 60,
      "command": "cmd",
      "args": [
        "/c",
        "uvx",
        "mcp-server-time",
        "--local-timezone=Asia/Shanghai"
      ],
      "env": {},
      "transportType": "stdio"
    },
    "filesystem": {
      "timeout": 60,
      "command": "cmd",
      "args": [
        "/c",
        "npx",
        "-y",
        "@modelcontextprotocol/server-filesystem",
        "D://SourceCode//dcl-modules"
      ],
      "transportType": "stdio"
    },
    "git": {
      "timeout": 60,
      "command": "cmd",
      "args": [
        "/c",
        "uvx",
        "mcp-server-git",
        "--repository",
        "D://SourceCode//dcl-modules"
      ],
      "transportType": "stdio"
    },
    "github": {
      "command": "cmd",
      "args": [
        "/c",
        "npx -y",
        "@modelcontextprotocol/server-github"
      ],
      "env": {
        "GITHUB_PERSONAL_ACCESS_TOKEN": "github_pat_xxx"
      }
    },
    "browser-tools": {
      "timeout": 60,
      "command": "cmd",
      "args": [
        "/c",
        "npx -y @agentdeskai/browser-tools-mcp@1.2.0"
      ],
      "transportType": "stdio"
    },
    "mcp-playwright": {
      "disabled": false,
      "timeout": 60,
      "command": "cmd",
      "args": [
        "/c",
        "npx",
        "-y",
        "@executeautomation/playwright-mcp-server"
      ],
      "env": {},
      "transportType": "stdio"
    },
    "sequentialthinking": {
      "disabled": false,
      "timeout": 60,
      "command": "cmd",
      "args": [
        "/c",
        "npx",
        "-y",
        "@modelcontextprotocol/server-sequential-thinking"
      ],
      "env": {},
      "transportType": "stdio"
    },
    "memory": {
      "timeout": 60,
      "command": "cmd",
      "args": [
        "/c",
        "npx",
        "-y",
        "@modelcontextprotocol/server-memory"
      ],
      "env": {
        "MEMORY_FILE_PATH": "D://SourceCode//memory.json"
      },
      "transportType": "stdio"
    }
  }
}
linux配置如下
{
  "mcpServers": {
    "time": {
      "autoApprove": [
      ],
      "disabled": false,
      "timeout": 60,
      "command": "uvx",
      "args": [
        "mcp-server-time",
        "--local-timezone=Asia/Shanghai"
      ],
      "env": {},
      "transportType": "stdio"
    },
    "filesystem": {
      "autoApprove": [
      ],
      "timeout": 60,
      "command": "npx",
      "args": [
        "-y",
        "@modelcontextprotocol/server-filesystem",
        "/home/d/SourceCode/homelab"
      ],
      "transportType": "stdio"
    },
    "git": {
      "autoApprove": [
      ],
      "timeout": 60,
      "command": "uvx",
      "args": [
        "mcp-server-git",
        "--repository",
        "/home/d/SourceCode/homelab"
      ],
      "transportType": "stdio"
    },
    "github": {
      "autoApprove": [
      ],
      "timeout": 60,
      "command": "npx",
      "args": [
        "-y",
        "@modelcontextprotocol/server-github"
      ],
      "env": {
        "GITHUB_PERSONAL_ACCESS_TOKEN": "github_pat_xxx"
      },
      "transportType": "stdio"
    },
    "browser-tools": {
      "autoApprove": [
      ],
      "timeout": 60,
      "command": "npx",
      "args": [
        "-y @agentdeskai/browser-tools-mcp@1.2.0"
      ],
      "transportType": "stdio"
    },
    "mcp-playwright": {
      "autoApprove": [
      ],
      "disabled": false,
      "timeout": 60,
      "command": "npx",
      "args": [
        "-y",
        "@executeautomation/playwright-mcp-server"
      ],
      "env": {},
      "transportType": "stdio"
    },
    "sequentialthinking": {
      "autoApprove": [
      ],
      "disabled": false,
      "timeout": 60,
      "command": "npx",
      "args": [
        "-y",
        "@modelcontextprotocol/server-sequential-thinking"
      ],
      "env": {},
      "transportType": "stdio"
    },
    "memory": {
      "autoApprove": [
      ],
      "timeout": 60,
      "command": "npx",
      "args": [
        "-y",
        "@modelcontextprotocol/server-memory"
      ],
      "env": {
        "MEMORY_FILE_PATH": "/home/d/memory.json"
      },
      "transportType": "stdio"
    }
  }
}
测试MCP:time
现在几点了?

伦敦现在几点了?

当纽约是下午四点,那伦敦是几点?

将伦敦时间上午 9:30 转换为纽约时间

continue插件
一堆bug,等更新后再说
cherry-studio
安装环境:bun和uv
https://docs.cherry-ai.com/advanced-basic/mcp/install
https://github.com/oven-sh/bun/releases
https://github.com/astral-sh/uv/releases
linux和windows配置
和上面的配置一样,粘贴进去,然后保存,再打开,只是需要自己打开"isActive": true

模型配置
ollama中 qwen2.5:14b默认不会勾选工具,会导致页面上没有MCP选项。

测试MCP:filesystem
homelab下有哪些文件?
